

Page 1

Voyager 4200 UC Series
User Guide
Page 2

Contents
Headset overview 3
Be safe 3
USB Bluetooth adapter 4
Connect and pair 5
Connect to PC 5
Configure USB adapter 5
Pair to mobile device 5
Pair USB adapter again 6
Fit and charge 7
Wear on the right or left 7
Charge 7
Check headset battery status 7
Load software 8
The Basics 9
Power on/off 9
Adjust the volume 9
Make/Take/End Calls 9
Play or pause audio 10
Track selection 10
Fast forward/rewind 10
Voice assistant 10
Enable and use Amazon Alexa 10
More Features 11
Select language 11
Enable Tile 11
DeepSleep Mode 11
Online indicator 11
Update
firmware 12
Headset recovery 12
Support 13
2
Page 3
:02
2x1x
1x
3x
Siri
Google Assistant™
Amazon
Alexa*
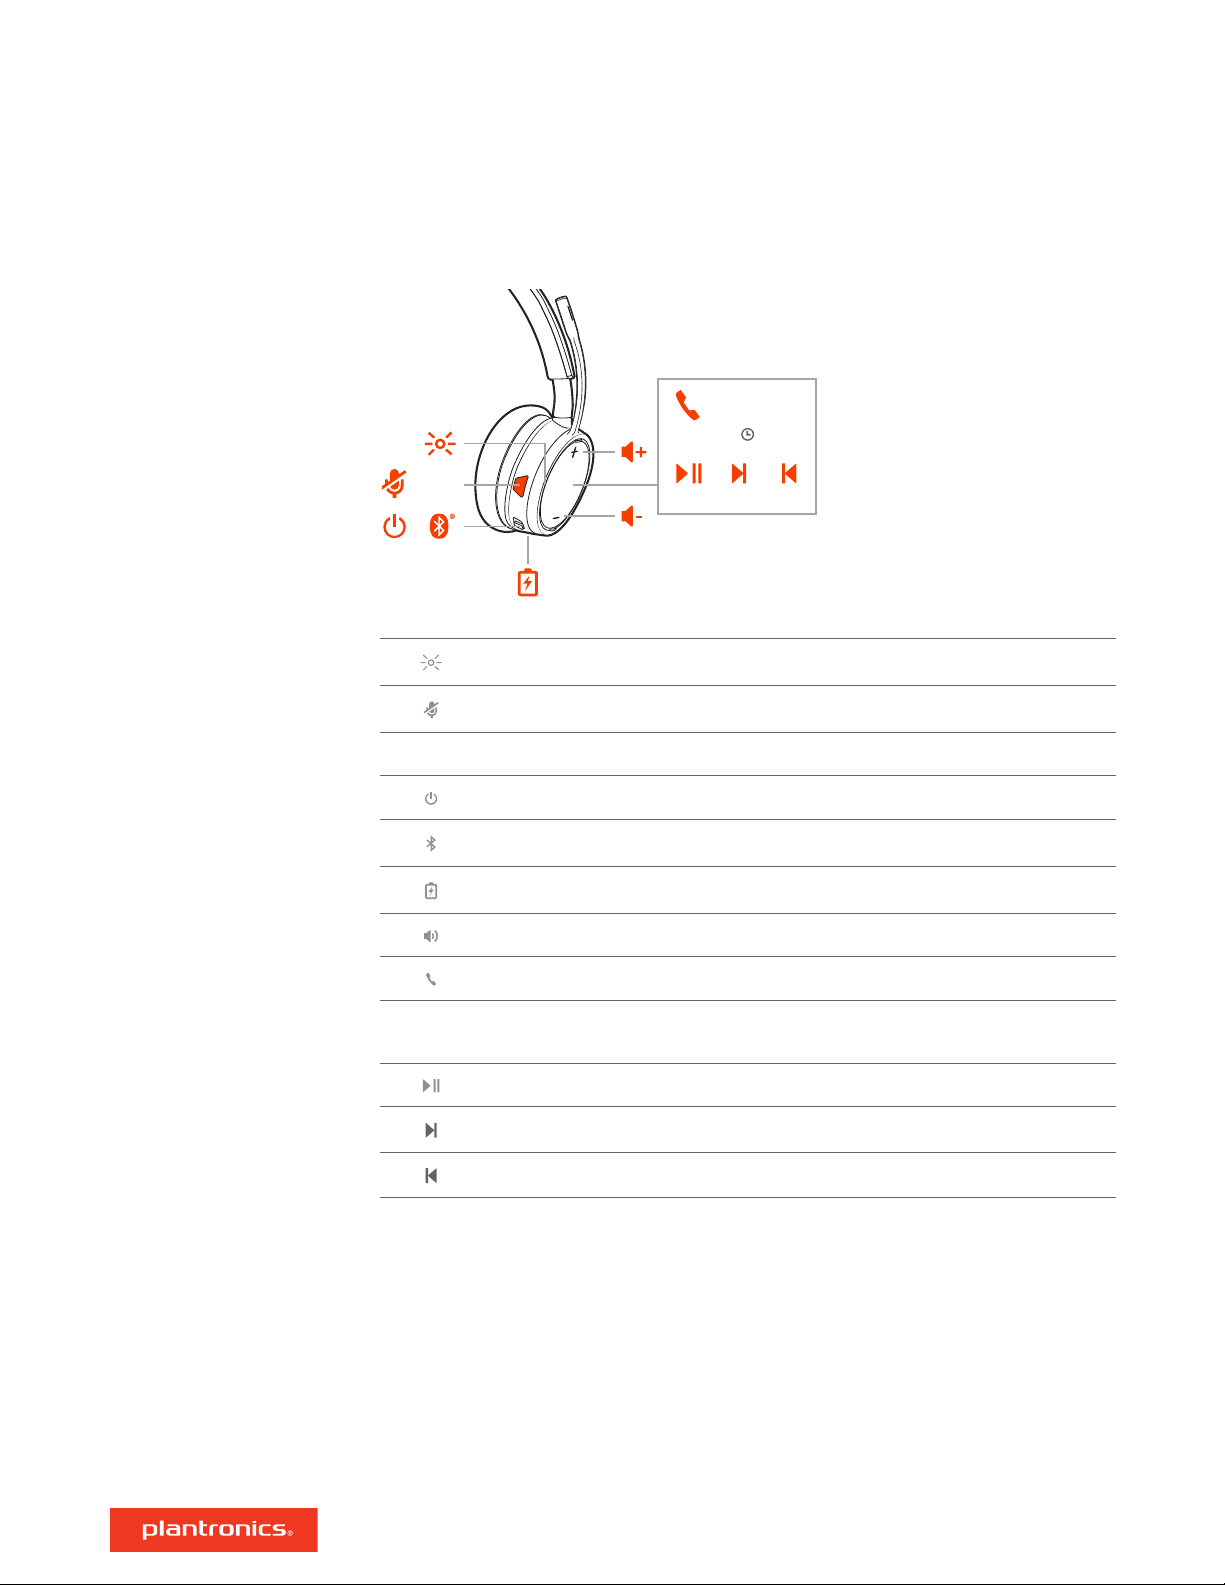
Headset overview
LEDs
Be safe
Mute/unmute
Alexa Voice assistant (*requires app)
Power
Bluetooth® pairing
Charge
Volume
Call
Siri®, Google
Assistant
Default voice assistant: Siri®, Google Assistant™, Cortana
™
Play/pause**
Next track**
Previous track**
NOTE **Functionality varies by application. May not function with web-based apps.
Please read the safety guide for important safety, charging, battery and regulatory information
before using your new headset.
3
Page 4

USB Bluetooth adapter
USB LEDs What they mean
Red and blue flashes Pairing
Solid Blue Pairing successful; connected
Blue flashes On a call
Solid red Mute active
Purple flashes Streaming music/media from computer
NOTE Adapter design may vary
4
Page 5

Connect and pair
Connect to PC
Configure USB adapter
Your Bluetooth USB adapter comes pre-paired to your headset.
1 Turn on your headset and insert the Bluetooth USB adapter into your laptop or PC.
2 The USB adapter LED flashes blue and then turns solid blue to indicate the headset is connected to
the USB adapter. If you are wearing your headset you will hear “PC connected” to indicate the
connection has been established. When on a call, the LED on the USB adapter will flash blue.
When not on a call the LED will be solid blue.
3 OPTIONAL Load Plantronics Hub for Windows and Mac by visiting plantronics.com/software. This
will allow you to customize your headset behavior through advanced settings and options.
Your high-fidelity Bluetooth USB adapter comes ready to take calls. If you want to listen to music,
you will need to configure your Bluetooth USB adapter.
Windows
1 To configure your Bluetooth USB adapter to play music, go to Start menu > Control Panel > Sound
> Playback tab. Select Plantronics BT600, set it as the Default Device and click OK.
2 To pause music when you place or receive calls, go to Start menu > Control Panel > Sound >
Communications tab and select the desired parameter.
Mac
1 To configure the Bluetooth USB adapter, go to Apple menu > System Preferences > Sound. On
both the Input and Output tabs, select Plantronics BT600.
Pair to mobile device
1 To put your headset in pair mode, slide and hold the Power
until you hear "pairing" and the headset LEDs flash red and blue.
2 Activate Bluetooth on your phone and set it to search for new devices.
• iPhone Settings > Bluetooth > On*
• Android Settings > Bluetooth: On > Scan for devices*
switch away from the off position
NOTE *Menus may vary by device.
3
Select “PLT V4210 Series / PLT V4220 Series.”
If necessary, enter four zeros (0000) for the passcode or accept the connection.
Once successfully paired, you hear “pairing successful” and the headset LEDs stop flashing.
NOTE Your headset can pair with up to 8 devices but only maintain 2 connections simultaneously;
this includes the Bluetooth USB adapter.
5
Page 6

Pair USB adapter again
Typically, your USB adapter is pre-paired to your headset. In the event that your adapter is
disconnected or bought separately, you will need to pair the adapter to your headset.
1 Insert the high-fidelity Bluetooth USB adapter into your laptop or computer and wait for your
computer to recognize it.
2 Put your headset in pair mode.
3 Put your Bluetooth USB adapter into pair mode by pressing and holding the recessed pair button
with a pen or paperclip until the Bluetooth USB adapter flashes red and blue.
NOTE Adapter design may vary
Pairing is successful when you hear "pairing successful" and "PC connected" and the Bluetooth
USB adapter LED is solid blue.
6
Page 7

R
R
Fit and charge
Wear on the right or left
Charge
Check headset battery
status
To position the microphone on the right or left side, rotate the microphone boom up and over.
Gently bend the boom so it is approximately 2 finger widths from the corner of your mouth.
IMPORTANT For true stereo sound, wear the boom on your right side.
It takes 90 minutes to fully charge the headset. The indicator light turns off once charging is
complete.
There are 3 ways to check the headset battery status. Choose:
• Plantronics Hub for iOS/Android: check the home screen
• Plantronics Hub for Windows/Mac: click on the Plantronics Hub headset icon in the system tray or
menu bar to view battery status
• Slide and release the Power
observe the headset LEDs.
switch away from the off position. Listen to the voice alert or
Headset LED behavior while charging
Off Charging complete
Battery high
Battery medium
Battery low
Battery critical
TIP To reset the accuracy of the talk time alert, deplete the headset battery then charge fully.
7
Page 8

Load software
Plantronics Hub is an invaluable headset tool.
NOTE Some softphones require the installation of Plantronics Hub for Windows and Mac to enable
headset control (answer/end and mute) functionality.
• Download Plantronics Hub for Windows/Mac by visiting plantronics.com/software.
• Download Plantronics Hub for iOS/Android by visiting plantronics.com/software, the App Store
or Google Play.
Plantronics Hub iOS and Android Windows and Mac
Call control for softphones available for some
softphones
Change headset language X X
Update firmware X X
Turn features on/off X X
View user guide X X
Battery meter X X
Find MyHeadset X
Use Amazon Alexa (requires app) X
X
8
Page 9

:02
2x1x
1x
3x
Siri
Google Assistant™
Amazon
Alexa*
The Basics
Power on/off
Adjust the volume
Make/Take/End Calls
Slide the switch to power on or off.
Tap the Volume up (+) or down (–) button.
Adjust headset microphone volume (softphone)
Place a test softphone call and adjust softphone volume and PC sound volume accordingly.
Answer or end a call
Tap the Call
Answer a second call
First, tap the Call button to end current call, then tap the Call button again to answer new call.
Mute
While on an active call, tap the red Mute button.
Hold a call
Double-tap the Call button to put a call on hold. Tap the Call button again to answer an
incoming call.
button.
NOTE Up to 2 calls can be put on hold.
Switch between calls (flash)
Double-tap the Call
button to switch between calls.
NOTE Flash functionality works only between calls of the same type. Flash does not work between
mobile and softphone calls.
Call back last call (smartphone)
To dial your last number you dialed, double-tap the Call button.
Answer calls from a second device
It's easy to answer calls from two devices (including softphone).
When on a call, you hear a ringtone notification of the incoming call from the second paired
device.
To answer a second call from the other device, first tap the Call
and tap the Call button again to answer the new call. If you choose to not answer the second call,
it will go to voicemail.
button to end the current call
9
Page 10

R
Play or pause audio
Tap the Call button.
Track selection
Fast forward/rewind
Voice assistant
Enable and use Amazon
Alexa
Double-tap the Call button to skip to the next track or triple-tap the Call button to play the
previous track.
NOTE Functionality varies by application. May not function with web-based apps.
Double-tap and hold the Call
rewind.
button to fast-forward. Triple-tap and hold the Call button to
NOTE Functionality varies by application. May not function with web-based apps.
Siri, Google Assistant™, Cortana Press and hold the Call button for 2 seconds to activate your
phone's default voice assistant. Wait for the phone prompt to activate voice dialing, search, and
other smartphone voice controls.
With Alexa enabled on your headset, you can ask for directions, call friends, access Alexa Skills and
more.
NOTE Amazon Alexa isn't available in all languages and countries.
1 Enable Alexa
A Connect the headset to your mobile device
B Update your Plantronics Hub mobile app (software) if necessary
C Launch Plantronics Hub app and ensure that your headset (firmware) is up-to-date
D From Plantronics Hub main menu, choose Apps > Amazon Alexa > Enable
E Launch the Amazon Alexa app and follow the instructions to set up your headset
2 Use Alexa
A To use Alexa, tap the Mute button and ask a question. You hear a tone when Alexa is
activated.
10
Page 11

R
More Features
Select language
Enable Tile
DeepSleep Mode
Online indicator
You can wirelessly change your headset language using Plantronics Hub software. Download:
plantronics.com/software. Choose:
• With your headset paired to your smartphone, select headset language in Plantronics Hub for iOS/
Android
• With your headset connected to your computer via USB adapter or cable, select headset language
in Plantronics Hub for Windows/Mac*
*USB adapter not included in all models.
Use the Tile app to ring your lost headset or locate it on a map and ask the Tile community for
help.
1 Connect the headset to your mobile device
2 Launch Plantronics Hub app and ensure that your firmware is up-to-date
3 From Plantronics Hub main menu, choose Apps > Tile > Enable
4 Launch the Tile app and follow the instructions to connect your headset
If you leave your headphones powered on but out of range of your paired phone or USB adapter
for more than 7 days, your headset conserves its battery power by entering into DeepSleep mode.
Once back in range with your phone or USB adapter, press the Call control
DeepSleep mode.
Your headset LEDs flash red to inform others that you are on a call. Manage settings in Plantronics
Hub.
button to exit
11
Page 12

Update
firmware
Keep your firmware up-to-date to improve performance and add new features to your headset.
Update your firmware using your computer or mobile device with Plantronics Hub for
Windows/Mac or Plantronics Hub for iOS/Android, respectively. Download Plantronics Hub at
plantronics.com/software. Choose:
• Plantronics Hub for Windows/Mac: With your headset connected your computer, check Updates
for available
• Plantronics Hub for iOS/Android: With your headset paired to your smartphone, check Settings
for available
While updating firmware:
• Remove your headset from your ear. Do not use your headset or device until the update is
complete.
• Disconnect your headset from other devices such as phones, tablets and computers
• Do not start a second update from a second device
• Do not stream media on your smartphone
firmware update
firmware update
Headset recovery
• Do not answer or place a call
NOTE Smartphone: If you receive a lot of calls, emails or texts, try turning on the Do Not Disturb
feature in your smartphone's settings while you update.
If you have several failed attempts at an over-the-air firmware update, or if your headset becomes
unresponsive, take the following steps:
1 Download and install Plantronics Hub for Windows/Mac at plantronics.com/software
2 Connect your headset to your computer using a USB cable
3 Open Plantronics Hub, go to Help > Support > Firmware Updates & Recovery and enter your
Product ID (PID) to complete the recovery
Find your Product ID (PID). Choose:
• Plantronics Hub app's headset recovery instructions
• Plantronics Hub app's home screen
12
Page 13

Support
NEED MORE HELP?
plantronics.com/support
Plantronics, Inc.
345 Encinal Street
Santa Cruz, CA 95060
United States
©
2019 Plantronics, Inc. Bluetooth is a registered trademark of Bluetooth SIG, Inc. and any use by Plantronics, Inc. is under license. Apple and Siri are
trademarks of Apple Inc., registered in the US and other countries. All other trademarks are the property of their respective owners.
Patents pending.
212340-06 (07.19)
Plantronics B.V.
Scorpius 171
2132 LR Hoofddorp
Netherlands
 Loading...