

Page 1

Plantronics Explorer® 200 Series
User Guide
Page 2

Welcome
Congratulations on purchasing a Plantronics headset. This
User Guide contains instructions for setting up and using your
Plantronics Explorer
“For Your Safety” booklet for important product safety information
prior to installation or use of the product.
®
200 series headset. Please refer to the separate
Getting Assistance
The Plantronics Technical Assistance Centre is ready to assist you.
You can fi nd answers to frequently asked questions, ask a question
using e-mail, receive service over the Internet, or speak directly with
a representative. Visit www.plantronics.com/support or call your country
support line mentioned at the back of this user guide.
Registering Your Product
Visit www.plantronics.com/productregistration to register your
product online so we can provide you with the best service and
technical support.
ii
Page 3

Contents
Welcome ...............................................................................................ii
What is Bluetooth®? ............................................................................iv
Package Contents, Features and Accessories .....................................1
Charging Your Headset ........................................................................2
How to Charge Your Headset Using the AC Charger .................. 2
Pairing Your Headset ........................................................................... 3
Plantronics QuickPair
How to Pair Your Phone With Your Headset for the First Time .....4
How to Pair Your Headset if it Has Been Previously Paired With
Another Device ........................................................................... 5
Adjusting the Fit ................................................................................... 6
Headset Controls ................................................................................. 7
Range .................................................................................................. 8
Indicator Lights .................................................................................... 9
Hands-Free Features ......................................................................... 10
Troubleshooting ................................................................................. 11
Product Specifi cations ....................................................................... 12
™
Technology ............................................. 3
iii
Page 4

What is Bluetooth®?
Bluetooth wireless technology provides a way for devices to
communicate with each other using short-range radio frequency instead
of wires. Any two Bluetooth devices can communicate as long as they
both have Bluetooth turned on, they are within range and they have
been paired — a quick “handshake” process that connects the two
devices. Bluetooth range is up to 10 metres (33 feet). Obstructions such
as walls or other electronics devices can cause interference or shorten
the effective range.
NOTE For optimal performance, place your headset and phone on the
same side of your body.
iv
Page 5
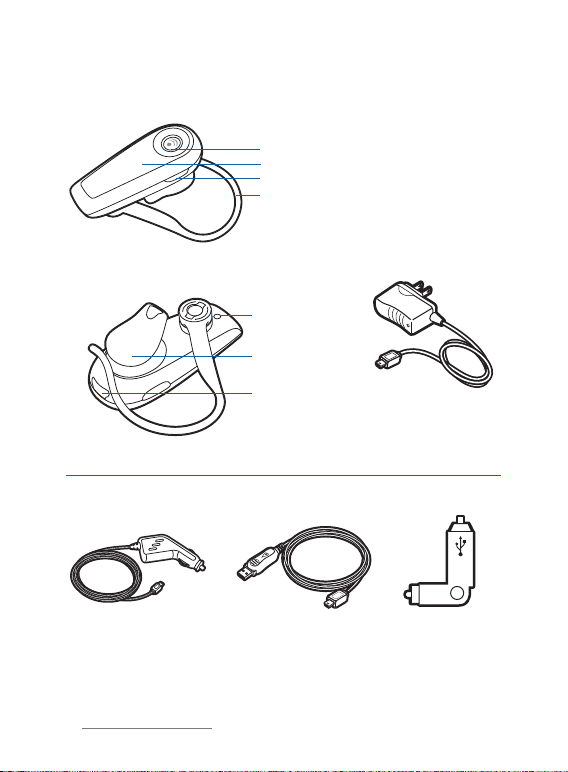
Package Contents and Features
Headset Front
Call Control Button (on/off)
Indicator Light
Volume Control
Earloop
Headset Back
Microphone
Speaker / Eartip
Charging Jack
AC Charger
100 – 240V
Plantronics Explorer® 200 Series Accessories*
Vehicle Charging Adapter
#76777-01
USB Headset Charger
#76016-01
Vehicle Power Charger
#78583-01
* Not included. To order, please contact your Plantronics supplier or go
to www.plantronics.com
1
Page 6
Charging Your Headset
1
2
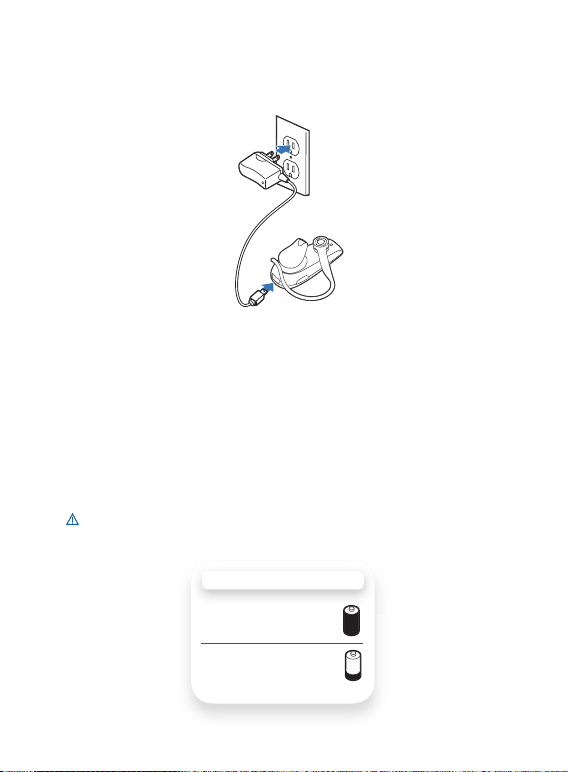
How to Charge Your Headset Using the AC Charger
Before using your headset for the fi rst time, charge it for at least
20 minutes. A full charge takes approximately two hours.
1 Connect the AC charger to a power outlet.
2 Plug the AC jack into the charging jack on the headset.
While your headset is charging, the indicator glows red. When your
headset is fully charged, the indicator turns off.
WARNING Do not use your headset while it is connected to
the charger.
CHARGING TIME
2 hours ...................
Full charge
20 minutes ..............
Minimum charge
before fi rst use
2
Page 7

Pairing Your Headset
Pairing is the process of introducing your headset to your phone.
Before using your headset for the fi rst time, you must pair it with
your Bluetooth phone. Normally, you need to pair your headset with
your phone only once.
To see a demo of the pairing process, visit www.plantronics.com/
EasyToPair (only available in English).
Plantronics QuickPair
Your new headset includes Plantronics QuickPair technology to simplify
the Bluetooth setup process. The fi rst time you turn your headset on,
your headset automatically enters pairing mode for 10 minutes (the
indicator light fl ashes red and blue). Once paired successfully, your
headset stays on for instant use.
If not sucessfully paired after 10 minutes, your headset automatically
powers off. When you turn the headset on again, it automatically goes
into pairing mode until successfully paired with a Bluetooth phone.
™
Technology
3
Page 8
Pairing Your Headset—First Time
1
SETTINGS
SETTINGS
Time and Date
Phone Settings
Bluetooth
Sound Settings
Network Services
Security
Reset Settings
2
3
BLUETOOTH
BLUETOOTH
Discover/
Search
8BK;JEEJ>
8BK;JEEJ>
(NNFbWdjhed_Yi
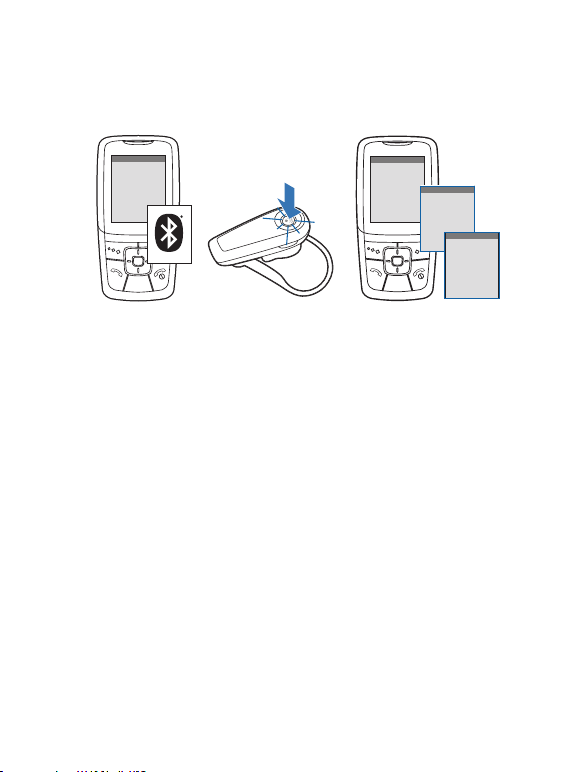
How to Pair Your Phone With Your Headset for the First Time
1 Turn on the Bluetooth feature on your phone.
For most phones, select Settings/Tools > Connections >
Bluetooth > On. See your phone’s user guide for more information.
2 Turn the headset on.
Press and hold the call control button until the indicator light
continues to fl ash red and blue. The headset is now in pairing mode.
If you don’t see the red/blue fl ash, press and hold the call control
button to turn your headset off, and then press and hold the call
control button again until you see the red/blue fl ash.
3 Use the commands on your phone to locate your headset.
For most phones, select Settings/Tools > Connections > Bluetooth >
Search > 2XXPlantronics. See your phone’s user guide for
more information.
When prompted for the passkey, enter 0000.
Pairing is successful when the indicator on your headset fl ashes
blue. Your headset is now connected and ready to use.
PASSKEY
0000
4
Page 9
Pairing Your Headset
2
3
BLUETOOTH
1
BLUETOOTH
Discover/
Search
8BK;JEEJ>
8BK;JEEJ>
(NNFbWdjhed_Yi
PASSKEY
0000
4
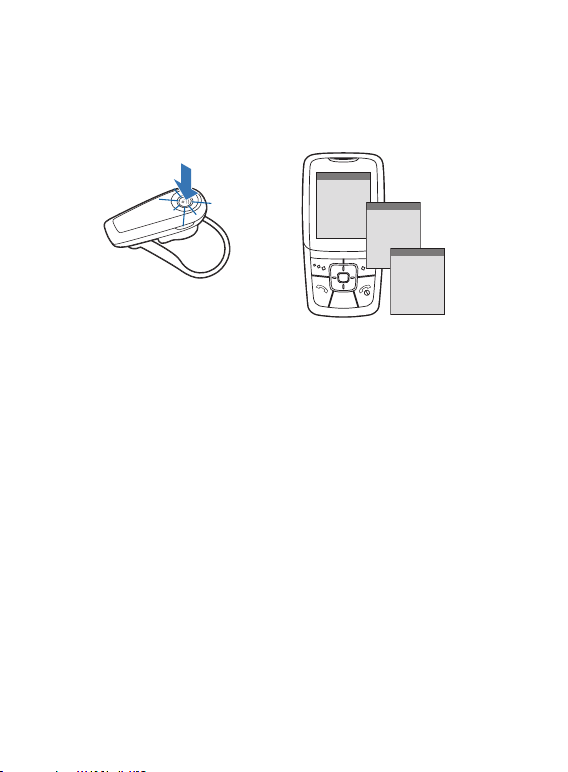
How to Pair Your Headset if it Has Been Previously Paired
With Another Device
1 Turn the headset off.
Press and hold the call control button until the indicator turns red
and then turns off.
2 Turn the headset on.
Press and hold the call control button until the indicator light
continues to fl ash red and blue. The headset is now in pairing mode.
3 Use the commands on your phone to locate your headset.
For most phones, select Settings/Tools > Connections > Bluetooth
> Search > 2XXPlantronics. See your phone’s user guide for
more information.
4 When prompted for the passkey, enter 0000.
Pairing is successful when the indicator on your headset fl ashes
blue. Your headset is now connected and ready to use.
5
Page 10
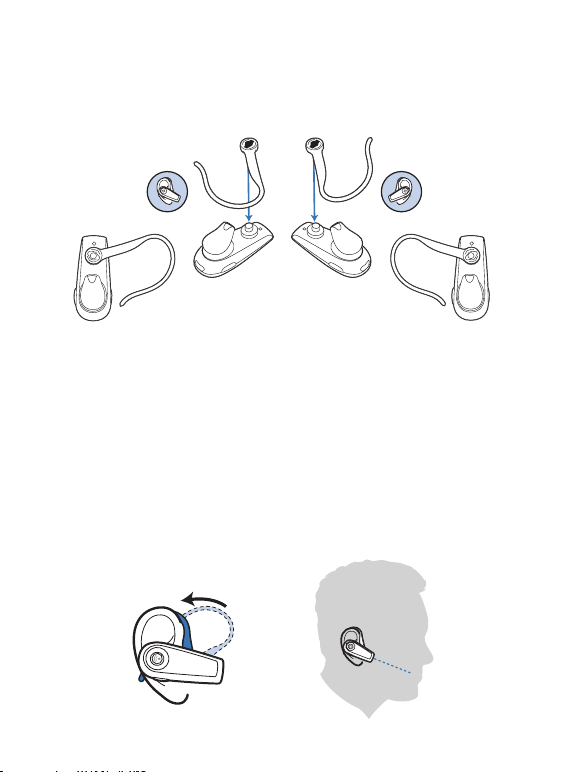
Adjusting the Fit
11
Right Left
22
1 To remove the earloop, gently pull up on earloop near the
Plantronics name until you hear a snap. To replace, gently
snap back onto post.
2 Position earloop as shown above.
3 Place the earloop behind your ear.
4 Rotate the headset so that the speaker/eartip rests
comfortably in your ear.
5 Align the microphone with the corner of your mouth.
Callers can hear you best when you point the microphone towards
the corner of your mouth.
4
3
6
5
Page 11

Headset Controls
Turn on the headset Press and hold the call control button until the
Turn off the headset Press and hold the call control button until the
Answer a call Briefl y press the call control button.
Reject a call Press the call control button for 2 seconds.
Make a call Enter number on your phone, press send, and
Adjust the volume
indicator glows blue. You will hear ascending
tones.
indicator glows red. You will hear descending
tones. When power is off, indicator stays off.
When you receive a call, your phone may ring
before your headset rings. Wait until you hear
the ring in your headset before you press the call
control button to answer the call.
the call is automatically transferred to headset; no
need to press call control button.
Briefl y press volume button to increase volume. At
upper limit you will hear two tones. Press again for
lowest volume level. There are fi ve volume levels.
WARNING Do not use headphones/headsets
at high volumes for an extended period of time.
Doing so can cause hearing loss. Always listen
at moderate levels. See www.plantronics.com/
healthandsafety for more information on headsets
and hearing.
7
Page 12

Headset Controls
Transfer a call from
headset to phone
Transfer a call from
phone to headset
While in a call, press and hold the call control
button until you hear a tone.
While in a call, press and hold the call control
button until you hear a tone.
Range
To maintain a connection, keep your headset within 10 metres (33 feet)
of the Bluetooth device. If there are obstacles between your headset and
the device, you may experience interference. For optimal performance,
place your headset and phone on the same side of your body.
Audio quality degrades as you move out of range. When you are far
enough away to lose the connection, you hear a high tone in the headset.
NOTE The headset attempts to reconnect after 30 seconds. If you
move back in range, you can manually reconnect by pressing the call
control button.
NOTE Audio quality is also dependent upon the device with which the
headset is paired.
8
Page 13

Indicator Lights
Headset Status Headset Indicator Light
Powering on Steady blue, then intermittent fl ashes
Powering off Red appears and goes off
Standby Blue intermittent fl ashes
Charging battery Red solid light. Light indicator turns off when
Low battery Triple red fl ashes
Pairing mode Blue/red alternating fl ashes
Missed call Purple fl ashes. Press the call control button
Incoming call Triple blue fl ashes when ringing.
(changes to standby mode)
battery is fully charged and headset is off.
to cancel fl ashing light.
9
Page 14

Hands-Free Features
If your phone and your wireless service provider both support hands-free
operation, you can use the following features:
Redial the last number To activate last number redial, double
Using Voice Dialling With the headset on, press the call control
Reject a call When receiving an incoming call, press the
press the call control button. You will hear
a double tone after each double-button
press.
button for 2 seconds to activate the voice
dialling.
NOTE To use voice-activated dialling, the
voice-dialling feature must be enabled on
your phone. See your Bluetooth phone
manual for instructions.
call control button for 2 seconds to reject
the call.
10
Page 15

Troubleshooting
My headset
does not work
with my phone.
I did not enter
my passkey.
Callers cannot hear
me, or I cannot
hear caller/dialling
tone.
Headset was not in pairing mode when mobile
phone menu selections were made. See page 5
“Pairing Your Headset.”
Incorrect menu selections were made on
your mobile phone. See page 5 “Pairing Your
Headset.”
Your phone did not locate the headset. Repeat
the pairing process on page 5.
Incorrect menu selections were made on your
mobile phone. Repeat the pairing process on
page 5.
The headset is not turned on or the headset is
not connected to mobile phone. Press the call
control button for 2 seconds until you hear a
beep or see the indicator light glow blue to turn
headset on.
Your headset is out of range. Move the headset
closer to the phone or Bluetooth device.
Your headset battery is drained. Charge your
battery using the AC power adapter supplied.
The listening volume is too low. Press the volume
key up (toward the earloop) to increase the
sound heard in the headset.
11
Page 16

Product Specifi cations
Talk Time* Up to 8 hours
Standby Time* Approximately 9 days or 218 hours
Charge Time 2 hours
Range Up to Bluetooth standard 10 metres (33 feet)
Power Requirements 5V DC – 180 mA
Battery Type Lithium ion polymer
Storage/Usage
Temperature
Version Bluetooth 2.0
Supports Bluetooth hands-free and headset profi les.
* Battery enabled. Performance may vary by device.
50 °F – 104 °F (10 °C – 40 °C)
12
Page 17

For safety information, see the separate “For Your Safety” booklet.
For warranty information, see the separate “2 Year Warranty” leafl et or visit
www.plantronics.com
en
Plantronics Ltd
Wootton Bassett, UK
Tel: 0800 410014
ar
Middle East Region
:لمزيد من المعلومات
www.plantronics.com
cs
Czech Republic
www.plantronics.com
da
Danmark
Tel: 44 35 05 35
de
Plantronics GmbH
Hürth, Deutschland
Kundenservice:
Deutschland 0800 9323 400
Österreich 0800 242 500
Schweiz 0800 932 340
el
Για περισσότερες
πληροφορίες:
www.plantronics.com
es
Plantronics Iberia, S.L.
Madrid, España
Tel: 902 41 51 91
fi
Finland
Tel: 0800 117095
fr
Plantronics Sarl
Noisy-le-Grand
France
ga
Plantronics BV
Regus House
Harcourt Centre
Harcourt Road
Dublin 2
Ireland
Office: +353 (0) 1 477 3919
Service ROI: 1800 551 896
he
:למידע נוסף, בקר באתר
www.plantronics.com
hu
További információk:
www.plantronics.com
it
Plantronics Acoustics
Italia Srl
Milano, Italia
Numero Verde: 800 950934
nl
Plantronics B.V.
Hoofddorp, Nederland
Tel: (0)0800 Plantronics
0800 7526876 (NL)
00800 75268766 (BE/LUX)
no
Norge
Tel: 80011336
pl
Aby uzyskać więcej
informacji:
www.plantronics.com
pt
Portugal
Tel: 0800 84 45 17
ro
Pentru informaţii
www.plantronics.com
ru
Дополнительная
информация:
www.plantronics.com
sv
Sverige
Tel: 031-28 95 00
tr
Daha fazla bilgi için:
www.plantronics.com
13
Page 18
МЛ05
Plantronics, Inc.
345 Encinal
Santa Cruz, CA 95060
USA
Tlf.: 800-544-4660
www.plantronics.com
© 2008 Plantronics, Inc. All rights reserved. Plantronics, the logo design, Plantronics
Explorer, QuickPair and Sound Innovation are trademarks or registered trademarks of
Plantronics, Inc. The Bluetooth word mark and logo are owned by Bluetooth SIG, Inc. and
any use of such marks by Plantronics, Inc. is under license. All other trademarks are the
property of their respective owners.
U.S. Patents Pending
78563-03 Rev A
 Loading...