

PLANMECA DENTAL UNITS
Planmeca PlanID user’s guide
1 PREREQUISITES
• Planmeca Romexis version 4.4 or later installed
• Dental units connected to Planmeca Romexis server
• Planmeca Romexis version
• Planmeca Compact i Touch version 7.6.15
• Planmeca Sovereign Classic version 1.8.0
• One PlanID reader for each dental unit and the same amount of Romexis Clinic
Management licences
2 ADDING PLANID USER TO PLANMECA ROMEXIS
When you add a PlanID user to Planmeca Romexis you must first create a PlanID group
and then add the user to that group.
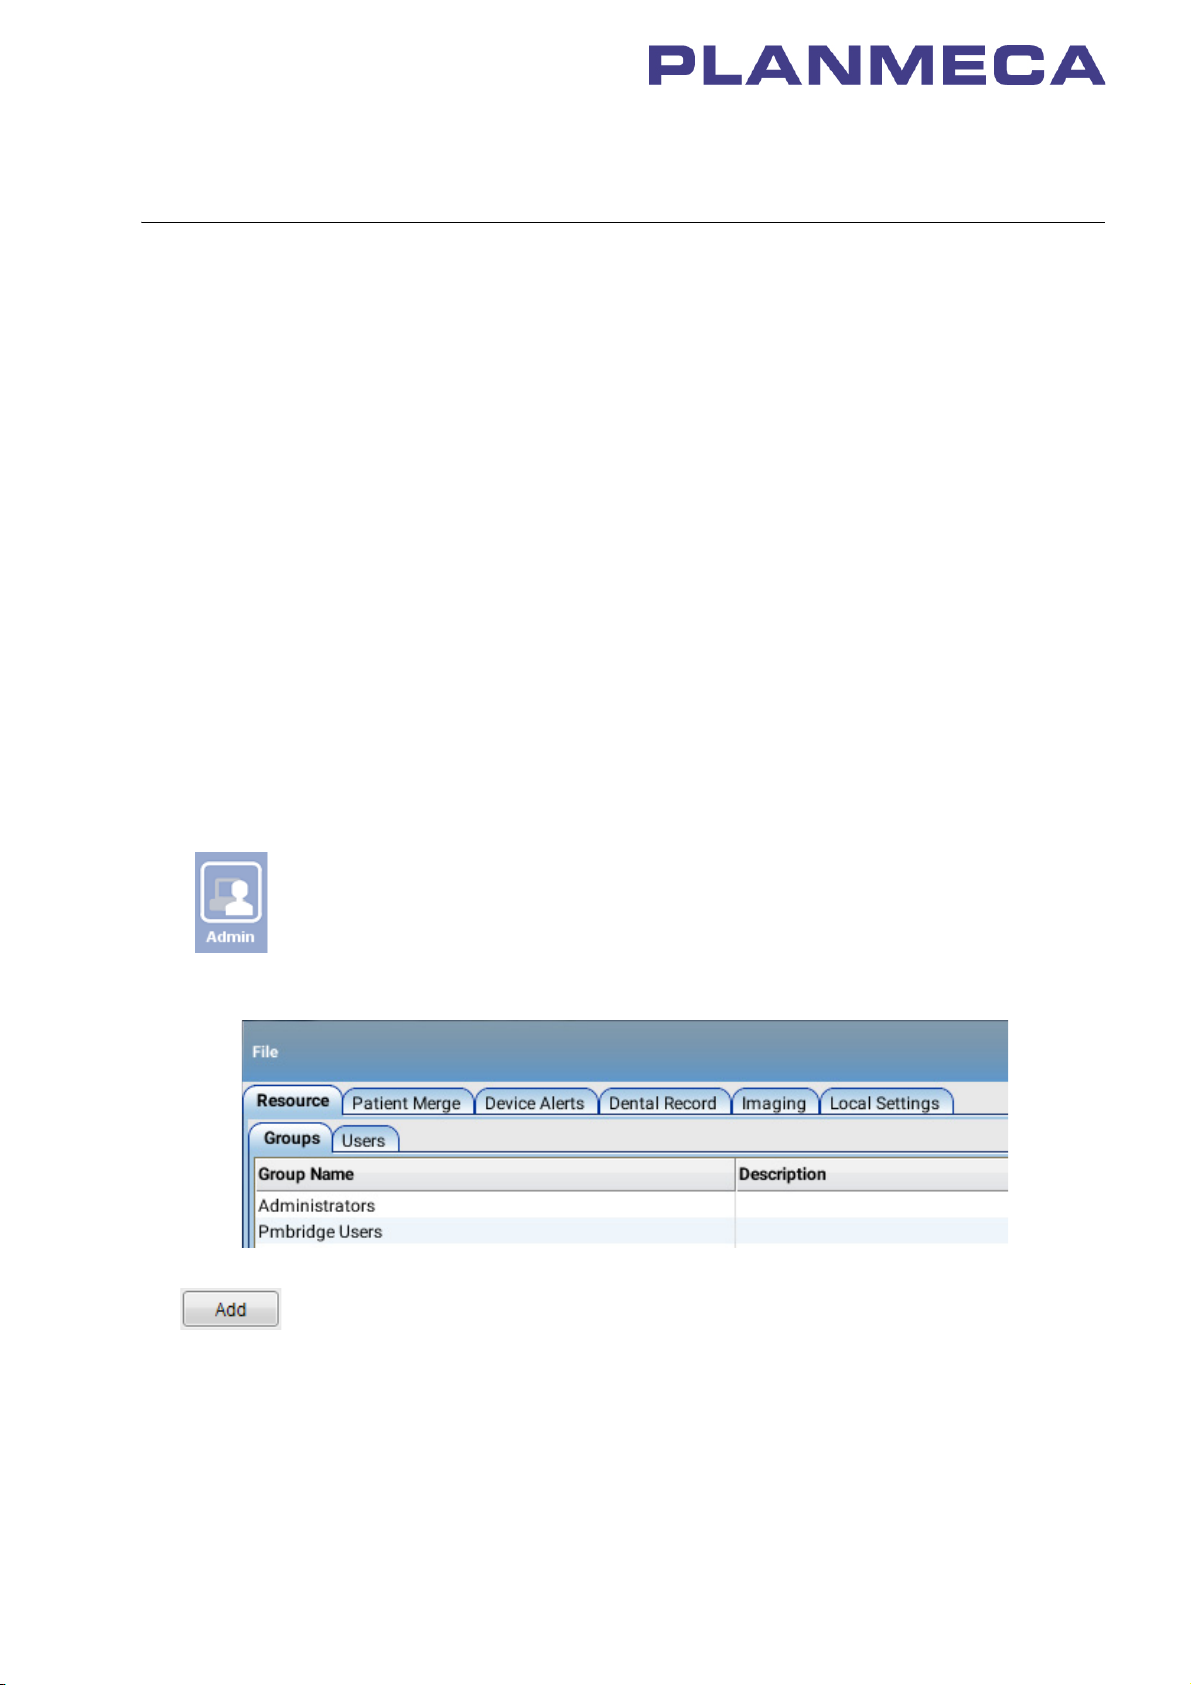
1. Open Planmeca Romexis.
2. Press Admin to go to the Admin module.
3. Create a new user group.
a. Select the
b. Click the Add button at the bottom of the screen to create a new user group.
Groups
tab under the
Resource
tab.
Publication number 30005120 version 1
Copyright Planmeca
Released 10 February 2017
2 ADDING PLANID USER TO PLANMECA ROMEXIS
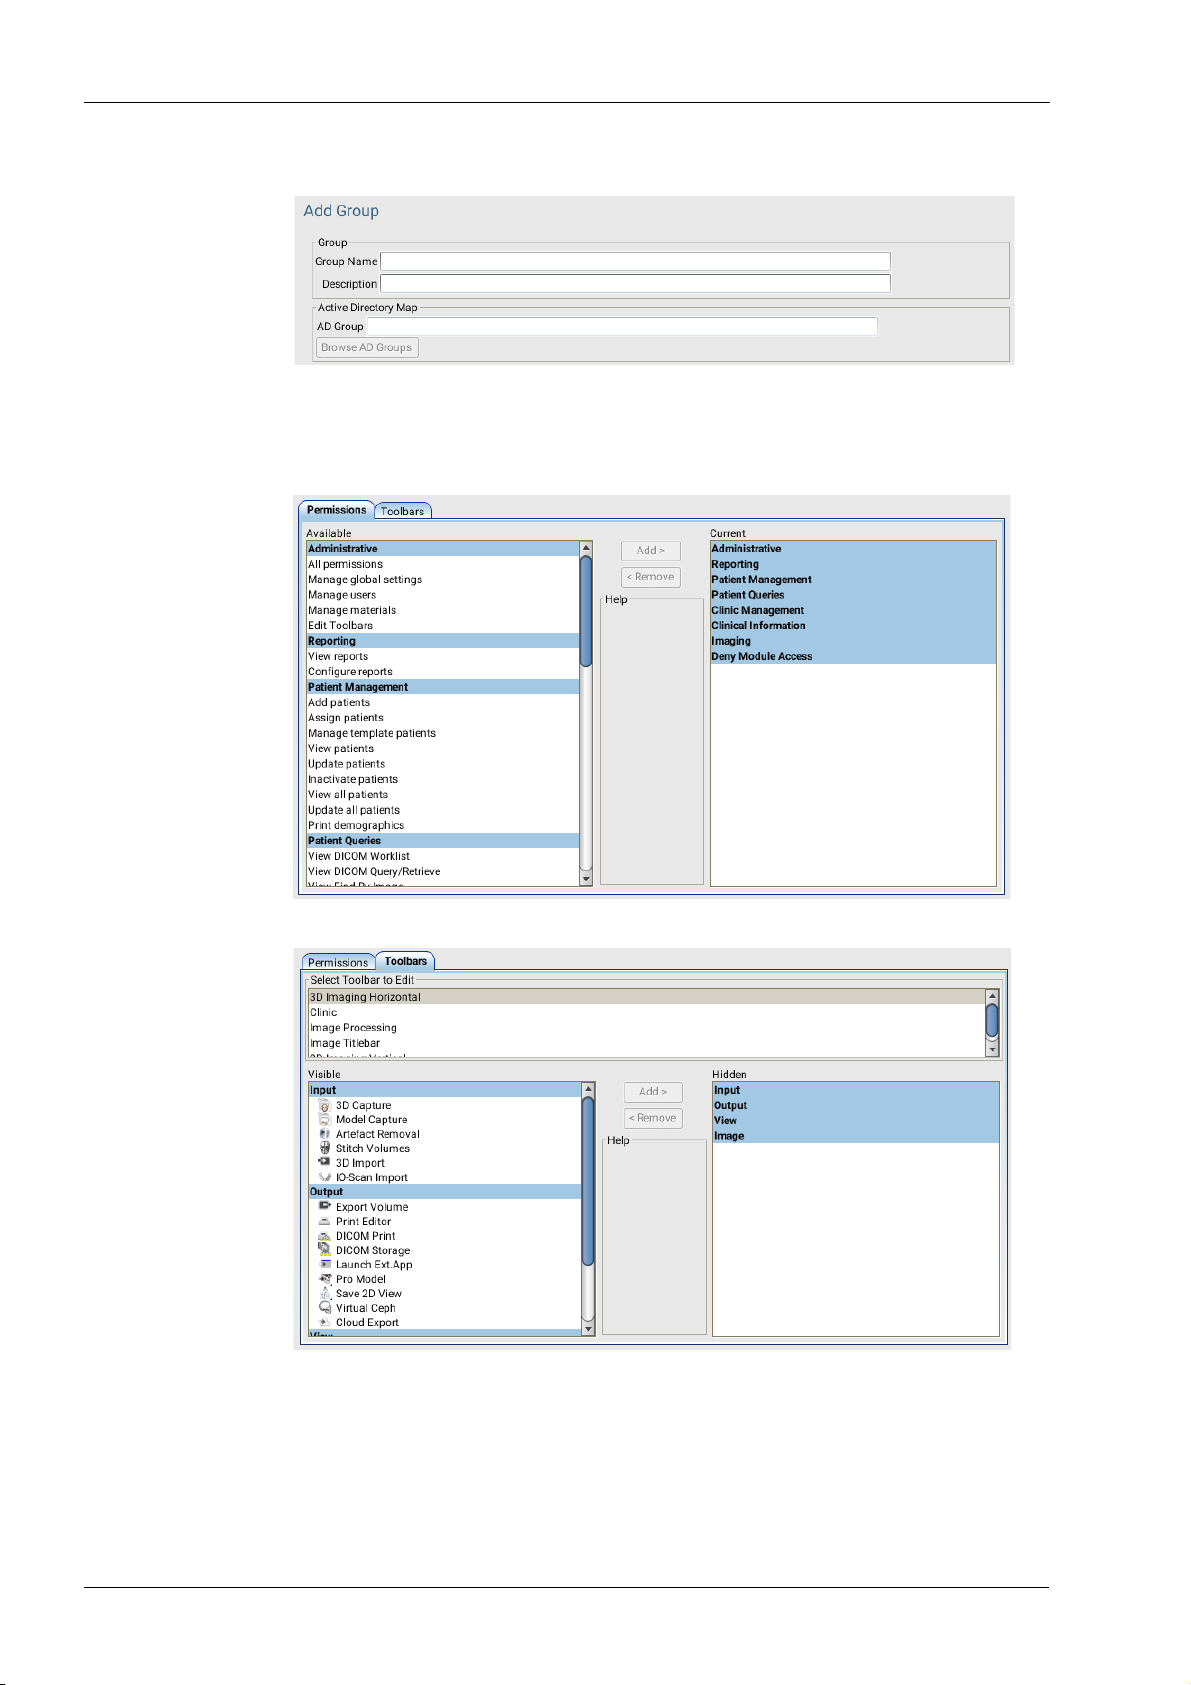
c. In the Add Group window, enter the name (PlanID) and description for the new
group.
d. Optionally, click the Browse AD Groups button to map a Planmeca Romexis
group to an Active Directory user group.
e. Define the permissions for the group by selecting the permission(s) and clicking
the using the Add / Remove buttons.
f. Select Toolbars tab.
In the Toolbars tab the tools visible for each user group can selected.
- Select the toolbar contents to be edited from the Select Toolbar to Edit menu.
- Move items between the Visible and Hidden fields by clicking the Add > and
< Remove buttons.
g. Click OK.
2 Planmeca dental units Planmeca PlanID user’s guide

2 ADDING PLANID USER TO PLANMECA ROMEXIS
4. Create a new user.
a. Select the
b. Click the Add button at the bottom of the screen to create a new user.
Users
tab under the
Resource
tab.
c. In the
Add User
• Fill in Username
This name is later entered in the
• Select a group by ticking the appropriate box.
window, open the
User
Romexis username
tab and:
field in the dental unit.
d. In the
Planmeca PlanID user’s guide Planmeca dental units 3
Add User
• First Name
• Last Name
window, open the
Personal
tab and fill in:

2 ADDING PLANID USER TO PLANMECA ROMEXIS
This name will show in the dental unit as your user name.
e. Click OK.
4 Planmeca dental units Planmeca PlanID user’s guide

3 ASSIGNING PLANID CARD TO NEW PLANID USER
3 ASSIGNING PLANID CARD TO NEW PLANID USER
3.1 Planmeca Compact i Touch
1. Sign in to the dental unit as one of the local users.
The local user’s settings are automatically transferred to the PlanID user.
2. Press Program.
3. Press New user.
The
Assign PlanID tag
window opens.
Planmeca PlanID user’s guide Planmeca dental units 5

3 ASSIGNING PLANID CARD TO NEW PLANID USER
NOTE
4. Press Edit next to
Romexis username
. The
Set Romexis username
window opens.
5. Enter your Romexis username and save the changes by pressing OK.
The username must be the same that you entered in the
Planmeca Romexis. If you did not enter a username in Planmeca Romexis as
instructed in
The
Set Romexis username
6. Optional: If you did not enter your first name and/or last name in Planmeca Romexis
as instructed in
the menu item. If first name and last name were entered in Planmeca Romexis, they
will be retrieved from Romexis when you sign in with your PlanID card.
7. Show the PlanID card to the PlanID reader on the dental unit.
The text
8. Close the
Your PlanID card has now been assigned to you and you have been signed in to the
dental unit.
Prerequisites
above, you can enter it now.
Prerequisites
PlanID tag detected
Assign PlanID tag
window closes.
above, you can enter them now by pressing Edit next to
is displayed.
window by pressing OK.
Add User
window in
6 Planmeca dental units Planmeca PlanID user’s guide

3 ASSIGNING PLANID CARD TO NEW PLANID USER
3.2 Planmeca Sovereign Classic
1. In the dental unit’s
The
User settings
Sign in
window opens.
window, press New user.
2. Press Assign PlanID tag.
The
Assign PlanID tag
window opens.
Planmeca PlanID user’s guide Planmeca dental units 7

3 ASSIGNING PLANID CARD TO NEW PLANID USER
NOTE
3. Press Edit next to
Romexis username
. The
Set Romexis username
window opens.
4. Enter your Romexis username and save the changes by pressing OK.
The username must be the same that you entered in the
Planmeca Romexis. If you did not enter a username in Planmeca Romexis as
instructed in
The
Set Romexis username
5. Show the PlanID card to the PlanID reader on the dental unit.
The text
6. Close the
7. Close the
Your PlanID card has now been assigned to you and you have been signed in to the
dental unit.
Prerequisites
above, you can enter it now.
PlanID tag detected
Assign PlanID tag
User settings
window by pressing OK.
window closes.
is displayed.
window by pressing OK.
Add User
window in
8 Planmeca dental units Planmeca PlanID user’s guide

4 SIGNING IN TO DENTAL UNIT AS PLANID USER
4 SIGNING IN TO DENTAL UNIT AS PLANID USER
To sign in to the dental unit, show the PlanID card to the PlanID reader.
A welcome message is displayed.
When you are signed in as a PlanID user, the PlanID user symbol is displayed.
Planmeca PlanID user’s guide Planmeca dental units 9

5 TECHNICAL SPECIFICATIONS
5 TECHNICAL SPECIFICATIONS
5.1 FCC Class B Notice for PlanID RFID-reader
This device complies with Part 15 of the FCC Rules. Operation is subject to the following
two conditions:
1. This device may not cause harmful interference.
2. This device must accept any interference received, including interference that may
cause undesired operation.
Note: This equipment has been tested and found to comply with the limits for a Class B
digital device, pursuant to Part 15 of the FCC Rules. These limits are designed to provide
reasonable protection against harmful interference in a residential installation. This
equipment generates, uses and can radiate radio frequency energy and, if not installed
and used in accordance with the instructions, may cause harmful interference to radio
communications. However, there is no guarantee that interference will not occur in a
particular installation. If this equipment does cause harmful interference to radio or
television reception, which can be determined by turning the equipment off and on, the
user is encouraged to try to correct the interference by one or more of the following
measures:
• Reorient or relocate the receiving antenna.
• Increase the separation between the equipment and receiver.
• Connect the equipment into an outlet on a circuit different from that to which the
receiver is connected.
• Consult the dealer or an experienced radio/television technician for help.
Modifications: Any modifications made to this device that are not approved by Planmeca
may void the authority granted to the user by the FCC to operate this equipment.
5.2 Industry Canada (IC) Compliance Statement
This device complies with Industry Canada licence-exempt RSS standard(s). Operation is
subject to the following two conditions:
(1) this device may not cause interference, and (2) this device must accept any
interference, including interference that may cause undesired operation of the device.
5.3 Industrie Canada (IC) Déclaration de conformité
Le présent appareil est conforme aux CNR d ʹ Industrie Canada applicables aux appareils
radio exempts de licence. L ʹ exploitation est autorisée aux deux conditions suivantes:
(1) l ʹ appareil ne doit pas produire de brouillage, et (2) l ʹ utilisateur de l ʹ appareil doit
accepter tout brouillage radioélectrique subi, même si le brouillage est susceptible d' ʹ en
compromettre le fonctionnement.
5.4 RF Exposure
This device has been tested for compliance with FCC RF exposure limits in a portable
configuration. At least 15 cm of separation distance between the PlanID device and the
user's body must be maintained at all times. This device must not be used with any other
antenna or transmitter that has not been approved to operate in conjunction with this
device.
10 Planmeca dental units Planmeca PlanID user’s guide
 Loading...