

Page 1
Copyright Planika Sp. z o.o. www.planikafires.com 1
USER’S MANUAL
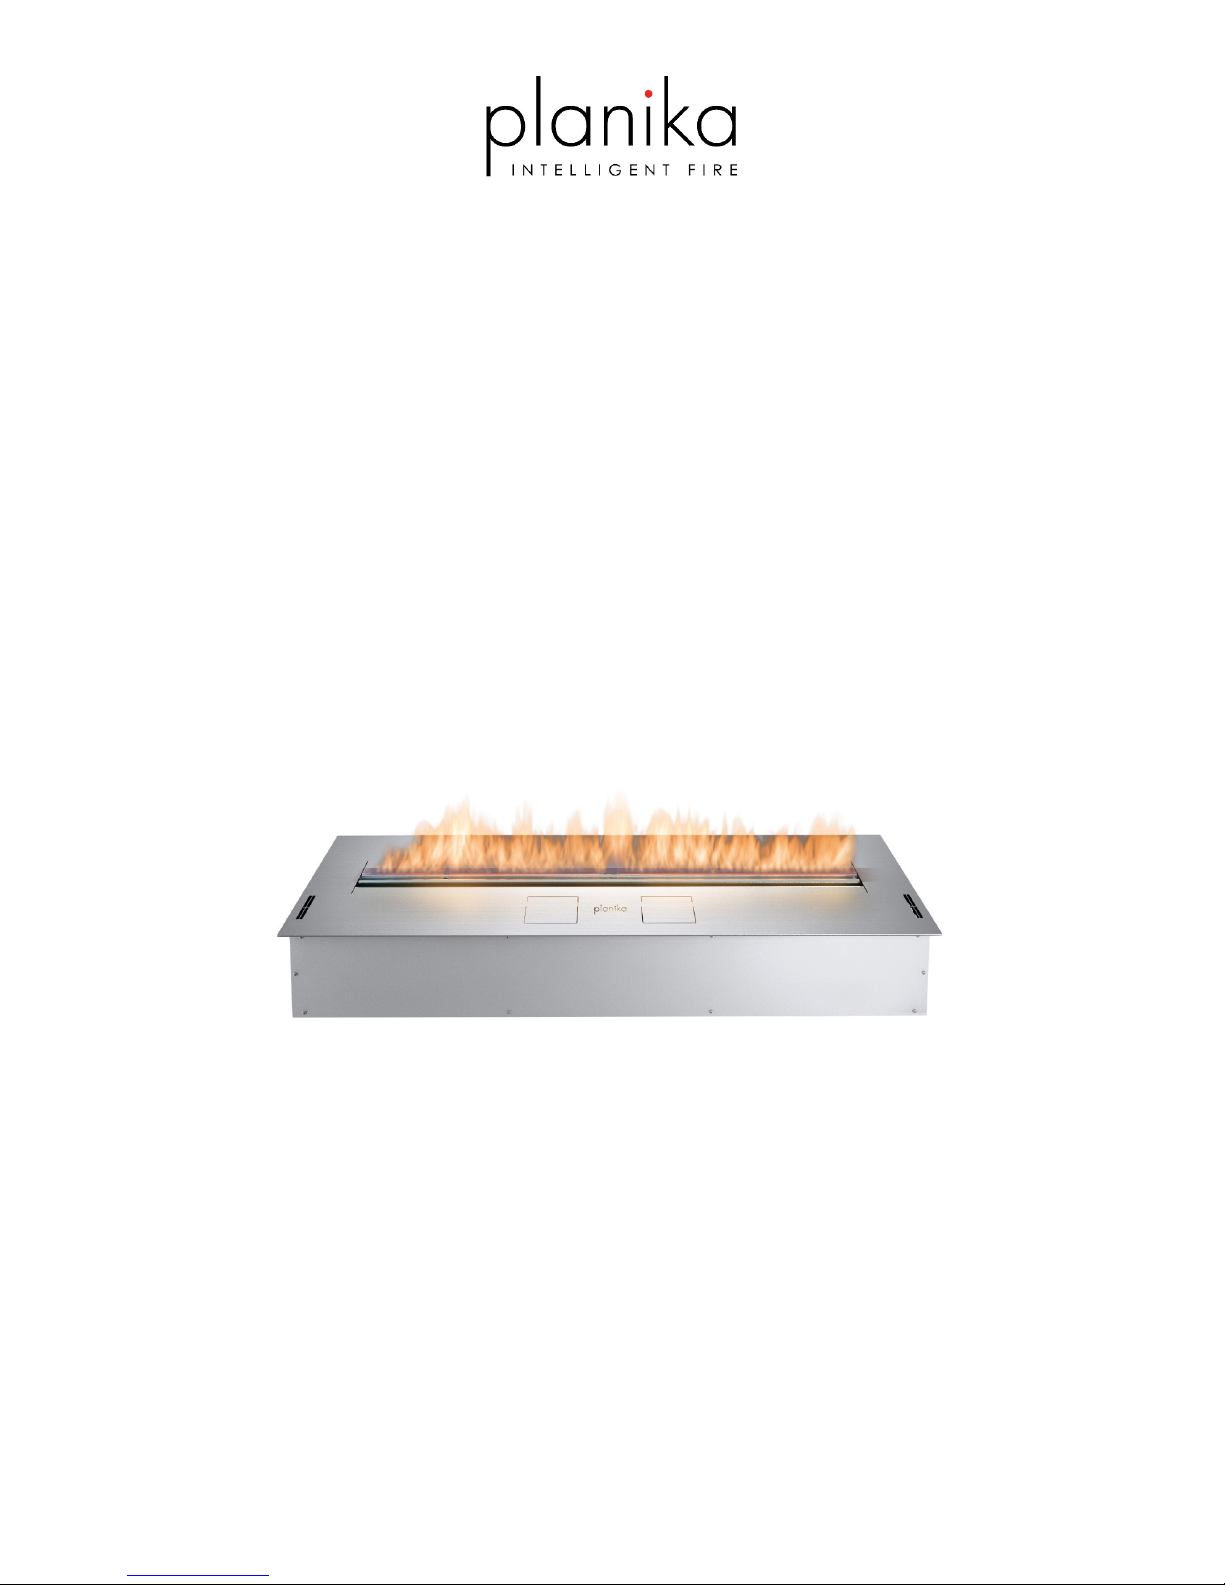
Fire Line Automatic 3
Manufactured by
Planika Sp. z o.o.
ul. Bydgoska 38
86-061 Brzoza
Poland
I0773#05 of 05.12.2014
Page 2
Copyright Planika Sp. z o.o. www.planikafires.com 2
IT IS OBLIGATORY TO READ AND KEEP THIS INSTRUCTION MANUAL.
TABLE OF CONTENTS
I. Safety. . . . . . . . . . . . . . . . . . . . . . . . . . . . . . . . . . . . . . . . . . . . . . . . . . . . . . . . . . . . . . . . . . 3
II. Operation
Operating elements. . . . . . . . . . . . . . . . . . . . . . . . . . . . . . . . . . . . . . . . . . . . . . . . . . . . . . . 4
Initial start-up of the device . . . . . . . . . . . . . . . . . . . . . . . . . . . . . . . . . . . . . . . . . . . . . . . . 5
Flame size regulation. . . . . . . . . . . . . . . . . . . . . . . . . . . . . . . . . . . . . . . . . . . . . . . . . . . . . . 6
SLEEP function. . . . . . . . . . . . . . . . . . . . . . . . . . . . . . . . . . . . . . . . . . . . . . . . . . . . . . . . . . . 7
Device extinguishing . . . . . . . . . . . . . . . . . . . . . . . . . . . . . . . . . . . . . . . . . . . . . . . . . . . . . . 7
Subsequent start up . . . . . . . . . . . . . . . . . . . . . . . . . . . . . . . . . . . . . . . . . . . . . . . . . . . . . . 7
Switching off . . . . . . . . . . . . . . . . . . . . . . . . . . . . . . . . . . . . . . . . . . . . . . . . . . . . . . . . . . . . 7
Information and warning alert . . . . . . . . . . . . . . . . . . . . . . . . . . . . . . . . . . . . . . . . . . . . . 8
III. Customer’s menu. . . . . . . . . . . . . . . . . . . . . . . . . . . . . . . . . . . . . . . . . . . . . . . . . . . . . . . . . 10
1) Lock the device . . . . . . . . . . . . . . . . . . . . . . . . . . . . . . . . . . . . . . . . . . . . . . . . . . . . . . . 10
2) Child lock . . . . . . . . . . . . . . . . . . . . . . . . . . . . . . . . . . . . . . . . . . . . . . . . . . . . . . . . . . . . 11
3) Set time . . . . . . . . . . . . . . . . . . . . . . . . . . . . . . . . . . . . . . . . . . . . . . . . . . . . . . . . . . . . . 11
4) Device IP . . . . . . . . . . . . . . . . . . . . . . . . . . . . . . . . . . . . . . . . . . . . . . . . . . . . . . . . . . . . 12
5) Remote Control . . . . . . . . . . . . . . . . . . . . . . . . . . . . . . . . . . . . . . . . . . . . . . . . . . . . . . 12
6) Fast start . . . . . . . . . . . . . . . . . . . . . . . . . . . . . . . . . . . . . . . . . . . . . . . . . . . . . . . . . . . . 12
7) Serial number . . . . . . . . . . . . . . . . . . . . . . . . . . . . . . . . . . . . . . . . . . . . . . . . . . . . . . . . 13
8) Software . . . . . . . . . . . . . . . . . . . . . . . . . . . . . . . . . . . . . . . . . . . . . . . . . . . . . . . . . . . . . 13
IV. Cleaning and maintenance . . . . . . . . . . . . . . . . . . . . . . . . . . . . . . . . . . . . . . . . . . . . . . . . . 13
V. Maintenance materials . . . . . . . . . . . . . . . . . . . . . . . . . . . . . . . . . . . . . . . . . . . . . . . . . . . . 14
VI. Disposal and recycling . . . . . . . . . . . . . . . . . . . . . . . . . . . . . . . . . . . . . . . . . . . . . . . . . . . . . 14
Page 3

Copyright Planika Sp. z o.o. www.planikafires.com 3
I. Safety
Fire Line Automatic is a decorative appliance with real flames that is why in order to use the
device properly and safely and in order to keep the warranty, the following safety rules
should be observed. Fire Line Automatic is not a heating device.
• The device should be installed according to the rules given in the installation manual.
• While working, the device emits heat, water vapour and carbon dioxide, therefore it is
necessary to provide proper cubic capacity of the room and proper ventilation of the interior.
• During the device starting-up sequence, the characteristic smell of the liquid used in the device
or the recommended FANOLA® liquid may be perceptible.
• It is obligatory to have a carbon-dioxide or dry chemical extinguisher placed nearby the device.
• The device that is switched on must not be moved. Wait for complete fuel burn-out, disconnect
the power supply and cool down the elements before moving the device.
• The device should not be left without adult supervision.
• Prevent handling of the device by persons not trained.
• Do not attempt to make changes or repairs to the construction of the device on your own.
Repairs can be made only by a person trained to service the device.
• Do not pour FANOLA liquid to a furnace, as it may cause damage of the device and cause fire.
Pouring FANOLA liquid to a burning furnace may cause a sudden ignition and can cause fire,
burns and a risk to life.
• Do not heat the FANOLA liquid before starting-up the device.
• Do not start up the device if the FANOLA liquid spilled out from the container.
• Do not cover the working device as it may cause fire.
• Keep the device and fuel away from children, pets and unauthorized persons.
• FANOLA liquid is not suitable for consumption. Avoid contact with skin and eyes.
• Do not operate by the filler when the device is running.
• Do not tamper with the elements inside the furnace body at the risk of burns, damage to the
device or fire.
• Some elements of the device heat up to high temperatures. Do not touch the area of the
furnace of the device as it may cause burns.
• Do not place any decorative elements on the burner’s surface.
• WARNING! The glowing coil temperature heats up to 1300 °C. Touching the device while it is
turned on may cause burns.
• WARNING! Prior to moving the appliance burn the fuel out and move the appliance slowly,
in the horizontal position, avoiding shaking. There is always some fuel left inside the device
and if spilled the sensors might get wet. If that happens the appliance will not work until the
liquid evaporates.
• WARNING! The first run can be made only after proper installation of the device and reading
the manual instructions!
Page 4
Copyright Planika Sp. z o.o. www.planikafires.com 4
II. Operation
The product is adjusted to work with the devices that have Wi-Fi access (such as smartphone, tablet).
If you are going to control the bio fireplace by means of such device you need to get familiar with the
instructions included in Configuration of the module with Wi-Fi and Smart Home System.
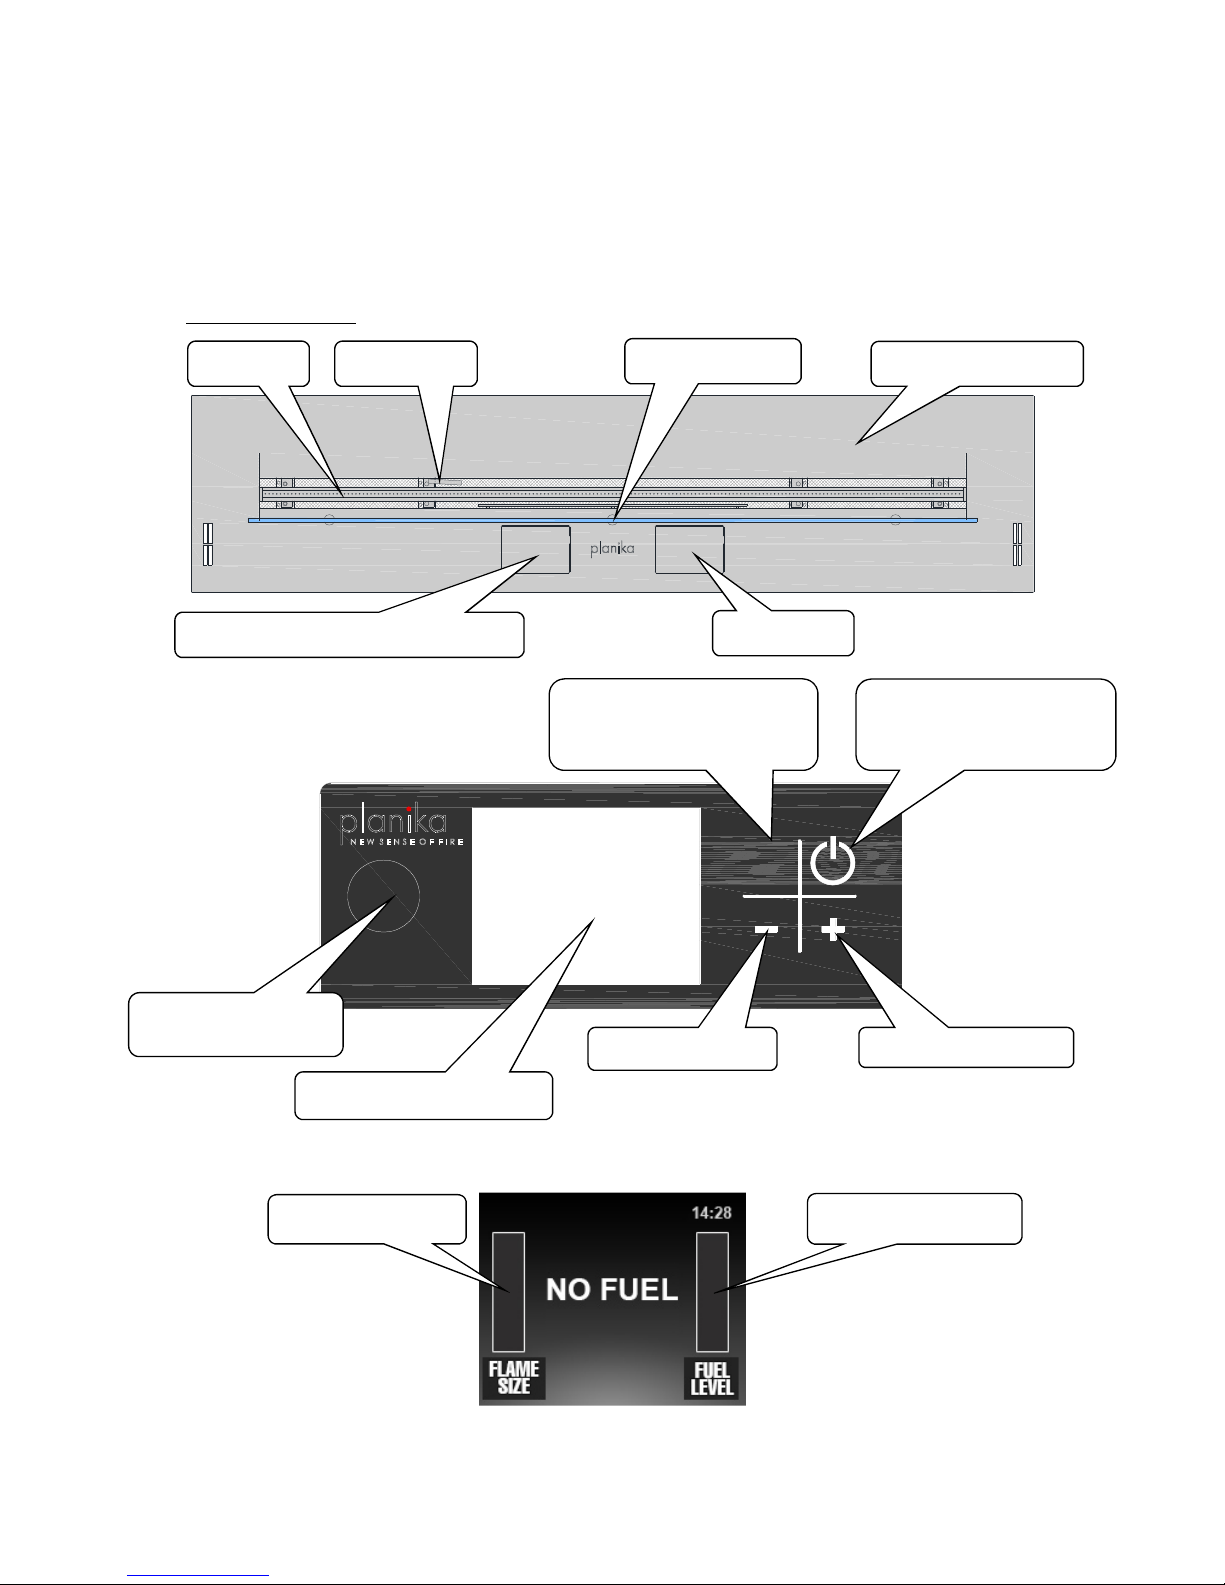
Operating elements
Control panel
Control panel display
START
STOP
PAT.
PEND.
hearth
glowing coil
Top of the furnance
c
ontrol panel display hidden under a flap
filler flap
control panel display
Starts up the device from
stand-by mode or turns off
the device to stand
-
by mode
Turns on to standby or
completely turns off the
device
reduces flame level
increases flame level
USB port hidden under
a flap
Fuel level indicator
Flame size indicator
Tempered glass
Page 5
Copyright Planika Sp. z o.o. www.planikafires.com 5
Initial start-up of the device
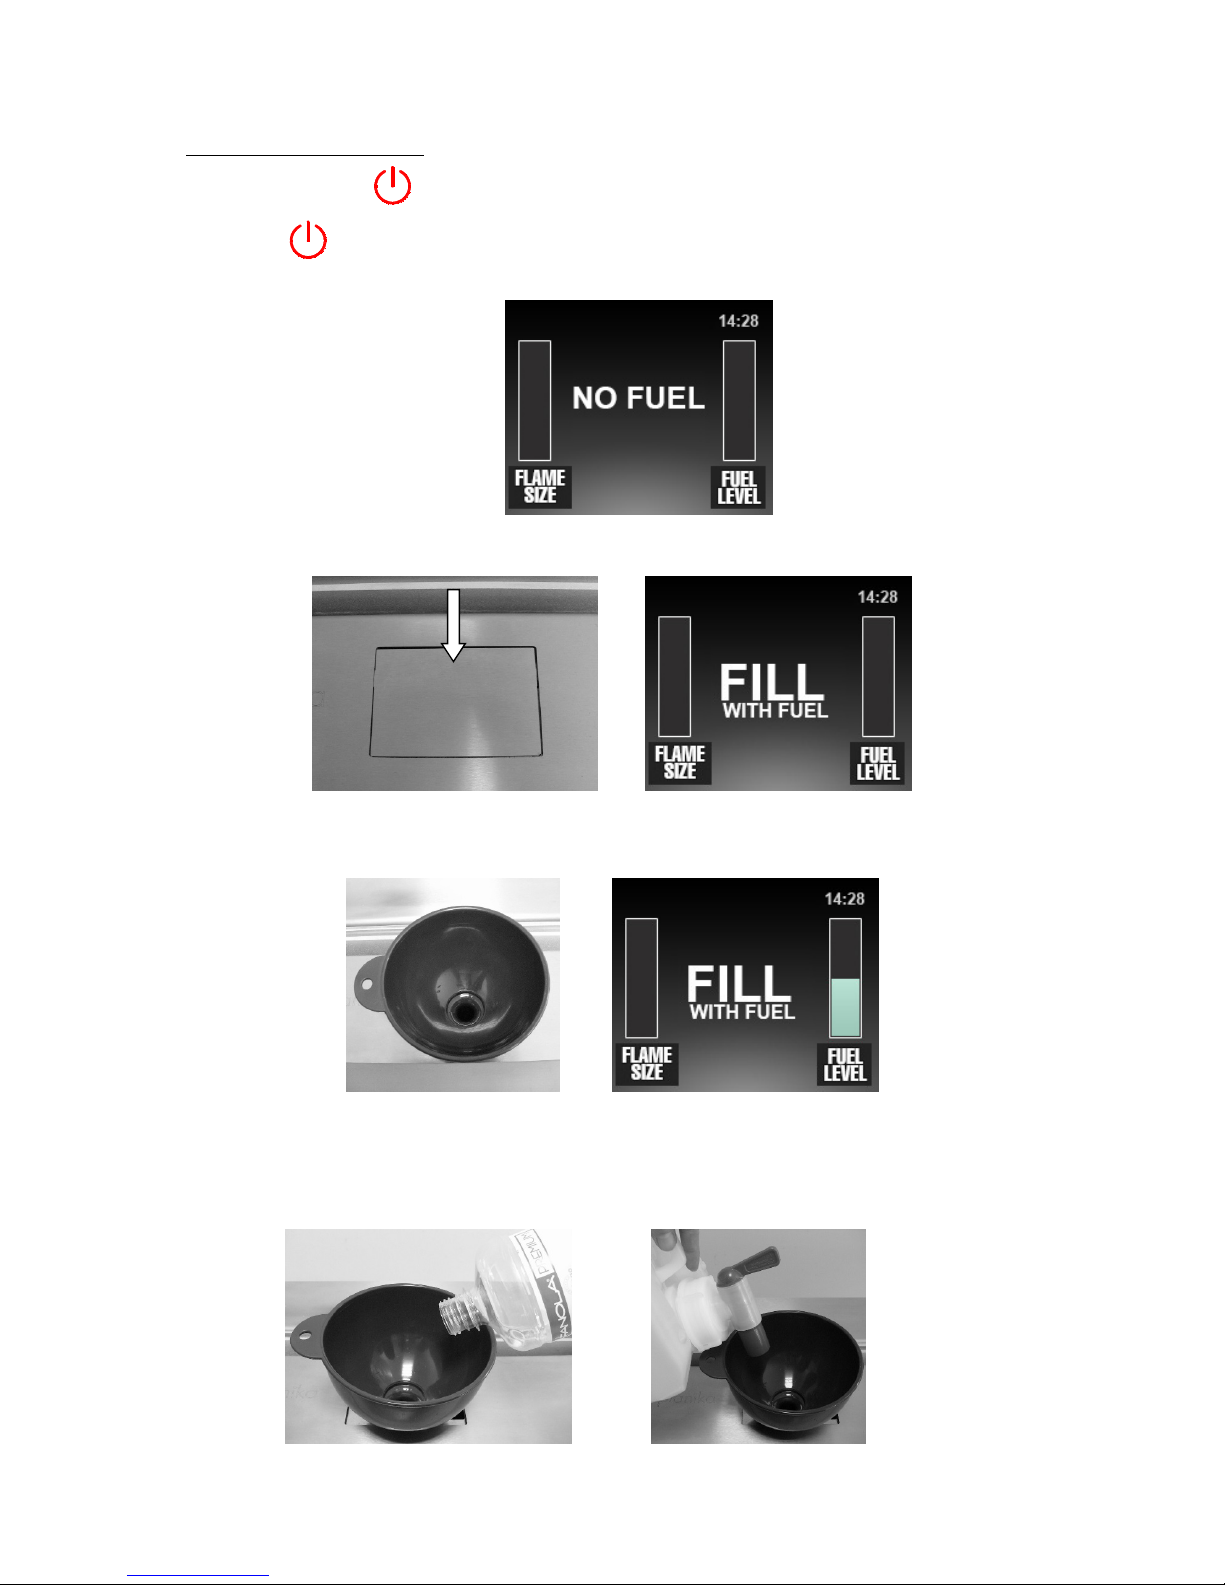
1. Pay attention if button is flashing. If so, the device was properly connected to the mains.
2. Press button on the control panel, welcoming display will appear and after 3 seconds you
will see the message
3. NO FUEL – lack of fuel. To fill it up:
3a. Open the Fanola filler bolt, message will change into FILL WITH FUEL
3b. Insert the funnel and fill the reservoir with fuel. Fuel level indicator on the display will
increase.
ATTENTION! Pour the fuel into the funnel following these precautions:
• During pouring be careful not to spill fuel out of the filler.
• If 5L containers are used to fill up, twist on the cap with the tap onto the container and pour the
fuel using the funnel. To fill up use exclusively accessories provided by the manufacturer.
Page 6
Copyright Planika Sp. z o.o. www.planikafires.com 6
WARNING! ERROR 01 - the fuel spilled out of the filler:
• stop filling the fuel instantly!
• remove the funnel
• dry the visible moisture
• with the use of the manual pump, supplied by the manufacturer, pump out at least 1 litre of fuel
from the fuel filler
• close the filler flap
• turn off the device with the red button
• if the spillage is excessive the source of power needs to be disconnected
• wait at least 1 hour until the remaining moisture evaporates
• after 1 hour turn the device on with the red button
• if the ERROR 01 message appears, turn off the device and wait a bit longer until the remaining
moisture evaporates.
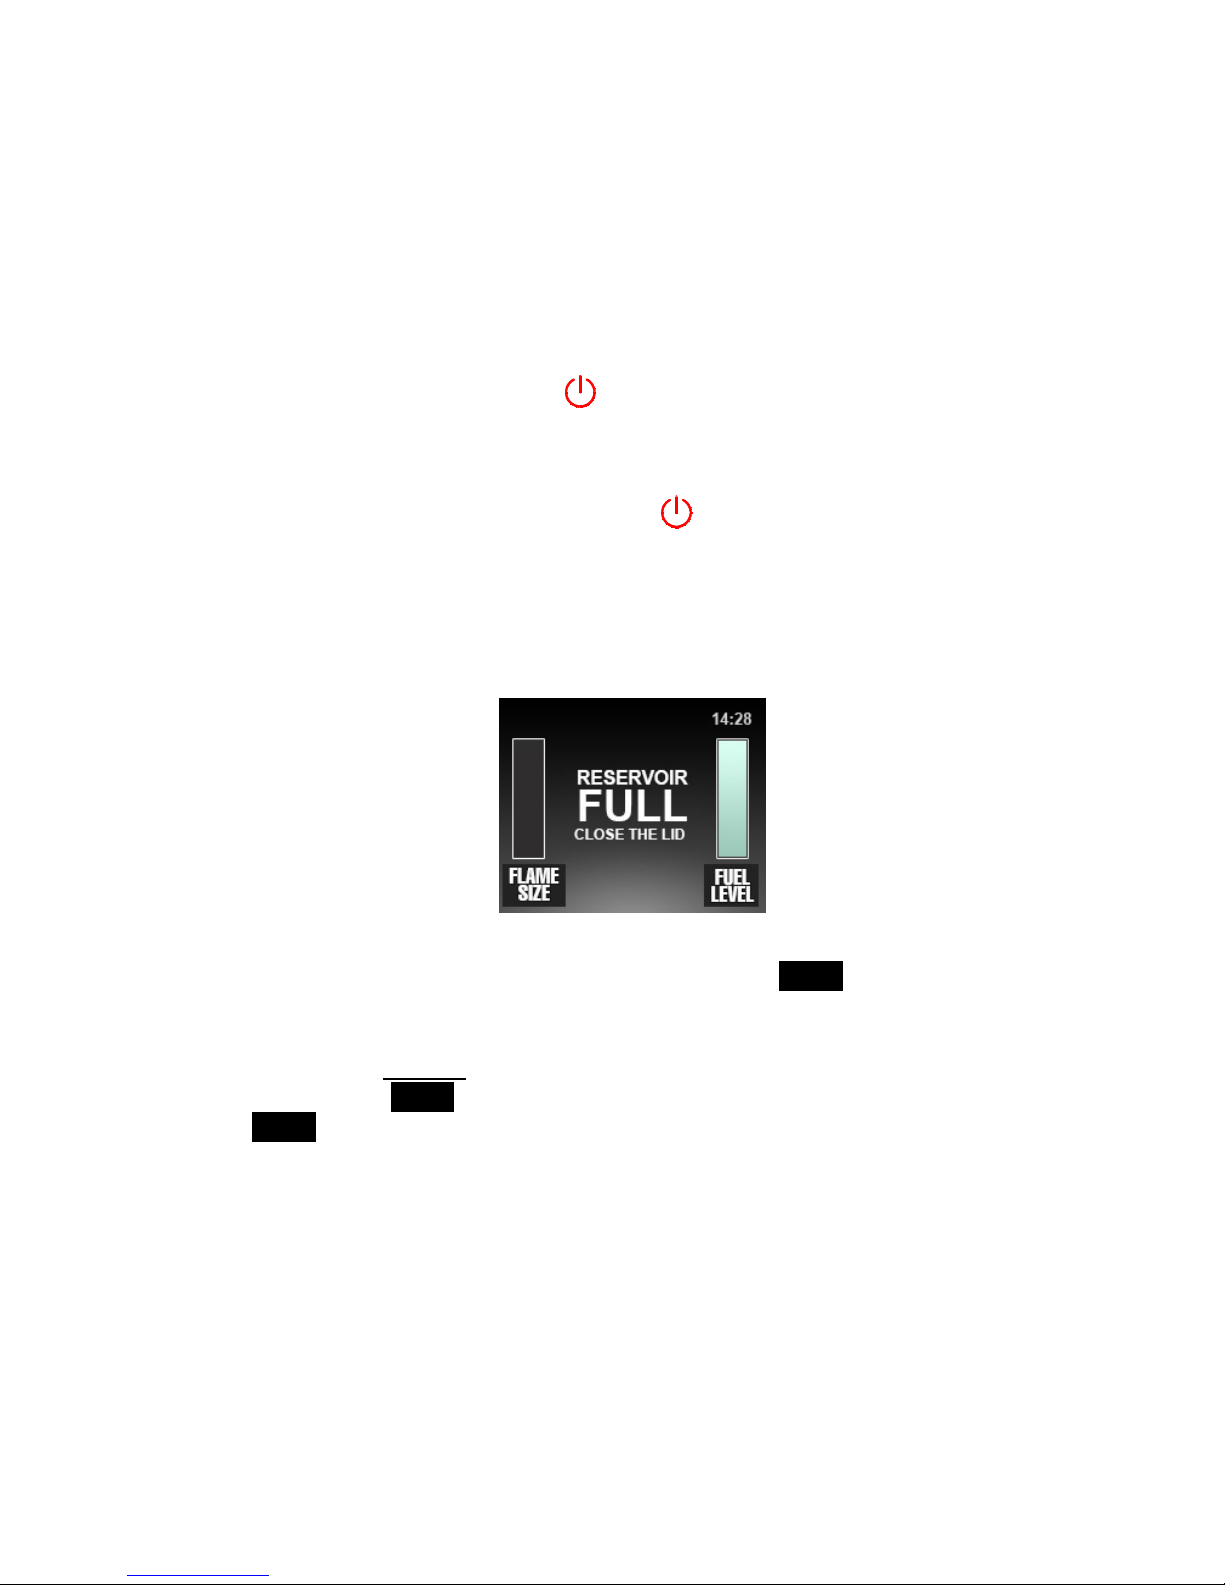
3c. When the message RESERVOIR FULL CLOSE THE LID appears on the display, stop pouring! Take
the funnel out and close the filler flap.
4. When message turns into READY – you can start up the device:
- press the
START/STOP
button on the control panel or the
START
button on the remote
control or on the configured appliance. WARNING! The glowing coil starts to heat up to 1300°C,
when you touch it you may be burnt!
- If the function Child lock is turned on, you need to hold the
START/STOP
button on the
control panel or
START
button on the remote control for 3 seconds. It is also possible to push
START
button on the configured appliance. WARNING! The filament starts to heat up to
1300°C, when you touch it you may be burnt!
5. PLEASE WAIT message – you need to wait a moment as it takes a few seconds for the appliance
to ignite the flame.
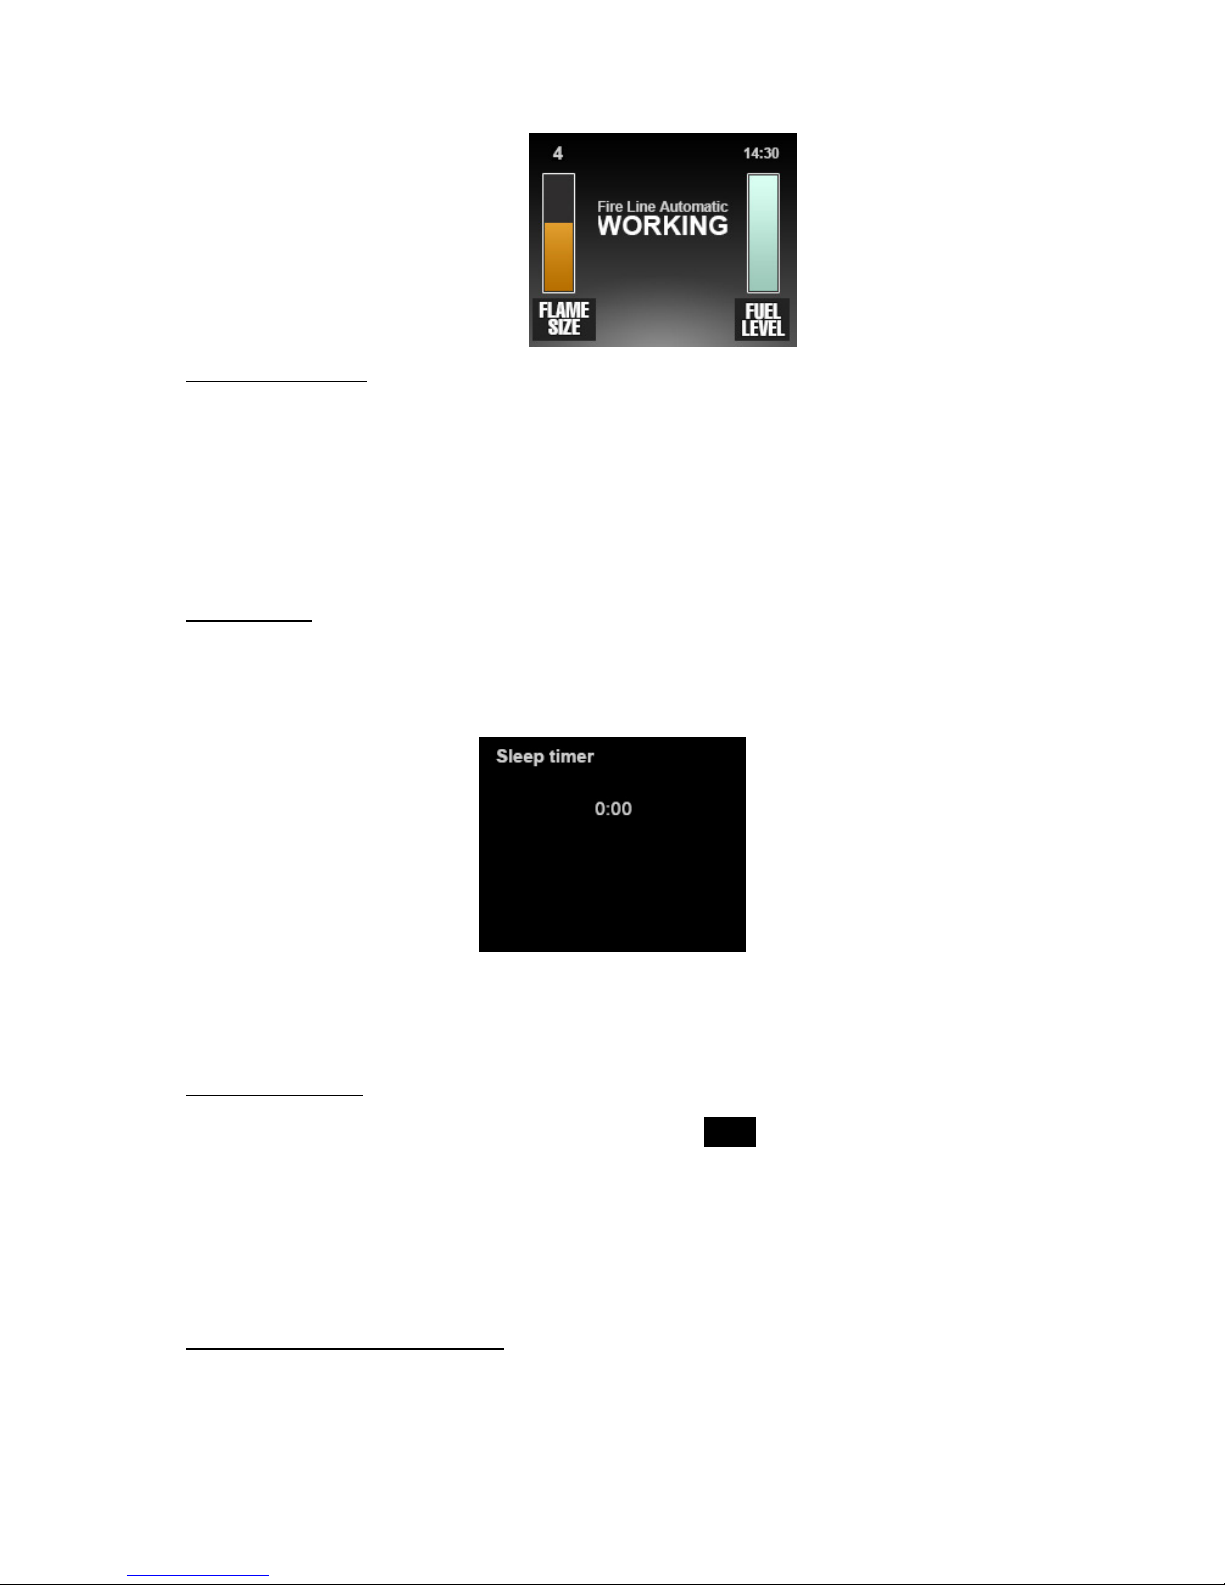
6. WORKING message – the device is in working mode.
Page 7
Copyright Planika Sp. z o.o. www.planikafires.com 7
Flame size regulation
• The appliance initially starts up at the 4th level of the flame size
• Adjust the flame size by pressing either the "+" or "-" button on the remote control, on the
control panel or on the configured appliance.
• Flame size indicator on the display informs about the chosen flame size. There is also a number
of the flame size visible above the flame size indicator.
SLEEP function
The appliance can be programmed to switch off after a given time. When the message WORKING is
visible on the display, you need to hold ‘+’ and ‘-‘ buttons simultaneously for a few seconds. The screen
will appear.
Using ‘+’ button choose the desired time (not longer than 3 hours) and confirm with ‘-‘ button.
WARNING! The device with SLEEP function turned on cannot be left without supervision!
Device extinguishing
Press the
START/STOP
button on the control panel or the
STOP
button on the remote control or
on the configured appliance.
WORKING message will change into COOLING THE DEVICE – the device is too hot to be started again.
To make the cooling process faster, the cooling fans start operating. When the device cools down the
message on the display turns into READY.
Subsequent start-up of the appliance
NO FUEL message visible on the display - start the procedures as in point 3 of this manual.
READY message visible on the display – start the procedures as in point 4 of this manual.
Page 8
Copyright Planika Sp. z o.o. www.planikafires.com 8
Switching off
To switch off the device completely press the red button on the control panel.
ATTENTION!
The appliance will automatically stop working when:
the fuel burns out (The “NO FUEL, REFUEL WHEN THE DEVICE IS COOLED” message will change to
the “NO FUEL” message once the device cools down),
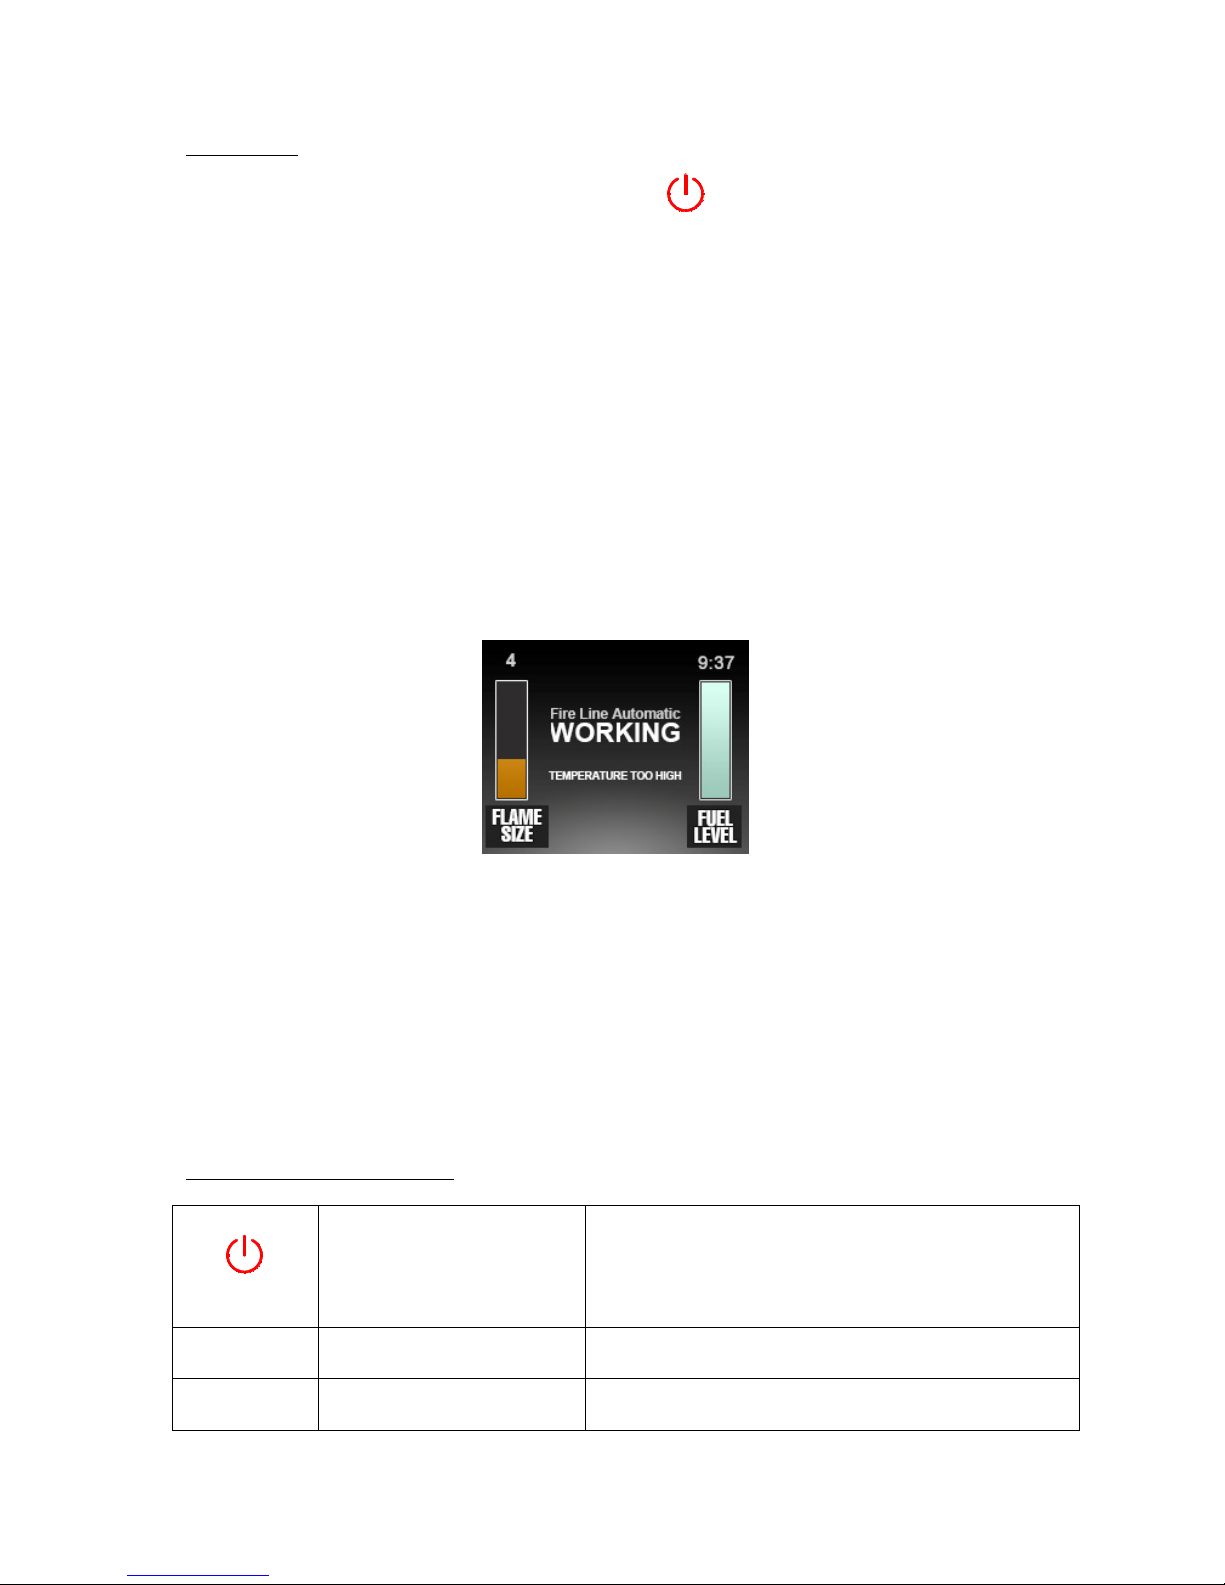
the temperature of the appliance is too high, (COOLING THE DEVICE TEMPERATURE TOO HIGH
message)
INFO! To avoid abrupt switching off when the temperature approaches the critical one, the flame size
will be diminished to 50% and will restrict the ability to increase the flame size – when you try to
increase the flame size, the message will appear
If the temperature of the device still increases, the device will switch off. When the temperature
decreases to the safe one, flame size can be increased again.
the device is moved or it senses seismic shocks (COOLING THE DEVICE. DEVICE HIT message)
the device is tilted (COOLING THE DEVICE. DEVICE TILTED message)
the allowed level of carbon dioxide is exceeded in the room (COOLING THE DEVICE CO2 LEVEL
TOO HIGH message)
any occurrence takes place that evokes ERROR message
Information and warning alerts
No
message
button is
flashing
The device is connected to
the mains, but remains
dormant.
To start operating the device, press the red button on the
control panel. In this mode, the device does not respond
to commands sent from the remote control, the
configured device nor buttons on the control panel.
READY
The device is connected to
the mains and ready to start.
You can start from point
3 and refuel or from point
4 and
immediately start the device.
NO FUEL
The fuel reservoir is empty.
Refill the fuel following the description in point
3 of the
User’s Manual.
Page 9

Copyright Planika Sp. z o.o. www.planikafires.com 9
NO FUEL,
REFUEL
WHEN THE
DEVICE IS
COOLED
The fuel has run out
however the device is too
hot to restart it.
Please wait until the device displays the NO FUEL
message. Only then can the fuel be replenished in
accordance with the point no. 3 of the User’s Manual
RESERVOIR
FULL CLOSE
THE LID
The fuel reservoir is full. Close the filler bolt. You can start the device now.
FILL WITH
FUEL
The filler bolt is open.
You can refill the fuel or close the bolt and start the
device.
COOLING
THE DEVICE
Protection against too fast
restart of the hot device is
active.
Wait until the device cools down. The message will
change to
READY
.
When the message
COOLING THE DEVICE
is displayed,
the fans that accelerate the cooling of the device switch
on.
COOLING
THE DEVICE
TEMP. TOO
HIGH
The acceptable device
operation temperature has
been exceeded.
Wait until the device cools down. The message will
change to
READY
.
When the message
COOLING THE DEVICE
is displayed,
the fans that accelerate the cooling of the device switch
on
COOLING
THE DEVICE
DEVICE HIT
The device has been hit
Wait until the device cools down. The message will
change to
READY
.
When the message
COOLING THE DEVICE
is displayed
the fans that accelerate the cooling of the device switch
on
COOLING
THE DEVICE
DEVICE
TILTED
The device has been tilted
Wait until the device cools down. The message will
change to
READY
.
When the message
COOLING THE DEVICE
is displayed
the fans that accelerate the cooling of the device switch
on
COOLING
THE DEVICE
CO2 LEVEL
TOO HIGH
The concentration of CO2 has
been exceeded
Wait until CO2 level in the room diminishes. It is advised
to open the windows or open the door to adjacent
rooms.
ERROR 1
There was a fuel spill or leak
detected.
Remove the funnel if it is placed in the fuel filler. Wipe
visible moisture, pump out at least 1 litre of fuel using
the attached manual pump then turn off the device using
the red button on the control panel. If the spillage is
excessive the source of power needs to be
disconnected. Dry the visible moisture. Leave the device
switched off for at least 1h. If the message is still
displayed after restart, turn off the device for a longer
time. If this does not solve the problem call SERVICE.
ERROR 2
An error of the heater
temperature sensor.
Turn off the device using the red button on the control
panel. Turn it on after a while. If the message does not
disappear call SERVICE.
ERROR 3
An error of the
furnace
temperature sensor.
ERROR 4
An error of the reservoir
temperature sensor.
Page 10
Copyright Planika Sp. z o.o. www.planikafires.com 10
ERROR 5
Movement sensor actuated.
If the device was moved during operation
. The message
will disappear with the disappearance of the source of
movement.
ERROR 6
An error of the fuel level
probe.
Turn off the device using the red button on the control
panel. Turn it on after a while. If the message does not
disappear call SERVICE.
ERROR 10
The heater is damaged.
Turn off the device using the red button on the control
panel. Turn it on after a while. If the message does not
disappear call SERVICE.
ERROR 14
Limiting switch K2 Call SERVICE.
ERROR 15
The device is tilted (set on a
non-levelled surface).
Switch off the device using the red button on the control
panel. Level the surface on which the device stands and
restart the device.
ERROR 16
Exceeded temperature of
the heater sensor.
Turn off the device using the red button on the control
panel. Turn it on after a while. If the message does not
disappear call SERVICE.
ERROR 17
Exceeded time of waiting for
the appearance of flame.
ERROR 20
Too low temperature in the
hearth while turning on.
Turn off the device using the red button
and try to restart
the device.
ERROR 21
Too low temperature in the
hearth during operation.
Turn off the device with the red button and wait until it
cools down. Try to restart the device.
ERROR 31
Fuel spilled within fuel pump
Turn off the device with the red button and wait at least
1h. Try to restart the device. If the message does not
disappear wait longer until the moisture evaporates
completely. If the message does not disappear call
SERVICE.
ERROR 98
Error occurred during
remote control programming
Try to program the remote control again.
ERROR 99
No connection between
the
control panel and
microprocessor
Try to restart the device.. If the message does not
disappear call SERVICE.
III. Customer’s menu
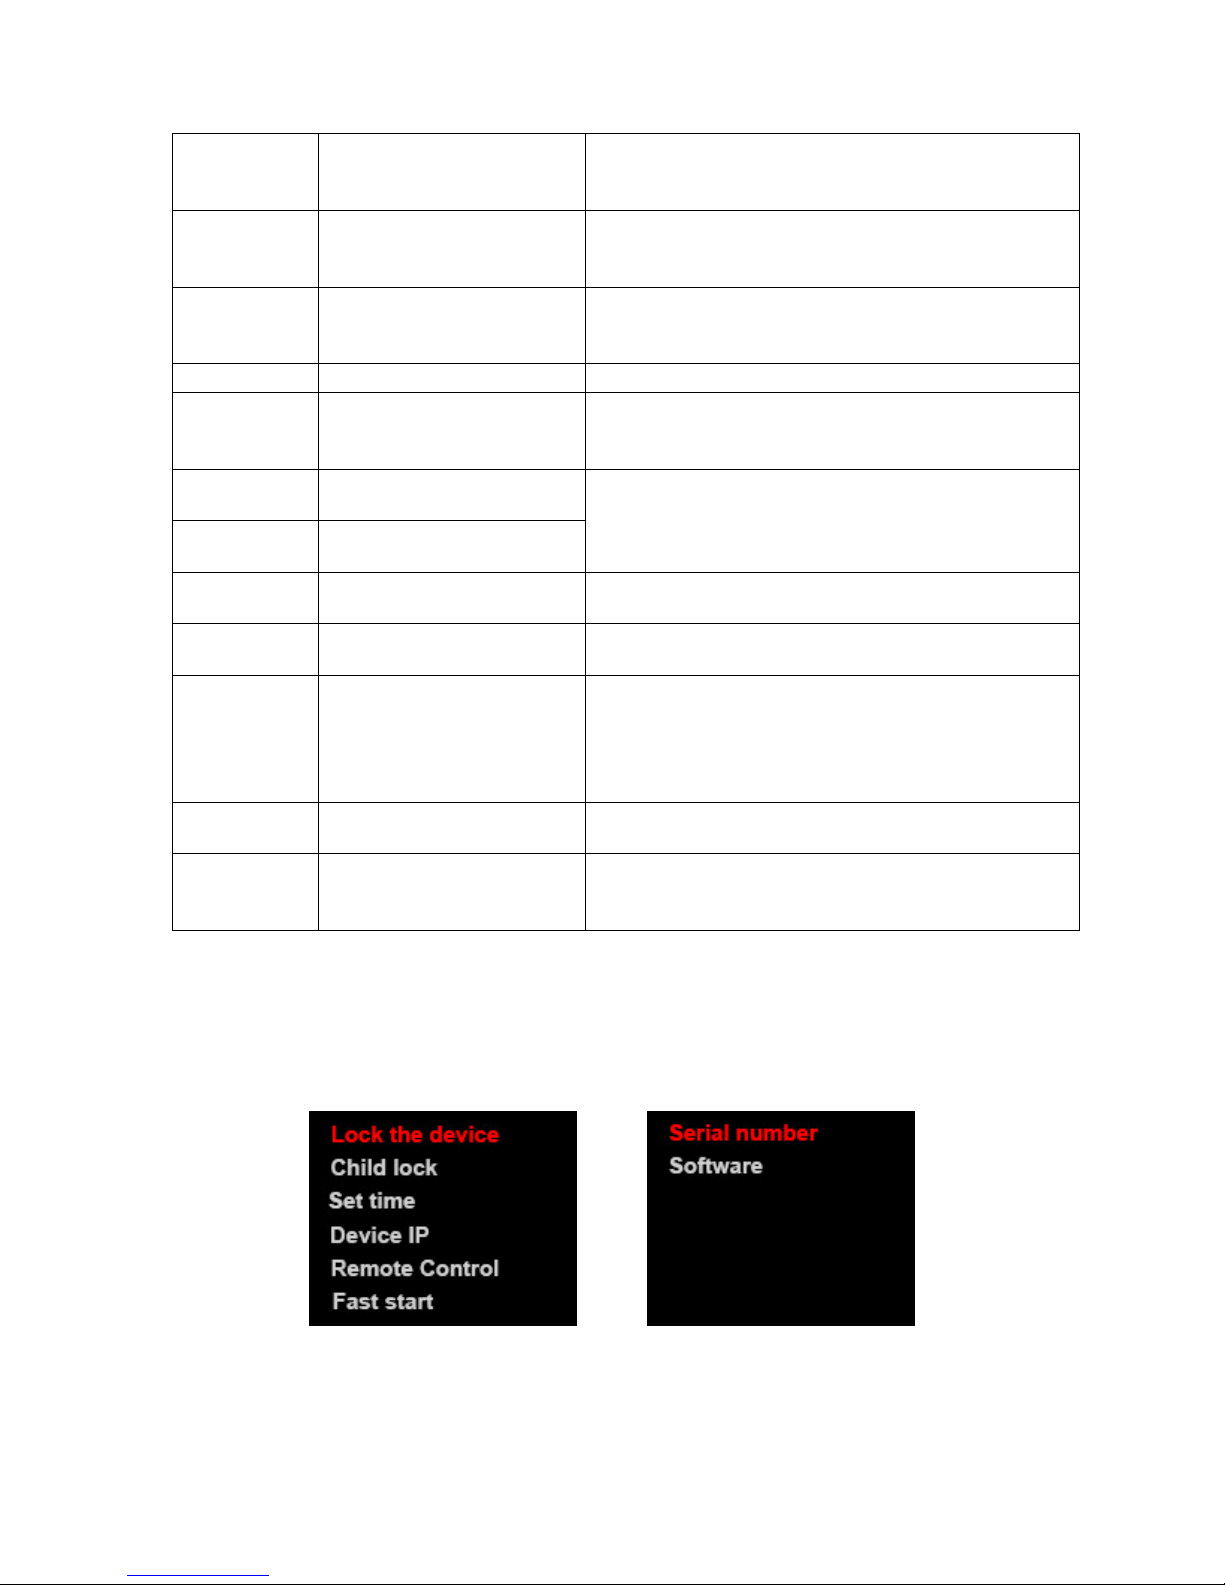
If READY or NO FUEL message is visible on the display, you may access Customer’s menu. To do this,
hold ‘+’ button for 8s and menu will appear on the display.
It is possible to operate the menu only by means of the buttons on the control panel. To move between
the categories use ‘+’ and to choose a particular category use ‘-‘. Leaving the menu unused for 5s will
result in coming back to the main display.
Page 11
Copyright Planika Sp. z o.o. www.planikafires.com 11
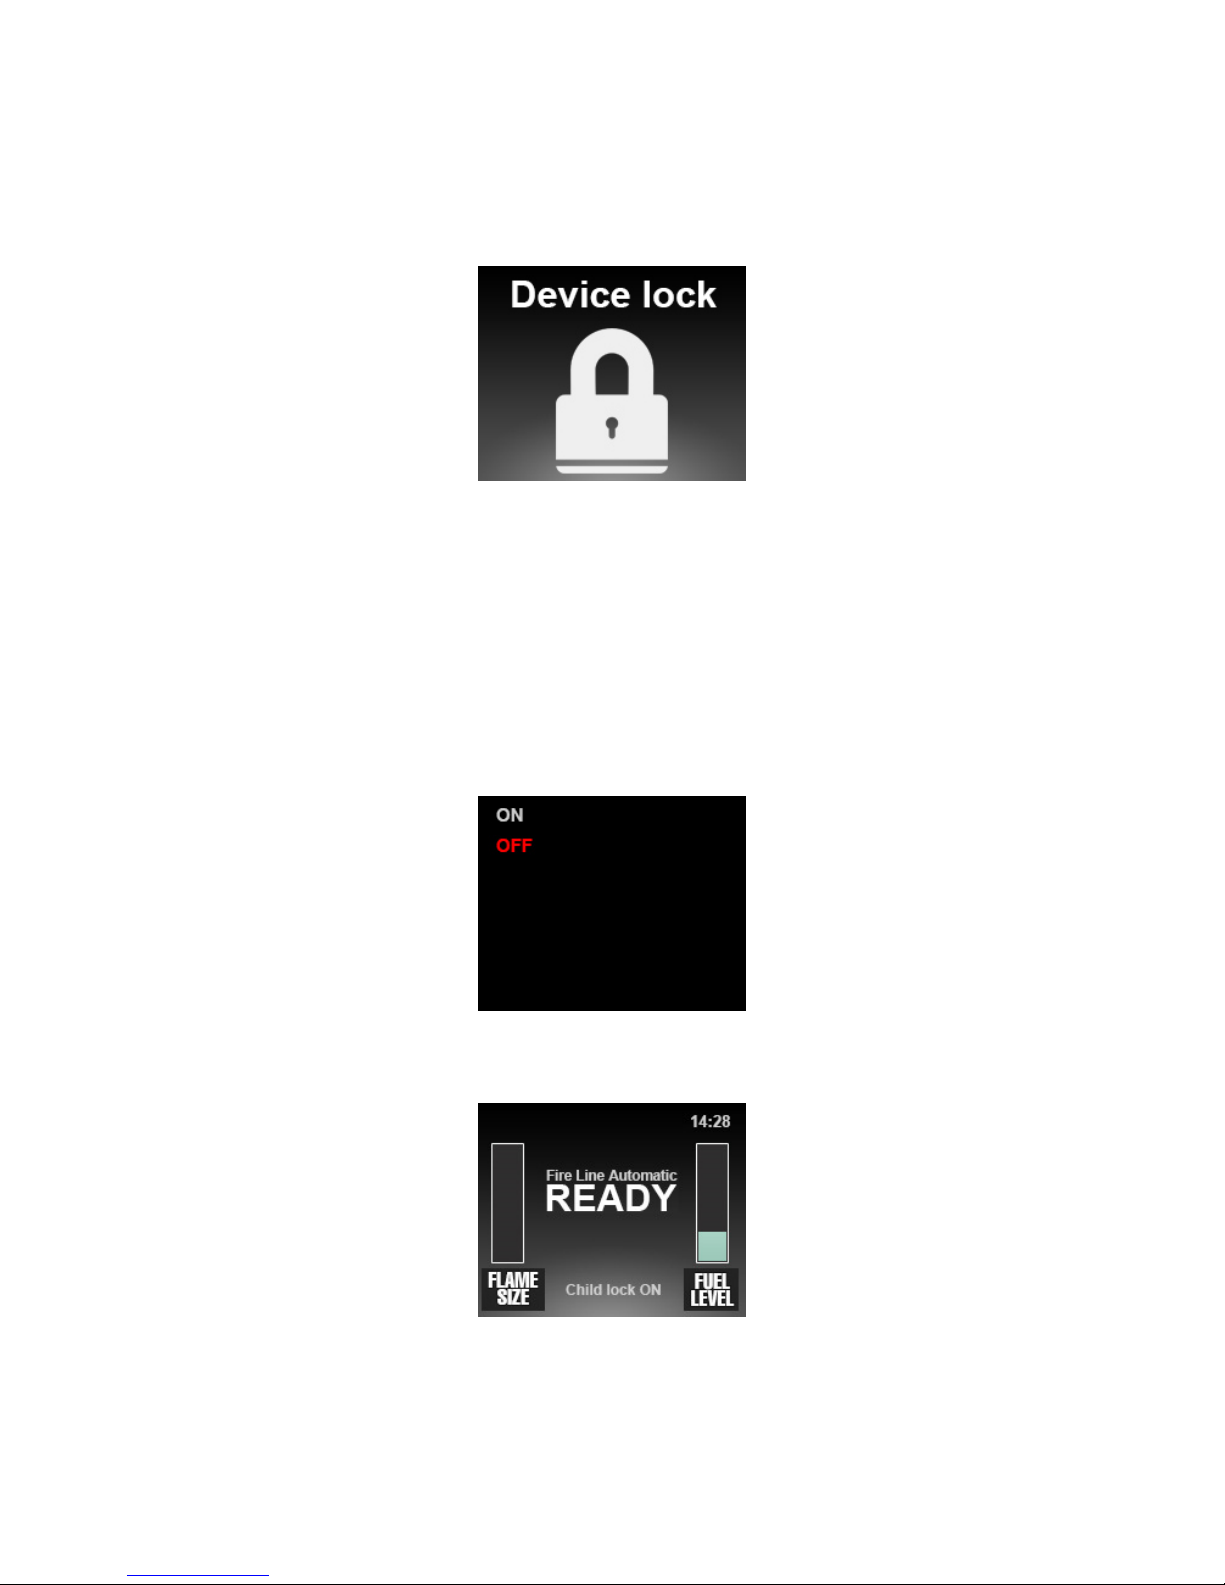
1) Lock the device
This function allows to lock the device in order to avoid being manipulated by unauthorized persons.
To turn this function on press ‘-‘ on the control panel. This screen appears:
The device cannot be turned on neither via remote control nor the configured device nor according
to the manual, without previous unlocking it. To unlock the device hold START/STOP button for 5s –
the message will disappear.
2) Child lock
When the function is turned on it forces the user to hold START/STOP button on the control panel or
remote control for 3s in order to start the device. If START/STOP button is only pressed quickly, the
device will not start.
To turn this function on press ‘-‘ on the control panel. This screen will appear:
Using ‘-‘ button confirm ON option flashing in red. On the main display the information that ‘Child
lock’ function is turned on will be visible.
To turn this function off, choose OFF option in the menu of ‘Child lock’ function.
3) Set time
Page 12
Copyright Planika Sp. z o.o. www.planikafires.com 12
It allows to set date and hour.
Go to the menu’s functions by means of ‘-‘ button. The hour starts to blink. Using ‘+’ button set the
appropriate hour and confirm with ‘-‘ button. Do the same to set minutes and date, using ‘+’ for
choosing the appropriate numbers and ‘-‘ for confirming them. When setting finished, the device will
automatically come back to the main display with already visible hour.
4) Device IP
It shows device IP that is essential in operating the device via the configured appliance. Additional
information can be found in the manual concerning Configuration of the module with Wi-Fi and
Smart Home System.
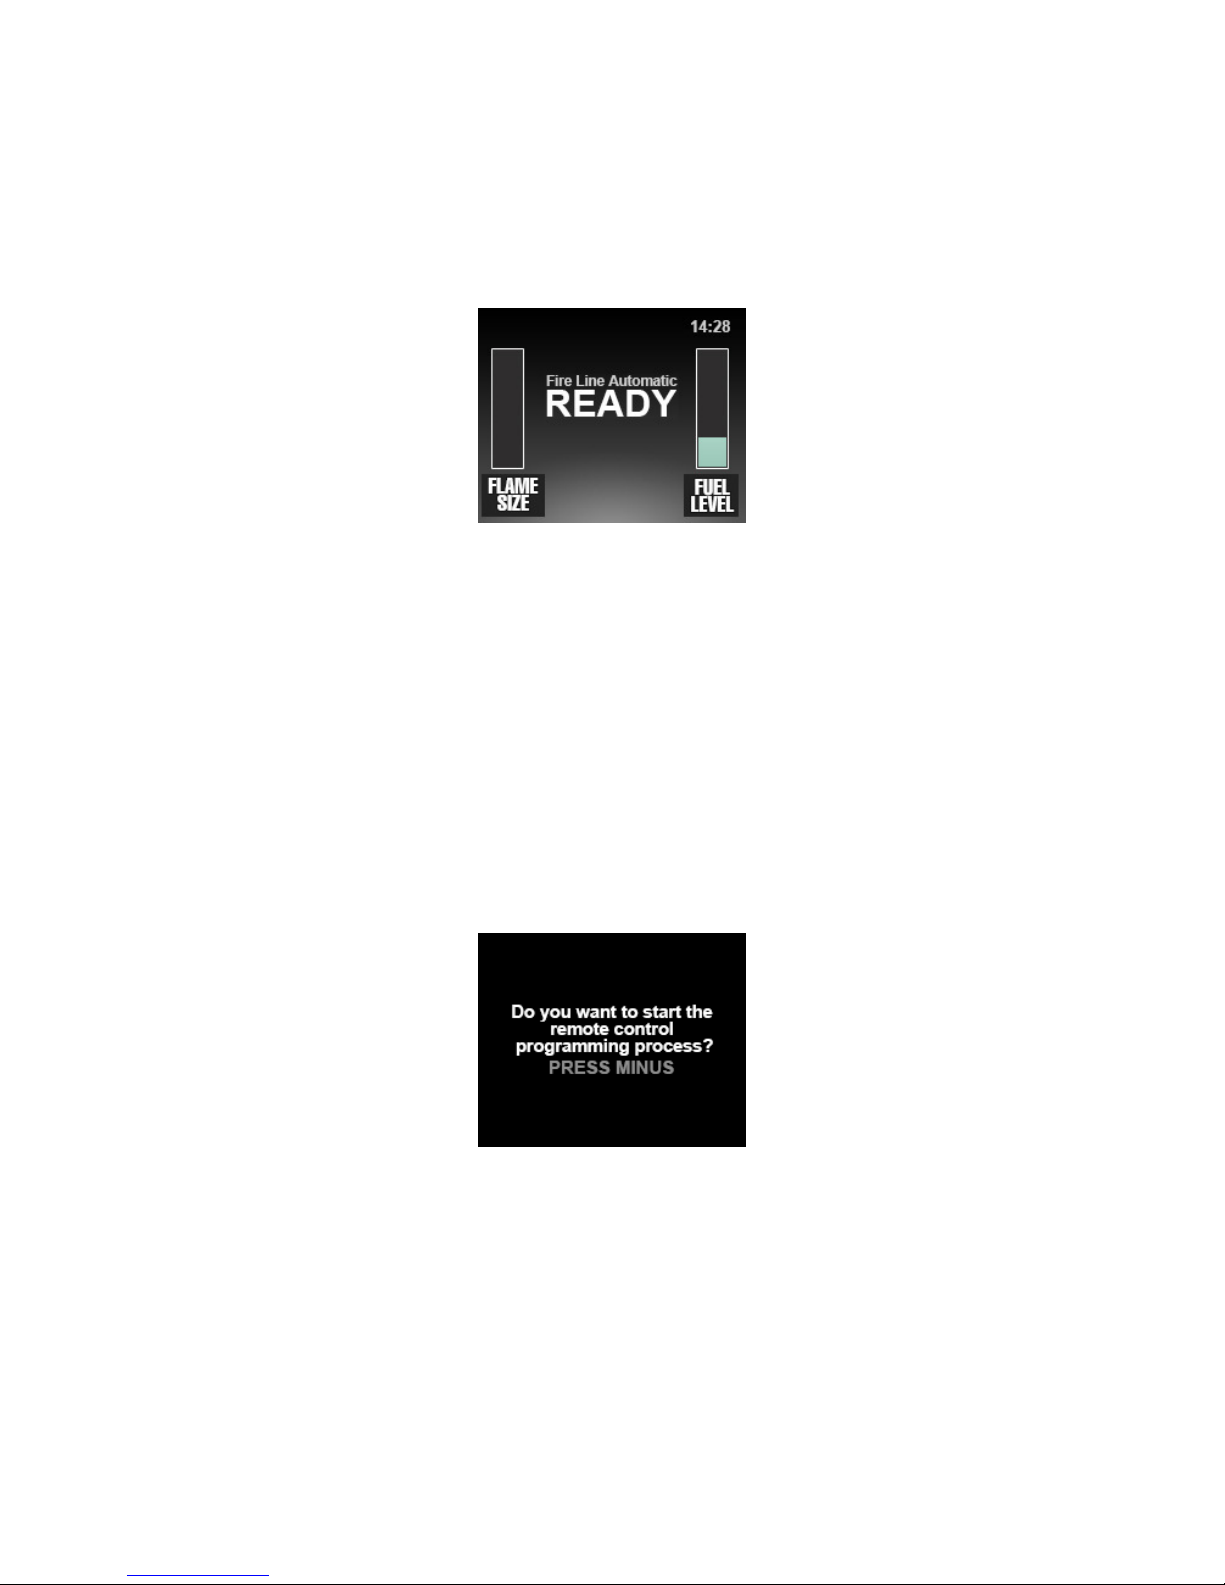
5) Remote Control
Remote control attached to the device is already programmed. This function allows to program the
remote control if there is such a need after some time or if one remote control is to control few
units.
To program the remote control press ‘+’, choose ‘Remote Control’ and confirm with ‘-‘ button. This
screen will appear:
Press ‘-‘ button to confirm. Then press in sequence (hold until next message appears) START, STOP,
PLUS, MINUS. After the remote control has been programmed the messages disappear and main
display appears. Remote control is programmed.
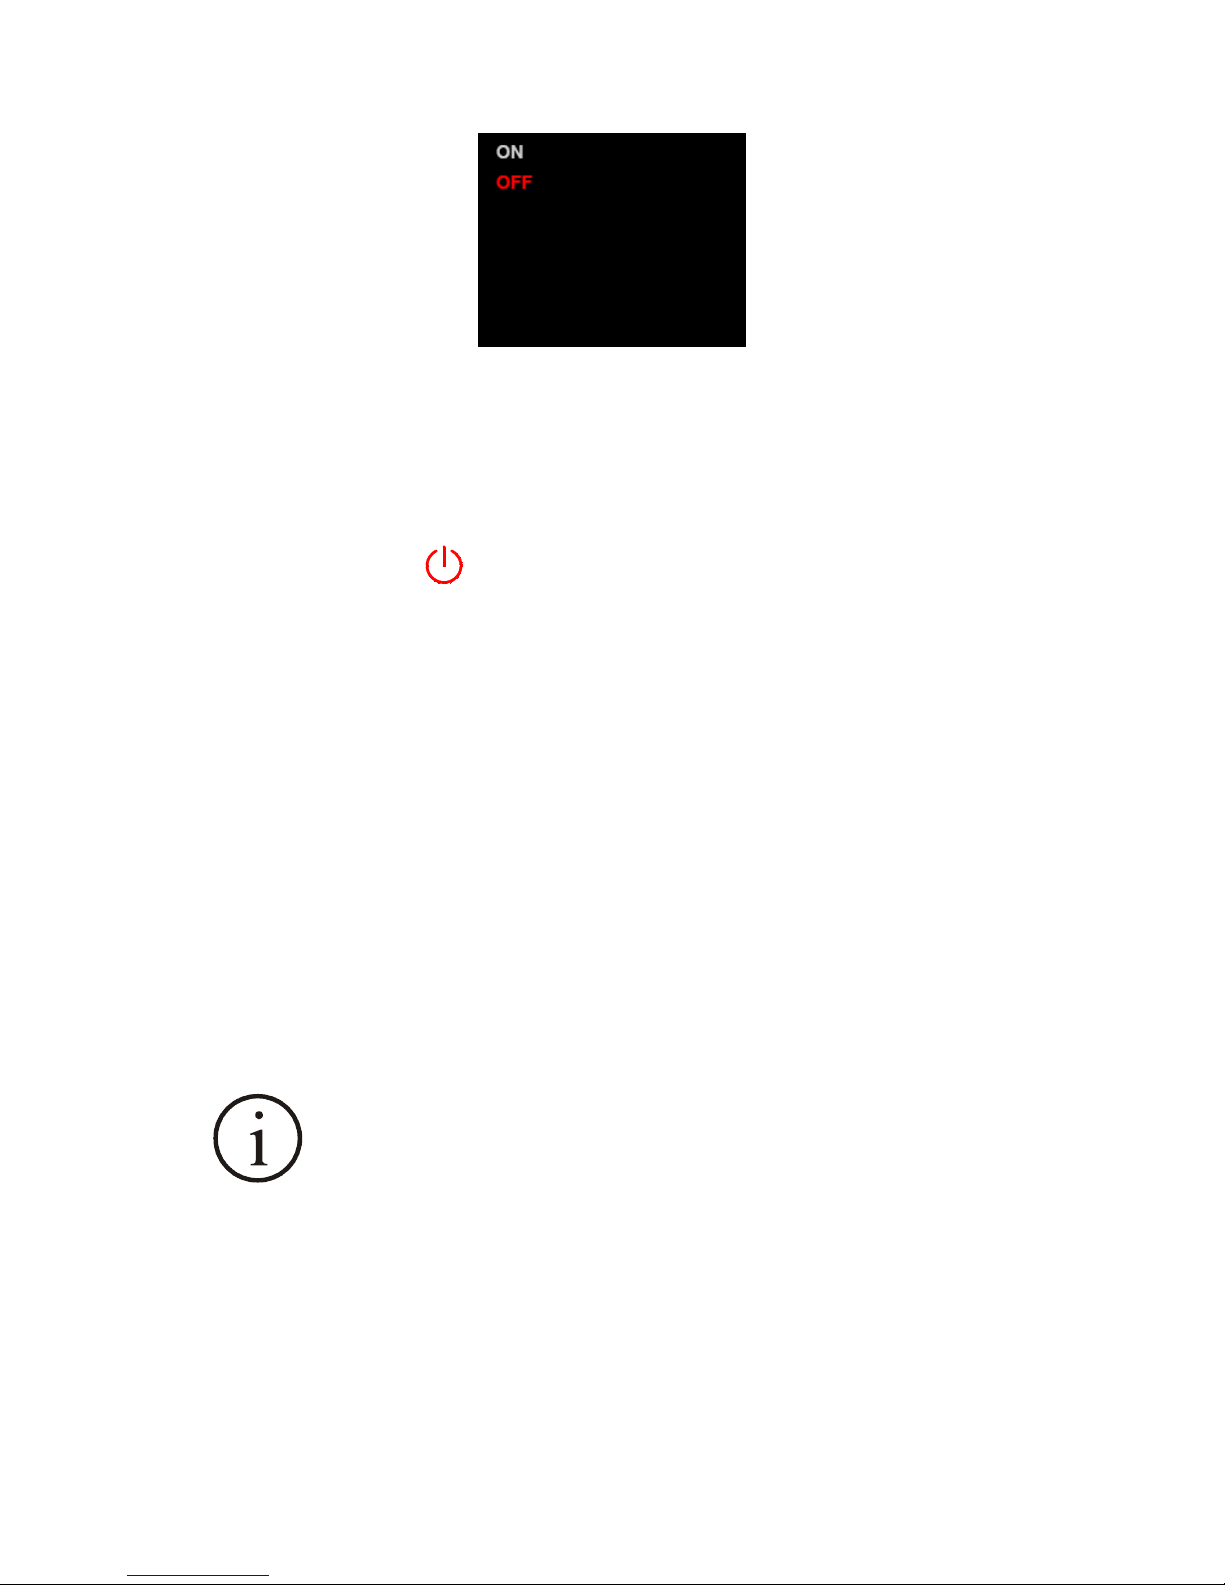
6) Fast start
When ‘Fast start’ function is turned on, time of waiting for the flame to appear is much shorter. Fire
Line Automatic is automatically programmed with ‘Fast start’ function turned on. To turn it off press
‘-‘ button on the control panel. The screen will appear:
Page 13
Copyright Planika Sp. z o.o. www.planikafires.com 13
Using ‘+‘ button choose OFF option and confirm with ‘-‘ button. The device automatically returns to
main display and ‘Fast start’ function will be turned off.
To restart this function choose ON option in menu of ‘Fast start’ function.
Warning! When ‘Fast start’ function is turned on the device uses the energy in the amount of 100W.
Turning off the device with button prevents from using the energy but does not turn off ‘Fast
start’ function.
7) Serial number
It displays serial number of the device.
8) Software
It displays the version of an installed program.
IV. Cleaning and maintenance
Switch off the device before cleaning. Wait until the temperature of the device gets close to the
ambient temperature. To maintain appropriate technical condition of the device, please observe the
following rules:
•
To clean stainless steel surfaces, use only gentle cleaners which do not cause
cracks or scratches, or use other means specifically designed for cleaning stainless
steel.
When purchasing and dozing cleaners, be sure to protect the environment and comply with the
recommendations of manufacturers.
It is forbidden to clean the inside of the device by unauthorized persons.
The manufacturer does not foresee a situation where it will be necessary to clean elements not
normally available.
The manufacturer is not liable for damage resulting from:
Page 14

Copyright Planika Sp. z o.o. www.planikafires.com 14
improper operation (disobeying rules included in User’s Manual)
self-dismantling
attempts to modify
using fluids other than the recommended FANOLA ®.
V. Maintenance materials
To maintain Fire Line Automatic correctly use recommended FANOLA® fuel that has got a special
composition which allows the device to function properly. Using different liquids than recommended
FANOLA® may lead to malfunction, damage of the device or even may be the reason of fire and health
risk. The manufacturer does not take the responsibility for damage resulting from using different fuel
than recommended FANOLA®.
VI. Disposal and recycling
The product is equipped with parts made of aluminium, steel, plastics and electronics. If you need to
dispose of the device, follow the terms of disposal and recycling in force in your country.
Moreover, dispose of the empty Fanola containers to plastic waste baskets.
Most of the materials used in Planika appliances can be recycled.
-------------------------------------------------------------------------------------------------------------------------------------
If you have technical problems or other questions that require clarification, please contact your dealer.
FANOLA® fuel recommended for this product has received following certification:
 Loading...