

Page 1

10/100/1000 Mbps Gigabit Ethernet
PCI adapter
GN-1200TW
PLANEX COMMUNICATIONS INC
Page 2

2
CONTENTS
1. INTRODUCTION .............................................................................................................................. 3
2. FEATURES & SPECIFICATIONS .................................................................................................. 4
(1) F
EATURES
.......................................................................................................................................4
(2) P
ACKAGE CONTENTS
.......................................................................................................................4
(3) T
ECHNICAL SPECIFICATION
.............................................................................................................5
3. INSTALLATION................................................................................................................................ 6
(1) H
ARDWARE INSTALLATION
..............................................................................................................6
(2) D
RIVER INSTALLATION
....................................................................................................................6
Windows 98SE Driver Installation .................................................................................................6
Windows ME Driver Installation ..................................................................................................10
Windows 2000 Driver Installation ................................................................................................13
Windows XP Driver Installation...................................................................................................18
4. TROUBLESHOOTING ................................................................................................................... 21
TRADE MARKS .................................................................................................................................. 22
Page 3

3
1. Introduction
This guide is to provide the installation and usage of this adapter for network
installers and users. The Gigabit network adapter complies to 64-bit or 32-bit PCI
specification and supports half/full duplex feature which can double network speed.
This adapter supports 1000Mbps, 100Mbps and 10Mbps network speed, 1000BaseT
operates on all four pairs of category 5 UTP cable, 100BaseTX operates on two pairs
of category 5 UTP cable and 10BaseT operates on Category 3, 4 or 5 UTP cable.
With the Auto-Negotiation technology, network speed is auto detected. When you
connect the adapter to Gigabit Switch or another Gigabit NIC, the speed will be
doubled to 2000Mbps (1000Mbps Transmit and 1000Mbps Receive). If you connect
the adapter to 100BaseTX hub, the network speed is 100Mbps. Similarly, if the hub
is a switching hub which supports full duplex function, then the speed will be doubled
to 200Mbps.
This adapter supplies many drivers including Microsoft Windows 98SE, Me, 2000,
XP, Netware Server 4.x/5.x/6.x, Netware ODI for DOS, Linux, Unix and MAC OS
10.2.x/10.3. Whatever your requirements are ease of installation, superior
performance or responsive support backed up by unlimited technical support, this
adapter is the superior choice.
Page 4

4
2. Features & Specifications
(1) Features
Supports 64-bit or 32-bit, 66/33MHz PCI Local Bus Master Version 2.2/2.1.
Comply with the IEEE 802.3, IEEE 802.3u, IEEE 802.3ab, IEEE 802.3x.
Supports IEEE 802.3x full duplex flow control.
Supports IEEE 802.1Q VLAN tagging.
Supports Wake On LAN power management function.
Supports Jumbo Frame.
Plug and Play installation, auto-setup IRQ and I/O address.
Auto-Negotiation, half/full duplex.
(2) Package Contents
GN-1200TW
CD-ROM (User’s Manual & Driver)
Warranty Card
Low Profile Bracket
Page 5
5
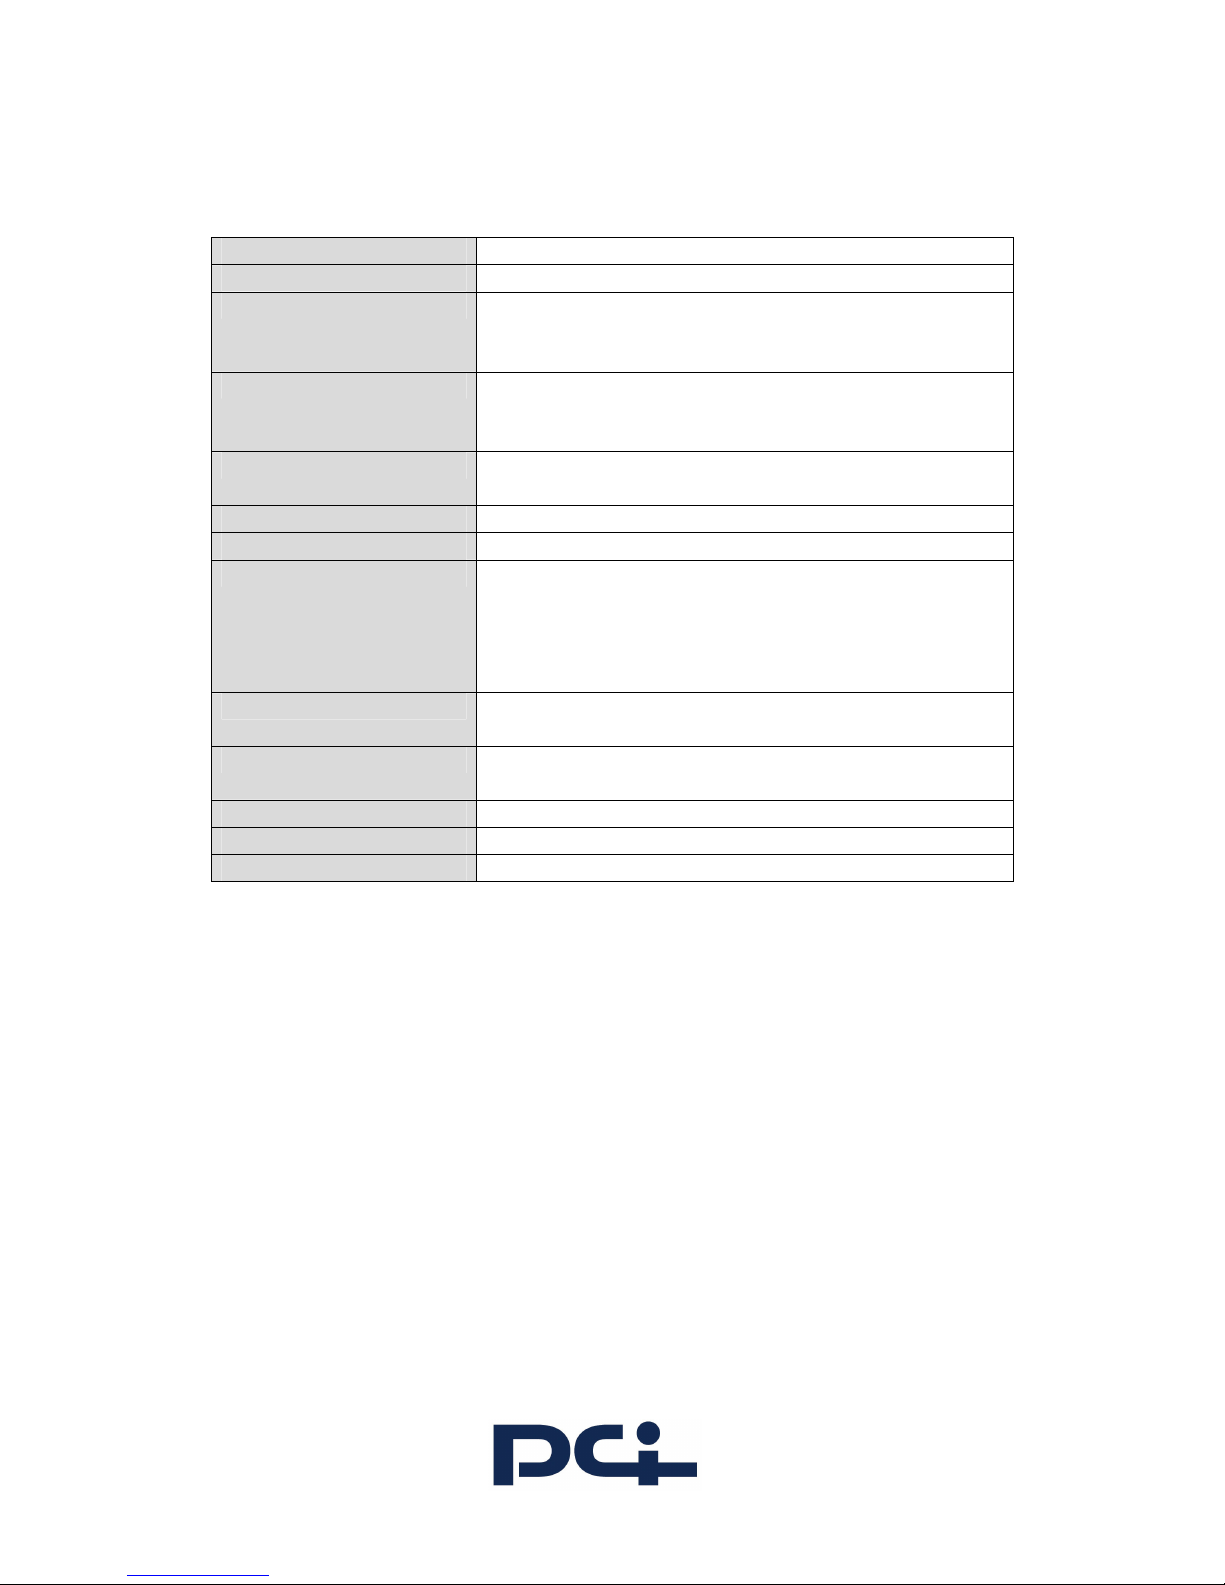
(3) Technical Specification
Topology Star
Connector RJ-45
Standard IEEE 802.3 10BaseT
IEEE 802.3u 100BaseTX
IEEE 802.3ab 1000BaseT
Transmission 10Mbps/20Mbps
100Mbps/200Mbps
1000Mbps/2000Mbps
Hardware Required IBM compatible PC with available PCI slot
(PCI 2.2/2.1), 64-/32-bits, 66/33MHz
IRQ Line Assigned by system
I/O Address Assigned by system
Drivers Windows 98SE/Me/2000/XP
Netware Server 4.x/5.x/6.x
Netware ODI voor DOS
Linux, Unix
MAC OS 10.2.x/10.3
LEDs Speed, Link/Activity (for 64-bit Model)
Link/Activity (for 32-bit Model)
Dimension 163 x 45 mm (for 64-bit Model)
120 x 40 mm (for 32-bit Model)
Temperature 32 ~ 131° F ( 0 ~ 55° C)
Humidity 10% to 95%(Non-condensing)
Weight 47g
Page 6
6
3. Installation
(1) Hardware Installation
1. Turn off the computer and remove its cover.
2. Insert the adapter into a PCI slot.
3. Secure this adapter to the rear of the computer chassis and put back the computer
cover.
4. Connect the adapter to the network using twisted-pair cable.
(2) Driver Installation
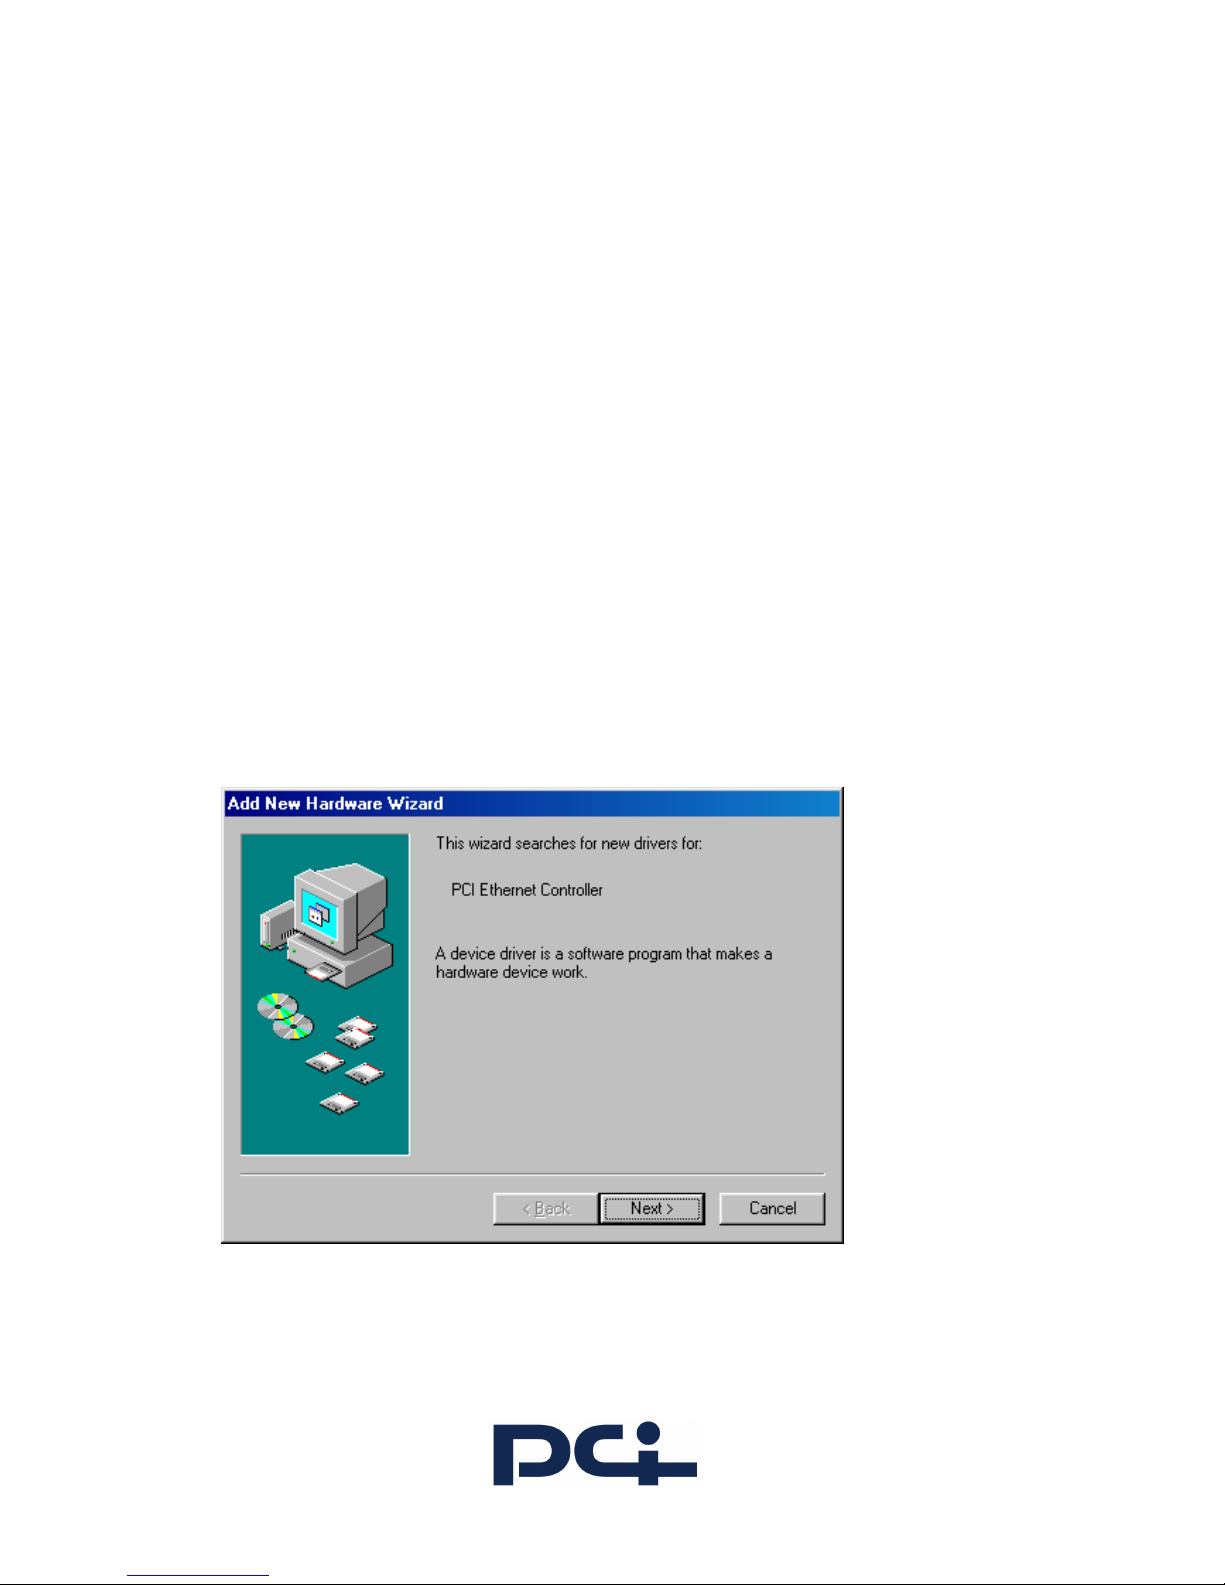
Windows 98SE Driver Installation
1. In Add New Hardware Wizard, click Next.
Page 7
7
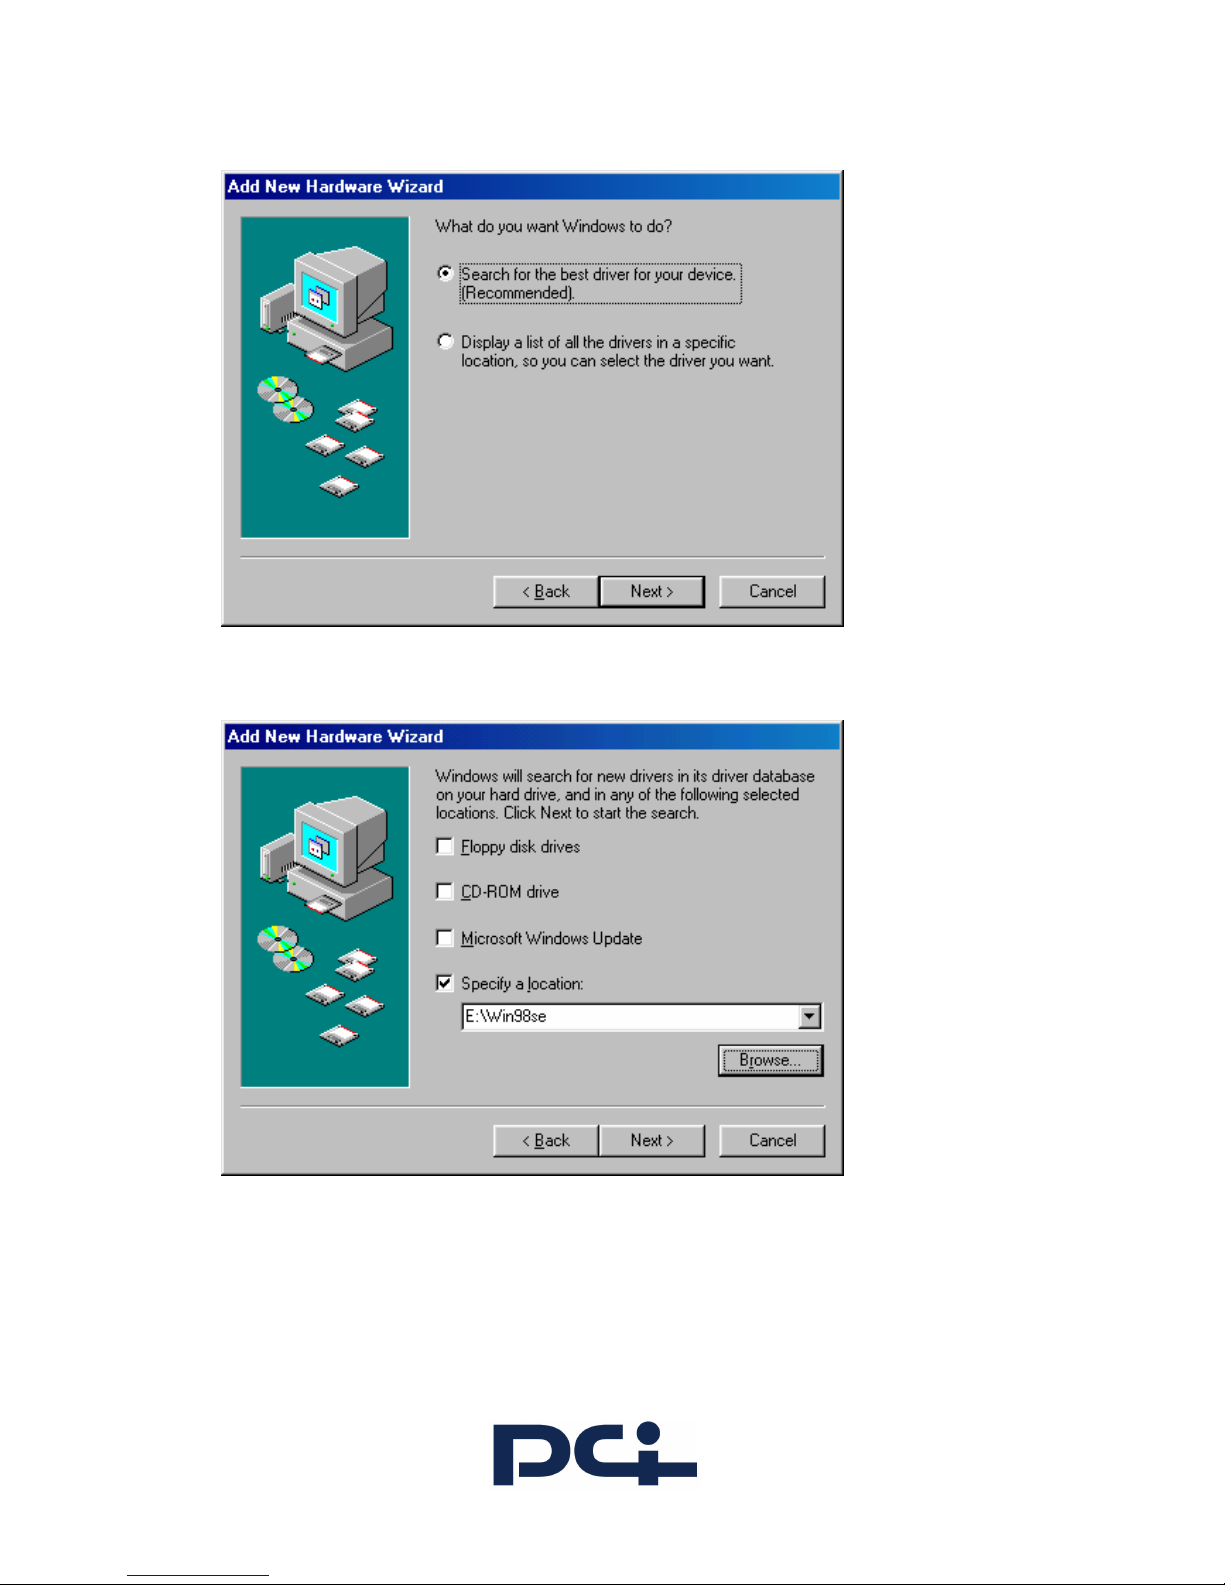
2. Select Search for the best driver for your device (Recommended). Click Next.
3. Insert the device driver CD-ROM into the CD-ROM drive. Select CD-ROM and Specify a location:
and click Browse to provide the appropriate path (e.g. E:\Win98).Click Next.
Page 8
8
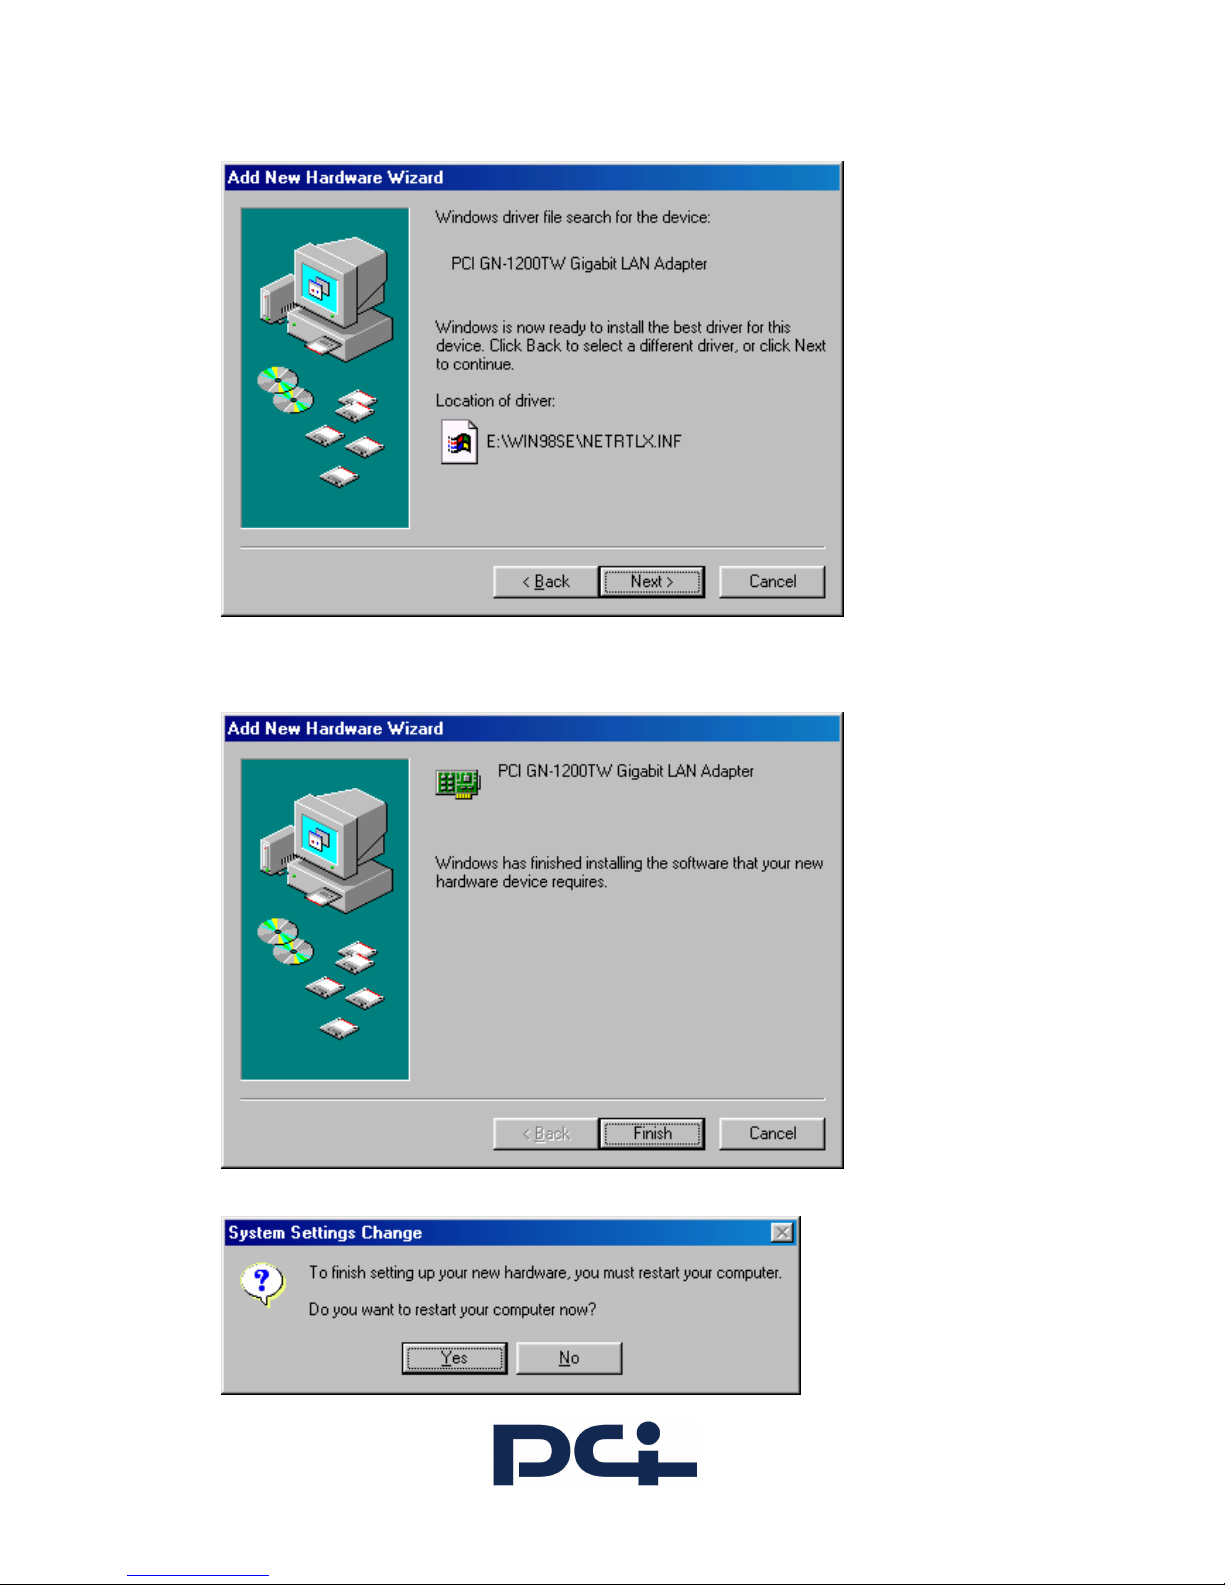
4. Click Next, Windows will copy all the necessary files to your system
5. Insert Windows 98SE CD-ROM, and then click OK.
6. Click Finish to complete the installation.
7. When Windows prompts you to restart your computer, click Yes.
Page 9

9
Verifying Successful Installation
To verify successful NIC installation:
1. Right-click My Computer and select Properties.
2. Click the Device Manager tab.
The Device Manager window appears.
3. Scroll down the list of hardware devices to Network Adapters. Click the plus sign (+) to the
left of the icon to d isplay the list of NICs currently configured.
4. Make sure the PCI GN-1200TW is installed and that there is not a red X or a yellow
exclamation point (!) next to the device.
Uninstalling the Driver
Windows 98SE automatically detects the installation of new hardware. However, Windows 98SE does
not automatically detect removal of driver software. You must first uninstall the NIC driver software
before physically removing the NIC.
To remove the NIC driver and associated software:
1. Start Windows 98SE and log in.
2. Right-click My Computer, and then select Properties.
3. Click the Device Manager tab.
The Device Manager window appears.
4. Scroll down the list of hardware devices to Network Adapters. Click the plus sign (+) to the
left of the icon to d isplay the list of NICs currently configured.
5. Click the NIC you want to uninstall (PCI GN-1200TW), and then click Remove.
6. Click OK to confirm th e removal of the NIC.
Windows prompts for a restart.
7. Turn off the power to the PC.
The driver and associated software are removed from the system. You can now physically
remove the NIC.
Page 10
10
Windows ME Driver Installation
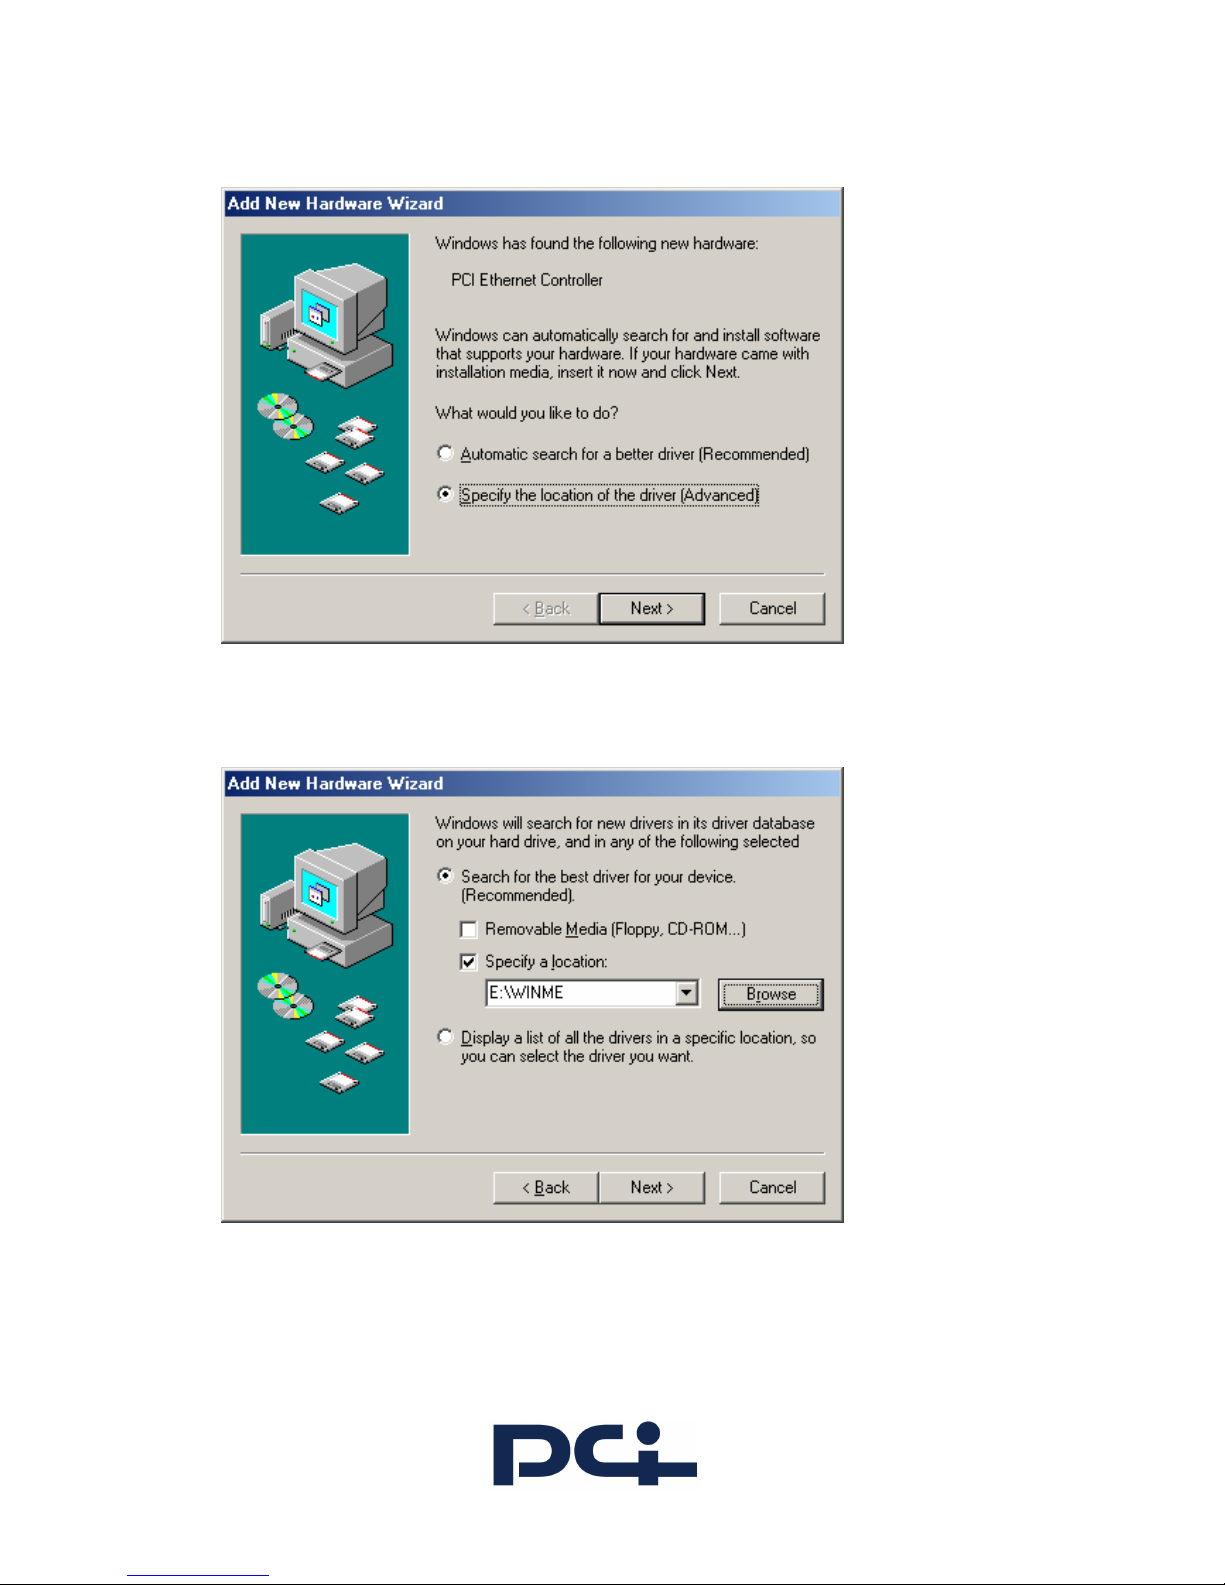
1. Select Specify the location of the driver (Advanced), click Next.
2. Insert the device driver CD-ROM into the CD-ROM drive. Select Search for the best driver for
your device (Recommended) and click Browse to provide the appropriate path (e.g. E:\Winme).
Click Next.
Page 11
11
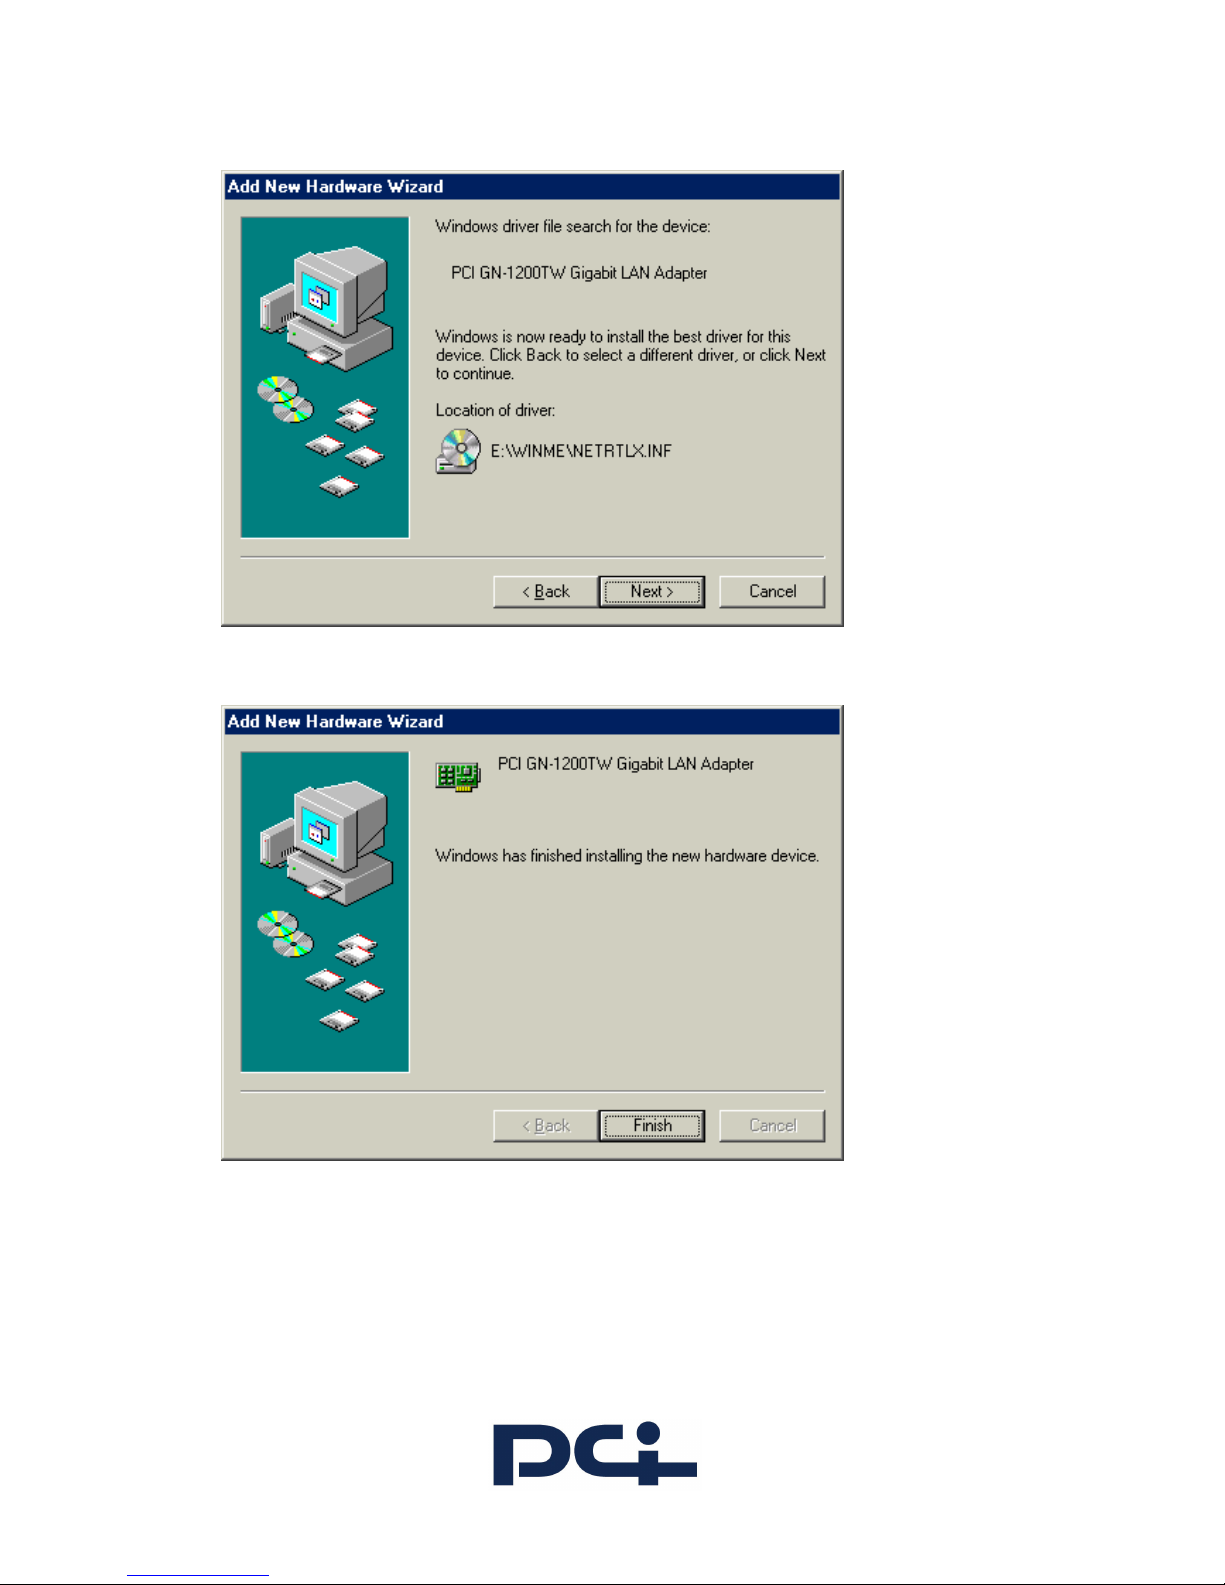
3. Click Next, Windows will copy all the necessary files to your system.
4. Click Finish to complete the installation.
Page 12
12
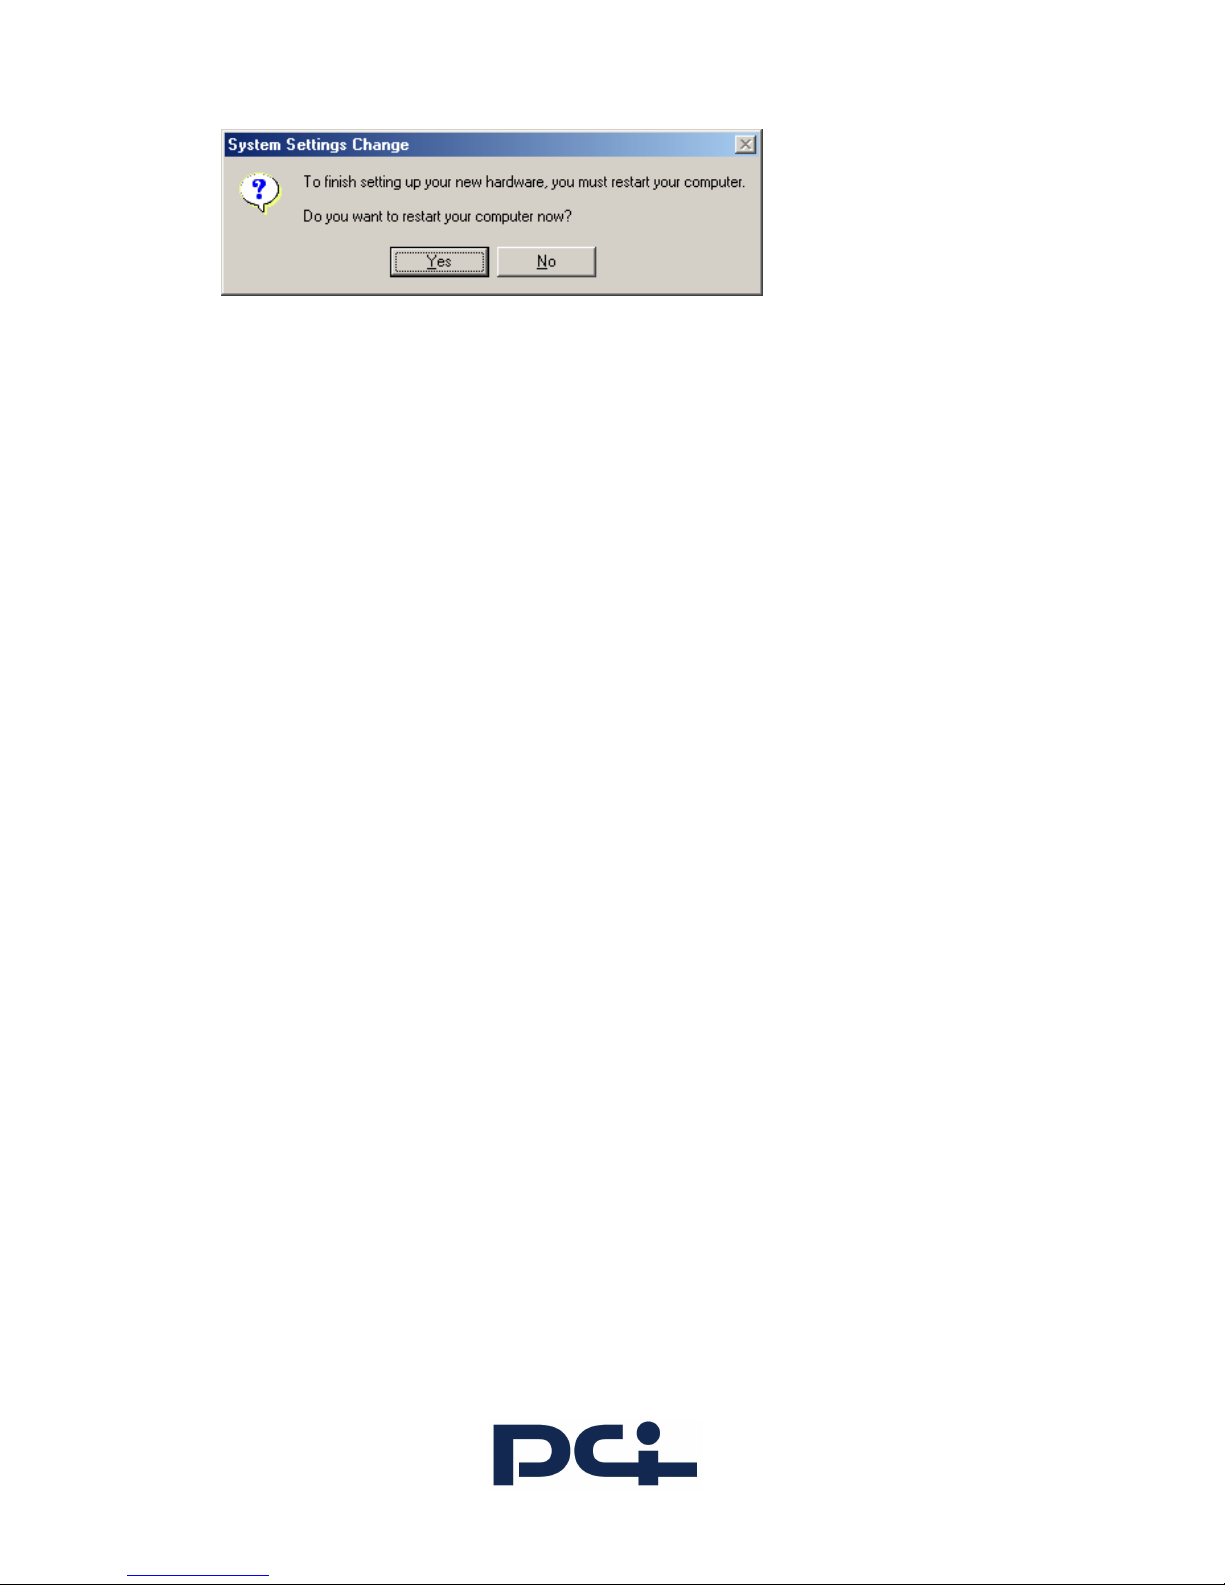
5. When Windows prompts you to restart your computer, click Yes.
Verifying Successfu Installation
To verify successful NIC installation:
1. Right-click My Computer and select Properties.
2. Click on th e Device Manager tab.
The Device Manager window appears.
3. Scroll down the list of hardware devices to Network Adapters. Click the plus sign (+) to the
left of the icon to d isplay the list of NICs currently configured.
4. Make sure that the PCI GN-1200TW is installed and that there is not a red X or a yellow
exclamation point (!) next to the device.
Uninstalling the Driver
Windows Me automatically detects the installation of new hardware. However, Windows Me does not
automatically detect removal of driver software. You must first uninstall the NIC driver software
before physically removing the NIC from the PC.
To remove the NIC driver and associated software:
1. Start Windows Me and log in.
2. Right-click My Computer and select Properties.
3. Click the Device Manager tab.
The Device Manager window appears.
4. Scroll down the list of hardware devices to Network Adapters. Click the plus sign (+) to the
left of the icon to d isplay the list of NICs currently configured.
5. Click the NIC you want to uninstall (PCI GN-1200TW), and then click Remove.
6. Click OK to confirm th e removal of the NIC.
Windows prompts to restart.
7. Turn off power to the PC.
The driver and associated software are removed from the system. You can now physically remove the
NIC.
Page 13
13
Windows 2000 Driver Installation
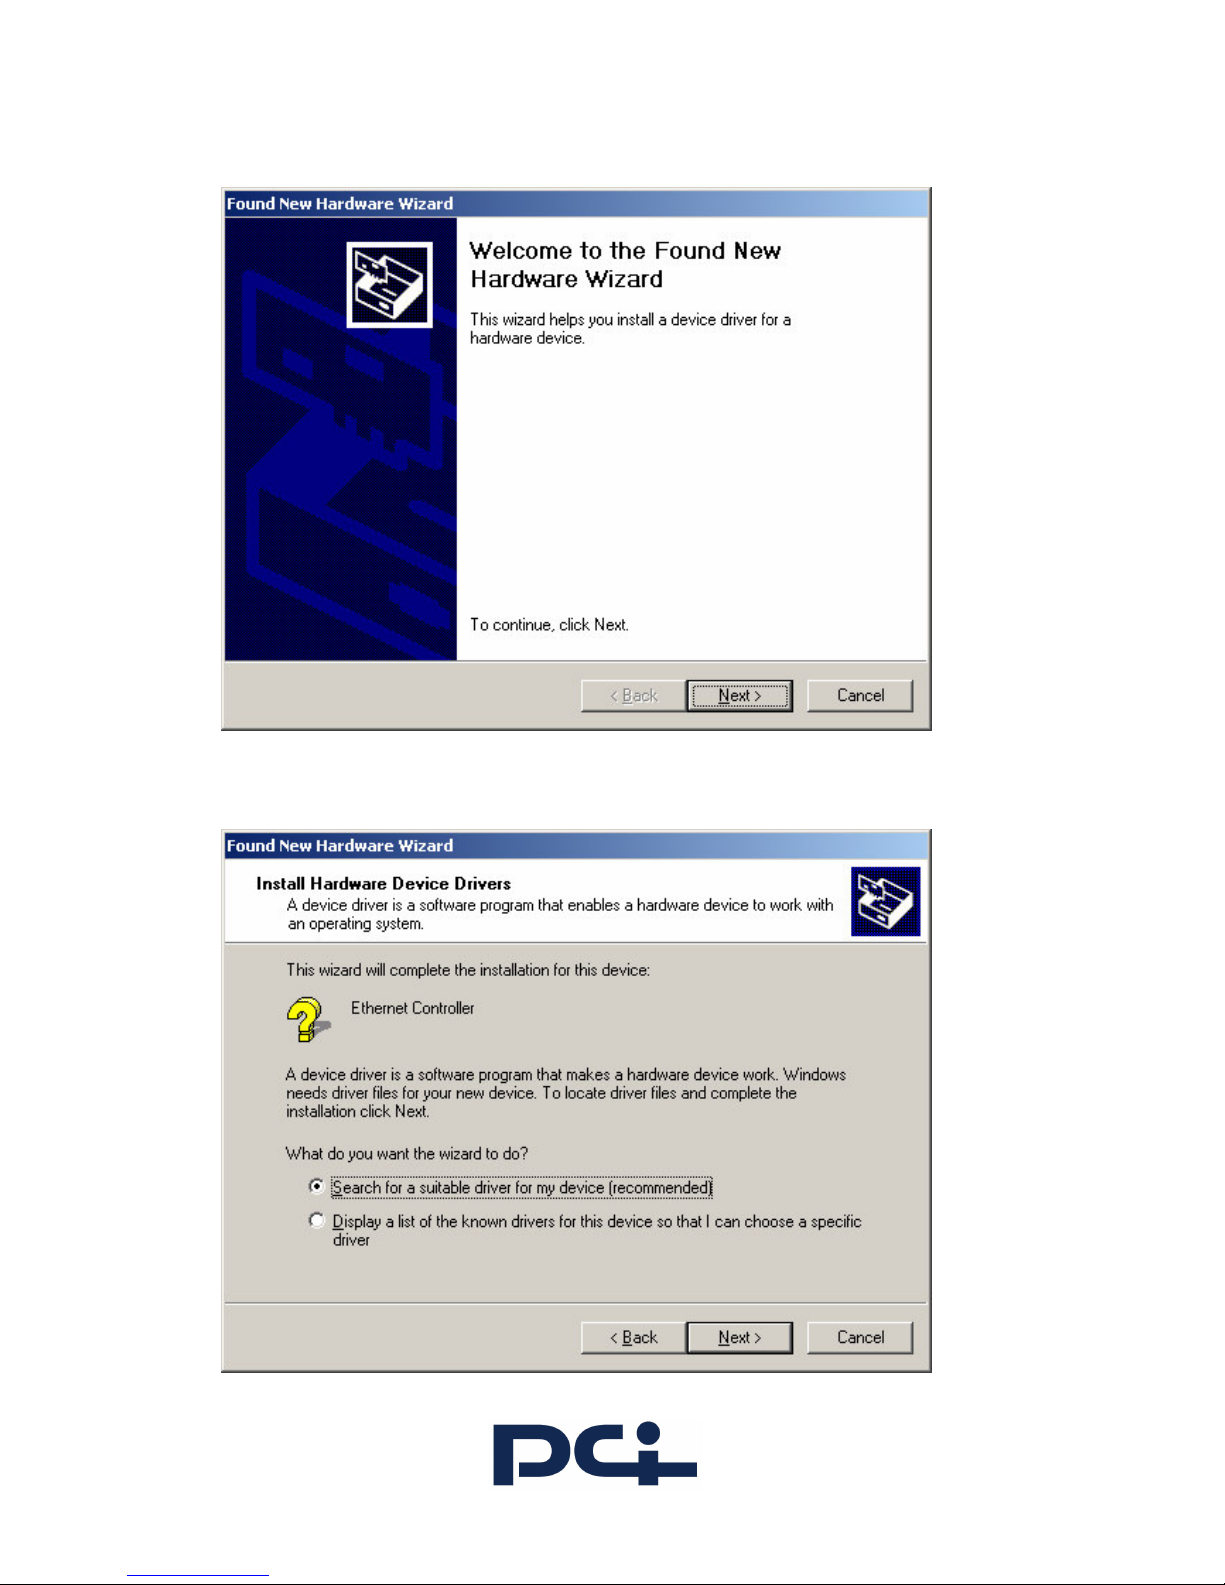
1. In Found New Hardware Wizard, click Next.
2. In Install Hardware Device Drivers, select Search for a suitable driver for my device Device
(recommended), click Next.
Page 14
14
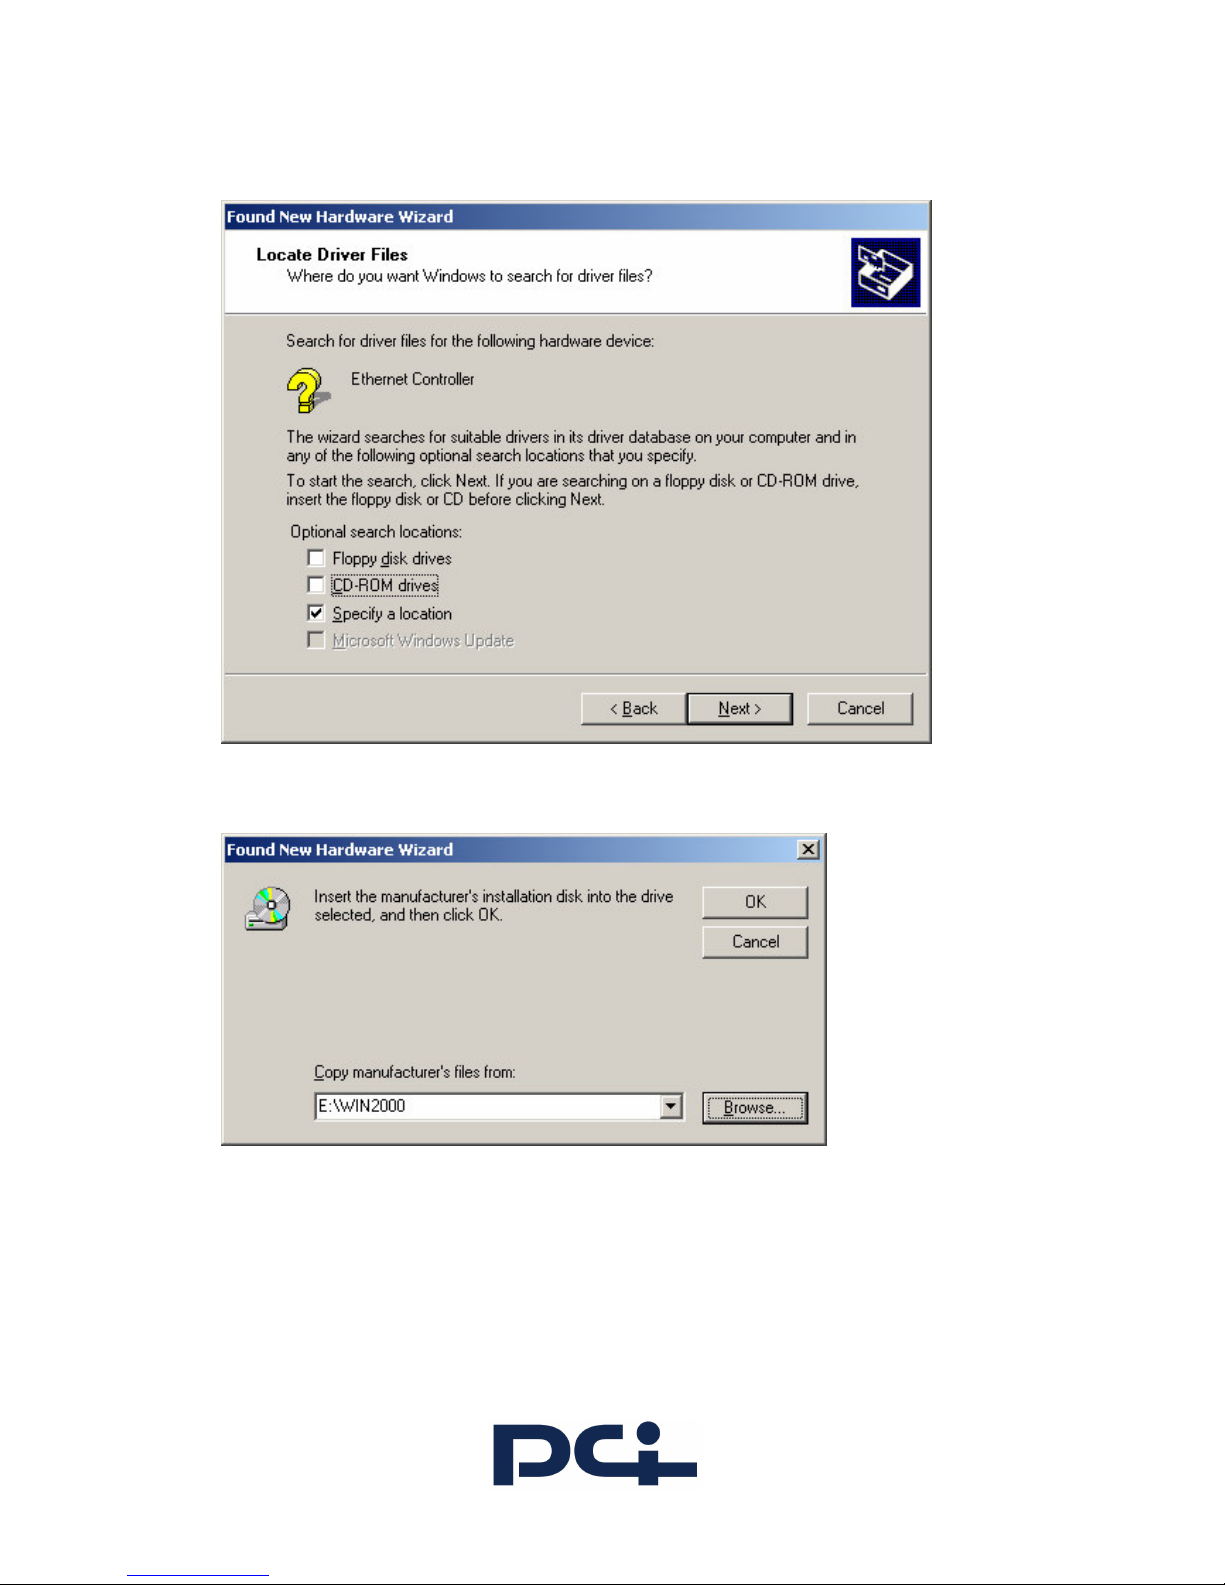
3. Insert the device driver CD-ROM into the CD-ROM drive. Select CD-ROM drivers and Specify a
location, click Next.
4. Click Browse to provide the appropriate path (e.g. E:\Win2000). Click OK.
Page 15
15
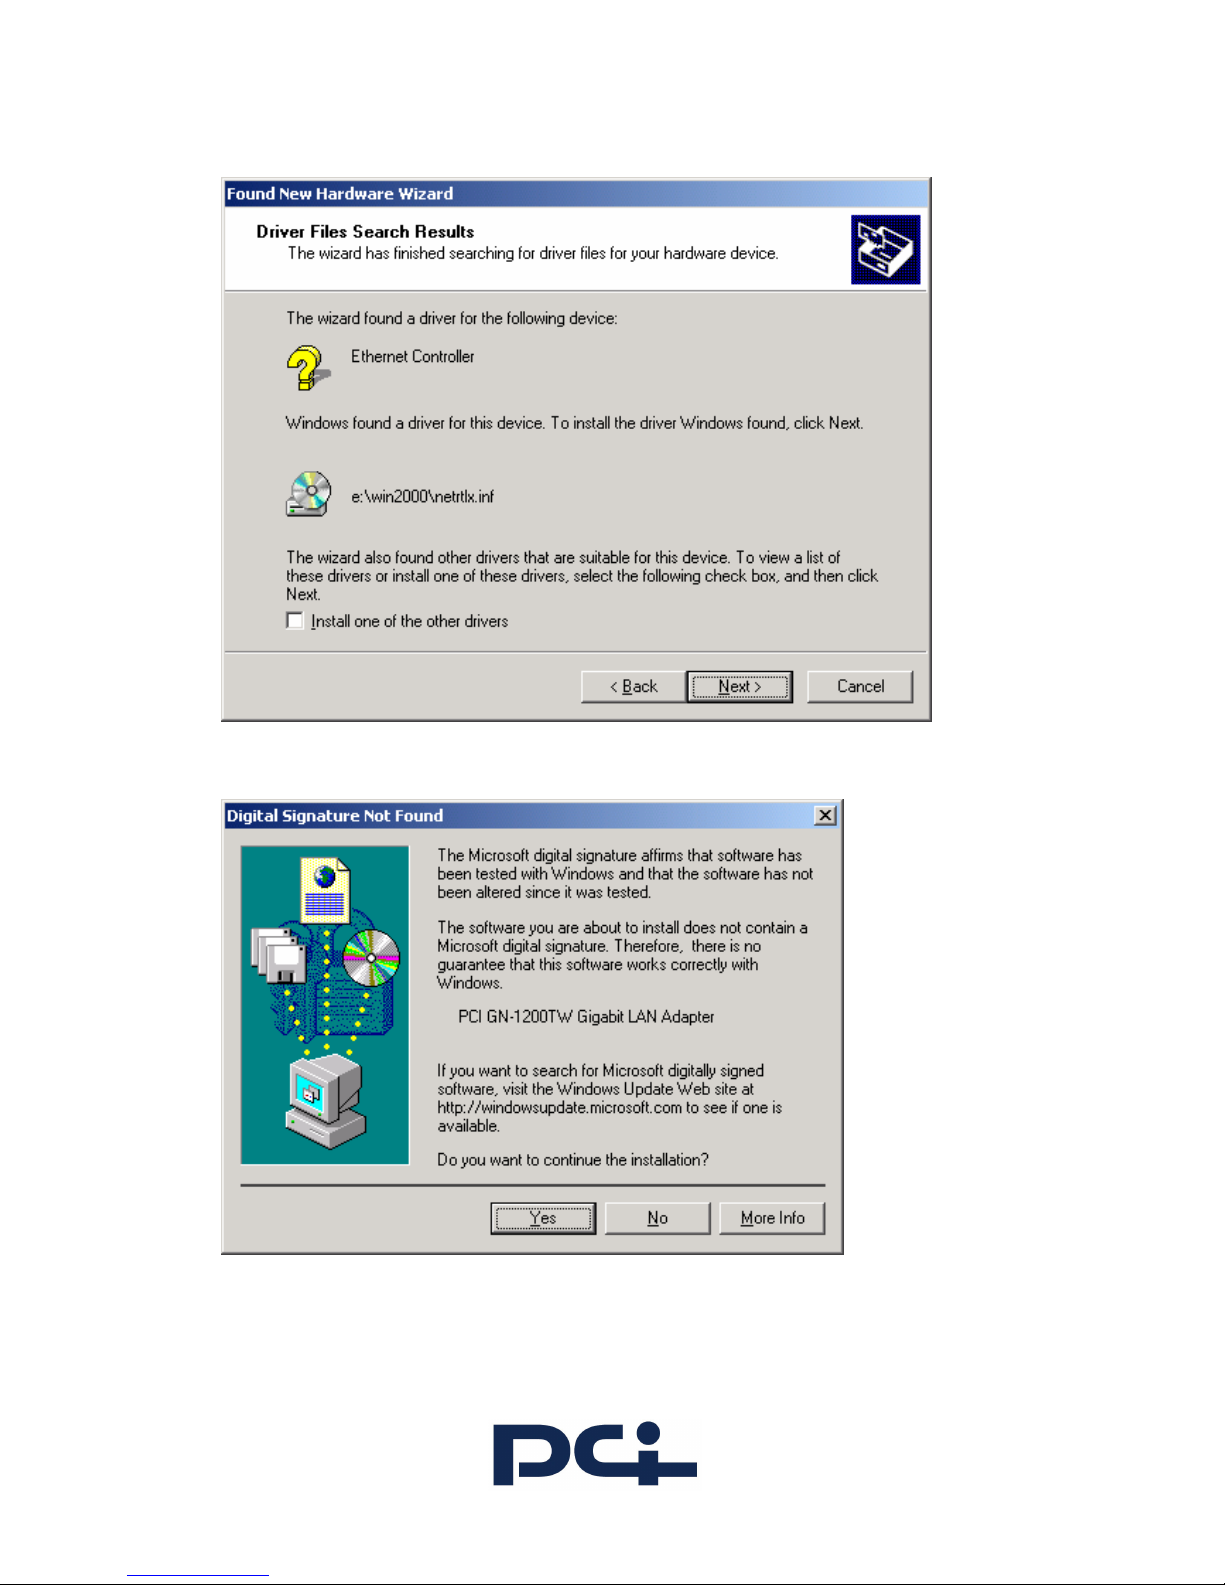
5. Click Next, Windows will copy all the necessary files to your system.
6. In Digital Signature Not Found window, click Yes to continue
Page 16
16
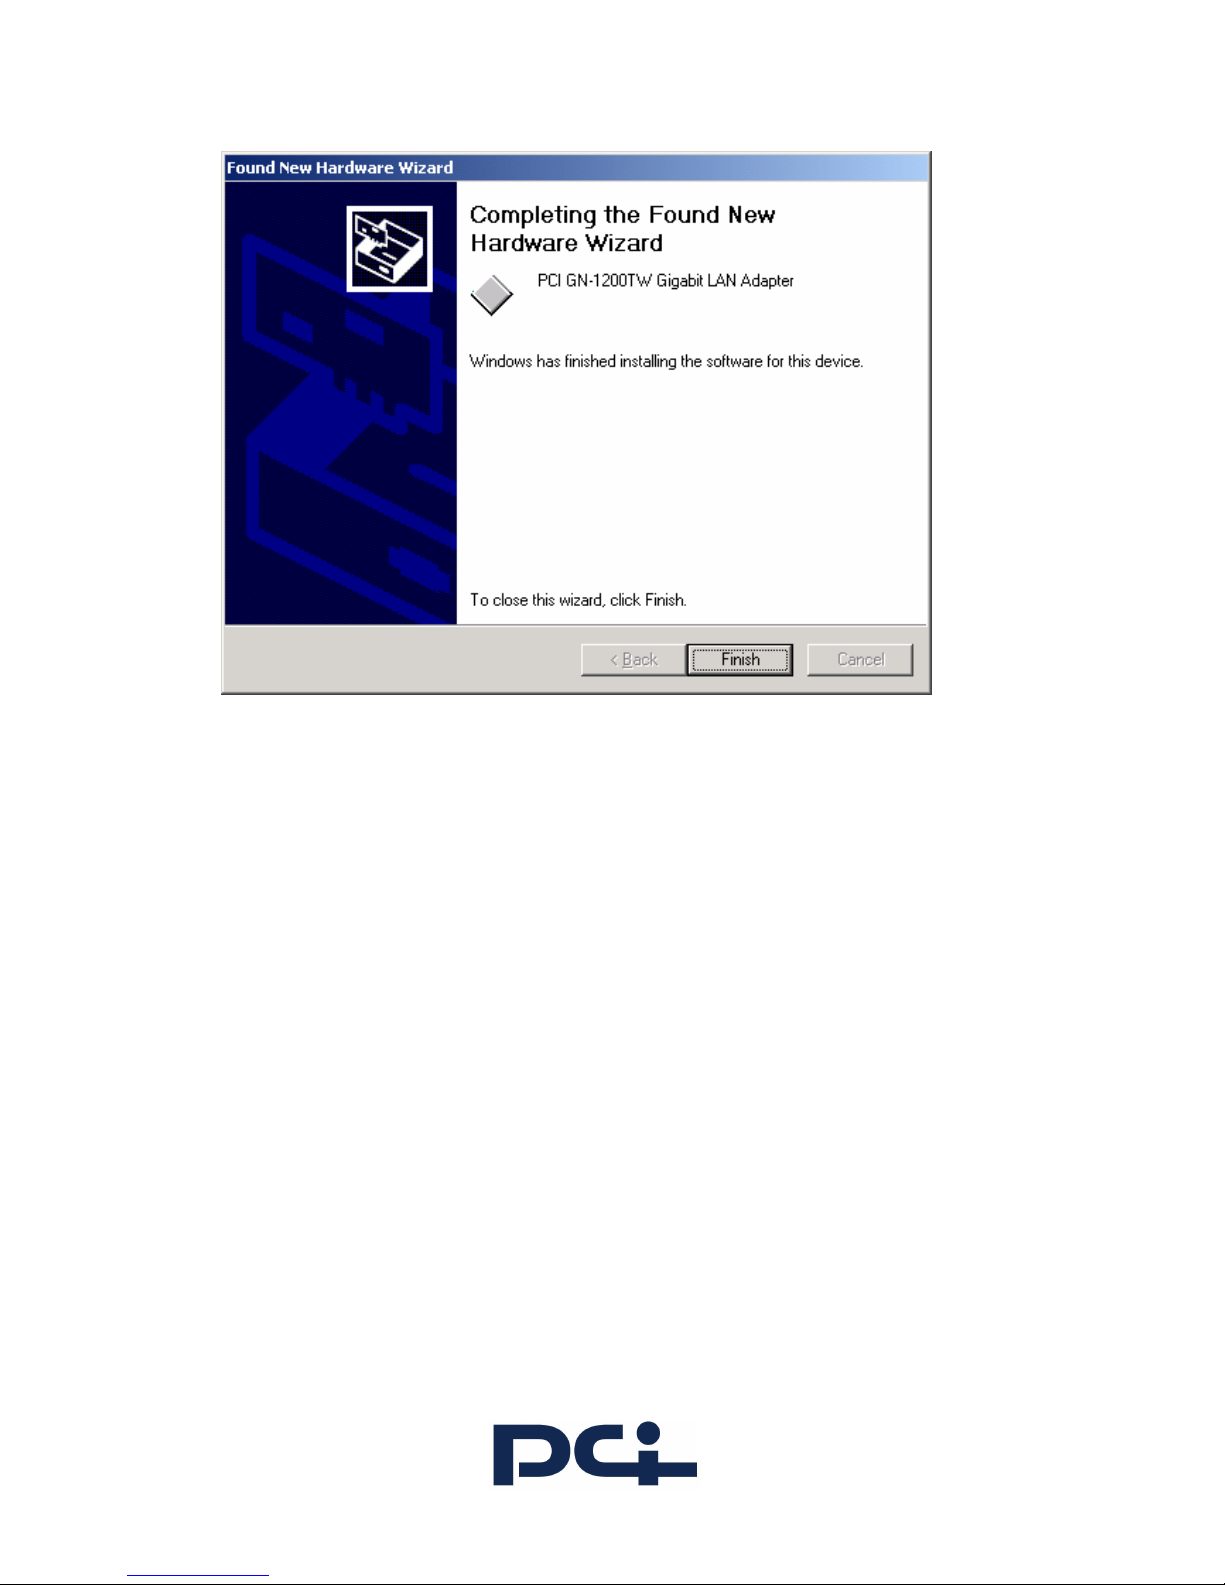
7. Click Finish to complete the installation.
Verifying Successful Installation
To verify successful NIC installation:
1. Right-click My Network Places and select Properties from the menu.
2. Check connections in the Network and Dial-up Connections window.
Uninstalling the Driver
Windows 2000 automatically detects the installation of new hardware. However, Windows 2000 does
not automatically detect removal of driver software. You must first uninstall the NIC driver software
before physically removing the NIC from the PC.
To remove the NIC driver and associated software:
1. Start Windows 2000 and log in.
2. Open the Windows Start menu and select Settings, and then Control Panel.
3. Double-click the Add/Remove Hardware Wizard.
The Add/Remove Hardware Wizard window appears.
4. Click Next.
The Choose a Hardware Task window appears.
Page 17

17
5. Click Uninstall/Unplug a device (recommended), and then click Next.
Choose this option to uninstall a device or to prepare your system for unplugging a device.
The Choose a Removal Task window appears.
6. Click Uninstall a device (recommended), and then click Next.
This option permanently uninstalls a device and its driver.
The Installed Devices on Your Computer screen appears.
7. Click the NIC you want to uninstall (PCI GN-1200TW), and then click Next.
8. On the Uninstalled Devices window, click Yes, I want to uninstall this device, and then click
Next.
The Completing the Add/Remove Hardware Wizard window appears.
9. Click Finish.
The driver and associated software are removed from the system. You can now shut down the system
and physically remove the NIC
Page 18
18
Windows XP Driver Installation
Installing the Driver
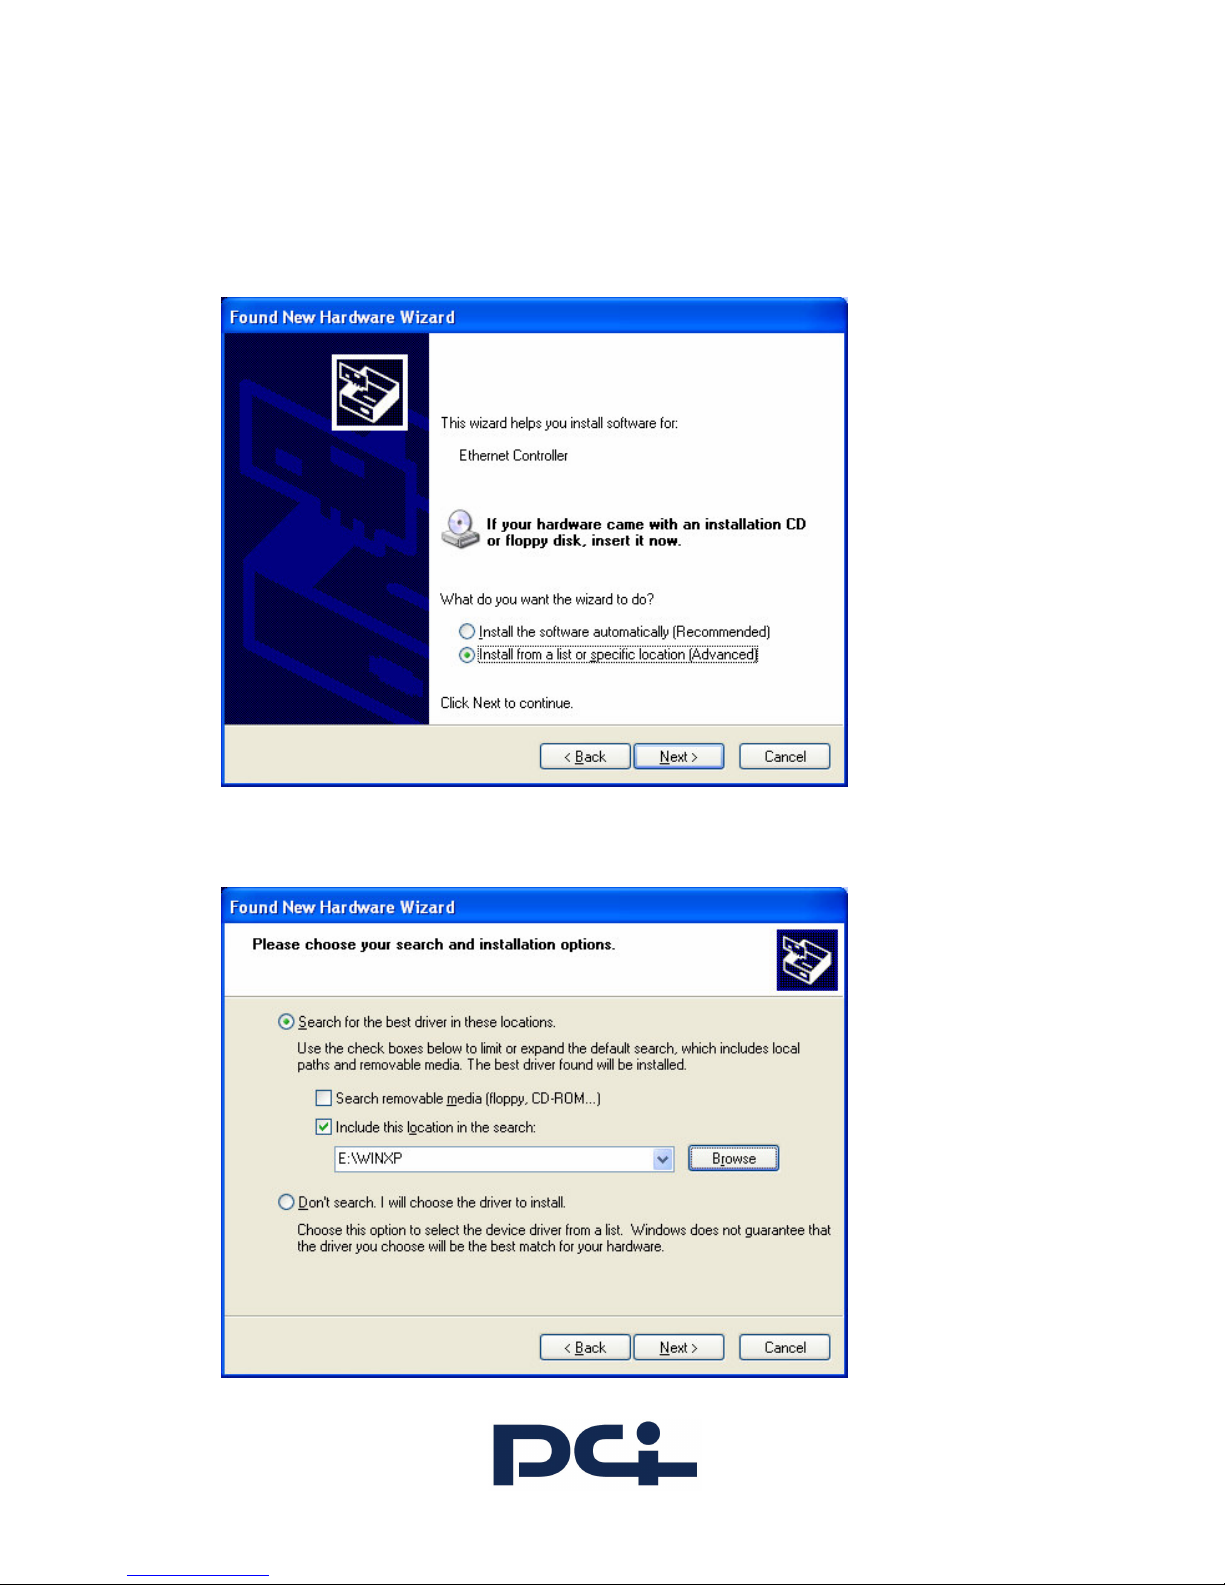
1. On ce the device is well connected to your computer, Windows XP will automatically detect the
new device. Select Install from a list or specific location (Advanced) and click Next.
2. Insert the device driver CD-ROM into the CD-ROM drive. Select Include this location in the
search: and click Browse to provide the appropriate path (e.g. E:\Winxp). Click Next.
Page 19
19
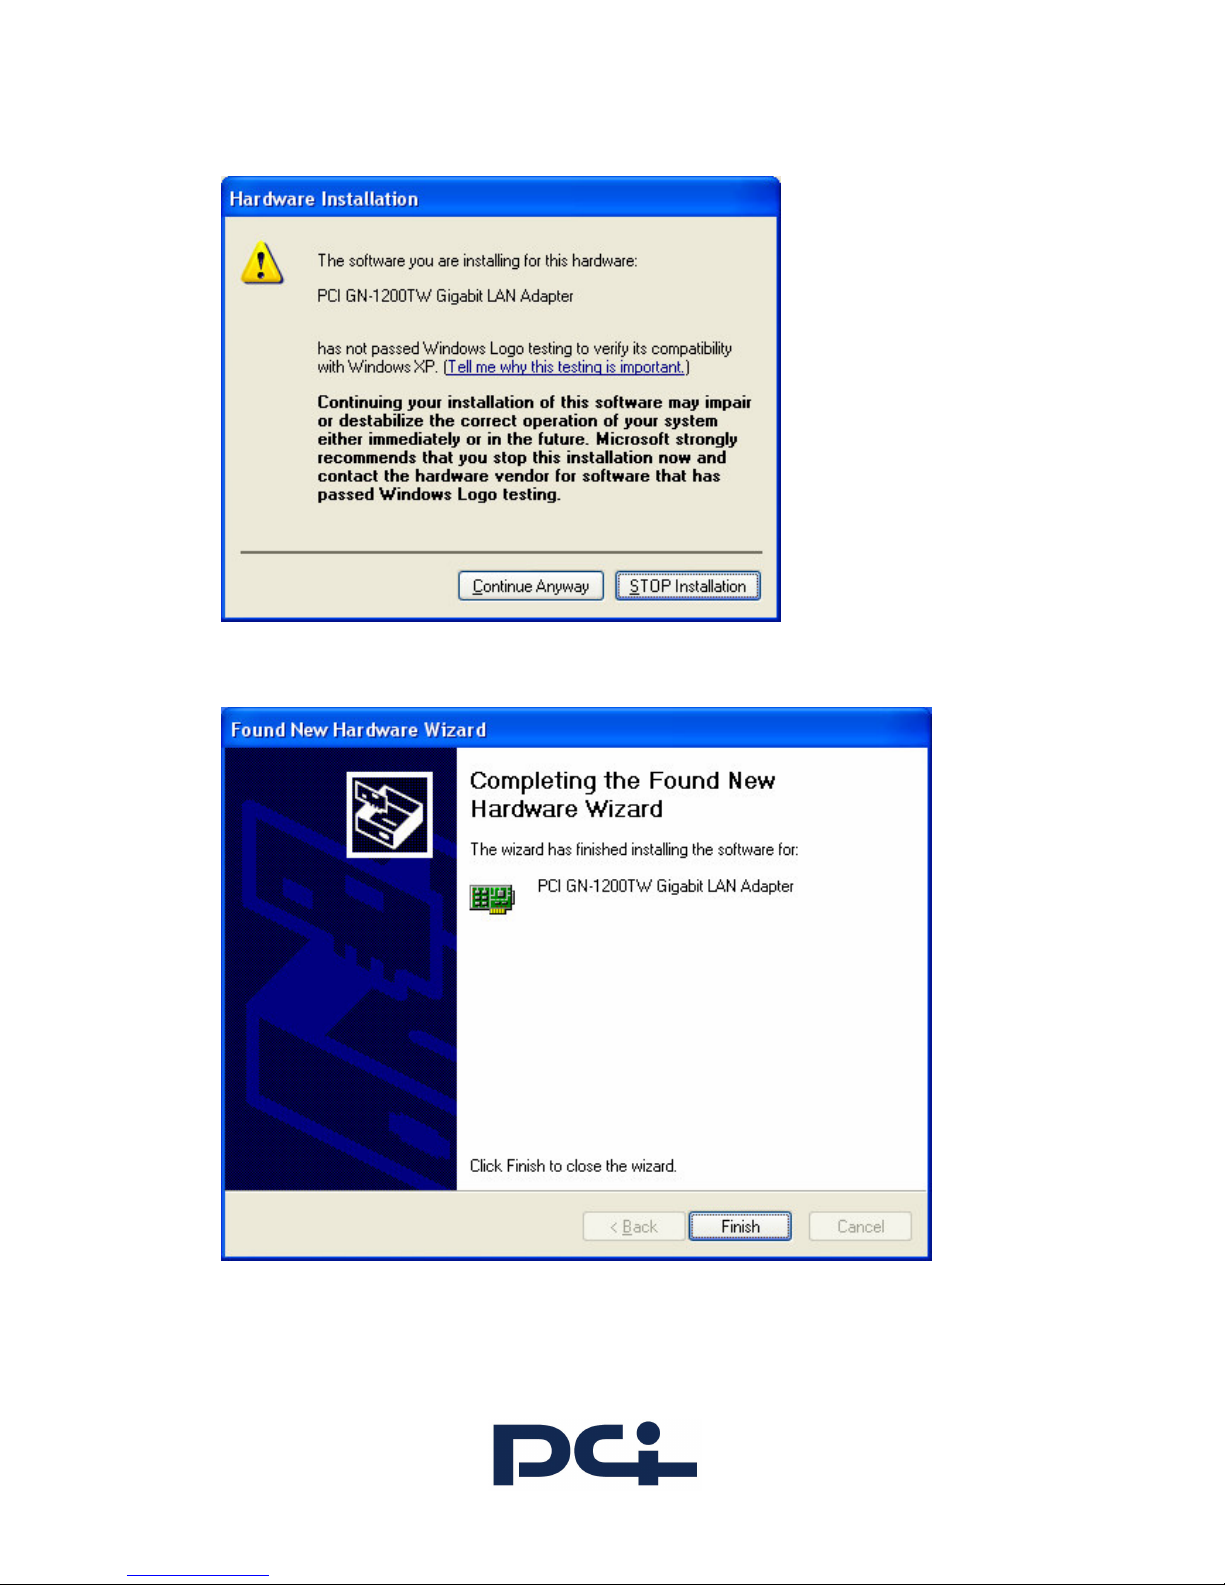
3. Click Continue Anyway to proceed. Windows will copy all the necessary files to your system.
4. Click Finish to complete the installation.
Page 20

20
Verifying Successful Installation
To verify successful NIC installation:
1. Open the Windows Start menu, and then select Control Panel.
2. Double click Network Connections.
3. Check connections in the LAN or High-Speed Internet window.
Uninstalling the Driver
Windows XP automatically detects the installation of new hardware. However, Windows XP does not
automatically detect removal of driver software. You must first uninstall the NIC driver software
before physically removing the NIC from the PC.
To remove the NIC driver and associated software:
1. Start Windows XP and log in.
You must have Network Administrator privileges to uninstall the driver software.
2. Select Start, and then Control Panel.
The Control Panel window ap pears.
3. Double-click Administrative Tools, and then Computer Management.
4. The Computer Management window appears. In the left window, click on the plus sign (+)
next to System Tools, and then click on Device Manager.
5. Click Network adapters, and then right-click on the PCI GN-1200TW that you want to
remove.
6. Select Uninstall.
7. When the Confirm Device Removal window appears, click OK.
The driver and associated software are removed from the system. You can now shut down the system
and physically remove the NIC
Page 21

21
4. Troubleshooting
If you experience any problems with the adapter, please make sure the appropriate
driver is loaded, the proper cable is connected to the adapter port and the hub/switch
complies with the adapter specification, such as 10Mbps 10BaseT, 100Mbps
100BaseTX and 1000Mbps 1000BaseT, then check the LED.
The adapter provides LEDs to indicate network status.
Speed
The LED indicates the adapter is connected to 10BaseT, 100BaseTX, or 1000BaseT
network. When the light is OFF, it indicates that the adapter is connected to
10BaseT network. When the light is ON in green color, it indicates that the adapter
is connected to 100BaseTX network. When the light is ON in amber color, it
indicates that the adapter is connected to 1000BaseT network.
Link/Activity
The LED indicates if the UTP has been LINK ok or not. When the light is OFF, it
indicates that the UTP port has not been connected or LINK not ok. When the light
is ON, it indicates that the UTP port LINK ok. When the light is BLINKING, it
indicates that there is traffic flow on the network which the adapter is connected to.
Page 22

22
TRADE MARKS
Copyright 2004/2005 by the manufacturer of this product. No part of this manual may
be reproduced, transcribed, stored in a retrieval system, translated into any language
or computer language without the prior written consent of the manufacturer.
All brand and product names are trademarks and/or registered trademarks of their
respective company.
Page 23

23
FCC COMPLIANCE STATEMENT
This equipment has been tested and found to comply with the limits of a Class B
computing devices, pursuant to Part 15 of the FCC rules. These limits are designed
to provide reasonable protection against harmful interference in a residential
installation. This equipment generates, uses and can radiate radio frequency energy
and, if not installed and used in accordance with the instructions, may cause harmful
interference to radio communications.
If you suspect this product is causing interference, turn your computer on and off
while your radio or TV is showing interference. If the interference disappears then
when you turn the computer off and reappears then you turn the computer on,
something in the computer is causing interference.
You can try to correct the interference by one or more of the following measures :
1. Reorient/Relocate the receiving antenna.
2. Increase the separation between the equipment and receiver.
3. Connect the equipment into an outlet on a circuit difference from that to which the
receiver is connected.
4. Ensure that all expansion slots (on the back or side of the computer) are covered.
Also ensure that all metal retaining brackets are tightly attached to the computer.
 Loading...