

Page 1

Page 2

Table of Contents
Chapter 1 Introduction 1
About the BLW-03FA .................................................................................................. 1
Chapter 2 Installation 3
Package Contents.......................................................................................................... 3
Hardware Description................................................................................................... 3
Connect the System ...................................................................................................... 5
Basic Installation Procedure ......................................................................................... 5
Chapter 3 Configuring Client PCs 9
TCP/IP Configuration...................................................................................................9
Chapter 4 Configuring the BLW-03FA 10
Login...........................................................................................................................10
Main Menu .................................................................................................................11
Basic Setting............................................................................................................... 18
Advanced Setting........................................................................................................ 26
Chapter 5 Configuring Client TCP/IP 39
Installing TCP/IP ........................................................................................................ 39
Setting Up TCP/IP to Work with BLW-03FA............................................................ 42
Configuration Computer with Windows 95 / 98 / ME................................................ 45
Configuration Computer with Windows 2000............................................................ 51
Configuration Computer with Windows XP............................................................... 58
Configuration Computer with Windows NT ..............................................................65
Configuration Macintosh Computer ........................................................................... 72
Verifying Your TCP/IP Connectionverview ..............................................................77
Chapter 6 Printer Server 79
Print Server Installation for Windows 98/ME ............................................................ 79
Print Server Installation for Windows 2000/XP ......................................................... 79
Printer Compatible list................................................................................................82
Chapter 7 Troubleshooting 84
Appendix A CABLES 87
Ethernet Cable ............................................................................................................87
RJ-45 Port Pin Assignments ....................................................................................... 88
Appendix B Specifications 89
Hardware ....................................................................................................................89
Wireless RF ................................................................................................................89
Page 3

PLANEX COMMUNICATIONS INC.
http://www.planex.com.tw/ TEL+886-2-22191816 FAX +886-2-22190655 Page 1
Chapter 1
Introduction
Congratulations on your purchase of a Barricade™ Wireless
Cable/DSL Broadband Router. PCI is proud to provide you with a
powerful yet simple communication device for connecting your local
area network (LAN) to the Internet. For those who want to surf the
Internet at the lowest possible cost, the BLW-03FA™ is the convenient,
easy solution.
About the BLW-03FA
The BLW-03FA provides Internet access to multiple users by sharing a single-user account.
The BLW-03FA features a WAN interface that allows you to connect either a DSL or cable
modem. The BLW-03FA provides extensive firewall protection services.
The BLW-03FA provides many cost-effective functions and management benefits. It is simple
to configure and can be up and running in minutes.
Features and Benefits
• Internet connection to DSL or cable modem via a 10/100 Mbps WAN port
• Local network connection via 10/100 Mbps Ethernet ports or 11 Mbps wireless
interface (supporting up to 128 mobile users)
• 802.11b Compliant – interoperable with multiple vendors
• Provides seamless roaming within 802.11b WLAN environment
• DHCP for dynamic IP configuration, and DNS for domain name mapping
• Firewall with Stateful Packet Inspection, client privileges, hacker prevention, DoS, and
NAT
• NAT also enables multi-user access with a single-user account, and virtual server
functionality (providing protected access to Internet services such as web, mail, FTP,
and Telnet)
• User-definable application sensing tunnel supports applications requiring multiple
connections
• Parental controls allows the user to limit certain web sites
• Email alerts when the users network is being compromise
• Easy setup through a web browser on any operating system that supports TCP/IP
• Compatible with all popular Internet applications
Applications
Many advanced applications are provided by the BLW-03FA, such as:
LAN Access
1
Page 4

PLANEX COMMUNICATIONS INC.
http://www.planex.com.tw/ TEL+886-2-22191816 FAX +886-2-22190655 Page 2
The BLW-03FA provides connectivity to 10/100 Mbps devices, making it easy to create
a network in small offices or homes.
Internet Access
This device supports Internet access through a DSL or cable connection. Since many
DSL providers use PPPoE to establish communications with end users, the BLW-03FA
includes a built-in client for this protocol, eliminating the need to install this service on
your computer.
Shared IP Address
The BLW-03FA shares a single IP address with up to 253 users. Using only one ISP
account, multiple users on your network can simultaneously browse the Internet.
Virtual Server
If you have a static IP address, you can set up the BLW-03FA to act as a virtual host for
network address translation. Remote users access various services at your site using the
static IP address. Then, depending on the requested service (or port number), the BLW03FA routes the request to the appropriate server (at an internal network IP address). This
secures your network from direct attack by hackers, and provides more flexible
management by allowing you to change internal network IP addresses without affecting
outside access to your network.
User-Definable Application Sensing Tunnel
You may define special applications that require multiple connections such as Internet
gaming, video conferencing, and Internet telephony. The BLW-03FA will then sense the
application type and open a multi-port tunnel for it.
DMZ Hosts Support
Allows a networked computer to be fully exposed to the Internet. This function is used
when the special application sensing tunnel feature is insufficient to allow an application
to function correctly.
Security
The BLW-03FA supports security features that deny Internet access to specified users, or
drop requests for specific services. The BLW-03FA’s firewall also blocks common
hacker attacks, including IP Spoofing, Land Attack, Ping of Death, IP with zero length,
Smurf Attack, UDP port loopback, Snork Attack, TCP null scan, and TCP SYN flooding.
Page 5

PLANEX COMMUNICATIONS INC.
http://www.planex.com.tw/ TEL+886-2-22191816 FAX +886-2-22190655 Page 3
Chapter 2
Installation
Before installing the BLW-03FA™, verify that you have the items listed under “Package
Contents.” Also be sure that you have the necessary cabling
Package Contents
If any of the items are missing or damaged, contact your local PCI distributor.
• BLW-03FA Broadband Router
• Power adapter
• One CAT-5 Ethernet cable
• Four rubber feet
• User’s Manual
• PCI Warranty Registration Card If possible, retain the carton and original packing
materials in case there is a need to return the product.
Please fill out and return the Warranty Registration Card to PCI, or register on PCI’s web
site at www.planex.com.tw. The BLW-03FA Broadband Router is covered by a limited
lifetime warranty.
Hardware Description
The BLW-03FA Broadband Router may be connected to the Internet or to a remote site
using its RJ-45 WAN port. It may be connected directly to your PC or to a local area
network using any of the three 10/100 autosensing switch ports.
These RJ-45 ports auto-negotiate the operating speed (10/100 Mbps) and the duplex
mode (half/full duplex).
Access speed to the Internet depends on your service type. Full-rate symmetric Digital
Subscriber Line (ADSL) provides up to 8 Mbps downstream and 640 Kbps upstream;
G.lite (or splitterless) ADSL provides up to 1.5 Mbps downstream and 512 Kbps
upstream; Cable modems provide up to 36 Mbps downstream and 2 Mbps upstream.
However, you should note that the actual rate provided by specific service providers may
vary dramatically from these upper limits.
Though Internet access speed is determined by the modem type connected to your BLW03FA, data passing between devices connected to your local area network can run up to
100 Mbps over the Fast Ethernet ports.
The BLW-03FA includes LED indicators on the front panel that simplify installation and
network troubleshooting
LED Indicators
The BLW-03FA includes LED indicators on the front panel that
simplify installation and network troubleshooting.
Check the power and port indicators as shown in the following table.
LED
Condition
Status
2
Page 6

LAN Installation
PLANEX COMMUNICATIONS INC.
http://www.planex.com.tw/ TEL+886-2-22191816 FAX +886-2-22190655 Page 4
Power
(Green)
On
BLW-03FA is receiving power.
WLAN
(Green)
On
The BLW-03FA has established a valid
wireless connection.
WAN
(Green)
On
The WAN port has established a valid network
connection.
LLAANN
Link
(Green)
On
The indicated LAN port has established a valid
network connection.
Activity
(Amber)
Flashing
The indicated LAN port is transmitting or receiving
traffic.
Page 7

LAN Installation
PLANEX COMMUNICATIONS INC.
http://www.planex.com.tw/ TEL+886-2-22191816 FAX +886-2-22190655 Page 5
Item
Description
9V 1A
Connect the included power adapter to this port.
Warning: Using the wrong type of power adapter may cause
damage.
Reset
Use this button to reset the power or restore the default factory
settings. Reboot by pushing 1 second. Return all settings to the
factory defaults by pushing 5 seconds.
WAN
WAN port (RJ-45). Connect a cable modem, DSL modem, or an
Ethernet router to this port.
LAN
Three 10/100 Autosensing switch ports (RJ-45). Connect devices
on your local area network to these ports (such as a PC, hub, or
switch).
Printer Printer port. Connect to Printer.
System Requirements
You must meet the following minimum requirements:
• Internet access from your local telephone company or Internet Service Provider (ISP)
using a DSL modem or cable modem.
• A PC using a fixed IP address or a dynamic IP address assigned via DHCP, as well as a
gateway server address and DNS server address from your service provider.
• A computer equipped with a 10 Mbps, 100 Mbps, or 10/100 Mbps Fast Ethernet card,
or a USB-to-Ethernet converter.
• TCP/IP protocols installed on each PC that will access the Internet.
• A Java-enabled web browser, such as Microsoft Internet Explorer 5.0 or above, or
Netscape Communicator 4.0 or above, installed on one PC at your site for configuring the
BLW-03FA.
Connect the System
The BLW-03FA can be positioned at any convenient location in your office or home. No
special wiring or cooling requirements are needed. You should, however comply with the
following guidelines:
• Keep the BLW-03FA away from any heating devices.
• Do not place the BLW-03FA in a dusty or wet environment.
You should also remember to turn off the power, remove the power cord from the outlet,
and keep your hands dry when handling the BLW-03FA.
Basic Installation Procedure
1. Connect the LAN: You can connect the BLW-03FA to your PC, or to a hub or
switch. Run Ethernet cable from one of the LAN ports on the rear of the BLW-03FA
to your computer’s network adapter or to another network device. You can also
Page 8
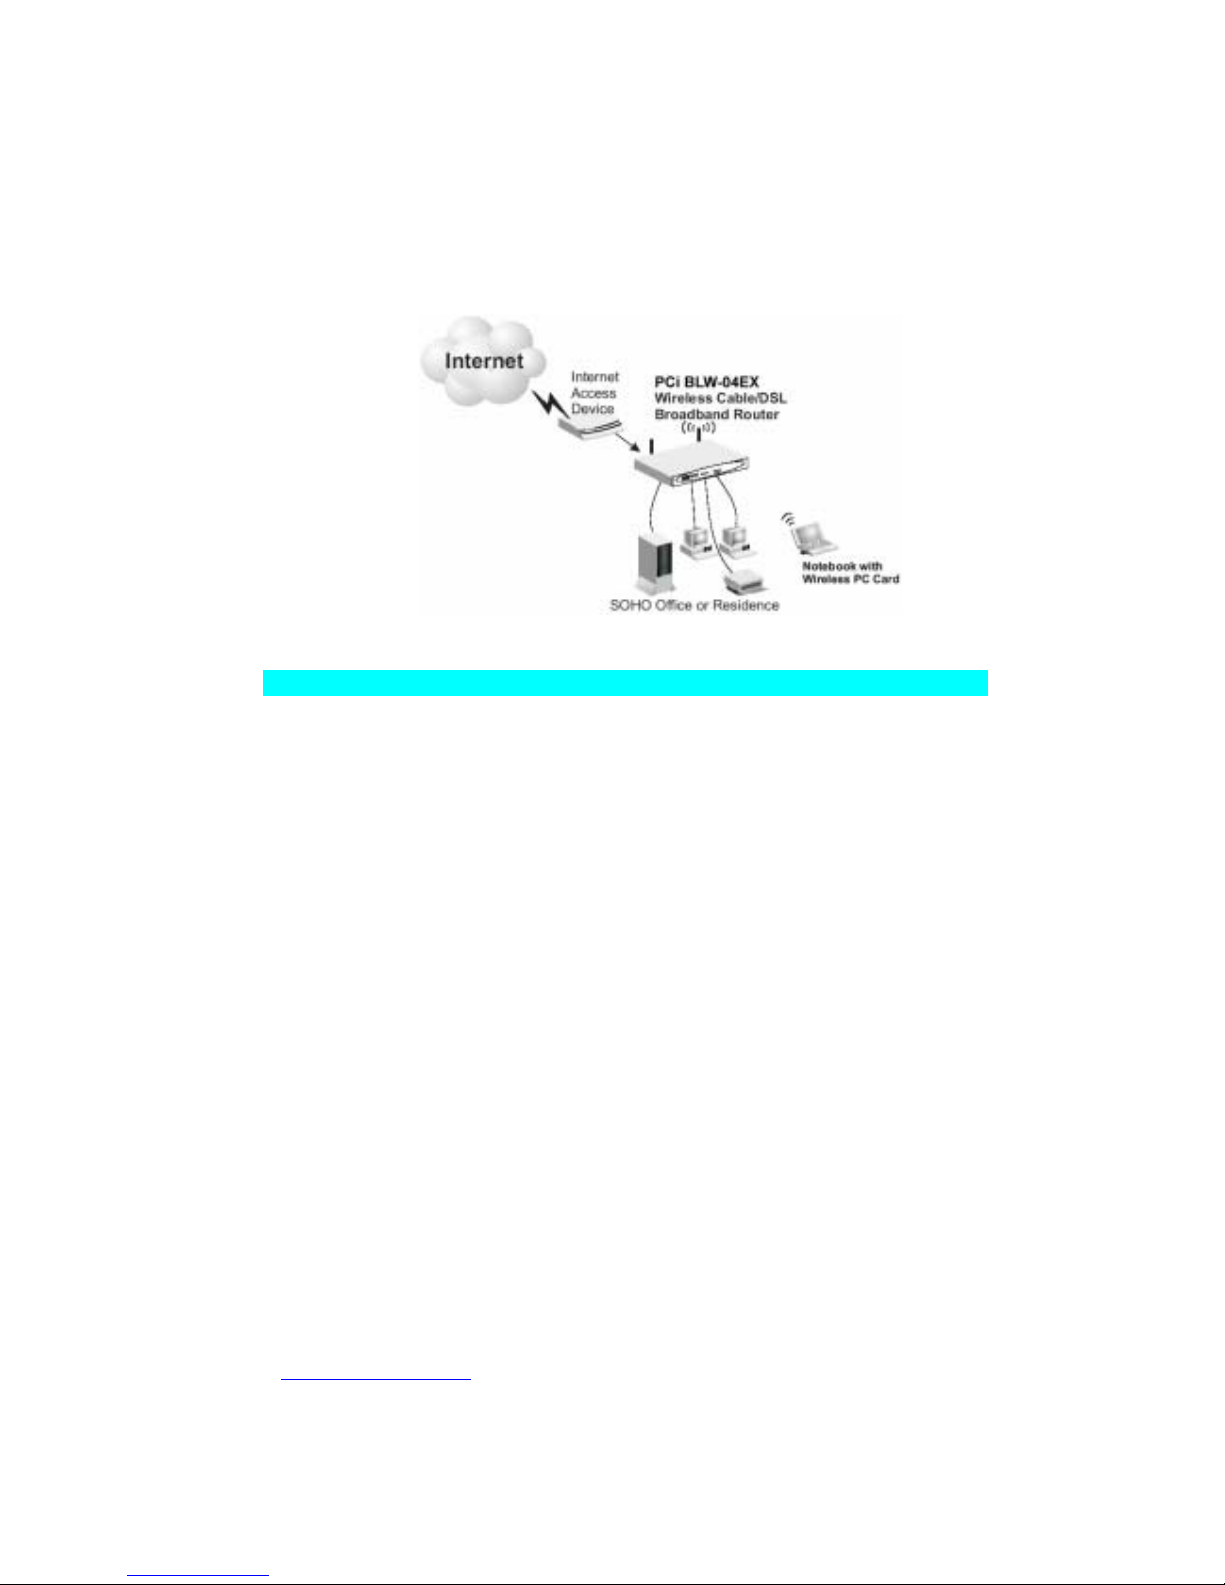
LAN Installation
PLANEX COMMUNICATIONS INC.
http://www.planex.com.tw/ TEL+886-2-22191816 FAX +886-2-22190655 Page 6
connect the BLW-03FA to your PC (using a wireless client adapter) via radio signals.
Position both antennas on the back of the BLW-03FA into the desired positions. For
more effective coverage, you may want to position one antenna along the vertical axis
and the other antenna along the horizontal axis. (The antennas emit signals along
the toroidal plane – and thus provide more effective coverage when positioned
along alternate axes.)
2. Connect the WAN: Prepare an Ethernet cable for connecting the BLW-03FA to a
cable/xDSL modem or Ethernet router.
3. Power on: Connect the power adapter to the BLW-03FA.
Figure 2-3. Connecting the BLW-03FA
Attach to Your Network Using Ethernet Cabling
The three LAN ports on the BLW-03FA can auto-negotiate the connection speed to
10 Mbps Ethernet or 100 Mbps Fast Ethernet, as well as the transmission mode to
half-duplex or full-duplex. These LAN ports also support auto-configuration for pin
signals (auto-MDI/MDI-X) that allows you to use straight-through cable for
connecting the BLW-03FA to any network device. (See Appendix B for details on
wiring.) Use twisted-pair cable to connect any of the three LAN ports on the BLW03FA to an Ethernet adapter on your PC. Otherwise, you can cascade any of LAN
ports on the BLW-03FA to an Ethernet hub or switch, and then connect your PC or
other network equipment to the hub or switch. When inserting an RJ-45 plug, be sure
the tab on the plug clicks into position to ensure that it is properly seated.
Warning: Do not plug a phone jack connector into any RJ-45 port. This may damage
the BLW-03FA. Instead, use only twisted-pair cables with RJ-45 connectors that
conform with FCC standards.
Page 9
LAN Installation
PLANEX COMMUNICATIONS INC.
http://www.planex.com.tw/ TEL+886-2-22191816 FAX +886-2-22190655 Page 7
Notes: 1. Use 100-ohm shielded or unshielded twisted-pair cable with RJ-45
connectors for all connections. Use Category 3, 4 or 5 for connections that operate at
10 Mbps, and Category 5 for connections that operate at 100 Mbps.
2. Make sure each twisted-pair cable does not exceed 100 meters (328 feet).
Attach to Your Network Using Radio Signals
Install a wireless network adapter in each computer that will be connected to the
Internet or your local network via radio signals. PCI currently offers several wireless
network cards, including the GW-DS110 Wireless PCI card and the GW-NS11S
Wireless PC card.
Rotate both antennas on the back of the BLW-03FA to the desired position. For more
effective coverage, position one antenna along the vertical axis and the other along
the horizontal axis. Try to place the BLW-03FA in a position that is located in the
center of your wireless network. Normally, the higher you place the antenna, the
better the performance. Ensure that the BLW-03FA’s location provides optimal
reception throughout your home or office.Computers equipped with a wireless
adapter can communicate with each other as an independent wireless LAN by
configuring each computer to the same radio channel. However, the BLW-03FA can
provide access to your wired/wireless LAN or to the Internet for all wireless
workstations. Each wireless PC in this network infrastructure can talk to any
computer in the wireless group via a radio link, or access other computers or network
resources in the wired LAN infrastructure or over the Internet via the BLW-03FA.
The wireless infrastructure configuration not only extends the accessibility of wireless
PCs to the wired LAN, but also doubles the effective wireless transmission range for
wireless PCs by retransmitting incoming radio signals through the BLW-03FA.
A wireless infrastructure can be used for access to a central database, or for
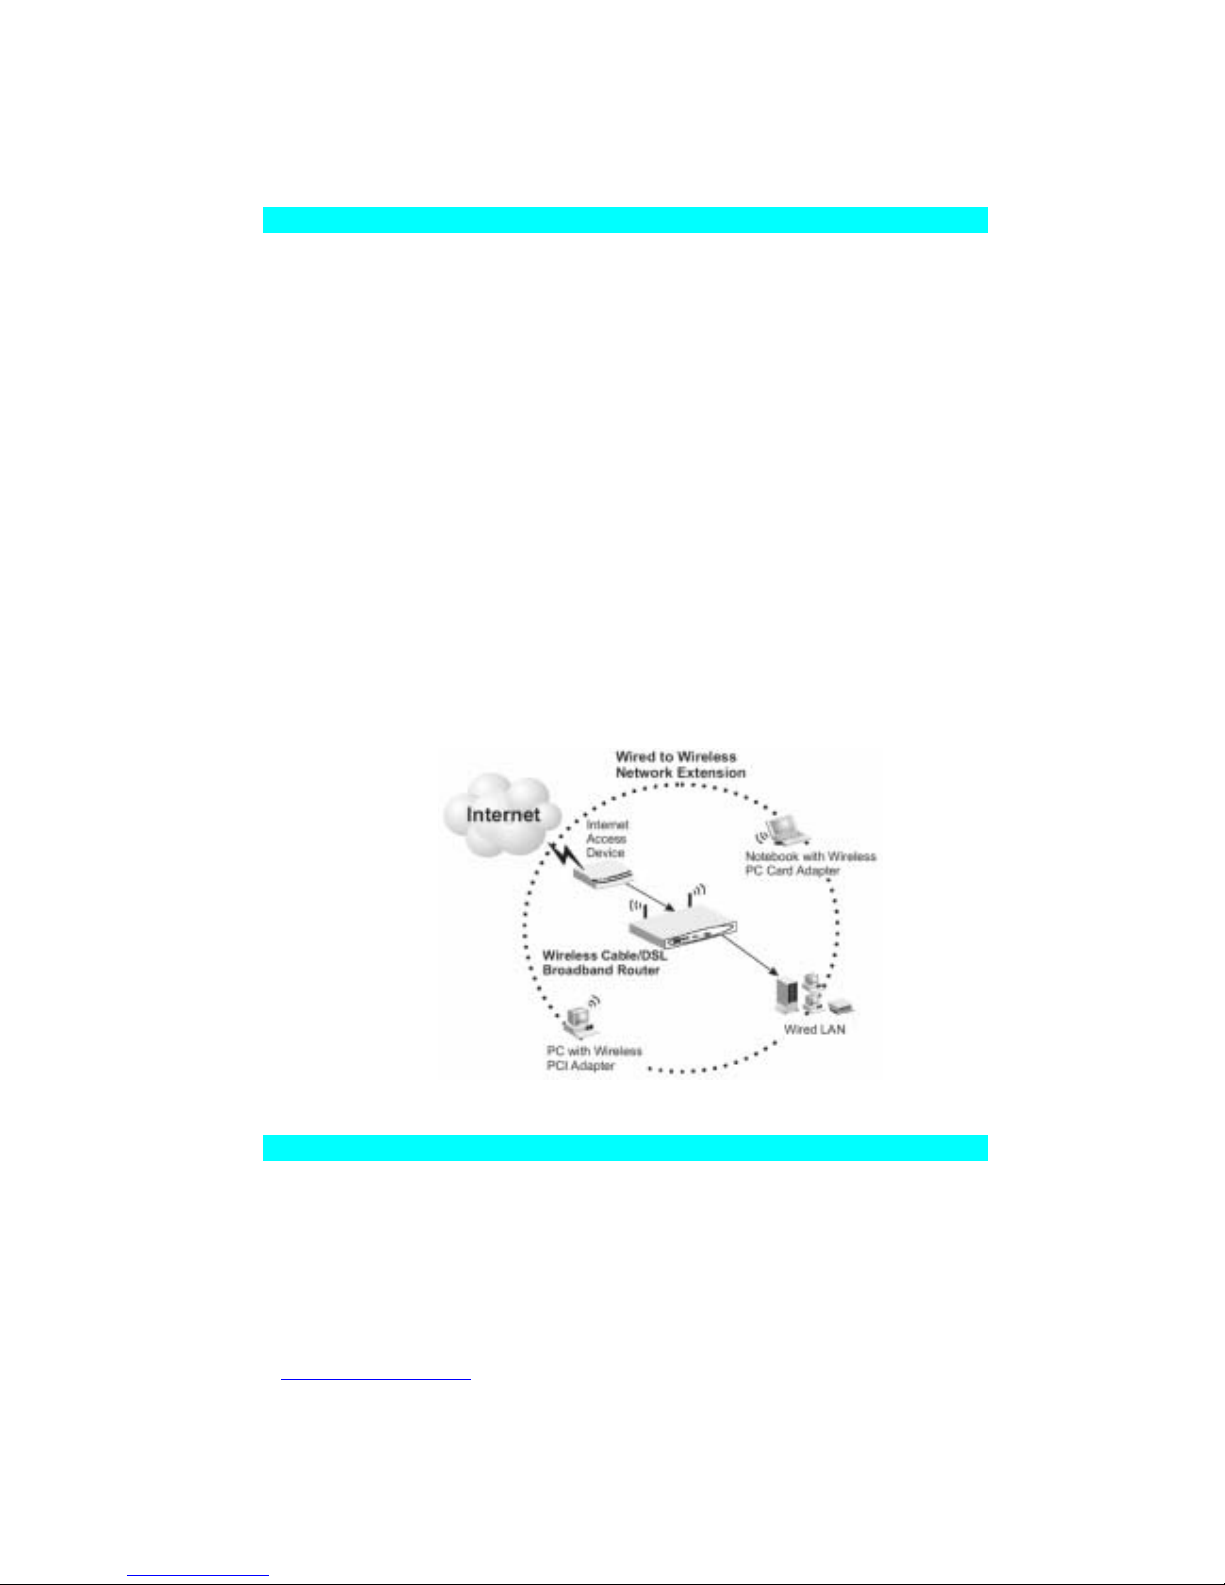
connection between mobile workers, as shown in the following figure:
Figure 2-5. Making WLAN Connections
Attach the BLW-03FA to the Interne
If Internet services are provided through an xDSL or cable modem, use unshielded or
shielded twisted-pair Ethernet cable (Category 3 or greater) with RJ-45 plugs to
connect the broadband modem directly to the WAN port on the BLW-03FA.
Page 10

LAN Installation
PLANEX COMMUNICATIONS INC.
http://www.planex.com.tw/ TEL+886-2-22191816 FAX +886-2-22190655 Page 8
Note: When connecting to the WAN port, use 100-ohm Category 3, 4 or 5 shielded or
unshielded twisted-pair cable with RJ-45 connectors at both ends for all connections.
Connecting the Power Adapter
Plug the power adapter into the power socket on the BLW-03FA, and the other end
into a power outlet. Check the indicator marked Power on the front panel to be sure it
is on. If the Power indicator does not light up, refer to Troubleshooting in Appendix
A.
Page 11

PLANEX COMMUNICATIONS INC.
http://www.planex.com.tw/ TEL+886-2-22191816 FAX +886-2-22190655 Page 9
Chapter 3
Configuring Client PCs
TCP/IP Configuration
To access the Internet through the BLW-03FA, you must configure the network settings
of the computers on your LAN to use the same IP subnet as the BLW-03FA. The default
network settings for the BLW-03FA are:
IP Address: 192.168.1.1
Subnet Mask: 255.255.255.0
Note: These settings may be changed to suit your network requirements, but you must
first configure at least one computer as described in Chapter 5 to access the BLW-03FA’s
web configuration interface. (See Chapter 4 for information on configuring the BLW03FA.)
If you have not previously configured TCP/IP for your computer, refer to “Configuring
Client TCP/IP” on page 5-1.
All PCs connected to the BLW-03FA must be in the same IP subnet as the BLW-03FA.
The default IP address of the BLW-03FA is 192.168.1.1 (where x means 2–254) and the
subnet mask is 255.255.255.0. You can set the IP address for client PCs either by
automatically obtaining an IP address from the BLW-03FA’s DHCP service or by manual
configuration. See “Setting Up TCP/IP to Work with the BLW-03FA” on page 5-5.
3
Page 12

PLANEX COMMUNICATIONS INC.
http://www.planex.com.tw/ TEL+886-2-22191816 FAX +886-2-22190655 Page 10
Chapter 4
Configuring the BLW-03FA
After you have configured TCP/IP on a client computer, use a web
browser to configure the BLW-03FA. The BLW-03FA can be
configured by any Java-supported browser including Internet Explorer
4.0 or above, or Netscape Navigator 4.0 or above. Using the web
management interface, you may configure the BLW-03FA and view
statistics to monitor network activity.
Login
To access the BLW-03FA’s
management interface, enter the IP
your web browser address of the
BLW-03FA in http://192.168.1.1
Note: For some browsers, it may be
necessary to include :88 after
the management IP address.
For example:http://192.168.1.1:88
Then click “LOGIN” (by default, there is no password).
4
Page 13

PLANEX COMMUNICATIONS INC.
http://www.planex.com.tw/ TEL+886-2-22191816 FAX +886-2-22190655 Page 11
Making Configuration Changes
Configurable parameters have a dialog box or a drop-down list. Once a configuration
change has been made on a page, be sure to click the “Apply” or “Next” button at the
bottom of the page to enable the new setting.
Note: To ensure proper screen refresh after a command entry, be sure that Internet
Explorer 5.0 is configured as follows: Under the menu “Tools/Internet
Options/General/Temporary Internet Files/Settings,” the setting for “Check for
newer versions of stored pages” should be “Every visit to the page.”
Main Menu
Page 14
PLANEX COMMUNICATIONS INC.
http://www.planex.com.tw/ TEL+886-2-22191816 FAX +886-2-22190655 Page 12
SETUP
For accurate timing of client filtering and log events, you need to set the time zone. Select your
time zone from the dropdown list. Click “Next.”
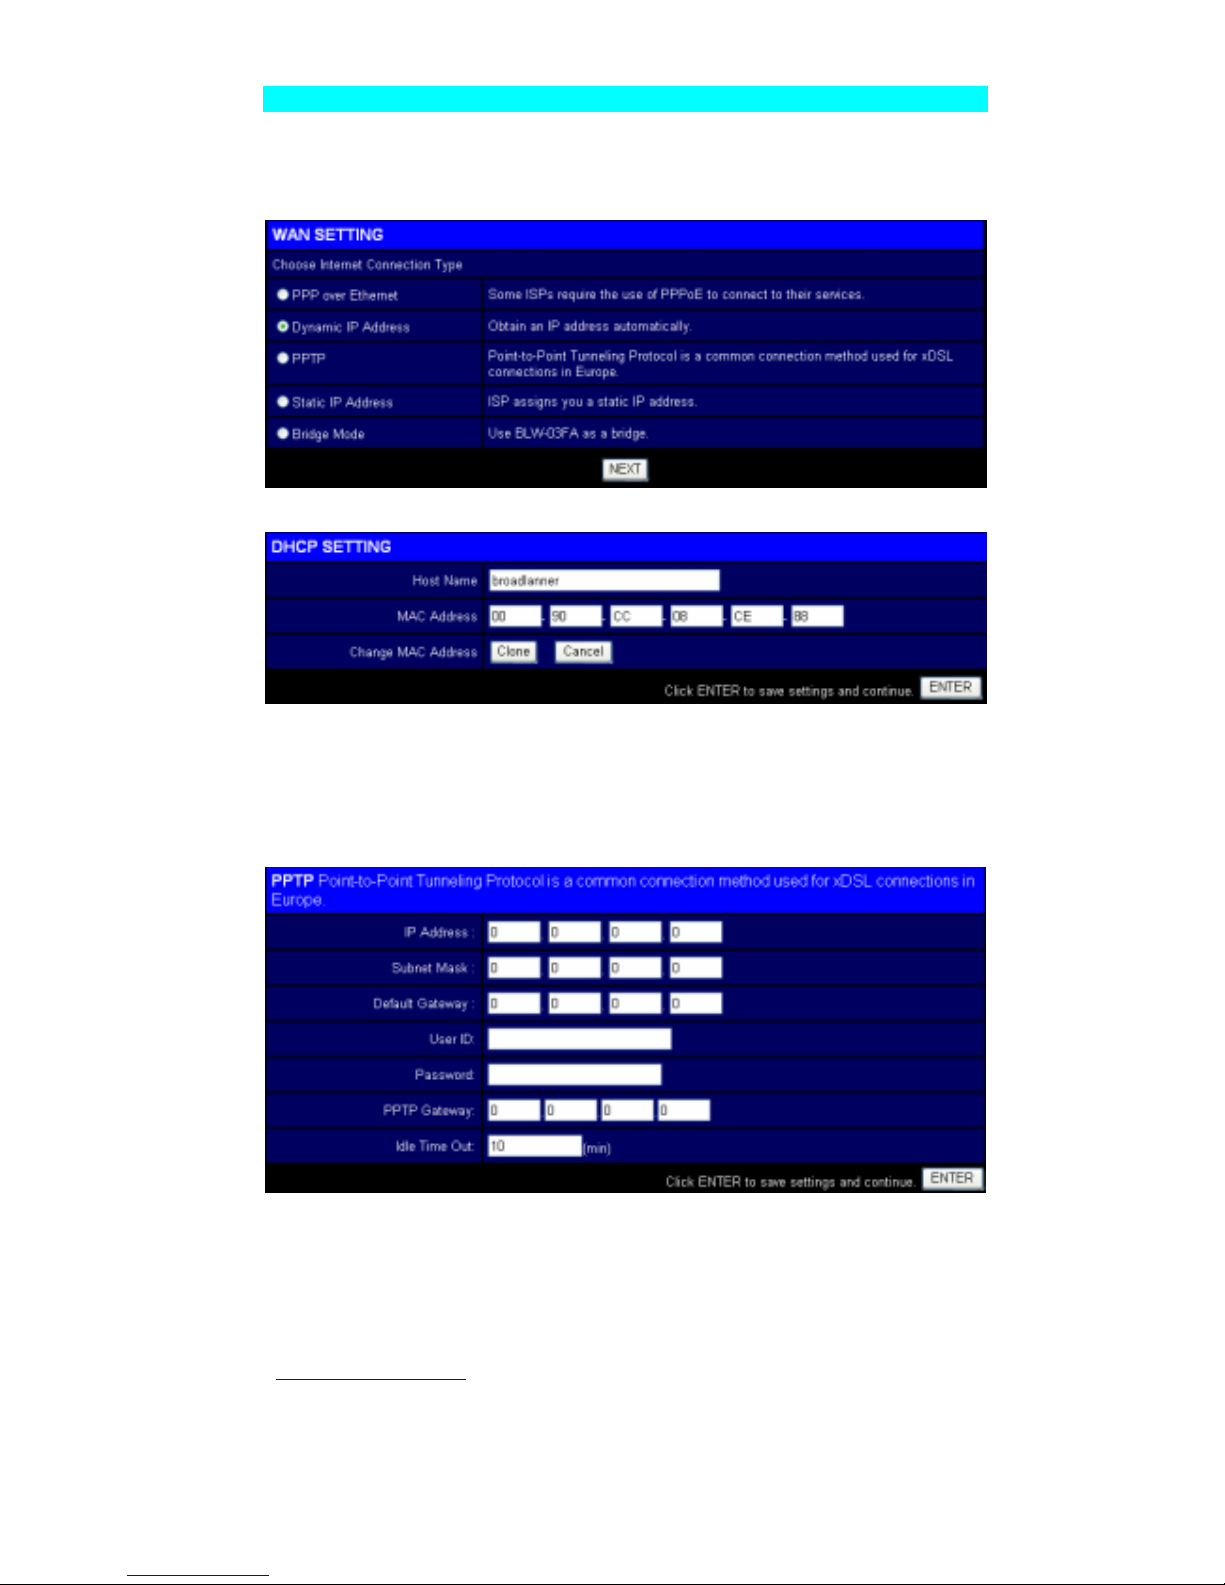
Select the type of broadband connection you have.
Dynamic IP Address
Your ISP may have given you a host name. If so, enter it into this field.
Click “Finish” to complete the setup. The Status page will open to allow you to view the
connection status, as well as other information. See “Status” on page 64 for details.
PPTP
1. IP Address:Enter the ISP assigned to your PC’s IP address
2. Subnet Mask:Enter the ISP assigned to your PC’s Subnet Mask.
3. Default Gateway:Enter the xDSL modem’s IP address.
Page 15
PLANEX COMMUNICATIONS INC.
http://www.planex.com.tw/ TEL+886-2-22191816 FAX +886-2-22190655 Page 13
4. User ID:The user ID provided by the ISP for the PPTP connection.
5. Password:The password provided by the ISP for the PPTP connection.
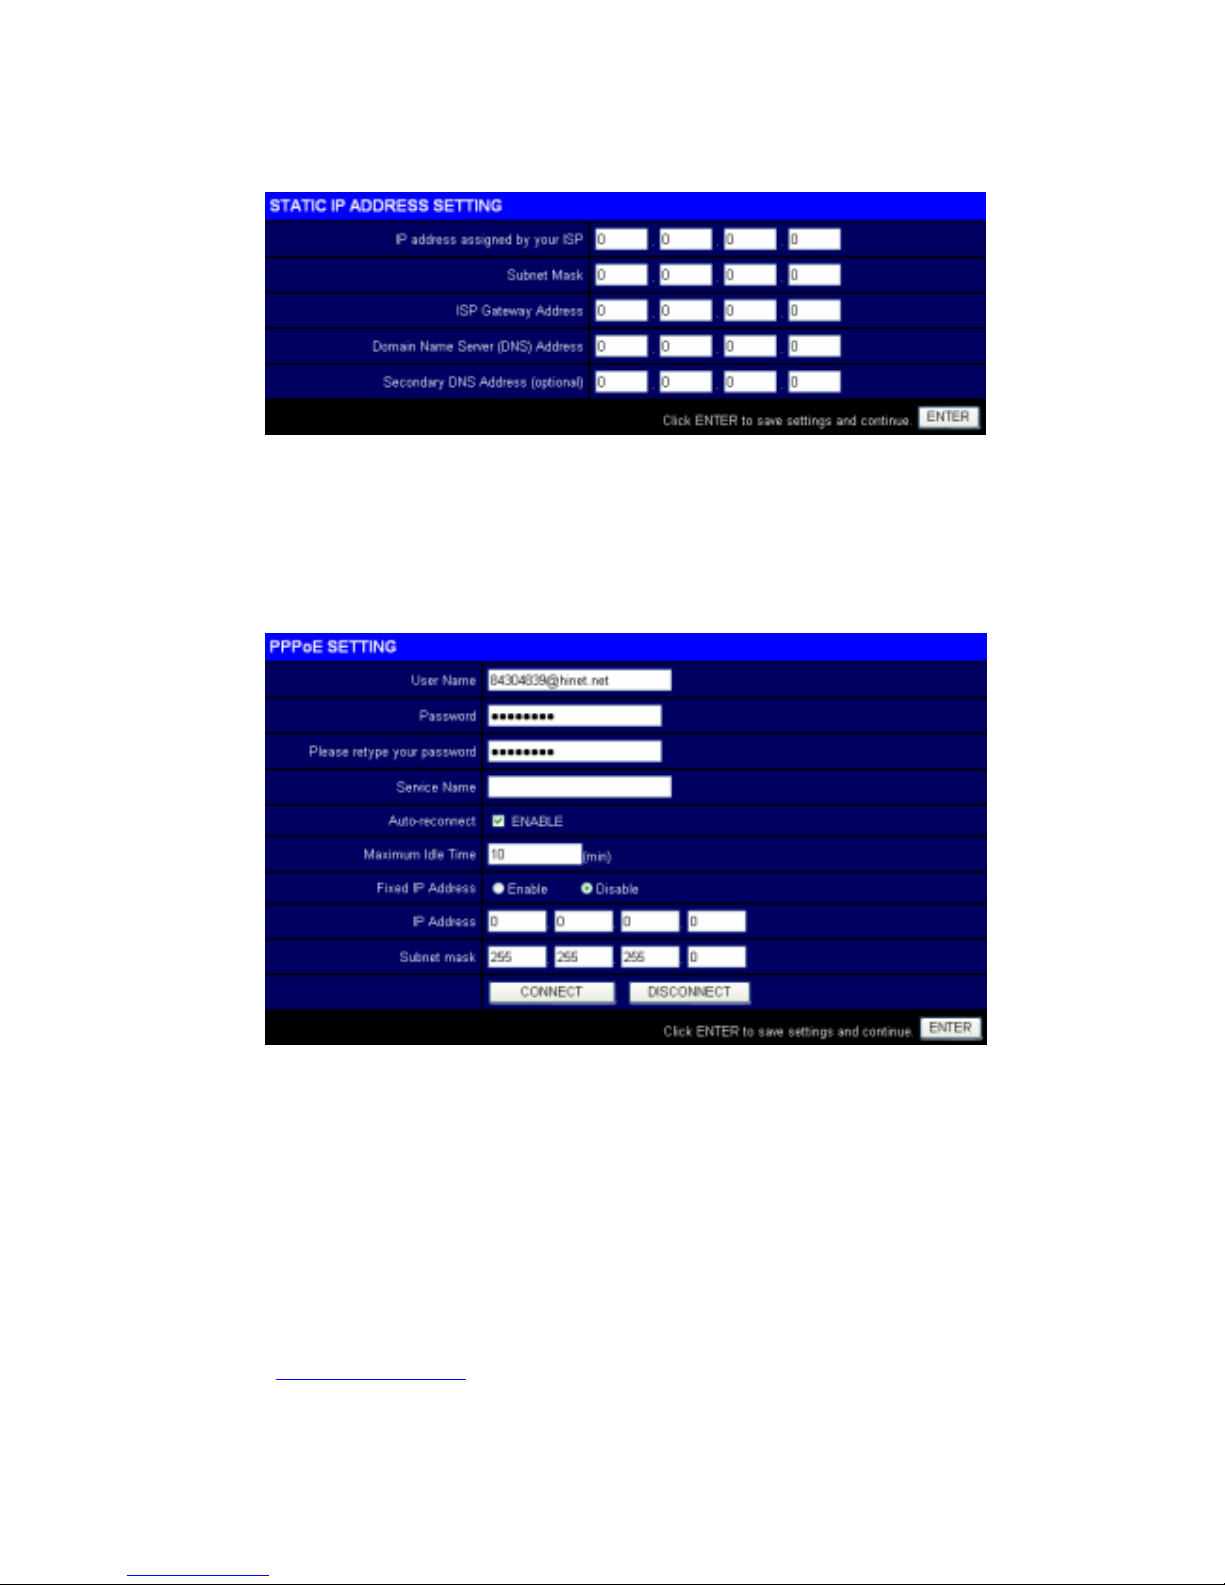
Static IP Address
Some xDSL Internet Service Providers may assign a fixed (static) IP address for your
gateway. If you have been provided with this information, choose this option and enter
the assigned IP address, subnet mask, gateway IP, and DNS IP addresses for the BLW03FA.
Click “Finish” to complete the setup. The Status page will open to allow you to view the
connection status, as well as other information. See “Status” on page 64 for details.
PPP Over Ethernet
Enter the PPPoE user name and password assigned by your Service Provider. The
Service Name is normally optional, but may be required by some service providers.
Leave the Maximum Transmission Unit (MTU) on the default value (1492) unless you
have a particular reason to change it.
Enter a Maximum Idle Time (in minutes) to define a maximum period of time for which
the Internet connection is maintained during inactivity. If the connection is inactive for
longer than the Maximum Idle Time, it will be dropped. Enable the Auto-reconnect
option to automatically re-establish the connection as soon as you attempt to access the
Internet again.
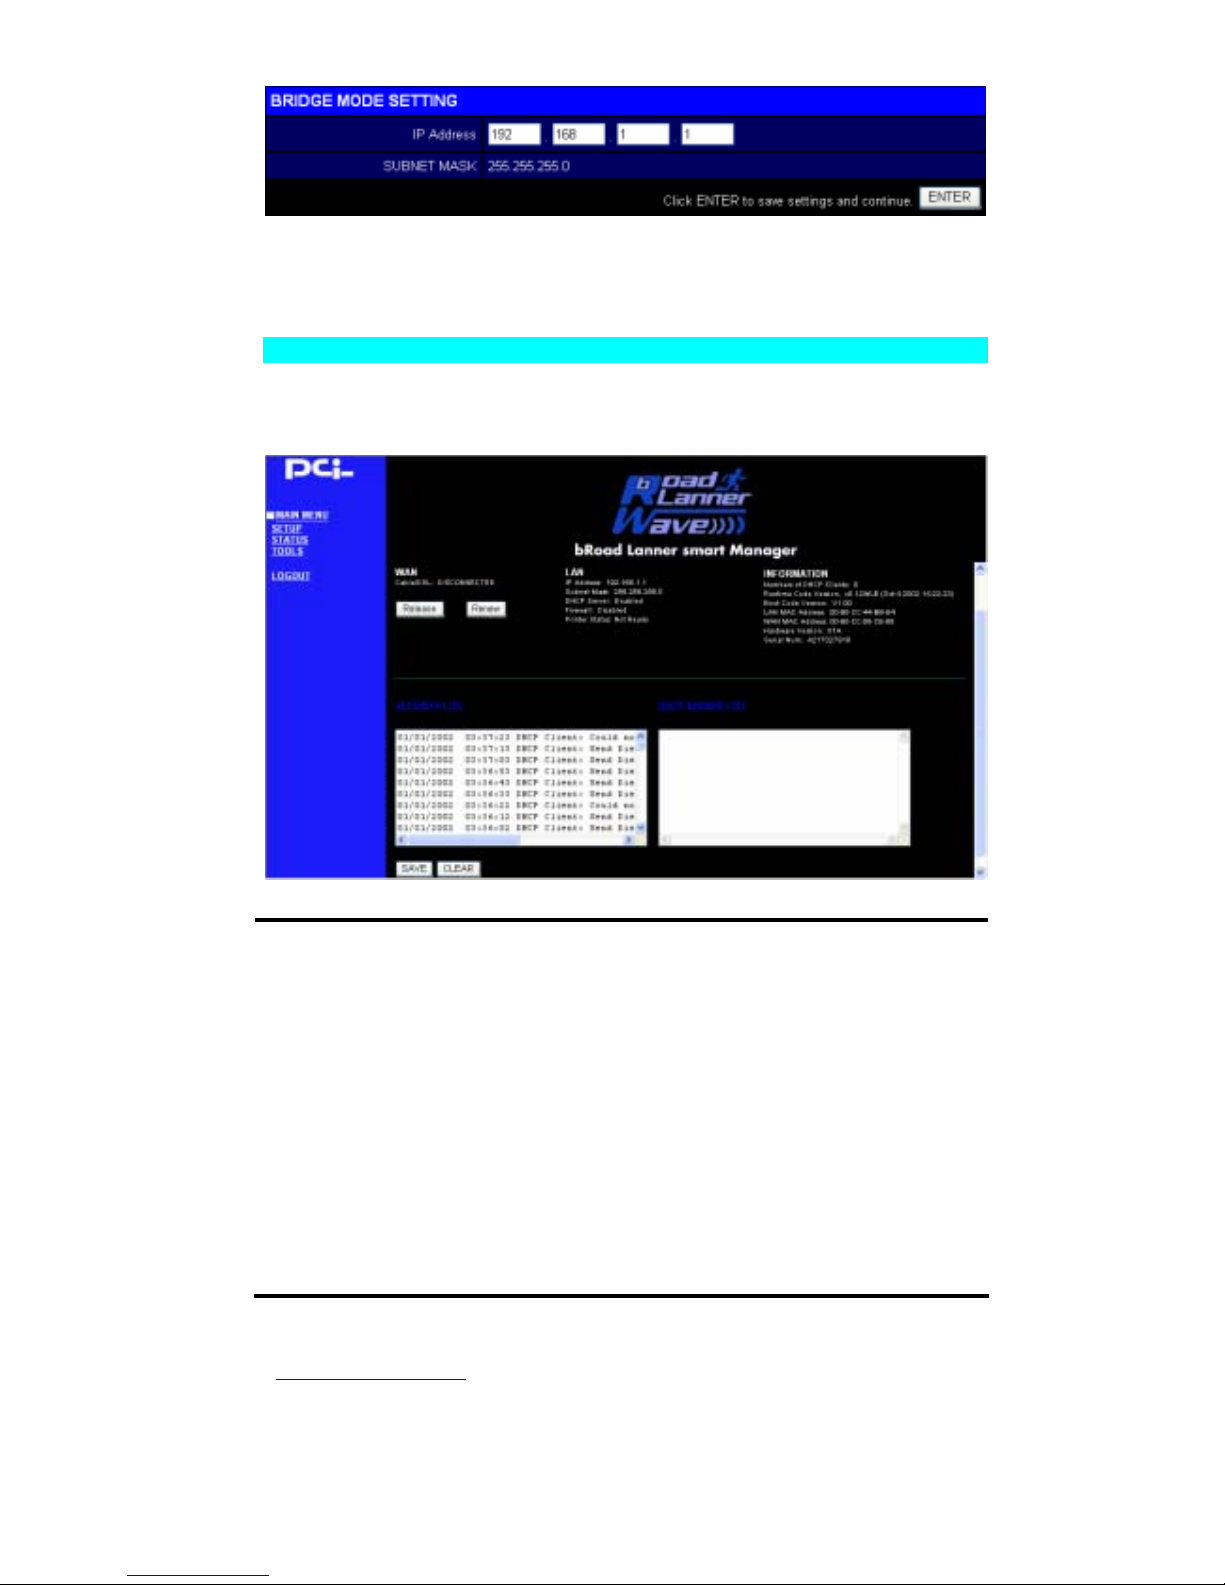
Bridge Mode
Page 16
PLANEX COMMUNICATIONS INC.
http://www.planex.com.tw/ TEL+886-2-22191816 FAX +886-2-22190655 Page 14
Use your BLW-03FA as a Bridge.
STATUS
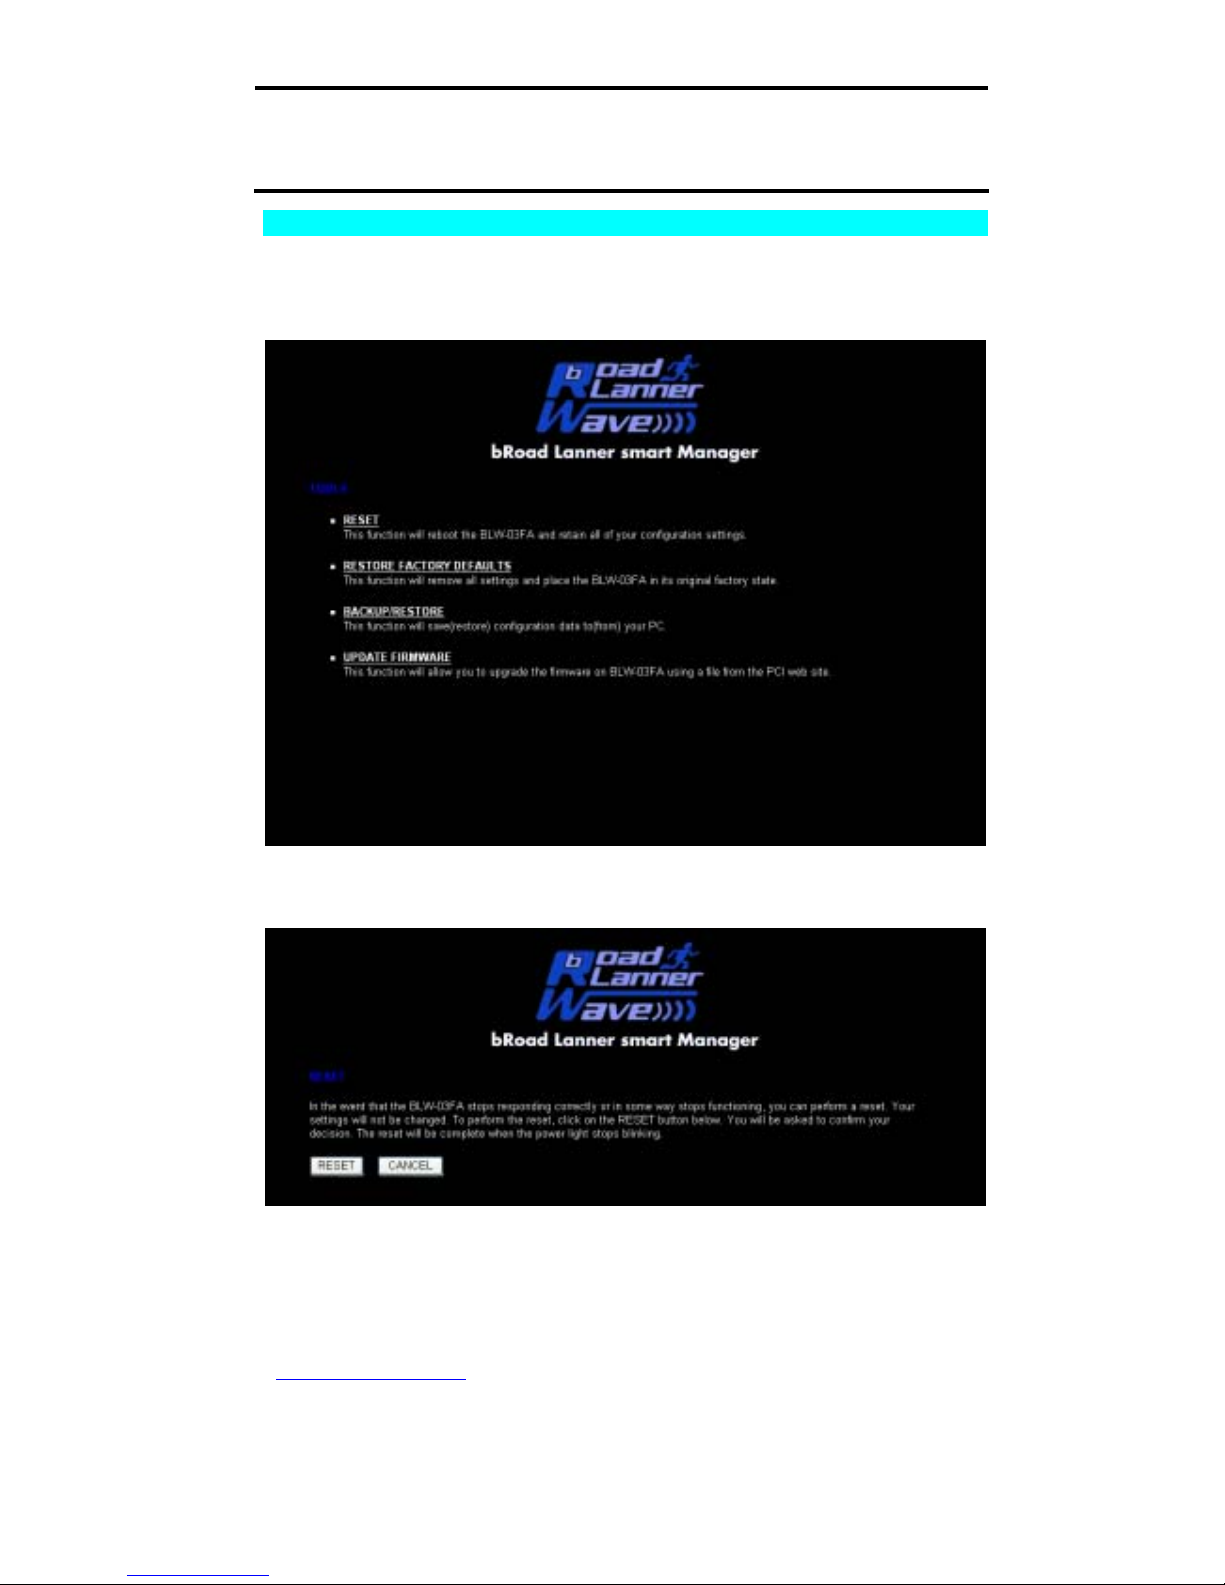
The Status screen displays WAN/LAN connection status, firmware, and hardware version
numbers, illegal attempts to access your network, as well as information on DHCP clients
connected to your network.
The following items are included on this screen:
Section Description
INTERNET Displays WAN connection type and status.
GATEWAY Displays system IP settings, as well as DHCP and
Firewall status.
INFORMATION Displays the number of attached clients, the firmware versions,
the physical MAC address for each media interface, as well as the
hardware version and serial number.
Security Log Displays illegal attempts to access your network.
Save Click on this button to save a security log file.
Clear Click on this button to delete the access log.
Refresh Click on this button to refresh the screen.
DHCP Client Log Displays information on all DHCP clients on your
Page 17
PLANEX COMMUNICATIONS INC.
http://www.planex.com.tw/ TEL+886-2-22191816 FAX +886-2-22190655 Page 15
network.
Release Click on this button to confirm Dynamic settings.
Renew Click on this button to refresh Dynamic settings.
TOOLS
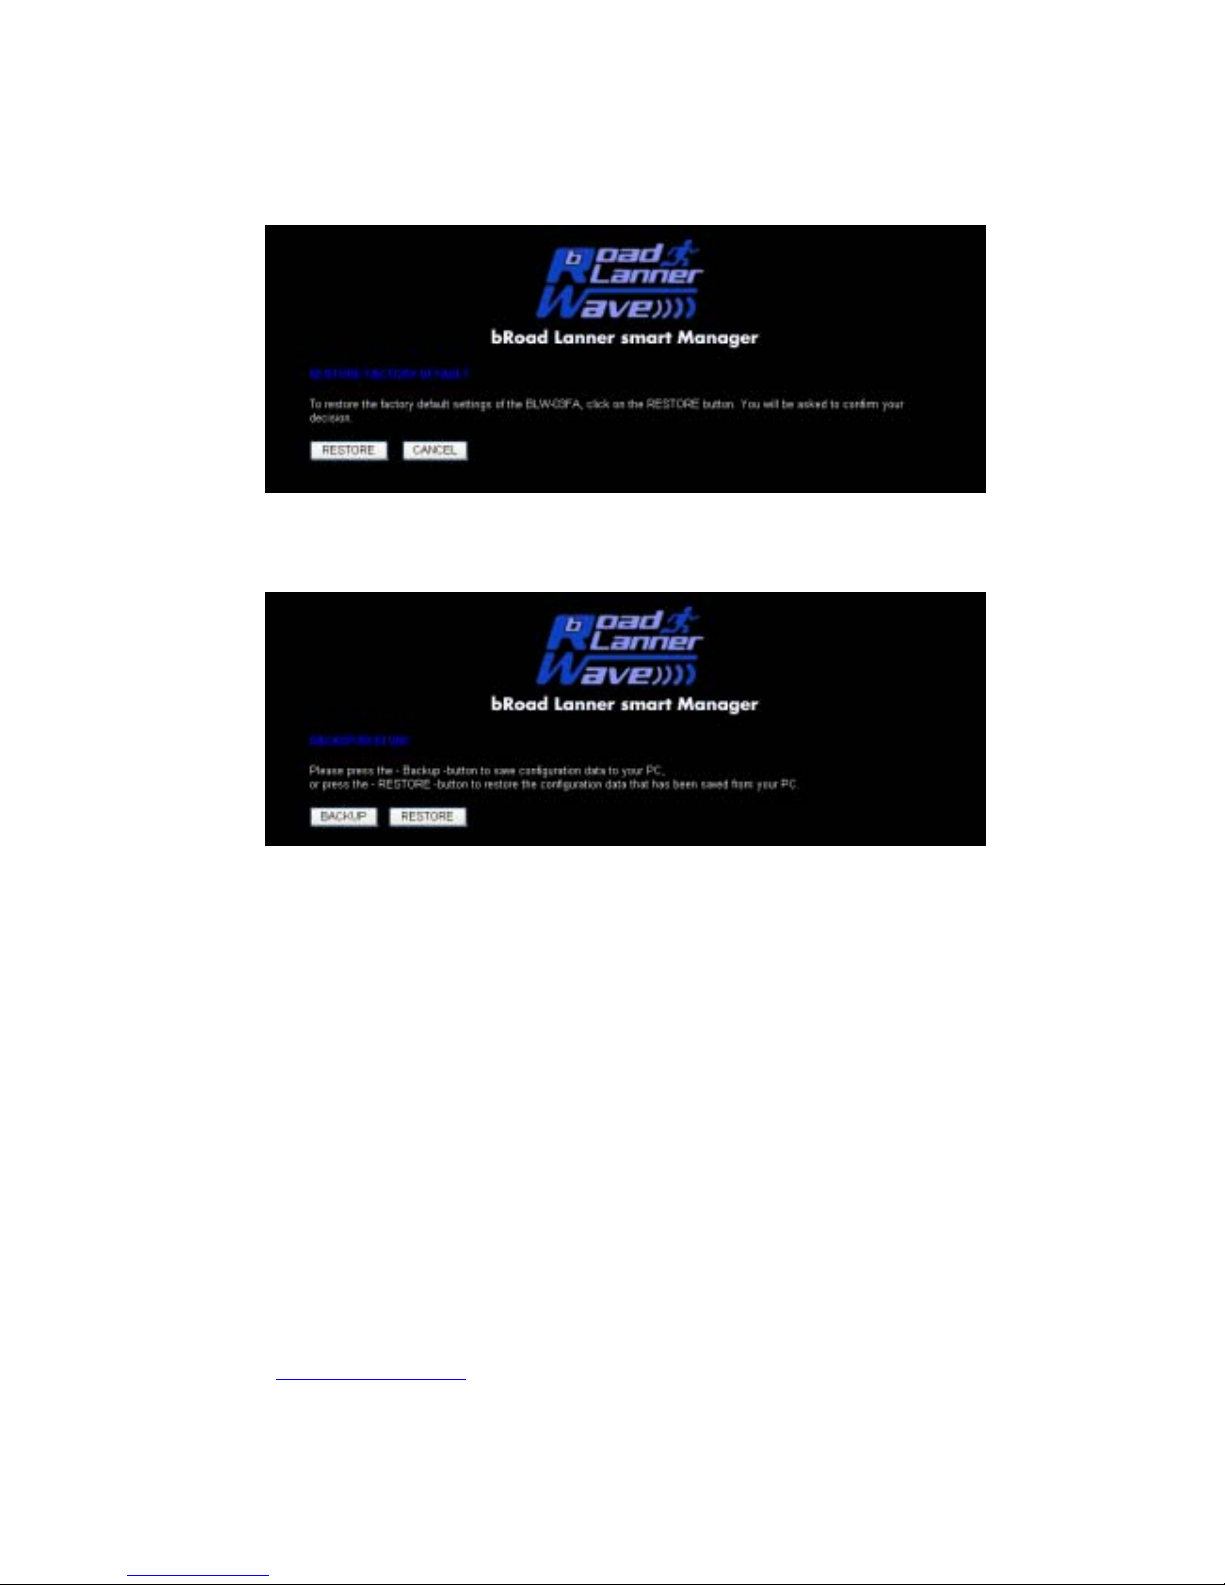
Use the “Tools” menu to backup the current configuration, restore a previously saved
configuration, restore factory settings, update firmware, and reset the BLW-03FA.
Configuration Tools
Choose a function and click.
RESET
Click “Apply” to reset the BLW-03FA. The reset will be complete when the power LED
stops blinking.
Page 18
PLANEX COMMUNICATIONS INC.
http://www.planex.com.tw/ TEL+886-2-22191816 FAX +886-2-22190655 Page 16
Note: If you use the Reset button on the rear panel, the BLW-03FA performs a power reset. If
the button is held depressed for over 5 seconds, all the LEDs will illuminate and the factory
settings will be restored.
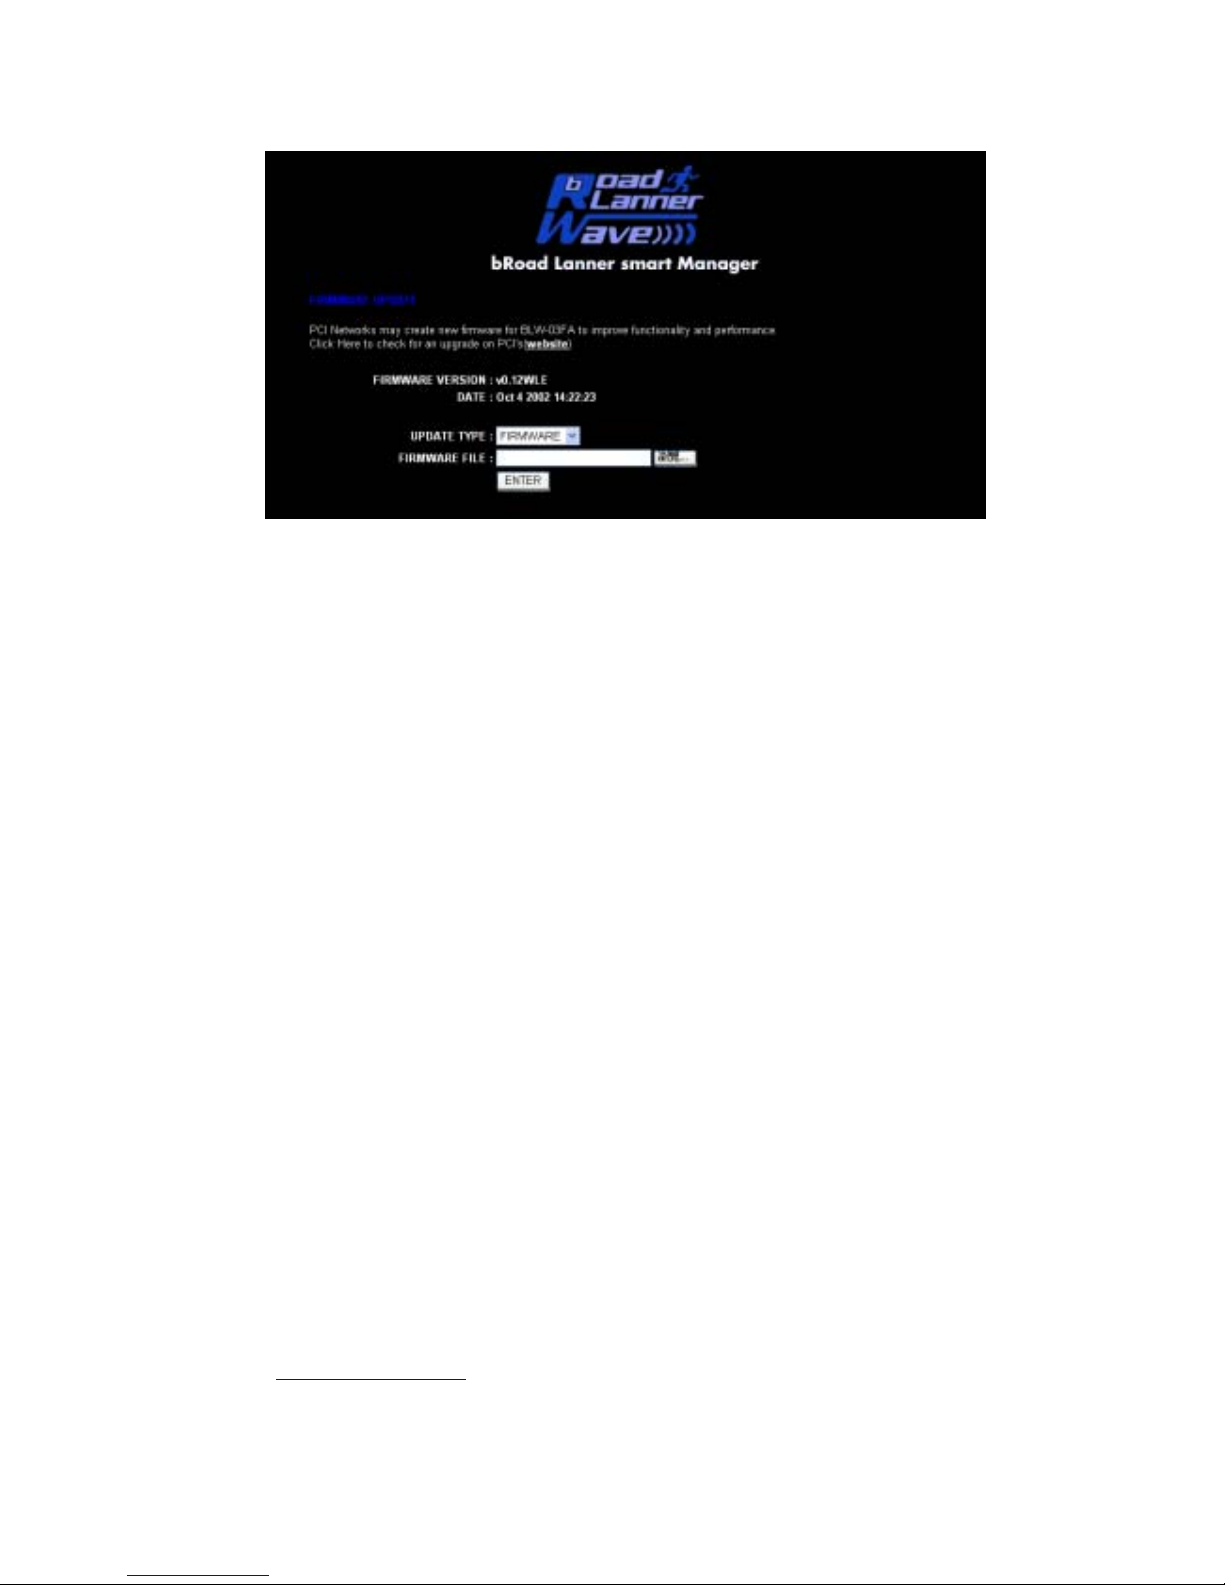
Restore Factory Defaults
You can click the Reset to Default button to reset the settings of this device to the default
values
BACKUP / RESTORE
Backup allows you to save the BLW-03FA’s configuration to a file. You can then check
“Restore” to restore the saved backup configuration file. “Restore to factory defaults” resets the
Baricade to the original settings.
Page 19
PLANEX COMMUNICATIONS INC.
http://www.planex.com.tw/ TEL+886-2-22191816 FAX +886-2-22190655 Page 17
FIRMWARE UPDATE
This tool permits easy downloading of the latest Firmware. Download the upgrade file from the
PCI website (www.planex.com.tw) and save it to your hard drive. Browse for the file and then
click “Apply”. Check the Status page Information section to confirm that the upgrade process
was successful.
Page 20
PLANEX COMMUNICATIONS INC.
http://www.planex.com.tw/ TEL+886-2-22191816 FAX +886-2-22190655 Page 18
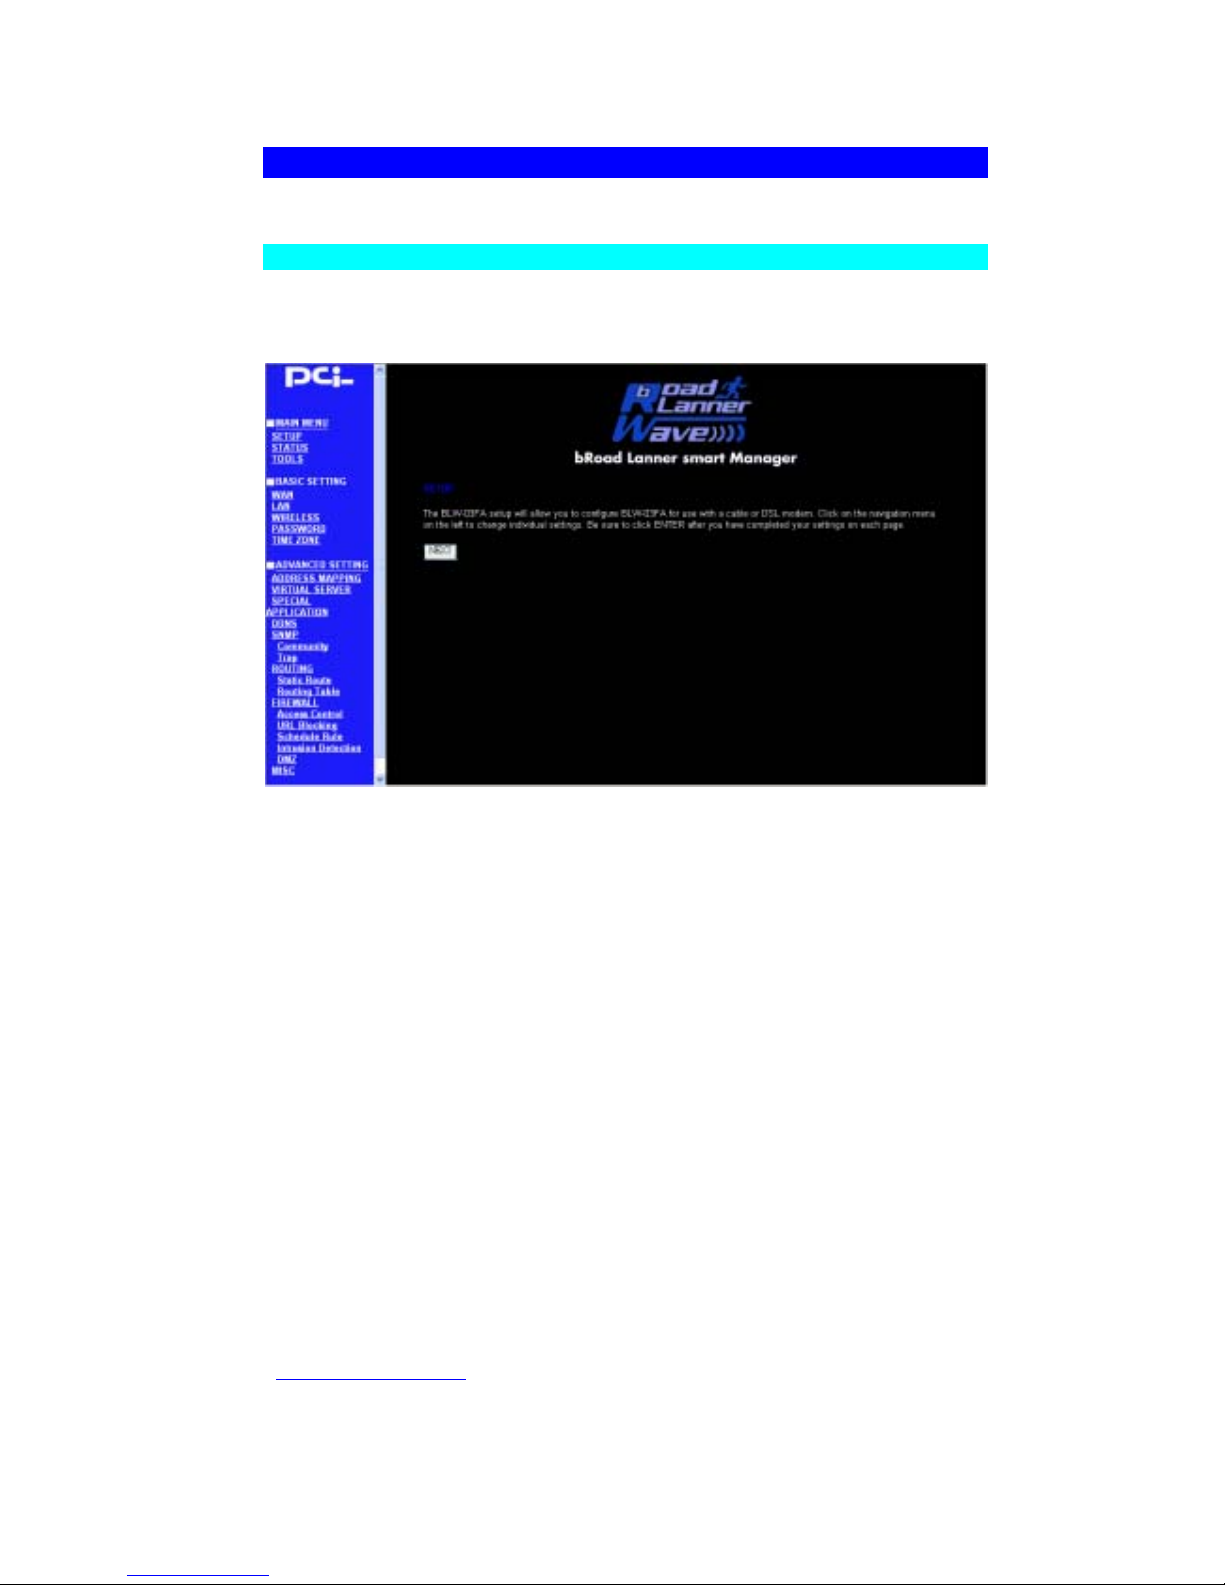
Basic Setting
WAN
Specify the WAN connection type provided by your Internet Service Provider, then click
“More Configuration” to enter detailed configuration parameters for the selected
connection type.
Page 21
PLANEX COMMUNICATIONS INC.
http://www.planex.com.tw/ TEL+886-2-22191816 FAX +886-2-22190655 Page 19
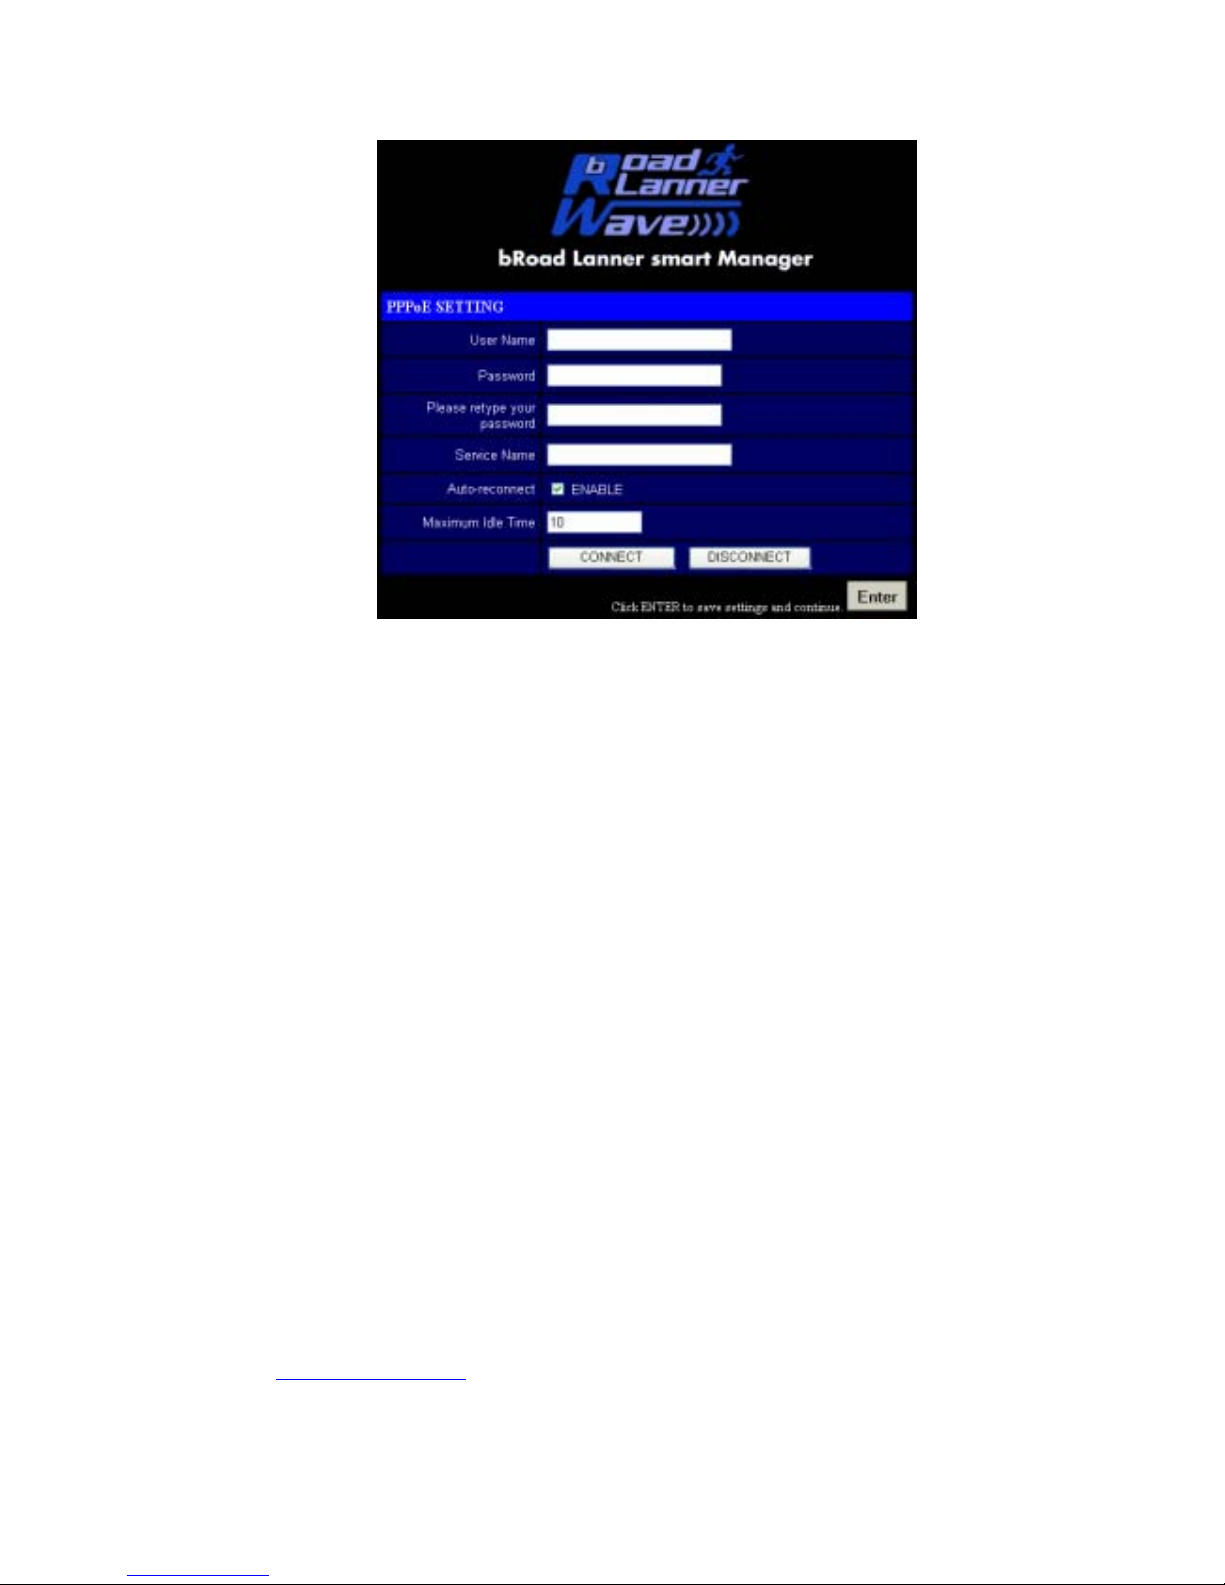
PPP over Ethernet
Enter the PPPoE user name and password assigned by your Service Provider. The Service
Name is normally optional, but may be required by some service providers.
The MTU (Maximum Transmission Unit) governs the maximum size of the data packets.
Leave this on the default value (1492) unless you have a particular reason to change it.
Enter a Maximum Idle Time (in minutes) to define a maximum period of time for which
the Internet connection is maintained during inactivity. If the connection is inactive for
longer than the Maximum Idle Time, it will be dropped. Enable the Auto-reconnect
option to automatically re-establish the connection when an application attempts to
access the Internet again.
Page 22
PLANEX COMMUNICATIONS INC.
http://www.planex.com.tw/ TEL+886-2-22191816 FAX +886-2-22190655 Page 20
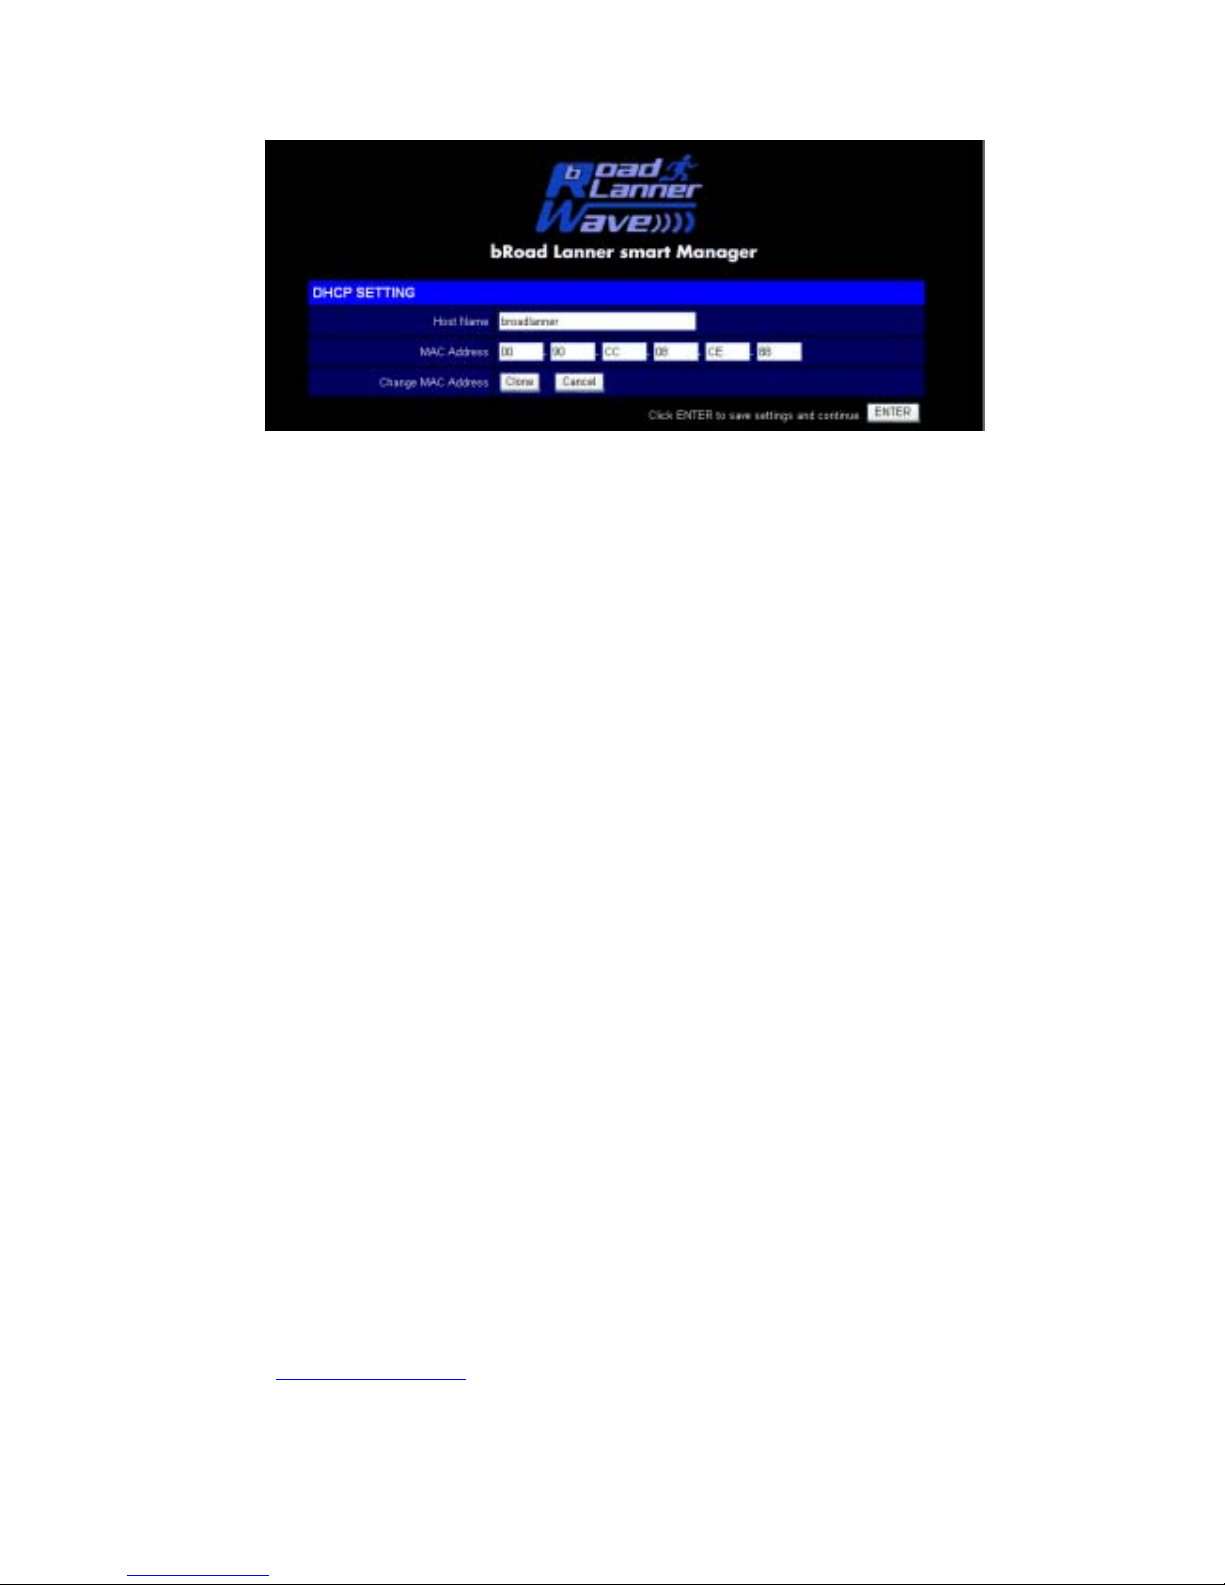
Dynamic IP
The Host Name is optional, but may be required by some ISPs. The default MAC address
is set to the WAN’s physical interface on the BLW-03FA. Use this address when
registering for Internet service, and do not change it unless required by your ISP. If your
ISP used the MAC address of an Ethernet card as an identifier when first setting up your
broadband account, connect only the PC with the registered MAC address to the BLW03FA and click the “Clone MAC Address” button. This will replace the current BLW03FA MAC address with the already registered Ethernet card MAC address.
If you are unsure of which PC was originally set up by the broadband technician, call
your ISP and request they register a new MAC address for your account. Register using
the default BLW-03FA MAC address.
Page 23
PLANEX COMMUNICATIONS INC.
http://www.planex.com.tw/ TEL+886-2-22191816 FAX +886-2-22190655 Page 21
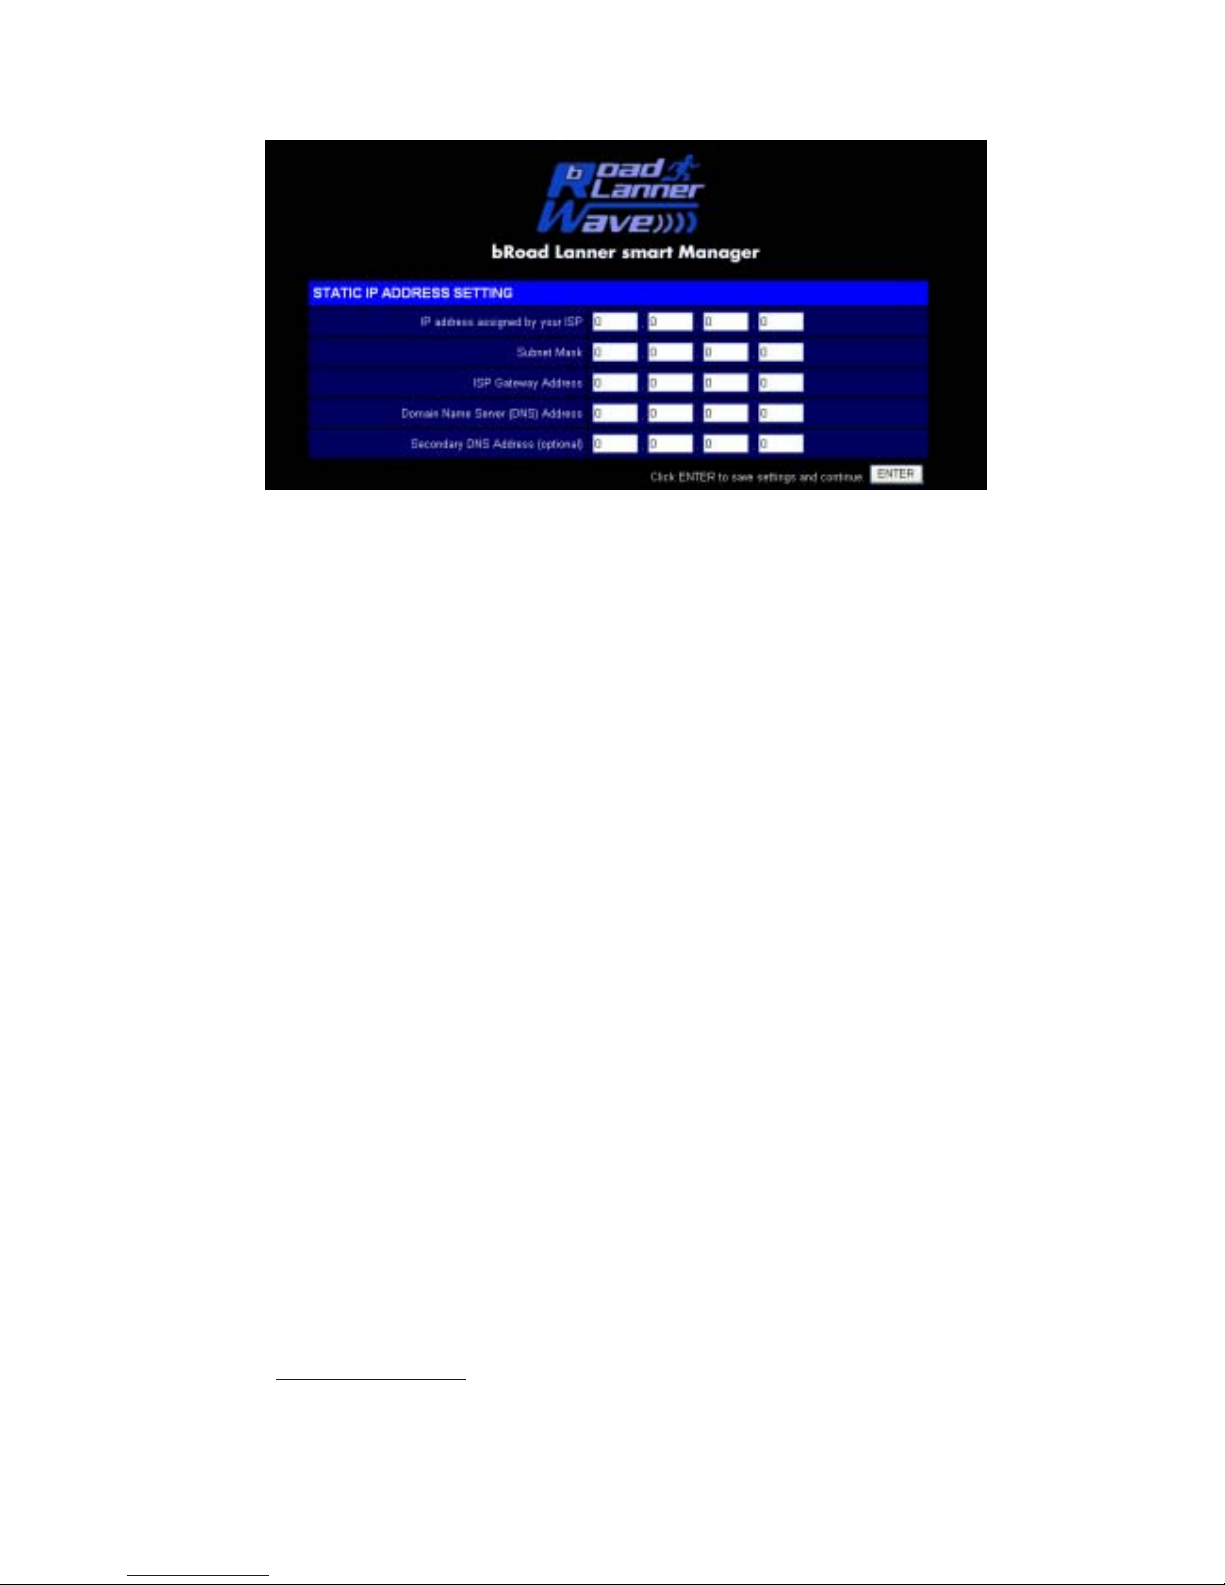
Static IP Address Setting
If your Internet Service Provider has assigned a fixed IP address, enter the assigned
address and subnet mask for the Wireless Barricade, then enter the gateway address of
your ISP. You may need a fixed address if you want to provide Internet services, such as
a web server, or FTP server.
Page 24
PLANEX COMMUNICATIONS INC.
http://www.planex.com.tw/ TEL+886-2-22191816 FAX +886-2-22190655 Page 22
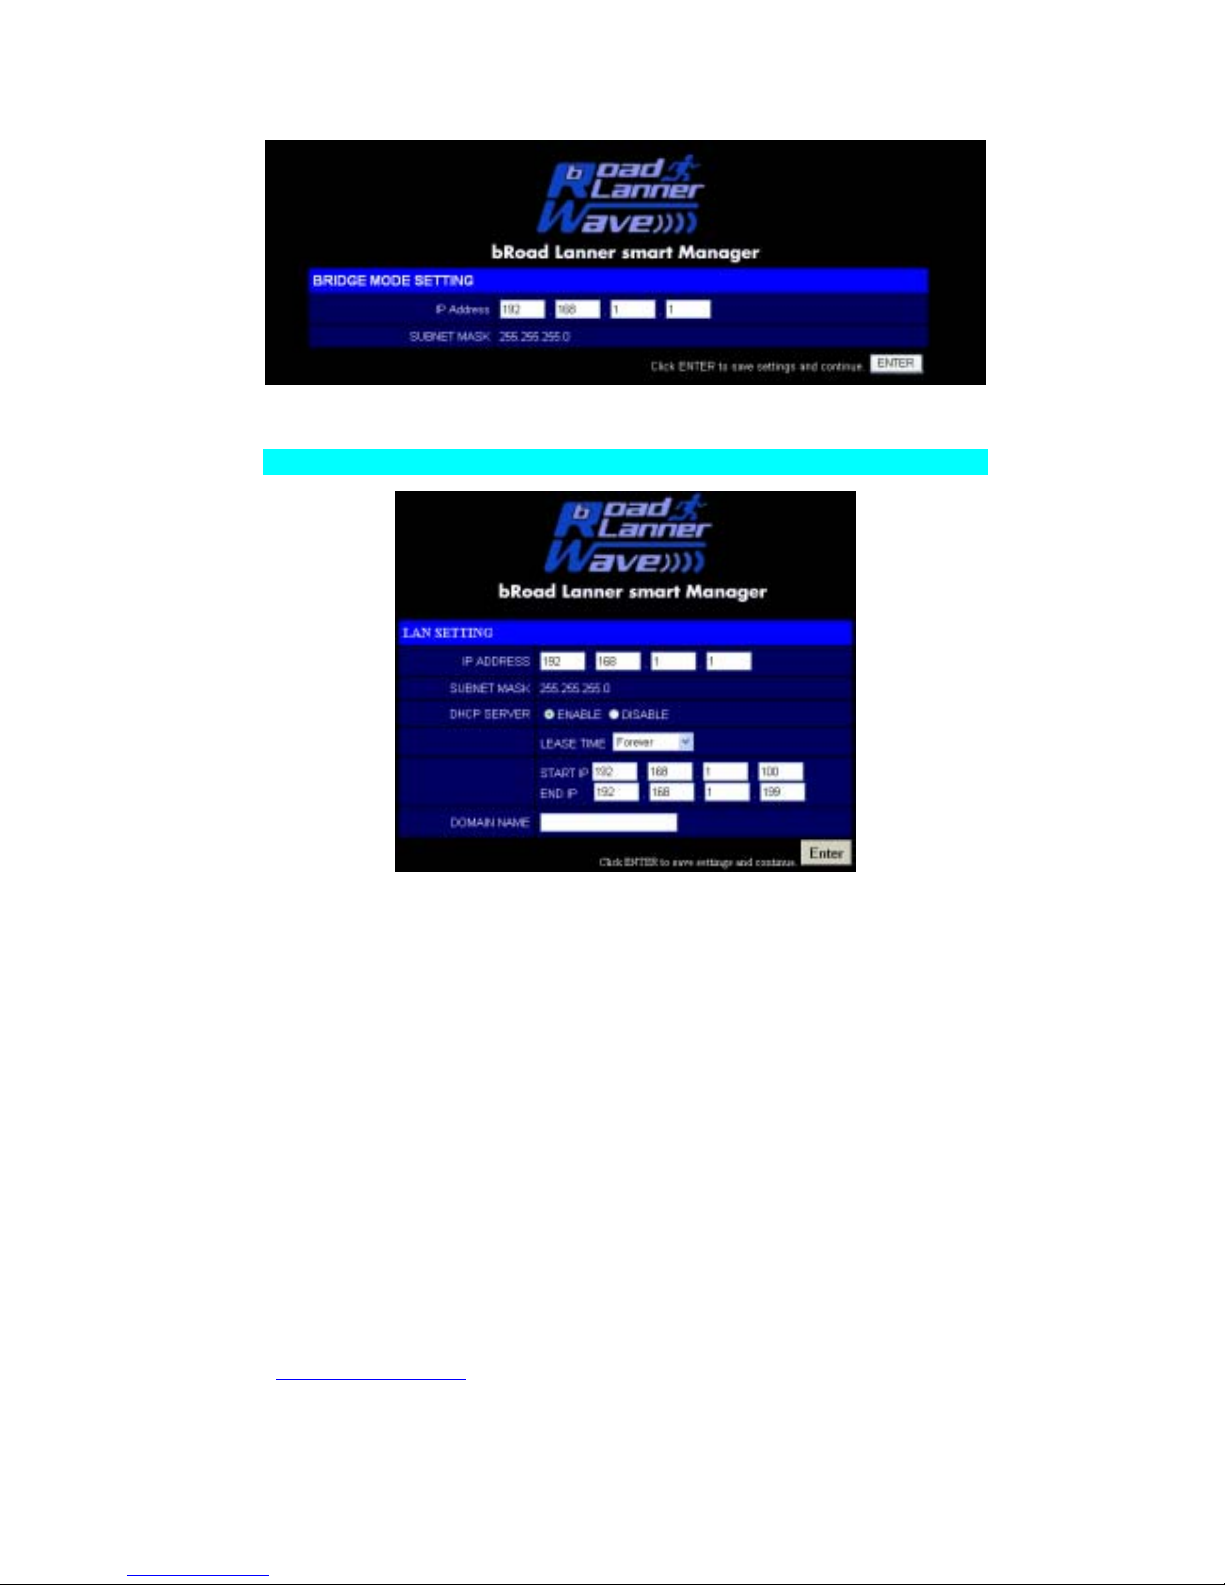
Bridge Mode
Use your BLW-03FA as a Bridge
LAN
LAN IP
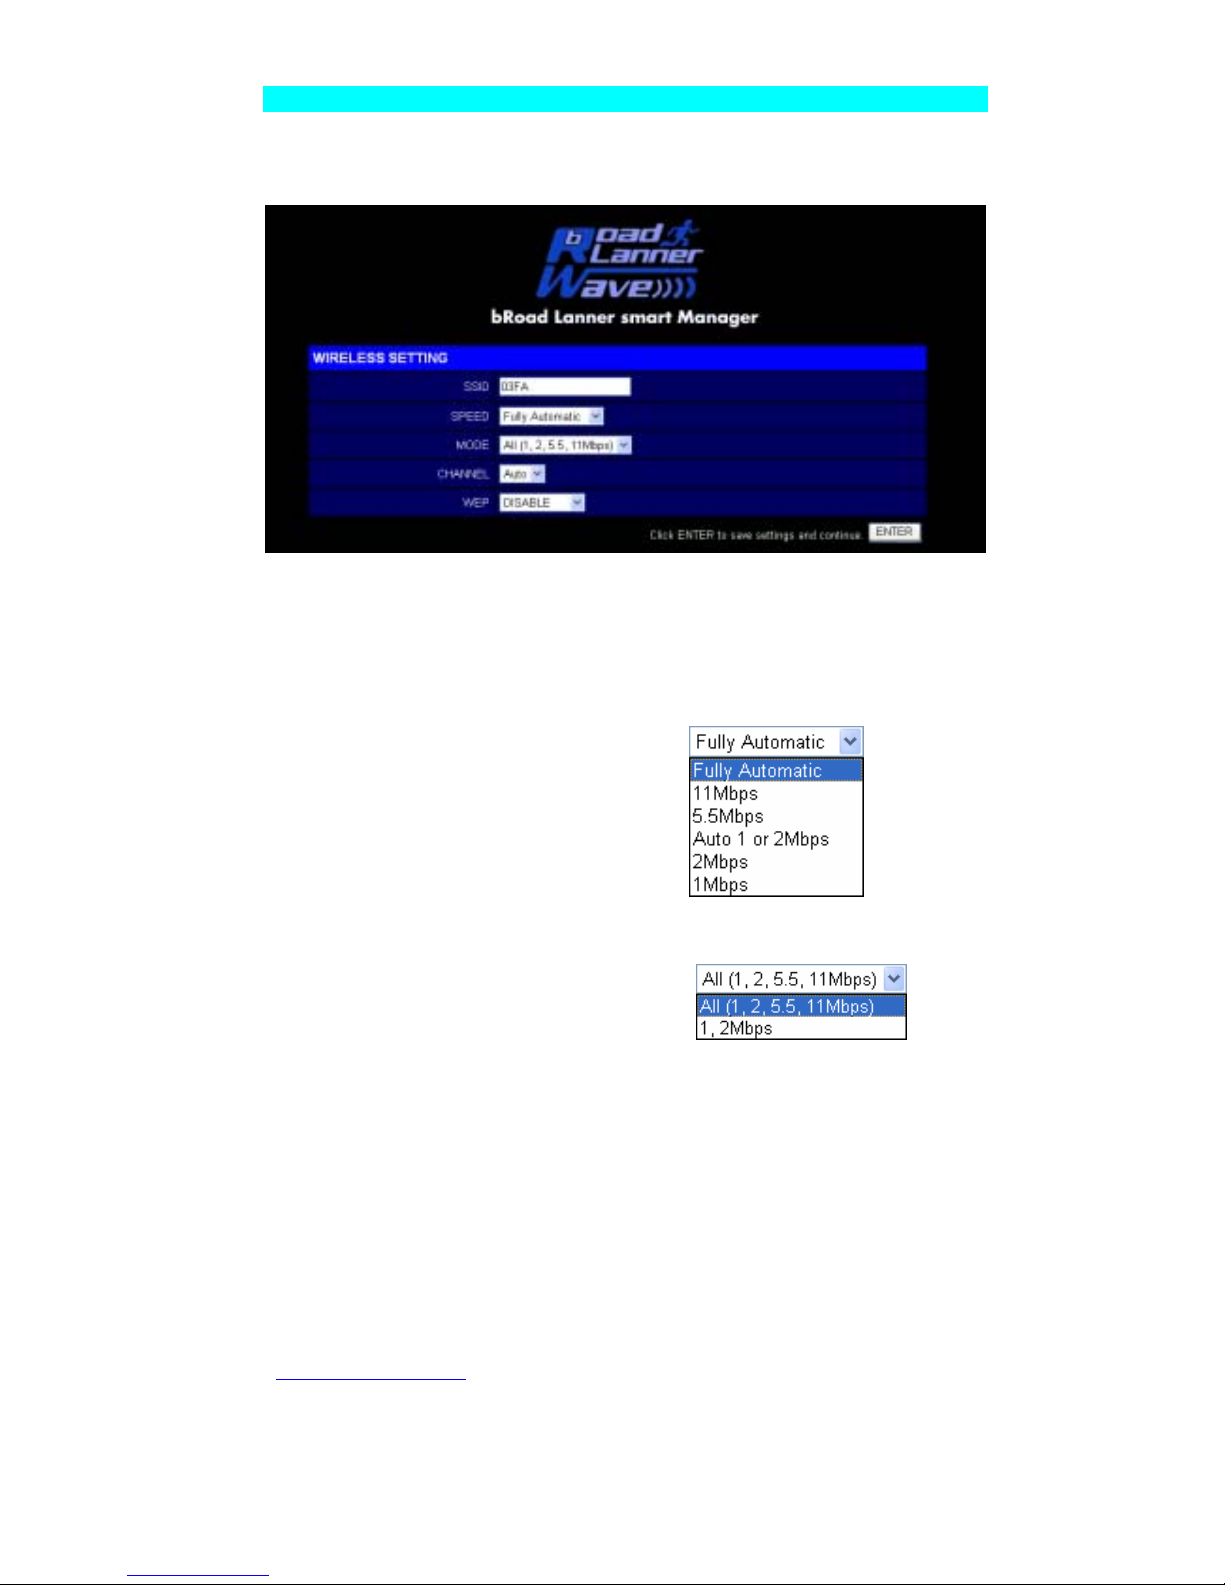
Use the LAN menu to configure the LAN IP address for the BLW-03FA and to enable
the DHCP server for dynamic client address allocation.
Set a period for the lease time if required. For home networks this may be set to
“Forever”, which means there is no time limit on the IP address lease.
IP Address Pool
A dynamic IP start address may be specified by the user, e.g. 192.168.1.100 (default
value). Once this start IP address has been assigned, IP addresses running from
192.168.1.100 to 192.168.1.199 will be part of the dynamic IP address pool. IP
addresses from 192.168.1.2 to 192.168.1.99, and 192.168.1.200 to 192.168.1.254 will
be available as static IP addresses.
Remember not to include the address of the BLW-03FA in the client address pool. Also
remember to configure your client PCs for dynamic IP address allocation.
Page 25
PLANEX COMMUNICATIONS INC.
http://www.planex.com.tw/ TEL+886-2-22191816 FAX +886-2-22190655 Page 23
Wireless
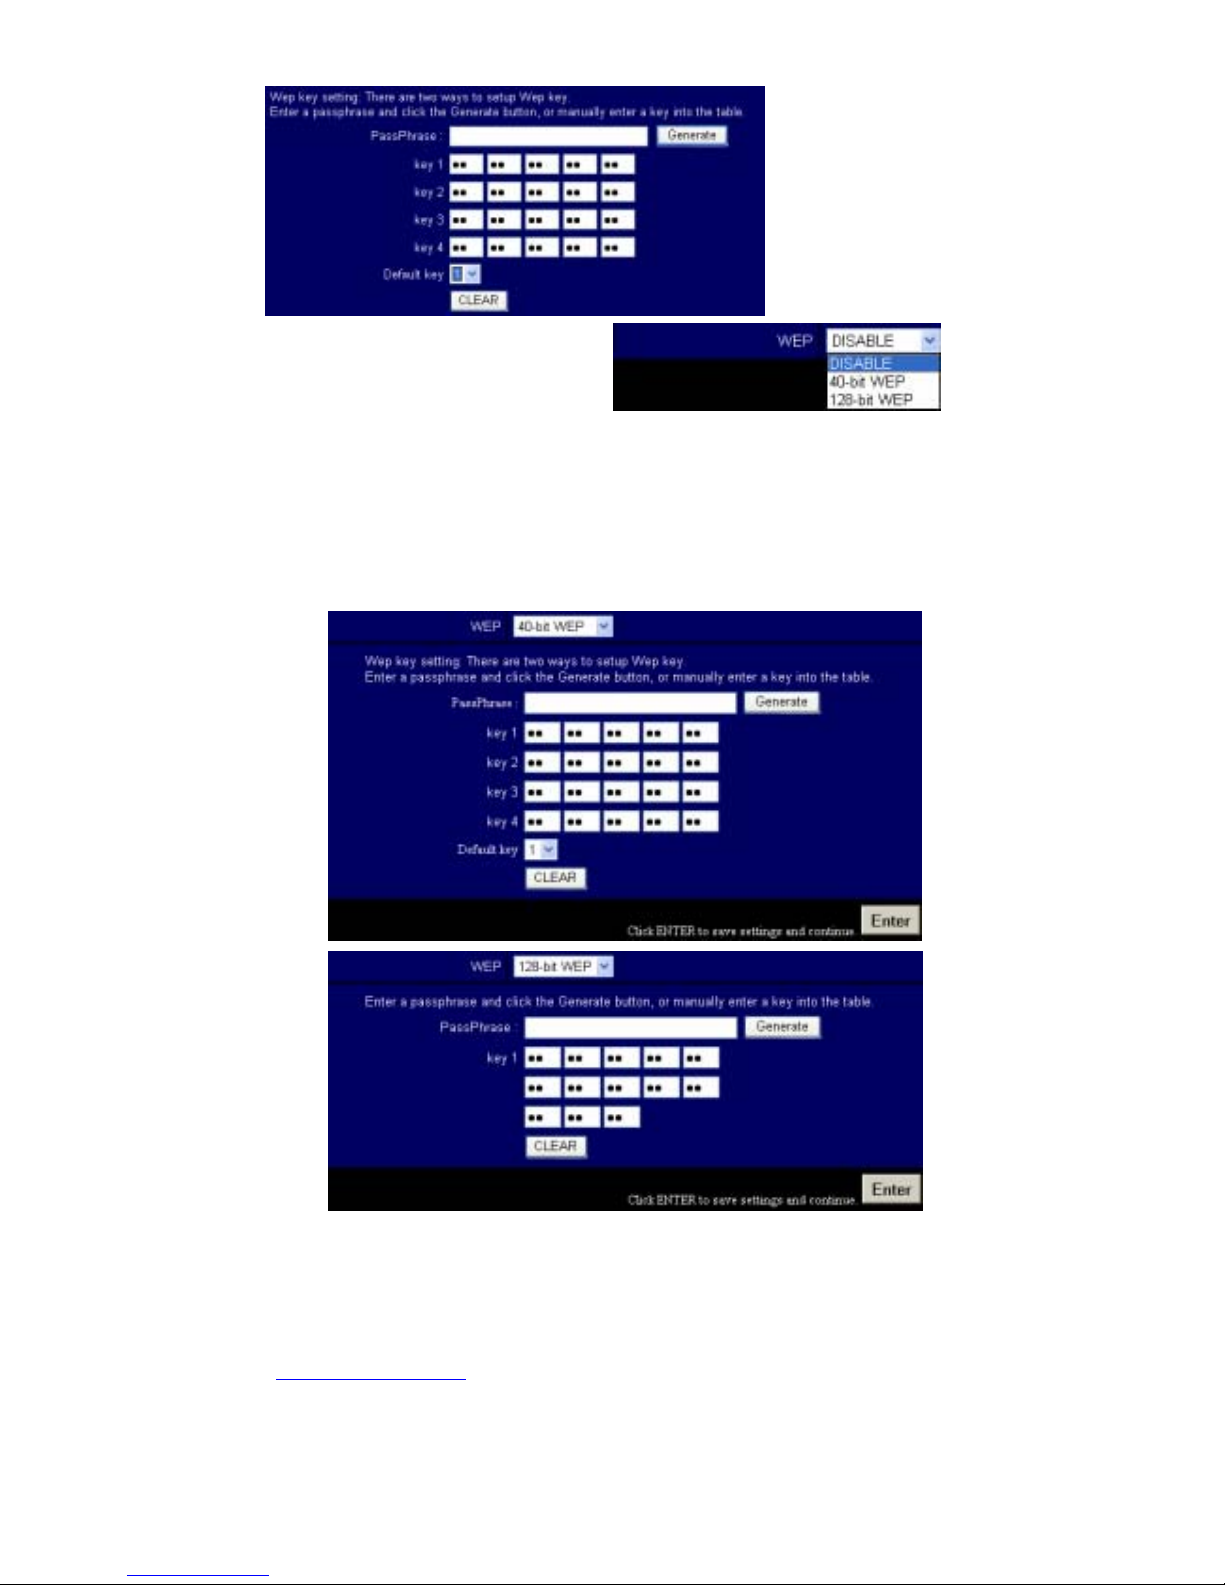
To configure the BLW-03FA as a wireless access point for wireless clients (either
stationary or roaming), all you need to do is define the radio channel, the Service Set
identifier (SSID), and encryption options.
You must specify a common radio channel and SSID (Service Set ID) to be used by the BLW03FA and all of your wireless clients. Be sure you configure all of your clients to the same
values.
SSID: The Service Set ID. This should be set to the same value as other wireless devices in
your network.
Note: The SSID is case sensitive and can consist of up to 32 alphanumeric characters.
Transmission Rate: Set the data rate transmitted from the
BLW-03FA. The lower the data rate, the longer the
transmission distance. (Default: Fully Automatic)
Basic Rate: Select “All (1, 2, 5.5, 11Mbps)” from the
drop-down list to optimize the data transfer speed for
your network. (Default: 1, 2Mbps)
Channel: The radio channel through which the BLW-03FA communicates to PCs in its BSS.
(Default: “Auto”)
Note: The available channel settings are limited to local
regulations, which determine the number of channels
that are available.
Encryption
Page 26
PLANEX COMMUNICATIONS INC.
http://www.planex.com.tw/ TEL+886-2-22191816 FAX +886-2-22190655 Page 24
If you are transmitting sensitive data across
wireless channels, you should enable Wired
Equivalent Privacy (WEP) encryption.
Encryption requires you to use the same set of encryption/decryption keys for the BLW-03FA
and all of your wireless clients. You can choose between standard 64-bit or the more robust
128-bit encryption keys.
You can automatically generate encryption keys or you can manually enter the keys. For
automatic 64-bit security, you enter a passphrase that is used to create four keys (as shown
below). The automatic 128-bit security generates a single key by entering a passphrase.
• If you use encryption, configure the same keys used for the BLW-03FA on each of
your wireless clients. Note that the Wired Equivalent Privacy (WEP) protects data
transmitted between wireless nodes, but does not protect any transmissions over your
wired network or over the Internet
Page 27
PLANEX COMMUNICATIONS INC.
http://www.planex.com.tw/ TEL+886-2-22191816 FAX +886-2-22190655 Page 25
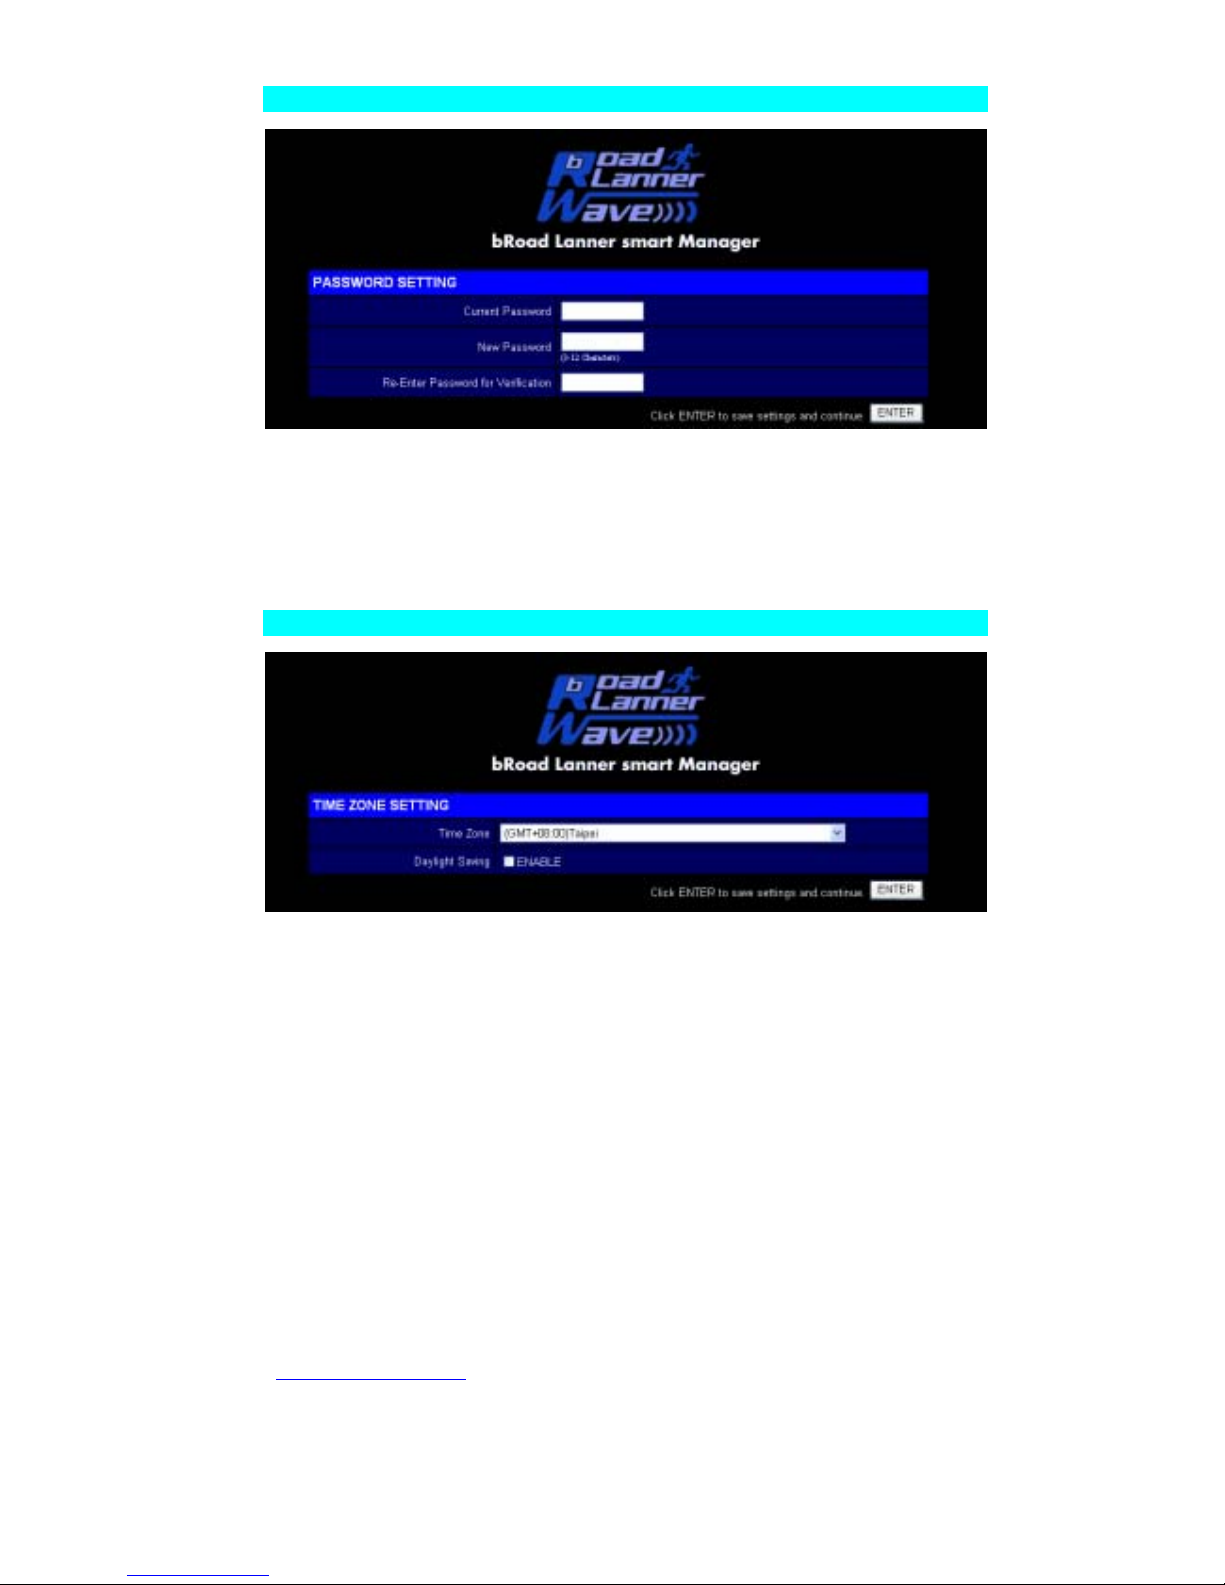
Password
Use this menu to restrict access based on a password. By default, there is no password.
For security you should assign one before exposing the BLW-03FA to the Internet.
Passwords can contain from 3–12 alphanumeric characters and are not case sensitive.
• If your password is lost, or you cannot gain access to the user interface, press the
Reset button on the rear panel (holding it down for at least five seconds) to restore the
factory defaults (default is “0000”).
Time Zone
Sets the time zone for the BLW-03FA. This information is used for log entries and client
access control.
Page 28
PLANEX COMMUNICATIONS INC.
http://www.planex.com.tw/ TEL+886-2-22191816 FAX +886-2-22190655 Page 26
Advanced Setting
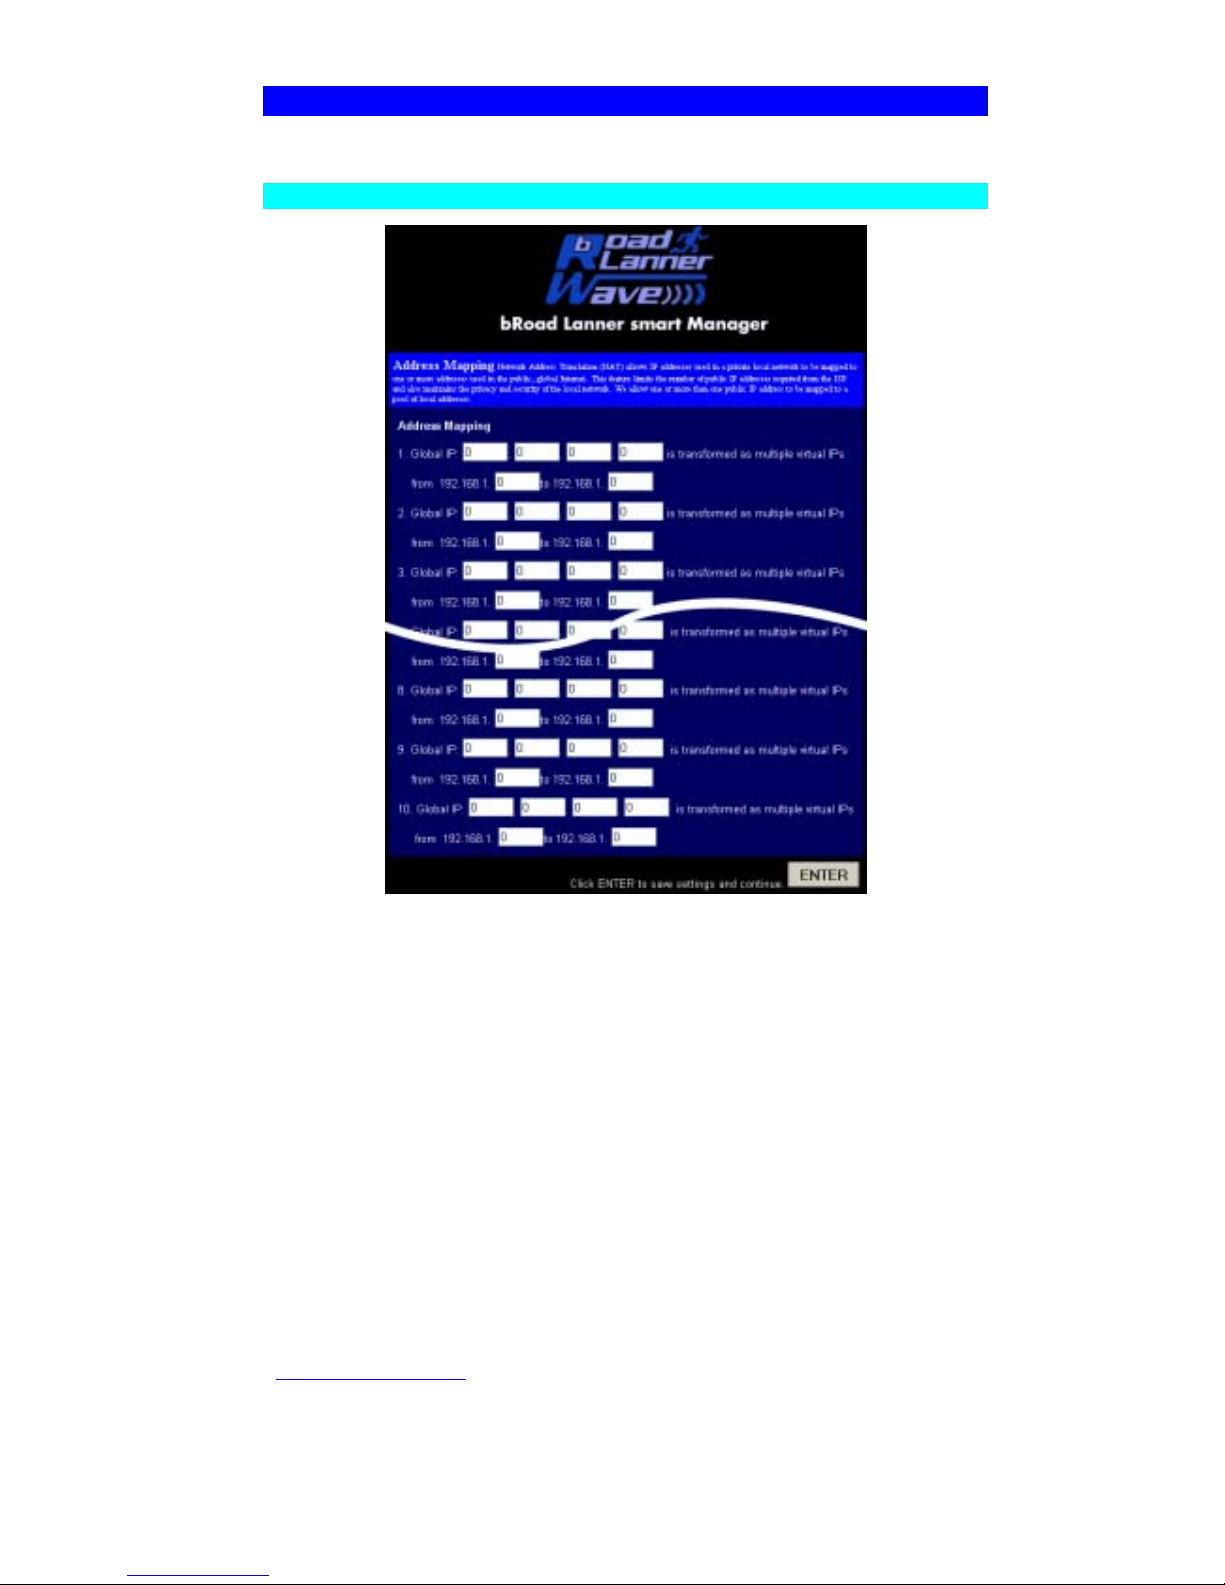
Address Mapping
Allows one or more public IP addresses to be shared by multiple internal users. Enter the
Public IP address you wish to share into the “Global IP” field. Enter a range of internal IPs that
will share the global IP into the “from” field.
Page 29
PLANEX COMMUNICATIONS INC.
http://www.planex.com.tw/ TEL+886-2-22191816 FAX +886-2-22190655 Page 27
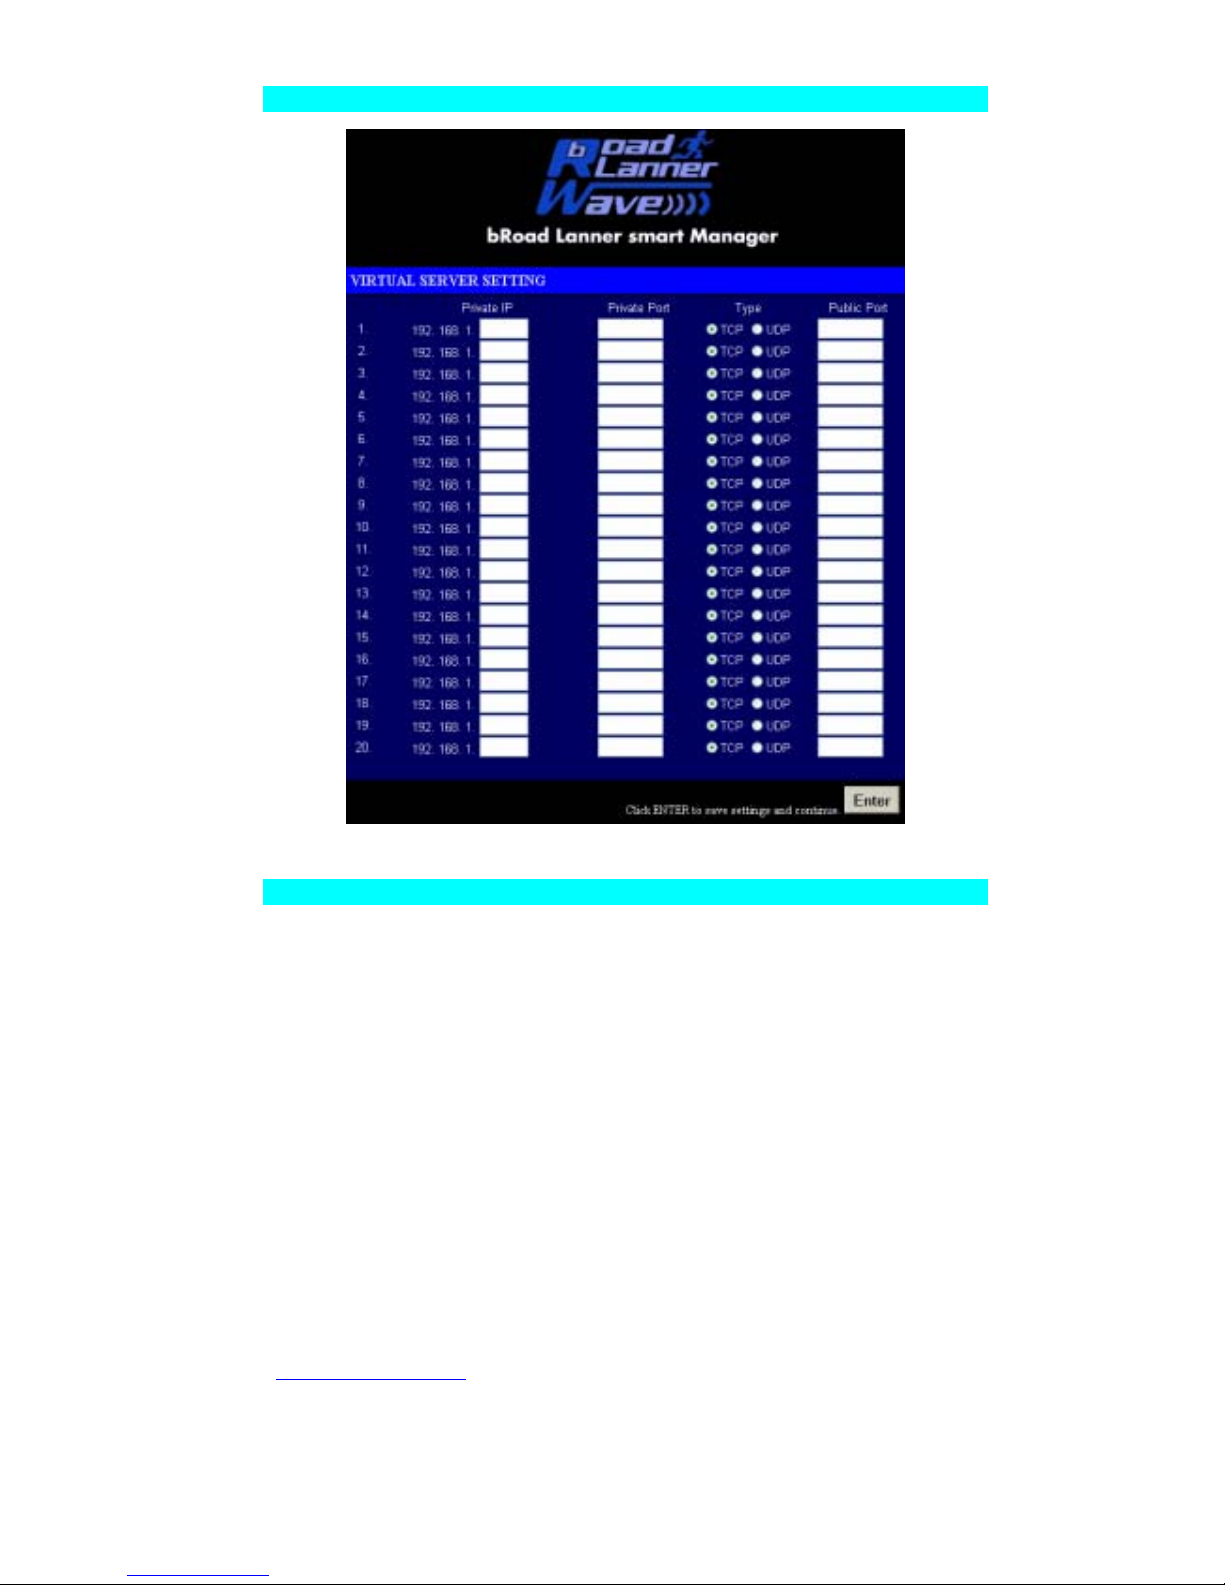
Virtual Server
If you configure the BLW-03FA as a virtual server, remote users accessing services
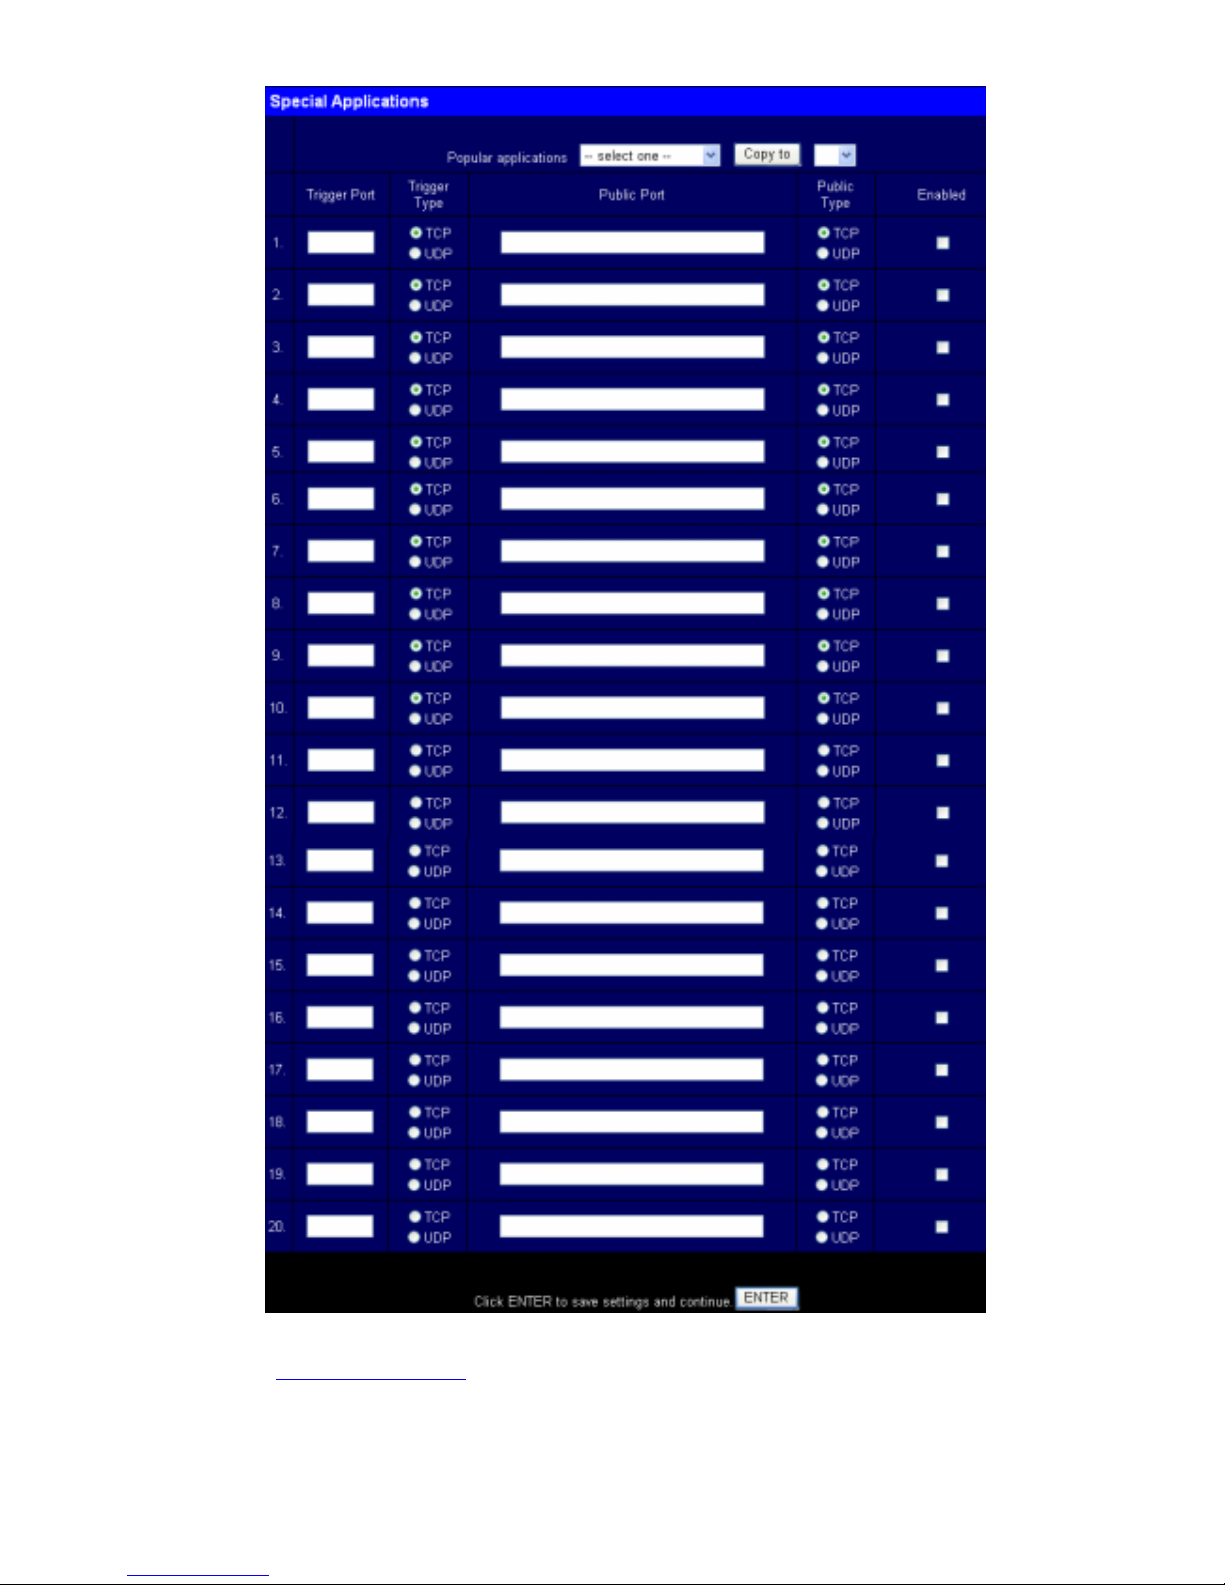
Special Application
Some applications require multiple connections, like Internet games, Video conferencing, and
Internet telephony and so on. Due to the firewall function, these applications can not work with
pure NAT router. Special Applications makes some of these applications to work with NAT
router.
Page 30
PLANEX COMMUNICATIONS INC.
http://www.planex.com.tw/ TEL+886-2-22191816 FAX +886-2-22190655 Page 28
Page 31
PLANEX COMMUNICATIONS INC.
http://www.planex.com.tw/ TEL+886-2-22191816 FAX +886-2-22190655 Page 29
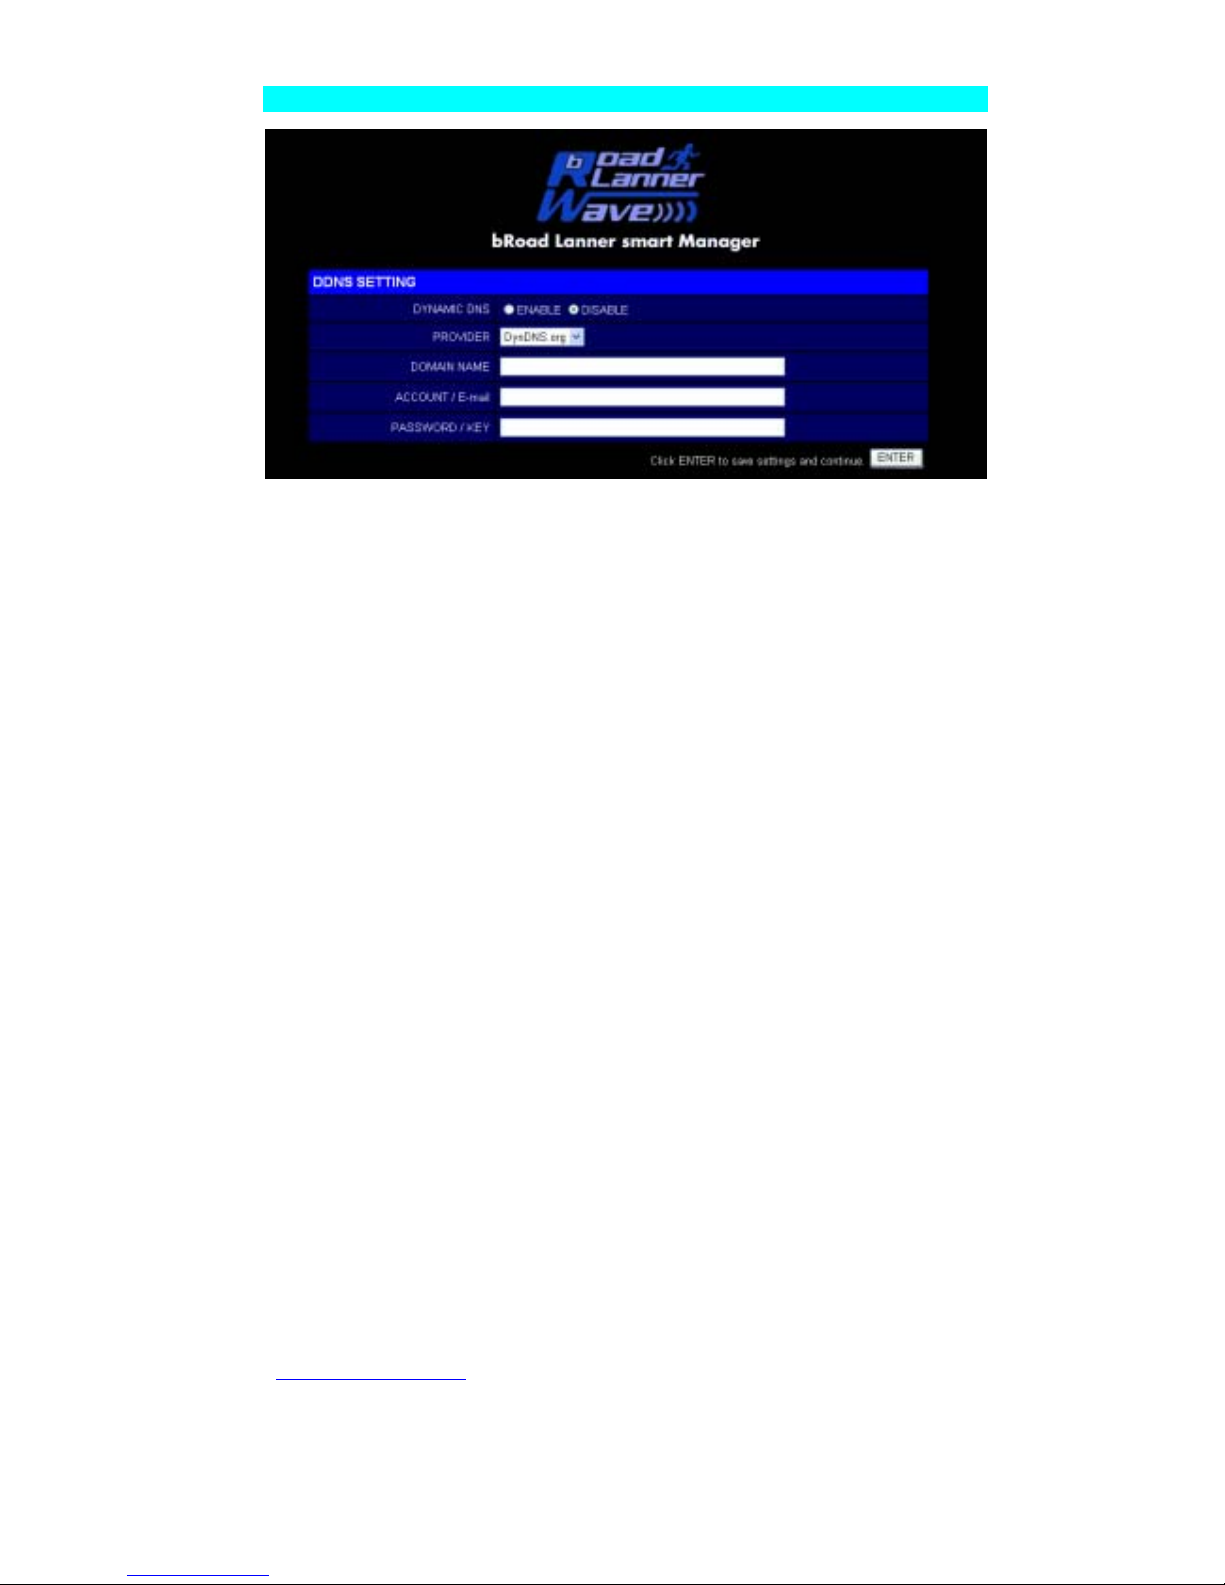
DDNS
Dynamic DNS support enables users to enjoy domain name even they have no fixed IP address.
The proposed system supports the following DDNS providers:
WWW.DYNDNS.ORG
WWW.TZO.COM
All other DDNS providers that support CGI update commands
Page 32
PLANEX COMMUNICATIONS INC.
http://www.planex.com.tw/ TEL+886-2-22191816 FAX +886-2-22190655 Page 30
SNMP
The BLW-03FA provides SNMP settings for community and trap information
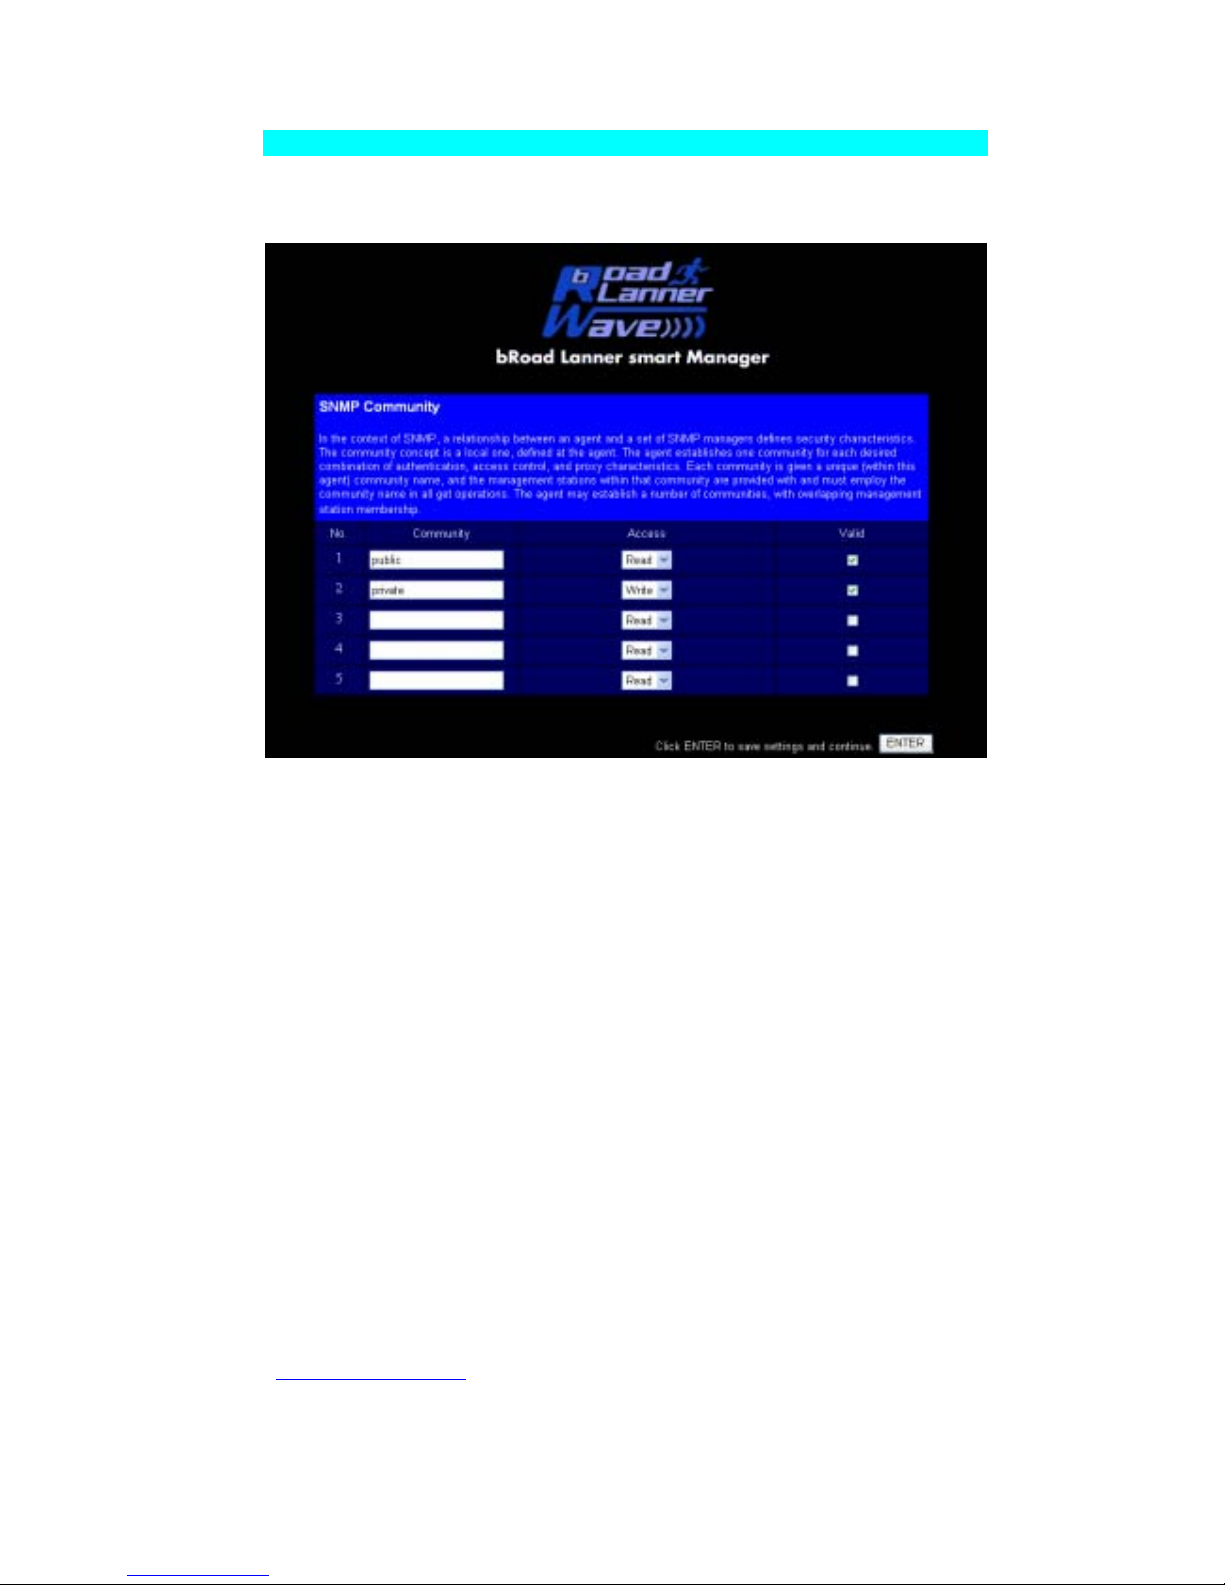
Community
In the context of SNMP, a relationship between an agent and a set of SNMP managers defines
security characteristics. The community concept is a local one, defined at the agent. The agent
establishes one community for each desired combination of authentication, access control, and
proxy characteristics. Each community is given a unique (within this agent) community name,
and the management stations within that community are provided with and must employ the
community name in all get operations. The agent may establish a number of communities, with
overlapping management station membership
Page 33
PLANEX COMMUNICATIONS INC.
http://www.planex.com.tw/ TEL+886-2-22191816 FAX +886-2-22190655 Page 31
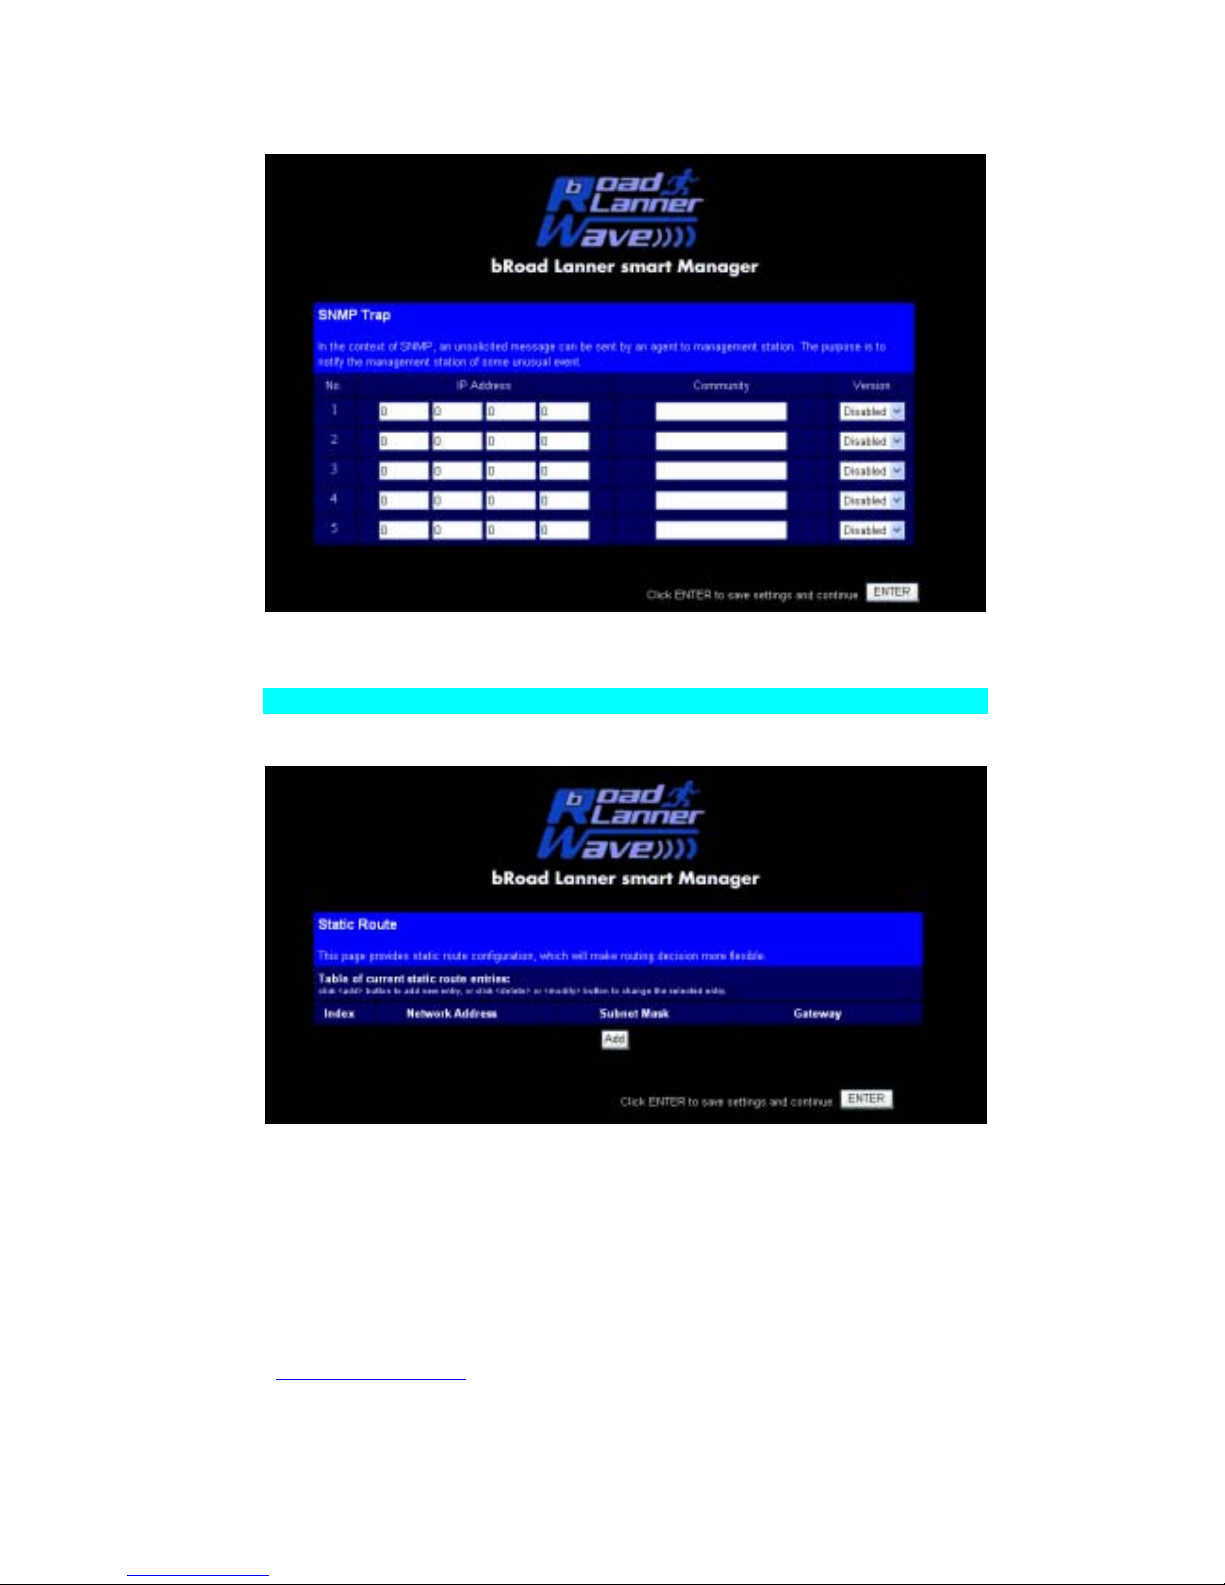
Trap
In the context of SNMP, an unsolicited message can be sent by an agent to management station.
The purpose is to notify the management station of some unusual event
Routing
Static Route
1. Click Add button.
2. Type the destination’s IP address, the net mask, the Gateway IP, and Metric.
3. Click OK button to finish configuration.
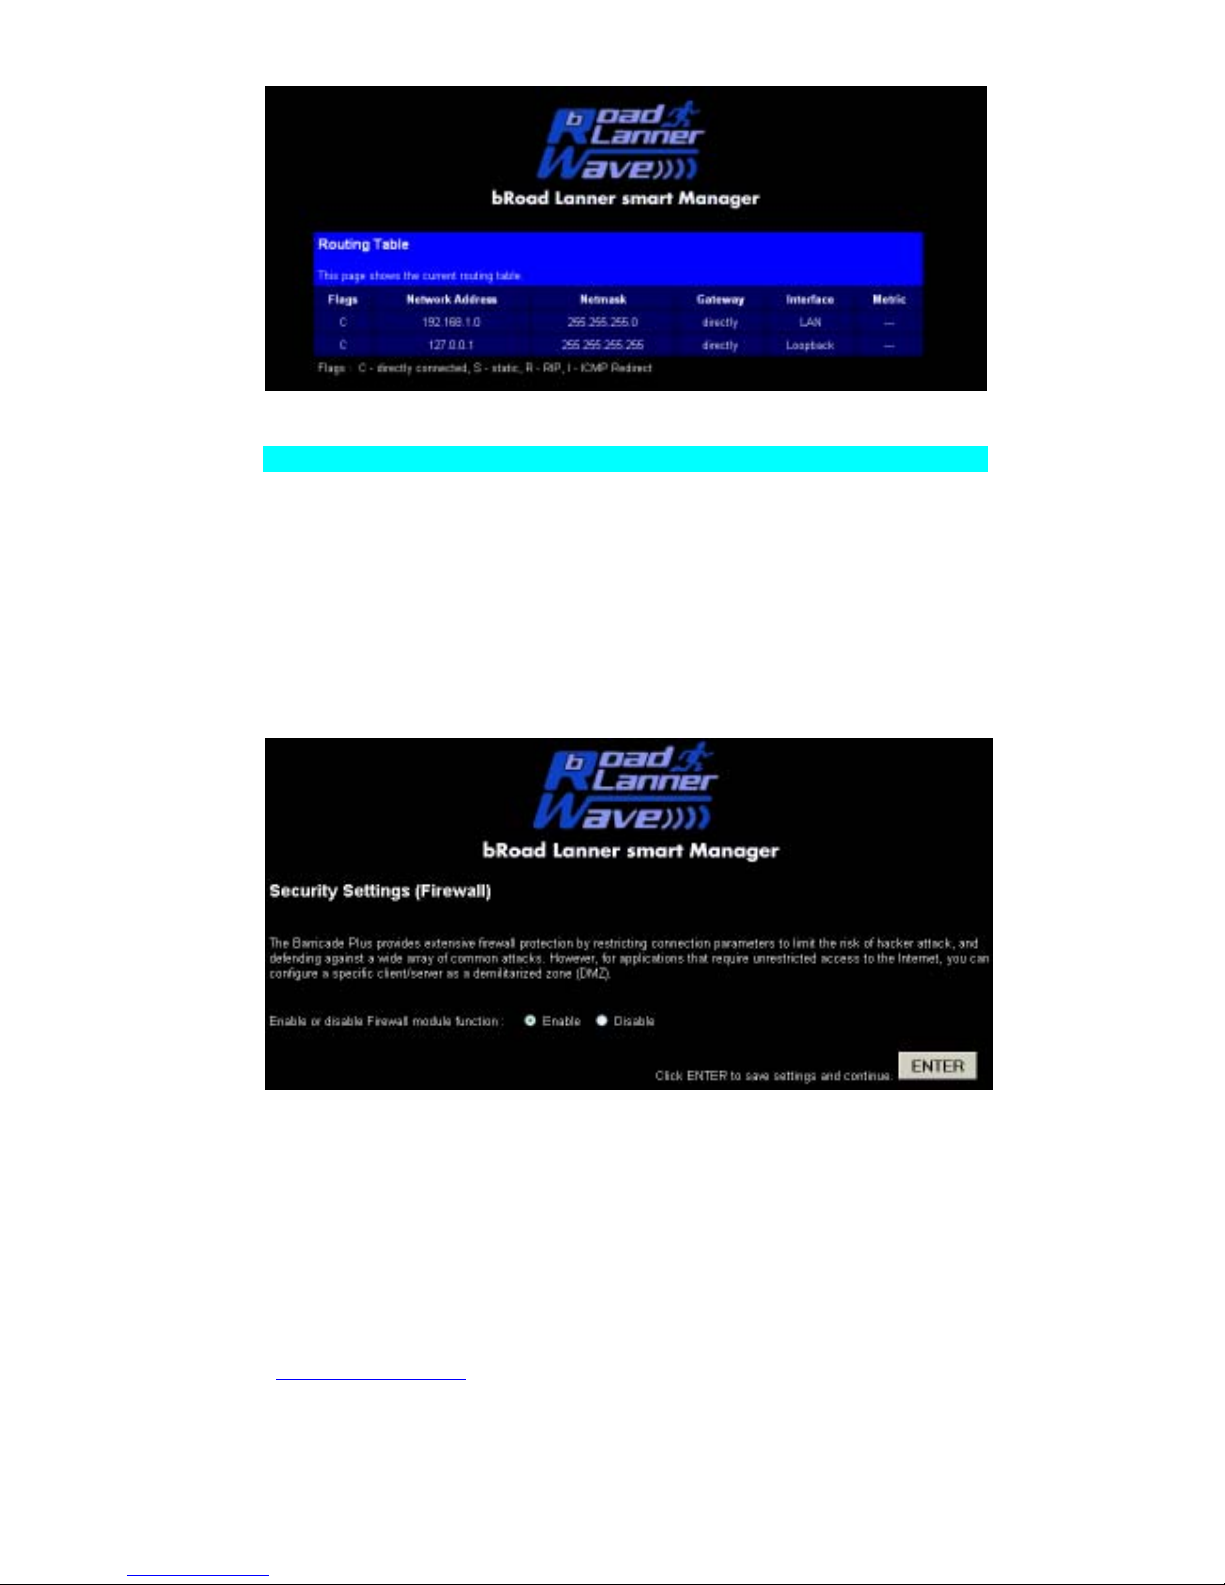
Routing Table
Page 34
PLANEX COMMUNICATIONS INC.
http://www.planex.com.tw/ TEL+886-2-22191816 FAX +886-2-22190655 Page 32
This page shows the current routing table
Firewall
The firewall does not significantly affect system performance, so we advise enabling
it to protect your network users. Select “Enable” and click the “APPLY” button to
open the Firewall submenus.
The BLW-03FA’s firewall can provide the access control of connected client PCs,
block common hacker attacks, including IP Spoofing, Land Attack, Ping of Death, IP
with zero length, Smurf Attack, UDP port loopback, Snork Attack, TCP null scan,
and TCP SYN flooding. The firewall does not significantly affect system
performance, so we advise leaving it enabled to protect your network users.
Note: When you select the “Enable” radio button of the “Enable or disable Firewall
module function” field, be sure to press the “APPLY” button.
Page 35
PLANEX COMMUNICATIONS INC.
http://www.planex.com.tw/ TEL+886-2-22191816 FAX +886-2-22190655 Page 33
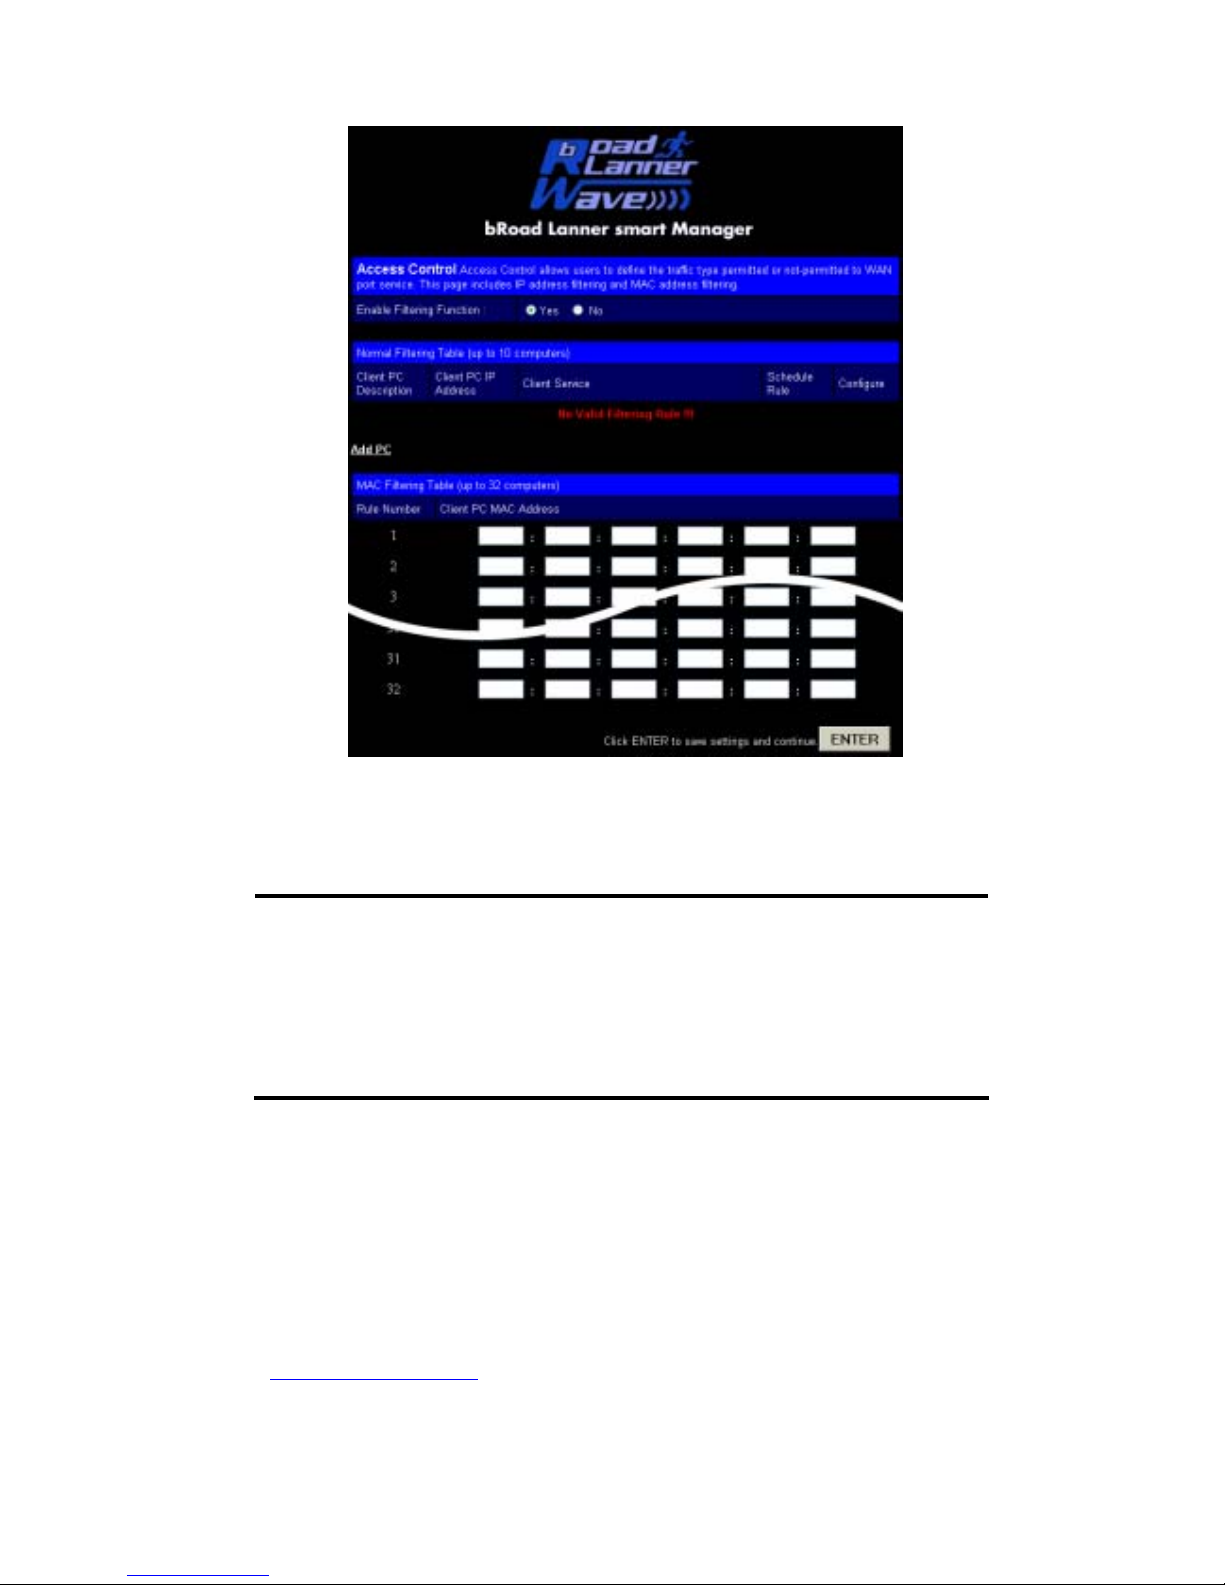
Access Control
Using this option allows you to specify different privileges for the client PCs.
The following items are included in the “Access Control” screen:
Field Description
Normal Filtering Table Displays the IP address and filtering status of the
connected client PC
MAC Filtering Table Displays the MAC address of the client PC
Remote Management Allows you to set the IP address of an
administrator for a remote management
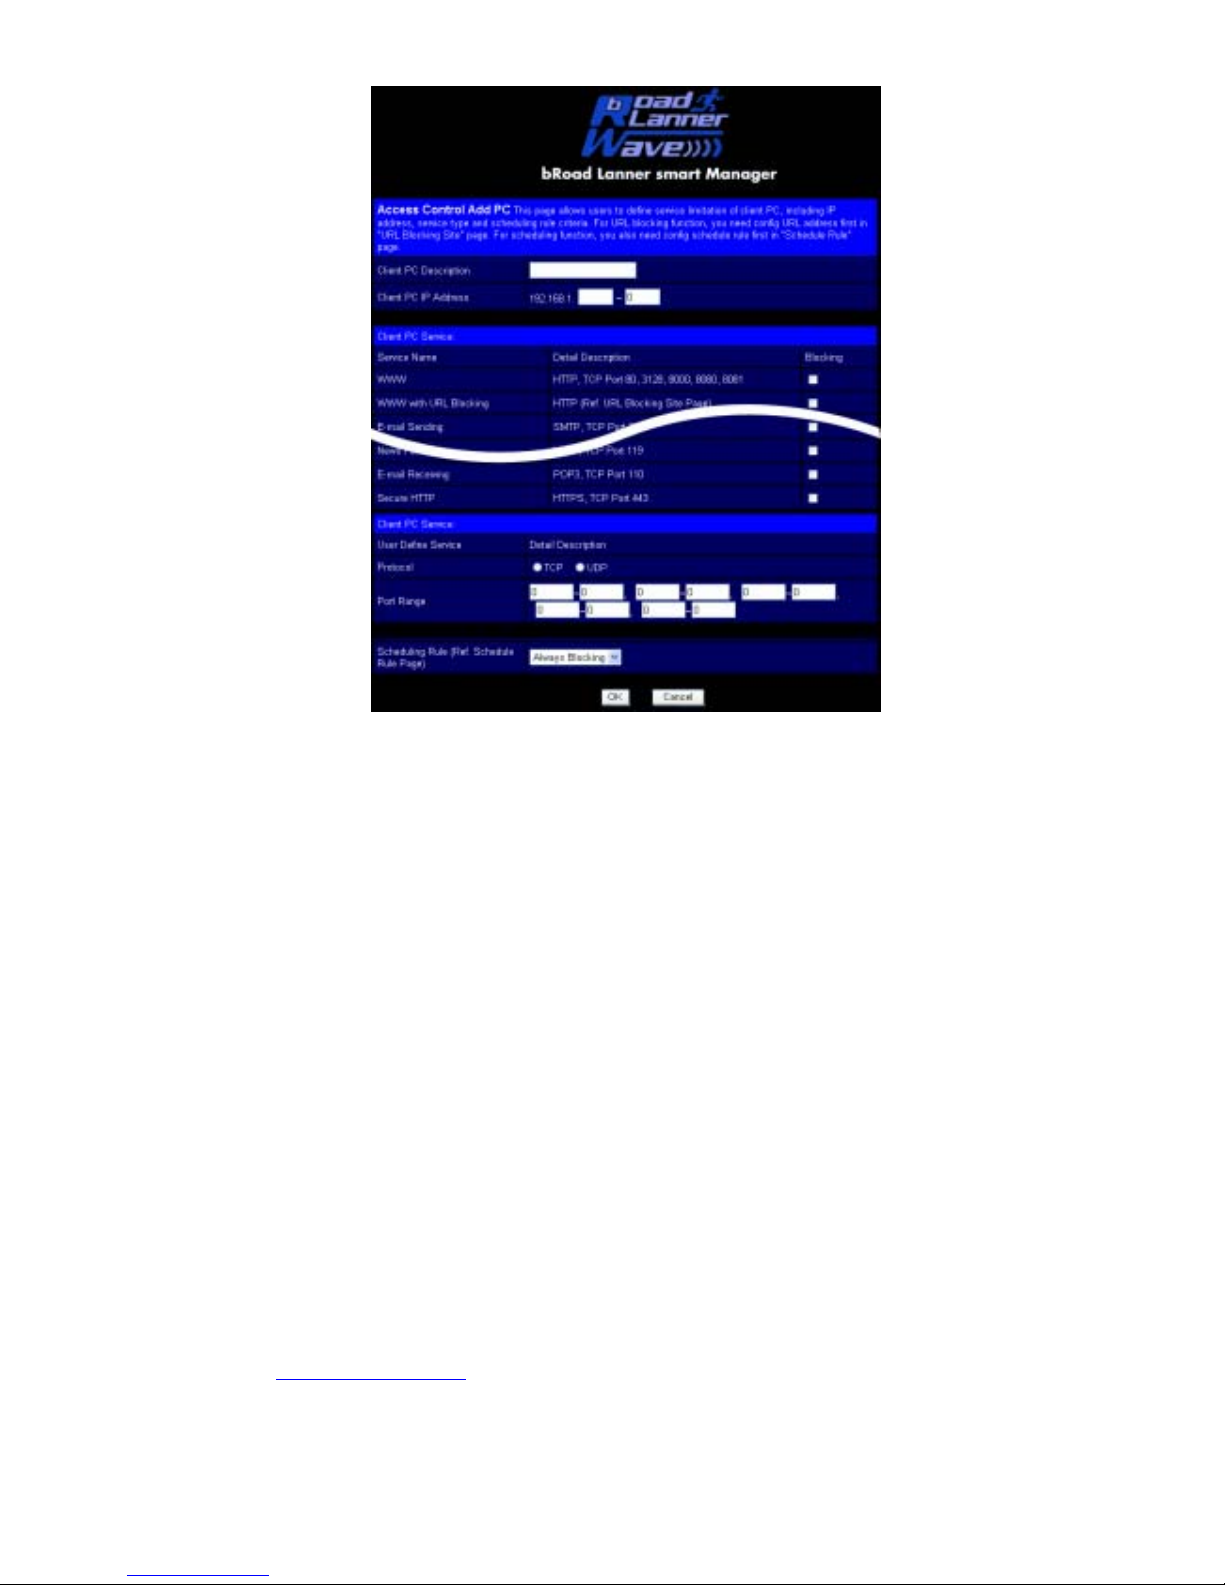
Note: Click on “Add PC” and define the appropriate settings for client PC services (as shown
in the following screen).
Page 36
PLANEX COMMUNICATIONS INC.
http://www.planex.com.tw/ TEL+886-2-22191816 FAX +886-2-22190655 Page 34
Page 37
PLANEX COMMUNICATIONS INC.
http://www.planex.com.tw/ TEL+886-2-22191816 FAX +886-2-22190655 Page 35
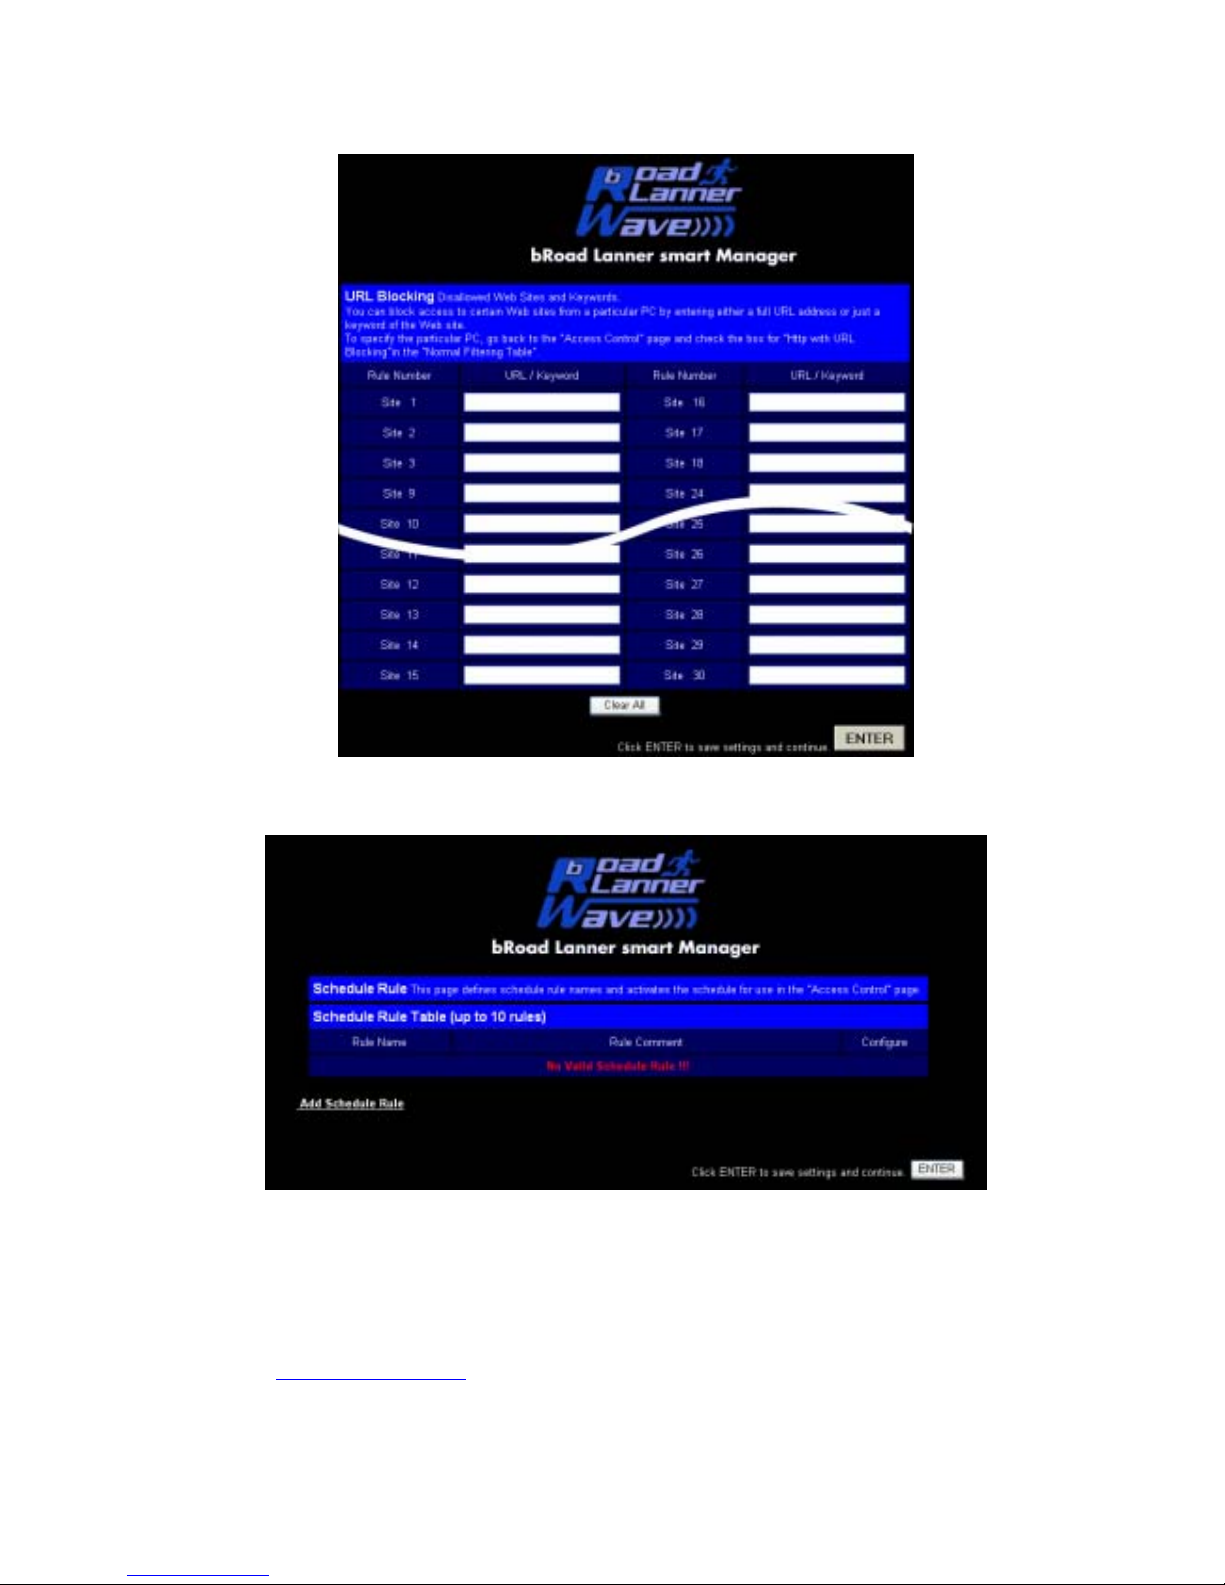
URL Blocking
Using the above screen to block access to the Web sites specified in the table.
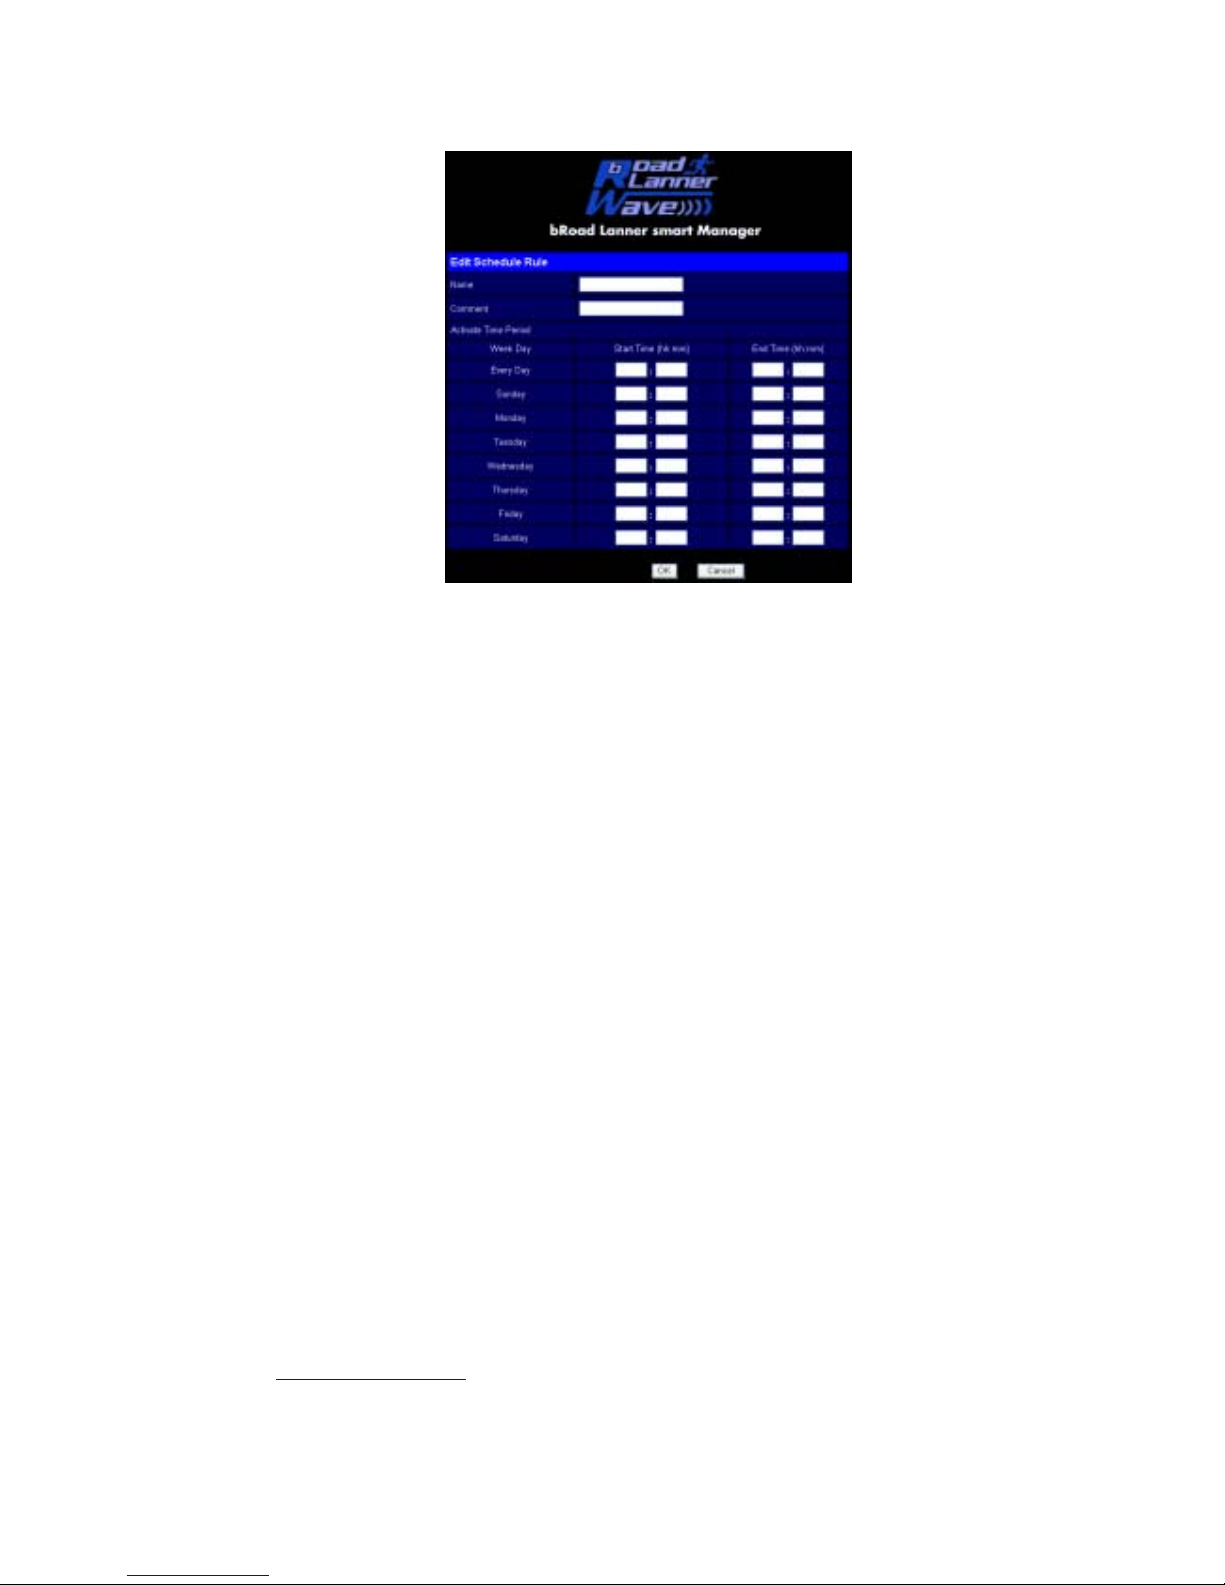
Schedule Rule
You can filter Internet access for local clients based on the “Rule Name,” and time of day.
1. Click on “Add Schedule Rule”
2. Define the appropriate settings for a schedule rule (as shown in the following screen).
Page 38
PLANEX COMMUNICATIONS INC.
http://www.planex.com.tw/ TEL+886-2-22191816 FAX +886-2-22190655 Page 36
3. Click “OK” and then the “APPLY” button to save your settings. (as
shown on previous page)
Page 39
PLANEX COMMUNICATIONS INC.
http://www.planex.com.tw/ TEL+886-2-22191816 FAX +886-2-22190655 Page 37
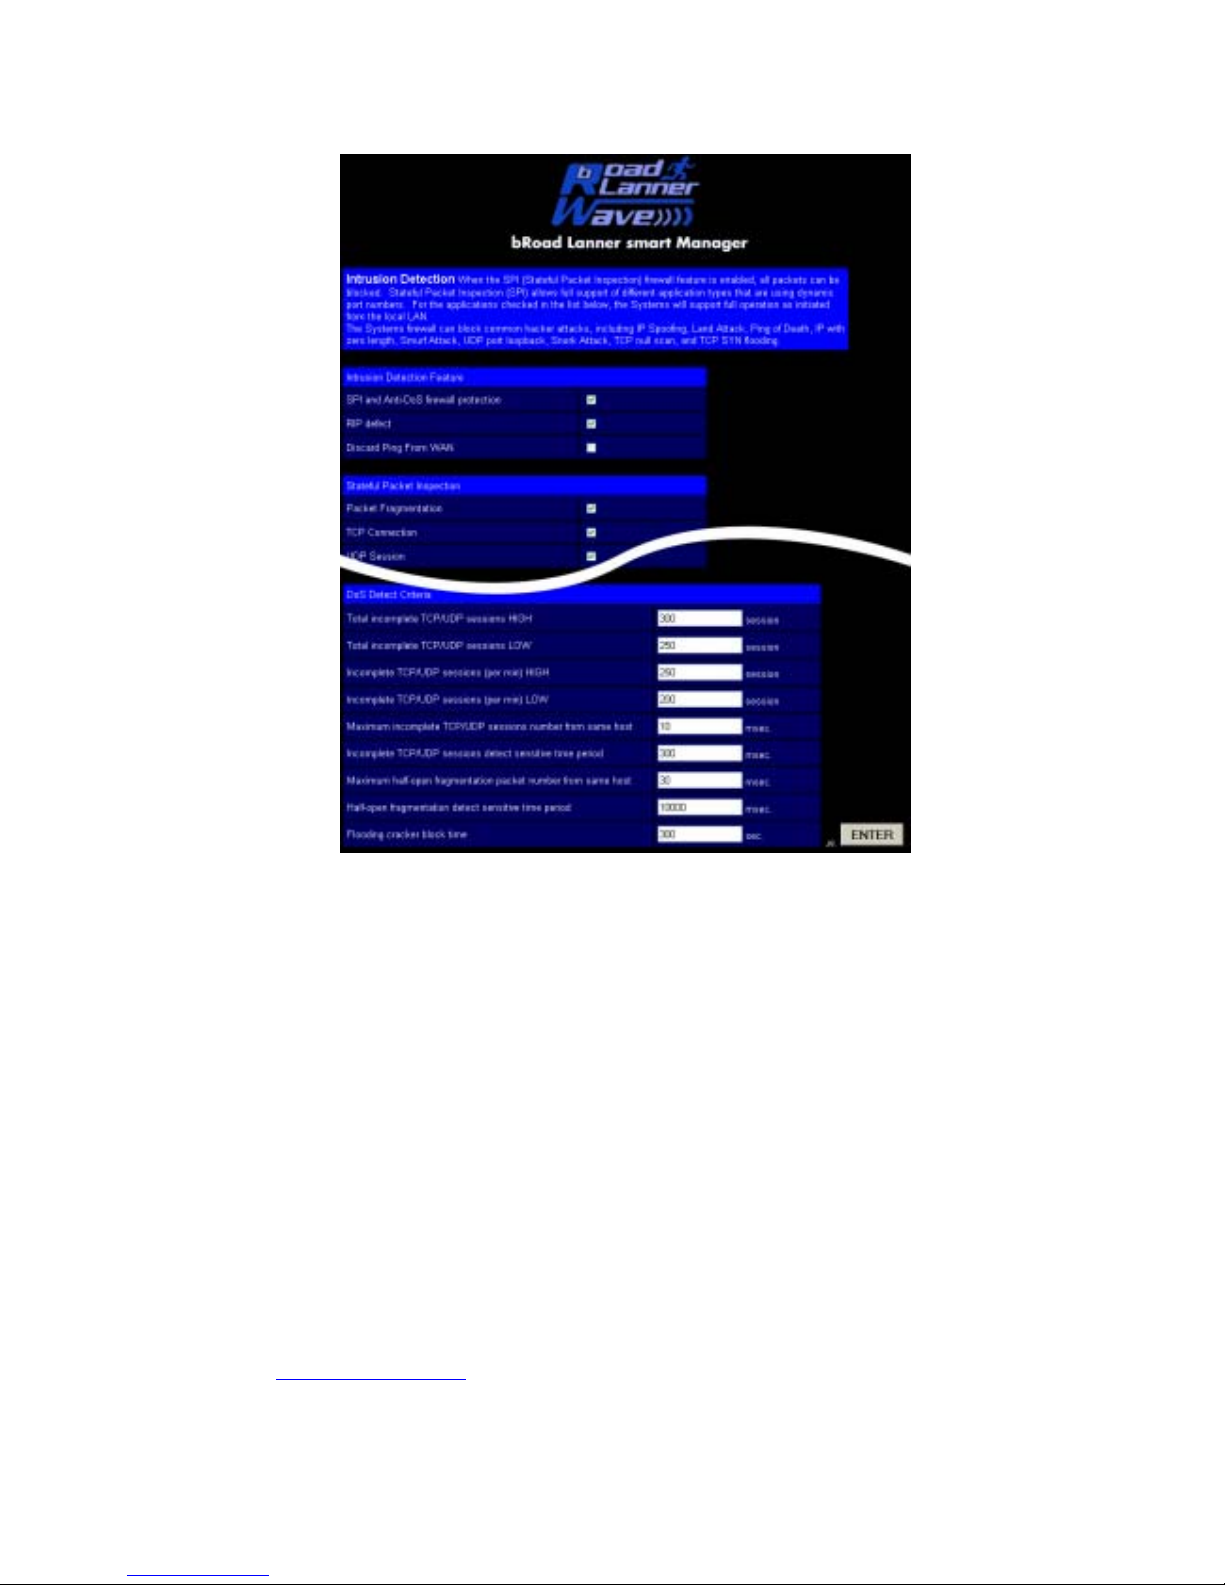
Intrusion Detection
When the SPI (Stateful Packet Inspection) firewall feature is enabled, all packets can be
blocked. Stateful Packet Inspection (SPI) allows full support of different application types that
are using dynamic port numbers. For the applications checked in the list below, the Systems
will support full operation as initiated from the local LAN.
The Systems firewall can block common hacker attacks, including IP Spoofing, Land Attack,
Ping of Death, IP with zero length, Smurf Attack, UDP port loopback, Snork Attack, TCP null
scan, and TCP SYN flooding.
Page 40
PLANEX COMMUNICATIONS INC.
http://www.planex.com.tw/ TEL+886-2-22191816 FAX +886-2-22190655 Page 38
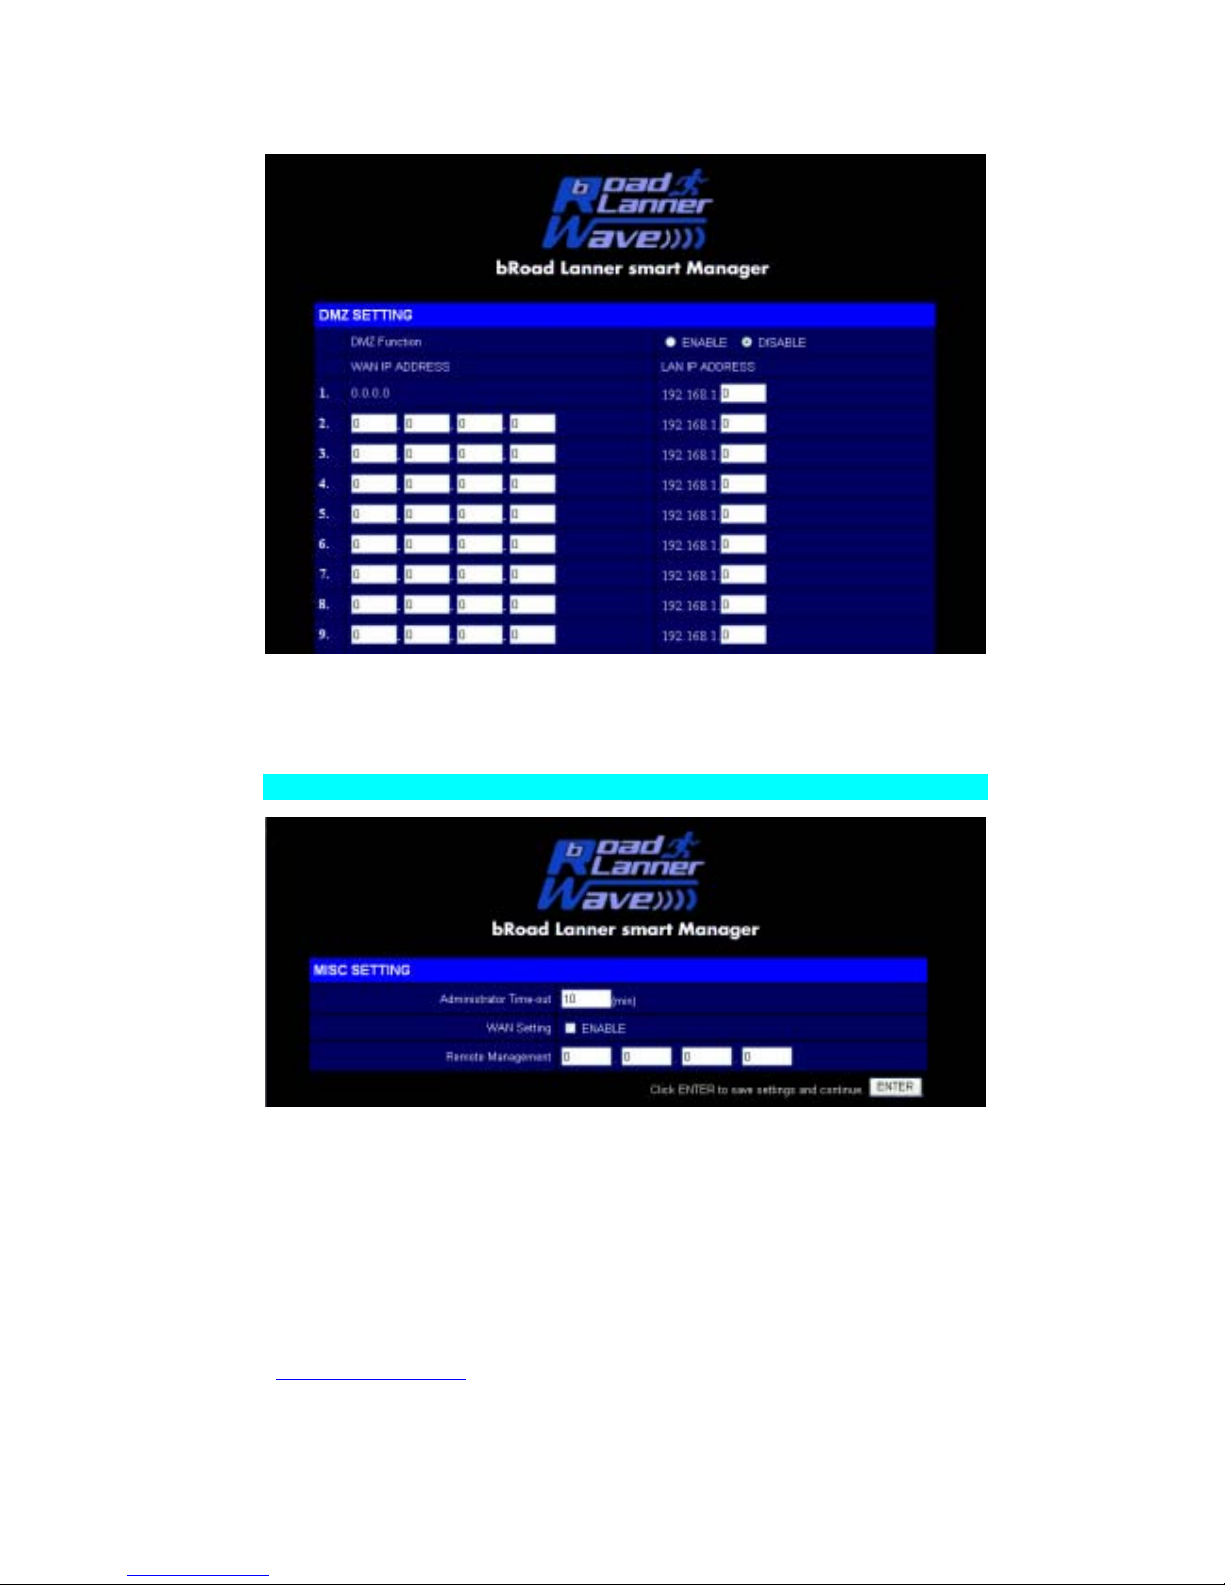
DMZ (Demilitarized Zone)
If you have a client PC that cannot run an Internet application properly from behind the
firewall, then you can open the client up to unrestricted two-way Internet access. Enter the IP
address of a DMZ host to this screen. Adding a client to the DMZ (Demilitarized Zone) may
expose your local network to a variety of security risks, so only use this option as a last resort.
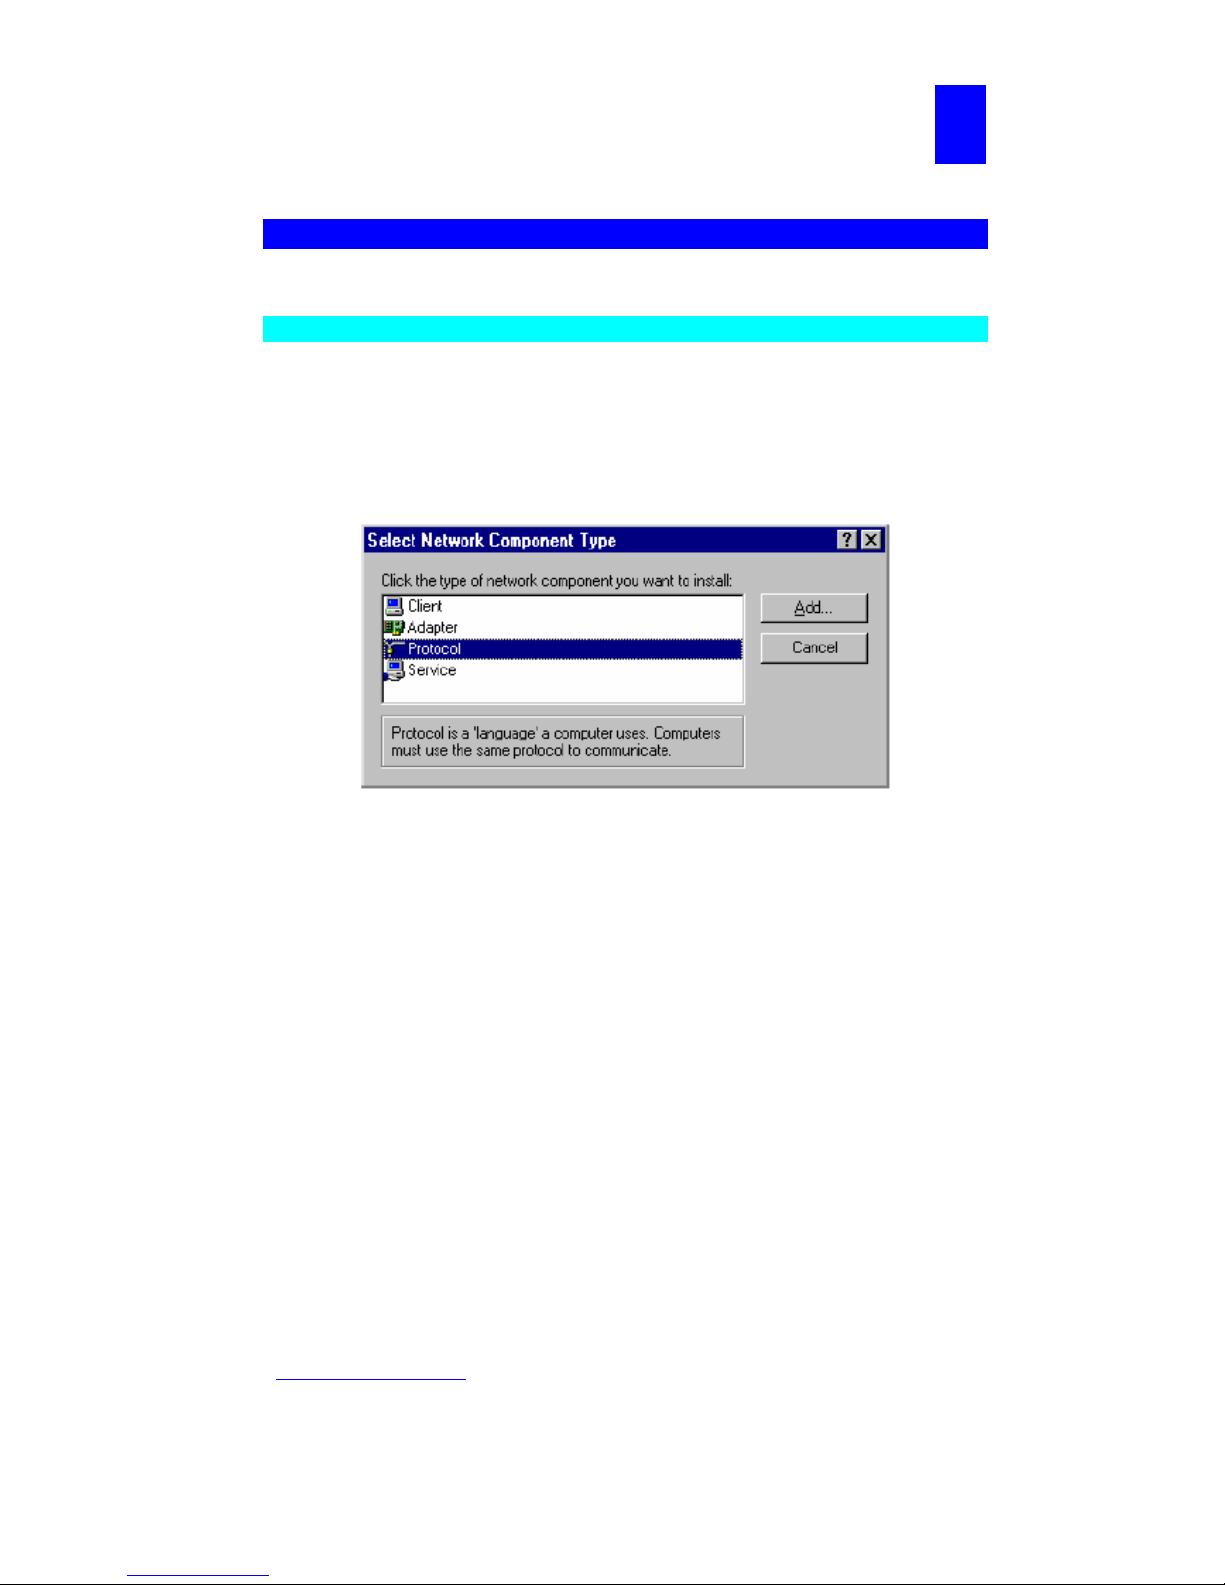
MISC
Allows a remote PC to configure, manage, and monitor the BLW-03FA using a standard
web browser. Check “Enable” and enter the IP address of the remote host. Click
“APPLY.”
Note: If you specify an IP address of 0.0.0.0, any host can manage the BLW-03FA.
Page 41
PLANEX COMMUNICATIONS INC.
http://www.planex.com.tw/ TEL+886-2-22191816 FAX +886-2-22190655 Page 39
Chapter 5
Configuring Client TCP/IP
Installing TCP/IP
Windows 95 / 98 / ME
1. Click “Start/Settings/Control Panel.”
2. Double-click the Network icon and select the “Configuration” tab in
the Network window.
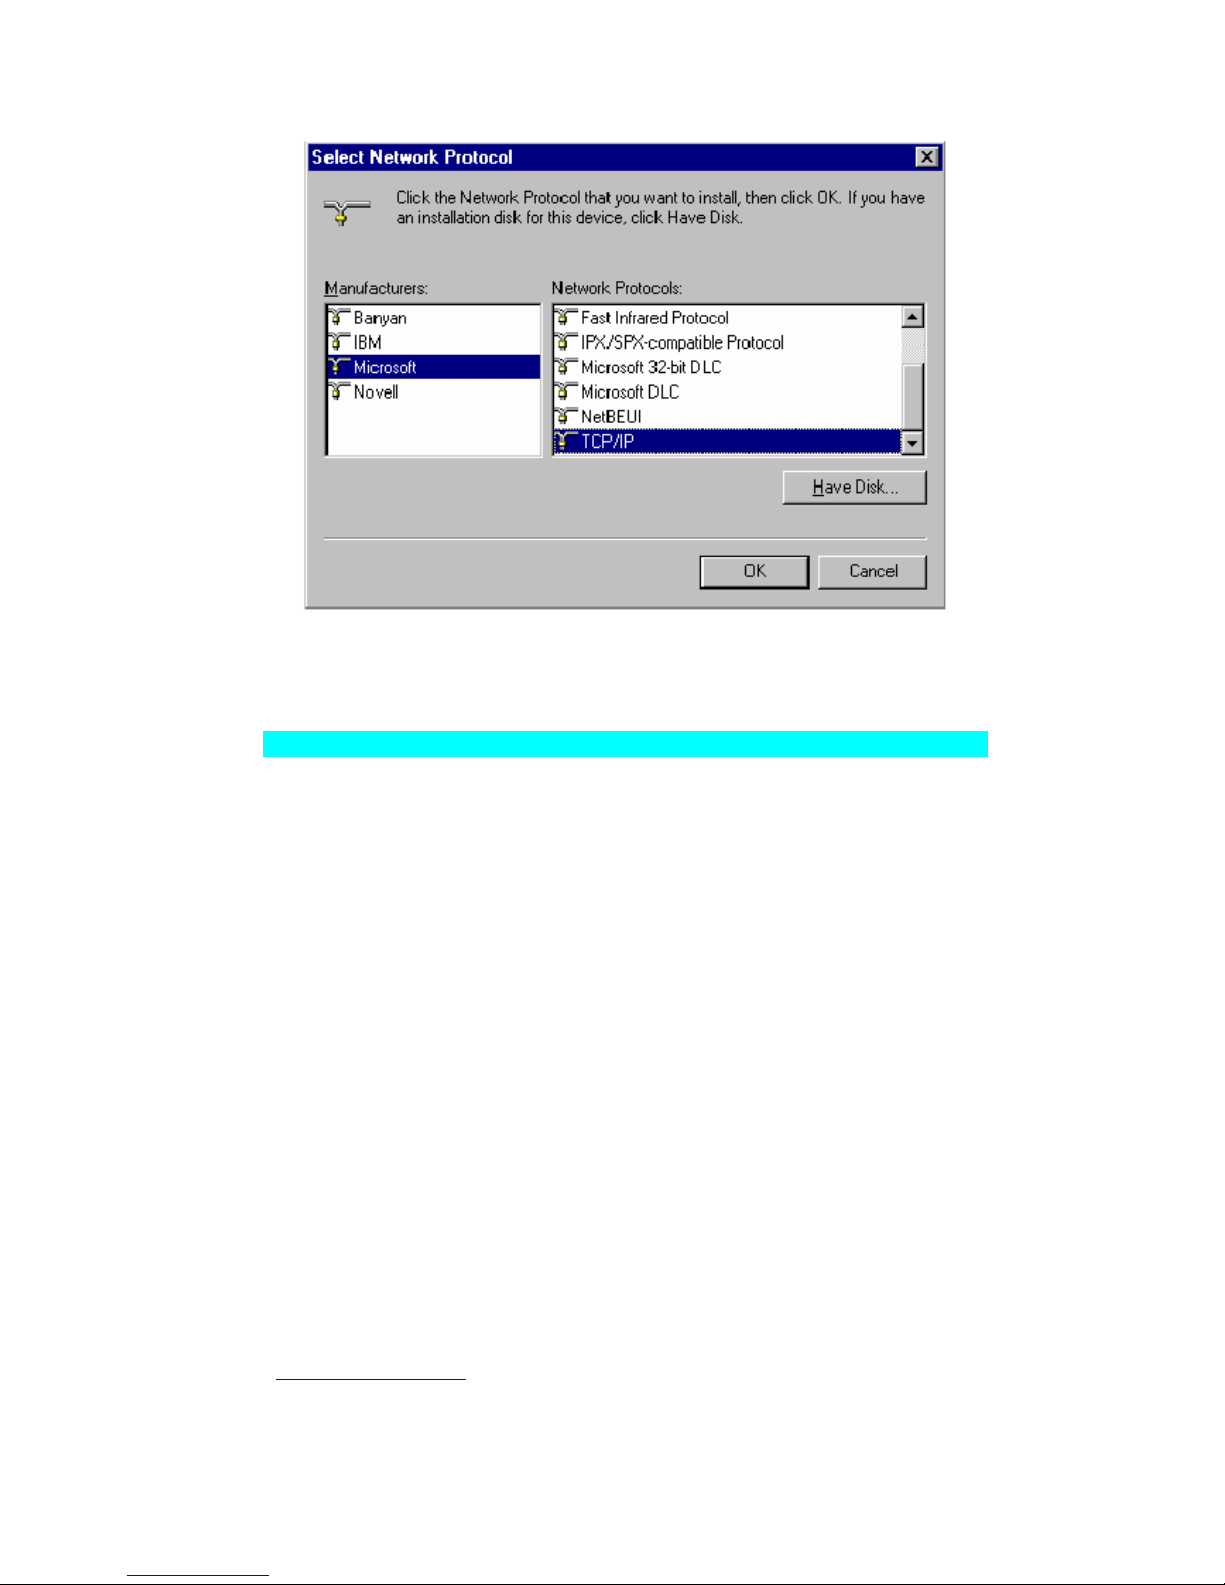
3. Click the “Add” button.
4. Double-click “Protocol.”
5
Page 42
PLANEX COMMUNICATIONS INC.
http://www.planex.com.tw/ TEL+886-2-22191816 FAX +886-2-22190655 Page 40
5. Select “Microsoft” in the manufacturers list. Select “TCP/IP” in the Network
Protocols list. Click the “OK” button to return to the Network window.
6. The TCP/IP protocol will be listed in the Network window. Click “OK” to complete
the installation procedure and restart your PC to enable the TCP/IP protocols. The
operating system may prompt you to restart your system. Click “Yes” and the
computer will shut down and restart
Windows 2000
1. Click the “Start” button and choose “Settings,” then click “Control Panel.”
2. Double click the “Network and Dial-up Connections” icon, then “Local Area
Connection” icon, and press the “Properties” button in the “General” tab.
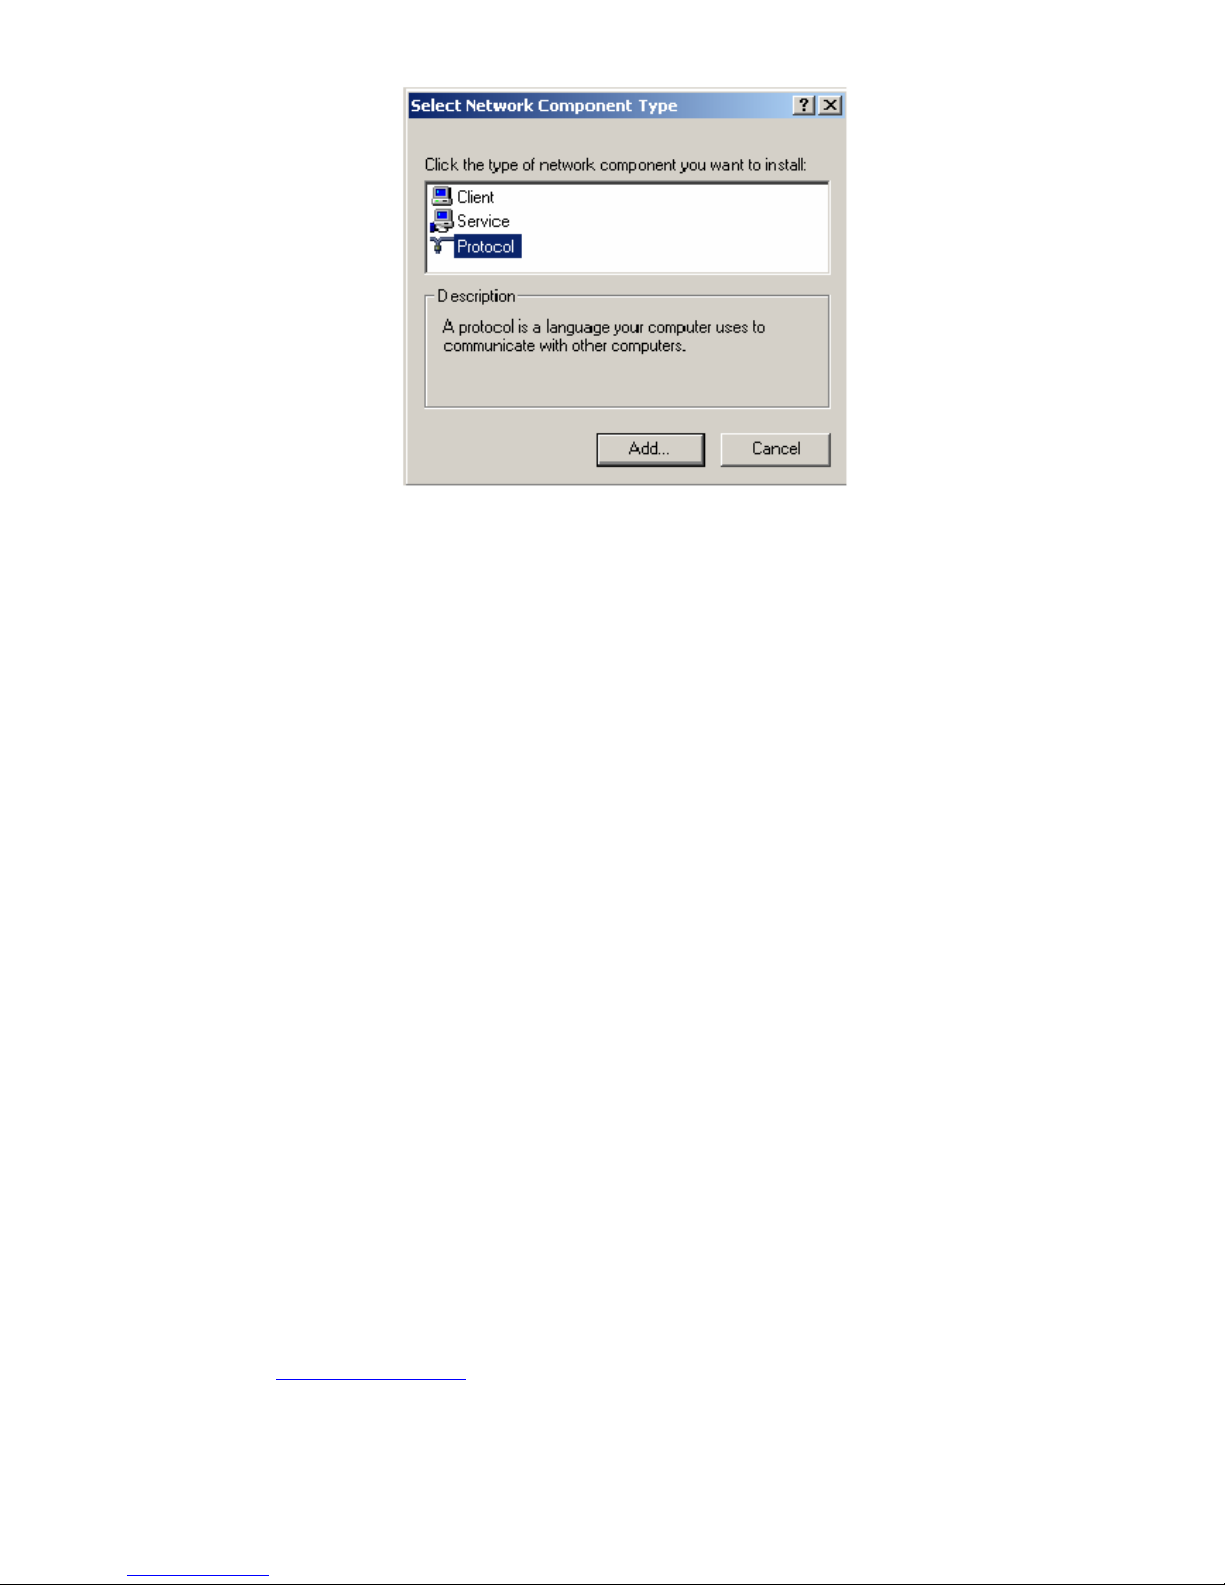
3. Click the “install...” button to add the network component to your PC.
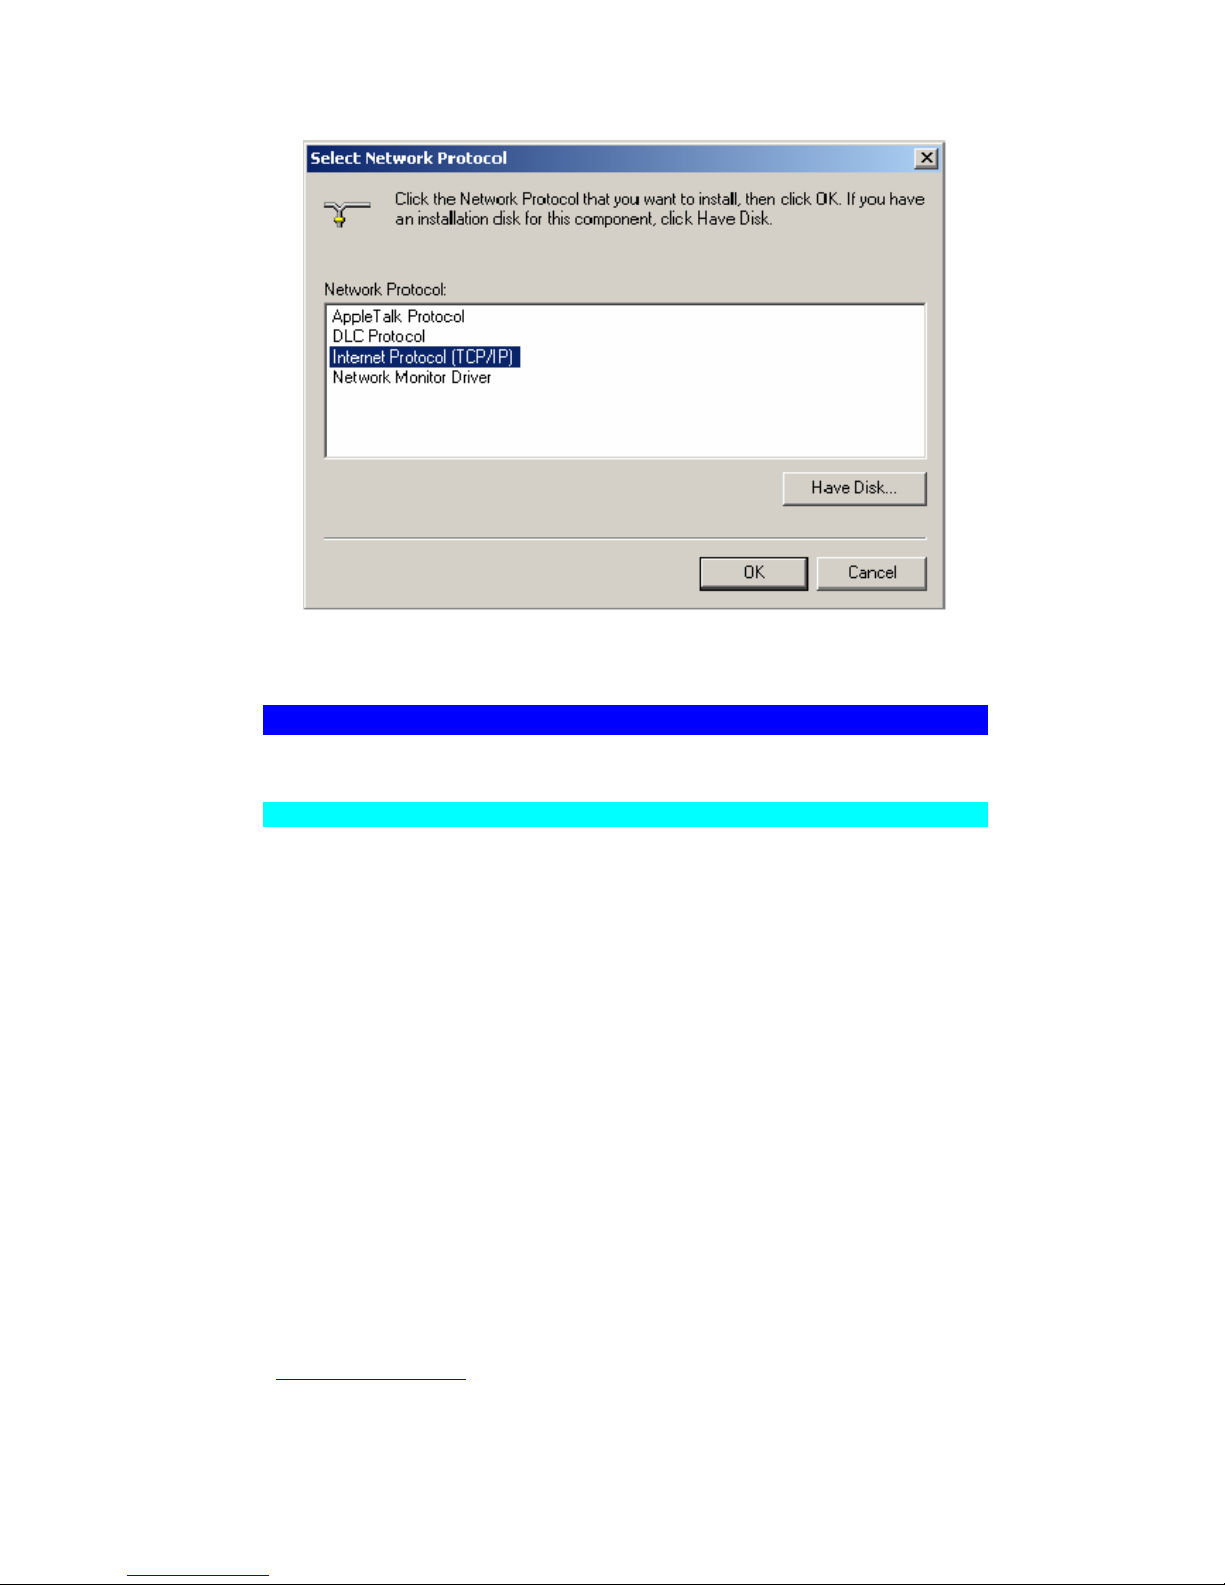
4. Double click on “Protocol” to add the TCP/IP protocol.
Page 43
PLANEX COMMUNICATIONS INC.
http://www.planex.com.tw/ TEL+886-2-22191816 FAX +886-2-22190655 Page 41
Page 44
PLANEX COMMUNICATIONS INC.
http://www.planex.com.tw/ TEL+886-2-22191816 FAX +886-2-22190655 Page 42
5. Choose “Internet Protocol (TCP/IP)” in the Network Protocols. Click the “OK” button
to return to the Network window.
6. The TCP/IP protocol will be listed in the Network window. Click “OK” to complete the
install procedure.
Setting Up TCP/IP to Work with BLW-03FA
Windows 95 / 98 / ME
1. Click “Start/Settings/Control Panel.”
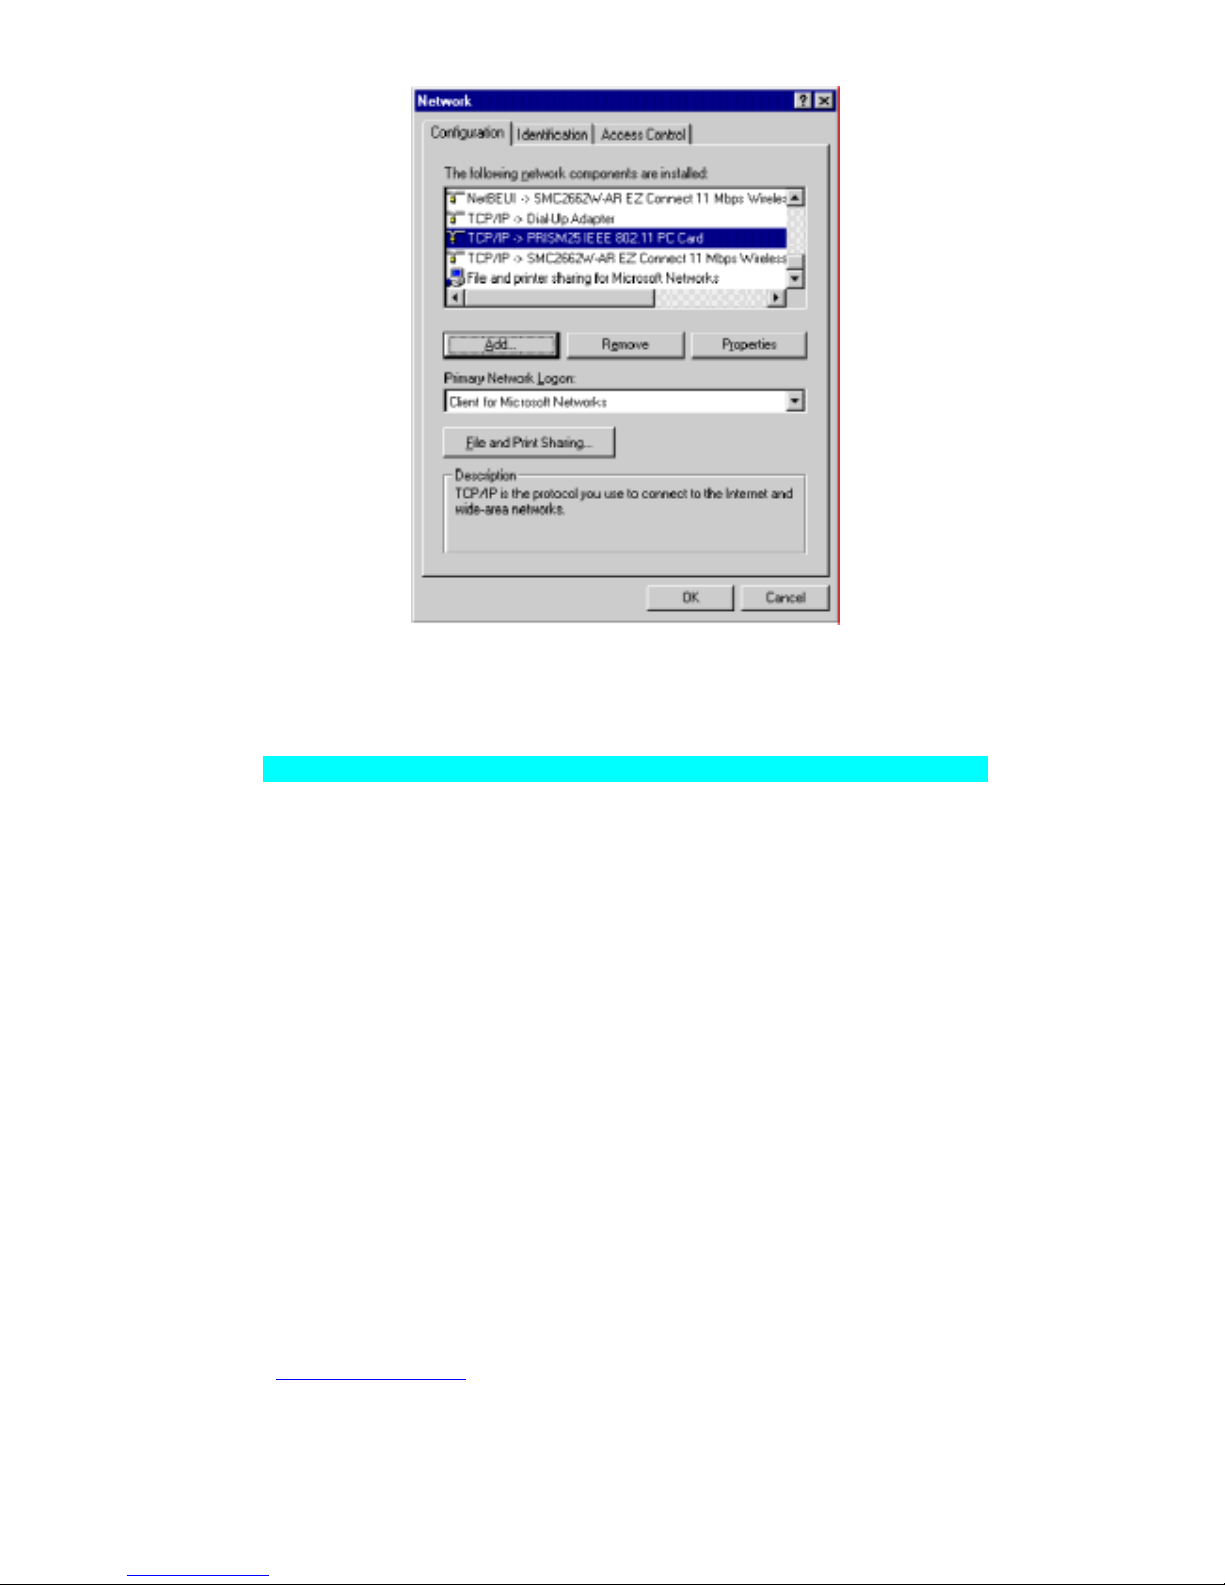
2. Double-click the Network icon. Highlight the TCP/IP line that has been assigned to
your network card on the “Configuration” tab of the Network window.
Page 45
PLANEX COMMUNICATIONS INC.
http://www.planex.com.tw/ TEL+886-2-22191816 FAX +886-2-22190655 Page 43
3. Click the “Properties” button.
4. You may dynamically assign TCP/IP address settings to a client, or you can manually
configure a client with address settings to meet your specific network requirements. (Note that
the default IP address of the BLW-03FA is 192.168.1.1.)
Windows 2000
1. Click the “Start” button and choose “Settings,” then click “Control Panel.”
2. Double click the “Network and Dial-up Connections” icon, then “Local Area
Connection” icon, and press the “Properties” button in the “General” tab.
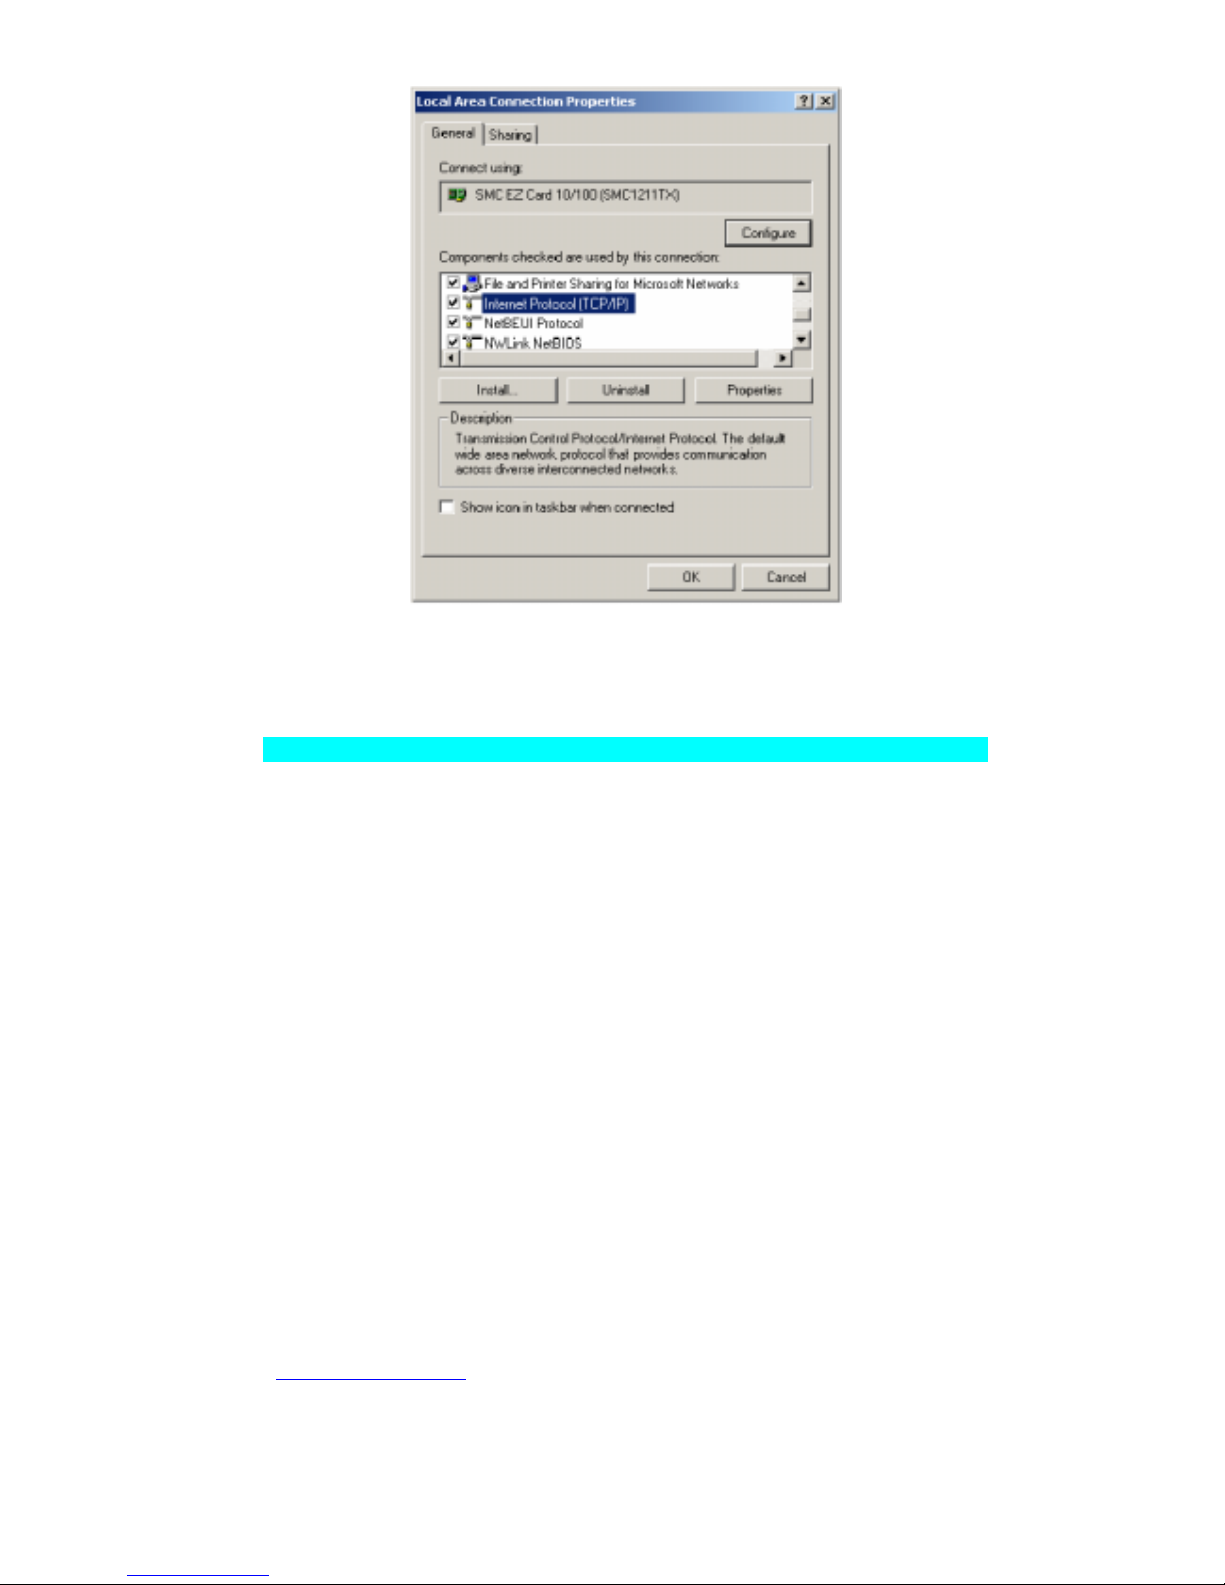
3. Select the TCP/IP line that has been assigned to your network card in the “Local Area
Connection Properties” window.
4. Click the “Properties” button to set the TCP/IP protocol for the BLW-03FA.
Page 46
PLANEX COMMUNICATIONS INC.
http://www.planex.com.tw/ TEL+886-2-22191816 FAX +886-2-22190655 Page 44
5. You can dynamically assign TCP/IP address settings to a client, or you can manually
configure a client with address settings to meet your specific network requirements. (Note that
the default IP address of the BLW-03FA is 192.168.1.1.)
Windows XP
1. Click the “start” button and choose “Control Panel.”
2. Select the “Network and Internet Connections” icon, then click the “Network
Connections” icon, and double click on the “LAN or High-Speed Internet.”
3. Press the “Properties” button in the “General” tab.
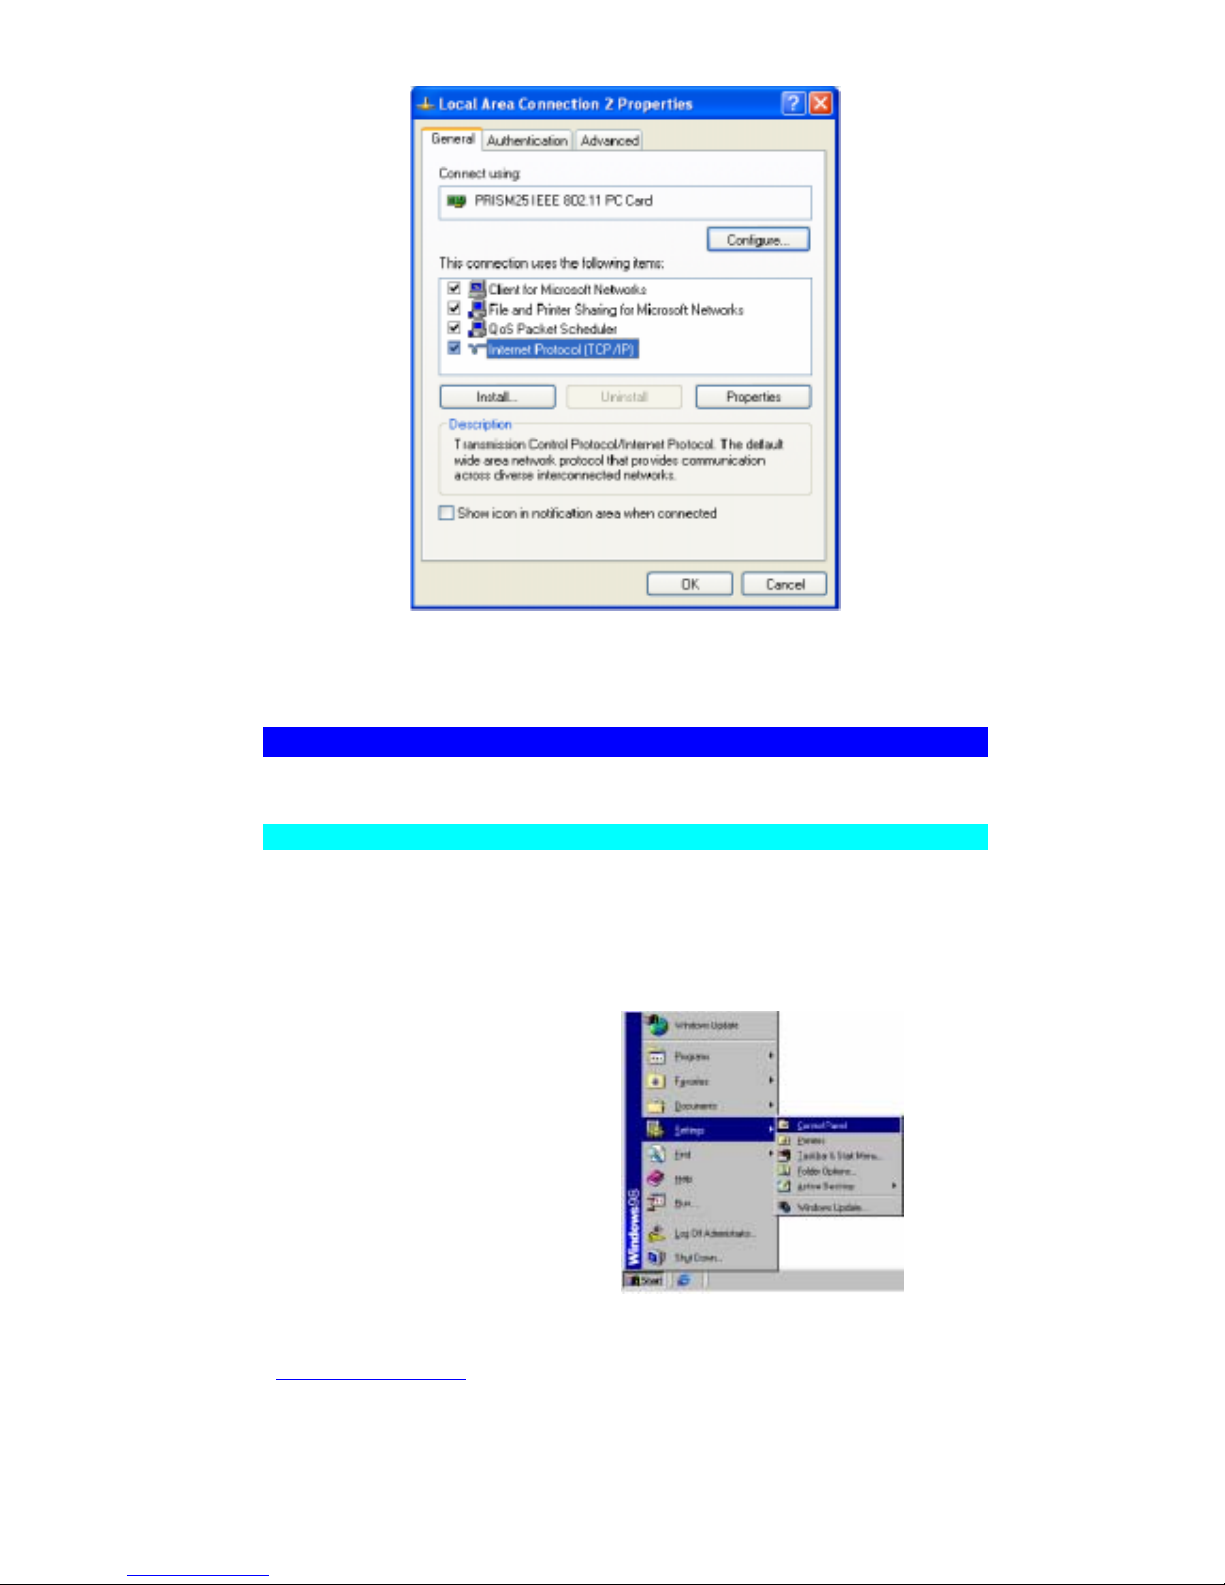
4. Select the TCP/IP line that has been assigned to your network card in the “Local Area
Connection Properties” window.
5. Click the “Properties” button to set the TCP/IP protocol for the BLW-03FA.
Page 47
PLANEX COMMUNICATIONS INC.
http://www.planex.com.tw/ TEL+886-2-22191816 FAX +886-2-22190655 Page 45
6. You can dynamically assign TCP/IP address settings to a client, or you can manually
configure a client with address settings to meet your specific network requirements.
(Note that the default IP address of the BLW-03FA is 192.168.1.1.)
Configuration Computer with Windows 95 / 98 / ME
Step 1. Configure TCP/IP Settings
After you have completed the hardware setup by connecting your devices, you need to
configure the computer to connect to the BLW-03FA. You need to determine how your
ISP issues your IP address. Many ISPs issue these numbers automatically using a
networking technology known as Dynamic Host Control Protocol, or DHCP. Other ISPs
will specify your IP address and associated numbers, which you must enter manually.
This is also known as a static IP address. How your ISP assigns your IP address
determines how you will configure your computer.
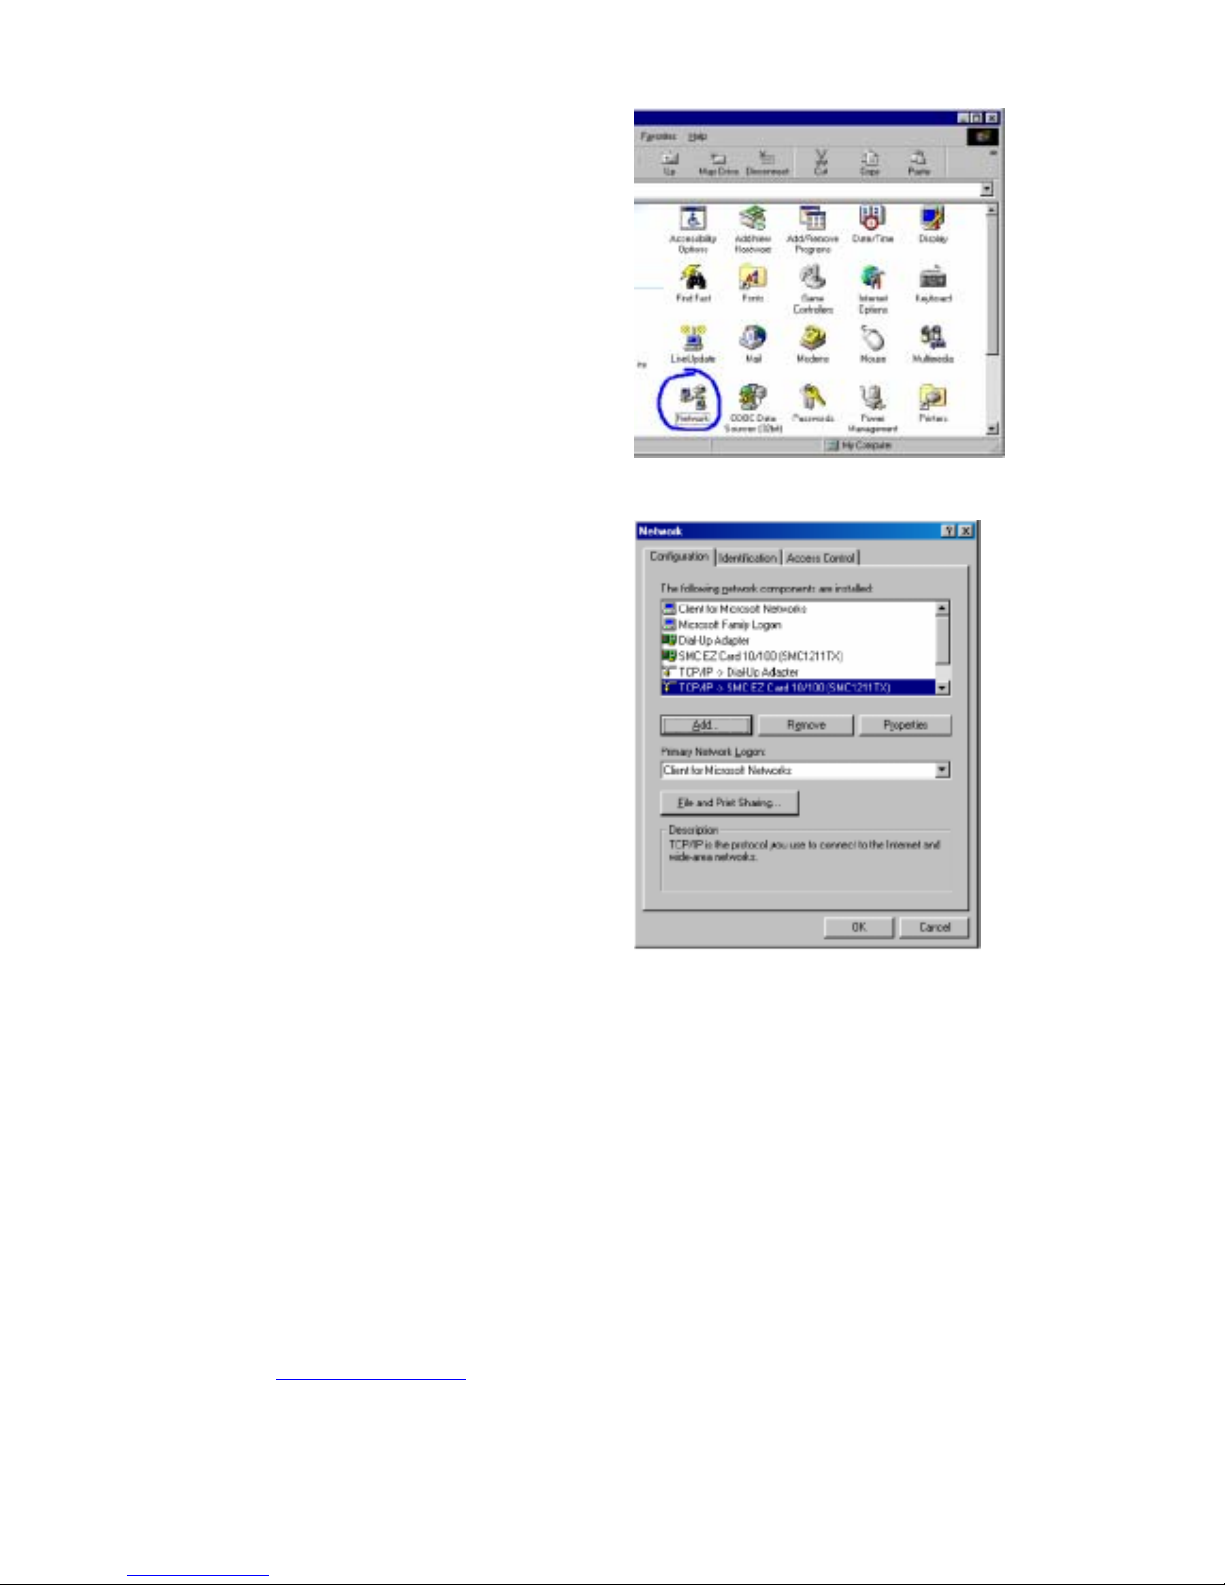
1. From the Windows desktop,
click “Start/Settings/Control
Panel.”
Page 48
PLANEX COMMUNICATIONS INC.
http://www.planex.com.tw/ TEL+886-2-22191816 FAX +886-2-22190655 Page 46
2. Double-click the
“Network” icon.
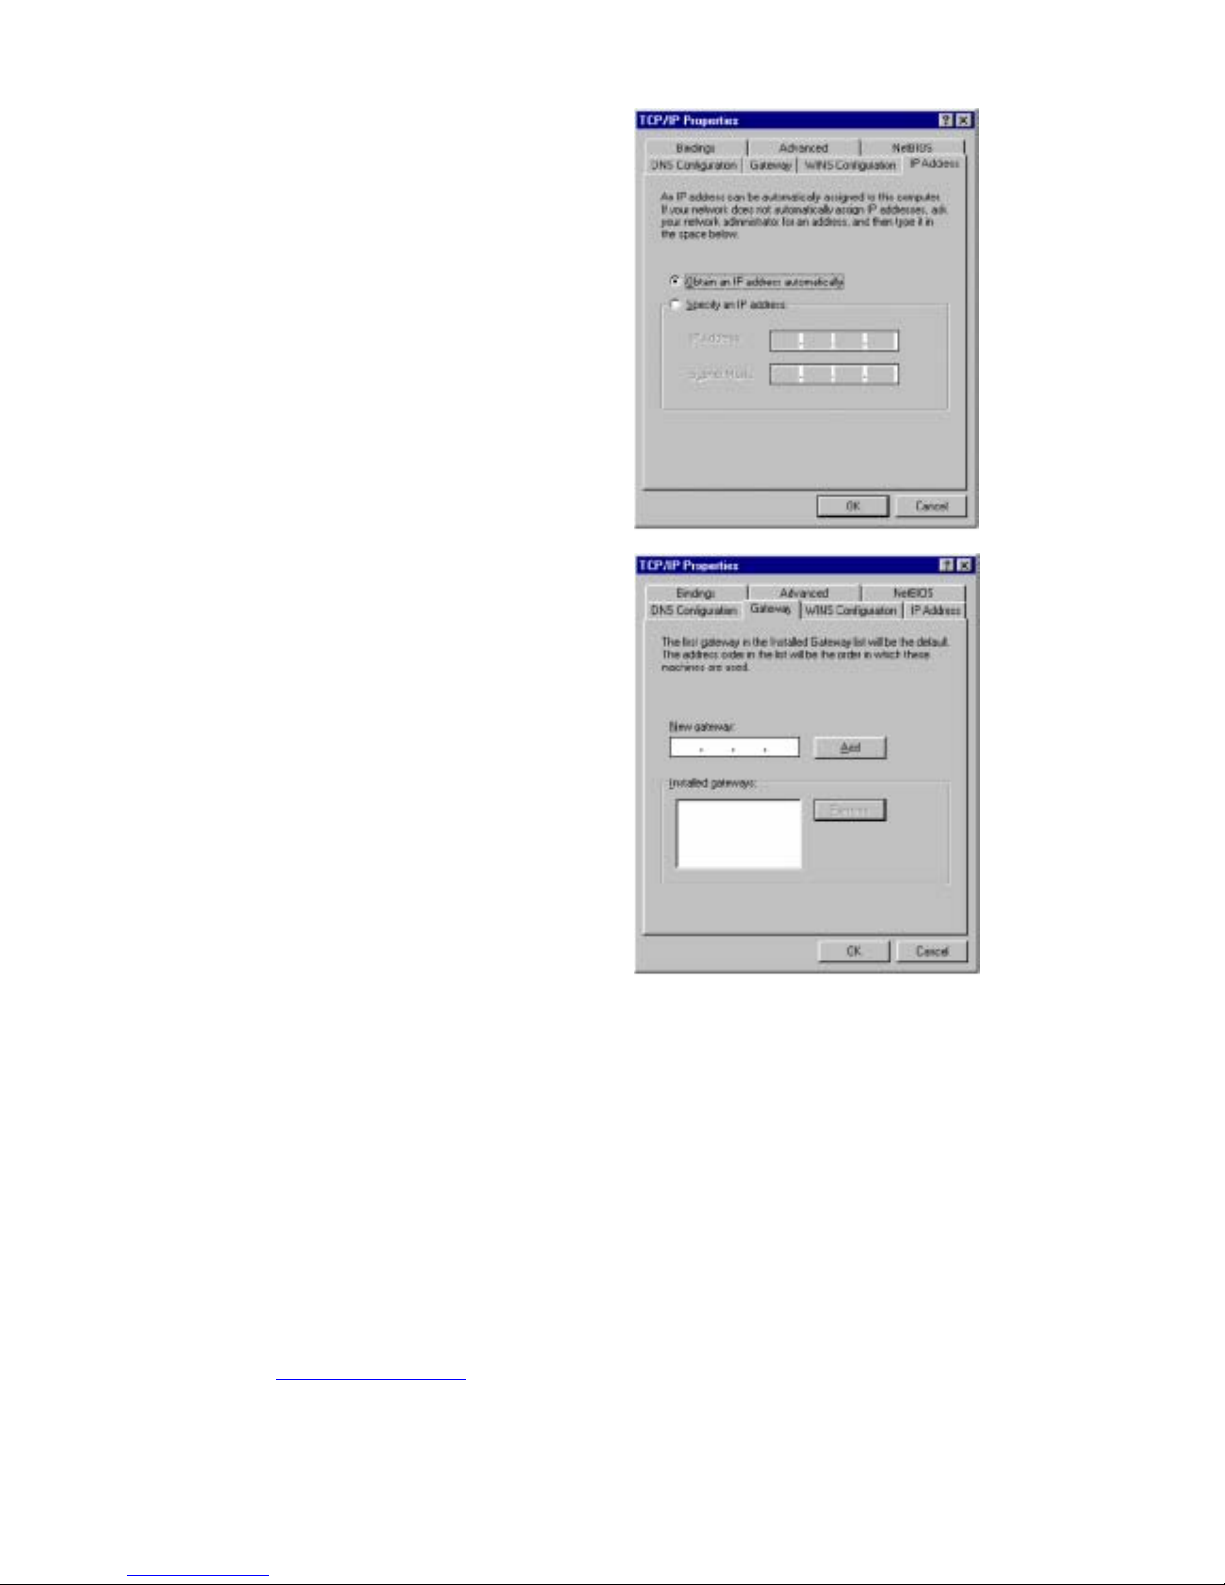
3. On the “Network”
window “Configuration” tab,
double-click the “TCP/IP”
entry for your network card.
Page 49
PLANEX COMMUNICATIONS INC.
http://www.planex.com.tw/ TEL+886-2-22191816 FAX +886-2-22190655 Page 47
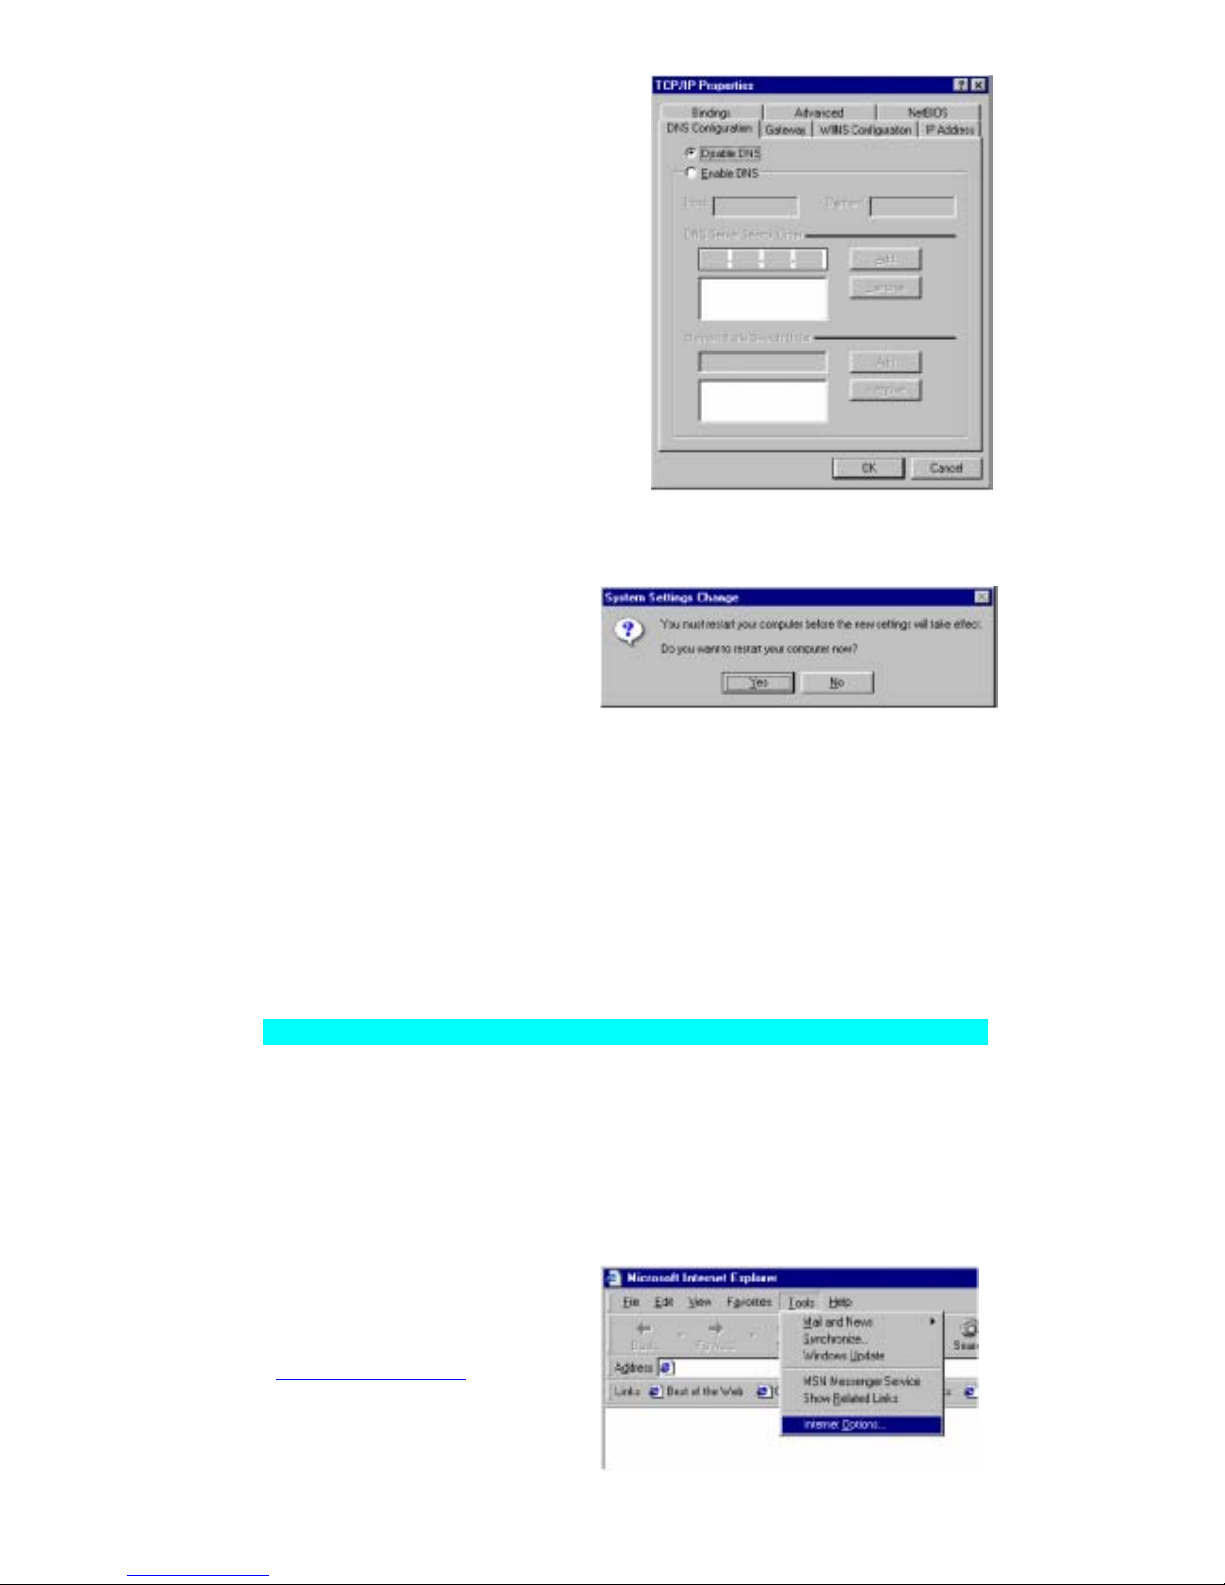
4. Click the “IP Address” tab.
If “Obtain an IP address
automatically” is already
checked, your computer is
already configured for DHCP.
Click “Cancel” to close each
window, and skip to “Step 2.
Disable HTTP Proxy” on
page 5-12.
5. Make a note of the current IP
Address and Subnet Mask (a
space is provided on the next
page).
6. Click the “Gateway” tab and
record the numbers listed
under “Installed gateways.”
Page 50
PLANEX COMMUNICATIONS INC.
http://www.planex.com.tw/ TEL+886-2-22191816 FAX +886-2-22190655 Page 48
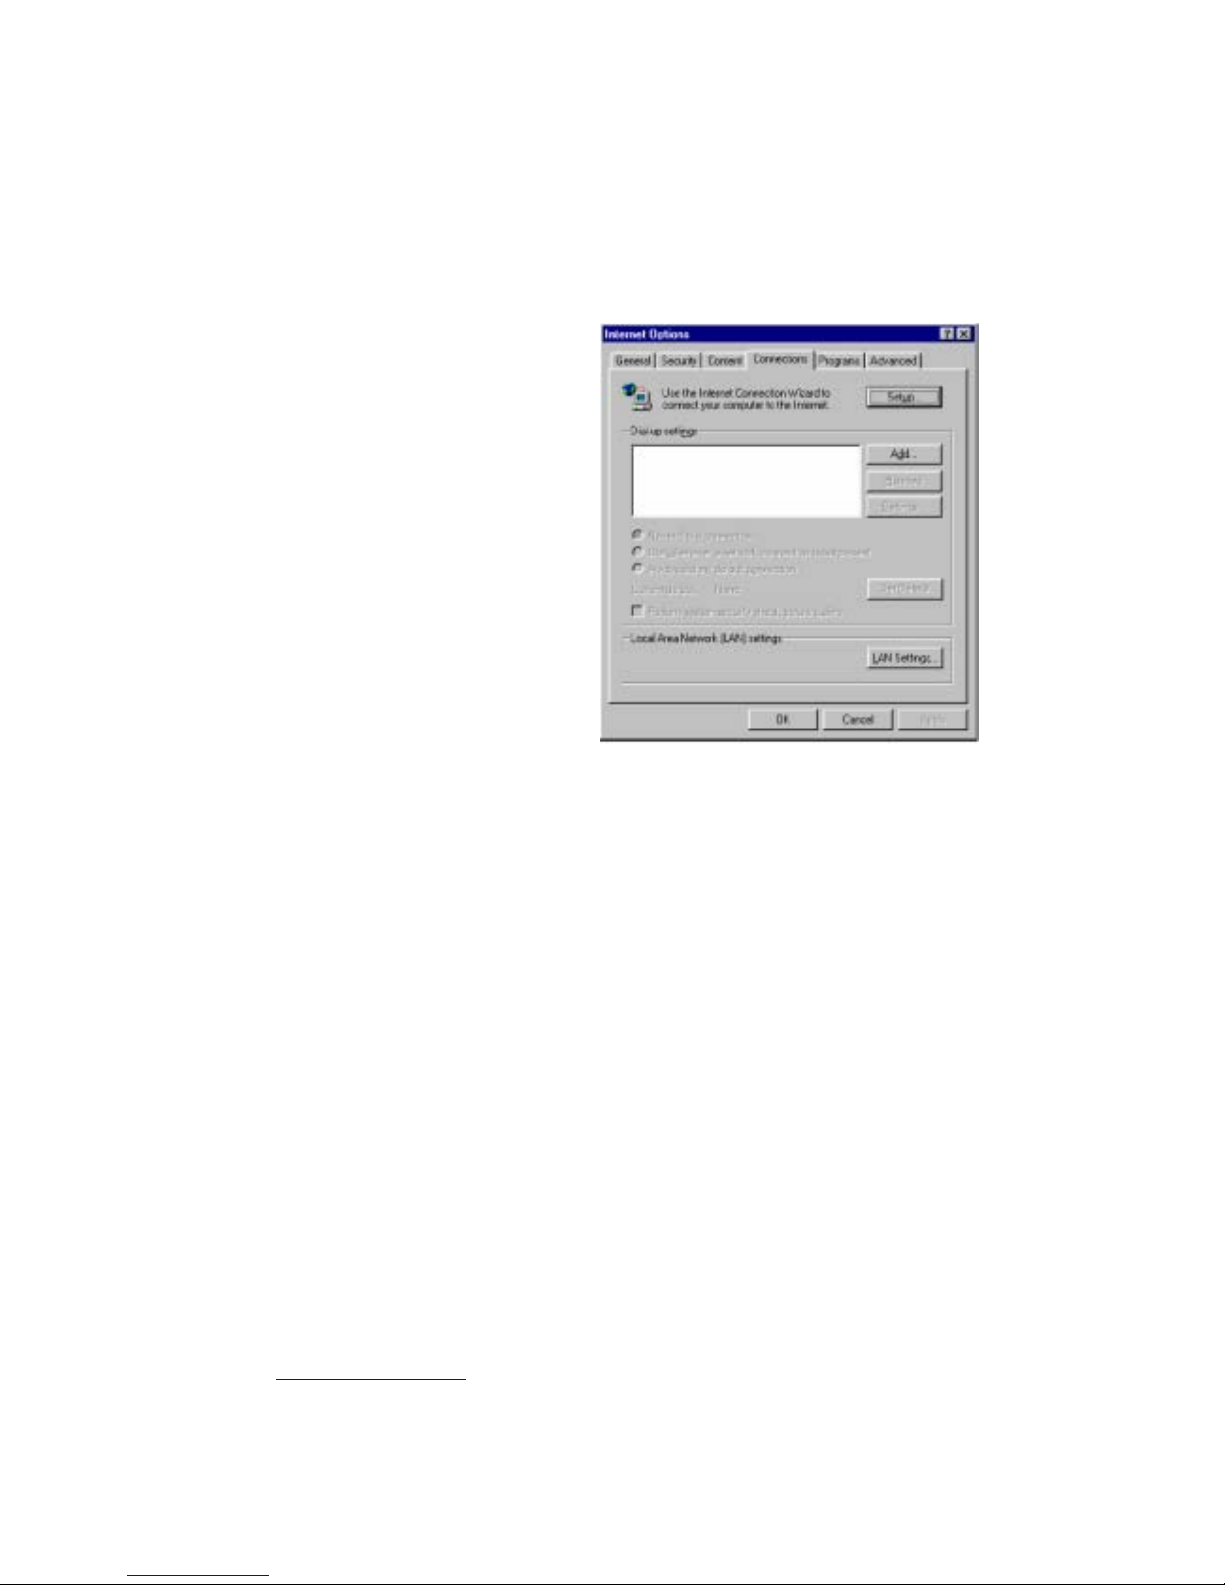
7. Click the “DNS
Configuration” tab. Record the
DNS servers listed under
“DNS Server Search Order.”
8. Click the “IP Address” tab and
then check “Obtain an IP
address automatically.” Click
“OK.”
9. Windows may need your
Windows 95/98/ME CD
to copy some files. After
it finishes copying, it will
then prompt you to
restart your system. Click
“Yes” and the computer will shut down and restart.
TCP/IP Configuration Setting
IP Address ____.____.____.____
Subnet Mask ____.____.____.____
Primary DNS Server ____.____.____.____
Secondary DNS Server ____.____.____.____
Default Gateway ____.____.____.____
Step 2. Disable the HTTP Proxy
You will need to verify that the “HTTP Proxy” feature of your web
browser is disabled. This is so that your web browser will be able to view
the configuration pages inside your BLW-03FA. The following
steps are for Internet Explorer and for Netscape. Determine which
browser you use and follow the appropriate steps.
Internet Explorer
Page 51
PLANEX COMMUNICATIONS INC.
http://www.planex.com.tw/ TEL+886-2-22191816 FAX +886-2-22190655 Page 49
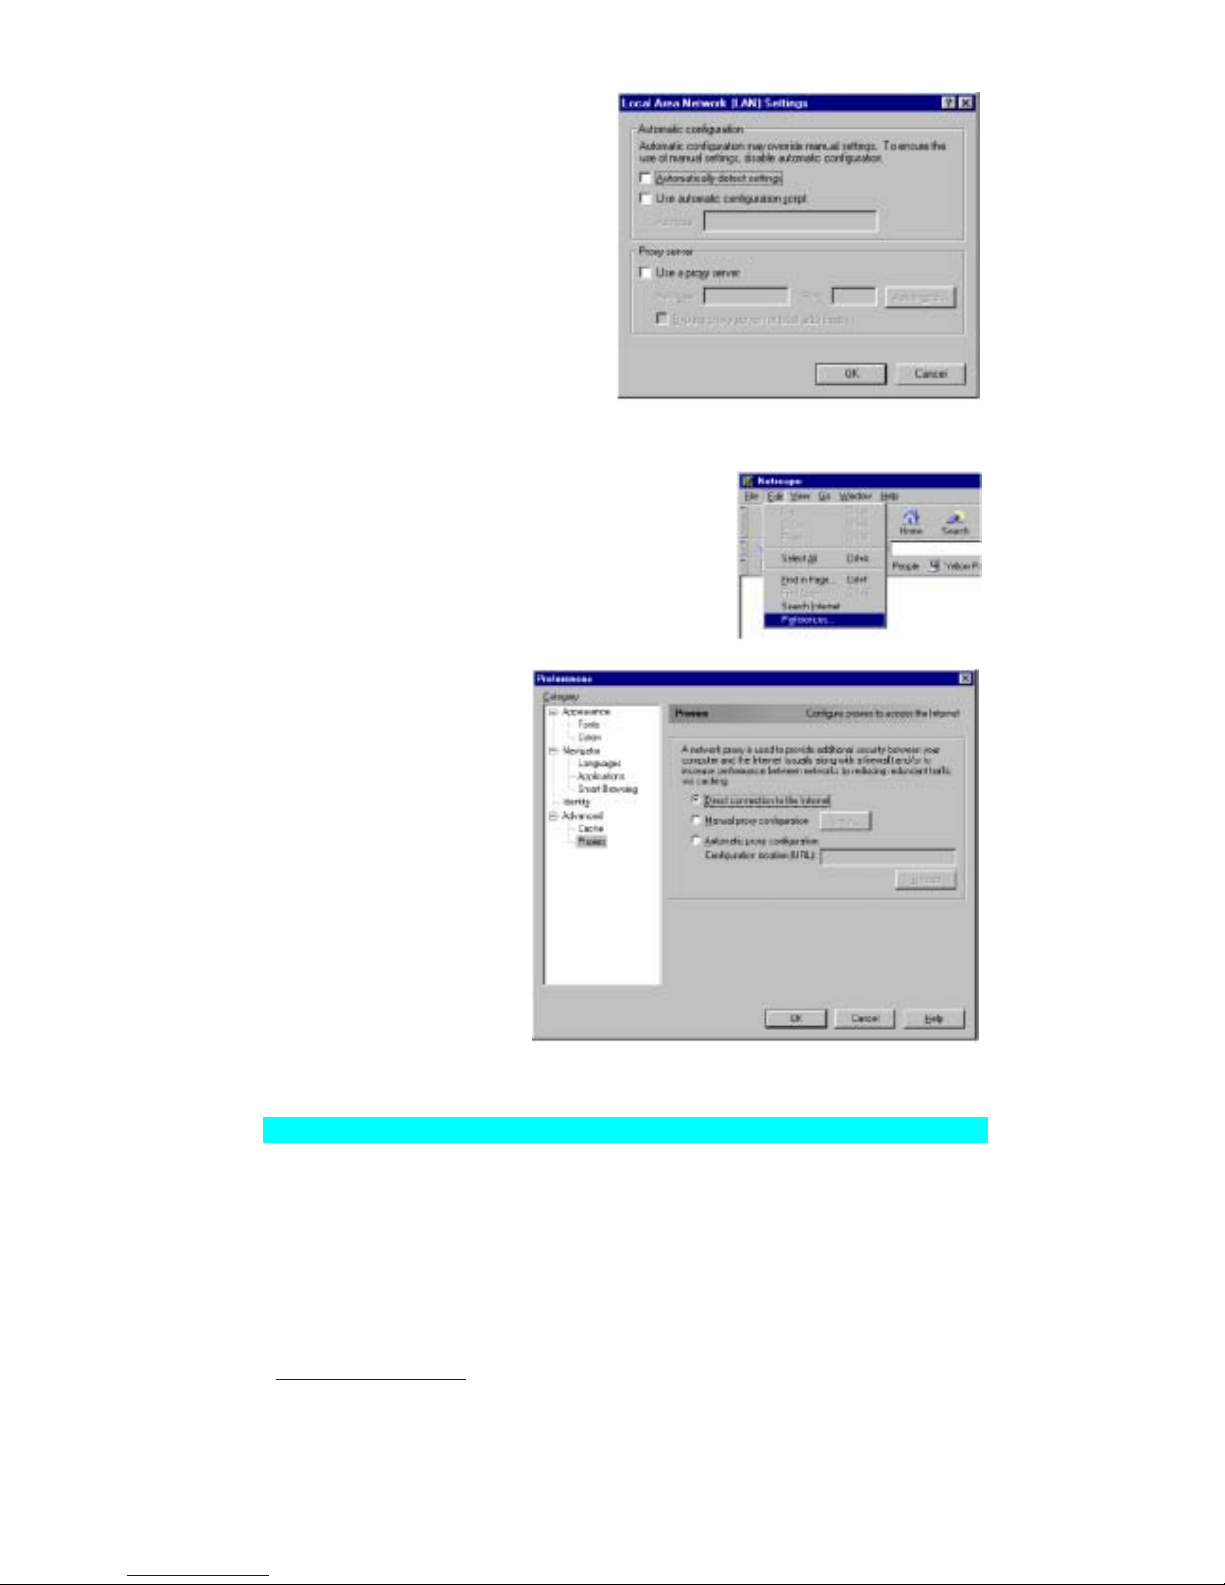
1. Open Internet Explorer.
Click “Tools/Internet
Options.”
2. In the “Internet Options”
window, click the
“Connections” tab. Click
the “LAN Settings”
button.
Page 52
PLANEX COMMUNICATIONS INC.
http://www.planex.com.tw/ TEL+886-2-22191816 FAX +886-2-22190655 Page 50
3. Clear all the check boxes
and click “OK”. Click
“OK” again to close the
“Internet Options” window.
Netscape
1. Open Netscape. Click “Edit,” then
click “Preferences.”
2. In the
“Preferences”
window, under
“Category,”
double-click
“Advanced,” then
click “Proxies.”
Check “Direct
connection to the
Internet.” Click
“OK”.
3. Repeat these
steps for each
Windows 95/98/ME computer connected to your BLW-03FA
Step 3. Obtain IP Settings from Your BLW-03FA
Now that you have configured your computer to connect to your Wireless
Barricade, it needs to obtain new network settings. By releasing old IP
settings and renewing them with settings from your BLW-03FA,
you will also verify that you have configured your computer correctly.
Page 53
PLANEX COMMUNICATIONS INC.
http://www.planex.com.tw/ TEL+886-2-22191816 FAX +886-2-22190655 Page 51
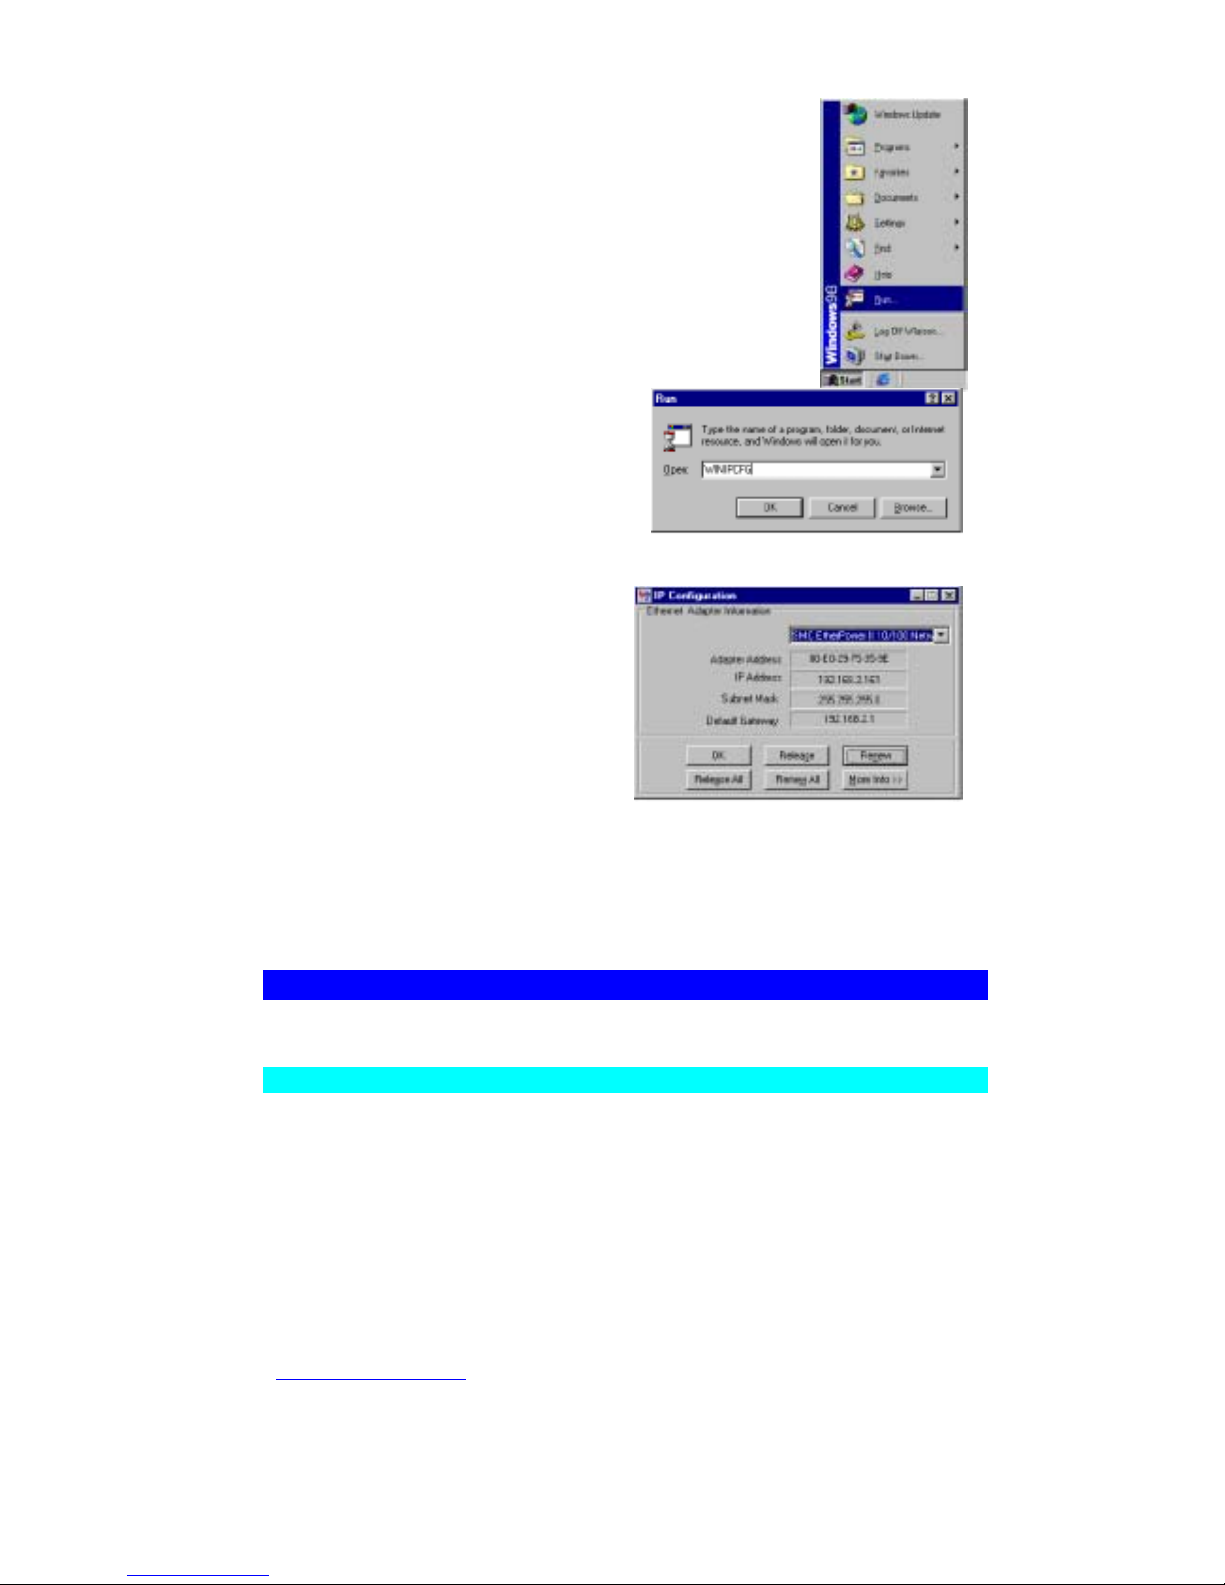
1. Click “Start/Run.”
2. Type “WINIPCFG” and click
“OK.” It may take a minute or
two for the “IP Configuration”
window to appear.
3. From the dropdown menu,
select your network card.
Click “Release” and then
“Renew.” Verify that your IP
address is now 192.168.1.xxx,
your Subnet Mask is
255.255.255.0 and your
Default Gateway is 192.168.
2.1. These values confirm that
your BLW-03FA is functioning. Click “OK” to close the “IP
Configuration” window.
Configuration Computer with Windows 2000
Step 1. Configure TCP/IP Settings
After you have completed the hardware setup by connecting your devices, you need to
configure the computer to connect to the BLW-03FA. You need to determine how your
ISP issues your IP address. Many ISPs issue these numbers automatically using a
networking technology known as Dynamic Host Control Protocol, or DHCP. Other ISPs
will specify your IP address and associated numbers, which you must enter manually.
This is also known as a static IP address. How your ISP assigns your IP address
determines how you will configure your computer.
Page 54
PLANEX COMMUNICATIONS INC.
http://www.planex.com.tw/ TEL+886-2-22191816 FAX +886-2-22190655 Page 52
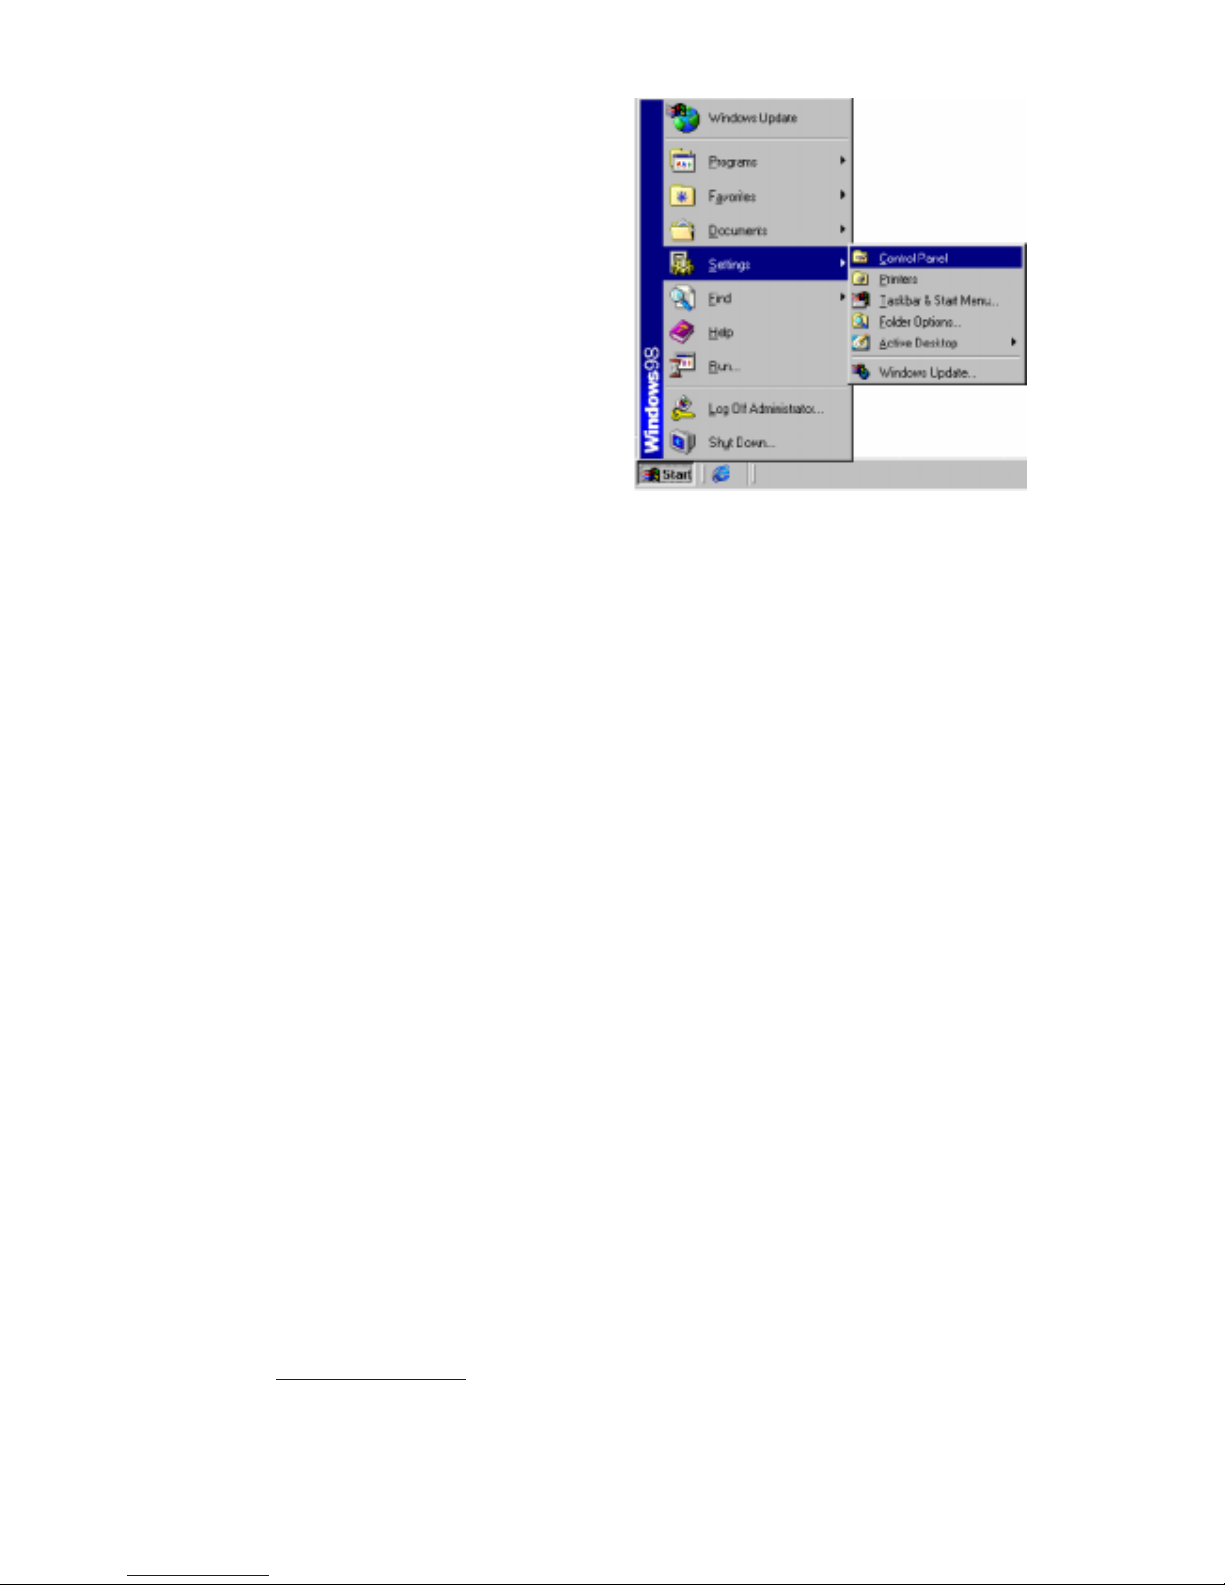
1. From the Windows desktop,
click “Start/Settings/Control
Panel.”
Page 55
PLANEX COMMUNICATIONS INC.
http://www.planex.com.tw/ TEL+886-2-22191816 FAX +886-2-22190655 Page 53
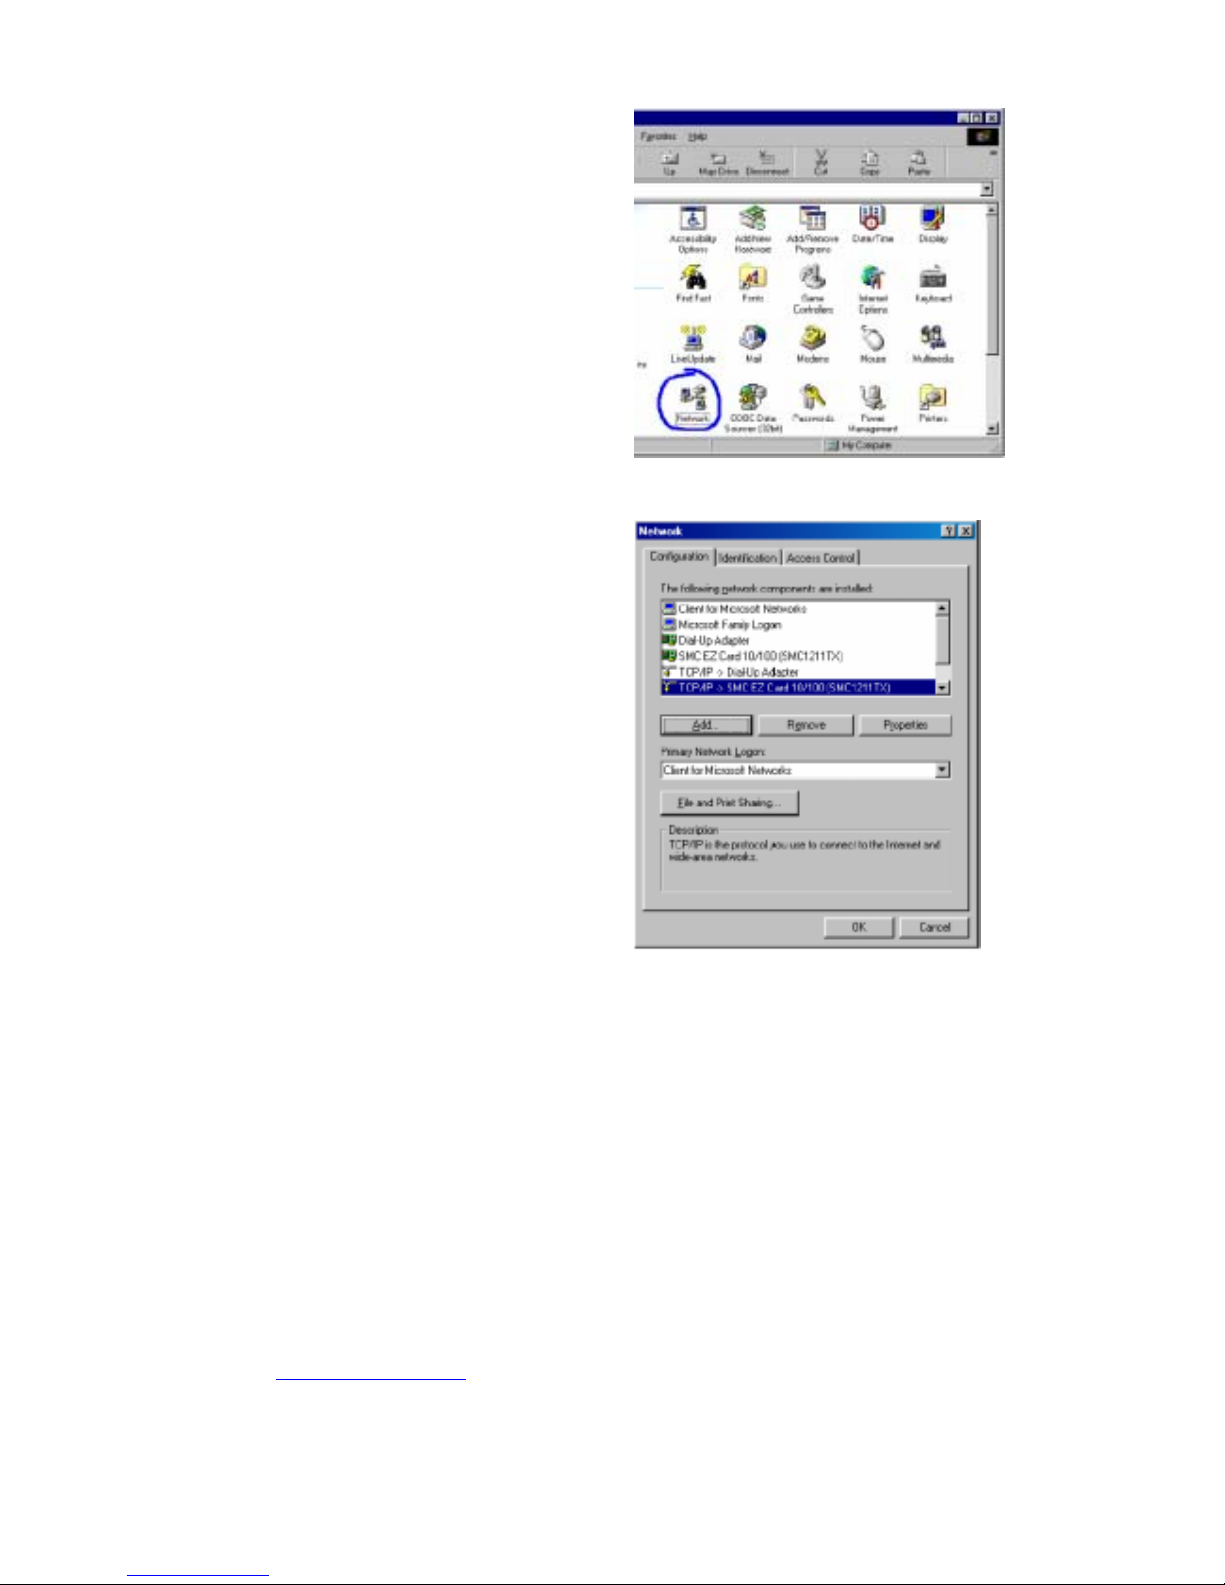
2. Double-click the
“Network” icon.
3. On the “Network”
window “Configuration” tab,
double-click the “TCP/IP”
entry for your network card.
Page 56
PLANEX COMMUNICATIONS INC.
http://www.planex.com.tw/ TEL+886-2-22191816 FAX +886-2-22190655 Page 54
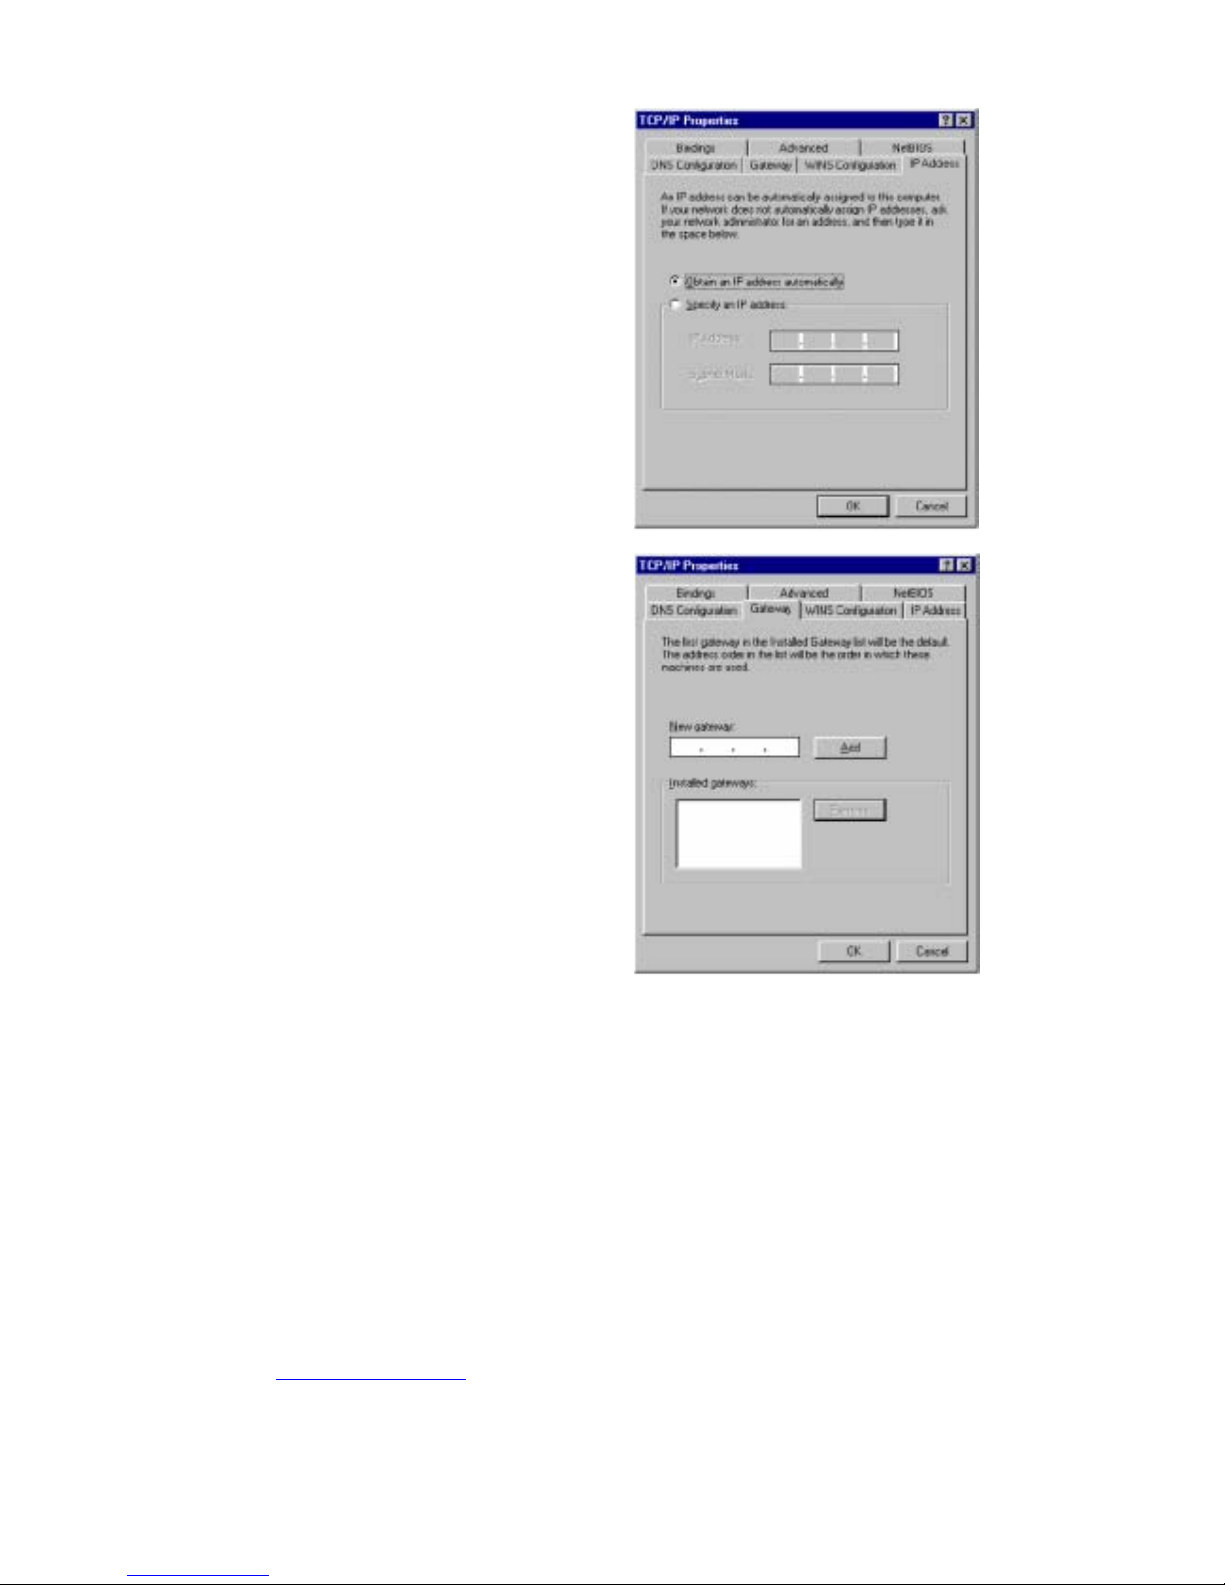
4. Click the “IP Address” tab.
If “Obtain an IP address
automatically” is already
checked, your computer is
already configured for DHCP.
Click “Cancel” to close each
window, and skip to “Step 2.
Disable HTTP Proxy” on
page 5-12.
5. Make a note of the current IP
Address and Subnet Mask (a
space is provided on the next
page).
6. Click the “Gateway” tab and
record the numbers listed
under “Installed gateways.”
Page 57
PLANEX COMMUNICATIONS INC.
http://www.planex.com.tw/ TEL+886-2-22191816 FAX +886-2-22190655 Page 55
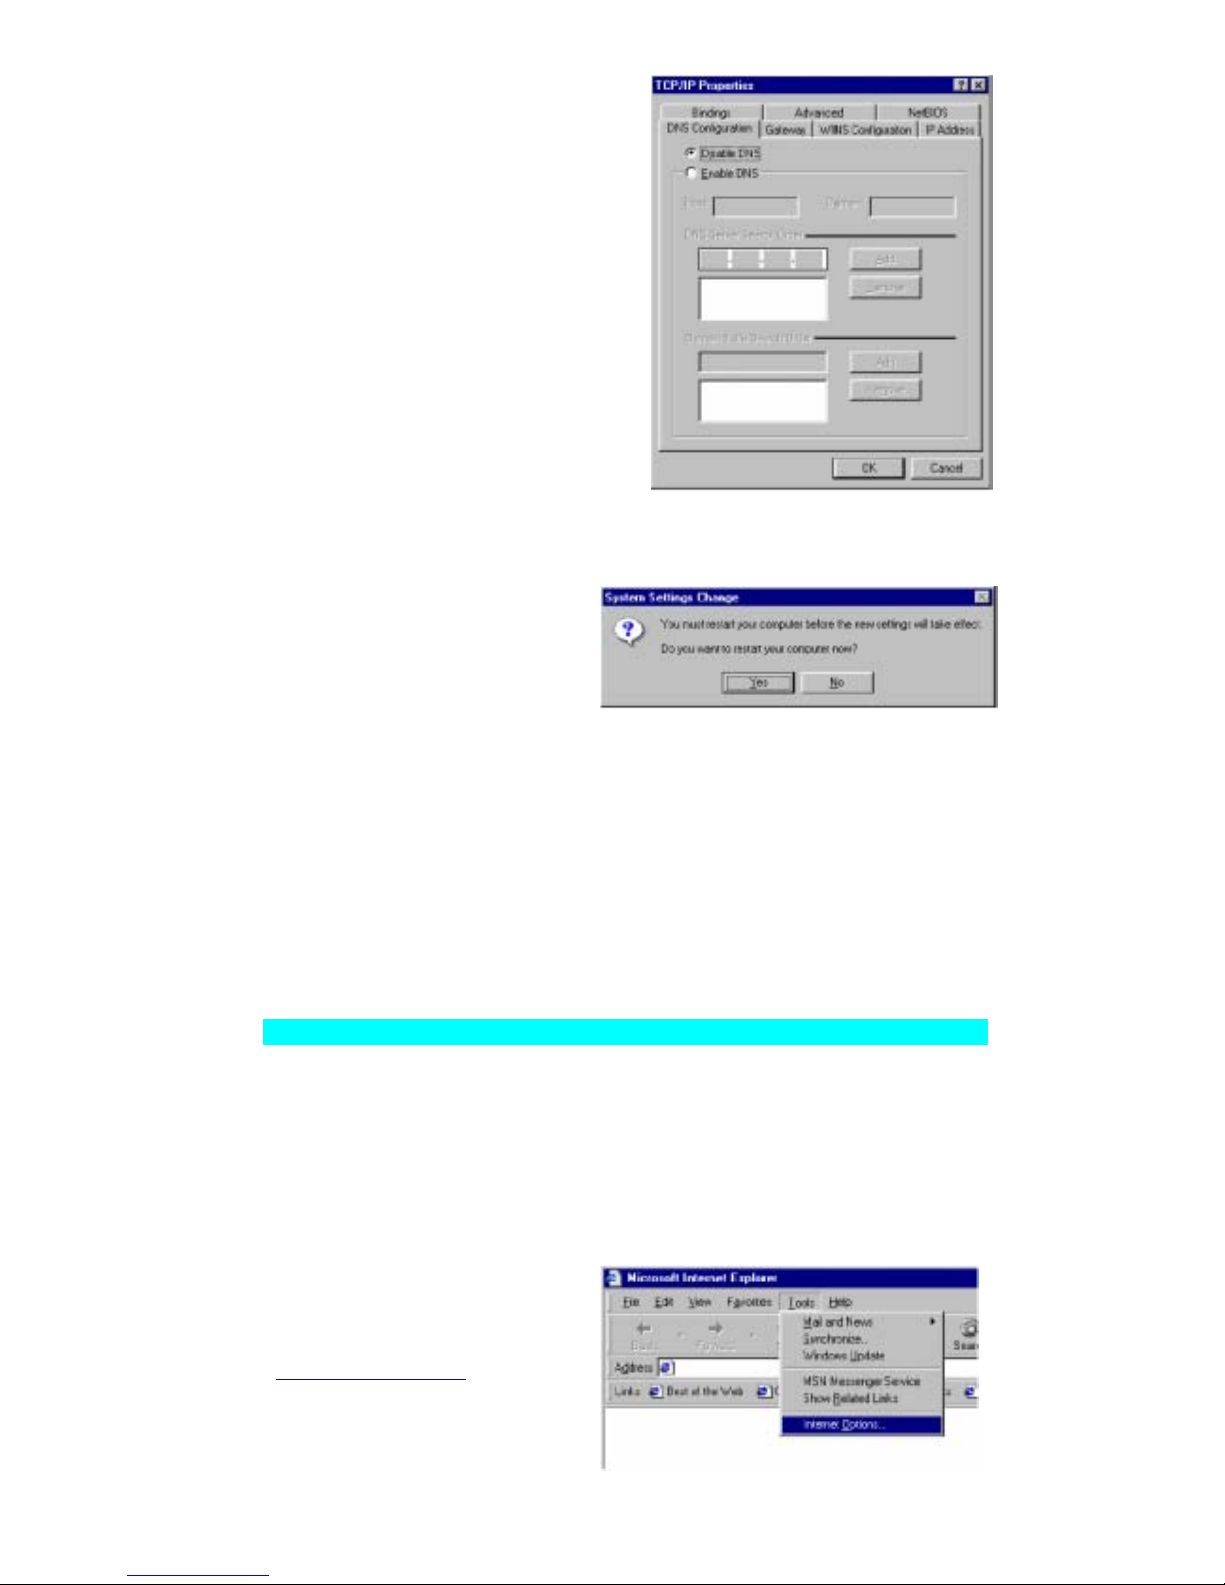
7. Click the “DNS
Configuration” tab. Record the
DNS servers listed under
“DNS Server Search Order.”
8. Click the “IP Address” tab and
then check “Obtain an IP
address automatically.” Click
“OK.”
9. Windows may need your
Windows 95/98/ME CD
to copy some files. After
it finishes copying, it will
then prompt you to
restart your system. Click
“Yes” and the computer will shut down and restart.
TCP/IP Configuration Setting
IP Address ____.____.____.____
Subnet Mask ____.____.____.____
Primary DNS Server ____.____.____.____
Secondary DNS Server ____.____.____.____
Default Gateway ____.____.____.____
Step 2. Disable the HTTP Proxy
You will need to verify that the “HTTP Proxy” feature of your web
browser is disabled. This is so that your web browser will be able to view
the configuration pages inside your BLW-03FA. The following
steps are for Internet Explorer and for Netscape. Determine which
browser you use and follow the appropriate steps.
Internet Explorer
Page 58
PLANEX COMMUNICATIONS INC.
http://www.planex.com.tw/ TEL+886-2-22191816 FAX +886-2-22190655 Page 56
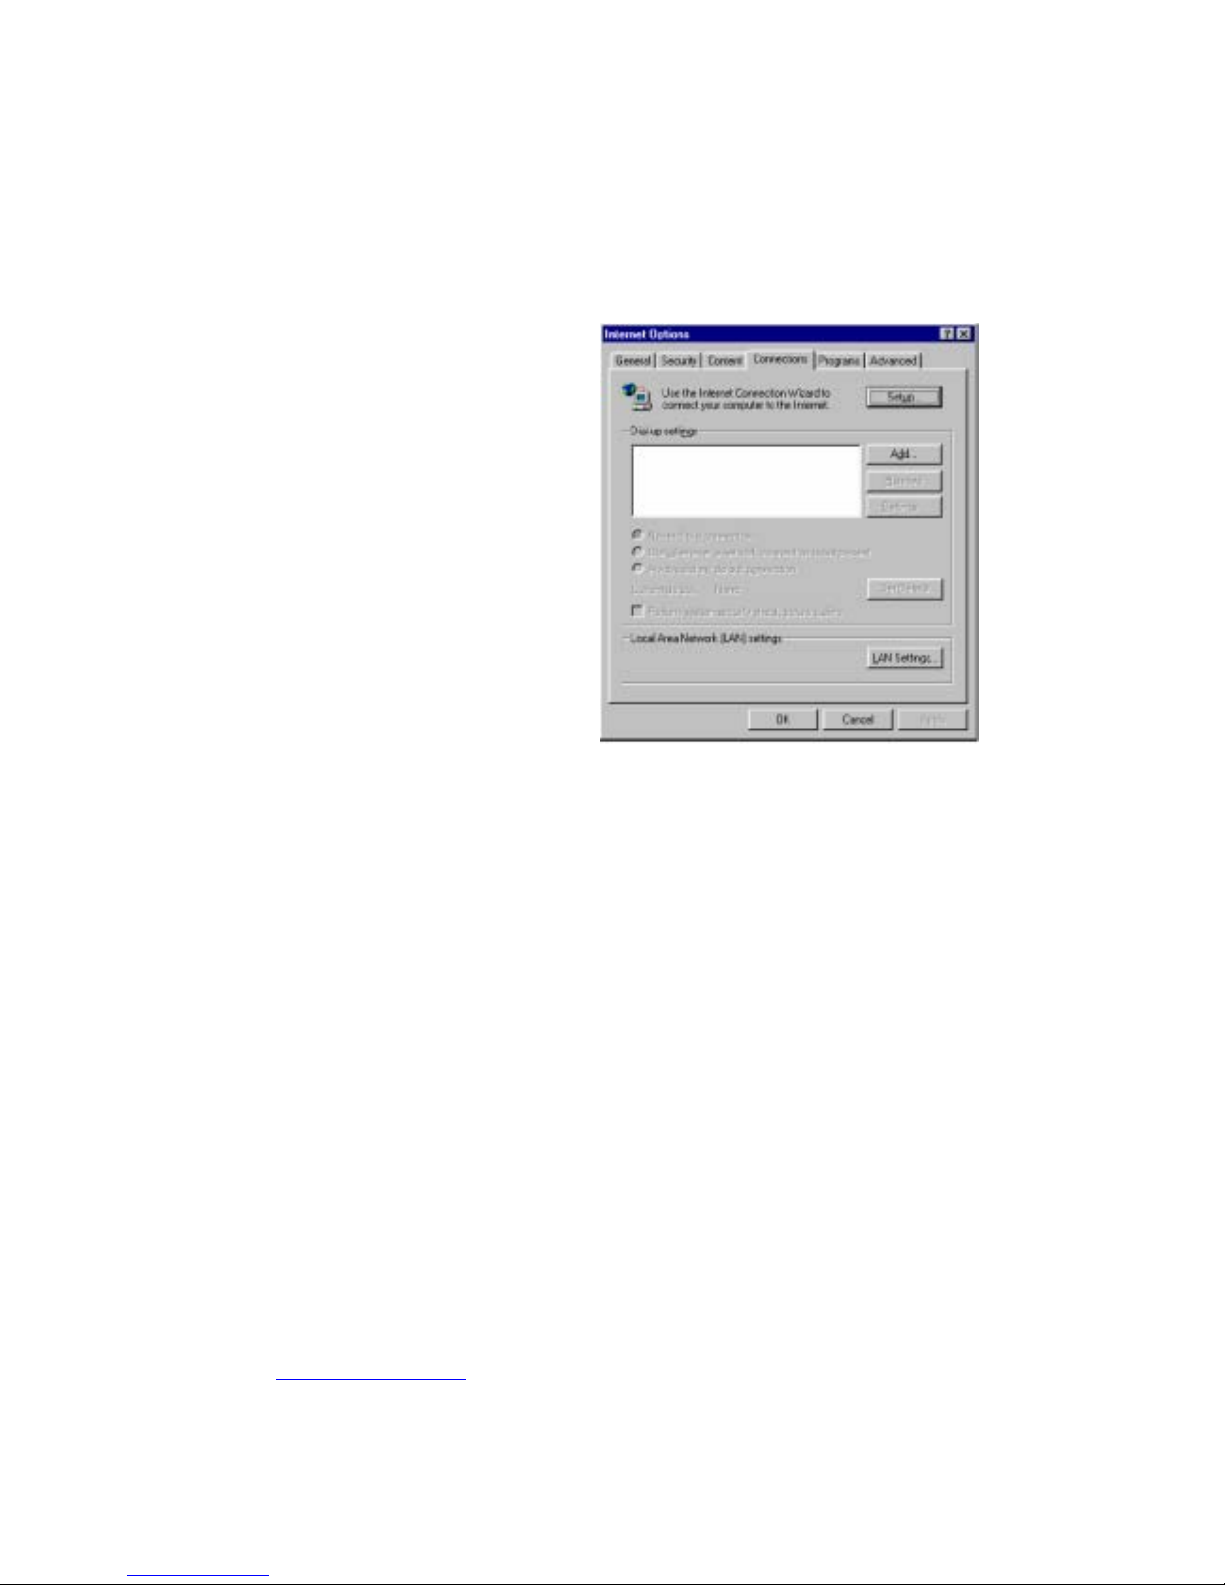
1. Open Internet Explorer.
Click “Tools/Internet
Options.”
2. In the “Internet Options”
window, click the
“Connections” tab. Click
the “LAN Settings”
button.
Page 59
PLANEX COMMUNICATIONS INC.
http://www.planex.com.tw/ TEL+886-2-22191816 FAX +886-2-22190655 Page 57
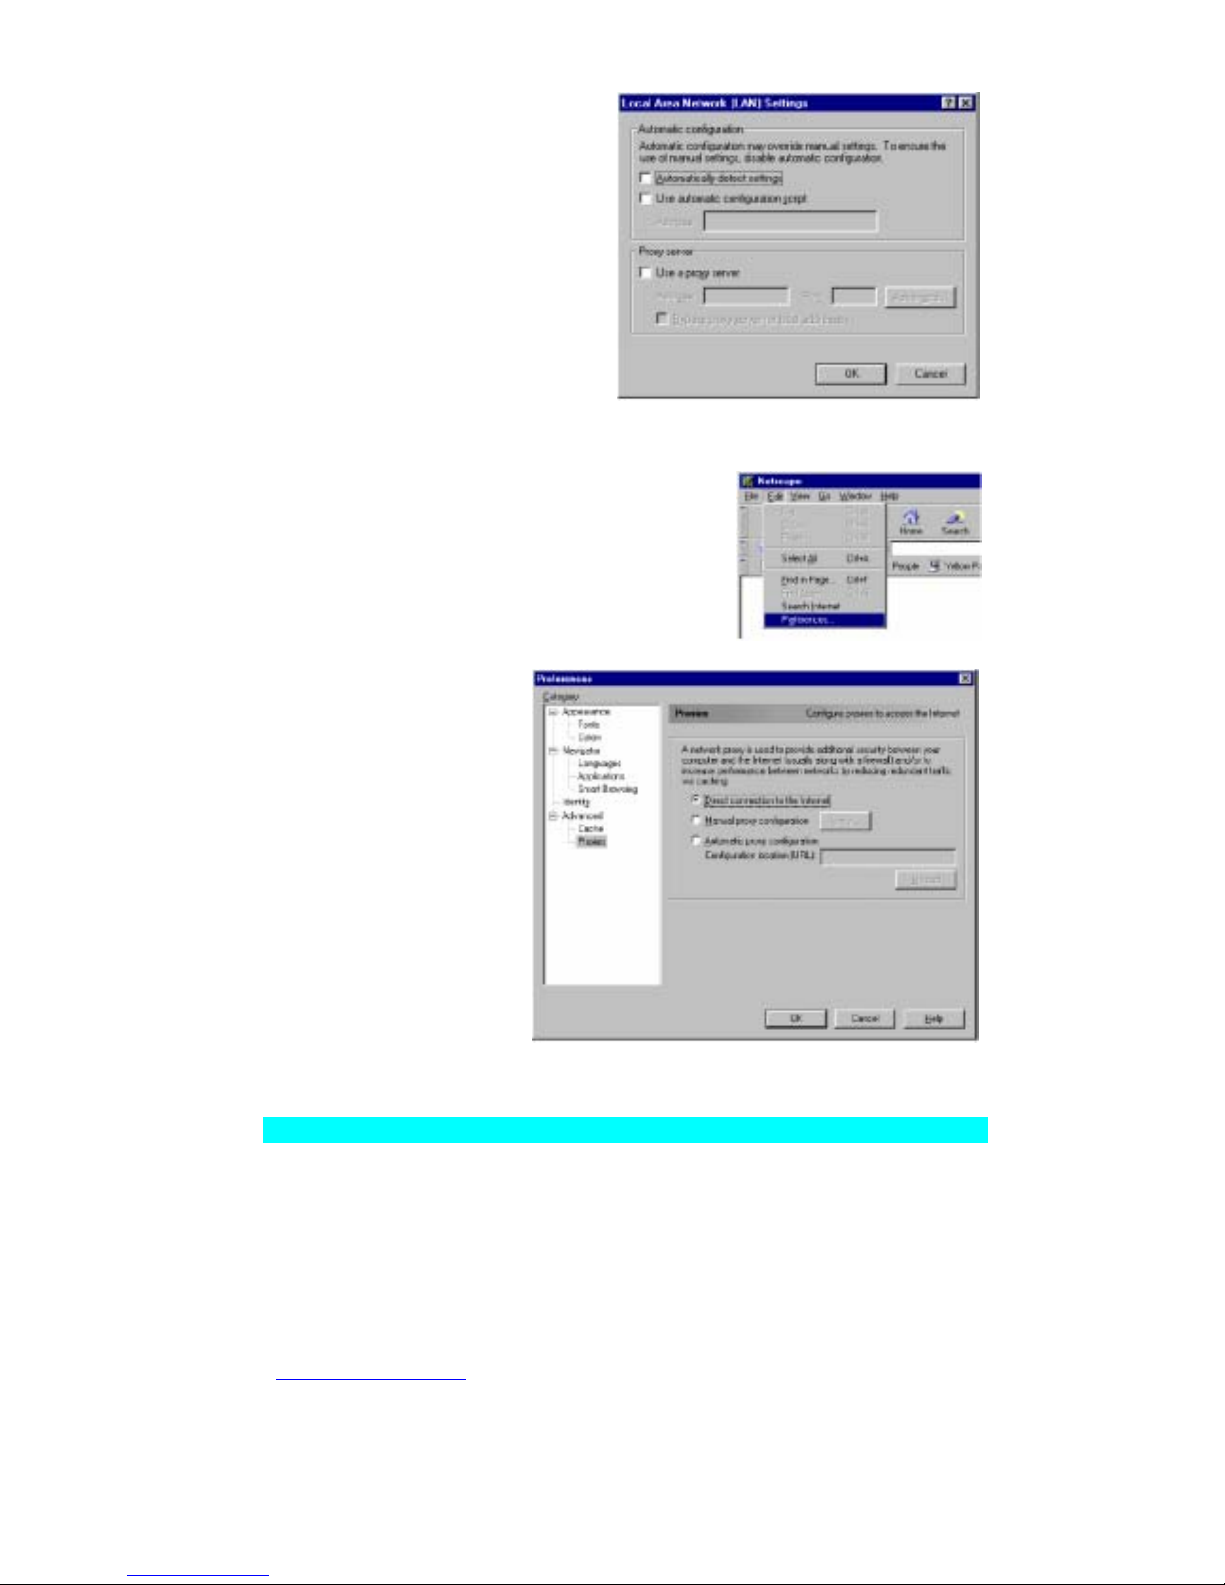
3. Clear all the check boxes
and click “OK”. Click
“OK” again to close the
“Internet Options” window.
Netscape
1. Open Netscape. Click “Edit,” then
click “Preferences.”
2. In the
“Preferences”
window, under
“Category,”
double-click
“Advanced,” then
click “Proxies.”
Check “Direct
connection to the
Internet.” Click
“OK”.
3. Repeat these
steps for each
Windows 95/98/ME computer connected to your BLW-03FA.
Step 3. Obtain IP Settings from Your BLW-03FA
Now that you have configured your computer to connect to your Wireless
Barricade, it needs to obtain new network settings. By releasing old IP
settings and renewing them with settings from your BLW-03FA,
you will also verify that you have configured your computer correctly.
Page 60
PLANEX COMMUNICATIONS INC.
http://www.planex.com.tw/ TEL+886-2-22191816 FAX +886-2-22190655 Page 58
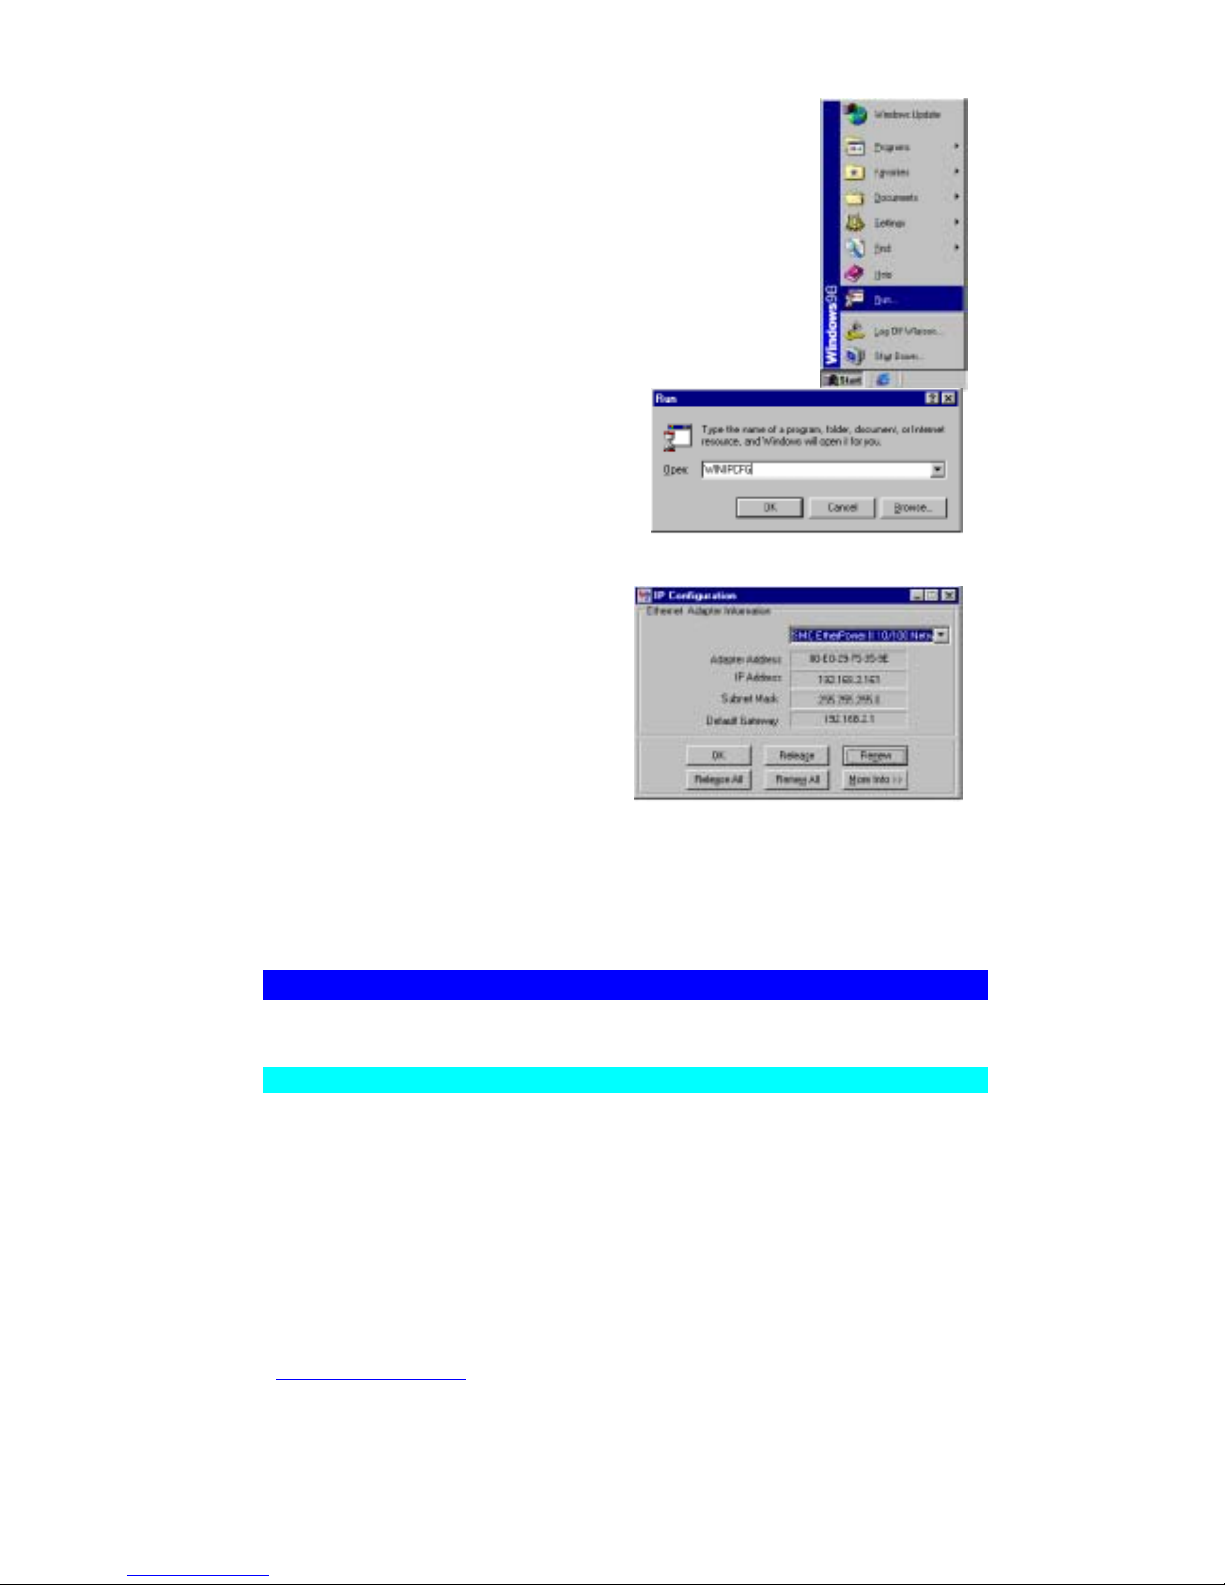
1. Click “Start/Run.”
2. Type “WINIPCFG” and click
“OK.” It may take a minute or
two for the “IP Configuration”
window to appear.
3. From the dropdown menu,
select your network card.
Click “Release” and then
“Renew.” Verify that your IP
address is now 192.168.1.xxx,
your Subnet Mask is
255.255.255.0 and your
Default Gateway is 192.168.
2.1. These values confirm that
your BLW-03FA is functioning. Click “OK” to close the “IP
Configuration” window.
Configuration Computer with Windows XP
Step 1. Configure TCP/IP Settings
After you have completed the hardware setup, you need to configure your computer to
connect to your BLW-03FA. You also need to determine how your ISP issues your IP
address. Many ISPs issue these numbers automatically, using a networking technology
known as Dynamic Host Configuration Protocol, or DHCP. Other ISPs will specify your
IP address and associated numbers, which you must enter manually. This is also known
as a static IP address. How your ISP assigns your IP address determines how you will
configure your computer.
Page 61
PLANEX COMMUNICATIONS INC.
http://www.planex.com.tw/ TEL+886-2-22191816 FAX +886-2-22190655 Page 59
Here is what to do:
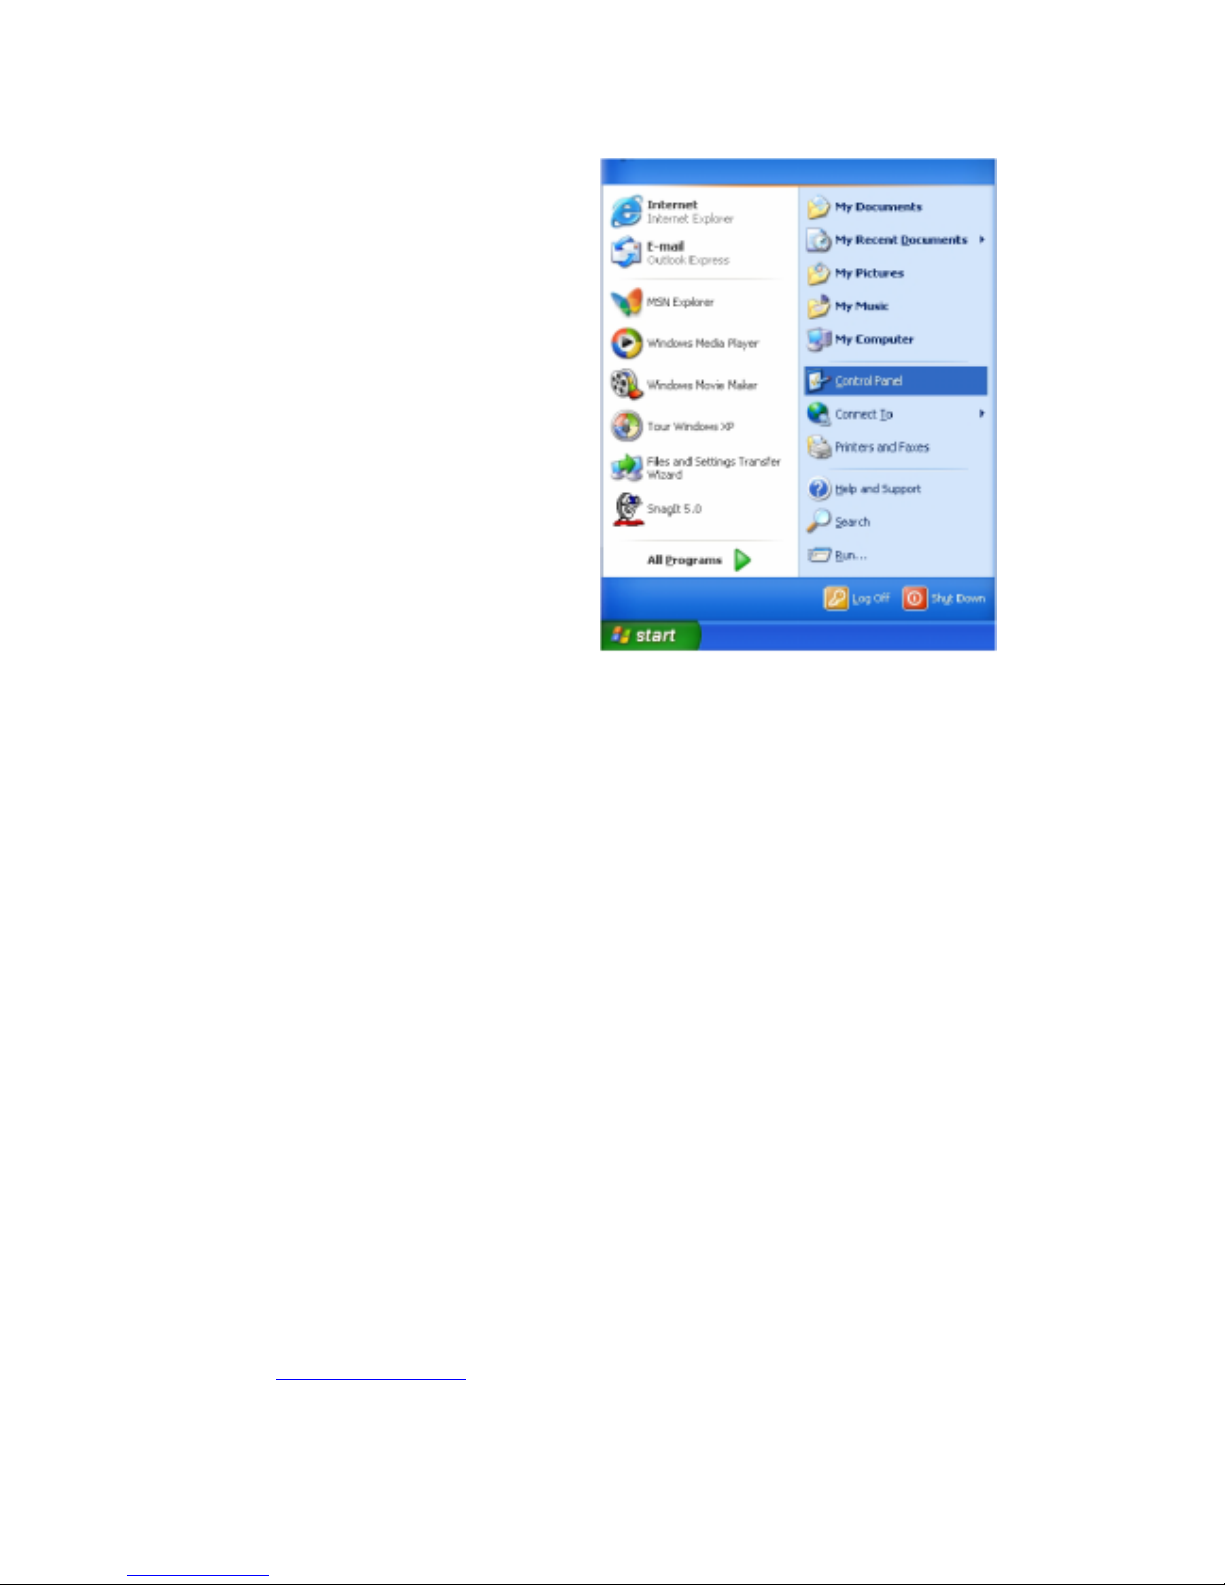
1. From the Windows
desktop, click the “start”
button. Choose “Control
Panel.”
Page 62
PLANEX COMMUNICATIONS INC.
http://www.planex.com.tw/ TEL+886-2-22191816 FAX +886-2-22190655 Page 60
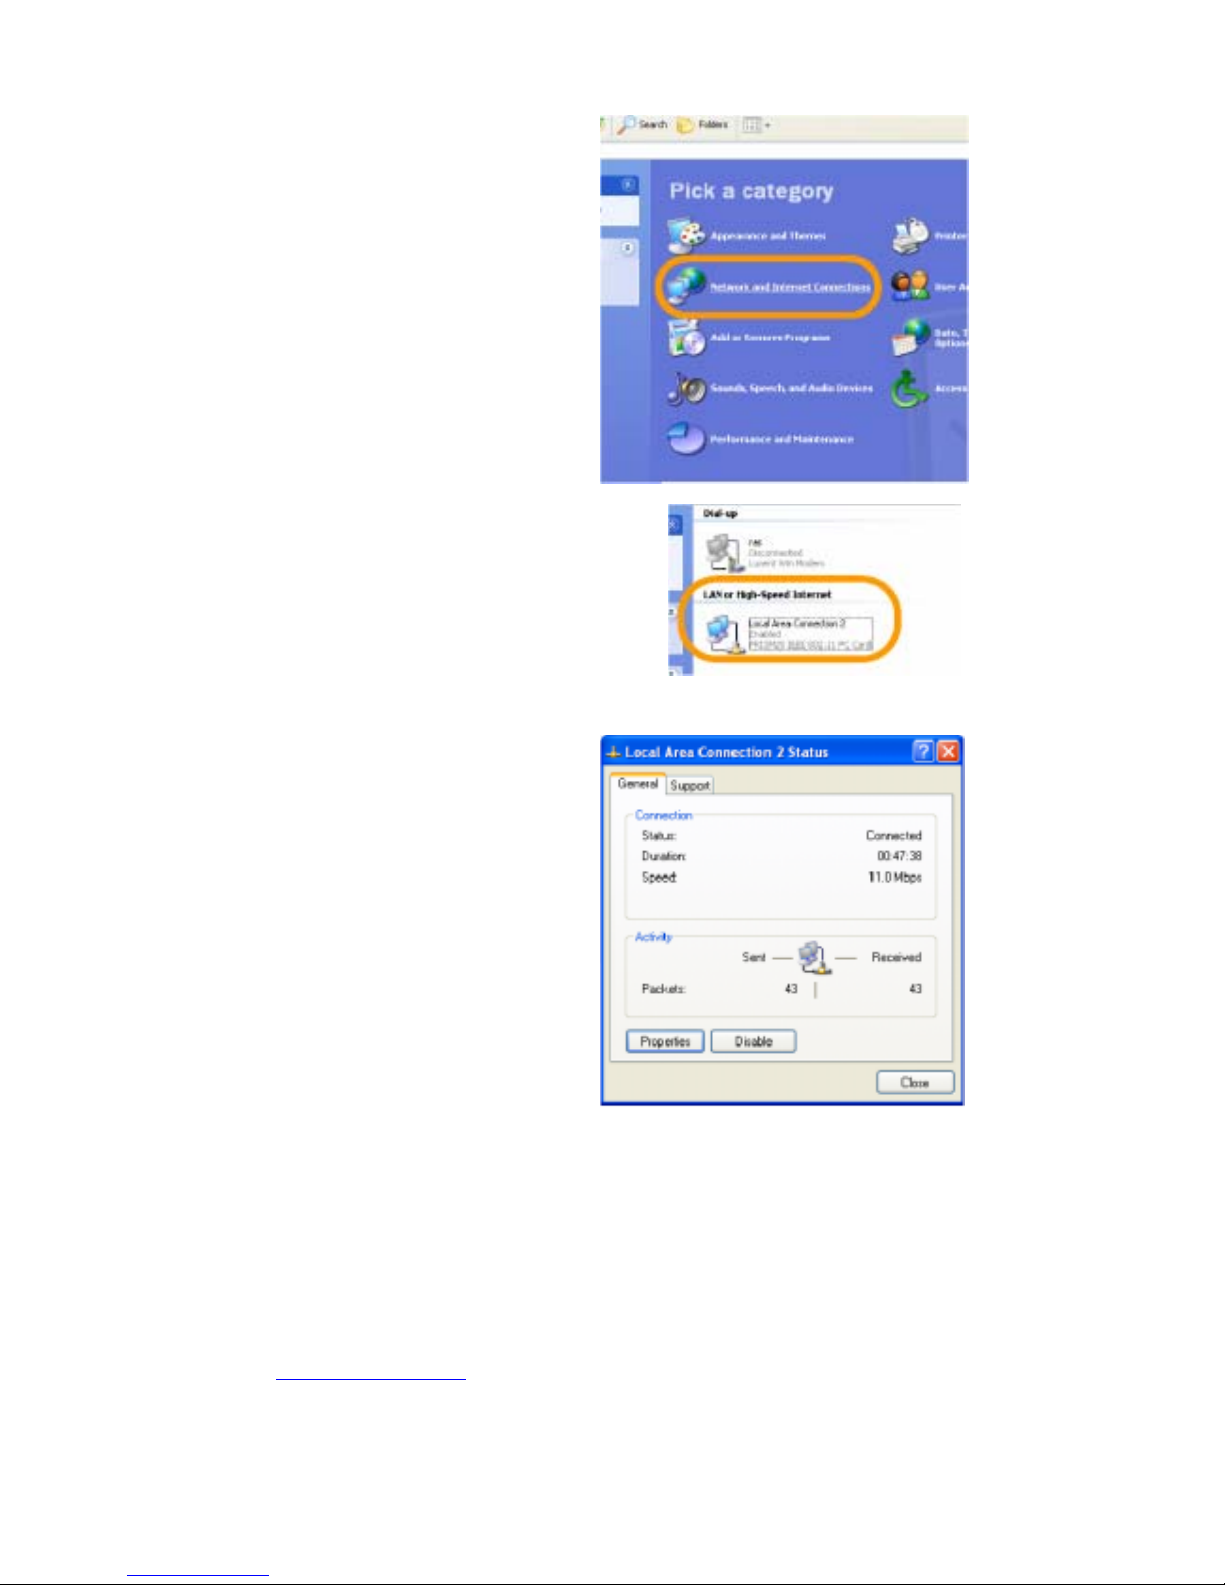
2. Select the “Network
and Internet
Connections” icon,
then click the
“Network
Connections” icon.
3. Double click on the
“LAN or High-Speed
Internet.”
4. Click “Properties.”
Page 63
PLANEX COMMUNICATIONS INC.
http://www.planex.com.tw/ TEL+886-2-22191816 FAX +886-2-22190655 Page 61
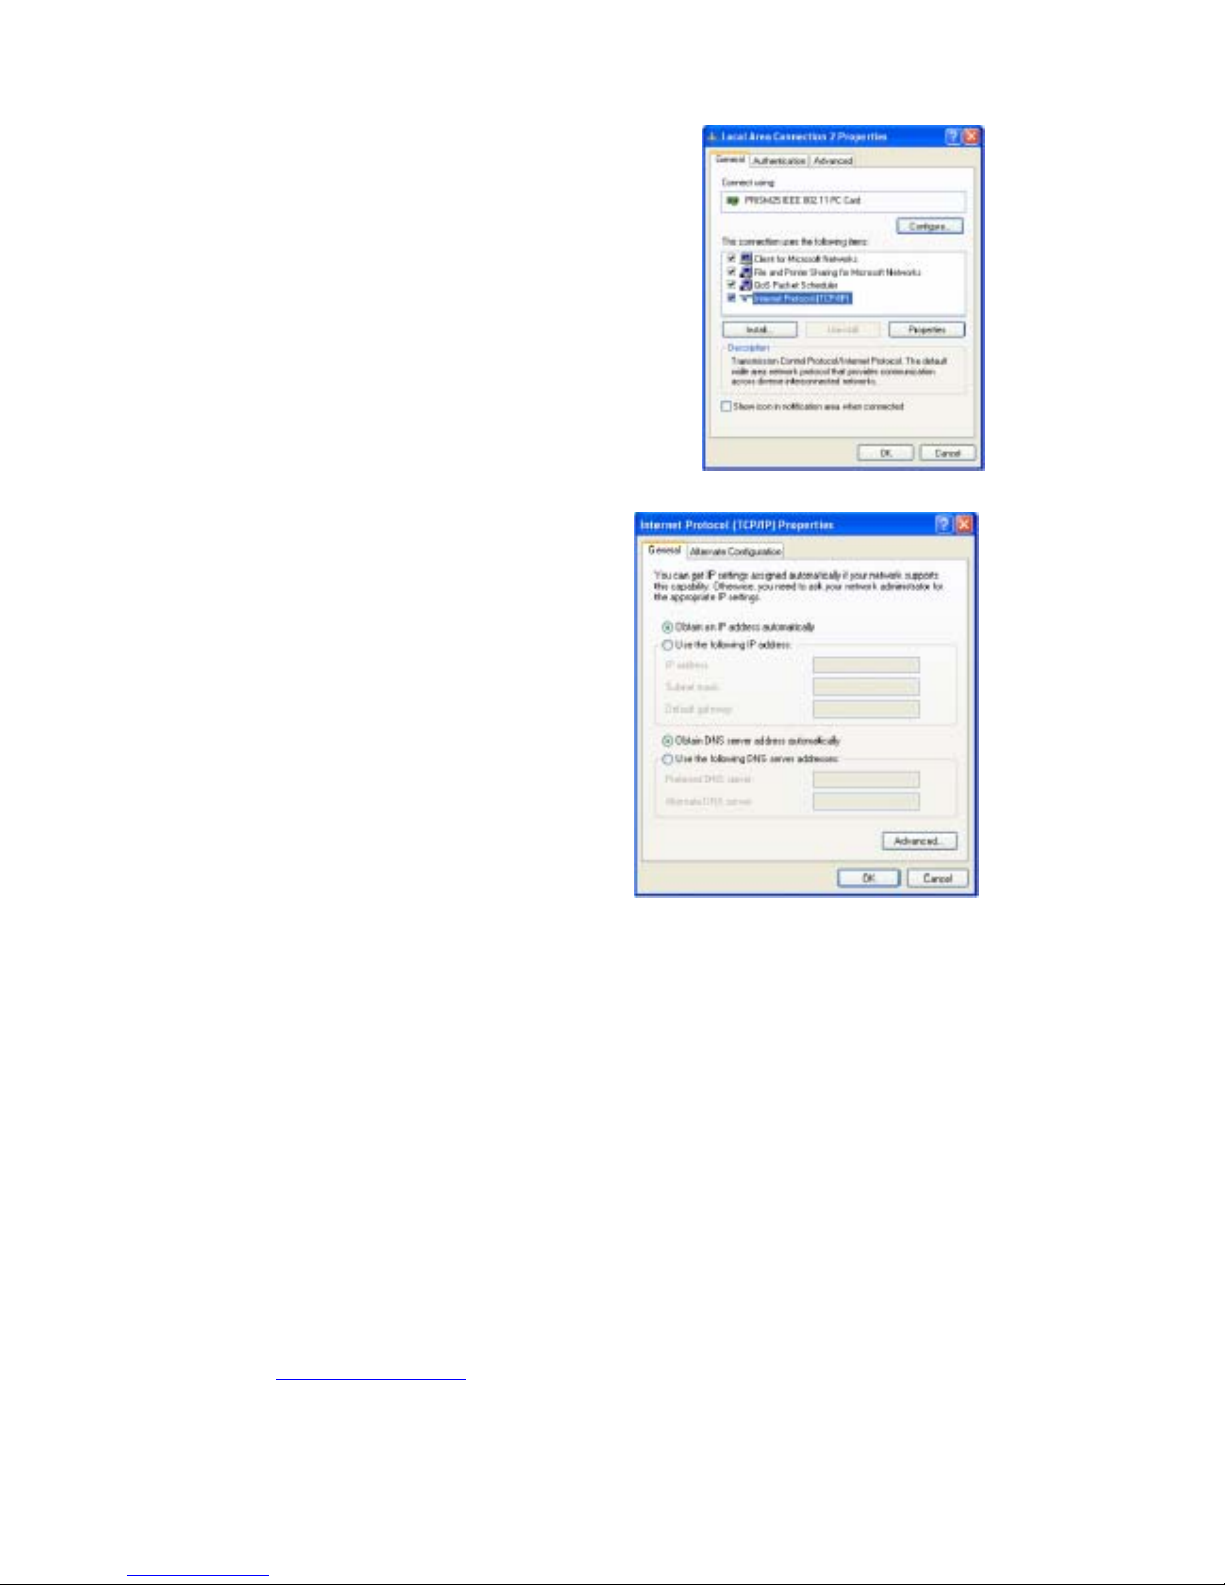
5. Double-click “Internet
Protocol (TCP/IP).”
6. All the information that
you need to record is on
the “Internet Protocol
(TCP/IP) Properties”
dialog box. Use the
spaces below to record
the information.
If “Obtain an IP address
automatically” and “Obtain
DNS server address
automatically” are already
selected, your computer is
already configured for
DHCP. Click “Cancel” to
close each window, and skip
to “Step 2. Disable HTTP
Proxy” on page 5-25.
Page 64
PLANEX COMMUNICATIONS INC.
http://www.planex.com.tw/ TEL+886-2-22191816 FAX +886-2-22190655 Page 62
7. Select “Obtain an IP address automatically” and then select “Obtain
DNS server address automatically.” Then click “OK.” Click “OK” or
“Close” to close each window.
TCP/IP Configuration Setting
IP Address ____.____.____.____
Subnet Mask ____.____.____.____
Primary DNS Server ____.____.____.____
Secondary DNS Server ____.____.____.____
Default Gateway ____.____.____.____
Step 2. Disable the HTTP Proxy
You will need to verify that the “HTTP Proxy” feature of your Web
browser is disabled. This is so that your Web browser will be able to view
the configuration pages inside your BLW-03FA. The following
steps are for Internet Explorer and for Netscape. Determine which
browser you use and follow the appropriate steps.
Internet Explorer
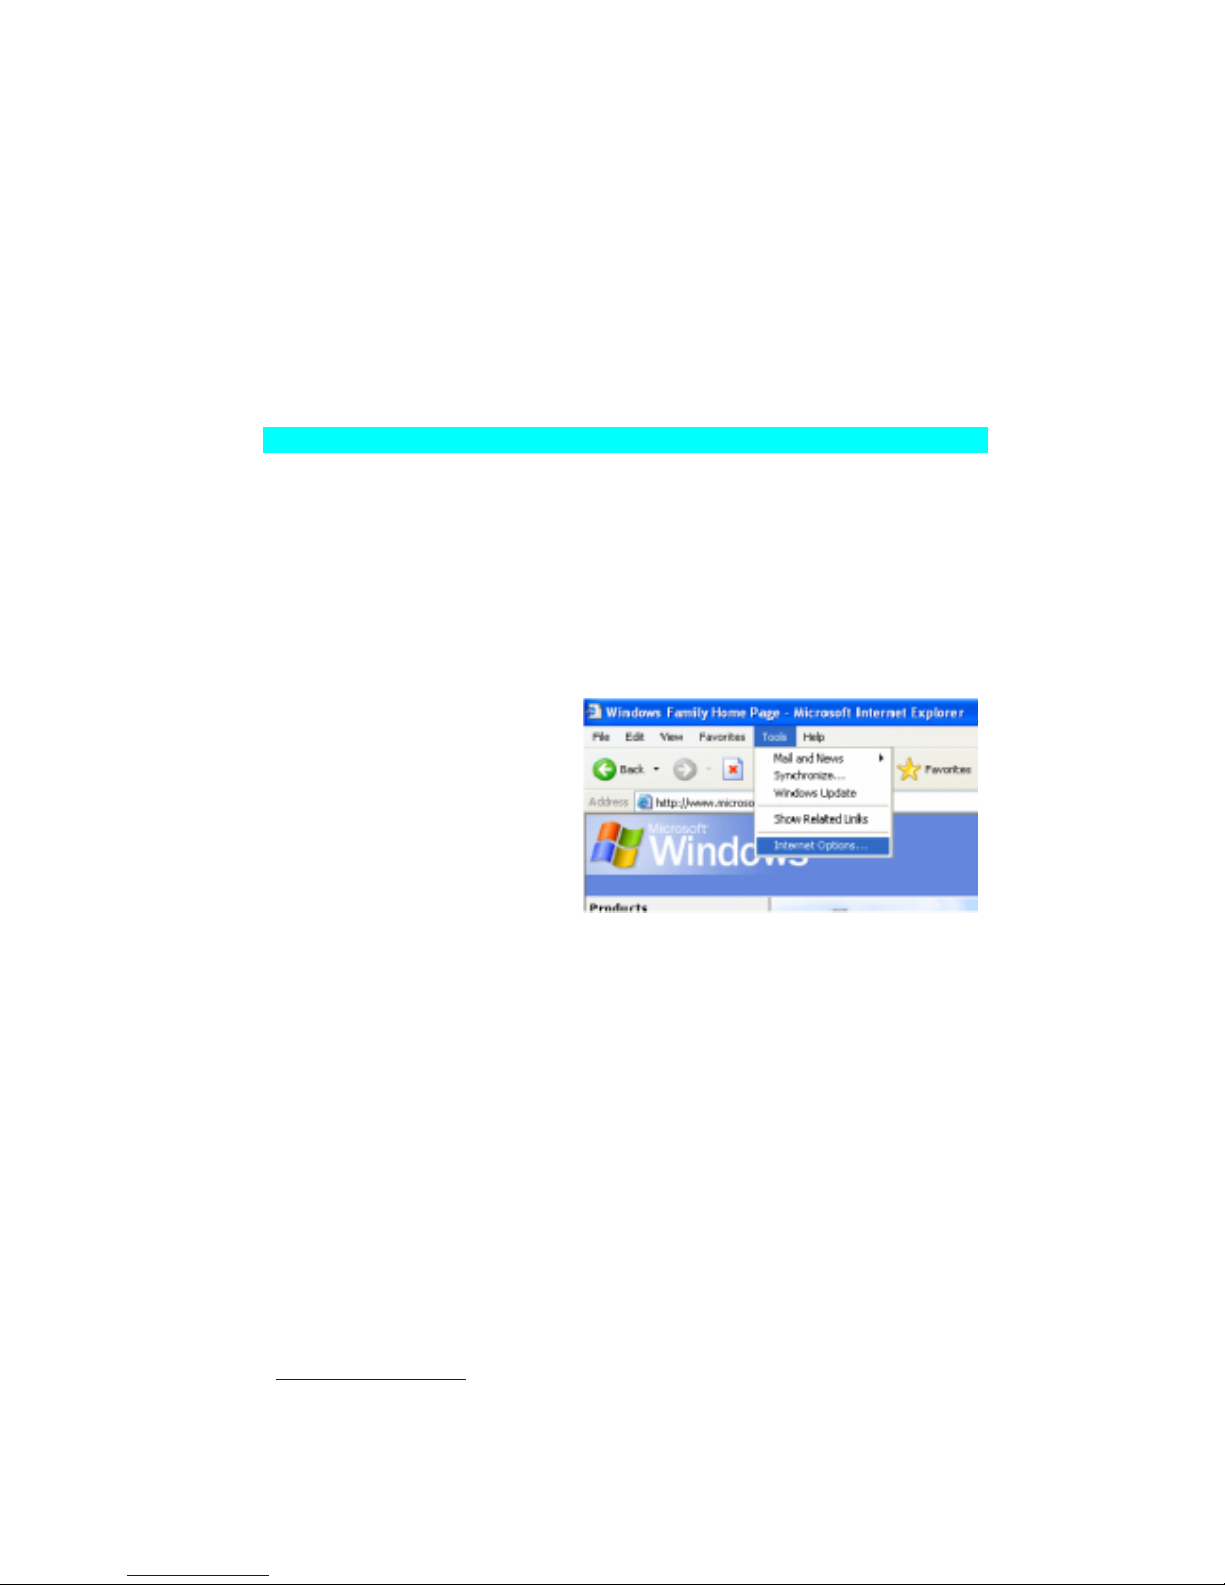
1. Open Internet Explorer
and click the stop button.
Click “Tools,” then
“Internet Options.”
Page 65
PLANEX COMMUNICATIONS INC.
http://www.planex.com.tw/ TEL+886-2-22191816 FAX +886-2-22190655 Page 63
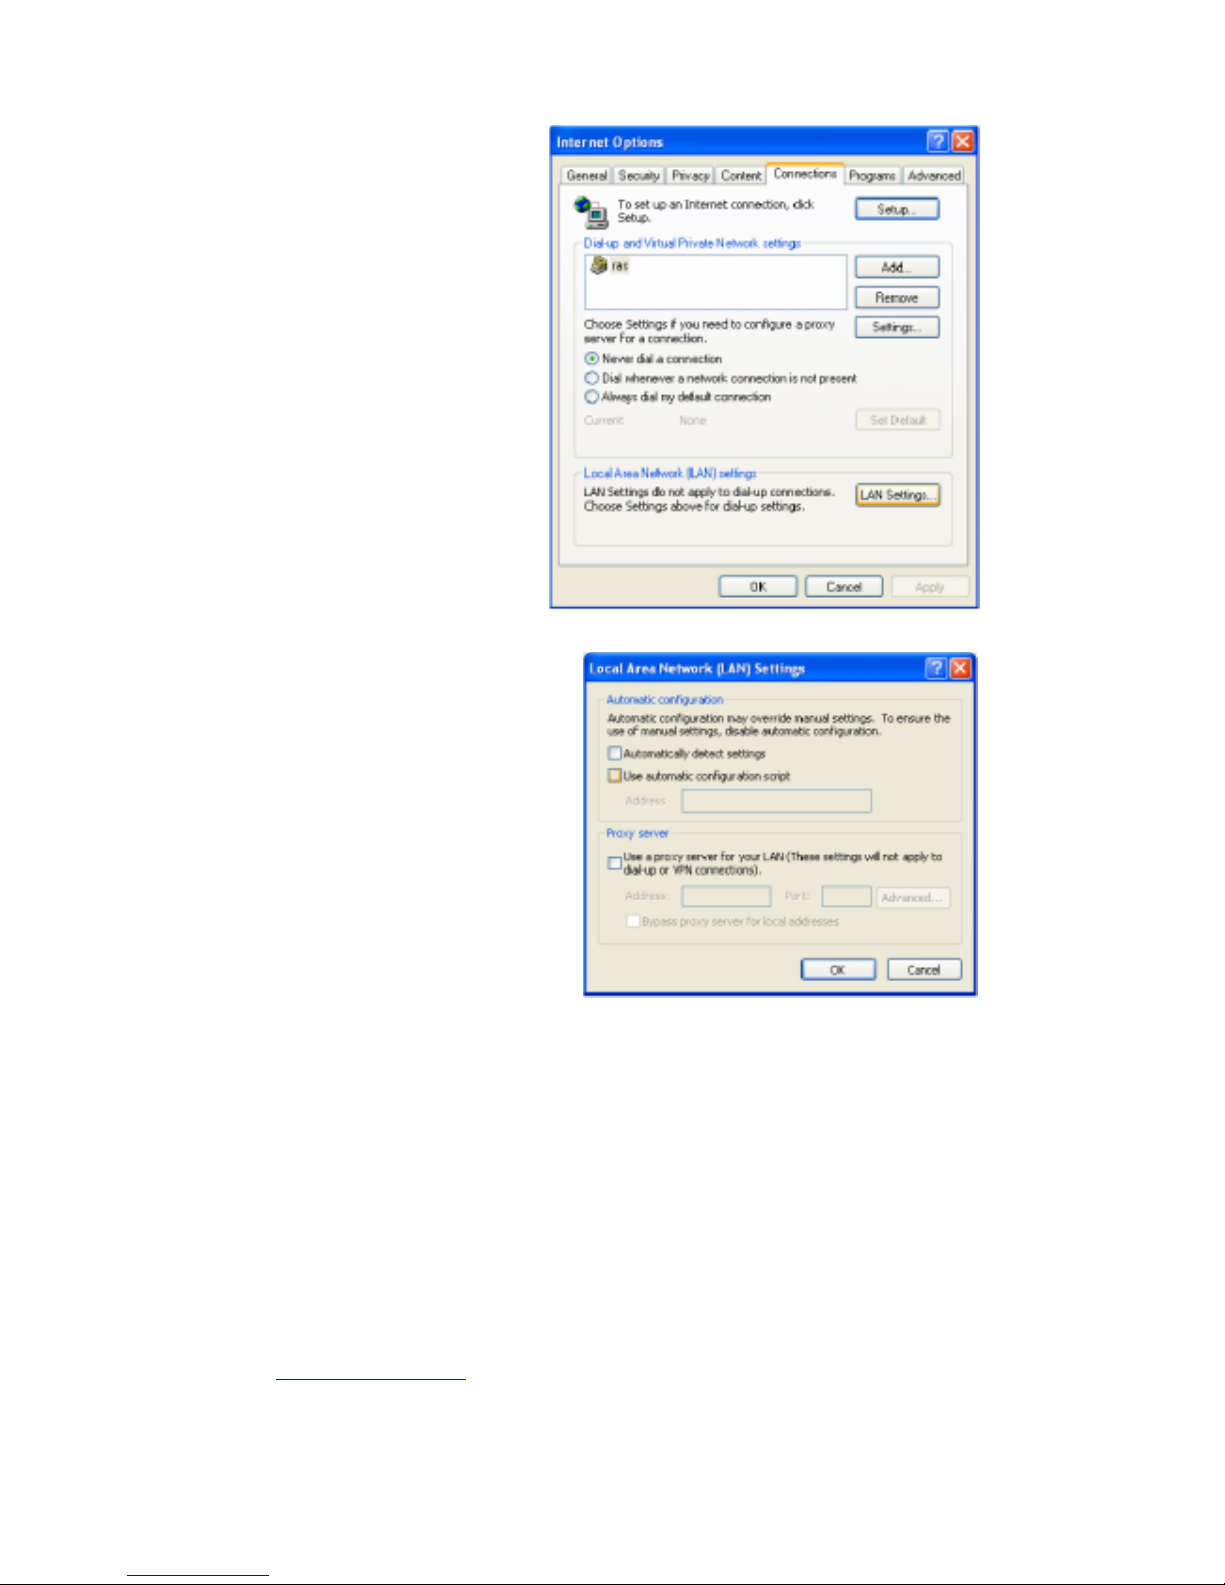
2. In the “Internet
Options” window click
the “Connections” tab.
Next, click the “LAN
Settings...” button.
3. Clear all the checkboxes.
4. Click “OK,” and then click
“OK” again to close the
“Internet Options”
Windows.
Page 66
PLANEX COMMUNICATIONS INC.
http://www.planex.com.tw/ TEL+886-2-22191816 FAX +886-2-22190655 Page 64
Step 3. Obtain IP Settings from Your BLW-03FA
Now that you have configured your computer to connect to your BLW-03FA, it needs to
obtain new network settings. By releasing any old IP settings and renewing them with
settings from your BLW-03FA, you will also verify that you have configured your
computer correctly.
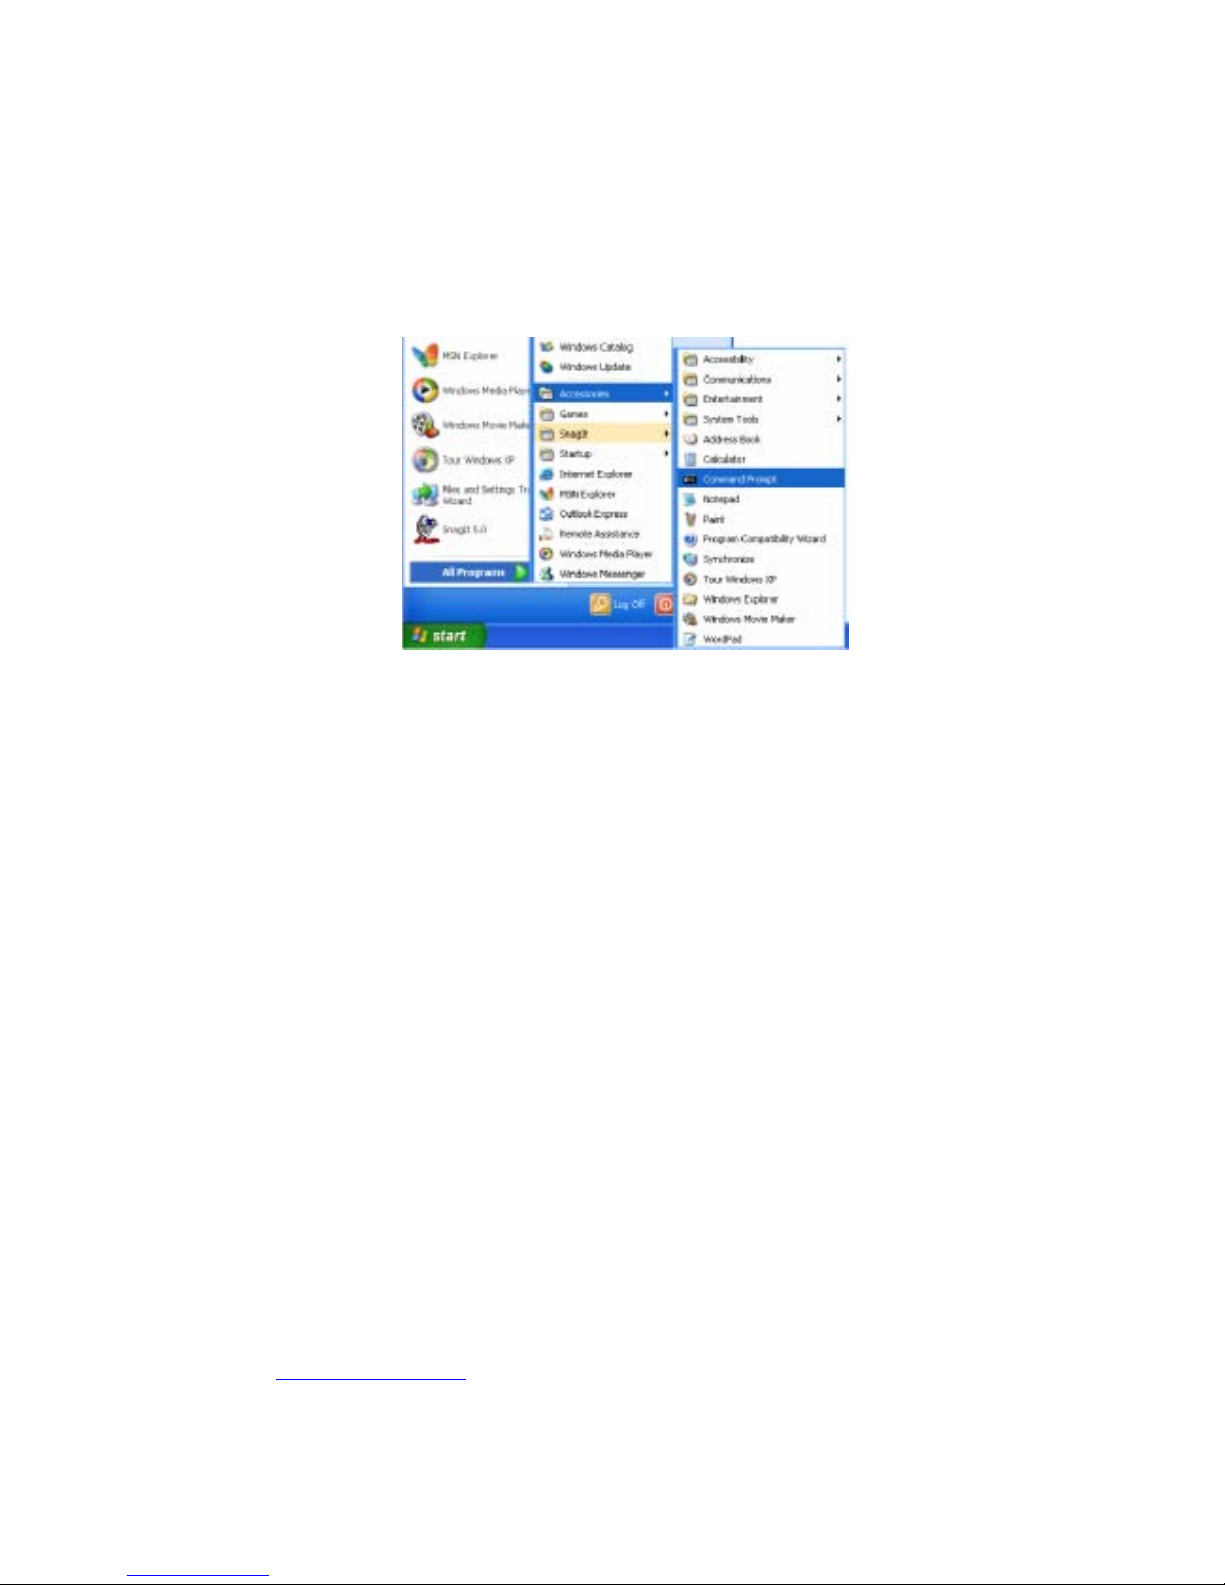
1. From the Windows desktop, click the “Start” button, then “Programs,” then
“Accessories,” and then click “Command Prompt.”
Page 67
PLANEX COMMUNICATIONS INC.
http://www.planex.com.tw/ TEL+886-2-22191816 FAX +886-2-22190655 Page 65
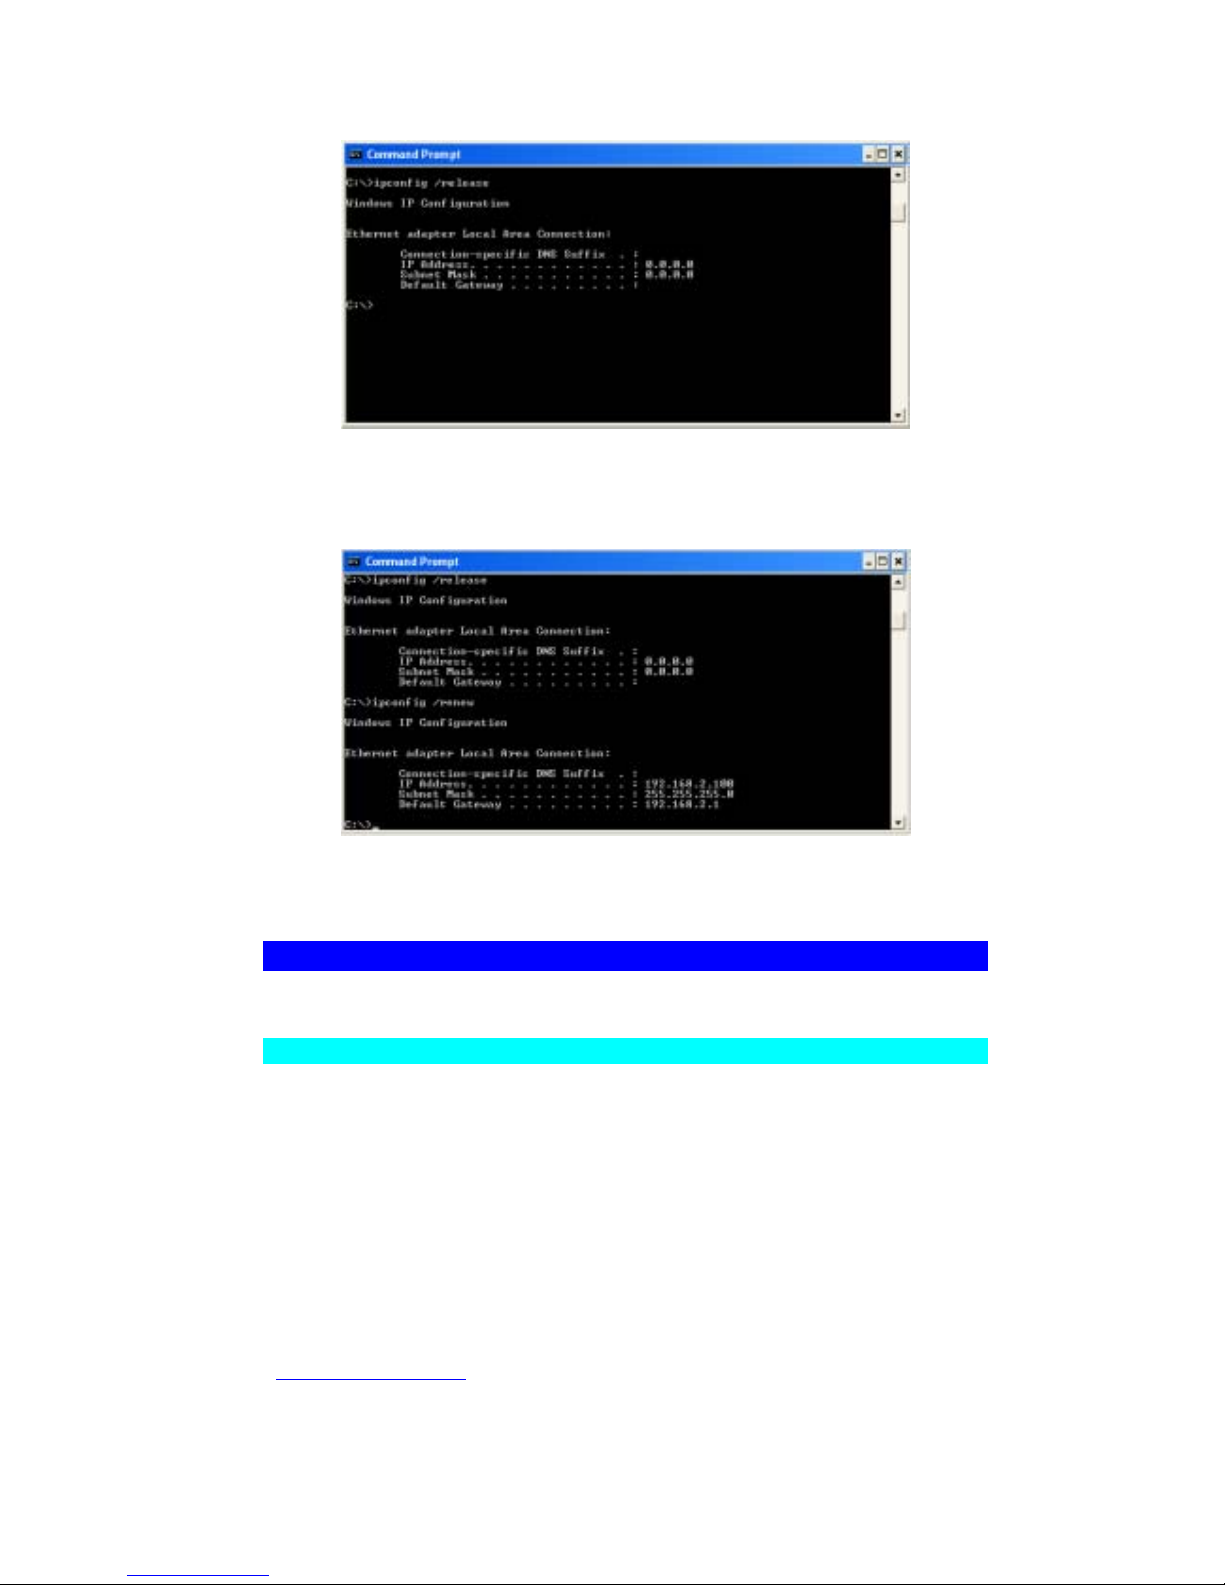
2. In the “Command Prompt” window, type “IPCONFIG /RELEASE” and press the
<ENTER> key.
3. Type “IPCONFIG /RENEW” and press the <ENTER> key. Verify that your IP address
is now 192.168.1.xxx (2-255), your Subnet Mask is 255.255.255.0 and your Default
Gateway is 192.168.1.1. These values confirm that your BLW-03FA is functioning.
4. Type “EXIT” and press <ENTER> to close the “Command Prompt” window.
Configuration Computer with Windows NT
Step 1. Configure TCP/IP Settings
After you have completed the hardware setup, you need to configure your computer to
connect to your BLW-03FA. You need to determine how your ISP issues your IP address.
Many ISPs issue these numbers automatically using a networking technology known as
Dynamic Host Configuration Protocol, or DHCP. Other ISPs will specify your IP address
and associated numbers, which you must enter manually. This is known as a static or
fixed IP address. How your ISP assigns your IP address determines how you will
configure your computer.
Page 68
PLANEX COMMUNICATIONS INC.
http://www.planex.com.tw/ TEL+886-2-22191816 FAX +886-2-22190655 Page 66
Here is what to do:
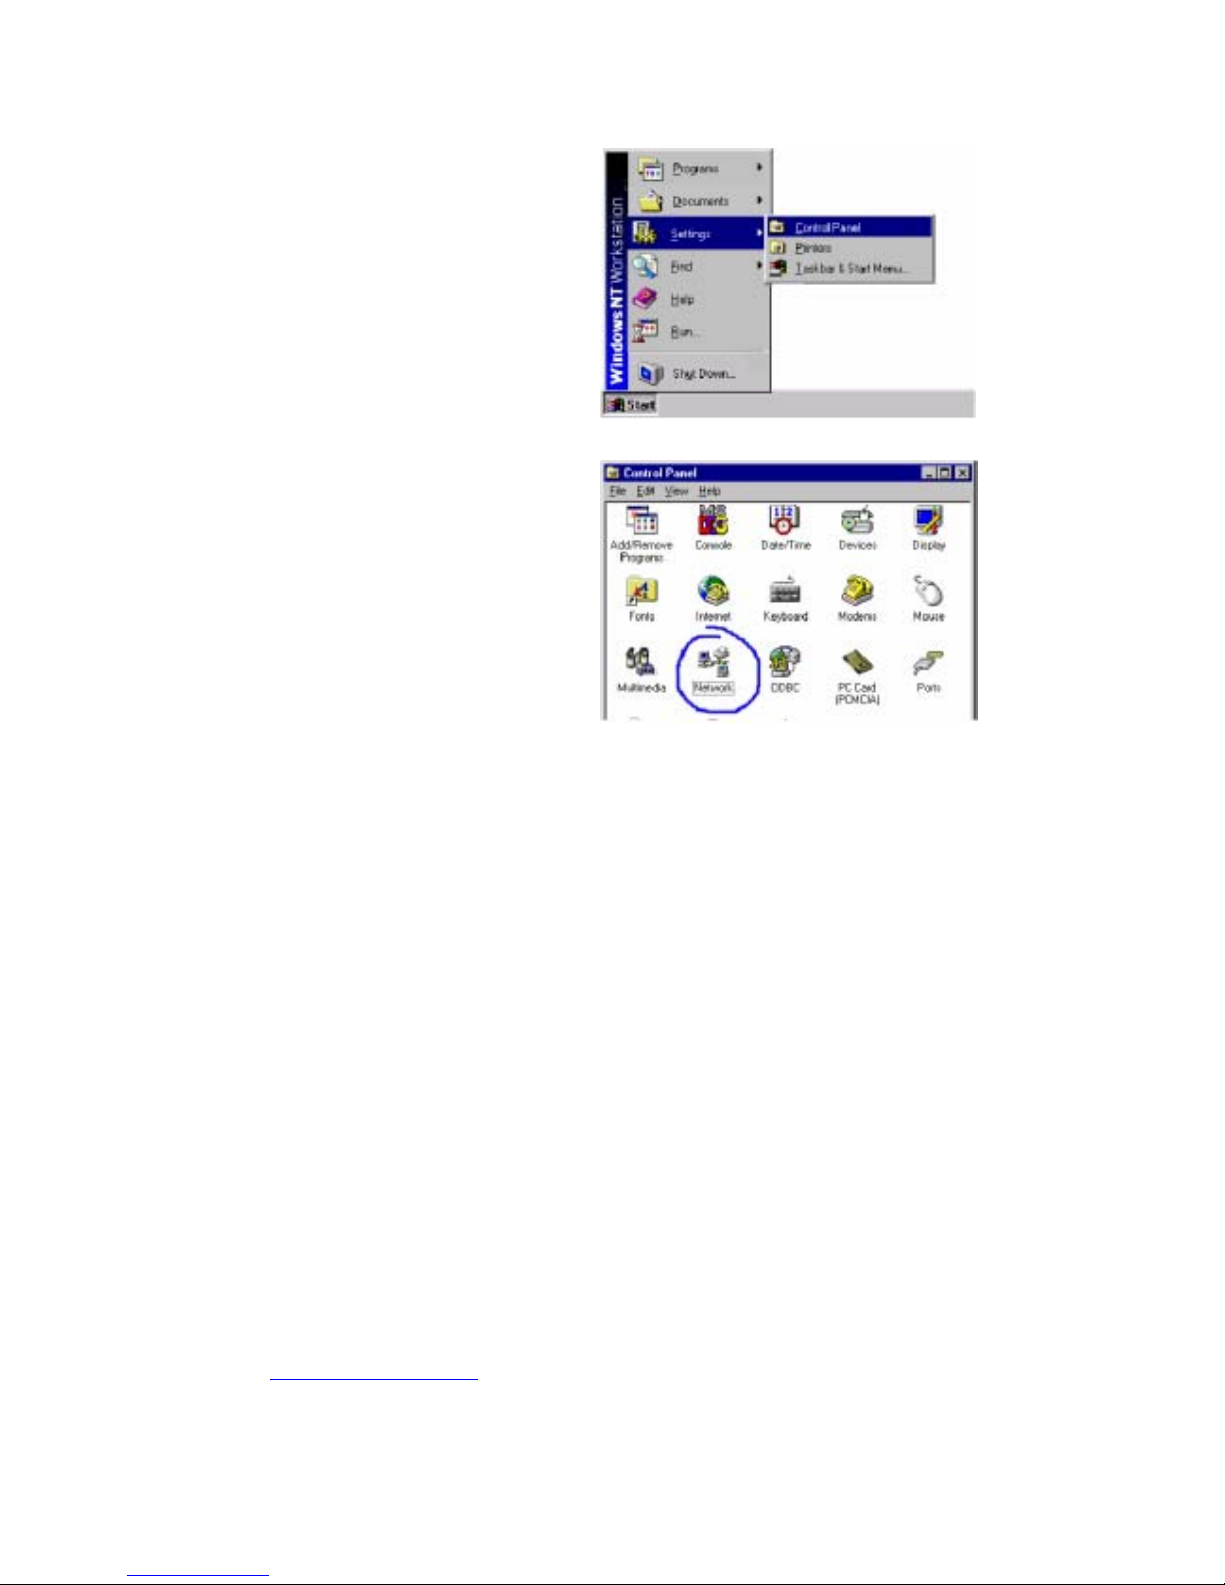
1. From the Windows
desktop click “Start/
Settings/Control
Panel.”
2. Double-click the
“Network” icon.
Page 69
PLANEX COMMUNICATIONS INC.
http://www.planex.com.tw/ TEL+886-2-22191816 FAX +886-2-22190655 Page 67
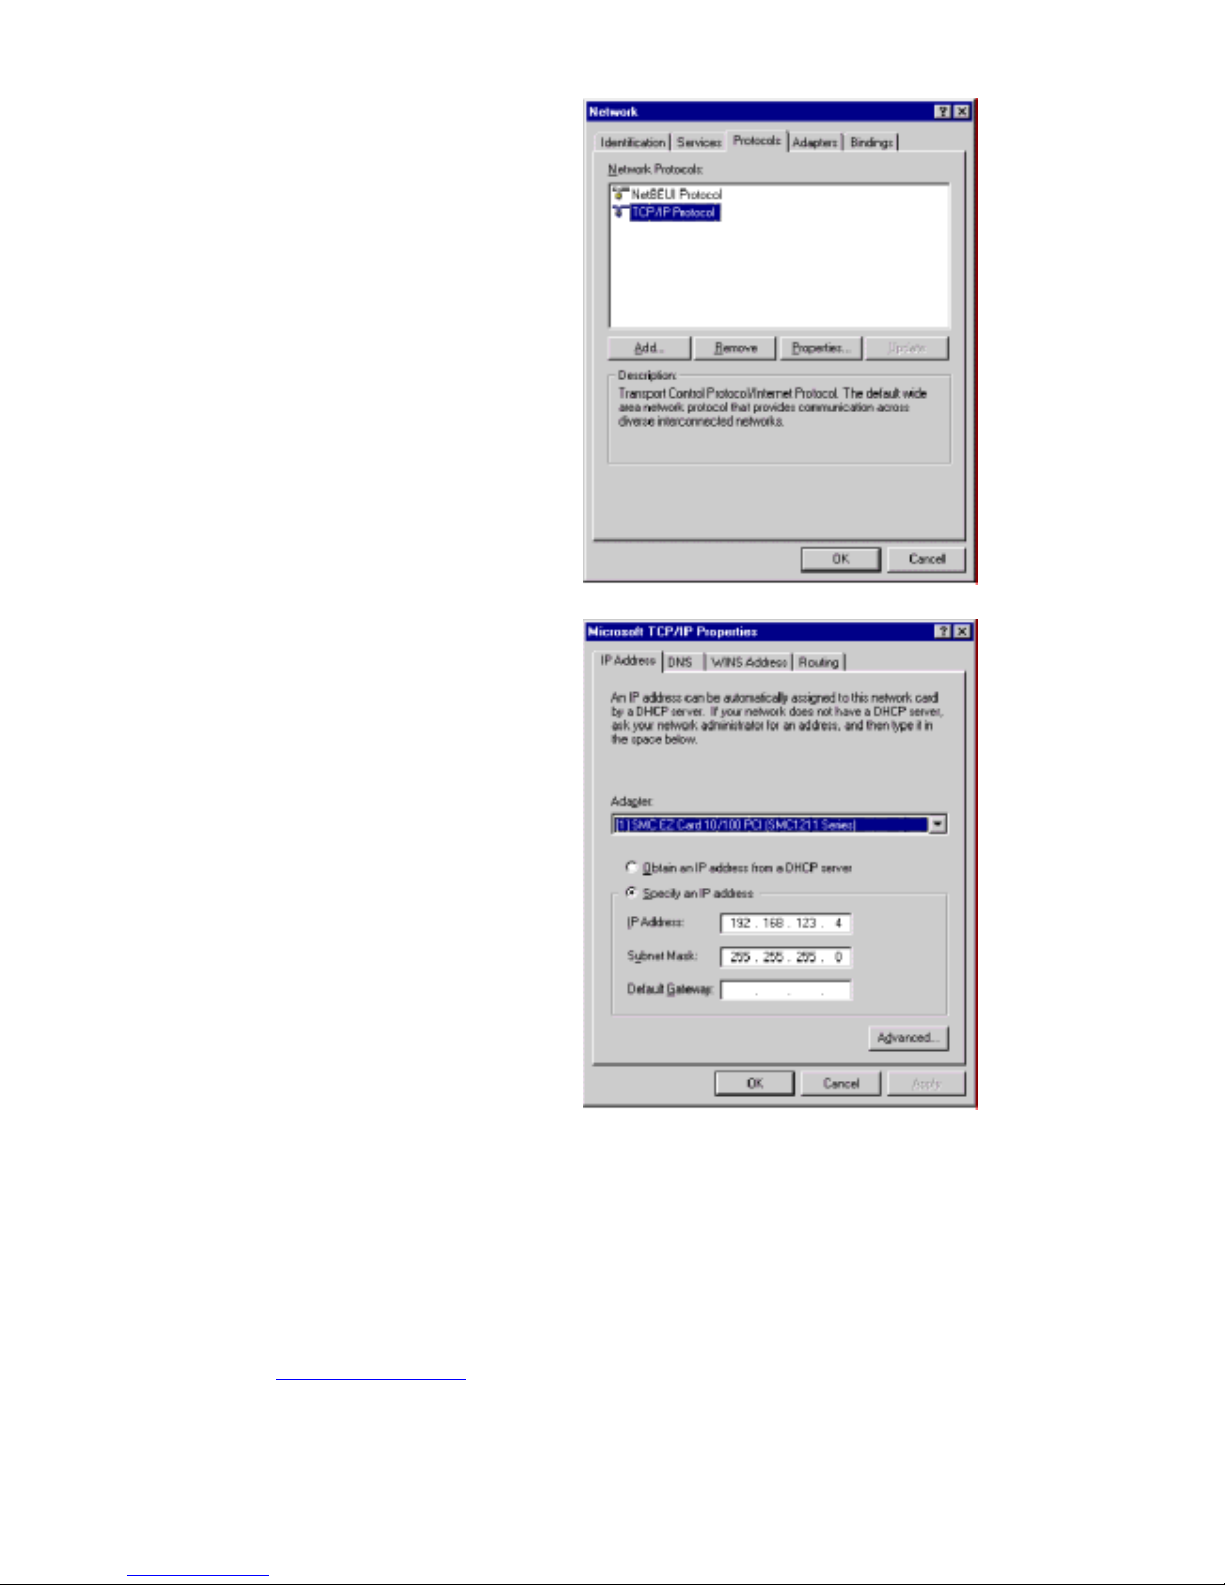
3. Click on the
“Protocols” tab.
4. Double-click “TCP/
IP Protocol.”
5. Click on the “IP
Address” tab.
6. In the “Adapter”
dropdown list, be sure
your Ethernet adapter
is selected.
Page 70
PLANEX COMMUNICATIONS INC.
http://www.planex.com.tw/ TEL+886-2-22191816 FAX +886-2-22190655 Page 68
7. If “Obtain an IP
address automatically”
is already checked,
your computer is
already configured for
DHCP. Click
“Cancel” to close each
window, and skip to
“Step 2. Disable
HTTP Proxy” on
page 5-32. In the
“TCP/IP Properties”
dialog box, click the
IP address tab to
locate your IP
Address, Subnet
Mask, and Default
Gateway. Record these
values in the space provided below.
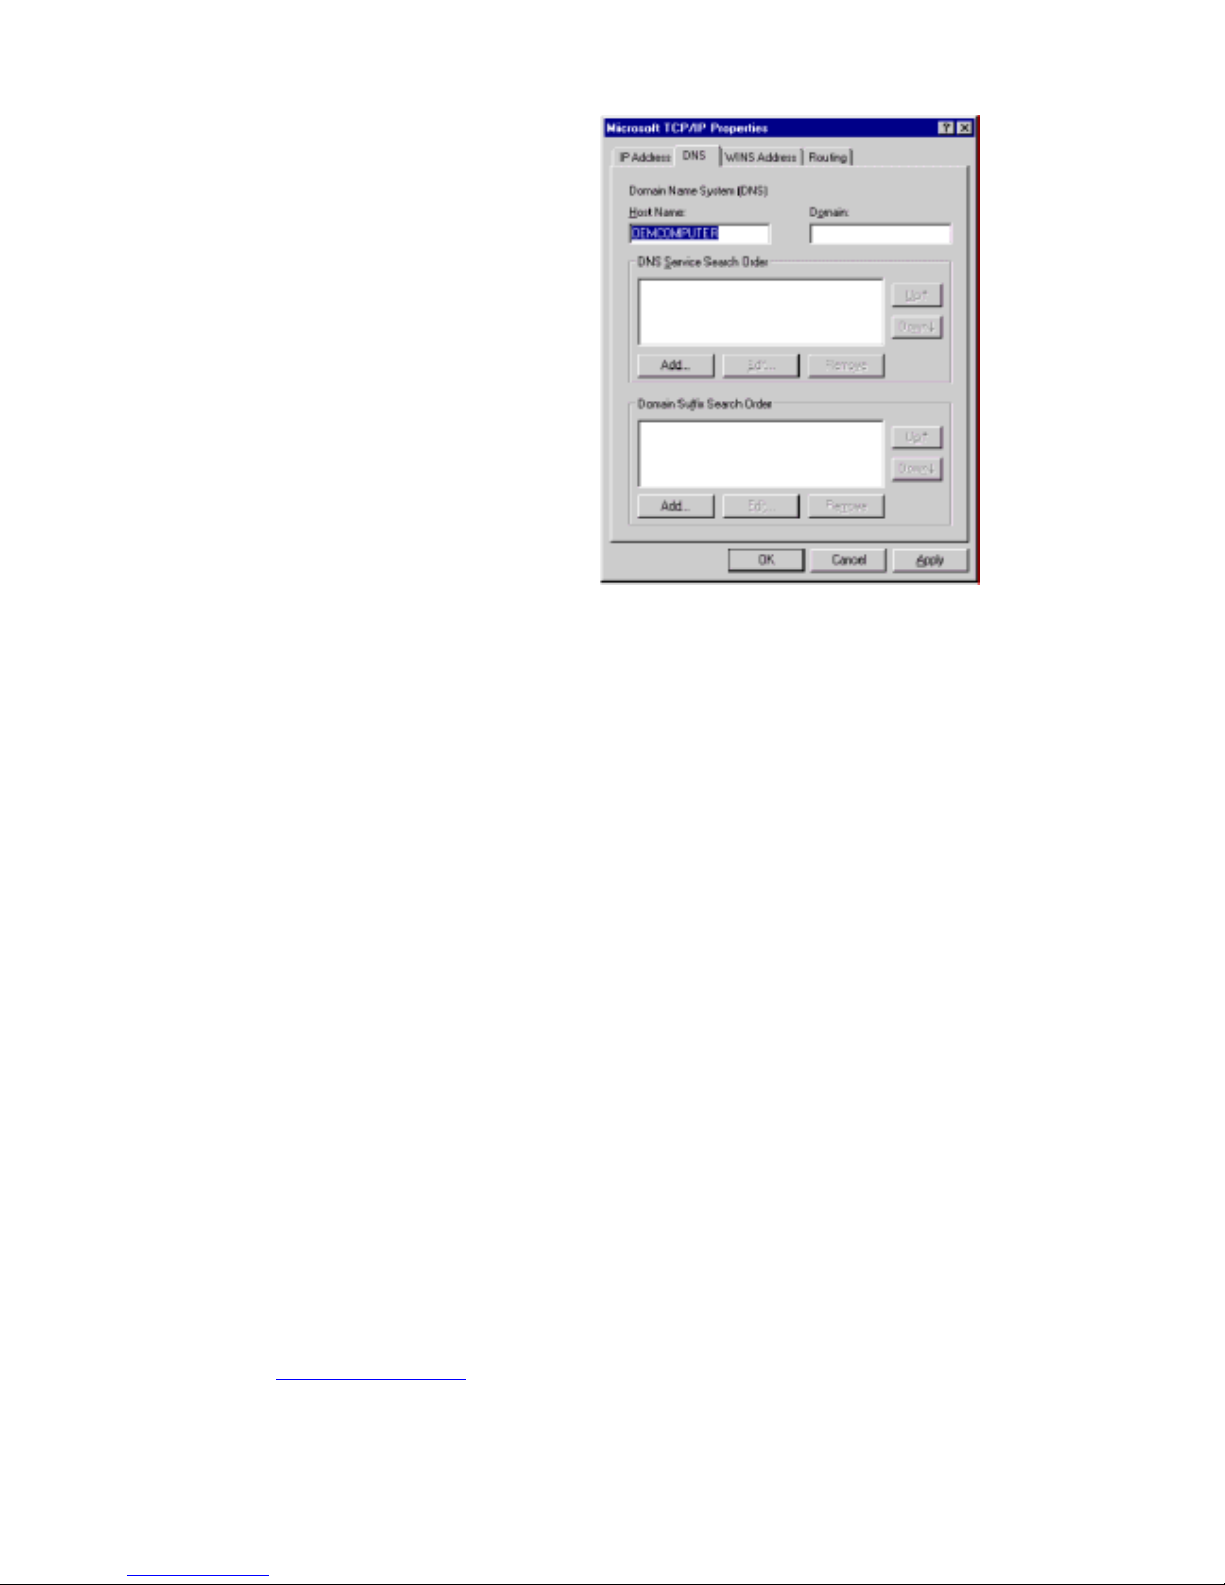
8. Click the “DNS” tab to see the primary and secondary DNS servers. Record these
values in the appropriate spaces below.
9. After writing down your IP settings, click the “IP address” tab. Check “Obtain IP
address automatically” and click “OK.” Click “OK” again to close the “Network”
window.
10. Windows may copy files and will then prompt you to restart your system. Click
“Yes” and your computer will shut down and restart.
TCP/IP Configuration Setting
IP Address ____.____.____.____
Subnet Mask ____.____.____.____
Primary DNS Server ____.____.____.____
Secondary DNS Server ____.____.____.____
Default Gateway ____.____.____.____
Page 71
PLANEX COMMUNICATIONS INC.
http://www.planex.com.tw/ TEL+886-2-22191816 FAX +886-2-22190655 Page 69
Step 2. Disable the HTTP Proxy
You will need to verify that the “HTTP Proxy” feature of your web
browser is disabled. This is so that your web browser will be able to view
the BLW-03FA configuration pages. The following steps are for
Internet Explorer and for Netscape. Determine which browser you use
and follow the appropriate steps.
Internet Explorer
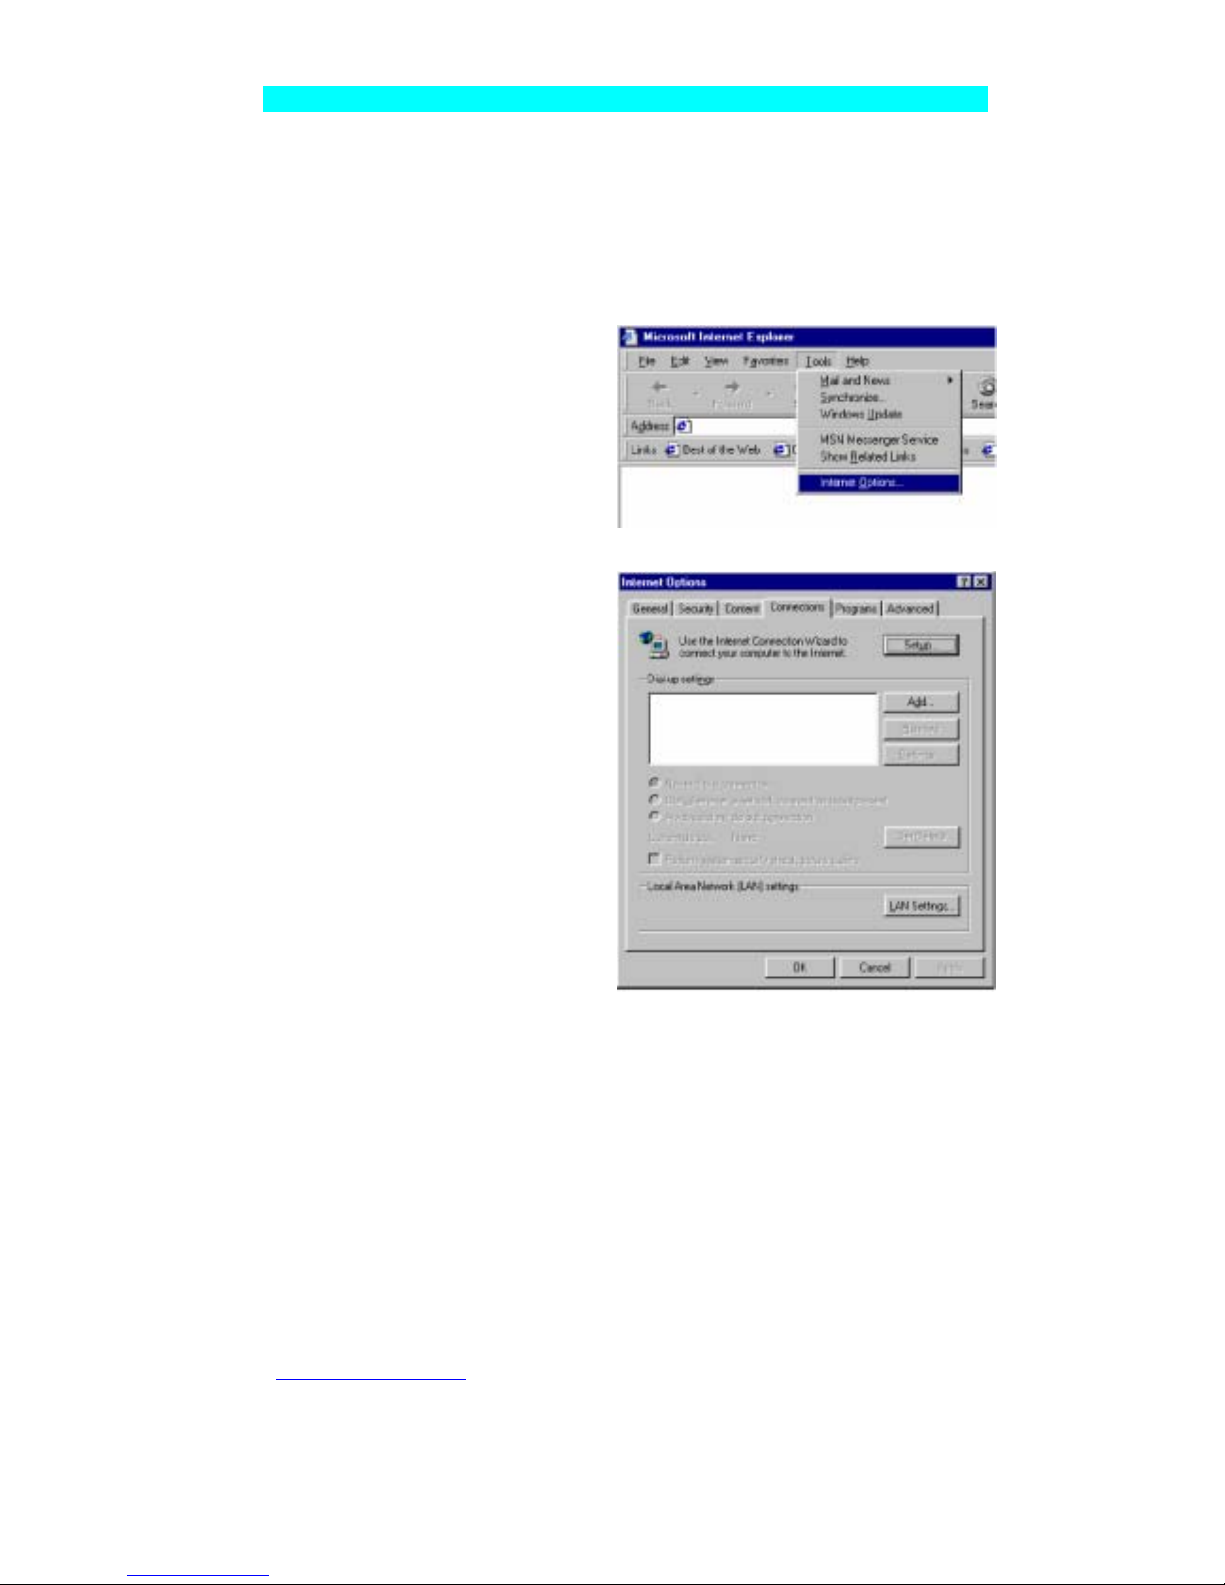
1. Open Internet Explorer.
Click “Tools/Internet
Options.”
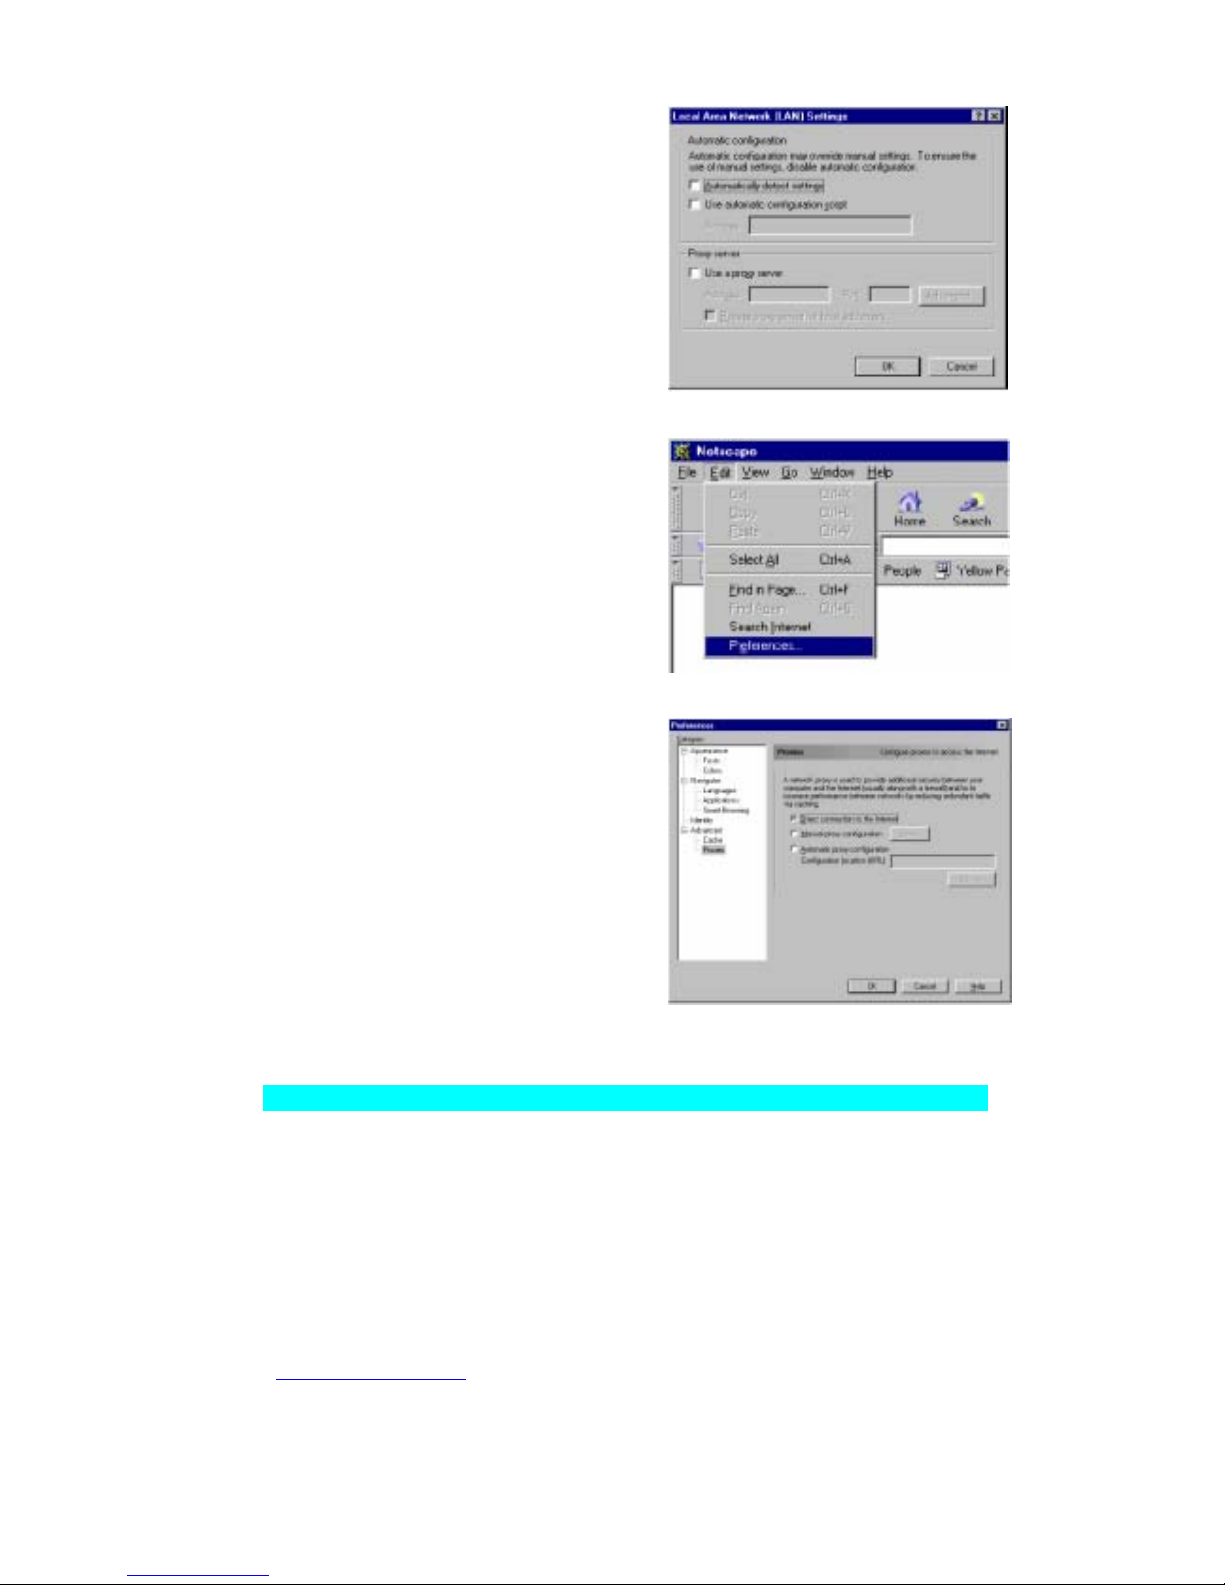
2. In the “Internet Options”
window, click the
“Connections” tab. Next,
click “LAN Settings.”
Page 72
PLANEX COMMUNICATIONS INC.
http://www.planex.com.tw/ TEL+886-2-22191816 FAX +886-2-22190655 Page 70
3. Clear all the checkboxes.
4. Click “OK,” and then click
“OK” again to close the
“Internet Options” window.
Netscape
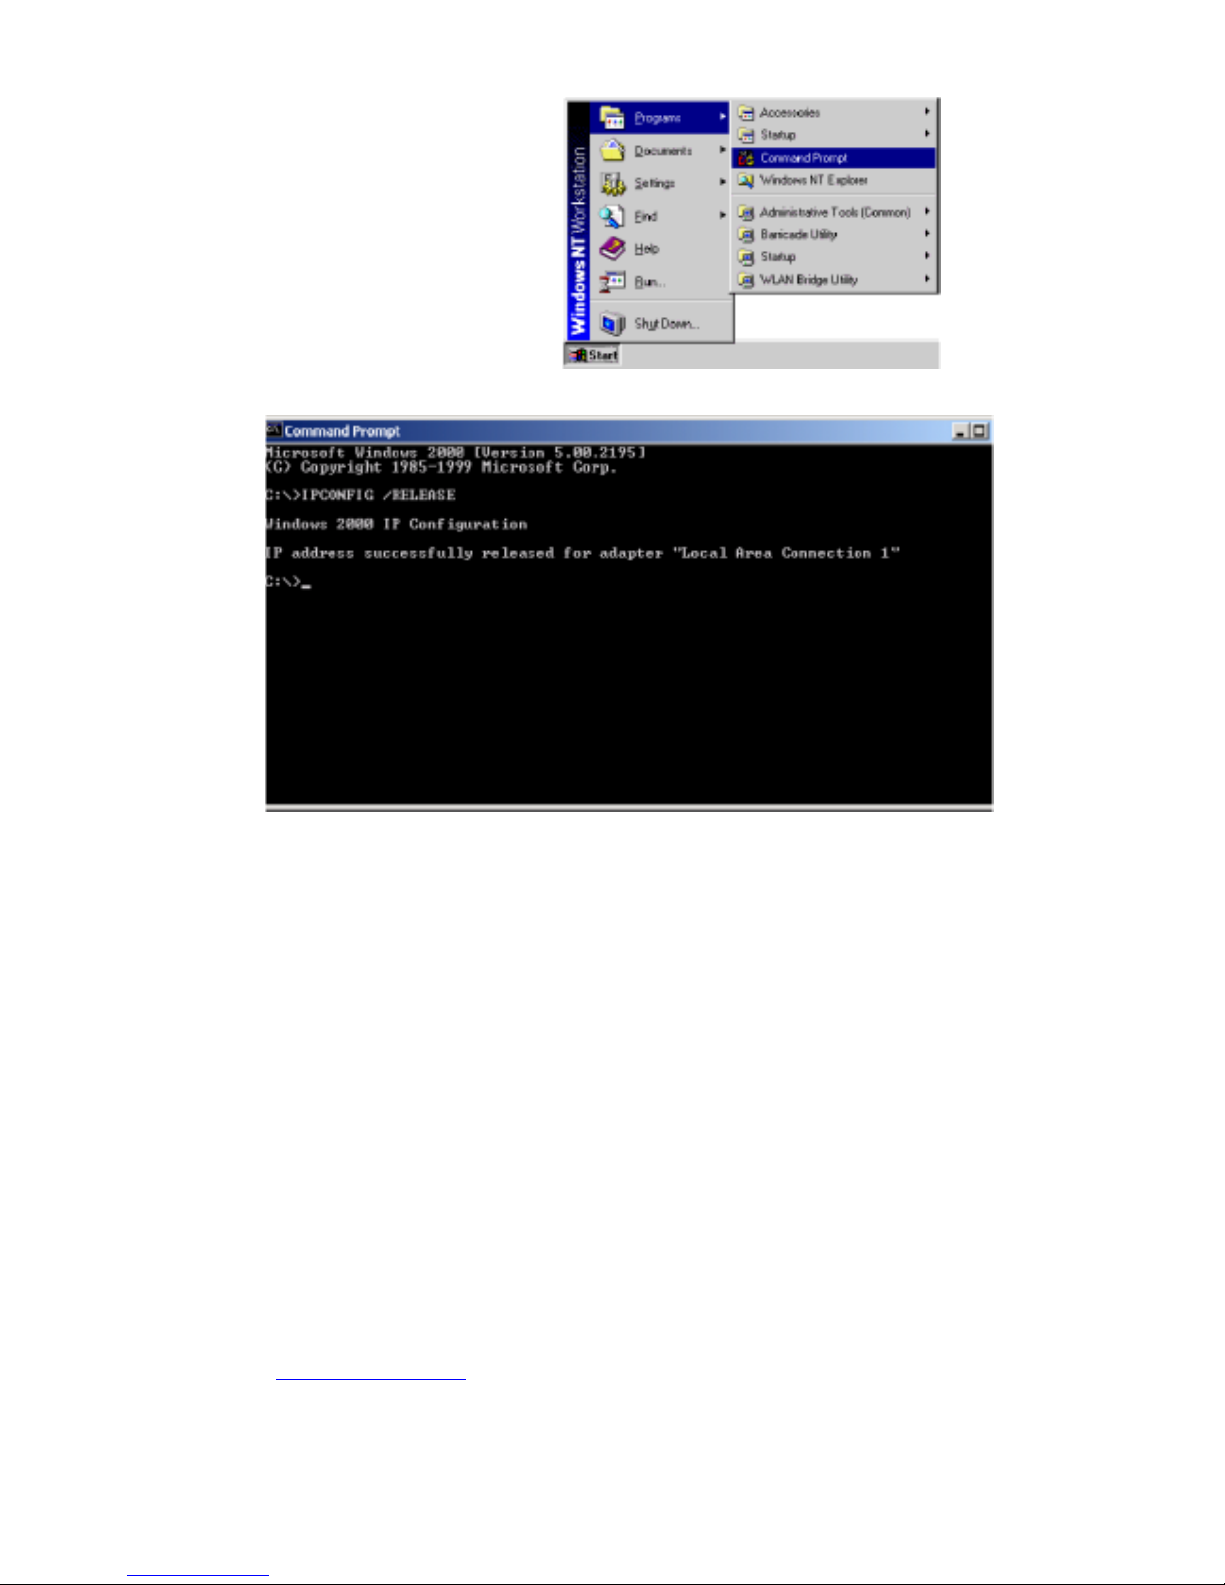
1. Open Netscape. Click “Edit,” then
click “Preferences...”
2. In the
“Preferences”
window, under
“Category”
double-click
“Advanced,” then
click “Proxies.”
Check “Direct
connection to the
Internet.” Click
“OK.”
Step 3. Obtain IP Settings From Your BLW-03FA
Now that you have configured your computer to connect to your BLW-03FA, it needs to
obtain new network settings. By releasing old IP settings and renewing them with settings
from the BLW-03FA, you will also verify that you have configured your computer
correctly.
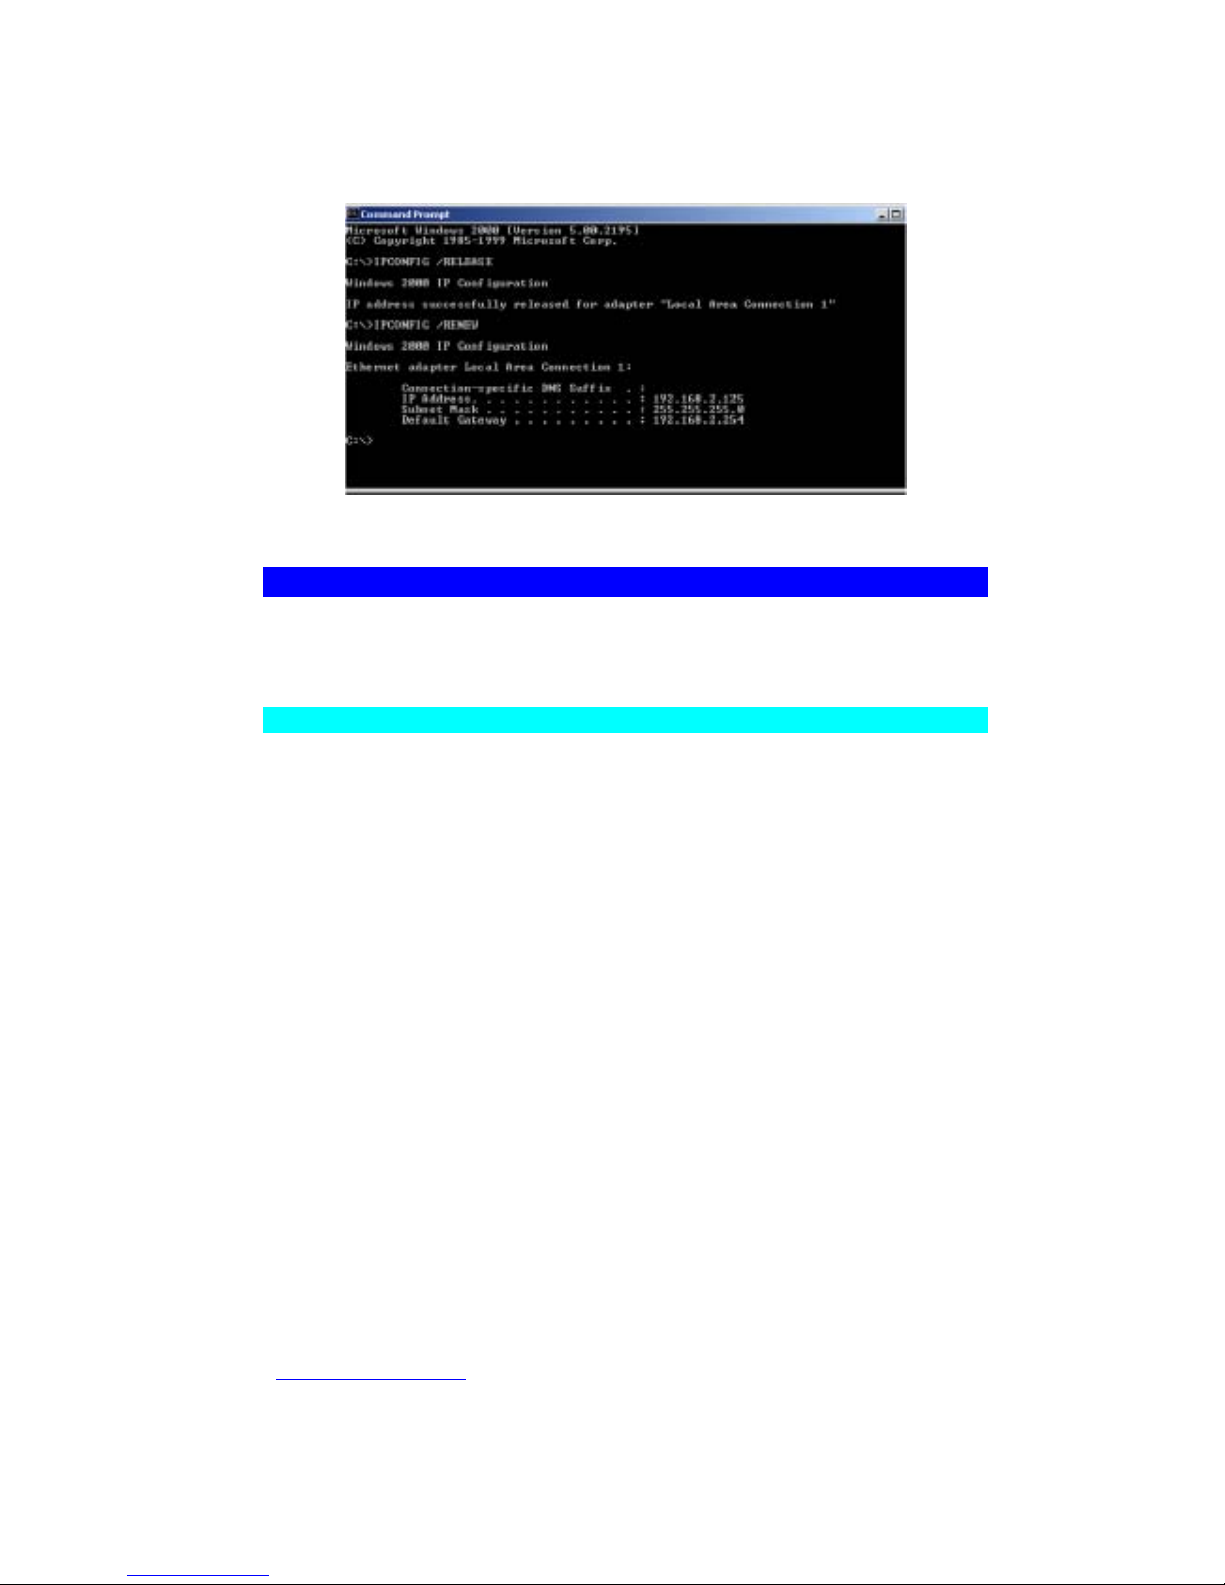
1. On the Windows
Page 73
PLANEX COMMUNICATIONS INC.
http://www.planex.com.tw/ TEL+886-2-22191816 FAX +886-2-22190655 Page 71
desktop, click “Start/
Programs/Command
Prompt.”
2. In the “Command
Prompt” window, type
“IPCONFIG /
RELEASE” and press
the <ENTER> key.
Page 74
PLANEX COMMUNICATIONS INC.
http://www.planex.com.tw/ TEL+886-2-22191816 FAX +886-2-22190655 Page 72
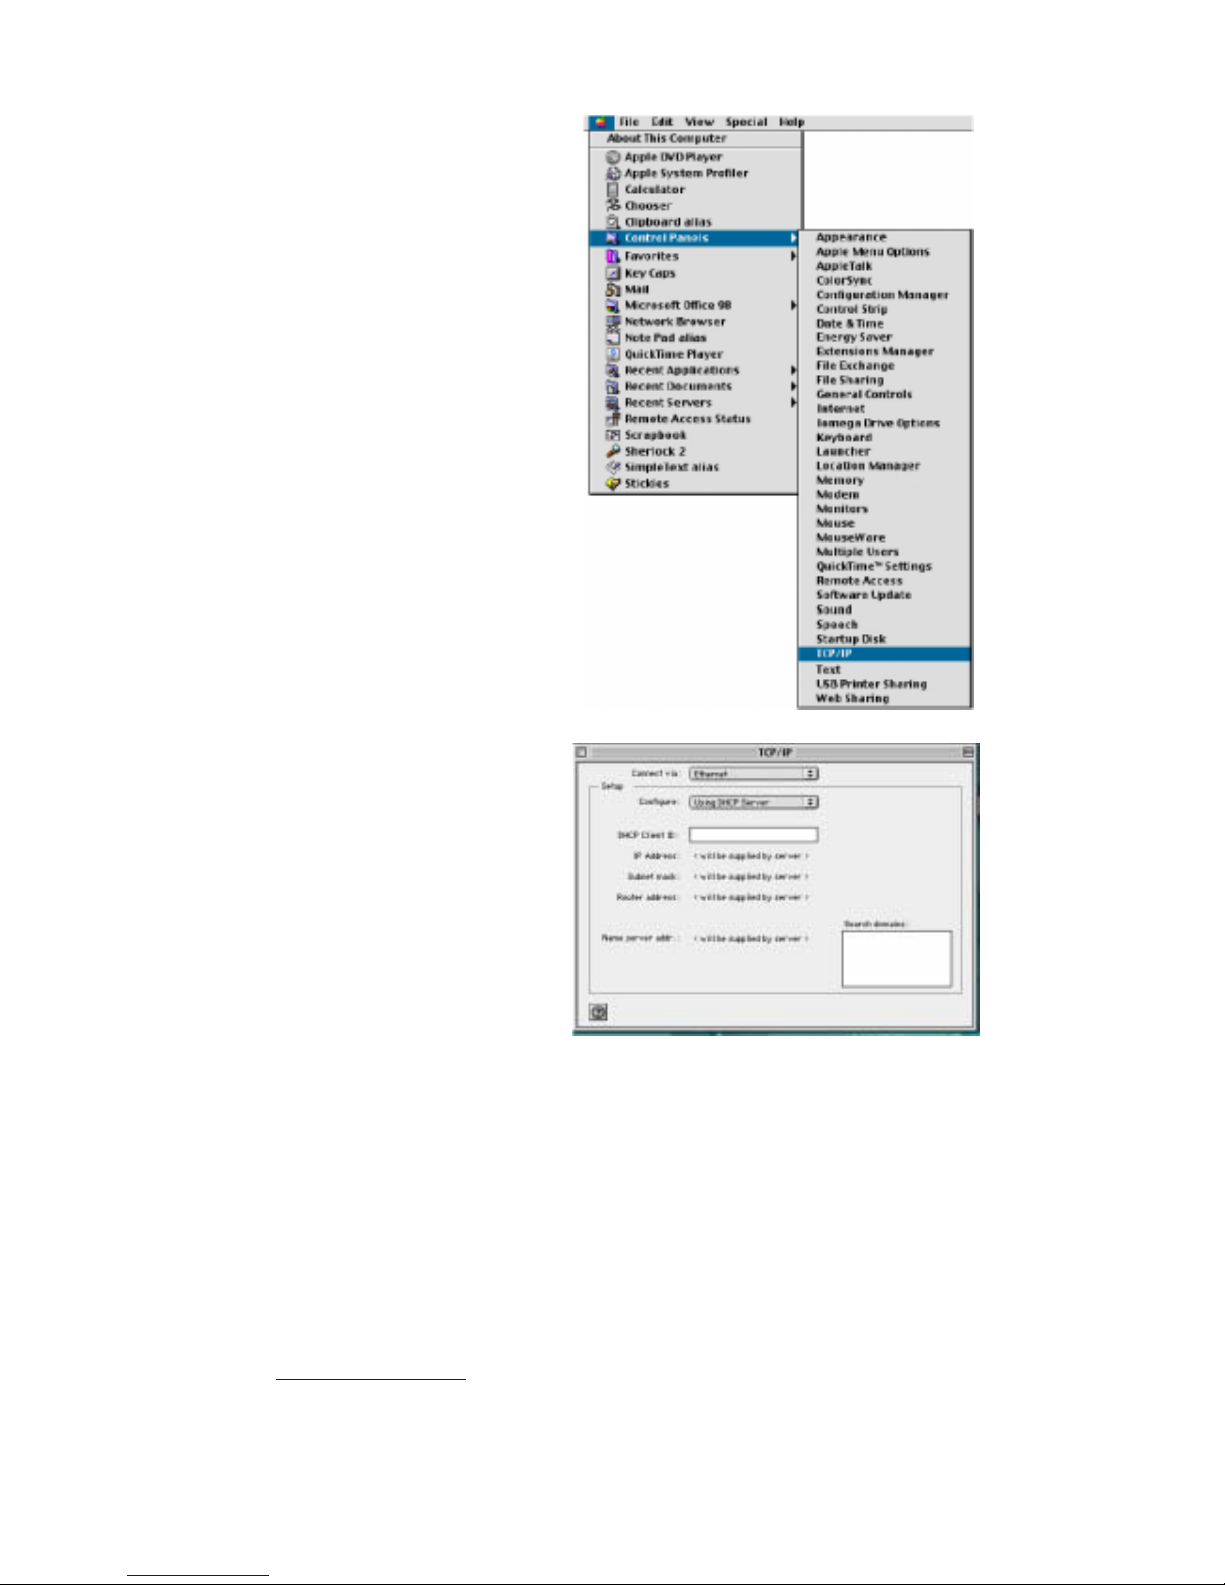
3. Type “IPCONFIG /RENEW” and press the <ENTER> key. Verify that your IP
Address is now 192.168.1.xxx, your Subnet Mask is 255.255.255.0 and your Default
Gateway is 192.168.1.1. These values confirm that the BLW-03FA is functioning.
4. Type “EXIT” and press <ENTER> to close the “Command Prompt” window.
Configuration Macintosh Computer
You may find that the instructions here do not exactly match your screen. This is because these
steps and screenshots were created using Mac OS 8.5. Mac OS 7.x and above are all very
similar, but may not be identical to Mac OS 8.5
Step 1. Configure TCP/IP Settings
After you have completed the hardware setup, you need to configure your computer to
connect to the BLW-03FA. You need to determine how your ISP issues your IP address.
Many ISPs issue these numbers automatically using a networking technology known as
Dynamic Host Configuration Protocol, or DHCP. Other ISPs will specify your IP address
and associated numbers, which you must enter manually. This is also known as a static IP
address. How your ISP assigns your IP address determines how you will configure your
computer.
Page 75
PLANEX COMMUNICATIONS INC.
http://www.planex.com.tw/ TEL+886-2-22191816 FAX +886-2-22190655 Page 73
Here is what to do:
1. Pull down the Apple
Menu. Click
“Control Panels” and
select TCP/IP.
2. In the TCP/IP
dialog box, make
sure that
“Ethernet” is
selected in the
“Connect Via:”
field.
Page 76
PLANEX COMMUNICATIONS INC.
http://www.planex.com.tw/ TEL+886-2-22191816 FAX +886-2-22190655 Page 74
If “Using DHCP Server” is already selected in the “Configure” field, your computer is already
configured for DHCP. Close the TCP/IP dialog box, and skip to Step 2 Disable HTTP Proxy
(bottom of this page).
3. All the information that you need to record is on the “TCP/IP” dialog box. Use the
space below to record the information.
4. After writing down your IP settings, select “Using DHCP Server” in the “Configure”
field and close the window.
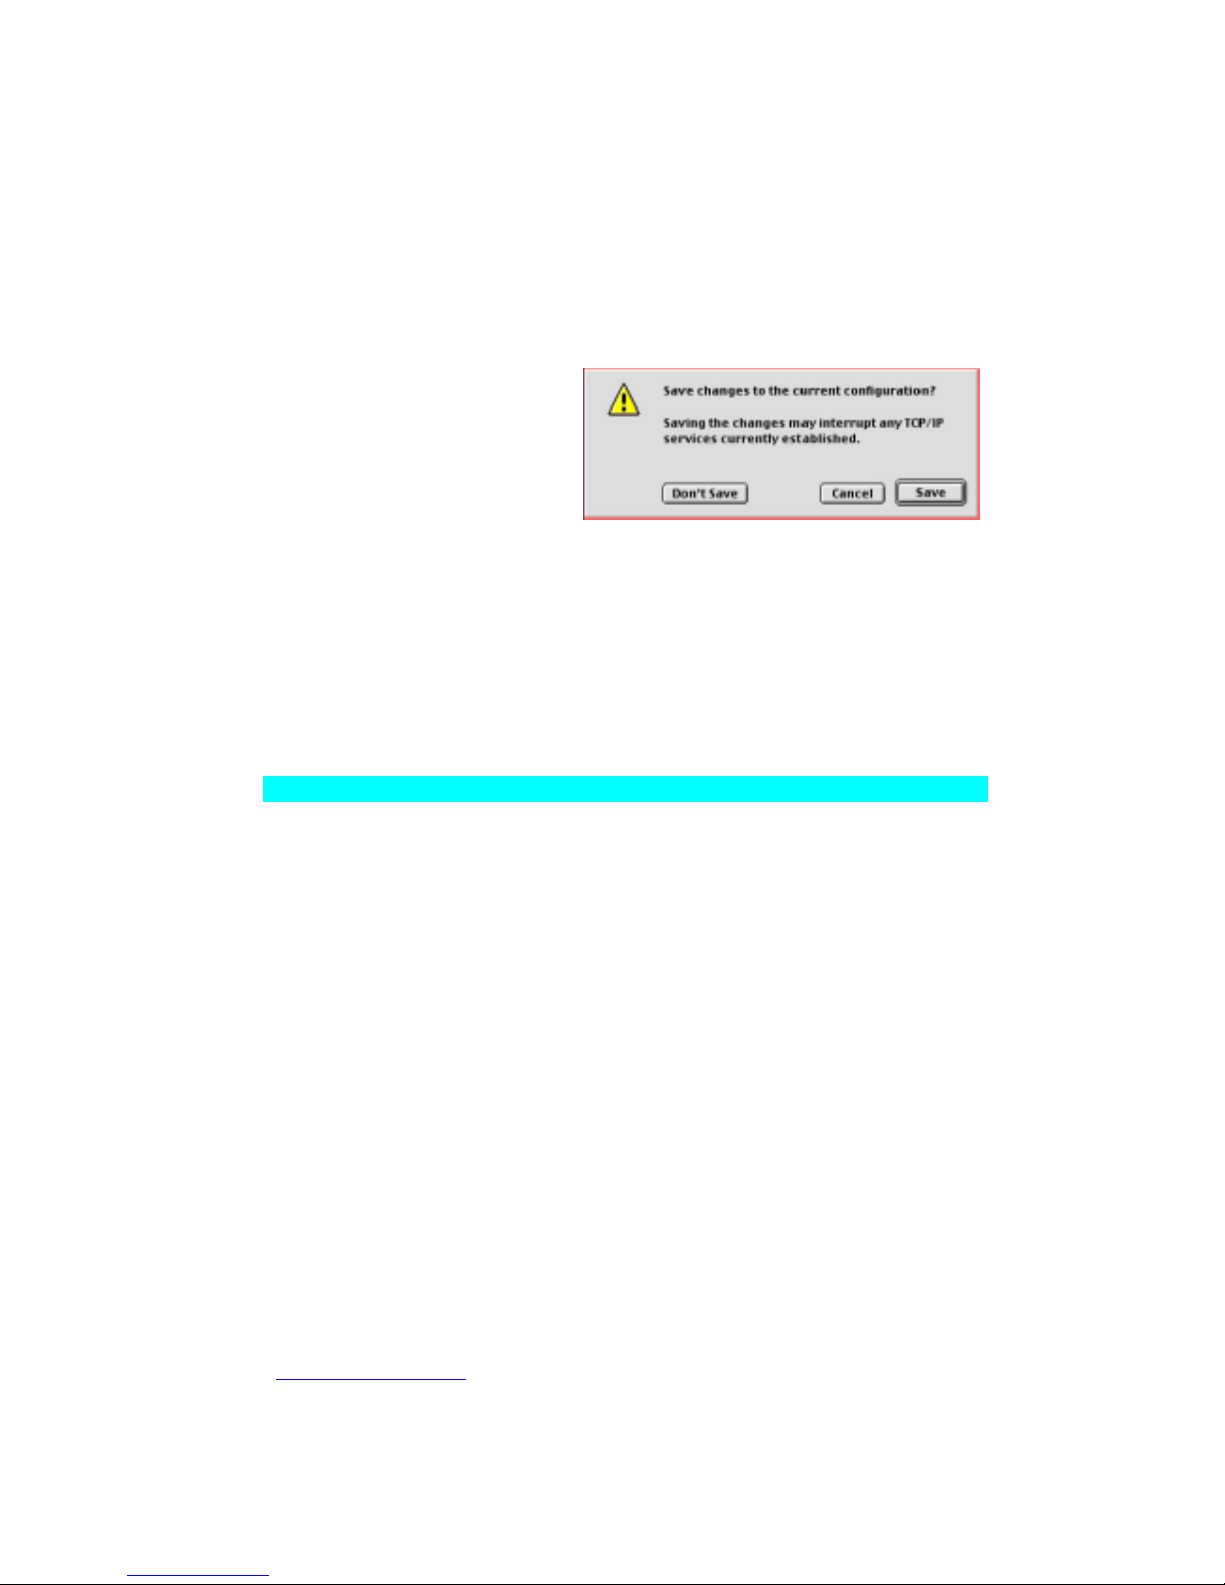
5. Another box will
appear asking whether
you want to save your
TCP/IP settings. Click
“Save”.
TCP/IP Configuration Setting
IP Address ____.____.____.____
Subnet Mask ____.____.____.____
Router ____.____.____.____
Name Server ____.____.____.____
Step 2. Disable the HTTP Proxy
You will need to verify that the “HTTP Proxy” feature of your web
browser is disabled. This is so that your web browser will be able to view
the BLW-03FA configuration pages. The following steps are for
Internet Explorer and for Netscape. Determine which browser you use
and follow the appropriate steps.
Page 77
PLANEX COMMUNICATIONS INC.
http://www.planex.com.tw/ TEL+886-2-22191816 FAX +886-2-22190655 Page 75
Internet Explorer
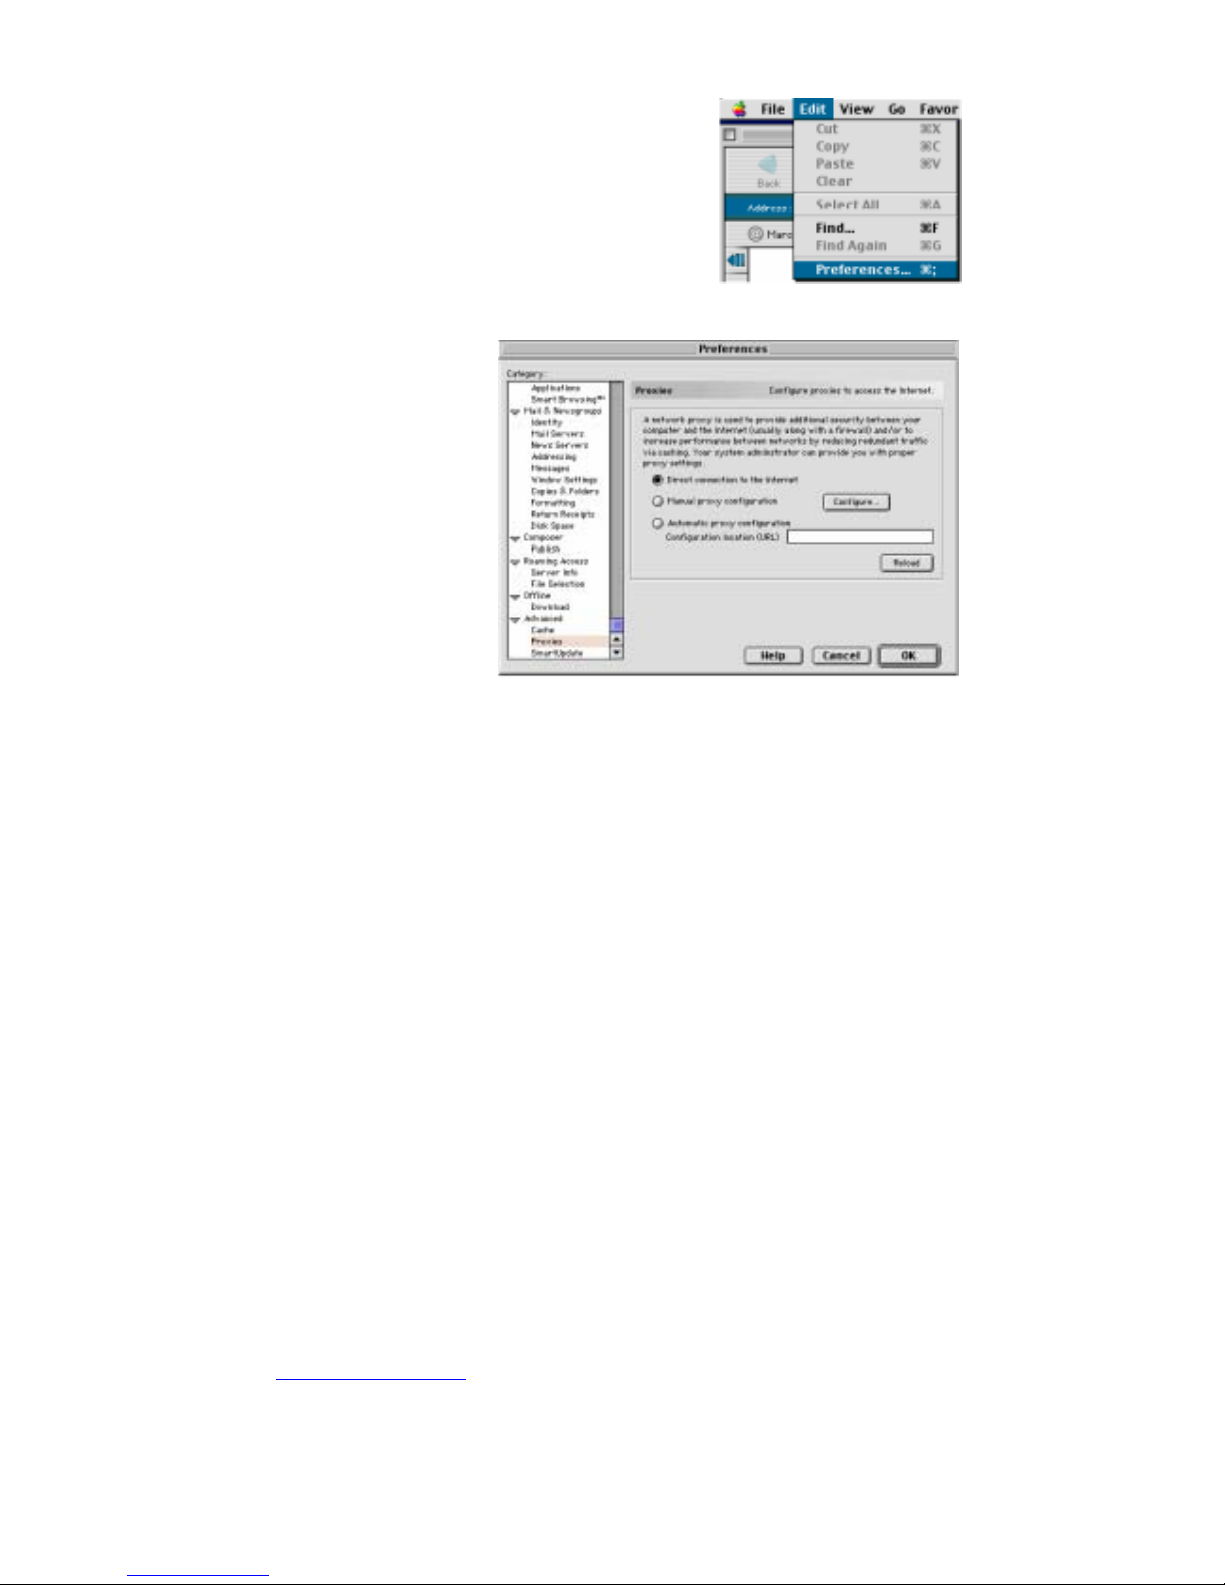
1. Open Internet Explorer. Click “Edit/
Preferences.”
2. In the
Internet
Explorer
“Preferences”
window,
under
“Network,”
select
“Proxies.”
3. Uncheck all
checkboxes
and click
“OK.”
Page 78
PLANEX COMMUNICATIONS INC.
http://www.planex.com.tw/ TEL+886-2-22191816 FAX +886-2-22190655 Page 76
Netscape
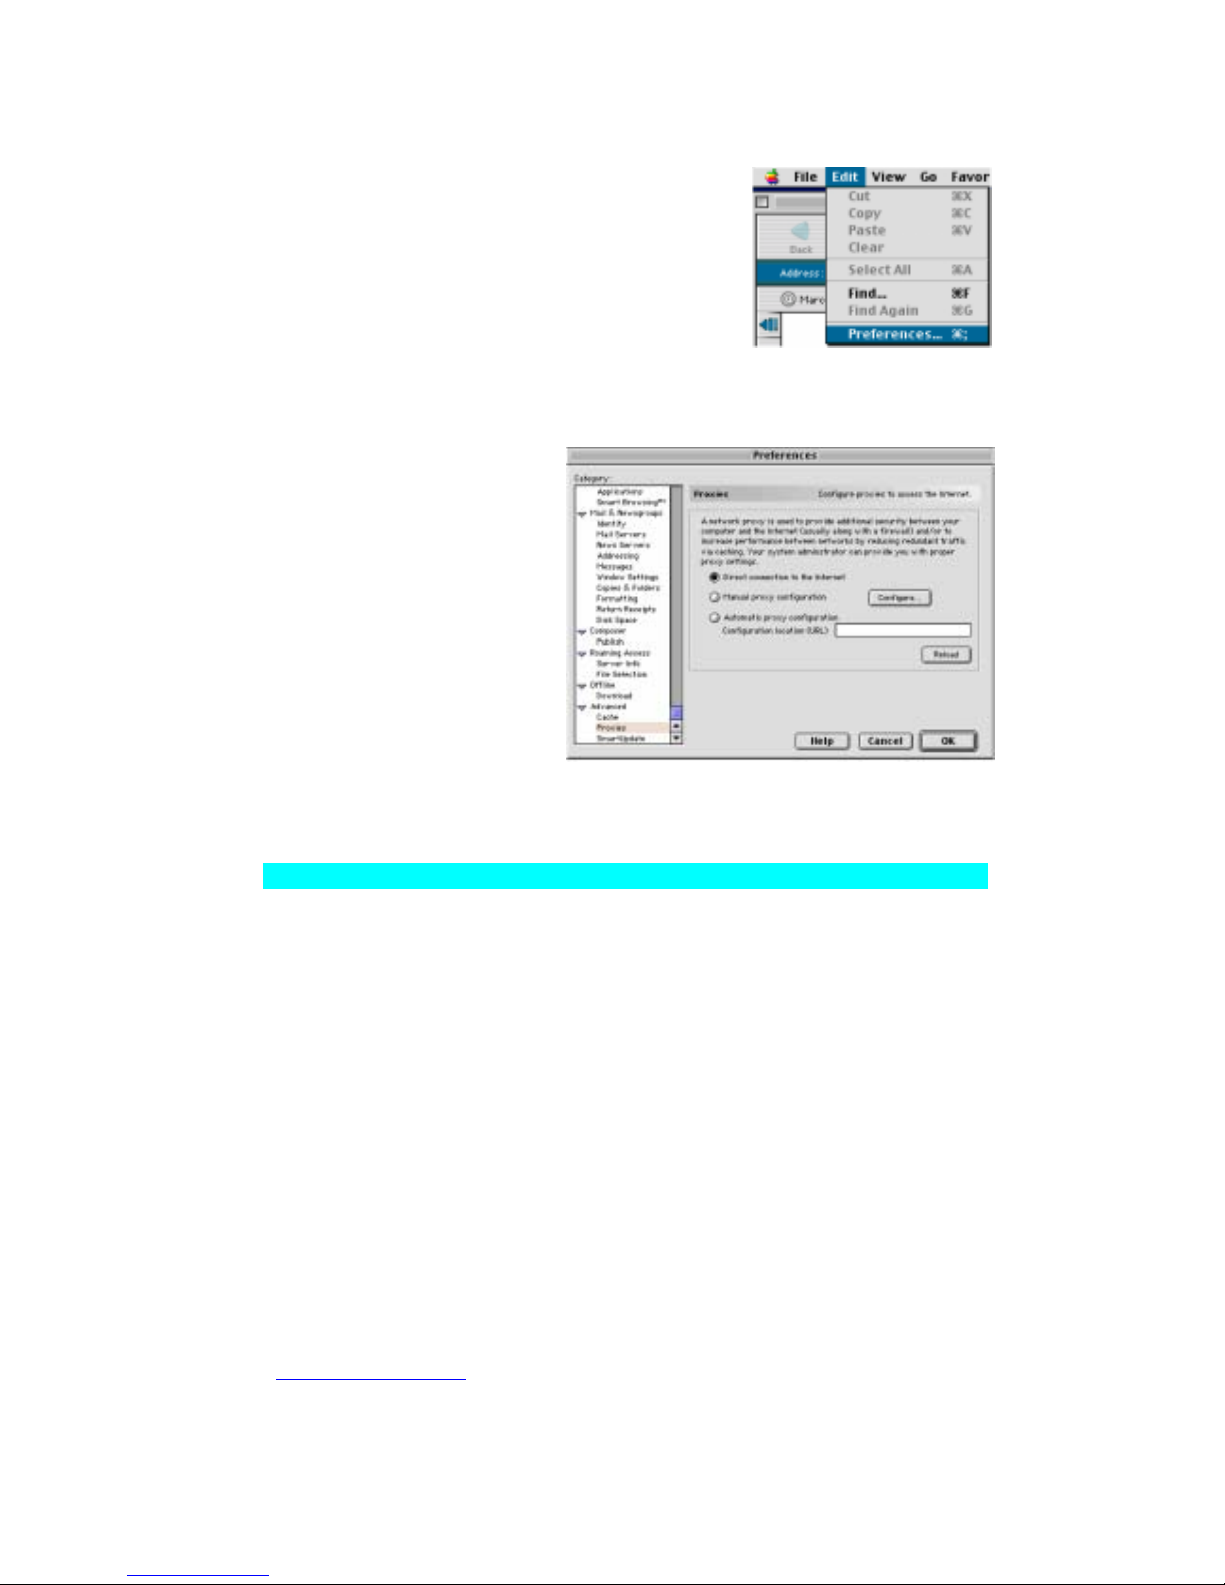
1. Open Netscape. Click “Edit/Preferences.”
2. In the column
labeled
“Category,”
select
“Advanced.”
Under the
“Advanced”
category, select
“Proxies.”
3. Select “Direct
Connection to
the Internet”
and click
“OK.”
Step 3. Obtain IP Settings From Your BLW-03FA
Now that you have configured your computer to connect to your BLW-03FA, it needs to
obtain new network settings. By releasing old IP settings and renewing them with settings
from the BLW-03FA, you will also verify that you have configured your computer
correctly.
Page 79
PLANEX COMMUNICATIONS INC.
http://www.planex.com.tw/ TEL+886-2-22191816 FAX +886-2-22190655 Page 77
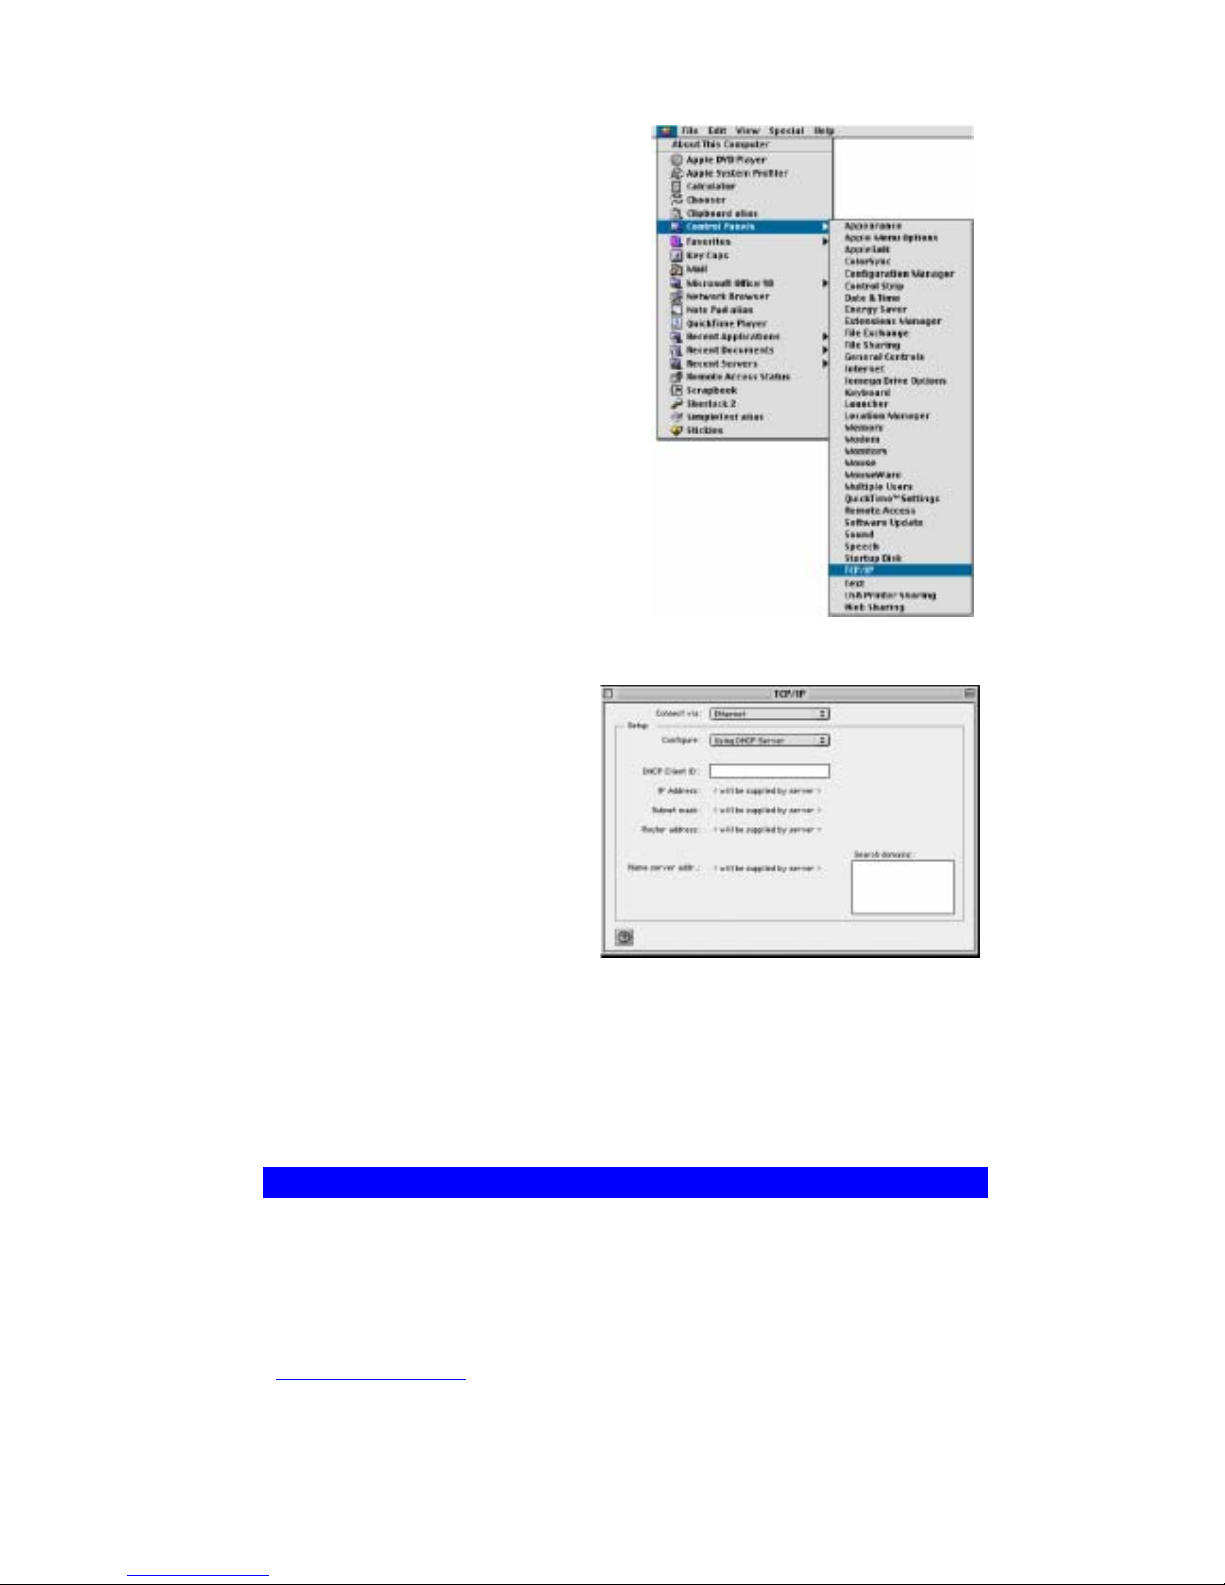
1. Pull down the Apple
Menu. Click “Control
Panels” and “TCP/IP.”
2. In the TCP/IP
window, your new
settings will be
shown. Verify that
your IP address is
now 192.168.1.xxx,
your Subnet Mask
is 255.255.255.0
and your Default
Gateway is
192.168.1.1. These
values confirm that
your BLW-03FA is functioning.
3. Close the TCP/IP window.
Verifying Your TCP/IP Connectionverview
After installing the TCP/IP communication protocols and configuring an IP address in the same
network as the BLW-03FA, use the “Ping” command to check if your computer has
successfully connected to the BLW-03FA. The following example shows how the Ping
procedure can be executed in an MS-DOS window. First, execute the “Ping” command:
Page 80

PLANEX COMMUNICATIONS INC.
http://www.planex.com.tw/ TEL+886-2-22191816 FAX +886-2-22190655 Page 78
ping 192.168.1.1
If a message similar to the following appears:
Pinging 192.168.1.1 with 32 bytes of data:
Reply from 192.168.1.1: bytes=32 time=2ms TTL=64
a communication link between your computer and the BLW-03FA has been successfully
established.
If you get the following message,
Pinging 192.168.1.1 with 32 bytes of data:
Request timed out.
there may be something wrong in your installation procedure. Check the
following items in sequence:
1. Is the Ethernet cable correctly connected between the BLW-03FA and the computer?
The LAN LED on the BLW-03FA and the Link LED of the network card on your computer
must be on.
2. Is TCP/IP properly configured on your computer?
If the IP address of the BLW-03FA is 192.168.1.1, the IP address of your PC must be from
192.168.1.2 - 192.168.1.254 and the default gateway must be 192.168.1.1.
If you can successfully Ping the BLW-03FA you are now ready to
connect to the Internet!
Page 81
PLANEX COMMUNICATIONS INC.
http://www.planex.com.tw/ TEL+886-2-22191816 FAX +886-2-22190655 Page 79
Chapter 6
Printer Server
Print Server Installation for Windows 98/ME
The following procedure is for Windows 95/98, Windows ME, Windows NT4.0, and Windows
2000.
1. Insert the supplied CD-ROM into your drive. If the setup program does not start
automatically, run SETUP.EXE in the root folder.
2. Restart you computer.
3. Open your Printers folder, and start the Add Printer Wizard.
4. When prompted, select Local Printer
5. On the 【Select the Printer Port】 screen, select monitor, and Click Next to continue.
6. Select the correct Printer Manufacturer and Model, or use the "Have Disk" option if
appropriate.
7. Installation is now complete. You can now print using this printer.
Print Server Installation for Windows 2000/XP
1. Click Start, Point to Settings, and select Printer.
2. Run Add Printer, Click Next.
3. The Add Printer Wizard screen will appear, Select Local Printer and click Next.
76
Page 82
PLANEX COMMUNICATIONS INC.
http://www.planex.com.tw/ TEL+886-2-22191816 FAX +886-2-22190655 Page 80
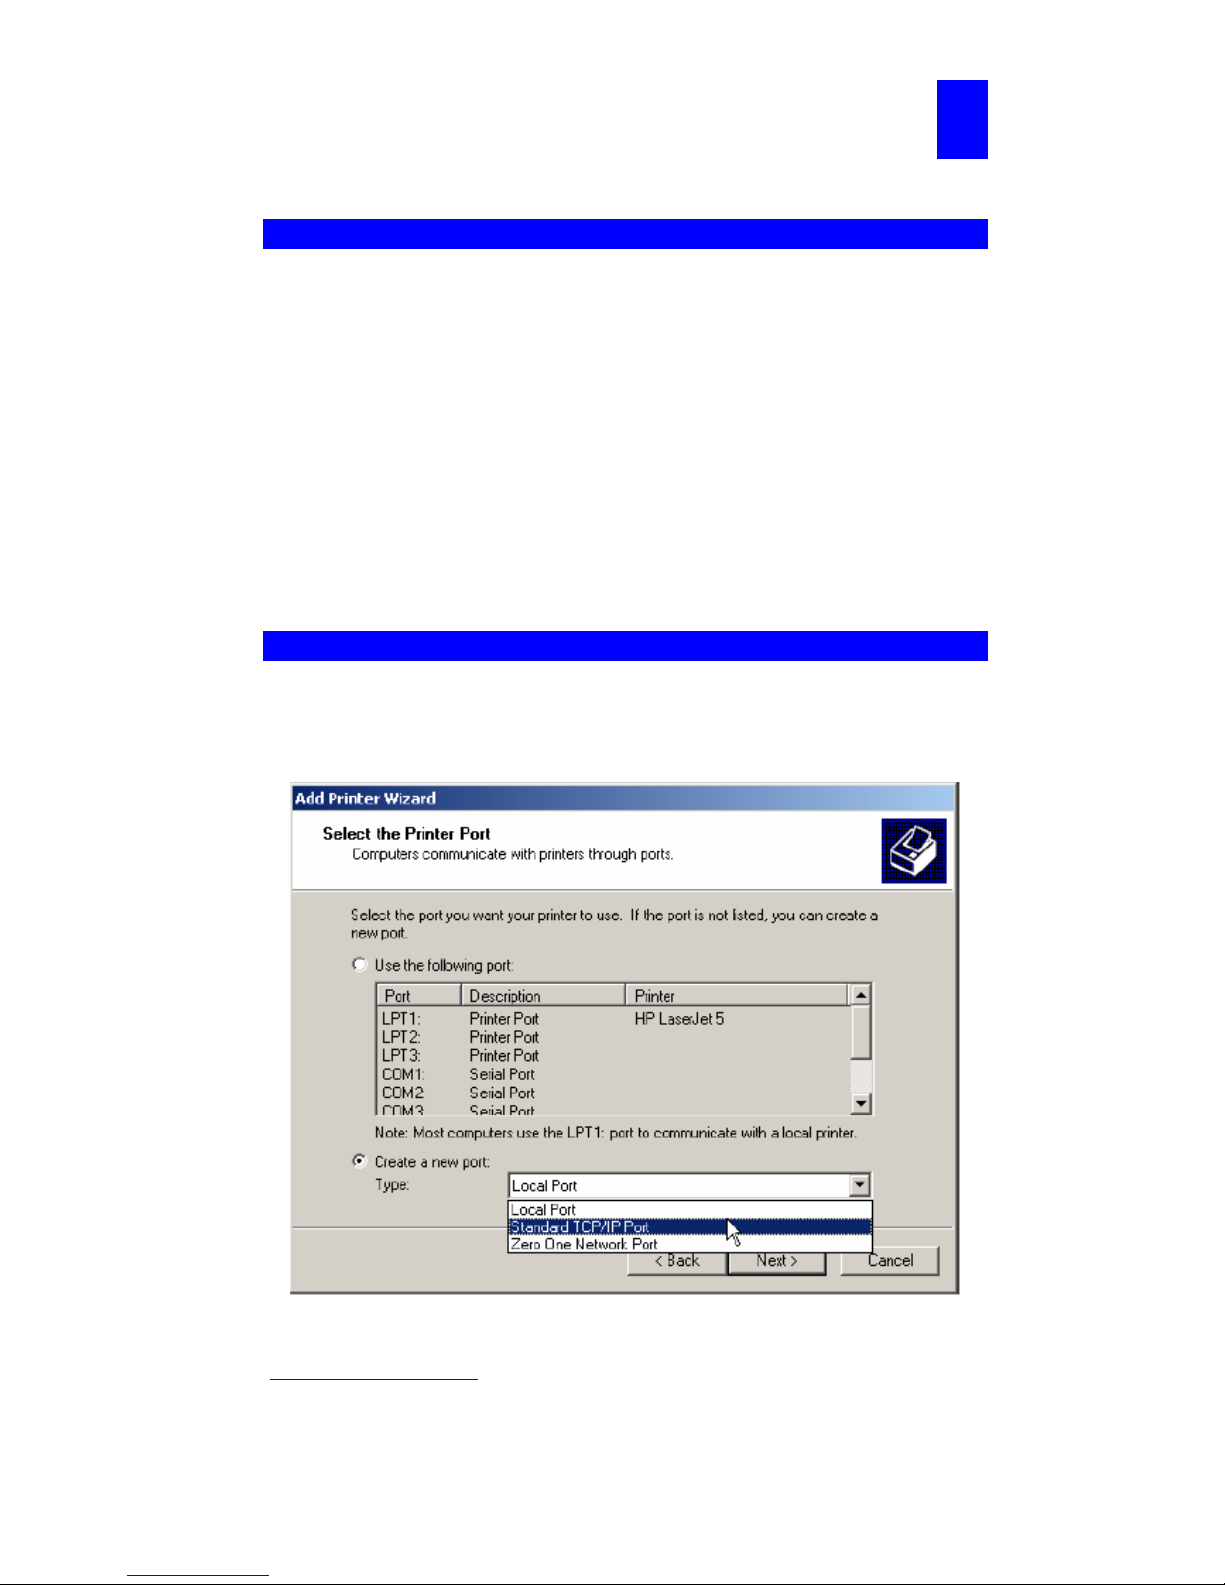
4. From the list under Create a new port, as shown in the previous picture, select the
Standard TCP/IP Port, Click Next and Next.
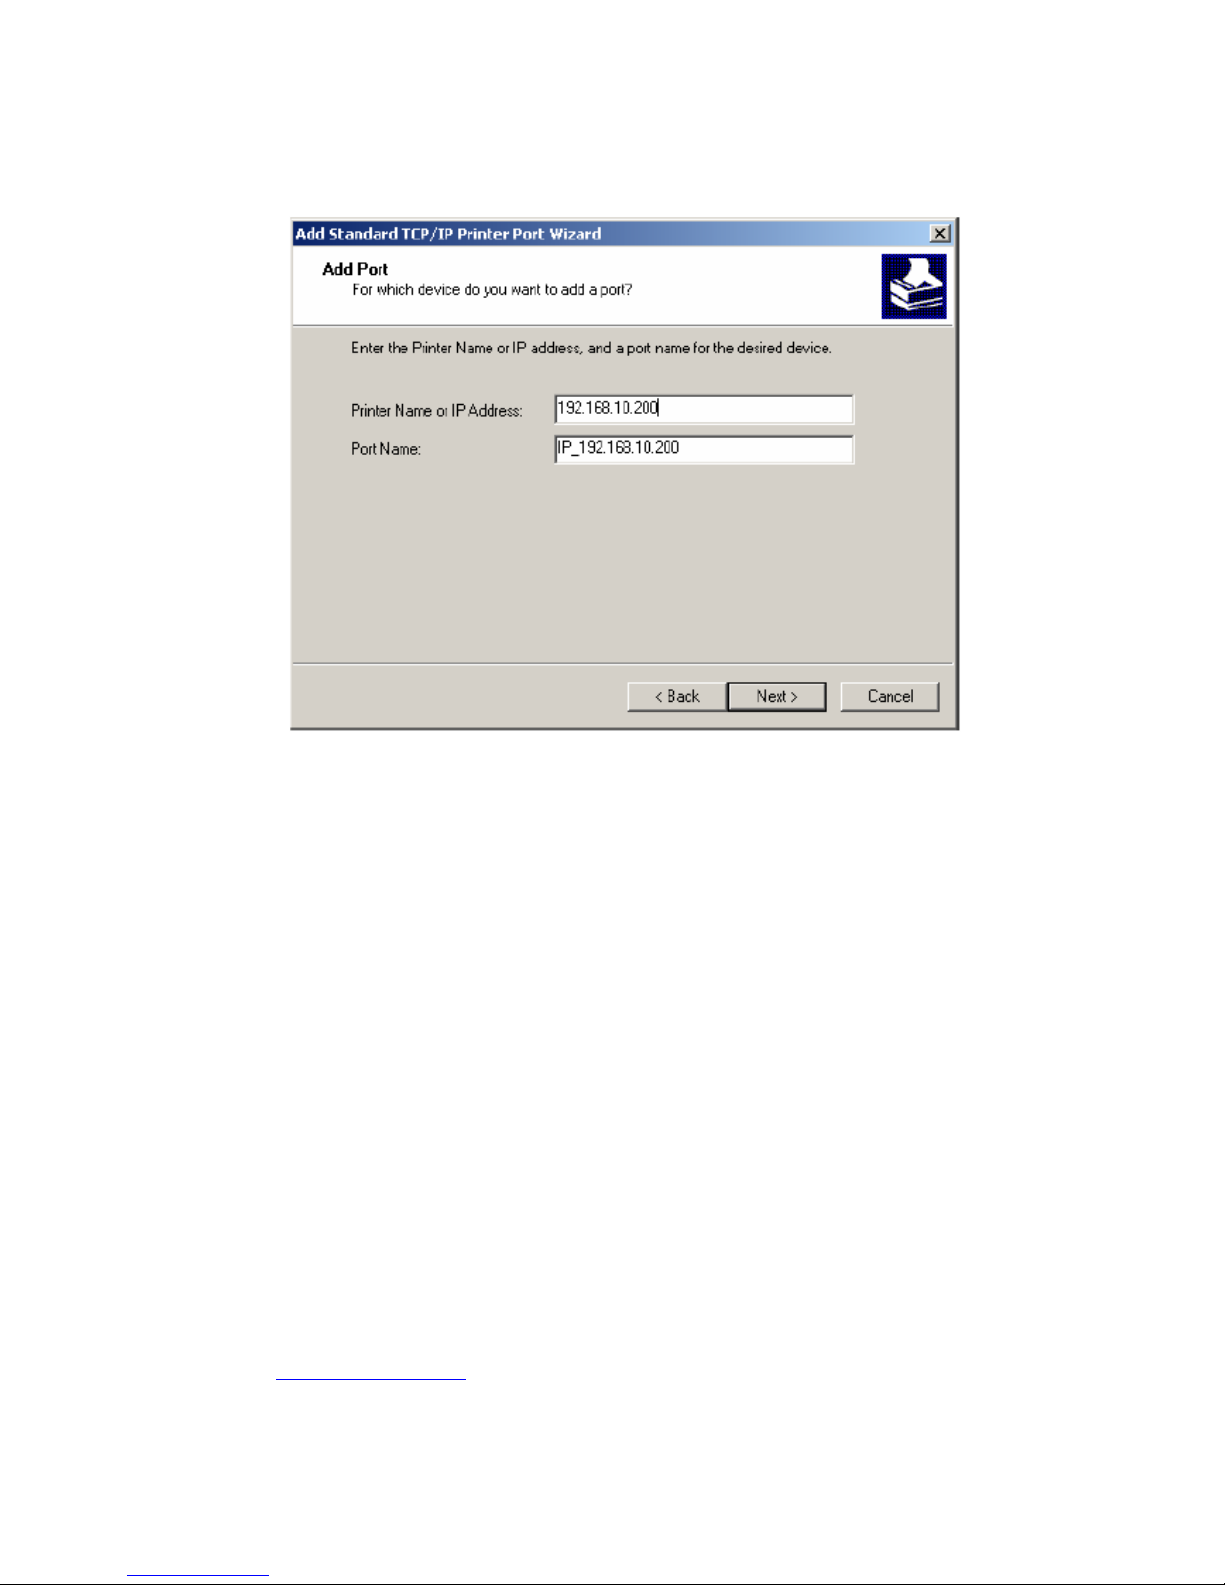
5. The Add Standard TCP/IP Printer Port Wizard box will then appear as shown below.
Type the IP address assigned to the print server in the Printer Name or IP Address box,
click Next.
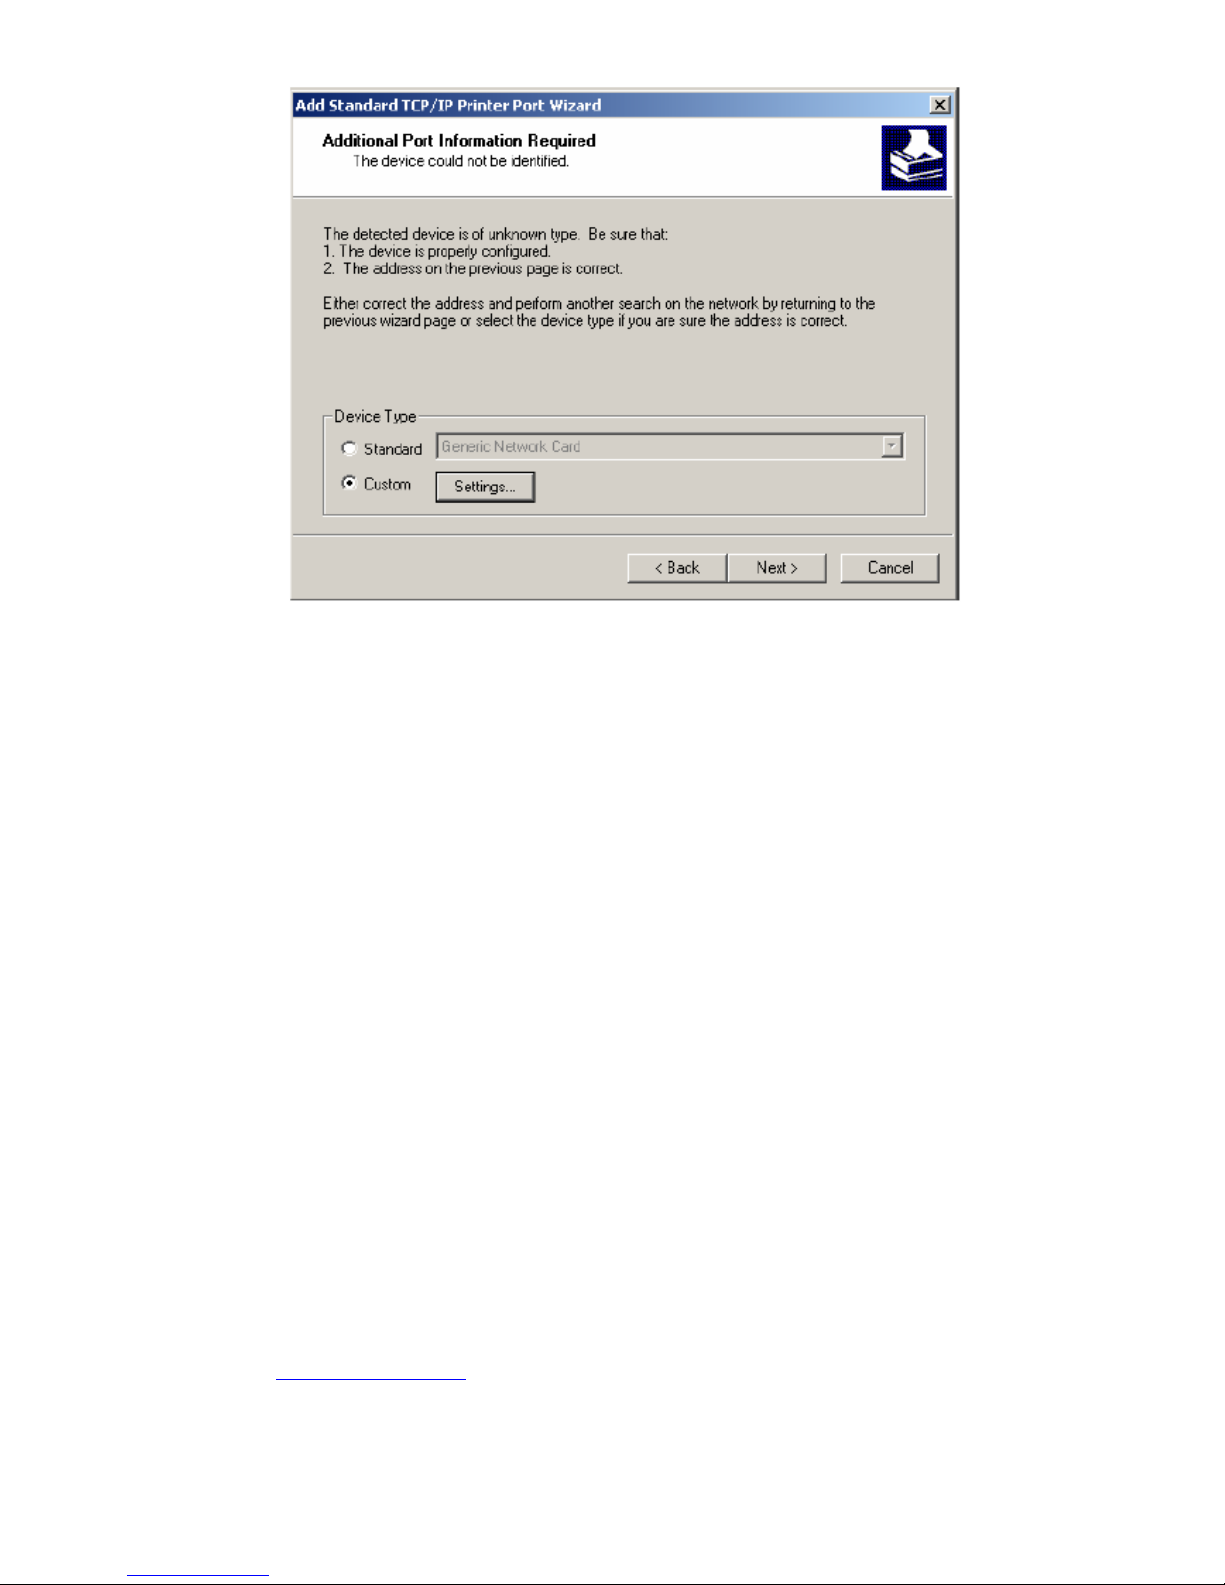
6. In the Add Standard TCP/IP Printer Port Wizard box shown in the following picture.
Select Custom, Click Settings button, and click Next.
Page 83
PLANEX COMMUNICATIONS INC.
http://www.planex.com.tw/ TEL+886-2-22191816 FAX +886-2-22190655 Page 81
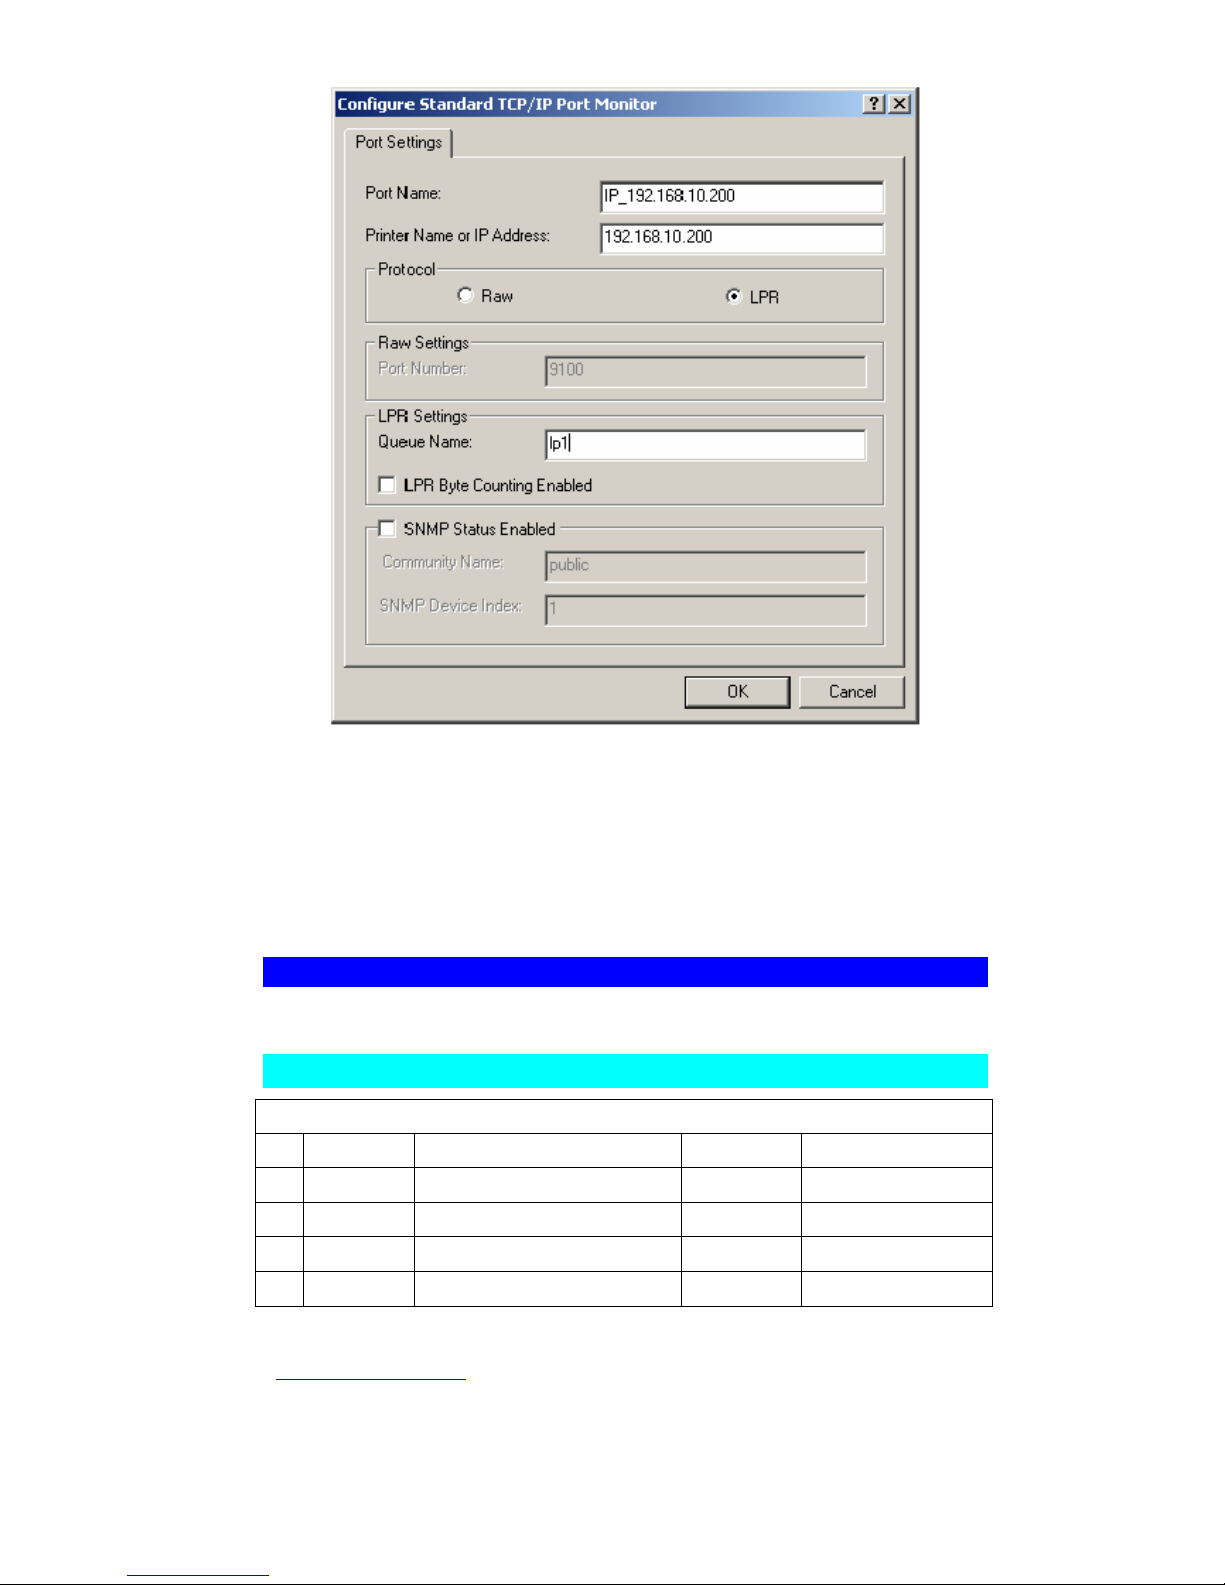
7. In the Configure Standard TCP/IP Port Monitor box shown in the following picture,
select LPR form Protocol, and type in a queue name, for example, lp1.
8. Click OK, and Next.
Page 84
PLANEX COMMUNICATIONS INC.
http://www.planex.com.tw/ TEL+886-2-22191816 FAX +886-2-22190655 Page 82
9. Click Finish.
10. Select the appropriate printer manufacturer and printer type list and click Next.
11. Type in a new Printer name or leave it in default, and click Next button.
12. A box containing the message:”To confirm that the printer is installed properly, you
can print a test page” will appear. Select Yes
(
Recommended) and click Finish.
13. The installation is complete.
Printer Compatible list
Compatible Device Test (Test OS:Win98 & Win2000)
Printer Tested
NO Vendor Model Result Remark
01 Epson
EPSON Stylus Color 300
Pass
02 Epson
EPSON Stylus Color 400
Pass
03 Epson
EPSON Stylus Color 600
Pass
04 Epson
EPSON Stylus Color 640
Pass
Page 85
PLANEX COMMUNICATIONS INC.
http://www.planex.com.tw/ TEL+886-2-22191816 FAX +886-2-22190655 Page 83
05 Epson
EPSON Stylus Color 660
Pass
06 Epson
EPSON Stylus Color 670
Pass
07 Epson
EPSON Stylus Color 740
Pass
08 Epson
EPSON Stylus Color 790
Pass
09 Epson
EPSON Stylus Color 850
Pass
10 Epson
EPSON Stylus Color 900
Pass
11 Epson
EPSON Stylus Photo 720
Pass
12 Epson
EPSON Stylus Photo 750
Pass
13 Epson
EPSON Stylus Photo 790
Pass
14 Epson
EPSON IP-100
Pass
15 HP
HP DeskJet 610C
Pass
16 HP HP DeskJet 640C Pass
17 HP HP DeskJet 710C Pass
18 HP HP LaserJet 6L Pass
19 HP HP LaserJet 1100 Pass
20 HP HP LaserJet 4050 Pass
Different OS Print test paper List
Printer Type OS1 OS2 OS3 OS4 OS5 OS6 OS7 OS8 OS9 Result
Epson photo 790
3 3 3 3 3 3 3 3 3
Pass
Epson photo 750
3 3 3 3 3 3 3 3 3
Pass
HP LaserJet 6L
3 3 3 3 3 3 3 3 3
Pass
HP LaserJet1100
3 3 3 3 3 3 3 3 3
Pass
HP DeskJet 640C
3 3 3 3 3 3 3 3 3
Pass
OS1:WIN2K(Server) OS2:WINNTworkstation OS3:WIN98 OS4:WINME
OS5:WINNT OS6:WIN2KPRO OS7: Linux OS8: WIN95
OS9:WINXP
Page 86

PLANEX COMMUNICATIONS INC.
http://www.planex.com.tw/ TEL+886-2-22191816 FAX +886-2-22190655 Page 84
Chapter 7
Troubleshooting
This appendix describes common problems you may encounter and possible solutions to them.
The BLW-03FA can be easily monitored through panel indicators to identify problems. If you
cannot resolve any connection problems after checking the indicators, then refer to the other
sections in the following table.
Troubleshooting Chart
Symptom Action
LED Indicators
Power LED is OFF • External power supply has failed or is disconnected.
• Check connections between the BLW-03FA, the external power
supply, and the wall outlet.
• If the power indicator does not light when the power cord is
plugged in, you may have a problem with the power outlet,
power cord, or external power supply. If the unit powers off
after running for a while, check for loose power connections,
power losses, or surges at the power outlet.
If you cannot isolate the problem, then the external power
supply may be defective. In this case, contact SMC Technical
Support for assistance.
7
Page 87

PLANEX COMMUNICATIONS INC.
http://www.planex.com.tw/ TEL+886-2-22191816 FAX +886-2-22190655 Page 85
TROUBLESHOOTING
Troubleshooting Chart
Symptom Action
LED Indicators
Link LED is OFF • Verify that the BLW-03FA and attached device are
powered on.
• Be sure the cable is plugged into both the BLW-03FA
and the corresponding device.
• Verify that the proper cable type is used and that its
length does not exceed the specified limits.
• Be sure that the network interface on the attached device
is configured for the proper communication speed and
duplex mode.
• Check the adapter on the attached device and cable
connections for possible defects. Replace any defective
adapter or cable if necessary.
Network Connection Problems
Cannot Ping the BLW-03FA
from the attached LAN, or the
BLW-03FA cannot Ping any
device on the attached LAN
• Verify that the IP addresses are properly configured. For
most applications, you should use the BLW-03FA’s
DHCP function to dynamically assign IP addresses to
clients on the LAN. However, if you manually configure
IP addresses on the LAN, verify that the same network
address (network component of the IP address) and subnet
mask are used for both the BLW-03FA and the LAN
devices.
• Be sure the device you want to Ping (and the device
from which you are Pinging) have been configured for
TCP/IP.
Page 88
PLANEX COMMUNICATIONS INC.
http://www.planex.com.tw/ TEL+886-2-22191816 FAX +886-2-22190655 Page 86
TROUBLESHOOTING
Troubleshooting Chart
Symptom Action
Management Problems
Cannot connect using the web
browser
• Be sure to have configured the BLW-03FA with a valid IP
address, subnet mask, and default gateway.
• Check that you have a valid network connection to the
BLW-03FA and that the port you are using has not been
disabled.
• Check the network cabling between the management station
and the BLW-03FA.
Forgot or lost the password • Press the Reset button on the front panel (holding it down
for at least five seconds) to restore the factory defaults.
Printer Server
The printer cannot print,
or prints garbage
• Make sure the parallel cable between the BLW-03FA and
printer is connected and is in good condition
Page 89
PLANEX COMMUNICATIONS INC.
http://www.planex.com.tw/ TEL+886-2-22191816 FAX +886-2-22190655 Page 87
Appendix A
CABLES
Ethernet Cable
Specifications
Cable Types and Specifications
Cable Type Max.Length Connector
10BASE-T Cat. 3, 4, 5 UTP 100 m 100-ohm (328 ft) RJ-45
100BASE-TX Cat. 5 UTP 100 m 100-ohm (328 ft) RJ-45
Twisted-pair Cable
Caution: Do NOT plug a phone jack connector into any RJ-45 port. Use only twisted-
pair cables with RJ-45 connectors that conform with FCC standards.
For 10BASE-T/100BASE-TX connections, a twisted-pair cable must have two pairs of
wires. Each wire pair is identified by different colors. For example, one wire might be
red and the other, red with white stripes. Also, an RJ-45 connector must be attached to
both ends of the cable.
Cables
Figure B-1 illustrates how the pins on the RJ-45 connector are numbered. Be sure to hold the
connectors in the same orientation when attaching the wires to the pins.
Figure B-1. RJ-45 Connector Pin Numbers
Straight-through Cable
Straight-Through RJ-45 Pin Assignments
End 1 End 2
1 (TD+) 1 (TD+)
2 (TD-) 2 (TD-)
3 (RD+) 3 (RD+)
6 (RD-) 6 (RD-)
A
Page 90
PLANEX COMMUNICATIONS INC.
http://www.planex.com.tw/ TEL+886-2-22191816 FAX +886-2-22190655 Page 88
Pins 4, 5, 7, and 8 are not connected.
Crossover Cable
Crossover RJ-45 Pin Assignments
End 1 End 2
1 (TD+) 3 (RD+)
2 (TD-) 6 (RD-)
3 (RD+) 1 (TD+)
6 (RD-) 2 (TD-)
Pins 4, 5, 7, and 8 are not connected.
RJ-45 Port Pin Assignments
Pin MDI Signal Name* MDI-X Signal Name*
1 Transmit Data (TD+) Receive Data (RD+)
2 Transmit Data (TD-) Receive Data (RD-)
3 Receive Data (RD+) Transmit Data (TD+)
6 Receive Data (RD-) Transmit Data (RD-)
Pins 4, 5, 7, and 8 are not connected.
z The “+” and “-” signs represent the polarity of the wires that make up each wire pair.
Page 91

PLANEX COMMUNICATIONS INC.
http://www.planex.com.tw/ TEL+886-2-22191816 FAX +886-2-22190655 Page 89
Appendix B
Specifications
Hardware
z Dimension: 221 × 139 × 33.8 mm
z Power: 9V, 1000 mA
z Temperature 0°C ~ 40°C in operating
-25°C ~ 60°C in storage
z Humidity 15%~95%
z IEEE Standards: IEEE802.3, 802.3u, 802.11b
RFC DHCP
RFC NAT
z Cable Specification: Catg.5 UTP
z Electromagnetic Compatibility: VCCI/JATE/Telec
Wireless RF
z Radio: Complies with IEEE 802.11b
z Frequency Band: USA – FCC 2412~2462MHz (Ch1~Ch11)
Canada – IC 2412~2462MHz (Ch1~Ch11)
Europe – ETSI 2412~2472MHz (Ch1~Ch13)
Spain 2457~2462MHz (Ch10~Ch11)
France 2457~2472MHz (Ch10~Ch13)
Japan–STD-T66/STD-33 2412~2484MHz (Ch1~Ch14)
z Operating Channels: IEEE 802.11 compliant
z Channels 14 channels (Japan)
z Modulation Type: BPSK for 1Mbps
QPSK for 2Mbps
CCK for 5.5/11Mbps
z Radio Technology: Direct Sequence Spread Spectrum (DSSS)
z Data Rate: 1 / 2 / 5.5 / 11 Mbps
z Output Power: > +15dBm; Typically +17dBm
z Current consumption: TX 450mA Max;
RX 320mA Max;
Typical 350mA
B
Page 92

PLANEX COMMUNICATIONS INC.
http://www.planex.com.tw/ TEL+886-2-22191816 FAX +886-2-22190655 Page 90
Receive sensitivity: -80dBm for 11Mbps, 8% @ BER 1E-5
-83dBm for 5.5Mbps, 8% @ BER 1E-5
-88dBm for 2Mbps, 8% @ BER 1E-5
-90dBm f
 Loading...