

Page 1
Intelligent Ethernet over VDSL
Switch
VC-412
User’s Manual
Page 2

VC-412 User’s Manual
Trademarks
Copyright PLANET Technology Corp. 2002.
Contents subject to revision without prior notice.
PLANET is a registered trademark of PLANET Technology Corp. All
other trademarks belong to their respective owners.
FCC Warning
This equipment has been tested and found to comply with the limits for a
Class A digital device, pursuant to Part 15 of the FCC Rules. These limits
are designed to provide reasonable protection against harmful interference
when the equipment is operated in a commercial environment. This
equipment generates, uses, and can radiate radio frequency energy and, if
not installed and used in accordance with the Instruction manual, may
cause harmful interference to radio communications. Operation of this
equipment in a residential area is likely to cause harmful interference in
which case the user will be required to correct the interference at his own
expense.
CE Mark Warning
This is a Class A product. In a domestic environment, this product may
cause radio interference, in which case the user may be required to take
adequate measures.
Revision
PLANET Intelligent Ethernet over VDSL Switch User's Manual
For Model: VC-412
Part No.: EM-VC412V1
1
Page 3

VC-412 User’s Manual
1. INTRODUCTION..................................................................................................................................... 1
EATURE
1.1 F
1.2 VC-412 T
ACKAGE CONTENTS
1.3 P
1.4 LED I
2. INSTALLATION....................................................................................................................................... 6
2.1 CONNECTING VC-412...................................................................................................................... 6
2.2 CONSOLE PORT SETUP................................................................................................................... 7
2.3 TELNET SETUP................................................................................................................................. 9
3. WEB CONFIGURATION...................................................................................................................... 10
3.1 W
3.2 M
3.2.1 Unit Information........................................................................................................................ 12
3.2.2 Port Information........................................................................................................................ 12
............................................................................................................................................... 1
ECHNICAL SPECIFICATIONS
ARDWARE DESCRIPTION
& H
NDICATORS AND BUTTON DEFINITION
EB CONFIGURATION SETUP
ONITOR CONFIGURATION
3.2.2.1 VDSL PORT Information ...................................................................................................................12
.............................................................................................................. 10
................................................................................................................. 12
................................................................................................... 2
............................................................................... 3
........................................................................................ 4
3.2.2.2 TRUNK PORT INFORMATION........................................................................................................13
YSTEM CONFIGURATION
3.3 S
3.3.1 System Configuration................................................................................................................. 13
3.3.2 Reset To Default ......................................................................................................................... 14
3.3.3 Reboot System............................................................................................................................ 15
ETWORK CONFIGURATION
3.4 N
3.4.1 Protocol Control........................................................................................................................ 15
3.4.2 SNMP Access Table.................................................................................................................... 16
3.4.3 SNMP Trap Receiver Table........................................................................................................ 17
4. COMMANDS FOR CONSOLE AND TELNET................................................................................. 19
4.1 M
4.2 M
4.3 SNMP A
AIN MENU SELECTIONS
ANAGEMENT CONFIGURATION
4.2.1 System Configuration................................................................................................................. 20
4.2.2 Network Configuration .............................................................................................................. 22
4.2.3 System MIB Configuration......................................................................................................... 24
CCESS TABLE
.................................................................................................................... 13
................................................................................................................ 15
................................................................................................................ 19
........................................................................................................ 19
/SNMP T
RAP RECEIVE CONTROL TABLE
........................................................ 25
4.4 VDSL U
4.4.1 Pass-Through ICD Command to Unit........................................................................................ 26
NIT CONTROL
....................................................................................................................... 26
2
Page 4

VC-412 User’s Manual
4.4.2 Set Each VDSL Port Name of Unit............................................................................................ 26
4.4.3 Display All Ports Status of Unit................................................................................................. 27
4.4.4 Display All T runks Status of Unit............................................................................................... 28
ESET TO DEFAULT
4.5 R
EBOOT SYSTEM
4.6 R
OGOUT
4.7 L
.............................................................................................................................................. 30
............................................................................................................................ 29
................................................................................................................................29
5. ICD COMMANDS FOR TELNET AND CONSOLE......................................................................... 31
NTER
5.1 E
5.2 ICD
ETTING
5.3 S
5.4 VDSL C
ORT COMMAND
5.5 P
COMMAND LINE INTERFACE
ICD
COMMAND INDEX TABLE
VLAN F
OMMAND
UNCTIONALITY
.............................................................................................................................. 36
................................................................................................................................37
............................................................................................. 31
............................................................................................................ 32
....................................................................................................... 34
APPENDIX A – VC-412 FACTORY DEFAULT..................................................................................... 39
APPENDIX B – UPDATE VC-101S FIRMWARE TO R4.5 REMOTELY THROUGH VC-412....... 40
3
Page 5

VC-412 User’s Manual
1. INTRODUCTION
Thank you for choosing the VC-412 VDSL Managerial Switch for your MDU Solution.
PLANET has been on the forefront of VDSL (Very High Bit-Rate Digital Subscriber Line)
technologies since their inception, and will always strive to create quality, cost-effective
solutions for VDSL users and installers.
Fiber all the way to the home (FTTH) is very expensive therefore another alternative is a
combination of fiber cables to Optical Network Units (ONUs) or otherwise called the Fiber
to the Neighborhood (FTTN) as the connection point between fiber and existing or new
copper wire.
Subscriber Line, or VDSL. In simple terms, VDSL transmits high speed data over short
reaches of twisted-pair copper telephone lines, with a range of speeds depending upon
actual line length.
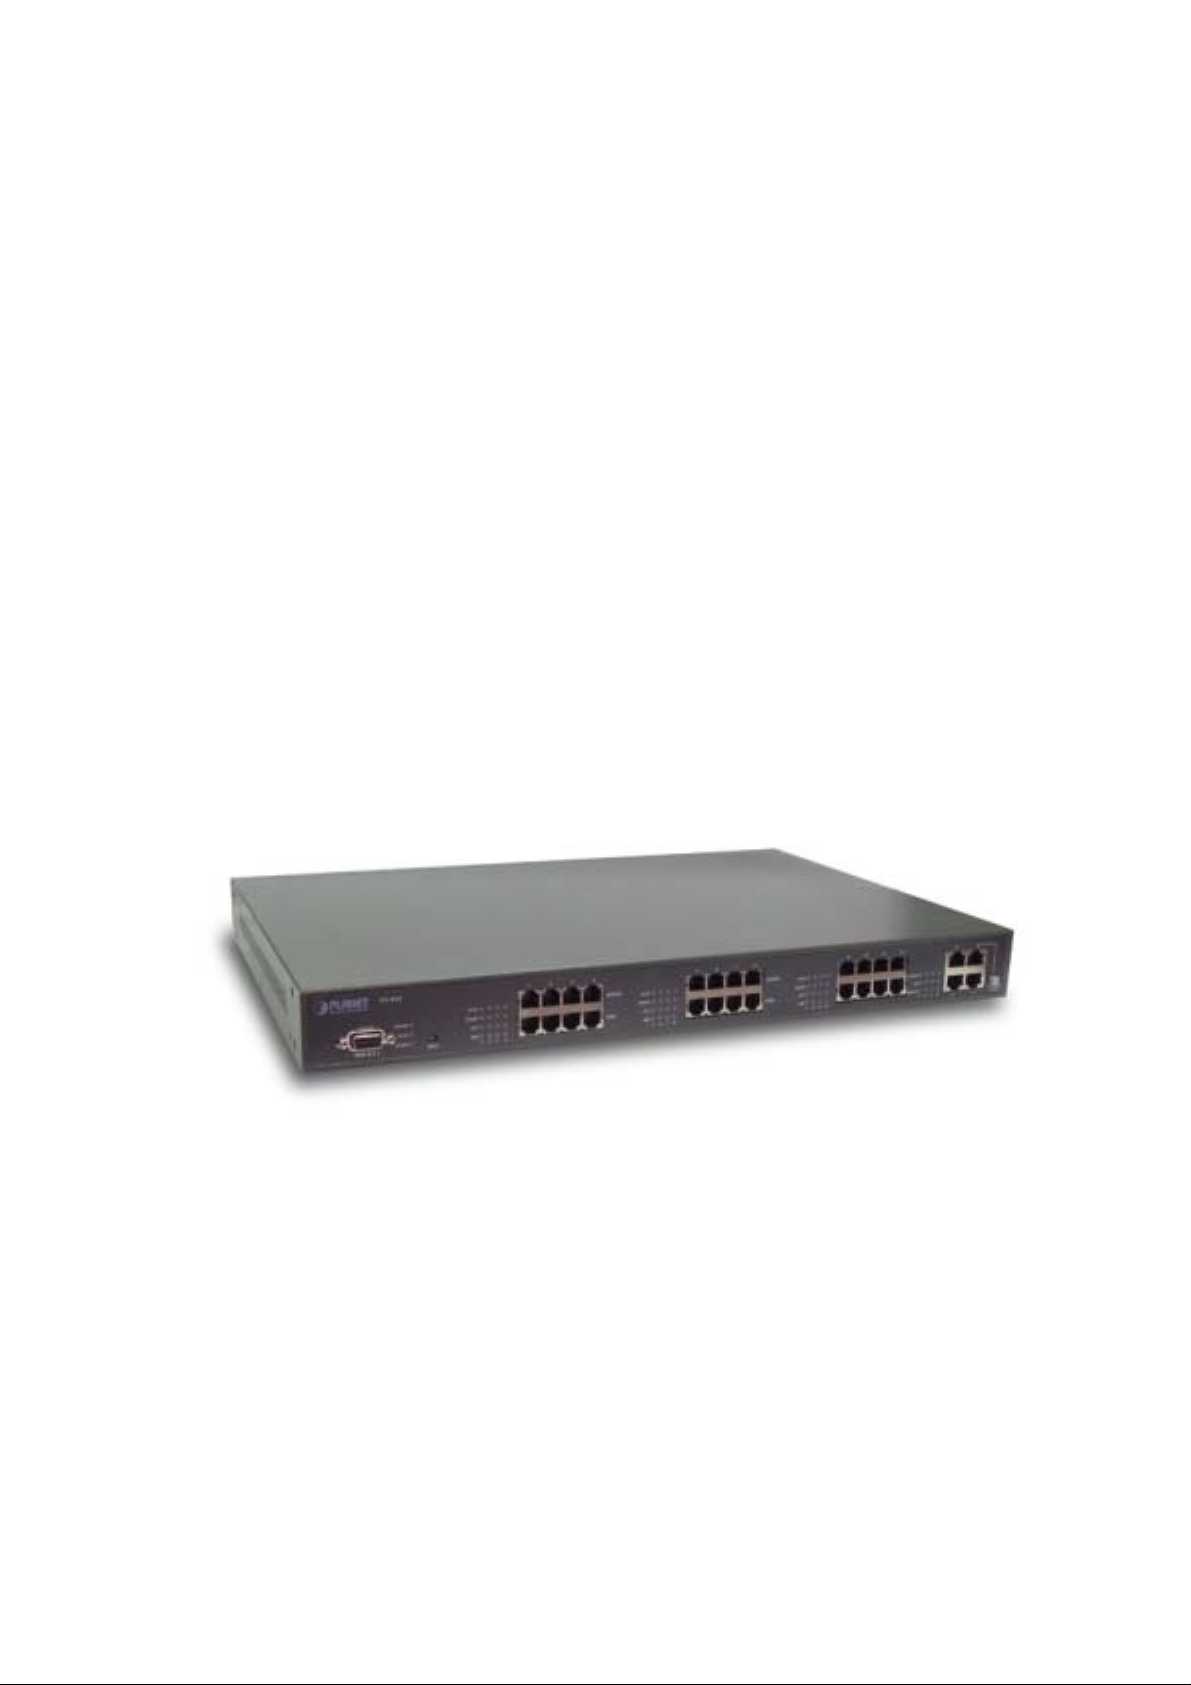
By choosing the VC-412 VDSL Managerial Switch, you have enabled your network to
have the superb speed and manageability. VC-412 offers 12 VDSL ports, 12 POTS/ISDN
ports and 4 Ethernet ports for your VDSL solutions.
One of the enabling technologies for FTTN is Very high rate Digital
1.1 Feature
Some VC-412 highlights include:
Twelve (12) VDSL ports
Twelve (12) POTS/ISDN ports
Four (4) 10/100 Mbps Ethernet ports
One (1) Local management Console port
Supports security with port based VLAN function
Virtual LAN (VLAN) Grouping
Frequency division multiplexing for uninterrupted simultaneous voice/data
transmission
Layer 2 Switching.
Support Telnet, Web-Based, Console and SNMP Interfaces
Ethernet ports status monitoring
Management Information Base (MIB) Settings
Store-and-Forward mechanism
1
Page 6

Back Pressure and IEEE 802.3x compliant flow control
Supports 8K MAC addresses entries
1 MB Buffer Memory
Back Pressure flow control for half-duplex
VC-412 User’s Manual
PAUSE Frame flow control for full-duplex (802.3x)
1.2 VC-412 Technical Specifications
Management Features
SNMP/MIB-II/RFC1213
In-Band/Out-Band management
Firmware upgradeable through TFTP
Telnet/Console/Web-Based/SNMP interfaces management support
Supports four languages (English, Traditional Chinese, Simplified Chinese,
Japanese)
SNMP Management
Standard based SNMP, MIB-II and proprietary MIBs
Supports TCP/IP, SNMP, HTTP, TFTP, DHCP, BOOTP, Telnet protocols.
Twelve (12) VDSL Ports and Twelve (12) POTS/ISDN Ports
LED: Sync, Activity, Error
Maximum Distance – 1.5 km
Four (4) Ethernet Ports
10/100 Mbps, Auto-Negotiation
IEEE 802.3, 802.3u, 802.3x
LED: Link/Activity, 10/100, Full Duplex/Collision
One (1) Console Port
Baud Rate: 19200 bps, 8 Data Bits, 1 Stop Bit, No Parity, No Flow Control
For VC-412 Local Console management
Physical Specifications:
AC Input: 100 - 250 VAC, 47 - 63 Hz, Internal Universal Power Supply
Power Consumption: 60W Max / 205 BTU Max.
2
Page 7
Operating Temperature: 32 to 122°F (0 to 50°C)
Storage Temperature: -13 to 158°F (-25 to 70°C)
Humidity: 10% - 90% Non-Condensing
Certification: FCC, VCCI, CE
Net Weight: 4.16 kg
VC-412 User’s Manual
Dimensions: 446 × 300 × 44 mm
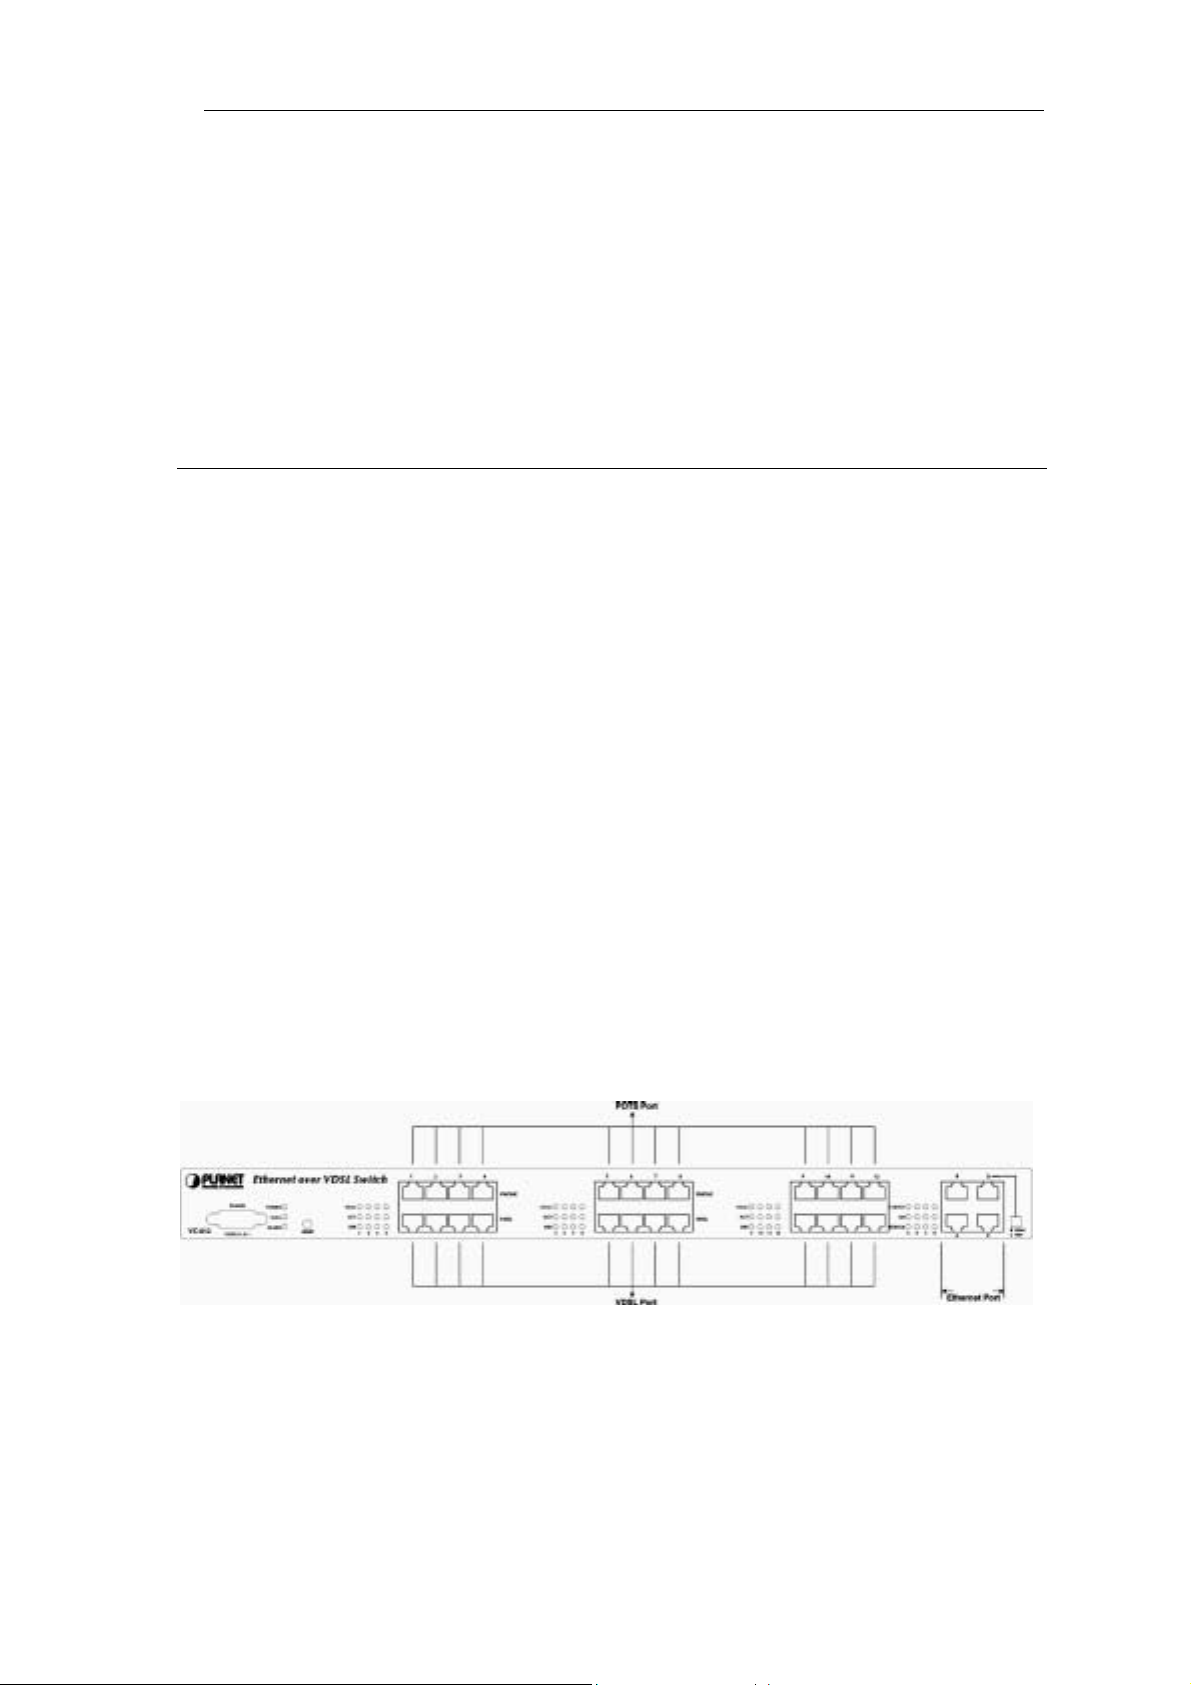
1.3 Package Contents & Hardware Description
Upon opening your package you should have the following items:
• (1) Power Cord
• (1) VC-412 Intelligent VDSL Switch
• (1) RS232 Male Console Cable (DB9 to DB9)
• (1) Setup and Installation Manual CD
• (1) Quick Installation Guide
If any of these items are missing, please contact your vendor immediately before
continuing. For additional manuals please contact your vendor.
Before removing the switch from the package please ensure to remove all static devices
and static electricity from your body by touching an available metal plate or grounding
point.
Your new VC-412 has 12 VDSL ports, 12 POTS/ISDN ports, 4 Ethernet ports and 1 Local
Console (RS232) port.
3
Page 8
VC-412 User’s Manual
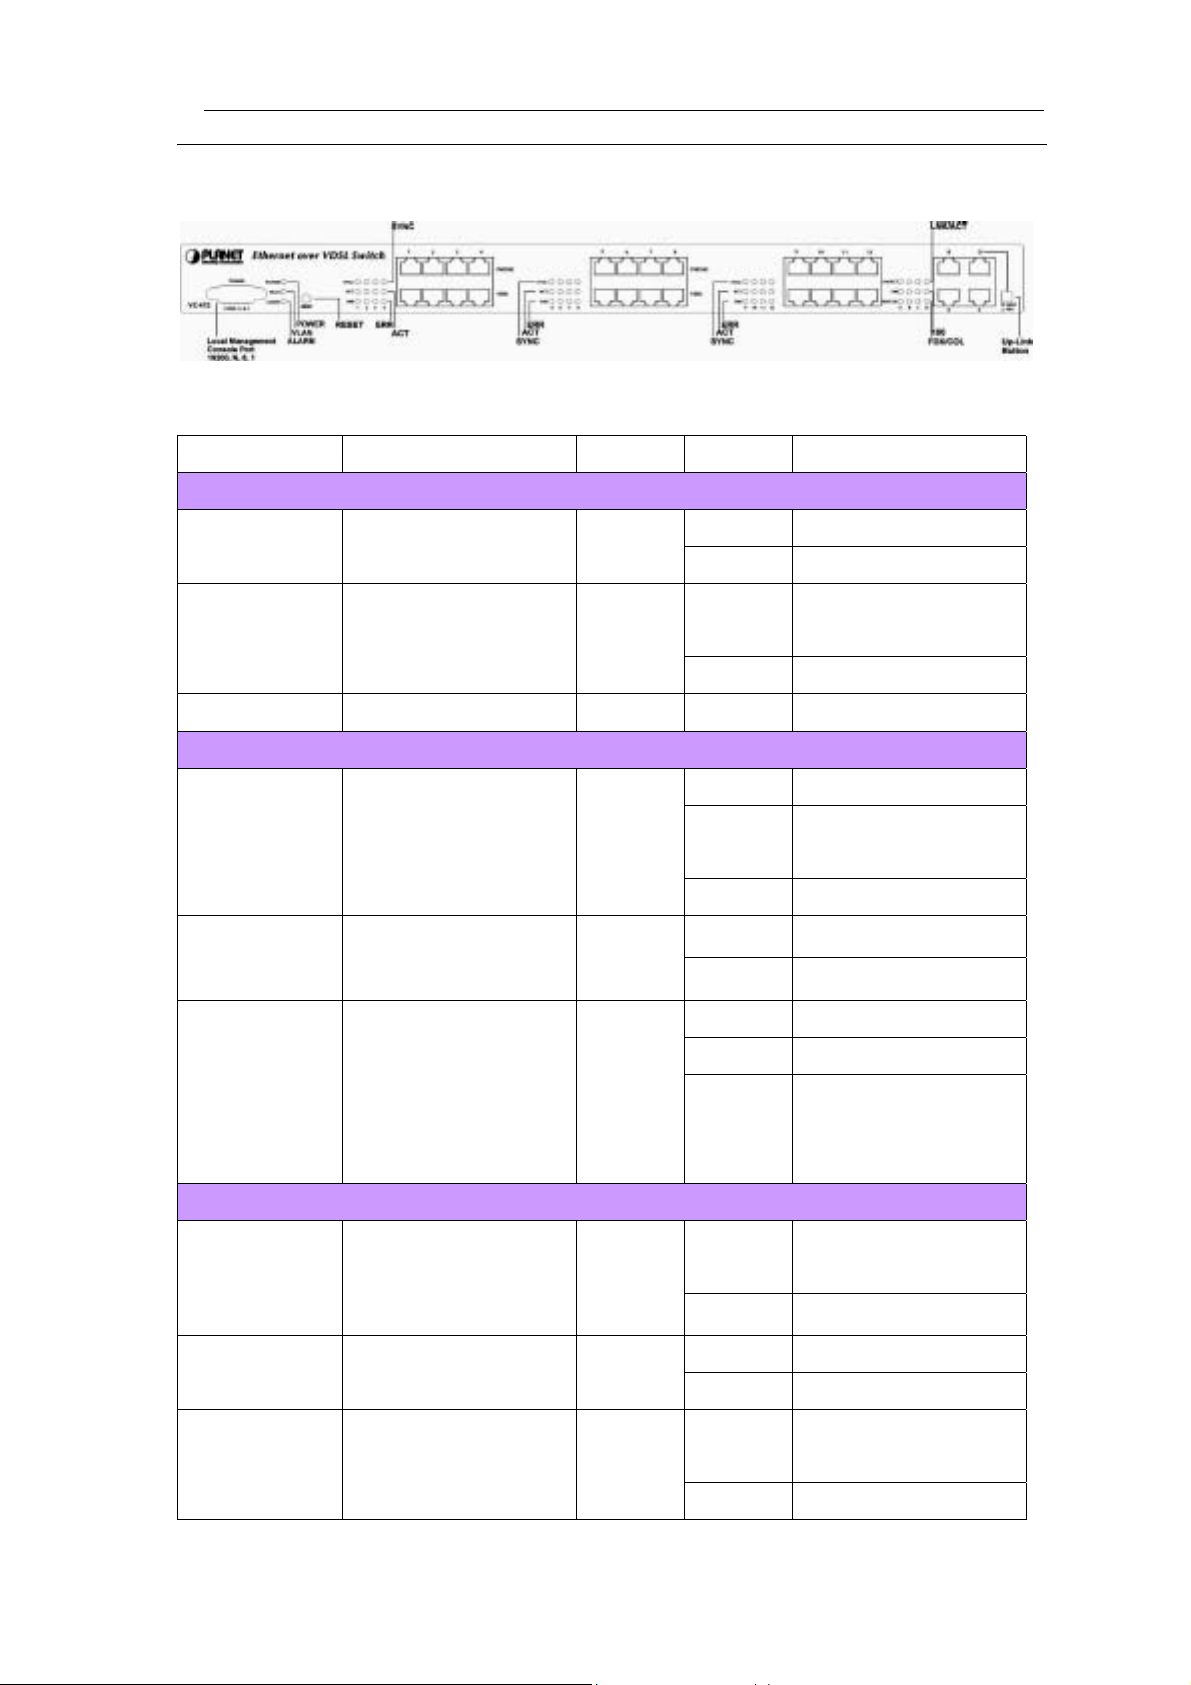
1.4 LED Indicators And Button Definition
LED Function Color Status Description
System Status
POWER Power indication Green
VLAN VLAN status Green
ALARM Reserved -- -- -Ethernet Port
LNK/ACT
Ethernet port
Link/Active
Ethernet port transmit
100
and receive speed
Ethernet port duplex
FDX/COL
mode
Green
Green
Yellow
On System is turned on
Off System is off
On
Off VLAN off
On Link no data transmit
Blinking
Off No Ethernet link
On The speed is 100Mbps
Off The speed is 10Mbps
On Full Duplex
Off Half duplex no collision
Blinking
VLAN or VLAN
grouping is on
Link and transmitting
data (active)
Half duplex and
transmission collisions
VDSL Ports
On
SYNC VDSL link Green
Off No VDSL link
On Transmitting data
ACT VDSL active Green
Off Not transmitting data
On
ERR Errors on line Yellow
Off No error
have occurred
VDSL link is
established
Errors occurred on the
line
4
Page 9

Button Function
Reset Push to reboot the switch
VC-412 User’s Manual
Normal / Uplink
Normal: When connect port D to PC or other end nodes.
Uplink: When connect port D to other switch or hub.
5
Page 10

VC-412 User’s Manual
2. INSTALLATION
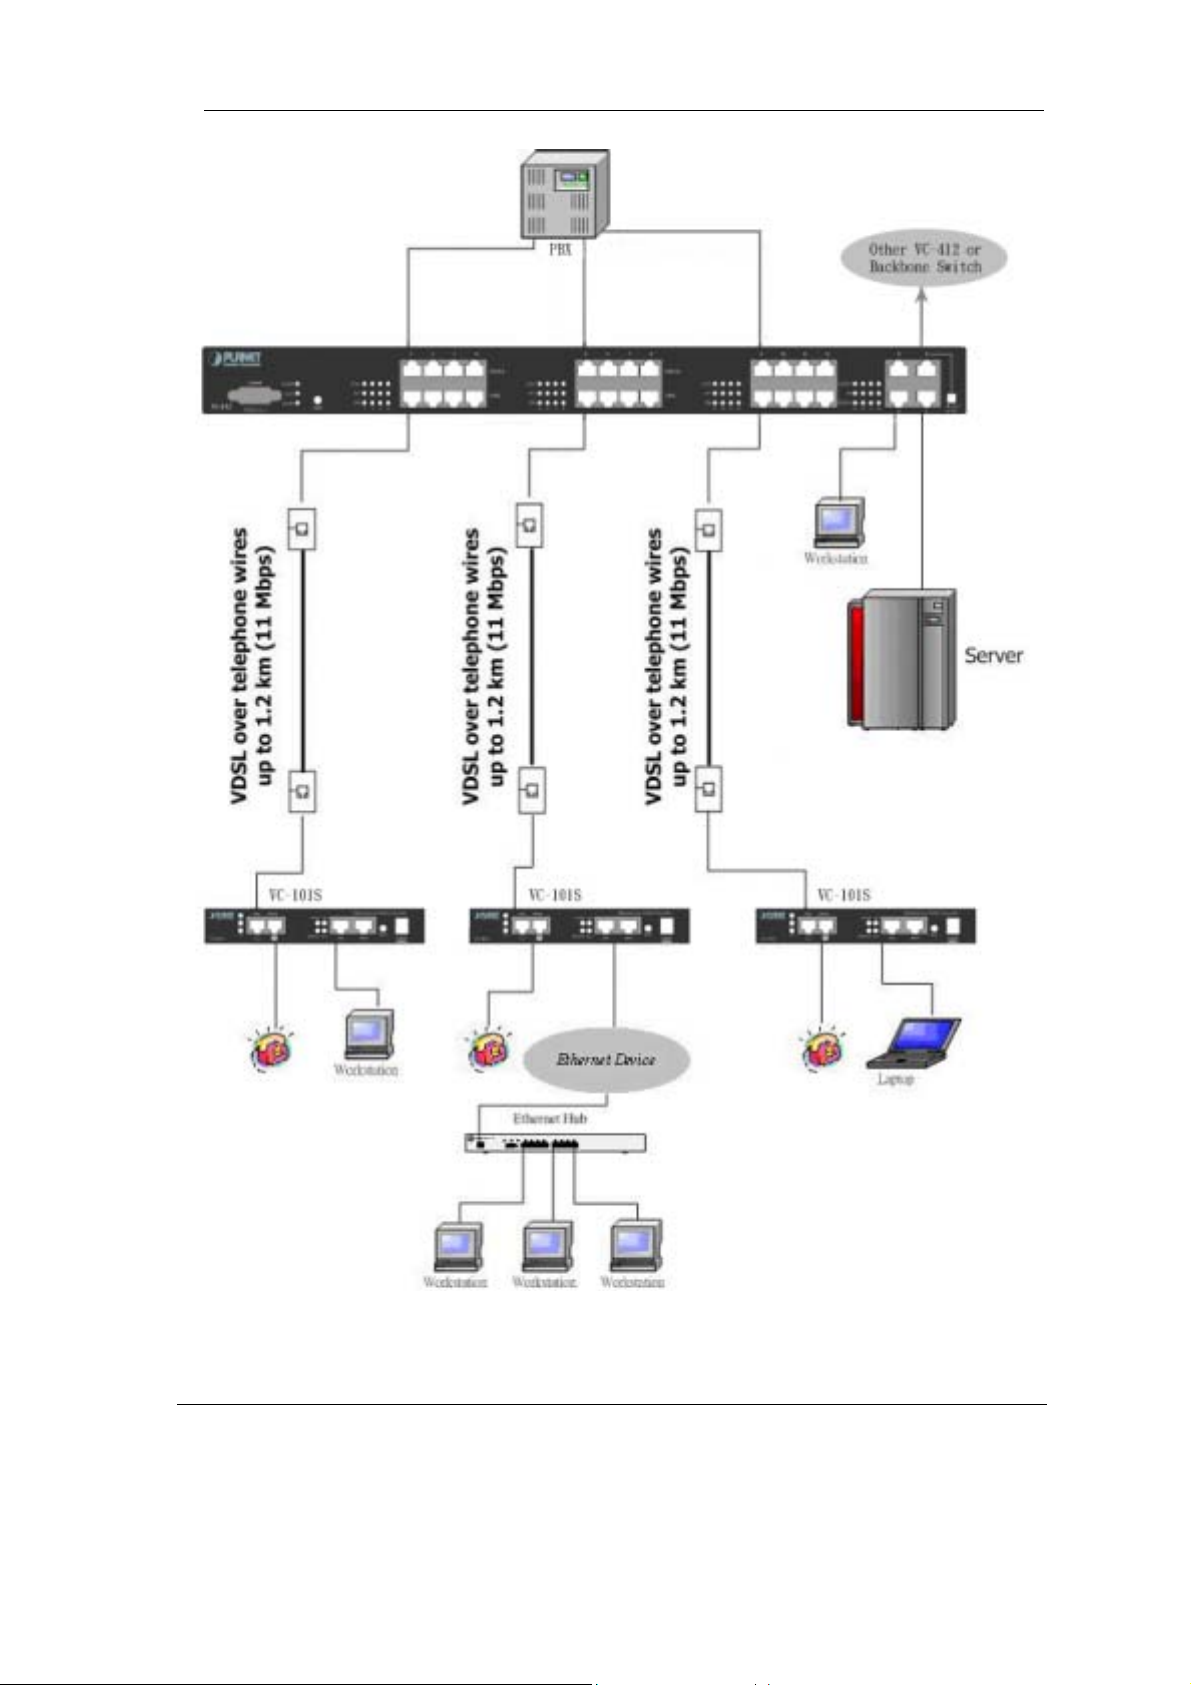
2.1 Connecting VC-412
The VC-412 has the ability to provide up to 12 remote VDSL connections. The VC-412
serves as a VDSL Managerial Switch, it can connect up to 12 sets of PLANET remote
VDSL modems such as the VC-101S.
The VC-412 connects to the PBX through the POTS/ISDN ports to provide telephone
services to the remote ends. The VC-412 VDSL ports then connect to the remote VDSL
modems via telephone wires with a maximum distance up to 1.5 km.
The VC-412 takes approximately 15 seconds to start, therefore when connecting the
VC-412 to a remote modem such as the VC-101S, it will take 15 seconds for link to be
established.
VC-412 Ethernet Port-D can serve as an uplink or a regular Ethernet port on, when the
Uplink button is pressed down it serve as an uplink port, when the Uplink button is
released it serve as a regular Ethernet port. Hence when connecting the VC-412 to
WAN via regular Cat. 5 cable on Port-D press down the Uplink button.
6
Page 11
VC-412 User’s Manual
2.2 Console Port Setup
7
Page 12

The VC-412 contains a powerful management interface accessible through the Console
Port. This section will discuss connecting to the switch through Console Port or Telnet.
For connection to the VC-412 via the console port, you must use the included DB-9 to
DB-9 cable.
Once out of the box and powered on, you must use the Console Port to setup the switch
core settings. Some of the basic settings include:
• Switch Management Module IP Address
• Gateway Address
• Subnet Mask
• Password Settings
To setup Console connection, use the DB9-to-DB9 cable to connect the VC-412 Console
port to PC COM port.
Once the VC-412 Console port is connected to the PC COM port, start any terminal
VC-412 User’s Manual
application. Subsequently, configure the terminal application settings with following
variables:
Baud Rate Data Bits Parity Stop Bits
19200bps 8 None 1 None
low Control
Once connected, password authentication is required. The default password is admin.
Console and Telnet share similar interfaces, the main difference between them is that
Console connects to the Switch directly through a cable. Telnet connects to the switch
remotely via an IP Address. Therefore, to use Telnet to access to the Switch, you will first
need to assign a valid IP address to the Switch through the Console. Otherwise use the
factory default IP address listed in the Appendix A. Web-Based interfaces also required
the same Switch IP, however the interfaces are different from Console and Telnet. (This
will be discussed in the Chapter 3.)
To assign an IP address to the Switch:
1.
Select Management Configuration option from the Main Menu.
2.
Select System Configuration option from the Submenu.
3.
Select IP Address option.
4.
Enter valid IP address.
5.
When setting up Gateway Address and Subnet Mask repeat Step 2 and select
the appropriate option in the menu. Refer to your network administrator for your
appropriate Gateway Address and Subnet Mask.
8
Page 13

.
Once you have assigned a valid IP address to the Switch, proceed to chapter 4 for an
explanation of the menu systems and commands.
VC-412 User’s Manual
2.3 Telnet Setup
Once you have setup the switch IP address via the Console Port, you are ready to access
the management functions from any station on your network via Telnet. To connect,
simply start your telnet client and enter the address you configured into the switch
(Device IP Address). Below you can see an example of using the standard Windows®
Telnet client. Before using Telnet, you must first know your Switch device IP address. The
IP should have been set earlier in the Console setup section. If the IP address has not yet
been set, refer to the quick installation guide.
For Windows 95/98/NT/2000/XP:
A. Press on Start Menu, then on RUN, type in telnet and the device IP address. For
example, if the IP address is 192.168.0.1, type “telnet 192.168.0.1” and hit enter.
B. Connection will initiate and you will be prompt to enter password.
C. The default password is admin, unless it has been changed previously.
Once you have logged into the switch, proceed to the next section for an explanation on
issuing ICD commands.
9
Page 14

VC-412 User’s Manual
3. WEB CONFIGURATION
3.1 Web configuration setup
Configuration through Web browser interface is a fast and convenient way. Although
this is an easy method, you do not have the full flexibility and control granted as you
would under Telnet or Console. The HTTP interface allows basic functions, such as Reset
Unit Counters. However, we recommend users to perform modifications through Console
or Telnet interfaces. The Web browser interface also allows VDSL ports and Ethernet
(trunk) ports monitoring, providing feedback on network statuses.
To log on to the VC-412 via HTTP you must first provide the IP address to the VC-412.
The IP address should have been set earlier in the Console setup section. If your IP has
not been set, please refer to the Console port section or the Defaults section in the
Appendix A.
Note: Please use MS Internet Explorer 5.5 or above to access to the VDSL Web page.
A. Launch your Web browser.
B. Enter the corresponding VDSL Managerial Switch IP Address in the address
field and press Enter.
C. You will be able to select your language preferences in the upper-right corner.
Selections are: English, Traditional Chinese, Simplified Chinese and
Japanese respectively.
D. Press the Become Administrator button if you want to access to administrator
options.
10
Page 15

E. A password dialog will appear prompting for username and password. The
default username is VDSL and password is admin, unless it has been
changed previously in the preliminary setup.
VC-412 User’s Manual
Important: Username and password are both case sensitive.
Note: Browsing is available without becoming an administrator by default. However, the
administrator can turn off the browse option (this will be discussed in later). Set
Value option is not availa ble without entering the correct username and password.
Administrators will need to close browser to log out of administrator page.
11
Page 16

VC-412 User’s Manual
3.2 Monitor Configuration
3.2.1 Unit Information
After the correct username and password are entered, you will be redirected to an
administrator page. On this particular screen you will be able to see the Virtual LAN
status. This window also contains the serial number information of the units. However , the
only adjustable value this panel is the Reset Unit Counter option. This option will reset the
Receive, Send and Collision counters for the unit. Select the check box and press the Set
Value button will reset the unit counter.
3.2.2 Port Information
3.2.2.1 VDSL PORT Information
Under the VDSL Port Information, you will find a representation of the switch LED to
indicate activity, collision, link etc. Administrator is also able to enable or disable port by
selecting or deselecting the check box under Enable option. Administrator may also
rename the ports by typing over the existing names.
12
Page 17

VC-412 User’s Manual
3.2.2.2 TRUNK PORT INFORMATION
Under this section you will be able to monitor the Ethernet Link, Active and Collision
LEDs. A green signal in the LED columns represents active status in the corresponding
port and column.
3.3 System configuration
3.3.1 System Configuration
You will also notice the System link at the top frame, select this link to change the system
13
Page 18

VC-412 User’s Manual
settings of the switch such as refresh time (the rate at which the monitoring screen
refreshes itself to report back statuses) and IP Address. The System Configuration
screen is illustrated below; the settings are self-explanatory.
3.3.2 Reset To Default
Also available under the System Link is the Reset to Default. Reset to Default option will
VC-412
clear the
settings, then restore the initial factory settings to it.
14
Page 19
VC-412 User’s Manual
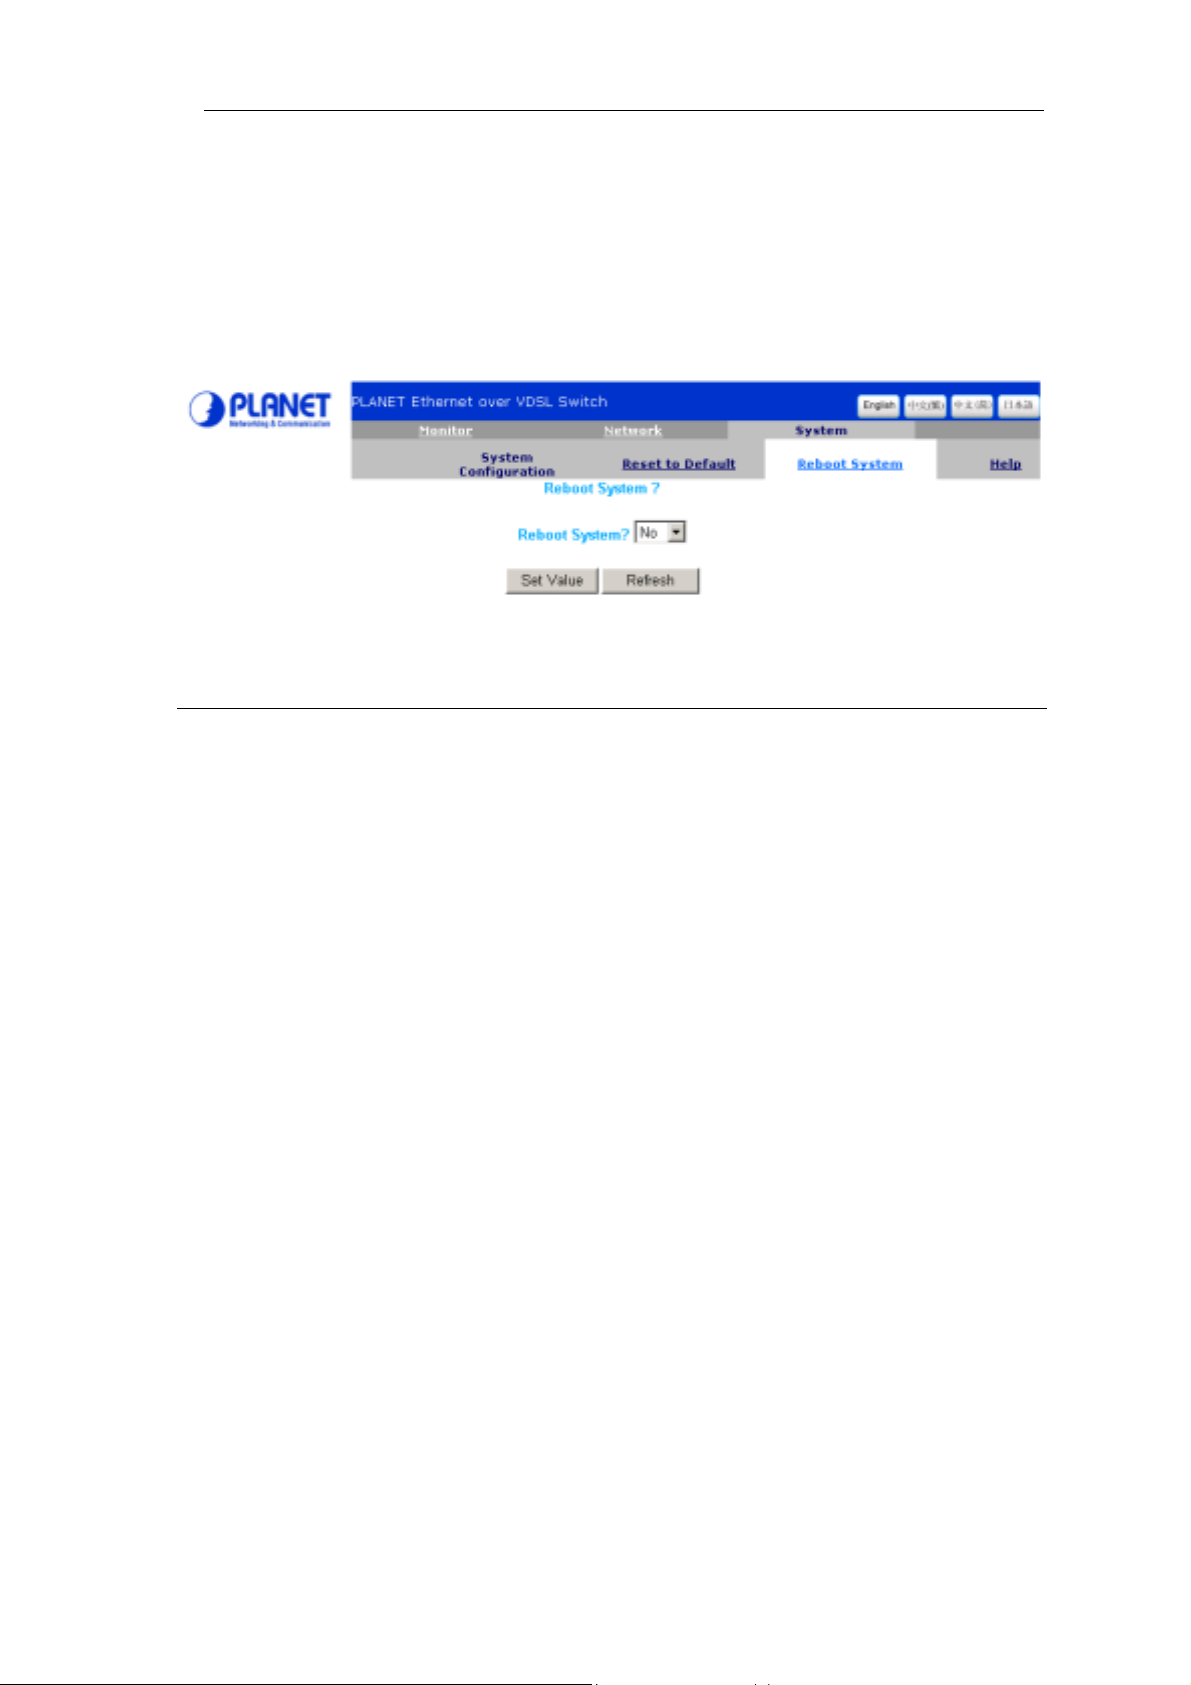
3.3.3 Reboot System
Reboot System option reboots the
VC-412
when it seems to be malfunctioning. It will not
reset or change any settings. Select the option from the drop-down menu and press the
Set Value button.
3.4 Network Configuration
3.4.1 Protocol Control
Selecting on the Network link will allow you to set access methods and set the capability
of future firmware updates. In the Protocol Control section you are presented with the
selections shown below.
HTTP Login Username: Set username for Web interface access to the VC-412.
(Note: The password for the Http interface is the same as the console password.)
HTTP Security: When disabled you will allow users on your network to view
settings and statuses of the VC-412, however modifications are prohibited unless
users login through “Become Administrator” option. When enabled, viewing is
forbidden unless users provide a correct password to login.
BOOTP/DHCP: Obtain IP address from DHCP server.
Telnet Control: Permit or forbid users to login via Telnet.
TFTP Upgrade: Permit or forbid users to upgrade SNMP firmware via TFTP.
15
Page 20

VC-412 User’s Manual
3.4.2 SNMP Access Table
Under SNMP Access Table and SNMP Trap Receiver Table options, you can set IP
addresses that will be enter into SNMP database relating to the functionality and status of
the
VC-412
. You can grant or deny accesses to a single PC or an entire subnet by entering
the appropriate IP address. To utilize this feature, you must have a workstation with
SNMP client access and protocols installed. The VC-412 has been tested with HP
OpenView® and Windows NT® SNMP client services, and should be also compatible
with most other SNMP client software. However, we do not recommend users to use
Silvercreek SNMP client, it has been found that it sometimes causes problem to the
firmware.
The SNMP Access Table specifies addresses In-Band or Out-of-Band of your network
that will have the ability to issue SNMP commands to the VC-412. Setting these IP
addresses and passwords will ensure only authorized SNMP clients can issue
commands to the VC-412.
16
Page 21

VC-412 User’s Manual
3.4.3 SNMP Trap Receiver Table
The SNMP Trap Receiver Table is a set of user-defined addresses that belonged to the
SNMP Trap server. When enabled (entered addresses, 4 receivers maximum) the
VC-412 will send out SNMP information to the trap clients. Currently the VC-412 offers 6
Trap Conditions in addition to port information and counters. The 6 trap conditions are:
1. Unit Up (Power On and Check Status OK)
2. Unit Down (Error or Power Off)
3. Port Link Up (RJ-11 Plugged-in and Link LED is On)
4. Port Link Down (RJ-11 is not plugged and Link LED is Off)
5. Trunk Port Up (RJ-45 is linked and Link/ACT LED is On)
6. Trunk Port Down (RJ-45 is not linked and Link/ACT LED is Off)
17
Page 22

VC-412 User’s Manual
Note: Be sure to press the Set Value button at the bottom of the screen to administer the
new settings, failure to do so will result in lost of settings at refresh time.
18
Page 23
VC-412 User’s Manual
4. COMMANDS FOR CONSOLE AND TELNET
Once successfully logged into the VC-412, administrator is ready to issue commands to
the VC-412. This chapter will cover option menus and their structures, giving details to
each option and setting. We will also list the ICD commands index in this chapter. The
ICD commands grant a variety of management controls and monitoring reports.
The following section will discuss the VC-412 Telnet menu structures and their functions.
Note: Telnet will timeout and end its session on the VC-412 if no action is taken within
one minute.
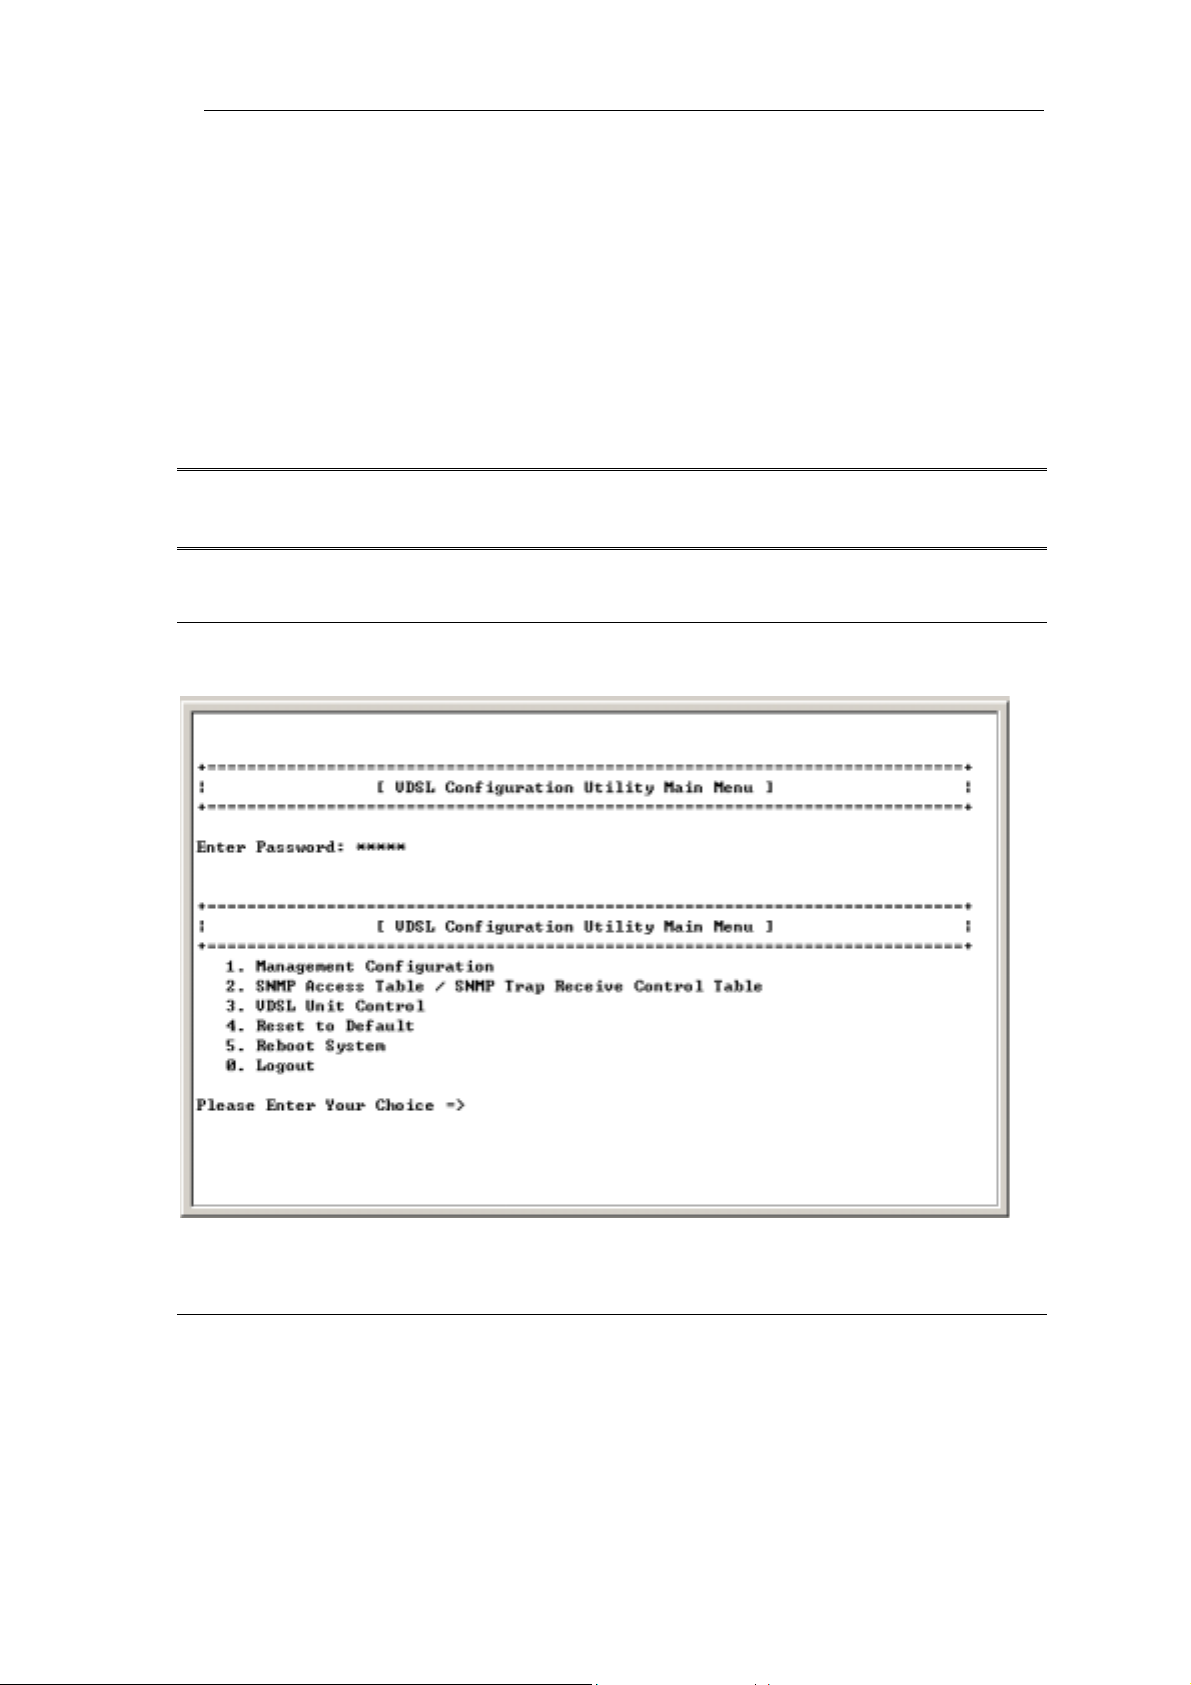
4.1 Main Menu Selections
4.2 Management Configuration
By choosing Management Configuration you will reach this sub menu.
19
Page 24

VC-412 User’s Manual
4.2.1 System Configuration
Choosing System Configuration will allow you to change the basic settings such as
IP Address, Subnet, Gateway etc., as well as date and time and login password.
I. Select the number you wished to edit and press “Enter” key. Type in the new
value and press “Enter”. If you do not wish to change any information press
“Enter” key without typing in any information.
20
Page 25

VC-412 User’s Manual
Figure 24
II. To change password select option 7 and press “Enter” key. Type in the new
password and press Enter.
III. Enter the new password again to confirm.
21
Page 26

VC-412 User’s Manual
Important: There is only one set of password; therefore the password will apply to
Console connection, Telnet, HTTP, and SNMP client.
4.2.2 Network Configuration
Choosing the Network Configuration will allow you to set the access methods for
administering the VC-412 as well as some future product enhancements.
HTTP Login Username: Set username for Web interface access on
22
Page 27

VC-412 User’s Manual
the VC-412.
Note: The password for HTTP is the same as the password in Console, but you will need
to specify username for HTTP access.
HTTP Security Control: When enabled, anyone who tries to access
the VC-412 via HTTP is required to enter a password and username
before able to see any settings or information. When disabled, the
VDSL Managerial Switch will allow all users to see and monitor the
settings of the VDSL Managerial Switch, however they will be unable to
make changes, unless they become an administrator by selecting the
“Become Administrator” button in the Web interface.
BootP/DHCP Control: Obtain IP address from DHCP server.
Telnet Control: Permit or forbid access to the VC-412 via the Telnet Console.
TFTP Upgrade Control: Permit or forbid users to upgrade SNNP firmware via
TFTP.
I. To change login username, select option 1 and enter new
username, otherwise press Enter key without entering any
information to cancel operation.
II. To Enable or Disable Network properties, select the option
number and press Enter key. Enter the new value and press
23
Page 28

VC-412 User’s Manual
Enter key, otherwise press Enter key without entering any
information to cancel operation.
4.2.3 System MIB Configuration
Choosing the System MIB Configuration will allow you to set your Management
Information Base fields. This feature allows administrator to enter contact information and
it is useful in situations where there is a problem with the unit or the network. The
customer can refer to this information from the Web interface or console to contact the
vendor or installer. To change this value, select the option number and enter the new
value then press “Enter”, otherwise press “Enter” key without entering any information to
cancel operation.
24
Page 29

VC-412 User’s Manual
4.3 SNMP Access Table/SNMP Trap Receive Control Table
Choosing option 2 in the Main menu (SNMP Access Table/SNMP Trap Receive Control
Table) enables the administrator to set Community and SNMP Access properties.
25
Page 30

VC-412 User’s Manual
4.4 VDSL Unit Control
To monitor and issue commands to the VC-412:
Select option 3 - VDSL Unit Control from the Main menu.
4.4.1 Pass-Through ICD Command to Unit
Option 1 will be discussed in “Using the ICD Command Interface” section. In the section,
you will learn how to access the command line interface (ICD command interface) of the
VC-412, and how to issue commands to the VC-412 via this interface.
4.4.2 Set Each VDSL Port Name of Unit
This option enables users to name or rename ports therefore offering a better port
monitoring organization. When asking for unit number, please input “0” and press Enter.
26
Page 31

VC-412 User’s Manual
4.4.3 Display All Ports Status of Unit
This option displays the statuses of all twelve VDSL ports. The three counter columns to
the right of the status indicators report the amount of packets have received, sent, and
collided. Using these statistics you will be able to monitor your network status easily and
quickly, allowing you to alleviate network build-up before problems occur.
27
Page 32

VC-412 User’s Manual
The E/S/A/Er Column represents the current operating status of the ports.
E- Enabled
S- Sync
A- Activity
Er- Error
4.4.4 Display All Trunks Status of Unit
This option will display the statuses of all four trunk ports. The three counter columns to
the right of the status indicators report the amount of packets have received, sent, and
collided. Using these statistics you will be able to monitor your network status easily and
quickly, allowing you to alleviate network build-up before problems occur.
The E/L/A/C Column represents the current operating status of the ports.
E- Enabled
L- Link
A- Activity
C- Collision
Note: 0 indicates off, 1 indicates on
28
Page 33

VC-412 User’s Manual
Note: Packet throughput is polled every 6 seconds.
4.5 Reset To Default
At the Main menu, you have the options to reset the VC-412 to its factory default settings.
The Reset option will reset ALL settings back to factory default; IP Addresses, Gateway
Address, Subnet Address, Auto Refresh Time, and any other commands issued to the
VC-412 will be lost by the reset. Use this option only when there is a malfunction of the
unit that prohibits it from functioning correctly after a reboot or power cycling.
4.6 Reboot System
The Reboot System command is used to reboot the OS but does not reset or change any
settings of the VC-412 and its firmware. On some occasions you will have to reboot the
firmware. The
to refresh the
VC-412
may function improperly after major changes, use the reboot function
VC-412
with the new settings.
29
Page 34

VC-412 User’s Manual
4.7 Logout
After finished issuing commands to the
interface. Logging out will ultimately end the session and require to re-enter password to
re-login.
Note: Make sure to save all changes before logging out.
VC-412
, it is recommended that you log out of the
30
Page 35

VC-412 User’s Manual
5. ICD COMMANDS FOR TELNET AND CONSOLE
NOTE: DO NOT ATTEMPT TO ISSUE COMMANDS TO THE SWITCH VIA THE ICD
COMMAND LINE INTERFACE UNLESS YOU HAVE READ THIS SECTION.
This section will discuss accessing the command line interface within the switch, and the
commands available in this mode. It is recommended that you read this section before
proceeding into the command line interface.
5.1 Enter ICD command line interface
From the Main Menu, Select option 3 for VDSL unit control
Now select Option 1 to issue ICD Commands. On “Enter Unit Number:” prompt, press
“0” and “Enter” button to enter ICD command prompt.
31
Page 36

VC-412 User’s Manual
The above line indicates “U00-ICD>”. The unit is now ready to be administered through
ICD commands.
5.2 ICD command Index Table
Please find the following table for available commands.
ICD Console Command & Description Index Table
Command Description
System Command
? Display command list
U Display unit information
S Save data to EEPROM
This command will save:
VDSL and Trunk port settings.
Speed mode: auto or preset modes only
RS Reboot system
RSW Restore factory defaults and reset the switch and ports.
This command will reset all VDSL ports settings
to the following default:
VLAN ON
32
Page 37

VC-412 User’s Manual
VDSL port Enable
Speed Mode = Auto Speed
X To exit ICD command pro mpt
VLAN Command
V Show the current VLAN settings
VO
Set VLAN to ON
*1
VF Set VLAN to OFF
VG <group>-<port>, ..., <port> Select the <port(s)> to belong to <group>
The available VLAN group number is from 1 to 16. Issue this
VG command will automatically switch the VLAN mode to
USER DEFINED.
Example: “VG 2-1,2,3,B” will create VLAN group 2 with
member ports:1,2,3 and B.
VG <group> Empty VLAN Ports group
VDSL Command
LT <port>-<speed> Set VDSL <port> to <speed> on local(LT) end
There are six speed levels to select from when
setting VDSL port speed. A, B, C, D is for
VC-101S firmware version R4.5. P is for
firmware version R2 and Q is for firmware
version R4.
A: Downstream 4 Mbps/Upstream 1 Mbps (R4.5)
B: Downstream 5 Mbps/Upstream 5 Mbps (R4.5)
C: Downstream 11 Mbps/Upstream 11 Mbps (R4.5)
D: Downstream 15 Mbps/Upstream 17 Mbps (R4.5)
P: Downstream 11 Mbps/Upstream 11 Mbps (R2)
Q: Downstream 15 Mbps/Upstream 17 Mbps (R4)
Example: “LT 2-B” will configure local port 2’s speed to
symmetric 5Mbps
RT <port>-<speed> Set VDSL <port> to <speed> on remote(RT) end
LR <port>-<speed> Set VDSL <port> to preset <speed>.
Please then issue S command if you want to save this
settings.
LR <port>- Set VDSL <port> to auto-speed
SR <port> Save data on remote side of VDSL <port>
Port Command
PC Show all counters for all ports
PC <port> Show all counters for <port>
C Clear all counters for all ports
C <port> Clear all counters for <port>
33
Page 38

VC-412 User’s Manual
P Show the status of all ports. Legend:
RS Err = Reed Solomon Error
AUT = Auto
PRE = Preset
MAN = Manual
P/A = Preset/Actual
* = Don't Care
PE <port> enable <port>
PD <port> Disable <port>
Note:
There are three VLAN modes: ON, OFF and USER DEFINED. When the VLAN mode is
OFF, all VDSL and Ethernet ports can communicate each other. When VLAN
mode is ON, the switch will automatically create the following 13 VLANs. All
VDSL ports cannot communicate each other and can only connect to port A and D.
When VLAN mode is USER DEFINED, you can use VG command to create your
own VLAN settings.
VLAN settings when VLAN is ON:
Group 01 - 1,A,D
Group 02 - 2,A,D
Group 03 - 3,A,D
Group 04 - 4,A,D
Group 05 - 5,A,D
Group 06 - 6,A,D
Group 07 - 7,A,D
Group 08 - 8,A,D
Group 09 - 9,A,D
Group 10 - 10,A,D
Group 11 - 11,A,D
Group 12 - 12,A,D
Group 13 - A,B,C,D
5.3 Setting VLAN Functionality
The VLAN function offers security and flexibility of controlling each port’s access to one
another. This feature is useful in MDU and hotel situations where you would not want
each computer to be able to “see” all other computers connected to the VC-412. However,
in some situation you may need to have a few ports with the capability of communicating
with one another. Such situations may arise for sharing files, collaboration software,
faster multi-player gaming, etc.
Activating the VLAN function allows each port to be individualized, and
34
Page 39

VC-412 User’s Manual
non-communicative to the other ports on the VC-412 in regards to local traffic.
Deactivating VLAN allows the switch to act as a normal Ethernet VC-412, by passing
along multicast and broadcast traffic to each port. Disabling this feature would be useful
when installing the VC-412 in office settings and for file/print sharing.
Within the ICD command interface or web interface, you can turn the VLAN function on or
off. In ICD simply type “VO” to activate the VLAN function, and “VF” to deactivate the
VLAN function.
Note that when VLAN is on, group 1 to 12 is categorized by one VDSL port and two
Ethernet ports (port-A and port-D). Hence, Ethernet port-B and port-C will not grant any
bandwidth to VDSL ports. Therefore, trunking can be only done via port-A and port-D.
Turning VLAN off will enable all four Ethernet ports accessibl e to all VDSL ports, however,
it sometimes causes the switch to halt since the Ethernet port-B and port-C are designed
for different purposes.
VC-412 also allows VLAN Grouping, which enables user to define ports to communicate
with each other, while remaining isolated from the other ports (outside the defined range)
traffic. The VC-412 supports up to 16 different groupings, and can only be set within the
ICD Command Interface. The ICD Command for VLAN Grouping is VG.
The command line format is as follow:
[VG] [Group]-[port1,…,portN]
Syntax Description
[VG]
[Group] Group number, from 01 to 16.
[-] Command string
[port1,…,portN]
Command string.
List of ports to be included in the group
separated by commas, the VDSL ports are
numbered with 01 to 12 and Ethernet ports are
ordered from A to D.
Important: Same ports can exist in different groups, however each invocation of the VG
for the same group will overwrite the previously saved list for that group.
Examples:
To group VDSL port-1, port-2, and Ethernet port-A together you will need to issue the
following commands:
35
Page 40

VC-412 User’s Manual
VG 1-1,2,A
Add port-4, port-8 and port-D to group 1 from previous example
VG 1-1,2,4,8,A,D
Delete port-2 and port-8, port-A of group 1 from previous example
VG 1-1,4,D
Empty group 1
VG 1-
Add port-1, port-3, port-6, port-10, port-B, port-C, port-D to group 5
VG 5-1,3,6,10,B,C,D
You can verify the VLAN groups through the “V” command.
5.4 VDSL Command
For VDSL local and remote connections to establish, local switch and remote modem
must adjust to a corresponding rate. However if the distance between VC-412 and the
remote VDSL modem is too far then connection may not establish with high stream rates.
Therefore the VC-412 VDSL Managerial Switch and the VDSL remote modem are factory
set to the lowest stream rate; 4 Mbps downstream and 1 Mbps upstream. Once
connection between the VC-412 and the remote modem is established the switch will try
to adjust the stream rate to the next higher speed mode. If the next new stream rate failed
then it will go back to speed level-A (LWD mode) and progressively adjust to the last
highest effective rate. It will take approximately 10 seconds for the VC-412 to recalibrate
to LWD mode. This is called auto-speed.
In some situations higher stream rate is reachable but line quality might be poor due to
environmental factors or/and bad line conditions. In such circumstances, administrators
will want to define the maximum steam rate to a more stable rate. For example, if you
want to define the maximum speed on port-5 to speed level-B (5 Mbps symmetric) then
you can issue LR 5-B in the ICD command interface. Doing so will preset port-5
maximum speed to level-B therefore it will establish connection from speed level-A and if
succeeded, it will progress to level-B and stays at that point if it is reachable.
You can also manually set the port speed for testing purposes. To experiment, you must
first manually set the remote modem to a desired speed and then set the speed on the
36
Page 41

VC-412 User’s Manual
connected port of the VC-412 to the same speed. The reason you need to set the speed
on the remote modem first is when you adjusts the speed on the remote modem,
connection with end since speeds on both sides will be different. After setting the VC-412
port to the same speed as the remote modem, connection will re-establish if it is within
the distance limitation. For example if you want to test the quality of transmission with the
stream rate speed at speed level-B (5 Mbps symmetric). You will enter the following
commands in the ICD command interface.
RT 10-B
Connection will end
LT 10-B
Connection will re-establish if within the range.
If connection does not establish with new speed level, reset the switch and wait
approximately 47 seconds for the switch and the remote modem to recalibrate.
5.5 Port Command
The “P” command displays all the VDSL ports status including its speed and speed mode.
AUT represents Auto-speed mode, PRE represents preset speed and MAN represents
manual set speed. At the speed column you will see a representation of preset speed and
the current speed of each port. The numerator is preset speed (“*” means not applicable)
and the denominator is current speed. Please refer to the ICD Command Index table for
reference.
37
Page 42

VC-412 User’s Manual
The “PC” command displays all ports Transmit, Receive and Collision statuses.
38
Page 43

VC-412 User’s Manual
APPENDIX A – VC-412 FACTORY DEFAULT
Virtual LAN – On
Ethernet Speed – 100 Full/Half Duplex
VDSL Port Line Rate –
Downstream at 4 Mbps
Upstream at 1 Mbps
IP Address – 192.168.1.1
39
Page 44

VC-412 User’s Manual
APPENDIX B – UPDATE VC-101S FIRMWARE TO
R4.5 REMOTELY THROUGH VC-412
The purpose of this appendix is to upgrade older versions of VC-101 (R2 or R4) into the
newest version (R4.5) remotely through VC-412. The new version will contain
auto-speed function which can seek the maximum transmission speed automatically.
The default speed of version R4.5 VC-412 Mbps downstream/1 Mbps upstream but the
default speed of version R2 is 11 Mbps symmetric and default speed of version R4 is 15
Mbps downsteam/17 Mbps upstream. Therefore you will need to adjust both VC-412 and
VC-101S to a complementary speed in order to establish link. You can perform these
procedures remotely via VC-412 console or telnet.
1. Login to the VC-412 via console or telnet.
2. Access to the ICD Command interface.
3. Adjust the speed on VC-412 to the remote modem’s speed with the following
command:
LT <port>-<speed of remote modem>
For example if port-2 is connected to a version R4 VC-101S the command would be:
LT 2-Q
If it is connected to a version R2 VC-101S then use the command would be:
LT 2-P
Note: Connection will establish after issue above command. Please note this setting
40
Page 45

VC-412 User’s Manual
can not be saved. Thus, you have to continue the following command to update
the VC-101S firmware.
Refer to the table below for speed versions
Speed VC-101S Version
P R2 (12.5/12.5)
Q R4 (18/16)
A LWD (4/1)
4. Now set the remote modem’s speed to A which is the LWD mode.
Command Description: RT <port>-<LWD speed mode>
Command: RT 2-A
Important: Setting the remote modem’s speed first is very important since connection
will end once the remote modem’s speed differs from the local switch.
5. Now set the speed of VC-412 back to LWD mode.
Command Description: LT<port>-<LWD speed mode>
Command: LT 2-A
Note: Connection will re-establish.
6. Save remote modem’s setting so it will not be lost upon power cycling.
Command Description: SR <port>
Command: SR 2
7. Adjust the VC-412 back to auto-speed mode.
Command Description: LR <port>Command: LR 2-
The figure below illustrates the commands to upgrade a version R4 VC-101S remotely
via VC-412 ICD command.
41
Page 46

VC-412 User’s Manual
For more detailed ICD command description please refer to the Chapter 5.
42
 Loading...