

Page 1

ADSL 2/2+ VoIP Router
IAD-300
Quick Installation Guide
Page 2

Table of Contents
Package Contents ............................................................................................ 3
Physical Details ................................................................................................ 4
Front-mounted LEDs ................................................................................... 4
Front Panel LED denition ........................................................................... 4
Rear Panel ................................................................................................ 5
Rear Panel Port and Button Denition ........................................................... 5
Installation Procedure ....................................................................................... 6
Conguration ................................................................................................
Preparation ................................................................................................ 7
Using your Web Browser ............................................................................. 7
Setup Wizard ............................................................................................. 8
Home Screen ............................................................................................11
Further information .........................................................................................12
7
Page 3

Package Contents
The following items should be included:
IAD-300 Unit x 1
ó
Power Adapter x 1
ó
Quick Installation Guide x 1
ó
User’s Manual CD x 1
ó
RJ-11 cable x 2
ó
RJ-45 cable x 1
ó
Splitter x 1
ó
USB Cable x 1
ó
If any of the above items are damaged or missing, please contact your dealer
immediately.
3
Page 4
4
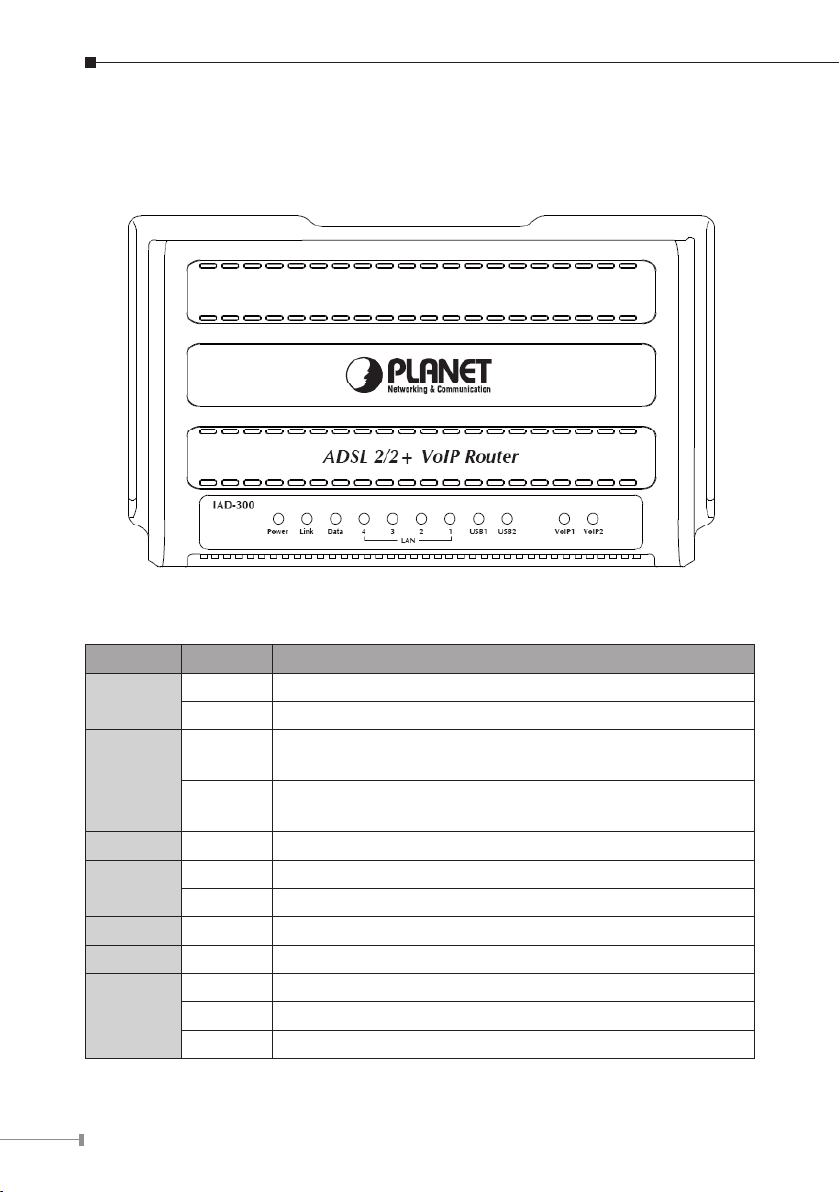
Physical Details
Front-mounted LEDs
Front Panel LED denition
LED State Description
Power
Link
Data Flashing Data is transferred between Router and Internet.
LAN 1-4
USB1 ON The USB Storage device connects to USB1
USB2 ON The USB Printer connects to USB2
VoIP 1/2
ON When the router is powered on and in ready state
OFF When the router is powered off
ON
Flashing
ON Link
Flashing TX or RX activity
ON VoIP Phone is registered
Flashing Phone call is off-hook
OFF VoIP Phone is not registered
Successful connection between ADSL modem and
telecom’s network
Modem is trying to establish a connection to telecom’s
network
Page 5

Rear Panel
Rear Panel Port and Button Denition
Connector Description
POWER
Button
Power Power connector with 12V DC 2A
USB1 Connect to USB Storage device to USB1 for FTP application.
USB2
LAN 1-4
Reset
VoIP 1/2 Connect to any analog telephone for VoIP application.
DSL Line
The Power Button is for turn on or turn off the router.
Connect your Printer to USB2, the IAD-300 supports the built-in
Printer Server.
Router is successfully connected to a device through the
corresponding port (1, 2, 3, or 4). If the LED is ashing, the
Router is actively sending or receiving data over that port.
The reset button can restore the default settings of device. To
restore factory defaults, keep the device powered on and push a
paper clip into the hole. Press down the button over 5 seconds
and then release.
The RJ-11 connector allows data communication between the
modem and the ADSL network through a twisted-pair phone wire.
5
Page 6

6
Installation Procedure
Please connect the device to you computer as below diagram:
1. Choose an Installation Site
Select a suitable place on the network to install the IAD-300.
2. Connect LAN Cables
Use standard LAN cables to connect PCs to the Switching Hub ports on the IAD-
300. Both 10Base-T and 100Base-TX connections can be used simultaneously.
3. Connect ADSL Cable
Connect the ADSL cable from the DSL port on the IAD-300 (the RJ-11
connector) to the ADSL terminator provided by your ISP.
4. Power Up
Connect the supplied power adapter to the IAD-300. Use only the power adapter
provided. Using a different one may cause hardware damage.
5. Check the LEDs
• The Power LED should be ON.
• The
Link LED should be ON if ADSL line is connected.
• For each LAN (PC) connection, one of the LAN LEDs should be ON (provided
the PC is also ON.)
Page 7

Conguration
The IAD-300 contains a HTTP server. You can login and congure it by using your
Web Browser.
Preparation
Before attempting to congure the IAD-300, please ensure as below:
Congure your network card’s TCP/IP properties to Obtain an IP address
automatically from VoIP router, or set the computer’s IP with the same network
mask of the router. (For example: Router’s default IP is 192.168.1.1 /
255.255.255.0)
Then you can set computer’s IP to:
192.168.1.x / 255.255.255.0.
The range for x is from 2 to 253
Using your Web Browser
1. Open web browser and type http://192.168.1.1 in the browser’s address box.
This number is the default IP address for this device. Press Enter.
2. An user name and password prompt will appear.The user name is admin and
password is admin.
7
Page 8

8
Setup Wizard
When you rst time congure the IAD-300, you can use the “Quick Setup” to
setup the router as follows, and the router will connect to the Internet via ADSL
line.
Step 1. Click “Quick Start”
the below screen. Enter the VPI / VCI value that provided by your ISP
and enable “Quality of Service”. Click “Next” to next step.
Step 2. Setup your Internet connection type. You can have this information from
your Internet Service Provider.
to get into the quick setup procedures. It will show
Page 9

Step 3. Enter the PPP user name and password that your ISP has provided to
you. Enter a PPPoE Service name and click “Next”.
Step 4. Setup your IGMP and WAN Service, use default setting and click “Next”.
9
Page 10

10
Step 5. Setup your LAN settings, use default setting and click “Next”.
Step 6. Setup complete, click “Save/Reboot” to reboot your device. Please wait
about two minutes for this process.
Page 11

Home Screen
After rebooting, you will see the Device Info screen and you can access to Internet
via IAD-300.
11
Page 12

Further information
The above steps introduce simple installations and congurations for IAD-300. For
further congurations of WAN, VoIP, LAN, NAT, Security, Routing, DNS, and DSL
etc, please refer to the User’s Manual in the CD. If you have other questions,
please contact the local dealer or distributor where you purchased this product.
12
 Loading...