

Page 1

USB 2.0 GDI Print Server
FPS-1011
User Manual
Version: 1.00
Page 2

Trademarks
Copyright © PLANET Technology Corp. 2006.
Contents subject to which revision without prior notice.
PLANET is a registered trademark of PLANET Technology Corp. All other trademarks belong to their
respective owners.
Disclaimer
PLANET Technology does not warrant that the hardware will work properly in all environments and
applications, and makes no warranty and representation, either implied or expressed, with respect to the
quality, performance, merchantability, or fitness for a particular purpose.
PLANET has made every effort to ensure that this User's Manual is accurate; PLANET disclaims liability
for any inaccuracies or omissions that may have occurred.
Information in this User's Manual is subject to change without notice and does not represent a
commitment on the part of PLANET. PLANET assumes no responsibility for any inaccuracies that may
be contained in this User's Manual. PLANET makes no commitment to update or keep current the
information in this User's Manual, and reserves the right to make improvements to this User's Manual
and/or to the products described in this User's Manual, at any time without notice.
If you find information in this manual that is incorrect, misleading, or incomplete, we would appreciate
your comments and suggestions.
FCC Warning
This equipment has been tested and found to comply with the limits for a Class B digital device,
pursuant to Part 15 of the FCC Rules. These limits are designed to provide reasonable protection
against harmful interference when the equipment is operated in a commercial environment. This
equipment generates, uses, and can radiate radio frequency energ y and, if not installed and used in
accordance with the Instruction manual, may cause harmful interference to radio communications.
Operation of this equipment in a residential area is likely to cause harmful interference in which cas e the
user will be required to correct the interference at whose own expense.
CE Mark Warning
This is a Class A product. In a domestic environment, this product may cause radio interference, in
which case the user may be required to take adequate measures.
WEEE Warning
To avoid the potential effects on the environment and human health as a result of
the presence of hazardous substances in electrical and electronic equipment, end
users of electrical and electronic equipment should understand the meaning of the
crossed-out wheeled bin symbol. Do not dispose of WEEE as unsorted municipal
waste and have to collect such WEEE separately.
Revision
User’s Manual for PLANET USB 2.0 GDI Print Server
Model: FPS-1011
Rev: 1.0 (November. 2006)
Part No. EM-FPS1011
Page 3

Contents
1. Introduction...................................................................................1
1.1 Product Introduction......................................................... 1
1.2 Product Package.............................................................. 1
1.3 Printer Server Outlook & LED Indicators..........................2
2. GDI Print Server with Print Server................................................ 3
3. Getting Started .............................................................................4
3.1 Hardware Installation Procedure......................................4
3.2 Software Installation Procedure.......................................4
3.2.1 General Printer......................................................... 10
3.2.2 GDI/Host-based Printer............................................ 13
3.3 Print Server Utilities ....................................................... 19
4. Setup Wizard..............................................................................20
5. Network Port Setup.................................................................... 21
5.1 Add Printer.....................................................................21
6. Server Configuration ..................................................................26
6.1 Introduction.................................................................... 26
6.2 Search for All Available GDI Print Server....................... 26
6.3 Status of GDI Print Server.............................................. 27
6.4 Setup the GDI Print Server ............................................28
6.5 General Configuration....................................................29
6.6 TCP/IP Configuration..................................................... 29
6.7 System Configuration..................................................... 30
7. Web Management......................................................................31
7.1 Introduction.................................................................... 31
7.2 Login.............................................................................. 31
7.3 Device Setup.................................................................. 31
7.3.1 System..................................................................... 31
7.3.2 Printer...................................................................... 32
7.3.3 TCP/IP ..................................................................... 32
7.4 Setup Wizard ................................................................. 33
7.4.1 System..................................................................... 33
7.4.2 TCP/IP ..................................................................... 33
Page 4

7.4.3 Save Settings ........................................................... 34
7.5 System Tools..................................................................34
7.5.1 Load Default ............................................................ 34
7.5.2 Upgrade Firmware from Browser............................. 34
8. LPR Printing...............................................................................35
9. RAW Printing.............................................................................. 41
10. IPP Printing ................................................................................ 47
10.1 Introduction.................................................................... 47
10.2 System Setup................................................................. 47
10.2.1 GDI Print Server Side .............................................. 47
10.2.2 Client Side ............................................................... 47
11. GDI Print Server Installation in UNIX/Linux................................ 51
11.1 GUI Mode....................................................................... 51
11.2 Console Mode................................................................ 54
11.2.1 Enable GDI Print Server’s TCP/IP Support.............. 54
11.2.2 Setup GDI Print Server’s IP Address....................... 54
11.2.3 Verify GDI Print Server’s IP Address........................ 55
11.2.4 Configure Remote LPD Printing on the Host........... 55
12. GDI Print Server Installation in MAC OS.................................... 57
12.1 MAC 10.4.x.................................................................... 57
12.2 MAC 10.3.x.................................................................... 57
13. Troubleshooting..........................................................................61
14. Appendix A Specification............................................................64
15. Appendix B: GDI Print Server Compatibility List......................... 65
Page 5

1. Introduction
1.1 Product Introduction
Thank you for purchasing and use our FPS-1011. The FPS-1011 allows your printer or
GDI/Host-based printer become a sharable device on the network.
GDI printer is a
no need to
GDI
printers are sometimes called host-based printers because th ey rely on the host computer to
rasterize pages. Because of that, almost none of Print Servers in the market can support GDI printer
network sharing. The FPS-1011 implements a special technology which allows it to communicate
with the GDI printer as if it is connected directly to your computer. With the feature, the GDI printer is
easy to become a shared device and you don’t need to worry about the compatibility with the GDI
printers anymore.
The FPS-1011 supports GDI printer in the most popular operating systems: Windows 98SE/Me/2000
SP4 above/XP SP1 above. Not only be a GDI Print Server, it can also act as a traditional Print Server.
This Print Server supports TCP/IP network protocol and LPR, RAW and IPP printing protocols. It is
compatible with a large number of normal printers in the various common network operating systems
including Windows 98SE/Me/NT/2000/XP/2003, UNIX, Linux and MAC OS 9.x above.
The FPS-1011 is the best solution for users to share GDI printer or printer conveniently and easily. It
offers the most flexible and manageable printing for GDI printer or normal printer on your Local Area
Network at an extremely low cost and with an absolute minimal setup and maintenance required.
printer that has built-in support for Windows Graphical Device Interface (GDI), so it is
convert the output from Windows to another format such as PostScript or PCL language.
1.2 Product Package
This package contains the following co mponents:
1 x FPS-1011
1 x Power Adapter
1 x Driver and User Manual CD
1 x Quick Installation Guide
1
Page 6

1.3 Printer Server Outlook & LED Indicators
LED Status Description
LAN On: Indicates LAN port is connected.
Off: Indicates LAN port is not connected.
ACT Blink: Indicates print server is transfer data to printer.
READY Blink: Indicates the print server is during boot up.
Off: Indicates the print server boot up procedure is complete.
2
Page 7

2. GDI Print Server with Print Server
The FPS-1011 supports dual functionalities: GDI Print Server and Print Server at the same time.
Users can choose one of the modes to share general printer or GDI printer through the GDI Print
Server.
GDI Print Server Mode:
GDI printer is a printer that has built-in support for Windows Graphical Device Interface (GDI), so it is
no need to
GDI printer relies on the bi-directional communications between printer and com puter frequently, so
that the majority of print servers cannot support it.
The FPS-1011 can communicate with the GDI printer as if it is connected directly to your computer.
The FPS-1011 supported OS in this mode is Windows 98SE/Me/2000 SP4 above/XP SP1 above.
The GDI Print Server mode doesn’t support Windows 98SE/ME/NT, Linux/UNIX or MAC OS.
Print Server Mode:
The FPS-1011 also supports LPR, IPP and RAW printing protocols, which enable users to share print
function from printer. The supported OS is Windows 98SE/Me/NT/2000/XP/2003, UNIX, Linux and
MAC OS 9.x above.
convert the output from Windows to another format such as PostScript or PCL language.
3
Page 8

3. Getting Started
Before you start, you should have:
One comp uter with Windows 98SE/Me/NT/2000/XP for normal printer installation, if you are
using GDI printer, please make sure your computer with Windows 98SE/Me/2000 SP4 above/XP
SP1 above
One GDI printer or general printer with USB port and an installatio n CD
One Catego ry 5 Ethernet Cable
One USB Ca ble
3.1 Hardware Installation Procedure
1. Unpack the FPS-1011 package and verify that all the items listed in the previous section are
provided.
2. Plug the USB cable to the FPS-1011 with the GDI printer or general printer that you want to
share on the network.
3. Connect the FPS-1011 to your network by attached the network cable to the network port of the
FPS-1011.
4. Connect the power adapter to the FPS-1011. The FPS-1011 will perform the Power-On-Self-Test
(POST) after it is powered on. When the ACT LED is unlighted, the FPS-1011 is ready.
Note:
1. You must use the power adapter shipped along with the FPS-1011, do NOT use any other
power adapter from other sources.
2. To prevent the compatibility problem between FPS-1011 and a few GDI printer or printer, it
is recommended that you power on the FPS-1011 before the GDI printer or general printer.
3.2 Software Installation Procedure
NOTE: You have to uninstall all the Print Server drivers and utilities if you have installed the
previous version
1. Insert Drivers and User’s Manual CD into the CD-ROM drive to initiate the autorun program.
Once completed a menu screen will appear
2. . Click on “Administrator Installation” hyper link to initiate the installation. Or you can click the
“Start” button and choose “Run”. (Suppose “E” is your CD-ROM drive). When the dialog box
appears, enter “E:\Utility\Setup.exe” and press enter key. You will see the dialog box as below.
Please click “Next” to continue.
.
3. The “Print Server Utilities - InstallShield Wizard” is displayed, click "Next"
4
.
Page 9
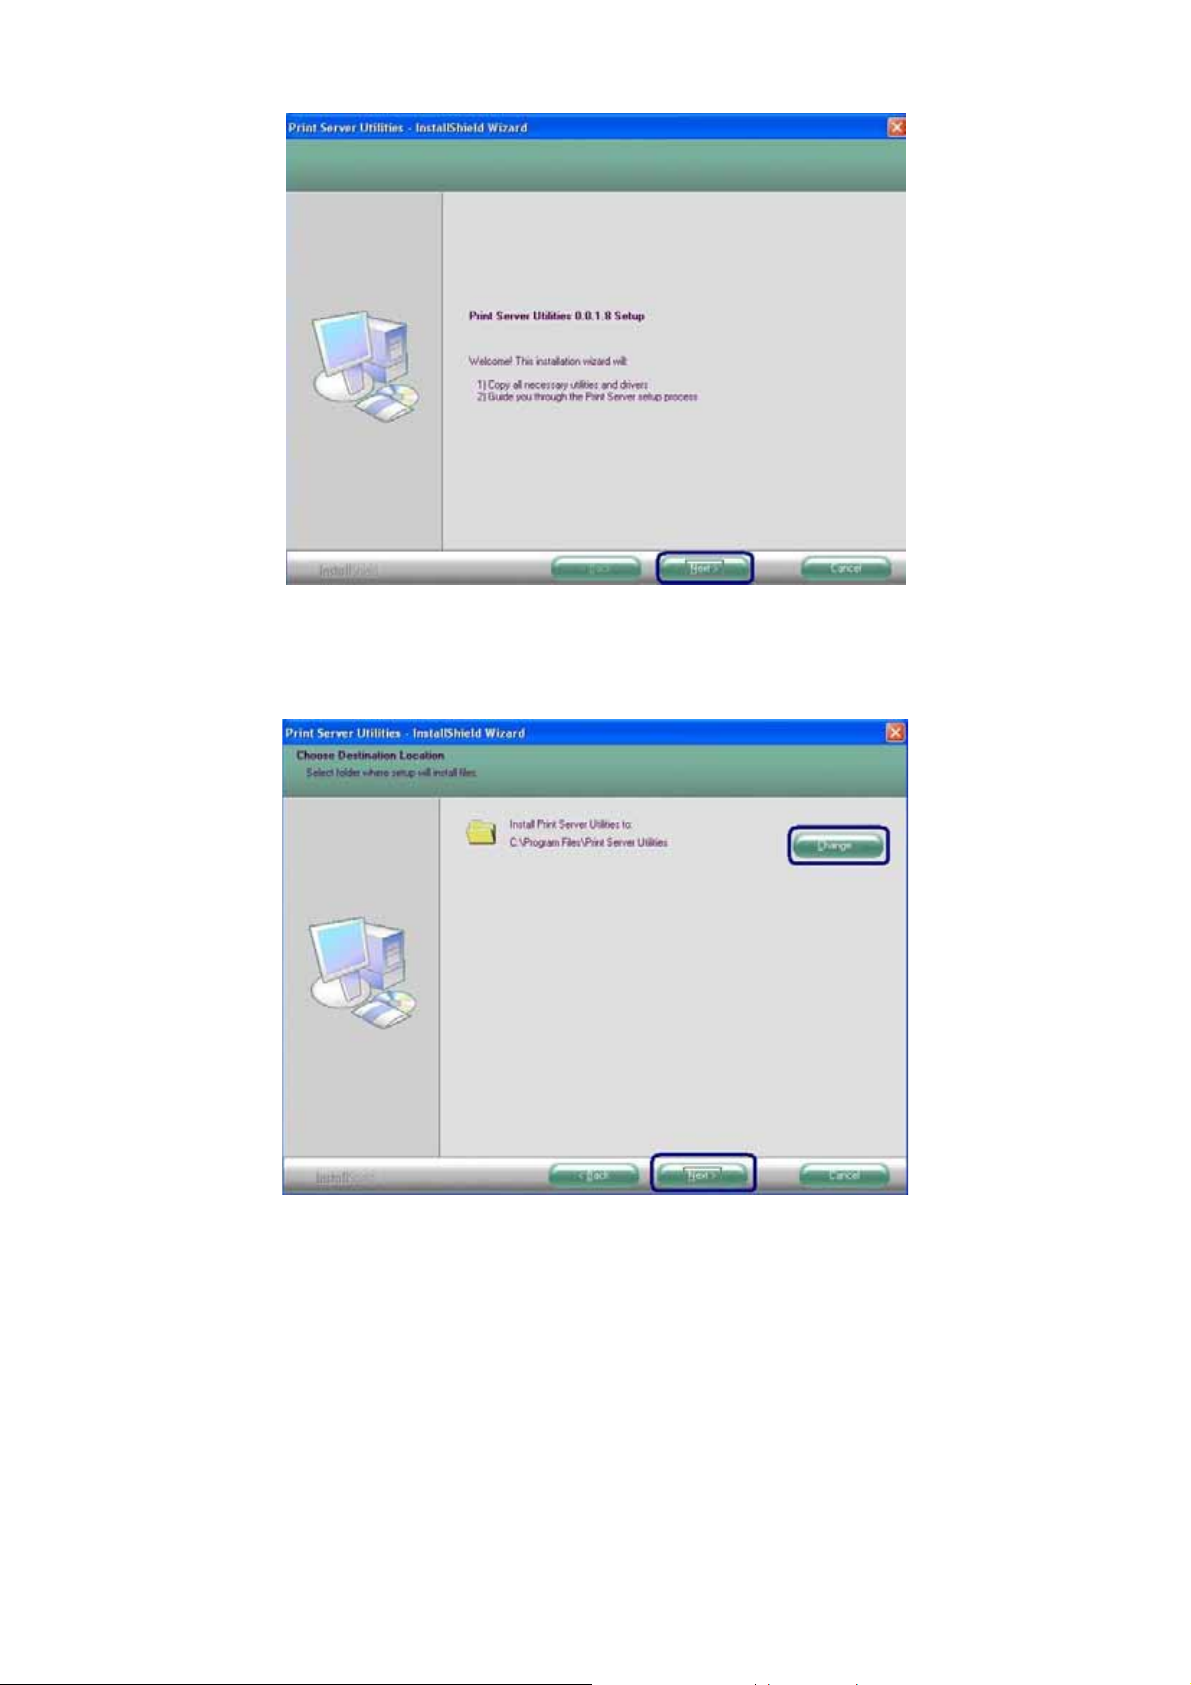
4. Click “Next” to install the Print Server utilities in the default folder or click “Change” to specify the
destination folder where you would like to install the Print Server utilities.
5. The system starts installing the Print Server Utilities.
5
Page 10
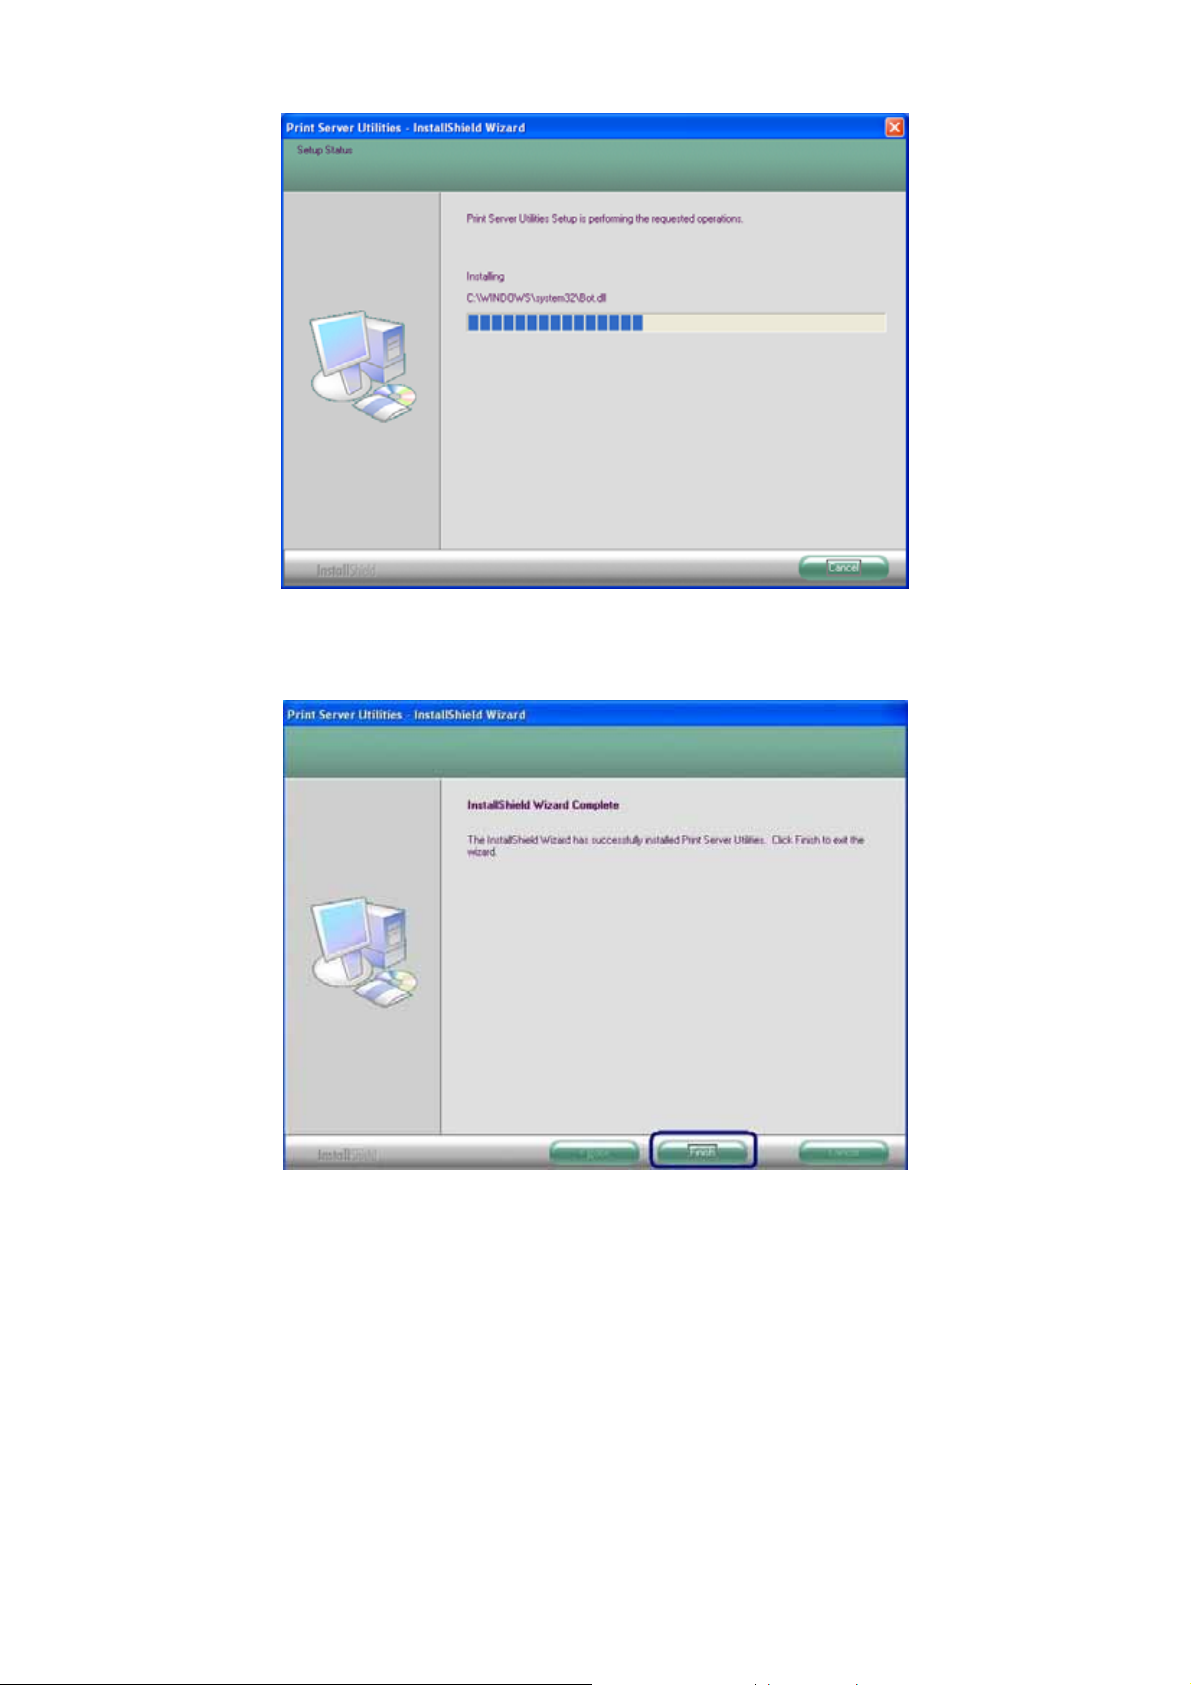
6. The utilities are all installed. Please click “Finish” to go to next step.
7. The Setup Wizard will be executed, it will guide you to configure the print server and install the
printer with the print server to your computer. Please click “Next”
6
.
Page 11
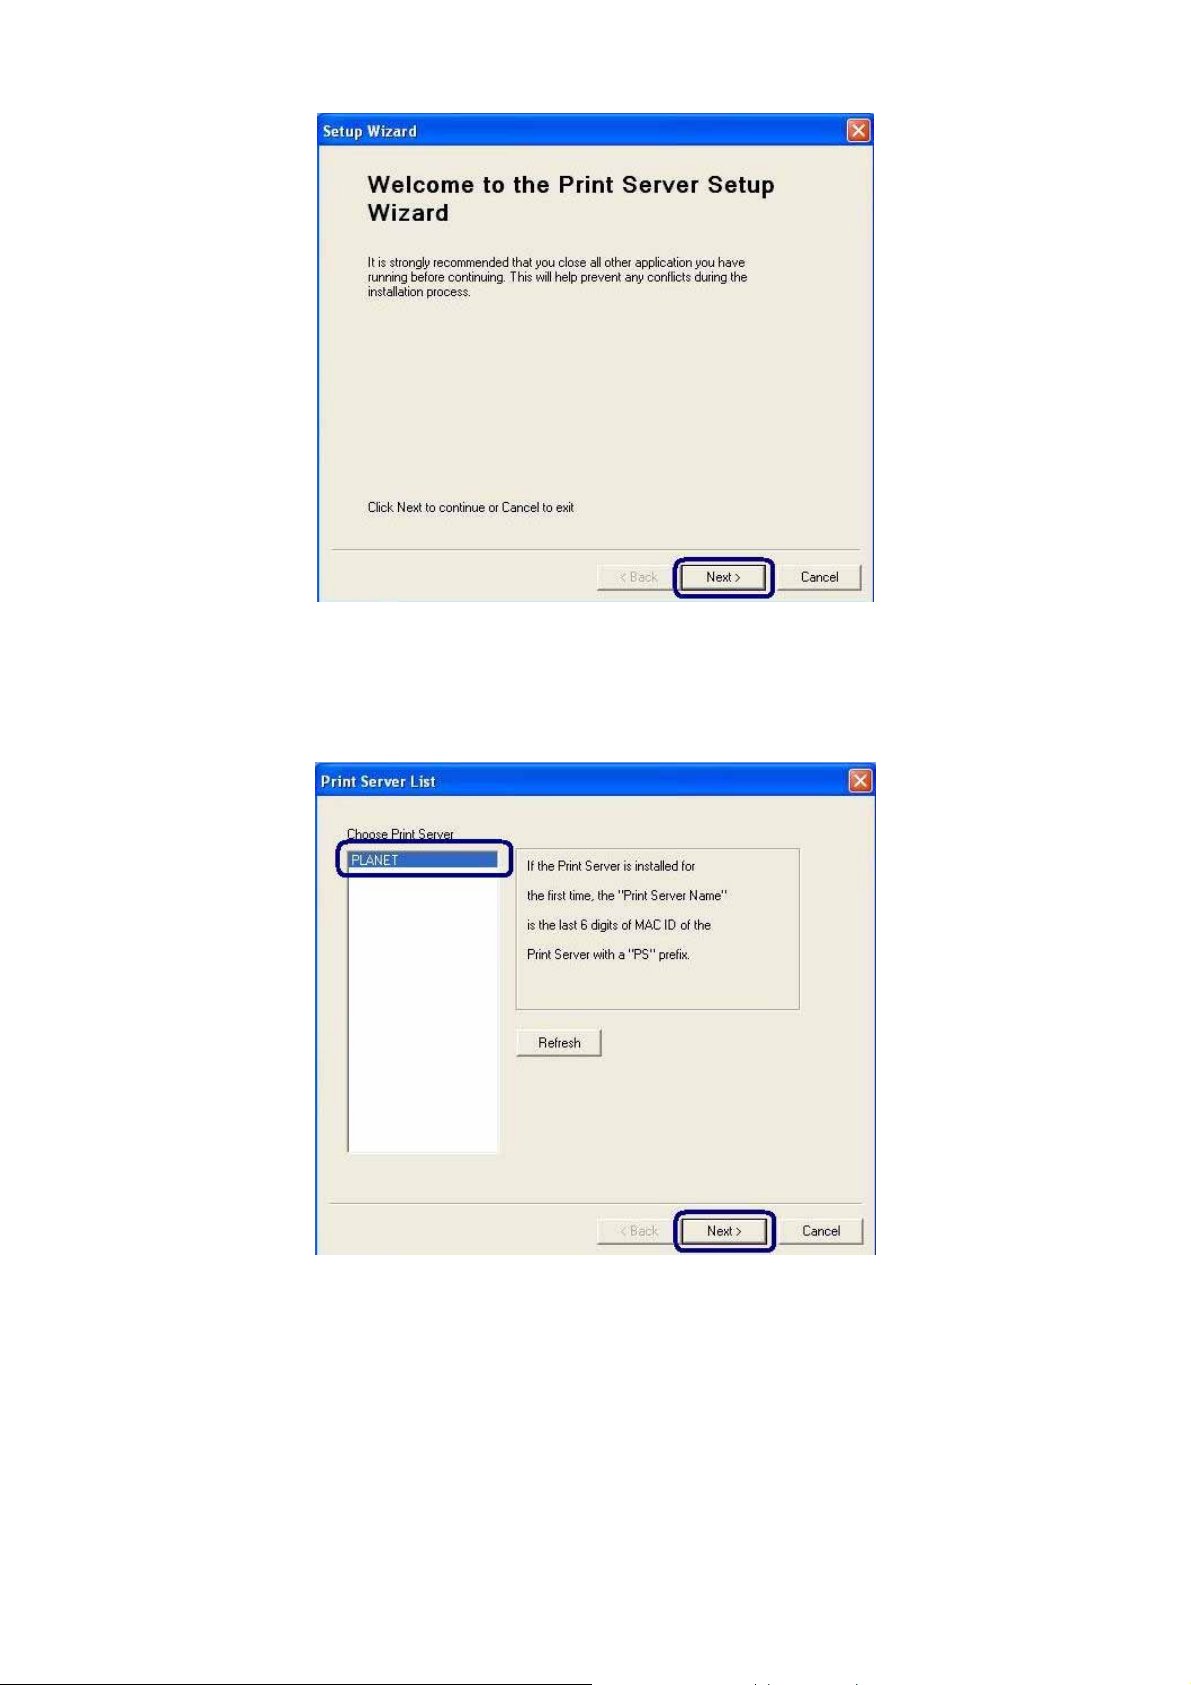
8. The program will search the Print Server within the network. Select the Print Server you would
like to setup and click “Next” to continue.
NOTE: If this is the first time you configure the print server, the “Print Server Name” will
the same as the “Device Name” printed at the bottom of the print server.
9. Please enter the “Password” of the Print Server you have selected to login the Print Server for
more settings. The default “User Name” is “admin”; default “Password” is “admin”
Following is the completed procedures for configuring the Print Server.
7
.
Page 12
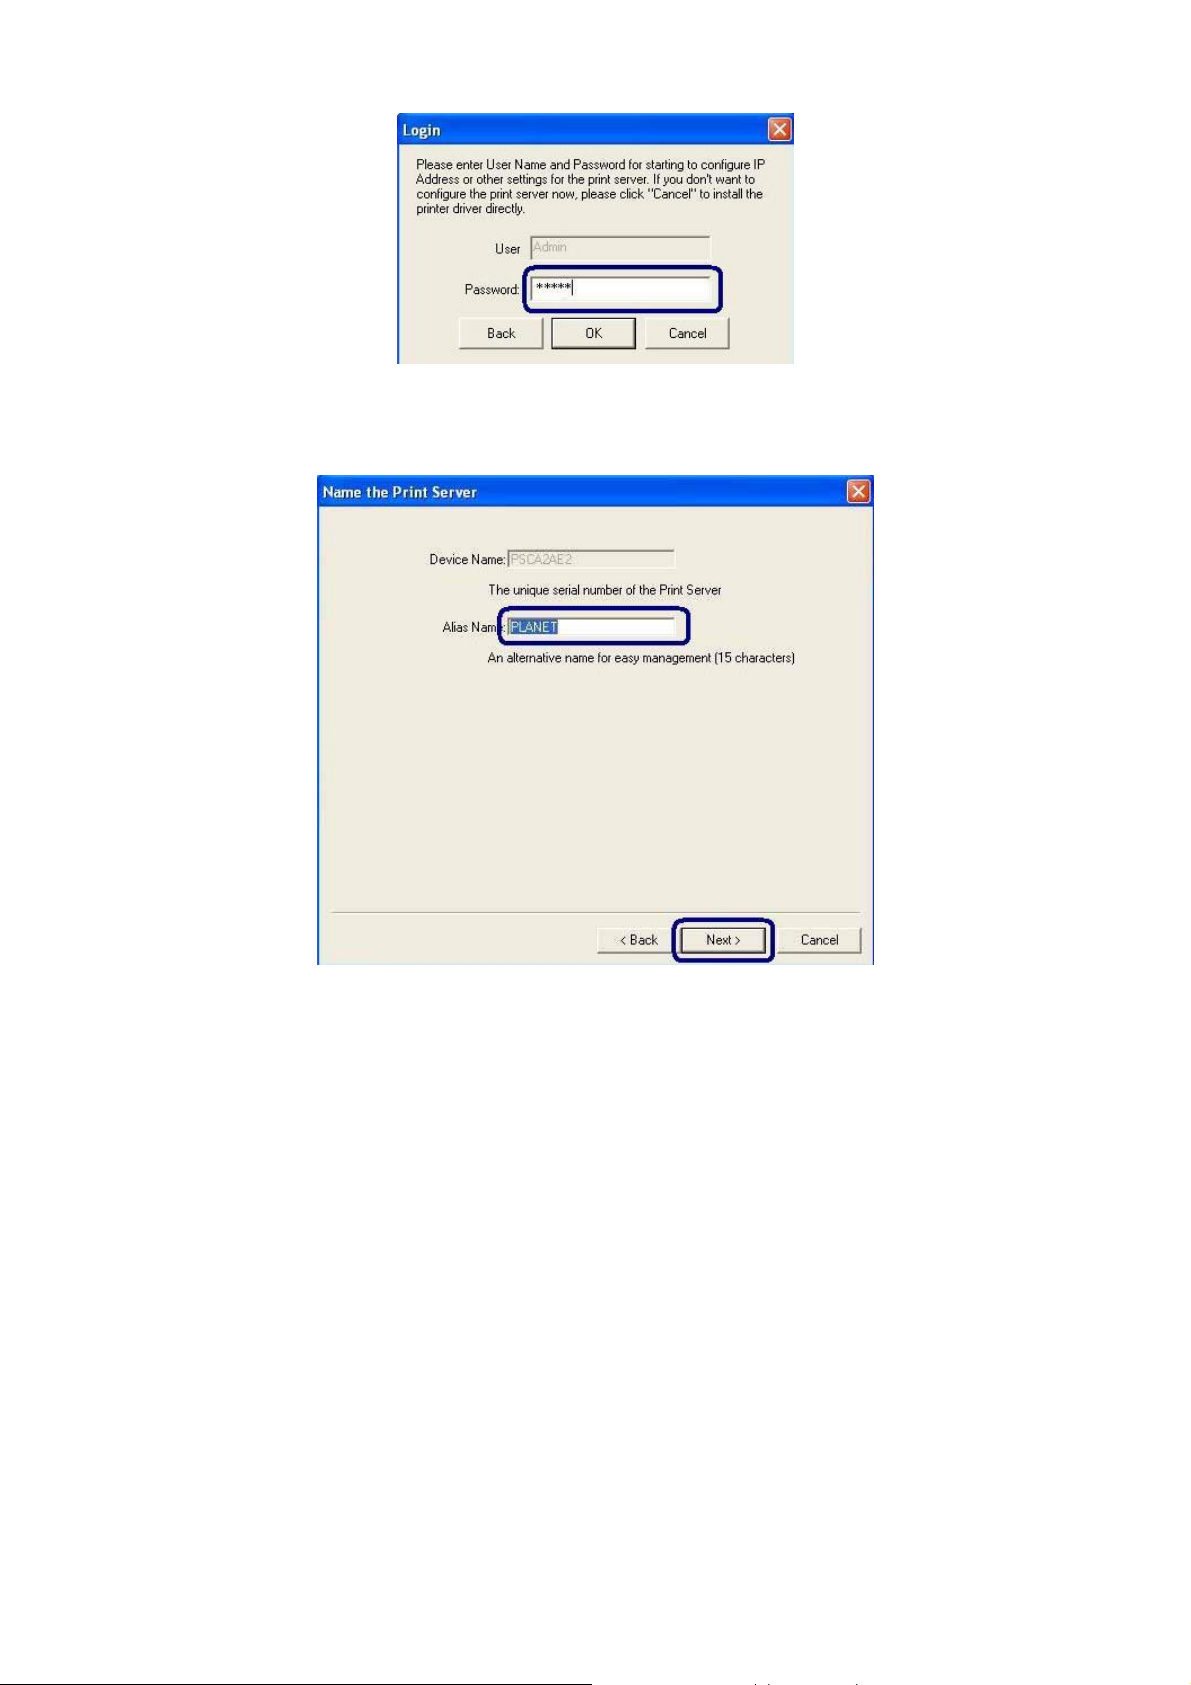
10. Set the “Alias Name” to the Print Server here. Click on “Next”
.
11. Please set the network settings for the Print Server manually. By default, the network settings are
as follow.
IP Address: 192.168.0.1
Subnet Mask: 255.255.255.0
If you have selected “DHCP”, the Print Server will try to determine the network settings
automatically. If a DHCP Server is present within the network, the Print Server will automatically
obtain and configure the network settings assigned by the DHCP Server. The assigned IP
Address will be shown in the IP Address fields. If no DHCP Server is present within the network,
please assign the network settings of the Print Server manually. Please click “Next” once you
have found appropriate network settings for the Print Server
Note: The Print Server IP Address must be set to the same network segment within your
network environment or connected computer. If the network IP address settings are
incorrect, then print server will not be able to communicate throughout the network.
The message will be prompted to remind you after you click “Next”. If you do not want to
set it now, please click “Cancel” to finish the installation. You can then use the “Server
Manager” utility to configure the Print Server IP address.
8
.
Page 13
12. The configurations are finished. Please click “Save” to apply new settings and restart the Print
Server.
13. The “Install Printer Driver” page allows you to install the printer drivers and bind your printer with
the Print Server to your computer. Please click “Install Printer” to start the installation
9
.
Page 14
3.2.1 General Printer
NOTE: Please select your printer type. Please check with your dealer about the printer type
and base on the information to select the correct one. If you are not sure the printer type,
please select “General Printer”. Click “Ok” to continue
Following is the installation procedures for “General Printer” installation.
1. Select the “General Printer” and click “OK”
2. The “Install Printer” page is for you to search for the printer drivers. If you want to manually
designated the file path of the drivers, please put the printer’s installation CD to your CD-ROM
drive and click “Browse” to find the drivers in the CD.
You can also install the drivers the same as your pre-installed printer (The printers in the
“Printers and Faxes” will be displayed in below table)
.
.
10
Page 15

3. Please select the driver files and the printer model you wish to install and then click “Install”.
4. After the drivers are installed completely. Your printer has been found with the Print Server to
your computer. Please click “Print Test Page” to confirm that you can print through the network
successfully.
11
Page 16
5. If you have completed the print job successfully, please click “Yes”.
6. The installed printer will be added to the “Printers & Faxes” in the Windows. If you want to print
documents, please select this printer
.
12
Page 17
3.2.2 GDI/Host-based Printer
Following is the installation procedures for “GDI/Host-based Printer” installation.
1. Select the “GDI/Host-based Printer” and click “OK”
.
2. The program will start installing the Print Server Drivers automatically. You will see several
pop-up screens and some prompt messages in the system tray. When the system stops
prompting, the drivers are all installed. Please wait for a moment
.
3. When the Print Server Drivers are all installed, the following screen is displayed. Before you click
“Connect”, please put your GDI printer’s installation CD to your CD-ROM drive and read the
manual of the GDI printer carefully.
Some GDI printers require users to install the drivers/utilities before connecting the GDI printer to
your computer. Some GDI printers require connecting the GDI printer to your computer during
the installation. Please refer to the below illustration which is the screen displayed during the
installation.
To connect the GDI printer to your computer through the Print Server just like you have directly
connected the GDI printer to your computer through the USB cable, you can click “Connect”
.
13
Page 18
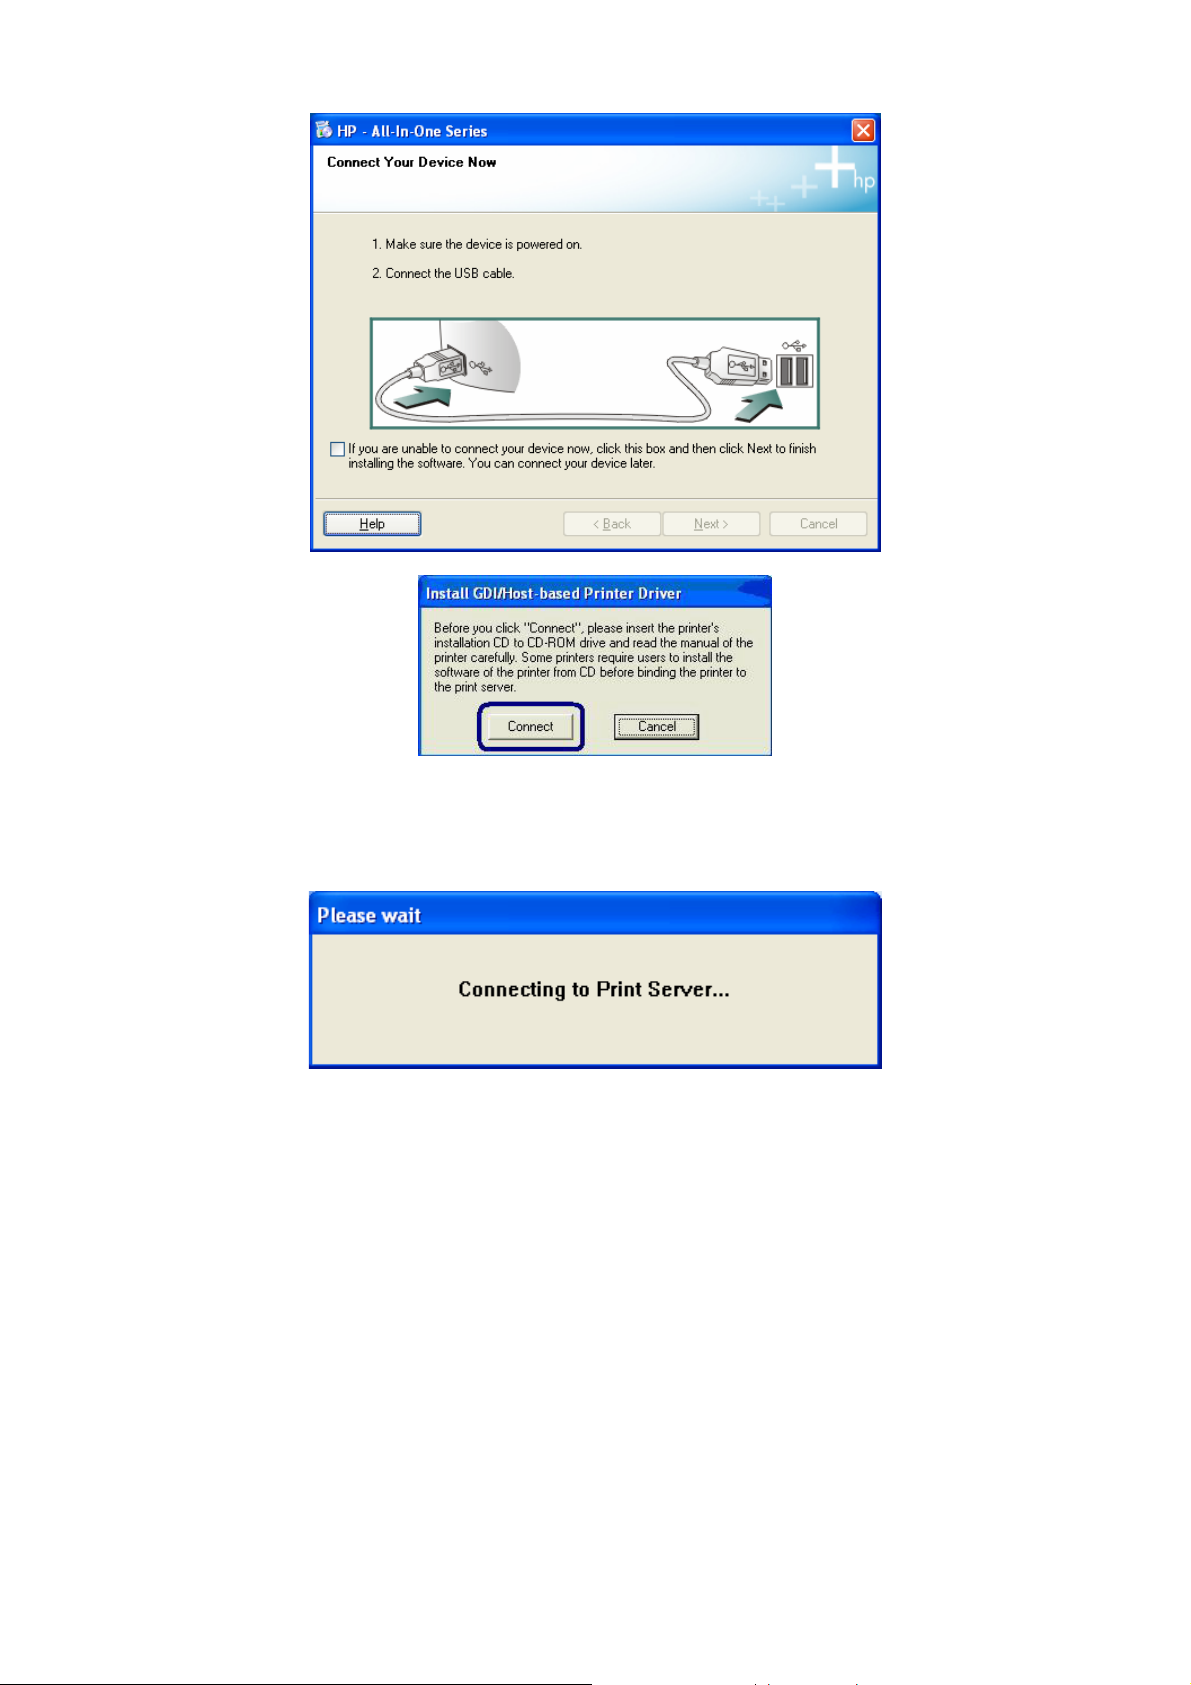
4. The system starts to connect the printer that connected on print server and automatically search
and install the GDI printer’s driver
.
5. You will see some prompt messages in the system tray. If there is driver needed you to manually
install. In the “Found New Hardware Wizard”, please select “No, not this time” and click “Next” to
continue
.
14
Page 19

6. Select “Install the software automatically (Recommended)” and click “Next”
.
7. Select the correct driver and click “Next”
.
15
Page 20
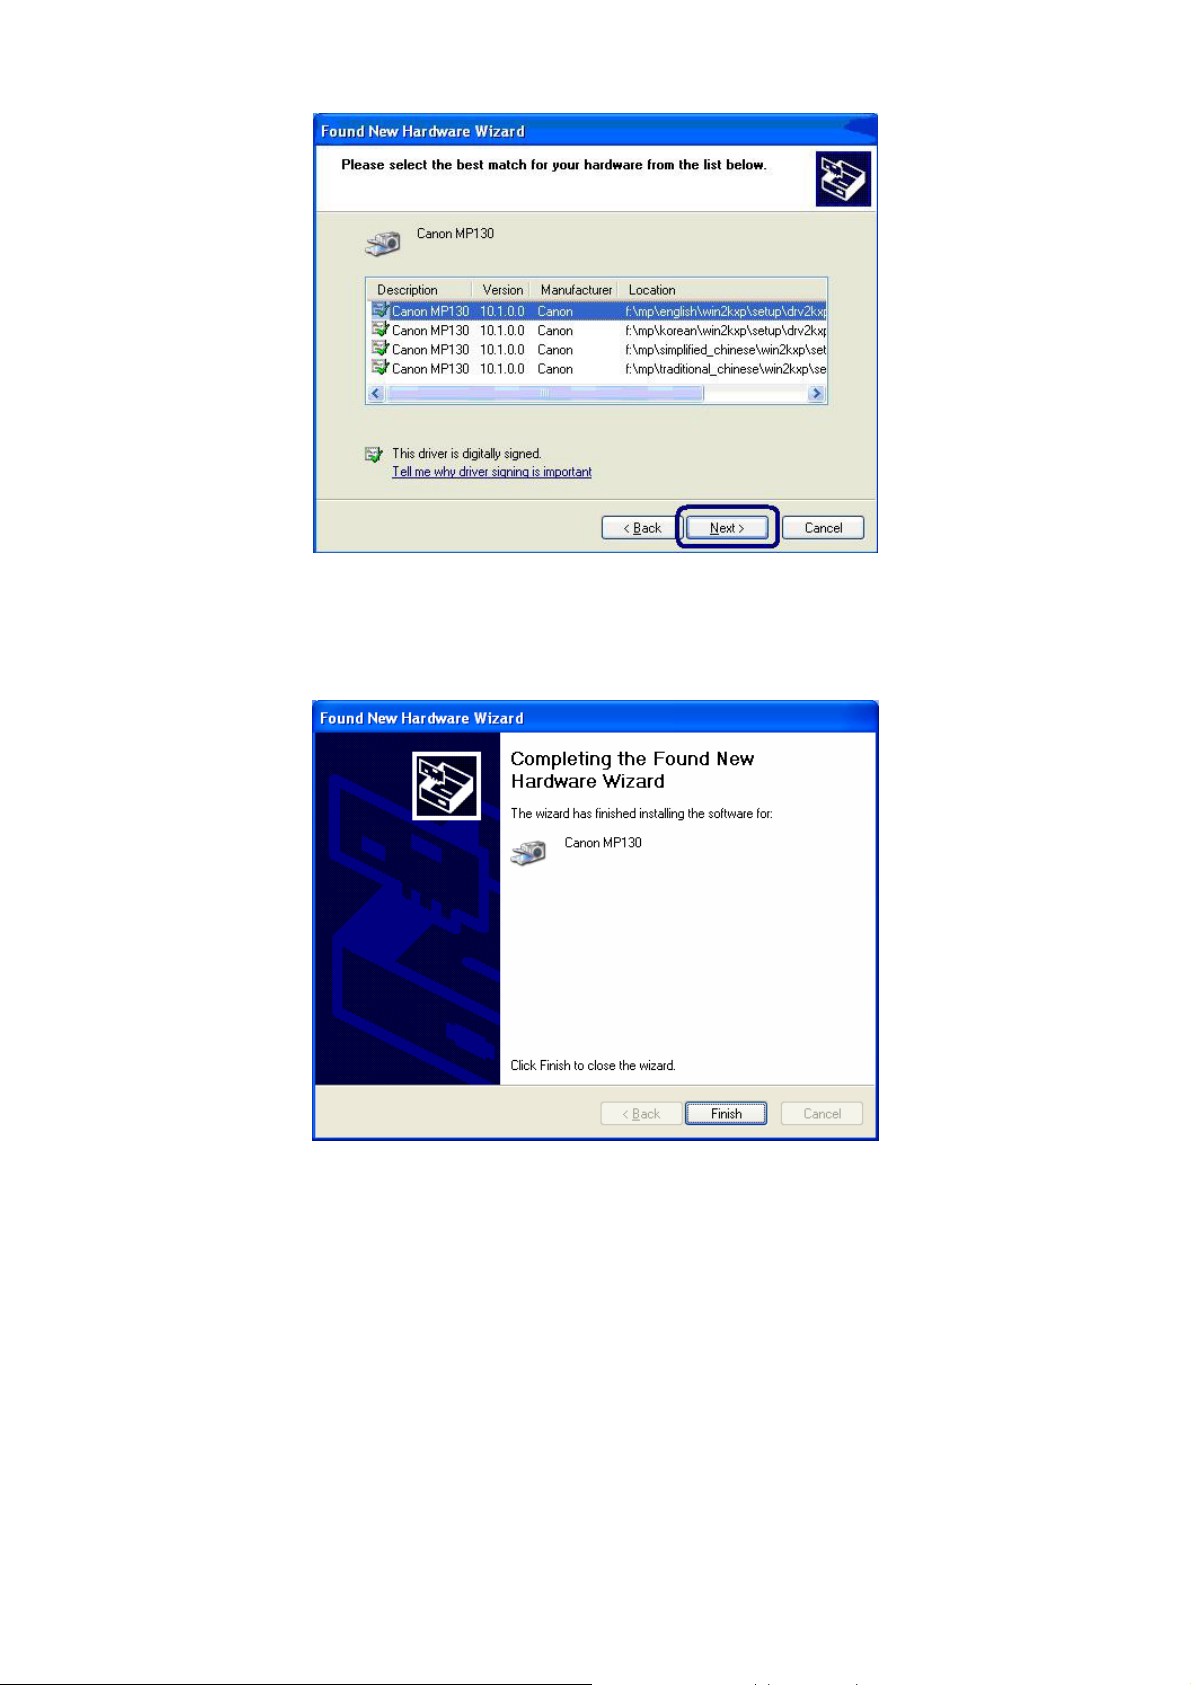
8. After the driver is installed, click “Finish”.
9. After the driver installed completely (no more prompt message). Your GDI printer has been found
with the Print Server to your computer. Please click “Print Test Page” to confirm that you can print
through the network successfully
.
16
Page 21
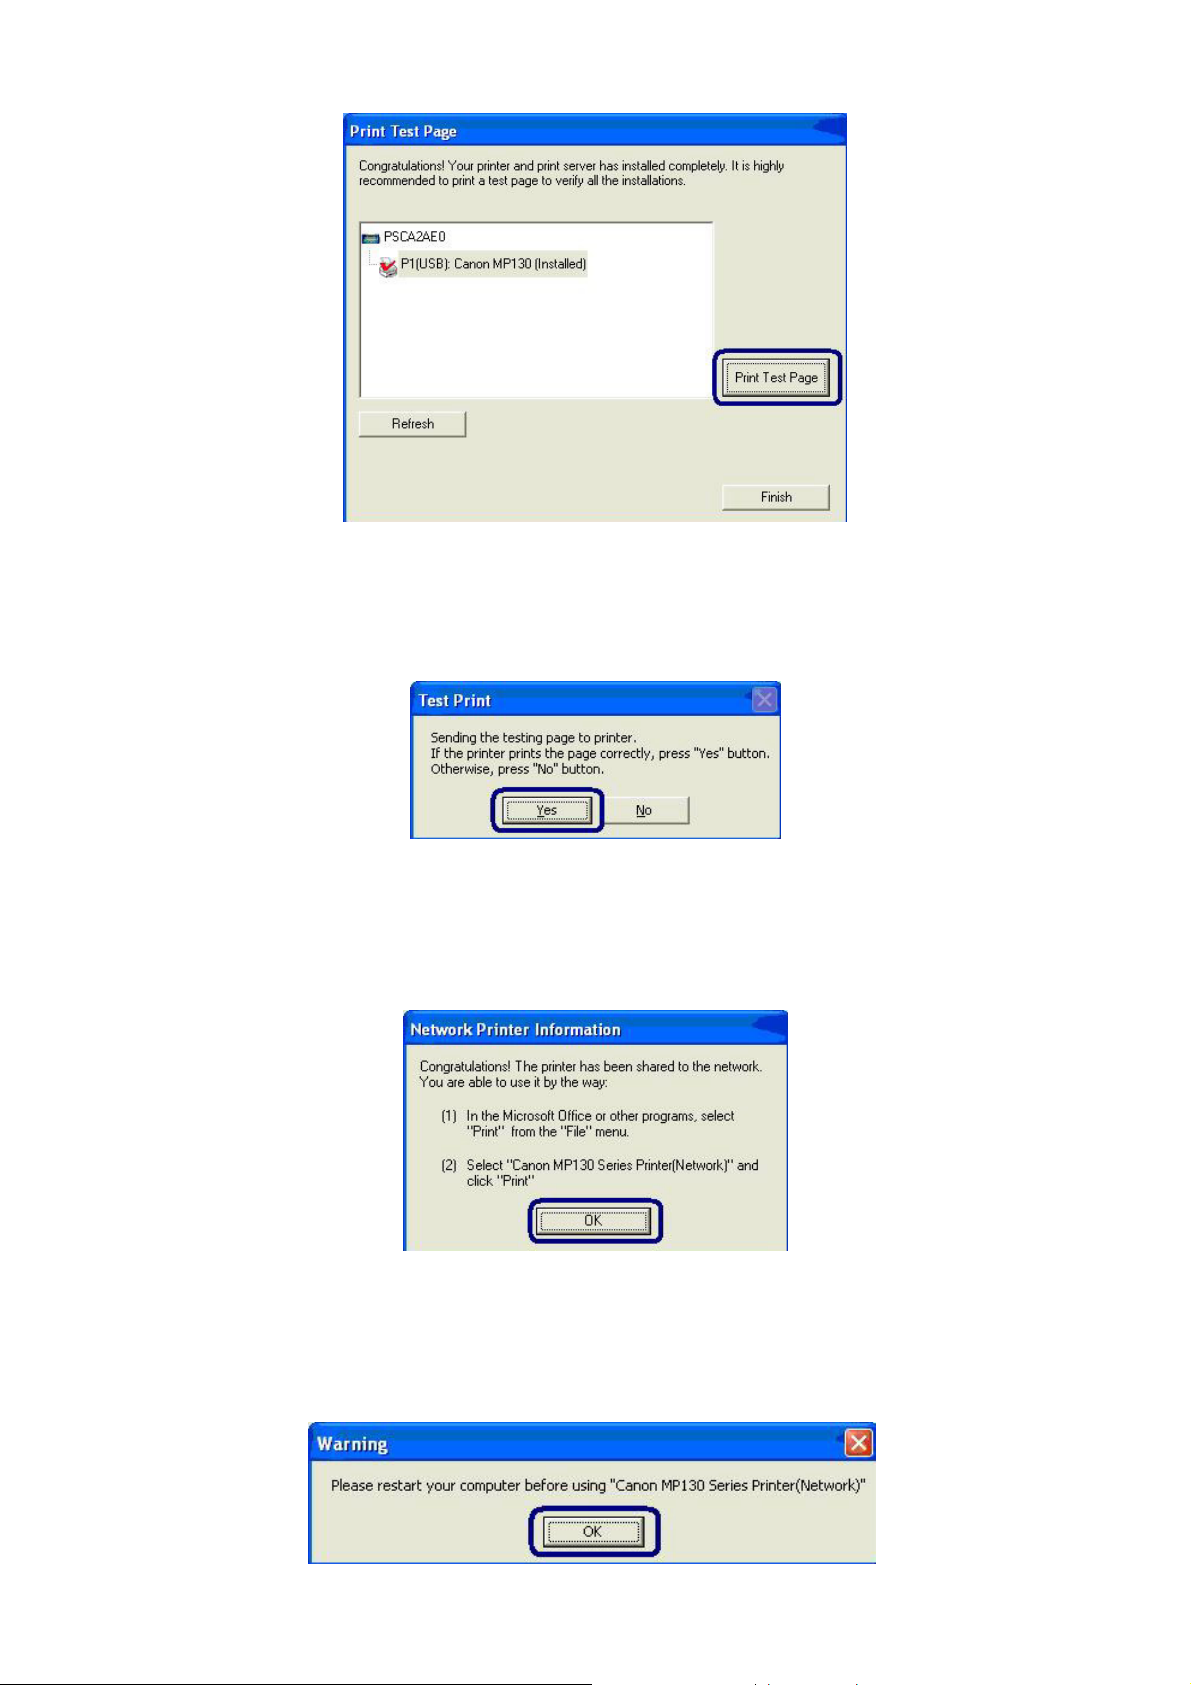
10. If you have completed the print job successfully, please click “Yes”. Or click “No” to try to install
again
.
11. Congratulations, the printer is installed successfully. The installed printer will be added to the
“Printers & Faxes” in the Windows. If you want to print documents, please select “Printer Model
Name(Network)”
.
12. The following message will alert you to restart your computer before you start using the network
printer. Click “OK” and restart your computer then all installations are completed.
]
17
Page 22
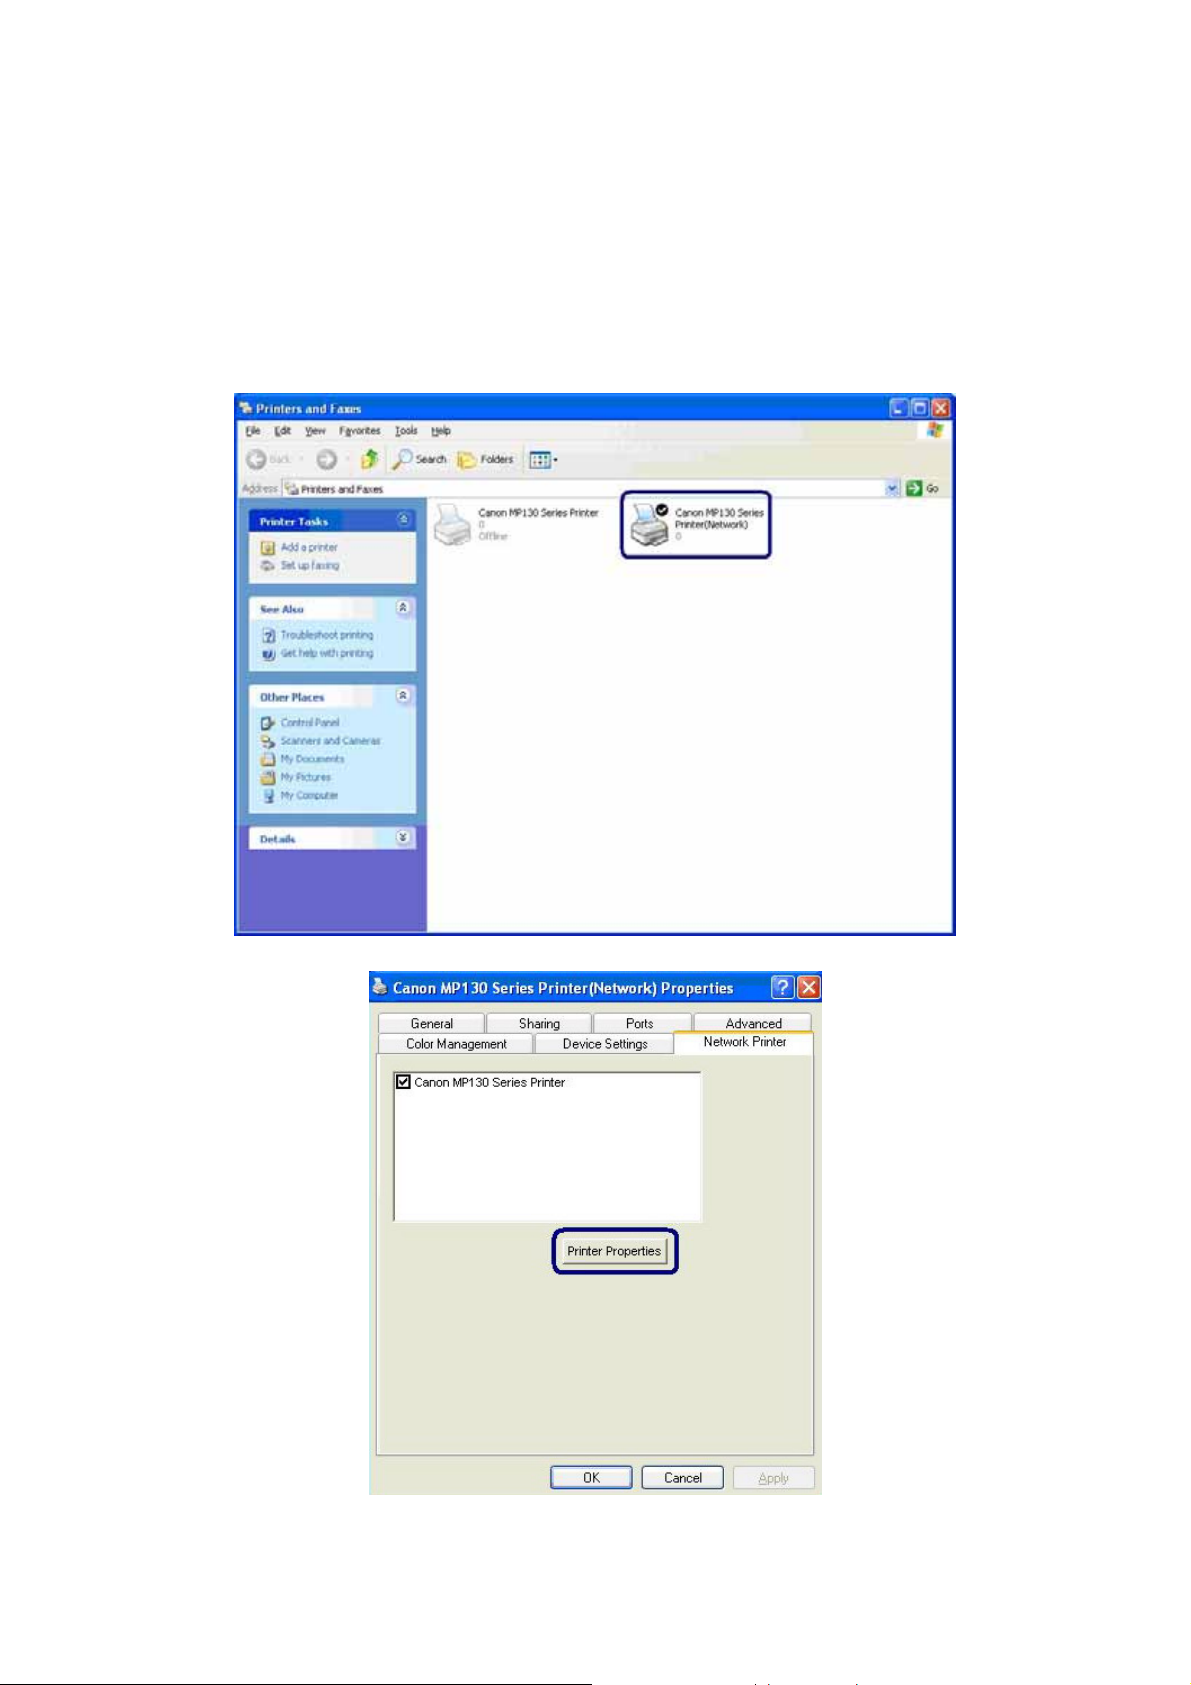
13. Using GDI Printer
After restarting the computer, you will find there are two printer icons added to “Printers and
Faxes” in the Windows. The “Printer Model Name (Network)” will stand for the printer.
If you want to print a file or document, please print to “Printer Model Name (Network)”. To set the
paper size or other feature of the printer, please right click “Printer Model Name (Network)” and
select “Properties”. In the “Printer Model Name (Network) Properties” screen, click “Pri nter
Properties” then you can configure the printer.
18
Page 23

3.3 Print Server Utilities
After the installation is completed, there will be four utilities add to “StartÆAll ProgramsÆPrint Server
Utilities” folder in the Windows.
Setup Wizard – If you don’t install the printer during the softwa re installation in Section 3.2, you can
run this setup wizard to install the printer drivers and bind the Print Server to you r computer.
Network Port Setup – Allows you to add network port of the print server to your computer.
Server Manager – Allows you to configure the Print Server’s IP Address, network protocols and
other advanced features.
Uninstall – Assistant for removing all installed Print Server software programs.
19
Page 24

4. Setup Wizard
The “Setup Wizard” will guide you to install the printer or GDI printer with the FPS-1011 into your
computer
If there is a new GDI Print Server installed in the network or the GDI Print Server you have inst alled
doesn’t work, please run the “Setup Wizard” to install again. Please refer to the Section 3.2 for the
detailed setup procedures.
Note: In Windows 98SE/Me/NT, the “Setup Wizard” will only allow you to install “General
Printer”.
.
20
Page 25

5. Network Port Setup
“Network Port Setup” Utility offers a very simple method to add or remove GDI Print Server’s printer
port from the client’s computer.
During the GDI Print Server’s installation procedure, the “Setup Wizard” will automatically add the
printer port of the GDI Print Server you have selected to user’s computer (see below).
If you have just installed another new GDI Print Server in the network, you can run “Setup Wizard” or
run this program. This program will search for new GDI Print Servers and allow you to add the new
network printer port into your computer conveniently. Perform the standard Add Printer procedure
then you can print directly to the printer through the newly installed GDI Print Server.
Select the network ports in the “Available Ports” list and click “>” to add ports. If you want to add all
available ports, please click “>>”. To cancel some of the network ports or all ports from the “Chosen
Ports” list, please click “<” or “<<”.
Note: Please be aware that Network Port Setup Utility can only detect and configure all GDI
Print Servers within the same network; it cannot search and configure the GDI Print Servers
on other subnets across network segments.
5.1 Add Printer
After adding a “Network Port” of the GDI Print Server to your computer, you can follow the procedure
described below to add printer to the Windows.
1. Click “Start”, choose “Settings” and select “Printers and Faxes”.
2. Click “Add a Printer”.
3. The “Add Printer Wizard” is displayed. Click “Next”.
21
Page 26

4. Select “Local printer attached to this computer” and make sure that “Automatically detect and
install my Plug and Play printer” is not selected. Click “Next”
.
5. Choose the suitable “Print Server Network Port” and click “Next”
22
.
Page 27

6. Select the printer manufacturer and the printer model and click “Next”. If your printer is not in the
list, click “Have Disk…” to install the driver of the printer. After installation, the printer model will
be added to the list.
7. Name your printer and setup the default printer, click “Next”.
23
Page 28
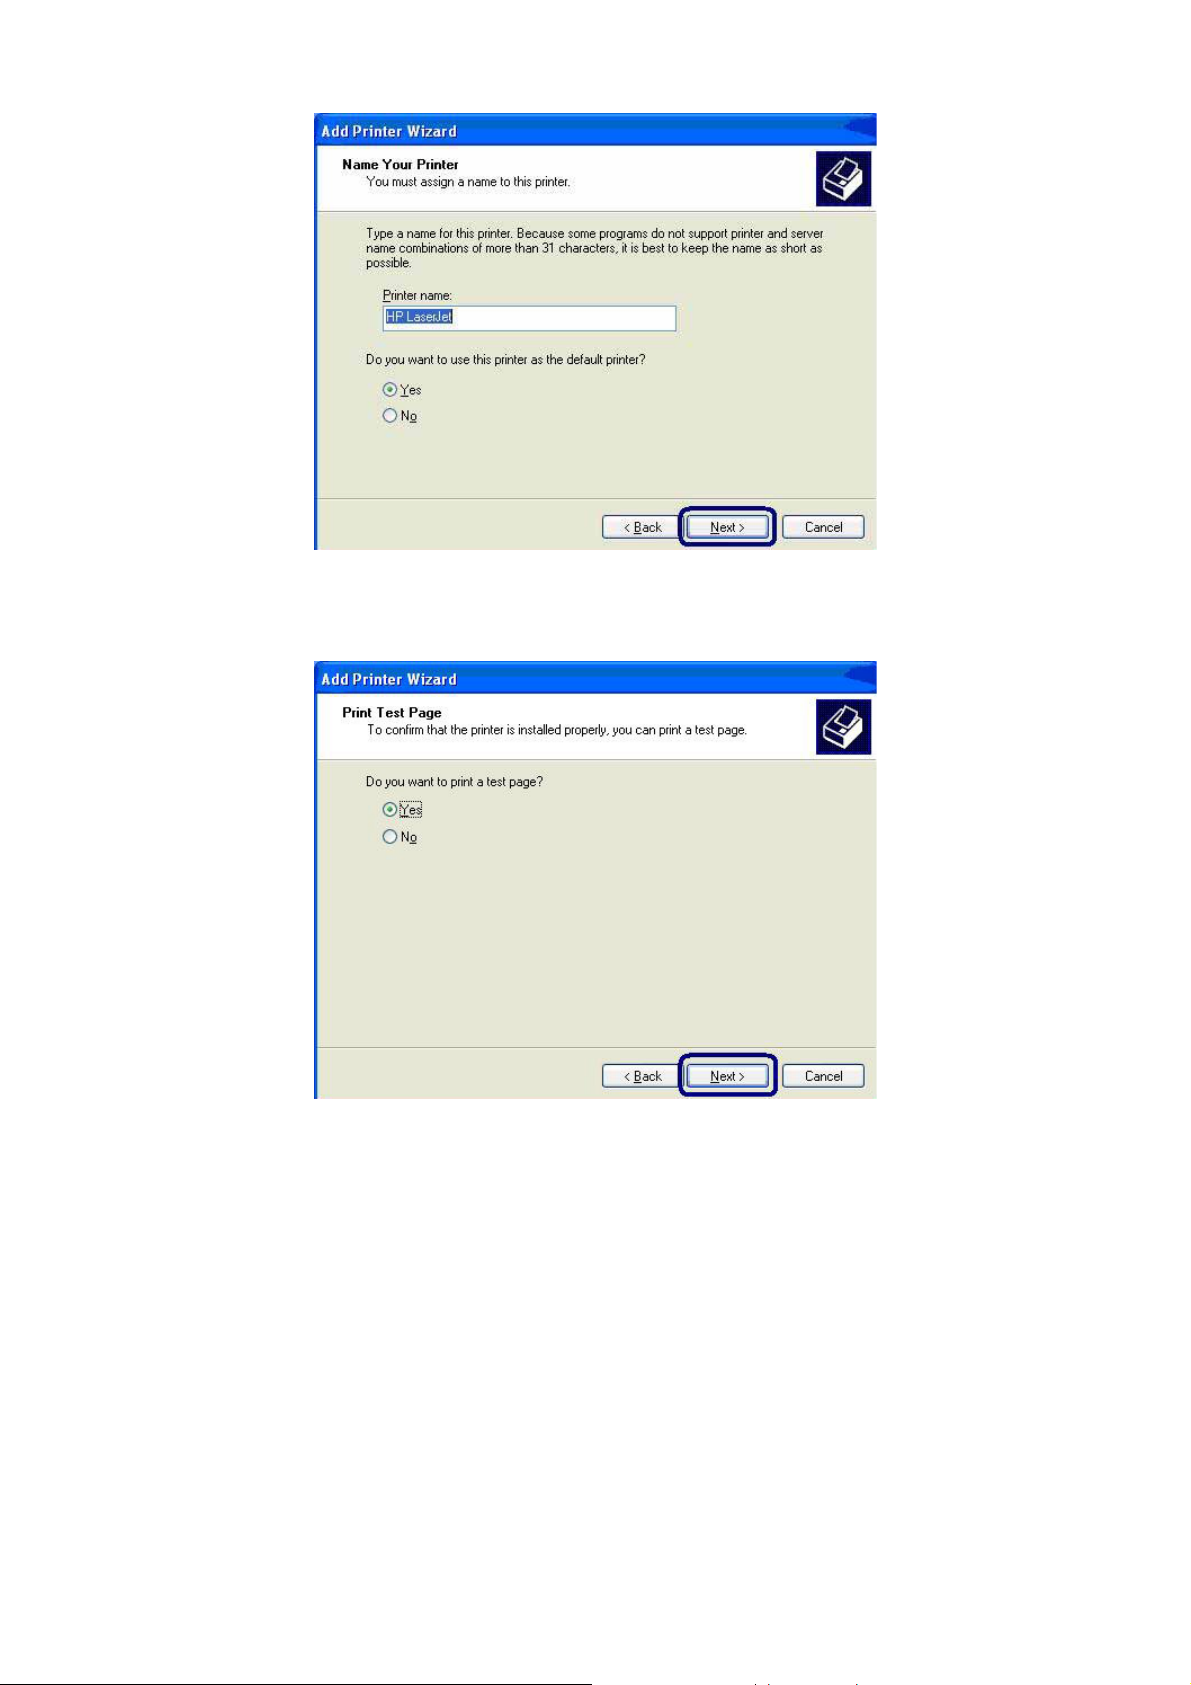
8. Choose to print the test page or not. It is recommended to print a test page. Click “Next”.
9. You have added the printer to the PC successfully. The information of the printer is displayed in
the windows. Click “Finish”
.
24
Page 29

10. The drivers of the printer will be installed. Af ter complete the installation, the printer has been
added to your computer and acted as a sharable printer.
25
Page 30

6. Server Configuration
6.1 Introduction
This chapter introduces GDI Print Server’s system configuration utility in Windows environment. This
utility provides the most complete management and configuration functions on the GDI Print Server
side. This utility only provides configuration functions for GDI Print Server itself; it does not include
configuration functions for client side or other file server in the network environment.
The Configuration Utility provides the following configuration and management functions:
Search Print Server: Search All Available GDI Print Servers on the Network.
St atus: Display GDI Print Server Network Status.
General Configuration: Configure general settings about the GDI Print Server such as Server
Name, Password, etc.
TCP/IP Configuration: Static and auto IP addre s s Configuration.
System Configuration: GDI Print Server Network Ability Setting and Firmware Upgrade.
6.2 Search for All Available GDI Print Server
.
Every time when you run the “Server Manager” configuration utility, click the “Search” icon
the tool bar. The configuration utility will delay for several seconds because the utility is using
system’s available network protocols to search for all GDI Print Servers o n the n etwork. All available
GDI Print Servers will be listed under “Server Group” on the left side of the window.
26
on
Page 31

You must select the GDI Print Server you would like to configure from the list. The system will display
the selected GDI Print Server’s status on the right side of the window.
6.3 Status of GDI Print Server
Click “Status” icon
showed on the right side of the window. The information of the GDI Print Server display including
MAC ID, Model Type, Firmware Version, status of each server port, IP address, subnet mask, default
gateway and supported printing protocols…etc.
You can refresh the GDI Print Server’s status by pressing the “Refresh” button .
You can restart the GDI Print Server by pressing the “Reb oot” button .
on the tool bar, the status of the currently selected GDI Print Server will be
27
Page 32

6.4 Setup the GDI Print Server
Click “Setup” icon
be showed on the right side of the window.
Double click one of the icons to set up the selected GDI Print Server. A screen will pop up to verify
“User Name” and “Password” of the GDI Print Server.
The default values are: User Name: admin Password: admin.
NOTE: When you have finished the settings, please click
Server to let the settings take effect.
on the tool bar, the setup items of the current selected GDI Print Server will
“ ” to restart the GDI Print
28
Page 33

6.5 General Configuration
Double Click “General” icon and the General configuration window will pop-up.
You can see basic GDI Print Server information in this page. You also can configure the “Server
Name”, “User Name” and “Password”
Server Name is the name of the GDI Print Server. You can use this name to identify the GDI Print
Server when you are searching for the GDI Print Server by the “Server Manger” utility.
User Name / Password is used to authenticate the administrator to login the GDI Print Server for
configuring it from the “Server Manger” utility or the Web Management tool.
.
6.6 TCP/IP Configuration
Double Click “TCP/IP” icon and the TCP/IP configuration window will pop-up.
You can configure the GDI Print Server to automatically get IP from DHCP server or manually specify
static IP.
IP Address Assignment:
29
Page 34

Click the “IP” button to enter the IP setting page. If you need the GDI Print Server to automatically get
an IP from DHCP server, select “Auto IP”. You can a lso select “St atic IP” to manually assign “IP
Address”, “Subnet Mask” and “Gateway” for the GDI Print Server. By default, “Static IP” is enabled
and the default settings are as follows.
IP Address: 192.168.0.1
Subnet Mask: 255.255.255.0
Auto IP – The IP Address information of the GDI Print Server obtained from DHCP Server will be
displayed in the address field.
Static IP – Manually assign the IP address information in the same network with your computer to
the GDI Print Server.
6.7 System Configuration
Double Click “System” icon and the System configuration window will pop-up.
In the System configuration page, you can see all available printing protocols and upgrade the new
firmware for this GDI Print Server.
Upgrade Firmware: You can use this “Upgrade Firmware” tool to update the newest firmware of the
GDI Print Server. Click “
firmware file, click the “Upgrade” button to finish the firmware update process.
NOTE: Before you upgrade the firmware, please make sure that the IP Address s ettings of the
GDI Print Server are in the same network as your computer.
Load Default: If you want to reset the GDI Print Server to default factory settings, please click “Load
Default”
.
” button and select the correct firmware in your PC. After selecting the
30
Page 35

7. Web Management
7.1 Introduction
GDI Print Server can be configured and managed on the Web. Through Lo cal Area Network, or even
Internet, administrator can easily configure and manage GDI Print Server’s various main functions in
browsers. Simply enter GDI Print Server’s IP address into your browser’s address field to manage a
GDI Print Server by GDI Print Server’s built-in Web Server.
The default IP Address, User Name and Password settings of the GDI Print Server are as follow.
IP Address: 192.168.0.1
User Name: Admi n
Password: admin
7.2 Login
You may use any Web Browser to review the status or configure the settings of the GDI Print Server.
After entering the IP address of the GDI Print Server, a login page display. You have to enter correct
“User Name” and “Password” before going to the Web Management pages.
Note: Default User Name is “admin”, default password is “admin”.
7.3 Device Setup
7.3.1 System
This web page will display the information about the GDI Print Server.
Device Name: The device name is not configurable. By default, it is the last 6-digit of the MAC ID of
the print server with prefix “PS”.
GDI Print Server Name: The print server name is the same as device name by default. You can
change this name to identify the print server easily when you are searching for the print server by the
supplied utilities.
Model Type: Display the type of the print server.
31
Page 36

Firmware Version: Display the firmware version of the GDI Print Server.
MAC Address: The MAC ID of the GDI Print Server will be displayed here
USB Port Number: Display the number of the USB port on the GDI print server.
LPT Port Number: Display the number of the parallel port on the GDI print server.
RAW/IPP/LPR Printing: By default, the RAW/IPP/LPR printing protocols are all enabled.
7.3.2 Printer
This page lists the information and the status of the printer connected to the GDI Print Server USB
port. The printer information includes manufacturer, model number and the supported printing
language. The status of the printer include ”Rea dy”, “Off Line” or “Paper Out”
.
Ready: The printer is ready to use.
Off Line: The printer is not connected to GDI Print Server through USB cable or it is turned off.
Paper Out: The printer is not ready because of paper out.
7.3.3 TCP/IP
This page lists all TCP/IP settings of the GDI Print Server.
Use DHCP/BOOTP: If the GDI Print Server enables to obtain IP Address from DCHP Server, it will
show “On”. Otherwise, it will show “Off”.
IP Address: Display the IP Address of the GDI Print Server.
Subnet Mask: Display the subnet mask setting of the GDI Print Server.
Gateway: Display the gateway setting of the GDI Print Server.
32
Page 37

7.4 Setup Wizard
NOTE: After you have changed the settings from the Setup Wizard, please click “Save
Settings” in the menu of the left side to let the settings take effect and reboot the GDI Print
Server.
7.4.1 System
You can change the server name and password of the GDI Print Server from here.
GDI Print Server Name: The name of the GDI Print Server. You can change this name to identify the
print server easily when you are searching for the print server by the supplied utilities.
Password: Enter new password of the GDI Print Server. The password can be up to 7-digit
alphanumeric format.
Re-type Password: enter the same password for the GDI Print Server again.
7.4.2 TCP/IP
You can configure the GDI Print Server to automatically get IP from DHCP server or manually specify
static IP.
If you need the GDI Print Server to automatically get an IP from DHCP server, select “Enable Obtain
TCP/IP Settings Automatically (Use DHCP/ BOOTP)”. You also can select “Disable Use the following
33
Page 38

TCP/IP Settings” to manually assign “IP Address”, “Subnet Mask” and “Gateway” for the GDI Print
Server.
7.4.3 Save Settings
After configuring the GDI Print Server, you have to click the “Save Settings” to save the settings and
restart the system.
7.5 System Tools
7.5.1 Load Default
You can use this page to restore the factory default settings. Click “OK” and af ter the print server is
restarted, the process is completed. Be aware that all of your previous setup will be cleared.
7.5.2 Upgrade Firmware from Browser
You can upgrade new firmware for this GDI Print Server in this page. Click “Browse” to select the
new firmware in your storage and then click “OK”, the firmware will be updated in several minutes.
Be aware that if you have started upgrading firmware, you have to follow all the upgradi ng steps or
the GDI Print Server can’t turn back to normal configuration.
34
Page 39

8. LPR Printing
LPR Printing (Line Printer Remote technology) allows users to connect to printers via TCP/IP for
printing sharing. The computer with Windows 98SE/Me/NT/2000/XP/2003 operating system can use
the protocol to share printing in the network. GDI Print Server can support LPR printing by default.
The GDI Print Server provides a tool “Network Port Setup” that helps to add the LPR protocol to
users’ computer (add network port to user’s computer) easily in Wi ndows
98SE/Me/NT/2000/XP/2003.
To configure the LPR setting by following standard LPR settings in Windows 2000/XP/2003, please
follow the steps below.
1. Click “Start”, and select “Printers and Faxes”.
2. Click “Add a Printer”.
3. The “Add Printer Wizard” is displayed. Click “Next”
4. Select “Local Printer attached to this computer” and click “Next”
.
.
35
Page 40

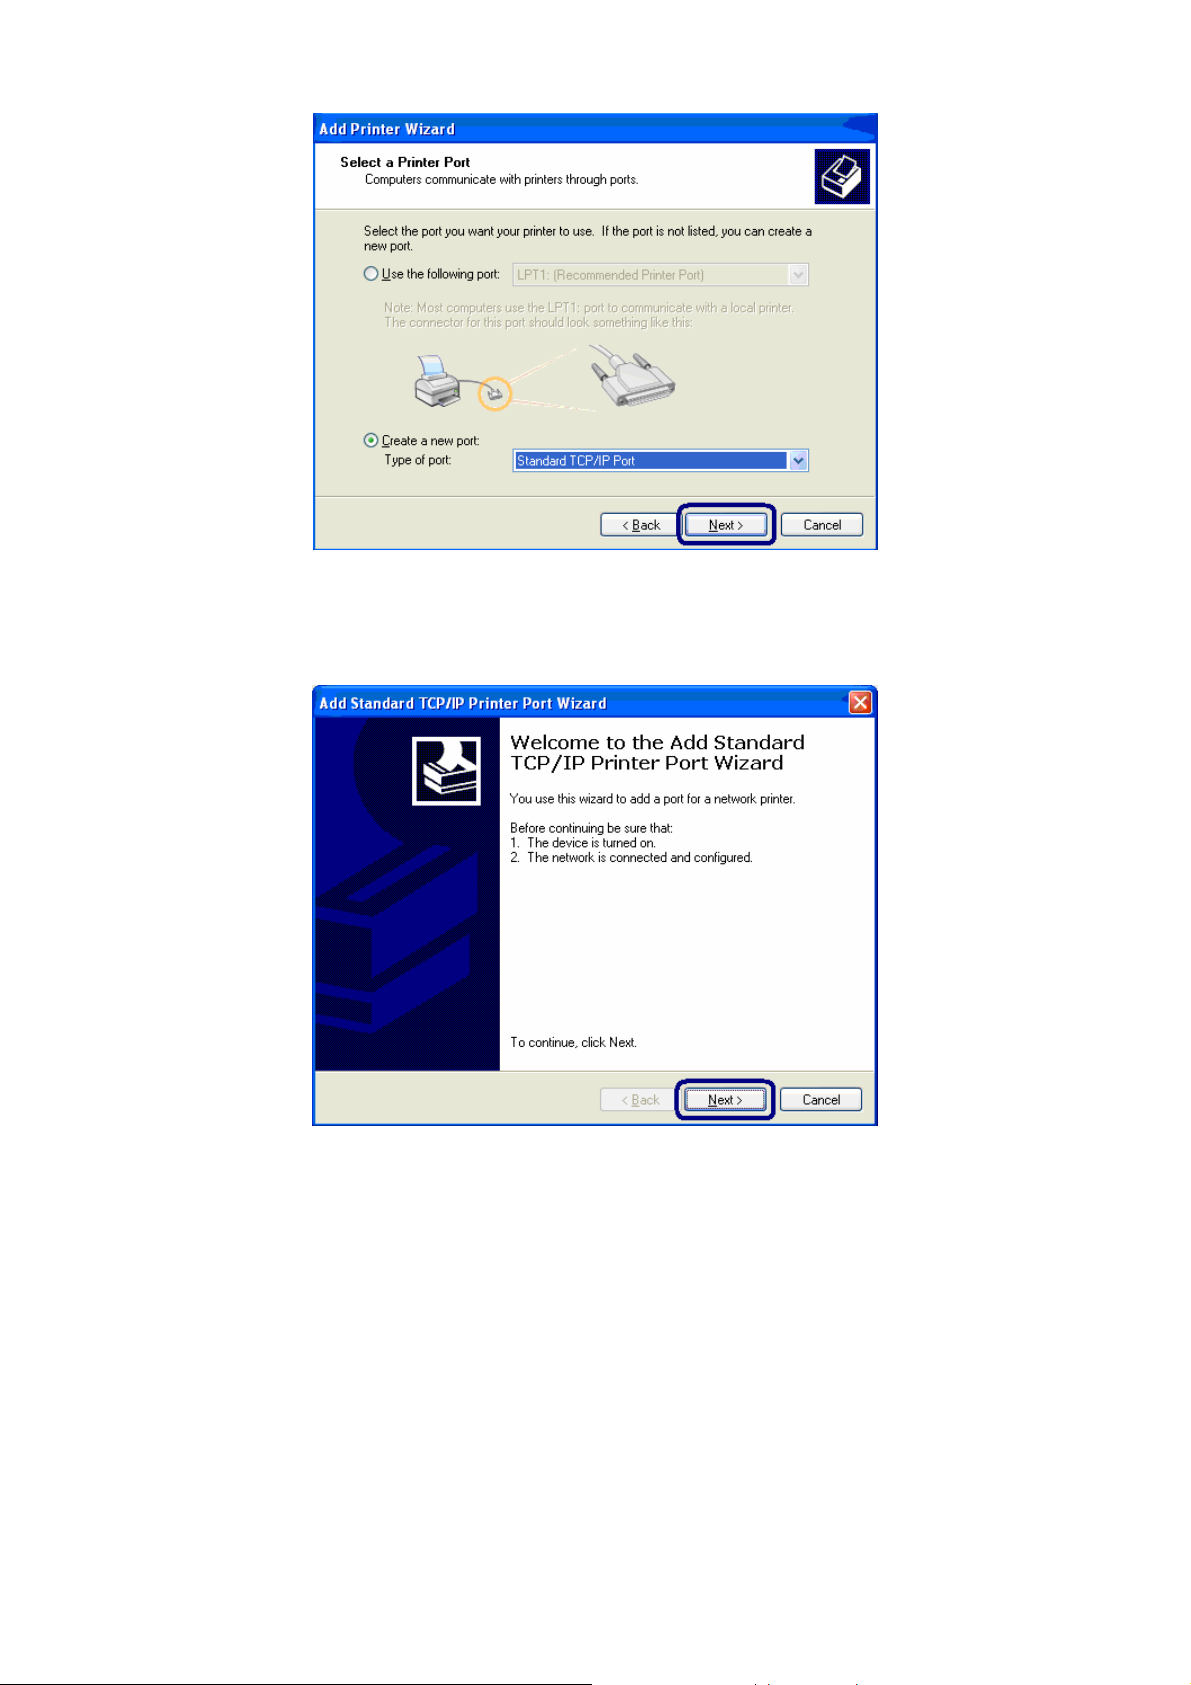
5. Choose “Create a new port” and “Standard TCP/IP Port”. Click “Ne x t”
.
6. Please make sure that the GDI Print Server and the printer have turned on and connected to the
network correctly before you continue. Click “Next”.
36
Page 41

7. Enter the IP Address of the GDI Print Server in the “Printer Name or IP Address”. Click “Next”.
8. Select “Custom” and click “Settings”. When you have finished the settings at step 9, click “Next”
to continue.
37
Page 42

9. Select “LPR” and enter “lpt1” in the “Queue Name”, click “OK”. By default the queue name of the
GDI Print Server is “lpt1”.
10. Click “Finish”.
38
Page 43

11. Select the printer manufacturer and the printer model and click “Next”. If your printer is not in the
list, click “Have Disk…” to install the driver of the printer. After installation, the printer model will
be added to the list.
12. Choose to set the print whether as a default printer or not. Click “Next”.
39
Page 44

13. You have added the network printer to the PC successfully. The information of the printer is
displayed in the windows. Click “Finish”.
40
Page 45

9. RAW Printing
RAW Printing allows users to connect to printers via TCP/IP for printing sharing. The computer with
Windows 2000/XP/2003 operating system can use the protocol to share printing in the network. GDI
Print Server can support RAW printing by default.
To configure the RAW setting in Windows 2000/XP/2003, please follow the steps below.
1. Click “Start”, and select “Printers and Faxes”.
2. Click “Add a Printer”.
3. The “Add Printer Wizard” is displayed. Click “Next”.
4. Select “Local Printer attached to this computer” and click “Next”.
5. Choose “Create a new port” and “Standard TCP/IP Port”. Click “Ne x t”
41
.
Page 46
6. Please make sure that the GDI Print Server and the printer have turned on and connected to the
network correctly before you continue. Click “Next”.
7. Enter the IP Address of the GDI Print Server in the “Printer Name or IP Address”. Click “Next”.
42
Page 47

8. Select “Custom” and click “Settings”. When you have finished the settings at step 9, click “Next”
to continue.
9. Select “RAW” and enter “9100” in the “Port Number”, click “OK”.
43
Page 48

10. Click “Finish”.
11. Select the printer manufacturer and the printer model and click “Next”. If your printer is not in the
list, click “Have Disk…” to install the driver of the printer. After installation, the printer model will
be added to the list.
44
Page 49

12. Choose to set the print whether as a default printer or not. Click “Next”.
13. You have added the network printer to the PC successfully. The information of the printer is
displayed in the windows. Click “Finish”.
45
Page 50

46
Page 51

10. IPP Printing
10.1 Introduction
IPP (Internet Printing Protocol) Printing provides a convenient way of remote printing service by
TCP/IP. The GDI Print Server can support IPP printing in Windows 2000/XP/2003 by default. By
using the IPP printing, you can share the printer to all the PC’ s that can a c cess the GDI Print Server
by IP. You can even share your printer to Internet users.
10.2 System Setup
10.2.1 GDI Print Server Side
It is needless to do any setting on the GDI Print Server side. Make sure the GDI Print Server has
correct IP settings. If you want to share the printers to Internet users, you have to set a real IP to the
GDI Print Server. You also have to make sure that any gateway, router or firewall does not block IPP
protocol if you have these gateway devices installed in your network.
10.2.2 Client Side
You only need to perform Window’s standard Add New Printer procedure.
1. Click “Start”, and select “Printers and Faxes”.
2. Click “Add a Printer”.
3. The “Add Printer Wizard” is displayed. Click “Next”.
4. Select “A network printer, or a printer attached to another computer”. Click “Next”.
47
Page 52

5. Select “Connect to a printer on the Internet or on a home or office network” and enter the URL of
GDI Print Server. The URL format is “http://IP:631/Port Name”. The IP should be the GDI Print
Server’s IP. The number 631 is IPP standard port number. Port Name is the port name of GDI
Print Server that your printer is connected to. The default port name is “lpt1”. One example of the
URL is http://192.168.0.1:631/lpt1. After entering the URL of GDI Print Server, click “Next”.
6. Select the printer manufacturer and the printer model and click “Next”. If your printer is not in the
list, click “Have Disk…” to install the driver of the printer. After installation, the printer model will
be added to the list.
48
Page 53

7. Choose to set the print whether as a default printer or not. Click “Next”.
8. You have added the network printer to the PC successfully. The information of the printer is
displayed in the windows. Click “Finish”.
49 50
Page 54

Page 55
11. GDI Print Server Installation in UNIX/Linux
The GDI Print Server is available for TCP/IP printing by Unix/Linux LPD (Line Printer Daemon)
protocol. This chapter explains how to set the GDI Print Server with the LPD protocol in the
Unix/Linux system. Following describe two modes to configure the GDI Print Server. In the GUI Mode,
we follow the settings in the Fedora Core 4 system. If you are in different system, you can refer to the
configurations in the Console Mode.
11.1 GUI Mode
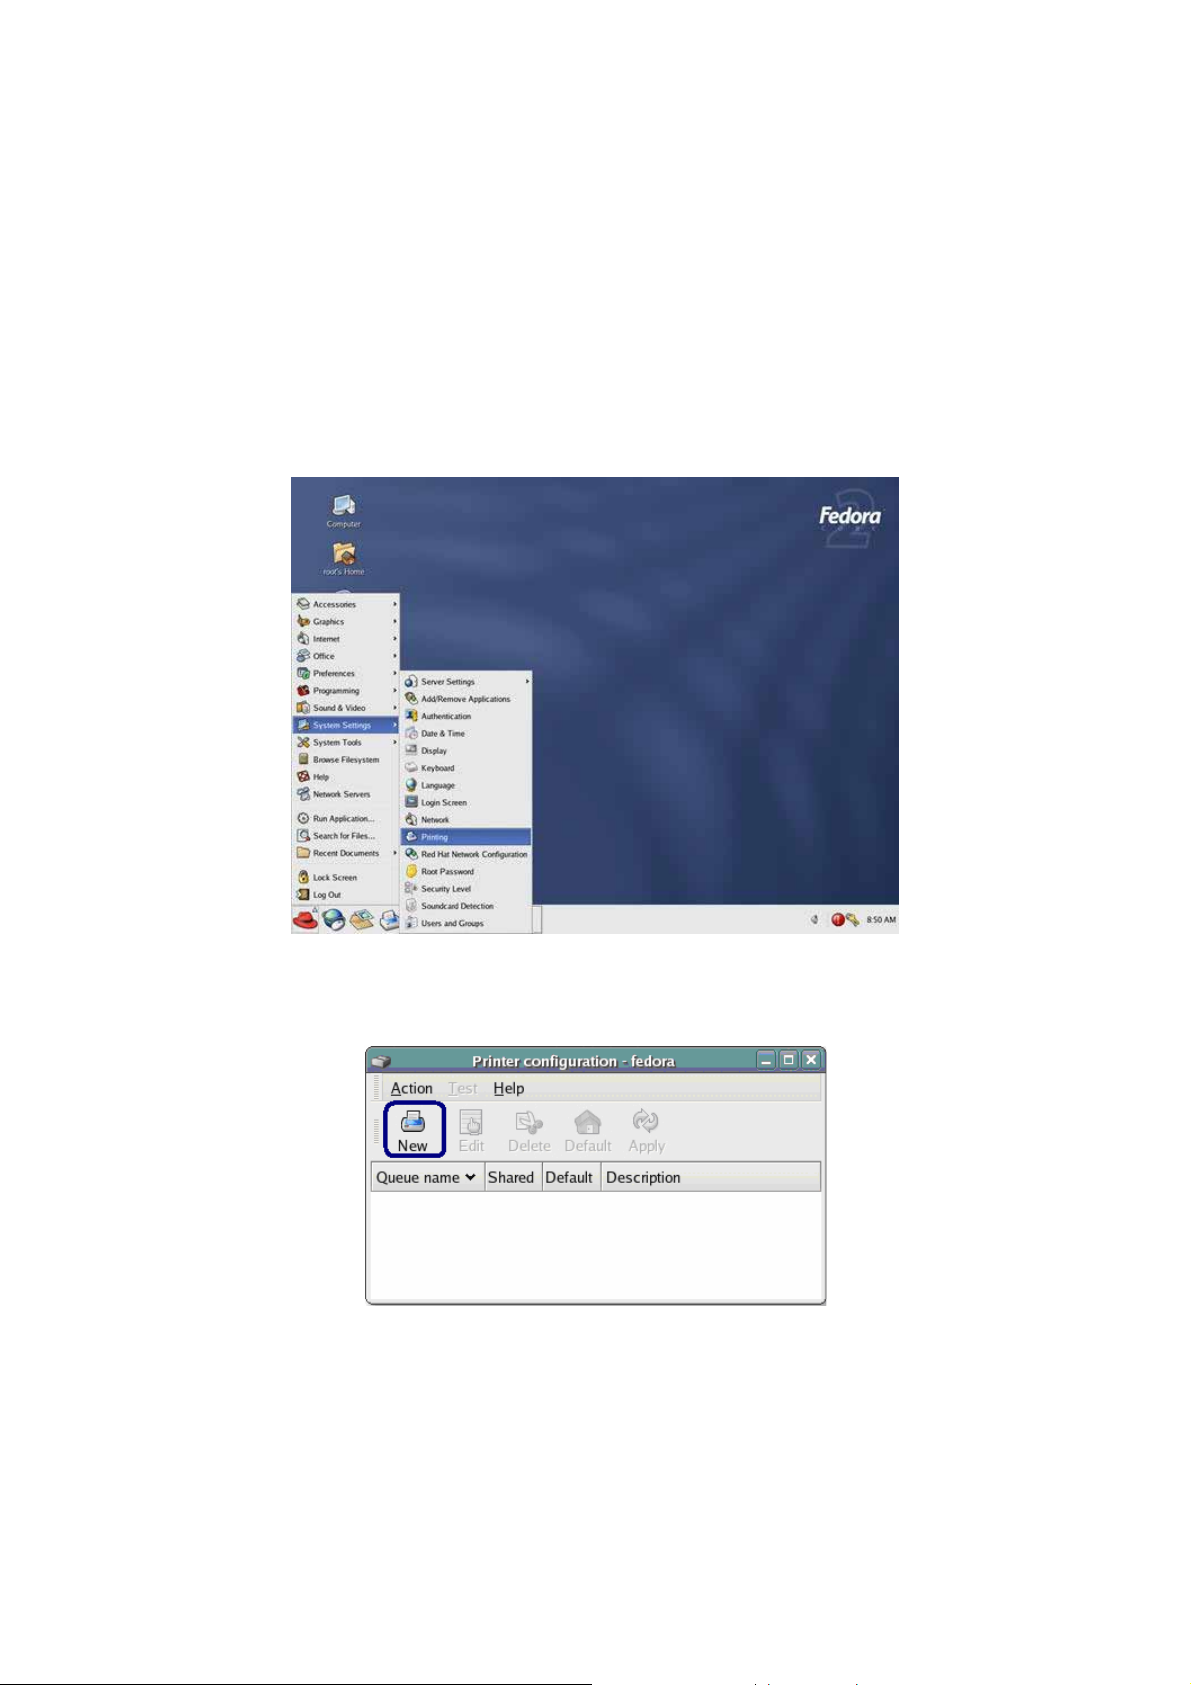
1. Select “Printing” from “System Settings”.
2. Click “New” to add the printer with the GDI Print Server.
3. Click “Forward”.
51
Page 56

4. Set the printer queue name and the short description of the printer and click “Forward”.
5. In the following screen, please configure as below. Then click “Forward” to continue.
Select a queue type: Select “Network UNIX (LPD)” as the queue type.
Server: Enter the IP Address of the GDI Print Server, for example: 192.168.2.253.
Queue: Set the queue name to lpt1.
52
Page 57

6. Select the printer manufacturer and model and click “Forward”.
7. Please review the settings. If the settings are no problem, click “Finish”
8. To print a test page and apply all the settings, please click “Yes”.
9. If the test page is printed without problem, please click “Yes”. If it is failed to print, please click
“No” to go back to “Printer configuration - fedora” screen and configure again.
53
Page 58

11.2 Console Mode
To configure the GDI Print Server for LPD printing, perform the procedures below:
1. Enable GDI Print Server’s TCP/IP Support.
2. Set up GDI Print Server’s IP address.
3. Verify GDI Print Server’s IP Address.
4. Configure remote LPD printing on the host.
5. Print a test page.
In the next sections, we will describe these five procedures step by step.
11.2.1 Enable GDI Print Server’s TCP/IP Support
The default configuration of the GDI Print Server is with TCP/IP support enable d. Anyway, you can
configure the GDI Print Server to enable TCP/IP support using the configuration program.
11.2.2 Setup GDI Print Server’s IP Address
The GDI Print Server must have a unique IP address in order to be recognized by the network.
You can set up the IP address on the various Unix/Linux systems using any one of the following
methods:
1. DHCP (Dynamic Host Configuration Protocol)
2. BOOTP (Bootstrap Protocol)
The GDI Print Server will use the last two methods to obtain its IP address automatically if its IP
address is configured as Auto (0.0.0.0).
11.2.2.1 DHCP
There are many Unix/Linux systems that support DHCP protocol, and the procedures to configure the
DHCP server database are different. Please refer to the manual of Unix/Linux for the way to use
different DHCP Server. It is highly recommended that the DHCP server should be located on the
same network as the GDI Print Server.
11.2.2.2 BOOTP
If you have the BOOTP daemon, bootpd, running on your UNIX/LINUX system that is accessible by
the GDI Print Server, you can use the BOOTP protocol to set up the IP address of the GDI Print
Server. We recommend that the BOOTP server should be located on the same subnet as the GDI
Print Server. If you use Network Informat ion Services (NIS) in your system, you may need to rebuild
the NIS map with the BOOTP services before doing the following BOOTP configuration. To rebuild
the NIS map, please refer to your system documentation.
54
Page 59

To configure the IP address data for the BOOTP server, you will need to log in the host of BOOTP
server as the superuser (root). Perform the following steps to add address entrie s,
1. Optionally, assign a name corresponding to the GDI Print Server’s IP address. You can add this
address to the /etc/hosts file, by adding a line such as:
203.66.191.12 pserver
2. Add an entry to the host’s /etc/bootptab file, similar to the following:
hostname:\
:ht=1:\
:ha=GDI_Server_ethernet_address:\
:ip=GDI_Server_ip_address:
Lines should be indented with tabs.
Where hostname is the device name of a GDI Print Server, the ht=1 tag specifies the hardware
type is Ethernet, the ha= tag specifies the Ethernet address of a GDI Print Server, which is the
Node ID located on the GDI Print Server. The ha tag must be preceded by the ht tag. The ip= tag
should correspond to the IP address you want to assign to the GDI Print Server.
For example, a GDI Print Server with the following configuration:
Node ID: 0000B4010101 (this implies Ethernet address is 00304F010101),
IP address: 203.66.191.12
The entry for this GDI Print Server in the /etc/bootptab file should be:
MF010101:\
:ht=1:\
:ha=00304F010101:\
:ip=203.66.191.12:
11.2.3 Verify GDI Print Server’s IP Address
To verify your GDI Print Server is responding to the newly assigned IP address using a PING
command:
ping ip-address
11.2.4 Configure Remote LPD Printing on the Host
The procedure you use to configure your Unix/Linux host(s) to allow printing to your network remote
GDI Print Server varies between different varieties of Unix/Linux. The procedure below can be used
for Unix/Linux variants that are related to BSD Unix, such as SunOS or Linux. For other versions of
Unix/Linux, consult your system documentation, keeping in mind that:
1. The GDI Print Server should be treated as a BSD networked GDI Print Server host.
2. The host name should be the name (or IP addres s) that you have assigned to the GDI Print
Server.
3. The printer name (or queue name) on the remote host should be lpt1, lpt2 or lpt3, the name of
the printer port on the GDI Print Server .
You will need to perform the tasks below, logged in as the superuser (root). To configure your
Unix/Linux host for printing,
1. Optionally, assign a name corresponding to the GDI Print Server’s IP address. You can add
55
Page 60

this address to the /etc/hosts file, by adding a line such as:
203.66.191.186 pserver
2. Create a spool directory for the printer in the same directory where spool directories are normally
kept on the machine, such as /var/spool or /var/spool/lpd:
mkdir /var/spool/lpd/pserv erd
chown daemon /var/spool/lpd/pserverd
chgrp daemon /var/spool/lpd/pserv erd
chmod 775 /var/spool/lpd/pserverd
3. Add an entry to the host’s /etc/printcap file, similar to the following:
printer-name:\
:lp=:\
:rm=203.66.191.186:\
:rp=lpt1:\
:lf=/var/spool/lpd/pserverd.log:\
:sd=/var/spool/lpd/pserverd:\
:mx#0:
Lines should be indented with tabs. More than one printer name can be used, with variants
separated by vertical bars (name1|name2).
The rm= entry should correspond to the IP address you have assigned to the GDI Print Server.
You can also use a host name if you have assigned one in the /etc/hosts file.
The sd= entry should correspond to the spool directory you created in the previous step.
The rp= entry should correspond to the port name of the remote printer. The values should be
one of lpt1, lpt2 or lpt3 depends on the printer port.
The GDI Print Server should now be available for printing from your Unix/Linux host.
56
Page 61

12. GDI Print Server Installation in MAC OS
LPR Printing (Line Printer Remote technology) allows Macintosh computers to connect to printers via
TCP/IP. LPR Printing can be set up on any Macintosh with version 9.x above.
12.1 MAC 10.4.x
To enable LPR Printing in Macintosh 10.4.x, please follow the procedures below.
1. Open Print and Fax from the System Preferences.
2. With the Printing tab selected, click the “Add” button.
3. When the Printer Browser opens, select “IP Printer”.
4. In the “IP Printer” screen, please configure as below.
Protocol: Select Line Printer Daemon - LPD as the Protocol.
IP Address: Set the address to the GDI Print Server’s IP Address, for example: 192.168.2.2.
Queue: Set the queue name to lpt1.
Name: You can designate a name for the printer.
Location: You can enter the location of the printer.
Printer: Select the printer model that is attached to the GDI Print Server.
5. Click “Add” to complete the printer installation.
12.2 MAC 10.3.x
To enable LPR Printing in Macintosh 10.3.x, please follow the procedures below.
1. In the Desktop, click “System Preferences”.
2. Click “Print & Fax”.
57
Page 62

3. From the “Print & Fax” screen, click “Set Up Printers…”.
4. Click “Add” to add the new GDI Print Server through TCP/IP.
58
Page 63
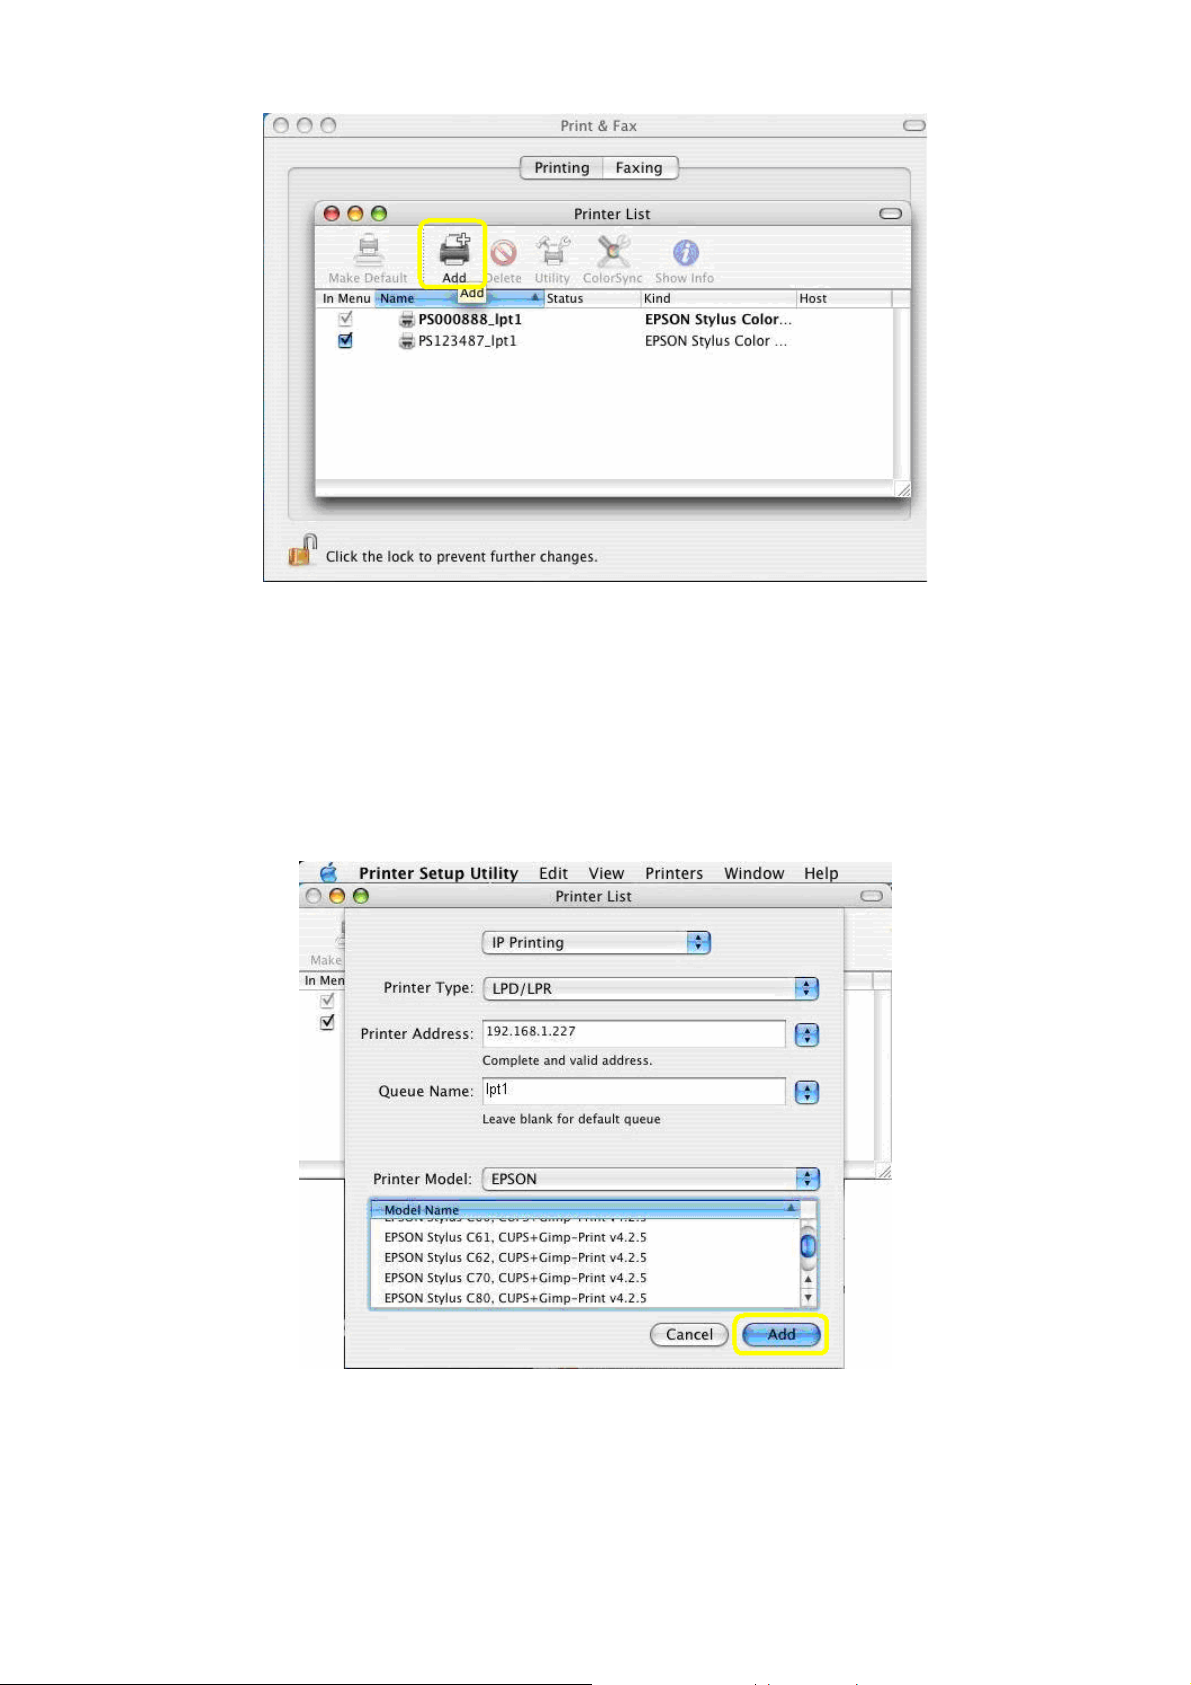
5. Enter the “Printer Type”, “Printer Ad dress” and “Queue Name” and select the “Printer Model” to
setup the GDI Print Server. Click “Add” to continue.
Printer Type: LPD/LPR
Printer Address: Input the IP Address of the GDI Print Server
Queue Name: The queue name of the GDI Print Server is “lpt1”.
Printer Model: Select the Printer Model that is attached to the GDI Print Server.
6. The GDI Print Server is installed completely. You can see it in the “Printer List”.
59
Page 64

7. You can print a file to check whether the GDI Print Server is installed successfully.
60
Page 65

Troubleshooting
1. The printer cannot be shared in the network.
Check if the printer is a GDI Printer. If it is a GDI printer, please make sure you have run the
“Setup Wizard” and follow the instructions in the manual to install the printer.
Check if the print server’s IP Address settings are in the same subnet with your computer. For
example, if your computer’s IP Address is 192.168.1.3, the print server’s IP Address setting
should be 192.168.1.x.
Check if the printer you are using is in the “Compatibility List” in Appendix or contact with your
dealer.
2. I am not sure the IP Address settings of my computer.
The following procedures will help you to check the current IP Address setting of your computer.
You can compare if your computer and print server’s IP Addresses are in the same subnet.
1. Click “Start” and select “Run”.
2. Type in “cmd” and click “OK”.
3. Type ipconfig /all and click enter.
z Your PC’s IP address is 192.168.2.111.
z The PC’s Subnet Mask is 255.255.255.0.
z Your PC’s MAC Address is the one entitled Physical Address (00-00-E2-82-C3-AD).
3. This product is not found even after searching by the “Server Manager”.
Check if the power adapter and the network cable are connected to the GDI Print Server
61
Page 66

properly.
Check if the LAN and ACT LEDs are turned on.
4. The ways to change the IP Address of the GDI Print Server.
A DHCP Server is installed in the network
If a DHCP Server is installed, you can s etup to let the GDI Print Server get IP Address from the
DHCP Server automatically.
1. Open “Server Manager” and then select “TCP/IP” setting.
2. Select “Auto IP” and click “Save”.
3. Reboot the GDI Print Server.
Set up the IP Address Manually
1. Open “Server Manager” and then select “TCP/IP” setting.
2. Select “Static IP” and enter the IP Address and Su bnet Mask as your computer. Click
“Save”.
3. Reboot the GDI Print Server.
NOTE: Set a static IP Address to GDI Print Server is recommended since DHCP
assignment may dramatically change the IP Address for GDI Print Server.
5. When I use LPR, IPP or RAW printing, the printing jobs are not able to print to the printer.
Disable “Bi-Directional Support”. Please follow the steps below.
1. Right click the printer from “Printer and Faxes” in the Windows.
2. Select “Properties” and select “Ports”.
3. Uncheck the “Enable bidirectional support “.
62
Page 67

Check if the printer you are using is in the “Compatibility List” in Appendix or contact with
your dealer.
This printer might be a GDI printer, please run “Setup Wizard” to install the printer again.
63
Page 68

Appendix A Specification
Model FPS-1011
Printer Connector 1 * USB 2.0
Ethernet Connector 1 * 10/100Base-TX
LEDs 3; LAN, ACT, READY
Protocol Support TCP/IP, NetBEUI, AppleTalk, HTTP, IPP, DHCP, LPR
Power Input 7.5V DC, 500mA
Cabling Type
Network Speed
Dimention (L * W * H) 75 x 56 x 24 (mm)
Weight 45g
Environmental Specifications
EMI CE, FCC Class B
10Base-T UTP Cat 3 or better
100Base-TX UTP Cat5 or better
10/100Mbps, Half-Duplex mode
20/200Mbps, Full-Duplex mode
Operating Temperature : 0~50 degree C
Storage Temperature: -10 ~ 60 degree C
Operating Humidity: 10~90%
Storage Humidity: 0~95%
64
Page 69

Appendix B: Print Server Compatibility List
The compatibility information is the first released in November 2006. For the latest information,
please contact with your dealer.
NOTE:
1. The compatibility list contains general printers and GDI printers. If the printer is GDI printer, you
will see “GDI” in the “Note” column.
2. Users have to close bi-directional.
3. For some of Lexmark printers, please close bi-directional and choose “WinPrint ” processor and
RAW printing protocol.
No. Company Type Printer Model Print Note
1. HP Color Inkjet Printer Deskjet 450 OK
2. HP Color Inkjet Printer Deskjet 810C OK
3. HP Color Inkjet Printer Deskjet 880C OK
4. HP Color Inkjet Printer Deskjet 882C OK
5. HP Color Inkjet Printer Deskjet 920C OK
6. HP Color Inkjet Printer Deskjet 960 OK
7. HP Color Inkjet Printer Deskjet 980 OK
8. HP Color Inkjet Printer Deskjet 990 OK
9. HP Color Inkjet Printer Deskjet 1120C OK
10. HP Color Inkjet Printer Deskjet 1180C OK
11. HP Color Inkjet Printer Deskjet 3325 OK
12. HP Color Inkjet Printer Deskjet 3535 OK
13. HP Color Inkjet Printer Deskjet 3550 OK
14. HP Color Inkjet Printer Deskjet 3650 OK
15. HP Color Inkjet Printer Deskjet 3820 OK
16. HP Color Inkjet Printer Deskjet 3920
17. HP Color Inkjet Printer Deskjet 5160 OK
18. HP Color Inkjet Printer Deskjet 5440 OK
(Note2)
OK
19. HP Color Inkjet Printer Deskjet 5550 OK
20. HP Color Inkjet Printer DeskJet 5652 OK
21. HP Color Inkjet Printer DeskJet 5740 OK
22. HP Color Inkjet Printer Deskjet 6122 OK
65
Page 70

No. Company Type Printer Model Print Note
23. HP Color Inkjet Printer DeskJet 6540 OK
24. HP Color Inkjet Printer DeskJet 6840 OK
25. HP Color Inkjet Printer Deskjet 9300 OK
26. HP Color Inkjet Printer Deskjet 9650 OK
27. HP Color Inkjet Printer Deskjet 995C OK
28. HP Color Inkjet Printer (Business) Business 1100d OK
29. HP Color Inkjet Printer (Business) Business 1200d OK
30. HP B&W LaserJet Printer (MFP) LaserJet 3015 OK
31. HP B&W LaserJet Printer (MFP) LaserJet 3020 OK
32. HP B&W LaserJet Printer (MFP) LaserJet 3030 OK
33. HP B&W LaserJet Printer (MFP) LaserJet 3055 OK
34. HP B&W LaserJet Printer (MFP) LaserJet 3380 OK
35. HP Color LaserJet Printer LaserJet 4650 OK
36. HP Color MFP (Business) Office Jet 4110 OK
37. HP Color MFP Office Jet 4255 OK
38. HP Color MFP Office Jet 4355 OK
39. HP Color MFP (Business) Office Jet 5110 OK
40. HP Color MFP Office Jet 5510 OK
41. HP Color MFP Office Jet 5610 OK
42. HP Color MFP Office Jet 6110 OK
43. HP Color MFP Office Jet 6210 OK
44. HP Color MFP Office Jet 6310 OK
45. HP Color MFP Office Jet 7210 OK
46. HP Color MFP Office Jet 7410 OK
47. HP Color MFP Office Jet 9100 OK
48. HP Color MFP (Business) Office Jet 9110 OK
49. HP Color MFP (Business) Office Jet 9120 OK
50. HP Color MFP (Business) Office Jet 9130 OK
51. HP Color MFP (Business) Office Jet V40 OK
52. HP B&W LaserJet Printer LaserJet 1010 OK
53. HP B&W LaserJet Printer LaserJet 1012 OK
54. HP B&W LaserJet Printer LaserJet 1015 OK
55. HP B&W LaserJet Printer LaserJet 1020 OK GDI
66
Page 71

No. Company Type Printer Model Print Note
56. HP B&W LaserJet Printer LaserJet 1022 OK GDI
57. HP B&W LaserJet Printer LaserJet 1200 OK
58. HP B&W LaserJet Printer LaserJet 1220 OK
59. HP B&W LaserJet Printer LaserJet 1300 OK
60. HP B&W LaserJet Printer LaserJet 1320 OK
61. HP B&W LaserJet Printer LaserJet 2300 OK
62. HP B&W LaserJet Printer LaserJet 2300L OK
63. HP B&W LaserJet Printer LaserJet 2420 OK
64. HP B&W LaserJet Printer (MFP) LaserJet 3200 OK
65. HP B&W LaserJet Printer (MFP) LaserJet 3300 OK
66. HP B&W LaserJet Printer (MFP) LaserJet 3330mfp OK
67. HP B&W LaserJet Printer LaserJet 4350 OK
68. HP Color LaserJet Printer CLJ 1500L OK
69. HP Color LaserJet Printer CLJ 3500 OK
70. HP Color LaserJet Printer CLJ 3500N OK
71. HP Color LaserJet Printer CLJ 3700 OK
72. HP Color LaserJet Printer CLJ 4600 OK
73. HP Mini Photo Printer Photosmart 145 OK
74. HP Mini Photo Printer Photosmart 245 OK
75. HP Mini Photo Printer PhotoSmart 325 OK
76. HP Mini Photo Printer PhotoSmart 375 OK
77. HP Mini Photo Printer PhotoSmart 475 OK
78. HP Color Photo Printer (MFP) PhotoSmart 2575 OK
79. HP Color Photo Printer (MFP) PhotoSmart 2610 OK
80. HP Color Photo Printer (MFP) PhotoSmart 2710 OK
81. HP Color Photo Printer (MFP) PhotoSmart 3110 OK
82. HP Color Photo Printer (MFP) PhotoSmart 3310 OK
83. HP Photo Printer Photosmart 7260 OK
84. HP Photo Printer Photosmart 7450 OK
85. HP Photo Printer Photosmart 7550 OK
86. HP Photo Printer Photosmart 7660 OK
87. HP Photo Printer PhotoSmart 7760 OK
88. HP Photo Printer PhotoSmart 7830 OK
67
Page 72

No. Company Type Printer Model Print Note
89. HP Photo Printer Photosmart 7960 OK
90. HP Photo Printer Photosmart 8030 OK
91. HP Photo Printer Photosmart 8230 OK
92. HP Photo Printer Photosmart 8250 OK
93. HP Photo Printer PhotoSmart 8450 OK
94. HP Photo Printer PhotoSmart 8750 OK
95. HP Color MFP (SOHO) PSC 750 OK
96. HP Color MFP (SOHO) PSC 1110 OK
97. HP Color MFP PSC 1210 OK
98. HP Color MFP PSC 1315 OK
99. HP Color MFP PSC 1350 OK
100. HP Color MFP PSC 1410 OK
101. HP Color MFP PSC 1510 OK
102. HP Color MFP PSC 1610 OK
103. HP Color MFP (SOHO) PSC 2110 OK
104. HP Color MFP PSC 2210 OK
105. HP Color MFP PSC 2310 OK
106. HP Color MFP PSC 2355 OK
107. HP Color MFP PSC 2410 OK
108. HP Color MFP PSC 2510 OK
109. HP Color MFP (SOHO) PSC 4110 OK
110. Canon Color Laser Machine (MFP) iC D380 OK
111. Canon Color Ink Printer S200SPx OK
112. Canon Color Ink Jet Printer C350 OK
113. Canon Color Ink Jet Printer i255 OK
114. Canon Color Ink Jet Printer i320 OK
115. Canon Color Ink Jet Printer i355 OK
116. Canon Color Ink Jet Printer i450 OK
117. Canon Color Ink Jet Printer i455 OK
118. Canon Color Ink Jet Printer i550 OK
119. Canon Color Ink Jet Printer i850 OK
120. Canon Color Ink Jet Printer i6100 OK
121. Canon Color Ink Jet Printer i6500 OK
68
Page 73

No. Company Type Printer Model Print Note
122. Canon Color Ink Jet Printer i9100 OK
123. Canon Color Ink Jet Printer i9950D OK
124. Canon Color Ink Jet Printer (Photo Printer) i475D OK
125. Canon Color Ink Jet Printer (Photo Printer) i560 OK
126. Canon Color Ink Jet Printer (Photo Printer) i865 OK
127. Canon Color Ink Jet Printer (Photo Printer) i905D OK
128. Canon B&W Copying Machine iR 2010 OK
129. Canon Color Ink Jet Printer iP90 OK
130. Canon Color Ink Jet Printer iP1000 OK
131. Canon Color Ink Jet Printer iP1500 OK
132. Canon Color Ink Jet Printer iP2000 OK
133. Canon Color Ink Jet Printer iP3000 OK
134. Canon Color Ink Jet Printer (Photo Printer) iP4000 OK
135. Canon Color Ink Jet Printer iP5000 OK
136. Canon Color Ink Jet Printer iP6000D OK
137. Canon Color Ink Jet Printer (Photo Printer) iP8500D OK
138. Canon Color Ink Jet Printer (A3 Photo Printer) iX4000 OK
139. Canon Color Ink Jet Printer (A3 Photo Printer) iX5000 OK
140. Canon Color Ink Jet Printer (MFP) PIXMA MP110 OK
141. Canon Color Ink Jet Printer (MFP) PIXMA MP130 OK
142. Canon Color Ink Jet Printer (MFP) PIXMA MP150 OK
143. Canon Color Ink Jet Printer (MFP) PIXMA MP170 OK
144. Canon Color Ink Jet Printer (MFP) PIXMA MP450 OK
145. Canon Color Ink Jet Printer (MFP) PIXMA MP700 OK
146. Canon Color Ink Jet Printer (MFP) PIXMA MP730 OK
147. Canon Color Ink Jet Printer (MFP) PIXMA MP780 OK
148. SAMSUNG B&W Laser Printer ML-1520LP OK
149. SAMSUNG B&W Laser Printer ML-1740 OK
150. SAMSUNG B&W Laser Printer ML-2010 OK
151. SAMSUNG Color MFP SCX-4100 OK
152. SAMSUNG Color MFP SCX-4720F OK
153. Lexmark All-in-One Photo Printer (MFP) P4350 OK
154. Lexmark All-in-One Photo Printer (MFP) P6210 OK
69
Page 74

No. Company Type Printer Model Print Note
155. Lexmark All-in-One Photo Printer (MFP) P6250 OK GDI
156. Lexmark All-in-One Photo Printer (MFP) X2350 OK GDI
157. Lexmark All-in-One Photo Printer (MFP) X3350 OK GDI
158. Lexmark All-in-One Photo Printer (MFP) X3470 OK GDI
159. Lexmark All-in-One Photo Printer (MFP) X4270 OK
160. Lexmark All-in-One Photo Printer (MFP) X6170 OK
161. Lexmark All-in-One Photo Printer (MFP) X7350 OK GDI
162. Lexmark Color Ink Jet Printer Z603
163. Lexmark Color Ink Jet Printer Z615
(Note3)
(Note3)
OK
OK
164. Lexmark Color Ink Jet Printer Z617 OK GDI
165. Lexmark Color Ink Jet Printer Z705
(Note3)
OK
166. Lexmark Color Ink Jet Printer Z735 OK GDI
167. Lexmark Color Ink Jet Printer Z810
168. Lexmark Color Ink Jet Printer Z816
169. Lexmark Color Ink Jet Printer Z818
(Note3)
(Note3)
(Note3)
OK
OK
OK
170. Lexmark B&W Laser Jet Printers E120 OK
171. Lexmark B&W Laser Jet Printers E230 OK
172. Lexmark Color Laser Jet Printers C510 OK
173. Epson Color Laser Jet Printer Aculaser C1900 OK
174. Epson Color Laser Jet Machi ne Aculaser C4000 OK
175. Epson Color Laser Jet Machi ne Aculaser C4100 OK
176. Epson Color Laser Jet Machi ne Aculaser C8600 OK
177. Epson Impact Printer DLQ-3500C OK
178. Epson B&W Laser Jet Machine EPL-6100 OK
179. Epson B&W Laser Jet Machine EPL-6200 OK
180. Epson B&W Laser Jet Machine EPL-6200L OK GDI
181. Epson B&W Laser Jet Machine EPL-N2500 OK
182. Epson B&W Laser Jet Machine EPL-N3000 OK
183. Epson Color Ink Jet Printer (Photo Printer) PictureMate OK
184. Epson Color Ink Jet Printer (Photo Printer) Stylus C43UX OK
185. Epson Color Ink Jet Printer Stylus C63 OK
186. Epson Color Ink Jet Printer Stylus C67 OK
187. Epson Color Ink Jet Printer Stylus C83 OK
70
Page 75

No. Company Type Printer Model Print Note
188. Epson Color Ink Jet Printer Stylus C88 OK
189. Epson Color Ink Jet Printer (Photo Printer) Stylus COLOR 900 OK
190. Epson Color Ink Jet Printer (Photo Printer) Stylus COLOR 1160 OK
191. Epson Color Ink Jet Photo Printer (MFP) Stylus CX1500 OK
192. Epson Color Ink Jet Photo Printer (MFP) Stylus CX3100 OK
193. Epson Color Ink Jet Photo Printer (MFP) Stylus CX3700 OK
194. Epson Color Ink Jet Photo Printer (MFP) Stylus CX4100 OK
195. Epson Color Ink Jet Photo Printer (MFP) Stylus CX4700 OK
196. Epson Color Ink Jet Photo Printer (MFP) Stylus CX5100 OK
197. Epson Color Ink Jet Photo Printer (MFP) Stylus CX5300 OK
198. Epson Color Ink Jet Photo Printer (MFP) Stylus CX5700F OK
199. Epson Color Ink Jet Printer (Photo Printer) Stylus PHOTO 830U OK
200. Epson Color Ink Jet Printer (Photo Printer) Stylus PHOTO 935 OK
201. Epson Color Ink Jet Printer (Photo Printer) Stylus PHOTO 2100 OK
202. Epson Color Ink Jet Printer (Photo Printer) Stylus PHOTO R210 OK
203. Epson Color Ink Jet Printer (Photo Printer) Stylus PHOTO R310 OK
204. Epson Color Ink Jet Printer (Photo Printer) Stylus PHOTO R340 OK
205. Epson Color Ink Jet Printer (Photo Printer) Stylus PHOTO R350 OK
206. Epson Color Ink Jet Photo Printer (MFP) Stylus PHOTO RX430 OK
207. Epson Color Ink Jet Photo Printer (MFP) Stylus PHOTO RX510 OK
208. Epson Color Ink Jet Photo Printer (MFP) Stylus PHOTO RX520 OK
209. Epson Color Ink Jet Photo Printer (MFP) Stylus PHOTO RX530 OK
210. Epson Color Ink Jet Photo Printer (MFP) Stylus PHOTO RX630 OK
211. Epson Color Ink Jet Photo Printer (MFP) Stylus PHOTO RX650 OK
212. Brother Color Lase r Printer HL-2070 OK
213. Brother Color Lase r Printer HL-5240 OK
214. Brother Color Laser Printer (MFP) MFC-210C OK
215. Brother Color Laser Printer (MFP) MFC-215C OK
216. Brother Color Laser Printer (MFP) MFC-2820 OK
217. Brother Color Laser Printer (MFP) MFC-3240C OK
218. Brother Color Laser Printer (MFP) MFC-420CN OK
219. Brother Color Laser Printer (MFP) MFC-425CN OK
220. Brother Color Laser Printer (MFP) MFC-4800J OK
71
Page 76

No. Company Type Printer Model Print Note
221. Brother Color Laser Printer (MFP) MFC-7420 OK
222. Brother Color Laser Printer (MFP) MFC-7820N OK
223. Brother Color Laser Printer (MFP) MFC-8840D OK
224. Konica Minolta Color Laser Printer (MFP) 2480 OK
225. Dell All-In-One Printer (MFP) 944 OK
226. BenQ MFP CM3000 OK GDI
72
 Loading...