

Page 1

Trademarks
Copyright PLANET Technology Corp. 2003
Contents subject to revision without prior notice.
PLANET is a registered trademark of PLANET Technology Corp. All other trademarks belong to their respective owners.
Disclaimer
PLANET Technology does not warrant that the hardware will work properly in
all environments and applications, and makes no warranty and representation, either implied or expressed, with respect to the quality, performance,
merchantability, or tness for a particular purpose.
PLANET has made every effort to ensure that this User’s Manual is accurate;
PLANET disclaims liability for any inaccuracies or omissions that may have
occurred.
Information in this User’s Manual is subject to change without notice and does
not represent a commitment on the part of PLANET. PLANET assumes no responsibility for any inaccuracies that may be contained in this User’s Manual.
PLANET makes no commitment to update or keep current the information
in this User’s Manual, and reserves the right to make improvements to this
User’s Manual and/or to the products described in this User’s Manual, at any
time without notice.
If you nd information in this manual that is incorrect, misleading, or incomplete, we would appreciate your comments and suggestions.
FCC Warning
This equipment has been tested and found to comply with the limits for a
Class A digital device, pursuant to Part 15 of the FCC Rules. These limits are
designed to provide reasonable protection against harmful interference when
the equipment is operated in a commercial environment. This equipment generates, uses, and can radiate radio frequency energy and, if not installed and
used in accordance with the Instruction manual, may cause harmful interference to radio communications. Operation of this equipment in a residential
area is likely to cause harmful interference in which case the user will be
required to correct the interference at his own expense.
CE Mark Warning
This is a Class A product. In a domestic environment, this product may cause
radio interference, in which case the user may be required to take adequate
measures.
Revision
PLANET 24-port + 2-slot Smart Fast Ethernet Switch User’s Manual
FOR MODEL: FNSW-2402S
Part No.: 2010-000023-000
Page 2

Table of Contents
Chapter 1 Introduction 1
1.1 Package Contents 1
1.2 How to Use This Manual 1
1.3 Product Features 1
1.4 Product Specifications 2
Chapter 2 Installation 5
2.1 Product Description 5
2.2 Installing a FNSW-2402S 6
Chapter 3 Configuration 9
3.1 Preparing for configuration 9
3.2 Getting Started 11
Chapter 4 Switch Operation 31
4.1 Address Table 31
4.2 Learning 31
4.3 Forwarding & Filtering 31
4.4 Store-and-Forward 31
4.5 Auto-Negotiation 32
Chapter 5 Troubleshooting 33
Appendix A Troubleshooting 35
A.1 Switch‘s RJ-45 Pin Assignments 35
Page 3

Chapter 1
INTRODUCTION
1.1 Package Contents
Check the contents of your package for following parts:
● Smart Fast Ethernet Switch x1
● User’s manual x1
● Power cord x1
● Two Rack-Mounting Brackets with Attachment Screws x1
● RS-232 cable x1
If any of these are missing or damaged, please contact your dealer immediately, if
possible, retain the carton including the original packing material, and use them against
to repack the product in case there is a need return to it to us for repairing.
1.2 How to Use This Manual
This Smart Fast Ethernet Switch User’s Manual is structured as follows:
• Section 2, Installation
It explains the functions of FNSW-2402S and how to physically install the
FNSW-2402S.
• Section 3, Configuration
It contains information about the smart function of FNSW-2402S.
• Section 4 Switch operation
It explains the Switch operation of FNSW-2402S.
• Section 5 Troubleshooting
It contains troubleshooting guide of FNSW-2402S.
• Appendix A
It contains cable information of FNSW-2402S.
1.3 Product Features
• Complies with IEEE802.3 and 802.3u standards for 100Base-TX/FX
• 24-port 10/100 Mbps Fast Ethernet Switch
• Each Switching ports support auto-negotiation-10/20, 100/200Mbps sup-
1
Page 4
3
ported
• 2 open slots for 10/100Base-TX/FX fiber-optic interface with various connection media and distances
• Auto-MDI/MDI-X detection on each RJ-45 port
• Prevents packet loss with back pressure (half-duplex) and 802.3x PAUSE frame
flow control (full-duplex)
• High performance Store and Forward architecture, broadcast storm control,
runt/CRC filtering eliminates erroneous packets to optimize the network bandwidth
• 6K MAC address table, automatic source address learning and ageing
• 512K bytes shared data memory buffering
• Console interface for Switch basic management and setup
• Support port-based VLAN and IEEE 802.1Q VLAN function.
• Support up to 7 Trunk groups, each trunk for up to maximum 4 port with
800Mbps bandwidth
• Support rate control on each port
1.4 Product Specications
Model FNSW-2402S
Hardware Specification
Network ports 24 10/100Base-T RJ-45 MDI/MDI-X ports
Module slot 2 open slot for 10/100Base-TX/FX fiber-optic interface
Console port 1 RS-232 DB-9 male
Dimensions 440 x 200 x 44 mm (1U height)
Weight 2.6 kg
Power Requirement 100~240 (±10%) VAC, 50-60 (±3) Hz
Power Consumption 30 Watts maximum / 100 BTU/hr maximum
Switch Specification
Switch architecture Store-and-forward
Address Table 6K entries, auto learning/ageing
Shared data Buffer 512K bytes
2
Page 5

Flow Control Back pressure for half duplex, IEEE 802.3x for full du-
plex
Packet Control Runt & CRC filtering, Broadcast storm control
Switching Fabric 8.8Gbps
Switch Management
Port Configuration Port disable/enable. Rate control configuration Auto-
negotiation/NWAY _FORCE/ FORCE mode selection.
10/100Mbps full and half duplex mode selection. Flow
control disable/enable.
Port Status Display each port’s link status, disable/enable status, and
speed duplex mode. Flow control status
Aging control Disable/Enable
VLAN Port-based VLAN and IEEE 802.1Q VLAN
Port Trunking 7 groups of 4-port trunk support
Standards Conformance
Network Standards IEEE 802.3 (Ethernet), IEEE 802.3u (Fast Ethernet),
IEEE802.3x (flow control), IEEE 802.1Q VLAN
Operating Temperature
Storage Temperature
Humidity 5% to 95% (Non-condensing)
Regulation Compliance
0~50˚C
-40~70˚C
FCC Class A, VCCI Class A, CISPR 22 Class A
3
Page 6

4
5
Page 7
Chapter 2
INSTALLATION
This section describes the functionalities of FNSW-2402S components and guides how to
install it on the desktop or shelf. Basic knowledge of networking is assumed. Please read
this chapter completely before continuing.
2.1 Product Description
The PLANET FNSW-2402S provides 24 10/100Mbps Fast Ethernet Switch ports with 2
open slots for available for 10/100Base-TX/ 100Base-FX Fast Ethernet modules. The
optional modules can be 10/100Base-TX TP port or multi-mode ber using either SC or
ST connectors. The PLANET FNSW-2402S with non -blocking backplane and simplies the
task of upgrading your LAN to cater for increased bandwidth demand. Equipped with a
console interface, the FNSW-2402S Smart Switch can be programmed for basic switch
management functions such as port speed conguration, rate control, VLAN and Port
Trunking.
2.1.1 Product Overview
PLANET FNSW-2402S is a Smart Fast Ethernet switch with 24 RJ-45 10/100Mbps ports
and up to two 100Mbps ber ports or two 10/100Mbps TP ports for cost effective highperformance network connectivity. With its 8.8Gbps non-blocking switch fabric, the
PLANET FNSW-2402S can also provide a local, high bandwidth, Fast Ethernet network
for your departmental backbone plus the ability to trunk two ports (200Mbps) to enable
switch-to-switch backbone. The advanced functionality of the FNSW-2402S eliminates
traditional problems associated with the use of Ethernet. Users can be segregated using
built-in VLAN functionality. This, coupled with the exible ber module options, make
the FNSW-2402S one of the best and most cost-effective MTU switch solutions for Multitenant service providers.
This product also supports store-and-forward forwarding scheme to ensure low latency
and high data integrity, eliminates unnecessary trafc and relieves congestion on critical
network paths. With an intelligent address recognition algorithm, FNSW-2402S could
recognize up to 6K different MAC address and enables ltering and forwarding at full
wire speed.
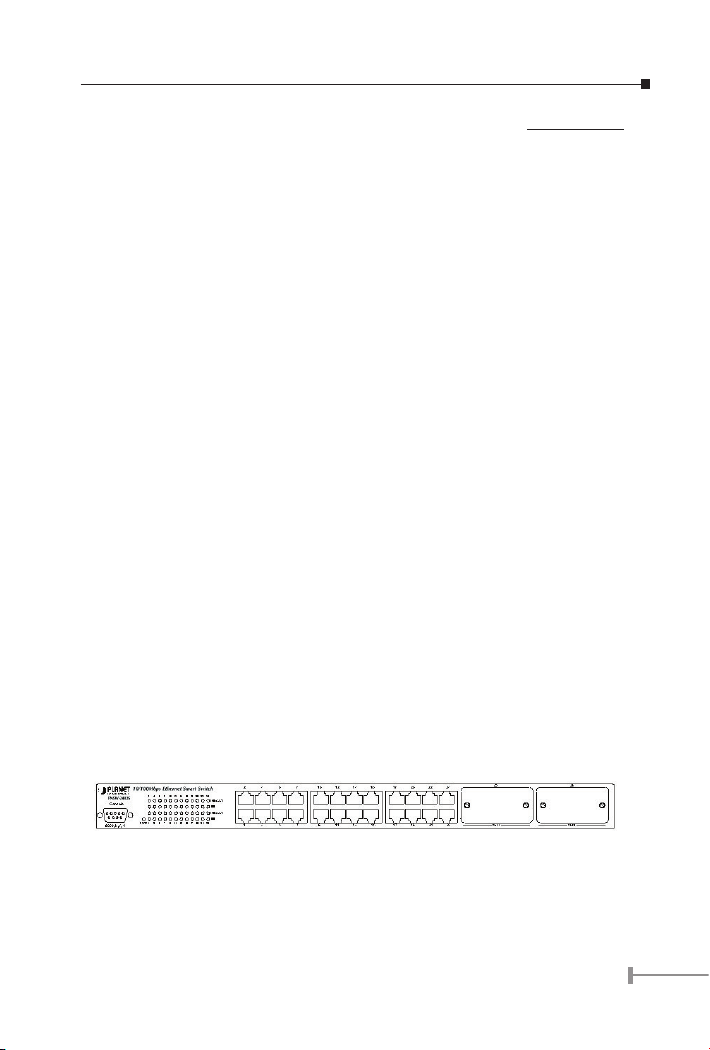
2.1.2 FNSW-2402S Front Panel
Figure 2-1 shows front panel of FNSW-2402S.
Figure 2-1 PLANET FNSW-2402S Front Panel
5
Page 8
7
2.1.3 LED Indicators
LED Color Function
PWR Green Lit: Power on
LNK/ACT Green Lit: indicate the link through that port is successfully
established
Blink: indicate that the switch is actively sending or
receiving data over that port
100 Orange Lit: indicate that the port is operating at 100Mbps.
Off: indicate that the port is operating at 10Mbps.
2.1.4 Extension Slots
The Switch extension slots #25 and #26 can be a 10/100Base-TX/FX switching port as
the extension module installed.
Please refer to the section 3.2.3.1 Port Conguration for the detailed installation and
settings.
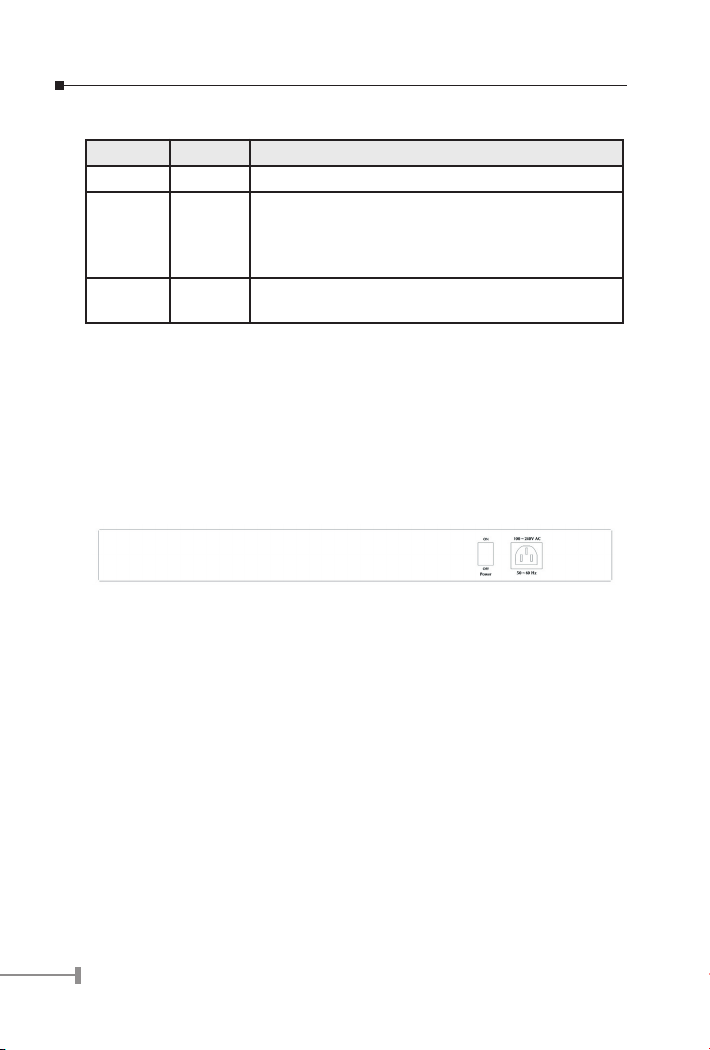
2.1.5 FNSW-2402S Rear Panel
The rear panel of the Switch indicates an AC inlet power socket, which accepts input
power from 100 to 240VAC, 50-60Hz. Figure 2-2 shows Rear panel of FNSW-2402S.
Figure 2-2 Rear Panel of FNSW-2402S
Power Notice:
1.The device is a power-required device, it means, it will not work till it is
powered. If your networks should active all the time, please consider using
UPS (Uninterrupted Power Supply) for your device. It will prevent you from
network data loss or network downtime.
2.In some area, installing a surge suppression device may also help to protect
your switch from being damaged by unregulated surge or current to the
Switch or the power adapter.
2.2 Installing a FNSW-2402S
This part describes how to install your FNSW-2402S Smart Fast Ethernet Switch and make
connections to the switch. Please read the following topics and perform the procedures in
the order being presented.
To install your FNSW-2402S on a desktop or shelf, simply complete the following steps.
6
Page 9

2.2.1 Desktop Installation
To install a FNSW-2402S on a desktop or shelf, simply complete the following steps:
Step1: Attach the rubber feet to the recessed areas on the bottom of the switch.
Step2: Place the FNSW-2402S on a desktop or shelf near an AC power source.
Step3: Keep enough ventilation space between the switch and the surrounding
objects.
Note: When choosing a location, please keep in mind the environmental re-
strictions discussed in Chapter 1, Section 4, Specification.
Step4: Connect your FNSW-2402S to network devices
A.Connect one end of a standard network cable to the 10/100 RJ-45 ports on
the front of the FNSW-2402S.
B.Connect the other end of the cable to the network devices such as printer
servers, workstations or routers…etc.
Note: Connection to the Switch requires UTP Category 5 network cabling with
RJ-45 tips. For more information, please see the Cabling Specification
in Appendix A.
Step5: Supply power to the Switch.
A.Connect one end of the power cable to the FNSW-2402S
B.Connect the power plug of the power cable to a standard wall outlet then
power on the FNSW-2402S.
When the FNSW-2402S receives power, the Power LED should remain solid Green.
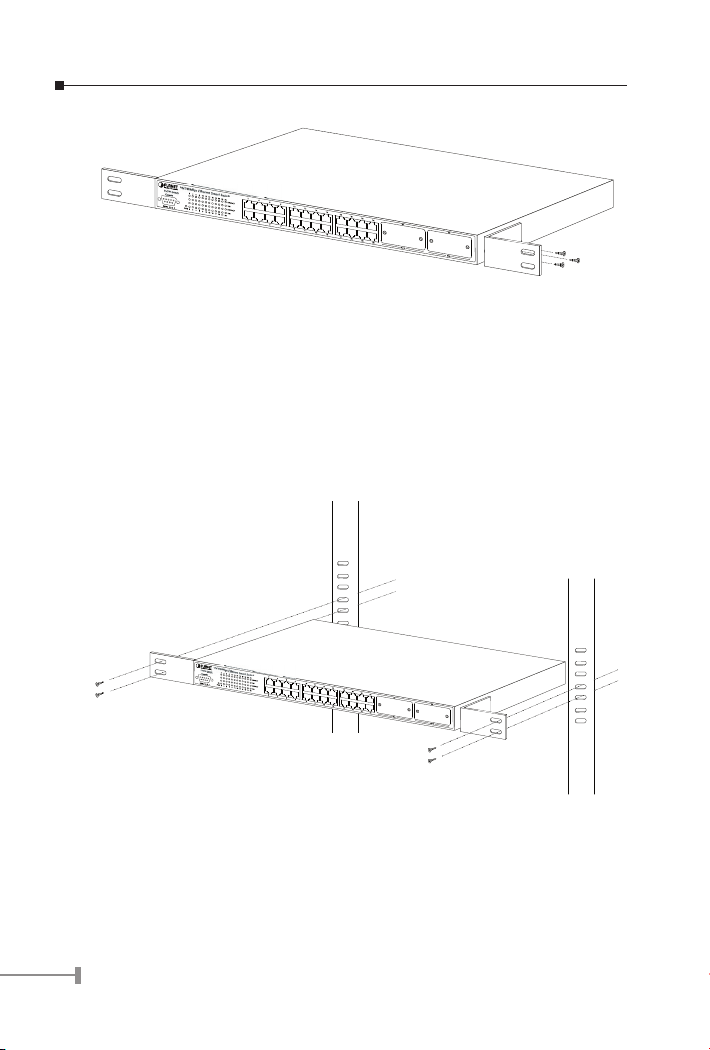
2.2.2 Rack Mounting
To install the switch in a 19-inch standard rack, follow the instructions described below.
Step1: Place your FNSW-2402S on a hard flat surface, with the front panel posi-
tioned towards your front side.
Step2: Attach a rack-mount bracket to each side of the switch with supplied
screws attached to the package. Figure 2-3 shows how to attach brackets
to one side of the switch.
7
Page 10
9
Figure 2-3 Attaching the brackets to the FNSW-2402S
Caution:
You must use the screws supplied with the mounting brackets. Damage
caused to the parts by using incorrect screws would invalidate your warranty.
Step 3: Secure the brackets tightly.
Step 4: Follow the same steps to attach the second bracket to the opposite side.
Step 5: After the brackets are attached to the switch, use suitable screws to se
curely attach the brackets to the rack, as shown in Figure 2-4
Figure 2-4 Mounting the Switch in a Rack
Step 6: Proceed with the steps 4 and steps 5 of section 2.2.1 Desktop Installation
to connect the network cabling and supply power to your switch.
8
Page 11
Chapter 3
CONFIGURATION
Unlike the unmanaged switch, FNSW-2402S performs series smart functions that make
the switch operate more effectively. This section will describe the common usage of the
Switch Smart Conguration.
3.1 Preparing for conguration
3.1.1 Connecting a PC or Terminal to the RS-232 Port
When you are ready to congure the smart functions of the switch, make sure you had
connected the supplied RS-232 serial cable to the RS-232 port at the front panel of your
FNSW-2402S Switch and your PC.
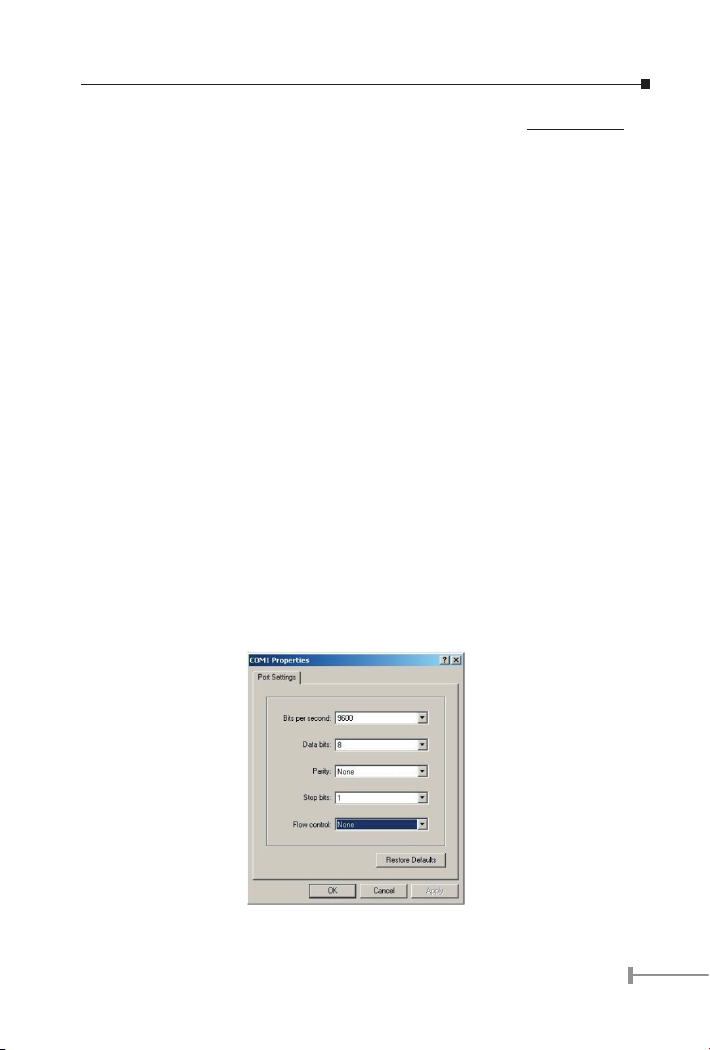
3.1.2 Terminal Emulation Setup Program
In Windows 98/2000/XP, launch “HyperTerminal”, create a new connection, and adjust
settings as below:
• Emulation: VT-100 compatible
• Baud per second: 9600
• Data bits: 8
• Parity: None
• Stop bits: 1
• Flow Control: None
To get a demonstration, please see the Figure 3-1.
Figure 3-1 Port Settings for smart functions
9
Page 12

11
3.1.3 Power-up Self-test Status
As the switch powers on, it goes through a self-test process to ensure proper operations
of the FNSW-2402S hardware. The messages will be displayed to show the test progress.
When the test completes successfully, the system will display a login screen. If any of the
components fails during the test, you may need to contact your local dealer and have the
switch replaced. Figure 3-2 shows a successful Self-test menu of the Power-up System
Self-diagnostic Process.
Figure 3-2 Power-up System Self-diagnostic screen
3.1.4 Login
After the self-test completes successfully, the screen in gure 3-3 appears. Login is
required to access the console interface. The factory default username is “admin” without
password. You may change it in the Account Conguration. To access to the Main Menu,
please always enter the correct username and password.
Figure 3-3 FNSW-2402S Login screen
10
Page 13
3.2 Getting Started
3.2.1 General Guidelines
FNSW-2402S allows users to congure the device via menu screens.
To work within the menu, please follow the guidelines shown in Table 3-1.
Item Description
TAB KEY Choose next item from the console screen.
BACKSPACE Back to previous item from the console screen.
ENTER KEY Access the highlighted item from the console screen.
SPACE KEY When a List item is performed, the Space key starts the selec-
tion and scrolls through the available choices.
CTRL+A Return to the actions menu.
Table 3-1 General Guideline within the Menu
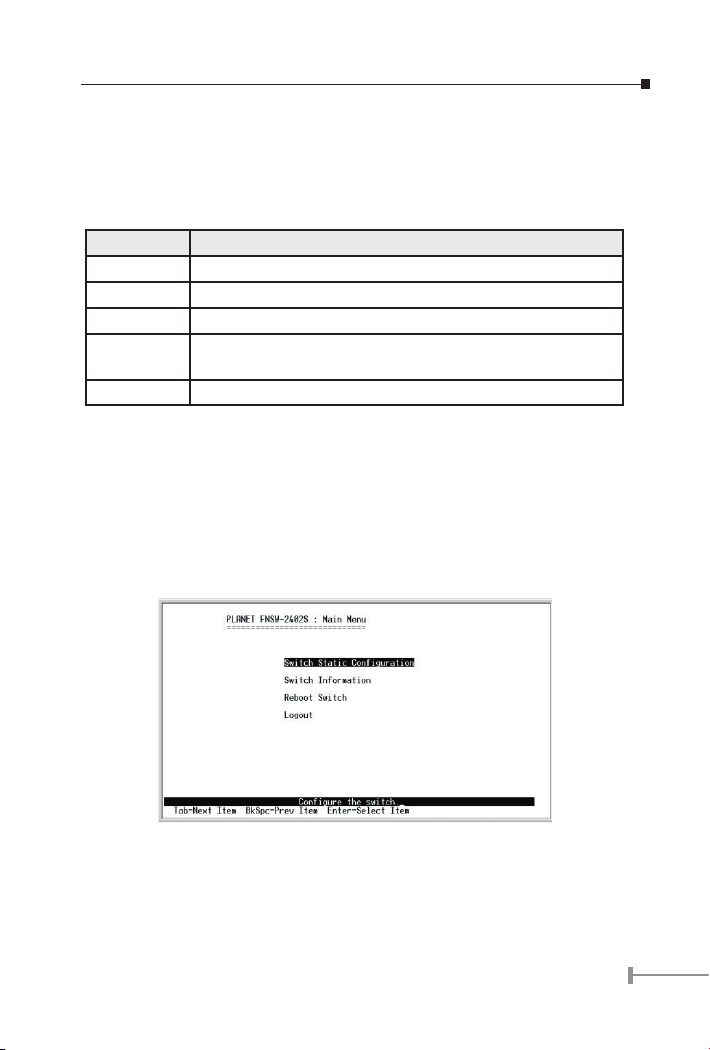
3.2.2 Main Menu Screen
The main menu enables you to view and manage the FNSW-2402S settings. Use the
“Tab” keys to move the highlight over a selection. Press “ Enter” key for chooses Smart
function of FNSW-2402S. After entering into any smart function screen, choose <Edit>
for conguring. Then Press the “Space Bar” to toggle back and forth between the options.
After setup completed, press “Ctrl-A” key to return to Actions menu and use the “TAB”
key to choose the <Save> for save the current conguration. Please see Figure 3-4 for
available options on main menu.
Figure 3-4 Main Menu Screen
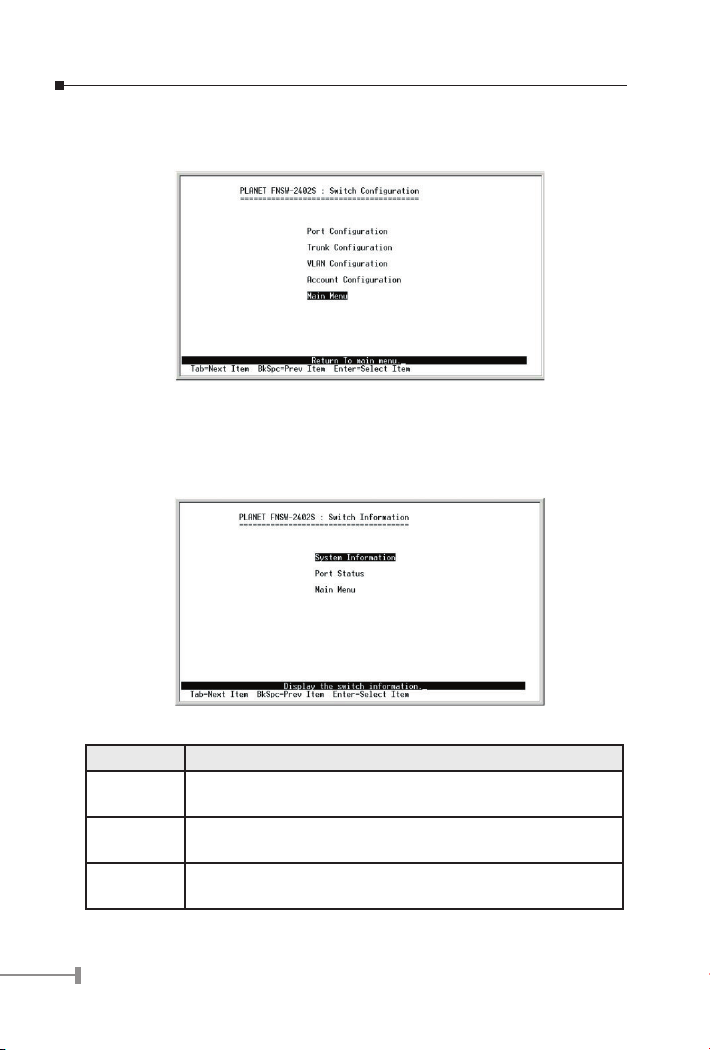
Switch Static Conguration
Provide the Port Conguration, Trunk Conguration, VLAN Conguration, and Account
Conguration of FNSW-2402S. Explained on section 3.2.3.
11
Page 14
13
Switch Information
Display the System Information and Port Status, which allows you to see the system
information, current link status, port disable/enable status, speed/duplex mode, ow
control status and trunk status of each port. Explained on section 3.2.4.
Reboot Switch
Allow user to reset the FNSW-2402S back to factory default and restart the FNSW-2402S.
Explained in section 3.2.5.
Logout
Allow user to logout the FNSW-2402S console interface. Explained in section 3.2.6.
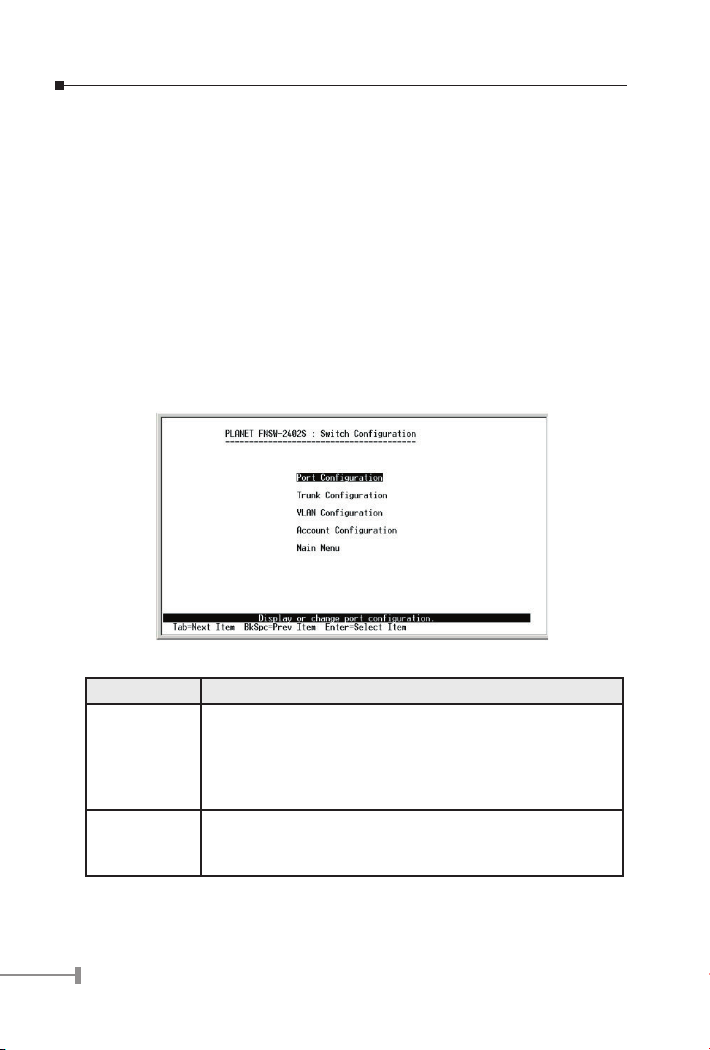
3.2.3 Switch Static Conguration
Press “Enter” to access the screen of Switch Static Conguration from the main menu
screen (please see the gure3-4). The following screen in Figure 3-5 appears. Table 3-2
describes the objects that shown in this screen.
Figure 3-5 Switch Conguration Screen
Object Description
Port
Configuration
Trunk
Configuration
Allow user to set rate control on each port, disable or enable
each port, set each port to run at Auto-negotiation, NWAYFORCE or FORCE mode, modify the speed duplex mode and
disable or enable flow control on each port. Please refer to
section 3.2.3.1 for detail configuration.
Provide seven groups of up to maximum 4-port trunk and
supports fail-over feature. Please refer to section 3.2.3.2 for
detail configuration.
12
Page 15

VLAN
Configuration
Provide port based VLAN (support overlapping) and IEEE
802.1Q VLAN. Please refer to section 3.2.3.3 for detail configuration.
Account
Configuration
Allow user to modify the username and password for FNSW2402S, enable Retry Forever options, enable MAC address
table auto-aging. Also provides two options of MAC address
table hash algorithm. Please refer to section 3.2.3.4 for detail
configuration.
Main Menu Return to the main menu. Please refer to section 3.2.3.5 for
detail configuration.
Table 3-2 Descriptions of the Switch Conguration Screen Objects
3.2.3.1 Port Conguration
Use the “TAB” key to move the highlight to the Port Conguration and press “Enter” to
access the screen of Port Conguration from the Switch Conguration screen (please see
the gure3-5). The screen of Port Conguration in Figure 3-6 appears. Table 3-3 describes
the Port Conguration objects of FNSW-2402S. This menu allows you to view or change
the port conguration of FNSW-2402S. The user can set rate control on each port and
determine each port’s disabled/enabled, auto-negotiation, NWAY-FORCE or FORCE mode,
speed, duplex mode, ow control and rate control. Use the “TAB” key to choose the
<Edit> then press “Enter”. Then start to modify these settings. Use the “TAB” key to move
the highlight to the object and press the “Space Bar” key to toggle back and forth between
the options. After setup completed, press “Ctrl-A” key to return to Actions menu and use
the “TAB” key to choose the <Save> for saving the current conguration.
Figure 3-6 Port Conguration Screen
13
Page 16

15
Object Description
InRate
(100K)
OutRate
(100K)
Enable Allow user to disable or enable each port. The descriptions of
Auto Provide three negotiation modes. The descriptions of the nego-
Spd/Dpx Allow user to modify the 4 various speed and duplex mode on
Flow Control Allow user to disable or enable the flow control function on full-
Note: The port number 25 and 26 can be 100Base-TX or FX module port.
Allow user to input the value of packet rate sent from the connected port to this port. You must enable the flow control feature
of this port for the function to work normally. The available value
ranges from 1 to 1000.
Allow user to input the value of packet rate sent from this port to
the connected port. The available value ranges from 1 to 1000.
options are shown as below:
No: disable this port.
Yes: enable this port.
tiation modes are shown as below:
AUTO: Use auto-negotiation to choose the best speed and duplex mode.
NWAY_FORCE: Use auto-negotiation to start the link at specified
speed and duplex mode.
FORCE: fixed speed and duplex mode.
each port of FNSW-2402S. This option only take effect when the
negotiation mode is set to NWAY_FORCE or FORCE. The descriptions of 4 various speed and duplex mode are shown as below:
10 Half: 10Mbps half-duplex mode.
10 Full: 10Mbps full-duplex mode.
100 Half: 100Mbps half-duplex mode.
100 Full: 100Mbps full-duplex mode.
duplex and half-duplex mode. The switch use PAUSE frame flow
control for full duplex mode and back-pressure for half duplex
mode. The descriptions of options are shown as below:
On: enable flow control.
Off: disable flow control.
Table 3-3 Descriptions of the Port Conguration screen Objects
The 100Base-FX modules provide half and full-duplex mode selection. Please configure the 100Base-FX module in the same duplex
mode between the module Slide-switch and the duplex mode of port
25 / 26 from the console interface. Please use the screen in Figure
3-7 to configure the duplex mode of module. Table 3-4 shows the settings for working under 100Mbps full-duplex mode and half-duplex
mode.
14
Page 17

Figure 3-7 Port Conguration Screen
Speed/duplex 100Full-duplex mode 100Half-duplex mode
Hardware (module) Full-duplex mode Half-duplex mode
Software (firmware) 100 Full 100 Half
Table 3-4 Settings of 100Base-FX module
3.2.3.2 Trunk Conguration
Use the “TAB” key to move the highlight to the Trunk Conguration and press “Enter” to
access the screen of Trunk Conguration from the Switch Conguration screen (please
see the gure3-5). The screen of Trunk Conguration in Figure 3-8 appears. Table 35 shows the descriptions of the Trunk Conguration screen Objects. The Port Trunking
Conguration menu controls the port trunking or the so-called Link Aggregation function.
There are 7 Trunk groups in the FNSW-2402S Smart Fast Ethernet Switch can be bundled
together to form a high-speed trunk. Use the “TAB” key to choose the <Edit> and press
“Enter”. Then start to modify these settings. Use the “TAB” key to move the highlight to
the selection and press the “Space Bar” key to toggle back and forth between the options.
After setup completed, press “Ctrl-A” key to return to Actions menu and use the “TAB” key
to choose the <Save> for saving the current conguration.
Figure 3-8 Trunk conguration Screen
15
Page 18
17
Object Description
Trunk Groups 1-7 Allow user to assign maximum 4 ports in each Trunk group.
Please note port 25 and port 26 can only be used to form
their own 2-port trunk.
TRK1 to TRK7 Allow user to disable or enable (static) trunk function in
TRK1 to TRK7 groups.
Table 3-5 Descriptions of the Trunk Conguration screen Objects
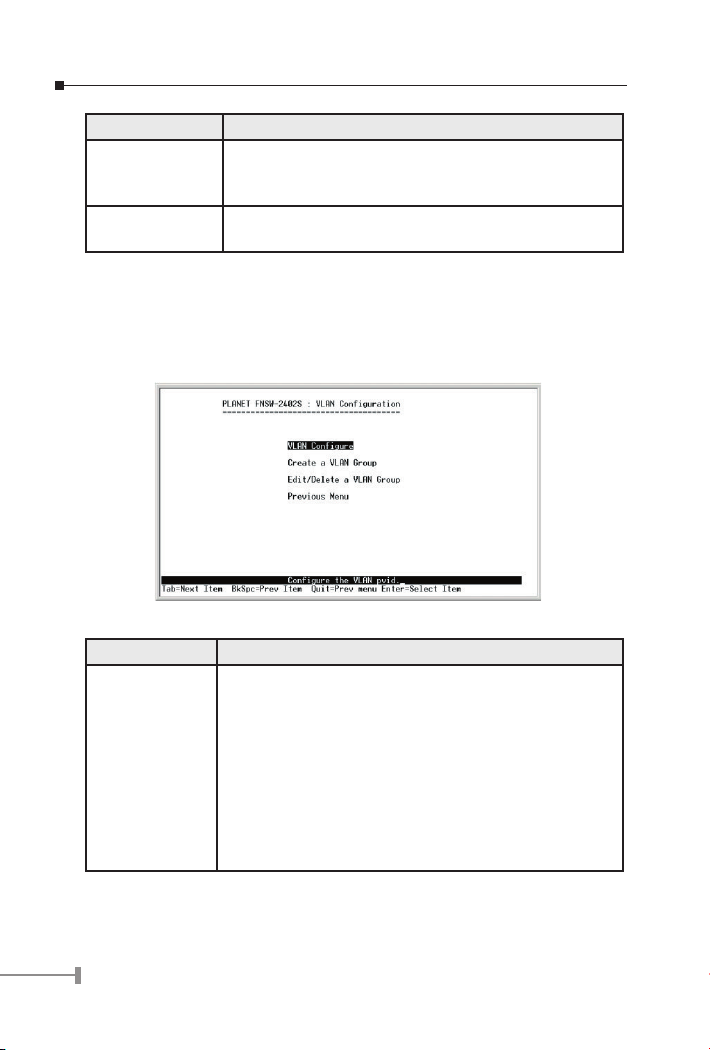
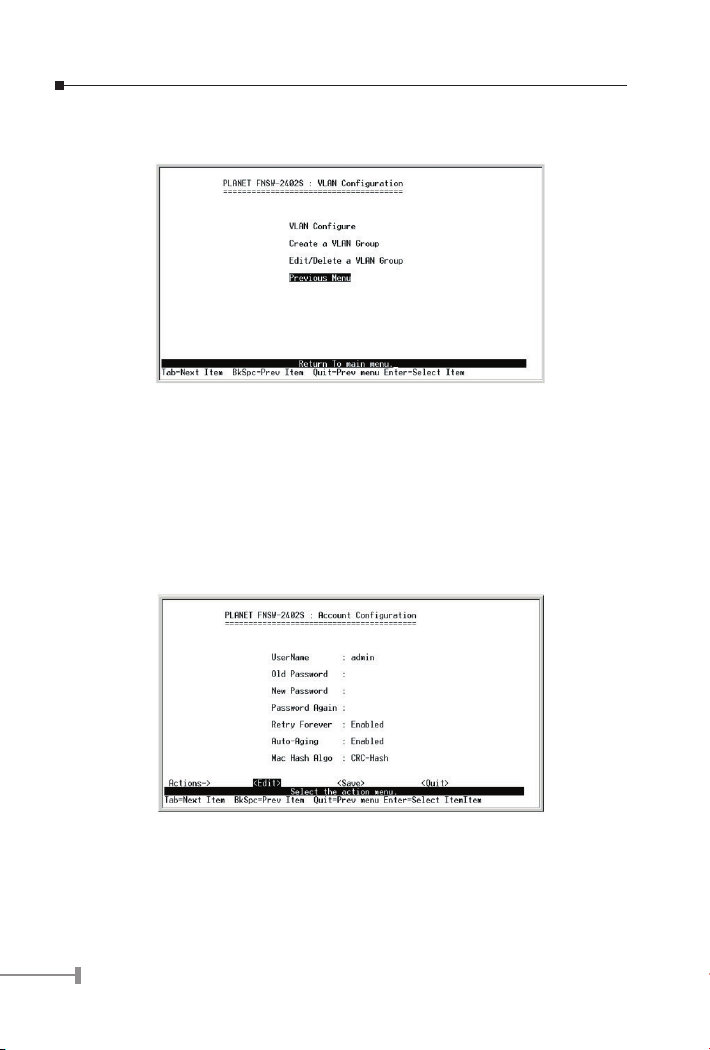
3.2.3.3 VLAN Conguration
Use the “TAB” key to move the highlight to the VLAN Conguration and press “Enter” to
access the screen of VLAN Conguration from the Switch Conguration screen (please see
the gure3-5). The screen of VLAN Conguration in Figure 3-9 appears. Table 3-6 shows
the descriptions of the VLAN Conguration Menu Objects.
Figure 3-9 VLAN Conguration Screen
Object Description
VLAN Configure Allow user to disable the VLAN function, enable Port-based
VLAN or IEEE 802.1Q VLAN. The available options are
shown as below:
Disabled: disable VLAN function of FNSW-2402S.
PortBased: enable port-based VLAN function of FNSW2402S.
802.1Q: enable IEEE 802.1Q VLAN function of FNSW2402S. After enabling this function, please assign PVID and
create VLAN group on each port for the function to work
normally. The available PVID ranges from 1 to 255.
16
Page 19
Create a VLAN
Group
Allow user to create new VLAN group. Maximum number of
VLAN group allowed on this switch is 26 for both port-based
VLAN and IEEE 802.1Q VLAN
Edit/Delete a
Allow user to edit or delete existing VLAN group.
VLAN Group
Previous Menu Back to Switch Configuration screen.
Table 3-6 Descriptions of the VLAN Conguration screen Objects
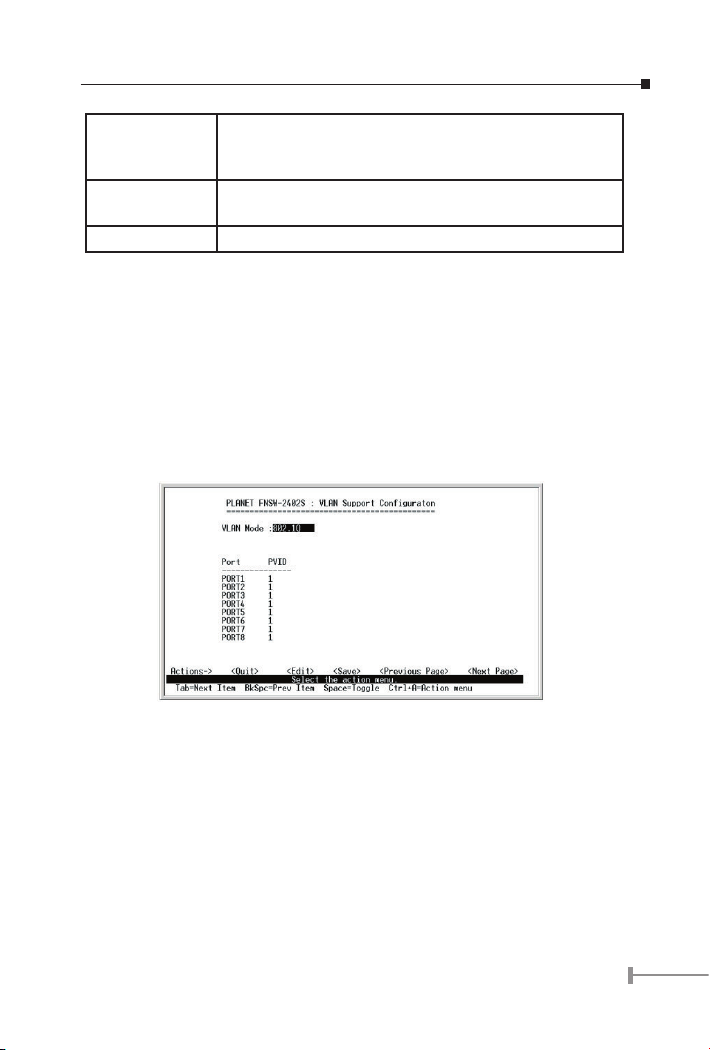
3.2.3.3.1 VLAN Congure
Use the “TAB” key to move the highlight to the VLAN Congure and press “Enter” to
access the screen of VLAN Congure. The screen of VLAN Congure in Figure 3-10
appears. Use the “TAB” key to move the highlight to the <Edit> and press “Enter” to
modify these settings. Use the “TAB” key to move the highlight to the selection and press
the “Space Bar” key to toggle back and forth between the options. After setup completed,
press “Ctrl-A” key to return to Actions menu and use the “TAB” key to choose the <Save>
for saving the current conguration. Choose <Quit> back to the previous menu. If you
choose 802.1Q VLAN mode, PVID (port VLAN ID) setup page is shown. When VLANuntagged packets enter this switch, it will use the PVID settings to add the VLAN tag to
the packets. The available PVID on this switch ranges from 1 to 255.
Figure 3-10 VLAN Congure screen
3.2.3.3.2 Create a VLAN Group
Choose “PortBased” or “802.1Q” from the VLAN mode of VLAN Congure. Use the “TAB”
key to move the highlight to the Create a VLAN Group and press “Enter” to access the
screen of Create a VLAN Group. The screen of Create a VLAN Group in Figure 3-11& 312 appears. Use the “TAB” key to move the highlight to the <Edit> and press “Enter”
to modify these settings. Use the “TAB” key to move the highlight to the selection and
press the “Space Bar” key to toggle back and forth between the options. The maximum
number of VLAN group allowed on this switch is 26 for both port-based VLAN and IEEE
802.1Q VLAN.
Note: Though you can congure a VLAN group with VLAN ID from 1 to 4094, the
supported PVID on this switch is only from 1 to 255.
17
Page 20
19
Figure 3-11 Create a port-based VLAN Group screen
Figure 3-12 Create an IEEE 802.1Q VLAN Group screen
After setup completed, press “Ctrl-A” key to return to Actions menu and use the “TAB” key
to choose the <Save> for saving the current conguration. The screen in gure 3-13 &
3-14 appears with message “Save successfully! Press any key to return!”
Figure 3-13 Save Port-based VLAN Conguration successfully screen
18
Page 21
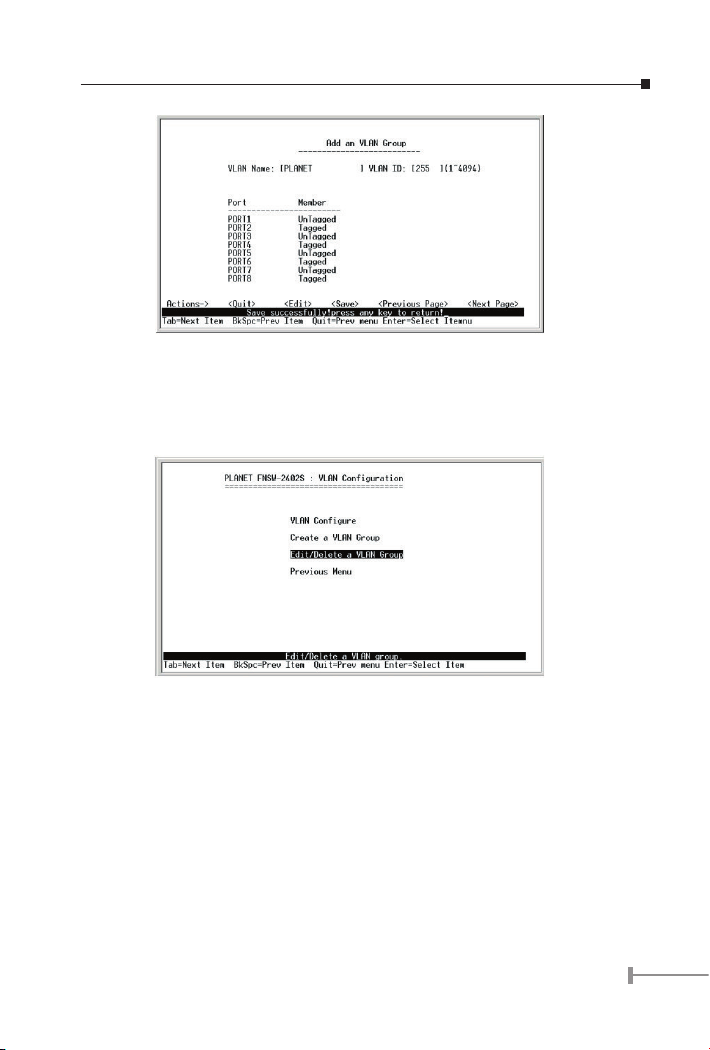
Figure 3-14 Save 802.1Q VLAN conguration successfully screen
3.2.3.3.3 Edit / Delete a VLAN Group
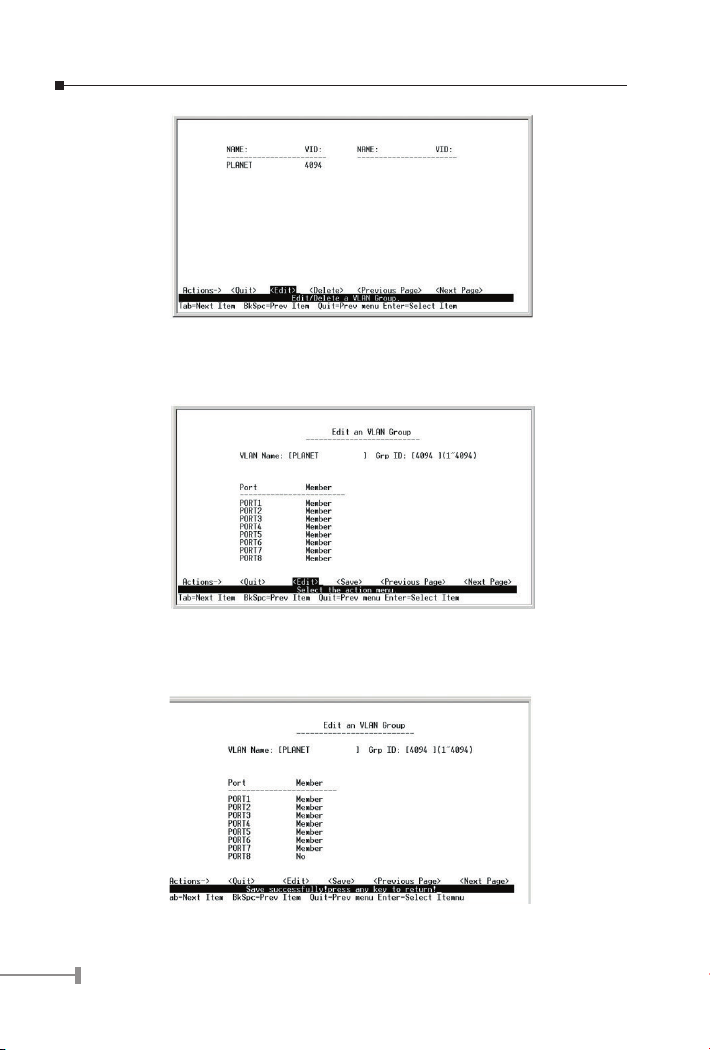
Use the “TAB” key to move the highlight to the Edit/Delete a VLAN Group (Figure 3-15)
and press “Enter” to access the screen of Edit/Delete a VLAN Group. The screen of Edit/
Delete a VLAN Group appears.
Figure 3-15 Edit/Delete a VLAN Group screen
3.2.3.3.3.1 Edit a VLAN Group
Use the “TAB” key to move the highlight to the <Edit> and press “Enter” to start editing
the existing VLAN group. The screen in gure 3-16 appears.
19
Page 22
21
Figure 3-16 Edit existing VLAN Group Conguration Screen
Use the “Tab” and “Back space” to move forth and back between VLAN and press “Enter”
to select the VLAN you want to edit. The screen in gure 3-17 appears. Please follow the
same procedure as section 3.2.3.3.2 Create a VLAN Group to edit the VLAN group.
Figure 3-17 Edit existing VLAN Group Conguration Screen
After editing is completed, press “Ctrl-A” key to return to Actions menu and use the “TAB”
key to choose the <Save> for saving the current conguration. The screen in gure 3-18
appears with message “Save successfully! Press any key to return!”
Figure 3-18 Save VLAN Conguration successfully screen
20
Page 23
3.2.3.3.3.2 Delete a VLAN Group
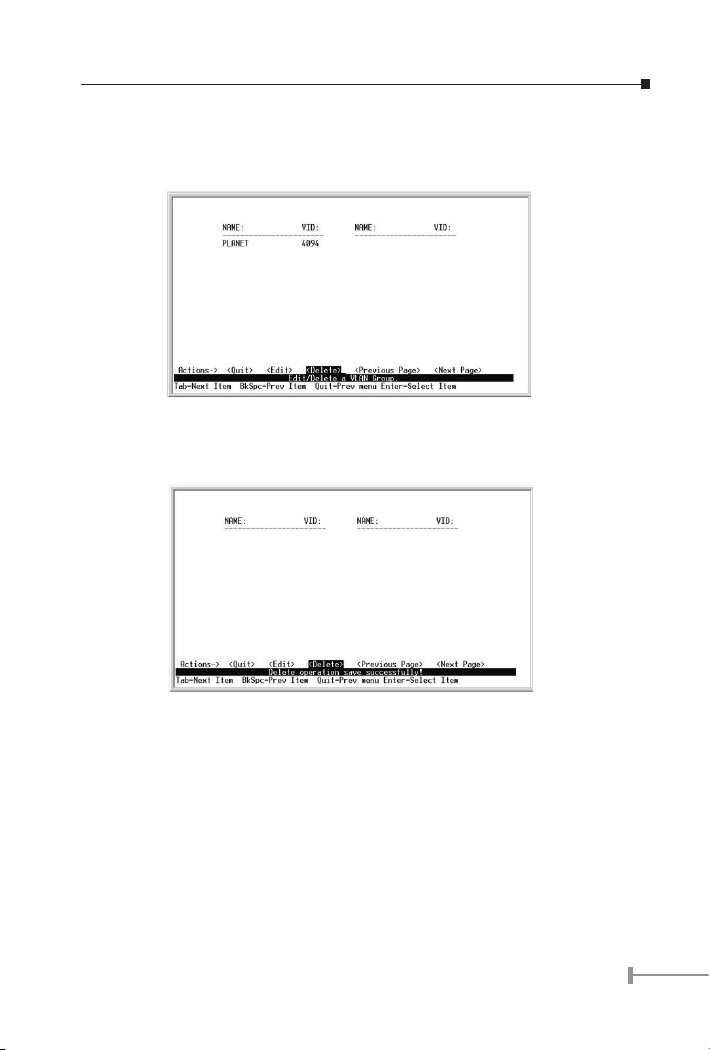
On “Edit / Delete a VLAN group” menu, use the “TAB” key to move the highlight to the
<Delete> and press “Enter” to start the deleting of existing VLAN group. The screen of
Delete a VLAN Group in Figure 3-19 appears.
Figure 3-19 Delete existing VLAN group Screen
Use “TAB” or “Backspace” key to move the highlight to the VLAN you want to delete and
press “Enter” to delete the VLAN. The screen similar to Figure 3-20 appears with message
“Delete operation save successfully!”
Figure 3-20 Delete existing VLAN Group successfully Screen
21
Page 24
23
3.2.3.3.4 Previous Menu
Choose “Previous Menu” to return to Switch Conguration screen of FNSW-2402S.
Figure 3-21 Previous Menu Screen
3.2.3.4 Misc Conguration
Use the “TAB” key to move the highlight to the Account Conguration and press “Enter” to
access the screen of Account Conguration from the Switch Conguration screen (please
see the gure 3-5). The screen of Account Conguration in Figure 3-22 appears. Table
3-7 shows the descriptions of the Account Conguration screen Objects. The Account
Conguration menu includes the username & passwords modication, Retry Forever
function and Auto-Aging function enabling or disabling, and Mac Hash Algorithm mode
selection. Use the “TAB” key to choose the <Edit>, then start to modify these settings.
Use the “TAB” key to move the highlight to the selection and press the “Space Bar” key to
toggle back and forth between the options.
Figure 3-22 Account Conguration screen
After setup is completed. press “Ctrl-A” key to return to Actions menu and use the “TAB”
key to choose the <Save> for saving the current conguration. The screen in gure 323 appears with message “Save successfully! Press any key to return!”
22
Page 25
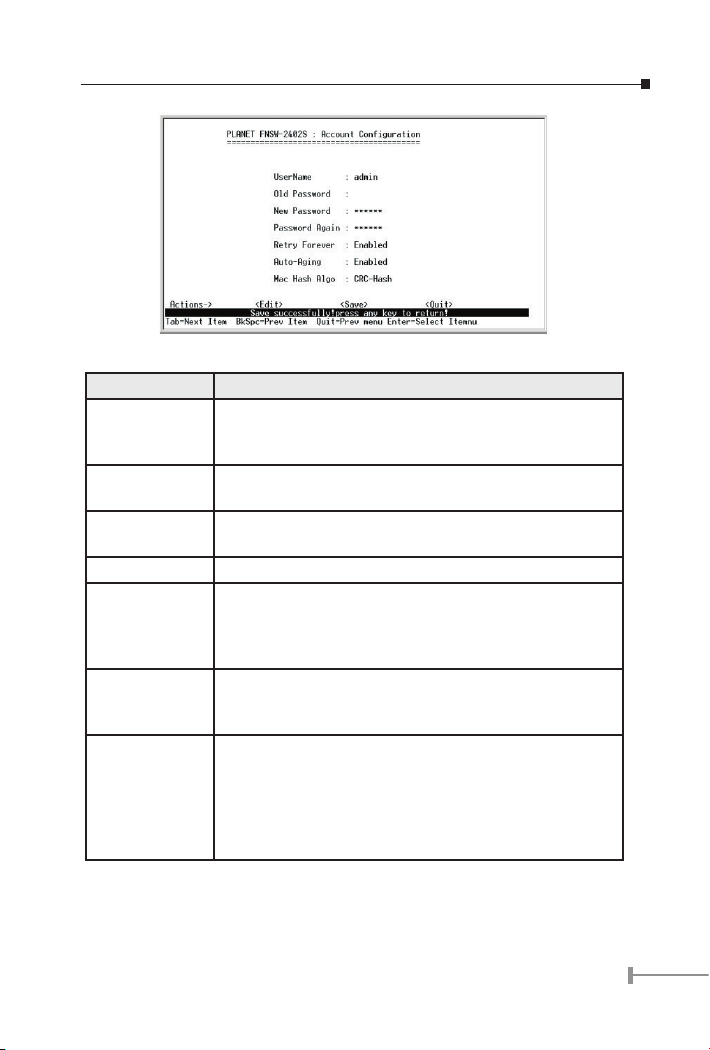
Figure 3-23 Save account Conguration successfully screen
Object Description
Username Allow user to set the login username for FNSW-2402S. The
default username is admin. Up to 10 characters is allowed
for the user name.
Old Password Allow user to input the existing old password for FNSW-
2402S. The default is without password.
New Password Allow user to input the new password for FNSW-2402S. Up
to 10 characters is allowed for the password.
Password Again Please input the new password again to confirm.
Retry Forever If this function is disabled, when a packet meet a collision,
the switch will retry 6 times before discard the packets.
Otherwise, the switch will retry until the packet is successfully sent.
Auto-Aging Allow user to disable or enable the auto-aging function of
FNSW-2402S. When this option is enabled, the auto-aging
time is 300 seconds.
Mac Hash Algo Allow user to choose the MAC address table mapping meth-
od. The available options are shown as below:
DirectMap: directly use MAC address to map to the MAC address table of FNSW-2402S.
CRC-Hash: use CRC-hashing algorithm to map the MAC address to the MAC address table of FNSW-2402S.
Table 3-7 Descriptions of the Account Conguration Screen Objects
23
Page 26
25
3.2.3.5 Main Menu
This function allows user to return to the main menu of FNSW-2402S. The screen in
gure 3-24 appears.
Figure 3-24 Main Menu screen
3.2.4 Switch Information
Press “Enter” to access the screen of Switch Information from the main menu screen
(please see the gure3-4). The following screen in Figure 3-25 appears. Table 3-9
describes the objects that shown in this screen.
Figure 3-25 Switch Information Screen
Object Description
System
Information
Port Status Display the current status of each port from FNSW-2402S. Please
Main Menu Back to Main Menu of FNSW-2402S. Please refer to chapter
Display the firmware version and EEPROM version of FNSW2402S. Please refer to chapter 3.2.4.1 for detail information.
refer to chapter 3.2.4.2 for detail information.
3.2.4.3 for detail information.
Table 3-9 Descriptions of the Switch Information screen Objects
24
Page 27
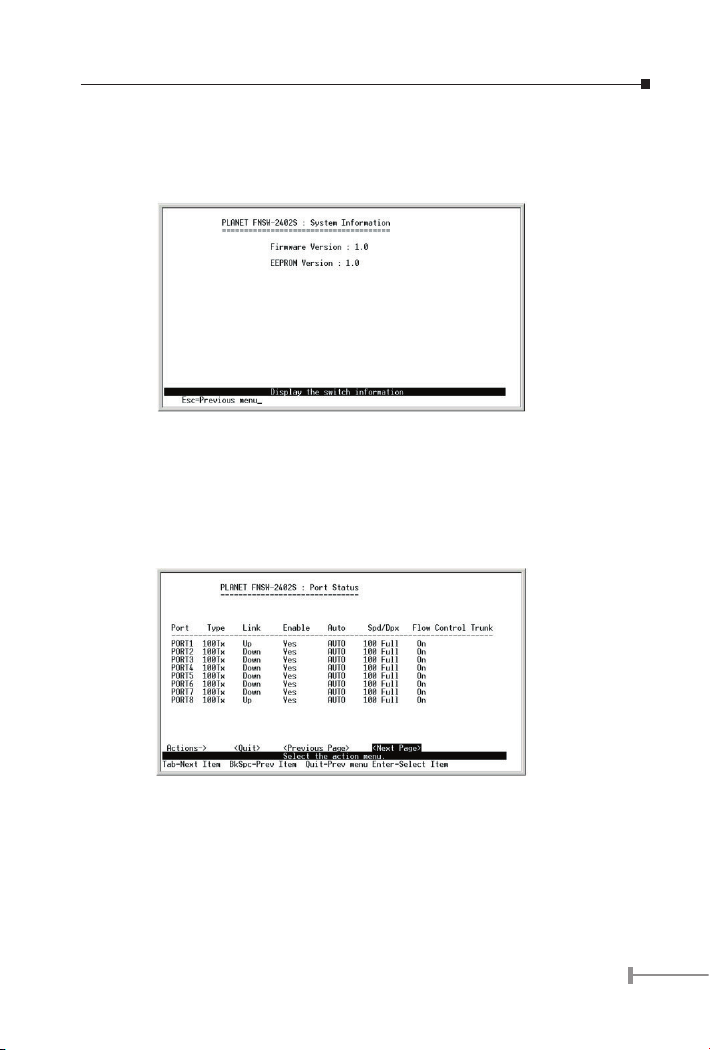
3.2.4.1 System Information
Use the “TAB” key to move the highlight to the System Information and press “Enter” to
access the screen of System Information from the Switch Information screen (please see
the gure 3-25). The screen in gure 3-26 appears. Press “Esc” to return to the Switch
Information screen.
Figure 3-26 System Information Screen
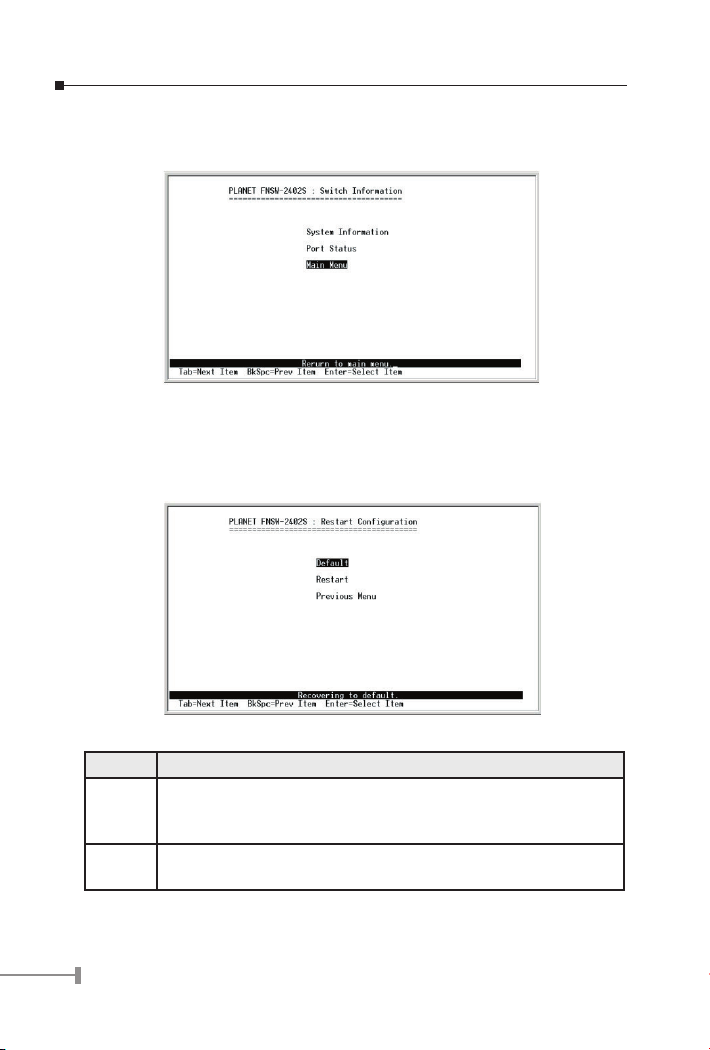
3.2.4.2 Port Status
Use the “TAB” key to move the highlight to the Port Status and press “Enter” to access
the screen of Port Status from the Switch Information screen (please see the gure 3-25).
This screen allows user to view the current status of each port from FNSW-2402S. The
screen in gure 3-27 appears. Choose < Next Page> to go to next page of Port Status
and choose < Previous Page> to return to previous page of Port Status. Choose <Quit>
to return to the Switch Information screen.
Figure 3-27 Port Status Screen
25
Page 28
27
3.2.4.3 Main Menu
This function allows user to return to the main menu of FNSW-2402S. The screen in gure
3-28 appears, press “Enter” to return to the main menu screen.
Figure 3-28 Main Menu Screen
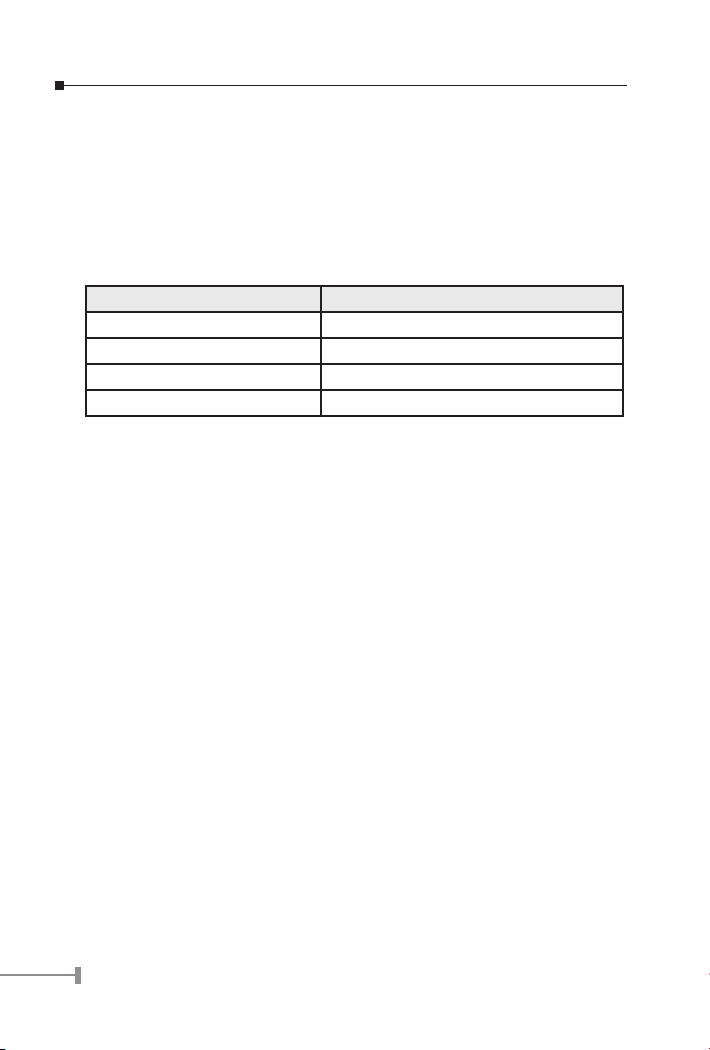
3.2.5 Reboot Switch
Press “Enter” to access the screen of Reboot Switch from the main menu screen (please
see the gure3-4). The screen in Figure 3-29 appears. Table 3-10 describes the objects
that shown in this screen.
Figure 3-29 Restart Conguration Screen
Object Description
Default This function allows user to reset the FNSW-2402S back to factory
default settings. Please refer to chapter 3.2.5.1 for detail information.
Restart This function allows user to reboot the FNSW-2402S. Please refer to
chapter 3.2.5.2 for detail information.
26
Page 29

Previous
Menu
Back to Main Menu of FNSW-2402S. Please refer to chapter 3.2.5.3
for detail information.
Table 3-10 Descriptions of the Switch Information Screen Objects
3.2.5.1 Default
Use the “TAB” key to move the highlight to the Default and press “Enter” from the Restart
Conguration screen (please see the gure 3-29). The following screen in gure 3-30
appears.
Figure 3-30 Reset the Switch to default mode Screen
Press “ Y”, then the following screen in gure 3-31 appears.
Figure 3-31 Reset the switch to default mode screen
27
Page 30

29
Then the FNSW-2402S will reboot and go to the login screen. The screen in gure 3-32 &
3-33 appears. All the conguration you have made to the switch is cleared now.
Figure 3-32 Reboot the FNSW-2402S Screen
Figure 3-33 FNSW-2402S login Screen
3.2.5.2 Restart
Use the “TAB” key to move the highlight to the Restart and press “Enter” from the Restart
Conguration screen (please see the gure 3-29). The following screen in gure 3-34 &
3-35 appears. Please note all unsaved settings will be gone after restart.
Figure 3-34 Rebooting FNSW-2402S Screen
28
Page 31

Figure 3-35 Rebooting FNSW-2402S Screen
Then the FNSW-2402S’s login screen in gure 3-36 appears.
Figure 3-36 FNSW-2402S login Screen
3.2.5.3 Previous Menu
This function allows user to return to the main menu of FNSW-2402S. The screen in gure
3-37 appears.
Figure 3-37 Previous Menu Screen
29
Page 32

31
3.2.6 Logout
Press “Enter” to access the screen of Logout from the main menu screen (please see
the gure3-4). Then users will logout from the FNSW-2402S. The screen in Figure 3-38
appears.
Figure 3-38 FNSW-2402S login Screen
30
Page 33

Chapter 4
SWITCH OPERATION
4.1 Address Table
The Switch is implemented with an address table. This address table composed of many
entries. Each entry is used to store the address information of some node in network,
including MAC address, port no, etc. This information comes from the learning process
of Ethernet Switch.
4.2 Learning
When one packet comes in from any port, the Switch will record the source address, port
no. and the other related information in address table.
This information will be used to decide either forwarding or ltering for future packets.
4.3 Forwarding & Filtering
When one packet comes from some port of the Ethernet Switching, it will also check
the destination address besides the source address learning. The Ethernet Switching will
lookup the address-table for the destination address. If not found, this packet will be
forwarded to all the other ports except the port which this packet comes in. And these
ports will transmit this packet to the network it connected. If found, and the destination
address is located at different port from this packet comes in, the Ethernet Switching will
forward this packet to the port where this destination address is located according to the
information from address table. But, if the destination address is located at the same port
with this packet comes in, then this packet will be ltered. Thereby increasing the network
throughput and availability.
4.4 Store-and-Forward
Store-and-Forward is one type of packet-forwarding techniques. A Store-and-Forward
Ethernet Switching stores the incoming frame in an internal buffer, do the complete error
checking before transmission. Therefore, no error packets occurrence, it is the best choice
when a network needs efciency and stability.
The Ethernet Switch scans the destination address from the packet-header, searches the
routing table provided for the incoming port and forwards the packet, only if required. The
fast forwarding makes the switch attractive for connecting servers directly to the network,
thereby increasing throughput and availability. However, the switch is most commonly
used to segment existing hubs, which nearly always improves overall performance. An
Ethernet Switching can be easily congured in any Ethernet network environment to
signicantly boost bandwidth using conventional cabling and adapters.
Due to the learning function of the Ethernet switching, the source address and
corresponding port number of each incoming and outgoing packet are stored in a routing
table. This information is subsequently used to lter packets whose destination address is
on the same segment as the source address. This connes network trafc to its respective
domain, reducing the overall load on the network.
31
Page 34
33
The Switch performs “Store and forward” therefore, no error packets occur. More reliably,
it reduces the re-transmission rate. No packet loss will occur.
4.5 Auto-Negotiation
The STP ports on the Switch have built-in “Auto-negotiation”. This technology automatically
sets the best possible bandwidth when a connection is established with another network
device (usually at Power On or Reset). This is done by detect the modes and speeds at
the second of both device is connected and capable of, Both 10Base-T and 100Base-TX
devices can connect with the port in either Half- or Full-Duplex mode.
If attached device is: 100Base-TX port will set to:
·10Mbps, no auto-negotiation 10Mbps
·10Mbps, with auto-negotiation 10/20Mbps (10Base-T/Full-Duplex)
·100Mbps, no auto-negotiation 100Mbps
·100Mbps, with auto-negotiation 100/200Mbps (100Base-TX/Full-Duplex)
32
Page 35

Chapter 5
TROUBLESHOOTING
This chapter contains information to help you solve problems. If the Ethernet Switch is not
functioning properly, make sure the Ethernet Switch was set up according to instructions
in this manual.
The Link LED is not lit
Solution:
Check the cable connection and remove duplex mode of the Ethernet Switch
Some stations cannot talk to other stations located on The other port
Solution:
Please check the VLAN settings, trunk settings, or port enabled / disabled status.
Performance is bad
Solution:
Check the full duplex status of the Ethernet Switch. If the Ethernet Switch is set to
full duplex and the partner is set to half duplex, then the performance will be poor.
Please also check the in/out rate of the port.
100Base-TX port link LED is lit, the collision LED is blinking, but trafc is
irregular
Solution:
Check that the attached device is not set to dedicated full-duplex. Some devices use
a physical or software switch to change duplex modes. Auto-negotiation may not
recognize this type of full-duplex setting.
33
Page 36

34
35
Page 37
Appendix A
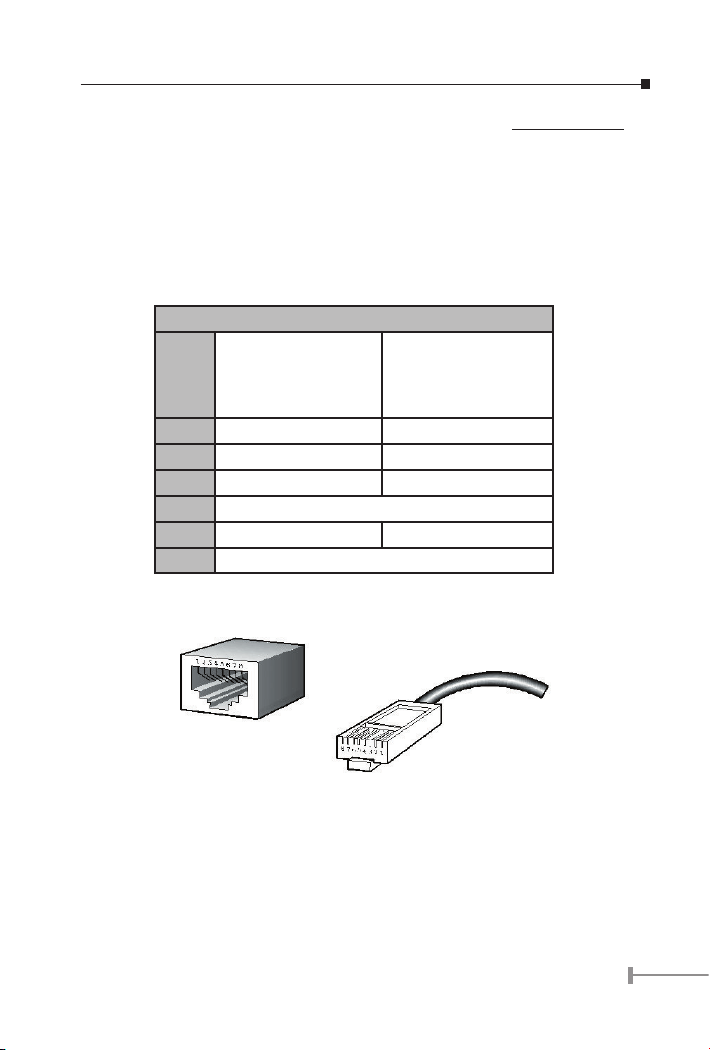
A.1 Switch‘s RJ-45 Pin Assignments
When connecting your 10/100Mbps Ethernet Switch to another switch, a bridge or a hub,
a straight or crossover cable is necessary. Each port of the Switch supports auto-MDI/
MDI-X detection. That means you can directly connect the Switch to any Ethernet devices
without making a crossover cable. The following table and diagram show the standard
RJ-45 receptacle/ connector and their pin assignments:
RJ-45 Connector pin assignment
Contact
1 TX + (transmit) Rx + (receive)
2 TX - (transmit) Rx - (receive)
3 Rx + (receive) TX + (transmit)
4,5* Not used
6 Rx - (receive) TX - (transmit)
7,8* Not used
The standard cable, RJ-45 pin assignment
MDI
Media
Dependant
Interface
MDI-X
Media
Dependant
Interface -Cross
The standard RJ-45 receptacle/connector
35
Page 38
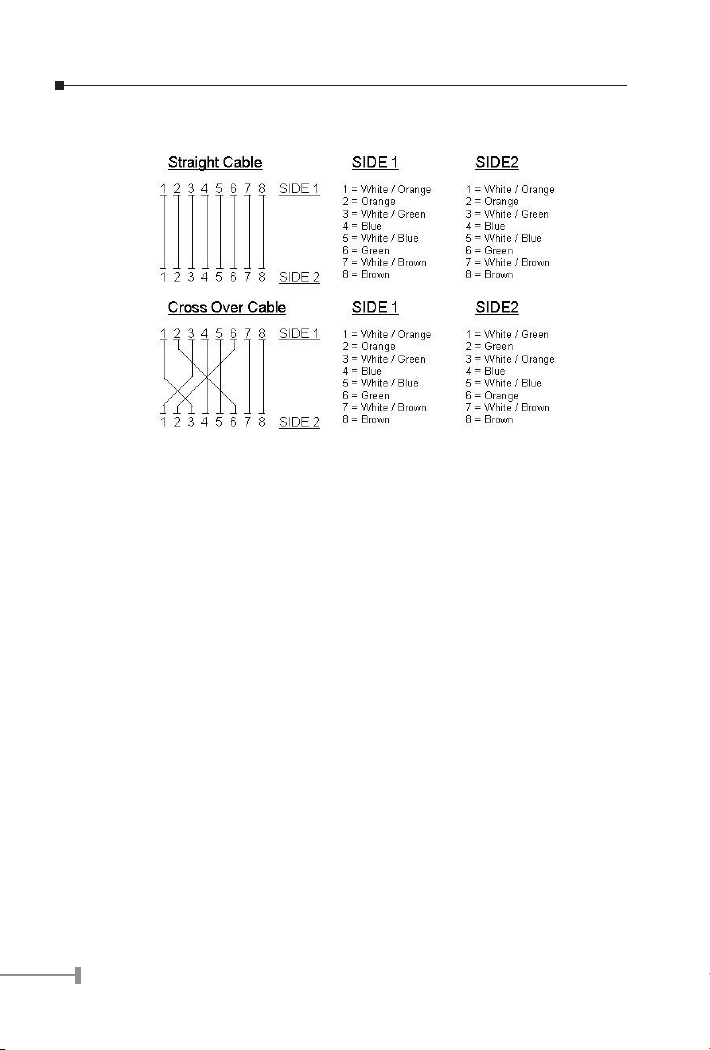
There are 8 wires on a standard UTP/STP cable and each wire is color-coded. The following
shows the pin allocation and color of straight cable and crossover cable connection:
Figure A-1: Straight-Through and Crossover Cable
Please make sure your connected cables are with same pin assignment and color as above
picture before deploying the cables into your network.
36
Page 39

Part No.:2010-000023-000
 Loading...