

Page 1
Digital Media Center
DMA-200
User’s manual
Version 1.0.0
1
Page 2

Copyright
Copyright© 2008 by PLANET Technology Corp. All rights reserved. No part of
this publication may be reproduced, transmitted, transcribed, stored in a
retrieval system, or translated into any language or computer language, in any
form or by any means, electronic, mechanical, magnetic, optical, chemical,
manual or otherwise, without the prior written permission of PLANET.
PLANET makes no representations or warranties, either expressed or implied,
with respect to the contents hereof and specifically disclaims any warranties,
merchantability or fitness for any particular purpose. Any software described in
this manual is sold or licensed "as is". Should the programs prove defective
following their purchase, the buyer (and not this company, its distributor, or its
dealer) assumes the entire cost of all necessary servicing, repair, and any
incidental or consequential damages resulting from any defect in the software.
Further, this company reserves the right to revise this publication and to make
changes from time to time in the contents hereof without obligation to notify any
person of such revision or changes.
All brand and product names mentioned in this manual are trademarks and/or
registered trademarks of their respective holders.
Federal Communication Commission Interference Statement
This equipment has been tested and found to comply with the limits for a Class B
digital device, pursuant to Part 15 of FCC Rules. These limits are designed to
provide reasonable protection against harmful interference in a residential
installation. This equipment generates, uses, and can radiate radio frequency
energy and, if not installed and used in accordance with the instructions, may
cause harmful interference to radio communications. However, there is no
guarantee that interference will not occur in a particular installation. If this
equipment does cause harmful interference to radio or television reception,
which can be determined by turning the equipment off and on, the user is
encouraged to try to correct the interference by one or more of the following
measures:
1. Reorient or relocate the receiving antenna.
2. Increase the separation between the equipment and receiver.
3. Connect the equipment into an outlet on a circuit different from that to which
the receiver is connected.
4. Consult the dealer or an experienced radio technician for help.
2
Page 3
FCC Caution
To assure continued compliance (example-use only shielded interface cables
when connecting to computer or peripheral devices). Any changes or
modifications not expressly approved by the party responsible for compliance
could void the user’s authority to operate the equipment.
This device complies with Part 15 of the FCC Rules. Operation is subject to the
Following two conditions: (1) This device may not cause harmful interference,
and (2) this Device must accept any interference received, including interference
that may cause undesired operation.
Federal Communication Commission (FCC) Radiation Exposure
Statement
This equipment complies with FCC radiation exposure set forth for an
uncontrolled environment. In order to avoid the possibility of exceeding the FCC
radio frequency exposure limits, human proximity to the antenna shall not be
less than 20 cm (8 inches) during normal operation.
R&TTE Compliance Statement
This equipment complies with all the requirements of DIRECTIVE 1999/5/EC OF
THE EUROPEAN PARLIAMENT AND THE COUNCIL OF 9 March 1999 on radio
equipment and telecommunication terminal Equipment and the mutual
recognition of their conformity (R&TTE)
The R&TTE Directive repeals and replaces in the directive 98/13/EEC
(Telecommunications Terminal Equipment and Satellite Earth Station Equipment)
As of April 8, 2000.
WEEE Regulation
To avoid the potential effects on the environment and human health as
a result of the presence of hazardous substances in electrical and
electronic equipment, end users of electrical and electronic equipment
should understand the meaning of the crossed-out wheeled bin symbol. Do not
dispose of WEEE as unsorted municipal waste and have to collect such WEEE
separately.
Safety
This equipment is designed with the utmost care for the safety of those who
install and use it. However, special attention must be paid to the dangers of
electric shock and static electricity when working with electrical equipment. All
3
Page 4

guidelines of this and of the computer manufacture must therefore be allowed at
all times to ensure the safe use of the equipment.
Revision
User’s Manual for Digital Media Center
Model: DMA-200
Rev: 1.0 (Sep. 2008)
Part No. EM-DMA-200v1
4
Page 5

Table of Contents
1. INTRODUCTION................................................................................................................................................... 7
1.1 Feature ............................................................................................................................ 7
1.2 Package Contents........................................................................................................ 8
1.3 Physical Details............................................................................................................ 9
2. INSTALLATION................................................................................................................................................... 14
2.1 System Requirement................................................................................................ 14
2.2 Getting Start................................................................................................................ 14
2.2.1Wired Network Setup..................................................................................................................... 21
2.2.2 Using the Digital Media Sever (DMS).....................................................................................22
2.3 Configuring the DMS ................................................................................................ 23
2.4 Advanced Network Setup....................................................................................... 24
2.4.1 Connect Digital Media Center to PC directly........................................................................24
2.4.1.1 Disable Firewall under Windows Vista.............................................................25
3. THE DIGITAL MEDIA SERVER (DMS).................................................................................................... 31
3.1 Media List Tab............................................................................................................. 31
3.2 Importing Media........................................................................................................ 32
3.3 System Tab .................................................................................................................. 34
3.4 Options Tab.................................................................................................................. 35
3.4.1 Play Multimedia Files.....................................................................................................................36
3.4.1.1 Music.....................................................................................................................................36
3.4.1.2 Photos..................................................................................................................................43
3.4.1.3 Video.....................................................................................................................................50
3.5 Internet Media............................................................................................................ 60
3.5.1 Play Internet Radio – Live 365 TM..........................................................................................60
3.5.2 Play Internet Radio – My Radio................................................................................................63
3.5.3 Play Internet Video – My Video.................................................................................................65
3.5.4 Viewing “Youtube” Content........................................................................................................66
3.5.5 Add/Delete the Internet Radio/TV Stations Lists...............................................................69
3.6 Firmware Upgrade and Reset to Default.......................................................... 71
3.6.1 Upgrade by Direct Internet Access..........................................................................................71
3.6.2 Upgrade by Using USB Flash Stick.......................................................................................... 71
3.6.3 Reset to Default..............................................................................................................................72
3.7 Miscellaneous Settings............................................................................................ 73
5
Page 6

3.7.1 System Setup..................................................................................................................................73
3.7.1.1 Language............................................................................................................................74
3.7.1.2 TV Mode Setup................................................................................................................75
3.7.1.3 Audio Setup......................................................................................................................76
3.7.1.4 Video Setup.......................................................................................................................76
3.7.1.5 Other Settings.................................................................................................................77
3.8 FAQ.................................................................................................................................. 78
Appendix A........................................................................................................................... 81
6
Page 7

1. Introduction
The PLANET Digital Media Center, DMA-200 is advanced customer premises
equipment (CPE) device for delivering streaming audio, video, and data
directly from network or Internet on consumers’ TV sets and/or Home
Entertainment systems. If you have already set up your local area network or
connected to Internet, you can huddle on the sofa using supplied remote
control to search and enjoy your favorite pictures, movies, or surf webs., so
you don‘t always have to be seated next to your computer or Home
Entertainment systems. Besides connecting your PC with the network, you
can simply plug in your USB devices to access and play the media files via
user-friendly On-Screen Display (OSD) menu.
In order to close your need and customize a unique viewing experience for
you, we provide the collective web-browser to let you enjoy more Internet
entertainment. Default web-browser page designs many links (appears as
buttons or thumbnail) that include UGC (User Generated Contents) website,
and you can choose these links directly to view amazing variety of internet
video contents.
With the fascinating features, the DMA-200 provides advanced MPEG1/2/4
video and MP3 audio compression algorithms and can deliver content
streams with optimal quality over networks with limited bandwidth, the
PLANET DMA-200 provides an immersive way of managing and interacting
with your entertainment library. Explore your complete digital collections of
music, photos, and videos in a single window; the DMA-200 is a powerful
Digital Media Center that supports Standard and High Definition (HD) video,
audio/video playback, web browsing and a myriad of media applications.
1.1 Feature
z Stream media contents from a PC or digital device to your entertainment
center.
z Instant access video, music, and photo on USB devices via a built-in USB
2.0 connector.
z Listen to digital music on your stereo system.
z View digital photo, slideshow, and video on TV.
7
Page 8

z Enjoy superior video quality provided by the progressive scan MPEG 1/2/4
contents.
z UPnP AV and DLNA compliant for maximum compatibility.
z Sleek design complements your existed audio/video equipment.
z Built in coaxial digital audio output.
z Built in Composite / S-Video / Component video output.
z Throughput up to 10/100/1000 Mbps linked with Ethernet network cable.
z Support DHCP and Auto IP for easily connects to your home networking.
z Provide one-touch color coded shortcut buttons remote controller for
quick access to music, photo, video, and online media content.
z Quick access to your media contents via the remote controlled TV
interface.
z Support Internet radio (Live 365, vTuner, etc.)
z Support media playlist.
z Multiple Media Formats Support.
z Favorite Web TV / Photo / Radio Station Galley.
z Network Setup Wizard for Wired Easy Setup.
z Surfing Internet on TV Simply.
z Support Bit Torrent Downloading.
1.2 Package Contents
DMA-200 Unit x 1
Remote Controller x 1
Power Adapter x 1
AV Cable (RCA) x 1
RJ-45 Cable (Blue) x 1
HDMI Cable (Black) x 1
Prob-Up Stand x 1
8
Page 9
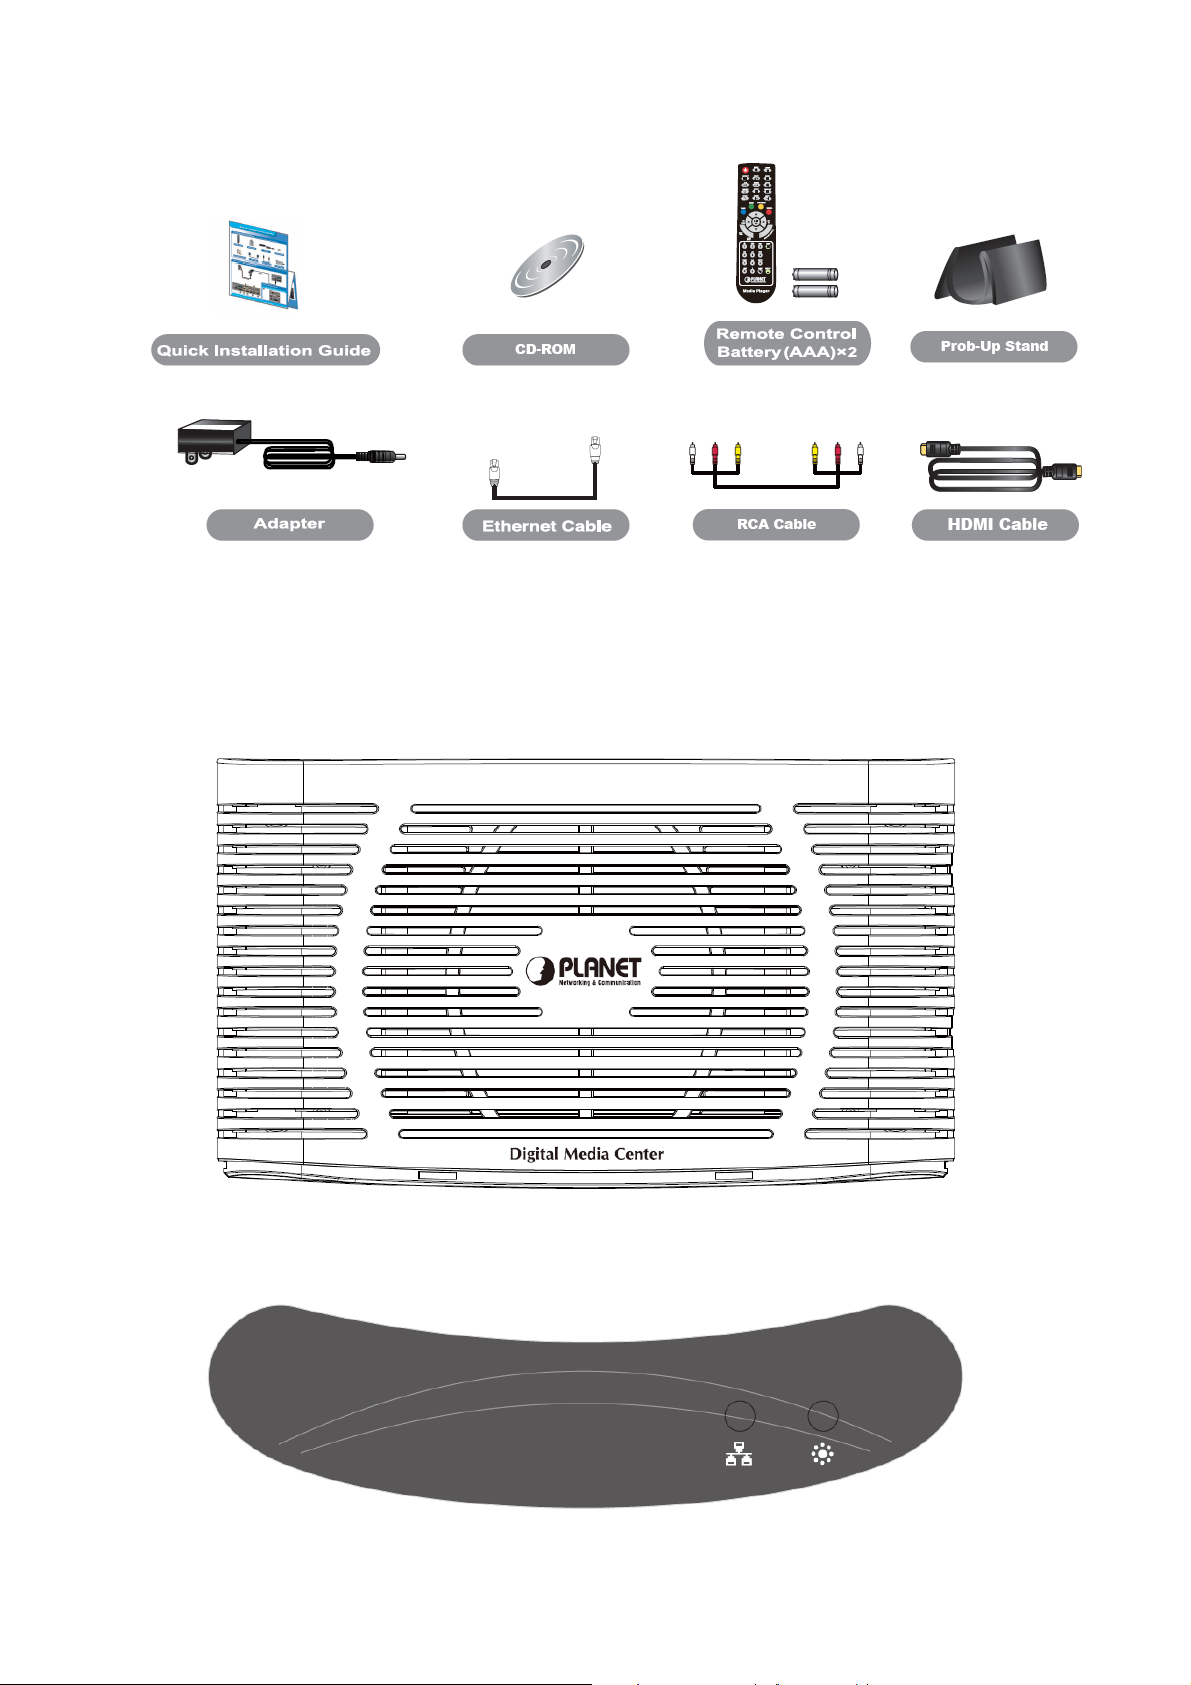
1.3 Physical Details
Top Panel
Front Panel
9
Page 10
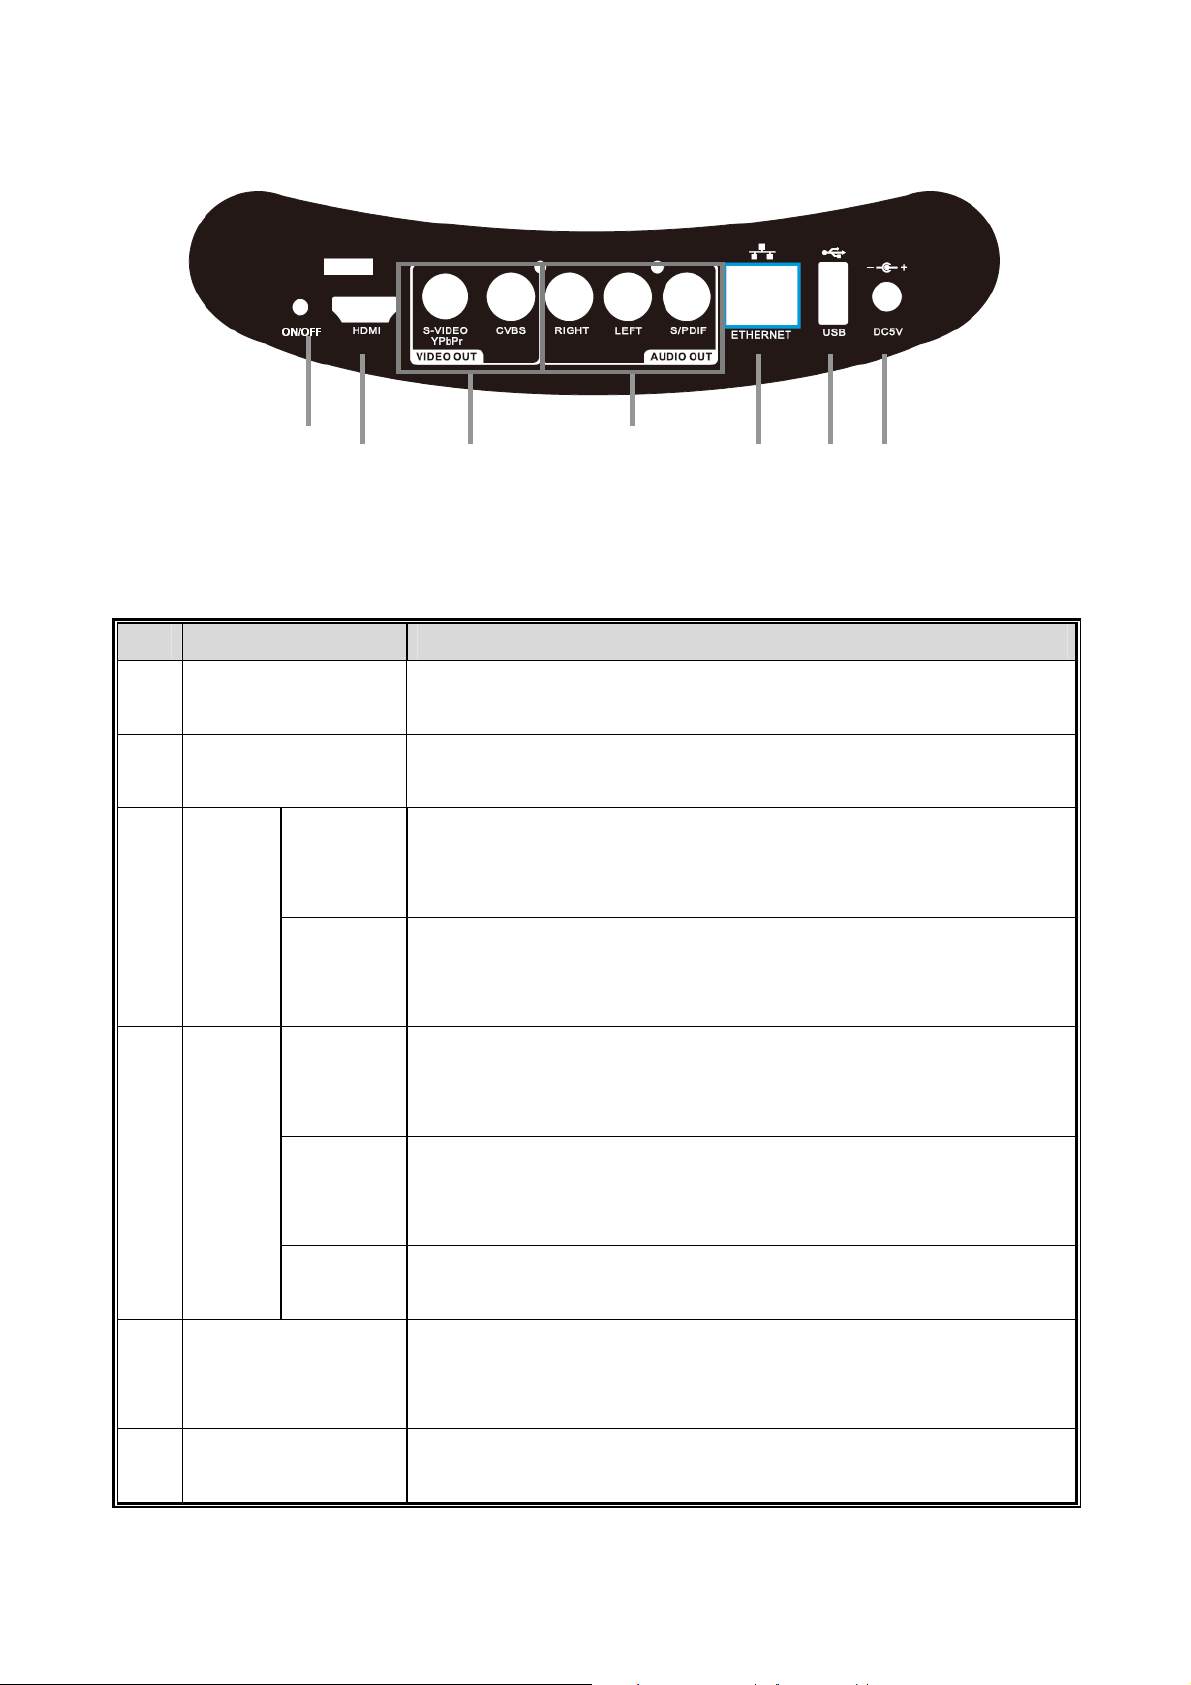
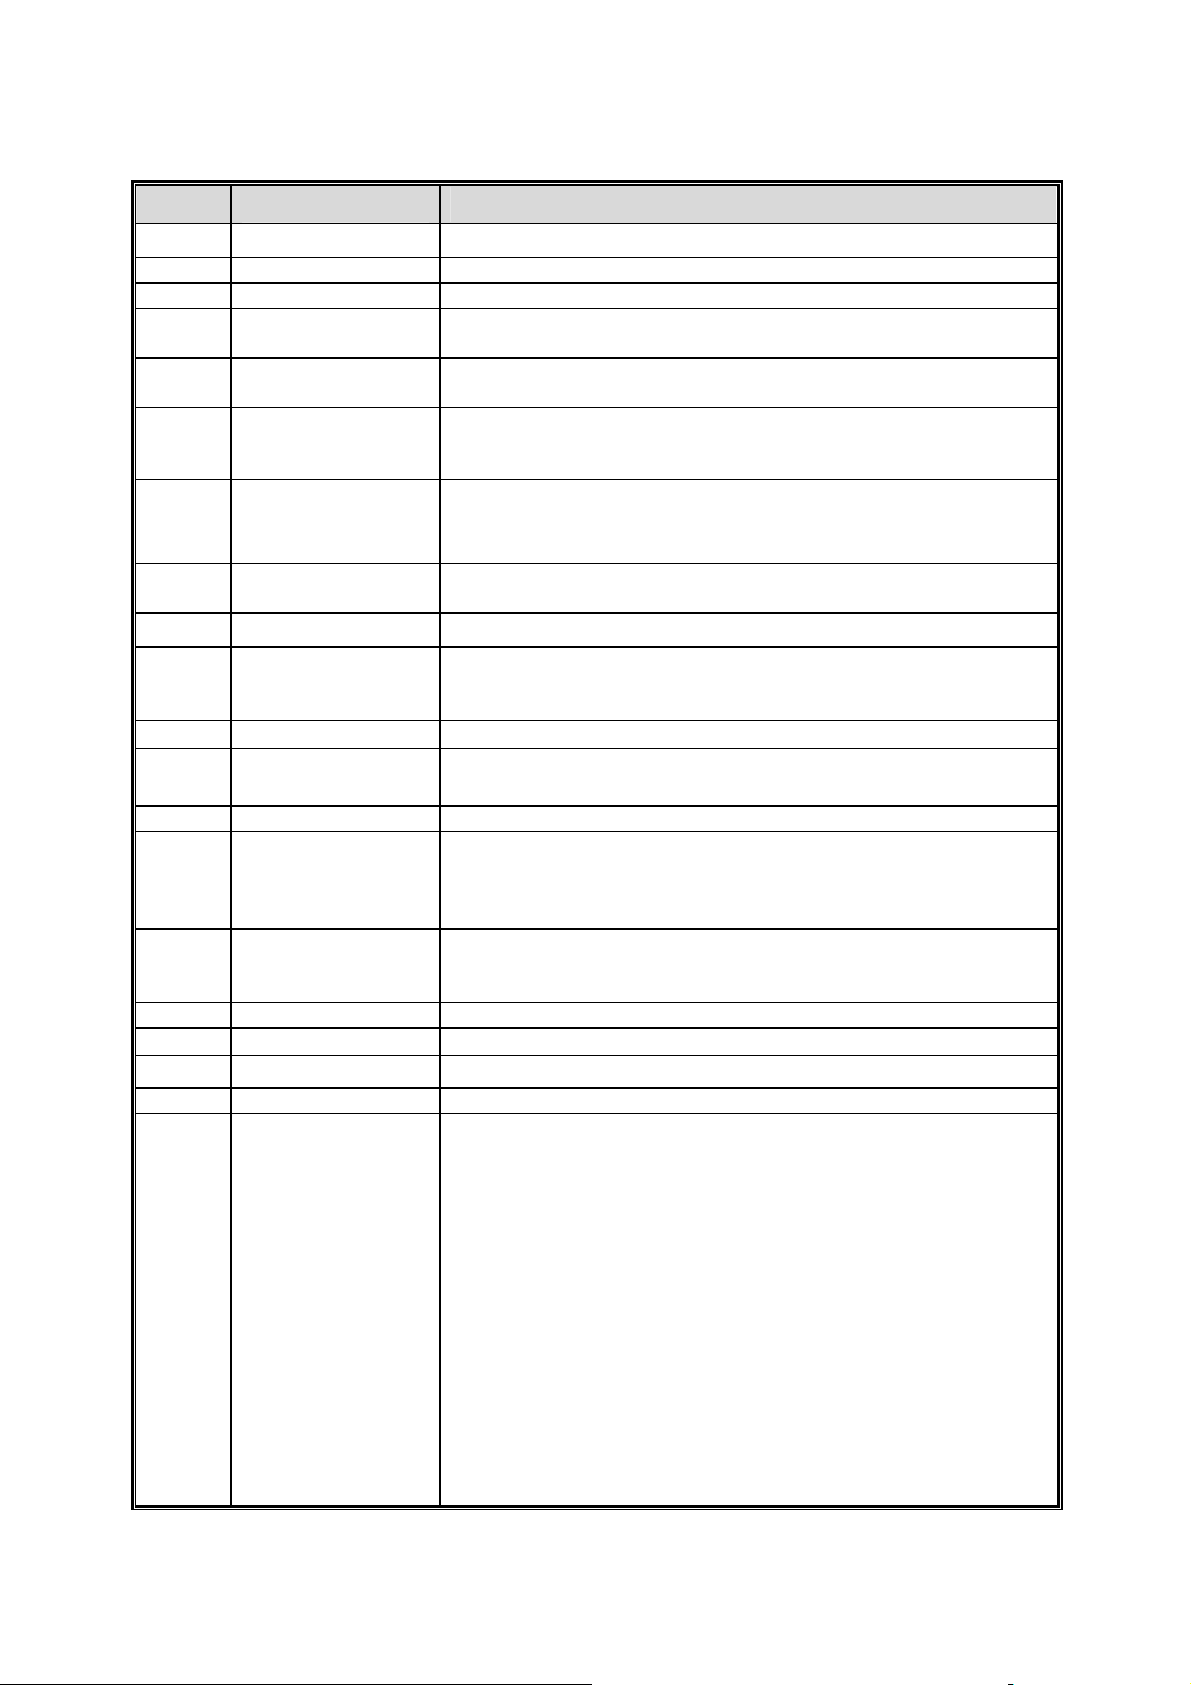
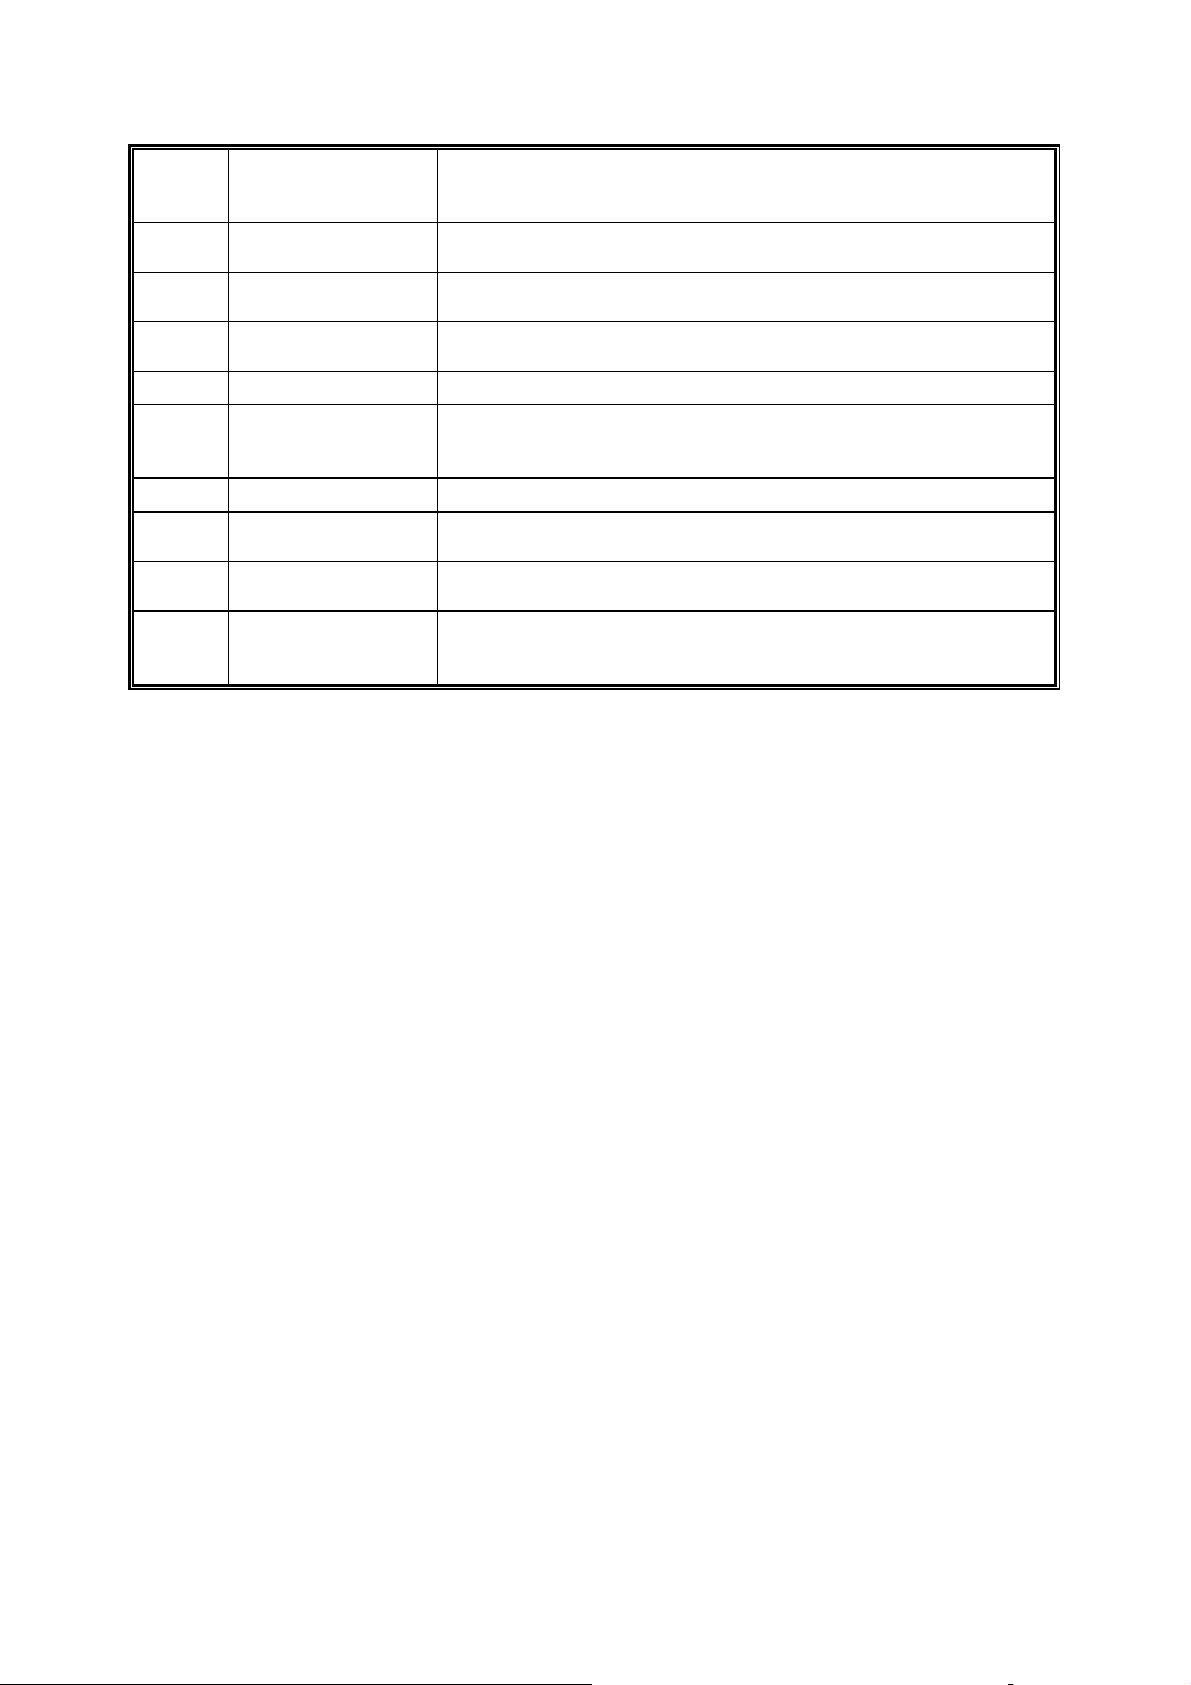
Rear Panel
1
2
3 4 5 6
Rear Panel Port and Button Definition
No. Connector Description
7
ON/OFF
Power ON / OFF switch
1
Button
HDMI Connect to this port cable to HDMI device via HDMI
2
cable.
Video
Out
S-Video
Use S-Video cable to connect to “S-Video” port of
Video out on the TV sets or Home Entertainment
systems in your home.
3
Use AV cable to connect to “CVBS” port of Video out
CVBS
on the TV sets or Home Entertainment systems in your
home.
Audio
Out
RIGHT
Use AV cable to connect to the “RIGHT” port of Audio
Out on the TV sets or Home Entertainment systems in
your home.
Use AV cable to connect to “LEFTT” port of Audio Out
4
LEFT
on the TV sets or Home Entertainment systems in your
home.
S-PDIF
Use AV cable to connect to S-PDIF port of the TV sets
or Home Entertainment systems in your home.
USB Connect the supplied USB cable to this port when
5
connecting to the USB devices such as USB storage or
USB CD-ROM.
Ethernet Digital Media Center is successfully connected to a
6
device through the corresponding port. If the LED is
10
Page 11
flashing, the Digital Media Center is actively sending or
receiving data over that port.
DC 5V Power connector with 5V DC 2.6A
7
1
RReemmoottee CCoonnttrroolllleerr
11
Page 12
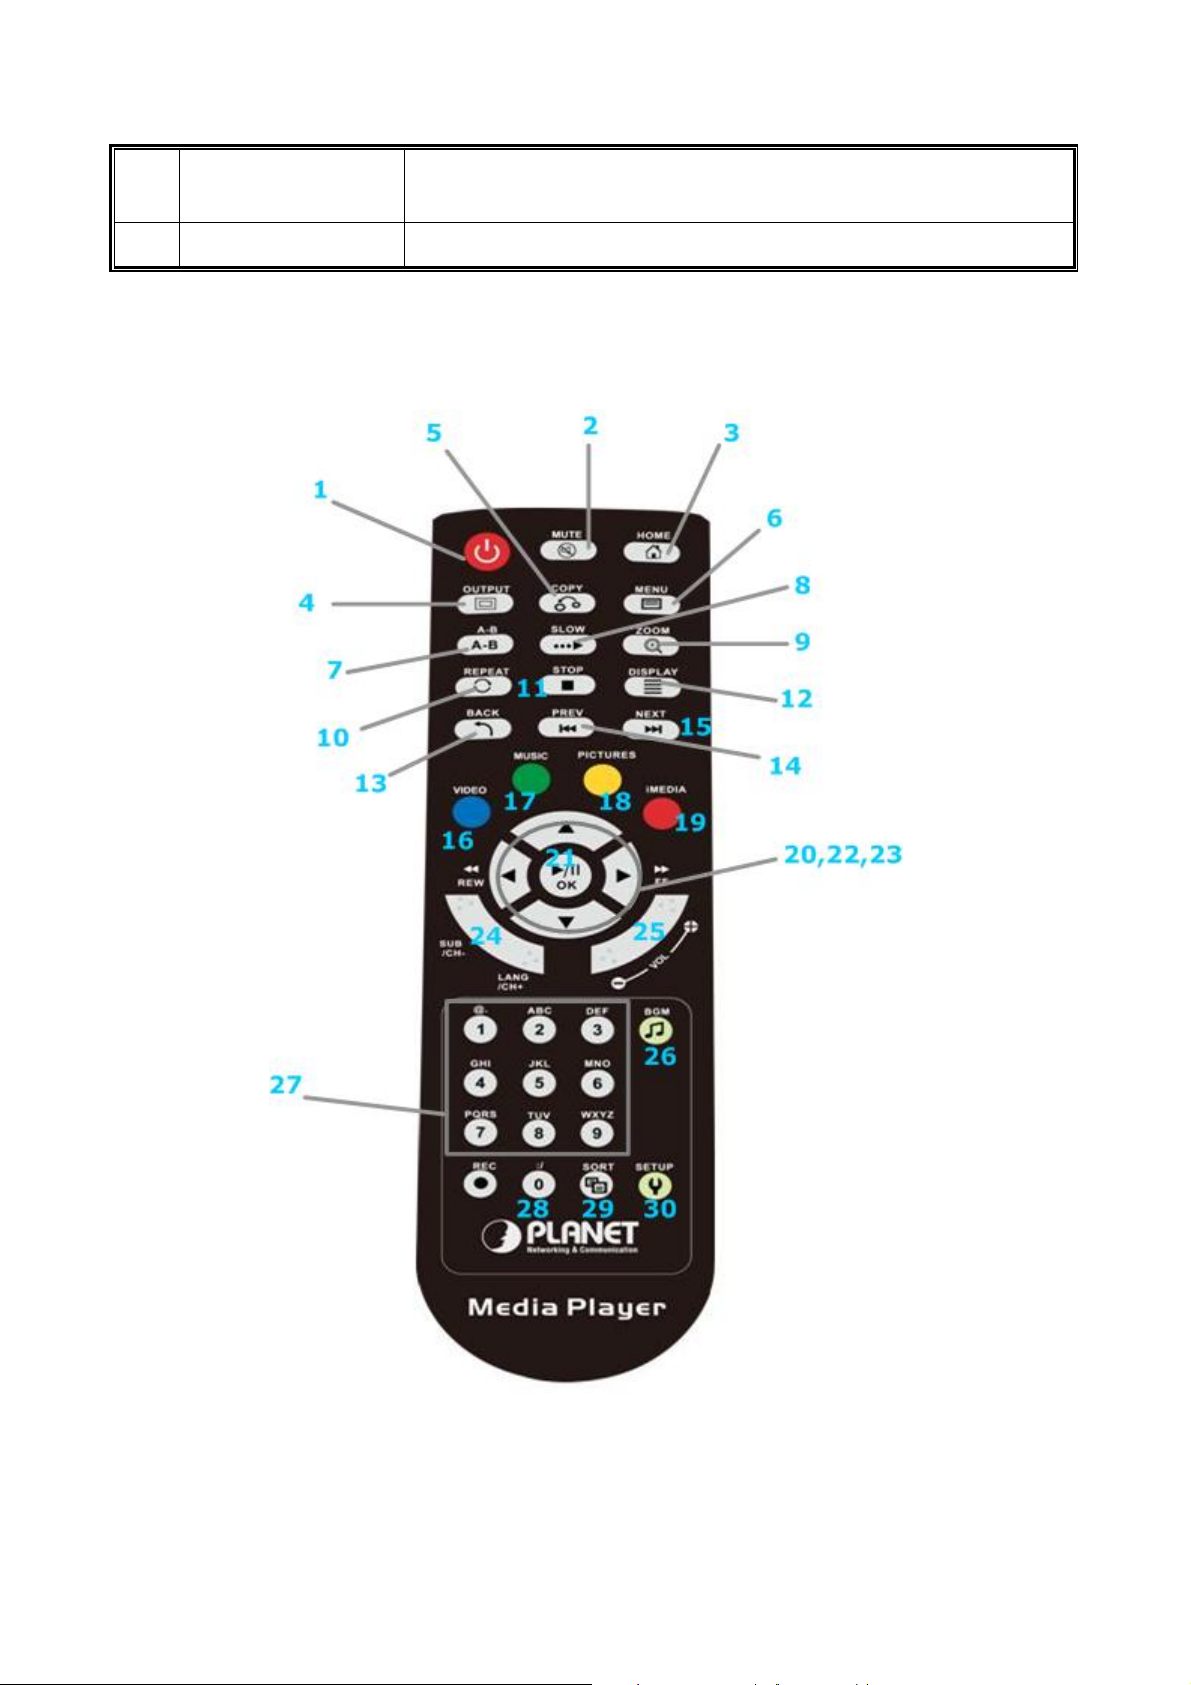
Keypad Definition
No.
Connector
Description
1 POWER Turn On/Off Digital Media Center.
2 MUTE Mute audio output.
3 HOME Hotkey to return to Main Menu.
4 OUTPUT
5 COPY
Switch the video output type with S-VideoÆ
YPbPrÆ HDMI sequence.
Copy USB content into USB flash stick or USB
external Hard disk drive.
6 MENU Menu of file management.
7 A-B
8 SLOW
Set/Cancel A-B repeat mode (for future
implement).
Slow forward / backward the media with speed
1/2x, 1/4x, 1/8x…
9 ZOOM Zoom video or photo.
1. Video & Music: Repeat current file or Repeat all
10 REPEAT
files in this folder or cancel repeat function.
2. Photo: Repeat Background music.
11 STOP Stop the media playing.
12 DISPLAY
1. Video: Display media name and media type.
2. Photo: Display media name and resolution.
13 BACK Press to return to previous folder or setup page.
1. Skip to the previous page when browsing media
14 PREV
files.
2. Skip to the previous file when playing media
files.
1. Skip to the next page when browsing media
15 NEXT
files.
2. Skip to the next file when playing media files.
16 VIDEO Press to jump to VIDEO mode.
17 MUSIC Press to jump to MUSIC mode.
18 PICTURES Press to jump to PHOTO mode.
19 iMEDIA Press to jump to Internet Media mode.
20
DIRECTIONS
(←,↑,↓,→)
1. Press “LEFT” to stop current mode return to
former layer; Press “RIGHT” to enter a selected
folder or server.
2. Video Mode: Press “UP” or “DOWN” to choose
other file.
3. Photo Mode: Move picture in “zoom” mode o
rotate picture in “rotate” mode.
4. Music Mode: Press “UP” to skip to previous
music file or press “DOWN” to skip to next music
file.
12
Page 13
21
OK/Play
Pause
22 REWIND
23
FAST
FORWARD
24 SUB & LANG
1. Play or pause media files.
2. Enter the highlight item.
3. Photo Mode: Enter “rotate” mode.
Fast backward the media file with speed 2x, 4x,
8x…
Fast forward the media file with speed 2x, 4x, 8x…
Select different subtitles and languages when
playing video file.
25 VOLUME+/- Increase/Decrease the volume.
1. Add/Remove a music file as background music.
26 BGM
2. Add/Remove a music station from “My
Media”.
27 NUMBERS Input number with the key value.
28 :/
29 SORT
Hotkey for internet radio URL input. (for future
implement)
Sorting all the files in one folder and re-arrange in
alphabetical order.
Hotkey to Setup Menu:
30 SETUP
“UP” & “DOWN” to move cursor.
“LEFT” & “RIGHT” to enter or leave page.
13
Page 14
2. Installation
This chapter offers information about installing your router. If you are not
familiar with the hardware or software parameters presented here, please
consult your service provider for the values needed.
2.1 System Requirement
1.8GHz Processor or higher
512MB RAM or above (512MB recommended)
HD space at least 1 GB free for installation
Microsoft DirectX 9 or above
Windows 2000 or above
Windows Media Player 9 or above
2.2 Getting Start
This chapter shows you how to configure these steps to connect DMA-200,
and the following figure is the Rear Panel of Digital Media Center.
Step1Î To Select Video Output By HDMI, S-Video, or AV Cable
22
Page 15
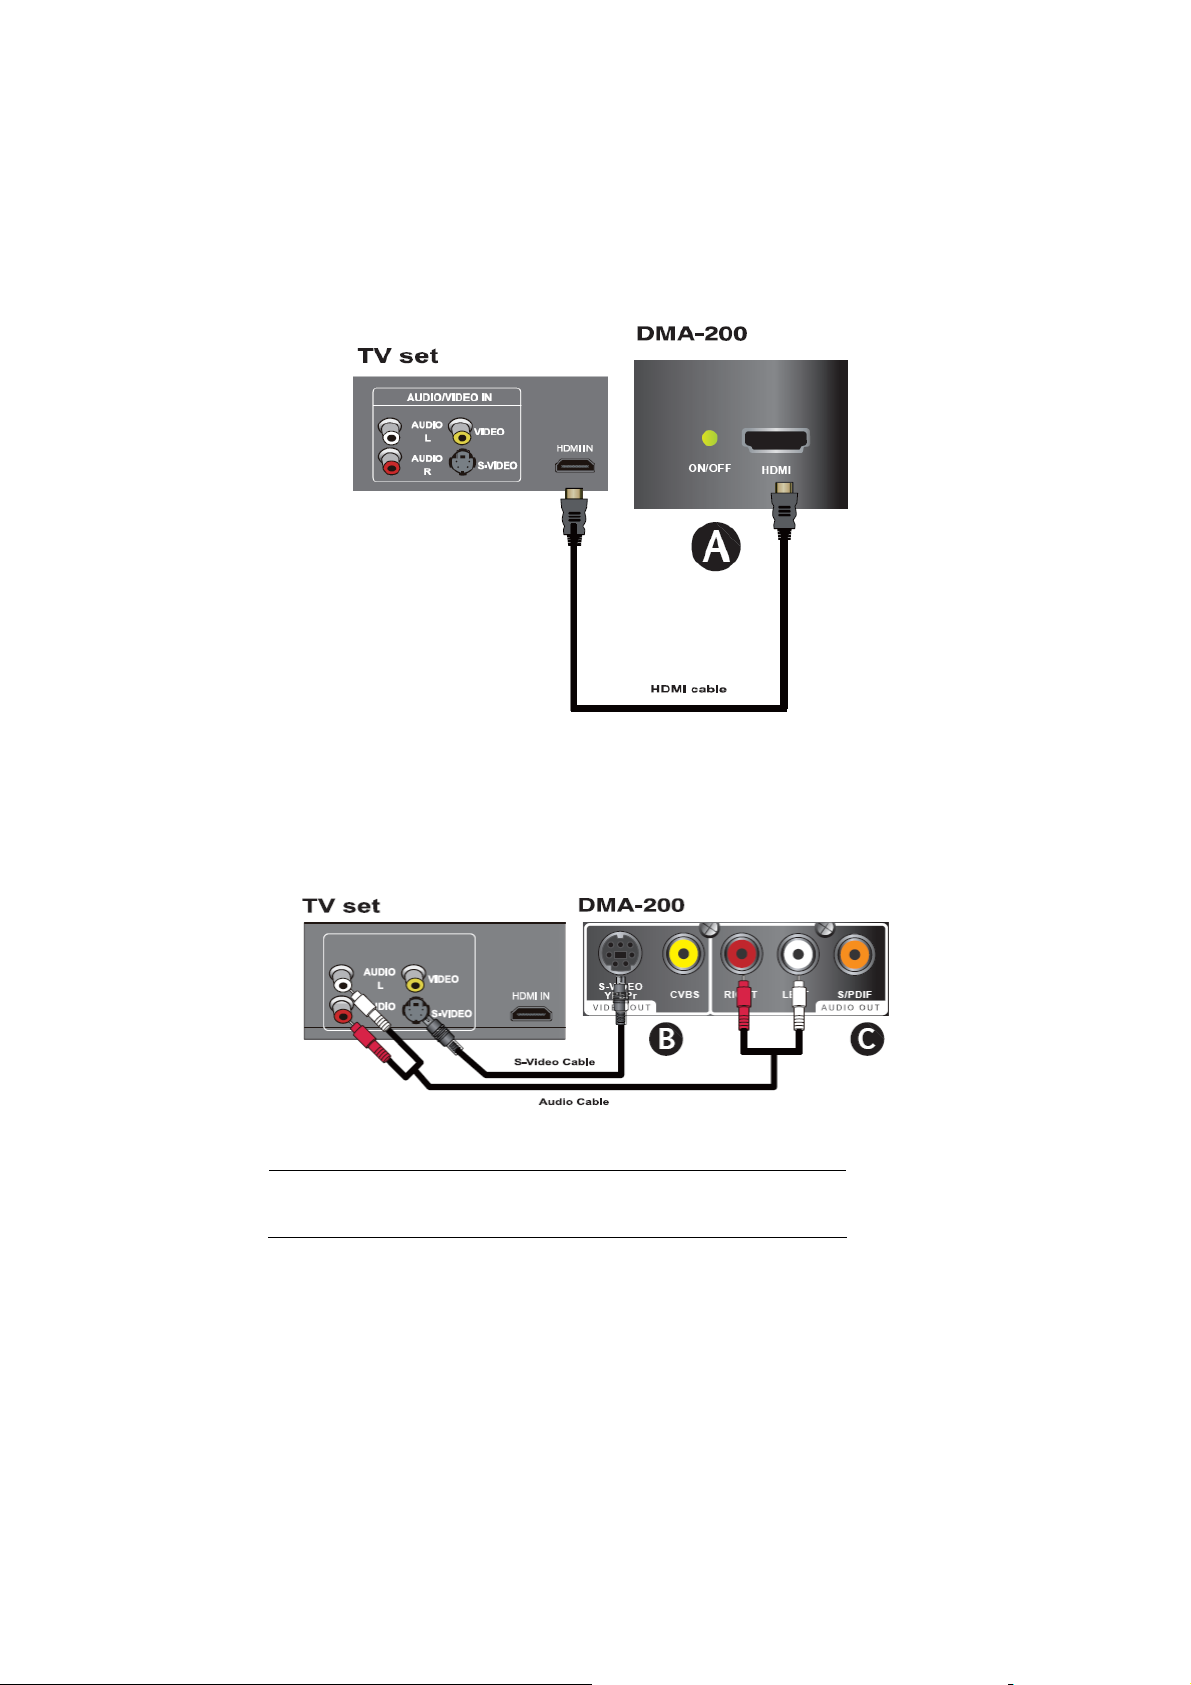
Make sure you have the appropriate cables for connecting. Take care to
watch the colors of the plugs on the cable.
1. Connect via HDMI
2. Connect via S-Video or Composite Video Cable (with Audio Cable)
I. Connect via S-Video and Audio
"Note
S-Video cable is not bundle in the package
II. Connect via AV Cable
15
Page 16
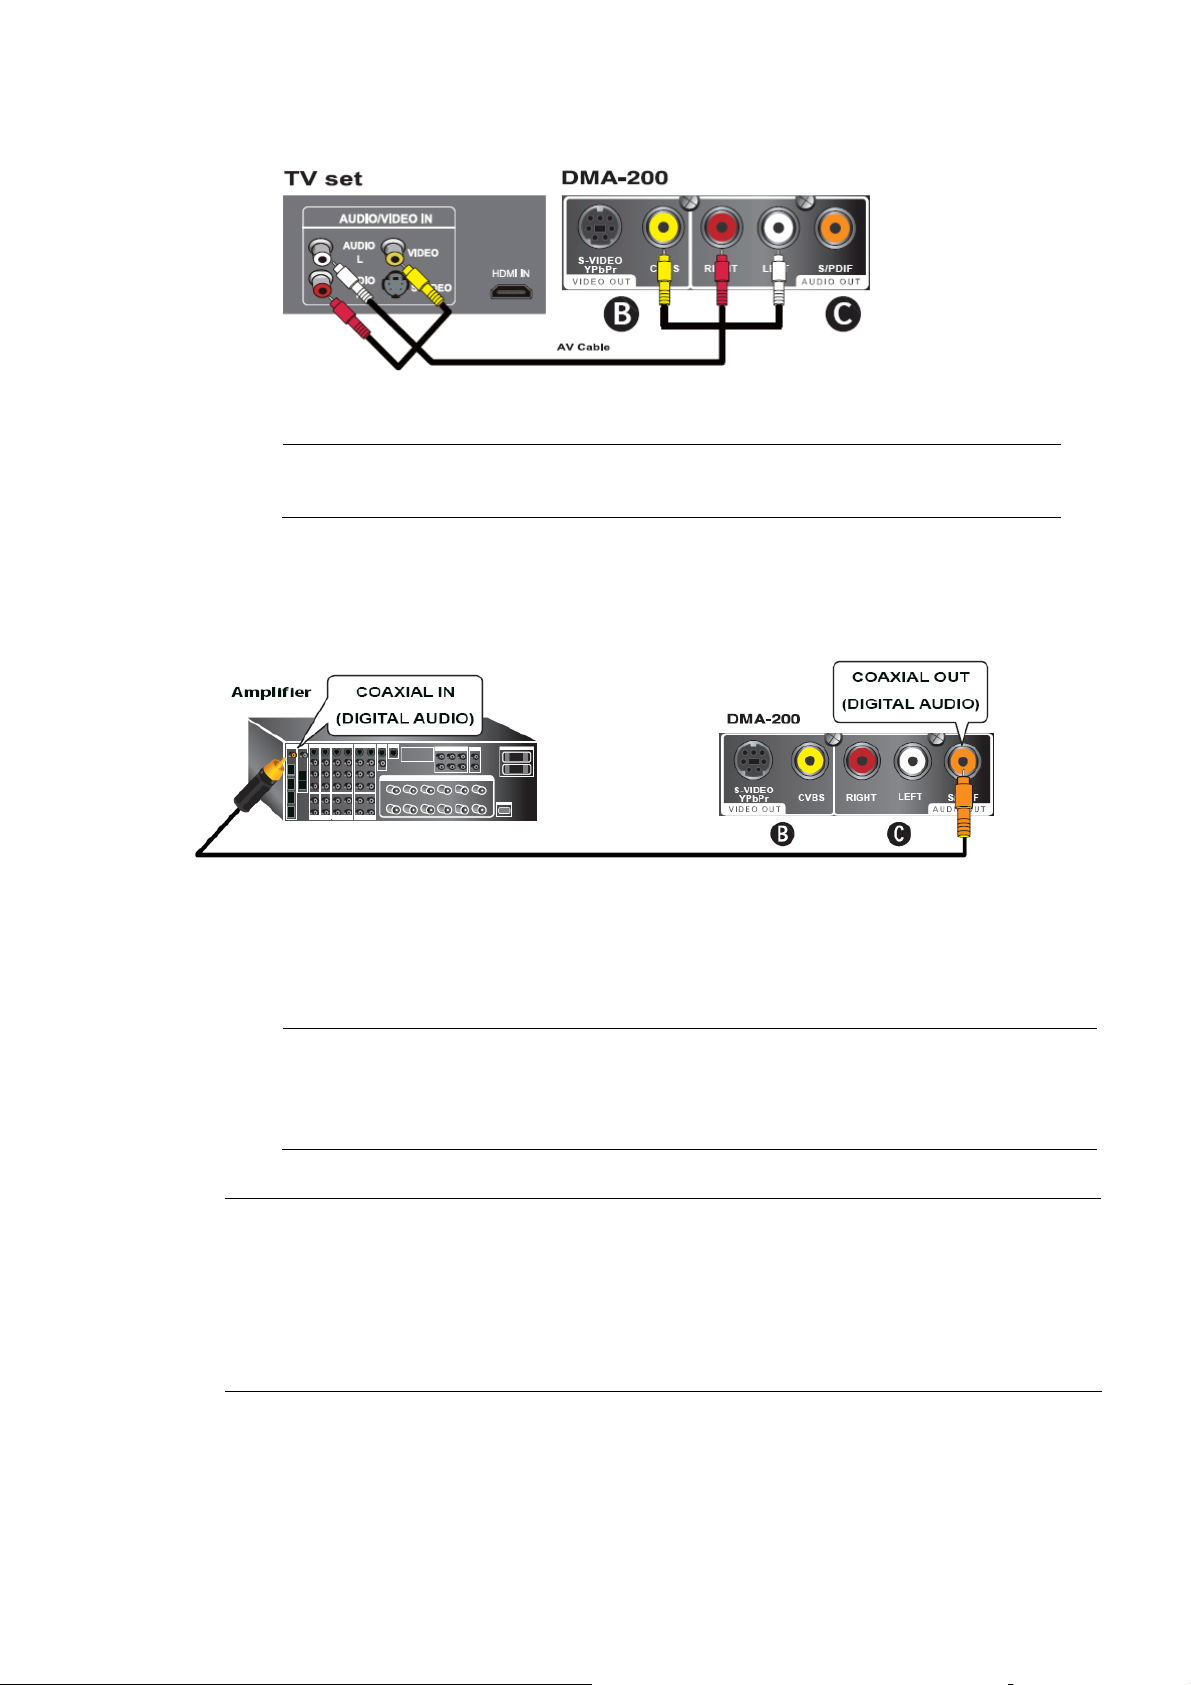
"Note
RCA Audio is also available for audio output
III. Connect via S/PDIF cable
The S-Video and Component is in the same port. You need to have a S-Video
/ Component cable and a S-Video to S-Video cable or a Y-Pbpr to Y-Pbpr cable
to connect to your TV port.
S/PDIF (Sony / Philips Digital Interconnect Format) For connection
"Note
of this interface, please also check the capability of your audio
amplifier.
If no sound is heard after connecting the Optical/Coaxial cable, check if
you have changed the audio setup of Digital Media Center to Digital
"Note
mode. Please go to Setup Æ System Setup Æ Audio Setup for
configuration. By default, audio out of DMA-200 is set as analog RCA
output.
Step2 Î Connect Ethernet Connector
16
Page 17
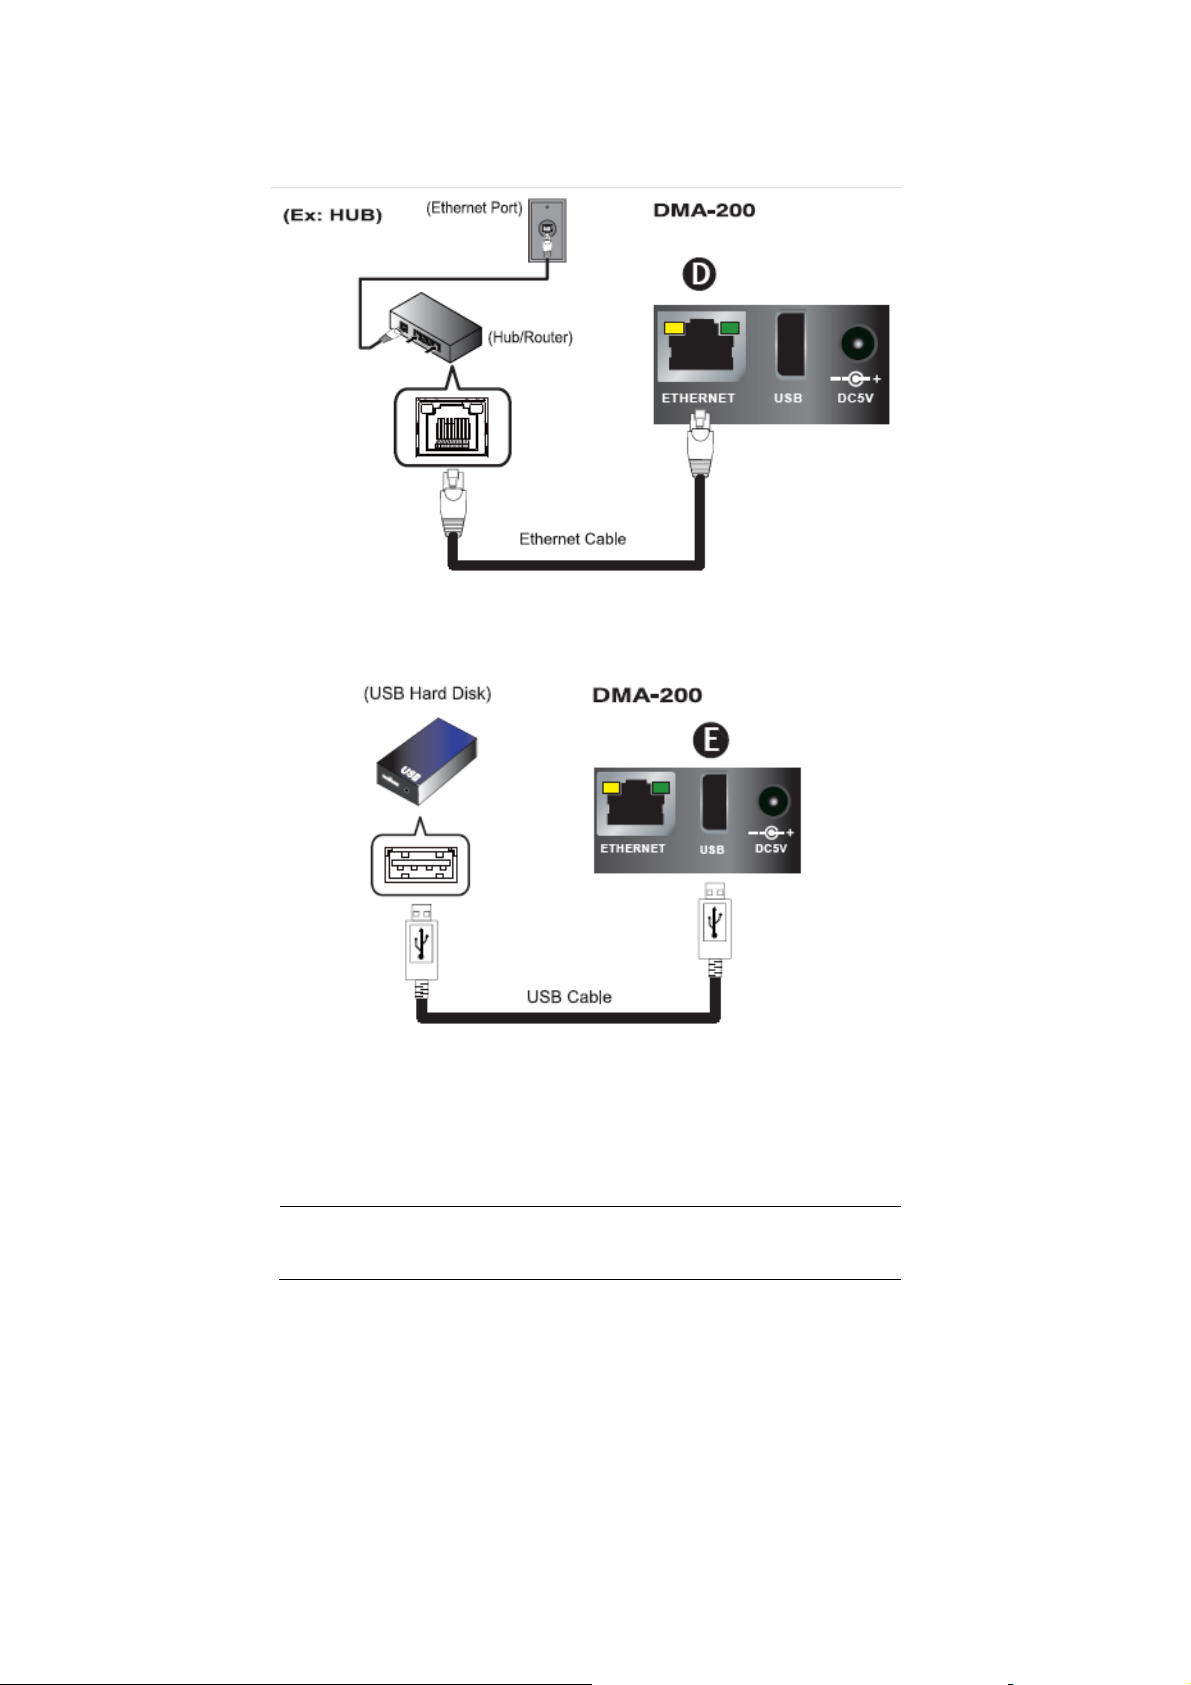
Step3Î Connect USB Devices If Available
EX: USB CD-ROM Drive, USB Hard Disk
"Note
The USB cable is not bundled in the package
Step4 Î Connect Power Adapter
17
Page 18
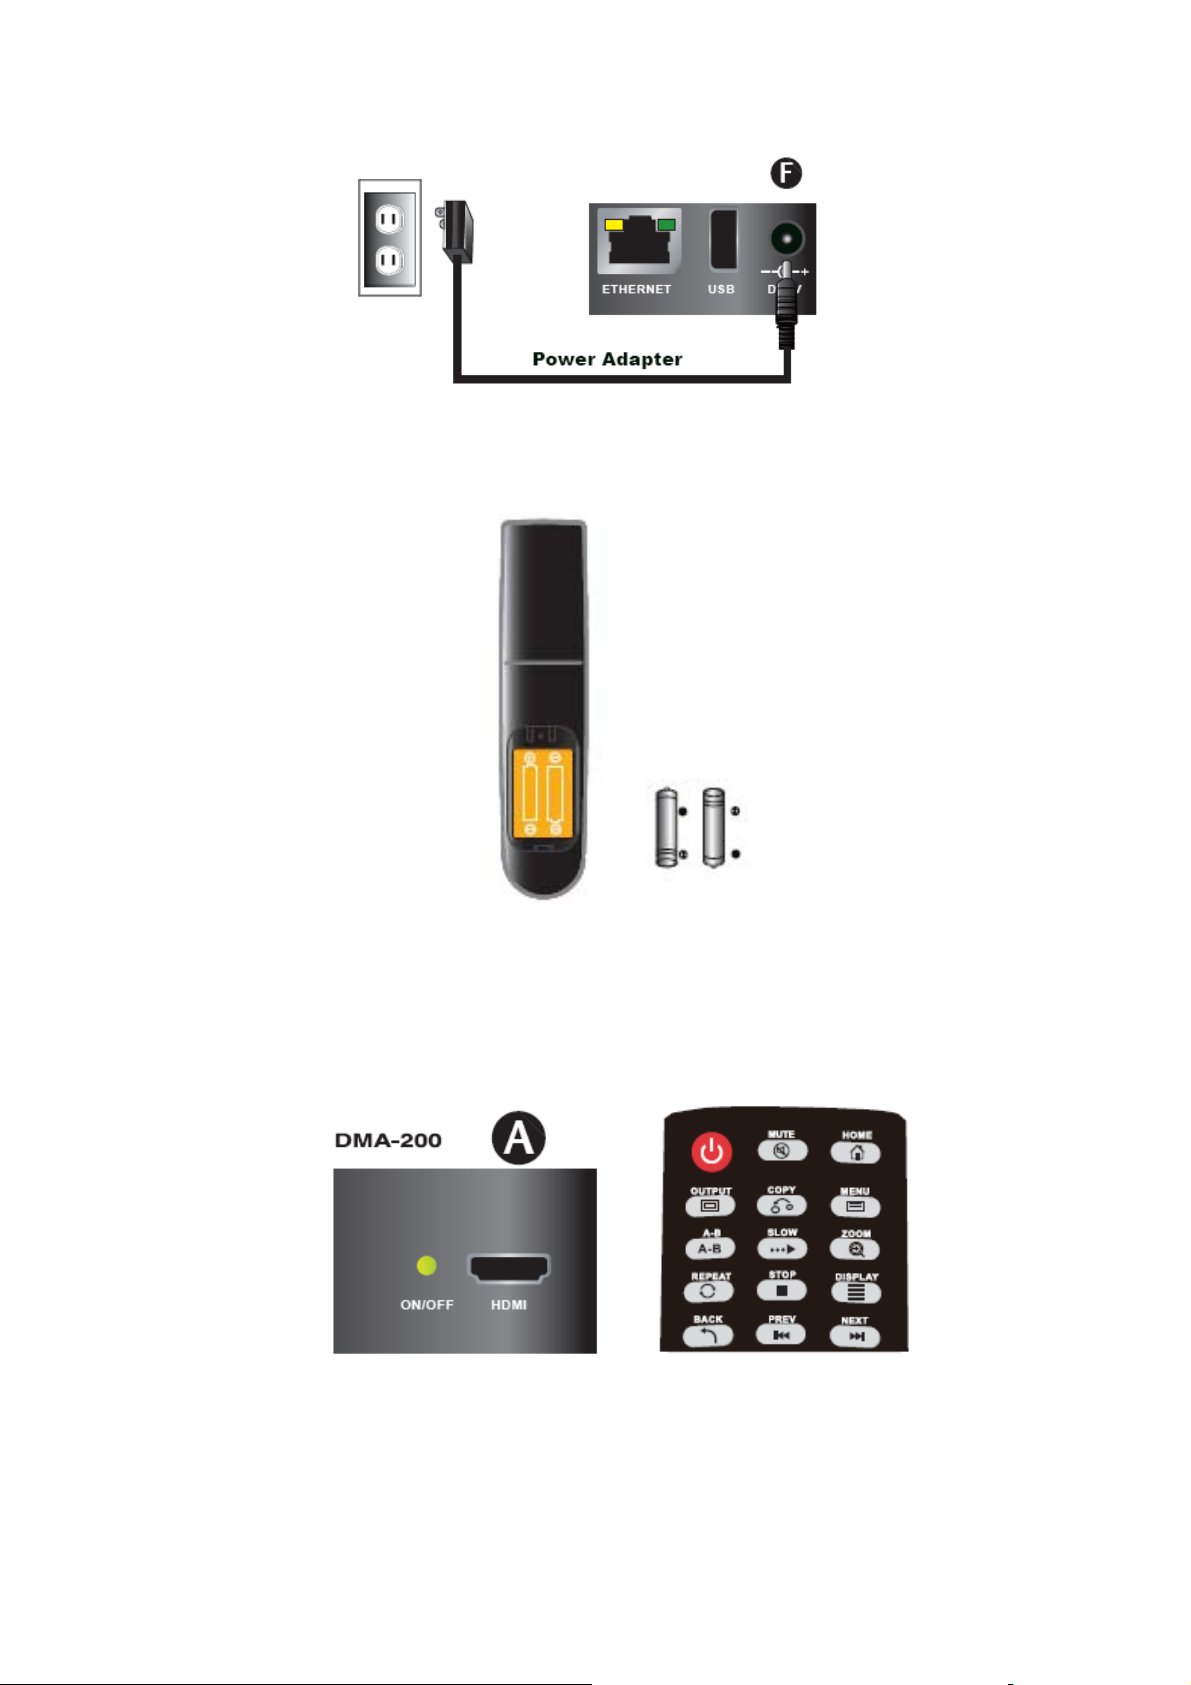
Step5 Î Install Batteries in Remote Control
Step6 Î Turn On the Digital Media Center
1. When DC power applied, the LED light on with red color in standby mode
2. Press the POWER button on the remote controller or the ON/OFF button of
DMA-200, the front power LED light with green color
18
Page 19
RED LIGHT: Standby
GREEN LIGHT: Power on
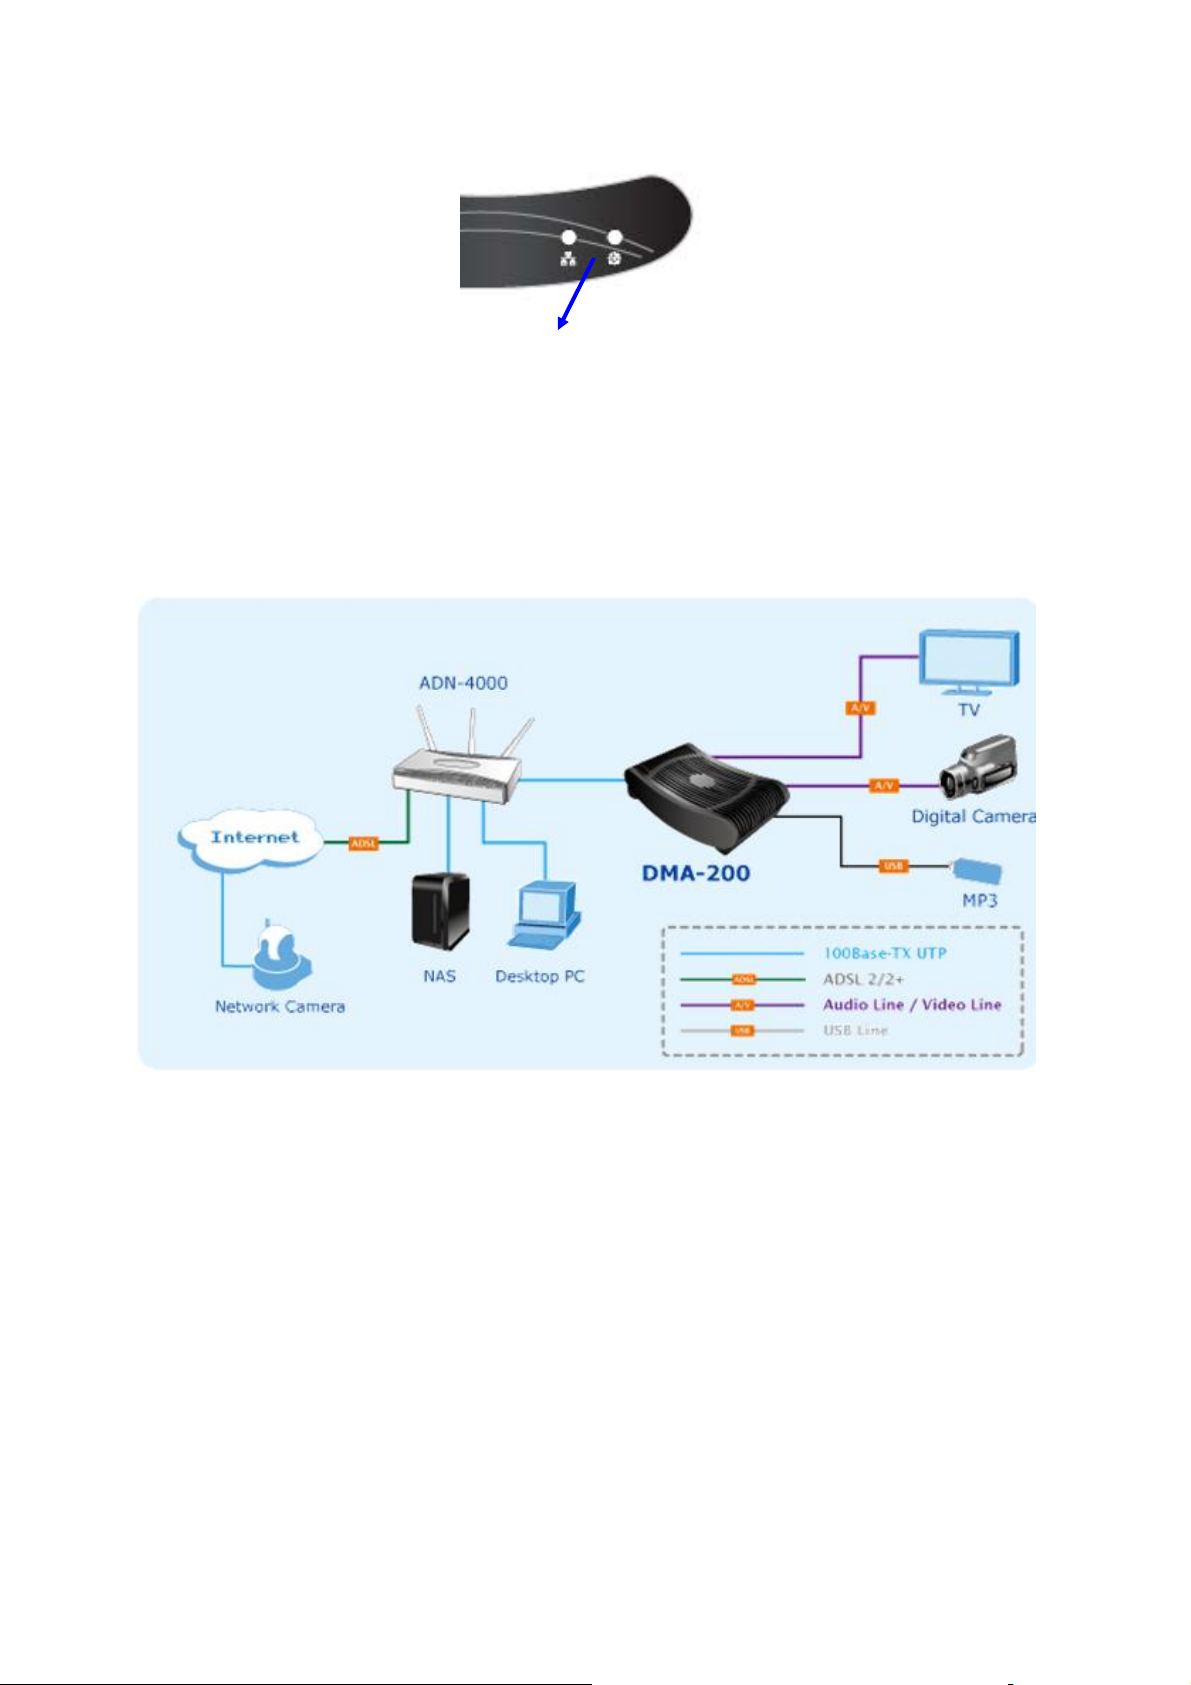
Connection Diagram
Following is a connection example with network and UPnP devices.
Configuring the Digital Media Center
Please reference the follow steps to setup the Digital Media Center
Step1Î Turn on the TV. Set the video sources selector on your TV to match
the connection from your Digital Media Center.
For example, if you used HDMI, set the TV to use “HDMI” Input.
Step2Î Turn on the Digital Media Center. The LED on the front panel of the
Digital Media Center lights up to show that it is powered on.
19
Page 20
Step3Î Check the TV display. The default display of Digital Media Center is
Composite (CVBS). If you use HDMI, aim the remote control at the Digital
Media Center and push “ ” Key. You can cycle through the TV modes
to get the correct display.
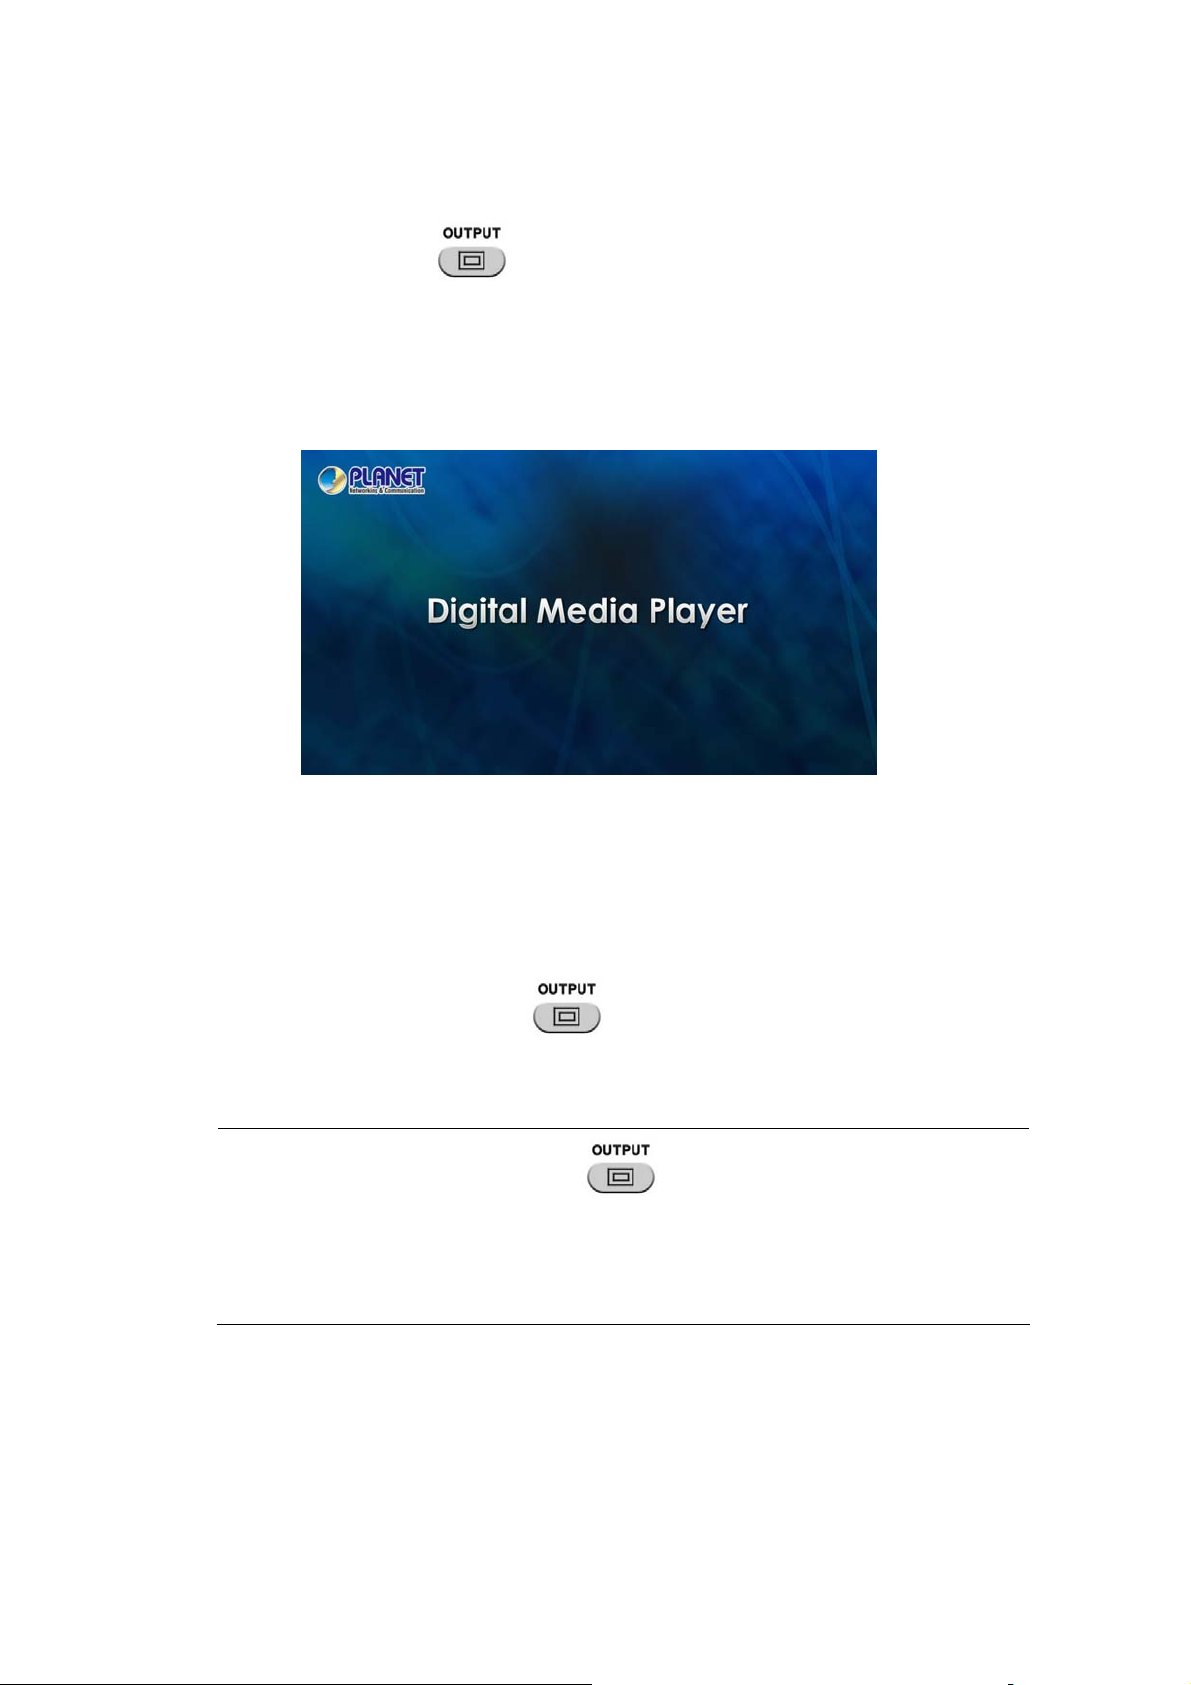
Step4Î Wait few seconds for the startup page to show up, and it will turns
into the Main Menu Afterwards.
Step5Î The startup page will last for only few seconds, and then go to a
black screen. Please wait few seconds and it will run into the Main Menu. If
there is no video output after the startup page appears, please make sure the
Digital Media Center and the TV are in the same mode.
If not, please cycle through the “ ” key on the remote control, wait few
seconds during each cycle.
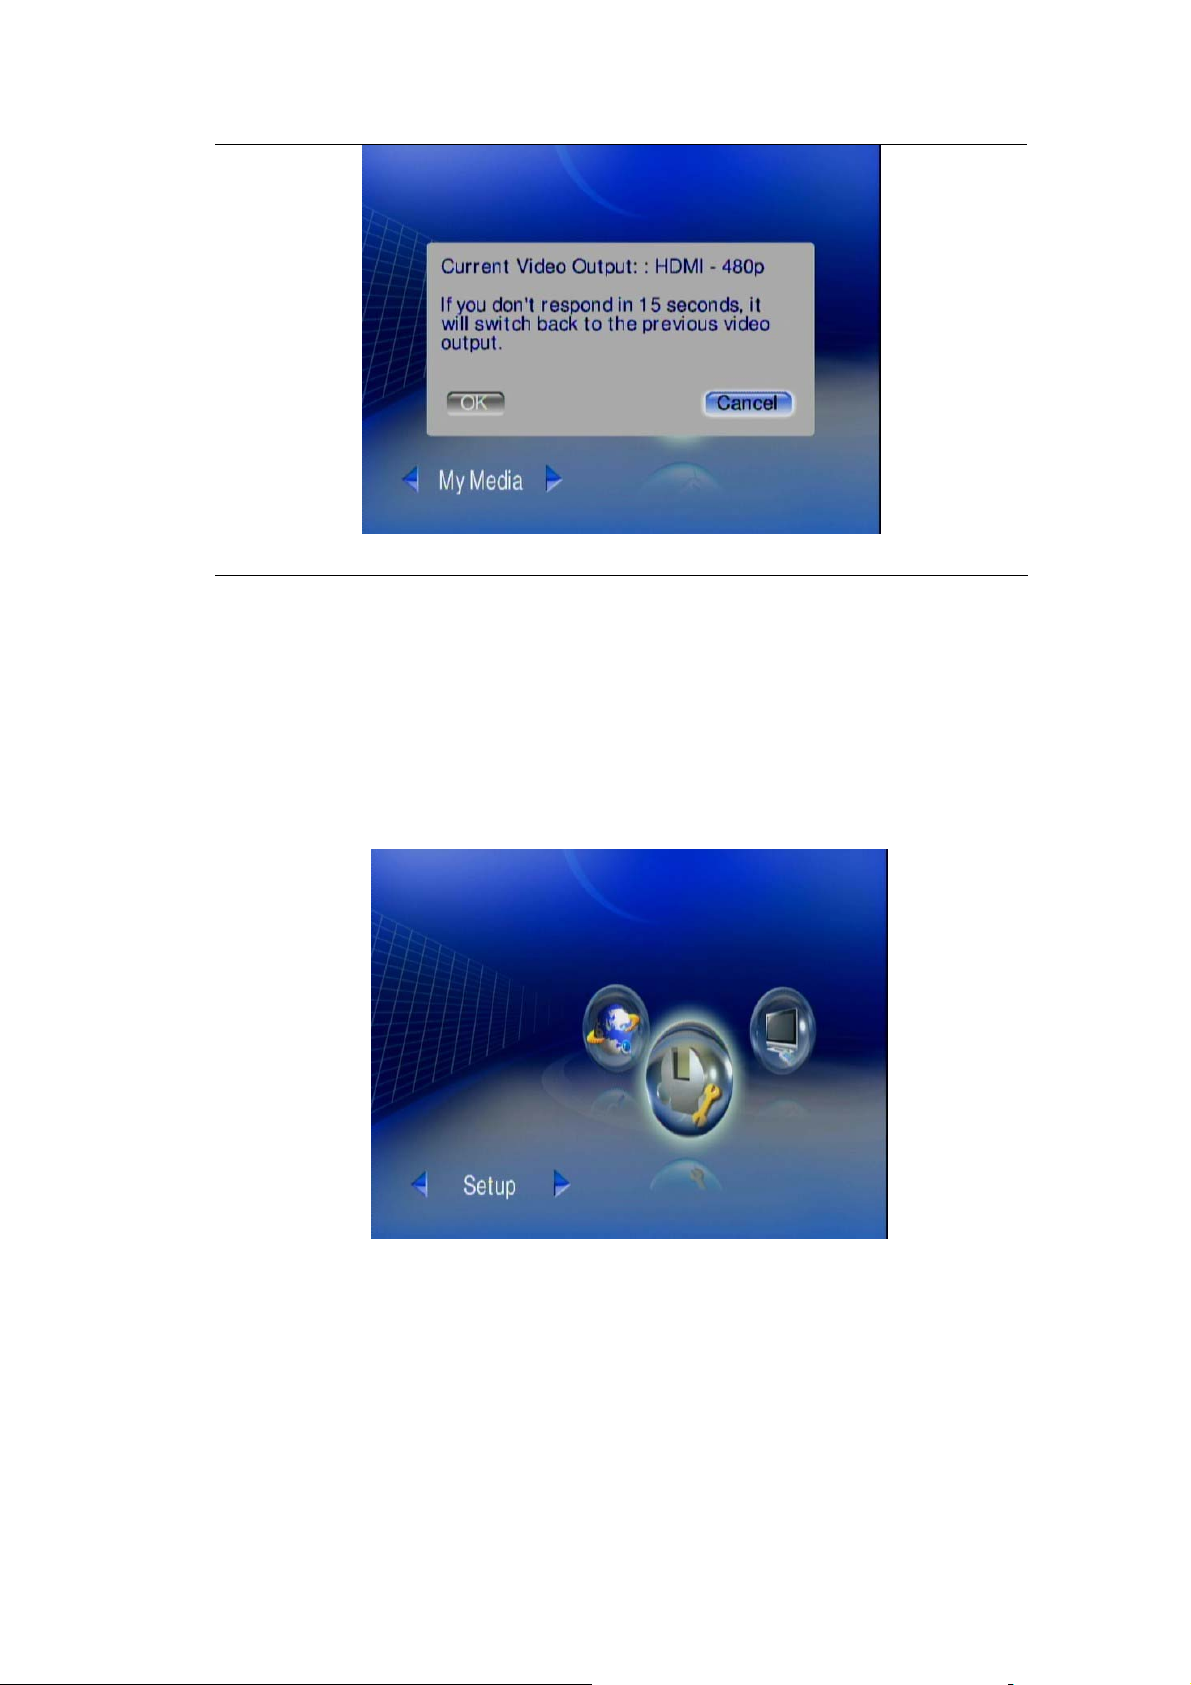
When you cycle through the “ ” Key, the Digital Media Center
"Note
will tell you which mode you are at. Below figure is an example of
cycling to “HDMI” mode. Please press “OK” if you want to select to
HDMI mode. It will switch to the original mode automatically if idle
for 15 seconds.
20
Page 21
Step6Î Select Wired Network for Digital Media Center to set up.
2.2.1Wired Network Setup
Step1Î Press “SETUP” hotkey on the remote control or select “Setup”
mode from The Main Menu.
Step2Î Select “Network Wizard” from Setup Main Menu to start the
wizard
21
Page 22
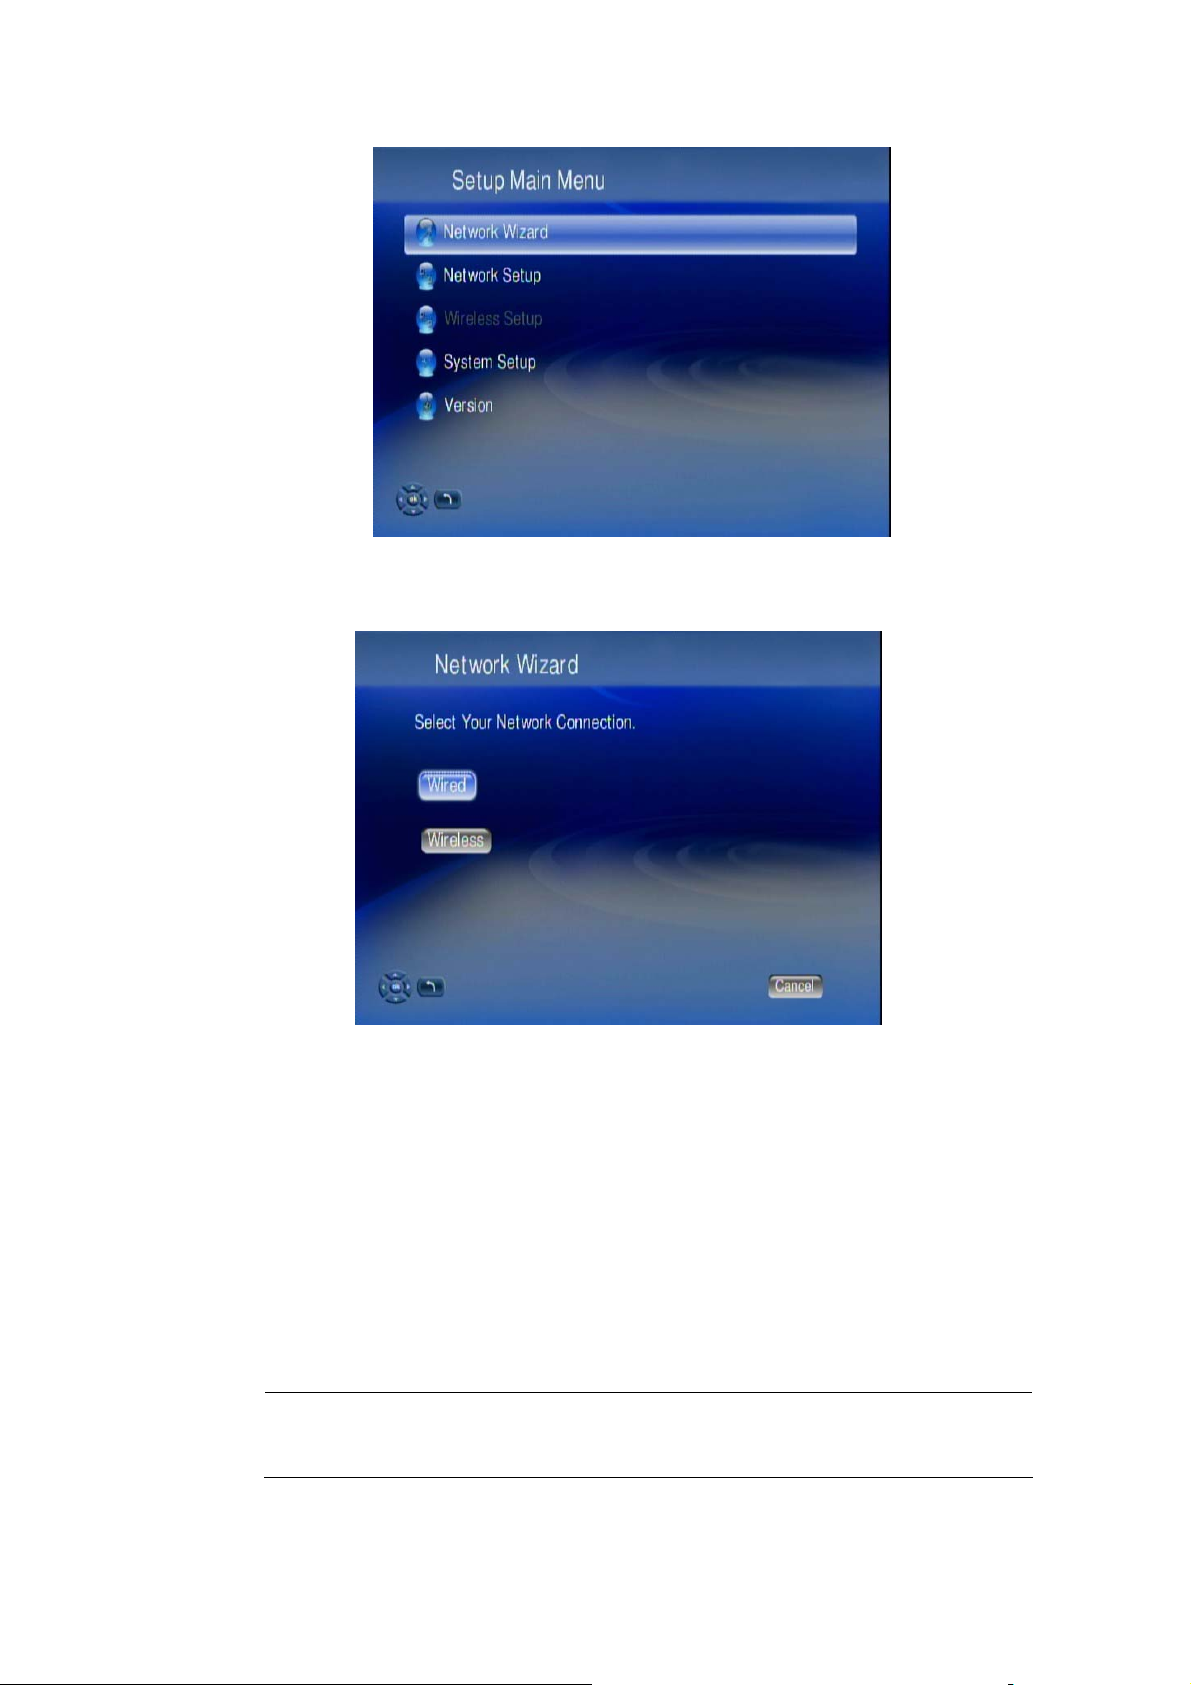
Step3Î Select “Wired” and follow the on screen instructions.
Step4Î Now the setup is complete.
2.2.2 Using the Digital Media Sever (DMS)
To share music, photo and video files from your computer, it is necessary to
install the Digital Media Sever (DMS) on the PC that contains the files you
want to share.
"Note
Check Appendix A. Specification for the minimal system
requirement of DMS.
22
Page 23
The DMA-200 can connect to more than one Media Server at a time and scan
all the files you want to share in the same local network.
Follow these steps to install the software:
1. Insert the Installer CD into the CD drive on the computer.
2. Select “Utility” on the main CD page.
3. Choose language from pop icon.
4. The Install Shield Wizard starts. Follow Install Shield Wizard steps to
install the software.
5. After the Install Shield Wizard finish, select PLANETÆ DMS Server to
begin service.
"Note
For more information on DMS Server Software, please see
Chapter 3.
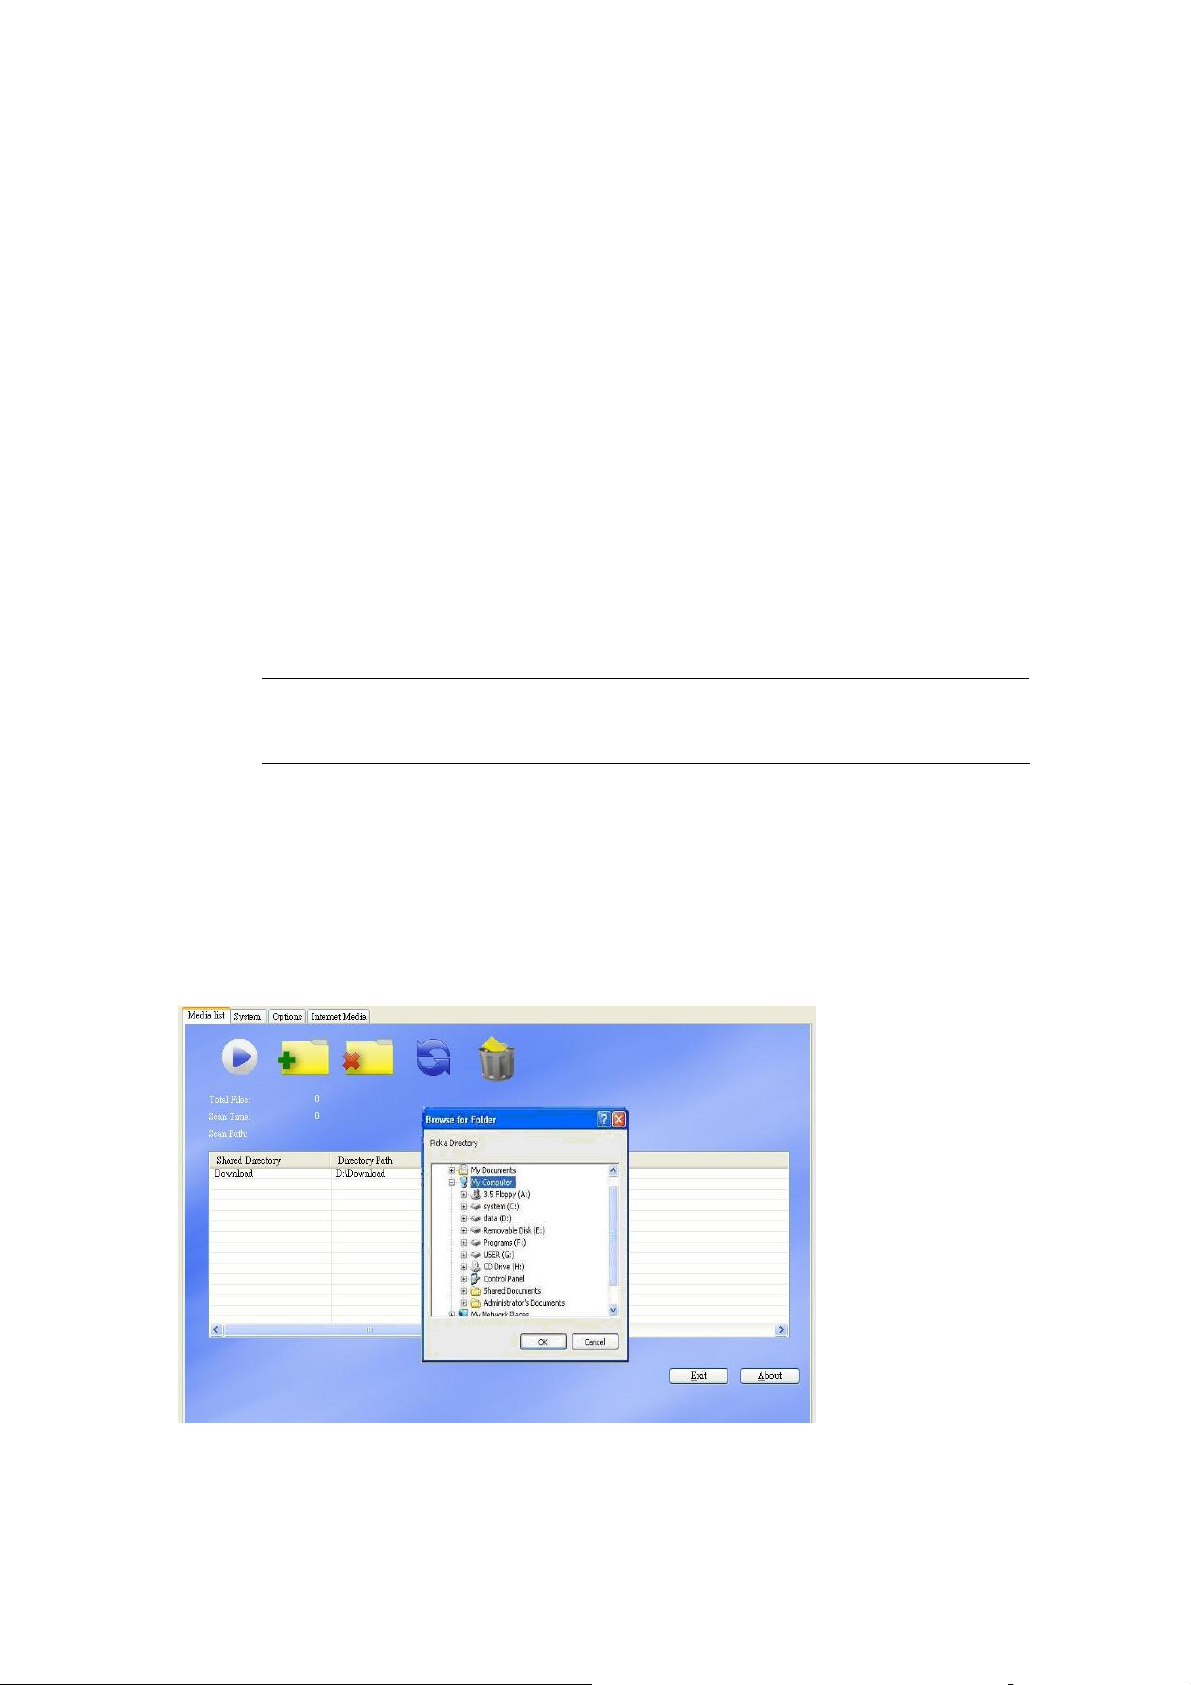
2.3 Configuring the DMS
1. For the first time of using DMS Server, click “Add” button on the screen to
add new folder.
2. Select folder you want to share and add to the directories
3. After all are done, click “Play“ button to begin service.
23
Page 24

g
4. When you are finished, please go to your TV.
5. Your Digital Media Center is ready for using. The Main Menu is displayed.
PLANET will put new version of server on the website
"Note
(www.planet.com.tw) when it is released, please uninstall the old
version of DMS every time before you install a new one.
2.4 Advanced Network Setup
2.4.1 Connect Digital Media Center to PC directly
This Chapter gives you a description on how to connect the Digital Media
Center directly to your PC instead of the local area network.
3. Connect the LAN cable to the LAN port of both Digital Media Center and the
PC.
4. Go to Digital Media Center, press Setup hotkey or select “Setup Main
Menu”.
5. Follow on screens instructions to complete Wired Network settings.
"Note
In this case, use a LAN cross cable type.
Some firewall and anti-Virus tools will forbid “UPnP” protocol.
This will affect the connection between “DMS” and Digital Media
"Note
Center Utility. It is suggested to allow “DMS” pass through your
firewall or temporarily turn off your firewall when you are usin
Digital Media Center.
24
Page 25

2.4.1.1 Disable Firewall under Windows Vista
Some firewall and anti-Virus tools will forbid “UPnP” protocol. That will affect the
connection between “DMS” and Digital Media Center Utility. It is suggested to
allow “DMS” pass through your firewall or temporarily turn off your firewall when
you are using Digital Media Center. Please reference the follow steps to disable
firewall.
Step1Î Select “Control Panel”
Step2Î Select “Security” and click “Allow a program through Windows
firewall”.
22
Page 26

Step3Î Choose “Exceptions” Tab, and click “Add program…”
Step4Î Click “Browse…” to browse for DMS program
26
Page 27

"Note
The default PLANET DMS program files path is at Computer Æ
Local Disk (C)Æ Program Files Æ PLANET Utility
Follow below step5~8 to search for program files.
Step5Î Click “Computer”.
Step6Î Click “Program files”
27
Page 28

Step7Î Click Folders “PLANET”
Step8Î Click “DMS Server v1.04.14”
28
Page 29

Step9Î Select “DigitalMediaServer”
Step10Î DMS Server is successfully included to the exceptions. Click “OK” to
finish.
29
Page 30

Step11Î Click “Allow” to add this program.
30
Page 31

3. The Digital Media Server (DMS)
The Digital Media Server software that runs in a computer on your home network.
To play media files on PC, Digital Media Center must be connected to the network,
and the Digital Media Server software must be running. Digital Media Server
software is easy to install from the Installer CD.
After installation, it can be configured to automatically start when Windows
system is up. You may use the Digital Media Server to scan for additional media
at any time.
3.1 Media List Tab
The Media list tab is where you select the types of files you want to share.
22
Page 32

3.2 Importing Media
Please reference the follow steps to import media.
1. Press “
2. Select the folder you want to share and press “OK” to start the files scanning.
“ button to invoke the Explore to choose folder.
3. The DMS will ignore those none supported files automatically and you can see
which folders had been shared from “Shared Directory” column.
4. Press “ ” button to start the file sharing service, then you can choose
this server from Digital Media Player.
32
Page 33

5. If you want to add or remove any shared folder, press “ ” first, then
repeat step 1-4.
6. If there is any change in the folders that you shared, please also press
“ ” button first, and then press “ ” button to refresh the file list.
7. When all folders you shared are refreshed, Digital Media Server will restart
automatically.
33
Page 34

3.3 System Tab
The System Tab is where you can change the name of your Server Software,
delete/add iMedia list or browse/delete/add the local USB HDD content
3.3.1 Change the Server Name as you like
Follow below steps to change the desired name.
1. Press “ ” button then change the desired name.
2. Click “OK” to restart service with new server name.
34
Page 35

3.3.2 DMA Setup
The DMA Setup has two major functions. One is to help you to
add/delete your favorite Internet Radio/TV lists on iMedia. The other is to
browse for each local USB HDD contents on the network and to copy/delete its
files by using the DMS Software installed on your PC.
"Note
For information on how to manage iMedia lists, please see Chapter
3-5.
3.4 Options Tab
The Options tab is where you can enable the auto-run or trans-code settings
Please reference the follow steps to configure your settings.
1. Check the “Enable Auto Run” box and this Digital Media Server will auto run
once the Window system is up.
2. Check the “Minimized at Startup” box and this Digital Media Server will
minimize to system tray when the program is invoked.
35
Page 36

3. Check “Enable Transcoding” box and press “ ” button to enable the
Transcoding function. When you want to watch “MP4” or “MOV” format,
enable this function.
4. If service of Digital Media Server is running, please press “
first to check “Enable Transcoding” box.
5. When the “Transcoding” function is enabled, please also select the
“Transcoding Quality” at the bottom column.
3.4.1 Play Multimedia Files
3.4.1.1 Music
Supported Music Format
The following music formats are supported:
Format File Extension
AAC+ AAC, MP4, M4A
AAC-LC AAC, MP4, M4A
” button
AC3 / Dolby Digital 5.1 Down mixing AC3
AC3 Pass through AC3
DTS Pass through DTS
LPCM WAV, PCM
MP3 MP3 (ID3 tag supported)
MP3Pro MP3
OGG Vorbis OGG
WMA WMA, ASF
WMA Lossless WMA, ASF
WMA Voice WMA, ASF
WMA Pro WMA, ASF
36
Page 37

To Play Music
1. Select “My Media” from Main Menu to enter server list, or press “Music”
hotkey on remote control.
2. Available file sources will be listed on the server list, including files stored at
media server in your PC, at USB flash stick, at USB external Hard disk drive,
USB external CD-ROM drive or at other UPnP servers. Please select the
media server you want to use and press “OK” button on remote control.
"Note
When you want to play music on other UPnP Servers, please make
sure the UPnP function for each device is enabled correctly.
37
Page 38

3. Select MUSIC mode and press “OK” to enter music mode.
4. You select “DMS”, the music files will organize by “Album”, “Artist”, or
“Genre” automatically for your convenient; or you can select “All Music” to
see all music files.
You may also select “My Folder” to view the music files that organized in
several subfolders as on your PC. Please use “Up” and “Down” buttons on the
remote control to navigate those folders, and select the option by press “OK”
or “Right” button on the remote control.
5. Select the folder that contains the music files or the subfolders you want, and
press “OK”, “Play”, or “Left” button on the remote control to play it.
"Note
icon is stand for a folder; icon is stand for a file.
38
Page 39

6. You can get related information about the music you are playing from playing
page such like “Artist”, “Album”, “Title”, and “Genre”.
Controlling Music Playback
Use the remote to PLAY, PAUSE, or
STOPV music. Controlling the music
playback will be as easy as controlling your TV set.
Play and Pause
Press “PLAY” button while music is playing you can pause the music by pressing
“PLAY” button again can resume the music
Pause Music
Play Music
olume ControlV
ol-” buttons to control the volume Press “Vol+” or “V
39
Page 40

Mute
ute” button to mute or un-mute the music. Press “M
kip to Next or Previous FileS
mute music
un-mute music
Press “Next” or “Down” buttons
to skip to next music file.
Press “PREV” or “UP” buttons to skip to previous music file.
Fast Forward
” button to fast forward the music file. Press several times to Press “>> (FF)
switch the speed.
Rewind
“<< (REW)” button to fast backward the music file. Press several Press
times to switch the speed.
epeat and Repeat All
R
You can turn on the repeat f
music within a folder.
unction to continuously play individual music or
40
Page 41

Repeat Once:
Repeat All:
Repeat Off:
Repeat” button for three times to disable the repeat mode. Press “
t” button once to repeat playing current music file. Press “Repea
” button twice to repeat all music files in current folder. Press “Repeat
Viewing Photos While M
The Digital Media Center is capable of displaying
music simultaneously. Follow below steps to add music to “BGM” list.
1. Enter music files list
usic is playing
photos and pla
ying background
2. Please
use “Up” and “Down” buttons on the remote control to navigate music
files, and press “BGM” hotkey
bar.
on remote control to invoke “BGM” tool
41
Page 42

3. Please use “Rig BGM” tool bar,
ht” and “Left” buttons to select options on “
and press “OK” button on “
” icon to add current music files to “BGM”
list.
4. You can also select “
” icon to add all music files in current folder. The
music files that been added to “BGM” list will display with “ ” icon.
Add music to BGM list
Music added successfully
42
Page 43

5. To play BGM files, please select “ ” button on “BGM” tool bar; to stop
playing BGM, please select “ ” button.
6. To remove music files from BGM list, please select “ ” icon on the file you
want to remove; or select “ ” to remove all files from BGM list.
7. To check the “BGM” list, please select “ ” icon to view all music files in the
list.
BGM music is playing
3.4.1.2 Photos
Supported Photo Format
The following photo formats are supported:
Format
BMP BMP
EXIF SUPPORT JPEG, JPEG, JPE, TIFF, TIF
GIF GIF
JPEG JPEG, JPG
JPEG2000 JPG, JPEG, JPE
PNG PNG
File Extension
TIFF TIFF, TIF
Windows Media Photo WDP, HDP
43
Page 44

To Play Photos
1. Select “My Media” from Main Menu to enter server list, or press “PHOTO”
hotkey on remote control.
2. All available file sources will be listed on the server list, including files stored at
media server in your PC, at USB flash stick, at USB external Hard disk drive,
USB external CD-ROM drive or at other UPnP servers. Please select the media
server you want to use and press “OK” button on remote control.
44
Page 45

3. Select “PHOTO” mode and press “OK”, or press “PHOTO” hotkey to enter
photo mode.
4. If you select “DMS”, you may select “My Folders” to view the image files that
organized in several subfolders as on your PC, or select “All Images” to see
all shared image files. Please use “Up” and “Down” buttons on the remote
control to navigate those folders, and select the option by press “OK” or
“Right” button on the remote control.
5. Select the folder that contains the image files or the subfolders you want, and
press “OK”, or “Left” button on the remote control to play it.
45
Page 46

"Note
icon is stand for a folder; icon is stand for a file.
Playing a Photo Slideshow
To start playing a photo slideshow, navigate to the first photo of each folder and
press the button on the remote control. The first photo will be
displayed and then followed by the next photo in the folder. All photos in the
folder will be displayed.
Controlling Photo Playback
Play, Pause and Stop
Press “PLAY” button on the image files list to enable slideshow playing. Press
“STOP” button to stop it.
Skip to Next or Previous File
Press “Next” or “Down” buttons to skip to next video file.
46
Page 47

Press “PREV” or “UP” buttons to skip to previous music file.
Viewing Photo Information
Press “Info” button to get image information.
Photo Viewing Effect
Zoom in and Zoom Out
Press “ ” button while viewing the photo that you want to manipulate,
1. Press “Zoom” button and press “Left” button to enlarge the image.
2. When the image screen is larger than TV screen, press “Zoom” again and
press “directions” buttons to move the image.
47
Page 48

3. Press “Zoom” button and press “Right” button to shrink the image
Rotate
Press “Repeat” button while viewing the photo to enable rotate function.
48
Page 49

View Photo in Thumbnails Mode
You can view thumbnails of several photos at a time. To enable the thumbnail
mode, please do the following:
1. Go to “Setup Main Menu”.
2. Select “Other Settings”.
3. Choose “Thumbnail” on “Photo Display Setup” Menu.
4. After go back to the folder, you will now view several photos displayed at a
time.
49
Page 50

3.4.1.3 Video
Supported Video Format
The following movie format are supported
Format File Extensions
DivX 3 AVI, DivX
DivX 4 AVI, DivX
DivX 5 HD AVI, DivX
DiVX 5 SD AVI, DivX
DivX 6 HD AVI, DivX
DivX 6 SD AVI, DivX
H. 264 AVC MPEG4 part 10 (HD) MPG, MP4, MOV, AVI
H. 264 AVC MPEG4 part 10 (SD) MPG, MP4, MOV, AVI
MJPEG AVI
MPEG-1 MPG, MPEG, DAT
MPEG-2 HD MPG, MPEG
MPEG-2 SD MPG, MPEG
MPEG-2 VOB MPG, MPEG, VOB
MPEG-4 part 2 ASP MP4, AVI
VC-1 HD 1080i WMV
VC-1 HD 720p WMV
WMV 9 WMV, ASF
WMV HD 1080i WMV, ASF
WMV HD 720p WMV, ASF
WMVPro WMV, ASF
XviD AVI, MP4
HD 1080i/p AVI, MP4, MOV
DVD ISO, IFO
50
Page 51

To Play Video
1. Select “My Media” from Main Menu to enter server list, or press “VIDEO”
hotkey on remote control.
2. All available file sources will be listed on the server list, including files stored at
media server in your PC, at USB flash stick, at USB external Hard disk drive,
USB external CD-ROM drive or at other UPnP servers. Please select the media
server you want to use and press “OK” button on remote control.
51
Page 52

3. Select VIDEO mode and press “OK”, or press “VIDEO” hotkey to enter video
mode.
4. If you select “DMS”, you may select “My Folder” to view the video files that
organized in several subfolders as on your PC, or select “All Videos” to see all
shared video files. Please use “Up” and “Down” buttons on the remote control
to navigate those folders, and select the option by press “OK” or “Right”
button on the remote control.
5. Select the folder that contains the music files or the subfolders you want, and
press “OK”, “Play”, or “Left” button on the remote control to play it.
52
Page 53

"Note
icon is stand for a folder; icon is stand for a file.
Control Video Playback
Volume Control
Press “Vole+” or “Vole-” buttons to control the volume
Mute
Press “Mute” button to mute or un-mute the video.
mute video
53
Page 54

un-mute video
Pause and Play
Press “PLAY” button while video is playing you can pause the music by pressing
“PLAY” button again can resume the music
Pause Video
Play Video
Skip to Next or Previous File
Press “Next” or “Down” buttons to skip to next video file.
Press “PREV” or “UP” buttons to skip to previous music file.
Fast Forward
Press “>> (FF)” button to fast forward the video file. Press several times to
switch the speed.
Fast Forward Video
54
Page 55

Rewind
Press “<< (REW)” button to fast backward the video file. Press several times to
switch the speed.
Slow Forward
Press “Slow” button to slow forward the video file. Press several times to switch
the speed.
Slow backward
Press “Slow” button and press “Left” button to slow backward the video file.
Press “Left” button several times to switch the speed.
Viewing Video Information
Press “Info” button to get video information.
Video Viewing Effect
Zoom in and Zoom Out
While video is playing, press “
function.
“button to enable zoom in/ zoom out
55
Page 56

1. Press “Zoom” button and press “Left” button to enlarge the video screen.
2. When the video screen is larger than TV screen, press “Zoom” again and press
“directions” buttons to move the video screen.
3. Press “Zoom” button and press “Right” button to shrink the video screen
Repeat and Repeat All
You can turn on the repeat function to continuously play individual video or video
within a folder.
Repeat Once
Press “Repeat” button once to repeat playing current video file.
56
Page 57

Repeat All
Press “Repeat” button twice to repeat all video files in current folder.
Repeat Off
Press “Repeat” button for three times to disable the repeat mode.
Subtitles and Languages
If you are playing “VOB” files or “AVI” files, “ ” button and “ ” button
are available for the subtitle and language switching. Press “LANG” to change
different language that recorded in “VOB” files; and press “SUB” button to
change different subtitles in both “VOB” and “AVI” files.
To use it, make sure that it is in the same folder as your video
"Note
file and that they are both named exactly the same.
Video Resume Playing
The Digital Media Center supports resume video playing to the previous point
where the video is interrupted. The device needs to keep powered on to enable
this function.
57
Page 58

The default setting is that it will ask you every time whether you want to resume
the playing when you are back to the interrupted file. If you want to change the
setting, please follow below instructions:
(1)Go to “Set Up“
(1) Select “Other Setting”, and highlight “Video Resume Playing”. You can
disable the setting or make it always on without asking.
Play Next Video Automatically
The default setting is the all the video files in one folder will be played
continuously until the last file and then return to the main menu.
If you want to play only the selected file and then return to the main menu,
please go to “Other Settings” Æ ‘Play Next Video” to disable the function.
58
Page 59

Search Video
The Digital Media Center can search the video by percentage of total file length.
When viewing the video, you can press the numeric keys on the remote control
to
Jump to your destination. For example, when you press “7” + “0”, you will jump
to 70% of the total file length.
Numeric keys
Start playing from 70% of the file length
59
Page 60

DVD Menu Navigation
The Digital Media Center support viewing DVD files as you are playing a DVD
menu.
Follow below steps to enable DVD menu navigation feature.
1. When you select a DVD file, choose the item with and press “Play”
2. The Menu will appear. Use the navigation button on the remote control
To select the item you want.
3.5 Internet Media
3.5.1 Play Internet Radio – Live 365 TM
Live365™ is an Internet radio service that provides unlimited on-demand
access to thousands of radio stations. The audio is streamed directly over the
Internet.
60
Page 61

Follow below steps to access the radio stations:
1. Make sure your network setting is correct and be able to access internet.
2. Select “iMedia” from main menu or press “iMedia” button on the remote
control.
3. Select “Live 365” and press “OK” button on remote control.
4. Select a catalog you prefer from list, or select “All Broadcasts” to browse all
radio stations.
61
Page 62

5. Select a radio station from list, and press “OK”, “Play”, or “Left” button to
play it.
"Note
is stand for a radio station.
Live365- Playing
62
Page 63

3.5.2 Play Internet Radio – My Radio
1. Make sure your network setting is correct and be able to access internet
2. Select “iMedia” from main menu or press “iMedia” button on the remote
control.
3. Select “My Media” and press “OK” button on remote control.
63
Page 64

4. Select “My Radio” and press “OK” to enter.
5. There is some radio stations listed as default; you can select one of the
stations from list and play it.
6. You can also add your favorite radio station manually by select “Add New
Entry”.
7. Select “Add New Station” or “Add New Folder” to configure a new radio
station or Folder; then enter related information of this new radio station or
Folder.
64
Page 65

3.5.3 Play Internet Video – My Video
1. Make sure your network setting is correct and be able to access internet
2. Select “iMedia” from main menu or press “iMedia” button on the remote
control.
3. Select “My Media” and press “OK” button on remote control.
65
Page 66

4.
Select “My Video” and press “OK” to enter.
5. There are also some internet video stations listed as default; you can select
one of the stations from the list and play it.
"Note
is stand for a video station.
3.5.4 Viewing “Youtube” Content
You can use the Digital Media Center to view Youtube content. The Youtube
content is transcoded by DMS, and you must have a PC running the DMS for
Windows software to use this feature.
To view YouTube content, follow these steps:
1. Go to the Main Page and select “My Media”
66
Page 67

2. Select “Video”
3. Select “Internet Videos”
67
Page 68

4. Select ‘Youtube”
6. The Digital Media Center list the “Youtube” content in 7 categories, choose
the item you will view and press “OK”.
"Note
The Youtube content on Digital Media Center is streamed
from www.youtube.com
68
Page 69

3.5.5 Add/Delete the Internet Radio/TV Stations Lists
With a PC running Media Server software, you can add/delete your favorite
Station lists of your Digital Media Center and even other DMA-200 available in
local network.
You have to install Media software to your PC first. Please make reference to
Chapter 3 on how to install the DMS software. After installation is completed,
follow below steps to add or delete your favorite Internet Radio/TV lists.
1. Select “System” tab from Media Server.
2. Double click “DMA Setup” icon.
69
Page 70

3. The “DMA List” menu pops up, and shows all available Digital Media Center
on the local network. Following is the example with 2 Digital Media Center
connected to the same local network.
4. Choose the one you want and double click “OK” icon.
5. The browser links automatically to the IP of Digital Media Center you select.
This may takes few seconds based on your computer speed.
6. You can edit/delete list from the browser via your PC now. Go on step 3~5 if
you want to manage other Digital Media Center iMedia lists on the network.
70
Page 71

3.6 Firmware Upgrade and Reset to Default
3.6.1 Upgrade by Direct Internet Access
You can view the firmware version and check for updates, even if your computer
is not running. Digital Media Center uses your network router to access Internet.
Follow the steps below to check for product updates.
1. Go to “Set Up Main Menu”, Select “Version”, and choose ‘Firmware
upgrade”
2. Choose “Internet Upgrade”, the system will automatically search available
firmware code.
3. Follow the onscreen instructions to complete the upgrade.
4. When the upgrade is successfully finished, Digital Media Center will reboot
automatically.
3.6.2 Upgrade by Using USB Flash Stick
As an option, Digital Media Center provides you the other choice for using USB
flash for updates. Follow the steps below to check for product updates:
1. Have your USB flash ready, download by PC the latest firmware from
http://www.planet.com.tw to USB flash stick.
2. Insert the USB flash to the USB port of Digital Media Center.
3. Go to “Set Up Main Menu”, Select “Version”, and choose ‘Firmware
upgrade”
4. Choose “USB Upgrade”, the system will automatically search available
firmware code.
5. Follow the onscreen instructions to complete the upgrade.
6. When the upgrade is successfully finished, Digital Media Center will reboot
automatically.
71
Page 72

Do not power off the system or remove the USB flash while
the upgrade process is running.
WARNING
3.6.3 Reset to Default
You can restore all configurations to factory default settings by following below
steps:
1. Go to “Set Up Main Menu”, Select “Version”, and choose “Reset to
Default”
2. Make sure you want to do so, then press “OK” button to restore system to
default settings.
Restoring Digital Media Center to its default settings will
WARNING
erase the network set up and media sever configuration.
You will need to set up Digital Media Center again to run on
your network and to access media files.
72
Page 73

3.7 Miscellaneous Settings
System Language and other settings apply on system are configured in the
“System Setup” of the “Setup Main Menu”. Please select the item that you
want to configure and press “OK” button or “Right” button on remote control to
enter sub page. After configuration, please press “Back” button or “Left” button
to leave the setup menu and save the configurations that you changed.
3.7.1 System Setup
If you want to change the configuration of your setup, you can select the
“Setup” from Main Page, and select “System Setup” from Setup Main Menu.
You can select, configure or adjust Language, TV mode, Audio, Video and
other settings here.
73
Page 74

System Setup main page
Below table is a brief description for the System Setup selection.
Item Name Value Use
Language Language Selecct
TV Mode Setup
Audio Setup
Video Setup
Other Setting
3.7.1.1 Language
TV System/ Video Output/ Video
Configure
Scale
Digital Audio Output/Analog
Configure
Audio Output
Brightness/ Contrast/ HUE/
Adjust
Saturation
Screen Saver/ Photo Display
Configure
Mode/ Slide Show Time/ BG Music
Language Table
Item Name Value Use
English/ German/ French/ Italian/ Spanish/
Language
Portuguese / Turkish/ Netherlandish/
Select
Serbian/ Hewbrew/ Traditonal Chinese
74
Page 75

3.7.1.2 TV Mode Setup
You can go to the “System Setup” menu to change the TV mode setting,
including the Video output, TV system and aspect ratio.
TV Mode Setup Table
Item Name Value Use
Video Output
TV System
Video Scale
P-SCAN YPbPr/ S-Video/
HDMI
NTSC/ PAL
4:3 PS/ 16:9/ 4:3 LB
Select
Select
Select
75
Page 76

3.7.1.3 Audio Setup
If you are connecting the Optical/Coaxial cable, please make sure the Digital
Audio Output mode is on. (SPDIF-PCM / SPDIF-RAW)
Audio Setup Table
Item Name Value Use
Digital Audio Output
Analog Audio Output
3.7.1.4 Video Setup
SPDIF-PCM/ SPDIF-RAW/
SPDIF-OFF
MONO R/ MONO L/ MIX
MONO/ STEREO
Select
Select
Video Setup Table
Item Name Value Use
Brightness
Contrast
0 ~ 32
0 ~ 32
76
Adjust
Adjust
Page 77

HUE
Saturation
0 ~ 32
0 ~ 32
Adjust
Adjust
3.7.1.5 Other Settings
The “Photo Display Setup”, “Video Resume Playing” and “Play Next
Video”
You can configure the “Screen Saver Time”, “Slide Show Time” and “Music
Auto Play” function by this item.
Other Settings Table
Item Name Value Use
Screen Saver
Photo Display Setup
Slide Show Time
Music Auto Play
Video Resume Playing
Play Next Video
OFF / 1 min~30 min
List / Thumbnail
1 sec ~ 3 min
Repeat All/ OFF/ One Time
Ask/Always/Off
Enable/Disable
Select
Switch
Select
Select
Switch
Switch
77
Page 78

3.8 FAQ
Q: No Television display or Poor Display.
A: 1. Make sure your TV is turned on and switched to the correct input.
2. Make sure Digital Media Center is turned on and switched to the correct TV
mode.
3. If the TV Mode that you are using is not the right one for your television,
you may not be able to see the display on television. To fix this problem, push
“Output” key on the remote control. You can cycle through each of the
possible TV modes to find and select the correct one.
4. Make sure you are using the correct video cables and that they are
connected firmly to Digital Media Center and to your TV.
5. The Power adapter for Digital Media Center and your TV are securely
connected to a working power source.
Q: Digital Media Center does not find my network
A: If you use wireless networks, make sure that the Wireless Network Name
(SSID) and the security settings of Digital Media Center and media server match
exactly. If you use wired network, make sure the cable hooked correctly.
Q: Digital Media Center does not find the DMS Server
A: 1. Verify that the DMS Server software was installed on your PC.
2. Verify that Digital Media Center and the PC running the software are on the
same subnet and that they can communicate with each other. In most cases,
this means that the first three fields of the two IP address should be the same.
3. Make sure you have pressed the “Start Service” button on DMS Server
after importing media files.
Q: Digital Media Server can only be seen for a short time
A: Some firewall or antivirus software may cause failures of the UPnP
communications between Digital Media Center and Digital Media Server. Please
configure your firewall setting to allow the access of “UPnP” and Digital Media
Server. Or you may disable the firewall or antivirus applications while using
Digital Media Server!
78
Page 79

Q: Digital Media Center does not receive a valid IP Address
A: 1. Verify that a working DHCP server is on your network. PCs on the
network should get IP addresses in the correct range.
2. You can use a Static IP Address of there is a problem connecting to the
server.
Q: No Subtitle when playing “mpeg2” files
A: Please make sure to enable the “subtitle” function by press “subtitle
button” every time when you are watching mpeg2 video files; also please enable
this function with each mpeg2 video file that has subtitle file with it.
Q: No Subtitle when playing “mpeg2” files after pressing “subtitle”
button
A: Please make sure the conversation of the “mpeg2” video file has begun before
pressing “subtitle” button.
Q: No Subtitle when playing “mpeg2” files even the “subtitle function”
is enabling
A: Please note if you have enabled the “Transcoding” function, the subtitle
function might not work for some video files.
Q: Fast forward or slow forward is not working
A: Please note if you have enabled the “Transcoding” function, the “fast
forward”, “fast backward”, “slow forward”, and “slow backward” functions
will not work due to limitation.
Q: Can not add music files to BGM list?
A: Please make sure you did not add more than 500 music files to BGM list since
the capacity of BGM list is 500 files.
Q: Can not find Firmware Upgrade file in the USB device
A: Please check if you put the latest firmware file under root directory of USB
device, or Digital Media Center can not find it.
79
Page 80

Q: Performance of video playing is not so good?
A: If you use wireless connection, the playing performance can be affected by the
wireless environment, you may try to enable the “Transcoding” function to
make the video playing smoother.
Q: USB HDD External Enclosure is not supported?
A: Please use external power supply for USB HDD (or USD CD-ORM drive)
External Enclosure.
80
Page 81

V
Appendix A Specification
Product
Model
Hardware Specification
ideo Output
Audio Output
Port
Ethernet
USB
LED Indicators
Power Switch
Web TV / Radio Protocol
Digital Media Center
DMA-200
HDMI (480p, 576p, 720p50, 720p60, 1080i50, 1080i60, 1080p60),
S-Video/Component Video, Composite (CVBS)
Audio (Right, Left), S/PDIF (Coaxial)
1 Ethernet:10/100/1000Mbps, Half or Full Duplex, Auto-negotiation,
Auto MID/MID-X
1 USB 2.0 Host (External Storage or CD-ROM drive support)
1 Power LED light on front panel / 1 Network LED light on front panel
1 Power On / Off Switch on rear panel
RTSP, HTTP, and MMS
Digital Home Standard
Video Format
Image Format
Audio Format
Content Protection
Content File Format
Sub-Titles
Format
Multi-Languages
Support OS
UPnP 1.0 and DLNA 1.0
1080p Full HD Resolution, MPEG1/2/4 SD/HD, AVI, H.264 HD, WMV9,
VC1, and Divx / Xvid
JPEG, TIFF, PNG, GIF, and BMP
MPEG 1 Layer 1/2, MP3, MPEG 2 AAC, MPEG 4 AAC, AC3, WMA, and
WMA Pro
MSFT DRM
mkv, avi, wmv, iso, ifo, mp4, vob, asf, m2ts, mov, tp, ts, and mpg
Text: srt, ssa, and idx / Image: sub
English, French, German, Spanish, Italian, Portuguese, Netherlands,
Japanese, Chinese (Simplified/Traditional), and Hebrew.
Windows 2000 / XP / Vista
Utility Minimum System
Requirements
22
1.8GHz Processor or higher
Page 82

512MB RAM or above (512MB recommended)
HD space at least 1 GB free for installation
Microsoft DirectX 9 or above
Windows 2000 or above
Windows Media Player 9 or above
Environment Specifications
Dimension (W x D x H)
Power
Operating Environment
Emission
200 x 120 x 55 mm (W x D x H)
5V DC, 2.6A
Operating temperature: 0 ~ 45 Degree C
Storage temperature: -25 ~ 55 Degree C
Humidity: 10 ~ 90% non-condensing
FCC, CE
82
Page 83

EC Declaration of Conformity
For the following equipment:
*Type of Product :
*Model Number : DMA-200
* Produced by:
Manufacturer‘s Name : Planet T echnology Corp.
Manufacturer‘s Address : 11F, No. 96, Min Chuan Road, Hsin Tien
is herewith confirmed to comply with the requirements set out in the Council Directive on the
Approximation of the Laws of the Member States relating to Electromagnetic Compatibility
(89/336/EEC, 92/31/EEC, 93/68/EEC).
For the evaluation regarding the Electromagnetic Compatibility, the following standards were
applied:
EN 55022 (2006, Class B)
EN 55024 (1998 + A1: 2001 + A2: 2003)
EN 61000-3-2 (2006, Class A)
EN 61000-3-3 (1995 + A1: 2001 + A2: 2005)
IEC 61000-4-2 Edition 1.2 (2001-04)
IEC 61000-4-3 (2002 + A1: 2002)
IEC 61000-4-4 (2004)
IEC 61000-4-5 Edition 1.1 (2001-04)
IEC 61000-4-6 Edition 2.1 (2004-11)
IEC 61000-4-8 Edition 1.1 (2001-03)
IEC 61000-4-11 2nd Edition (2004-03)
Responsible for marking this declarati o n i f the:
⌧ Manufacturer Authorized representative established within the EU
Authorized representative established within the EU (if applicable):
Company Name: Planet Technology Corp.
Company Address: 11F, No.96, Min Chuan Road, Hsin Tien, Taipei, Taiwan, R.O.C
Person responsible for making this declaration
Name, Surname Jonas Yang
Position / Title : Product Manager
Taiwan
19th Sep., 2008
Place Date Legal Signature
Digital Media Center
Taipei, Taiwan, R.O.C.
PLANET TECHNOLOGY CORPORATION
e-mail: sales@planet.com.tw http://www.planet.com.tw
11F, No. 96, Min Chuan Road, Hsin Tien, Taipei, Taiwan, R.O.C. Tel:886-2-2219-9518 Fax:886-2-2219-9528
 Loading...