

Page 1
Wireless Digital Media Adapter
DMA-100W
User’s Manual
Page 2

Software License Agreement
1. This Software License Agreement (the “Agreement”) is a legal agreement between you
(either an individual or an entity) (“You”) and PLANET Technology Corp. (“PLANET”) regarding the use of PLANET’s software provided with the Wireless Digital Media Adapter
DMA-100W (inside the Wireless Digital Media Adapter DMA-100W, any accompanying CDs,
and any accompanying documentation; together, the “Software”).
BEFORE YOU USE THIS SOFTWARE, CAREFULLY READ THE TERMS AND
CONDITIONS OF THIS AGREEMENT. IF YOU ARE NOT AUTHORIZED TO SIGN, THEN
DO NOT DOWNLOAD, INSTALL OR USE THE SOFTWARE, BECAUSE BY DOING SO,
YOU ARE AGREEING TO BE BOUND BY THIS AGREEMENT. IF YOU DO NOT AGREE
TO ALL OF THE TERMS OF THIS AGREEMENT, DO NOT DOWNLOAD, INSTALL OR
USE THIS SOFTWARE, AND DESTROY OR RETURN ALL COPIES IN YOUR
POSSESSION.
2. Subject to the restrictions set forth below, PLANET grants You a nonexclusive, personal,
nontransferable, perpetual (subject to section 5) license to install and use 1 copy of the provided version of the Software in object code format, for internal and personal purposes only,
on 1 computer. The Software is “in use” on a computer when it is loaded into the temporary
memory or installed into the permanent memory of a computer. The license granted hereunder shall not be effective until You have paid all fees in full. Except for the license rights
granted above, PLANET and PLANET’s licensors retain all right, title and interest in and to
the Software, including all intellectual property rights therein. YOU MAY NOT (AND MAY
NOT ALLOW A THIRD PARTY TO) (a) RENT, LEASE, SUBLICENSE, SELL, ASSIGN,
LOAN, USE FOR TIMESHARING OR SERVICE BUREAU PURPOSES OR OTHERWISE
TRANSFER THE SOFTWARE OR ANY OF YOUR RIGHTS AND OBLIGATIONS UNDER
THIS AGREEMENT; (b) reverse engineer, decompile, disassemble or attempt to reconstruct, identify or discover any source code, underlying ideas, underlying user interface
techniques or algorithms of the Software by any means whatsoever, except to the extent
the foregoing restrictions are expressly prohibited by applicable law; (c) remove or destroy
any copyright notices or other proprietary markings; (d) attempt to circumvent any use
restrictions; (e) modify or adapt the Software, merge the Software into another program or
create derivative works based on the Software; (f) use, copy or distribute the Software without PLANET’s written authorization, excepting 1 copy for archival or backup purposes only;
or (g) use the Software or the Wireless Digital Media Adapter DMA-100W for commercial
use.
YOU MAY NOT (AND MAY NOT ALLOW A THIRD PARTY TO) COPY, REPRODUCE,
CAPTURE, STORE, RETRANSMIT, DISTRIBUTE, OR BURN TO CD (OR ANY OT HER
FORMAT) ANY COPYRIGHTED CONTENT (INCLUDING BUT NOT LIMITED TO
MUSICAL AND MUSIC-RELATED) THAT YOU ACCESS OR RECEIVE THROUGH USE
OF THE SOFTWARE. YOU ASSUME ALL RISK AND LIABILITY, CIVIL AND CRIMINAL,
FOR ANY SUCH PROHIBITED USE OF COPYRIGHTED CONTENT.
3. THIS AGREEMENT SHALL BE EFFECTIVE UPON INSTALLATION OF THE SOFTWARE
AND SHALL TERMINATE UPON THE EARLIER OF: (A) YOUR FAILURE TO COMPLY
WITH ANY TERM OF THIS AGREEMENT OR (B) RETURN, DESTRUCTION OR
DELETION OF ALL COPIES OF THE SOFTWARE IN YOUR POSSESSION. PLANET’s
rights and your obligations shall survive any termination of this Agreement. Upon termination of this Agreement, You shall certify in writing to PLANET or such PLANET licensor that
all copies of the Software have been destroyed or deleted from any of your computer libraries or storage devices.
4. PLANET warrants that the Software will perform substantially in accordance with the
documentation accompanying the Software for a period of 90 days after your initial receipt
of the Software. PLANET’s entire liability and your exclusive remedy for breach of this warranty shall be repair or replacement of the Software. This limited warranty shall be void if
failure of the Software has resulted from any accident, abuse, misuse or misapplication by
You.
EXCEPT AS SET FORTH ABOVE, THE SOFTWARE IS PROVIDED ON AN “AS IS”
BASIS. YOU ASSUME ALL RESPONSIBILITY FOR SELECTION OF THE SOFTWARE
TO ACHIEVE YOUR INTENDED RESULTS AND FOR THE INSTALLATION OF, USE OF
AND RESULTS OBTAINED FROM THE SOFTWARE. TO THE MAXIMUM EXTENT
PERMITTED BY APPLICABLE LAW, PLANET DISCLAIMS ALL WARRANTIES, EITHER
ii
Page 3

EXPRESS, IMPLIED OR STATUTORY, INCLUDING, BUT NOT LIMITED TO, IMPLIED
WARRANTIES OF MERCHANTABILITY, NONINFRINGEMENT, QUALITY, ACCURACY,
FITNESS FOR A PARTICULAR PURPOSE, AND FITNESS FOR YOUR PURPOSE WITH
RESPECT TO THE SOFTWARE AND THE ACCOMPANYING WRITTEN MATERIALS.
THERE IS NO WARRANTY AGAINST INTERFERENCE WITH THE ENJOYMENT OF
THE SOFTWARE OR AGAINST INFRINGEMENT. PLANET DOES NOT WARRANT
THAT THE FUNCTIONS CONTAINED IN THE SOFTWARE WILL MEET YOUR
REQUIREMENTS, BE UNINTERRUPTED OR ERROR-FREE, OR THAT ALL DEFECTS
IN THE SOFTWARE WILL OR CAN BE CORRECTED.
5. In the event that a claim alleging infringement or misappropriation of an intellectual property
right arises concerning the Software, PLANET in its sole discretion may elect to defend or
settle such claim. PLANET, in the event of such claim, may also in its sole discretion, elect
to terminate this Agreement and all rights to use the Software and require the return and/or
destruction of the Software, with a refund of the fees paid for use of the Software less a
reasonable allowance for use and shipping.
THE FOREGOING ARE PLANET’S SOLE EXCLUSIVE OBLIGATIONS, AND YOUR SOLE
AND EXCLUSIVE REMEDIES, WITH RESPECT TO INFRINGEMENT AND/OR
MISAPPROPRIATION OF ANY INTELLECTUAL PROPERTY RIGHT.
6. UNDER NO CIRCUMSTANCES WILL PLANET OR ITS LICENSORS BE LIABLE FOR
ANY CONSEQUENTIAL, SPECIAL, INDIRECT, INCIDENTAL OR PUNITIVE DAMAGES
WHATSOEVER (INCLUDING, WITHOUT LIMITATION, DAMAGES FOR LOSS OF
PROFITS, INTERRUPTION, LOSS OF BUSINESS INFORMATION, LOSS OF DATA OR
OTHER SUCH PECUNIARY LOSS), WHETHER BASED ON BREACH OF CONTRACT,
TORT (INCLUDING NEGLIGENCE), STRICT LIABILITY, PRODUCT LIABILITY OR
OTHERWISE, ARISING OUT OF THE USE OR INABILITY TO USE THE SOFTWARE,
EVEN IF PLANET AND/OR ITS LICENSORS HAVE BEEN ADVISED OF THE
POSSIBILITY OF SUCH DAMAGES. IN NO EVENT SHALL PLANET’S AND ITS
LICENSORS’ AGGREGATE LIABILITY FOR DAMAGES ARISING OUT OF THIS
AGREEMENT EXCEED THE FEES PAID BY YOU FOR THE SOFTWARE. THE
FOREGOING LIMITATIONS ARE INDEPENDENT OF THE EXCLUSIVE REMEDY
PROVIDED IN SECTION 6 ABOVE AND SHALL APPLY NOTWITHSTANDING ANY
FAILURE OF SUCH EXCLUSIVE REMEDY OR OF ITS ESSENTIAL PURPOSE.
THE FOREGOING EXCLUSIONS AND LIMITATIONS OF LIABILITY AND DAMAGES
SHALL NOT APPLY TO CONSEQUENTIAL DAMAGES FOR PERSONAL INJURY.
7.
You may not export or re-export the Software without: (a) the prior written consent of
PLANET, (b) complying with applicable export control laws, including, but not limited to, restrictions and regulations of the Department of Commerce or other agency or authority, and
(c) obtaining any necessary permits and licenses. In any event, You may not transfer or
authorize the transfer of the Software to a prohibited territory or country or otherwise in
violation of any applicable restrictions or regulations.
iii
Page 4

Copyright
Copyright (C) 2005 PLANET Technology Corp. All rights reserved.
The products and programs described in this User’s Manual are licensed products of PLANET
Technology, This User’s Manual contains proprietary information protected by copyright, and
this User’s Manual and all accompanying hardware, software, and documentation are copyrighted.
No part of this User’s Manual may be copied, photocopied, reproduced, translated, or reduced
to any electronic medium or machine-readable form by any means by electronic or mechanical.
Including photocopying, recording, or information storage and retrieval systems, for any purpose
other than the purchaser's personal use, and without the prior express written permission of
PLANET Technology.
Disclaimer
Certain content and services accessible via the DMA-100W may include materials owned by
third parties. The users shall be entirely responsible for ensuring that they have the necessary
rights to access and use such third party content. PLANET assumes no liability for and shall not
be responsible for a user’s access of such content, including but not limited to unlawfully ‘ripped’
or downloaded content.
PLANET Technology does not warrant that the hardware will work properly in all environments
and applications, and makes no warranty and representation, either implied or expressed, with
respect to the quality, performance, merchantability, or fitness for a particular purpose.
PLANET has made every effort to ensure that this User’s Manual is accurate; PLANET disclaims liability for any inaccuracies or omissions that may have occurred.
Information in this User’s Manual is subject to change without notice and does not represent a
commitment on the part of PLANET. PLANET assumes no responsibility for any inaccuracies
that may be contained in this User’s Manual. PLANET makes no commitment to update or keep
current the information in this User’s Manual, and reserves the right to make improvements to
this User’s Manual and/or to the products described in this User’s Manual, at any time without
notice.
If you find information in this manual that is incorrect, misleading, or incomplete, we would
appreciate your comments and suggestions.
FCC - Class B
This device complies with FCC Rules Part 15. Operation is subject to the following two conditions:
1. This device may not cause harmful interference, and
2. This device must accept any interference received, including interference that may cause
undesired operation.
This equipment has been tested and found to comply with the limits for a Class B digital device,
pursuant to Part 15 of the FCC Rules. These limits are designed to provide reasonable protection against harmful interference in a residential installation. This equipment generates, uses
and can radiate radio frequency energy and, if not installed and used in accordance with manufacturer's instructions, may cause harmful interference to radio communications. However, there
is no guarantee that interference will not occur in a particular installation. If this equipment does
cause harmful interference to radio or television reception, which can be determined by turning
the equipment off and on, the user is encouraged to try to correct the interference by one or
more of the following measures:
1. Re-orient or relocate the receiving antenna.
2. Increase the separation between the equipment and receiver.
iv
Page 5

3. Connect the equipment to an outlet on a circuit different from that to which the receiver is
connected.
4. Consult the dealer or an experienced radio/TV technician for help.
FCC Caution: To assure continued compliance, (example - use only shielded interface cables
when connecting to computer or peripheral devices). Any changes or modifications not expressly approved by the party responsible for compliance could void the user’s authority to
operate this equipment.
FCC Radiation Exposure Statement
This equipment complies with FCC radiation exposure limits set forth for an uncontrolled environment. This equipment should be installed and operated with a minimum distance of 5
centimeters between the radiator and your body. This transmitter must not be co-located or
operating in conjunction with any other antenna or transmitter. Note: In order to maintain compliance with the limits of a Class B digital device, we require that you use a quality interface
cable when connecting to this device.
WARNING! Any changes or modifications to this product not expressly approved by the manufacturer could void any assurances of safety or performance and could result in violation of Part
15 of the FCC Rules.
v
Page 6
European Community CE Notice
Marking by the symbol
indicates compliance with the essential requirements of Directive 73/23/EC and the essential
requirements of articles 3.1(b), 3.2 and 3.3 of Directive 1999/5/EC. Such marking is indicative
that this equipment meets or exceeds the following technical standards:
EN 300 328 — Electromagnetic compatibility and Radio spectrum Matters (ERM); Wideband
Transmission systems; data transmission equipment operating in the 2,4GHz ISM band and
using spread spectrum modulation techniques.
ETN 301 489-17 — Electromagnetic compatibility and Radio spectrum Matters (ERM); ElectroMagnetic Compatibility (EMC) standard for radio equipment and services; Part 17: Specific
conditions for Wideband data and HIP-ERLAN equipment.
EN 60950-1 — Safety of information technology equipment, including electrical business equipment.
Due to frequency restrictions, it is necessary to select your channel that allowed using in your
country before using this radio device.
European Community Declaration of Conformity
This device complies with the essential requirements and other relevant provisions of R&TTE
Directive (1999/5/EC) issued by the Commission of the European Community.
To avoid the potential effects on the environment and human health as a result of
the presence of hazardous substances in electrical and electronic equipment, end
users of electrical and electronic equipment should understand the meaning of the
crossed-out wheeled bin symbol. Do not dispose of WEEE as unsorted municipal
waste and have to collect such WEEE separately.
Trademarks
The PLANET logo is a trademark of PLANET Technology. This documentation may refer to
numerous hardware and software products by their trade names. In most, if not all cases, these
designations are claimed as trademarks or registered trademarks by their respective companies.
Revision
User’s Manual for PLANET Wireless Digital Media Adapter:
Model: DMA-100W
Rev: 1.0 (July. 2005)
Part No. EM-DMA100W
vi
Page 7

TABLE OF CONTENTS
CHAPTER 1 INTRODUCTION ......................................................................... 1
DMA-100W Features............................................................................................. 1
Media Format ........................................................................................................ 1
Package Contents ................................................................................................ 2
Physical Details .................................................................................................... 3
CHAPTER 2 INSTALLATION........................................................................... 7
Hardware Connection .......................................................................................... 7
CHAPTER 3 MEDIA SERVER SOFTWARE.................................................. 11
Install the DMA-100W Media Server ................................................................. 11
Configure DMA-100W Media Server.................................................................16
CHAPTER 4 DMA-100W CONFIGURATION................................................. 24
Options Screen................................................................................................... 24
IP Config Screen................................................................................................. 25
WIFI Setup Screen.............................................................................................. 26
Update Firmware ................................................................................................ 27
CHAPTER 5 PLAYBACK VIDEO/MUSIC/PHOTO........................................ 28
Login Page .......................................................................................................... 28
Play Video............................................................................................................ 29
Play Music........................................................................................................... 30
Search Media Files ............................................................................................. 32
Play Photo........................................................................................................... 32
Online Media ....................................................................................................... 33
APPENDIX A TROUBLESHOOTING............................................................ 35
APPENDIX B SPECIFICATION.................................................................... 36
i
Page 8

Page 9

Chapter 1
Introduction
Turn your home into a multimedia entertainment center with Wireless Digital Media
Adapter from PLANET.
PLANET DMA-100W is innovative easy-to-use entertainment center designed for your digital
media playback. Via wired or wireless network connection, this device can playback your favorite digital music, picture, and video onto television or stereo system in your home at your
convenience. With its on-screen, ease-of-use user interface and handy remote control, you can
start sharing the media content on the TV or stereo system in your digital home in real-time.
The DMA-100W is a multimedia player that can play the popular MPEG 1, MPEG 2, MPEG 4,
DivX video format files from your computer to TV. Using this device, you can also enjoy the
playback of your favorite MP3, WAV, WMA audio files on your stereo system. As digital photo is
gaining its popularity, the DMA-100W is capable of displaying slide show of your favorite pictures on TV (supported formats in JPEG, GIF, TIFF, BMP). With supporting all commonly used
video, audio, and image file formats, the DMA-100W allows uses to enjoy the ultimate digital
media experiences.
1
DMA-100W Features
• Popular media file format supports
PLANET DMA-100W support popular audio formats (MP3, WMA, WAV, MP2), image
formats (JPG, GIF, TIF, JPEG and BMP), and video formats (MPEG-1/2/4, DivX).
• Ease-of-use configuration interface, intuitive remote control
The DMA-100W has built-in easy TV setup for machine configuration to bring the most
convenience. Via intuitive design remote controller, users may enjoy the media content just
in minutes.
• 802.11g high speed wireless connection
DMA-100W offers an 802.11g high-speed wireless interface with up to 54 Mbps data rate.
• 64/128bit WEP support
DMA-100W supports wireless security with 64/128-bit WEP encryption.
• Analog/Digital audio output
DMA-100W has built-in left / right analog stereo audio and coaxial digital audio connectors
for the audio system connection.
• Image viewing
DMA-100W is able to view the stored images in slide show or digital album mode for more
convenience and pleasure.
Media Format
The playback quality of DMA-100W depends upon the quality of your digital media files on your
PC. For music, avoid quality settings below 48kbps as they are unsupported. For CD quality
music, rip your MP3s at 128kbps or higher, with a sample rate of 44.1kHz.
1
Page 10
Wireless Digital Media Adapter User Guide
Following is the list of the media format which DMA-100W support:
Video
MPEG-1 VCD format (1.15 Mbps CBR) .mpg, .mpe, .mpeg, .dat, .m1v
MPEG-2 up to 12 Mbps .mpg, .mpe, .mpeg, .m2v, .vob, .vro
MPEG-4 (XviD, DiVX) .avi, .mov, .mp4
AVI audio codec MP3, PCM, WMA, Ogg
MOV (3ivX converted from supported MPEG-4
video codec using Dr. DivX II for MAC OS)
MP4 (only support non-hinted MP4) MP4V + MP4A (AAC)
Subtitle (MicroDVD, SubRip, Sub Station
Alpha, Sami)
Windows Media Video 9 .wmv
Audio
MPEG-1 Layer 1 .mp1, .mpa
MPEG-1 Layer 2 .mp2
MPEG-1 Layer 3 .mp3
Ogg Vorbis .ogg
Microsoft PCM Wave .wav
Apple MPEG-4 AAC Audio .m4a
Microsoft Windows Media Audio version 1 and
version 2
Photo
Jpeg (grayscale, RGB, YCbCy)(Does not support CMYK, YCCK.)
TIFF (RGB) (Does not support CMYK, YMC, YMCK, KCMY)
BMP (non-compressed)
GIF (Animated GIF’s are not supported)
PNG (Non-alpha channel only)
PICT
3ivX + MP3, 3ivX + PCM
.sub, .srt, .ssa, .smi
.wma, .asf
Package Contents
The following items should be included:
DMA-100W
Power adapter
Remote controller
Quick installation guide
CD-ROM (user manual and utility)
Composite video and audio L/R cable
S-video cable
If any of the above items are damaged or missing, please contact your dealer for support.
2
Page 11

Physical Details
Product Outlook
LEDs Description
PWR Indicates the power status of DMA-100W.
STANDBY When this LED is on, the DMA-100W is under power saving mode.
WLAN When this LED is on, the DMA-100W has built a wireless connection.
When this LED is blinking, it indicates activity on the wireless connection.
10 When this LED is on, the DMA-100W has built a 10Mbps Ethernet connec-
LAN
tion.
When this LED is blinking, it indicates activity on the 10Mbps Ethernet
connection.
100 When this LED is on, the DMA-100W has built a 100Mbps Ethernet connec-
tion.
When this LED is blinking, it indicates activity on the 100Mbps Ethernet
connection.
PAL When this LED is on, the DMA-100W is setting on PAL system.
NTSC When this LED is on, the DMA-100W is setting on NTSC system.
Rear Panel
DC In
Vi d e o O u t pu t
Y
Pb
Pr
DVI
S-Video
Com p.
Audio Output
L
S/PDIF
Optical
R
Coax.
LAN
Reset
Reset Button Resets the DMA-100W and returns all settings to factory
defaults.
LAN (RJ-45) Connects to your wired (Ethernet) network, if applicable.
S/PDIF Connects to digital audio port of an AV receiver. Audio
Output
Video
Output
DC Power Connects to the supplied power Adapter.
L/R Analog Audio Connects to the L/R analog audio ports of your TV or sound
system.
Composite Video Connects to your TV, Plasma display, LCD display, etc.
S-Video Connects to your TV, Plasma display, etc.
DVI Connects to HDTV or other display.
Component Video
Connects to a TV, Plasma display, etc.
(YPbPr)
3
Page 12
Wireless Digital Media Adapter User Guide
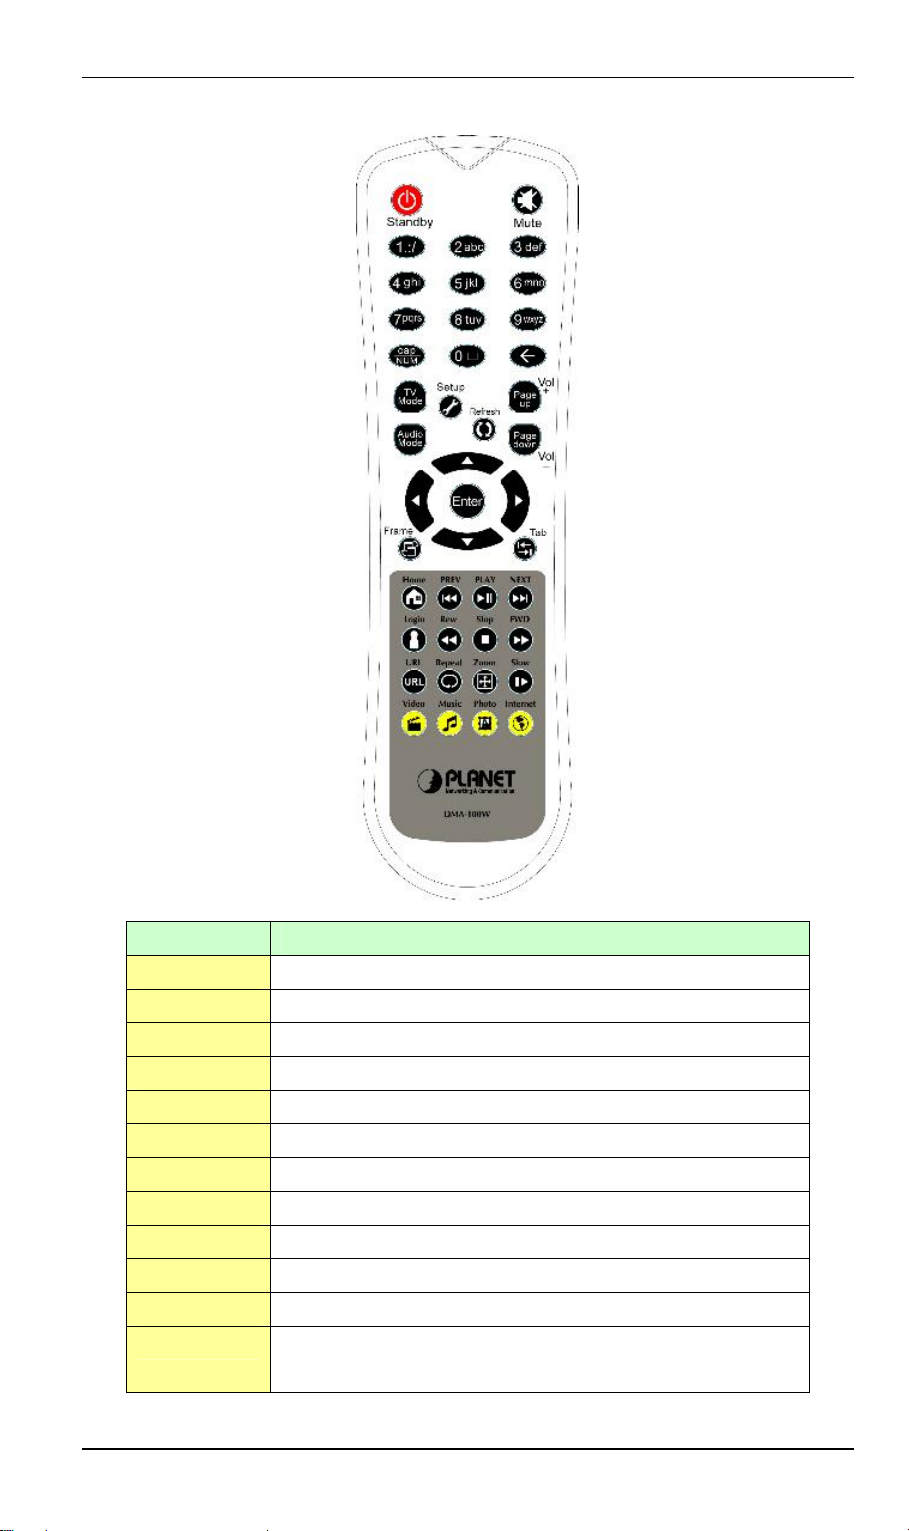
Remote Controller
Key definition of Remote Controller
Key Name Functionality Description
Power Power on/down software and screen
Mute Mute
1.:/ Enter the digit “1”/Wildcard
2abc Enter the digit “2”/alphabet “a” “b” “c”
3def Enter the digit “3”/alphabet “d” “e” “f”
4ghi Enter the digit “4”/alphabet “g” “h” “i”
5jkl Enter the digit “5”/alphabet “j” “k” “l”
6mno Enter the digit “6”/alphabet “m” “n” “o”
7pqrs Enter the digit “7”/alphabet “p” “q” “r” “s”
8tuv Enter the digit “8”/alphabet “t” “u” “v”
9wxyz Enter the digit “9”/alphabet “w” “x” “y” “z”
Cap/Num 1. Change the alphabet lowercase and digit
2. Change the alphabet uppercase and digit
4
Page 13
3. Digit
0︺ Enter the digit “0”/ punctuation “︺”
Clear/Return Erase the previous digit/alphabet
TV Mode Change the TV output format “NTSC” “PAL” “DVI”.
Default is composite/S-Video
Audio Select the audio output type. Default is composite
1. Mono Left
2. Mono Right
3. Stereo
4. DVD Audio option
Setup/ Info Go to the DMA-100W Setup Menu
Display the Video,Music,Photo file information
Refresh Reload a page
Page
up/Volume+
Page
down/VolumeLeft Arrow Go to left
Up Arrow Go up
Down Arrow Go down
Right Arrow Go to right
Enter Select
Frame Switch the frame when TV theme Music/Video play
Menu Select item by item
Home Go to the Login Page/Play the selected section repeatedly
Turn the volume up
Turn the volume down
Preview Play the previous Video, Music, Photo
Play Playback
Next Skip to the next Video, Music, Photo
Login Go to the Login page/Play the Video, Music, Photo repeatedly
Review Fast reward playback with 1X, 2X, 3X, 4X speed
Stop Stop playback
Forward Fast forward playback with 1X, 2X, 3X, 4X speed
URL Reserved for future use
Repeat Playback the Video/Music/Photo:
1. Repeat one
2. Repeat all
3. Off
Zoom Magnify/reduce the view of the Video, Photo
1. Fit to screen
5
Page 14

Wireless Digital Media Adapter User Guide
2. Actual size
3. Full screen
Slow Slow playback with 2, 4, 8, 16, 32 times
Video Go to Video select page
Music Go to Music select page
Photo Go to Photo select page
Internet Go to Online Media select page
6
Page 15

Chapter 2
2
Installation
Hardware Connection
This chapter describes the different topologies of the DMA-100W and how to connect the
topology with your DMA-100W and TV.
Under every situation the DMA-100W must be wired to the TV or other display device. The
following image shows the simple connection of the DMA-100W and the related equipments.
All audio, video, and networking connections are located on the rear panel of the DMA-100W.
Before starting to connect cables to your TV, Stereo system and network, determine which type
of cable your television, Stereo system uses and your network type (wired or wireless).
Connect Video
Note: The TV Mode button on the remote control toggles between the composite, S-Video
output, component output and DVI output. After hardware connection, switch it to the correct
video output via press the button.
Composite Video:
Connect the supplied yellow video cable to the Composite Video port on the back of the DMA100W. And the matching opposite end of the cable to your television input.
Audio Output
RCA
LR
Optical Coax.
S/PDIF
LAN
Reset
DC In DVI
S-Video:
Vide o Ou t pu t
YPbPr
Co mp.S-Video
7
Page 16

Wireless Digital Media Adapter User Guide
Connect the supplied black video cable to the S-Video port on the back of the DMA-100W. And
the matching opposite end of the cable to your television input.
YPbPr
DC In DVI
Vide o Out p u t
Co mp.S-Video
Audio Output
RCA
LR
Optical Coa x.
S/PDIF
LAN
Reset
Component Video:
Match the color-coded cables to the matching connectors on the DMA-100W and into the
component video input of your television. (This cable is not supplied.)
YPbPr
DC In DVI
Vide o Ou t pu t
Co mp.S-Video
Audio Output
RCA
LR
S/PDIF
Optica l Coax.
LAN
Reset
DVI Video:
Using the DVI cable to connect the DVI port on DMA-100W and your television. (This cable is
not supplied.)
Audio Output
RCA
LR
S/PDIF
Optica l Coax.
LAN
Reset
YPbPr
DC In DVI
Vide o Out p u t
S-Video
Co mp.
Connect Audio
Note: The Audio Mode button on the remote control toggles between the composite Audio
output and the digital audio output (optical/coaxial). Switch it to the correct output via press the
button.
Composite Audio:
Plug the supplied red and white connectors into the color-coded matching jacks on the DMA100W. Plug the opposite ends to the matching jacks on your television or stereo system.
8
Page 17

Audio Out put
LR
S/PDIF
Optical Coax.
LAN
Reset
YPbPr
DC In DVI
Vide o Ou t pu t
Comp.S-Video
S/PDIF Optical Audio:
Connect an optical audio connector into the DMA-100W and the matching opposite end of the
cable to the audio input of your audio system. (This cable is not supplied.)
YPbPr
DC In DVI
V i de o Ou t pu t
Comp.S-Video
Audio Out put
LR
S/PDIF
Optica l Coax.
LAN
Reset
S/PDIF Coaxial Audio:
Connect a coaxial audio connector into the DMA-100W and the matching opposite end of the
cable to the audio input of your audio system. (This cable is not supplied.)
YPbPr
Vi de o Out p u t
Audio Output
S/PDIF
DC In DVI
Co mp.S-Video
LR
Optical Coax.
LAN
Reset
Network Connection
Note: You may have an Ethernet cable plugged into the unit and have the wireless antenna
connected. Neither will interfere with the other, but only one network can be accessed at a time
(wired or wireless).
Wired Network:
Use the Ethernet cable to plug into the network port on DMA-100W, and attach the other end to
the network.
YPbPr
DC In DVI
Vi de o Ou t pu t
Co mp.S-Video
Wireless Network:
Make the antenna to be secure and in an upright position.
Audio Output
LR
S/PDIF
Optica l Coax.
LAN
Reset
9
Page 18

Wireless Digital Media Adapter User Guide
YPbPr
DC In DVI
V id e o O u t p ut
Comp.S-Video
Audio Output
LR
S/PDIF
Optical Coax.
LAN
Reset
10
Page 19

Chapter 3
Media Server Software
This chapter describes how to install and configure the DMA-100W Media Server on
to your PC.
Install Requirements
DMA-100W Media Server installation requirement
System Hardware • CPU: Pentium 4 1.6GHz or Faster
• Memory Size: 128 MB (256 MB recommended)
• VGA card resolution: 1024 x 768 or above
• 60MB or above free HDD space
• CD ROM drive
• Wireless (802.11g or 802.11b) or Ethernet network capability
Support OS Win 98 SE, Win 2000, Win Me, Win XP
Note: The PC installed with DMA-100W Media Server and the Wireless Digital Media Adapter
must be directly connected or on the same LAN segment.
3
Install the DMA-100W Media Server
STEP 1:
Insert the provided CD-ROM into the CD-ROM drive of you PC. The software should
run automatically. If it does not, please execute the setup.exe file manually by clicking
on the CD-ROM drive from the My Computer icon on the desktop. You will then see
the Welcome screen.
STEP 2:
STEP 3:
Click “DMA-100W Media Server” to start installation.
11
Page 20

Wireless Digital Media Adapter User Guide
Choose your language and click “OK”.
STEP 4:
Close all other applications and then click on the “Next” button to continue.
STEP 5:
After reading the License Agreement, mark “I accept the agreement” and click “Next”
button to continue.
12
Page 21

STEP 6:
When you are ready to continue with setup, click “Next” button to continue.
13
Page 22

Wireless Digital Media Adapter User Guide
STEP 7:
Click on the “Browse” button if you would like to change the destination location, if not
click on the “Next” button to continue.
STEP 8:
On this screen you may change the name of the program folder. If you do not want to
change this name, click on the “Next” button to continue.
14
Page 23

STEP 9:
Select the additional tasks you would like Setup to perform, then click “Next”.
STEP 10:
On this screen, click “Back” if you want change the previous settings. If you do not want
to change any settings, click on the “Install” button to begin copying the files.
15
Page 24

Wireless Digital Media Adapter User Guide
STEP 11:
Click “Finish” to complete the installation.
Configure DMA-100W Media Server
After installation completed, you will see the icon of DMA-100W Media Server in the Windows
Programs and on the desktop.
To run the DMA-100W Media Server, click Start > Pr ogr ams > PLANET DMA-100W Server, or
just double click on the desktop icon.
Desktop Icon
Or you can click the DMA-100W icon on your desktop or right-click the DMA-100W icon on your
system tray and select “Manage Media Files” to configure.
When launching the program, the main home screen will be displayed as the image depicts
below.
16
Page 25

The DMA-100W Media Server will share media content from selected directory folders. You can
configure the Shared Folders you want via click “Edit” and select “Preference” setting. The three
buttons on the left “Video”, “Music” and “Photo” displays the list of files in the shared folders.
The Media Server software has a detailed online help, which is not included in this manual. To
open it, click “Help” and select “Contents”.
If you’d like to know which version of your DMA-100W software, you may select “About”.
17
Page 26

Wireless Digital Media Adapter User Guide
When EXIT the configuration screen, the server utility can still run in the background.
General Option
Click “Edit” and select “Preferences” to go to the “General Setting” screen.
In System tab, it will show your product name, product version, computer name and IP address
of this computer. The last column shows the port number of your TCP/IP. You can set the port
number as you want.
Note: We strongly recommend that use default value “8000” to be your port number. If you
change to other port number, make sure your firewall in your computer or router allows it.
In Security tab, you can set password of your DMA-100W Server. Just type in your password
into the columns and click “Save”. Please keep your password safely.
18
Page 27

In MAC Address tab, you can enable the MAC address control to block the requests from
specified computers. You can click “+” or “-” to add/delete MAC address to the list below. The
computer with the MAC address listed won’t be able to access the DMA-100W Server.
Video Option
The Video screen allows you to add folders where your videos are stored, or remove folders you
no longer wish to share.
In Default Library tab, you can use “Browse…” button to select the directory folder to share.
19
Page 28

Wireless Digital Media Adapter User Guide
OpenDiv3 is a popular streaming video format. OpenDiv3 features small file size, best compression and quality. If your network bandwidth is not enough to use, you can check the box of
“Enable automatic OpenDiv3….”. The DMA-100W server will convert your videos in your shared
directory folders to OpenDiv3 format. You also can convert videos to OpenDiv3 format in the
following screen.
In Watch Folder tab, you can add multiple directory folders need to be shared. Click “+” or “-” to
add/delete the additional directory folder.
20
Page 29

Music Option
The Music screen allows you to add folders where your music files are stored, or remove folders
you no longer wish to share.
In Default Library tab, you can use “Browse…” button to select the directory folder to share.
The DMA-100W Server supports the playlist format of Windows Media player, Winamp and
iTunes. You can select the appropriate option to enable this functionality.
In Watch Folder tab, you can add multiple directory folders need to be shared. Click “+” or “-” to
add/delete the additional directory folder.
You can select the photo album you want to play when playback music. If you choose “Default”
in the screen below, the DMA-100W will play your default directory of shared photo. If you
choose none, DMA-100W will play the theme pictures.
21
Page 30

Wireless Digital Media Adapter User Guide
Photo Option
The Photo screen allows you to add folders where your photo files are stored, or remove folders
you no longer wish to share.
In Default Library tab, you can use “Browse…” button to select the directory folder to share and
select the photo scale.
You also can designate the music playlist when playback photo and the displaying time.
22
Page 31

Language Option
You can set the language of DMA-100W server via clicking the “Language” option.
23
Page 32

Wireless Digital Media Adapter User Guide
Chapter 4
DMA-100W Configuration
This chapter describes how to use the configuration and maintenance features of your
100W.
Note: We suggest you to re-login to DMA-100W Server after changing any settings of DMA100W.
The DMA-100W uses an on-screen menu interface. As you move through the menus, you will
use the selection arrows on the remote control to move up, down, right and left. Or you can use
Tab button to move. The highlight bar moves from item to item as you press the selection
arrows. In some instances you will need to press ENTER on the remote control to access the
pull down menu within an item. You will then see an arrow within the highlighted bar. These
arrow “hints” help you with menu navigation, and show you the possible paths you may take. For
example, a down arrow hints that more items are available if you move the highlight bar down.
After all hardware connection has been done and the DMA-100W Server software is installed
and configured, you can power on DMA-100W. Wait for 30 seconds, the Login page will show
up on your TV screen. If there’s no screen showed up, make sure all the connections are correct
and press the “TV Mode” button on the remote control to switch the Video output mode. The
default video output mode is NTSC. Press the TV Mode until the screen show up.
Note: For the first time using DMA-100W, do not directly log into Media Server. Please go to
setup page to configure DMA-100W first. To access the setup page, click the “Setup” button on
remote controller. A tool tray will arise as the picture below. Please use the Left/Right arrow key
to select the most right option and click “Enter” to access “Setup” page.
4
DMA-
Click to enter
“Setup” page
Options Screen
Screen Saver You can specify the time duration before screen saver displays.
24
Page 33

System Language You can choose the system’s display language. Note that the se-
lected language must match with DMA-100W media server’s
language setting.
Encoding Language Select the encoding language you want.
Subtitle Language Select the subtitle’s language. Note that this option will work with *.srt
file format.
Video Setting This option allows you to setup the Video output format. Please select
the proper option according to your video system.
Video Zoom Select how the video displays on your television.
Audio Setting Specify your audio output format according to your audio system.
Browser Option Check the box to enable HD (High Definition) browser.
Sound Option Check the box to enable Typing, Navigation and System Alert sound.
Save/Cancel Button Click “Save” to store all modified settings, or click “Cancel” to discard
the changes.
Restore Factory
Settings
Click this button to restore all configurations back to factory defaults.
IP Config Screen
You can choose “DHCP client” or “Static IP” to configure the IP address of DMA-100W. The
default is using DHCP client.
If you want to change the IP address to static, click “Switch to Manual”, and enter the desired
network settings using Remote Controller.
25
Page 34

Wireless Digital Media Adapter User Guide
WIFI Setup Screen
You can configure the network connection type of DMA-100W in this screen.
Preferred Specify the network type of DMA-100W here. When the network type is
changed, you must click “Save” before configuring related options. The following options need to be configured only when you select wireless network
connection.
Available When DMA-100W is using wireless network connection, it will search for all
26
Page 35

available wireless networks and display their SSIDs in the drop-down list.
Select the preferred SSID and click “Select” button.
SSID Enter the SSID of the preferred WLAN.
Connection Select Infrastructure or Ad-Hoc connection.
Security Choose the security method used for this wireless network. The DMA-100W
supports WEP 64/128-bit with Open System. This setting must be identical to
the target wireless station.
Key If you choose 64-bit WEP security in the previous option, enter 10 hexadeci-
mal characters (0-9, A-F). If you choose 128-bit WEP security, 26 hexadecimal
characters (0-9, A-F) are required.
Update Firmware
The DMA-100W will connect to a pre-configured network server to check available Firmware
Updates.
Select “Check for firmware update” and press Enter button on your remote control.
If a firmware update is located, you will be prompted to update.
Note: Do not turn off the unit or disconnect the power during the firmware update. Once the
update has been completed, the DMA-100W will restart automatically.
27
Page 36

Wireless Digital Media Adapter User Guide
Chapter 5
Playback Video/Music/Photo
After all hardware connections are done and the DMA-100W Media Server software h
installed and configured properly, you can power on DMA-100W. Wait for 30 seconds, the Login
page will show up on your TV screen. If there’s no any screen showed up, please double check
the hardware connections, or press the “TV Mode” button on the remote control to switch the
Video output mode. The default video output mode is NTSC. Press the TV Mode until the
screen shows up.
5
as been
Login Page
The first page being showed up is the login page. You can add, delete or edit profile here. Each
profile represents one active media server in LAN.
Connected
Not connected
1. Choose a Profile to Login
This page will list the profile’s name sequence of connecting. The grey profile mark means it’s
not in connection right now. The green profile mark means the DMA-100W server is connected.
Only the connected profile can be login.
2. Add/Edit/Delete profile
The DMA-100W can automatically search and connect to DMA-100W server on the same
network. You can press the “Login” button on remote controller to refresh the list of profiles. If
you want to manually add/edit/delete profile, click “Add”, “Edit” or “Delete” button to configure.
Note: DMA-100W only connects to one Media Server at a time.
Once you login to the Media Server successfully, the main menu will show up as below.
28
Page 37

Play Video
In main menu, select “Video” or press the “Video” button on remote control. The video list will
show up. Select the video files you want to playback and press “Enter”.
During the playback of video, you can press “Setup” button to display file information.
29
Page 38

Wireless Digital Media Adapter User Guide
You can use the Remote Control during playback of video.
PLAY/PAUSE To pause the video and to resume playing the video.
+ (VOLUME) To increase the volume.
- (VOLUME) To decrease the volume.
MUTE To silence the audio portion of the video.
FWD To fast forward through the video.
REW To fast review through the video.
Repeat To repeat the video after viewing it.
Slow To playback the video slowly.
Zoom Adjust the playback size to fit on your television screen or actual size.
Login Subtitle function
Up Arrow Play the previous video
Down Arrow Skip to the next video
Left/Right
Arrow
Display playback information of percentage (GO TO 1% ~ 99%). You can
also press the number buttons on the Remote Control to control, press “ 1
“Æ GO TO 10%、” 2 “ Æ GO TO 20%......” 9” Æ GO TO 90%.
Play Music
In main menu, select “Music” or press the “Music” button on remote control. The music list will
show up. Select the audio files you want to playback and press “Enter”.
30
Page 39

During the playback of music, you can press “Setup” button to display file information.
You can use Remote Control during playback of music.
PLAY/PAUSE To pause the music and to resume playing the music.
+ (VOLUME) To increase the volume.
- (VOLUME) To decrease the volume.
MUTE To silence the audio portion of the music.
Next Playback next audio file.
Preview Playback previous audio file.
Repeat To repeat the music after viewing it.
Up Arrow Play the previous music
Down Arrow Skip to the next music
Left/Right
Arrow
Display playback information of percentage (GO TO 1% ~ 99%). You can
also press the number buttons on the Remote Control to control, press “ 1
31
Page 40

Wireless Digital Media Adapter User Guide
“Æ GO TO 10%、” 2 “ Æ GO TO 20%......” 9” Æ GO TO 90%.
Note: When playing MP3 file via wireless connection, there would be noise in the first few
seconds. This is because at this time, the DMA-100W is buffering and playing the received data
simultaneously. Thus causes the noise. To improve the quality, please move the DMA-100W
closer to the target AP or change to Wired Network connection.
Search Media Files
In the Video/Music page, select the “Search” option. The following screen will display. Enter the
search parameters and click “Go”. The search result will be displayed.
Play Photo
In main menu, select “Photo” or press the “Photo” button on remote control. The photo list will
show up. Select the picture files you want to playback and press “Enter”. You can also playback
these pictures with slideshow.
You can use Remote Control during playback of photo.
32
Page 41

PLAY/PAUSE To pause the photo and to resume playing the photo.
Next Playback next picture file.
Preview Playback picture file.
Repeat To repeat the photo after viewing it.
Zoom Adjust the playback size to fit on your television screen or actual size.
Up Arrow Play the previous photo
Down Arrow Skip to the next photo
Online Media
Currently, the DMA-100W supports Radio @ AOL online services. This service allows you to
listen to online radio. In main menu, select “Online Media” or press the “Internet” button on
remote control. The Online Media page will show up.
Select AOL Services by press “Enter” on your remote control.
NOTE: Radio @ AOL is available for USA customers only. ISP Service is NOT required to
access the AOL online radio. You can be an AOL member and have another Internet
Service Provider.
After select AOL Services, please enter your AOL Screen Name and Password. If you are not a
member, you can also direct click “Submit” and enjoy a Free Trial.
33
Page 42

Wireless Digital Media Adapter User Guide
34
Page 43

Appendix A
Troubleshooting
Q: I have plugged the DMA-100W to my TV correctly, but I don’t see anything on the screen.
A: Make sure that your video connection is correct. Refer to Chapter 2 to find out more
information.
If the video connection is correct, the wrong video output set on the DMA-100W will cause
that the television display will not work. Press “TV Mode” button on the remote control to
cycle through the video output settings. When you have reached the correct setting, the
television display will work.
Q: The network is unable to link.
A: (1) Please make sure that the network line is linked normally when you choose “Ethernet”.
(2) Please make sure the SSID and Security configurations are correct when you choose
“Wireless”.
(3) Make sure the IP Address configurations are correct.
Q: The remote controller does not function.
A: (1) Point the remote control closer to the DMA-100W’s sensor
(2) Change the batteries.
Q: The media plays fine for a while, and then all of a sudden it freezes on the screen.
A: (1) If you are using Ethernet, please make sure that the cable is securely connected. If
using wireless, this could be due to 2.4GHz interference from other 802.11b devices such
as: WLAN, cordless phone, or microwave ovens.
(2) You may need to start the server again.
(3) Press the reset button on the rear panel of the DMA-100W to restart.
A
Q: No sound when playing audio/video files.
A: (1) Make sure the DMA-100W has not started in mute mode.
(2) Make sure the volume of the speaker is turned up.
(3) Make sure audio input source signal line is connect firmly and correctly.
Q: When playing MP3 file via wireless connection, there would be noise in the first few seconds.
A: At this time, the DMA-100W is buffering and playing the received data simultaneously.
Thus causes the noise. To improve the quality, please move the DMA-100W closer to the
target AP or change to Wired Network connection.
35
Page 44

Wireless Digital Media Adapter User Guide
Appendix B
Specification
Product Wireless Digital Media Adapter
Model DMA-100W
Hardware
Network Interface 1 x 10/100Mbps RJ-45 port
1 x 802.11g wireless interface
Wireless output power 14dBm @ 54Mbps
18dBm @ 11Mbps
Wireless receiver
sensitivity
Wireless security 64/128-bit WEP
Video output S-video
Audio output Coaxial S/PDIF
Software
Supported image format JPEG, TIFF, BMP, GIF, PNG
Supported audio format MPEG-1 Layer 1/2/3, WAV, WMA
Supported video format MPEG-1/2/4, XviD, AVI, WMV
Network and Configuration
Connection type Static IP, DHCP
Management
Environmental Specification
Operating temperature 0-45 degree C
Storage temperature 0-55 degree C
Humidity 5-95% non-condensing
Power requirement 12V DC, 2A
-68dBm @ 54Mbps
-86dBm @ 11Mbps
NTSC/PAL composite video
DVI
YPbPr/RGB component video
Optical S/PDIF
RCA audio (L/R stereo)
On-screen remote control
Media Server Utility for media content management
B
36
 Loading...