

Page 1

Class 1 / Class 2
Bluetooth V2.0 USB Adapter
BT-510U/BT-520U
User’s Guide
Page 2

Copyright
Copyright (C) 2006 PLANET Technology Corp. All rights reserved.
The products and programs described in this User’s Manual are licensed products of PLANET Technology, This User’s
Manual contains proprietary information protected by copyright, and this User’s Manual and all accompanying hardware,
software, and documentation are copyrighted.
No part of this User’s Manual may be copied, photocopied, reproduced, translated, or reduced to any electronic medium
or machine-readable form by any means by electronic or mechanical. Including photocopying, recording, or information
storage and retrieval systems, for any purpose other than the purchaser's personal use, and without the prior express
written permission of PLANET Technology.
Disclaimer
PLANET Technology does not warrant that the hardware will work properly in all environments and applications, and
makes no warranty and representation, either implied or expressed, with respect to the quality, performance,
merchantability, or fitness for a particular purpose.
PLANET has made every effort to ensure that this User’s Manual is accurate; PLANET disclaims liability for any
inaccuracies or omissions that may have occurred.
Information in this User’s Manual is subject to change without notice and does not represent a commitment on the part of
PLANET. PLANET assumes no responsibility for any inaccuracies that may be contained in this User’s Manual.
PLANET makes no commitment to update or keep current the information in this User’s Manual, and reserves the right
to make improvements to this User’s Manual and/or to the products described in this User’s Manual, at any time without
notice.
If you find information in this manual that is incorrect, misleading, or incomplete, we would appreciate your comments
and suggestions.
Federal Communication Commission Interference Statement
This equipment has been tested and found to comply with the limits for a Class B digital device, pursuant to Part 15 of FCC
Rules. These limits are designed to provide reasonable protection against harmful interference in a residential installation. This
equipment generates, uses, and can radiate radio frequency energy and, if not installed and used in accordance with the
instructions, may cause harmful interference to radio communications. However, there is no guarantee that interference will not
occur in a particular installation. If this equipment does cause harmful interference to radio or television reception, which can be
determined by turning the equipment off and on, the user is encouraged to try to correct the interference by one or more of the
following measures:
1. Reorient or relocate the receiving antenna.
2. Increase the separation between the equipment and receiver.
3. Connect the equipment into an outlet on a circuit different from that to which the receiver is connected.
4. Consult the dealer or an experienced radio technician for help.
FCC Caution
To assure continued compliance. (example-use only shielded interface cables when connecting to computer or
peripheral devices). Any changes or modifications not expressly approved by the party responsible for compliance
could void the user’s authority to operate the equipment.
This device complies with Part 15 of the FCC Rules. Operation is subject to the Following two conditions: ( 1 ) This
device may not cause harmful interference, and ( 2 ) this Device must accept any interference received, including
interference that may cause undesired operation.
Federal Communication Commission (FCC) Radiation Exposure Statement
This equipment complies with FCC radiation exposure set forth for an uncontrolled environment. In order to avoid the
possibility of exceeding the FCC radio frequency exposure limits, human proximity to the antenna shall not be less than
20 cm (8 inches) during normal operation.
CE mark Warning
The is a class B device, In a domestic environment, this product may cause radio interference, in which case the user
may be required to take adequate measures.
2
Page 3

Trademarks
The PLANET logo is a trademark of PLANET Technology. This documentation may refer to numerous hardware and
software products by their trade names. In most, if not all cases, these designations are claimed as trademarks or
registered trademarks by their respective companies.
WEEE regulation
To avoid the potential effects on the environment and human health as a result of the presence of hazardous
substances in electrical and electronic equipment, end users of electrical and electronic equipment should
understand the meaning of the crossed-out wheeled bin symbol. Do not dispose of WEEE as unsorted
municipal waste and have to collect such WEEE separately.
Revision
User’s Manual for PLANET Class1/Class2 Bluetooth V2.0 USB Adapter:
Model: BT-510U, BT-520U
Rev: 1.0 (September, 2006)
Part No. EM-BT510U
3
Page 4

Table of Contents
CHAPTER1 INTRODUCTION.....................................................................................................6
1.1 FEATURES..............................................................................................................................6
1.2 PACKET CONTENT .................................................................................................................7
1.3 SUPPORTED PROFILES ............................................................................................................7
1.4 SUPPORTED LANGUAGES .......................................................................................................7
1.5 SUPPORTED OPERATING SYSTEMS..........................................................................................8
1.6 LIMITATIONS .........................................................................................................................8
CHAPTER 2 SETUP FOR WINDOWS 98SE/ME/2000/XP/2003............................................10
CHAPTER 3 BASIC SETTING...................................................................................................12
3.1 EXPRESS MODE SET-UP.......................................................................................................12
3.1.1 Starting Bluetooth Settings.............................................................................................12
3.1.2 Detecting Bluetooth devices...........................................................................................13
3.1.3 Detecting services...........................................................................................................15
3.1.4 Registering settings information.....................................................................................19
3.2 CUSTOM MODE SET-UP .......................................................................................................20
3.2.1 Starting Bluetooth Settings.............................................................................................20
3.2.2 Detecting Bluetooth devices...........................................................................................21
3.2.3 Detecting services...........................................................................................................23
3.2.4 Registering settings information.....................................................................................27
CHAPTER 4 MAKING THE MOST OF YOUR BLUETOOTH DEVICE............................28
4.1 CONNECTING TO THE INTERNET...........................................................................................28
4.1.1 Connecting to the internet using a modem station .........................................................28
4.1.2 Connecting to the internet using a mobile telephone .....................................................37
4.2 CONNECTING TO A NETWORK[LAN] ...................................................................................46
4.2.1 Connecting to a LAN using an access point[LAP].........................................................46
4.2.2 Connecting to a LAN using an access point[PAN]........................................................54
4.3 SENDING FILES.....................................................................................................................59
4.3.1 Exchanging files with a PC or PDA...............................................................................59
4.3.2 Sending images to a mobile telephone...........................................................................65
4.4 EXCHANGING BUSINESS CARD DATA WITH A PC OR PDA....................................................68
4.5 SYNCHRONIZING DATA WITH A PDA...................................................................................77
4.5.1 Connecting using ActiveSync ........................................................................................77
4.6 FAX TRANSMISSION .............................................................................................................86
4.6.1 Using a modem station for fax transmission..................................................................86
4.6.2 Using a mobile telephone for fax transmission............................................................104
4.7 USING A BLUETOOTH-COMPATIBLE CAMERA.....................................................................116
4.8 USING A HEADSET TO COMMUNICATE................................................................................122
CHAPTER 5 ADVANCED FEATURES...................................................................................129
5.1 MAKING A DEVICE UNDISCOVERABLE TO OTHER USERS ....................................................129
5.2 ENCRYPTING THE CONTENT OF YOUR TRANSMISSIONS.......................................................130
5.3 CHANGING THE DEFAULT CONNECTION .............................................................................131
5.4 MANUALLY CREATING A VIRTUAL BLUETOOTH COM PORT..............................................134
4
Page 5

5.4.1 Clients and servers........................................................................................................134
5.4.2 Creating a virtual COM port.........................................................................................135
5.4.3 Deleting a virtual COM port.........................................................................................137
CHAPTER 6 FAQ........................................................................................................................139
6.1 GENERAL OPERATION OF THE BLUETOOTH UTILITY..........................................................139
6.2 USING A WIRELESS MODEM STATION .................................................................................141
6.3 USING AN ACCESS POINT....................................................................................................144
6.4 USING A MOBILE TELEPHONE.............................................................................................145
6.5 USING A PDA....................................................................................................................148
6.6 USING A CAMERA ..............................................................................................................148
6.7 USING A BLUETOOTH HEADSET.........................................................................................149
APPENDIX A SPECIFICATION ..............................................................................................151
5
Page 6

1
Chapter1 Introduction
The BT-510U/520U is designed to connect USB port of a desktop or laptop PC, and
allows the computer to build a short-range wireless connection to other Bluetooth devices
like cellular phones, PDAs, and computers. Since the transmission medium of
BT-510U/520U is air, PLANET also enhances both connection protection and data
security mechanism to the product which helps people share and access trigger
information. Compliant with Bluetooth specification Version 2.0 + EDR, BT-510U/520U
can provide transfer rate up to 3Mbps, which is higher than Bluetooth v1.2 device.
The BT-510U/520U provides services of virtual serial port, dial-up networking, fax, file
transfer, information exchange, information synchronization, and network access. With
powerful bundled software, it’s not difficult to implement configuration and management
even there are so many functions. Most popular operating system support, including
Windows 98SE, ME, 2000, XP and Server 2003, makes the application of BT-510U/520U
more flexible.
Link your notebook with your handheld, mobile phone, printer, audio gateway and other
Bluetooth devices within your personal area network (PAN) via a secure short-range
wireless radio link. Get rid of all those hassle cables and automatically share documents,
browse the Internet and synchronize calendars, address books and more.
1.1 Features
¾ Compatible with Bluetooth Core Specification Version 2.0 + EDR (Enhanced Data
Rate)
¾ Bluetooth Manager Utility eases the difficulties of configuration and management
¾ Date rate up to 3Mbps
¾ Lower power consumption through reduced duty cycle
¾ Simplification of multi-link scenarios due to more available bandwidth
¾ Backwards compatible to Bluetooth V1.1/V1.2 specifications
¾ Further improved BER (Bit Error Rate) performance
¾ Connection protection and data security enhanced mechanism
¾ Up to 8 devices Point-to-MultiPoint topology expands your PAN coverage
¾ Various services provided: Virtual Serial Port, Dial-up Networking, Fax, File Transfer,
Information Exchange, Information Synchronization, and Network Access
¾ Multilingual support in Bluetooth utility
¾ Most popular OS support: Windows 98SE/Me/2000/XP and Server 2003
¾ BT-510U has suppor Bluetooth Class 1, it can provide bigger cover area for user to
connect their Bluetooth device longer
6
Page 7

1.2 Packet Content
The following items should be included:
• 1 * Bluetooth V2.0 USB Adapter
• 1 * CD-ROM (includes Driver, Utility, Manual)
• 1 * Quick Installation Guide
If any of the above items are damaged or missing, please contact your dealer immediately.
1.3 Supported profiles
Windows 98SE/ME
This Bluetooth Stack for Windows supports the following profiles. Please note that
profiles HSP, PAN, BIP, A2DP, AVRCP and GAVDP are supported by Windows XP and
Windows 2000 only.
(a) DUN
(b) FAX
(c) LAP
(d) SPP
(e) HID
(f) HCRP
(g) FTP
(h) OPP
Windows 2000/XP
(a) DUN
(b) FAX
(c) LAP
(d) SPP
(e) HID
(f) HCRP
(g) FTP
(h) OPP
(i) HSP
(j) PAN
(k) BIP
(l) A2DP
(m) AVRCP
(n) GAVDP
1.4 Supported languages
The Bluetooth Stack for Windows supports the following languages.
English
Danish
French
German
Italian
7
Page 8

Japanese
Norwegian
Spanish
Swedish
The following languages are supported by Windows 2000/XP and Windows Server 2003
only.
Dutch
Korean
Simplified Chinese
Traditional Chinese
Russian
Finnish
Portuguese (Brazil)
1.5 Supported operating systems
The Bluetooth Stack for Windows supports the following operating systems.
Windows 98 Second Edition
Windows ME
Windows 2000 Professional (Service Pack 3 or above)
Windows XP Professional (Service Pack 1 or above)
Windows XP Home (Service Pack 1 or above)
Windows XP Tablet PC Edition
Windows XP Media Center Edition
Windows Server 2003
1.6 Limitations
(a) External Bluetooth drivers cannot be "signed drivers" to receive Microsoft WHQL logo.
Therefore, Microsoft's "Unsigned driver" warning messages may pop up during the
software installation, Bluetooth headset, mouse or keyboard setup. Please install the
drivers and then follow the on-screen instructions.
(b) On Swedish Windows XP, an error message (error code = 633) may be seen during
dial-up. Please update the operating system to Windows XP Service Pack 2 or refer to
Microsoft knowledge base #831717.
(c) Windows XP fast user switch is not supported. When switching to another user, the
Bluetooth Manager is not launched. Please log off before switching to another user.
(d) If "automatic FAX receiving" is enabled on Microsoft FAX manager, and if DUN, FAX,
or LAP profile icon is registered on Bluetooth Settings, and then Bluetooth's "resume from
standby" may take a couple of minutes to turn on.
(e) Windows 98 Second Edition: If the "Install New Modem" dialog pops up when setting
up a Bluetooth modem, mobile phone, or access point, please choose "Don't detect my
8
Page 9

modem; I will select from a list". Otherwise, the system may freeze during the modem
detection. If the manual for your Bluetooth device does not specify a modem driver, then
please select "Standard 33600bps modem".
(f) Before connecting or disconnecting a Bluetooth headset, please exit any voice or
sound-related applications (e.g. Windows Messenger, Windows Media Player). The
audio input and output may not be switched properly if those applications are running.
This same precaution is important prior to system standby, hibernate or shutdown, and
prior to turning off or unpluging the primary Bluetooth device.
9
Page 10

2
Chapter 2 Setup for Windows 98SE/ME/2000/XP/2003
Installing Bluetooth software for Windows
1. Insert the Drivers and User’s Manual CD into CD-ROM drive to initiate the autorun
program. Once completed, a menu screen will appear.
2. Install the Bluetooth software by click the “Bluetooth Software“ hyperlink of the menu
screen to activate the installation for the application program.
If the menu screen doesn’t appear, please start the installation as follows.
• Click “Start“ button.
• Click “Run“.
• Enter “E:\Utility\setup.exe” to the appeared dialog box, suppose “E” is your CD-ROM
drive.
Click on “OK” button.
3. When the License Agreement screen is displayed, read the License Agreement, then
click the radio button to the left of "I accept" and then click the “Next“ button.
4. During the installation, the system will try to detect your Bluetooth device, please
plug-in your Bluetooth device and then click on the “OK”.
10
Page 11
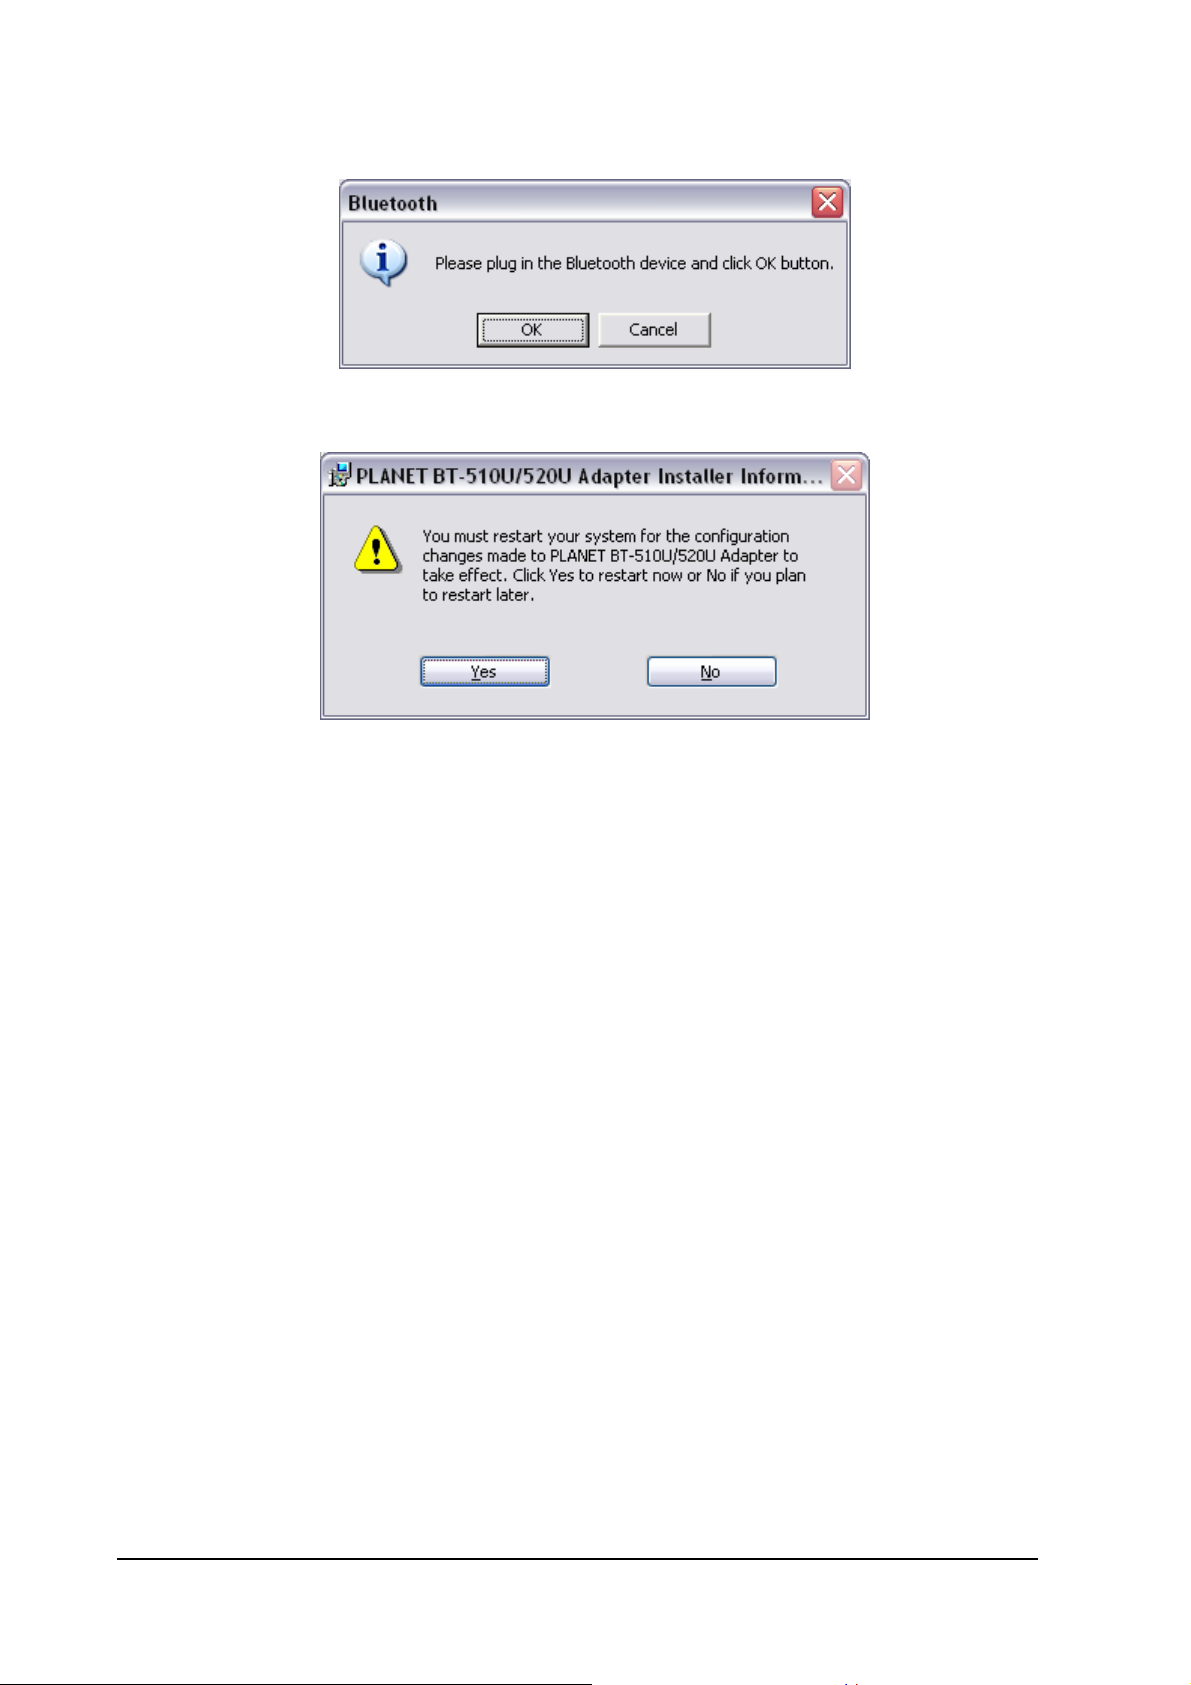
5. When the installation is completed, please click on the "Yes" to restart your system.
11
Page 12
3
Chapter 3 Basic setting
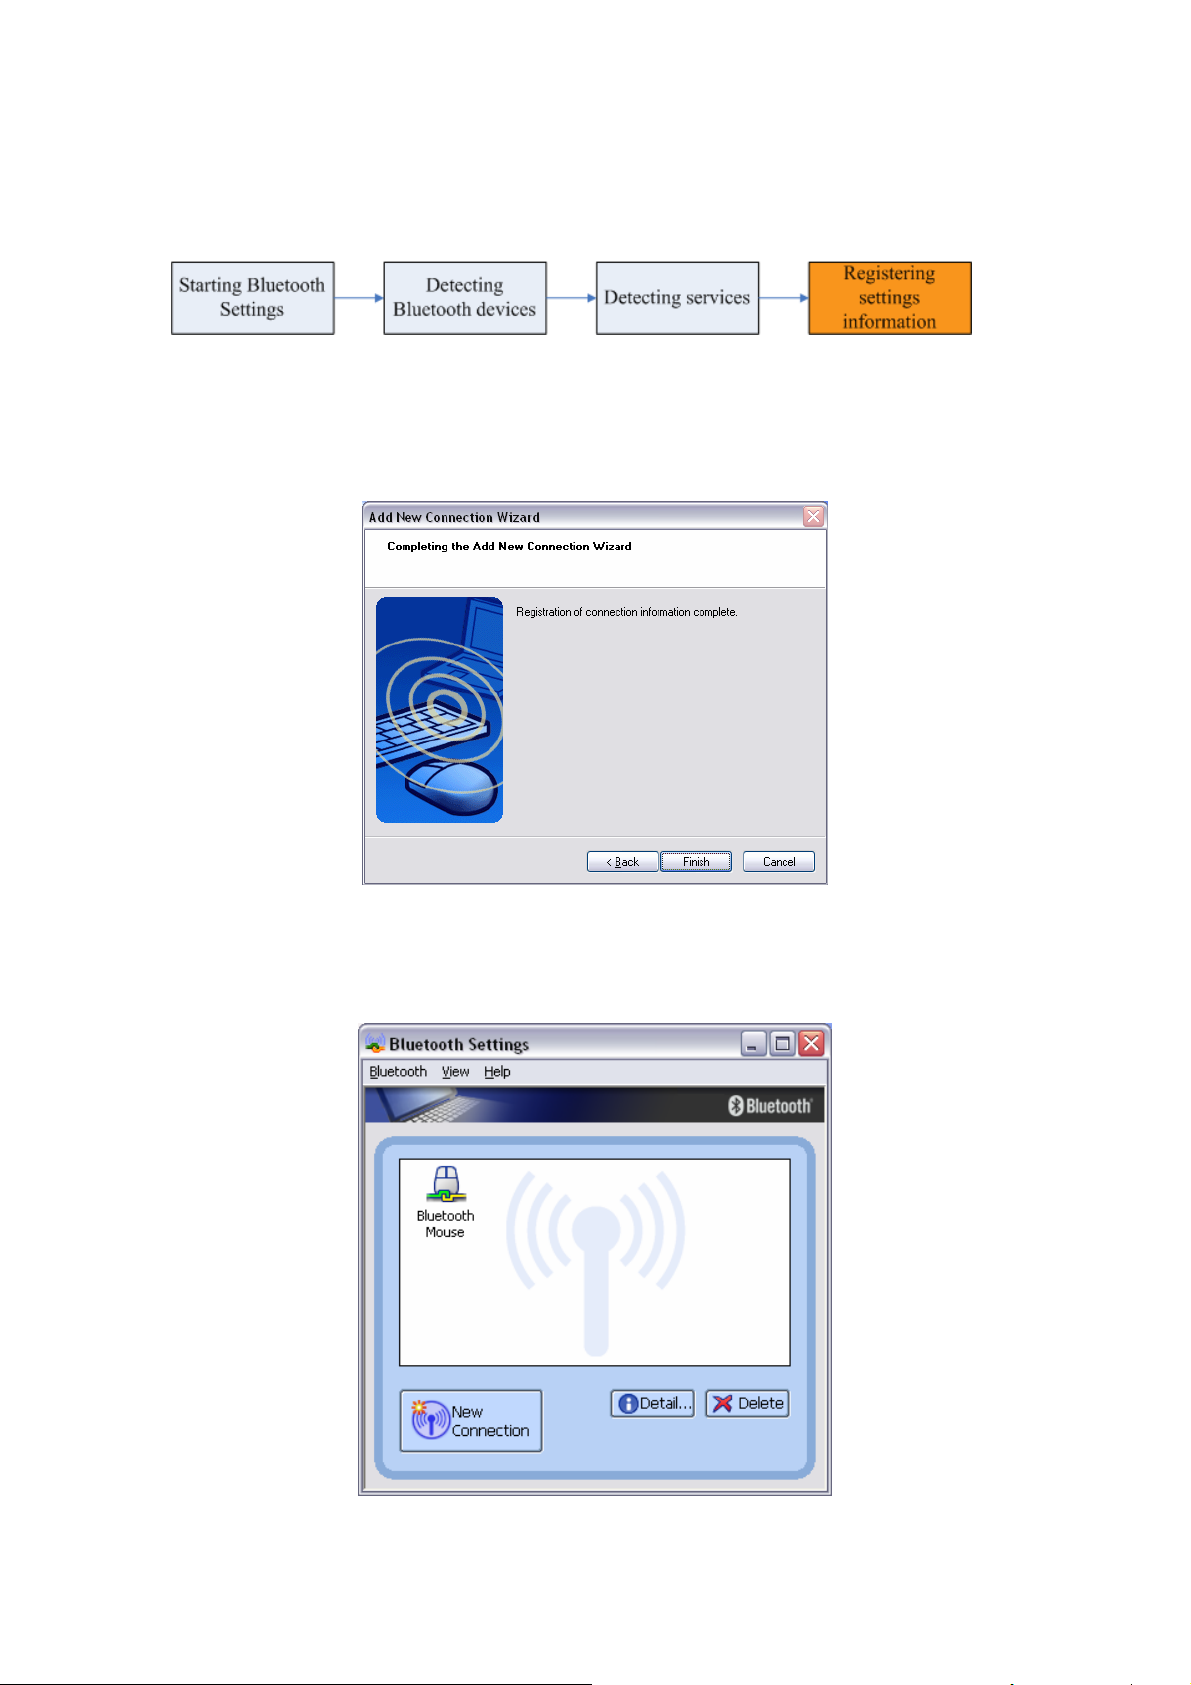
Methods for registering new devices using the Bluetooth Utility shall now be described.
A Bluetooth mouse shall be connected and set up using [Bluetooth Settings] as an
example.
[Bluetooth Settings] provides two set-up methods: "Express Mode" and "Custom Mode."
• Express Mode
[Bluetooth Settings] will automatically detect and register services. If several
services (profiles) are supported by the device the service that has been set to the
highest priority shall be selected and registered.
Express Mode is normally recommended for device set-up.
• Custom Mode
After having been detected, the services supported by the device are displayed as
a list, from which you can select the desired function(s).
Custom Mode must be used to set up a device if, for example, you wish to use a
modem station to send a fax (because in Express Mode, the DUN profile will be
automatically selected since it has a higher priority than the FAX profile).
The differences between setting up the same device (a Bluetooth mouse) using Express
Mode and Custom Mode are described on the following pages.
3.1 Express Mode Set-up
3.1.1 Starting Bluetooth Settings
1. Click [Start]Æ[All Programs]Æ[Bluetooth]Æ[Bluetooth Settings].
(Under Windows 2000, click [Start]→[Programs]→[Bluetooth]→[Bluetooth
Settings].)
Note
Page 13
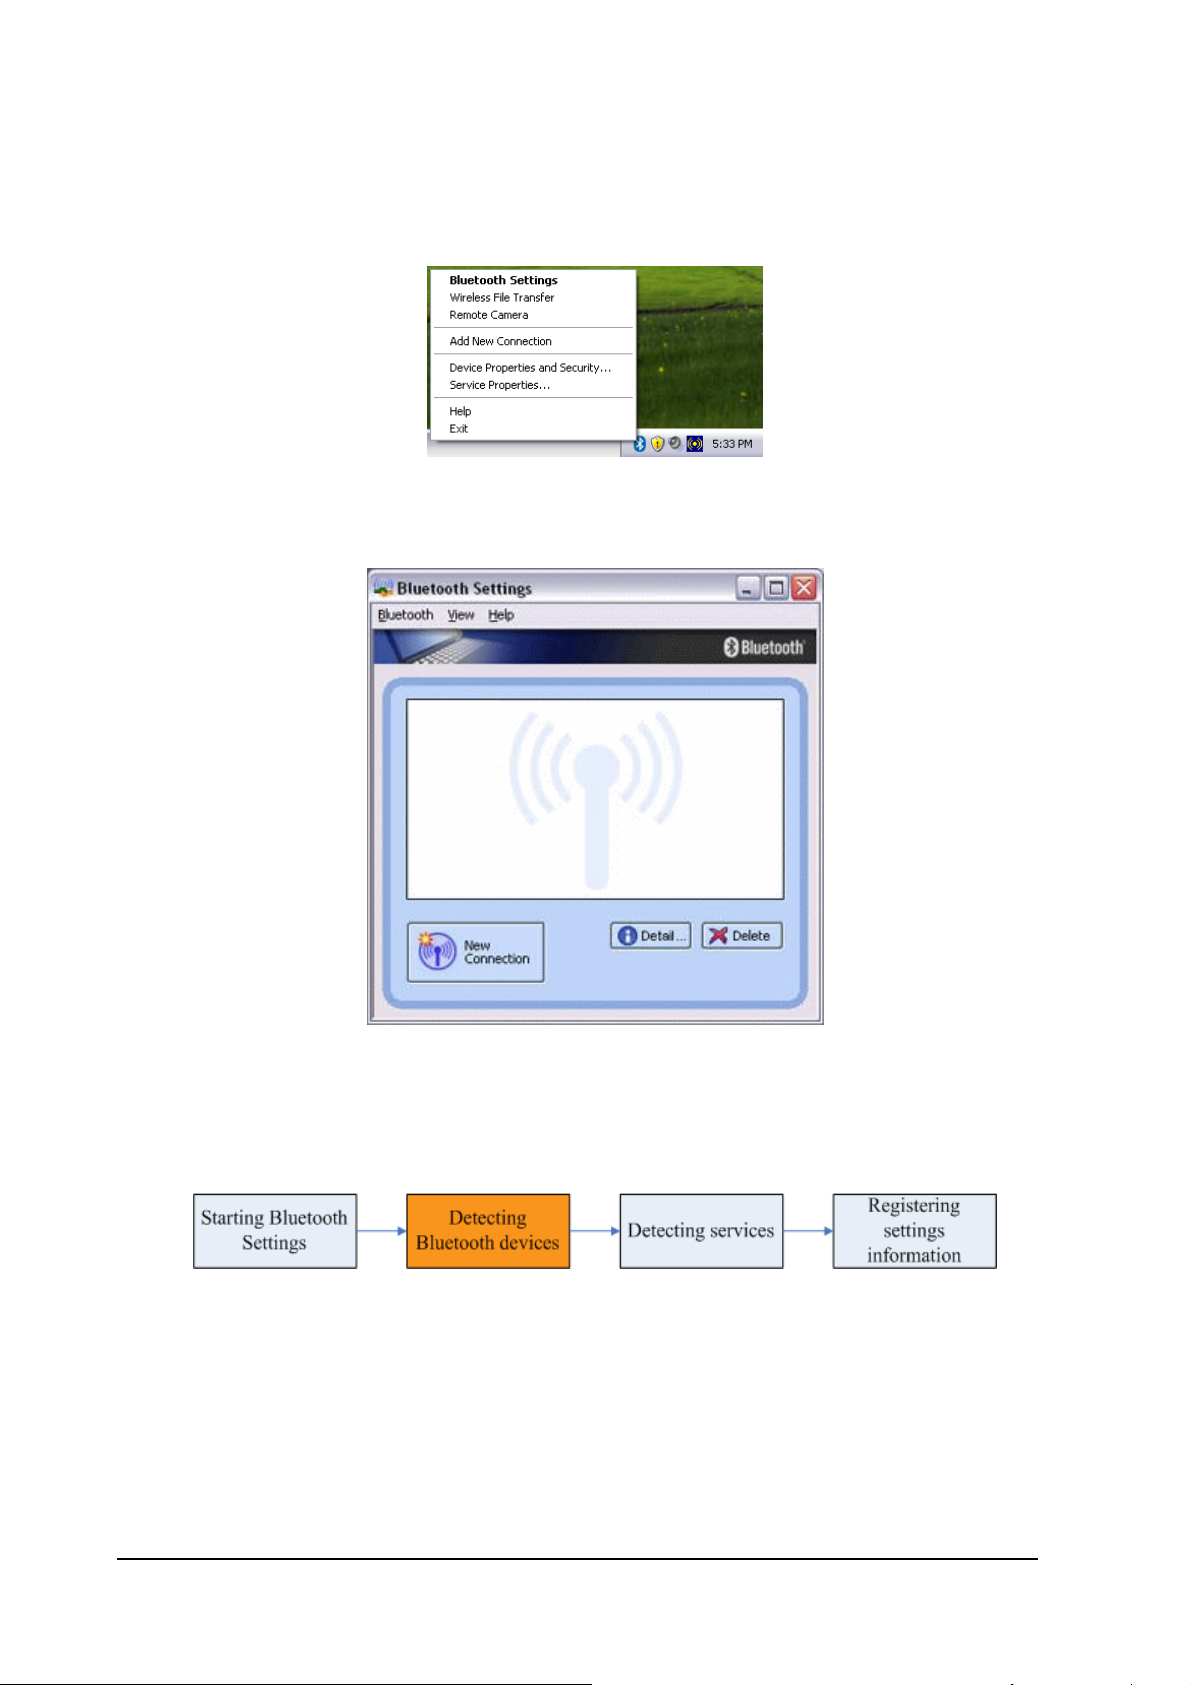
.The same result can be achieved by right-clicking on the Bluetooth icon in the
task tray and selecting [Bluetooth Settings] from the menu that appears.
The [Bluetooth Settings] window below will appear when other devices have
already been registered.
Please click the [New Connection] button to open the [Add New Connection Wizard]
window. If no devices have been registered yet, please proceed directly to
"Detecting Bluetooth Devices."
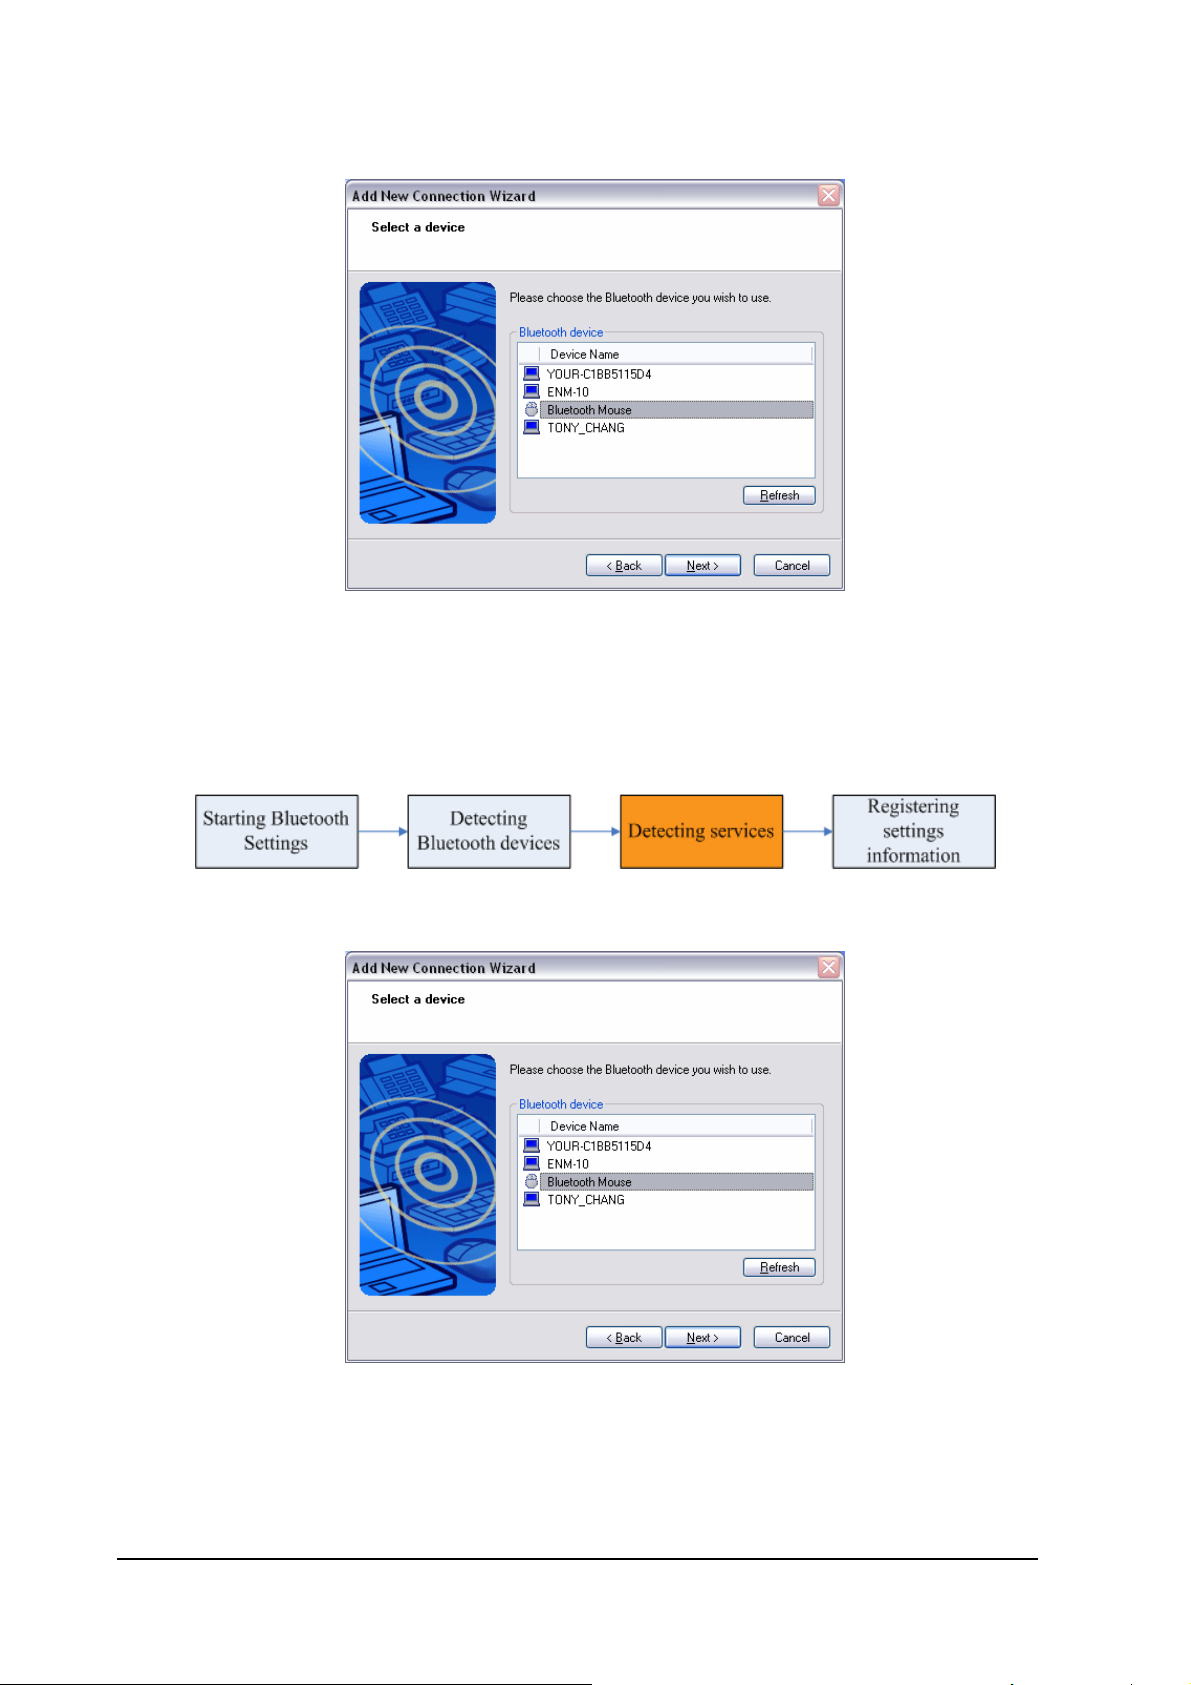
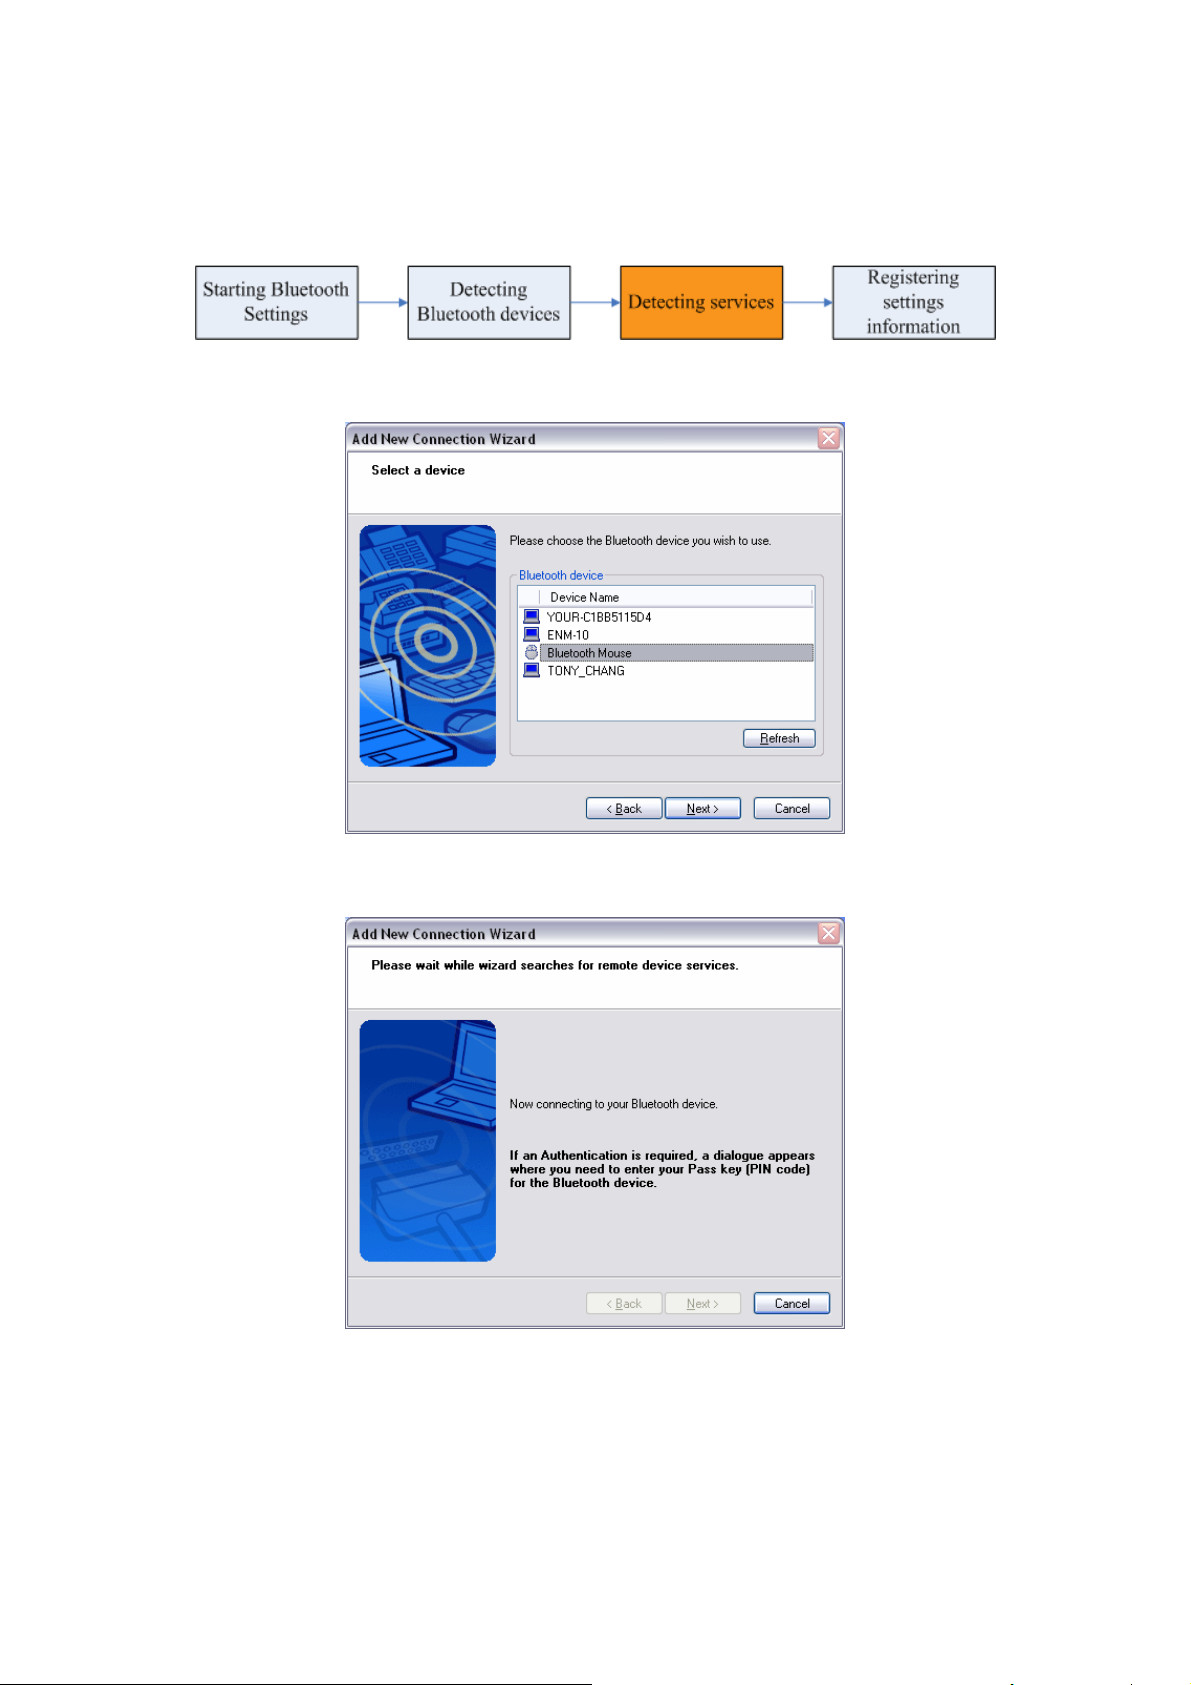
3.1.2 Detecting Bluetooth devices
The [Add New Connection Wizard (Welcome to the Add New Connection Wizard)] window
will appear.
1. Switch the device power ON to make it connectable via Bluetooth.
13
Page 14
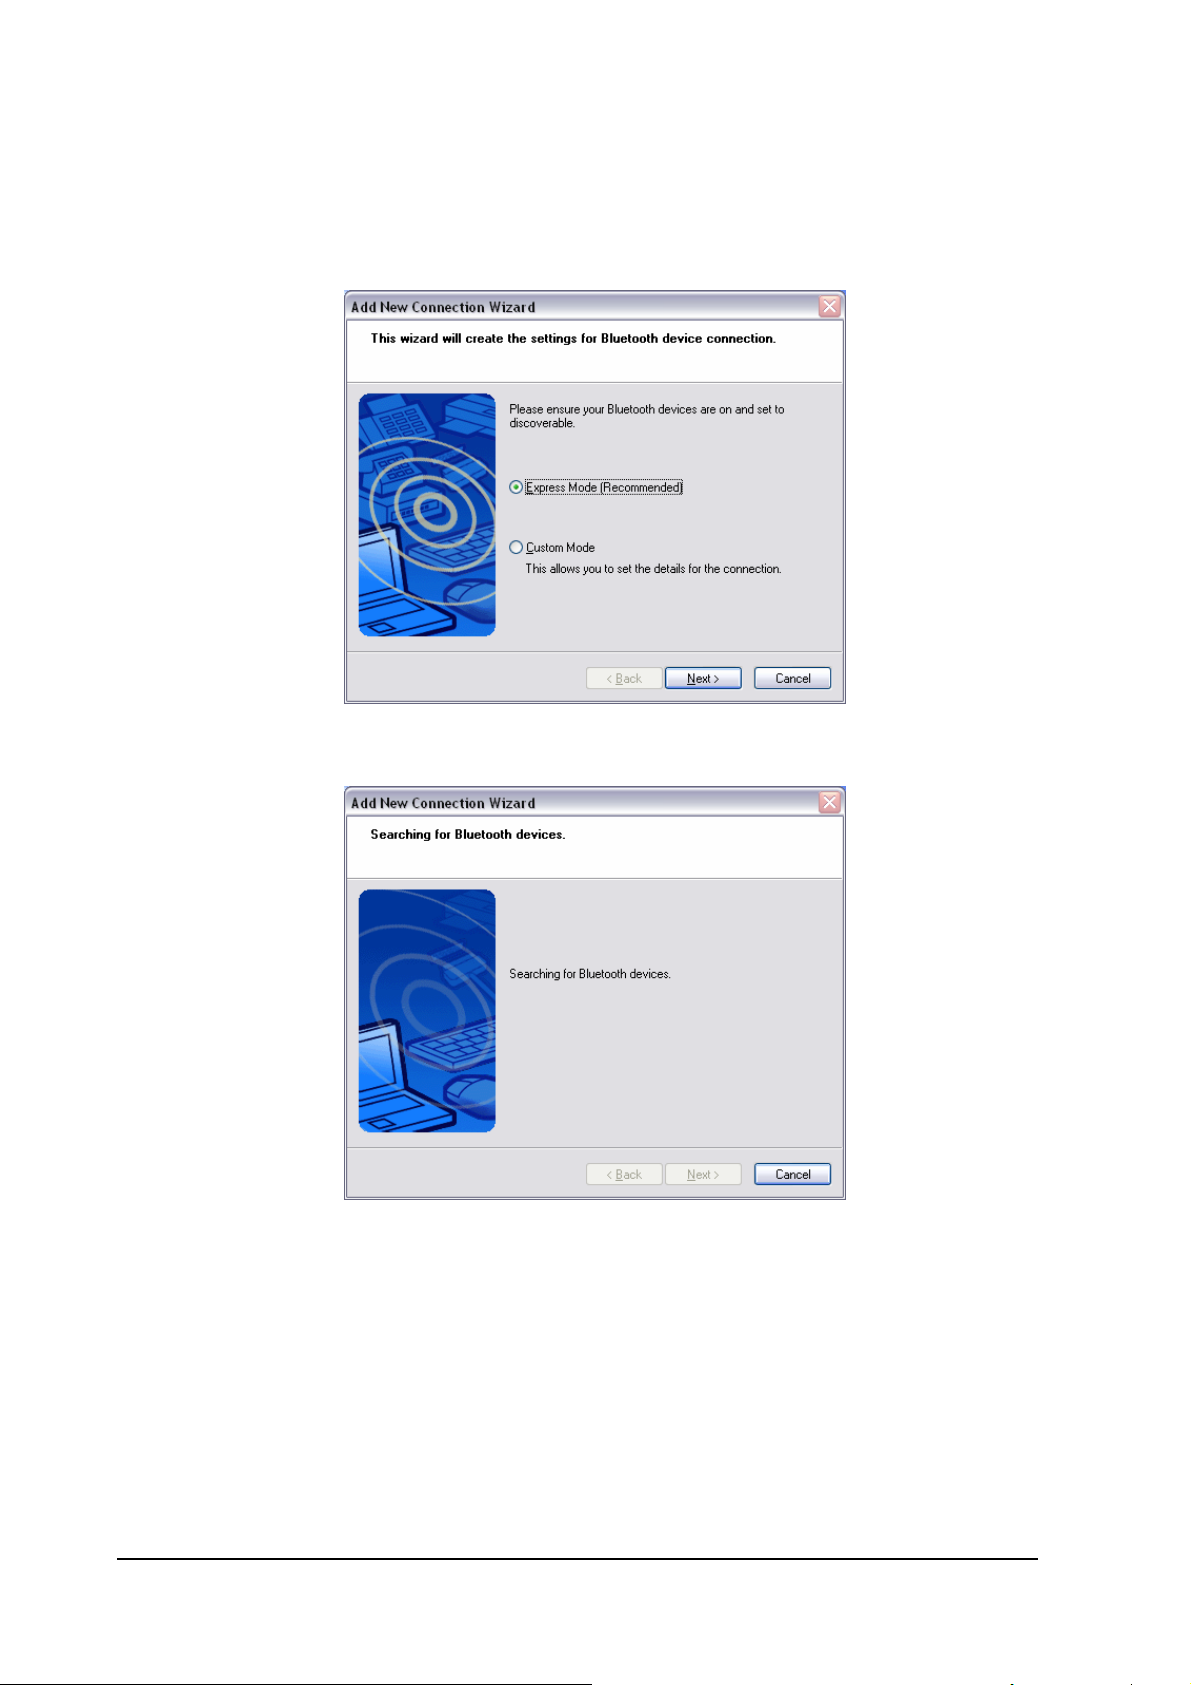
2. Confirm that [Express Mode] has been selected in the [Add New Connection
Wizard (Welcome to the Add New Connection Wizard)] window, and click on
the [Next] button.
Searching for Bluetooth devices will start.
When the device has been detected, the name and address of the device will
appear in the [Add New Connection Wizard (Select Device)] window.
14
Page 15
Note
.If no device is found, please confirm that the device has been made
connectable via Bluetooth, and click on the [Update] button.
.A further device search will be performed.
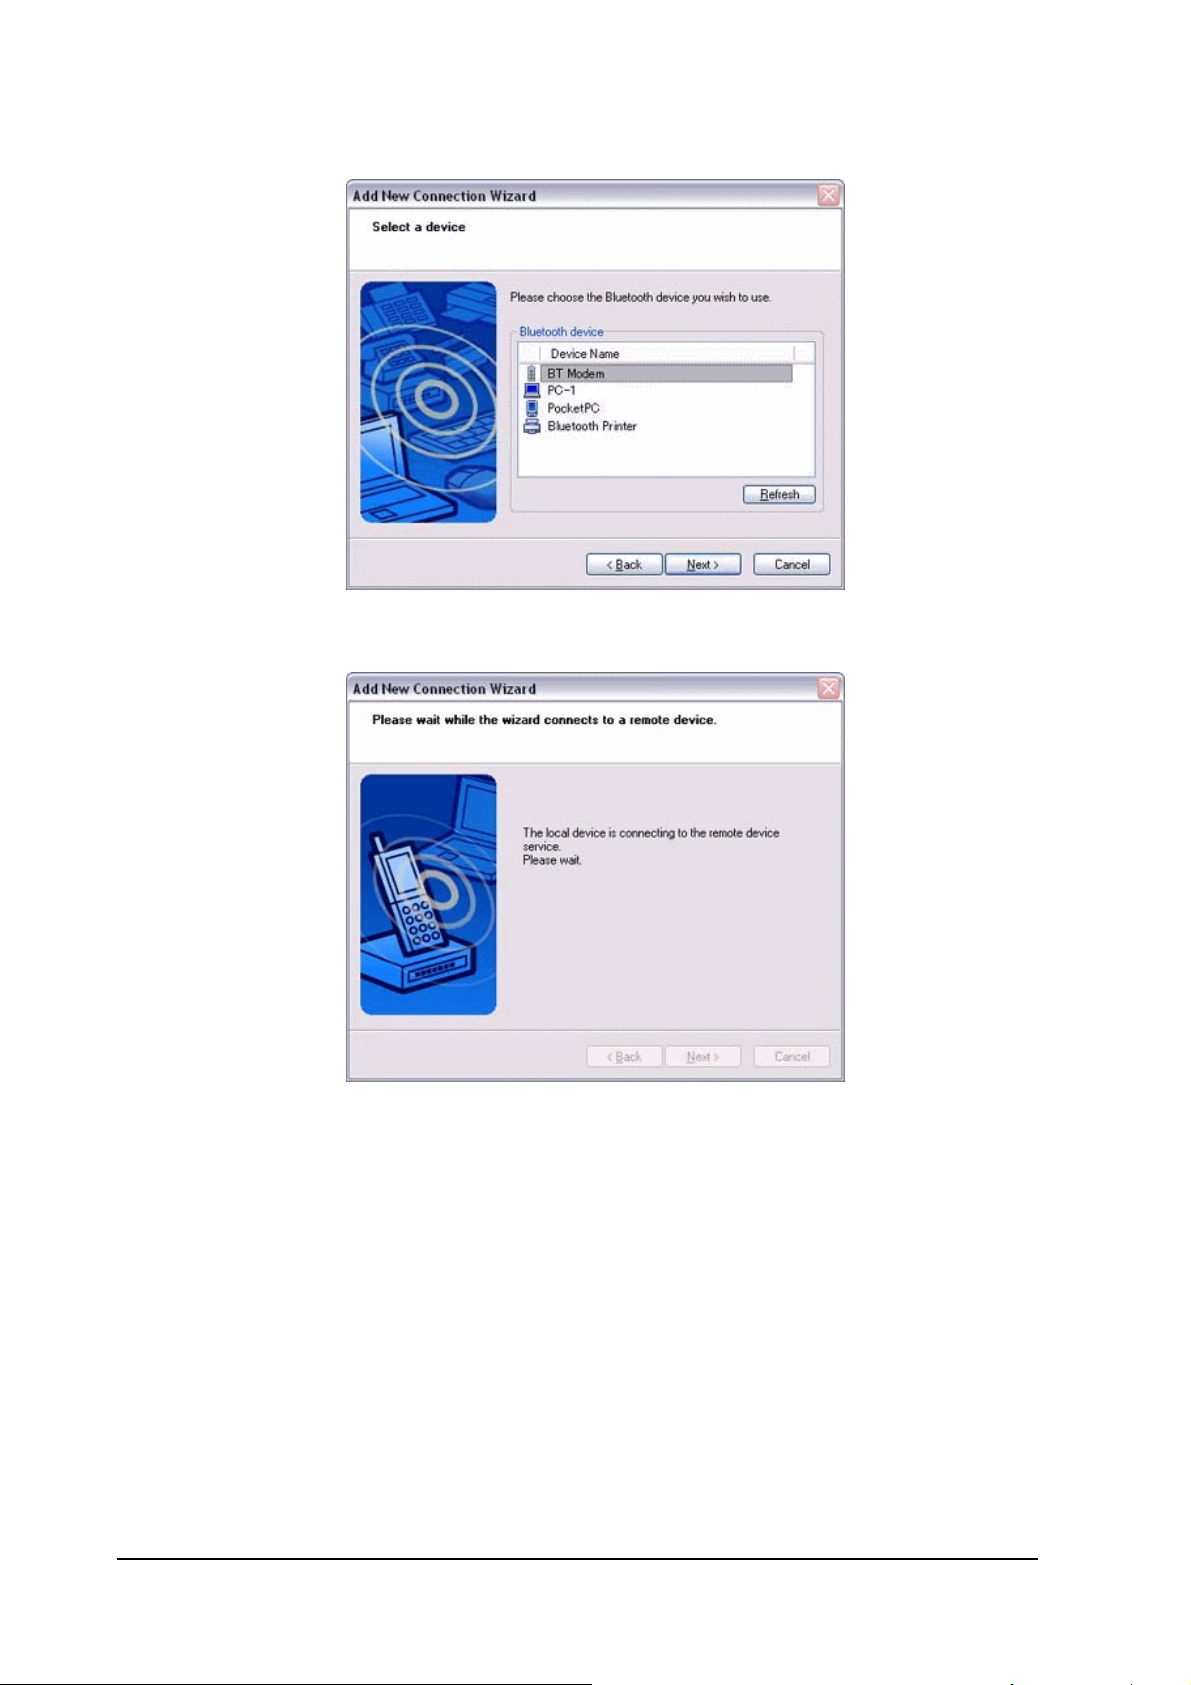
3.1.3 Detecting services
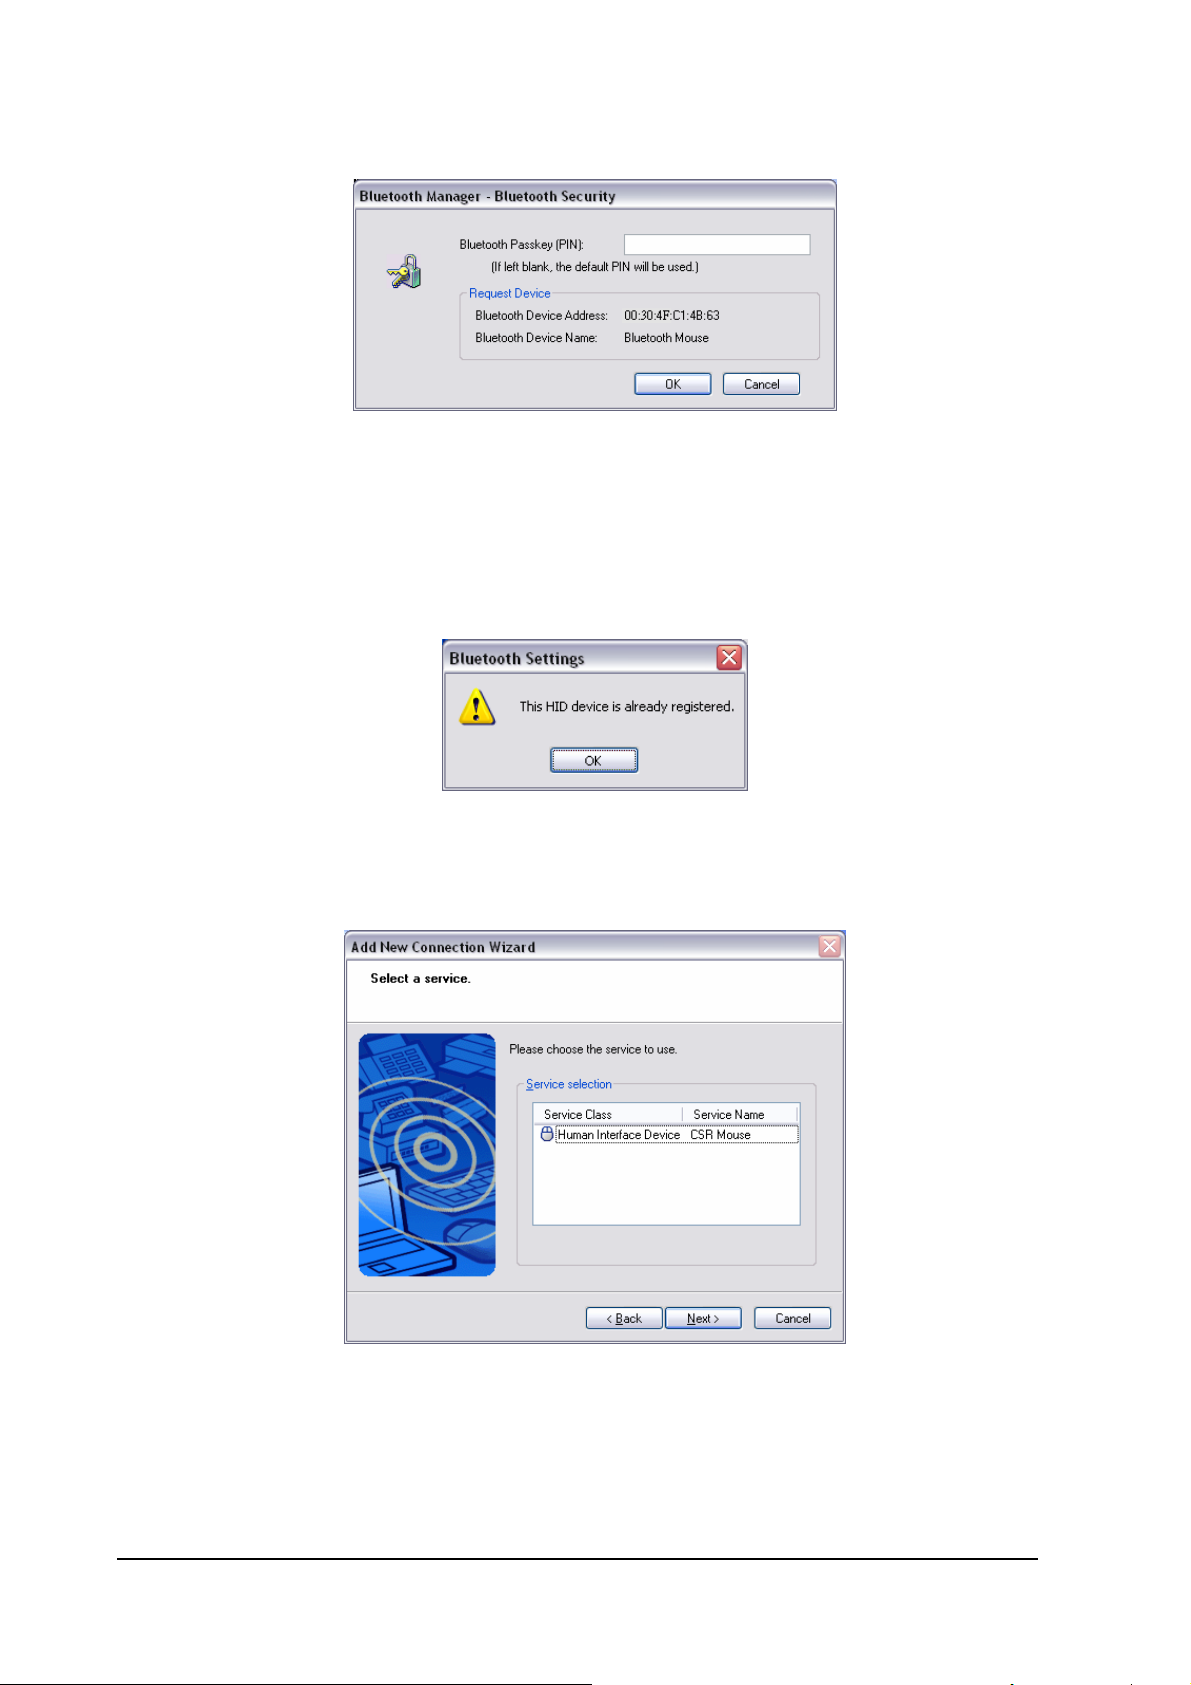
1. Select the device name from [Device List] and click on the [Next] button.
Bluetooth device detection will commence.
15
Page 16
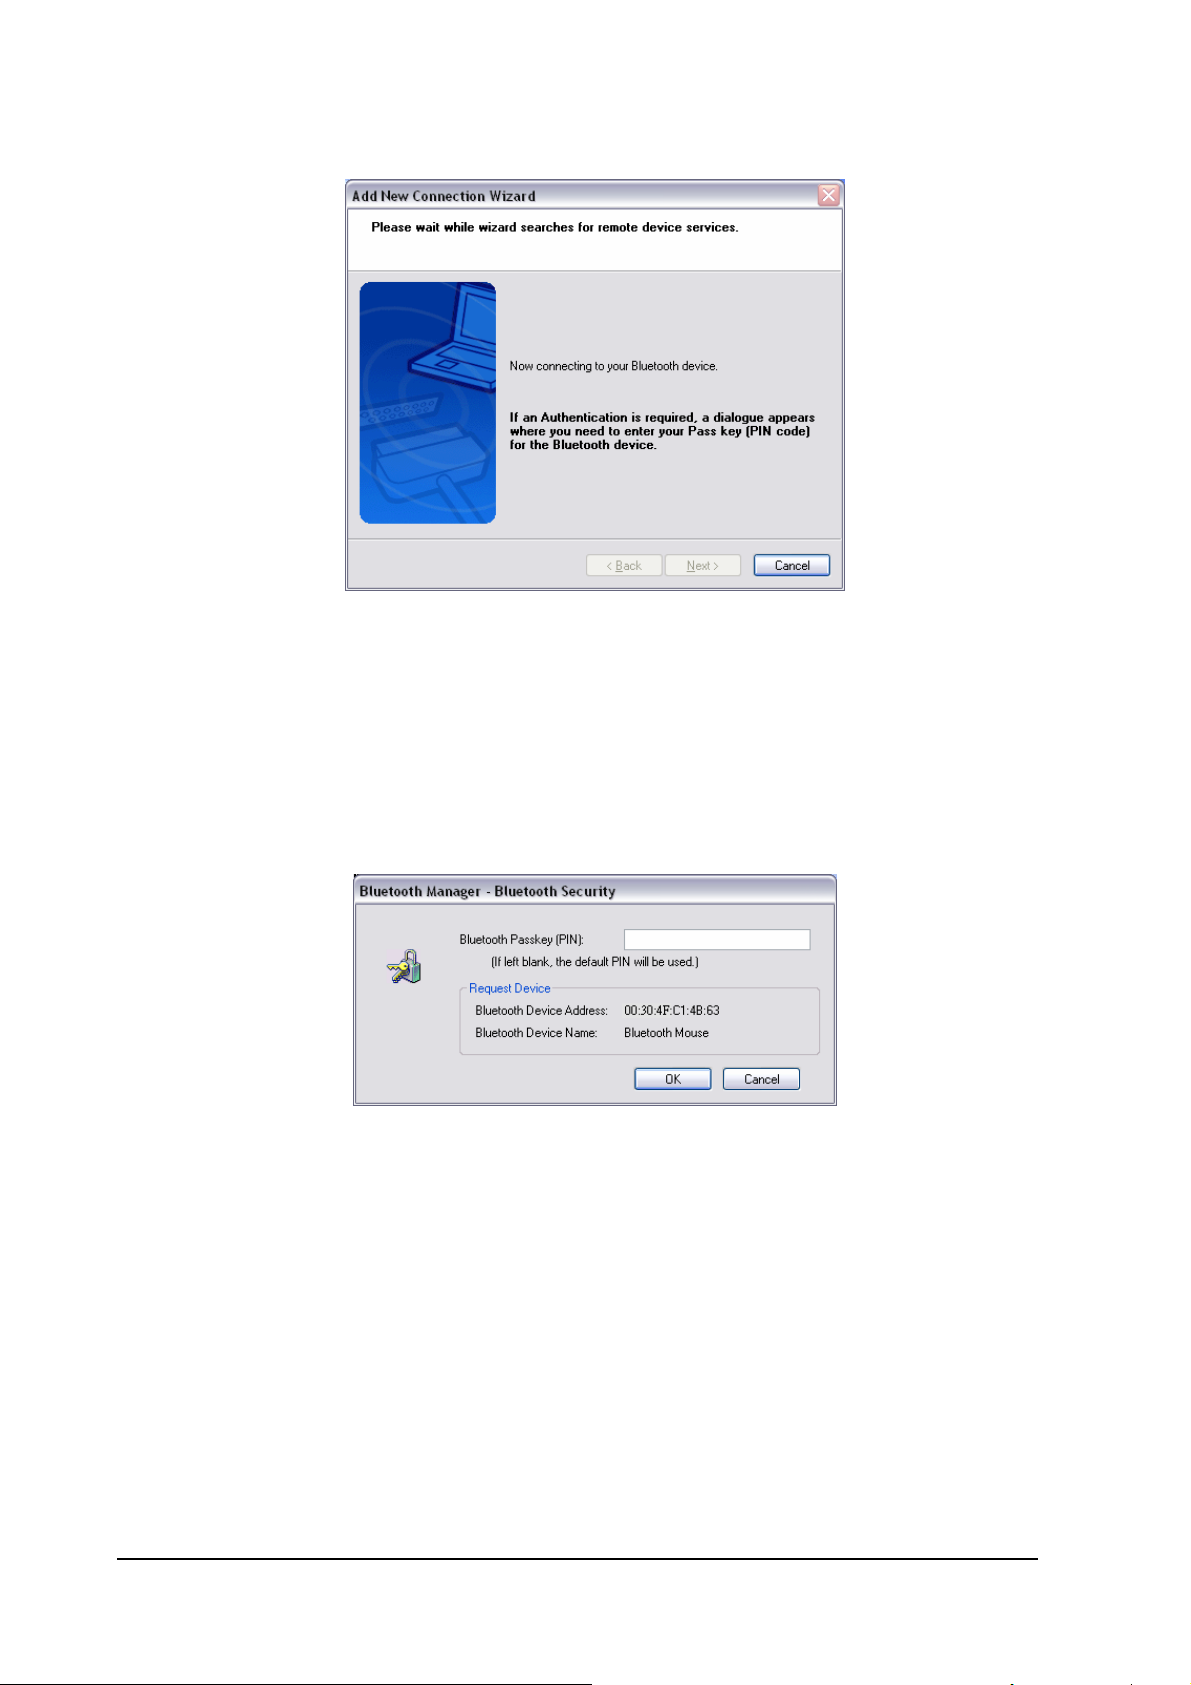
Note
.If several services (profiles) are supported by the device, the service that has
been set to the highest priority shall be automatically selected and set up in
Express Mode. Please use Custom Mode if you wish to select desired services
manually.
.When a service has been detected, a window prompting you to enter the
Bluetooth passkey (PIN code) may appear. Please enter the passkey and click
on the [OK] button.
.If you have not entered your Bluetooth passkey after a certain amount of time
has passed, the connection process will be cancelled for security reasons.
Please perform the passkey entry process again.
A message will appear prompting you to prepare the device for connection.
2. Click on the [OK] button.
16
Page 17
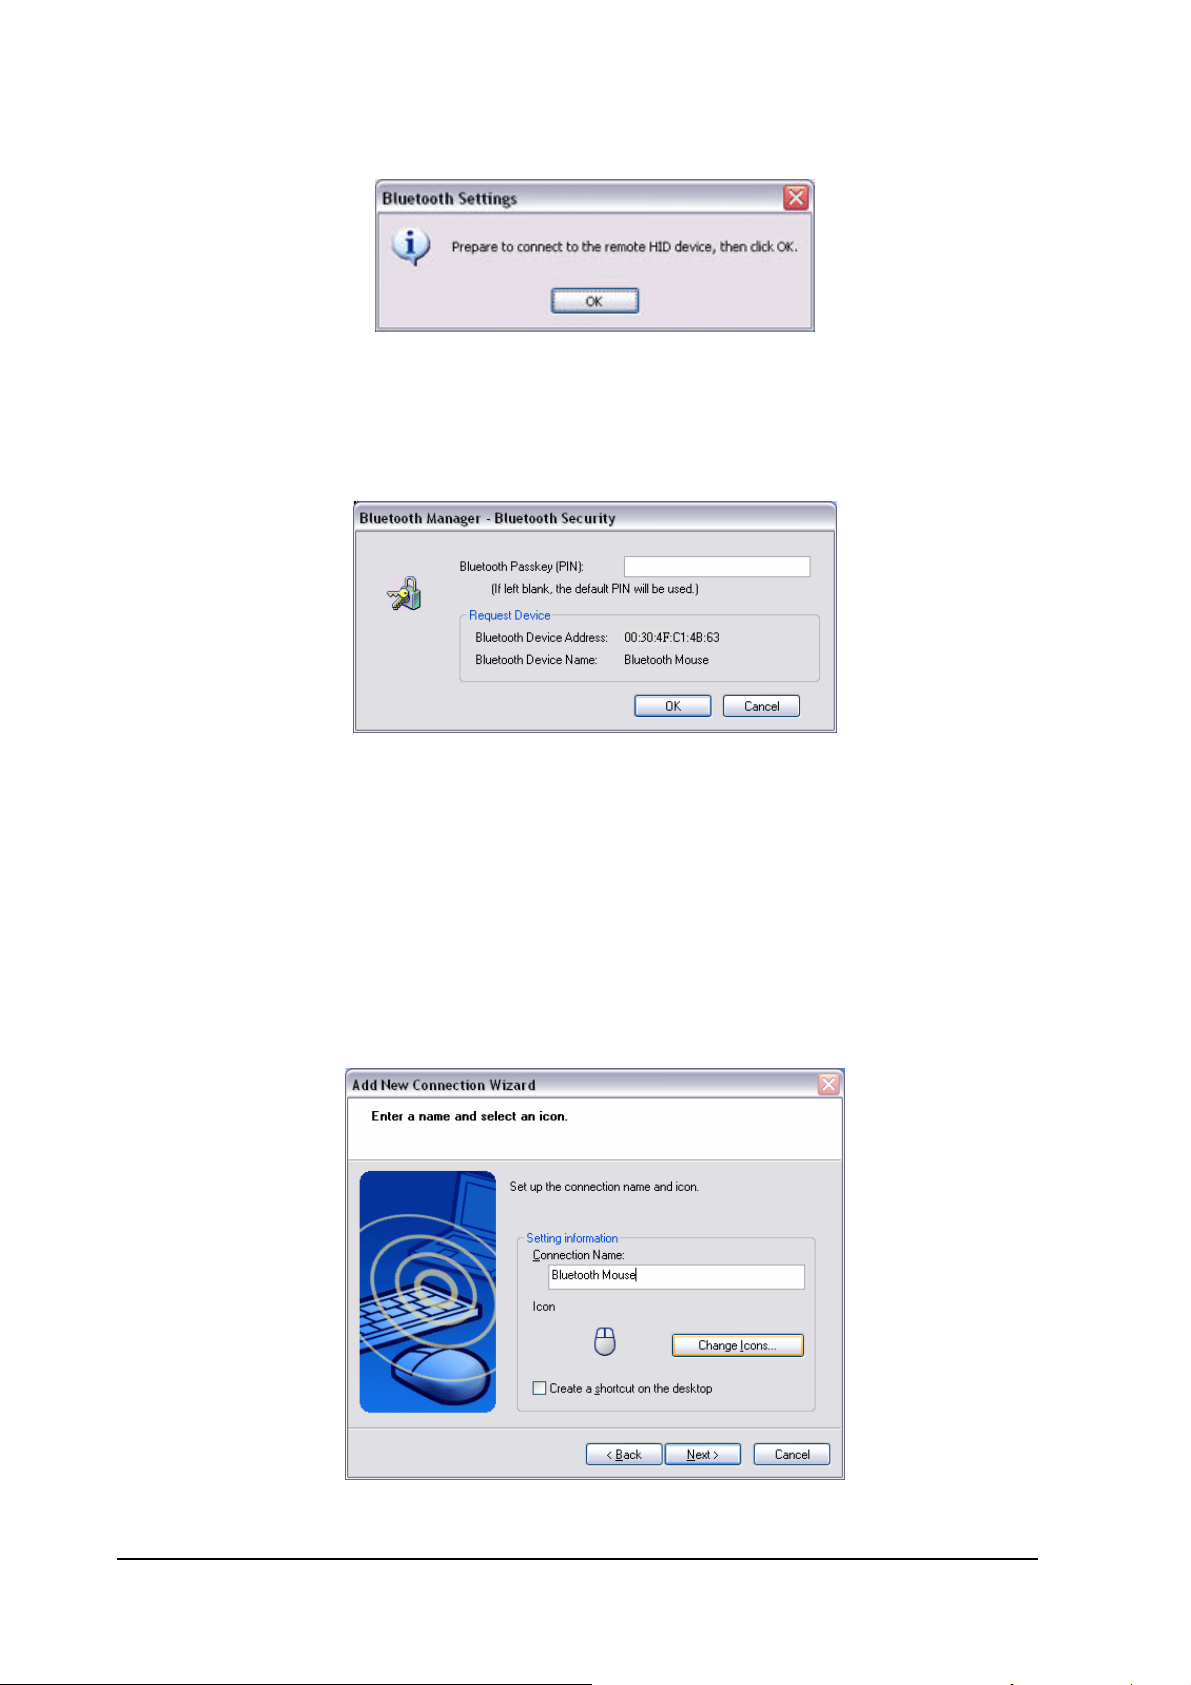
Note
.When the settings information has been registered, a window prompting you to
enter your Bluetooth passkey (PIN code) may appear. Please enter your passkey
and click on the [OK] button.
.If you have not entered your Bluetooth passkey after a certain amount of time
has passed, the connection process will be cancelled for security reasons.
Please perform the passkey entry process again.
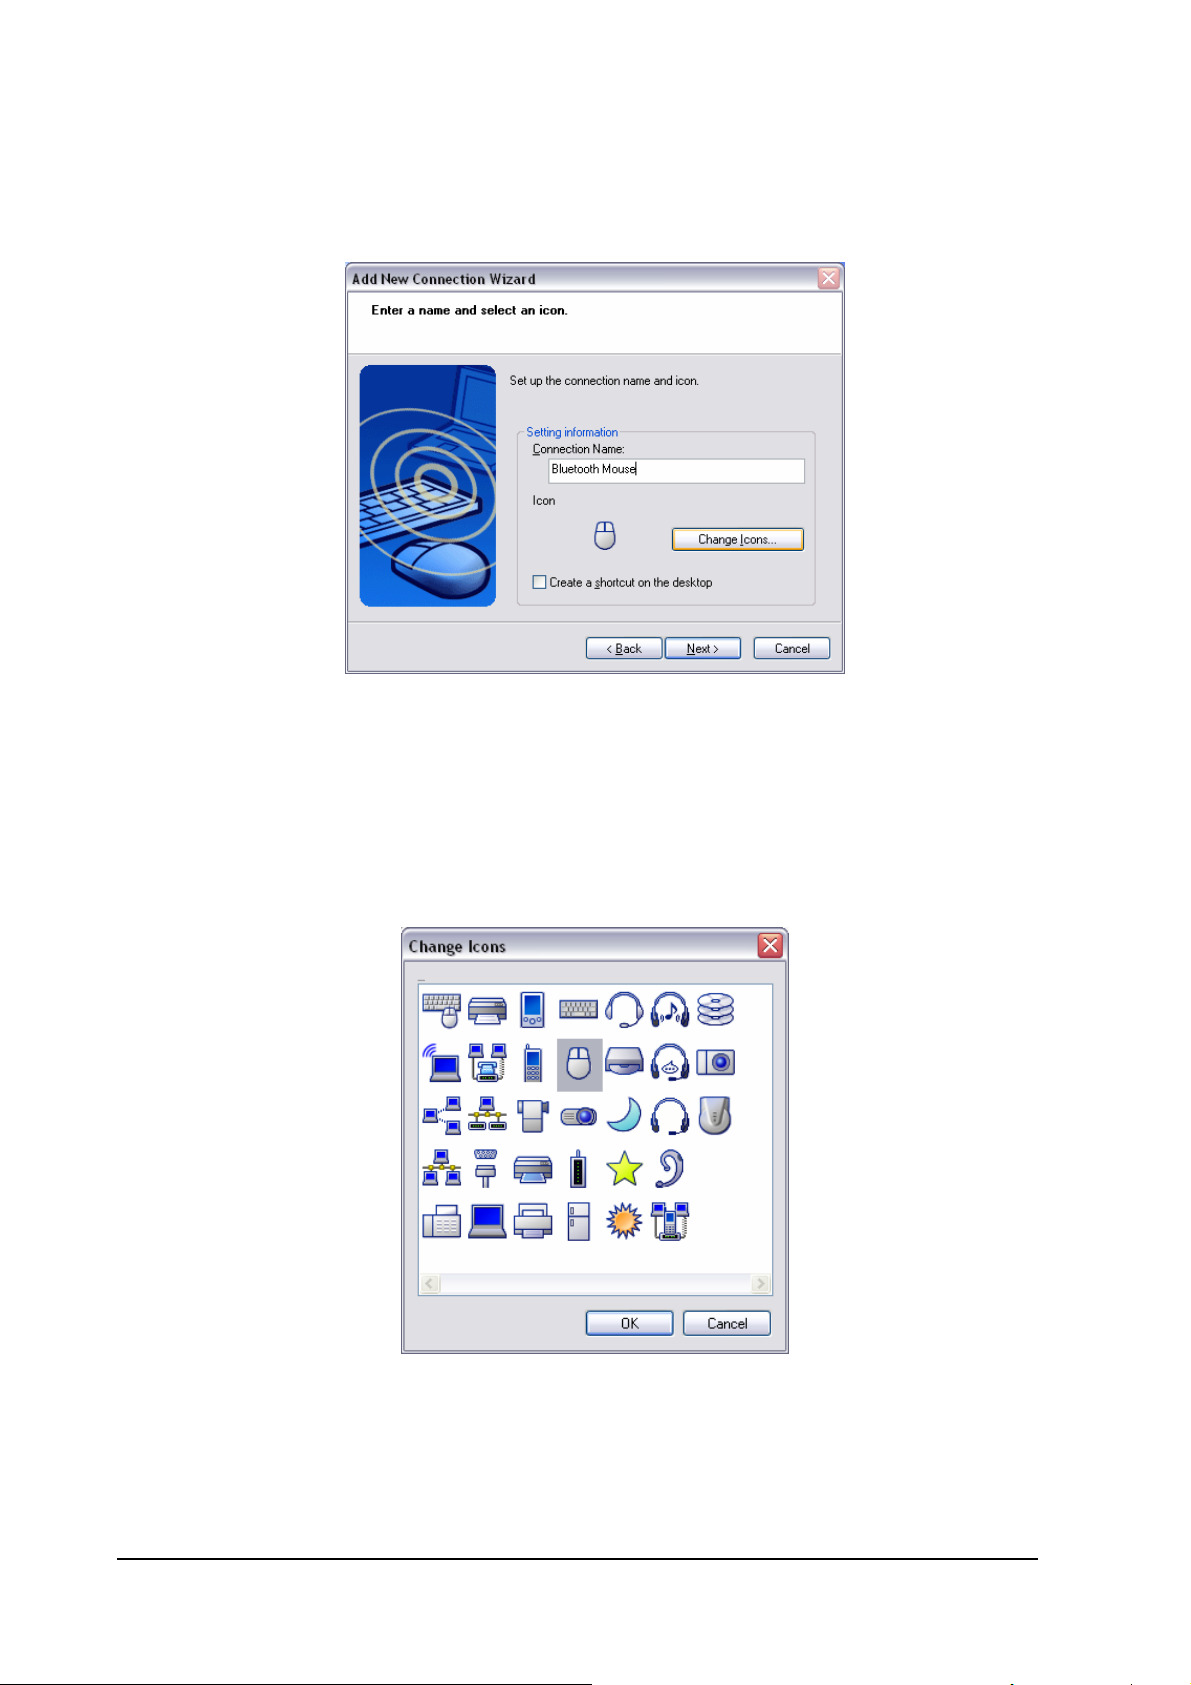
The [Add New Connection Wizard (Connection Name Setup)] window will appear if
a service has been properly detected.
3. Select the type and name of the icon to be displayed once the device has
been registered, and click on the [Next] button.
17
Page 18
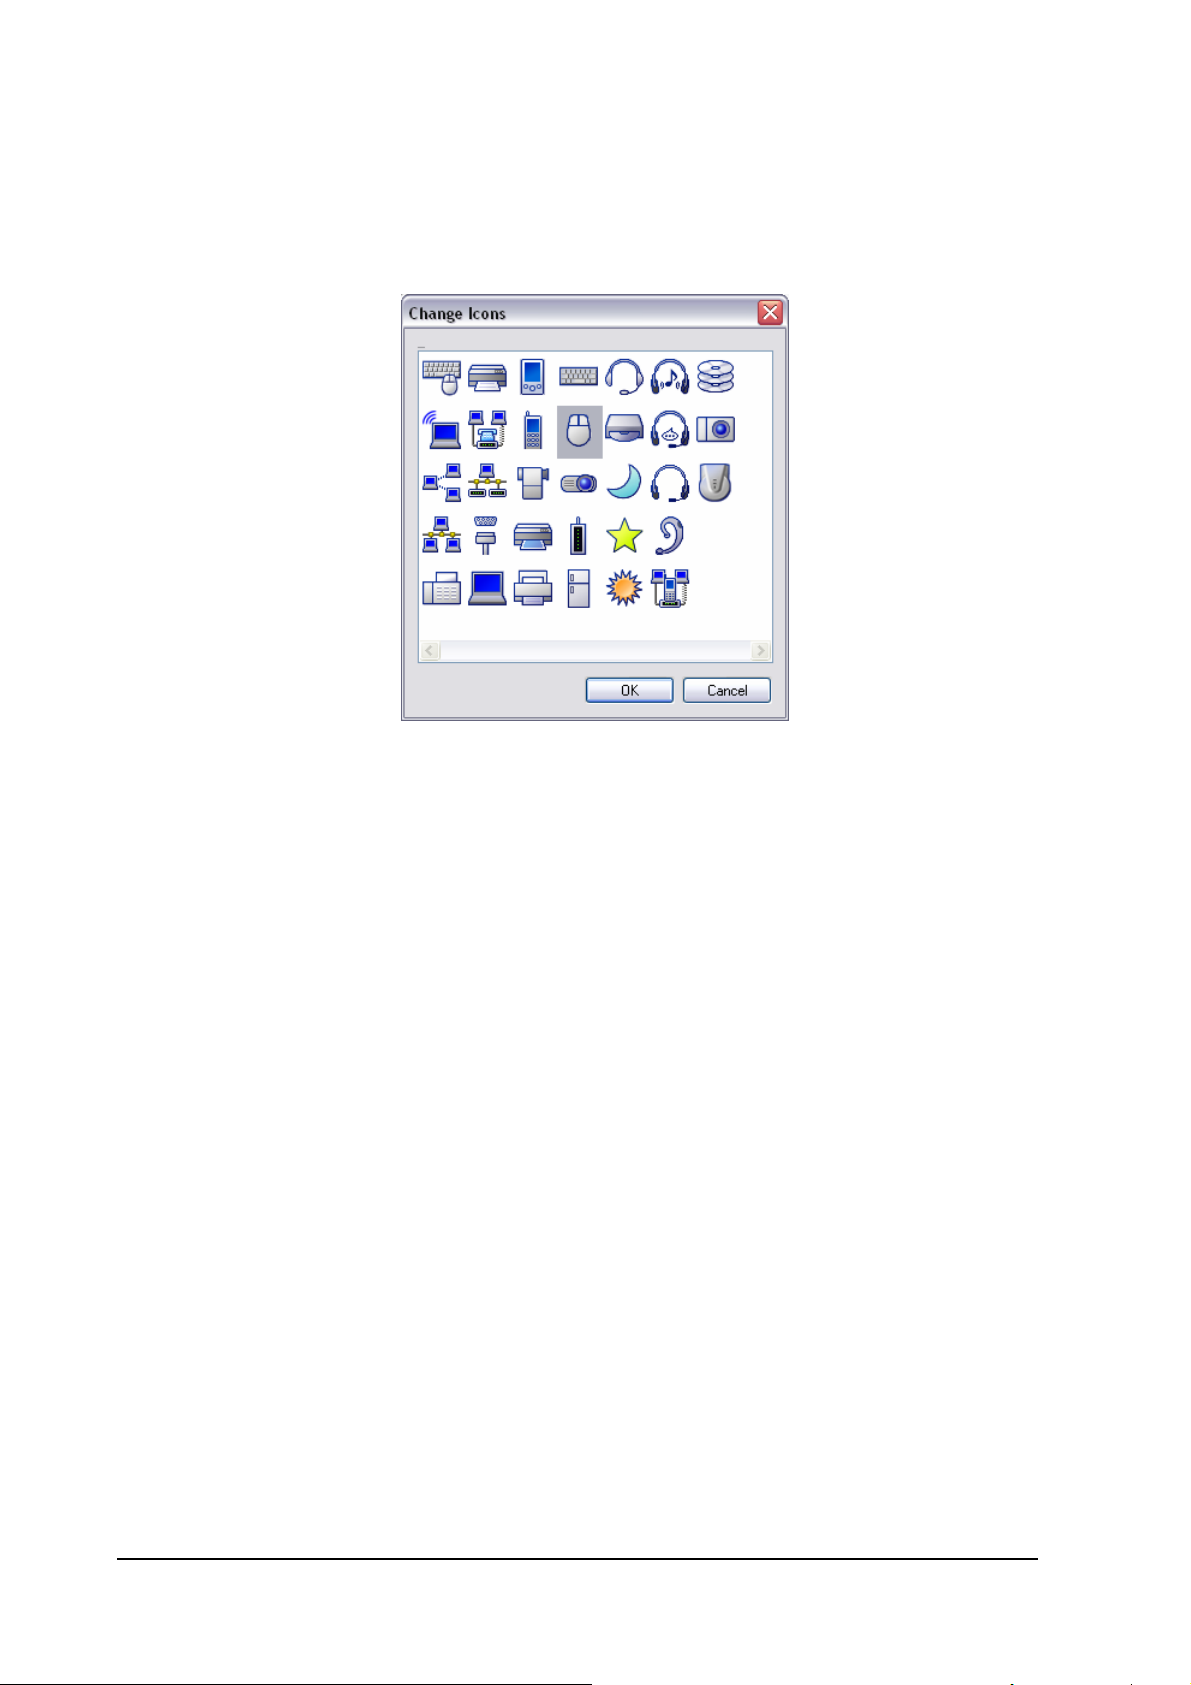
Note
.If you wish to change the icon, please click on the [Change Icon] button and
select your preferred icon from the list that appears.
18
Page 19
3.1.4 Registering settings information
The [Add New Connection Wizard (Completing the Add New Connection Wizard)] window
will appear.
1. Click on the [Finish] button
The [Bluetooth Settings] window will appear.
The icons of the registered devices will appear, and the devices will be ready to
use.
19
Page 20
3.2 Custom Mode Set-up
3.2.1 Starting Bluetooth Settings
1. Click [Start]Æ[All Programs]Æ[Bluetooth]Æ[Bluetooth Settings].
(Under Windows 2000, click [Start]→[Programs]→[Bluetooth]→[Bluetooth
Settings].)
Note
.The same result can be achieved by right-clicking on the Bluetooth icon in the
task tray and selecting [Bluetooth Settings] from the menu that appears.
The [Bluetooth Settings] window below will appear when other devices have
already been registered.
Please click the [New Connection] button to open the [Add New Connection Wizard]
window. If no devices have been registered yet, please proceed directly to
"Detecting Bluetooth Devices."
20
Page 21
3.2.2 Detecting Bluetooth devices
The [Add New Connection Wizard (Welcome to the Add New Connection Wizard)] window
will appear.
1. Switch the device power ON to make it connectable via Bluetooth.
2. Confirm that [Custom Mode] has been selected in the [Add New Connection
Wizard (Welcome to the Add New Connection Wizard)] window, and click on
the [Next] button.
Searching for Bluetooth devices will start.
21
Page 22
When the device has been detected, the name and address of the device will
appear in the [Add New Connection Wizard (Select Device)] window.
Note
.If no device is found, please confirm that the device has been made
connectable via Bluetooth, and click on the [Update] button.
.A further device search will be performed.
22
Page 23
3.2.3 Detecting services
1. Select the device name from [Device List] and click on the [Next] button.
Bluetooth device detection will commence.
Note
.When a service has been detected, a window prompting you to enter the
Bluetooth passkey (PIN code) may appear. Please enter the passkey and click
on the [OK] button.
Page 24
.If you have not entered your Bluetooth passkey after a certain amount of time
has passed, the connection process will be cancelled for security reasons.
Please perform the passkey entry process again.
.If you try to register a device that has already been registered, the following
message will appear, and you will not be able to proceed with further operation.
Please click on the [OK] button to close the message.
The services supported by the device will be displayed.
2. Select the desired service and click on the [Next] button.
Note
.When a device supports several services
If the device supports several services, you can use Custom Mode to manually
select the services (profiles) you wish to use from the list that appears under
24
Page 25
[Select Services].
Example: List of another computer’s services
If Express Mode is used to perform the set-up, the highest-priority service in the
device will be automatically selected and configured.
3. Click on the [OK] button.
Note
.When the settings information has been registered, a window prompting you to
enter your Bluetooth passkey (PIN code) may appear. Please enter your passkey
and click on the [OK] button.
.If you have not entered your Bluetooth passkey after a certain amount of time
has passed, the connection process will be cancelled for security reasons.
Please perform the passkey entry process again.
The [Add New Connection Wizard (Connection Name Setup)] window will appear if a
service has been properly detected.
25
Page 26
4. Select the type and name of the icon to be displayed once the device has
been registered, and click on the [Next] button.
Note
.If you wish to change the icon, please click on the [Change Icon] button and
select your preferred icon from the list that appears.
26
Page 27
3.2.4 Registering settings information
The [Add New Connection Wizard (Completing the Add New Connection Wizard)] window
will appear.
1. Click on the [Finish] button
The [Bluetooth Settings] window will appear.
The icons of the registered devices will appear, and the devices will be ready to
use.
Page 28
4
Chapter 4 Making the most of your Bluetooth device
4.1 Connecting to the internet
4.1.1 Connecting to the internet using a modem station
Setting up the modem station
1. Turn on the wireless modem station.
2. Right-click the Bluetooth icon in the task tray, and then click on [Add New
Connection].
Note
.Alternatively, click [Start]→[All Programs]→[Bluetooth]→[Bluetooth Settings],
and then click on [New Connection] from the active [Bluetooth Settings] window.
3. Confirm that [Express Mode] has been selected, and then click on the [Next]
button.
28
Page 29
The [Add New Connection Wizard (Searching for Bluetooth devices)] window will
appear.
4. Select the device name of the wireless modem station from [Device List], and
then click on the [Next] button.
29
Page 30
The [Add New Connection Wizard (Searching for Services)] window will appear.
Once a service has been detected successfully, connection to the device and COM
port creation will be performed automatically, after which the [Add New Connection
Wizard (Modem Settings)] window will appear.
5. If you are connecting to a wireless modem station for the first time, enter the
passkey for the modem station under [Bluetooth Passkey (PIN code)], and
then click on the [OK] button.
30
Page 31

Once the program has finished searching for the devices, the [Add New
Connection Wizard (Device Selection)] window will appear.
6. Click on the [Next] button.
Certain modems require you to configure initialization commands separately.
Please click on the [Additional initialization Command Settings] button, enter the
initialization commands in the following window, and then click on the [OK] button.
Note
.Please refer to the modem or mobile phone instruction manual for further detail
or mobile phone instruction manual for further details on initialization commands.
31
Page 32

7. Enter the connection name (optional), telephone number (of your provider's
access point), user name and password (as issued by your provider), and
then click on the [Finish] button.
Important
.The sample entries shown in the window are provided solely for purpose of
explanation. Please use your own telephone number, ID and password
according to the arrangement with your provider.
The settings will be registered, and an icon will appear in the [Bluetooth Settings]
window.
32
Page 33

Connecting to the Internet
1. Start your browser, e-mail application or other application
Important
.Please enter the e-mail settings separately if you are going to use e-mail (the
set-up method will vary with the application).
2. Enter the URL of the Web page you wish to display and then press the [Enter]
key, or use the e-mail tool to send/receive items or perform other activities.
The [Dial-up Connection] window will appear.
3. Click on the [Connect] button
Important
.A connection will be automatically established with the modem station if COM
Auto Connect is available. If COM Auto Connect is not available, please
manually connect to the modem station.
The following message will appear once you have connected to the Internet.
4. End the connection
The window below will appear if you double-click on the
33
icon in the task bar.
Page 34

Please click on the [Disconnect] button when you want to disconnect from the Internet.
Alternatively, please right-click on the icon, and then click on [Disconnect].
Note
.You can start an application to make an automatic connection to the Internet, but
you can also make a manual connection using the connection destination icon.
The procedure is described below.
1. From the [Bluetooth Settings] window, right-click on the connection
destination icon, and then click on [Connect] from the menu that appears.
34
Page 35

A window indicating that the connection is being established will appear.
If the connection has been established successfully, the connection icon and task
tray will appear as shown below.
You will be able to browse Web pages using your browser and send and receive
e-mail.
Important
.Please enter the e-mail settings separately if you are going to use e-mail (the
set-up method will vary with the application).
2. End the connection
Right-click on the icon, and then click [Disconnect] to end the connection.
35
Page 36

The following message will appear. Click on the [Yes] button.
When the icon appears as shown below, the connection will have ended.
36
Page 37

4.1.2 Connecting to the internet using a mobile telephone
Important
.In order to connect to the Internet, you must have already signed up with a
provider and obtained a connection ID and password. Please ensure you have
confirmed the ID, password and telephone number of your provider's access
point before you begin the set-up process.
.A Bluetooth passkey (PIN code) is required for you to connect to the mobile
telephone. Please make a note of your Bluetooth passkey before you start the
set-up process.
Configuring a mobile telephone for use a modem
1. Turn on the mobile phone, and set it to be connectable via Bluetooth.
2. Right-click the Bluetooth icon in the task tray, and then click on [Add New
Connection].
Note
.Alternatively, click [Start]→[All Programs]→[Bluetooth]→[Bluetooth Settings],
and then click on [New Connection] from the active [Bluetooth Settings] window.
3. Confirm that [Express Mode] has been selected, and then click on the [Next]
button.
37
Page 38

The [Add New Connection Wizard (Searching for Bluetooth devices)] window will
appear.
4. Select the device name of the mobile telephone from [Device List], and then
click on the [Next] button.
The [Add New Connection Wizard (Searching for Services)] window will appear.
38
Page 39

Once a service has been detected successfully, connection to the device and COM
port creation will be performed automatically, after which the [Add New Connection
Wizard (Modem Settings)] window will appear.
5. If you are connecting to a mobile telephone for the first time, enter the
passkey for the wireless modem station under [Bluetooth Passkey (PIN
code)], and then click on the [OK] button.
Once the program has finished searching for the devices, the [Add New
Connection Wizard (Device Selection)] window will appear.
6. Click on the [Next] button.
39
Page 40

Certain modems require you to configure initialization commands separately.
Please click on the [Additional initialization Command Settings] button, enter the
initialization commands in the following window, and then click on the [OK]
button.
7. Enter the connection name (optional), telephone number (of your provider's
access point), user name and password (as issued by your provider), and
then click on the [Finish] button.
40
Page 41

Important
.The sample entries shown in the window are provided solely for purpose of
explanation. Please use your own telephone number, ID and password
according to the arrangement with your provider.
The settings will be registered, and an icon will appear in the [Bluetooth Settings]
window.
Connecting to the Internet
1. Start your browser, e-mail application or other application
Important
.Please enter the e-mail settings separately if you are going to use e-mail (the
set-up method will vary with the application).
2. Enter the URL of the Web page you wish to display and then press the [Enter]
key, or use the e-mail tool to send/receive items or perform other activities.
The [Dial-up Connection] window will appear.
3. Click on the [Connect] button
41
Page 42

Important
.A connection will be automatically established with the modem station if COM
Auto Connect is available. If COM Auto Connect is not available, please
manually connect to the mobile telephone .
The following message will appear once you have connected to the Internet.
4. End the connection
The window below will appear if you double-click on the
42
icon in the task bar.
Page 43

Please click on the [Disconnect] button when you want to disconnect from the Internet.
Alternatively, please right-click on the icon, and then click on [Disconnect].
Note
.You can start an application to make an automatic connection to the Internet, but
you can also make a manual connection using the connection destination icon.
The procedure is described below.
1. From the [Bluetooth Settings] window, right-click on the connection
destination icon, and then click on [Connect] from the menu that appears.
A window indicating that the connection is being established will appear.
43
Page 44

If the connection has been established successfully, the connection icon and task
tray will appear as shown below.
You will be able to browse Web pages using your browser and send and receive
e-mail.
Important
.Please enter the e-mail settings separately if you are going to use e-mail (the
set-up method will vary with the application).
2. End the connection
Right-click on the icon, and then click [Disconnect] to end the connection.
44
Page 45

The following message will appear. Click on the [Yes] button.
When the icon appears as shown below, the connection will have ended.
45
Page 46

4.2 Connecting to a network[LAN]
4.2.1 Connecting to a LAN using an access point[LAP]
Setting up the access point
Important
.The access point must have been started and a normal connection already
established to the network before the access point is set up. Please refer to the
access point instruction manual for information on how to set up the access
point.
.A Bluetooth passkey (PIN code) is required for you to connect to the access
point. Please make a note of your Bluetooth passkey before you start the set-up
process.
1. Turn on the access point, and confirm that a connection has been
established with the network.
2. Right-click the Bluetooth icon in the task tray, and then click on [Add New
Connection].
Note
.Alternatively, click [Start]→[All Programs]→[Bluetooth]→[Bluetooth Settings],
and then click on [New Connection] from the active [Bluetooth Settings] window.
3. Confirm that [Express Mode] has been selected, and then click on the [Next]
button.
46
Page 47

The [Add New Connection Wizard (Searching for Bluetooth devices)] window will
appear.
4. Select the device name of the access point from [Device List], and then click
on the [Next] button.
47
Page 48

You will be asked for the Bluetooth passkey in the window that appears.
5. Enter the passkey under [Bluetooth Passkey (PIN code)], and then click on
the [OK] button.
Service detection and COM port creation will be performed automatically.
The [Add New Connection Wizard (Create Connection Destination)] window will
appear.
6. Enter the connection name, user name and password, then click on the
[Next] button.
48
Page 49

Note
.The user name and password are entered here to allow you to connect to the
access point.
The [Add New Connection Wizard (Confirm Dial-up Settings)] window will appear.
7. Click on the [Confirm Settings] button.
8. Configure the connection method, and then click on the [OK] button.
Set the connection destination used for the LAN connection set up in (6) above as
the default connection destination, and then select "Always dial my default
connection."
49
Page 50

9. Click on the [Next] button.
10. Enter the type and name of the icon displayed after registration, and then
click on the [Next] button.
Please click on the [Next] button if you are satisfied with the settings.
50
Page 51

11. Click on the [Finish] button.
The access point icon will be registered in the [Bluetooth Settings] window.
Connecting to a LAN(LAP)
1. Right-click on the connection icon in the [Bluetooth Settings] window, and
then click on [Connect].
51
Page 52

2. Confirm that "Direct connection" has been selected under [Connection
Destination], and then click on the [Connect] button
A connection will be initiated.
Note
.This is an example of what happens when you use "Direct connection" as a
connection name under "Connect to access point." If a name different from the
connection name is used, that name will appear under [Connection
Destination].
.Please simply click on [Settings] if no user name or password have been
entered (i.e., if those fields have been left blank)
.Please change the connection destination if a different connection name (for a
dial-up connection) appears in [Connection Destination].
Once you connect to the network, Internet Explorer will start automatically, and you
will be able to exchange data with other computers on the network.
Note
.Please follow the procedure below if you need to set up a proxy server to
connect to the Internet (the following procedure is not necessary if the PC you
are going to use has already been set up as a proxy server).
1. Select [Internet Options...] from the [Tools] menu in Internet Explorer.
The [Internet Options] window will appear.
52
Page 53

2. Click on the [Connections] tab, and then click on the [Settings...]
button.
3. Enter the IP address and port number of the proxy server under [Proxy
Server], and then click on the [OK] button.
53
Page 54

4.2.2 Connecting to a LAN using an access point[PAN]
Setting up the access point
Important
.The access point must have been started and a normal connection already
established to the network before the access point is set up. Please refer to the
access point instruction manual for information on how to set up the access
point.
.A Bluetooth passkey (PIN code) is required for you to connect to the access
point. Please make a note of your Bluetooth passkey before you start the set-up
process.
2. Turn on the access point, and confirm that a connection has been
established with the network.
3. Right-click the Bluetooth icon in the task tray, and then click on [Add New
Connection].
Note
.Alternatively, click [Start]→[All Programs]→[Bluetooth]→[Bluetooth Settings],
and then click on [New Connection] from the active [Bluetooth Settings] window.
4. Confirm that [Express Mode] has been selected, and then click on the [Next]
button.
54
Page 55

The [Add New Connection Wizard (Searching for Bluetooth devices)] window will
appear.
5. Select the device name of the access point from [Device List], and then click
on the [Next] button.
You will be asked for the Bluetooth passkey in the window that appears.
6. Enter the passkey under [Bluetooth Passkey (PIN code)], and then click on
the [OK] button.
55
Page 56

Service detection and COM port creation will be performed automatically.
The [Add New Connection Wizard (Connection Name Settings)] window will
appear.
7. Enter the type and name of the icon displayed after registration, and then
click on the [Next] button.
Please click on the [Next] button if you are satisfied with the settings.
The [Add New Connection Wizard (Completing the Add New Connection Wizard)]
window will appear.
8. Click on the [Finish] button.
The access point icon will be registered in the [Bluetooth Settings] window.
This will complete the access point set-up process.
Connecting to a LAN(PAN)
56
Page 57

1. Right-click on the connection icon in the [Bluetooth Settings] window, and
then click on [Connect].
2. Enter the passkey under [Bluetooth Passkey (PIN code)], and then click on
the [OK] button.
A connection will be initiated.
Note
.Please follow the procedure below if you need to set up a proxy server to
connect to the Internet (the following procedure is not necessary if the PC you
are going to use has already been set up as a proxy server).
1. Select [Internet Options...] from the [Tools] menu in Internet Explorer.
The [Internet Options] window will appear.
2. Click on the [Connections] tab, and then click on the [Settings...]
button.
57
Page 58

3. Enter the IP address and port number of the proxy server under [Proxy
Server], and then click on the [OK] button.
58
Page 59
4.3 Sending files
You can send and receive files other than business card data with a Bluetooth-enabled
PC or PDA.
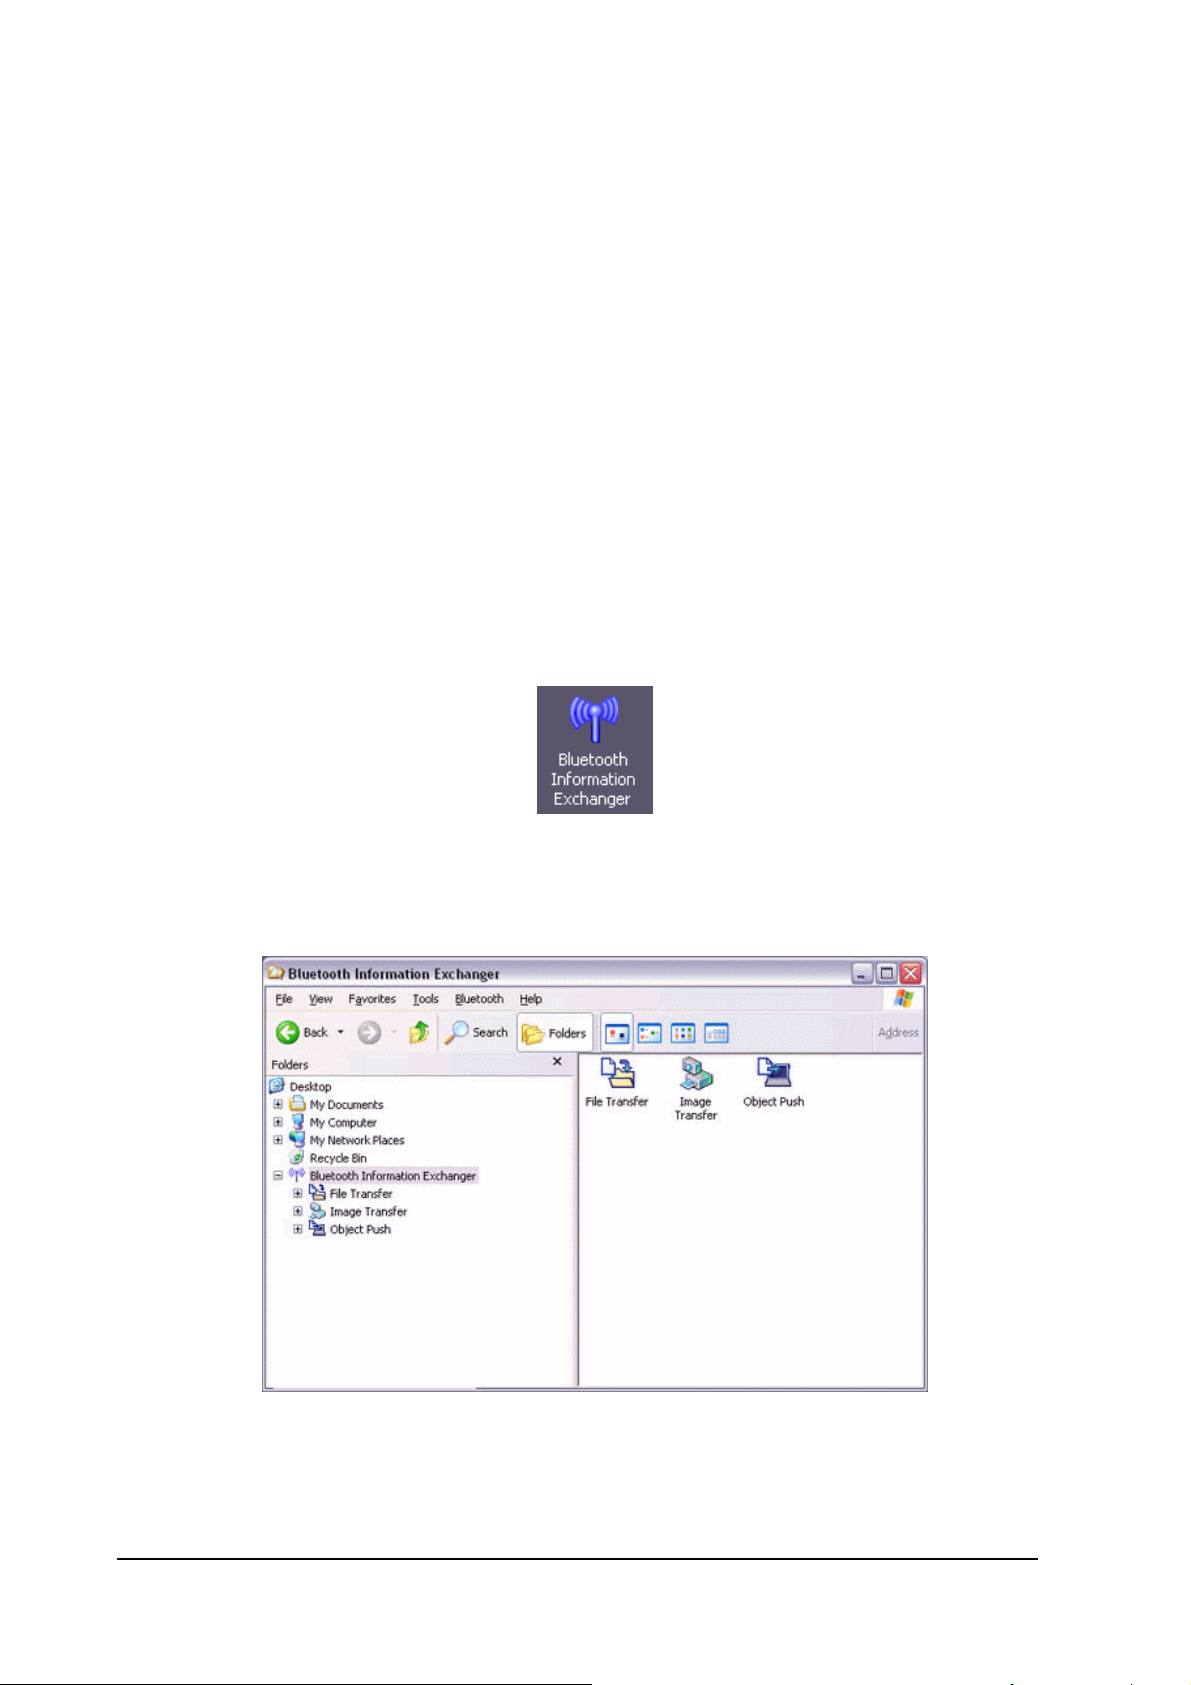
Use "File transfer" in the Bluetooth Information Exchanger to exchange files.
Note
.The same operations will be valid as long as the PC and PDA support the FTP
profile
."File transfer" cannot be used to send or receive business card data. Please
instead use "Object Push" to perform these activities.
4.3.1 Exchanging files with a PC or PDA
Sending files to a PC or PDA
1. Turn on the PC or PDA.
2. Double-click on the Bluetooth Information Exchanger icon on the Desktop.
Note
.Alternatively, opening Explorer and clicking on the Bluetooth Information
Exchanger folder will produce the same result.
3. Double-click on the [File transfer] icon.
A list of devices will appear in the [File transfer] window.
59
Page 60

Note
.If the desired device does not appear in the list, please confirm that the device
has been turned on, and then select [Bluetooth]→[Search Devices].
A device search will be performed.
.You can also use "Image transfer" when sending individual image files.
4. Use the mouse to drag and drop the file you wish to send over the destination
icon.
In this case, the file will be sent to a PC named "PC-1".
Note
.When using "File transfer", you can send individual files as well as entire
folders.
60
Page 61

5. Confirm that the file is being sent.
The file will be sent to the PC.
Note
.When sending files using "File transfer", a message requesting permission to
receive the files may appear on the destination (receiving) device. The content of
the message will vary with the Bluetooth software installed on the destination
device, so please be sure to follow the instructions provided.
If you are using the Bluetooth Utility, a message similar to the one below will
appear.
If the file has been sent successfully, the message below will appear.
Please click on the [OK] button.
The message below will appear if the file transmission was unsuccessful.
Please click on the [OK] button to close the message, and repeat the procedure.
Note
.Files that have been sent will be saved in a file transfer shared folder on the
destination device.
.Additionally, with "File transfer", you can open the shared folder on the
destination device using Explorer, specify a subfolder, and then send the file
there.
61
Page 62

.You can use
Properties in the Bluetooth Information Exchanger to change the
location of the "Shared folder" on the hard drive.
Receiving files from a PC or PDA
Your PC is able to receive files that have been saved in the shared folder on the
destination PC or PDA. Received files will be saved in the shared folder under "File
transfer".
1. Turn on the PC or PDA.
Confirm that a Bluetooth connection has been enabled before proceeding.
2. Double-click on the Bluetooth Information Exchanger icon on the Desktop.
Note
.Alternatively, opening Explorer and clicking on the Bluetooth Information
Exchanger folder will produce the same result.
62
Page 63

3. Double-click on the [File transfer] icon
A list of devices will appear in the [File transfer] window.
In this case, the file will be received from the PDA named "My Mobile".
4. Double-click on the [PDA-1] icon
The file saved in the shared folder in "My Mobile" will appear.
5. Right-click on the file you wish to receive, and then select "Receive file".
63
Page 64

The file will be received from a PDA.
Note
.With "File transfer", you can send individual files as well as entire folders.
Please right-click on the folder you wish to receive, and select "Receive folder".
Subsequent operations should be performed in the same manner as when
receiving individual files.
If the file has been received successfully, the message below will appear.
Please click on the [OK] button.
The message below will appear if the file transmission was unsuccessful. Please
click on the [OK] button to close the message, and repeat the procedure.
64
Page 65

Note
.The received file will be saved in the "Shared folder" under "File transfer" in the
Bluetooth Information Exchanger
You can use Properties under the Bluetooth Information Exchanger to specify
the location of the "Shared folder" on the hard drive.
4.3.2 Sending images to a mobile telephone
1. Turn on the PC or PDA.
2. Double-click on the Bluetooth Information Exchanger icon on the Desktop.
Note
.The mobile telephone must support the BIP profile.
.The image file”(*.bmp)(*.jpg,*.jpeg)(*.png)” formats can be sent and received
using "Image transfer".
.Alternatively, opening Explorer and clicking on the Bluetooth Information
Exchanger folder will produce the same result.
65
Page 66

3. Double-click on the [File transfer] icon.
A list of devices will appear in the [File transfer] window.
4. Drag and drop the file you wish to send over the destination icon.
In this case, the image will be sent to a mobile telephone named "BT-Phone-1".
66
Page 67

The image will be sent.
If the image has been sent successfully, the message below will appear.
Please click on the [OK] button.
The message below will appear if the image transmission was unsuccessful.
Please click on the [OK] button to close the message, and repeat the procedure.
67
Page 68

4.4 Exchanging business card data with a PC or PDA
You can exchange business card data with a Bluetooth-enabled PC or PDA.
Business card data are exchanged using "Object Push" under Bluetooth Information
Exchanger.
Selecting a business card and sending it to a PC or PDA
1. Turn on the PC or PDA.
2. Double-click on the Bluetooth Information Exchanger icon on the Desktop.
Note
.Alternatively, opening Explorer and clicking on the Bluetooth Information
Exchanger folder will produce the same result.
3. Double-click on the [Object Push] icon.
A list of devices will appear in the [Object Push] window.
68
Page 69

Note
.If the desired device does not appear in the list, please confirm that the device
has been turned on, and then select [Bluetooth]→[Search Devices].
A device search will be performed.
4. Use the mouse to drag and drop the business card you wish to send over the
destination icon
In this case, the business card will be sent to a PC named "PC-1".
Note
.When you try to send a business card, a message requesting permission to
receive the card may appear on the device belonging to the other party (i.e., on
the receiving end). The content of the message will vary with the Bluetooth
software installed on the destination device, so please be sure to follow the
instructions provided. If you are using the Bluetooth Utility, a message similar to
the one below will appear.
69
Page 70

If the business card has been sent successfully, the message below will appear.
Please click on the [OK] button.
The message below will appear if the business card transmission was
unsuccessful.
Please click on the [OK] button to close the message, and repeat the procedure.
Selecting your personal business card
You can prepare a business card bearing your name and other details such as your
company and telephone numbers, and then send it to another party.
Note
.Alternatively, opening Explorer and clicking on the Bluetooth Information
Exchanger folder will produce the same result.
1. Turn on the PC or PDA.
2. Double-click on the Bluetooth Information Exchanger icon on the Desktop.
70
Page 71

Note
.Alternatively, opening Explorer and clicking on the Bluetooth Information
Exchanger folder will produce the same result.
3. Double-click on the [Object Push] icon.
A list of devices will appear in the [Object Push] window.
Note
.If the desired device does not appear in the list, please confirm that the device
has been turned on, and then select [Bluetooth]→[Search Devices].
A device search will be performed.
4. Right-click on the destination icon, and then click on [Send business card
To].
In this case, your personal business card will be sent to a PC named "PC-1".
71
Page 72

The business card will be sent.
Note
.When you try to send a business card, a message requesting permission to
receive the files may appear on the device belonging to the other party (i.e., on
the receiving end). The content of the message will vary with the Bluetooth
software installed on the destination device, so please be sure to follow the
instructions provided. If you are using the Bluetooth Utility, a message similar to
the one below will appear.
.Business cards that have been sent will be saved in the Inbox of the destination
party.
If your business card has been sent successfully, the message below will appear.
Please click on the [OK] button.
The message below will appear if the business card transmission was unsuccessful.
Please click on the [OK] button to close the message, and repeat the procedure.
72
Page 73

Note
.Data that has been sent will be saved in a folder for exchanged business cards
on the destination device.
Receiving a business card from another party
You can prepare a business card bearing your name and other details such as your
company and telephone numbers, and then send it to another party.
Note
.Alternatively, opening Explorer and clicking on the Bluetooth Information
Exchanger folder will produce the same result.
1. Turn on the PC or PDA.
2. Double-click on the Bluetooth Information Exchanger icon on the Desktop.
Note
.Alternatively, opening Explorer and clicking on the Bluetooth Information
Exchanger folder will produce the same result.
73
Page 74

3. Double-click on the [Object Push] icon.
A list of devices will appear in the [Object Push] window.
Note
.If the desired device does not appear in the list, please confirm that the device
has been turned on, and then select [Bluetooth]→[Search Devices].
A device search will be performed.
4. Right-click on the icon of the party whose card you wish to acquire, and then
click on [Receive business card]
In this case, the business card of the other party will be acquired from a PC named
"PC-1".
The business card will be received.
Exchanging business cards
Simultaneously exchange your business card with one belonging to another party.
74
Page 75

1. Turn on the PC or PDA.
2. Double-click on the Bluetooth Information Exchanger icon on the Desktop.
Note
.Alternatively, opening Explorer and clicking on the Bluetooth Information
Exchanger folder will produce the same result.
3. Double-click on the [Object Push] icon.
A list of devices will appear in the [Object Push] window.
75
Page 76

Note
.If the desired device does not appear in the list, please confirm that the device
has been turned on, and then select [Bluetooth]→[Search Devices].
A device search will be performed.
4. Right-click on the icon of the party with whom you wish to exchange
business cards, and then click on [Object Push].
In this case, the business cards will be exchanged with a PC named "PC-1".
The business card from the party who executed the "Exchange business cards"
command will be sent first.
Note
.When you try to send a business card, a message requesting permission to
receive the files may appear on the device belonging to the other party (i.e., on the
receiving end). The content of the message will vary with the Bluetooth software
installed on the destination device, so please be sure to follow the instructions
provided.
If you are using the Bluetooth Utility, a message similar to the one below will
appear.
76
Page 77

4.5 Synchronizing data with a PDA
When you connect via Bluetooth instead of with a standard cable, you will always be able
to synchronize your data without the hassle of having to connect the cable.
4.5.1 Connecting using ActiveSync
Preparing the PC
1. On the PC, click on [Start]Æ[All Programs]Æ[Microsoft ActiveSync].
The initial ActiveSync set-up window will appear.
It is assumed in the explanation below that no ActiveSync connections have been
established with other devices.
2. Click [File]Æ[Connection Settings].
The [Connection Settings] window will appear.
77
Page 78

3. Place a check next to [Allow serial cable or infrared connection to this COM
port], and then select "COM7".
Note
.In the standard set-up, the port is configured to "COM7" (refer to Steps (3) and
(4) under "Preparing the PDA" below). When using a different port, please also
change the port number selected in this window
Preparing the PDA
1. Tap on the Bluetooth icon in the bottom right of the screen.
78
Page 79

Important
.The graphic above shows an example of a PDA operating window.
The connection procedure may be different depending on the manufacturer or
model of PDA you use. Please refer to the product instruction manuals for further
details.
The [Bluetooth Settings] window will open.
The message "Connection not registered" will appear if no Bluetooth device has
been registered.
Please tap on [OK] to close the message.
2. Double click on [Tools]Æ[Search for peripheral components].
79
Page 80

The application searches for nearby Bluetooth devices.
3. Tap and hold on the destination PC icon, and then select [Update Services].
A search for services will be carried out, and then a list of service names and their
connection status will appear as list in the lower window.
4. Tap and hold on "COM7" from the list of service names, and then select
"Register ActiveSync".
80
Page 81

5. Tap [OK] in the confirmation message window.
An ActiveSync connection will be initiated.
Establishing a partnership between ActiveSync and a PDA
Once a connection has been successfully established with a PDA, the procedure for
establishing a partnership with the PDA will be started by the ActiveSync application on
the PC.
Performing this set-up procedure will enable data to be synchronised between your PC
and PDA.
81
Page 82

1. In the [New Partnership (Set Up a Partnership)] window, select "Standard
partnership", and then click on the [Next] button.
The [New Partnership (Specify Data Synchronisation Method)] window will appear.
2. Select "Synchronise with this PC", and then click on the [Next] button.
The [New Partnership (Select Synchronisation Settings)] window will appear.
3. Select the type of information to be synchronised between your PC and PDA,
and then click on the [Next] button.
82
Page 83

The [New Partnership (Completing Setup)] window will appear.
4. Click on the [Finish] button.
When you click on the [Finish] button, ActiveSync will begin to synchronize your
information.
[Confirming changes]
83
Page 84

↓
(Synchronization process)
↓
[Synchronization complete]
While the ActiveSync connection is active, synchronization will be performed
whenever information is changed on either the PC or the PDA.
Once a partnership has been established, every time you start your PC (and PDA)
thereafter, a Bluetooth connection will be opened and ActiveSync will synchronize
your information.
Finishing an ActiveSync connection
Tap and hold on "COM7" in the Bluetooth Settings window, and select
[ActiveSync Release].
84
Page 85

Cancelling a partnership
Click on [File]Æ"Delete partnership".
Click on the [Yes] button when the confirmation message appears.
85
Page 86

4.6 Fax transmission
4.6.1 Using a modem station for fax transmission
Important
.Please refer to the modem station instruction manual for information on how to
connect the station to a telephone line.
.Please ensure that any drivers used to connect the PC to the modem have
been installed.
.A Bluetooth passkey (PIN code) is required for you to connect to the modem
station. Please make a note of your Bluetooth passkey before you start the
set-up process.
.A fax application is required for you to be able to send and receive faxes. The
description below is based on a example using Microsoft Fax, which is installed
with Windows XP as standard.
If you are going to use a commercially available fax application, then please refer
to the manual that came with the application for information on how to send and
receive faxes.
Setting up the modem station
1. Turn on the wireless modem station.
2. Right-click on the Bluetooth icon in the task tray, and then click on [Add New
Connection].
Note
.Alternatively, click [Start]→[All Programs]→[Bluetooth]→[Bluetooth Settings],
and then click on [New Connection] from the active [Bluetooth Settings] window.
The [Add New Connection Wizard (Welcome to the Add New Connection
Wizard)] window will appear.
3. Select [Custom Mode], and then click on the [Next] button.
86
Page 87

The [Add New Connection Wizard (Searching for Bluetooth devices)] window will
appear.
Once the program has finished searching for the devices, the [Add New
Connection Wizard (Select Device)] window will appear.
4. Select the device name of the wireless modem station from [Device List], and
then click on the [Next] button.
87
Page 88

The [Add New Connection Wizard (Searching for Services)] window will appear.
5. If you are connecting to the wireless modem station for the first time, enter
the passkey for the device from the [Bluetooth Passkey (PIN Code)] window,
and then click on the [OK] button.
88
Page 89

Once the program has finished searching for the services, the [Add New
Connection Wizard (Select Service)] window will appear.
6. Select "Fax" under [Select Service], and then click on the [Next] button.
The [Add New Connection Wizard (Select COM Port)] window will appear.
7. Check [Use default COM port], and then click on the [Next] button.
Note
.The modem station will be installed to the grayed-out COM port displayed under
[Assignment of COM Port] in this window. You will be specifying this COM port in
Step (3) of "●Installing a Modem", so please write it down for future reference.
The [Add New Connection Wizard (Connecting to Remote Device)] window will
appear.
89
Page 90

The [Add New Connection Wizard (Modem Settings)] and [Phone and Modem
Options] windows will appear.
8. Click on the "Add..." button in the [Phone and Modem Options] window.
The [Add New Hardware Wizard (Install New Modem)] window will appear.
Install the modem by following the instructions in the windows that follow.
Installing a modem
The [Add New Hardware Wizard (Install New Modem)] window will appear.
90
Page 91

1. Check [Don't detect my modem; I will select it from a list], and then click on
the [Next] button.
A list of modem manufacturers and models will appear.
2. Select the desired wireless modem from under [Manufacturer] and [Models],
and then click on the [Next] button.
Note
.If you have not yet installed a modem driver, click on the "Use Device" button to
install one from this window.
.If no modem drivers appear, please select "(Standard Modem Types)" and
"Standard 33600 bps modem."
91
Page 92

A window will appear where you can specify the port to which you can install the
modem.
3. Select "Selected Port", specify the COM port to which the modem will be
installed, and then click on the [Next] button.
Important
.Please specify the COM port displayed in the window pertaining to Step (7)
under "●Setting up the modem station."
4. Click on the [Continue] button.
The wizard will display the following window by design, but you may disregard it
and click on the "Continue" button.
92
Page 93

A window will appear indicating that the modem installation is complete.
5. Click on the [Finish] button.
6. Confirm that the configured modem has been added to the list in the [Phone
and Modem Options] window, and then click on the [OK] button.
93
Page 94

The [Next] button will be enabled on the [Add New Connection Wizard (Modem
Settings)] window.
7. Click on the [Next] button on the [Add New Connection Wizard (Modem
Settings)] window.
The [Add New Connection Wizard (Connection Name Settings)] window will
appear.
94
Page 95

8. Enter the type and name of the icon displayed after registration, and then
click on the [Next] button.
Please click on the [Next] button if you are satisfied with the settings.
The [Add New Connection Wizard (Completing the Add New Connection Wizard)]
window will appear.
9. Click on the [Finish] button.
The settings will be registered, and the icon will appear in the [Bluetooth Settings]
window.
Setting fax information
Configure send/receive settings and register fax information.
1. Select [Start]Æ[Control Panel], and then double-click on the [Printers and
Other Hardware] icon.
Note
.If the control panel is displayed in "Classic view", and you use Windows 2000,
please start from Step (2).
2. Double-click on the [Printers and Faxes] icon.
The [Printers & Faxes] window will appear.
3. Click on "Install a local fax printer" in the [Printers and Faxes] window.
95
Page 96

A window showing installed programs will appear, and a Fax icon will have been
created in the [Printers and Faxes] screen.
4. Click on "Send a fax" under "Printer Tasks" on the left side of the window.
96
Page 97

If you have not yet configured a fax device, the [Fax Configuration Wizard] window
will appear. In the window you can enter settings pertaining to the sender
(yourself).
Note
.If the fax configuration information has already been registered, the [Send Fax
Wizard] window, which can be viewed under "
Sending a fax" below, will appear
instead of the [Fax Configuration Wizard] window.
5. Enter the sender information, and click on the [Next] button
Note
.The sender information that you configure here will be automatically appended
as header information when you send a fax.
6. Select a device to be used for fax transmissions, enable the device for
sending or receiving, and then click on the [Next] button
97
Page 98

Note
.If [Enable Receive] is selected, the device will be on standby for receiving faxes
even if it is not sending or receiving anything, and therefore will be in continuous
connection to the wireless modem (when
COM Auto Connect is on).
Please decide whether to select this option based on the desired objective and/or
frequency of transmission.
7. Click on the [Next] button.
It is important that you do not change the transmitter subscriber identification.
8. Click on the [Finish] button.
98
Page 99

Setting fax information
Important
.The Fax service must be enabled for sending in order for you to send a fax.
Please refer to "
Using a wireless modem station" under "Troubleshooting" for
how to change the send and receive settings once the service has been
configured.
1. Double-click on the [Fax] icon in the Control Panel.
The [Fax Console] window will appear.
2. In the [Fax Console] window, click [File]→[Send fax].
The [Send Fax Wizard (Starting the Send Fax Wizard)] window will appear.
3. Click on the [Next] button.
99
Page 100

The [Send Fax Wizard (Recipient Information)] window will appear.
4. Enter the name and fax number of the destination party, and then click on the
[Next] button.
The [Send Fax Wizard (Preparing the Cover Page)] window will appear.
5. Specify the cover page template, subject line, and note (body text), and then
click on the [Next] button.
The [Send Fax Wizard (Schedule)] window will appear.
6. If you wish to send the fax immediately, select "Now", and then click on the
[Next] button.
100
 Loading...