

Page 1

USB Bluetooth Adapter
BT-200U
User’s Manual
Page 2

Copyright
Copyright (C) 2003 PLANET Technology Corp. All rights reserved.
The products and programs described in this User’s Manual are licensed products of PLANET
Technology, This User’s Manual contains proprietary information protected by copyright, and
this User’s Manual and all accompanying hardware, software, and documentation are copyrighted.
No part of this User’s Manual may be copied, photocopied, reproduced, translated, or reduced
to any electronic medium or machine-readable form by any means by electronic or mechanical.
Including photocopying, recording, or information storage and retrieval systems, for any purpose other than the purchaser's personal use, and without the prior express written permission
of PLANET Technology.
Disclaimer
PLANET Technology does not warrant that the hardware will work properly in all environments
and applications, and makes no warranty and representation, either implied or expressed, with
respect to the quality, performance, merchantability, or fitness for a particular purpose.
PLANET has made every effort to ensure that this User’s Manual is accurate; PLANET disclaims liability for any inaccuracies or omissions that may have occurred.
Information in this User’s Manual is subject to change without notice and does not represent a
commitment on the part of PLANET. PLANET assumes no responsibility for any inaccuracies
that may be contained in this User’s Manual. PLANET makes no commitment to update or keep
current the information in this User’s Manual, and reserves the right to make improvements to
this User’s Manual and/or to the products described in this User’s Manual, at any time without
notice.
If you find information in this manual that is incorrect, misleading, or incomplete, we would
appreciate your comments and suggestions.
CE mark Warning
The is a class B device, In a domestic environment, this product may cause radio interference,
in which case the user may be required to take adequate measures.
Trademarks
The PLANET logo is a trademark of PLANET Technology. This documentation may refer to
numerous hardware and software products by their trade names. In most, if not all cases, these
designations are claimed as trademarks or registered trademarks by their respective companies.
Revision
User’s Manual for PLANET USB Bluetooth Adapter:
Model: BT-200U
Rev: 2.0 (October 2003)
Part No. EM-BT200Uv2
ii
Page 3

TABLE OF CONTENTS
CHAPTER 1 INTRODUCTION......................................................................................1
1.1 BT-200U FEATURES ..............................................................................................1
1.2 PACKAGE CONTENTS..............................................................................................1
CHAPTER 2 INSTALLATION........................................................................................2
2.1 SOFTWARE INSTALLATION.......................................................................................2
2.2 HARDWARE INSTALLATION.......................................................................................5
2.3 GETTING HOOKED UP.............................................................................................6
2.4 INITIAL BLUETOOTH CONFIGURATION.......................................................................8
CHAPTER 3 BLUETOOTH SOFTWARE....................................................................12
3.1 BLUETOOTH TRAY...........................................................................................12
3.2 ACCESS MY BLUETOOTH PLACES................................................................12
3.3 ICONS USED FOR BLUETOOTH DEVICES AND SERVICES.........................13
CHAPTER 4 BASIC OPERATIONS............................................................................17
4.1 START OR STOP BLUETOOTH.......................................................................17
4.2 CREATE A CONNECTION FROM THE BLUETOOTH ICON IN THE SYSTEM
TRAY........................................................................................................................17
4.3 CREATE A CONNECTION USING THE BLUETOOTH SETUP WIZARD........17
4.4 CREATE A CONNECTION FROM ENTIRE BLUETOOTH NEIGHBORHOOD18
4.5 FIND BLUETOOTH DEVICES...........................................................................18
4.5.1 Periodic Search for Devices.........................................................................18
4.6 FIND A SERVICE...............................................................................................19
4.7 BLUETOOTH CONNECTION STATUS.............................................................20
4.8 SEND TO BLUETOOTH.....................................................................................20
CHAPTER 5 CONFIGURE BLUETOOTH...................................................................22
5.1 ACCESS THE BLUETOOTH CONFIGURATION PANEL.................................22
5.2 BLUETOOTH SERVICES VERSUS BLUETOOTH APPLICATIONS................22
5.3 BLUETOOTH EXCHANGE FOLDER.................................................................22
5.4 GENERAL CONFIGURATION SETTINGS........................................................23
5.5 BLUETOOTH APPLICATIONS..........................................................................23
5.5.1 Overview......................................................................................................23
5.5.2 General Configuration..................................................................................23
5.5.3 Human Interface Device..............................................................................24
5.5.4 Audio Gateway.............................................................................................25
5.5.5 Bluetooth Serial Port....................................................................................25
5.5.6 Dial-up Networking.......................................................................................26
5.5.7 Fax...............................................................................................................27
5.5.8 Headset........................................................................................................28
5.5.9 File Transfer.................................................................................................29
5.5.11 PIM Synchronization..................................................................................30
5.5.12 PIM Item Transfer......................................................................................32
5.5.13 Printer.........................................................................................................33
5.6 BLUETOOTH SERVICES..................................................................................34
5.6.1 Notifications..................................................................................................34
5.6.2 Audio Gateway.............................................................................................35
5.6.3 Bluetooth Serial Port....................................................................................36
5.6.4 Dial-up Networking Service..........................................................................37
5.6.5 Fax Service..................................................................................................37
5.6.6 File Transfer Service....................................................................................37
i
Page 4

5.6.7 Headset Service...........................................................................................38
5.6.8 Network Access...........................................................................................38
5.6.9 PIM Item Transfer........................................................................................40
5.6.10 PIM Synchronization..................................................................................42
5.7 HARDWARE SETTINGS...................................................................................42
5.7.1 Advanced Settings.......................................................................................43
5.8 ACCESSIBILITY SETTINGS..............................................................................44
5.9 DISCOVERY SETTINGS....................................................................................45
CHAPTER 6 SECURITY..............................................................................................47
6.1 AUTHENTICATION............................................................................................47
6.2 AUTHORIZATION..............................................................................................47
6.3 BLUETOOTH DEVICE IDENTITY......................................................................47
6.4 ENCRYPTION....................................................................................................47
6.5 LINK KEY............................................................................................................47
6.6 PAIRING DEVICES............................................................................................48
6.7 PASSKEY...........................................................................................................48
6.8 SECURE CONNECTION...................................................................................48
6.9 SECURITY REQUEST DIALOG BOX................................................................48
CHAPTER 7 TROUBLESHOOTING...........................................................................49
7.1 CANNOT CONNECT TO A PAIRED DEVICE...................................................49
7.2 CANNOT DISCOVER SERVICES ON AN UN-PAIRED REMOTE DEVICE.....49
7.3 DIAL-UP NETWORKING SERVICE DOES NOT START..................................49
7.4 DETERMINE THE BLUETOOTH DEVICE ADDRESS (BDA) OF MY
HARDWARE.............................................................................................................49
7.5 DETERMINE THE VERSION OF THE HOST CONTROLLER INTERFACE (HCI)
..................................................................................................................................49
7.6 DETERMINE THE VERSION OF THE LINK MANAGER PROTOCOL (LMP)..50
7.7 FIND INFORMATION ABOUT THE BLUETOOTH HARDWARE ATTACHED TO
MY COMPUTER.......................................................................................................50
7.8 INTERNET CONNECTION SHARING DOES NOT WORK...............................50
7.9 TEST A NETWORK ACCESS CONNECTION..................................................50
7.10 UNKNOWN PORT MESSAGE WHEN USING A BLUETOOTH SERIAL PORT
..................................................................................................................................50
7.11 BLUETOOTH HEADSET DOESN’T ALWAYS FUNCTION UNDER WIN 98..51
APPENDIX A SPECIFICATION...................................................................................52
ii
Page 5

1
Chapter 1
Introduction
This USB Bluetooth Adapter, BT-200U, is specifically designed to plug into an available Universal Serial Bus port connecting to a desktop or laptop PC. It allows you to
make short-range wireless connections between Bluetooth devices such as cellular
phones, personal digital assistants (PDA), and desktop and notebook computers.
BT-200U uses radio transmission, voice and data are thus transmitted almost immediately. Bluetooth transmission ensures both protection from interference and secures
data transfers. It helps people share and access the information that's important to
them more easily.
Link your notebook with your handheld, mobile phone, printer and other Bluetooth
devices within your personal area network (PAN) via a secure short-range wireless
radio link. Get rid of all those hassle cables and automatically share documents,
browse the Internet and synchronize calendars, address books and more.
1.1 BT-200U Features
Ø Follows world wide standard which compatible to other Bluetooth devices
Ø Bluetooth Manager Utility eases the difficulties of configuration and management
Ø Various services provided: Virtual Serial Port, Dial-up Networking, Fax, File Trans-
fer, Information Exchange, Information Synchronization, and Network Access
Ø Connection protection and data security enhanced mechanism
Ø Most popular OS support: Windows 98SE, ME, 2000, XP
Ø Up to 8 devices Point-to-MultiPoint topology expands your PAN coverage
1.2 Package Contents
The following items should be included:
• USB Bluetooth Adapter x 1
• USB Adapter Cable x 1
• CD-ROM (includes Driver, Utility, Manual) x 1
• Quick Installation Guide x 1
If any of the above items are damaged or missing, please contact your dealer immediately.
.
1
Page 6
2
Chapter 2
Installation
2.1 Software Installation
Note: The Bluetooth Software should be installed well prior to the hardware
installation.
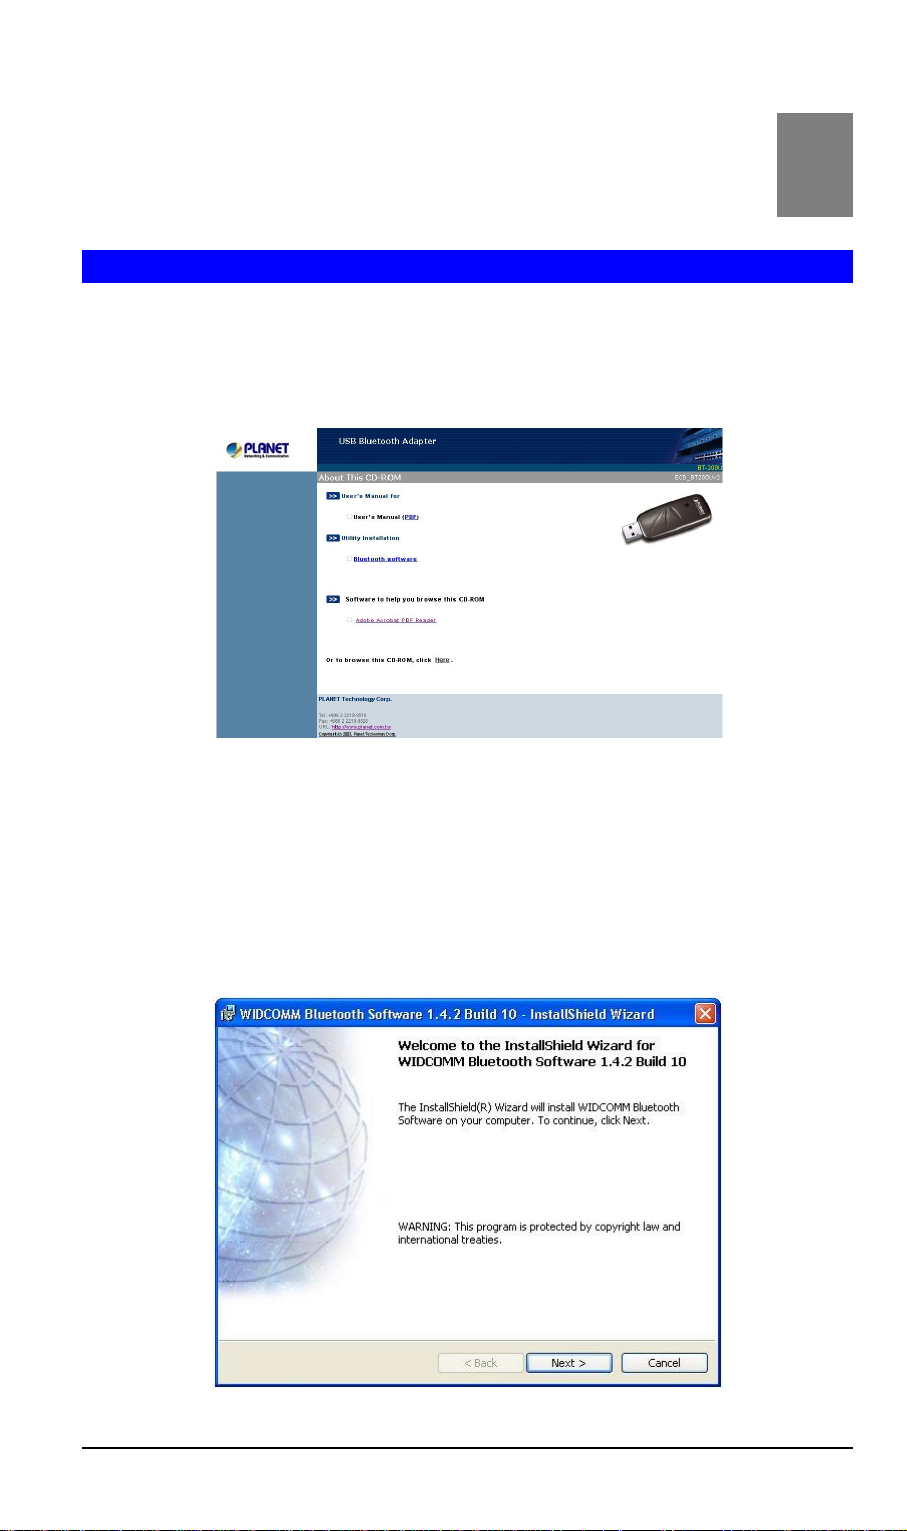
1. Insert the CD-ROM into the CD-ROM drive to initiate the autorun program. Once
completed, a menu screen will appear as follows:
2. To install the Bluetooth software, click on the "Bluetooth Software" hyperlink to
activate the installation procedure for the application program.
If the above screen is not shown, you can start the installation as follows.
• Click on Start Menu/ Run.
• Enter “D:\Utility\setup.exe” in the appeared box, where “D” is the letter of your
CD-ROM drive.
• Click on “OK” button.
3. On the Welcome screen, click the Next button.
2
Page 7
Installation
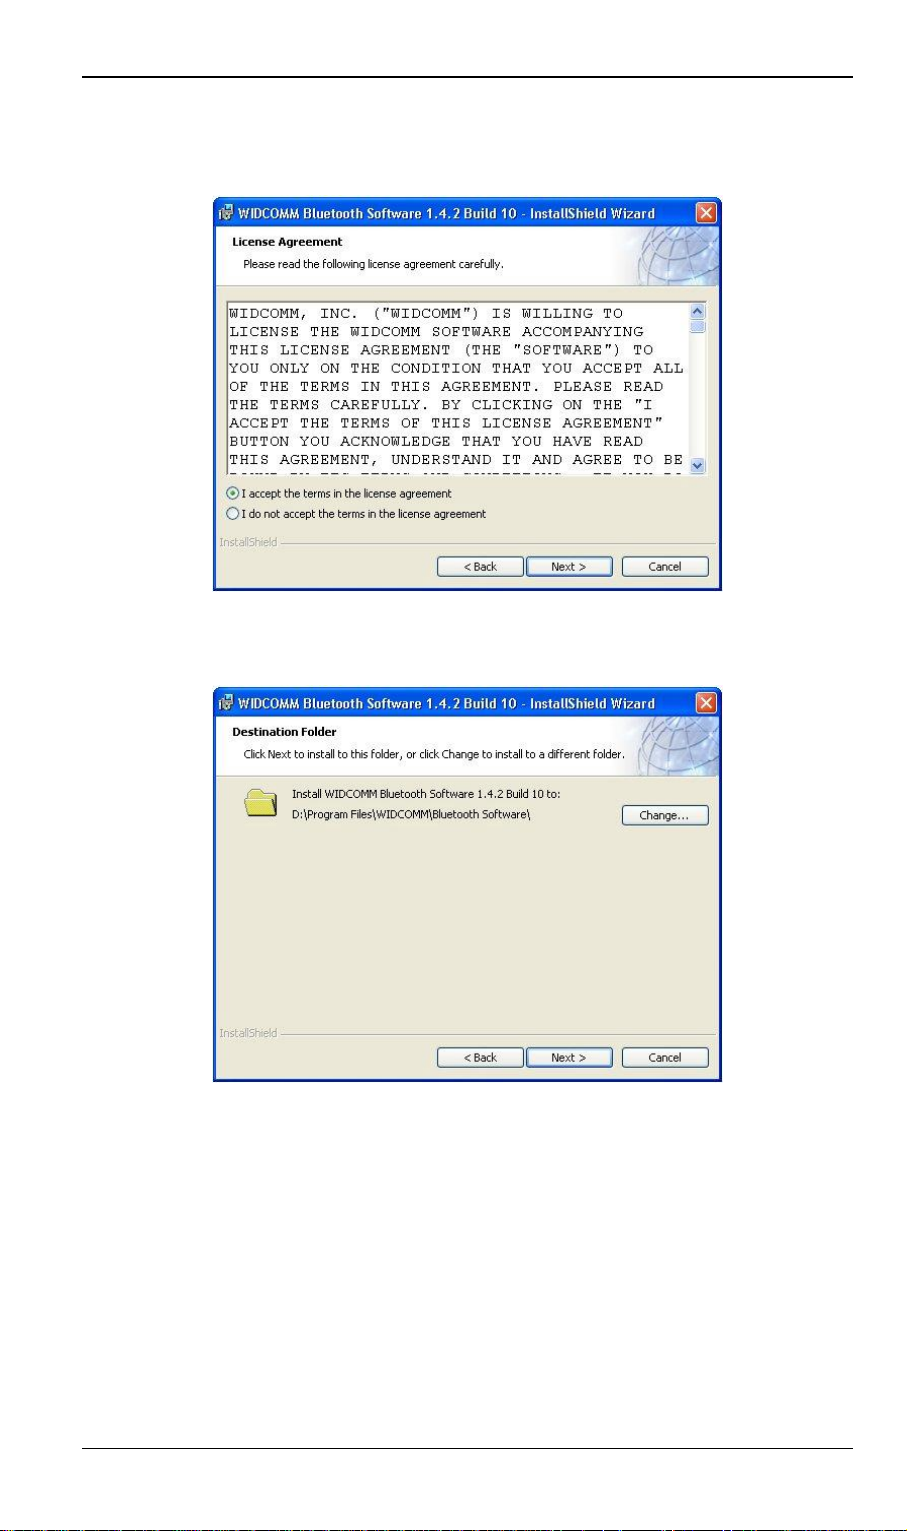
4. When the License Agreement screen is displayed, read the License Agreement,
then click the radio button to the left of “I accept the terms in the license agree-
ment” and click the Next button.
5. On the Destination Folder screen, click the Change button to browse to a new
destination folder for the Bluetooth software. Otherwise, click the Next button to accept the default folder.
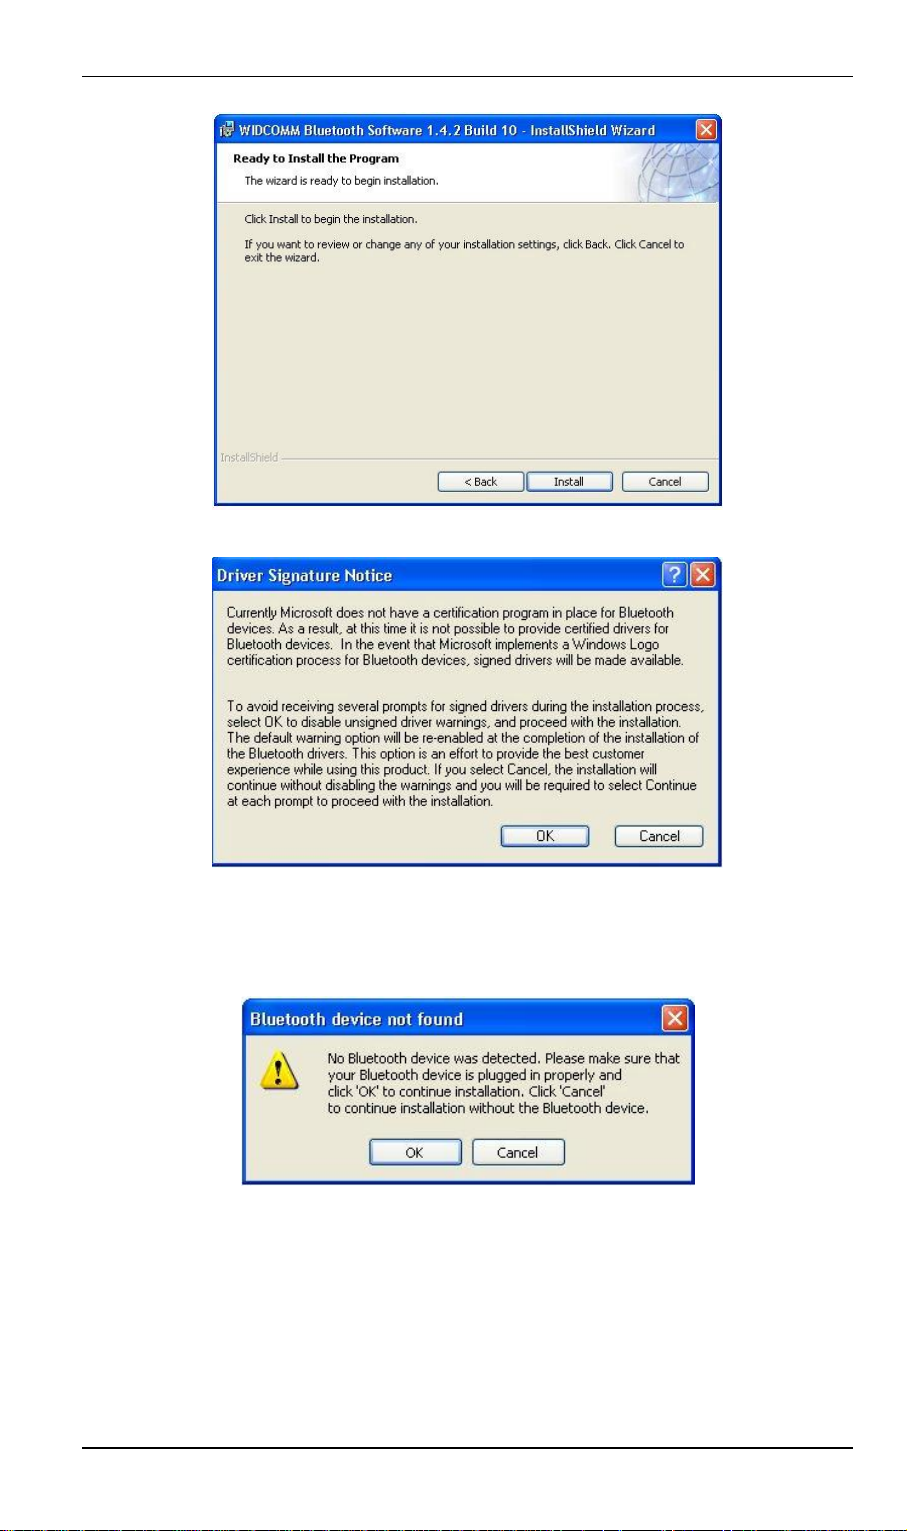
6. The InstallShield Wizard is ready to install the Bluetooth software. If you need to
review or change any settings, click the Back button. Click the Cancel button to exit
the Wizard. Otherwise, click the Install button.
3
Page 8
Broadband Router User Guide
7. Click OK at the following message (only for Windows 2000/XP installation).
8. The Installing Bluetooth Software screen displays the installation progress. If
prompted to insert the Windows CD, do so and follow the on-screen instructions.
9. The following message is shown to prompt that you have not installed the Bluetooth
USB adapter. Click Cancel to continue.
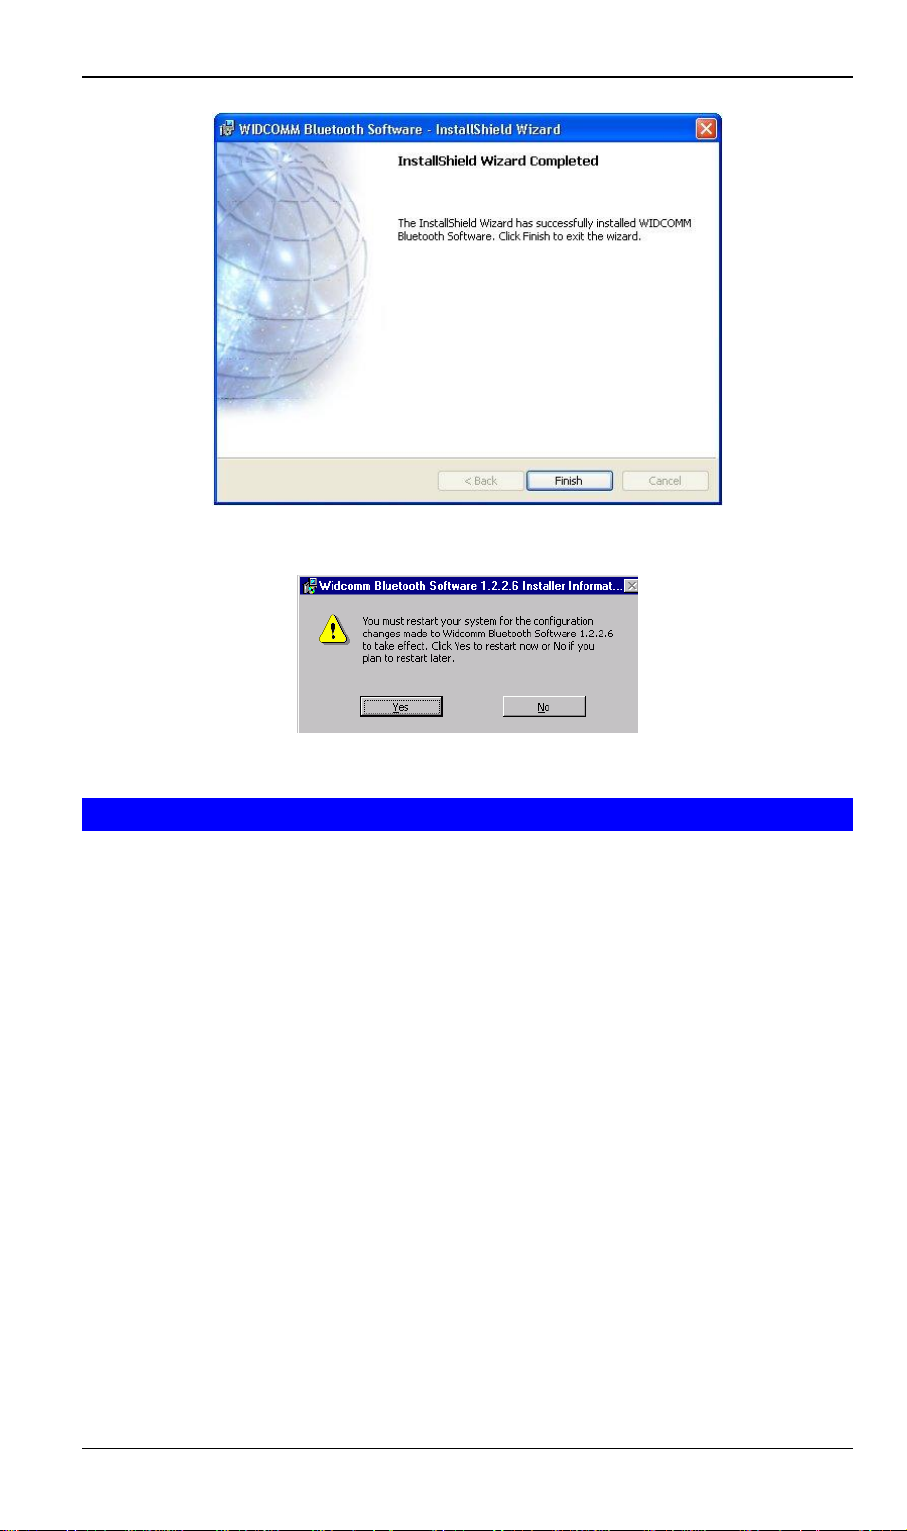
10. When finished, click Finish to end the Installation Wizard.
4
Page 9
Installation
11. Remember to restart your computer to have the new configuration take effect if the
following message is shown.
2.2 Hardware installation
Note: The hardware installation should be only performed when the software is
well installed.
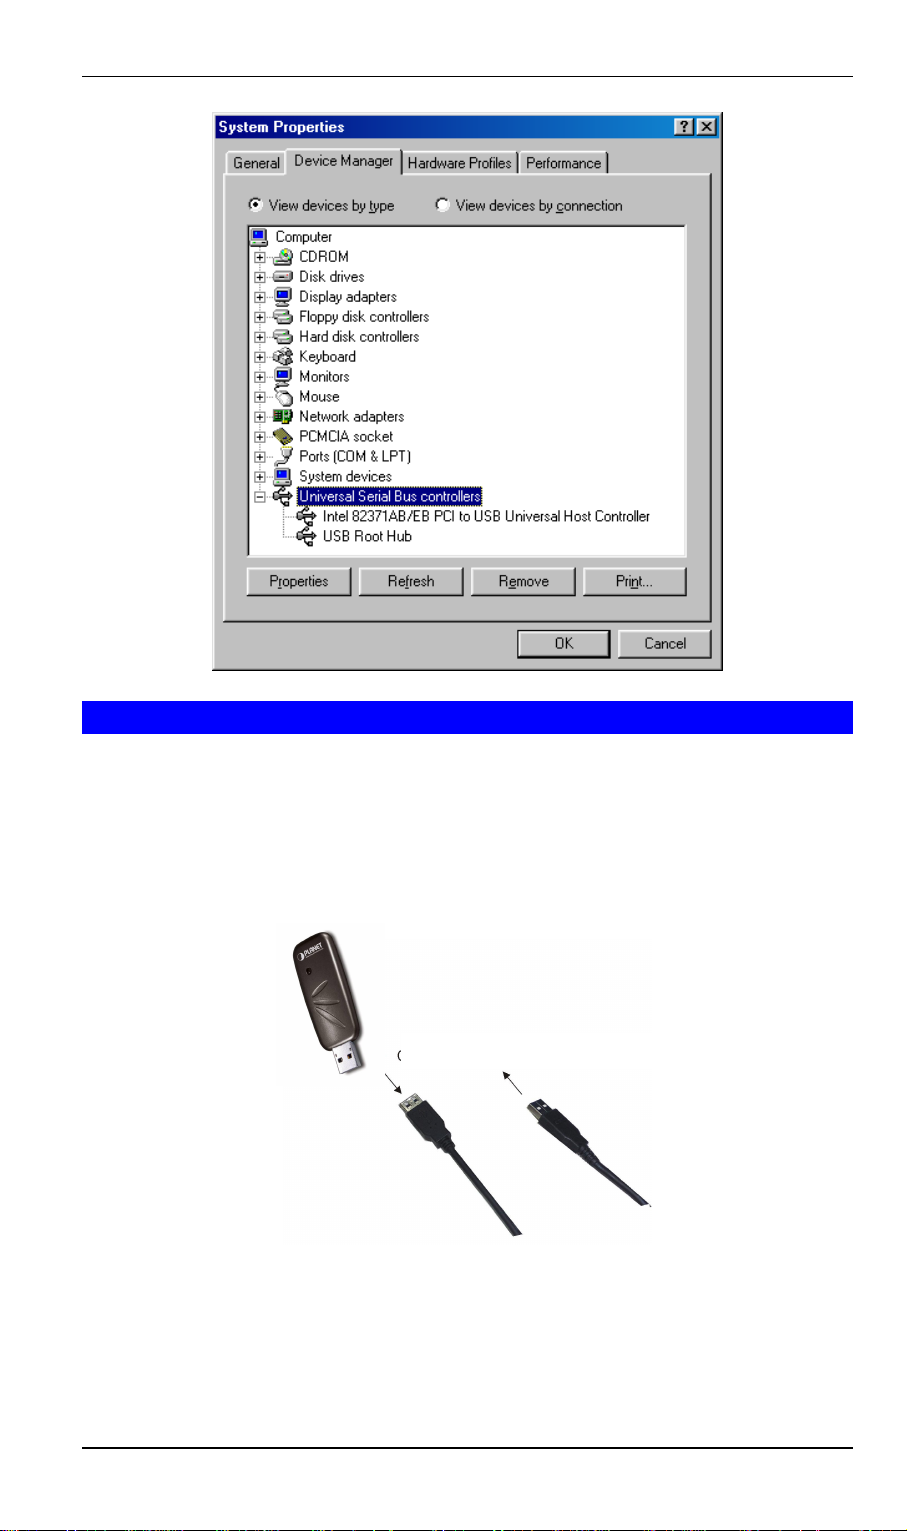
Precaution
Before the installation, make sure the USB port exists in your computer and is enabled.
To check this, go to My ComputeràControl Panel àSystem. Open the Device
Manager tab. If the Universal Serial Bus controller device is found, it means your
USB port is installed and enabled. If not, either no USB port is installed or the USB
bios is not properly enabled. In this case, consult your computer dealer for USB support.
5
Page 10
Broadband Router User Guide
Connects to the USB host port
2.3 Getting Hooked Up
1. Locate the USB host port of your system. Align the USB connector (the thinner
end) of the USB adapter toward the USB host port, push evenly and steadily until
it is seated.
2. Plug your BT-200U into the thicker end of the USB adapter cable.
3. As soon as the device is properly plugged to your computer, Windows will auto-
matically detect the device and prompt the following message. Select “Install the
software automatically (Recommended)” And press Next to continue.
6
Page 11
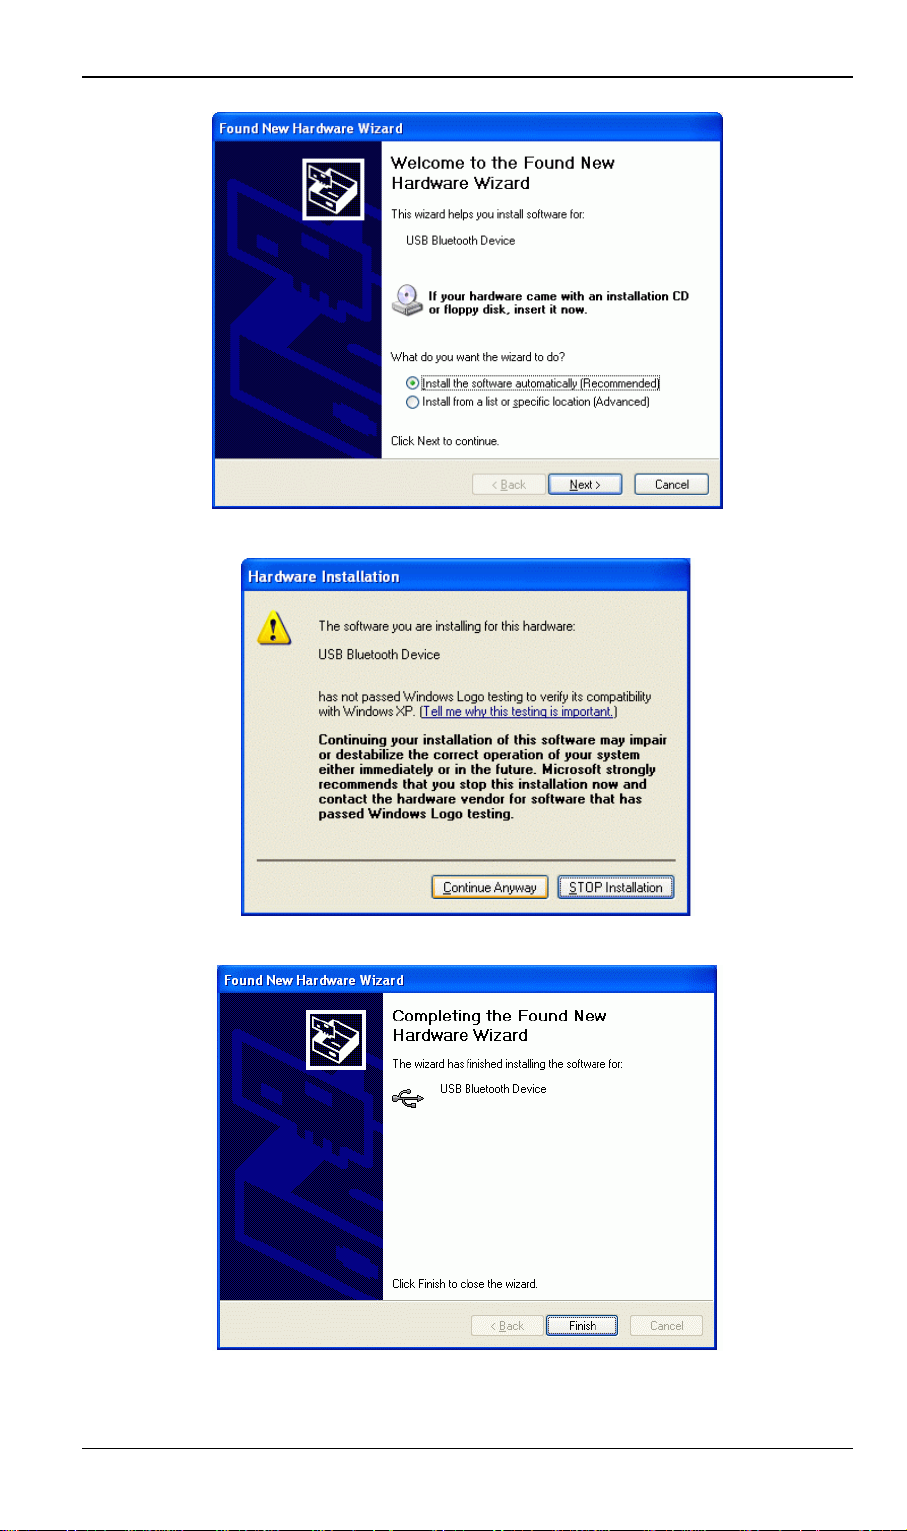
4. Select “Continue Anyway” with the following message.
Installation
5. Press Finish to complete the hardware installation.
7
Page 12
Broadband Router User Guide
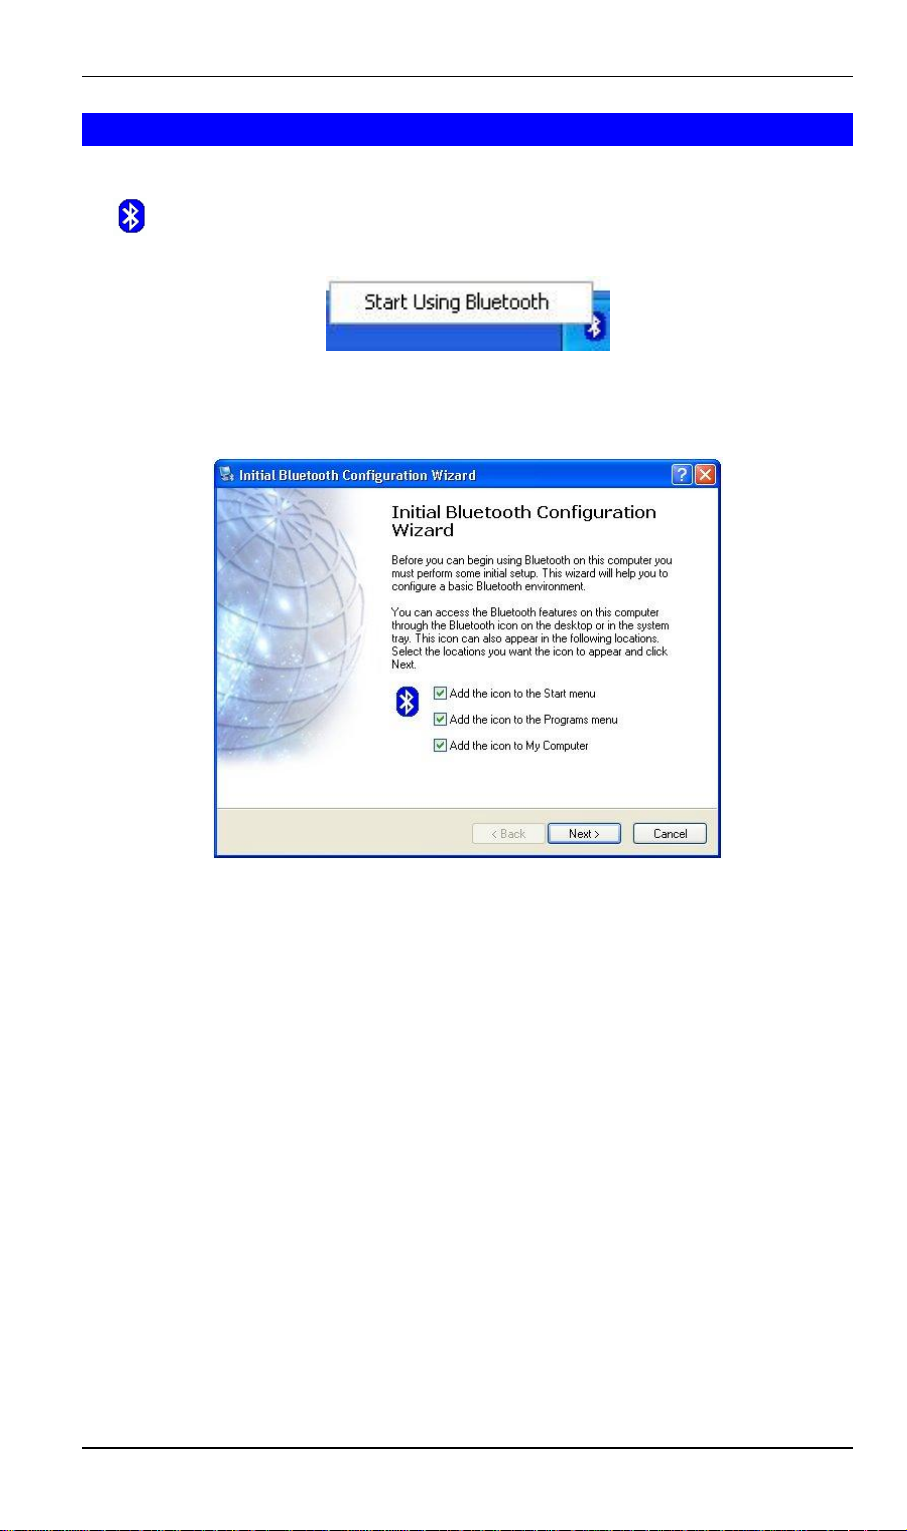
2.4 Initial Bluetooth Configuration
1. Once the software is well installed, your computer should prompt a Bluetooth icon
on the bottom right corner. You may right click and select the Start Using Blue-
tooth to make initial Bluetooth configuration.
2. The following message is shown to prompt you to select the location where you
want to show the Bluetooth icon. Select the location and click Next.
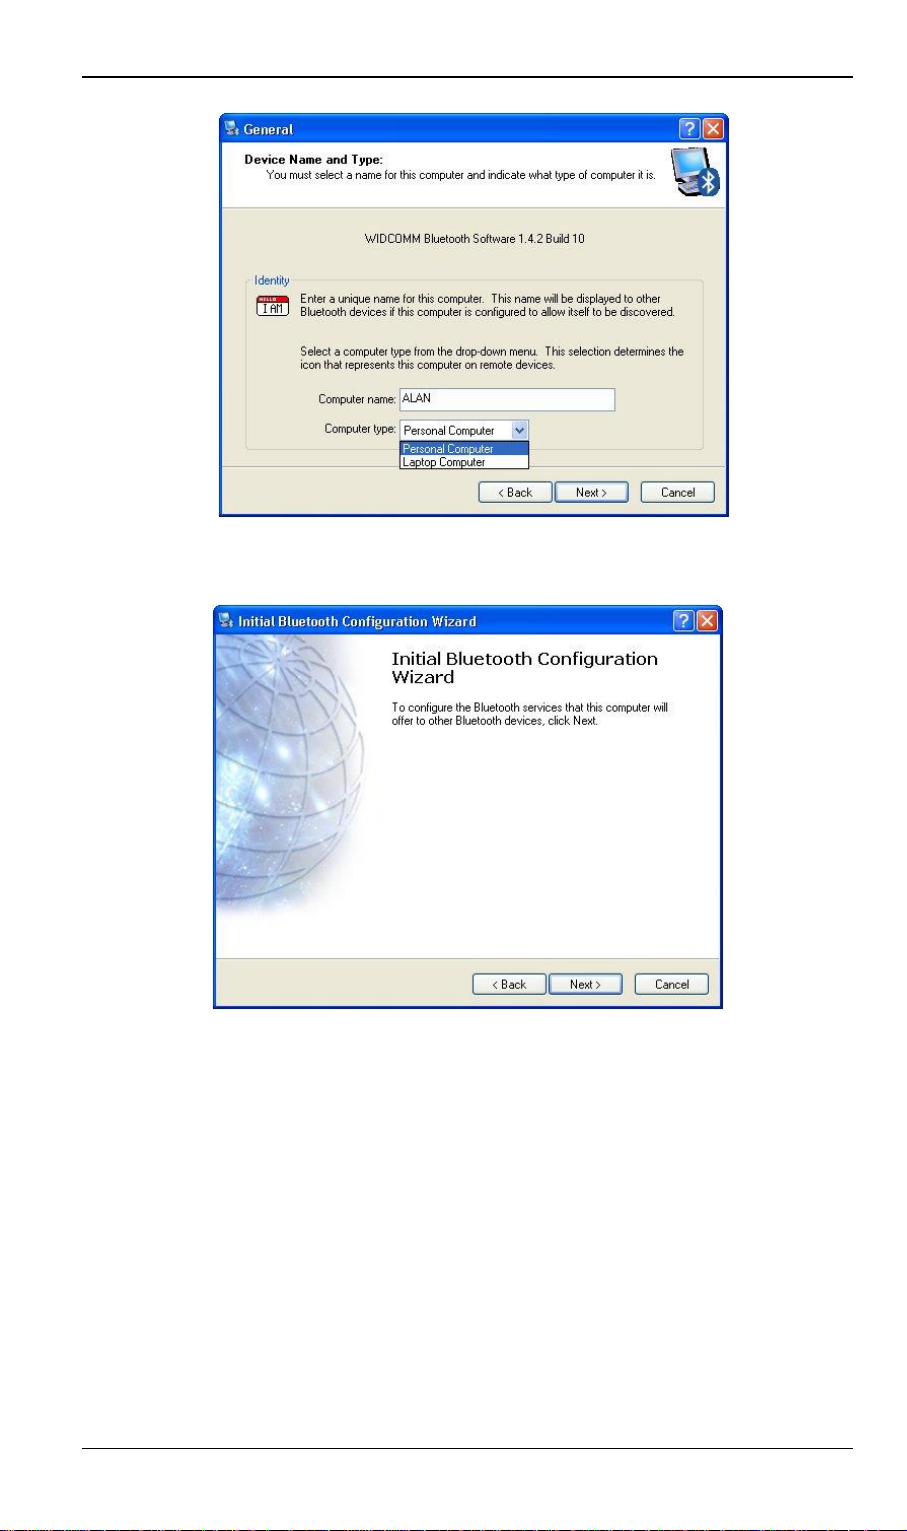
3. On the Device Name and Type screen, enter the required information:
Device Name—other Bluetooth-enabled devices, when inquiring about devices
within radio range, will see this user-configured device name.
The name can be changed after the installation process through the Bluetooth
Software Configuration Panel.
Device Type—click the down arrow 6and choose Desktop or Laptop from the
drop-down list. The device type can be changed after the installation process
through the Bluetooth Software Configuration Panel.
Click the Next button.
8
Page 13
Installation
4. Click Next to configure the Bluetooth services that this computer will offer to the
Bluetooth devices.
5. Select the services you want this computer to offer and click the Configure if you
need further configuration. Click Next to continue.
9
Page 14

Broadband Router User Guide
6. The following message is shown. Please wait for a while for the software installation process to complete.
7. Select Skip button on the following page to continue.
8. Click Finish to complete the initial Bluetooth configuration.
10
Page 15
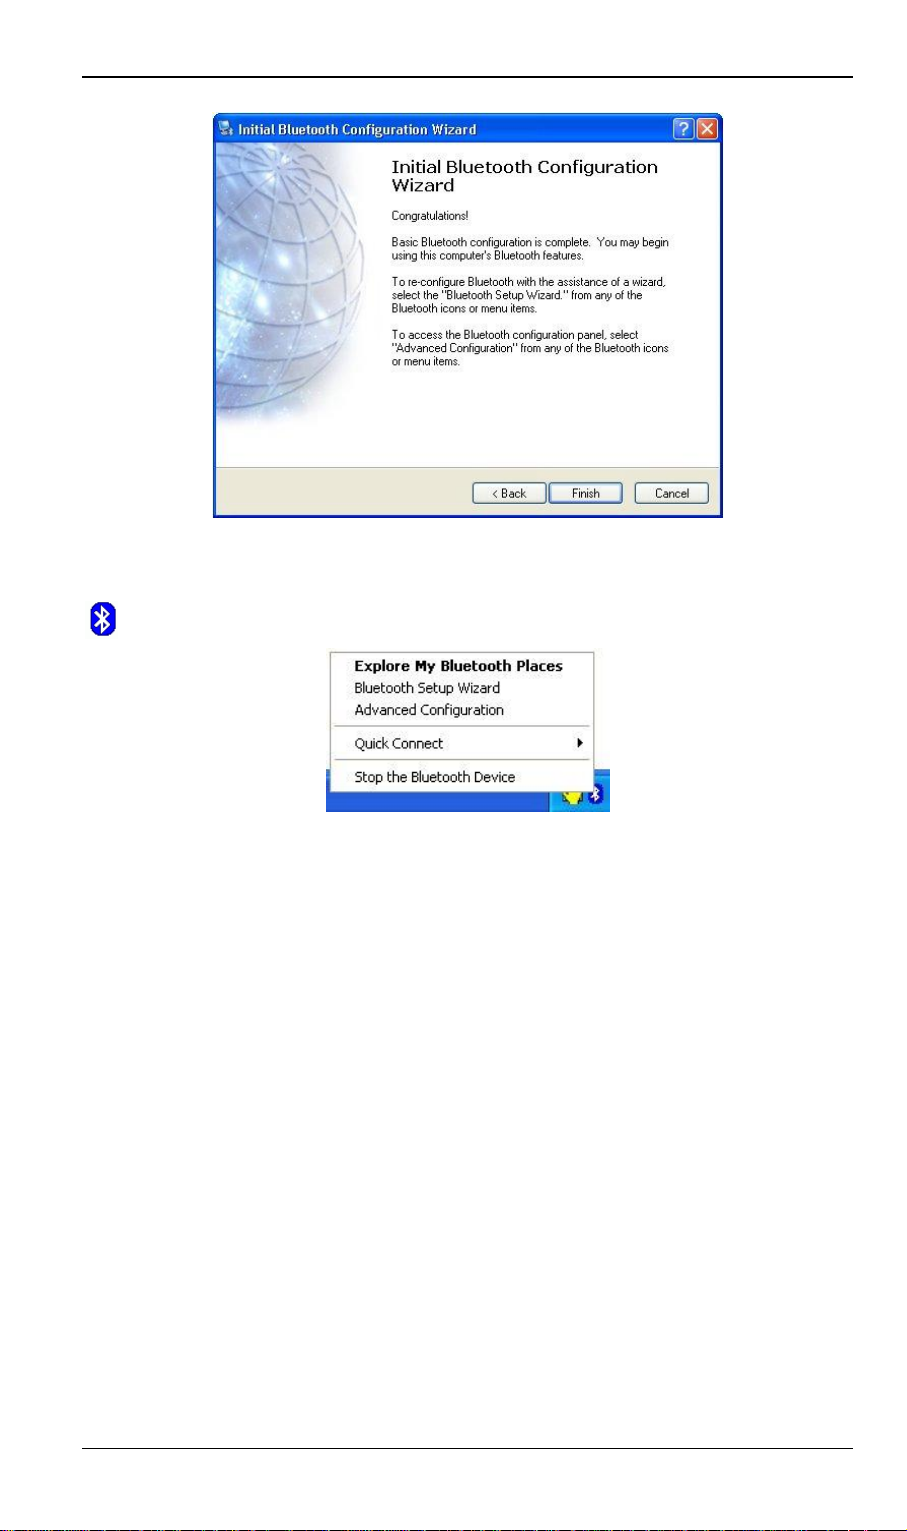
Installation
Once the initial Bluetooth configuration is completed, right click the Bluetooth icon
on the bottom right corner again. The following menu is show.
Your Bluetooth USB adapter is well installed now. Pleas check the next chpater to use
or make further configuration for the services you need.
11
Page 16

3
Chapter 3
Bluetooth Software
3.1 BLUETOOTH TRAY
The Bluetooth tray resides in the Windows system tray, which is normally located in the
lower-right corner of the screen. The Bluetooth tray provides fast access to most
Bluetooth operations.
From the Bluetooth tray you can:
l Access My Bluetooth Places—double-click the Bluetooth icon, or right-
click the Bluetooth icon and then select Explore My Bluetooth Places.
l Access the Bluetooth Setup Wizard. This wizard will help you:
l Configure how this computer accesses a service on another Bluetooth
device
l Locate remote Bluetooth devices
l Configure the way that this computer provides services to remote
Bluetooth devices
l Set the name and type of this Bluetooth device, e.g., “John's PC” and
“Desktop.”
l Access the Bluetooth Configuration Panel—right-click the Bluetooth icon,
and then select Advanced Configuration.
l Access the Quick Connect option—right-click the Bluetooth icon, select
Quick Connect, and then select the type of service to which you wish to
connect.
l Start/Stop Bluetooth on this computer.
3.2 ACCESS MY BLUETOOTH PLACES
My Bluetooth Places is part of Windows Explorer.
There are multiple ways to access My Bluetooth Places:
l In the Windows system tray
l Right-click the Bluetooth icon and select Explore My Bluetooth Places
or
l Double-click the Bluetooth icon
l On the desktop, double-click the Bluetooth icon
l Open Windows Explorer and select My Bluetooth Places in the Folders
pane or from the Address shortcut menu.
12
Page 17
Appendix C - Specifications
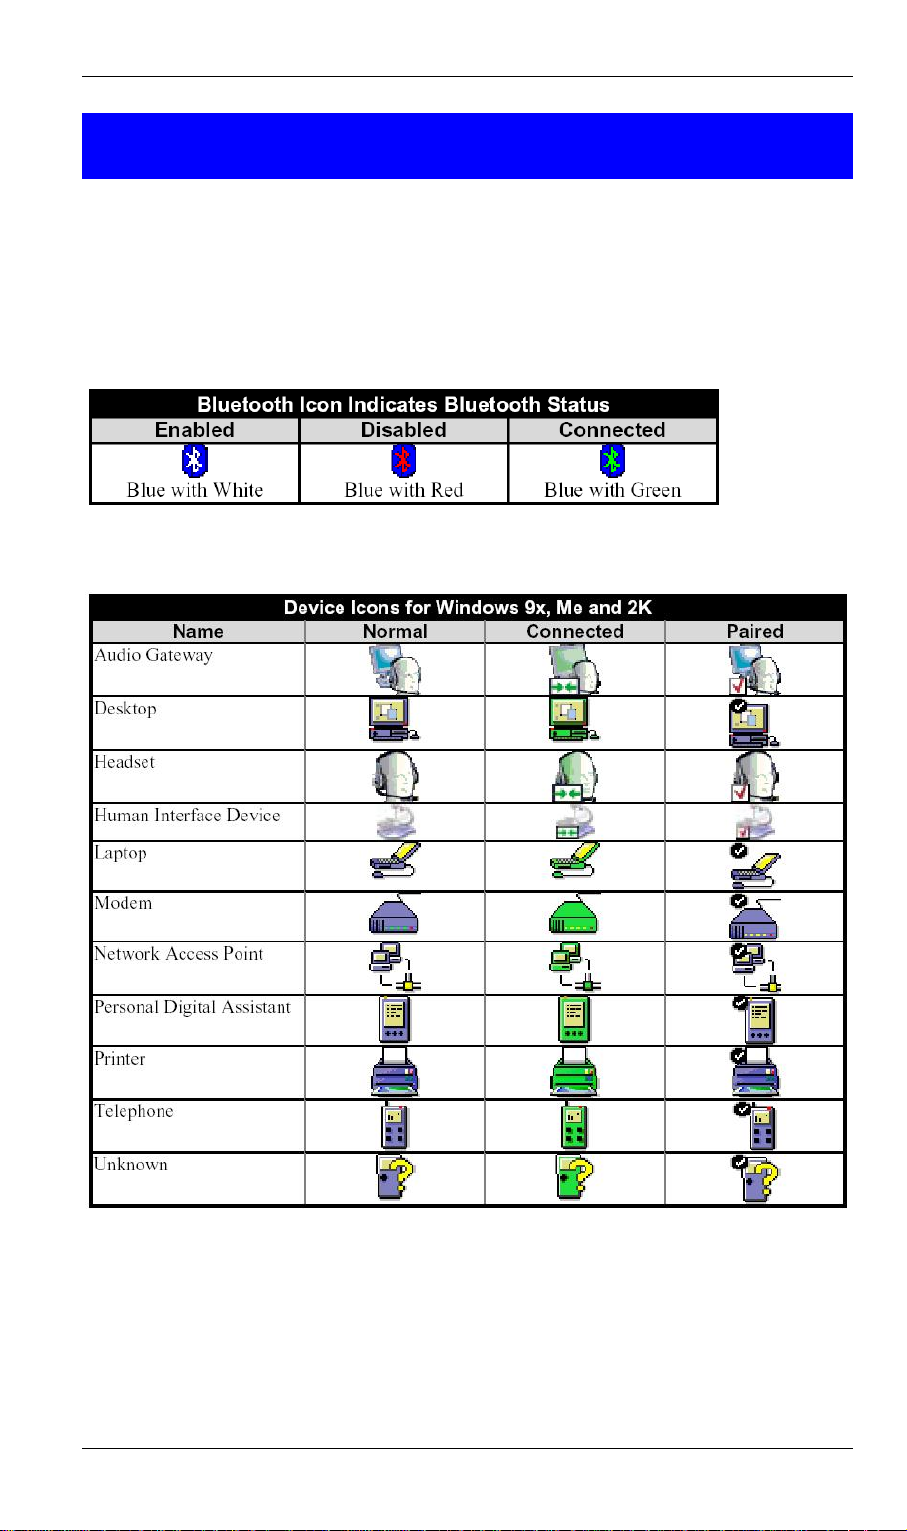
3.3 ICONS USED FOR BLUETOOTH DEVICES AND SERVICES
Bluetooth icons provide at-a-glance feedback about a device or service's status by
changing appearance.
The Bluetooth icon in the Windows system tray provides feedback about Bluetooth
status.
Figure 1: Bluetooth Icon
Figure 2: Device Icons for Windows 9x, Me and 2K
13
Page 18

Broadband Router User Guide
Figure 3: Service Icons for Windows 9x, Me and 2K
14
Page 19

Figure 4: Device Icons for Windows XP
Appendix C - Specifications
15
Page 20

Broadband Router User Guide
Figure 5: Service Icons for Windows XP
16
Page 21

Appendix C - Specifications
4
Chapter 4
Basic Operations
4.1 START OR STOP BLUETOOTH
To start Bluetooth: in the Windows system tray, right-click the Bluetooth icon and
select Start the Bluetooth Device. The Bluetooth icon is blue in color with a white
insert when Bluetooth is running.
To stop Bluetooth: in the Windows system tray, right-click the Bluetooth icon and
select Stop the Bluetooth Device. The Bluetooth icon is blue in color with a red insert
when Bluetooth is stopped.
4.2 CREATE A CONNECTION FROM THE BLUETOOTH
ICON IN THE SYSTEM TRAY
In the Windows system tray, right-click the Bluetooth icon, select Quick Connect and
then the Bluetooth service that you wish to use.
If this computer has created a connection to the desired type of service in the past, the
options on the shortcut menu are:
l The name(s) of any device(s) with which prior connections to this type of
service have been established. Select a name from the list to re-establish
connection.
l Other Devices…Select this option to search for additional devices that po-
tentially provide the desired service, select a device from the list, and then
click Connect.
If this computer has never created a connection to this type of service, the only option
on the shortcut menu is “Find Devices….” Select this option to search for devices that
potentially provide the desired service, select a device from the list, and then click
Connect.
4.3 CREATE A CONNECTION USING THE BLUETOOTH
SETUP WIZARD
l From the Folders pane of Windows Explorer, right-click My Bluetooth
Places and select Bluetooth Setup Wizard
or
l In Windows Explorer, with My Bluetooth Places selected, from the Blue-
tooth menu, select Bluetooth Setup Wizard
or
l From the Windows system tray: right-click the Bluetooth icon and select
Bluetooth Setup Wizard.
Follow the wizard's on-screen instructions.
17
Page 22

Broadband Router User Guide
The Bluetooth menu is only visible when My Bluetooth Places is
4.4 CREATE A CONNECTION FROM ENTIRE
BLUETOOTH NEIGHBORHOOD
From Windows Explorer:
l In the Folders pane, select Entire Bluetooth Neighborhood, right-click a de-
vice name and select “Connect …” the desired service.
or
l In the Folders pane, expand Entire Bluetooth Neighborhood, select a device,
and then, in the right pane, right-click a service provided by that device and
select “Connect to…”
?NOTE:
Only available services are displayed in the menus.
4.5 FIND BLUETOOTH DEVICES
Search for Devices looks for Bluetooth devices in the vicinity and displays the devices
that it finds in My Bluetooth Places.
To start a search for devices, in the Folders pane of My Bluetooth Places, select Entire
Bluetooth Neighborhood, and then, from the Bluetooth menu, select Search for Devices.
?NOTE:
4.5.1 Periodic Search for Devices
Bluetooth can be configured to automatically search for devices on a regular basis
(Bluetooth Configuration Panel > Discovery tab).
One of the advantages of Bluetooth is the mobility that the wireless connections allow.
active.
However, mobility means that devices may move in or out of connection range during
the time between the automatic updates performed by Bluetooth. To be certain that the
displayed list of devices in the neighborhood is current, or if automatic periodic inquiry
is not enabled, force an update of the device list using the technique described in
Search for Devices, above.
Some devices within connection range may not show up in the list of devices found
because:
l Your device is configured to report only specific types or classes of devices
(Bluetooth Configuration Panel > Discovery tab, on your device).
l The unlisted device is configured to be non-discoverable (Bluetooth Con-
figuration Panel > Accessibility tab, on the un-listed device).
18
Page 23

Appendix C - Specifications
4.6 FIND A SERVICE
The process of determining the services that a device provides is called Service Discovery.
To initiate a Service Discovery, in the Folders pane of My Bluetooth Places, right-click
a device name and select Discover Available Services from the shortcut menu.
Bluetooth services are those things that this computer can do for remote Bluetooth
devices. For example, if this computer allows a remote Bluetooth device to send a fax
using a fax modem that is physically attached to this computer, then this computer is
providing the Bluetooth fax service.
Some services are hardware dependant; this computer cannot provide the fax service
unless it has a physical fax modem, for example.
Some Bluetooth services use virtual “hardware.” The Bluetooth Serial Port service, for
example, does not use a physical port on this computer. Instead, it creates virtual
serial ports that Windows applications can see and use as if they were actual physical
ports.
Each Bluetooth service that this computer is capable of providing can be started automatically when Bluetooth starts. Each service can be setup to require security
measures before allowing a remote Bluetooth device to connect.
Bluetooth services require a Bluetooth application on the remote device; services and
applications usually have coinciding names; i.e., there is a Bluetooth Fax Service and a
Bluetooth Fax Application.
The services supported by Bluetooth are:
l Bluetooth Serial Port—a wireless connection between two devices. This
connection can be used by applications as though a physical serial cable
connected the devices.
l Dial-up Networking—allows a device to use a modem that is physically at-
tached to another Bluetooth device.
l Fax—allows a device to send a fax using a remote Bluetooth cell phone,
modem, or computer.
l File Transfer—allows a device to perform file system operations on another
Bluetooth device; browse, open, copy, etc.
l Headset—allows a Bluetooth headset to be used as the audio input/output
mechanism for another Bluetooth device, such as a computer or cell phone.
l PIM Item Transfer—allows two Bluetooth devices to exchange Personal In-
formation Manager data such as business cards, calendar items, email
messages, and notes.
l PIM Synchronization—allows two Bluetooth devices to synchronize Per-
sonal Information Manager data.
l Network Access—allows a device to access a Local Area Network via a
second Bluetooth device that is physically connected to the network or allows a remote device to become part of an ad hoc network provided by the
Bluetooth server.
l Audio Gateway—allows the microphone/speakers on Bluetooth device
(typically a computer) to be used as the audio input/output mechanism for a
remote Bluetooth device, such as a cell phone.
All Bluetooth servers do not necessarily provide all of these services. For example,
network gateways may provide only the Network Access service.
19
Page 24

Broadband Router User Guide
only visible when My Bluetooth Places is
4.7 BLUETOOTH CONNECTION STATUS
The Bluetooth Connection Status dialog box displays information about the state of a
connection and provides a means to disconnect an active connection.
Display the Connection Status dialog box: in My Bluetooth Places, from the Folders
pane, select a device, and then, in the right pane of My Bluetooth Places, right-click a
service name and select Status from the shortcut menu.
The Information provided is:
l Status: “Connected” or “Not Connected”
l Device Name: the name of the device to which this computer is connected.
l Duration: the length of time that this connection has been established, dis-
played in hours, minutes and seconds. Depending on the service, the
connection may time out (automatically disconnect) after a specific period
of inactivity.
l Activity: the number of bytes sent and received over the connection.
l Signal Strength: a graphic indicator that ranges from Too Weak through
Good to Too Strong.
The Bluetooth menu is
?NOTE:
active.
NOTE: To change the power transmission level of this computer: from the Bluetooth Configuration Panel, Hardware tab, click the Advanced button, and then
change the setting in the Maximum Power Transmission drop-down list. The
Advanced button is not available in all countries.
The controls in the Bluetooth Connection Status dialog box are
l Properties button: displays the Bluetooth Properties dialog box for this
connection.
l Disconnect button: closes this connection.
l Close button: closes the Bluetooth Connection Status dialog box.
4.8 SEND TO BLUETOOTH
This feature is used to send information to another Bluetooth device. Data types include:
l Files from Windows Explorer
l Documents from Microsoft Office applications, including:
l Word
l Excel
l Access
l PowerPoint.
l Microsoft Outlook items, including:
20
Page 25

Appendix C - Specifications
l Contacts
l Appointments
l Tasks
l Messages
l Notes.
To use Send to Bluetooth
1. In the application:
a) Windows Explorer—select one or more files to be transferred. Folders
cannot be transferred.
b) Microsoft Office—only the document in the active window can be trans-
ferred.
c) Microsoft Outlook—select one or more items to be transferred.
2. From the application's File menu, select Send To, and then select Bluetooth from
the shortcut menu.
3. Select a device from the shortcut menu to send the data
or
Select Other..., choose a device from the list, and then click OK to
send the data.
21
Page 26

Broadband Router User Guide
ransfer
and the File Transfer services and can be configured from the
Properties page of either of those services. When the Bluetooth
Exchange Folder is re
-
configured for e
i
ther of these services, the
5
Chapter 5
Configure Bluetooth
5.1 ACCESS THE BLUETOOTH CONFIGURATION PANEL
The Bluetooth Configuration Panel provides access to settings for Bluetooth services,
client applications, hardware, security, discovery, accessibility, default paths, event
notification and other Bluetooth related items.
To Open the Bluetooth Configuration Panel
l From the Windows Control Panel, select Bluetooth Configuration
or
l In the Windows System Tray, right-click the Bluetooth icon, and select Ad-
vanced Configuration from the shortcut menu.
5.2 BLUETOOTH SERVICES VERSUS BLUETOOTH APPLICATIONS
Bluetooth Services are services that this computer provides to remote Bluetooth
devices.
The Bluetooth services on this computer are referred to collectively in the Bluetooth
configuration panel as “Local Services.”
Bluetooth Applications are software applications on this computer that allow this
computer to use the Bluetooth services that are provided by remote devices. The
Bluetooth applications on this computer are referred to collectively in the Bluetooth
configuration panel as “Client Applications.”
Bluetooth Services and Bluetooth Applications usually have coinciding names; e.g.,
there is a File Transfer service and a File Transfer client application.
How this computer provides a service to remote devices is configured on the Local
Services tab of the Bluetooth configuration panel.
How this computer uses a service that is provided by a remote device is configured on
the Client Applications tab of the Bluetooth configuration panel.
5.3 BLUETOOTH EXCHANGE FOLDER
This is the highest-level directory on this computer to which a remote Bluetooth device
has access.
Devices that have been granted access to this computer’s Bluetooth Exchange Folder
also have access to all sub-folders contained within that folder and all files in those
subfolders.
The Bluetooth Exchange Folder is shared by the PIM Item T
?NOTE:
22
Page 27

Appendix C - Specifications
ocal Services usually have coinciding
other service will be updated to use the new location.
5.4 GENERAL CONFIGURATION SETTINGS
General Configuration Settings
The settings on the General tab of the Bluetooth Configuration Panel determine information that is displayed to remote devices.
Identity
l Computer Name-enter a unique name to identify this computer to other
Bluetooth devices in the vicinity; this field cannot be left blank.
l Computer type-select either Desktop or Laptop from the shortcut menu to
set the type of icon remote devices will use to represent this computer.
5.5 BLUETOOTH APPLICATIONS
5.5.1 Overview
Some built-in Bluetooth applications provide full functionality for a specific task, such
as locating other Bluetooth devices or synchronizing two Personal Information Managers.
Other built-in Bluetooth applications provide a way for standard Windows applications
to accomplish their tasks wirelessly. For example, a Bluetooth application may create a
wireless serial connection between computers or provide wireless access to the Internet.
The difference between Bluetooth Applications and Bluetooth Services
l Bluetooth Applications are software programs on this computer that allow
this computer to use the Bluetooth services that are provided by other devices. In the Bluetooth configuration panel, these programs are referred to
collectively as “Client Applications.”
l Bluetooth Services are software programs on this computer that provide a
service to other devices. In the Bluetooth configuration panel, these programs are referred to collectively as “Local Services.”
?NOTE:
Client Applications and L
names; e.g., there is a Fax service and a Fax application.
5.5.2 General Configuration
All of the built-in Bluetooth applications allow you to rename the application and to
require a secure connection when using the application.
To access the configuration properties page for a built-in Bluetooth
Application
l In the Windows system tray, right-click the Bluetooth icon and select Ad-
vanced Configuration from the shortcut menu
23
Page 28

Broadband Router User Guide
Some HIDs have multiple modes. Before establishing a connection,
be sure the HID is in the desired mode. For example, in the case of
HID that can function as both a mouse and a laser pointer, be
that must be pressed before other Bluetooth devices can locate the
Read the documentation that accompanies the HID before you
or
l From the Windows control panel select Bluetooth Configuration
or
l From Windows Explorer, right-click Entire Bluetooth Neighborhood and se-
lect Properties from the shortcut menu.
In the Bluetooth configuration panel, Client Applications tab, highlight the application to
be configured, and then click Properties (or double-click the application).
5.5.3 Human Interface Device
Overview
The Human Interface Device (HID) Application allows this computer to wirelessly use
one or more remote Bluetooth HIDs as input/output devices.
For example, the HID Application allows this computer to use a Bluetooth keyboard
and a Bluetooth mouse.
Create a Bluetooth HID connection
?NOTE:
Open a connection to a Bluetooth Human Interface Device using one of these techniques:
l From My Bluetooth Places
l Using the Bluetooth Setup Wizard
Once an HID connection is established, that connection will persist. If the computer is
shut down, when the computer is turned on again the connection will re-establish
automatically.
?NOTE:
an
sure the mode switch is set to “Mouse” before attempting to con-
nect.
HIDs usually have a button, which is sometimes difficult to find,
HID. Even after the button is pressed, the HID can only be discovered for a limited time, and then the button must be pressed again.
The time period can be as short as 30 seconds or as long as 180
seconds.
attempt to connect to the device.
Close an HID connection
24
Page 29

Appendix C - Specifications
Under normal circumstances, there is no reason to close an HID connection; once
established the connection is maintained automatically, even during the power off and
power on processes.
If, for some reason, the connection must be closed: from My Bluetooth Places, rightclick the service name and select Disconnect.
When an HID connection is closed manually by the operator, the connection’s
“persistence” is broken. The connection must be re-established manually, after which
the connection will again persist until broken manually.
Configure
No configuration is necessary.
5.5.4 Audio Gateway
Overview
The Audio Gateway Application allows a remote Bluetooth device to use this computer’s microphone and speakers as the remote device’s audio input and output
devices.
Create a Bluetooth Audio Gateway connection
Open a connection to the Audio Gateway service that is provided by another Bluetooth
device using one of these techniques:
l Windows system tray, Bluetooth icon
l From My Bluetooth Places
l Using the Bluetooth Setup Wizard
Close an audio gateway connection:
If the connection was established via the Bluetooth icon in the Windows system tray;
click the Bluetooth icon, select Quick Connect, Audio Gateway and then select the
device that is providing the service (active connections have a checkmark in front of
them).
or
No matter how the connection was created, in My Bluetooth Places, right-click the
service name and select Disconnect.
Configure
The Bluetooth Configuration Panel > Client Applications > Audio Gateway > General
tab provides options to configure:
l The application name—to change it, highlight the existing name and enter
the new name.
l Enable or disable secure connection. To enable secure connection, place a
checkmark in the box.
5.5.5 Bluetooth Serial Port
Overview
25
Page 30

Broadband Router User Guide
the
The Bluetooth Serial Port application allows this computer to establish a wireless serial
connection with a remote Bluetooth device.
The applications on both this computer and the remote device must be configured to
send and receive data to and from the respective communications port (COM port)
assigned to the Bluetooth serial port. The wireless serial connection may then be used
by the applications as though a physical serial cable connected the devices.
Create a Bluetooth Serial Port connection
Establish a connection using one of these techniques
l Windows system tray, Bluetooth icon
l From My Bluetooth Places
l Using the Bluetooth Setup Wizard
Close a Bluetooth Serial Port connection
l If the connection was established via the Bluetooth icon in the Windows
system tray; click the Bluetooth icon, select Quick Connect, Bluetooth Serial
Port and then select the device that is providing the service (active connections have a checkmark in front of them).
or
l No matter how the connection was created, In My Bluetooth Places, right-
click the service name and select Disconnect.
Configure
The Bluetooth Configuration Panel > Client Applications > Bluetooth Serial Port >
General tab provides options to configure:
l The application name—to change it, highlight the existing name and enter
the new name.
l Enable or disable secure connection. To enable secure connection, place a
checkmark in the box.
l The communications port (COM port) to be used.
Unless you have a specific reason to do so, DO NOT CHANGE
?NOTE:
default COM Port setting.
5.5.6 Dial-up Networking
Overview
The Bluetooth Dial-up Networking application allows this computer to use a modem
that is physically connected to a remote device to access the Internet, log on to a
remote network.
Open a connection to the Dial-up Networking service that is provided by another
Bluetooth device using one of these techniques:
l Windows system tray, Bluetooth icon
l From My Bluetooth Places
l Using the Bluetooth Setup Wizard
26
Page 31

Appendix C - Specifications
the
After the Bluetooth dial-up networking connection is established it can be used the
same way as any other networking connection. For example, you can open a browser
and explore the World Wide Web, if the remote computer has Internet access.
Close a Dial-up Networking connection
l If the connection was established via the Bluetooth icon in the Windows
system tray; click the Bluetooth icon, select Quick Connect, Dial-up Networking and then select the device that is providing the service (active
connections have a checkmark in front of them).
or
l No matter how the connection was created, In My Bluetooth Places, right-
click the service name and select Disconnect.
Configure
The Bluetooth Configuration Panel > Client Applications > Dial-up Networking > General tab provides options to configure:
l The application name—to change it, highlight the existing name and enter
the new name.
l Enable or disable secure connection. To enable secure connection, place a
checkmark in the box.
l The Bluetooth virtual device to be used.
Unless you have a specific reason to do so, DO NOT CHANGE
?NOTE:
default Bluetooth device or alter the device's configuration.
5.5.7 Fax
Overview
The Bluetooth Fax service allows this computer to send a fax using a Fax/Modem that
is physically connected to a remote device.
To Send a Fax
1. Open a connection to the Fax service that is provided by another Bluetooth device,
using one of these techniques:
l Windows system tray, Bluetooth icon
l From My Bluetooth Places
l Using the Bluetooth Setup Wizard
2. Open or create the document to be faxed and select the “Print,” “Send to Fax
Recipient” or similar command that is available in most applications.
Close a Fax Connection
Fax connections close automatically when the Fax transmission is complete.
Configure
The Bluetooth Configuration Panel > Client Applications > Fax > General tab provides
options to configure:
l The application name—to change it, highlight the existing name and enter
the new name.
27
Page 32

Broadband Router User Guide
Most Bluetooth headsets “ring” when a connection is attempted;
answer the ring to complete the connection and begin using the
l Enable or disable secure connection. To enable secure connection, place a
checkmark in the box.
5.5.8 Headset
Overview
The Headset application allows this computer to use a Bluetooth headset (or any other
device that offers the Bluetooth headset service) as the audio input and output device
for this computer.
Possible uses include:
l If this computer has on-board telephone hardware, a Bluetooth headset
might be used as the audio input/output device to make/receive telephone
calls.
l If this computer has voice recognition capabilities, a Bluetooth headset
might be used as the audio input device.
Any other scenario that requires audio input/output can potentially take advantage of a
Bluetooth headset to replace a hardwired microphone and/or speakers.
?NOTE:
Windows 98 limitation— please check 7.11 for more info.
Create a Headset connection
Establish a connection using one of these techniques:
l Windows system tray, Bluetooth icon
l From My Bluetooth Places
l Using the Bluetooth Setup Wizard
?NOTE:
headset as the audio input/output device for this computer.
Close a Headset connection
l If the connection was established via the Bluetooth icon in the Windows
system tray; click the Bluetooth icon, select Quick Connect, Headset and
then select the device that is providing the service (active connections have
a checkmark in front of them).
or
l No matter how the connection was created, in My Bluetooth Places, right-
click the service name and select Disconnect.
Configure
The Bluetooth Configuration Panel > Client Applications > Headset > General tab
provides options to configure:
l The application name—to change it, highlight the existing name and enter
the new name.
28
Page 33

Appendix C - Specifications
l Enable or disable secure connection. To enable secure connection, place a
checkmark in the box.
5.5.9 File Transfer
Overview
The Bluetooth File Transfer application allows this computer to perform file operations
on the Bluetooth Exchange Folder (and the folders and files it contains) of a remote
device.
Copy to/from a remote device
In the Folders pane of Windows Explorer, from the Entire Bluetooth Neighborhood
branch, select a device and expand that branch to view the Bluetooth Exchange Folder
of the remote device.
?NOTE:
ured to allow remote file operations.
Use drag-and-drop to copy any file or folder contained in the Public Folder of the
remote device to the desired folder on this computer.
You can also drag-and-drop files or folders from this computer to the Public Folder
(and its sub-folders) of the remote device.
Other file operations
Right-click a file or folder in the remote device’s Public Folder for a context sensitive
menu. All potential menu options may not be available at all times.
Potential menu options include:
If “Public Folder” is not available, the remote device is not config-
l Open—opens the selected file on this computer, using the default applica-
tion for this type of file.
l Print—sends the selected file to this computer’s default printer.
l Send To
l 3 ½ floppy (A)—the 3 ½ inch floppy drive on this computer
l Bluetooth Exchange Folder—the Bluetooth Exchange Folder on this com-
puter.
l Rename—applies only to empty folders; file names and the names of fold-
ers that contain objects cannot be changed using this technique.
l Cut, Copy, Paste, Delete, Refresh, View & New—standard Windows func-
tions.
Configure
The Bluetooth Configuration Panel > Client Applications > File Transfer > General tab
provides options to configure:
l The application name—to change it, highlight the existing name and enter
the new name.
l Enable or disable secure connection. To enable secure connection, place a
checkmark in the box.
29
Page 34

Broadband Router User Guide
5.5.10 Network Access
Overview
The Bluetooth Network Access application makes it possible for this computer:
l To connect to a Local Area Network via a physical connection on a remote
Bluetooth device.
or
l To connect to an ad hoc network provided by a remote Bluetooth device.
The type of network connection that is available is determined by the configuration of
the remote Bluetooth device.
Create a Network Access connection
Establish a connection using one of these techniques
l Windows system tray, Bluetooth icon
l From My Bluetooth Places
l Using the Bluetooth Setup Wizard
Close a Network Access connection
l If the connection was established via the Bluetooth icon in the Windows
system tray; click the Bluetooth icon, select Quick Connect, Network Access and then select the device that is providing the service (active
connections have a checkmark in front of them).
or
l No matter how the connection was created, In My Bluetooth Places, right-
click the service name and select Disconnect.
Configure
The Bluetooth Configuration Panel > Client Applications > Network Access > General
tab provides options to configure:
l The application name—to change it, highlight the existing name and enter
the new name.
l Enable or disable secure connection. To enable secure connection, place a
checkmark in the box.
5.5.11 PIM Synchronization
Overview
The PIM Synchronization Application is used to synchronize the Personal Information
Manager (PIM) database of this computer with the PIM database of a remote Bluetooth device.
The supported PIMs are:
l Microsoft Outlook
l Microsoft Outlook Express
l Lotus Notes.
The supported data types are:
30
Page 35

Appendix C - Specifications
If synchronization is enabled for a specific item type, but is not
abled for that item type on the remote device, synchronization
All choices are not available for all items. For example, “Note”
ook, therefore
press do not appear as options in the
l Business cards
l Calendar items
l Email (with or without attachments)
l Notes.
Configure PIM Synchronization
The Bluetooth Configuration Panel > Client Applications > PIM Synchronization >
General tab provides options to configure:
l The application name—to change it, highlight the existing name and
enter the new name.
l Enable or disable secure connection. To enable secure connection,
place a checkmark in the box.
l The PIM items to be synchronized and the PIM on this computer
with which those items should be synced.
?NOTE:
en
WILL NOT take place for that item.
l The data item types which can be synchronized are:
l Business cards
l Calendar items
l Email (with or without attachments-see below)
l Notes
Possible synchronization options for each of these data item types include:
l Do Not Synchronize-this item type will not be synchronized
l Synchronize Microsoft Outlook-this item type will be synced with its matching
entry in Microsoft Outlook, regardless of the PIM that contains this entry on the
remote device. If a matching Outlook entry does not exist, it will be created
l Synchronize Outlook-Express-this item type will be synced with its matching
entry in Express, regardless of the PIM that contains this entry on the remote device. If a matching Express entry does not exist, it will be created
l Synchronize Lotus Notes-this item type will be synced with its matching entry in
Lotus Notes, regardless of the PIM that contains this entry on the remote device.
If a matching Notes entry does not exist, it will be created.
items can only be synchronized in Microsoft Outl
Lotus Notes and Outlook Ex
?NOTE:
“Notes” item shortcut menu.
Personal Information Managers that are not installed on this com-
puter do not appear as options in the shortcut menus.
l Email attachments. The only option is include or do not include attach-
ments with email that is sent or received on this computer using this
service.
31
Page 36

Broadband Router User Guide
5.5.12 PIM Item Transfer
Overview
The Bluetooth PIM Item Transfer application allows this computer to send and receive
Personal Information Manager items to-and-from a remote Bluetooth device. Item
transfer can be accomplished several ways:
To send, receive or exchange business cards:
1. From Windows Explorer, My Bluetooth Places, right-click the PIM Item Transfer
service on a remote device and select the appropriate option.
or
In the Windows system tray, right-click the Bluetooth icon, select Quick Connect
> Business Card Exchange, select a device from the list, select the appropriate
option from the shortcut menu, and then click OK.
2. From Windows Explorer, My Bluetooth Places, highlight the PIM Item Transfer
service on a remote device, and then, from the Bluetooth menu on the Windows
menu bar, select the appropriate action.
In addition to the business card options listed above, you can also send Notes
(*.vnt), Email (*.vmg) and Calendar (*.vcs) items from this menu.
3. From within a supported Personal Information Manager, select one or more items
and then, from the PIM's File menu, select Send to Bluetooth.
Whether sent items are accepted by the remote device is determined by how the
remote device's PIM Item Transfer service is configured.
Close a PIM Item Transfer Connection
This application closes the open connection automatically when its task is complete.
Configure PIM Item Transfer
The Bluetooth Configuration Panel > Client Applications > PIM Item Transfer > General tab provides options to configure:
l The application name—to change it, highlight the existing name and en-
ter the new name.
l Enable or disable secure connection. To enable secure connection,
place a checkmark in the box.
l How your business card is handled when it is requested by a remote de-
vice. The Send My Business Card options are:
Choose a business card as needed-each time a remote device requests your business card you must select a card from your PIM. If you ignore the request the remote
device will receive a timeout notice.
Always send the same business card-when this option is selected a dialog appears
that allows you to set a default business card, which will be sent automatically when
requests are received.
l Where to store received business cards. The Received Business Cards
options are:
l Microsoft Outlook
l Outlook Express
l Lotus Notes
32
Page 37

Appendix C - Specifications
business card
option on this computer is configured to “Do Not Accept,” the PIM
will still accept business cards that the
The selected Received Business Cards option does not influence
the settings on other PIM-related property pages.
For example, even if the PIM Item Transfer service
?NOTE:
Item Transfer application
application has specifically requested via its “Receive” or “Ex-
change” functions.
l Email attachments. The only option is include or do not include attach-
ments with email that is sent or received on this computer using this
service.
5.5.13 Printer
Overview
The Bluetooth Printer application allows this computer to use a Bluetooth printer.
Once a Bluetooth printer has been properly installed, it can be used from this computer
in the same way as any other printer would be.
Configure
The Bluetooth Configuration Panel > Client Applications > Printer > General tab provides options to configure:
l The application name—to change it, highlight the existing name and enter
the new name.
l Enable or disable secure connection. To enable secure connection, place
a checkmark in the box.
Install a Bluetooth Printer
Option One:
1. Perform a search for devices and then, from Entire Bluetooth Neighborhood, rightclick a Bluetooth printer, select Add Printer from the shortcut menu and follow the
on-screen instructions.
2. When the wizard asks you to select a printer make and model, do so. If your
printer is not in the list of options, click Have Disk…, insert the driver disk for the
printer, and then navigate to the drive and directory that contains the driver initiation file (*.inf) for the printer.
3. To complete the installation, follow the on-screen instructions.
Option Two:
1. From the Windows Control Panel, select Printers > Add Printer > Next > Local
printer > Next
2. On the Select the Printer Port screen of the wizard:
a) Select Create a new port
b) In the Type shortcut menu, select Bluetooth Printer Port, and then click Next
3. On the next screen, select the printer by name, and then click Connect.
4. Install the driver: when asked to select a printer make and model, do so. If your
33
Page 38

Broadband Router User Guide
printer is not in the list of options, click Have Disk…, insert the driver disk for the
printer, and then navigate to the drive and directory that contain the driver initiation
file (*.inf) for the printer.
5. To complete the installation, follow the on-screen instructions.
Delete a printer:
Click Start > Settings > Printers, right-click the printer to be deleted, and then select
Delete from the shortcut menu.
Or
In Entire Bluetooth Neighborhood, right-click an installed Bluetooth printer and select
Delete Printer from the shortcut menu.
5.6 BLUETOOTH SERVICES
Common Configuration Settings
These properties can be set individually for each Bluetooth service:
l Service Name-the default name of each service can be changed.
l Secure Connection-requires that remote devices provide proof of identity
and that all data be encrypted.
l Startup Automatically-starts the service automatically when Bluetooth is
started.
l Notifications-provides visual and/or audio notification that a remote de-
vice is attempting to connect (or has connected) to a service on this
computer.
5.6.1 Notifications
Overview
There are three types of notification:
l Authentication request, also called a PIN code request—this notification ap-
pears automatically in a balloon over the Windows system tray if a Personal
Identification Code is required before a connection can proceed. An audio
file can also be associated with the notification.
l Authorization request, also called a connection request—this type of notifi-
cation can be visual, audio, or both. It notifies you of attempts to access a
Bluetooth service on this computer; the connection will not proceed until you
click the balloon that appears over the Windows system tray. If the notification balloon is ignored, the connection request will time out and fail.
l Notification only—this type of notification does not effect access in any way;
it is solely for information purposes to let you know that a connection has
been established.
Example
Both Authentication and Authorization request notifications are controlled by whether
Secure Connection is enabled for an individual service.
An example of how notifications might work when a remote device attempts to access
a service on this computer, if all notifications are enabled:
34
Page 39

Appendix C - Specifications
1. Authentication: a balloon notification (audio optional) appears to prompt for a PIN
code. If the PIN code does not match the code entered on the remote device, the
connection will not be allowed. Once the remote device has been authenticated
this notification will not appear again, unless the paired relationship is broken and
the devices must re-pair.
2. Authorization: a balloon notification appears and/or a sound file provides audio
notification that a remote device is attempting to access a Bluetooth service on this
computer. Click the balloon to proceed. A dialog box appears that offers the option
of letting the connection proceed this time only or to always allow this particular
remote device to use the service it is attempting to access.
3. Once a connection has been authorized, an additional visual and/or audio notification may appear (if enabled). This notification is for information only to inform the
operator that a connection has been established.
After two devices are paired (step 1, above), the authentication notification will no
longer appear when a connection is attempted.
If “Always allow…” is enabled during the authorization process (step 2, above), the
authorization notification will not appear on future connection attempts.
Connection notification (step 3, above) only happens if it has been enabled on the
Notifications tab of the individual service being accessed.
Service Access Notification
“Notifications” lets you associate a sound (Windows *.wav file) and/or a visual indication with access attempts by remote devices.
A different notification sound can be associated with each local Bluetooth service.
Associate a sound with service access
From the Bluetooth Configuration Panel, Local Services tab:
1. Double-click a service name and then select the Notifications tab.
2. Check the desired options; visual and sound may both be selected for a single
event.
3. Choose a sound; click the Browse button and navigate to the sound file (*.wav) to
be used for notification. To preview the sound file, click the play ( ) button.
4. Click OK to close the service's property dialog box.
5.6.2 Audio Gateway
The Bluetooth Audio Gateway service allows this computer to use a remote Bluetooth
device’s microphone and speakers as this computer’s input and output devices.
For example, if this computer has voice recognition capabilities, a Bluetooth headset
might be used as the audio input device.
Hardware Requirements
l The Bluetooth radio on both this computer and the remote device must support
audio.
l The remote device handles both audio input and output for this computer;
therefore, this computer does not require a sound card, microphone, or speak-
35
Page 40

Broadband Router User Guide
The Delete button is only available when a Bluetooth Serial Port is
ers.
Configure the Audio Gateway Service
From the Windows system tray, right-click the Bluetooth icon, select Advanced Configuration > Local Services, and then double-click the Audio Gateway service.
Set the common configuration properties of the service, and then click OK.
5.6.3 Bluetooth Serial Port
The Bluetooth Serial Port service allows a remote Bluetooth device to establish a
wireless serial connection with this computer. The wireless serial connection may be
used by applications as though a physical serial cable connected the devices.
To establish a Bluetooth Serial Port connection
The connection must be initiated from the remote device by the Bluetooth Serial Port
application.
Determine the communications port being used by this computer for the Bluetooth
Serial Port
In the Windows system tray, right-click the Bluetooth icon, select Advanced Configuration, and then the Local Services tab. The COM port assigned to this service is the last
item in the Bluetooth Serial Port service row. Configure the application on this computer that will use this service to send its data to this COM.
Add a Bluetooth Serial Port
The Bluetooth Serial Port service has one pre-configured Bluetooth Serial Port, but
additional Bluetooth Serial Ports can be added as needed.
To add a port
1. From the Bluetooth Configuration Panel, Local Services tab, click Add Serial
Service.
2. In the properties dialog box, modify the properties:
3. Enter a unique name (less than 99 alphanumeric characters).
4. Select secure connection, if desired.
5. Select Startup Automatically, if desired
6. From the COM Port shortcut menu select a communications port that is not assigned to any other service.
7. Click OK.
To remove a Bluetooth Serial Port
From the Bluetooth Configuration Panel, Local Services tab, select the port to be
removed and then click Delete.
?NOTE:
selected.
36
Page 41

Appendix C - Specifications
5.6.4 Dial-up Networking Service
The Bluetooth Dial-up Networking service makes it possible for a remote Bluetooth
device to use a modem that is physically connected to this computer. The remote
device can then access the Internet or log on to a remote network.
Configure the Dial-up Networking service:
From the Windows system tray, right-click the Bluetooth icon, select Advanced Configuration > Local Services, and then double-click the Dial-up Networking service.
l Select the physical modem to be used from the Modems: shortcut menu.
l Set the common configuration properties of the service, and then click OK.
5.6.5 Fax Service
The Fax service allows a remote Bluetooth device to send a Fax via a modem that is
physically attached to this computer.
Configure the Fax service:
From the Windows system tray, right-click the Bluetooth icon, select Advanced Configuration > Local Services, and then double-click the Fax service.
l Select the physical modem to be used from the Modems: shortcut menu.
l Set the common configuration properties of the service, and then click OK.
5.6.6 File Transfer Service
Overview
The File Transfer service allows this computer to perform file operations on the Bluetooth Exchange Folder (and the folders and files it contains) of a remote device.
Basic setup procedure Right-click the Bluetooth icon and select Explore My Bluetooth
Places.
Configure Windows Explorer so that the Folders pane is visible (View > Explorer Bar >
Folders).
In the Folders pane, select Entire Bluetooth Neighborhood and then, on the menu bar,
select Bluetooth > Search For Devices.
In the Folders pane, expand Entire Bluetooth Neighborhood to show the devices in the
vicinity.
Copy to/from a remote device In the Folders pane of Windows Explorer, from the
Entire Bluetooth Neighborhood branch, select a device and expand that branch to view
the Bluetooth Exchange Folder of the remote device.
?NOTE:
“Public Folder” is not available, the remote device is not config-
ured to allow remote file operations.
Use drag-and-drop to copy any file or folder contained in the Public Folder of the
remote device to the desired folder on this computer.
37
Page 42

Broadband Router User Guide
You can also drag-and-drop files or folders from this computer to the Public Folder
(and its sub-folders) of the remote device.
Other file operations
Right-click a file or folder in the remote device’s Public Folder for a context sensitive
menu. All potential menu options may not be available at all times.
Potential menu options include:
l Open—opens the selected file on this computer, using the default applica-
tion for this type of file.
l Print—sends the selected file to this computer’s default printer.
l Send To
l 3 ½ floppy (A)—the 3 ½ inch floppy drive on this computer
l Public Folder on My Device—the Public Folder on this computer.
l Rename—applies only to empty folders; file names and the names of fold-
ers that contain objects cannot be changed using this technique.
l Cut, Copy, Paste, Delete, Refresh, View & New—standard Windows func-
tions.
5.6.7 Headset Service
The Bluetooth Headset Service allows this computer to provide audio input/output for
remote Bluetooth devices.
For example, if the remote device is a Bluetooth telephone, this computer’s micro-
phone and speakers can be used as speakerphone input and output for that device.
?NOTE:
Hardware Requirements
l This computer must have a sound card, microphone, and speakers in-
l The Bluetooth radio on both on this computer and the remote device must
Configure the Headset Service
l From the Windows system tray, right-click the Bluetooth icon, select Ad-
l Set the common configuration properties of the service, and then click OK.
Windows 98 limitation— please check section 7.11 for more info.
stalled.
support audio.
vanced Configuration > Local Services, and then double-click the Headset
service.
5.6.8 Network Access
The Bluetooth Network Access service makes it possible for a remote Bluetooth device to access a Local Area Network that is physically attached to this computer or
allows a remote device to become part of an ad hoc network provided by this computer.
38
Page 43

Appendix C - Specifications
Install and configure the routing software as instructed by the
After this computer has been configured to provide the Network Access service to
other Bluetooth devices, it will not be able to use the Bluetooth Network Access service
provided by another Bluetooth device without being re-configured. Put another way,
this computer cannot be both a Bluetooth Network Access server and a Bluetooth
Network Access client at the same time.
5.6.8.1 Setup for Windows 98SE & Windows Me
Internet Protocol routing software is required on Windows 98SE
and Windows Me servers.
?NOTE:
software's manufacturer.
Configure the server:
1. From the Windows Control Panel, double-click the Network icon.
2. On the Configuration tab, select TCP/IP-> Bluetooth LAN Access Server Driver
(scroll down if necessary).
3. Click Properties and select the IP Address tab.
a) Select Specify an IP address
b) Enter an IP Address (suggested value—192.168.1.1)
c) Enter a Subnet Mask (suggested value—255.255.255.0)
4. Click OK twice to close the dialog boxes and then click YES to restart the computer.
5.6.8.2 Setup for Windows 2000 and Windows XP
If Internet Connection sharing was previously enabled (before BTW was installed) it
must be disabled and then re-enabled before the Bluetooth network adapter can use it.
Please find section 7.8 for more information.
Configure for Network Access:
1. From the Windows system tray, right-click the Bluetooth icon and select Advanced
Configuration from the shortcut menu.
2. In the Bluetooth configuration panel, select the Local Services tab, Network Ac-
cess and then click Properties....
3. From the Network Access, General properties page, in the Type of service shortcut menu, select “Allow other devices to access the Internet/LAN via this
computer,” and then click Configure Connection Sharing.
4. Right-click Local Area Connection, select Properties and then select the Sharing
tab.
5. Select Enable Internet Connection Sharing for this connection, click OK, and then
click YES in the confirmation dialog box.
5.6.8.3 Configure for Group Ad Hoc Networking:
1. From the Windows system tray, right-click the Bluetooth icon and select Advanced
39
Page 44

Broadband Router User Guide
PIMs which are not installed on this computer will not appear in
Previously sent business card additions to the menu are limited to
Configuration from the shortcut menu.
2. In the Bluetooth configuration panel, select the Local Services tab, Network Ac-
cess and then click Properties....
3. From the Network Access, General properties page, in the Type of service shortcut menu, select “Allow other devices to create a private network with this
computer.”
4. Click OK.
5.6.9 PIM Item Transfer
Overview
The PIM Item Transfer service allows Personal Information Manager items to be
transferred between this computer and a remote Bluetooth device.
Four data types are supported:
l Business Cards
l Calendar Items
l Email Messages
l Notes
Each data type can be saved in any of the supported and installed PIMs.
?NOTE:
When the PIM that is associated with an individual data type is changed on the PIM
Item Transfer page, that data type is also changed for the PIM Synchronization service.
the shortcut menus.
Configure
In addition to the configuration options common to all Bluetooth services, this service
also has settings that determine:
l How business card requests are handled. The options are:
l Never send my business card—ignore the request
l Choose a business card as needed—when prompted, select a
business card to be sent to the requester.
l Always send the same business card—when a request is received
always send the same business card. When this option is selected,
a dialog box appears from within which an installed Personal Information Manager (if more than one is installed on this computer) and
an existing business card can be selected.
l Previously sent business cards—once a card is selected using the
“Always send the same business card” option, above, that card will
be added to the shortcut menu as an option.
?NOTE:
ten, after which the oldest contact will be replaced.
40
Page 45

Appendix C - Specifications
bound items. If this folder is reconfigured here, it will also be
A new default business card must be selected from the database of
Once a card is highlighted, if you “hover” the mouse pointer over
that selection, a balloon appears with additional information about
l Where to store inbound data items, on an individual basis. Options include
(not all options apply to all items):
l Do Not Accept
l Any of the installed PIMs on this computer
l Save to Folder
l The Bluetooth Exchange Folder location—the directory on this computer
where inbound items that are not to be saved in a PIM will be kept.
This is also the folder where the File Transfer service stores in-
?NOTE:
reconfigured in that service automatically.
l Whether to send/receive attachments with email. Check or clear this op-
tion, as appropriate.
Close a PIM Item Transfer connection
PIM Item Transfer connections close automatically when the data transfer is complete.
Default Business Card Selection
When the “Always send the same business card” option is selected, a dialog box
appears to allow the selection of a default business card.
The first time the dialog box appears it provides a way to choose the Personal Information Manager that stores the default business card. Click the down-arrow in the PIM
shortcut menu and select the PIM to be used.
On subsequent appearances of this dialog box, the PIM selection option is not available.
Change the selected PIM
On the PIM Item Transfer properties page, “Received items” section, there is a Busi-
ness Cards shortcut menu. When a PIM was selected during initial setup the selected
item in this menu was set to the same PIM. To change the PIM used for the default
business card, open this shortcut menu and select a new PIM.
?NOTE:
the newly selected PIM.
Choose a default business card
1. In the Select a Bluetooth Business Card dialog box that appears when “Always
send the same business card” is selected, highlight the card.
?NOTE:
that contact.
41
Page 46

Broadband Router User Guide
In addition to the default menu options, the shortcut menu can
M
base (this is configured in the PIM Item Transfer service);
otherwise, that data type will not be available for selection (it will
Only Outlook’s default contacts folder is synchronized. Items in
folders are not synchronized. Items that are moved from the
en deleted the
1. Click OK to choose a highlighted business card and return to the PIM Item Trans-
fer Properties page. The chosen contact now appears in, and is selected in, the
“Business card requests” shortcut menu.
If the “Always send the same business card” option is selected again, and a different contact chosen, the properties page will display both contacts in the shortcut
menu.
?NOTE:
hold up to ten contact names.
5.6.10 PIM Synchronization
The PIM Synchronization service can be used by a remote device to synchronize its
Personal Information Manager (PIM) database with the PIM database of this computer.
Four data types are supported:
l Business cards
l Calendar items
l Email messages
l Notes.
Whether an individual item is accepted and where it is stored, when accepted, is
configured in the PIM Item Transfer service. If that service is not configured to store a
particular data type in Outlook, then that data type cannot be synchronized.
Data types that will be synchronized must be saved in the PI
data
?NOTE:
be grayed out) in the PIM Synchronization configuration settings.
Microsoft Outlook permits duplicate entries, so all duplicates may not be exchanged in
the synchronization process.
?NOTE:
subdefault folder to a sub-folder will appear to have be
next time synchronization takes place.
5.7 HARDWARE SETTINGS
The Hardware tab of the Bluetooth Configuration Panel provides basic information
about the Bluetooth hardware installed on this computer and access to the Advanced
Settings dialog box, if required:
l Devices:
l Name: the name of the device, e.g., WIDCOMM Bluetooth Device
l Type: the type of device, e.g., USB.
l Device Properties:
42
Page 47

Appendix C - Specifications
Depending on the country in which the hardware is sold and/or in
l Device status: indicates that the device is operating properly or that
there is a problem/conflict.
l Manufacturer: the name of the company that manufactured the de-
vice selected in the Devices section of this dialog box.
l Firmware Revision: the manufacturer's firmware version number.
l Device Address: the Bluetooth Device Address (BDA or BD_Addr)
assigned to this device when it was manufactured.
l HCI Version: the version number of the Bluetooth Specification that
the
l Host Controller Interface complies with.
l HCI Revision: the revision number of the Bluetooth Specification that
the
l Host Controller Interface complies with.
l LMP Version: the version number of the Bluetooth Specification that
the
l Link Manager Protocol complies with.
l LMP Sub Version: the sub-version number of the Bluetooth Specifi-
cation that the Link Manager Protocol complies with.
l The Advanced button: displays the Advanced Settings dialog box, which al-
lows you to select the country code and transmission power settings. This
option is not available on all systems.
5.7.1 Advanced Settings
When available, this dialog box is reached from the Hardware tab of the Bluetooth
Configuration Panel.
?NOTE:
From this dialog box you can set the:
l Country Code:
l Maximum Transmission Power:
Click Apply to implement the changes. A dialog box appears with notification that the
Bluetooth device attached to this computer must be reset before the change(s) will
take effect.
which it will be used, the Advanced button may not be present.
l North America, Europe (except France), and Japan
l France and China
l High
l Medium
l Low.
Click Yes to reset the Bluetooth device now—all open Bluetooth connections will be
closed.
43
Page 48

Broadband Router User Guide
FT + click and/or CTRL
Click No to save the changes—the changes will be applied the next time the Bluetooth
device is reset or restarted.
5.8 ACCESSIBILITY SETTINGS
The Accessibility tab of the Bluetooth Configuration Panel lets you specify whether
remote devices may access this computer, which remote devices have access, and
whether an audio warning is played when a Personal Identification Number (PIN code)
is required.
Allow other devices to discover this computer
Select “Let other Bluetooth devices discover this computer” to permit remote Bluetooth
devices to find and report this computer.
If “Allow No devices” (below) is selected, this option is not available.
Control the types of devices that are allowed to connect to this computer
From the “Devices allowed to connect to this computer” shortcut-menu, select:
l No devices—no remote devices are permitted to initiate a connection with this
computer. However, this computer can still initiate connections with remote
Bluetooth devices.
l All devices—all remote devices are permitted to connect to this computer.
Connections are subject to additional security restrictions, such as authentication and authorization, that may be required by the individual services provided
by this computer.
l Only paired devices—only devices that have been paired with this computer
are allowed to connect to it.
l Only devices listed below—only the listed devices are allowed to connect to
this computer (see Accessibility, adding and deleting devices).
Choose an audio notification file
When Secure Connection is enabled for any of the Bluetooth Services on this computer a PIN code is required before that service can be accessed. To chose a
notification sound that will play when a remote device attempts to access a service that
requires a secure connection, click Select audio file... and select the sound (*.wav) file
to be played.
Limit access to this computer to specific remote devices
From the Bluetooth Configuration Panel, Accessibility tab, in the Allow shortcut menu,
select “Only devices listed below”.
Add a device to the list
1. Click Add Device
2. In the Devices with access... dialog box select the desired device(s) and click OK.
?NOTE:
Delete a device from the list
Multiple devices may be selected using SHI
+ click.
44
Page 49

Appendix C - Specifications
itial
matic search for devices even if “Look for other Bluetooth
In the list of devices allowed to access this computer, select the device to be removed
from the list, and then click Delete.
5.9 DISCOVERY SETTINGS
The settings on the Discovery tab of the Bluetooth Configuration Panel determine
whether this computer looks for other Bluetooth devices automatically, how often it
looks and what type of devices it looks for.
Periodic Search for Devices
When “Look for other Bluetooth devices” is selected, Bluetooth automatically searches
for devices every X minutes. X is an whole number between 1 and 60. To change the
time between auto inquiries, highlight the existing time and enter the new time.
When My Bluetooth Places is first opened it performs an in
?NOTE:
Determine the devices that will be reported
auto
devices” is not enabled.
Bluetooth can screen out devices that you do not need access to.
The options are:
l Report all Bluetooth devices
l Report only selected Bluetooth devices (see Discovery, Adding Specific De-
vices and Discovery, Deleting Specific Devices).
l Select the desired option from the drop-down list.
Discover Specific Devices
The type of device(s) that this computer looks for and reports when it is searching for
other Bluetooth devices can be limited.
Limit the remote devices reported Bluetooth can report only specific devices, specific
class(es) of device(s), or specific type(s) of device(s) within a class.
l Specific devices: an individual computer or Bluetooth cellular telephone are
examples of specific devices.
l Specific class of device: “computer” is an example of a class of devices
l Specific type of device within a class: “laptop” is an example of a specific
type of device within the “computer” class of devices.
The devices to be discovered can be mixed-and-matched; you can discover one or
more specific devices, classes of devices and types of devices within a class at the
same time.
Remove a device from the list of devices to be discovered
In the Bluetooth Configuration Panel, from the Discovery tab, select the device to be
removed and click the Delete button.
45
Page 50

Broadband Router User Guide
If “Report only selected Bluetooth devices” is not selected the
?NOTE:
Temporarily override the discovery of specific devices
In the Bluetooth Configuration Panel, from the Discovery tab, select “Report all Bluetooth devices.” The specifically selected devices will be discovered along with all other
devices.
To re-enable specific device discovery re-select “Report only selected Bluetooth devices.”
?NOTE:
Delete button will not be available.
When all devices are deleted an error message will appear if “Re-
port all Bluetooth devices” is not selected.
46
Page 51

Appendix C - Specifications
6
Chapter 6
Security
6.1 AUTHENTICATION
Authentication is used to verify identity; it requires a passkey or link key from the
remote device. When a remote device attempts access, a visual and/or audio warning
notifies the local operator.
If the notification is ignored, access is denied after a preset timeout.
When devices are “paired,” those devices automatically exchange a link key and
Authentication is carried out without operator intervention.
6.2 AUTHORIZATION
Authorization is Yes-or-No security that requires operator intervention to avoid having
the connection time out and fail.
Authorization is limited to:
l Yes, you may connect (click the balloon to proceed)
l No, you may not connect (ignore the balloon prompt and the connection will
fail).
6.3 BLUETOOTH DEVICE IDENTITY
Every Bluetooth device has a unique Bluetooth Device Address (BDA) assigned to it
during the manufacturing process. This address cannot be changed by the end-user.
A device’s BDA is usually displayed in hexadecimal format; 00:D0:B7:03:2E:9F is a
valid BDA.
Each Bluetooth device also has an operator-configurable, user-friendly name to help
distinguish it from other devices. The user-friendly name may be up to 99 alphanumeric characters in length and may contain spaces. My Personal Computer is a valid
user friendly name.
6.4 ENCRYPTION
Encrypting data translates it into an unreadable format using a secret key or password.
Decrypting the data requires the same key or password that was used to encrypt it.
6.5 LINK KEY
A unique, internally generated, access code based on a passkey, the Bluetooth Device
Address and an internally generated random number. Link keys are generated automatically when devices Pair.
After a link key is generated, manual entry of the passkey is not required.
47
Page 52

Broadband Router User Guide
6.6 PAIRING DEVICES
Pairing allows you to avoid entering access information each time a connection is
attempted. Paired devices share a unique link key, which they exchange each time
they connect.
NOTE: The mate of a pair always appears in My Bluetooth Places, even if the
mate is not turned on or is out of connection range.
Paired devices remain paired even when
l One of the devices is not on
l A service connection is interrupted or the service stopped
l One or both devices are rebooted.
To Pair with another device
If Secure Connection is enabled, devices will pair automatically the first time they
connect (a passkey must be successfully exchanged).
To pair with a device manually:
In the Folders pane of My Bluetooth Places, right-click a device, select Pair Device
from the shortcut menu, and then follow the on-screen instructions.
Remove Pairing In the Folders pane of My Bluetooth Places, right-click a paired device
and select Unpair Device from the shortcut menu.
6.7 PASSKEY
An alphanumeric string up to 16 characters in length. Passkeys are also called Personal Identification Numbers, or PIN codes.
A passkey may be required if the Secure Connection option is enabled for a Bluetooth
service or application.
6.8 SECURE CONNECTION
A passkey or link key is required each time a connection is attempted.
All data exchanged over the Bluetooth connection is encrypted.
Depending on other configuration options, authorization may also be required.
6.9 SECURITY REQUEST DIALOG BOX
A Bluetooth passkey request and/or Bluetooth Authorization request balloon may
appear over the Windows system tray when a connection is attempted if Secure Connection is enabled.
Click the balloon to proceed.
48
Page 53

Appendix C - Specifications
7
Chapter 7
Troubleshooting
7.1 CANNOT CONNECT TO A PAIRED DEVICE
Paired devices are always displayed in My Bluetooth Places, even if the remote device
is out of range or not powered up.
Verify that the remote member of the pair is within radio range, and powered up, and
then attempt the connection again.
7.2 CANNOT DISCOVER SERVICES ON AN UN-PAIRED
REMOTE DEVICE
The remote device may not be powered up or may be out of range.
l Verify that the remote device is powered up.
l Verify that the remote device is in Connectable mode (Bluetooth Configura-
tion Panel > Accessibility tab).
l Perform a Search for Devices to verify that the device is within range.
7.3 DIAL-UP NETWORKING SERVICE DOES NOT START
The Dial-up Networking service will not start unless a properly configured modem is
attached to the server.
l Verify that the modem is usable as a local device on the computer to which
it is attached.
l In the Bluetooth Configuration Panel, Local Services tab, double-click
the Dial-up Networking service:
l Click the down arrow in the Modem field and select the modem that
will be used to dial out
l Click the OK button
l Click the OK button to close the Bluetooth Configuration Panel.
7.4 DETERMINE THE BLUETOOTH DEVICE ADDRESS
(BDA) OF MY HARDWARE
DEVICE
In the Bluetooth Configuration Panel, on the Hardware tab, in the Devices section,
select the device you want to determine the address of. In the Device Properties
section of the dialog box, the fourth entry, Device Address, is the BDA of the selected
Bluetooth device.
7.5 DETERMINE THE VERSION OF THE HOST
CONTROLLER INTERFACE (HCI)
In the Bluetooth Configuration Panel, on the Hardware tab, in the Device Properties
section, the fifth entry provides Bluetooth Specification compliance information for the
Host Controller Interface.
49
Page 54

Broadband Router User Guide
The sixth entry contains the Specification Revision information for the Host Controller
Interface, if appropriate.
7.6 DETERMINE THE VERSION OF THE LINK MANAGER
PROTOCOL (LMP)
In the Bluetooth Configuration Panel, on the Hardware tab, in the Device Properties
section, the seventh entry provides Link Manager Protocol version number information.
The eighth entry contains the Link Manager Protocol sub-version number information,
if appropriate.
7.7 FIND INFORMATION ABOUT THE BLUETOOTH
HARDWARE ATTACHED TO MY COMPUTER
In the Bluetooth Configuration Panel, select the Hardware tab.
7.8 INTERNET CONNECTION SHARING DOES NOT
WORK
This occurs because Internet Connection Sharing was enabled when Bluetooth was
installed (this is a Microsoft Windows behavior and is considered proper operation).
To resolve the “problem”:
1. Disable Sharing for the Ethernet adapter:
a) Windows Control Panel > Network and Dial-up Connections
b) Right-click “Local Area Connection,” select Properties, and then select the
Sharing tab.
c) Clear (uncheck) the box for “Enable Internet Connection Sharing for this
connection” and click OK.
2. Re-enable Sharing for the Ethernet adapter; repeat Step 1.c.), and select (check)
the sharing box.
If offered an option to select an adapter, select “Bluetooth network adapter.” (This
option will not appear unless more than one adapter is available.)
If asked to reboot the computer, do so.
7.9 TEST A NETWORK ACCESS CONNECTION
If the client is hardwired to the LAN, unplug the hardwired connection to ensure that
the test checks the wireless connection rather than the hardwired connection.
If the server has access to the Internet, open a browser on the client and connect to
the World Wide Web.
You may also Ping the server from the DOS prompt.
7.10 UNKNOWN PORT MESSAGE WHEN USING A
BLUETOOTH SERIAL PORT
The “Unknown Port” error message usually means an attempt was made to connect a
port that was in use.
50
Page 55

Appendix C - Specifications
Additional Bluetooth Serial Ports can be added if they are required.
7.11 BLUETOOTH HEADSET DOESN’T ALWAYS
FUNCTION UNDER WIN 98
Windows 98 cannot convert audio files with the extension m3u (e.g., myfile.m3u) into
the Pulse Code Modulation (PCM) audio format used by Bluetooth headsets; this is a
limitation of Windows 98.
Other versions of Windows (2000, ME and XP) can translate m3u audio files into the
PCM format.
Possible solutions are:
l Upgrade to a newer version of Windows
l Use an m3u-to-mp3 conversion utility to convert the file(s) into a format that
is supported by Windows 98. (Conversion utilities are available as freeware
or shareware on the Internet.)
51
Page 56

Broadband Router User Guide
Appendix A
Specification
Standard
Interface
Frequency band
Data rate
Modulation method
Spread spectrum
Operating voltage
TX output power
Operating distance
Topology
Receiver sensitivity
Compatible OS
Security provided
LED indicator
Operating temperature
Storage temperature
Humidity
Power requirement
Regulatory compliance
Bluetooth v1.1
USB v1.1 (Type A)
2.4~2.4835GHz unlicensed ISM band
Up to 723Kbps
GFSK (Gaussian Frequency Shift Keying)
FHSS (Frequency Hopping Spread Spectrum)
5V from connected USB port
Class 2
Up to 10 meters in open space
8 devices Point-to-MultiPoint
Better than -70dBm @ 0.1% BER
Windows 98SE/ME/2000/XP
Pairing, encryption, authentication
Power: Orange
0°C ~ 45°C
-10°C ~ 70°C
5 ~ 90% (non-condensing)
5V DC, 86mA
FCC, CE
52
 Loading...