

Page 1

802.11n Wireless
ADSL 2/2+ Router
ADN-4000
Quick Installation Guide
Page 2

Table of Contents
Package Contents ........................................................................... 3
Physical Details ............................................................................... 4
Front Panel LEDs ....................................................................... 4
Rear Panel ................................................................................ 5
Rear panel Port and Button Denition ......................................... 5
Installation Procedure ...................................................................... 6
Conguration .................................................................................
Preparation ............................................................................... 8
Using your Web Browser ............................................................ 8
Setup Wizard ............................................................................ 9
Home Screen ...........................................................................13
Further information ..................................................................14
8
Page 3

Package Contents
The following items should be included:
ADN-4000 Unit x 1
l
Quick Installation Guide x 1
l
User’s Manual CD x 1
l
Power Adapter x 1
l
RJ-45 Cable x 1
l
RJ-11 Cable x 2
l
Antenna x 3
l
ADSL Splitter x 1
l
If any of the above items are damaged or missing, please contact your
dealer immediately.
3
Page 4
4
Physical Details
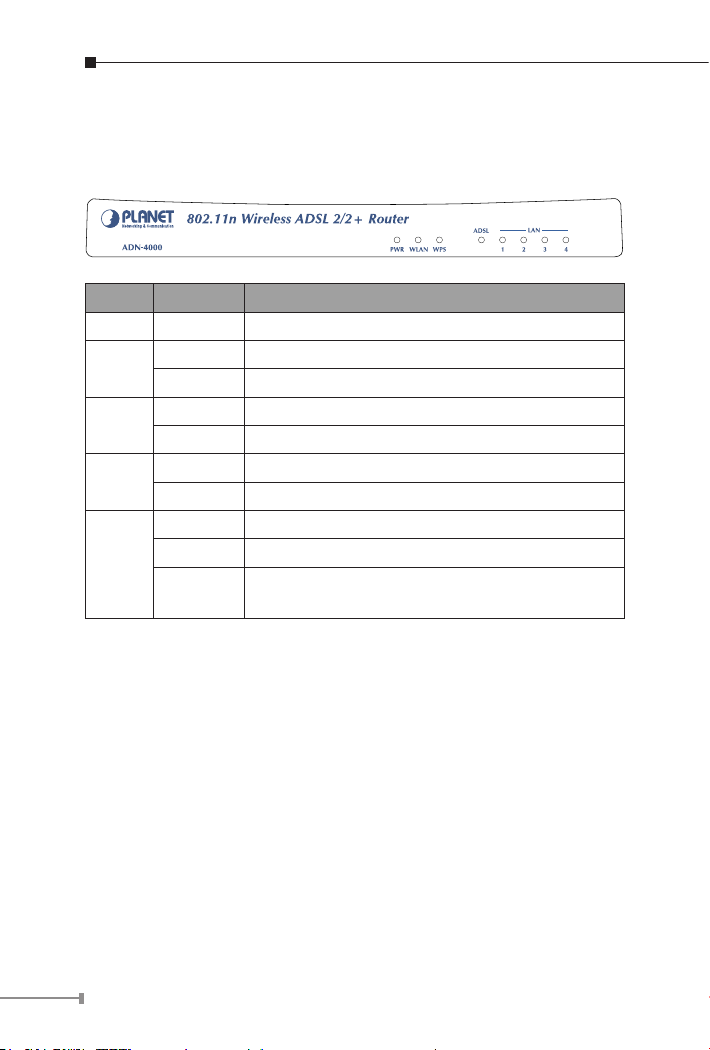
Front Panel LEDs
LED Status Description
PWR ON The Router is ready.
WLAN
WPS
ADSL
LAN1-4
OFF Wireless LAN is disabled
BLINKING Wireless trafc is transmitting or receiving
OFF WPS function is disabled
BLINKING WPS function is enabled
ON Connected to an ADSL DSLAN successfully
BLINKING No Connection
ON The LAN cable is connected to the router
OFF No Connection
Blinking
Network trafc transferring or receiving through
the LAN port
Page 5
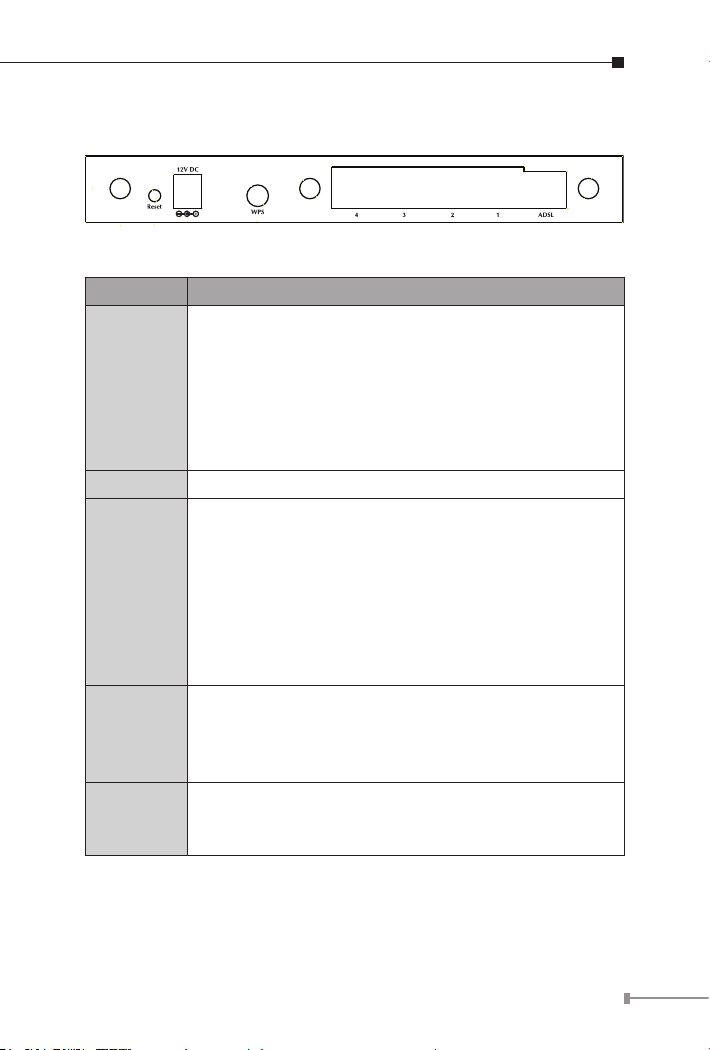
Rear Panel
Rear panel Port and Button Denition
Port Description
● Reboot router: press the reset button for less than 5
seconds, and it will keep your original congurations.
● Load factory default setting: press the reset button
Reset
Power Power connector with 12V DC 1A.
WPS Button
for longer than 5 seconds and the router will reset
itself to the factory default settings
(Warning! your original congurations will be replaced
with the factory default settings)
Wi-Fi Protected Setup (WPS) is the simplest way to
build connection between wireless network clients and
this ADSL router. Press this button on the router and
enable WPS function of the wireless clients, the router
and clients will automatically congure the security key
and connect directly. Please note that the router will
wait for WPS requests from wireless clients in 2 minutes
after the WPS button is pressed.
LAN1-4
ADSL
Connector
Router is successfully connected to a device through
the corresponding port (1, 2, 3, or 4). If the LED is
ashing, the Router is actively sending or receiving data
over that port.
The RJ-11 connector allows data communication
between the modem and the ADSL network through a
twisted-pair phone wire.
5
Page 6

6
Installation Procedure
Note
1. Choose an Installation Site
Select a suitable place on the network to install the ADN-4000.
For best Wireless reception and performance, the ADN4000 should be positioned in a central location with
minimum obstructions between the ADN-4000 and the
PCs.
Also, if using multiple Access Points, adjacent Access
Points should use different Channels.
2. Connect LAN Cables
Use standard LAN cables to connect PCs to the Switching Hub ports
on the ADN-4000. Both 10Base-T and 100Base-TX connections can
be used simultaneously.
If required, connect any port to a normal port on another Hub, using
a standard LAN cable. Any LAN port on the ADN-4000 will automatically function as an “Uplink” port when required.
Page 7

3. Connect ADSL Cable
Connect the supplied ADSL cable from to the WAN port on the ADN-
4000 (the RJ-11 connector) to the ADSL terminator provided by your
phone company.
4. Power Up
Connect the supplied power adapter to the ADN-4000. Use only the
power adapter provided. Using a different one may cause hardware
damage.
5. Check the LEDs
• The PWR LED should be ON.
• The WLAN LED should be ash, when wireless AP is ready.
• The ADSL LED should be ON if ADSL line is connected.
• For each LAN (PC) connection, one of the LAN LEDs should be ON
(provided the PC is also ON.)
7
Page 8

8
Conguration
The ADN-4000 contains a HTTP server. This enables you to connect to
it, and congure it, using your Web Browser.
Preparation
Before attempting to congure the ADN-4000, please ensure that:
• Your PC can establish a physical connection to the ADN-4000. The PC
and the ADN-4000 must be directly connected (using the Hub ports
on the ADN-4000) or on the same LAN segment.
• The ADN-4000 must be installed and powered ON.
• If the ADN-4000's default IP Address (192.168.1.1) is already used
by another device, the other device must be turned OFF until the
ADN-4000 is allocated a new IP Address during conguration.
Using your Web Browser
1. Open web browser and type http://192.168.1.1 in the browser’s
address box. This number is the default IP address for this device.
Press Enter.
Page 9

2. A user name and password prompt will appear. The user name and
password are both “admin”.
Setup Wizard
You can use “Setup Wizard” to setup the router as follows, and the
router will connect to the Internet via ADSL line.
Click “Quick Start” to get into the quick setup procedures.
Click “RUN WIZARD” to start up this procedure.
9
Page 10

10
Step 1 - Click “Next” to begin these four quick steps.
Step 2 - Click “Next” to setup your new administrator’s password.
Page 11

Step 3 - Click “Next” to setup your time zone.
Step 4 - Click “Next” to setup your Internet connection type. You can
have this information from your Internet Service Provider.
11
Page 12

12
Step 5 - Enter the connection information provided by your ISP.
Step 6 - The Setup Wizard has completed. If you have any change or
mistake, click “Back” to modify it, or click “Next” to save the current
settings.
Page 13

Step 7 - Saved Changes.
Home Screen
After nishing the Setup Wizard, you will see the Home screen. When
you connect in future, you will see this screen when you connect. An
example screen is shown below.
13
Page 14

Further information
If you still have problem on connecting to your ISP, please check the
user’s manual on the bundled CD for detail conguration.
If you have any other questions, please contact the dealer where
you purchased this product or you can contact PLANET directly at the
following email address: support@planet.com.tw
14
Page 15

This page is intentionally left blank
Page 16

This page is intentionally left blank
 Loading...