

Page 1
Page 2

Page 3
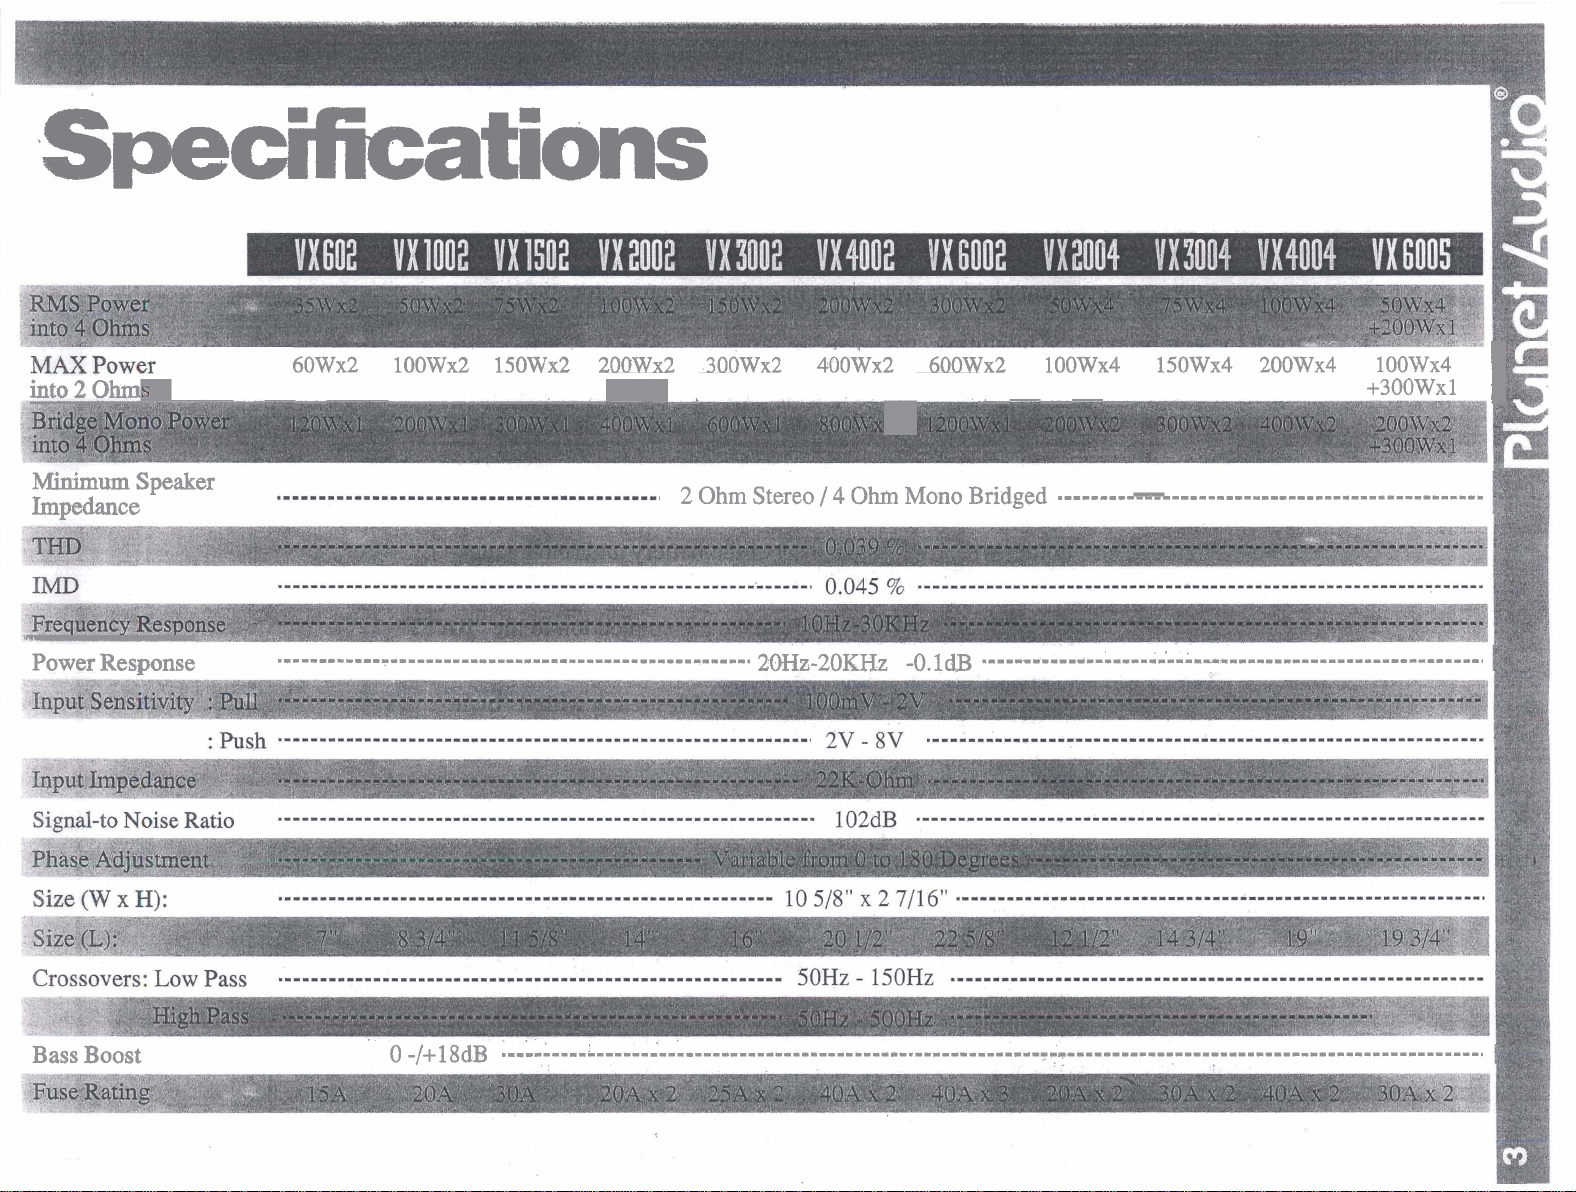
Specifications
60Wx2 100~x2 1SOWx2 200Wx2 300Wx2 400~x2 600Wx2 ' 100Wx4 150Wx4 200Wx4 100Wx4
into
2
Ohm
A
-
- -
+300Wx1
I
I
Minimum
Impedance
Power Response
Bass Boost
Speaker
.------------------------------m-------------------m-m
0
-/+18d~
2
Ohm
Stereo
2mz-20KHz
.-.-------'-----------------------------------.----------------m---------m------------------------------------.
/
4
Ohm
Mono Bridged
-O.ldB
m----------i~-----~--'---mm~~IIII~~IIIIIII---I--------I--~
.-----------------------------------------------
Page 4
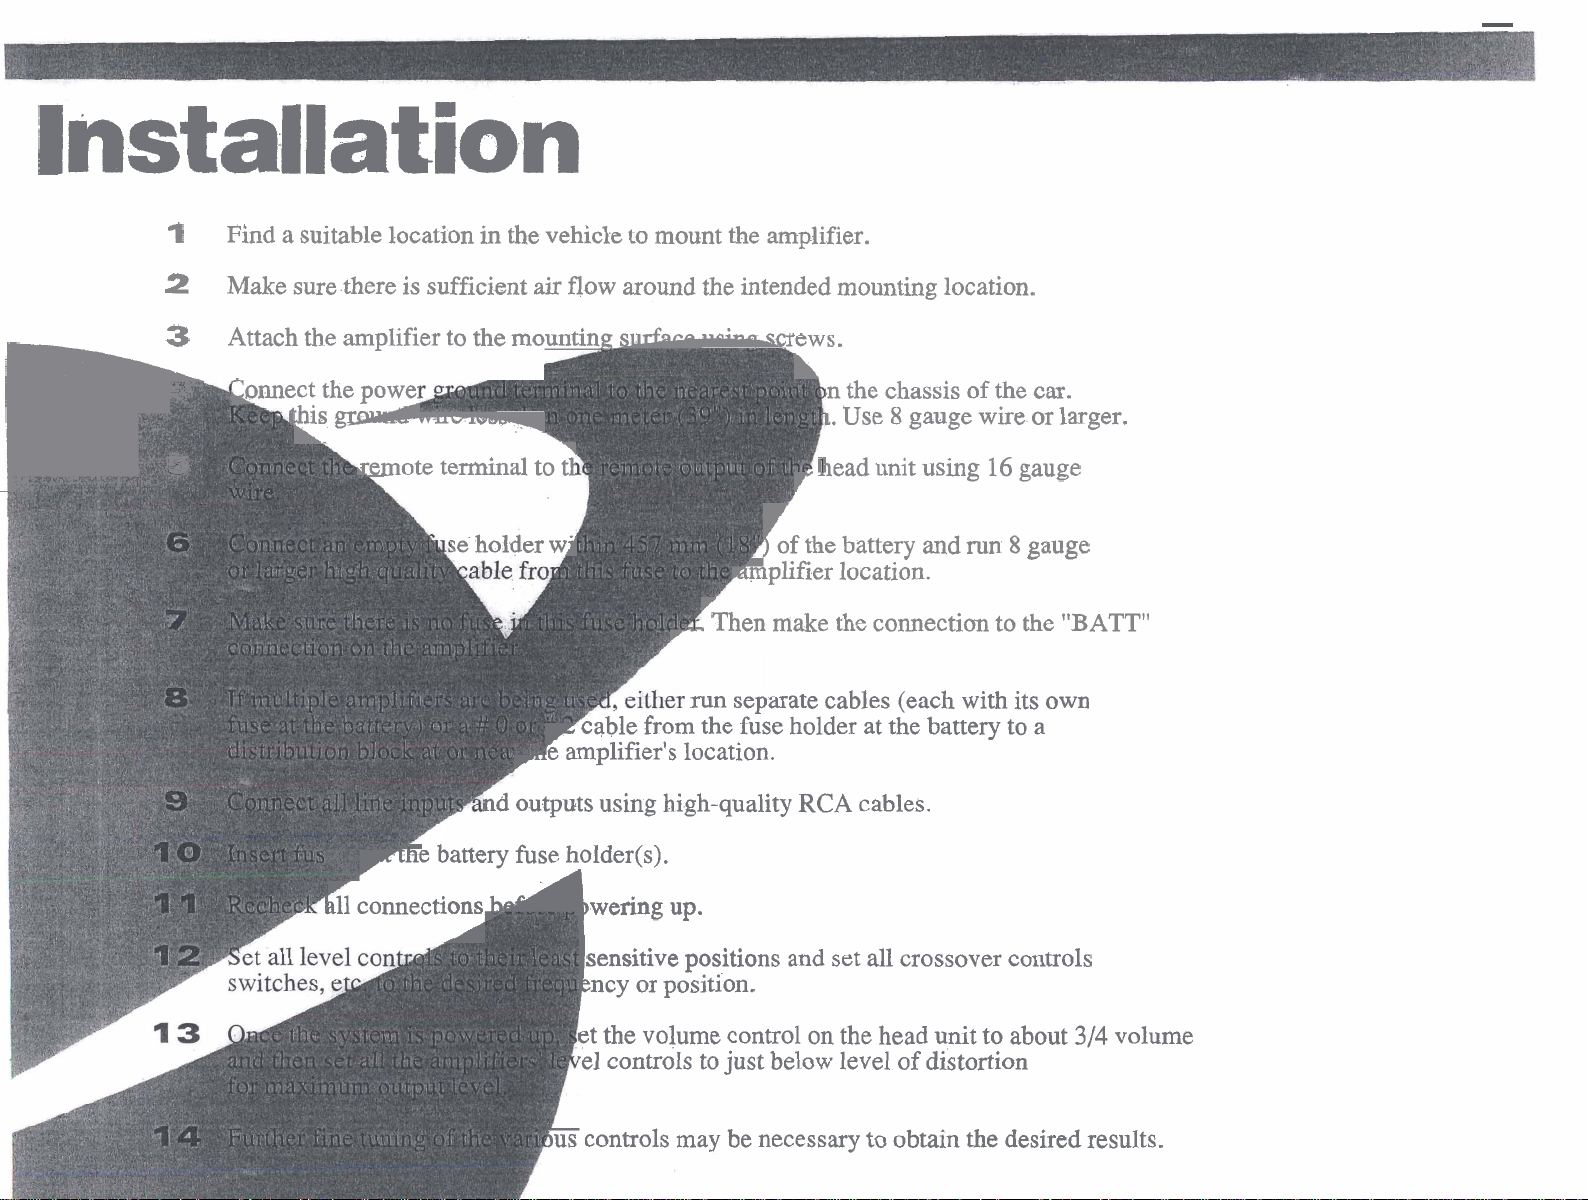
Installation
I
Find a suitable location in the vehicle to mount the amplifier.
2
3
Make sure there is sufficient
Attach the amplifier to the mounting-
"onnect the powei
'his
L.
m-
air
flow around the intended mounting location.
gcpyb,,
&emote terminal to
pule battery fuse holder@).
-
'1
tl
se holder
hd
wjl
p
rAe amplifier's location.
outputs using high-quality
cable from the fuse holder at the battery to a
rews.
L
bn the chassis of the car.
1.
Use 8 gauge wire or larger.
-lead unit using
r
Ff the battery and run 8 gauge
mmplifier location.
r
Then make the connection to the
r-'
run separate cables (each with its own
RCA
cables.
16
gauge
-
-
"BATT"
311 connections wering
sensitive positions and set all crossover controls
-1
ncy or position.
et
the volume control
.el controls to just below level of distortion
)us controls may be necessary to obtain the desired results.
up.
on
the head unit to about
314
volume
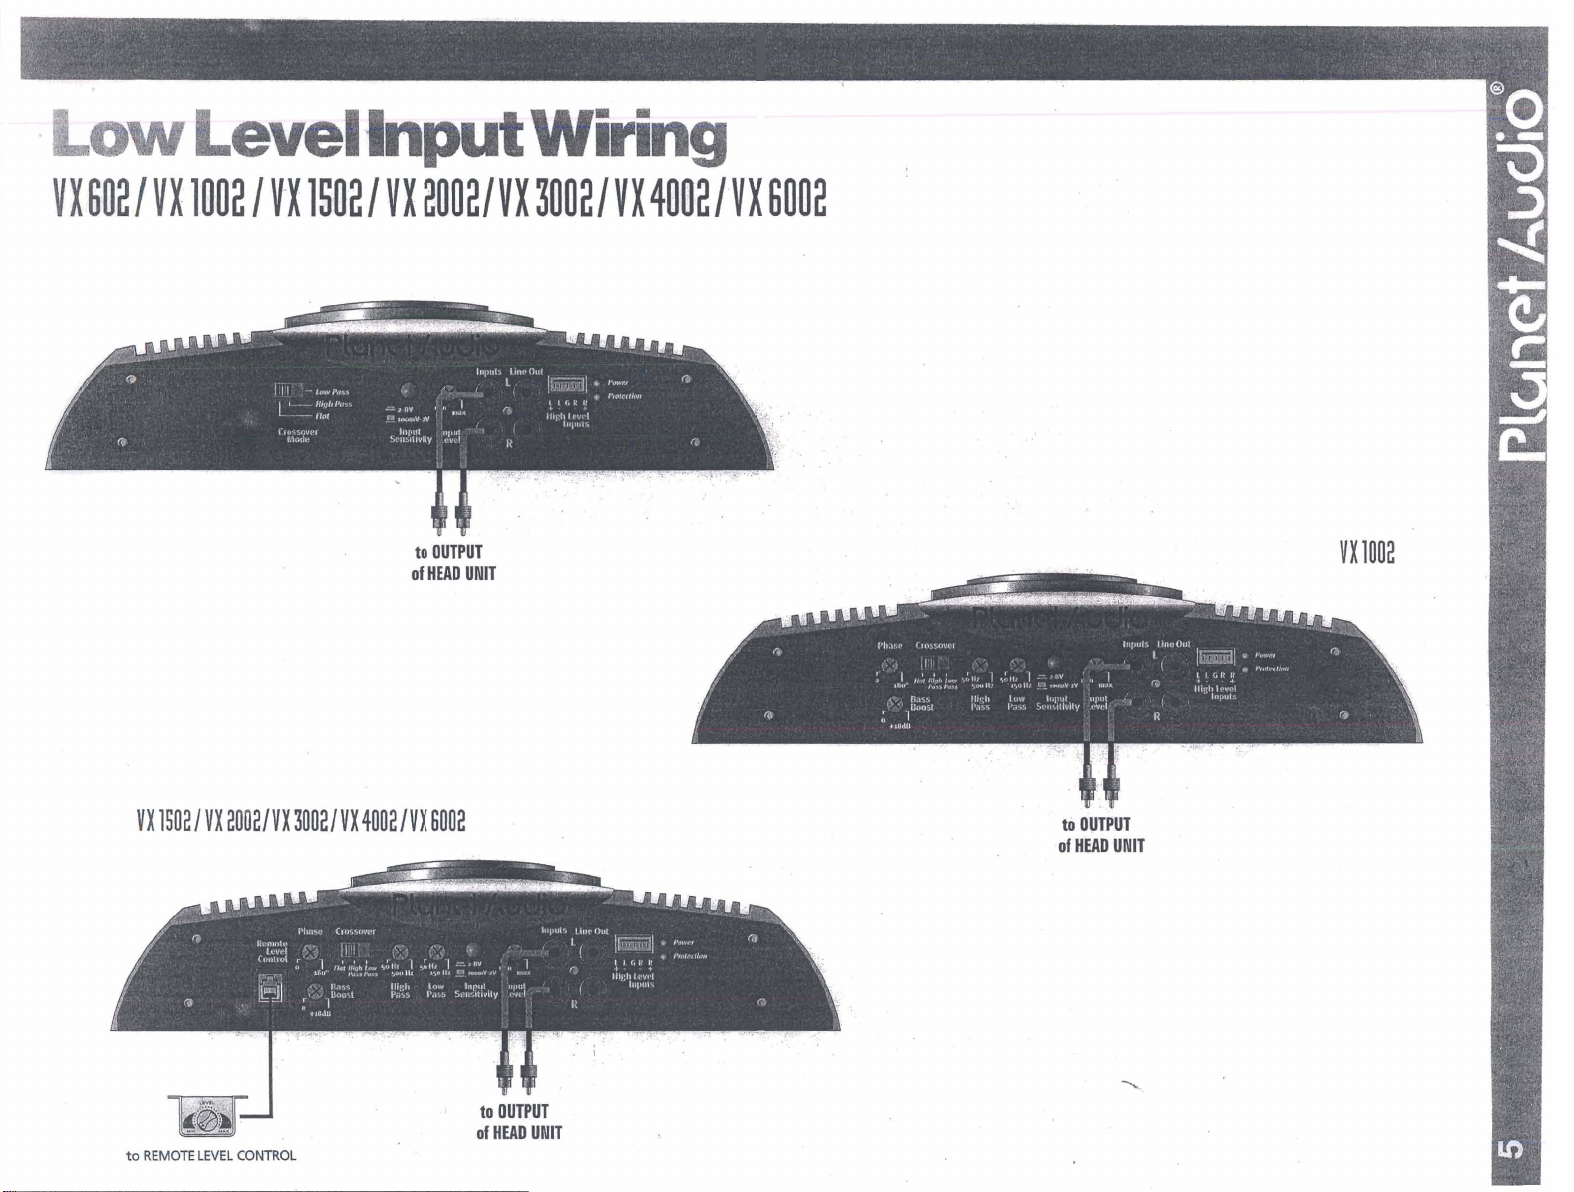
Page 5
Page 6

'I'
-
c.
3
9.
-
B
S
Page 7

..*.*:;:..:
$st,
<I
::r
$iz;>.;*.y..:
;=,
-.
..,.
..<--,.:.
.
;.
-:;
:&?:.
:;.-,:'
.
.*.<-*
.
.
7::.
:2
',
.
1
I..::
.
.
...~
2.j
:I7:
r.:
st.:
..
..-,..:
.
.
,
.
-. .
-.
.
',
.
-..:
.
.
-
.
-1.:.
.-.
:
>!--.
.
.,
Page 8

Page 9

Page 10

Page 11

+,
'FT-
LA-
__
,
p;:;:.:
I-.
.;
.;
.-
..
.
I
:
:
,
\.-
.
. .
-
.,.
t'
. . .
.
.
6
.
L..
a.
.:
.
.
..
-
-
.
-
.:.
Page 12

Four
Four Channel Wiring
Chanhel
n.
..
:
,I
I.,,.
,-
,
-,,.
tT
~-
-
Amplifier
-
,.._..,
:
Power/Speaker
Bridged Wliring
To
BAnERY
@
-
Wiring
"il
la-
SPEAKER
To REMOTE OUTPUT
from
HEAD
uNrr
LJLJ
SUBWOOFER SUBWOOFER
LEFT
SPEAKER
RIGHT
SPEAKER
Page 13

Five
Channel
Five Channel Wiring
-
4%
To
REMOTE OUTPUT
frnm
HFAn
IlNlT
.
.
-
. .
. . .- -. . . .
GROUND
Tri-Mode Wiring
A
+uV'&?We
a
paw
-.
Mnad.
I
,
CHZ
Amplifier
CHr.,;#+
,CtI+CHa-CH.1*C*~~CH*
CH,
a&
CII,.
c@j-
,
CH
SPEAKER
Power
/Speaker
Wiring
Bridged Wiring
4
SUBWOOFER
LEFT.
SPEAKER
SUBWOOFER
RIGHTSPEAKER
Page 14

Amplifier will
not
power up*
Check for good ground connection.
Check that Remote Input (turn-on)
at amplifier has at least
Check that there is battery
on the + terminal.
Check that there
Che&d
3
volts DC.
High hiss in
speakers.
EEiP
squeal
noise from
speakers.
Disconnect all RCA inputs to the
amplifier(s) - if hiss disappears, then
plug in the component driving the
amplifier and unplug its inputs. If
hiss disappears, go on until the
faultylnoisy component is found.
It is best to set the amplifier's input
level as insensitive as possible. The
best subjective
obtainable this way.
high a
signal
unit
as
possible.
This is.alrnost always caused by a
poorly-grounded RCA interconnect.
'
SIN
ratio is
Try
level from the head
to drive as
Distorted
sound
&pl,ifier(s)
gek very hot.
Engine noise
(static
type)
Engine noise
(alternator
whine)
Check that the Level control(s) is set
to match the signal level of the
head unit. Always begin at the
lowest setting.
Check that all crossover frequencies
have been properly set.
-
Check for short circuits on the
speaker leads.
,
,
Check thatthe minimum speaker
impedance for that modelis correct.
-
-
Check .that there is good airflow
around the amplifier. In some
applicaitierns, an dermal cooling
fan
may be iequired.
This is caused primarily by poor
quality RCA cables picking up
radiated noise. Route all RCA cables
away from power wires, and use
only the best quality cables.
Check that the speaker leads are not
shorted to the vehicle chassis.
Check thawhe RCA grounds are not
shorted to the vehicle chassis.
Check that the head unit is
correctly grounded.
 Loading...