

Page 1
TELEPHONE
888-990-1236 US Toll-free
805-751-4854 Customer Service
TECHNICAL SUPPORT
www.planetaudiousa.com/customer-support
www.planetaudiousa.com
USER’S MANUAL
USER’S MANUAL
P9759B
0817
The Bluetooth® word mark and logos are registered trademarks owned by Bluetooth SIG, Inc.
and any use of such marks by Planet Audio is under license. Other trademarks and trade
names are those of their respective owners.
BLUETOOTH
®
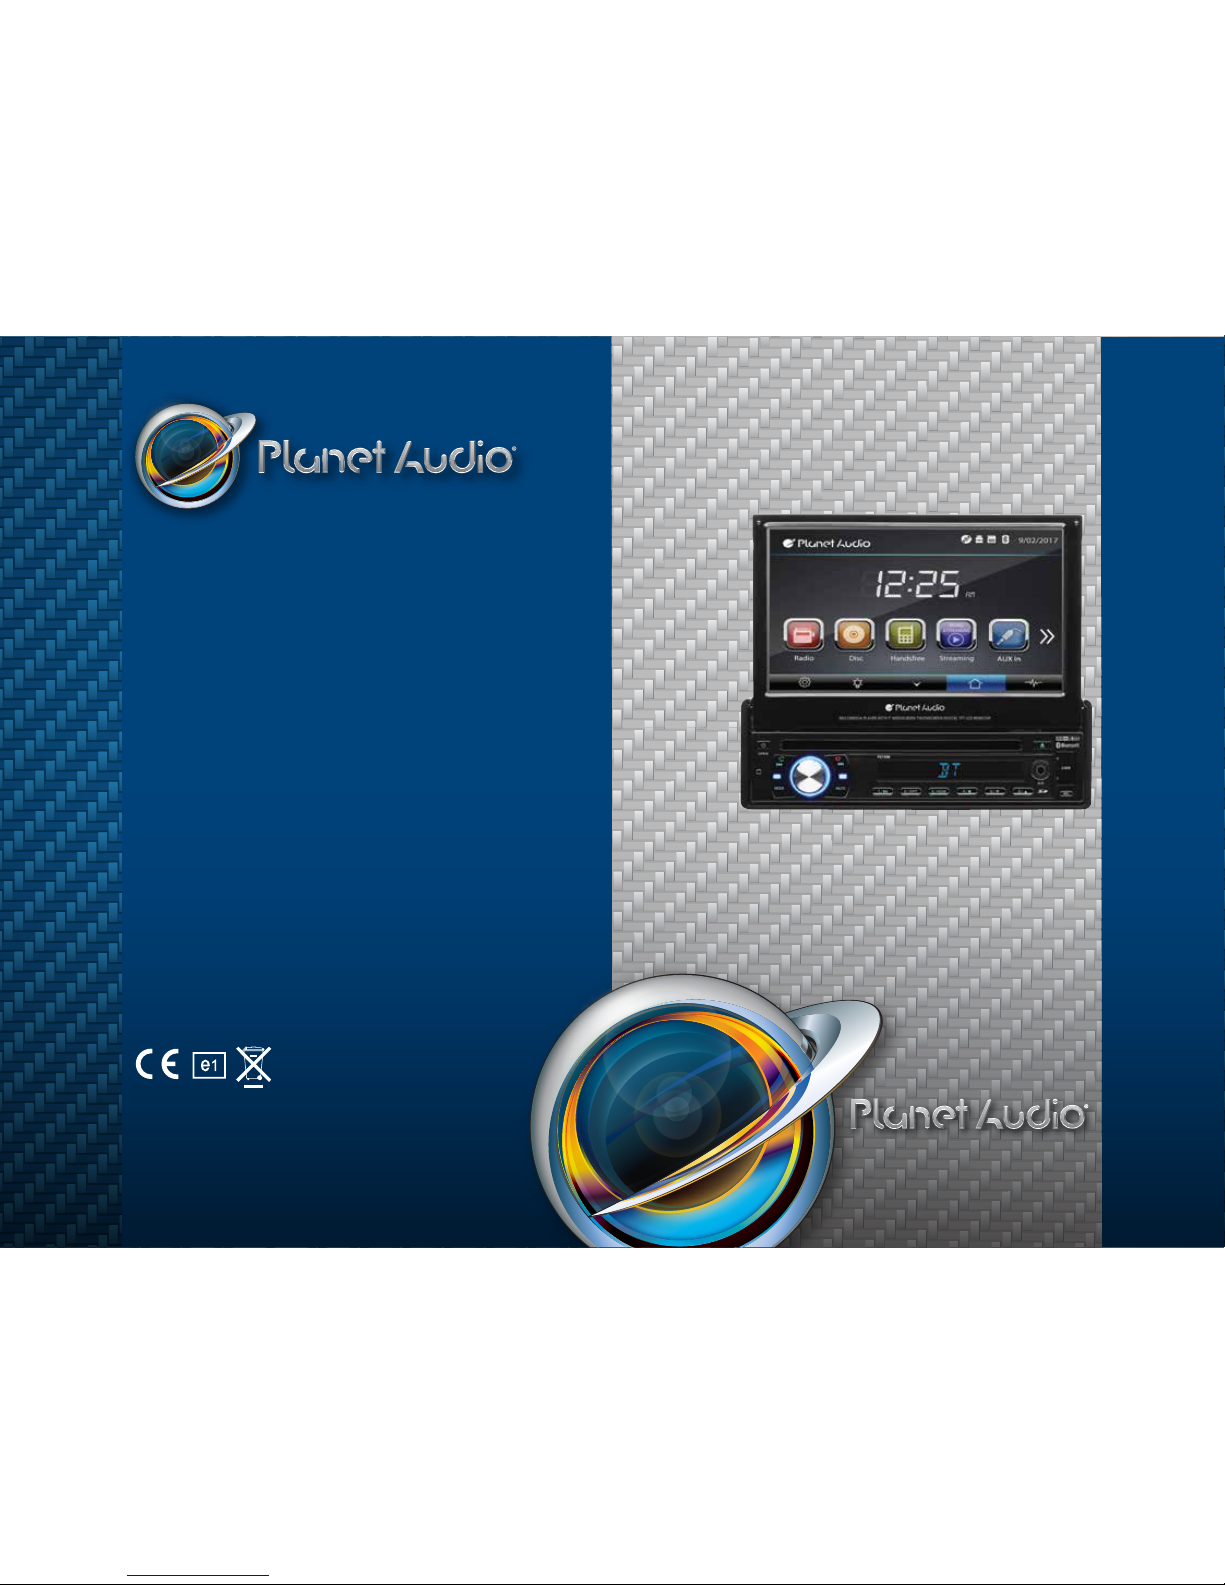
DVD/MP3/CD AM/FM RECEIVER
FEATURING MOTORIZED 7" (178
mm
) WIDESCREEN
TOUCHSCREEN DIGITAL TFT LCD MONITOR
P9759B
BLUETOOTH
®
DVD/MP3/CD AM/FM RECEIVER
FEATURING MOTORIZED 7" (178
mm
) WIDESCREEN
TOUCHSCREEN DIGITAL TFT LCD MONITOR
Page 2

To ensure safety while driving
and to comply with laws,
drivers should not watch video or
operate the video device while driving.
Page 3

Congratulations on your purchase of a Boss Audio Systems Multimedia
Receiver. It has been designed, engineered and manufactured to
bring you the highest level of performance and quality, and will offer
you years of entertainment pleasure.
Content
01
A
ccessories ………………………………………………………………………………………………………………………………………...02
Unit Installation………………………………………………………………………………………………………………………………..03
Wire Connection………………………………………………………………………………………………………………………………04
Parking Brake Connection ………………………………………………………………………………………………………05
Speaker connection……………………………………………………………………………………………………………………….06
Button Description………………………………………………………………………………………………………………………….07
Remote Control………………………………………………………………………………………………………………………………..09
Main Menu…………………………………………………………………………………………………………………………………………...12
Radio Operation……………………………………………………………………………………………………………………………….12
DVD Operation………………………………………………………………………………………………………………………………..13
USB /SD Operation………………………………………………………………………………………………………………………..14
Settings Operation ………………………………………………………………………………………………………………………..15
Bluetooth Operation……………………………………………………………………………………………………………………..18
A
ux-In Operation ……………………………………………………………………………………………………………………………19
Notes of Disc……………………………………………………………………………………………………………………………………...20
T
roubleshooting ……………………………………………………………………………………………………………………………..21
General Specification…………………………………………………………………………………………………………………..23
Page 4

Power Cable
User Manual
Accessories
Package contains the following accessories for installation and operation of the unit.
(1) Washer,
Spring
Washer,
M5 Nut
1
(5) Rubber
Cushion
1
(2) Screw
1
(6) Screw
4
(3) Bolt 1
(7)installation
bracket
2
(4) Mounting
Strap
1
02
Remote Control
(8)Halfsleeve
1
Panel bag
Page 5
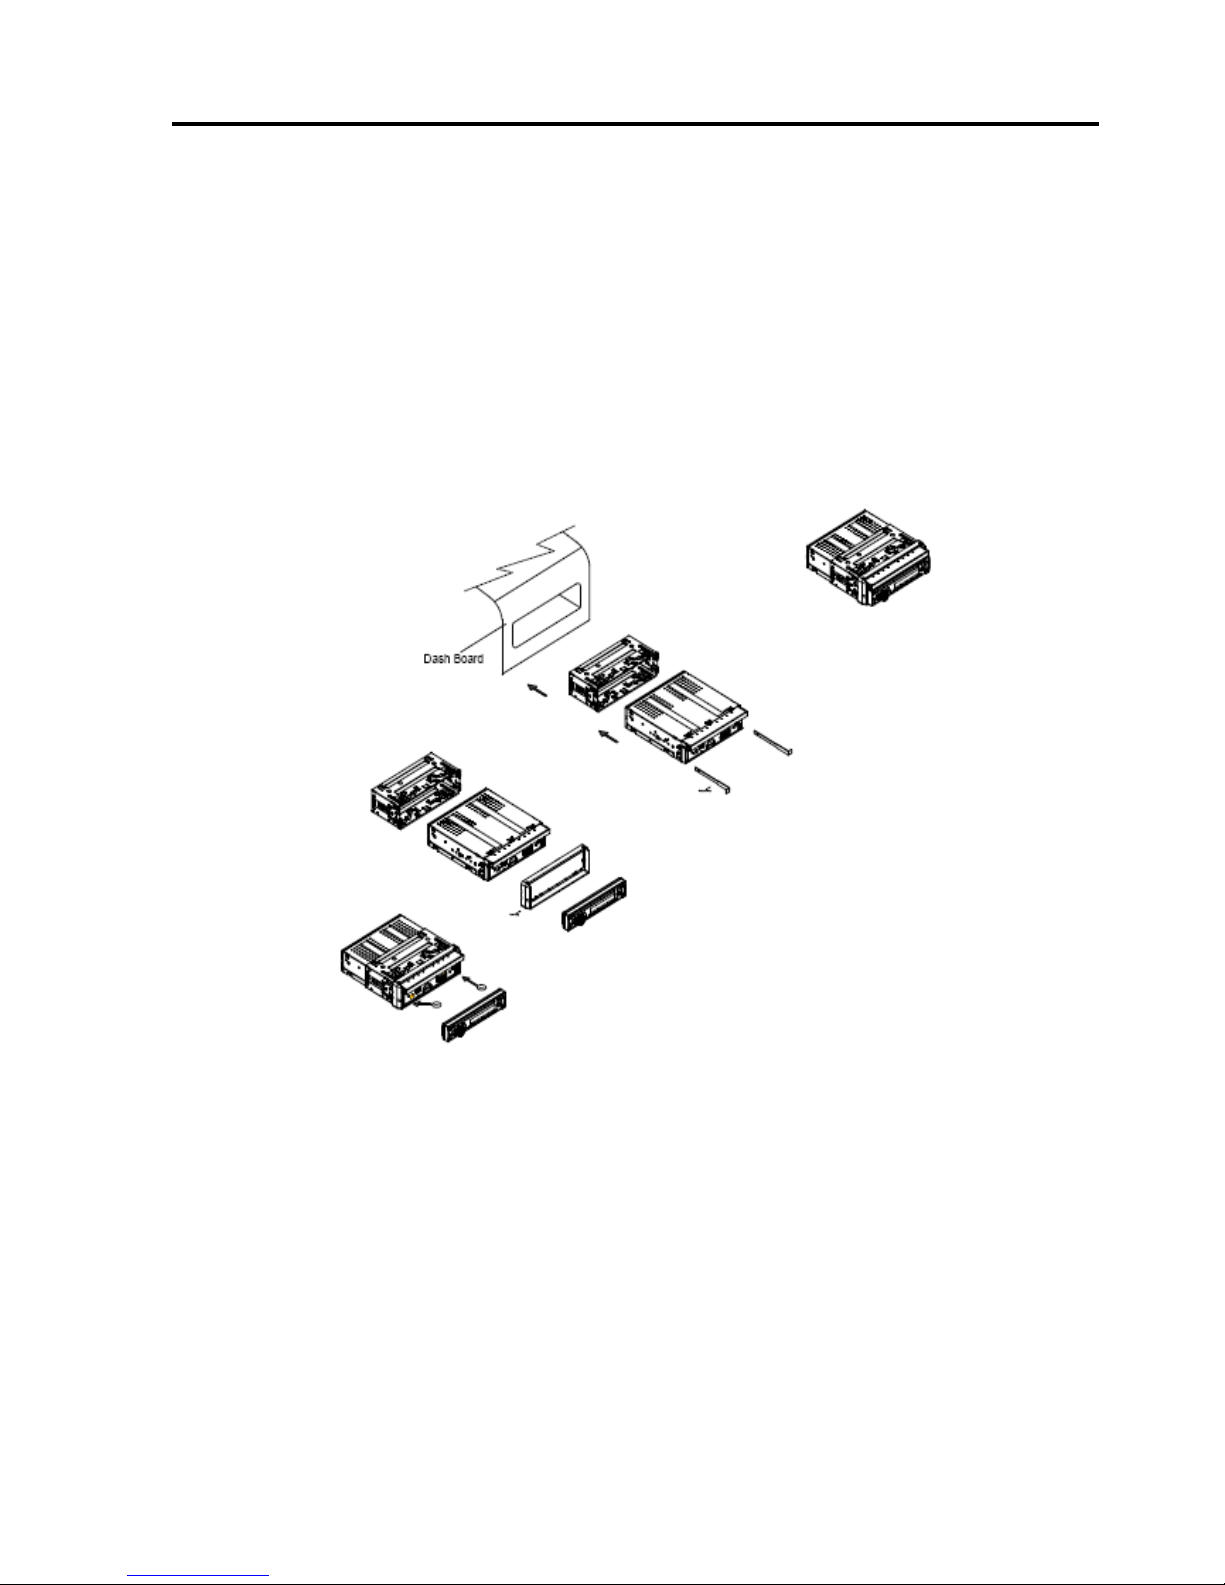
Unit Installation
Note
Before starting installation of the unit, make sure the wiring is connected properly.
Use only the parts provided with the unit to ensure proper installation.
The use of unauthorized parts may cause malfunction.
Install the unit where it does not get in the driver’s way and will not injure the passenger in case
there is a sudden stop, like an emergency stop.
INSTALLATION (Figure 1)
Insert the unit into dash-board hole.
If necessary, place the mount strap at the rear of the unit and fix it with provided washer as
figure 2.
Push the unit into the Half Sleeve until you hear a click sound
Place Trim Ring over the unit and installation is completed as figure 3. (Some vehicle may
not need Trim Ring)
03
Page 6
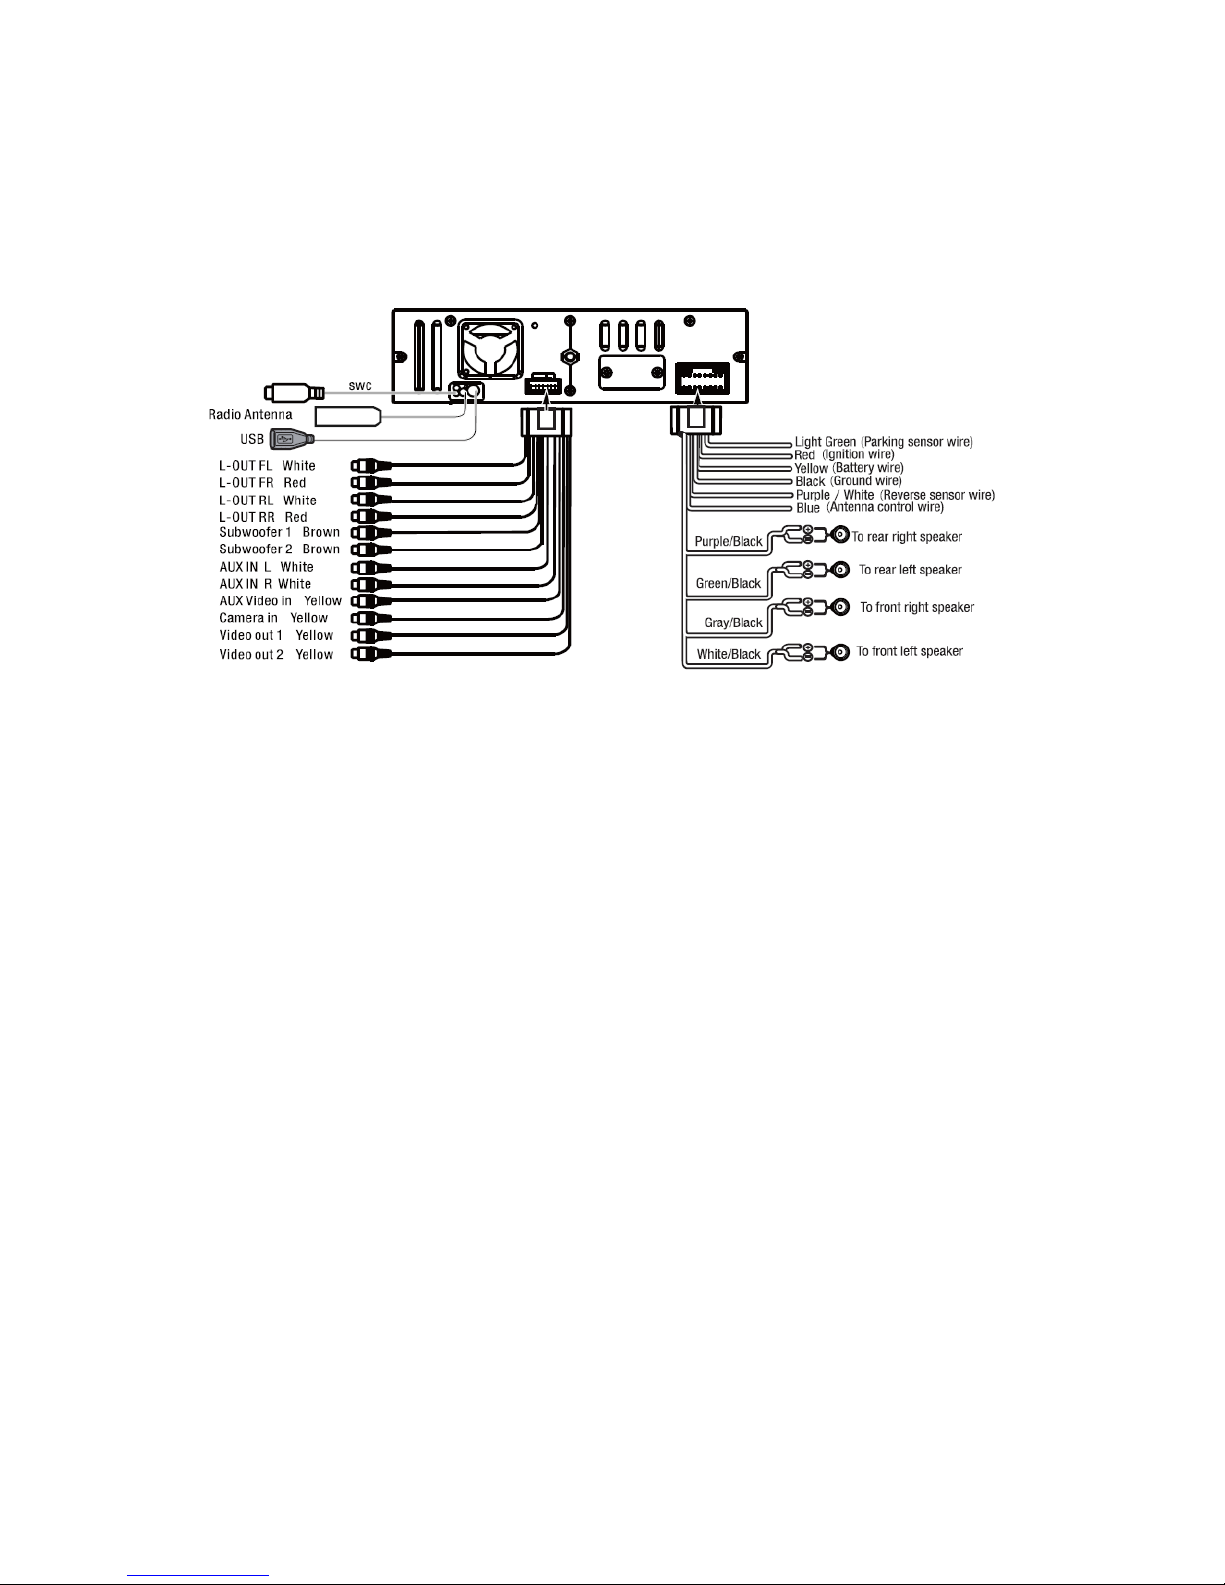
Wire Connection
The Description of the Input/output Interface of the Rear Chassis
04
Page 7
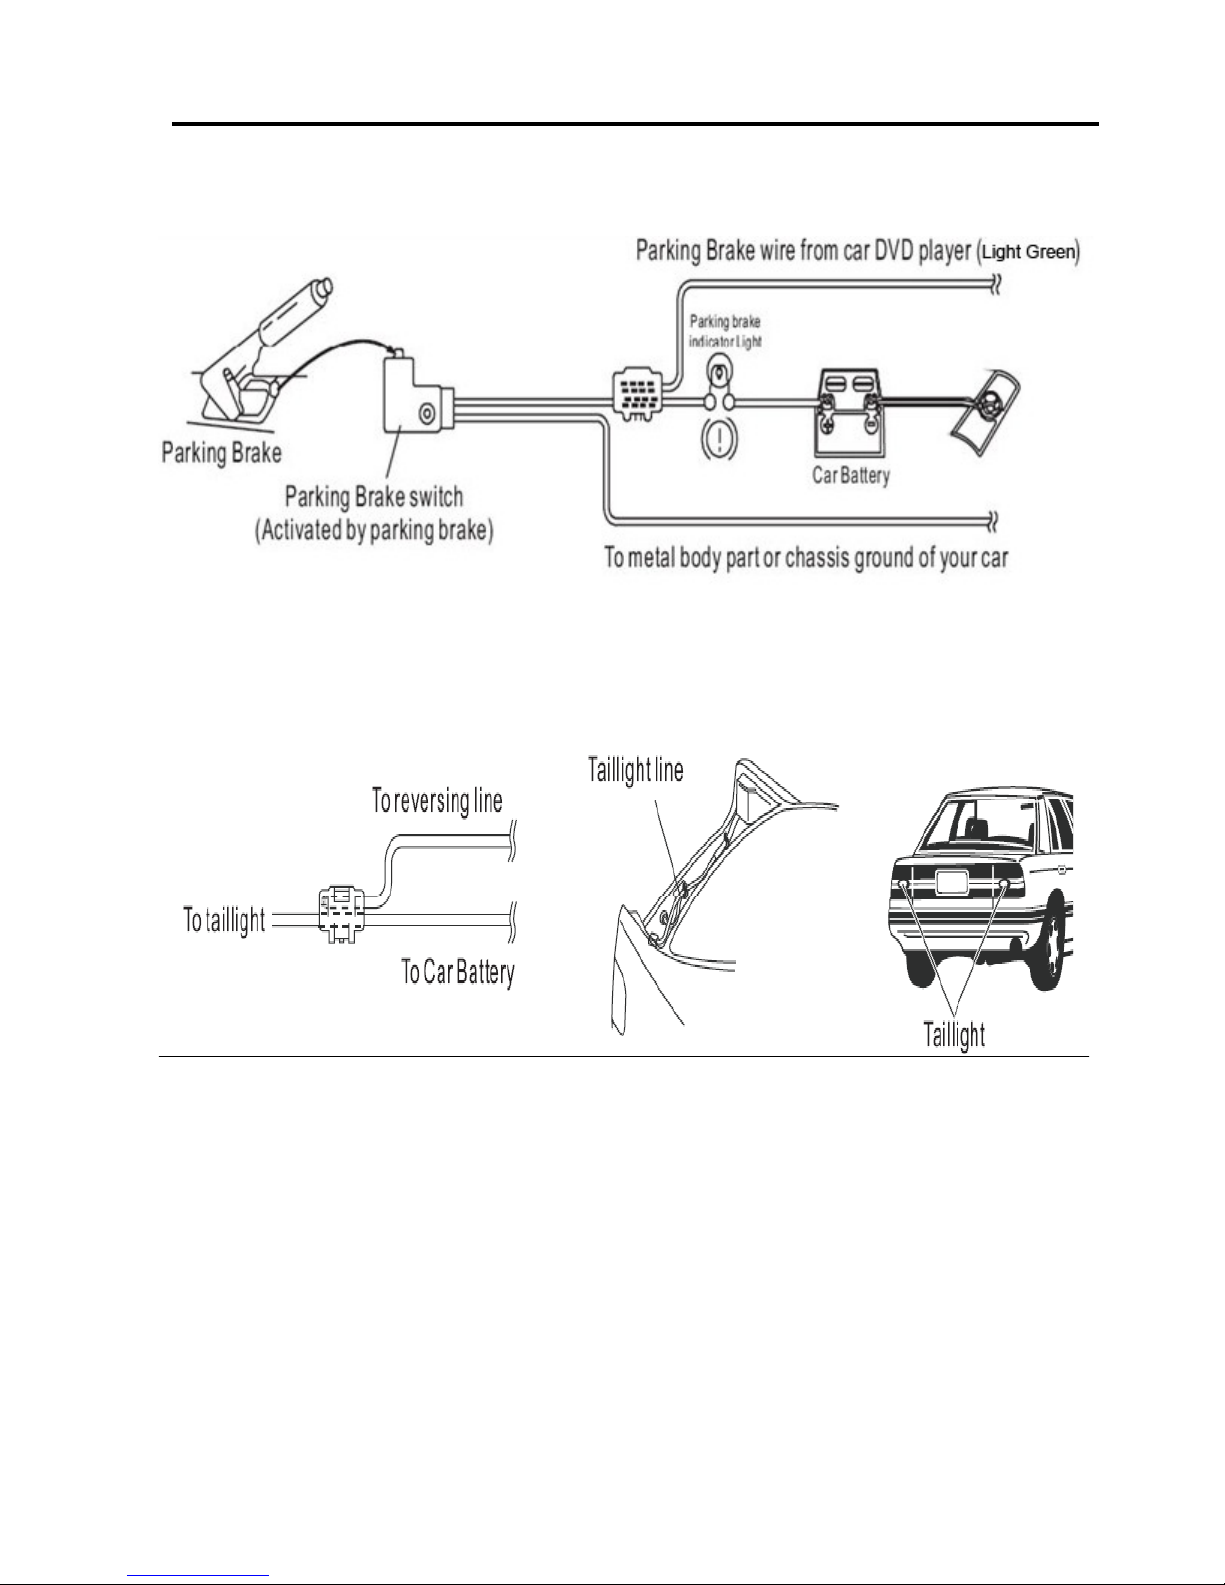
Parking Brake Connection
In order to view videos, the parking brake wire must be connected, and the vehicle stopped
Connecting the reversing line to taillight on the car
05
Page 8

Speaker Connection
After connecting, when you start up the reverse gear, the unit will receive the picture from car rear
view camera.
Connect the speakers according the following diagram, incorrect connections will damage the unit or
your loudspeakers.
Correct connection
Left front - Right front | Left rear - Right rear
Incorrect connections
06
Page 9

Button Description
1.Open button
Press the button to open/close the screen
Press the button for short moment to turn on power,and long press it to turn off power.
Press the button can adjustment the screen angle
2.Fast Forward button
In radio mode, press the button to select station upward
3 .Fast Forward button
In radio mode,press the button to select station backward
07
Page 10

Button Description
4.MIC input
Bluetooth microphone input socket
5. Mode Button
When the unit is power on ,Repeat press this button can switch to different function mode as follow
picture.
6. Mute Button
Press the button will briefly to mute
7. Number Button1
In radio mode,press this button to hear radio preset
In disc playback mode,press this button to turn on/off TFT LCD display.
8. Number Button2
In radio mode,press this button to hear radio preset
In disc playback mode,press this button to repeat the current track indefinitely.
9. Number Button3
In radio mode,press this button to hear radio preset
In disc playback mode,press this button to play frocks on the disc in random order.
10. Number Button4
In radio mode,press this button to hear radio preset
In disc playback mode,press this button for to stop playback.
11. Number Button5
In playback mode,press this button to adjust the angle of screen.
12. Number Button6
In playback mode,press this button to adjust the angle of screen.
13.RELEASE Button
Press this button to release the panel.
14. AUX
Put the Aux plug into the Aux-In jack which was marked on front panel
15. USB
insert a USB into this slot and the unit will automatically start reading and playback
16.Eject
When there is a disc in the unit,press the button to eject the disc.
17 .Rotate Button
Press the button to increase or decrease volume level
08
Page 11

Remote Control
1. MODE button
Press it to select the mode: radio, disc (if there is a disc in unit), USB (if there is a USB device in the
unit), SD (if there is a SD/MMC card in the unit), Bluetooth, Aux-In
2. POWER button
Power on or power off.
3. UP button
Press it to move the cursor up.
4. BAND/RDM/CLEAR button
In radio mode, press to change radio band in sequence of FM1 → FM2 → FM3 → AW1 → AW2; In DVD
mode, press to play randomly; In Bluetooth mode, short press it to clear the single phone number; long
press it to clear all the phone number.
5: ENTER
Press it to confirm your selection
6. LEFT button
Press it to move the cursor left
7. DOWN button
Press it to move the cursor d
8. EJECT button
Press it to eject the disc.
9. STEREO/MONO/* button
Press to switch the radio in stereo and mono sound. In Bluetooth mode, press it to make a symbol.
10. P.SCN/ RPT /# button
In DVD mode, press to repeat REP 1 => REP Title => REP ALL.
In SD /USB mode ,press to repeat REP 1 => REP Dir => REP ALL.
09
1: MODE
2: POWER
3: UP
4: BAND/RANDOM/CLEAR
5: ENTER
6: LEFT
7: DOWN
8: EJECT
9: STEREO/MONO/*
10:P.SCAN/REPEAT/#
11: SEEK-/BACKWARD
12: LOUD
13: STOP/PBC
14: OSD
15: PLAY/PAUSE
16: MUTE/BLUETOOTH
17: MENU/ROOT
18: SUBTITLE
19: RIGHT
20: SETUP
21: DIAL/ANGLE
22: HANG UP
23: VOLUME UP
24: ZOOM
25: SELECT
26: SEEK+/FORWARD
27: VOLUME DOWN
28: AUDIO
29: NUMERIC KEY
30: OPEN
/
TILT
Page 12

Remote Control
In radio mode, PS (preset scan): Press to scan all preset stations in the memory of the current band
and stay on each memory stations for about 5 seconds.
AS (Auto Save), long press to save the stations with good reception automatically.
In bluetooth mode, press it to make a # symbol.
11.
/ SEEK- button
In DVD mode, press
button to skip to the previous track, press and hold button for two seconds to
activate fast reverse (REW) search in a track.
In radio mode, press and hold
button to select station backward automatically, touch again will stop
select station.
button frequency down.
12. LOUD
Press to select loudness on or off.
13. STOP/PBC button
Press to stop playback from the current position, press again to final stop from the beginning. Press
play/pause button to play.
14. OSD button
In DVD mode press to show disc playing information.
15. PLAY/PAUSE button
In DVD/USB/SD mode, press it to break playback, press again to resume playback.
16. Mute button/Bluetooth button
: Short press to mute the volume output, press again to resume volume.
Long press this button to enter into Bluetooth mode (Hands free).
17. MENU/ROOT button
Press it to show main menu, in DVD mode, long press it to enter title menu (Available only if the DVD
disc with title menu).
18. SUBTITLE button
Press it to select the subtitle language (Available only if the disc with subtitle function).
19. RIGHT button
Press it to move cursor right.
20. SETUP button
In DVD mode press it to enter the setup menu, press again to resume playback.
21. Dial button/ANGLE Button
In DVD mode, press it repeatedly to change the viewing angle (Available only with a recorded DVD file
or DVD disc has this function).
In Bluetooth mode, press to make a call after inputted a phone number or accept an incoming call.
22. HANG UP button
In Bluetooth mode, press to reject a coming call or hang up while calling.
23. VOLUME UP button
Press to increase volume level.
24. ZOOM button
In DVD mode Press to zoom the image in or out in the sequence of zoom 2-> zoom 3-> zoom4-> zoom
5-> zoom 1/2-> zoom 1/3-> zoom 1/4-> zoom off.
25. SELECT button
Press it to enter the EQ setting menu, and press cursor up/down button to choose an item and press
cursor left/right buttons to set the item, press select button again to exit the menu.
26.
/ SEEK + buttons
In DVD mode, press
button to skip to the next track, press and hold button for two seconds to
activate fast forward (FF) search in a track.
In radio mode, press and hold
button to select station forward automatically, touch again will stop
10
Page 13

Remote battery
select station.
button frequency up.
27. VOLUME DOWN button
Press to decrease volume level.
28. AUDIO
In DVD mode press it to select the audio language.
29. NUMERIC KEY
In radio mode, select 1-6 the desired band; In DVD mode, select track.
In Bluetooth mode, press to input phone number,long press 0 number to make a + symbol.
30. OPEN/TILT
Press the button to open/close the screen.
Note:
The distance may vary according to the brightness of ambient light.
If the remote is not used for an extended period of time, remove the battery to preve nt possible
damage from battery leakage and corrosion.
Do not place any objects between the remote control unit and the sensor on the unit.
Do not drop the remote control onto the floor; it will damage it beyond repair.
Do not use the remote control unit, while simultaneously operating the remote control unit of any
other equipment; they may interfere resulting in improper operation.
The battery normally last for about one year although depending how often the remote control is
used. If the remote control unit isn’t working even when it is operated near the unit, replace the
battery with a new battery of the same make and use only a lithium cell battery type: CR2025 (3V).
Dispose empty batteries in accordance with your local governmental regulations.
Do not short-circuit, disassemble, heat or dispose of fire or flames the battery.
Keep the battery out of reach of children, should the battery be swallow ed, immediately consult a
doctor.
11
Page 14

Main Menu
The best way to discover the program is to explore ea ch screen in detail, and to find out how to move
from one to another. Read this chapter for a guided tour.
Unit starts by displaying the main menu.
This is the root of the screen hierarchy, and you ca n simply access all features by tapping on the touch
screen buttons.
Tap the icons to enter a desired mode. Slip the screen left and right to switch between the 2 menu
pages.
Page 1
Page 2
Radio Operation
To start radio, tap radio button on main menu screen.
Touch it to select station backward manually, touch and hold this icon to select station backward
automatically.
Touch it to select station forward manually, touch and hold this icon to select station.
forward automatically.
Touch it to select FM1—>FM2—>FM3.
Tou ch it to select AM1—>AM2.
Touch it to select station forward automatically. Touch again will stop select station.
Touch it to select station backward automatically. Touch again will stop select station.
Touch this button can turn on or turn off Local function.
Touch this button to select mono sound reception.
Touch this button can scan the stations from 1-6, Long Touch it to save the stations with
good reception automatically and scan each station for about 5 seconds.
Touch this button go to setting mode
12
Page 15

. Radio Operation
Touch this button to adjust the brightness of TFT panel
.
Touch this button to return to main menu
Touch button go to EQ setting
DVD Operation
DVD Player
To start DVD player, tap on DVD button from main menu screen.
Touch Screen Menu
You will not see any buttons while DVD is played, buttons will appear when you tap on TFT screen. Tap
the screen again to hide the buttons, slide the subtitle part of bottom screen to switch the following 2
pages.
Note:
1. DVD player will automatically start playing when you insert the DVD disc.
2. Suggest that don’t watch video if the vehicle is moving for driver's safety.
3. DVD Player will not only play video, but picture and music files as well.
Touch it to enter to previous/next page menu.
Touch it skip to the previous track
Touch it skip to the next track
Touch it to pause/play
Touch it to select the sound track in the sequence of mono L => mono R =>auto L => auto R
=>stereo
Touch it choose brightness
Zoom the image in or out in the sequence of ×2×3×4×5×1/2× 1/3 ×1/4
In DVD mode, touches it chooses Repeat 1=>repeat title =>repeat all. In VCD mode, touch it
can choose REP 1 => REP DIR => REP ALL
13
Page 16

DVD Operation
Touch it to turn on / off random playback.
Touch it go to EQ mode
Select the subtitle language
Touch it setting the display brightness of TFT panel
Touch it go to setting
Press it to select title (only the file has many files)
Press it to select file
In VCD mode touch it can choose PBC ON or OFF
USB/SD Operation
When a file of USB or SD card is played (music, video, photo), the screen will show following interface:
Press it to repeat REP 1 => REP DIR => REP ALL
Press it to skip to the previous track
Play/pause button. Press it to break the track, press again to resume playback.
to resume playback
Press it to skip to the next track
Press it to select file
Press it to select title (only the file has many files)
Press it to play track randomly
Rotate the image in the sequence of ×90×180×270
Change the image playback direction
Zoom the image in or out in the sequence of
×2×3×4×5×1/2× 1/3 ×1/4
14
Page 17

Settings Operation
Setting Control
Your device has default system setting, you can customize the settings to suit your personal needs.
Once you change settings, your new settings will remain until you change it again. To start setting,
tap it on main menu.
General Control
Tap Wallpaper button to setup wallpaper
Tap Panel Adjust button to setup panel touch
15
OSD Language : select English/Spanish
Wallpaper :select and change the wallpaper setting
Panel Adjust :calibrate the touch panel
Radio Area :select radio area, from Europe— USA—
South America—Russian— Asia
Clock & Calendar :setting the clock and date
SWC : program Steering Wheel Control
Key Beep :set beep sound on or off
Standby Display :set standby display on or off
Version : just show you the firmware version
Restore Default
Tap center of the and hold at least 2S, after
tap five point, then it will show OK in the
picture. and press OK exit calibration mode.
Page 18

Settings Operation
Tap time setting button to setup time Tap SWC item to program SWC
1) First check whether the car has steering wheel button.
2) The steering wheel and the unit must be connected on the line.
3) While holding down the button on the steering wheel and the corresponding button on the SWC
interface it will display complete setting. When all the buttons on the steering wheel and the
corresponding button on the SWC interface complete set ting, you can use the steering wheel butt on to
operation the unit, such as in radio mode, press
button or button to search station backward or
forward; In DVD mode, press
button or button to select the pr evious or next track and activate
fast reverse (REW) search or fast forward in a track, press VOL+ button or VOL - button to adjust the
volume.
Note:
1. The “Enter” button and the “reset” button are not included in steering wheel, press the “enter”
button to confirm the select, press the “reset” button to clear the former select.
2. The restriction of use SWC is the voltage between the adjace nt buttons are above 0.2V that can be
identified.
DVD Setup Menu
[1].Subtitle Lang setting:
With this option you can select the preferred language for the
subtitles. When the selected language is recorded on the disc
then this language will automatically be shown. If not, the first
language recorded on the disc is displayed.
[2].Audio Lang setting:
With this option you can select the preferred language for the
audio output. When the selected language is recorded on the
disc (not all discs have multiple languages recorded) then this
language will automatically be played. If not, the first language
recorded on the disc is played
16
Audio Language : select desired language
Subtitle Language :select desired language
Menu Language :select desired language
Password
Rating
Page 19

Settings Operation
[3]. DVD Menu Lang setting:.
With this option you can select the preferred language for the disc m enu. When the selected languag e
is recorded on the disc then this language will automatically be selected. If not, the first language
recorded on the disc is displayed.
Sound Control
Tap Sound
Tap EQ button to show following interface
TV Type
Set TFT screen mode to the correct ratio:
Three screen ratio modes are available, Normal/PS (4:3
Pan Scan) and Normal/LB (4:3Letterbox) Different disc
formats will display different images depending this
setting and the screen size used.
Note: additional wide 16:9 only for DVD player.
17
Sound Effect
Subwoofer
Loudness : select on/off
Loud Cut off Freq:
EQ : select User—Classic—Rock—Pop—Jazz
—
Electric—Flat
Reset
Aspect ratio : select 4:3PS/4:3LB /16:9
Adjust : adjust screen brightness
/contrast/Hue/Saturation/Sharpness
Panel :setting backlight time
Page 20

Settings Operation
Bluetooth section
Subwoofer
Connect the subwoofer to the unit using sub output (see electrical diagram), tap menu on screen enter
into main menu setting choose setting menu., choose sound and s et subwoofer on to ena ble subwoofer .
Parking
When the car is stopped and the parking brake is working, the screen can display the video image,
otherwise the screen can't display the video image.
Back View Camera
This unit is equipped with back view camera output. The camera is used to observe the situation behind
the vehicle when you are backing the car.
Please connect your back view camera with the back car video input. And connect the reverse wire for
back a car with the rear gear light. Rear view camera picture will be enabled when you are backing the
car.
Bluetooth Operation
To enter bluetooth mode, you can tap bluetooth icon on main menu or long pres s the mute/bluetooth
button on the remote control or press mode button on remote.
Tap
calling button to use phone functions.
Tap
music button to start bluetooth music player.
Pairing Mode
At the 1st time when using bluetooth, you need to pair the mobile
phone first.
When a phone has not been paired with the unit, the BT icon and
pairing mark will blink continually on the panel.
When the unit have connect with phone, the BT icon will turn on
and the mobile phone name (if available) will be display on the
panel.
According to mobile pairing device manual, after searching new
device (BT friendly name: Planet Audio P9759B) select it, input password "0000" and confirm ok,
device paring is finished.
The phone name will available on the panel after the pairing is completed. It means device
is connected and ready for bluetooth communication.
Auto-connect - Disconnect
When power on the unit, the last paired phone will be connected to the device via Bluetooth
automatically, it can keep five phone names in the unit. Tap
will delete from the first paired
phone. if you want to disconnect the bluetooth connection, turn off the mobile phone Bluetooth function
or tap the phone name in the list , and tap phone name again it will be connected again.
18
Auto connect: select on/off
Auto answer : select on/off
Page 21

Bluetooth Operation
Calling Button
Tap on calling button to enter call mode.
In call mode, the unit can be used as your phone, making and receiving calls are possible with
bluetooth, simply tap phone number and tap button
to make a call, and tap
button to hang up.
1) Tap clear button shortly to delete a wrong digit, tap
the clear button or press RDM/C button on remote for 3-4
seconds to delete all the numbers at once.
2) Tap the button for 3-4 seconds, the device
automatically makes a call to the latest call in its call log.
3) The volume will be operated separately while calling.
4)In handsfree mode, press the icon
, it will ask or enter into a menu to download phonebook.
Note: the phonebook only supports western characters, any
difference in character will be shown such as “+, * or #”.
(A2DP) Music Mode
Tap music button to listen music in bluetooth mode.
Tap the button for ‘music’ in bluetooth main menu.
You can select the function with the key for previous, play /
pause, stop, and next.
A2DP(Advanced Audio Distribution Profile) Music Player
A2DP is a function which can receive the audio frequency signal
from the mobile phone, amplified by the car audio and played
out by the car speakers.
Notice: your mobile phone need to support A2DP.
Tap the buttons on the screen as shown, or press corresponding buttons (pause/play, stop,
previous/next) on remote control to play, pause, play previous, or next music file.
Aux-In
Aux-In MODE
To start Aux-In Mode, tap Aux-In icon from main menu screen. connect the ex tern al audio sig nal source
to this unit will display “NOW PLAYING”.
Note: Aux-In does not support a video display function . So, there is “NO SIG NAL DETECTED” displayed
if no audio signal input. Press the
icon to be back to main menu.
19
Page 22

Notes of Disc
In order to view videos, the parking brake wire must be connected, and the vehicle stopped
20
Page 23

Troubleshooting
Symptom Cause Remedy
General
Power does not turn
on
(No sound is
produced)
Fuse is blown
Replace with fuse of the same amperage. If
the fuse blows again, consult your store of
purchase
In correct wiring Consult your local retailer
No sound output when
operating the unit with
amplifiers or power
antenna attached
Power antennal lead
is shorted to ground,
excessive current is
required or remote
on the amplifiers or
power antenna
1. Turn off the unit
2. Remove all wires attached to the power
antenna lead, check each wire for a
possible short to ground using an ohm
meter
3. Turn on the unit
4. Reconnect each amplifier remote wire to
the power antenna lead one by one. If the
amplifiers turn off before all wires are
attached, use an external replay to provide
remote-on voltage (excessive current
required)
Nothing happens
when buttons
are pressed
Display is not
Accurate
Unit needs to be
Reset
Using a pen or toothpick, press and release
the Reset button.
Panel or main unit
Connectors are dirty
Wipe the dirt off with a soft cloth moistened
with cleaning alcohol
CD
Sound is bad directly
after power is turned
on
Compact disc is dirty Clean the compact disc without scratches
Compact disc is
heavily scratched or
warped
Replace with a compact disc without
scratches
Sound is bad directly
after power is turned
on
Water droplets may
form on the internal
lens when the car is
parked in a humid
place
Let it dry for about 1 hour with the power on
21
Page 24

Troubleshooting
symptom Cause Solution
No power
The car ignition is not on
If the power supply is properly connected
to the car accessory switch the ignition key
to “ACC”
The fuse is blown Replace the fuse
Disc cannot be loaded
Presence of disc inside the
player
Remove the disc in the player then put a
new upward
Disc cannot be read
Inserting the disc in upside
down
Insert the compact disc with the label
facing
upward
Compact disc is extremely
dirty or defective
Clean the disc or try to play a new one
Temperature inside the car
is too high
Cool off until the ambient temperature
returns to normal
No sound
Volume is in minimum Adjust volume to a desired level
Wiring is not properly
connected
Check wiring connection
The operation keys do
not work
The built-in microcomputer
is not operating properly
due to noise
Press the power button for about 10
seconds
to reset the unit
Front panel is not properly
fix into its place
Sound skips
The installation angle is
more than 30 degrees
Adjust the installation angle to less than 30
degrees
The disc is extremely dirty
or defective
Clean the compact disc/try to play a new
one
The radio does not
work, the radio station
automatic selection
does not work
The antenna cable is not
connected the signals are
too weak
Insert the antenna cable firmly select a
station manually
22
Page 25

General Specification
General
Power supply 11~16V DC
Current consumption Max. 10 A
Maximum power output 80W x 4 channels (max)
Compatible formats DVD ±R/RW Video, CD ±R/RW Audio & Video
Dimensions (W x D x H) / weight 7.0” x 6.4” x 2.0” /3.9 lbs
Working temperature range
-4°F -- +140°F
ESP function 10 sec. for Audio CD, 120 sec. for MP3
TFT display
Screen size 7.0 inch
Resolution 800*480 pixel
Aspect ration 4:3/16:9
Brightness
460 cd/㎡
Contrast ratio 500:1
FM radio
Frequency range(Europe area) FM:87.5 –108MHz(Step 50KHz)
Frequency range(America area) FM:87.5 –107.9MHz(Step 200KHz)
Frequency range(Asia area) FM:87.5 –108MHz(Step 100KHz)
Frequency range(South America area) FM:87.5 –108MHz(Step 100KHz)
Frequency range(Russia area) FM:87.5 –108MHz(Step 50KHz) 65-74MHz(Step
30KHz)
Preset memory stations 18
AM(MW)radio
Frequency range(Europe area) AM:522-1620(Step 9KHz)
Frequency range(America area) AM:530-1710(Step 10KHz)
Frequency range(Asia area) AM:531-1602(Step 9KHz)
Frequency range(South America area) AM:520-1710(Step 10KHz)
Frequency range(Russia area) AM:522-1620(Step 9KHz)
Preset memory stations 12
Audio specification
Frequency response 20 Hz-20 KHz
TV Color System Color system NTSC/PAL
USB interface
USB type USB 2.0 full speed
Support format MP3 , WMA, MPEG1, MPEG2, AVI
Specifications are subject to change without notice, mass and dimension are approximate.
23
 Loading...