

Page 1
Page 2

1
34
To ensure safety while driving
and to comply with laws,
drivers should not watch video or
operate the video device while driving.
Page 3
34
2
PRECAUTION
CAUTION
RISK OF ELE CT RIC SHO CK
DO NOT OP EN
CAUTION: TO R ED UC E THE RISK OF ELECTRIC SHOCK, DO NOT REMOVE
COVER (OR BACK). NO USER SERVICEABLE PARTS INSIDE. REFER
SERVICING TO QUALIFIED SERVICE PERSONNEL.
The lighten in g fl as h with arrowhea d sy mb ol, within an equ il at er al triangle , is
intended to a le rt t he u ser to the presen ce o f un insulated dan ge ro us v oltage
within the pr od uc ts e nclosure that m ay b e of s ufficie nt m ag nitude to const it ut e
a risk of elect ri c sh oc k to persons.
The exclama ti on p oi nt within an equi la te ral triangle is i nt en de d to alert user t o
the presenc e of i mp or tant operatin g an d ma intenance (se rv ic in g) instruct io ns
!
in the litera tu re a cc ompanying the a pp li ance.
WAR NING: TO REDUC E THE
RISK OF F IR E OR ELECTR IC
SHOCK , DO N OT EXPO SE
!
THIS APP LI AN CE TO R AIN OR
MOIST UR E.
CLAS S 1 LASER PRODU CT
Laser produ ct s ym bo l: located on the r ea r pa nel of the unit, in di ca te t his player is a c la ss
laser produ ct , on ly u se weak laser and n o ha za rdous radiati on o ut si de of the unit.
1.Read thro ug h th is i nstruction ma nu al b efore install at io n an d use.
2.Do not touc h th e po we r plug with wet han d.
3.Switch of f th e main power wh en t he u ni t is not in use. (Dis co nn ect the power plu g fr om
the power out le t wh en y ou do not intend to u se t he u nit for a prolong ed p er io d of time.)
Before movi ng t he u ni t, remove the dis c fr om t he unit/ tray fir st .
4.Do not open t he c ov er o r touch any of the co mp on ents exposed ou t of t he u ni t, only for
qualified t ec hn ic ians.
5.Do not expo se t he u ni t under direct su nl ig ht or nearby obje ct s th at r adiate heat t o av oi d
damage the un it .
6.Do not plac e th e un it i n moist and humid c on di tions, which ef fect the pick-u p of t he u nit
lead to out of wo rk .
7.Place the u ni t on a f la t surface and ven ti la tive conditio n. P le as e ensure the ve nt il at ion
holes are not c ov er ed t o avoid overhea ti ng a nd malfunctio n.
8.Clear the p an el a nd c ase with soft dry c lo th o nly, do not ap pl y an y kind of thinner,
alcohol or sp ra ys .
9.The appar at us s ha ll not be exposed t o dr ip ping or splashi ng a nd t ha t no objects fi ll ed
with liquid s, s uc h as v ases, shall be pl ac ed o n the apparatus .
Page 4

3
Contents
1. Before Operation...... .. .. .. .. .. .. .. ..................... .. .. .. .. .. .. .. ..................... .. .. .. .. .. .. .. .4
1.1 Glossary.. .. .. .. .. .. ....................... .. .. .. .. .. .. ....................... .. .. .. .. .. .. .............. 4
1.2 Precautions........ .. .. .. .. .. .. ....................... .. .. .. .. .. .. ....................... .. .. .. .. .. .. ..4
1.3 Maintenance and Cleaning of D is cs .. .. .. .. .. ..................... .. .. .. .. .. .. .. .............5
1.4 Battery Information of Re mo te C on tr ol .. .. ....................... .. .. .. .. .. .. ...............5
1.5 Remote Control Descriptio n. .. .. .. .. .. ....................... .. .. .. .. .. .. ....................... 6
1.6 Locations and Names of Contro ls o n or i n un it .. .. .. ....................... .. .. .. .. .. .. ...7
1.7 Connection Description. .. .. .. .. .. .. ....................... .. .. .. .. .. .. .............. ....8
1.8 Unit Installation.... .. .. .. .. .. .. ....................... .. .. .. .. .. .. ....................... .. .. .. .. .. .. 9
2. Common Operation........ .. .. .. .. .. .. ....................... .. .. .. .. .. .. ....................... .. .. .. .. 10
3. Radio Operation....... .. .. .. .. .. .. .. ..................... .. .. .. .. .. .. .. ....................... .. .. .. .. .. .. 11
. Rear View cam er a .. .. .. .. .. .. ....................... .. .. .. .. .. .. ......................... .. .. .. .. .. .. ...14
4
5. Disc, USB and Card Operation.. .. .. .. .. .. .. ....................... .. .. .. .. .. .. .....................14
5.1 Load/unload Disc, USB or Card .. .. .. .. .. .. ....................... .. .. .. .. .. .. ................14
5.2 Pause Playback....... .. .. .. .. .. .. ....................... .. .. .. .. .. .. ....................... .. .. .. .. 16
5.3 Stop Playback ......... .. .. .. .. .. .. ....................... .. .. .. .. .. .. ....................... .. .. .. .. 16
5.4 Select Chapter/Track with >>|/|<< Button s. .. .. .. .. .. .. ....................... .. .. .. .. .. .1 6
5.5 Select Chapter/Track with Number Buttons.. .. .. .. .. .. .. ....................... .. .. .. .. .1 6
5.6 Select Chapter/Track with Root/PBC Menu... .. .. .. .. .. .. ....................... .. .. .. .. 16
5.7 Playback with Speed.... .. .. .. .. .. .. .. ..................... .. .. .. .. .. .. .. ..................... .. .. 17
5.8 Playback with Slow Speed... .. .. .. .. .. .. ....................... .. .. .. .. .. .. ....................17
5 .9 Display Still Frame Step by St ep .. .. .. .. .. .. ....................... .. .. .. .. .. .. ..............18
5.10 Playback Repeatedly.. .. .. .. ..................... .. .. .. .. .. .. .. ..................... .. .. .. .. .. .1 8
5.10.1 One/All Repeat.... .. .. .. .. .. .. .. ..................... .. .. .. .. .. .. .. ..................... .. .. .. .1 8
5.10.2 A-B Repeat......... .. .. .. .. .. .. ....................... .. .. .. .. .. .. ....................... .. .. .. .. 18
5.11 Playbac k in S ca n Mo de .. .. .. ....................... .. .. .. .. .. .. ....................... .. .. .. .. .1 9
5.12 Playback from a specifie d Ch ap te r/ Track or a Sp ec if ie d Tim e. .. .. ..............19
5.13 Playback in Random...... .. .. .. .. .. .. ....................... .. .. .. .. .. .. ....................... .1 9
5.14 Playback in Diff er en t View-Angle....... .. .. .. .. .. .. .. ..................... .. .. .. .. .. .. .. ...19
5.15 Playback in Zoom Mode... .. .. .. .. .. .. .. ..................... .. .. .. .. .. .. .. ....................19
5.16 Change Caption Language. .. .. .. .. .. .. ....................... .. .. .. .. .. .. .. ..................20
5.17 Change Audio Language.... .. .. .. .. .. .. ....................... .. .. .. .. .. .. ....................20
5.18 Look over Playback Statu s. .. .. .. .. .. .. ....................... .. .. .. .. .. .. ....................20
5.19 Program Playback.... .. .. .. .. .. .. .. ..................... .. .. .. .. .. .. .. ..................... .. .. .. 21
5.20 Playback IMAGE files.. .. .. .. .. .. .. ....................... .. .. .. .. .. .. ....................... .. .2 1
5.21 Playback MP4 files.... .. .. .. .. .. .. .. ..................... .. .. .. .. .. .. .. ..................... .. .. .2 2
5.22 ESP and ID 3 Fu nc ti on .. .. .. ....................... .. .. .. .. .. .. ....................... .. .. .. .. .. .2 2
5.23 DVD System Menu Setup Operat io n. .. .. .. .. ....................... .. .. .. .. .. .. ..........22
* Parental Control....... .. .. .. .. .. .. ....................... .. .. .. .. .. .. ....................... .. .. .2 6
* Region Code............ .. .. .. .. .. .. ....................... .. .. .. .. .. .. ....................... .. .. .2 7
32
..........
6 .......... ................... .. .. .. .. .. .. .. ..................... .. 28
7. Troubleshooting........ .. .. .. .. .. .. ....................... .. .. .. .. .. .. .. ....................... .. .. .. .. .3 0
8. Specification....... .. .. .. .. .. .. .. ....................... .. .. .. .. .. .. ....................... .. .. .. .. .. .. .. ..31
.... Bluetooth Hands-Free System
Page 5
31
4
8. Spe ci fication
Gene ra l Specificati on
Powe r Su pply Requirem en t.......... .. ........... .. ............. ............D C 12 V
Maxi mu m Power Output. .. ........... .. ...4 x 85W(meas ur ed at DC 14.4 V)
Dime ns ions(w x h x d).... .. ........... .. ............. .. ....
DVD De ck S pecificatio n
Form at ........... .. ............. .. .........DV D/ VCD/JPEG/MP 4/ MP3/WMA/CD
Video Syst em ............. .. ........... .. ........... .. ........... .. ........... .. .....NTSC
Audi o Sy stem....... .. ............. .. ........... .. ........... .. ........... .2 4 bit/96KHz
Load in g System..... .. ........... .. ............. .. ........... .. .......... Aut o Lo ading
Moun ti ng An gle........ .. ........... .. ........... .. ............. .. ........... .. .0 to +/-30
Video Spec if ication
Video Type....... .. ........... .. ........... .. ........... .. ............. .. ....16:9 and 4: 3
Video Outp ut l evel......... .. ........... .. ........... .. .Composite: 1. 0± 0.2Vp-p
Load imped an ce: 75 ohms
Hori zo ntal Resoluti on ........... .. ........... .. ............. .. ........... .. ..........5 00
Audi o Sp ecification
Audi o Ou tput(Analog a ud io)........ .. ........... .. ........... .. ......2.0+0 -1. 0Vrms
Freq ue ncy Response. .. ........... .. ............. 20Hz ~ 20KHz(at 1 KH z 0 dB)
S/N Ra ti o(Audio)... .. ........... .. ............. .. ........... .≥90 dB(at 1KHz 0 dB)
Sepa ra tion....... .. ........... .. ............. .. ........... .. ........... .. ........... .. ..50dB
Radi o Sp ecification
FM Sec ti on
Freq ue ncy range.... .. ........... .. ............. .. .....
Usab le s ensitivity........ ............. .. ........... .. ........... .. ........... .. ........3uV
I.F Fr eq uency.. ........... .. ........... .. ........... .. ........... .. ............. .1 0.7MHz
AM Sec ti on
Freq ue ncy.. .. ........... .. ........... .. ........... .. ........... .
7.0" W x 3. 9"H x 6.4"D
87.5 MH z - 107.9.0MHz( US )
87.5 MH z - 108.0MHz(EU )
530K Hz - 1 710KHz(US)
522K Hz - 1 620KHz(EU)
1. Bef ore Operati on
1.1 Gl ossary
PBC (p layback con trol)
It is a ki nd of signal( menu) rec orded in the di sc with SVC D or VCD2.0
form at used for the p layback c ontrol. For t he discs co ntained PBC , It can
play back intera ctive sof tware with th e menu disp layed on moni tor scree n.
If the d isc contain s till imag es, it can play back high d efinition o f still ima ge.
Tit le
Gene rally, the title i s the importa nt part of DV D disc. for exa mple, the
them e part of movie i s title 1, th e part descri bed how to ma ke movie is tit le
2, the c ast is title 3, e tc. Every t itle contai n a serial nu mber that is ea sy to
look u p.
Chap ter
A title c an be divided i nto sever al blocks, so t hat every b lock can be ope rated
as a uni t, the unit is ca lled chap ter. Th e chapter c ontain a unit a t least.
Tra ck
It is th e biggest com ponent of V CD. General ly, every song of ka raoke dis c
is a tra ck.
1.2 Precautions
Safety
1. Power Source: The unit should be connected to power supply only of
the type described in the operating instructions or as marked on the unit.
2. The unit is designed for negative terminal of the battery which is
connected to the vehicle metal. Please confirm it before installation.
3. Do not allow the speaker wires to be shorted together when the unit is
switched on. Otherwise it may overload or burn out the power amplifier.
4. Do not install the detachable panel before connecting the wire.
Environment
1. Do not use this unit when water and moisture is near it.
2. If moisture forms inside the Lens, it may not operate properly. To correct
this problem, wait about one hour for the moisture to evaporate.
3. If the car interior is extremely hot, do not use the player until the car has
been driven for a while to cool off the interior.
Page 6
5
30
1.3 Maintenance and Cleaning of Discs
Disc Maintenance
1. To keep the disc clean, handle the disc by its edge, do not touch the disc
surface of the play side.
2. Do not stick paper or tape on the disc. If there is glue (or analog) on the
disc surface, must wipe it up before using.
3. Do not expose the disc to direct sunlight, or nearby heat sources such as
caliduct, or leave it in a car parked in direct sunlight where there can be a
considerable rise in temperature.
4. Put the disc inside disc case to keep temperature after finishing playback.
Disc Cleaning
1. Before playing, wipe the disc with a clean lint. wipe the disc outwards from
the disc center.
2. Do not use petrel, thinner. commercially cleaner or anti-static spray can
damage the unit.
B
A
Fig .1
Fig .2
Fig .3
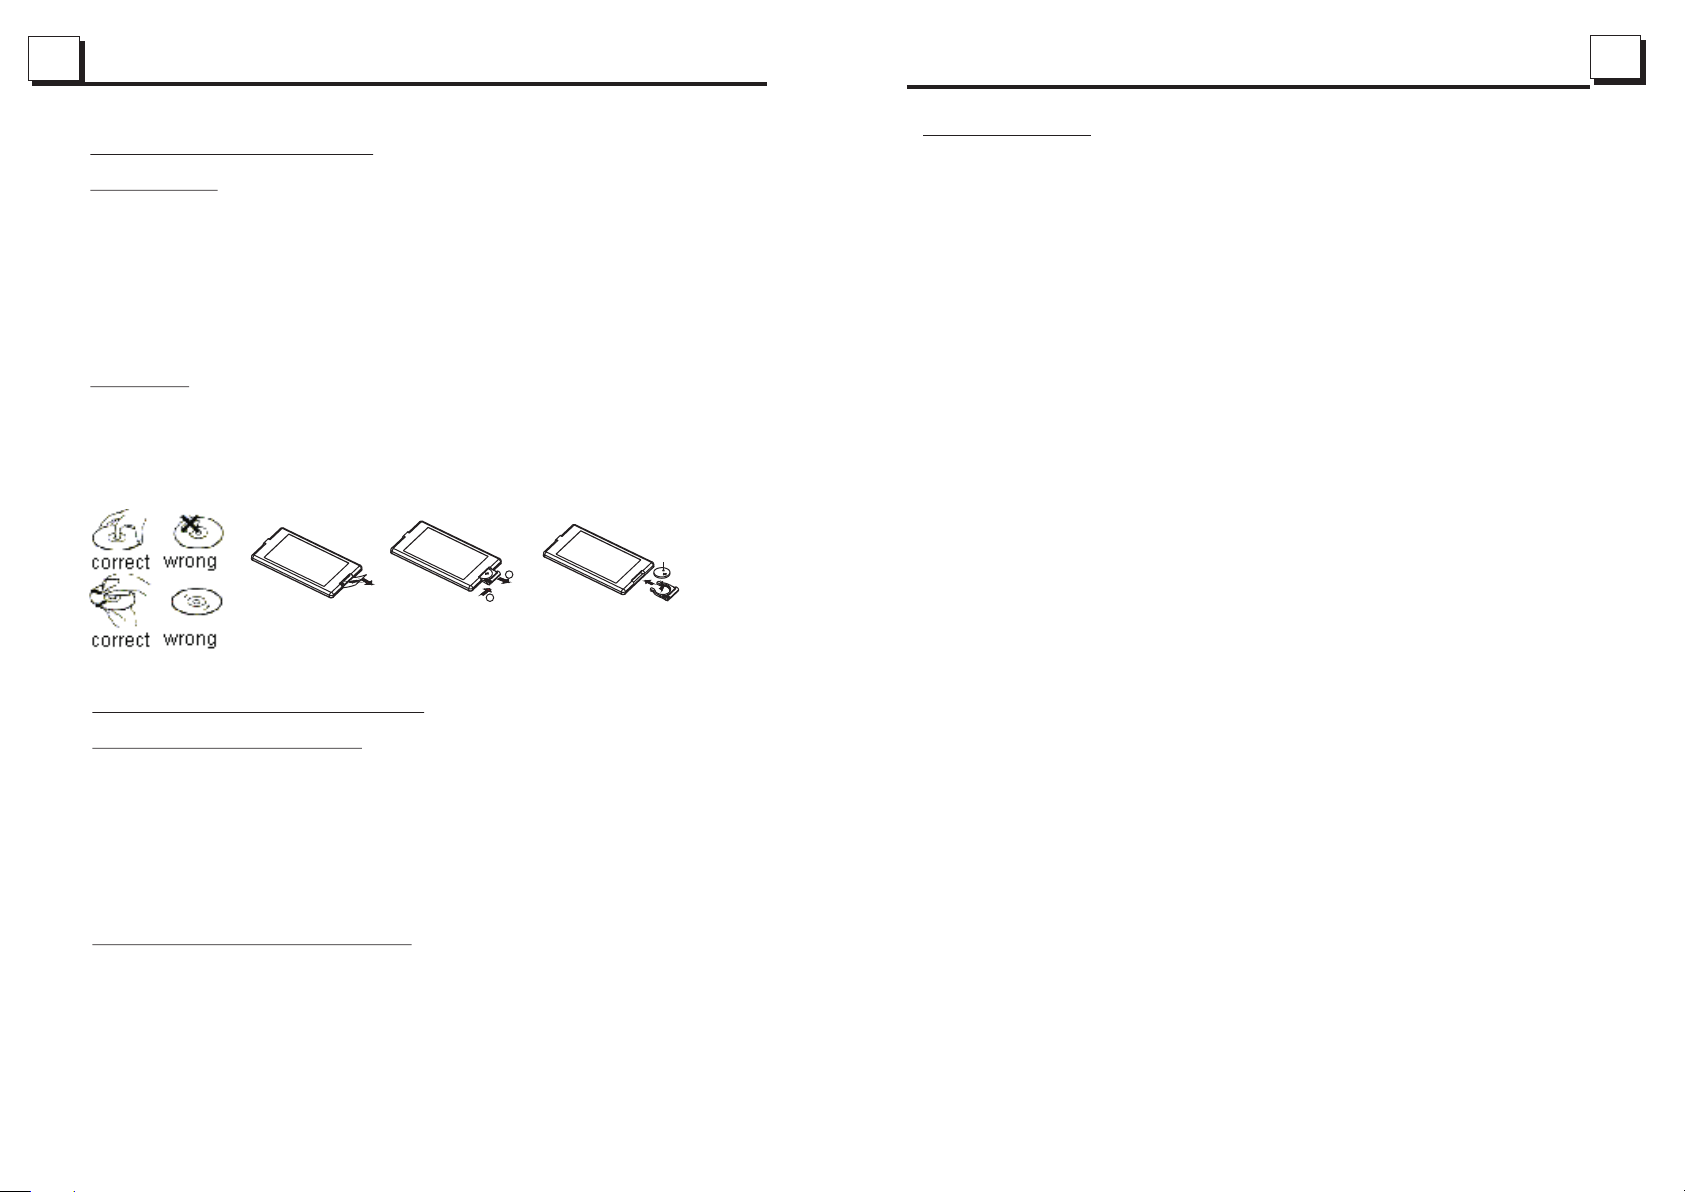
1.4 Battery Information of Remote Control
Replace Battery in Remote Control:
1.Before using the remote control for the first time, pull the insulating
sheet out of the remote control as the direction indicated by the
arrow.(see fig.1)
2.Press the movable block hold as the direction indicated by the A arrow
(See fig.2), then pull the battery holder out of the remote control as
the direction indicated by the B arrow(see fig.2).
3.Replace the old battery by a new battery with (+) polarity side upward.
(See fig.3).
4.Insert the battery holder to the original position in remote control.
(See fig.3).
Note about the Battery of Remote Control:
1.Improper use of battery may cause overheating or explosion. so that
Result in injury or fire .
2.Battery leakage may cause damage to the remote control(Battery
Life: 6 months with normal use in normal room temperature).
3.Do not short the battery.
4.Do not throw the battery into the fire.
5.To avoid the risk of accident, keep the battery out of reach of children.
+ side up
7. Trou bleshooti ng
Please re ad t he user ’s m an ual caref ul ly befo re u sing th e DV D pl ayer. If y ou h ave any t ro ubles
in using th is p layer, t ry t o solve t he p roblems b y th e sugge st ions ment io ned bel ow. I f you can
not rem ov e th e troub le a fter us in g all the sug ge stion s, p lease con ta ct the co mp any or the
techn ic al s ervic e ce nter au th orized by u s. F or the sa ke o f your safe ty, plea se d o not ope n th e
cover a nd r ep air the p la yer by yo ur self, if th at , it may ca us e electri c sh ock.
NO PICT UR E, SOUN D AND I NDICAT ION
* Ensur e th at the po we r switc h is o n.
* Ensur e th at the wa ll i nlet is o k.
* Ensur e th at the po we r cord is n ot d amage d or the fu se i s not blo wn .
* Ensur e th at the po we r plug is c on necte d to the in le t tight ly.
NO SOUN D BU T HAVE P ICTUR E
* Ensur e th at the pl ay er ’s audi o ou tput ha s a good co nn ectio n wi th moni to r’ s audio i np ut.
* Check w he ther th e au dio con ne ctor is d amage d.
* Check w he ther yo u ha ve turn ed d own the v olume .
* Ensur e th at you ha ve s et the ri gh t AUDIO se tup of th e pl ayer.
* Ensur e th at the au di o is not un de r mute.
NO PICT UR E BUT HAVE SOUN D
* Ensur e th at the pl ay er ’s vide o ou tput ha s a good co nn ectio n wi th moni to r’ s video i np ut.
* Ensur e th at you ha ve t urned y ou r monit or to the AV in put cha nn el conn ec ting to y ou r playe r.
* Check w he ther th e vi deo con ne ctor is d amage d.
* Ensur e th at you ha ve s et the ri gh t VIDEO s ettin gs o f the pla ye r.
BLACK AN D WH ITE PIC TU RE OR SCR EE N ROLLI NG
* Ensur e th at you ha ve s et the ri gh t TV SY STEM (e .g . PAL, N TS C) sett in g.
FLAWS OF PIC TU RE OR SOU ND
* Check w he ther th e se tting o f AUD IO is rig ht.
* Check w he ther th e di sc is scr at ched or s taine d.
* Check w he ther th e AV connec to r and the o utput t er minal i s st ained .
* Check w he ther th er e is cond en satio n insid e th e Lens. I f so , leave t he p layer o ff for an h our
or so, th en t ry agai n.
* Check w he ther th e in stall at ion ang le is les s th an 30°.
DISPL AY NO DI SC O R BAD DIS C
* Ensur e th at you ha ve p ut the di sc o n the tra y.
* Check w he ther th e di sc is put i n th e rever se side .
* Check w he ther th e di sc is dis to rted.
* Check w he ther th e di sc is sta in ed or scr atche d ba dly.
* Ensur e th at the di sc f ormat i s co mpati ble to th e pl ayer.
* Ensur e th at the te mp eratu re i nside t he car is n ot t oo high . If s o, cool o ff till t he a mbien t
tempe ra ture re tu rns to no rm al.
* Repla ce a nothe r di sc to ins er t it into t he disc c om partm en t.
REMOT E CO NTROL IS INS EN SITIV E OR DOES N OT WORK
* Check t he b atter ie s of remo te c ontro l and mak e su re that t he y are to be p ow erful a nd
good co nd uctiv it y.
* Direc t th e remot e co ntrol t o th e IR sens or of the p la yer.
* Check w he ther th er e are som e ob stacl es betw ee n the rem ot e contr ol a nd IR sen so r.
SOME FU NC TION BU TTONS D O NO T WOR K
* Turn off t he powe r, th en turn o n ag ain.
* Reset t he u nit to ze ro , then tu rn o n again .
* Remov e th e front p an el from t he u nit, th en inst al l it agai n an d then tu rn o n again .
THE TFT DISP LAY LO ST TO UCH EFF EC T
* Inser t a di sc and pr es s stop bu tt on , th en p ress zo om b utton , fi nally p re ss the ^ an d v bu tto ns t o
turn to c al ibrat e mo de and th en t ap the cr oss cur so r as it sho w un til dis pl ay ok and t ur n power o ff
and the n tu rn the un it o n again .
Page 7
29
6
4. In the connection status: the audio of mobile phone transfers to the car audio system
whenever a dialling takes place or receiving a call.
5. Dialling when in connection status
5.1 Dial with the mobile phone directly.
5.2 Dial with remote control with the following procedures:
(1) Input telephone number with number buttons 0-9
* Press CLEAR button briefly to cancel the wrongly input number if necessary
(2) Press TEL briefly to execute the dialling.
5.3 To redial the last phone number dialled
Press REDIAL button briefly or tap the icon to validate the last phone number.
6. Accept/Reject/End Call
6.1 When ringing, press TEL button briefly to accept the call;
6.2 When ringing, press HANGUP button briefly to reject the call;
6.3 When talking, press HANGUP button briefly to end the call.
Note: During ringing, the phone number appears.
7. To transfer the audio of a file played by Mobile Phone to the Car Audio Player
In the connection status between the Bluetooth devices of the Car Audio Player
and a Mobile Phone, if the mobile phone can play audio or video files and support
A2DP, when the Mobile Phone plays an audio or video file(For some Mobile Phones,
you must select Play by BT firstly), the audio of the playing file will be transferred
to the Car Audio Player.
In A2DP mode, if the Bluetooth device of the Mobile Phone support AVRCP, the
functions of the >>|, |<< , PLAY/PAUSE , EJECT, MUTE, EQ, LOUD, + , - and SEL
buttons are the same as one in media mode(no fast forward/backward functions for
the >>|/|<< buttons). The other buttons available in media mode are not available.
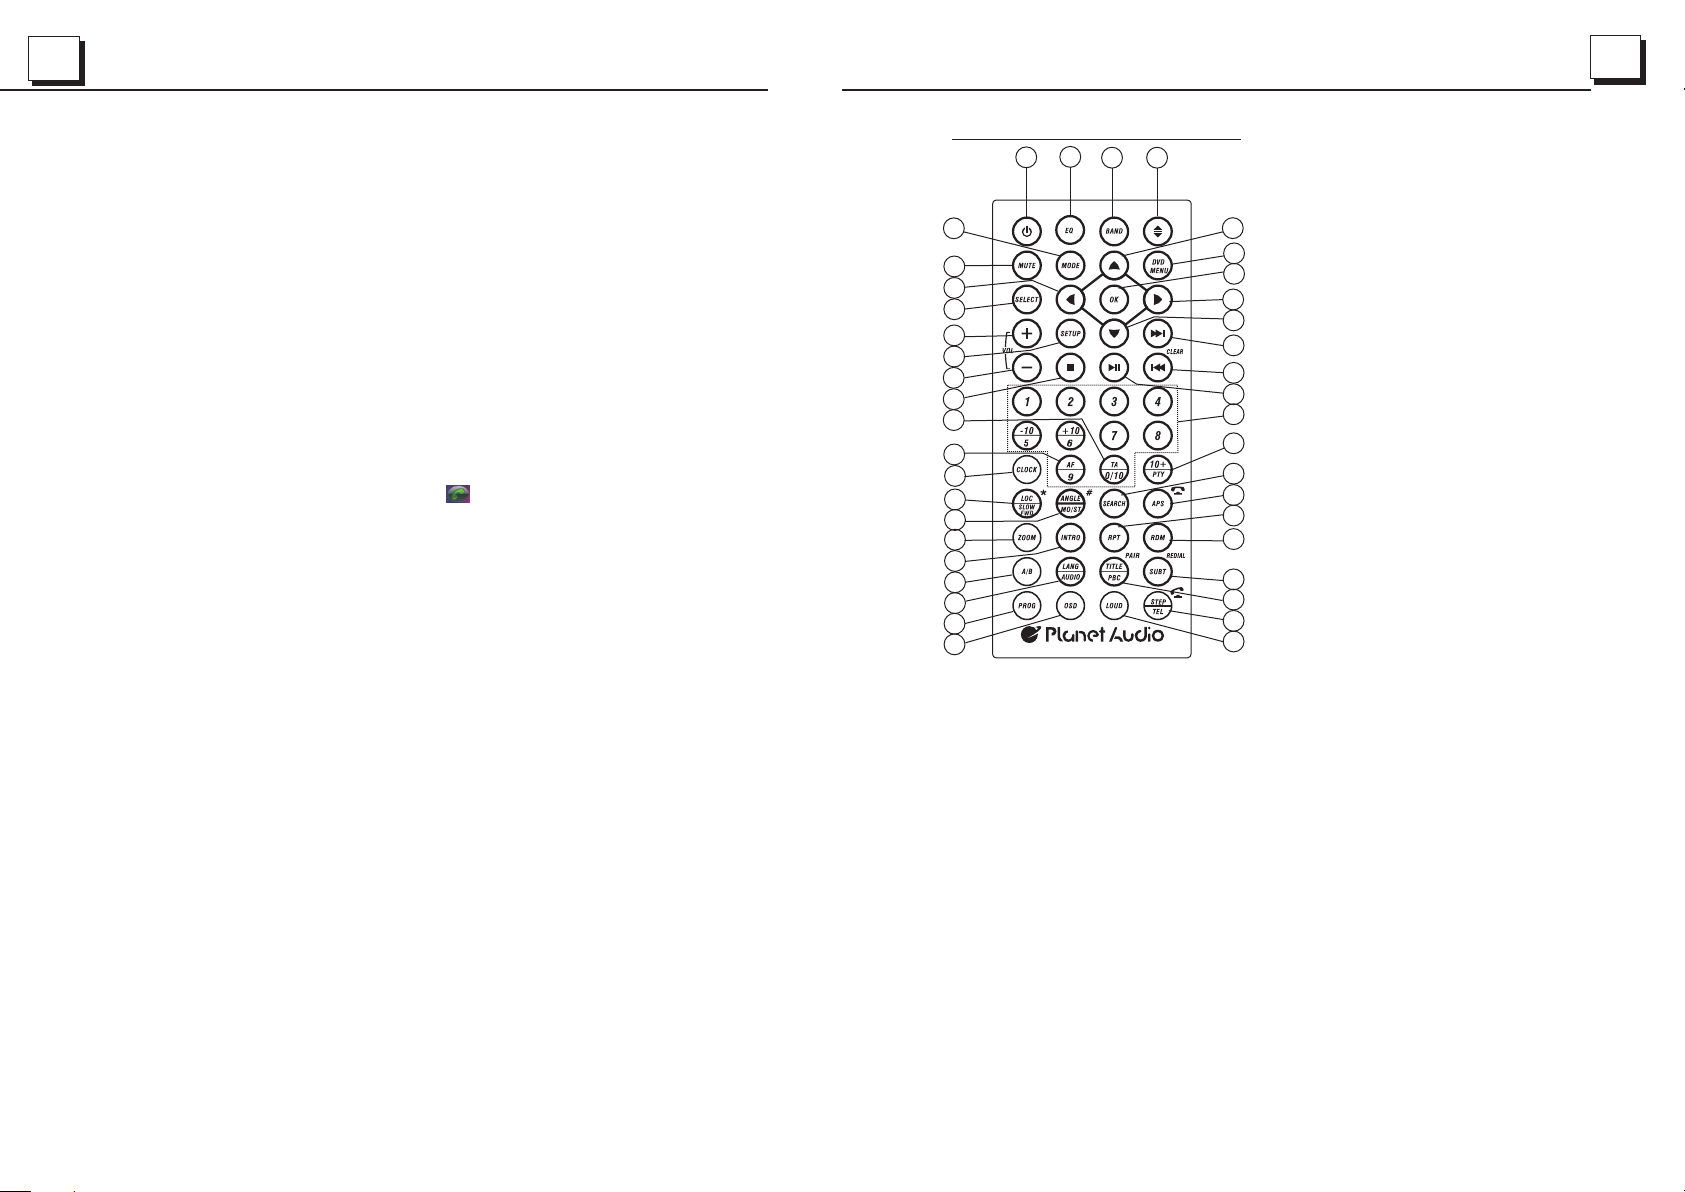
1.5 Re mote Contro l Descrip tion
3
27
14
29
32
9
34
13
31
30
40
41
24
28
21
22
26
25
23
36
37
16. SEARCH BU TT ON
17. RDM BUTTO N
18. RPT BUT TON
19. SUBTITL E/ RE DI AL BU TTON
20. TIT LE /P BC/PAIR BU TTON
21. VIEW- AN GL E/ST/# BUTT ON
22. ZOOM BUTT ON
23. AUDIO BUTT ON
24. CLK BUTTO N
25. A-B BUTTON
26. INT BUT TON
27. EQ BUTTON
28. LOC/SLO W- FWD/* BUTTO N
1
35
1. ANG BUTTO N
4
2
33
6
8
5
7
10
11
12
16
15
18
17
19
20
39
38
2. DVD MENU BUT TO N
3. POWER BUTT ON
4. ^ BUTTON
5. >>| BUTTON
6. > BUTTON
7. |<< BUTTON
8. v BUTTON
9. SEL BU TTON
10. PLAY/PAUSE BUTTO N
11. NUMB ER (0 ~1 0,+10
-10) BUTTON S
12. 10+/PTY B UT TON
13. SETUP BUT TON
14. MODE BUTT ON
15. APS/Hang U p BU TTON
29. MUTE BUTT ON
30. STO P BUTTO N
31. VOLUME- B UT TON
32. < BUTTO N
33. OK BUTTON
34. VOLUME+ B UT TON
35. BAND BUTT ON
36. PROG BUTT ON
37. OSD BUTTO N
38. LOUD BUTT ON
39. TEL BUTTON
40. TA BU TTON
41. AF BUTTO N
Page 8
7
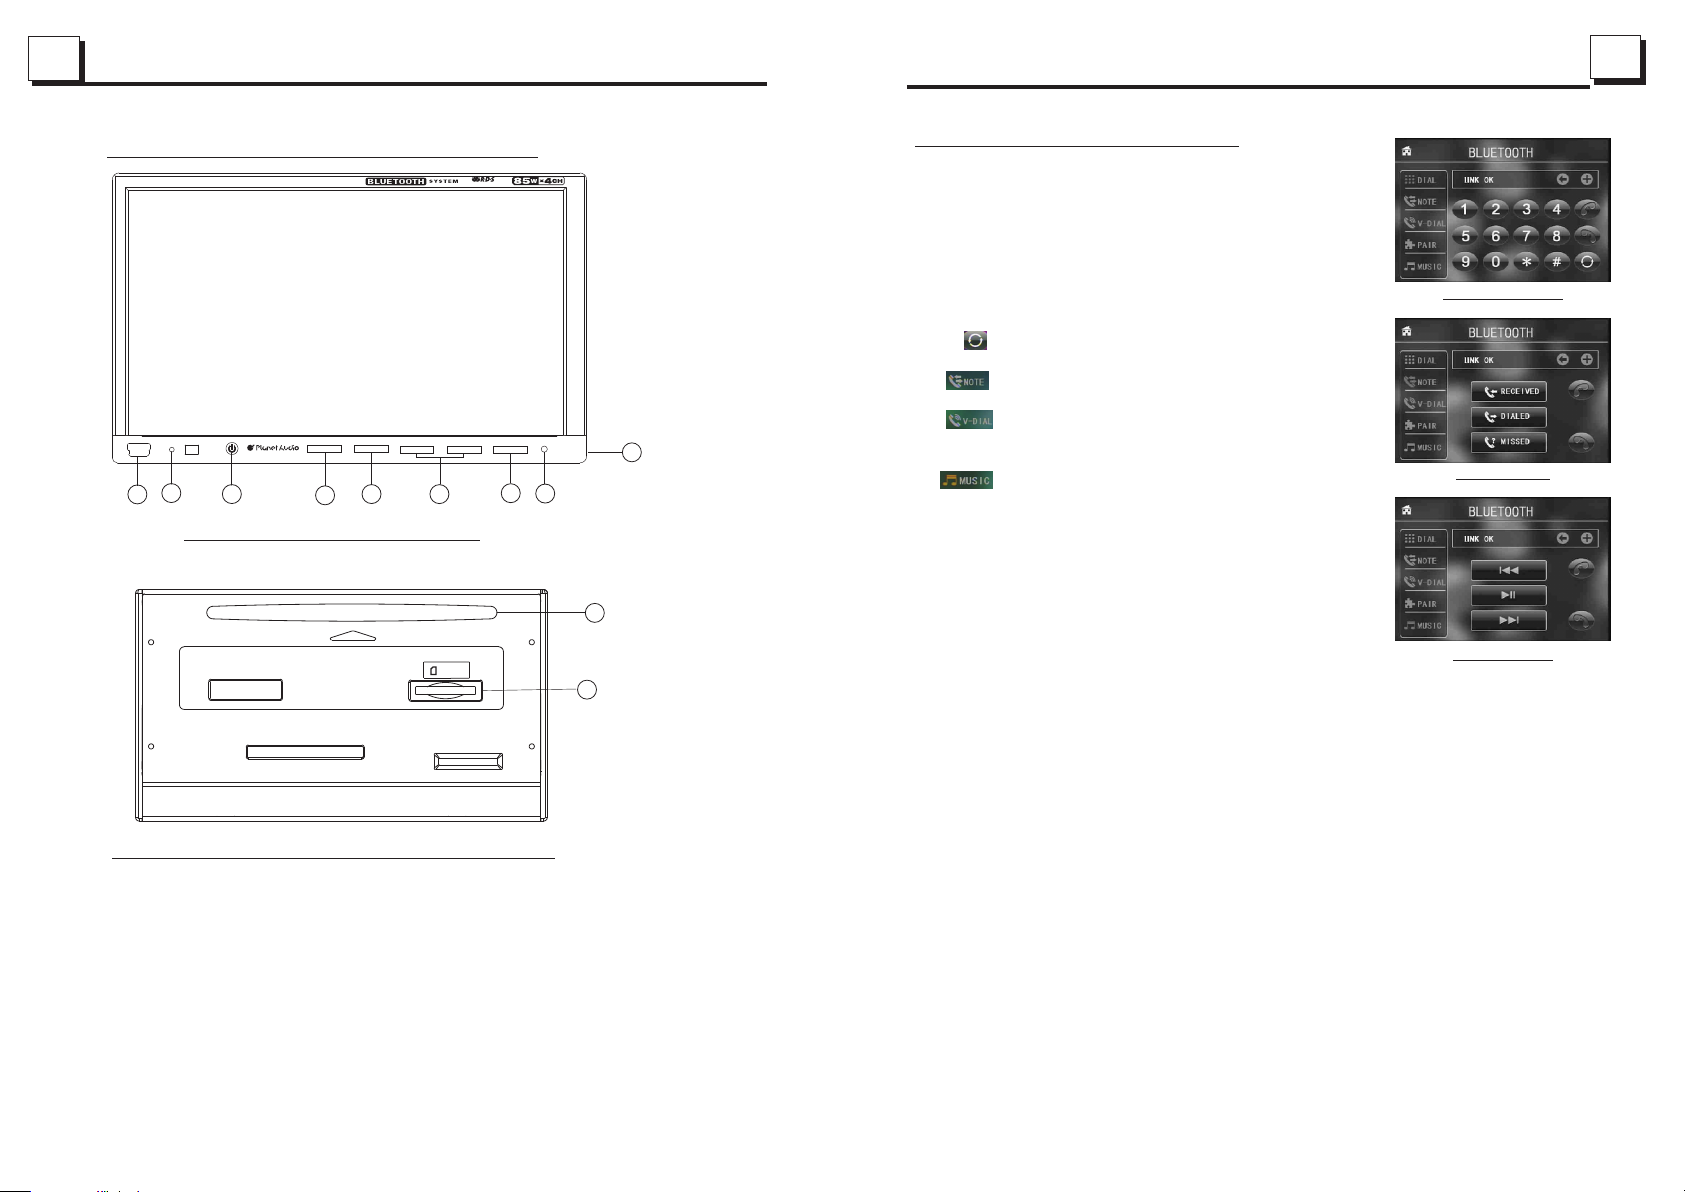
1.6 Lo cations and N ames of Con trols on or in un it
7" TFT
MUTE
8
7
1
The Dia gr am of the F ac e of the Fr on t Pan el
MENU
2
_
ANG
3
4
EJECT
+
6
28
Bluetooth Hands-Free System.
6.
1. Enter Bluetooth mode
When you use MENU button or Mode Menu to enter
Bluetooth mode, it will display Bluetooth interface as
right.
In Bluetooth interface, the icons descriptions are as
follows:
: Tap this icon can transfer audio between the
the Car Audio System and phone.
: Tap this icon to turn to call messages interface
as right.
RESET
P9752B
5
9
: Tap this icon to turn to audio call mode, call the
name you have record in your phone, then it
will can out automatically.
: When connect with the BT device, the phone
music playback can control by tap this
icon as right.
The other icons are same as ones in the front panel
and Remote Control.
Blu et oot h int er fac e
NOTE in ter fac e
SD/M MC
The Dia gra m of t he Fa ce of the U nit Afte r Sli di ng do wn the Fr ont P an el
1. POWER/MU TE b ut to n
2. MENU butto n
ANG button
3.
+ and - buttons
4.
RESET but to n
5.
EJECT but to n
6.
7.
USB jack
8. Micphone
9.AUX jack
10.
Disc slot
11. SD Car d sl ot
10
11
2
. Pairing and connection
1) Turn on the Bluetooth mode of the mobile phone;
MUSIC i nte rfa ce
2) Select the item of Finding the Bluetooth Device and enter it. After finishing the finding,
it will show the name of the Bluetooth Device if finding a Bluetooth Device.
Select it and enter it, then it will show a interface that ask you to input a password,
input the password 0000 and then enter it. Then it will tell you pair OK.
3) For some mobile phones, they can automatically connect with the BT device of the
car audio system after pairing is ok; for some mobile phones, they need to select the
paired BT device and press the CONNECTION button . When connection is ok, the
LCD of the car audio system will show LINK OK.
* when pairing is failed, press and hold the PAIR button on the remote control to enter
pairing mode, then the LCD will display PAIR START, then pair and connect with
mobile phone again.
3. Use the mobile phone to do connection or disconnection
In the connection status, find the paired and connected Bluetooth Device, then press
the disconnection button to do disconnection;
In the disconnection status, find the paired and disconnected Bluetooth Device, then
press the connection button to do connection.
Page 9
27
8
* Region C od e
Q: Not beg in t o pl ay back but to display REGION ER RO R af te r inserting disc into
disc com pa rt me nt. Why ?
A: Becau se t he D VD p layer and disc has respecti ve r eg io n code. If the region codes
of them ar e no t ma tc h with each other, the DVD playe r ca n no t pl ay the disc.
Appendi x: The regio n co de o f DV D:
The Motion Picture As so ci at ion of America (MPAA) divided the world int o 6
region s, a nd n am ed every region a code, namel y re gi on c ode. The r eg ion codes
and the co un tr ie s or areas represented by the r eg io n co des as follows:
Region 1 : Ame ri ca , Canada, East-Pacific In la nd s;
Region 2 : Ja pa n, Wes t Eu ro pe , North Europe, Egypt, Sout h Afr ic a, M iddle East;
Region 3 : So ut h- east Asian countries inclu de Taiwan, Hon g Ko ng , So uth Korea,
Thailand, indonesi a, e tc .;
Region 4 : Aus tr al ia, New Zealand, Central So ut h Ame ri ca, South Pacific Inlan ds ;
Region 5 : Ru ss ia , Mongolia, Indian Penins ul a, M id dle Asia, East Europe, Nor th
Korea, Nor th Af ri ca , North-west Asia etc.;
Region 6 : Ch in a ma inland.
Basica ll y, when a DVD m ov ie d is c fo r the version of region 6 was d ec id ed n ot to
issue, w e ne ed t o pu rchase another DVD player t ha t ca n pl ay the DVD movie disc
for the ve rs io n of n on-region 6. In order to view t hi s di sc , viewer who does not have
the non- re gi on 6 D VD player facilities will h av e to s pe nd extra sum of money to buy
it. The problems cau se d fr om t he a rea code inconsistenc y be tw ee n the disc and the
DVD play er h as p us hed for the production of Unl oc k- Ver sion DVD player facilit ie s,
and some D VD d is c se ts allow user to modify the are a co de s fo r a limited number of
times. B ut n ot e th at only the discs produced by t he 8 b ig ge st filmmaking companies
of Americ a re st ri ct so, they are not one of origin al D VD f or mat. Tha t is t o sa y, th e
DVD movi e di sc s no t produced by the 8 biggest fil mm ak in g companies of America
were not r es tr ic ted by the rule of region code. G en er al ly, the y ar e ca ll ed
FreeRe gi on Co de discs or Full Region discs . The 8 bigges t fi lm ma king companies
of Americ a ar e as f ol lows:
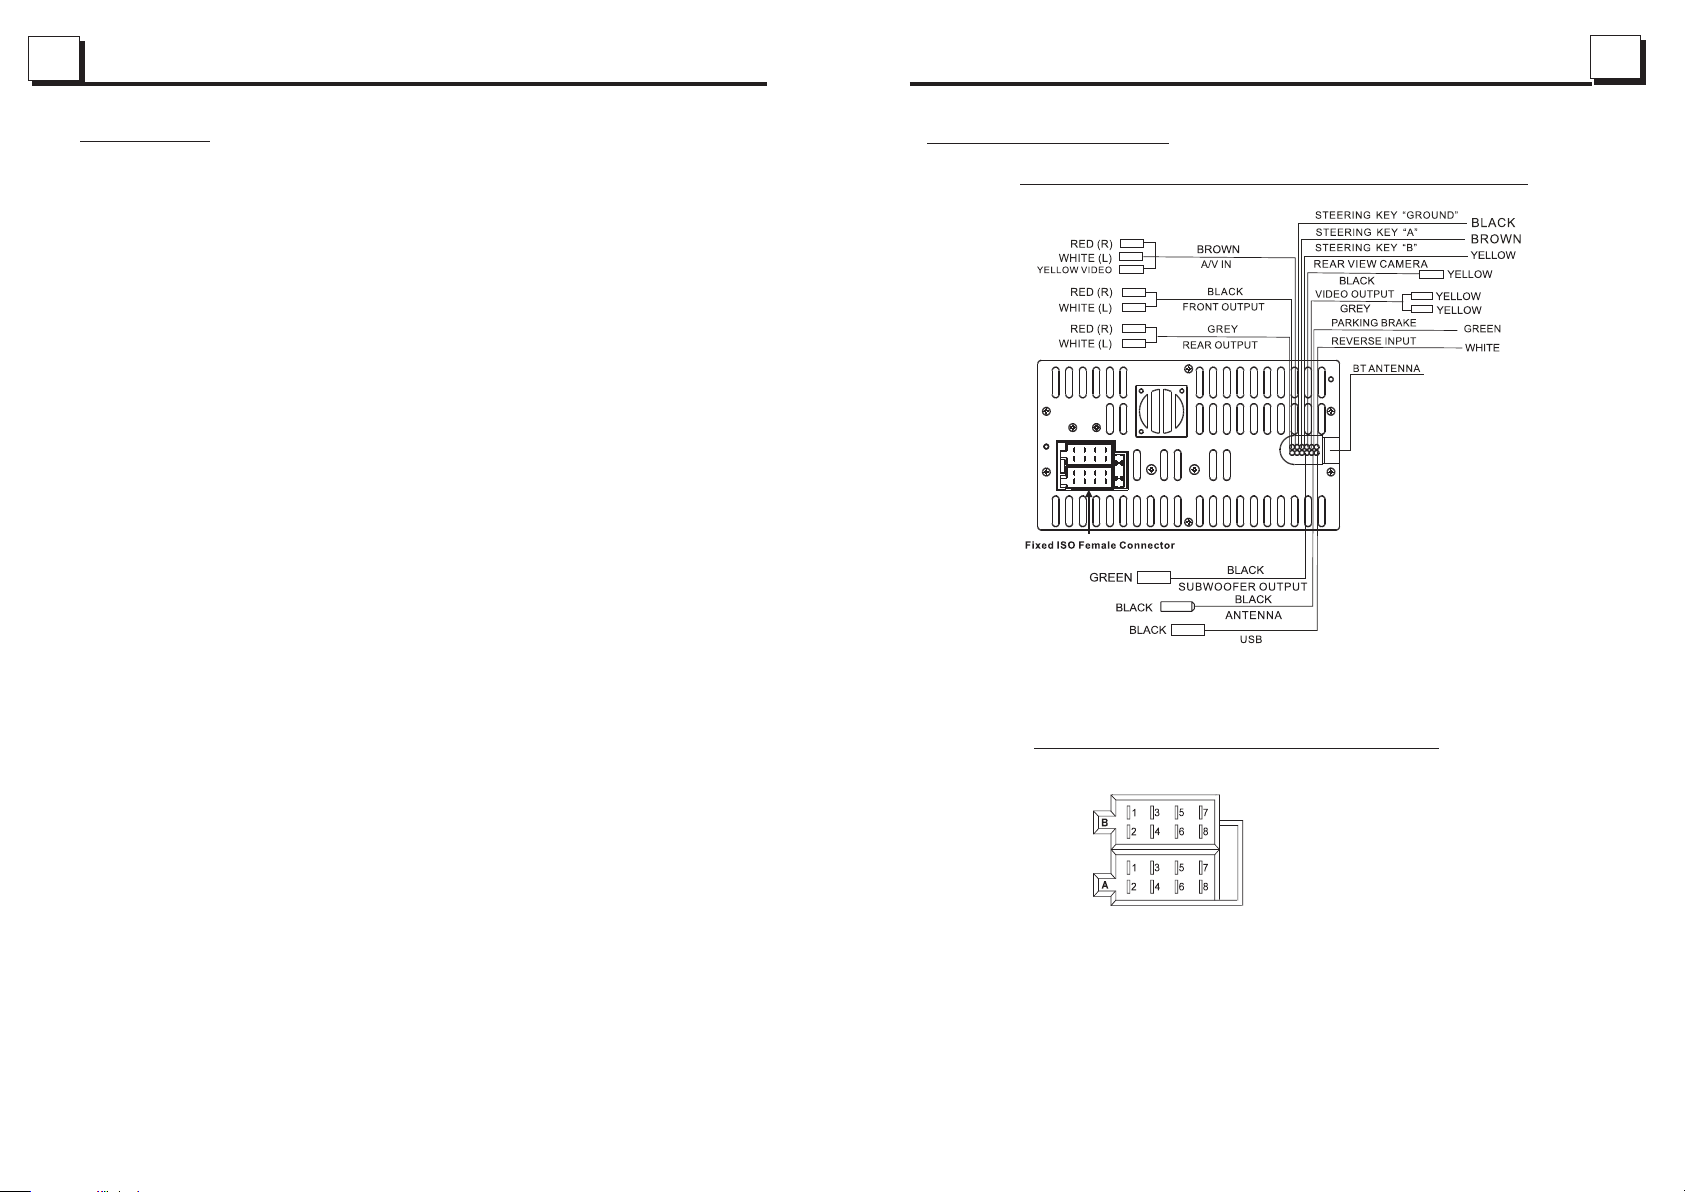
1.7 Co nnection De scripti on
The Description of the Input/Output Interface of the Rear Cabinet
The Description of the Fixed ISO Female Connector
FUS E 10 A
1. Wa rn erBros;
2. Colum bi a;
3. 20thC en tu ry FOX;
4. Param ou nt ;
5. Unive rs al ;
6. UA(Un it ed Ar tist);
7. MGM(M et ro Do gwynMayer);
8. Wa lt Disney
CONNECTOR A
1.
2.
3.
4. Memory +12V
5. Auto Antenna B+
6.
7. POWER B+
8. GROUND
CONNECTOR B
1. Rear Right Speaker (+)
2. Rear Right Speaker (-)
3. Front Right Speaker (+)
4. Front Right Speaker (-)
5. Front Left Speaker (+)
6. Front Left Speaker (-)
7. Rear Left Speaker (+)
8. Rear Left Speaker (-)
Page 10
9
26
Descr ip tion of C onnec ti ng the Pa rk ing Bra ke Line t o th e Parki ng B rak e Sy stem Bu il t in the Ca r
Par king br ake
Par king br ake lin e(gre en)
Par king br ake swi tch
(in side th e car)
NOTE: after connecting the Parking Line, the video on the small monitor of the front panel will be display only after braking the car.
To met all ic bo dy or cha ssis of t he car
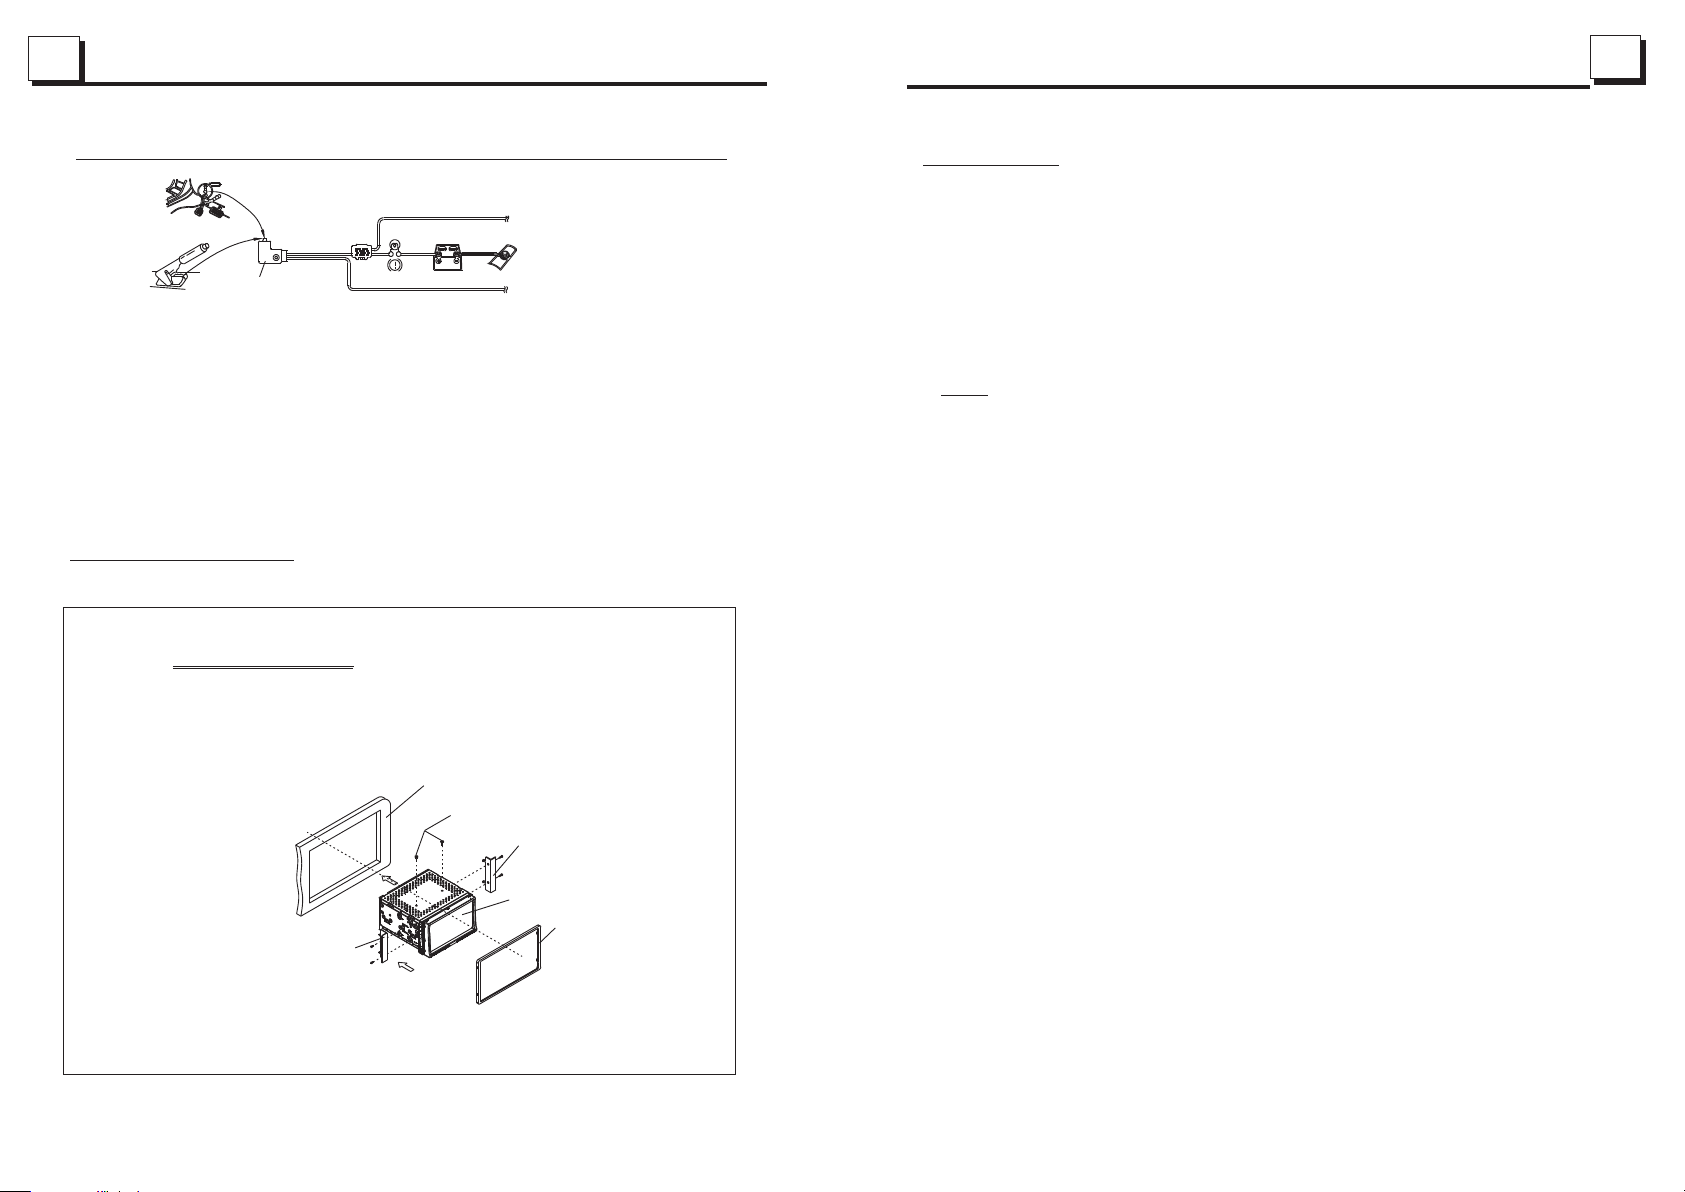
1.8 UN IT INS TAL LATIO N
INS TAL LATIO N INSTR UCTIO NS
1)R EMOVE T HE 2 DECK T RANSP ORT SCR EWS BEF ORE INS TALLA TION.
2)P LEASE D O THE CON NECTI ON OF THE P OWER, SP EAKER S AND ANT ENNA
ACC ORDIN G TO THE RE QUIRE MENT OF T HE INST RUCTI ON BOOK .
3)I F THE LEF T AND RIG HT INST ALLAT ION BRA CKETS S UPPLI ED BY FAC TORY
ARE F IT FOR YO UR CAR, PL EASE FI X THEM ON T HE CHAS SIS AND T HEN
FIX T HE UNIT I N THE CAR W ITH SCR EWS ACCO RDING TO T HE FOLL OWING
DIA GRAM; O THERW ISE, PL EASE US E THE LEF T AND RIG HT INST ALLAT ION
BRA CKETS S UPPLI ED BY YOU R CAR SUP PLIER.
DAS H BOARD
TRA NSPORT S CREWS
RIG HT INSTAL LATION B RACKE T
COM PLETE D UNIT
PLA STIC FR AME
LEF T INSTALL ATION BR ACKET
* Parental Co nt ro l
Q:After inserting DVD disc into disc compartment, it will appear a dialogue window
that ask me input a password of 4 digit. Why ?
A:This is because that the disc movie you are playing was rated with the Parental
Control, and the current rating level of DVD player is lower than one of current
disc. You must input right password and enter it to entry Parental Control setup
menu and then set a equal or higher rating level than one of current disc. So that
you can playback the disc.
! NOTE
* For the factory preset password of the DVD player, please refer to the relative
content of PASSWORD setup menu for details.
* For the rating level setup of Parental Control of the DVD player, please refer to
the relative content of LOCK setup menu for details.
Accessories: Parental Control
The Parental Control function of a DVD player can control the playback of movie
rated level in a disc. Can set the DVD player(include software player in PC) to be a
certain rating level with SETUP MENU on monitor screen. If the rating level set in the
disc is higher than one set in the DVD player, the DVD player can not playback the
disc. Sometimes the Parental Control sequences in some discs are different from
each other. The rating level setup can be protected by the password. The re in , if y ou
select Unlock item, the Parental Control function will be invalid, the content of disc
will be played totally.
The disc movie can be designed as that the DVD player will playback the diffe re nt
version of content of a same movie according to the different rating level set by
Parental Control. Depend on the DVD feature of seamless switching described above,
the scenes that are not fitting for children will be cleared or replaced by the other
fitting scene automatically.
All rating levels of Parental Control are as follows:
Unlock
1 Kid Safe
2 G
3 PG
4 PG 13
5 PG R
6 R
7 NC 17
8 Adult
Page 11
25
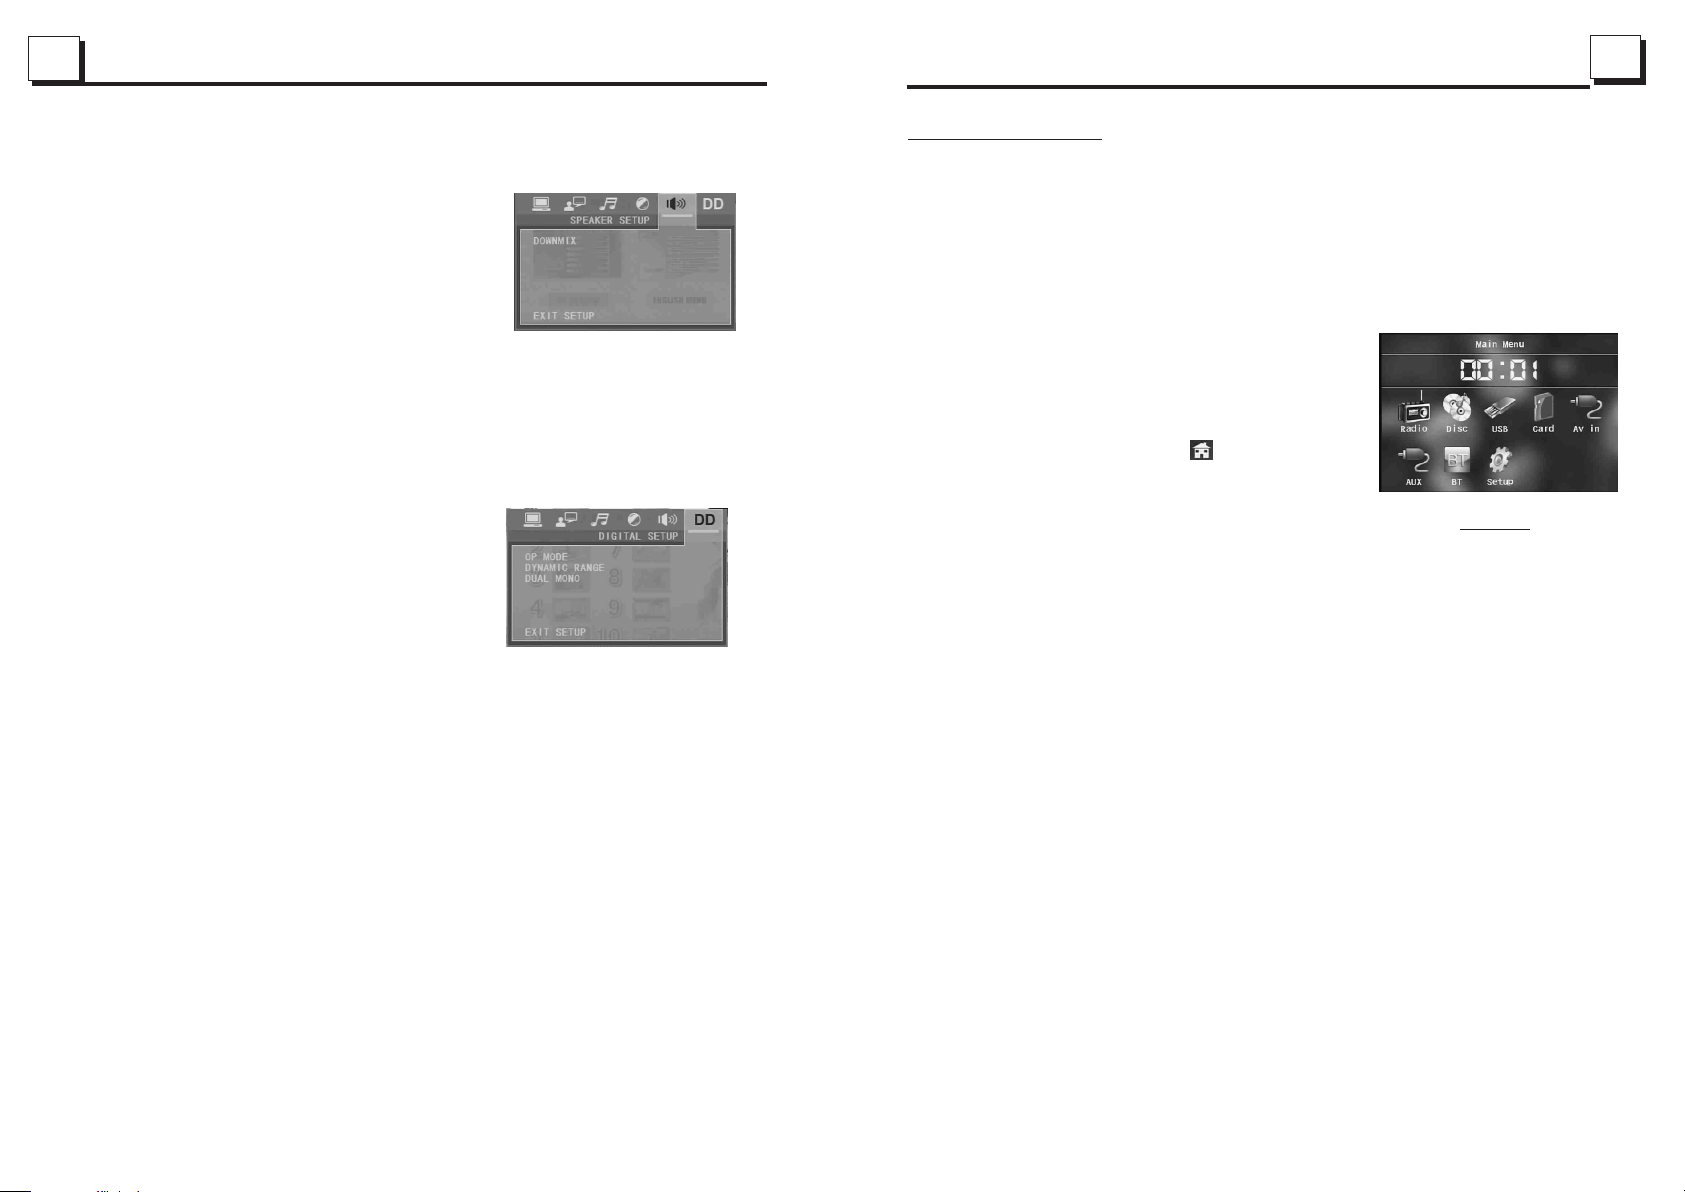
5.23 .5 SPEAKER SE TUP
DOWN MIX
It is fo r selecting y our desir ed sound effect
when t here is not cen tral spea ker and subwo ofer.
Ther e are 3 mode: LT/RT, STEREO, V SS.
LT/RT: When playi ng a disc with PR O LOGIC
Dolb y stereo effect , choose the it em, so it wil l
outp ut audio sign al with viv id theatre effe ct.
STER EO: If you choo se the item , when output ting
audi o signal with 5 .1 channe ls, it will out put the lef t
and ri ght channel s of signal ; w hen outputt ing audio
sign al with 2 chann els, it wil l output the co mmon 2 chan nels of stere o signal.
VSS: I f you choose th e item, whe n playing a dis c recorde d with 5.1 chan nels,
the ma in channel sp eakers ca n output audi o signal wi th VSS effect.
5.23 .6 DIGITAL SETU P
OP MODE
It is fo r selecting a udio outp ut mode
LINE O UT: It c an linear ly compress t he
audi o signal. So th e volume le vel is lower.
You shou ld select the i tem at nigh t.
RF REM OD: It can make t he volume l evel higher.
You shou ld select i t at d aylight .
DYNA MIC RANGE
Afte r selecting t he compre ssion mode of L INE OUT, set th e item, so you ca n
adju st the linear c ompress ion ratio. If y ou set it to be F ULL, the Peak -to-Peak
valu e of the audio si gnal is the m inimum; if yo u set it to be OF F, the Peak-toPeak v alue is the max imum.
DUAL MONO
It is fo r selecting a d esired au dio output mo de for the le ft and right wa ys of signa l.
It is ma inly for Kara oke of Ac3. There ar e 4 modes in al l as follows:
STER EO, MONO L, MON O R, MIX MONO .
10
2. Com mon Operati on
1. To turn on/off th e un it
In pow er off m ode, Press an y buttons on th e front panel t o turn on the uni t.
In pow er on mode, lon g press the POW ER b utton on th e fr ont panel o r sh ort
pres s the POWER but to n on the remo te c ontrol to t ur n off the unit.
2. To select an op timal angle o f the monitor o f the Car Audio Sy stem
To select an opt imal angle of t he monitor of t he Car Audio Sys tem, press th e
ANG but ton on the fron t panel or on the r emote contr ol r epeated ly.
3. To select fun ction mode
Pres s the MENU butt on to select RA DI O, DISC
(Aft er insertin g a disc), USB( Af ter inser ti ng a USB
stor age), CARD( After inser ti ng a card), AV IN , AUX
or BT mode.
Duri ng playback , tapping the i co n after pop pi ng
up Key board inter face can pop up M ode Menu as
righ t. then tap one i con in it to sele ct y our desir ed
mode .
4. To adju st sound leve l
pres s or hold the + or - bu tton to direc tl y adjust th e vo lume leve l.
5. To mute sound
Pres s the MUTE butt on on the remot e co ntrol to tu rn o n/off MUTE mode .
pres sing the POWE R button on the f ro nt panel sh or tly also ca n tu rn on/off
MUTE m ode.
6. To disp lay the clock t ime
Pres s the CLK butto n on the remote c on trol to dis pl ay clock ti me o n the screen
of the m onitor.
7. To select a des ired EQ mode
Pres s the EQ button o n th e remote co nt rol to sele ct o ne of the prese t music
equa lizer curve s: ROCK, POP, CLASS,E Q OFF. The s ound effect wil l be c hanged.
8. To turn on/off LO UD m ode
Pres s the LOUD butt on on the remot e to t urn on/off LOUD m ode.
When t urning on LOU D mode, it will e nhance bass l evel immedi ately when ba ss
is not e nough.
Mod e Me nu
9. To reset the pl ayer
When t he monitor di splay wrong ly or some butt on s are not ava il able or sou nd i s
dist orted, pres s the RESET button to r ehabilita te the distor ted program t o zero.
Page 12
11
24
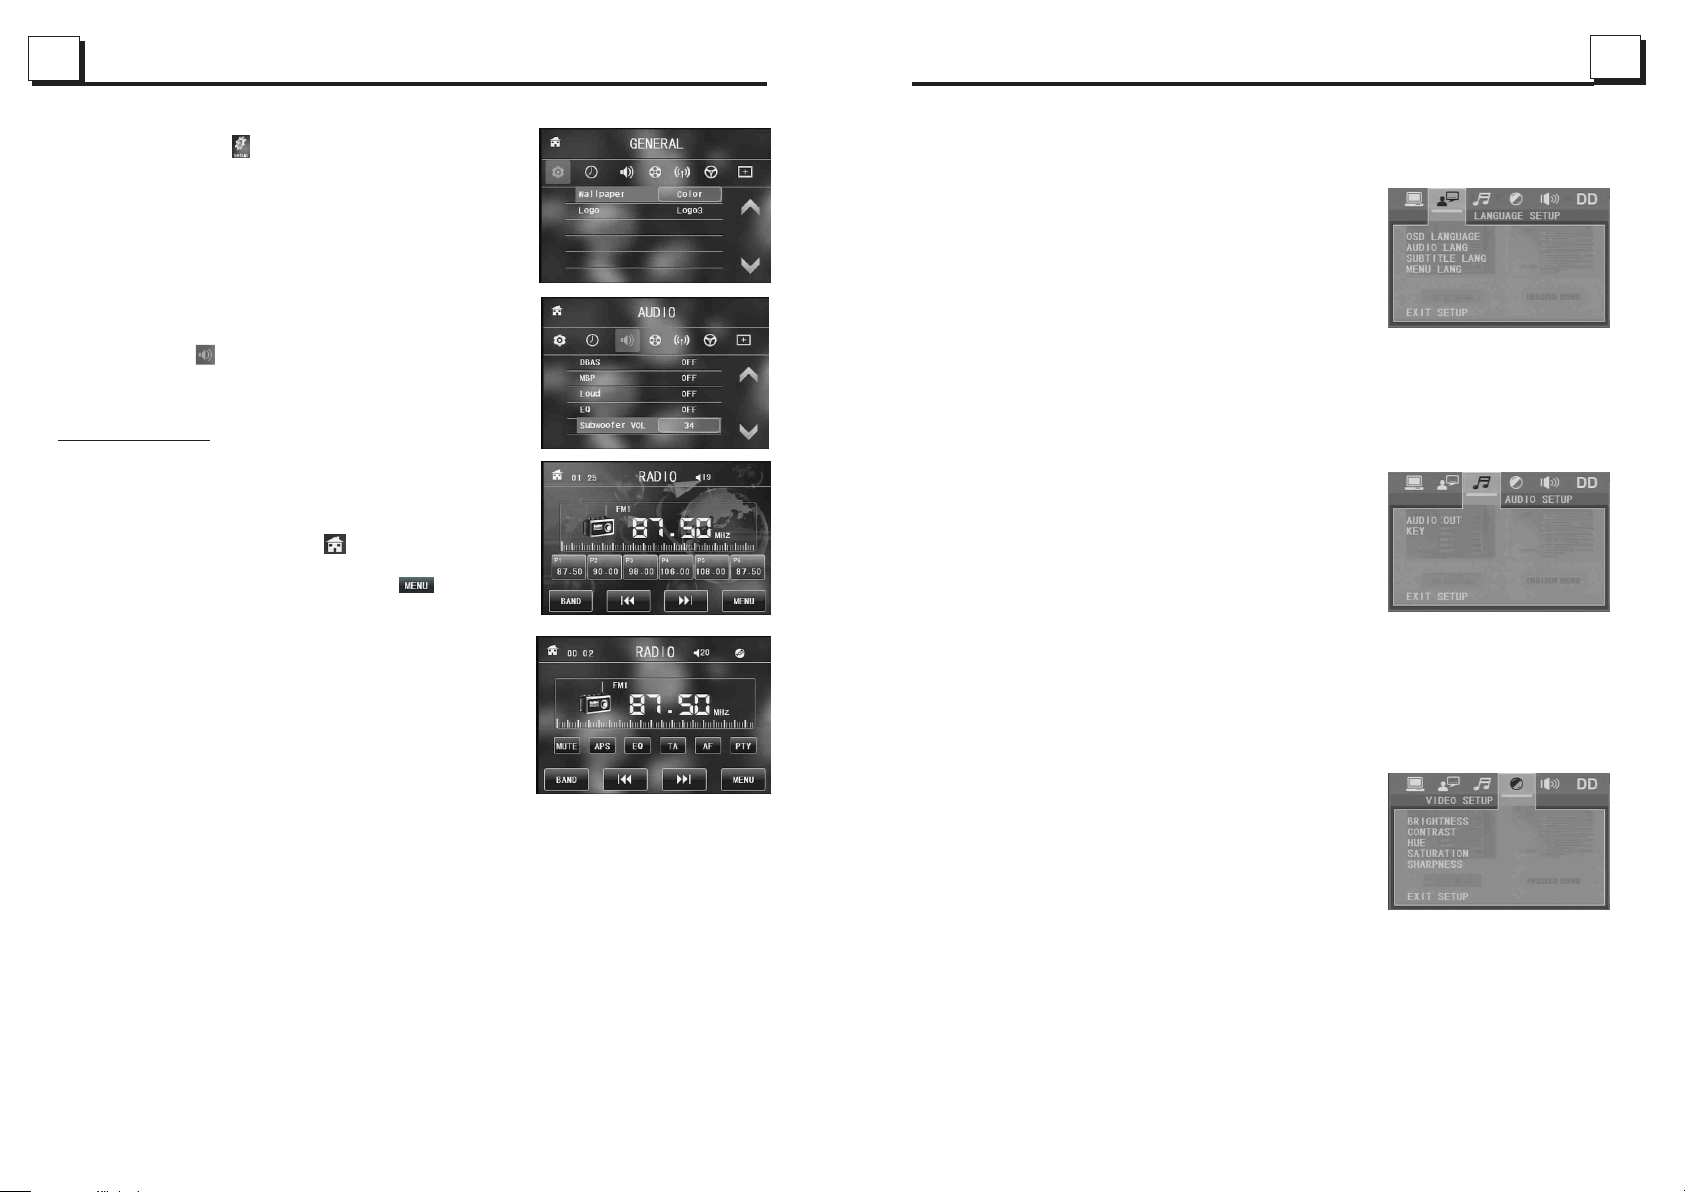
10.To do s et up
To do setup, tap the ico n in t he Main Menu to turn to
SETUP interfac e as r ight.
In the int er fa ce, select one of GENERAL , TIME, AUD IO ,
VIDEO ,R AD IO , S TE ERING WHEEL CO NT RO L,
CALIBR ATE by tappin g th em , then set them by tappin g
some ico ns o n th e right side accordingl y.
STEERI NG W HE EL CONTROL: pr es s on e bu tton on the
steeri ng w he el then the LCD will show K EY 1 setting , se le ct
the func ti on ( such as vol control ,seek in g, m ute ,power
etc)an d th en t ap it to confirm. It can supp or t mo stly 6
shortc ut k ey s. Press reset can cancel a ll t he s etting.
AUDIO: Tap the icon to po p up t he AU DI O setup interface
as right . yo u ca n adjust the Subwoofer VO L here.
Note : In radio mode , the passw ord is 888888 .
3. Rad io O pe ration
1. Enter R AD IO mode
When you u se M ENU button or Mode Me nu t o en ter RADIO
mode, it w il l display RADIO int er fa ce as right.
In RADIO i nt erface, tapping t he i co n can enter Mode
Menu; du ri ng playback ,pres s an d ho ld the mode button
can turn o n or o ff TFT display; tapp in g th e icon can
turn to fr eq uency interface a s ri gh t; the other icons ar e
same as on es i n the unit panel or in th e Re mo te Control.
In menu se t in terface, you can ad ju st M UTE, APS, EQ,
TA, AF, PTY as righ t.
2. BAND BU TTON
In RADIO m od e, press the BAND but to n on t he remote
contro l to s elect your desire d ra di o band of FM1, FM2, FM3 ,
AM1 and AM 2,
the smal l mo nitor of the front pa ne l.
3. TUNE/SEEK U P/ DO WN BUTTO NS
In RADIO m od e:
1) Pre ss a nd h old the >>|/|<< but to n to a utomatically se ar ch
up/dow n fo r an available stat io n fr om current freque nc y.
2) Bri ef ly p ress the >>| / |<< button t o ma nually search up or d ow n wi th step by step for you r
desire d st ation from the curr en t fr equency.
4. APS BU TTON
In RADIO m od e:
1)Wh en p re ssing and holding t he AP S bu tton,the radio se ar ches from the lowest fr eq uency
and chec ks t he signal strengt h le ve l until 1 cycle searc h is f in ished. And then the 6 st ro ngest
statio ns a re preset to the corr es po nding preset numb er m em ory bank. The AS operation is
implem en ted in the each bank of t he s el ected band. When th e AS op er ation is finished , it
will sca n ea ch preset station f or 5 s ec onds in FM or AM band from M 1 as b ri efly pressing
APS butto n. Af ter finishing a cir cl e of s canning , it will res um e br oadcasting on the M 1.
(It can st or e 3x6 stations for FM and 2 x6 s tations for AM in all)
2) Whe n br ie fly pressing the APS b ut to n, the radio will sca n ea ch p reset station for 5
second s in F M or AM b and from M1. After finis hi ng a circle of scanni ng , it w ill resume
and th e se le cted band will be dis pl ay ed on
5.23 .2 LANGUAGE S ETUP
OSD LA NGUAGE
This i tem is for sele cting the l anguage of th e
SYST EM MENU and all o peratin g prompt
inte rface displ ayed duri ng playback .
AUDI O LANG
This i tem is for sele cting a aud io language .
SUBT ITLE LANG
This i tem is for sele cting a sub title langu age.
MENU L ANG
This i tem is for sele cting a dis c menu langua ge.
5.23 .3 AU DIO SETUP
AUDI O OUT
ther e is only ANALOG m ode, i.e. S PDIF/OFF,
not op tional.
KEY
It is fo r selecting y our desir ed basic musi c tone
(fro m low to high).
5.23 .4 VIDEO SETU P
BRIG HTNESS
It is fo r adjusting t he bright ness of the vid eo output .
CONT RAST
It is fo r adjusting t he contra st of the video o utput.
HUE
It is fo r adjusting t he hue of the v ideo output .
SATURATION
It is fo r adjusting t he satura tion of the vid eo output .
SHAR PNESS
It is fo r adjusting t he sharpn ess of the vide o output.
Page 13
23
12
2. There are 6 s etup page s in all for the Sy stem Menu . Press the > or < bu tton to
sele ct an desired s etup page .
3. Pre ss the ^ or v butto n to select a n setup item in t he select ed setup page .
4. Pre ss the > button t o enter the s etup item. Then p ress the v or ^ but ton to select
a desi red mode of the s etup item , finally pre ss the OK but ton to confir m it.
* Pres s the < button to r eturn to th e upper level .
* Pres s the SETUP butto n again or use th e directi on buttons to h ighligh t the item
of the E XIT SE TUP and then pres s the OK butt on to exit the Sy stem Menu.
For th e DVD System Me nu, there a re 6 setup page s in all. They disp lay as foll ows:
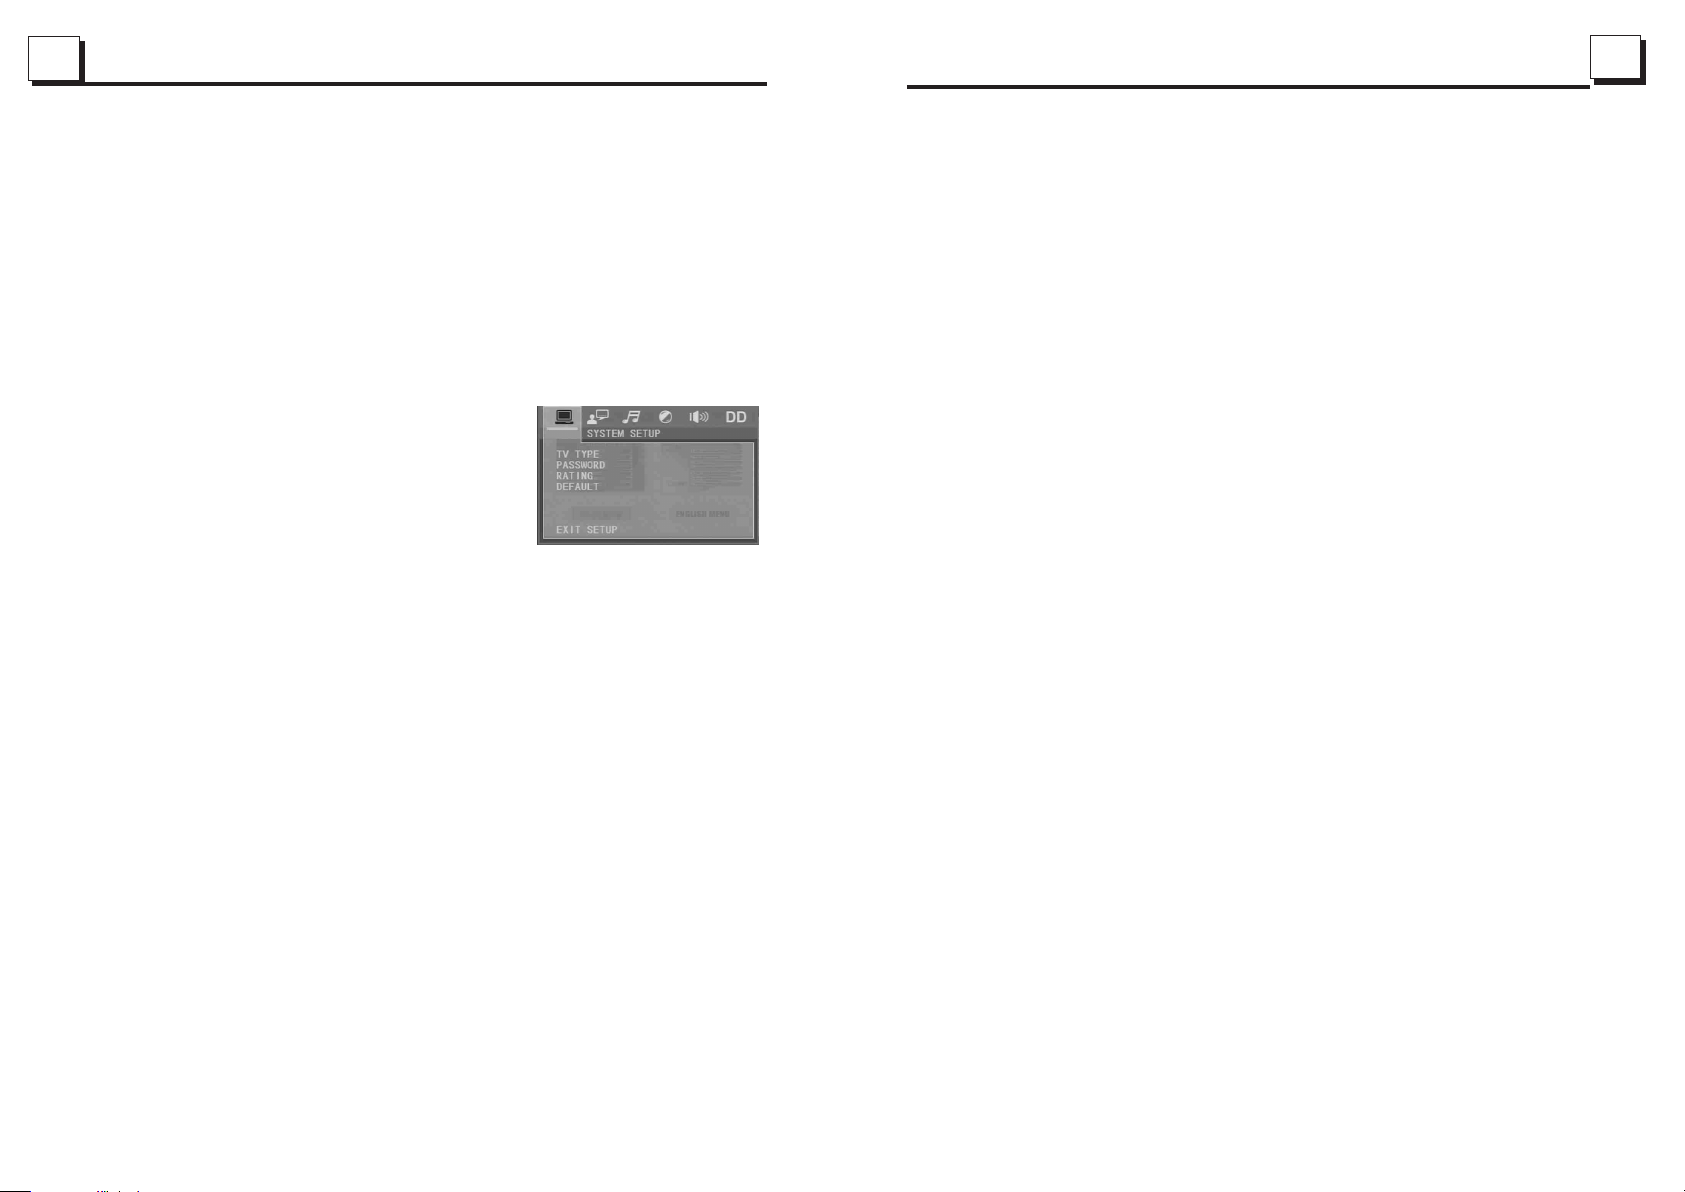
5.23 .1 SYSTEM SET UP
TV TYPE
The se tup item is for m atching TV scre en size.
4:3 PS : Choose the it em when con necting a TV set
with 4 :3 screen. Wh en playin g the picture s with
16:9 s ize, the left a nd right pa rts of the vide o will be
cut ou t, and displa y in full scr een.
4:3 LB : Choose the it em when con necting a TV set
with 4 :3 screen. Wh en playin g the picture s with
16:9 s ize, the top an d bottom pa rts of the TV scree n
will b e turned into a b lack squa re respecti vely.
16:9 : Choose the it em when con necting a TV set wi th 16:9 wide sc reen.
PASSWORD
This s etup item is fo r locking o r unlocking t he rating l evel of the Par ental Con trol.
The de faulted sta te is locke d. The d efaulte d password is 0 000.
You can set a new pas sword that yo u like: Sel ect the PASSWORD i tem and then
pres s the > button to e nter it, th en input the or iginal pa ssword 0000 , and then
pres s the OK button t o unlock it . Press the > but ton to ente r it again, the n input
a new pa ssword that y ou like and t hen press the O K button to m ake it effectiv e.
Befo re the other pe rsons see t he Manual, yo u should ge t the passwor d in mind
and cu t out the part of PASS WORD in the Man ual.
RATING
The it em is for setti ng a new rati ng level of the P arental C ontrol.
1. Sel ect the PASSWORD i tem and then pr ess the > but ton to enter it , then input
the pa ssword ment ioned abo ve, and then pr ess the OK bu tton to unloc k the
sett ing of the rati ng level of t he Parental C ontrol.
2. Sel ect the RATING ite m and then pres s the > butto n to enter it, th en use the
dire ction butto ns to selec t your desire d rating le vel, then pre ss the OK butto n
to con firm.
3. Sel ect the PASSWORD i tem again and t hen press t he > button to en ter it, then
inpu t the passwor d, and then p ress the OK but ton to lock t he new settin g of
the ra ting level of t he Parent al Control.
broadc as ting on the M1.
NOTE: In F M ba nd, FM1,FM2,FM3 is ch ec ked one at a time; In AM band, A M1 , AM2 is
checke d on e at a time.
5. PRESET STATION [ 1-6 ] BUTTONS
In RADIO mode:
1) To memorize the current frequency on the current band, long press any one of the six
preset buttons (1-6) on remote control or one of the six preset icons( P1-P6) on the radio
interface.
2) To recall the preset memory on the current band, press one of the preset buttons [1-6]
on remote control
6. STEREO BUTTON
Press the ST button on the remote control to select the stereo on or stereo off s ou nd
mode for FM band. ST ON or ST OFF w il l di sp la y on t he m on it or a cc or di ng ly.
7. LOC BUTTON
1) In RADIO mode, when the signal of the distance radio station are very weak and the
receiving effect is bad during tuning, check whether there is the word LOC on LCD. If
there is the word LOC on LCD, press this button to turn off the LOC function, then tune
again for the distance radio station;
2) In RADIO mode, when the signal of the local radio station are too strong to lead that the
interference to the receiving effect during tuning, press this button to turn on the LOC
function to display the word LOC on LCD, then tune again for the local radio station.
8. PTY (PROGRAM TYP E) B UT TON
Press the PTY button shortly to select one of the following mode:
PTY MUSIC group- - PTY SP EE CH g ro up - - OF F
When PTY group is on, press the + or - button on the front panel or remote control
to select one of PTY programs as follows:
<-->NEWS<-->AFFAIRS<-->INFO<-->SPORT<-->EDUCATE <- -> DR AM A< -- >C ULTURE
<-->SCIENCE<--> VARIED<-->WEATH ER <- -> F IN AN CE <- -> CH IL DR EN <- -> SO CI AL
<-->RELIGION<-->PHONE IN<-->TRAVEL<-->LEISURE<-->DOCUMENT< --> PT Y
NONE<-->ALARM POP M< -->ROCK M<-->EASY M< -- >L IG HT M<--> CLASSICS
<-->OTHER M <-->JAZZ<-->COUNTRY<-->NATIO N M< -- >O LD IE S< -- >F OL K M< -- >
When PTY group is on, pressing the 1-6 number buttons on the remote control also can select
one of PTY programs as above.
After selecting one of the PTY programs, it will display SEEK PTY and a ut om at ic al ly
search for the station of the PTY program. If the station of the PTY pr og ra m do es n ot e xi st ,
PTY NONE will display and flash on the monitor and then return to the normal station.
9. AF [ALTERNATI VE F RE QU EN CI ES ] BU TTON
In radio mode,pressing the AF button to select
the AF function.If the AF segment is
1)off: AF switching mode off .
2)on: AF switching mode on, and has RDS information.
3)flashing: AF switching mode on, but RDS information
is not received yet.
one of the six preset icons( P1-P6) on the radio interface.
<-->
DEFAU LT
This i tem is for maki ng all setu p items chang e back to ori ginal statu s.
Page 14
13
22
When the AF switching mode is selected, the radio checks the signal strength of the AF all the time.
The interval of checking time of each AFs depends on the signal strength of the current station,
from a few minute for the strong station to a few seconds for the weak station. Every time that a
new AF is stronger than the current station, it switches over to that frequency for very short time,
and the NEW FREQUENCY is displayed for 1-2 second.
Because the mute time of the AF switching or the checking time is very short, it is almost
inaudible in case of normal program. (When AF flash on LCD, it will search for the stronger
RDS station. If AF and TP fl as h on L CD , it c an o nl y se ar ch f or t he t ra ffic announcement station).
In FM mode, when AF is on, SEEK, (SCAN), AUTO-MEMORY function can only receive and save
the RDS program.
10. TA [T RA FF IC AN NO UN CE ME NT ] BU TTON
Press the TA bu tt on s ho rt ly t o tu rn o n TA se ar ch m od e.
When traffic announcement is transmitted:
1) If the unit is in Disc Play mode, it will switch to radio mode temporarily.
2) Temporarily switch over to an EON linked station when EON detects a traffi c an no un ce me nt
on that other program, and TA, TP will be displayed on LCD.
* TA in te rr up ti on f un ct io n:
The current traff ic a nn ou nc em en t is c an ce ll ed b y pr es si ng TA button shortly.
* When TA is on , SE EK , (S CA N) , AUTO MEMORY fu nc ti on c an b e re ce iv ed o r sa ve d on ly w he n
traffic program identification code has been received.
When y ou select the I MAGE file s ort icon, pre ss the ^ or > but ton to select t he
firs t IMAGE file, t hen press t he v button to se lect the de si red IMAGE f ile, finall y
pres s the OK or PLAY/PAUSE butt on to displ ay the image in f ull scree n from
the se lected IMAG E file.
3.Du ring IMAGE pl ayback, p ress one of the > /</^/v bu ttons to chan ge the angle
of vie wing pictur e that is dis playing as fo llows:
>: 90 de g cw; <: 90deg cc w; ^:UP<- ->DOWN; v: LE FT<-->RIG HT
Duri ng IMAGE play back, pre ss the PROG but ton to chan ge the mode of re fresh
pict ure.
Duri ng IMAGE play back, pre ss the STOP button to sto p playing a nd return to th e
root m enu.
* Duri ng IMAGE play back, the f ollowing bu ttons are n ot availabl e: SLOW-FWD,
SUBT ITLE, TITLE, ANG LE, AUDIO, RDM , INT and A-B.
* In IMA GE mode, the ot her opera tions are sam e as ones in MP 3/WMA mode.
5.21 P layback MP4 f iles
1. The root me nu is displ ayed on TV when beg inning to swi tch on MP4 mo de,
then i t will automa tically p lay the first f ile.
Duri ng playback , press the S TOP butt on to stop play ing and ret urn to the
root m enu.
When d isplaying t he root men u, Press the di rection b uttons or on th e
2.
remo te control or d irectio n icons or on the r oot menu inte rface to
page u p/down the FO LDERS, th en tap the Fold er your des ired to open
the Fo lder.
After o pen the Folde r, in the same w ay to select th e files to pl ayback
* The ANGLE, PR OG, RDM, IN T and TITL E/PBC butto n are not val id.
* The other fu nctions a re same as ones i n DVD mode; b ut the RPT functi on is
same a s one in MP3/WM A mode.
5.22 E SP and I D3 Functi on
There is ESP fun ction for all f ormats of d iscs.
In MP3 /WMA mode, dur ing playb ack, the info rmation o f the file name , folder
name , song s title, a rtist and a lbum will be sc rolling o n the LCD displ ay.
As long a s the current p laying MP 3 music conta ins relev ant ID3 tag inf ormatio n
in ver sion 1.0/2. 0 format, t he 3 items unde rlined ab ove will be scr olling on t he
LCD di splay; othe rwise, th ey will not.
5.23 The D VD S ystem Men u Setup Opera tion
1. Pre ss the SETUP butt on on the remot e control t o access the DV D System
Menu o n the monitor.
Page 15
21
14
5.19 P ro gram Playba ck
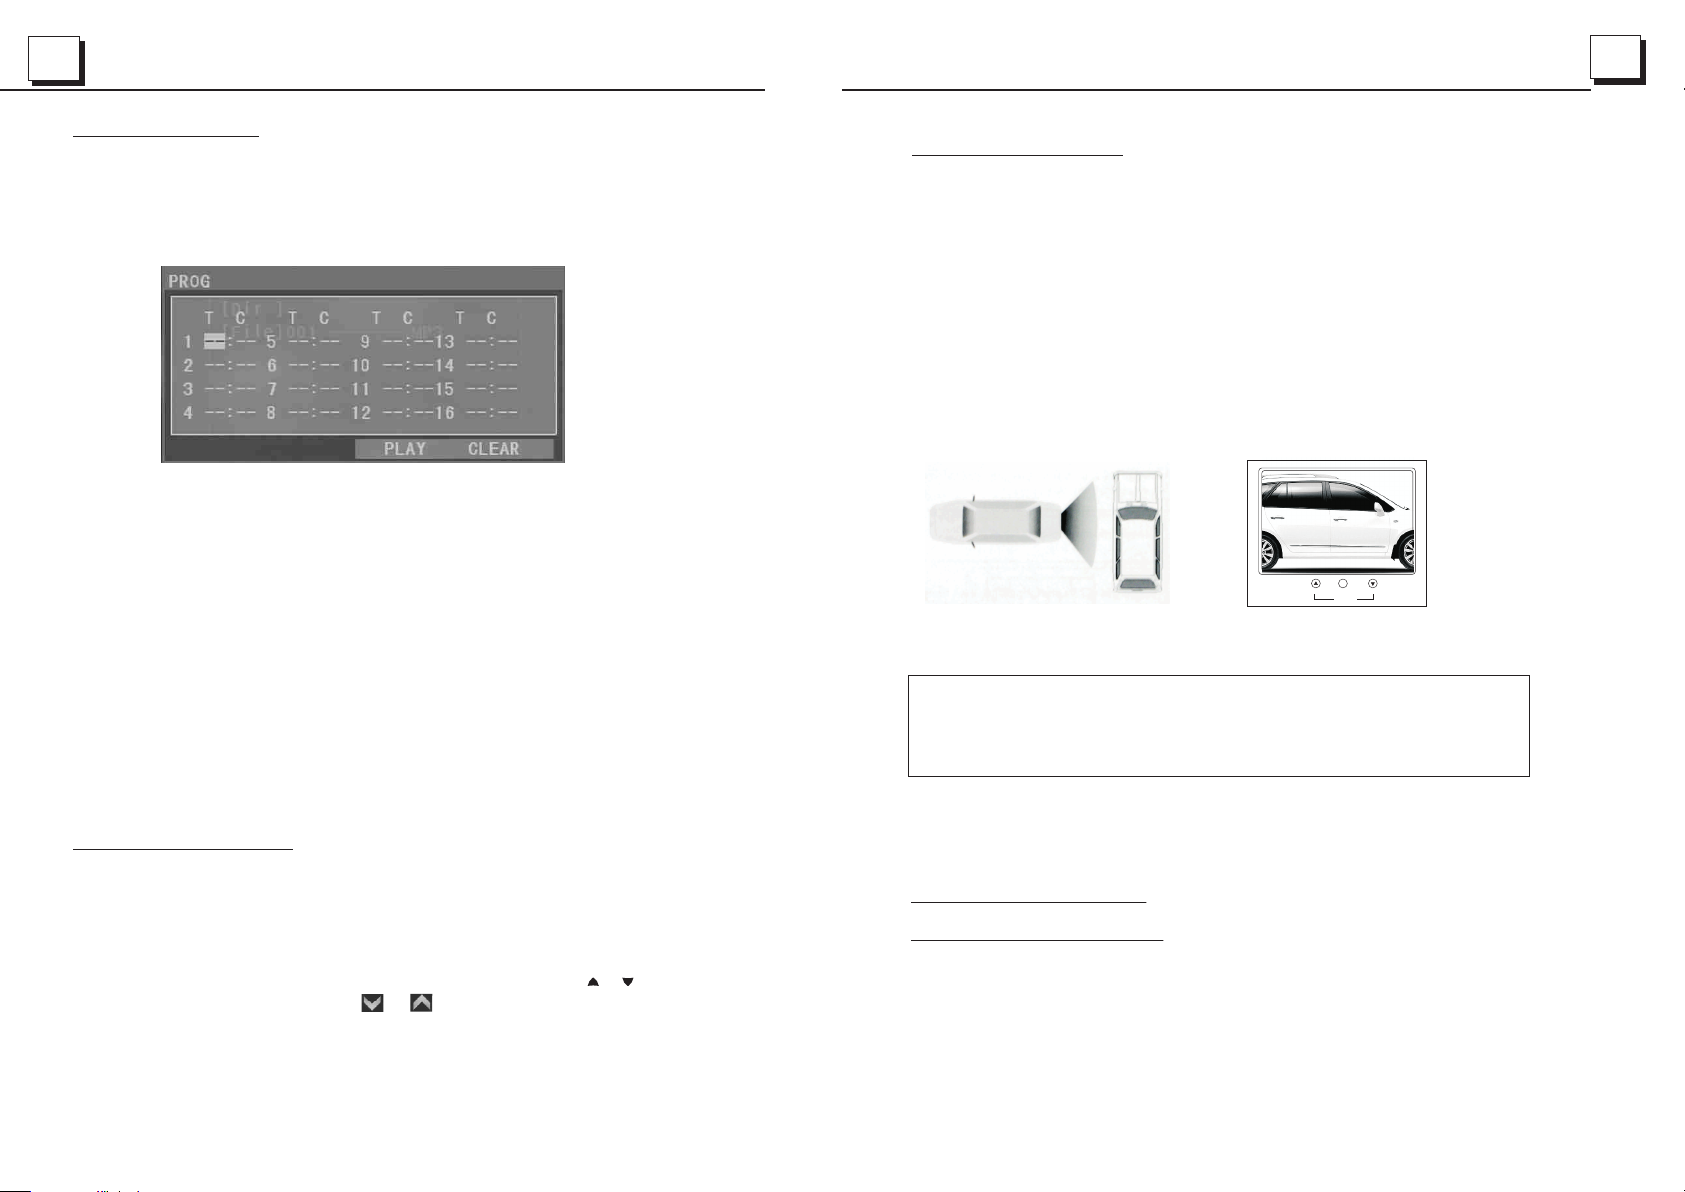
It all ow s you to enter the or der in which you wa nt s ome chapter s/ tracks in
DVD/ VC D/MP3/WMA/C D to play.
1 Duri ng p layback, pr es s the PROG button t o en ter a program i nt erface as
foll ow s:
2 Use th e direction b uttons to m ove cursor on to the desi red place for i nputtin g
the se quence numb er.
3 Use th e number butt on to input d esired sequ ence numb er of title/c hapter/
trac k with desire d sequenc e.
4 Use th e direction b utton to mo ve cursor ont o Play item , then press th e OK
butt on to play the pr ogramme d titles/ch apters/ tracks in pro grammed o rder;
only p ressing the P LAY butto n also can pl ay the progra mmed titl es/chapte rs
/tra cks in progra mmed orde r.
* To exit prog ra m playbac k, firstly pr ess the STOP button , then press th e PLAY
butt on to enter seq uence pla yback; or pre ss the PROG b utton twice a gain.
* To remove the al l program med sequenc e numbers , move the curs or onto
Clea r item, then pr ess the OK bu tton.
* To change th e programme d sequence, m ove the cur sor onto the it em you
want t o change, inp ut the desi red sequenc e number.
* Duri ng VCD playba ck, if it is in P BC ON mode, at th e same time o f entering
the st ate of progra m playbac k, it turns off PBC m ode.
4.RE AR VIEW CAMER A
The car AV system can ma ke you look at th e actual stat us b ehind your ca r
when y ou change the g ea r level to the ba ck position .
1) Use a n video cable t o ma ke the car AV system an d th e rear view cam era connect ed through th e RE AR CAMERA INPU T ja ck i n the rear cabi net of the car AV
syst em and VIDEO OU TP UT jack of the rear v ie w camera.
Make t he REAR CAMER A SWI TCH line in the r ear cabinet o f the car AV system
conn ected to(B+ ) 12 V power suppl y.
2)In a ny running mo de ,the video si gnal will swi tch to camera m ode(if appl ic able)
when c ar is in revers e.
After t aking the car o ut o f reverse,i t will resume t o its previou s mo de.
PI C
A N G L E
Analog on -s ite bac ku p Analog on -s ite bac ku p
War ning:
Always ch ec k the sur ro undin g en vi ronme nt . Objec ts m ight be rev er sed. Th e rear vi ew
camer a is d es igned o nl y to assi st w hile reve rs ing. Du e to t he limita ti ons of th e ca mera
angle and r an ge, it ma y ca use acc id en ts if the d ri ver rel ie s solely on t he r evers e ca mera
and displ ay.
5.20 P layback IMA GE files
1. The roo t me nu is displ ayed on the mon itor when b eginning to s witch on IM AGE
mode . .
In the r oot menu, the l eft file so rt icon is for MP 3/WMA file ; th e middle fi le sort
icon i s for IMAGE fil e; the righ t file sort ico n is for VIDE O fi le. If one of t hese 3
file s ort does not ex ist, you ca n not move curs or onto the f ile sort icon .
2. Whe n di splaying th e ro ot menu, Press th e direction but to ns or on the
remo te c ontrol or direc tion icons or on th e ro ot menu interfa ce to
page u p/ down the FOLDER S, then tap the Fol de r your desire d to o pen
the Fo ld er.
After o pe n the Folder, in the s ame way to select t he f iles to playb ac k
5. Disc an d US B Operation
5.1 Load /u nload disc or USB
To play files in a dis c or c ar d, press the EJECT button to sl id e do wn the monitor .
Then insert th e di sc o r card into the disc sl ot o r Ca rd slot.
To unload the disc o r ca rd , press the STOP but ton twice to stop pla yb ac k, then
press th e EJ ECT bu tt on to slide down the mo ni to r and eject disc in the d is c sl ot
and then r em ove the disc; or push t he c ar d firstly and then pu ll i t ou t of the card slot.
Page 16
15
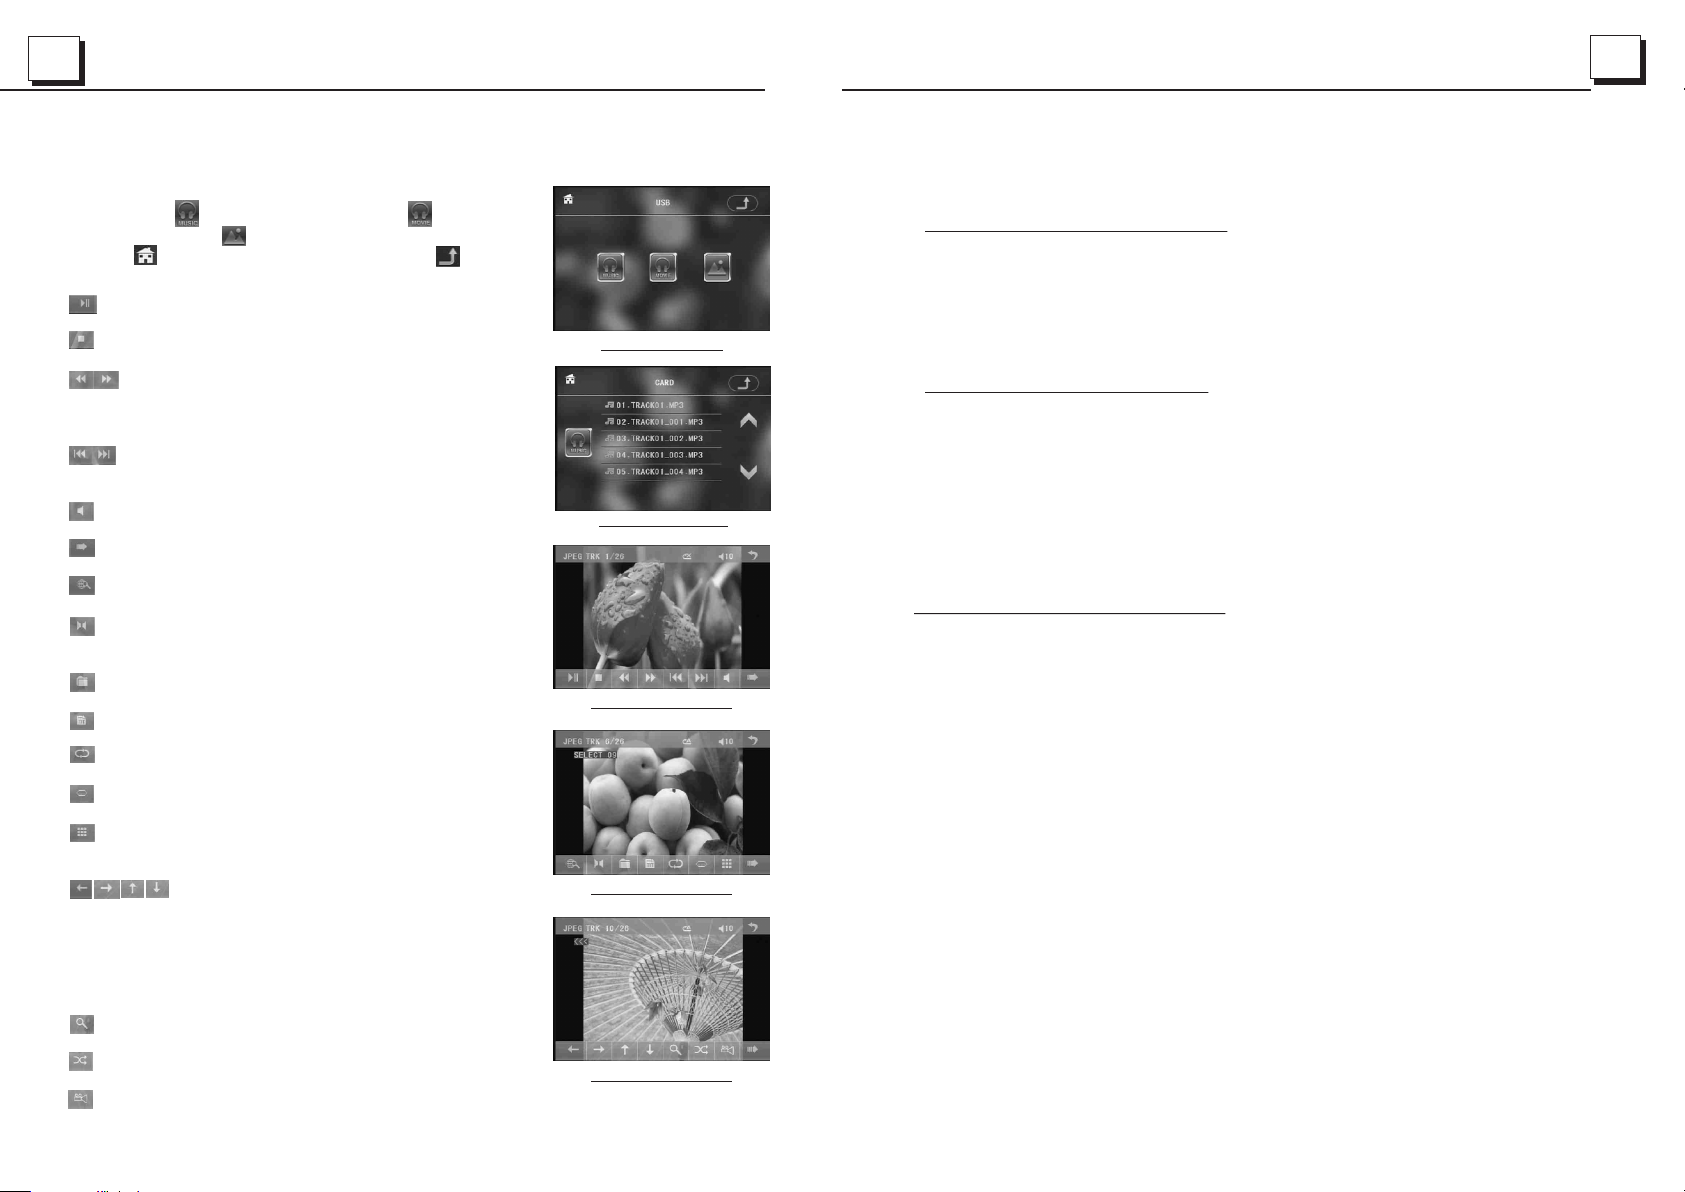
To play files in an US B, i ns ert the USB into the US B ja ck c onnecting to the Re ar
cabine t.
To unloa d th e US B, press the STOP bu tton twice and then r em ov e the USB .
In USB or CA RD m ode, select your de si re d as right.
Remark : th e icon is for audio files ; th e icon is
for vide o fi les; the icon is for imag e fi les.
Tap the icon to turn to ma in m enu, tap the icon
to turn to p re vious setting.
: Tap it can pause playb ac k
: Tap it can stop playba ck .
USB /CARD I NTERFA CE
20
ZOOM x2,ZOOMx3 ,ZOOMx4 ,ZOOMx1/2 ,ZOOMx1/3 ,ZOOMx1 /4,ZOOM OFF.
Pres s one of the ^/v/ >/< butto ns to select th e area you wa nt to enlarge .
5.16 C hange the Cap tion Lang uage
In the s tate of DVD pla ying, pre ss the SUBTIT LE button rep eatedly t o
sele ct the langua ge of the cap tion or turn off th e caption.( depend on t he
medi a used.)
In the s tate of VCD/M P3/WMA/ CD playing, t he button is no t availab le.
:Tapping o ne o f th em can switch on betw ee n
the spee d le ve ls of fast backward o r fo rward.
(Excep t im ag e mode.)
: Tapping one of them ca n se lect next or
previo us c ha pter/track.
: Tap it to turn volume up a nd d own.
: Tap it to turn the selec ti ng page up and down.
: Tap it to select INT play mode(E xc ept image mode.)
: During V CD p layback, tap it can sel ec t the audio
ST/MON O .
: Same as th e ME NU button on the remote c on trol.
: Same as th e TITLE bu tt on on the remote contro l.
: Same as th e RE PEAT button on th e re mote control.
: Same as th e SU BTITLE button on the re mo te control.
: Tap it to select the tra ck f rom 1-9 and then sele ct
OK to play y ou r se lecting.
: During p la yb ack, press the ZOOM b ut to n
and then t ap o ne of them are same as the di re ction
button s on t he R emote Control.
(Excep t mu sic & image mode.);
During p la yback, press one of the m to c hange the
playba ck a ngle. (Only for image m od e.)
Roo t inter face fo r MUSIC
Keybo ar d inter face- 1
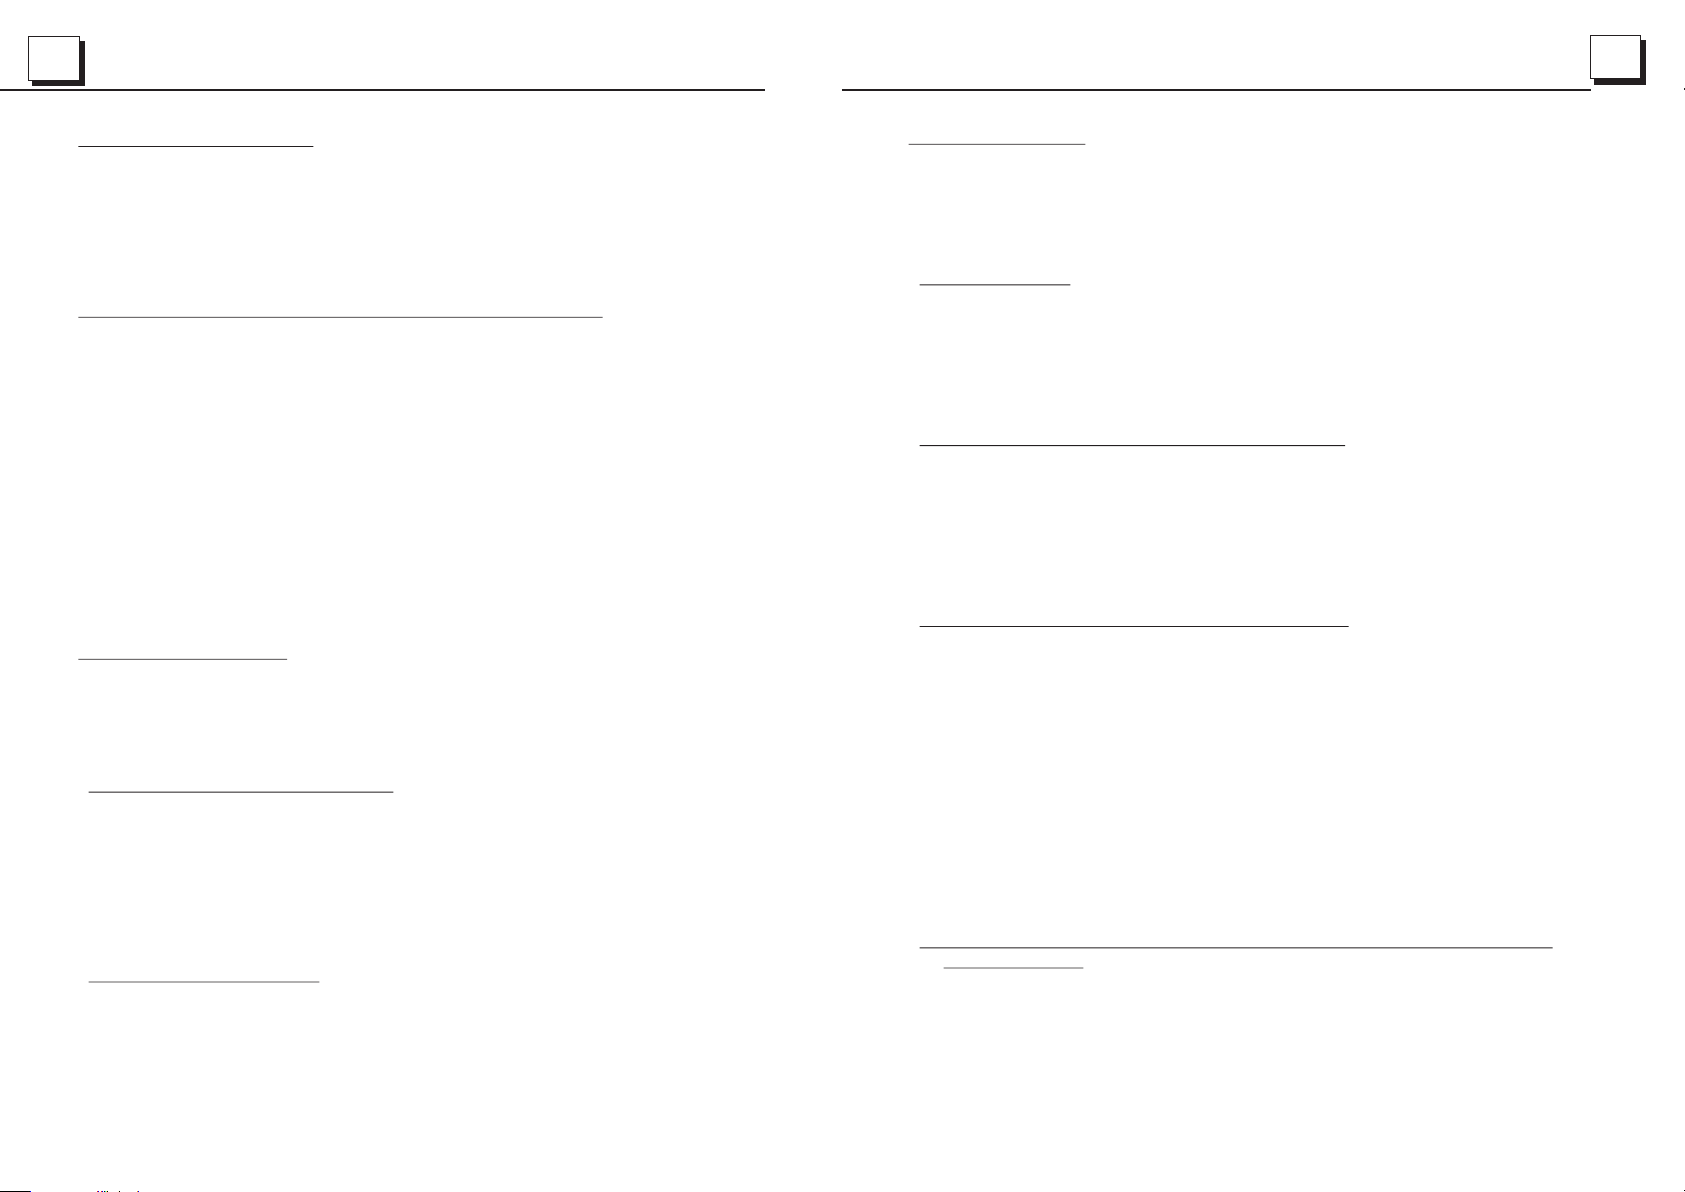
Keybo ar d inter face- 2
5.17 C hange the Audi o Languag e
1. In th e state of DVD pl aying, pr ess the AUDIO bu tton repe atedly
on the I R remote cont rol to sele ct the desire d languag e type.
(dep end on the medi a used)
2. In th e state of VCD pl aying, pr ess the AUDIO bu tton repe atedly to
sele ct the sound mo de of the MON O L, MONO R, MIX MO NO and Stereo ,
no lan guage funct ion.
3. In th e state of CD/W MA/MP3 pl aying, the AUD IO button i s invalid.
5.18 L ook over the Pl ayback St atus
1. In th e state of DVD pl aying, pr ess the OSD but ton repea tedly on the
remo te control to t urn on/off the pl ayback st atus. When it i s on, it will
disp lay the infor mation su ch as: the seri al number o f the playing t itle, the
seri al number of th e playing c hapter, the el apsed tim e of the playin g chapter,
the re mained time o f the playi ng chapter, th e elapsed t ime of the play ing title ,
the re mained time o f the playi ng title, etc .
2. In th e state of VCD/ CD playin g, press the OS D button re peatedly on t he
remo te control to t urn on/off the pl ayback st atus. When it i s on, it will
disp lay the infor mation su ch as: the seri al number o f the playing t rack, the
elap sed time of the p laying tr ack, the rema ined time o f the playing t rack, the
elap sted time of th e disc, the r emained tim e of the disc .
3. In th e state of MP3/ WMA playin g, press the OS D button re peatedly on
the re mote contro l to turn on/ off th e playbac k status. Whe n it is on, it will
disp lay the infor mation su ch as: the seri al number o f the playing t rack, the
elap sed time of the p laying tr ack, the rema ined time o f the playing t rack.
: Same as th e ZO OM b utton on the Remote C on trol.
: Same as th e RD M button on the Remote Co nt rol.
: During D VD p layback, tap the icon t o ch ange the playback a ng le .
Keybo ar d inter face- 3
Page 17
19
16
5.11 Playback i n Sc an M ode
1. In the st at e of VCD(PBC OFF)/CD pl ay ing, press the INT button to pl ay
the prev io us 15 seconds part of e ac h tr ack on the disc. Pres s th e IN T bu tt on
again to r es ume normal playba ck .
2. In the st at e of DVD/IMAGE playin g, t he INT but ton is not availabl e.
5.12 P la yb ack from a specifie d ch ap ter/track or a spec if ie d time
1. In the st at e of DVD playing, pre ss t he S EARCH button to dis pl ay a
interf ac e and highlight the t it le i tem, then use the num be r bu ttons to input
the seri al n umber of the title; u se t he d irection button s to h ig hlight the chapte r
item, th en u se the number butto ns t o in put the serial numb er o f th e chapter;
you can st il l use the direction b ut to ns to highlight the t im e it em, then use the
number b ut tons to input the des ir ed t ime to start playba ck ; fi nally press the
OK or PLAY button to play the sel ec ted chapter or play f ro m th e selected time.
2. In the st at e of VCD/MP3/WMA/CD p la ying, press the SEA RC H bu tton to
displa y a in terface and highl ig ht t he track item, then u se t he n umber buttons
to input t he s erial number of the t ra ck ; you can still use the d ir ec tion buttons
to highl ig ht the time item, the n us e th e number buttons to i np ut t he desired
time to st ar t playback; final ly p re ss the OK or PLAY but to n to play the selecte d
track or p la y from the selected tim e.
5.13 P la yb ack in Random
In the sta te o f DVD/VCD(PBC OFF)/ MP 3/WMA/CD playin g, p re ss the
RDM butt on t o switch between RA ND OM ( ON)/RANDOM OFF. Whe n in
RANDOM ( ON ) mode, it will play in r an do m.
5.14 P la yb ack in Different View-Angle
1. In the st at e of VCD/MP3/WMA/CD p la ying, the VIEW-ANGLE butt on o n
the IR rem ot e control is not avai la bl e.
2. In the st at e of DVD playing, pre ss t he V IEW- AN GLE button repeat ed ly
on the IR re mo te control to view in d iffere nt a ng le.(This functi on i s on ly
for the DV D me dia with ANGLE funct io n)
5.15 P la yb ack in Zoom Mode
In video /i mage mode, during p la yb ack, press the ZOOM b ut to n continuously
to enlar ge a c ertain area of the im ag es o n the screen with the se m ul tiples:
5.2 Pa use Playbac k
In the s tate of DVD/V CD/CD/M P3/WMA playi ng, press the PAUS E
butt on on IR remote c ontrol to p ause the play back, pre ss the PLAY
butt on to resume no rmal play back.
5.3 St op Playback
In the s tate of DVD/V CD/MP3/ WMA/CD play ing, press th e STOP but ton
once t o pause the pla yback, th en press the PL AY button t o resume th e no rmal
play back; press t he STOP bu tton twic e to full stop th e playbac k, t hen press
the PL AY button t o start playb ack from th e beginning o f the first cha pter/tr ack.
5.4 Se lect Chapte r/Trac k with the >> | / |<< Button
Pres s the >>| / |<< but ton durin g playback to s elect the nex t or last cha pter/
trac k to playback .
Note : Press the >>| /|<< butt on multiple t imes to advan ce multip le chapters /
trac ks forward or b ackward .
5.5 Se lect Chapte r/Trac k with the Nu mber Button s
In the s tate of DVD/V CD(PBC OF F)/MP3/WM A/CD playin g, press on e of
the 1~ 9 and the 0/10 nu mber butt ons to direct ly select a nd play the 1st t o
10th t rack/chap ter (the 0/ 10 button is us ed as the 10 bu tt on).
If you w ant to play the t rack/ch apter that s se rial number i s bigger th an 10,
use th e 10+, 1~9 and 0/ 10 button . For example 1 , to play the 1 3th track/
chap ter, firstly p ress the 10 + button once , then pres s th e 3 button. F or
exam ple 2, to play th e 34th trac k/chapter, f irstly pres s the 10+ but ton for 3
time s, then press t he 4 button .(the 0/10 bu tton is used as t he 0 button )
Note : long pressi ng the +10 or - 10 button can p lay the nex t 10 or last 10
chap ter/track (only for M P3 /WMA).
5.6 Se lect Chapte r/Trac k with the Ro ot/PBC Menu ( If the disc inc ludes the
root /PBC menu)
In the s tate of DVD pla ying
1. Pre ss the TITLE butt on on the remot e control t o display the t itle list.
Page 18
17
18
2. Pre ss the direct ion butto ns to select yo ur desire d title, and th en press the OK
or PLAY button to o pen the root me nu of the sel ected title .
3. Pre ss the direct ion butto ns to select yo ur desire d chapter, fin ally pres s th e
OK or PL AY button t o play the sele cted chap ter.
Duri ng playback , pressin g the MENU butt on can dire ctly displa y the root
menu o f the title tha t is playin g.
In VCD m ode
1. Whe n starting to t urn on the PB C function, i t will play f rom the begin ning of
the di sc till it disp lay the PBC m enu on TV screen if t he disc inclu de the PBC
menu .
2. Pre ss the number b uttons to s elect your de sired tra ck to play.
In MP3 /WMA mode
1. The root me nu is displ ayed on the mon itor scre en all the time (and the TITLE
or MEN U button is not a vailabl e).
When d isplaying t he root men u, Press the di rection b uttons or on th e
2.
remo te control or d irectio n icons or on the r oot menu inte rface to
page u p/down the FO LDERS, th en tap the Fold er your des ired to open
the Fo lder.
After o pen the Folde r, in the same w ay to select th e files to pl ayback.
Duri ng slow forwa rd, press t he PLAY but ton to resume n ormal pla yback.
The functi on is only fo r video.
5.9 Di splay still f rame step b y step
If the u nit is curren tly playi ng video, pre ss the STEP butto n consecuti vely
to dis play still fr ame step by s tep.
Pres s the PLAY bu tton to resum e normal pl ayback.
5.10 P layback Rep eatedly
5.10 .1 ONE/ALL Repeat
1. In th e mode of DVD pla yback:
Pres s the RPT button to s elect REP CHAPT ER, REP TI TLE, REP ALL
or REP OFF.
2. In th e mode of VCD(P BC OFF)/C D playback:
pres s the RPT button to s elect REP ONE, RE P ALL or OFF.
When i t is in the state o f PBC ON, dur ing VCD disc pl aying, th e RPT
butt on are not avai lable.
3. In th e mode of MP3/W MA playbac k:
Pres s the RPT button to s elect REP ONE, RE P DIR, R EP ALL or OFF.
In CD mo de, the TITLE, PB C, MENU butto ns are disa bled.
5.7 Pl ayback with S peed
Duri ng normal pla yback, lo ng press the >> |/|<< but ton continu ously to fast
forw ards or backw ards at the f ollowing sp eeds: x2, x 4, x8, x20, nor mal.
Duri ng speed play back, pre ss the PLAY button to resu me normal p layback.
5.8 Pl ayback with S low Speed
Duri ng playback , p ress the SL OW_FWD butt on to execu te the Slow For ward
func tion.
With e ach consecu tive pres sing of the SLO W_FWD but ton, the play back
spee d decreases . Th e speed level s in Slow For ward as follo ws:
x1/2 ,x1/3,x1/ 4,x1/5, x1/6,x1/7 ,normal .
5.10 .2 A- B Repeat
Pres s the A-B butto n if you want t o repeat a spec ific segm ent on a disc
that y ou define:
1. Pre ss the A-B butt on at a point ( A) where you wa nt it to be the s tart point
of the r epeat segme nt. Press t he A-B button a gain at a poi nt (B) where yo u
want i t to be the termi nal point o f the repeat se gment. Then it wi ll play the
segm ent repeate dly.
2. To cancel the A- B repeat mo de and resume n ormal pla yback, pres s the A-B
butt on for the thir d time.
Note :
Duri ng DVD/ VCD/M P3/WMA/ CD playback , points A and B must b e within the
same t rack.
 Loading...