

Page 1

Page 2

1. SAFETY INFORMATION
When Driving
Keep the volume level Iow enough to be aware of the road and traffic conditions.
When Car Washing
Do not expose the product to water or excessive moisture. This could cause electrical shorts, fire or
other damage.
When Parked
Parking in direct sunlight can produce very high temperatures inside your vehicle. Give the interior a
chance to cool down before starting playback.
Use the Proper Power Supply
This product is designed to operate with a 12 volt DC, negative ground battery system (the regular
system in a North American car).
Protect the Disc Mechanism
Avoid inserting any foreign objects into the slot of this player. Failure to follow this may cause
malfunction or permanent damage due to the precise mechanism of this unit.
CAUTION:
THIS MOBILE DVD PLAYER IS A CLASS I LASER PRODUCT. THIS UNIT USES A VISIBLE/INVISIBLE
LASER BEAM WHICH COULD CAUSE HAZARDOUS RADIATION IF EXPOSED DIRECTLY . BE SURE
TO OPERATE THE MOBILE DVD PLAYER CORRECTLY AS INSTRUCTED.
USE OF CONTROLS OR ADJUSTMENTS OR PERFORMANCE OR PROCEDURES OTHER THAN
THOSE SPECIFIED HEREIN MAY RESULT IN HAZARDOUS RADIATION EXPOSURE.
DO NOT OPEN COVERS AND DO NOT REPAIR BY YOURSELF PLEASE REFER SERVICING TO A
QUALIFIED TECHNICIAN.
WARNING:
TO REDUCE THE RISK OF FIRE OR ELECTRIC SHOCK, DO NOT EXPOSE THIS EQUIPMENT TO
RAIN OR MOISTURE.
TO REDUCE THE RISK OF FIRE OR ELECTRIC SHOCK, AND ANNOYING INTERFERENCE, USE
ONLY THE RECOMMENDED ACCESSORIES.
THIS DEVICE IS INTENDED FOR CONTINUOUS OPERATION.
This product incorporates copyright protection technology that is protected by method claims of
certain U.S. Patents and other intellectual property rights owned by Macrovision Corporation and other
rights owners. Use of this copyright protection technology must be authorized by Macrovision
Corporation, and is intended for home and other limited viewing uses only unless
otherwise authorized by Macrovision Corporation. Reverse engineering or disassembly is prohibited.
Region Management Information
Region Management Information:
This Mobile DVD Player is designed and manufactured to respond to the Region Management
Information that is recorded on a DVD disc. If the Region number described on the DVD disc does not
correspond to the Region number of this Mobile DVD Player, this Mobile DVD
Player cannot play this disc.
E-1
Page 3
2. DISC NOTES
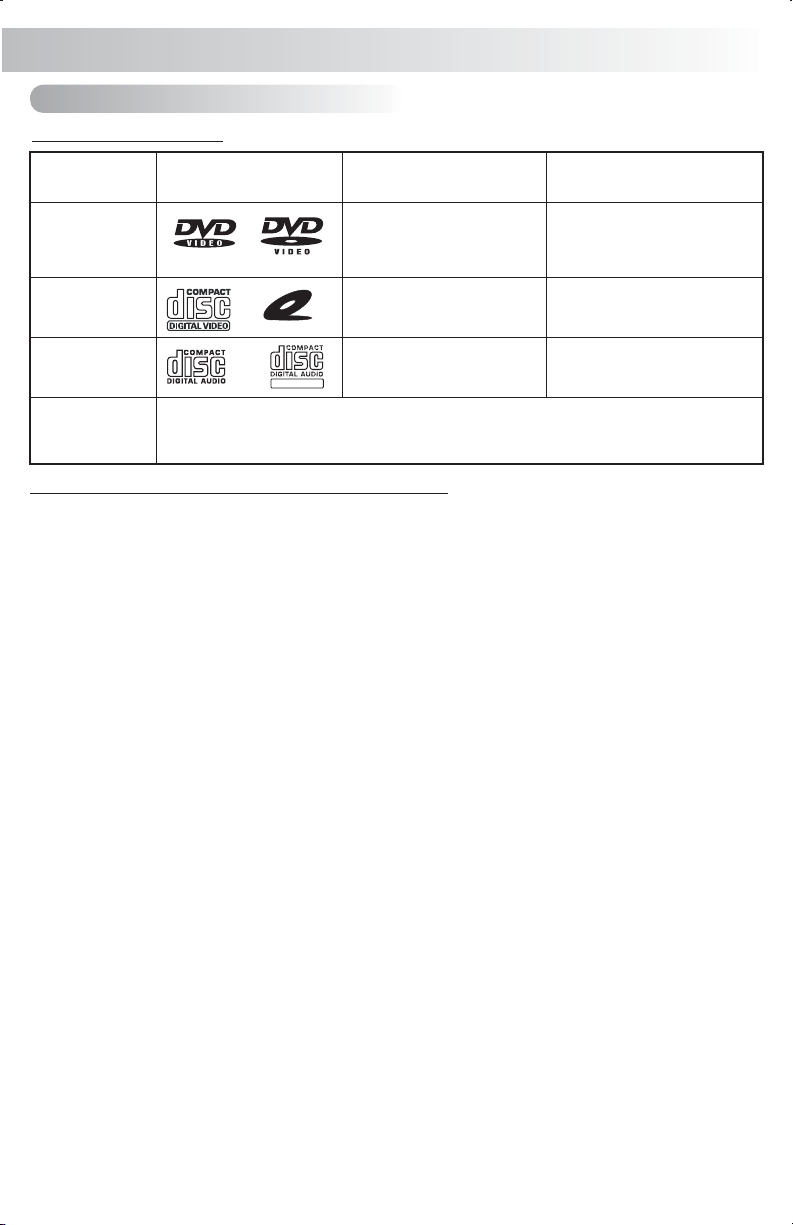
A. Disc Compatible Play with this Unit
General Disc Information:
Disc Type Mark (Logo)
DVD Video
TM
Diameter/Playable
sides
12 cm single/double side
( 1 layer & 2 layer)
Playback time
133 minutes (4.7GB)
242 minutes (8.5GB)
266 minutes (9.4GB)
484 minutes (17GB)
Video CD
Audio CD
MP3 disc
This Unit is capable of playing the following disc types:
CD-Rs or CD-RWs recorded in format MP3 MPEG1, 2, 2.5 Audio Layer 3 . The recorded
format must be compliant withISO 9660 Level 1, ISO 9660 Level 2,Romeo, and Joliet.
VIDEO CD
REWRITABLE
12 cm single side
12 cm single side
74 minutes
74 minutes
DVD Video
DVD contains excellent sound and Video due to Dolby digital and MPEG2 system. Its diameter is 12cm.
DVD can hold data as much as 7 times data of CD-ROM, and its maximum playing time can be up to 2
hours (Double-sided DVD is up to 4 hours). DVD has four types of discs: single-layer single-sided (1), twolayer single-sided (2), single-layerdouble-sided(3), and two-layer double-sided disc(4).
SVCD
Employing the MPEG-II compression terminology, Super VCD (SVCD) can offer the excellent image
quality and is abletorecord the bi-stereo sound track.SuperVCD also supports the wide-screen display.
VCD2.0
Compared with the VCD 1.1, the disc play order of VCD2.0 depends on the track order of the play-table of
the disc. It will not necessarily follow the saving-order of the disc original saving. Generally, the Karaoke
VCD2.0 discs contains thePBC (Playback Control) menu.
VCD1.1
The VCD can play both the audio and videodata, and has the same size with the voice CD. The maximum
playing time of thestandard12cm VCD is 74 minutes.
DVCD
The unit is compatible with the DVCD player. The DVCD player is the high-density VCD. Compared with
the VCD disc, moredatafiles can be compressed inoneDVCDdisc.
CD-DA
The unit is compatible with the CD-DA player. The CD-DA can play the voice data. The playing time of the
standard 12cm CD-DA discis 74 minutes.
DTS-CD
The unit is compatible with the DTS-CD player. The DTS digital surround sound is developed to use the 6
digital sound tracks to replace the analog voice tracks used in movies. The technology is used more and
more widely in the movie theatres worldwide. The digital theatre system company developed the family
theatre system, which enables you to enjoy the voice depth and the surround effect of DTS digital
surround system inyour household. Actually, the system doesnot lose its authenticity it realizes the clearcut voices of 6tracks.
E-2
Page 4
HDCD
The unit is compatible with the HDCD player. HDCD, the abbreviation of High Definition Compatible
Digital, is a recording/playing technology that improves the CD audio quality. Based on the full compliance
with the CD specification, it can enhance the quality and quantity of the digital sounds in the highest scale.
It encodes the required messages that were deserted by the CD format, and store the related commands
into the LSB. Without changing the CD format, it is output through the 24-bit D/A converter, which will help
to ultimately enhance the quality of the playback sounds.
MP3/JPEG
The unit is compatible with the CD-R, CD-RW, CD-ROM discs that contain the MP3/JPEG tracks.
Picture-CD
The unit is compatible with the Picture-CD player, and does not require the support from additional
software. Developed by Kodak, Picture CD is a disc format that saves pictures in the electronic text
format.
Photo-CD
The unit is compatible with the Photo-CD player, and does not require the support from additional
software. Developed by Fuji / Konica, Photo CD is a disc format that saves pictures in the electronic text
format.
CD-R/CD-RW
The unit is compatible with CD-R and CR-RW, which supports ISO9660 specification. The files in “.MP3”,
“.JPG”, “JPEG”, “.AC3”, “”.PCM”, “.MPG”, “.MPE”, and “.WAV” formats can be included into the ISO9660capatible discs.
DVDR / DVDRW
The unit is compatible with DVDR and DVDRW, which support UDF specification. The files in
“.MP3”, “.JPG”, “JPEG”, “.AC3”, “”.PCM”, “.MPG”, “.MPE”, and “.WAV” formats can be included
into the UDF-compatible discs.
B. DISCS WHICH CAN NOT BE PLAYED
8 cm disc
CD ROM
CDV, CDI, CDG,
LD
DVD ROM
DVD RAM
DVD-R and DVD-RW will not play unless the recording session is closed and the DVD is
finalized.
C. NOTE ON REGION CODE
DVD players and DVD Video their own Region Code numbers. This unit can play
dosc have
the disc of all region code numbers.
ALL
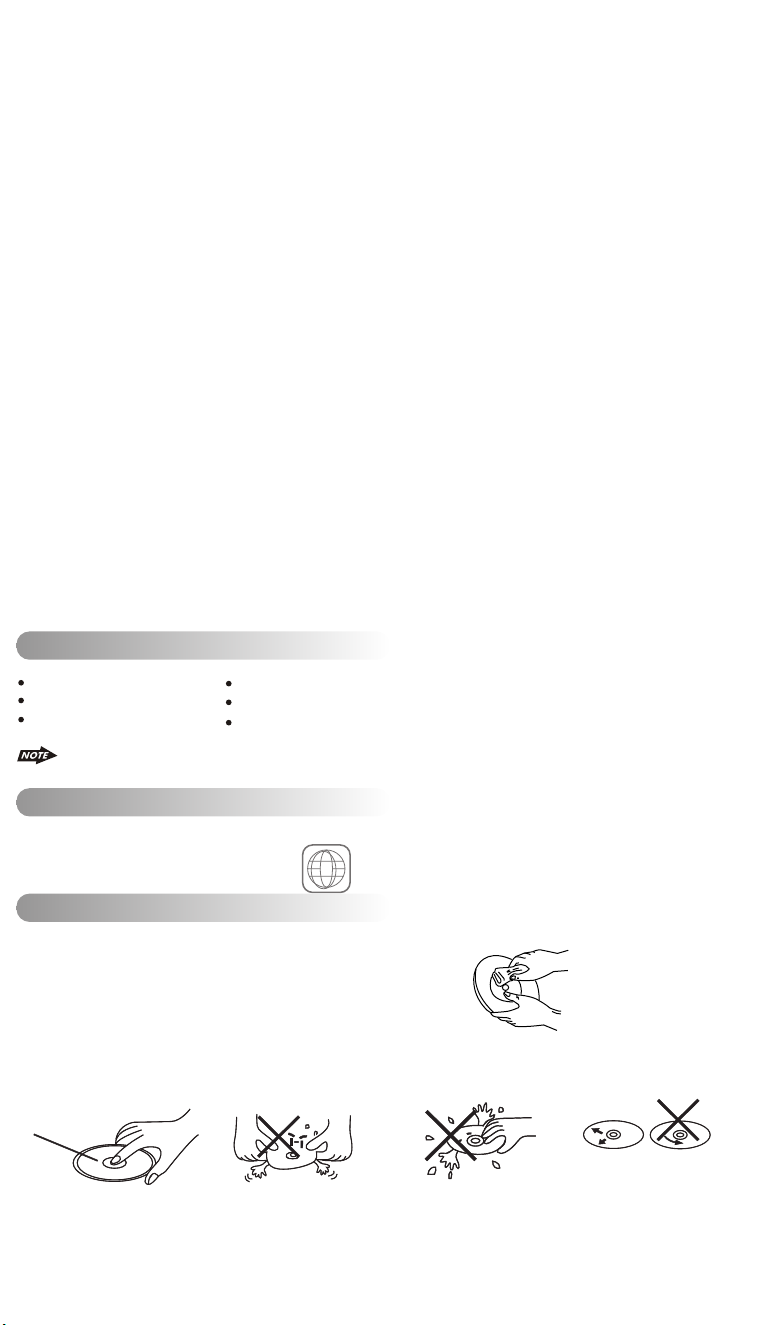
D. DISC MAINTENANCE
Before playing, wipe the disc using a clean cloth, working from the center hole towards the outside
edge.
Never use benzene, or thinners, or cleaning fluids,
or anti-static liquids or any other solvent.
Note: A disc may become somewhat scratched (although not enough to make it unusable) depending
on how you handle it and conditions in the usage environment. Please note these scratches are not an
indication of any problem with the player.
Label side
Up
Do not bend
Never touch
the under side
of a disc
E - 3
Wipe the disc surface
from the
center to the edge.
Page 5
3. INSTALLATION
Before finally installing the unit, connect the wiring temporarily and make sure it is all connected
properly and the unit and system work properly.
Use only the parts included with the unit to ensure proper installation. The use of unauthorized parts
can cause malfunctions.
Consult with your nearest dealer if installation requires drilling of holes or other modifications of the
vehicle.
Install the unit where it does not get in the driver's way and cannot injure the passenger if there is a
sudden stop, like an emergency stop.
If installation angle exceeds 30° from horizontal, the unit might not give its optimum performance.
30°
Avoid installing the unit where it would be subject to high temperature, such as from direct
sunlight, or from hot air, from heater, or where it would be subject to dust dirt or excessive
vibration.
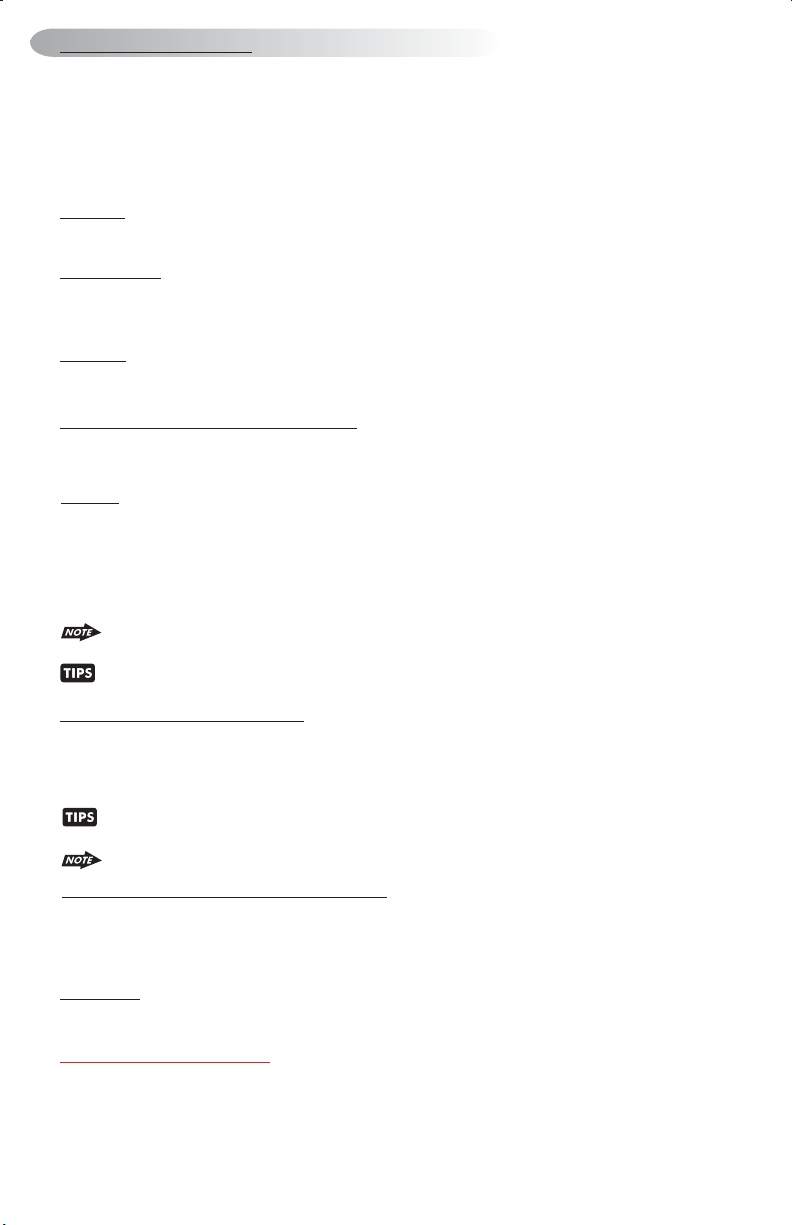
Be sure to remove the front panel before installing the unit.
DIN FRONT/REAR-MOUNT
This unit can be property installed either from “Front” (conventional DIN Front-mount) or “Rear”(DIN
Rear-mount installation, utilizing threaded screw holes at the sides of the unit chassis). For details,
refer to the following illustrated installation methods A and B.
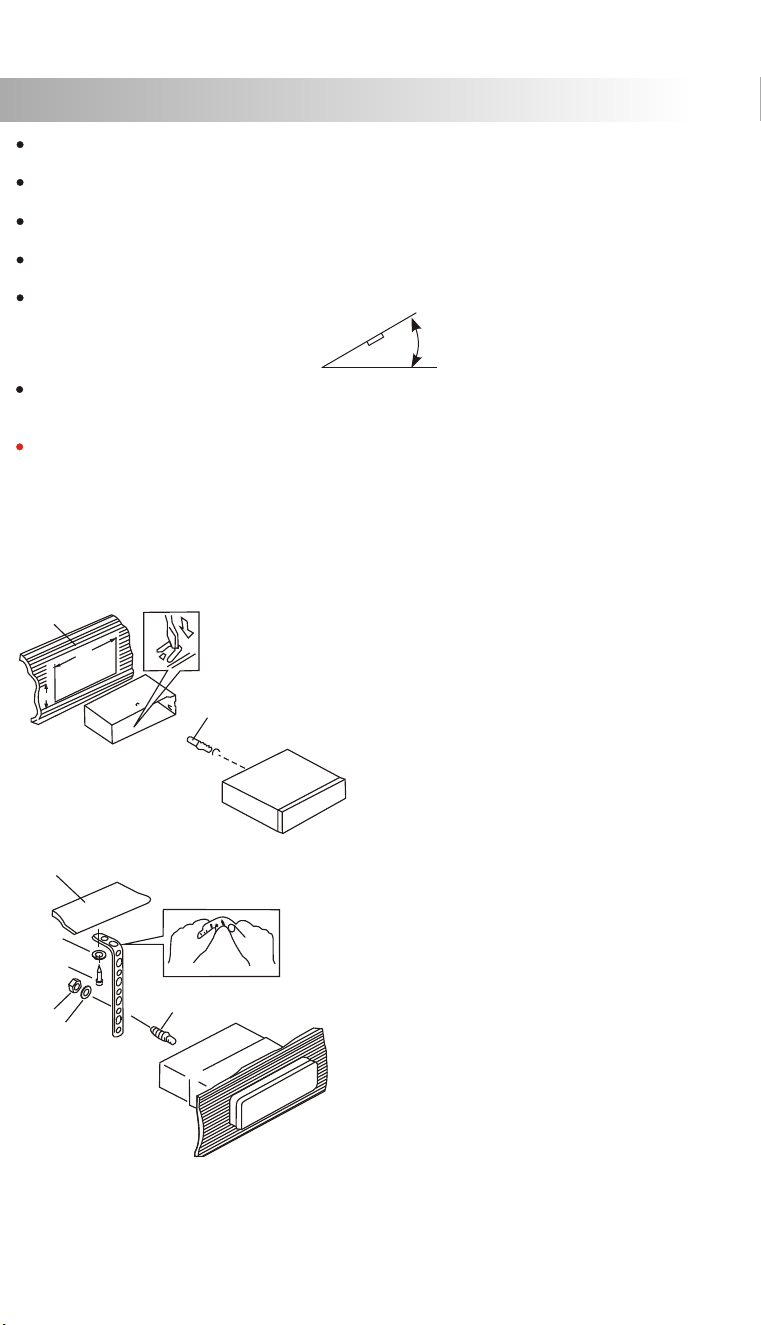
DIN FRONT-MOUNT (Method A)
Installation the unit
1
2
182
53
3
1. Dashboard
2. Holder
After inserting half sleeve into the
dashboard, select the appropriate
tab according to the thickness of
the dashboard material and bend
them inwards to secure the sleeve
In place.
3. Screw
1
7
4
2
3
6
5
1. Dashboard
2. Nut (5mm)
3. Spring washer
4. Screw (5x15mm)
5. Screw
6. Support Strap
Be sure to use the support strap to secure the
back of the unit in place. The strap can be bent
by hand to the desired angle.
7. Plain washer
E - 4
Page 6
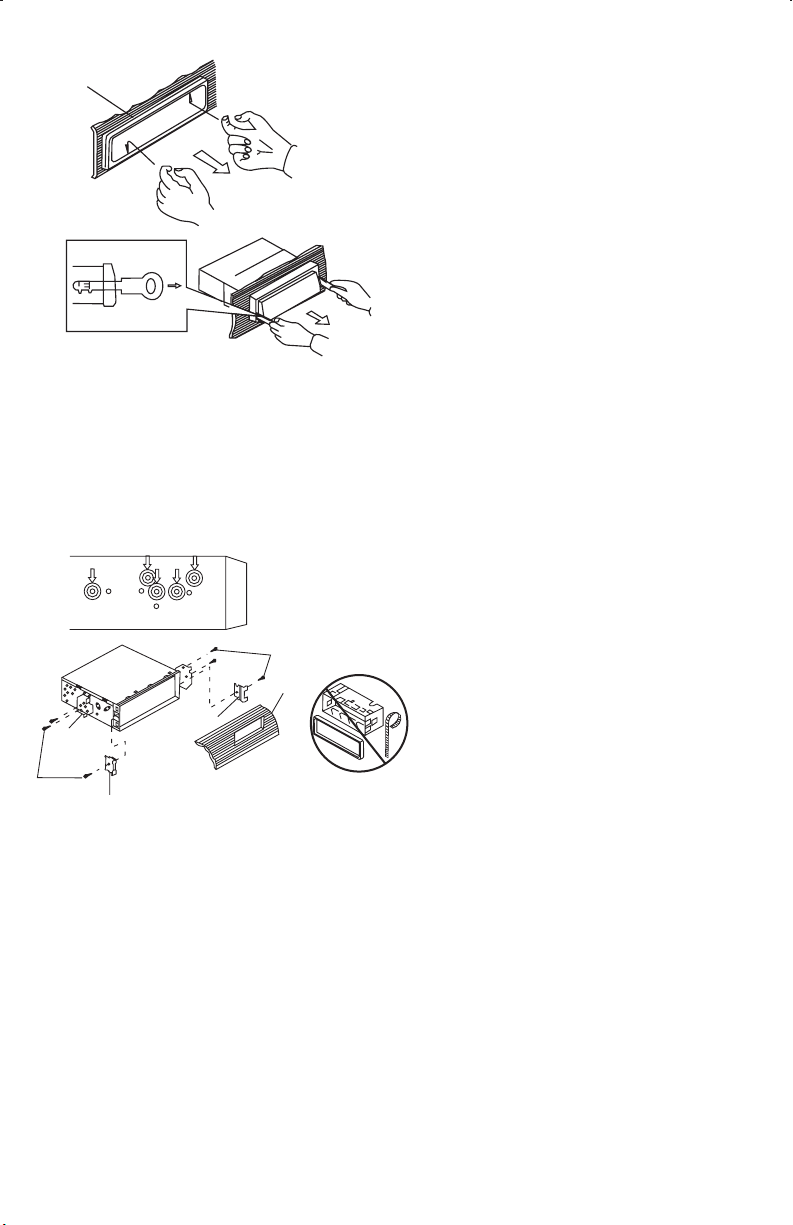
Removing the unit
a
b
c
Trim Plate Installation:
Push the trim plate against the chassis until it is fitted.
You must do this before you install the front panel, otherwise it can't be attached.
DIN REAR-MOUNT (METHOD B)
Installation using the screwholeson the sides of theunit.
Fastening the unit to thefactoryradio mounting bracket.
2
4
5
3
2
5
a. Frame
b. Insert fingers into the groove in the front
of frame and pull out to remove the
frame. (When re-attaching the frame,
point the side with a groove down wards
and attach it.)
c. Insert the supplied with the unit into
the grooves at both sides of the unit as
shown in figure until they click. Pulling
the levers makes it possible to remove
the unit from the dashboard.
1. Select a position where the screw
holes of the bracket and the screw
holes of the main unit become
aligned (are fitted) and tighten the
screws at 2 locations on each side.
2. Screw
3. Factory radio mounting bracket.
4. Dashboard or Console
5. Hook (Remove thispart)
Note: the mounting box, outer trim ring,
and the sleeve are not used for method
B installation.
keys
E-5
Page 7
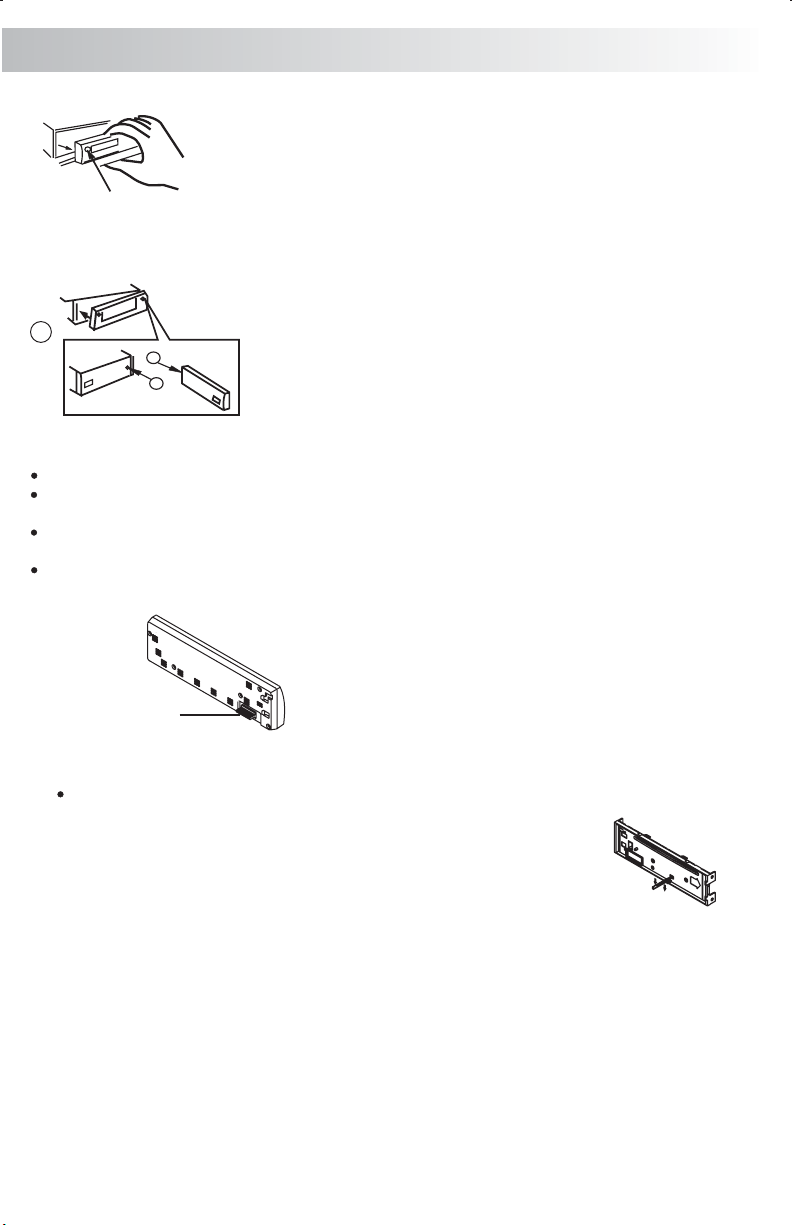
4. DETACHABLE CONTROL PANEL (D.C.P.)
Removing The Detachable Control Panel (D.C.P.).
1. Turn the power off
2. Press the D.C.P. release button
PANEL RELEASE
BUTTON
Attaching the DCP
3. Remove the D.C.P.
2
A
B
1. Attach the panelatthe right side first, with
point B on themainunit touching point A on
the D.C.P.(As shown on the digram).
2. Then press theleftside of D.C.P. onto the main
unit until a “click”soundis heard.
CAUTION
DO NOT D.C.P from the left side. Doing so may damage it.
insert the
The D.C.P can easily be damaged by shocks. After removing it, place it in a protective case and
be careful not to drop itor subject it to strong shocks.
When the release button is pressed and the D.C.P is unlocked, the car's vibrations may cause it
to fall. To prevent damage to the D.C.P, always store it in a protective case after detachingit.
The rear connector that connects the main unit and the D.C.P is an extremely important part. Be
careful not to damage it by pens, screwdrivers, etc.
pressing on it with fingernails,
Note:
If the D.C.P is dirty, wipe off the dirt with soft, dry
cloth only. And use a cotton swab soaked in
Socket
isopropyl alcohol to clean the socket on the back of
the D.C.P.
RESETTING THE UNIT:
After releasing the front panel, use a pencil or any non-metalic object to press & hold the reset
button for five seconds to reset the unit.
E-6
Page 8

5. WIRING DIAGRAM-AUDIO/VIDEO CONNECTIONS
SUB-WOOFER OUTPUT
SUB-W OUT
DIGITAL OUTPUT
DIGITAL OUT
EXTERNAL REMOTE JACK
REMOTE
VIDEO INPUT
VIDEO IN
AUDIO INPUT (RIGHT)
AUDIO IN R
AUDIO INPUT (LEFT)
AUDIO IN L
YELLOW
BLUE
BLACK
PINK
RED
WHITE
SUB
WOOFER
DOLBY DIGITAL
& DTS
DECODER
EXTERNAL REMOTE
RECEIVER
VCR or DVD
GAME CONSOLE
or
FUSE
VIDEO (1) OUTPUT
VIDEO OUT (1)
VIDEO (2) OUTPUT
VIDEO OUT (2)
YELLOW
YELLOW
E-7
Page 9
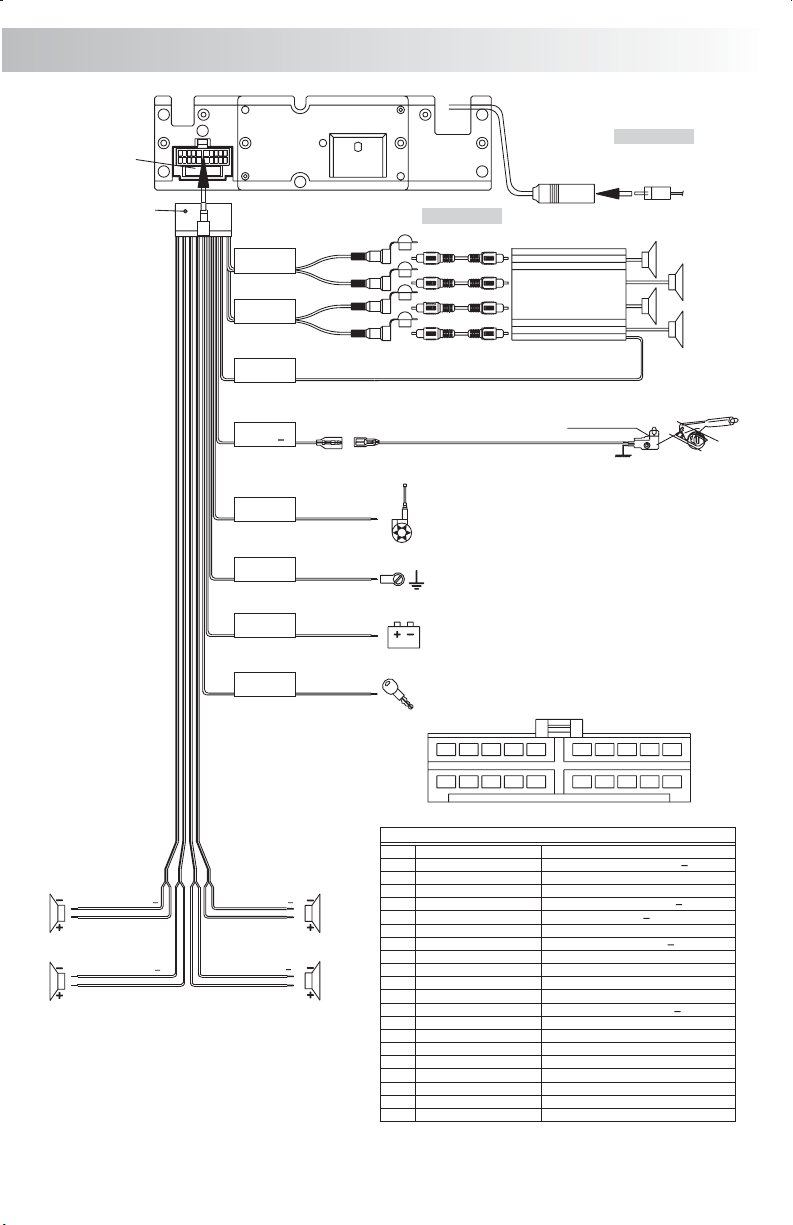
6. WIRING DIAGRAM - POWER / SPEAKERS (20 PIN)
FUSE
20-PIN
AUDIO/POWER
HARNESS
(See Figure 1 )
GREY
REAR
CHANNEL
BLACK
FRONT
CHANNEL
BLUE/WHITE
STRIPE
POWER
AMPLIFIER
REMOTE
WHITE
RED
WHITE
RED
(Not supplied)
RCA-TO-RCA
L-CH
R-CH
L-CH
R-CH
CABLES
Connect to power amplifier, If not used,
Tape bare end of wire.
ANTENNA
JACK
AMP
(Not supplied)
ANTENNA
EXTENDER
CABLE
LEFT FRONT
WHITE-BLACK LF
WHITE LF+
LEFT REAR
GREEN-BLACK LR
GREEN LR+
PINK
PARKING
BRAKE ( )
BLUE
POWER ANTENNA/
AMPLIFIER REMOTE
BLACK
GROUND
YELLOW
+12 VOLTS
CONSTANT
RED
+12 VOLTS
SWITCHED
RIGHT FRONT
GREY-BLACK RF
GREY RF+
RIGHT REAR
VIOLET-BLACKRR
VIOLET RR+
Connect to Parking Brake.
Extension wire
Power Antenna
Connect to power antenna or amplifier,
If not used, Tape bare end of wire.
Ground
Connect to ground terminal or clean
unpainted metal part of chassis.
Memory / Battery
Connect to battery or 12 volt power source
that is always live. The radio will not work if
this wire is not connected.
Accessory / Ignition
Connect to existing radio wire or radio fuse.
3
12
11 121314
20 PIN AUDIO / POWER HARNESS
PIN WIRE COLOR FUNCTION / LABEL
GREY / BLACK
1
2
GREY
VIOLET
3
4
VIOLET/BLACK
5
PINK
GREEN
6
7
GREEN / BLACK
8
RED
BLACK
9
10
RED
11
WHITE
12
WHITE / BLACK
13
BLUE/WHITE
14
BLUE
YELLOW
15
16
BLACK
WHITE
17
18
RED
19
BLACK
20
WHITE
20 PIN HARNESS PIN CHART
Brake Switch
Ground
5
4
6
7
8910
16
15
RIGHT FRONT SPEAKER ( )
RIGHT FRONT SPEAKER (+)
RIGHT REAR SPEAKER (+)
RIGHT REAR SPEAKER ( )
PARKING BRAKE ( )
LEFT REAR SPEAKER (+)
LEFT REAR SPEAKER ( )
IGNITION (ACC)
REAR PRE-AMPLIFIER LINE OUT COMMON
RIGHT REAR PRE-AMPLIFIER LINE OUT
LEFT FRONT SPEAKER (+)
LEFT FRONT SPEAKER ( )
POWER AMPLIFIER REMOTE (+)
POWER ANTENNA
BATTERY (+)
CHASSIS GROUND
LEFT FRONT PRE-AMPLIFIER LINE OUT
RIGHT FRONT PRE-AMPLIFIER LINE OUT
FRONT PRE-AMPLIFIER LINE OUT COMMON
LEFT REAR PRE-AMPLIFIER LINE OUT
17
181920
Figure 1Pin View
E-8
Page 10
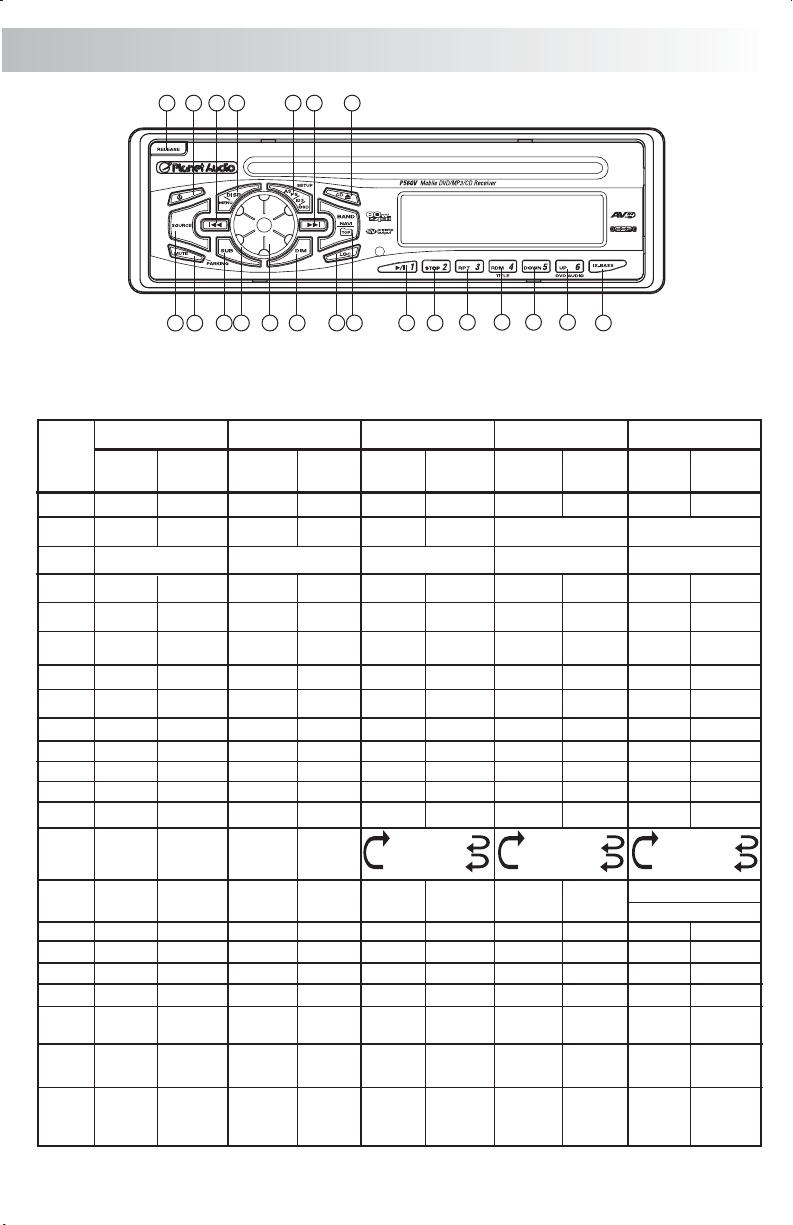
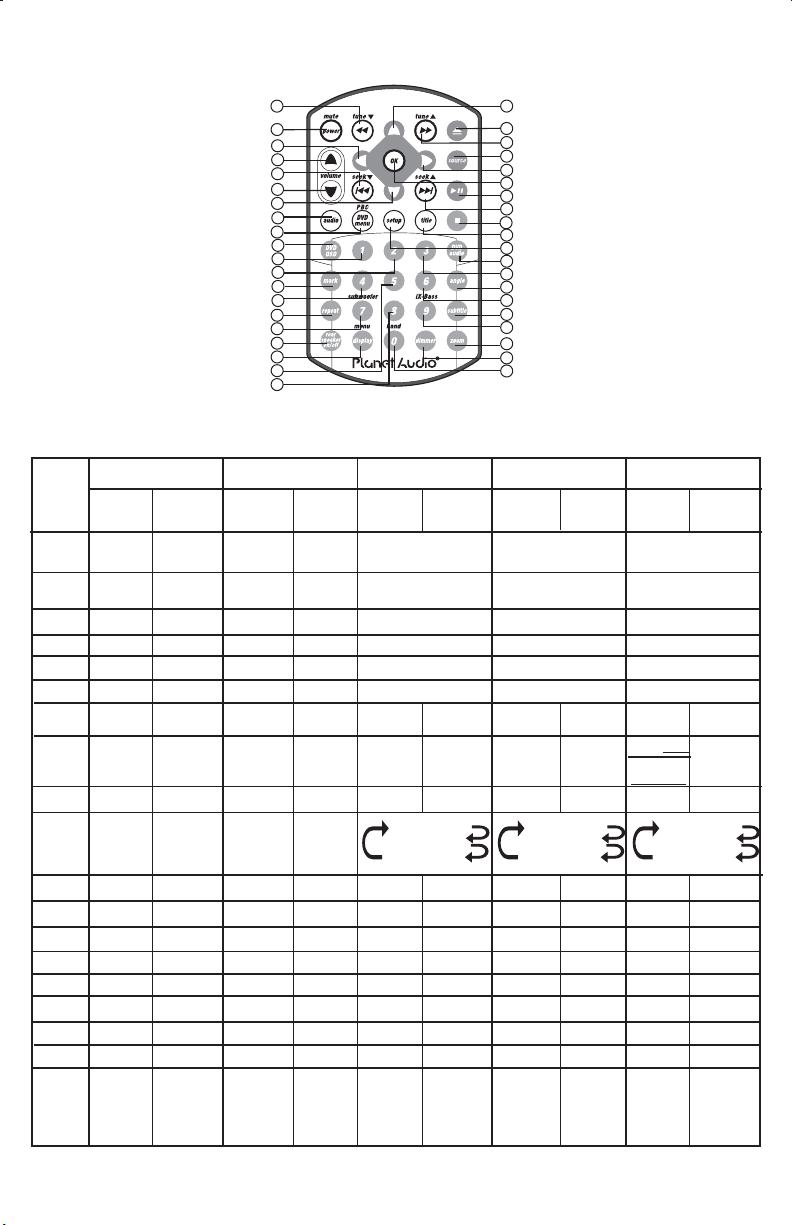
7. CONTROL PANEL FUNCTION
OPERATIONS:
SYSTEM TUNER CD
KEY
Short
Press
1
Power
2
Panel Releasebutton
3
Audio
4
Menu
5
Source
Encoder
6
Volume
7
Mute
8
Sub-W
9
Dimmer
10
Ix-bass
11
12
13
14
15
16
17
Display
18
19
20
21
22
371
5
Long
Press
Parkin g
Menu
2021 18 11
6
8 9
4
Short
Press
Panel Releasebutton
PS
M1
M2
M3
M4
M5
M6
Band
Seek Up
Seek
Down
Local
/Distant
Long
Press
AS
Memory 1
Memory 2
Memory 3
Memory 4
Memory 5
Memory 6
Tune Up
Tune
Down
2
12 13
19
22
Short
Press
Eject
Panel Releasebutton Panel Releasebutton Panel Release button
Ok
Pause/Play
Stop Stop St op
Repeat Off
Repeat Track
Repeat Disc
Random
Track Up
Track
Down
14 15 16 17
Long
Press
Set-up
Fast
Forward
Fast
Backward
10
MP3
Short
Press
Eject
Ok
ID3
Pause/Play Pause/Play
Random Folder
Folder-Down
Folder-Up
File Up
File
Down
Long
Press
Set-up Set-up
Repeat Off
Repeat File
Repeat Folder
Navigate
Fast
Forward
Fast
Backward
DVD
Short
Press
Eject
Ok
OSD
Repeat Off
Repeat Chapter
Repeat Title
VCD: Random
DVD: TITLE
DVD Audio
Next
Back
Long
Press
Fast
Forward
Fast
Backward
E-9
Page 11
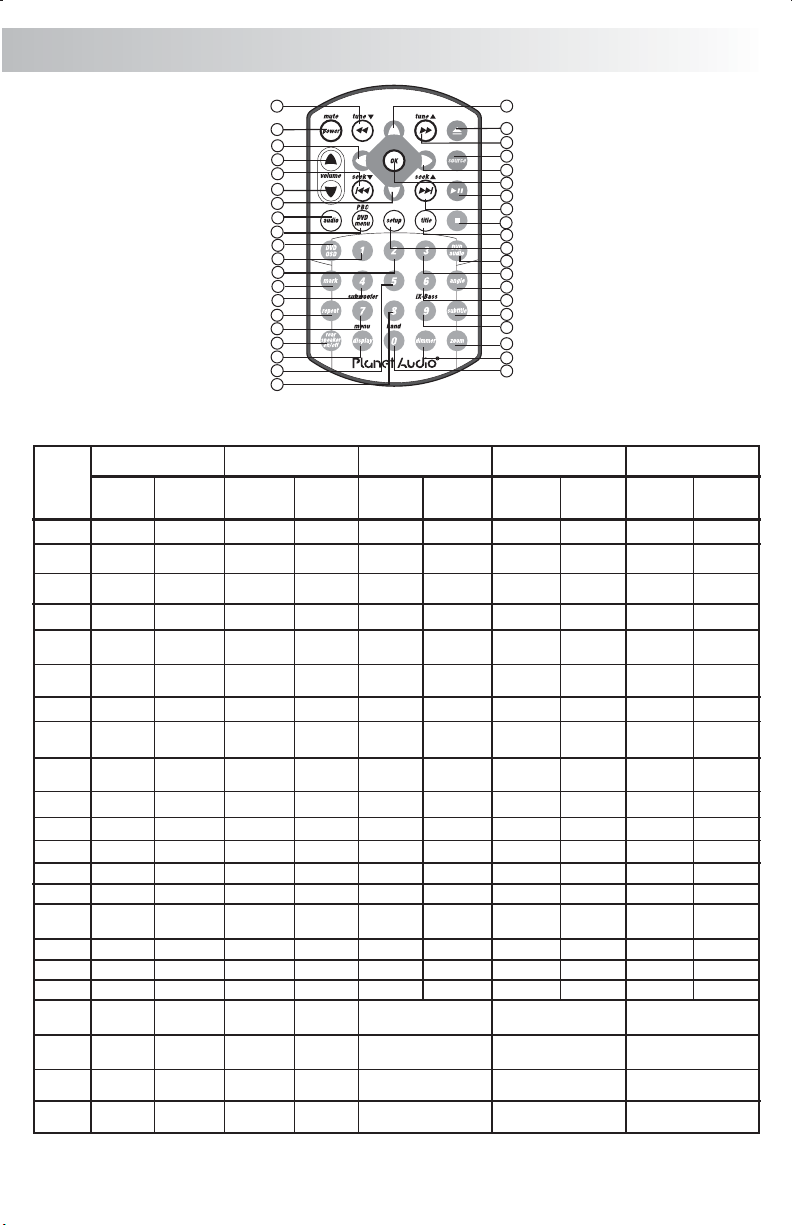
8. REMOTE FUNCTION
OPERATIONS:
KEY
1
2
3
4
5
6
7
8
9
10
11
12
13
14
15
16
17
18
19
20
21
22
SYSTEM TUNER CD
Short
Press
Mute
Audio
Menu
Source
Volume
Up
Volume
Down
Dimmer
Long
Press
Power
Short
Press
Tune
Up
Tune
Down
Seek Up
Seek
Down
M1
M2
M3
M4
9
1
10
5
15
6
13
3
30
34
19
20
35
22
32
25
29
40
23
26
Long
Press
Memory
1
Memory
2
Memory
3
Memory
4
12
2
8
4
11
16
17
14
18
37
31
38
21
39
24
36
27
33
7
28
MP3
Short
Press
Long
Press
Eject
Fast
Forward
Fast
Backward
Left
Right
Up
Down
Track Up
Track
Down
Ok Ok Ok
Pause/Play
Stop Stop Stop
Track NO. Access
Track NO. Access
Track NO. Access
Track NO. Access
Short
Press
Eject
Fast
Forward
Fast
Backward
Long
Press
Short
Press
Eject
Forward
Backward
Left
Right
Up
Down
Down
File Up
File
Down
Pause/Play Pause/Play
File NO.Access
File NO.Access
File NO.Access
File NO.Access
DVD
Fast
Fast
Left
Right
Up
Next
Back
Numeric 1
Numeric 2
Numeric 3
Numeric 4
Long
Press
E-10
Page 12
OPERATIONS:
9
1
10
5
15
6
13
3
30
34
19
20
35
22
32
25
29
40
23
26
12
2
8
4
11
16
17
14
18
37
31
38
21
39
24
36
27
33
7
28
KEY
23
24
25
26
27
28
29
30
31
32
33
34
35
36
37
38
39
40
SYSTEM TUNER
Short
Press
REAR
SPEAKER
DISPLAY
Long
Press
Sub-W
iX-Bass
MENU
Short
Press
M5
M6
Band
Long
Press
Memory
5
Memory
6
CD
Short
Press
Track NO. Access
Track NO. Access
Track NO. Access
Track NO. Access
Track NO. Access
Track NO. Access
Long
Press
Repeat Off
Repeat Track
Repeat Disc
MP3
Short
Press
Set UpSet Up
Long
Press
File NO.Access
File NO.Access
File NO.Access
File NO.Access
File NO.Access
File NO.Access
Repeat Off
Repeat File
Repeat Folder
DVD
Short
Press
Numeric 5
Numeric 6
Numeric 7
Numeric 8
Numeric 9
Numeric 0
VCD: PBC
DVD:
DVD MENU
Set Up
Repeat Off
Repeat Chapter
Repeat Title
Zoom
OSD
Mark
Subtitle
Title
DVD
Audio
Angle
Long
Press
E-11
Page 13
9. BASIC OPERATIONS
3) PANEL RELEASE BUTTON (RELEASE)
Press this button toremove the controlpanel.
1) POWER ON/OFF BUTTON ( )
Press the POWER button or Press any other button on the front of the unit (except the
Open/Eject) to turn Ontheunit. Press the POWER buttontoturn Off the unit.
7) MUTE BUTTON (MUTE)
Short Press the MUTE button to mute the audio output, and “Mute” will appear on the display.
Press the mute button again to restore the audio output to the previous level.
8) SUB-WOOFER (SUB)
Press the SUB-W button to activate the Sub-woofer function On, and “Sub-woofer” will appear on
the LCD display for 3 seconds. press the SUB-W button again to turn off the Sub-woofer function.
10) iX-BASS BUTTON (iX-Bass )
Short Press the iX-Bass button to turn on the IX-Bass function, and “iX-Bass” will appear in the
LCD display for 3 seconds. Press the iX-Bass button again to turn off the IX-Bass function
5) SOURCE BUTTON (SOURCE)
Short Press the SOURCE button to select a different mode of operation as indicated on the display
panel. Available modes includeTuner, DVD, AV IN.
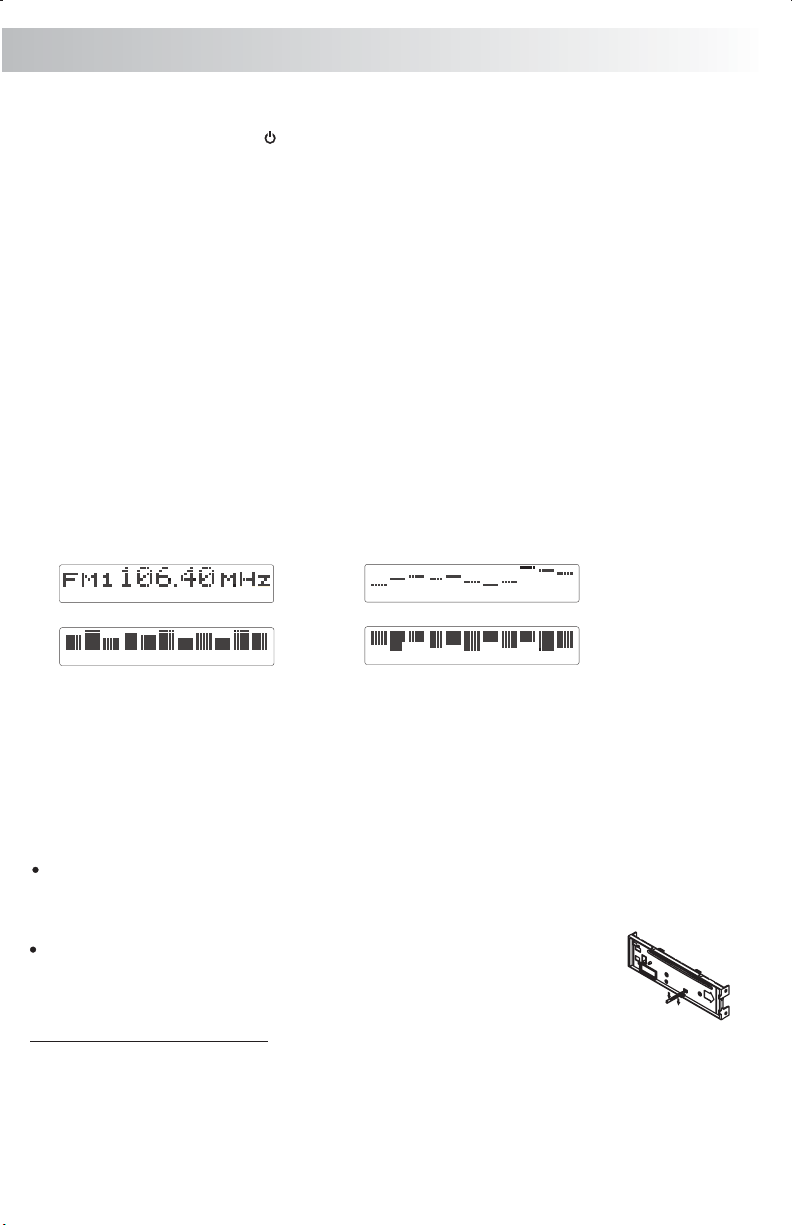
18) DISPLAY (DISP)
Short Press theDISPLAY/MENU button repeatedlytoselect the following different Displayoptions:
Spectrum mode 1 >Spectrummode 2 > Spectrum mode3 >Default Display.
The selected DISPLAY will appear in thedisplaywhen the unit is turnedon.
Short
Default Display
True Spectrum Analyzer mode1
True Spectrum Analyzer mode2
True Spectrum Analyzer mode3
9) DIMMER
Short Press theDIMMER button to adjust the dimmerlevel.
6) ENCODER VOLUME BUTTON
To increase the volume, rotate the volumecontrolknob clockwise.
To decrease the volume, rotate the volume control knob counter clockwise. When the volume is
adjusted, the volume level is shown on the display panel as a number ranging from 00 (lowest) to 46
(highest).
RESET
To Reset the Main Unit System
After releasing the front panel, use a pencil or any non-metalic object to press & hold the reset
button for five seconds to reset the main unit and the unit will return to the factory default
settings.
To Reset the DVD Setting
Press SET UP button on remote control or long press AS/PS button to bring
up the SET UP Menu, select OTHERS then select LOAD DEFAULT, the DVD
Setting will resume to factory default value .
IGNITION OFF CLOCK RECALL
The user can recall the clocktime display by pressing the DISPLAY button, even when ignition isoff.
E-12
Page 14
Menu operations
18) MENU FUNCTION LIST (MENU)
Press & hold the DISPLAY/ MENU button formore than 3seconds to accessthe menu. "Menu"will be
showed on appearonthe display momentarily.User can navigate thruthemenu items by pressing the
DISPLAY/ MENU button, or by pressing the Tuning Up or Tuning Down Buttons to access the next or
previous option. Once the desired menu items appears on the display, adjust that option by using the
Volume Up or Down button within 5seconds. The followingmenu items can be adjusted as described
above:
Contrast
The contrast level of the display is set at "CONTRAST 05" by default. User can use the Volume Up
or Down button to adjust the contrast level from 00 to 10.
Clock Format
"CLK FORMAT 12H" is set as default.
User can use the Volume Up or Down button to choose the Time Format between “12 Hours” or “24
Hours”
Time Set
The time on the clock is set to 12:00 by default. User can adjust the time by using the Volume Up
button to adjust the minutes and Volume Down button to adjust the hours.
AREA (TUNER FREQUENCY SPACING)
This option allows the selection of the frequency spacing which is most appropriate for your area.
"Area U.S.A" is the default setting. Use the volume control button to select the Europe , Latin
America, or Oirt options.
Parking
This option is useful if user FORGOT that the “PARKING WIRE” is not properly connected. There will
be no Video output if the is to the Hand Brake Switch.
The LCD will display “PARKING On” and will stay on the LCD for 5 seconds. User can use the Volume
Up or Down button to turn “PARKING” to “OFF” within the 5 seconds time out. Once “Parking” is
changed to “Off”, the TFT monitor will display the video signal regardless even if the is
NOT CONNECTED !
The “PARKING On” will keep scrolling through the LCD for every 20 seconds if user does not
select “PARKINGOff” under the DVD orAV-In Modes!
For quick access Parking “On” & “Off” . User can Long Press ‘Mute’ button on the Front
control panel or Remote control
Rear Speaker On/Off (Rear Spk)
Rear speaker is turned’ ON’ by default. If OFF is selected, the rear speaker's audio output will be
TURNED OFF. This function is useful while listening with the HEADPHONE and user doesn’t need
Rear Speakers sounds output through rear speakers. Select “ON” to reactivate the rear speakers
sound output
For quick access Rear Speaker “On” or “Off”, user can press Rear Speaker button on the
remote control.
When the Rear Spearker is 'OFF', the Audio Function, 'FADER', will not be functional.
Programmable Turn-on Volume (VOL PGM)
This optionallows selection of the volume level , the radio will automaticallyassume when turning on.
"VOL PGM 12" is the default setting, which will turn on the radio at the volume level as adjusted in the
VOL PGM. To program a specific turn on volume level, use the volume control button to select
"VOLUME LEVEL” within 5 seconds.
Beep Tone
The beep tone feature allows the selection of an audible beep tone when a button is pressed. "BEEP
TONE On" is thedefaultsetting. Use the volume up/downbuttonto select the "BEEP TONE Off"option
Illumination Color (COLOR)
This option allows selectionbetweentwo colors for the backlightilluminationof the unit.
"COLOR 1" is the default color and will illuminate the unit with bluebacklight. Use volumeup/down
button to select "COLOR 2”,, which willilluminatethe unit with red backlight.
Parking Wire NOT PROPERLY CONNECTED
Parking Wire
E-13
Page 15

Selectable Clock Display (CLK ON LCD)
When the selectable clock display feature is activated, the clock and default greeting note will
appear on the display while the radio is turned off but the ignition switch is still on . "CLK ON
LCD On" is the default setting for this option. To select the clock and greeting note to be
showed when the unit is powered off, to select "CLK ON LCD Off".use volume up/down button
Key Illumination On/Off (KEY LIGHT)
The Key Light on/off feature controls how the front panel buttons illuminate when the unit is turned off,
but theignition switch is still on. If the Key Light feature is activated, and whenthe unit is turned off and
the ignition turned on, the front panel buttons willbe illuminated. If the Key Light feature is deactivated
and when the unit is turned off and the ignition switch turned on, the front panel buttons will not be
illuminated.
E-14
Page 16

10. AUDIO OPERATION
Sources Tone Memory
The Audio Setting and Parameters for Bass, Treble, Ix-Bass, Subwoofer are automatically memorized for
each source: Tuner, DVD, AV independently.
Audio Menu
Short Press “AUDIO” button to access the Audio Menu. User can navigate thru the Audio Menu items by
pressing the / “AUDIO” button repeatedly, or by pressing the Tuning Up or Tuning Down Button. Once the
desired menu item appears on the display, adjust that option by using the Volume Up or Down button
within 5 seconds. The following menu items can be adjusted as described above. The unit will
automatically exit the Audio Menu after five seconds of inactivity.
VOLUME (Volume Level)
User has 5 seconds to use the Volume button to adjust the desire volume level, the volume level
will be shown on the LCD display ranging from 00 (lowest) to 46 (highest).
BASS (Bass Level)
User has 5 seconds to use the Volume Up or Down button to adjust the desired Bass level range
from -6 to +6.
TREBLE (Treble Level)
User has 5 seconds to use the Volume Up or Down button to adjust the desired Treble level range from
-6 to +6.
BALANCE
User has 5 seconds to use the Volume Up or Down button to adjust the Balance between the right
and left speakers from R12 (full right) to L12 (full left). “C00” represents an equal balance between
the right and left speakers.
FADER
User has 5 seconds to use Volume Up or Down button to adjust the Fader between the front and
rear speakers from R12 (full rear) to F12 (full front). “C00” represents an equal balance between
the front and rear speakers.
E - 15
Page 17

11. TUNER OPERATION
19) BAND BUTTON (BAND)
Press BAND to change between FM bands and AM(MW) bands.
20&21) TUNING UP/DOWN BUTTON ( / )
Manual Tuning
Press the Up Tuning( ) or Down Tuning ( )button for more than 3 seconds to move the
radio frequency number up or down by one step.
Auto Seek Tuning
Press the Up Tuning ( )or Down Tuning ( )button for less than 3 seconds to move to next
station automatically.
12~17) PRESET STATIONS BUTTONS
Six numbered preset buttons store and recall stations for each band.
11) AUTOMATICALLY STORE / PRESET SCAN (AS/PS)
Automatically select 6 strong stations and store them in the current band. Select a band (if
needed). Press AS/PS button for more than three seconds. The new stations replace stations
already stored in that band.
Preset Scan
Scan stations stored in the current band. Select a band (if needed). Press AS/PS button for less
than 3 seconds. The unit will pause for ten seconds at each preset station. Press AS/PS button
again to stop scanning when the desired station is reached.
STEREO
The unit will automatically pick up a stereo signal when available. When in stereo mode, the ST
icon appears in the display. When no stereo signal is available, the unit will automatically revert
to mono operation, and no icon will be displayed.
22) LOCAL / DISTANCE SELECTOR
Short press the LOC button to select between Local or Distant model. This feature is used to
designate the strength of the signals at which the radio will stop during automatic tuning.
"Distance" is the default, allowing the radio to stop at a broader range of signals. To set the
unit to select only strong local stations during automatic this button until "Local"
appears in the display.
tuning, press
E - 16
Page 18

12. CD OPERATION
Audio CD Operation - TFT Monitor
When a Audio CD is inserted into the player and the following picture will appear on the TF T
monitor.
Audio CD Operation - Remote Control
To operates CD function through the following keys on the remote control.
A. Type of disc playing
B. Content List
C. Playing mark.
D. Program mode
E. Program memory play list
F. Icon of playing condition
(play, resume stop, clear stop
pause. random)
G. Playing time.
H. Playing track / total track.
I. Repeat function (repeat A,
repeat A-B, repeat all,
repeat track)
L. Next page available.
J. Random play
9
13
10
~
15
28
19
~
8
16
17
14
18
17. Play/ Pause
18. Stop
8. Fast Forward
9. Fast Backward
14. Next
15. Back
19~28. Numeric buttons
32. Repeat
10~13. Up/Down/Left/Right button
16. OK button
32
17) PAUSE/ PLAY BUTTON ( / M1)
Press the pause button to suspend disc play. Press the pause button again to resume disc Play.
18) STOP( )
Stop the current disc playback.
Press STOP to enter the resume stop mode. Press PLAY under the resume stop mode to resume the
playback from where you stopped the playback . Press STOP two times consecutively to enter the clear
stop mode. Under the clear stop mode, if PLAY is pressed, the disc will resume the playback from the
beginning of the disc.
14) NEXT( )
When NEXT is pressed, the unit will go to the next track and start the playback.
15) BACK( )
When BACK is pressed, the unit will go back to the preivous track and start the playback.
E - 17
Page 19

8~9) FAST FORWARD& FAST BACKWARD( or )
When you press or under the Play mode, the unit will start to forward or rewind. You can
play discs at various speeds. With each consecutive press of or , the playback speed
increases. There are 4 speed levels for DVD discs in FWD/REV: X2, X4, X16, X100. There are 3
speed levels for disc types other than DVD disc: X2, X4, X8.
Press PLAY to resume the playback at normal speed.
19~28) NUMERIC BUTTONS
Use when function need numeric Selection or Input , like in the GOTO function, etc.
32) REPE
User can press the REPEAT button to repeat the whole disc or a specific track/chapter of the
disc.
Press REPEAT button to switch between different repeat modes, see the diagram as
below:
CD/MP3
10~13) UP/DOWN/LEFT/RIGHT BUTTON ( / / / )
Use to move cursor up/down/left/right.
16) OK BUTTON
Use this button to confirm the selection.
E - 18
Page 20

Audio CD Operation - Control Panel
The following function are avaiable operates through the control panel.
12 13
14 15
INSERT AND EJECT DISC
Insert a disc label-side up with the unit turned on, the total Track Number on the disc will display on the
LCD for about 2 seconds and the disc will begin to play. At the first track on the disc. Press the Eject
Button to stop disc play and eject the disc. The unit does not have to be turned on to eject the disc.
TRACK SELECT
Press the TRACK UP ( ) or TRACK DOWN ( ) button for less than one second to advance to the
next track on the CD, The selected track number will appear on the display. Press and Hold TRACK UP
( ) or TRACK DOWN ( ) more than one second to fast forward or fast reverse through the
button for
disc. CD play starts when the button is released.
When the last track playback completed, the unit will automatically enter into ‘STOP’ mode.
User can press play button to start the CD playback again when in the ‘STOP’ mode.
12) PAUSE/ PLAY BUTTON ( / M1)
Press the pause button to suspend disc play. Press the pause button again to resume disc Play.
13) STOP BUTTON (STOP / M2)
Press the STOP button to enter ‘RESUME STOP MODE’. Press the PLAY button under the
‘RESUME STOP MODE’ to resume the playback from the location where you stopped the
playback previously. Press the STOP button two times consecutively to enter the clear stop mode.
Under the clear stop mode, if the PLAY button is pressed, the disc will resume the playback from
the beginning of the disc.
14) REPEAT BUTTON (RPT / M3)
Press REPEAT BUTTON (RPT) during disc play repeatedly to activates the Repeat Mode as below:
Press REPEAT button once is repeat play current track.
Press REPEAT button twice is repeat play whole disc.
Press REPEAT button three times is repeat off.
15) RANDOM BUTTON (RDM / M4)
Press RANDOM BUTTON (RDM) during disc play to play all tracks on a CD in random, shuffled order.
Press RANDOM BUTTON (RDM) again to stop random play.
E - 19
Page 21

Program Play
Program Memory Mode
Under playing CD/MP3 disc. The unit allow user to memory the favor tracks or files into the play
list. The details operates as below:
1. Use (Up) / (Down) buttons on the remote control to navigate the highlight bar up or down
through the Play List to select the desire track need to add into program memory.
2. Once find the desire track need to add, press (Right)button on the remote control to “ ”
(Add) . Then press “OK” on the remote control as confirmation of the selection.
3. If user want to add whole disc into memory. Under the “ ” (Add) mode, press “ “ (Down)
to “ ” (Add All), then press “OK” on the remote control as confirmation of the selection.
Program Memory Playing Mode
1. Use (Right) buttons on the remote control to move the highlight bar to “Program List” on
the right hand side. Use (Up) / (Down) buttons on the remote control to navigate the
highlight bar up or down through the memory list .
2. Once the highlight bar on the track you want to play, then press “OK” on the remote control
as confirmation of the selection.
Program Memory Delete Mode
1. Use (Right) buttons on the remote control to move the highlight bar to “Program List” on
the right hand side. Use (Up) / (Down) buttons on the remote control to navigate the
highlight bar up or down through the memory list
2. Stop the highlight bar on the desire track want to delete
3. Use (Left) button on the remote control move to “ “. (Delete), then press “OK” on the
remote control as confirmation of the selection.
4. User can select “ “ (Delete All) to Clear all the Program Memory List at once.
E - 20
Page 22

13. MP3 OPERATION
MP3 Operation - TFT Monitor
When a MP3 disc is inserted into the player and the following picture will appear on the TF T monitor.
A. Icon of playing condition
(play, resume stop, clear stop
pause. Random)
B. Playing time.
C. Playing file / total file number
D. Repeat mode(repeat file,
repeat all)
E. Type of disc playing
F. Content of play list.
G. Program memory playlist
H. Program mode.
I. ID3 information
J. Playing MARK.
K. Folder Icon
L. File Icon
Audio CD Operation - Remote Control
To operates CD function through the following keys on the remote control.
9
13
10
~
15
34
28
19
~
8
16
17
14
18
17. Play/ Pause
18. Stop
8. Fast Forward
9. Fast Backward
14. Next
15. Back
19~28. Numeric buttons
32. Repeat
10~13. Up/Down/Left/Right button
16. OK button
32
34. OSD
17) PAUSE/ PLAY BUTTON ( )
Press the pause button to suspend disc play. Press the pause button again to resume disc Play.
When the last track playback completed, the unit will automatically enter into ‘STOP’ mode.
User can press play button to start the CD playback again when in the ‘STOP’ mode.
18) STOP( )
Press the STOP button to enter ‘RESUME STOP MODE’. Press the PLAY button under the
‘RESUME STOP MODE’ to resume the playback from the location where you stopped the
playback previously. Press the STOP button two times consecutively to enter the clear stop mode.
Under the clear stop mode, if the PLAY button is pressed, the disc will resume the playback from
the beginning of the disc.
14) NEXT( )
When NEXT is pressed, the unit will automatically jump to the next track and start the playback.
15) BACK( )
When BACK is pressed, the unit will automatically go back to the preivous track and start the
playback.
E - 21
Page 23

8~9) FAST FORWARD& FAST BACKWARD( or )
When you press or under the Play mode, the unit will start to forward or rewind. You can
play discs at various speed. With each consecutive press of or , the playback speed
increases. There are 4 speed levels for DVD discs in FWD/REV: X2, X4, X16, X100. There are 3
speed levels for disc types other than DVD disc: X2, X4, X8.
Press PLAY to resume the playback at normal speed.
19~28) NUMERIC BUTTONS
For function Selection or Input , like in the GOTO function, etc.need numeric
32) REPEAT
User can press the REPEAT button to repeat the whole disc or a specific track/chapter of the
disc.
Press REPEAT button to switch between different repeat modes, see the diagram as
below:
CD/MP3
10~13) UP/DOWN/LEFT/RIGHT BUTTON ( / / / )
Use to move cursor up/down/left/right.
16) OK BUTTON
Use this button to confirm the selection.
34) OSD
If any MP3 file containing any ID3-TAG information, user can view these ID3-TAG information
such as Track title, Artist title, Album title, Year, Comment, etc, by pressing the AS/PS or OSD
button repeatedly. These ID3-TAG information will be displayed on the lower left hand corner of
the TFT monitor.
E - 22
Page 24

Audio MP3 Operation - Control Panel
The following function are available operates through the control panel.
18
11
12 13
14 15 16 17
ABOUT MP3
MP3 music files are digital audio files that are compressed to allow more files on a single CD. This unit can
play MP3 directly from files contained on a CD-R/RW using the buttons on the receiver (or optional
remote). Depending
on the media type and recording method, some CD-R/RW's may be incompatible
with this unit. The unit supports playback of MP3 and CDDA (CDA), Mixed-Mode CDs and CD-Extra
(including multisession discs), but discs on which the session has not been closed cannot be played.
Notes on MP3 Play
This unit can play MP3 MPEG1, 2, 2.5 Audio Layer 3 .However, the MP3 recording media and accepted
formats are limited. When writing MP3, pay attention to the following restrictions.
Acceptable Media
The MP3 recording media acceptable to this unit are CD-ROM, CD-R and CD-RW. When using CD-RW,
use full format rather than quick format to prevent malfunction.
Acceptable Medium Formats
The following formats are available for the media used in this unit. The maximum number of characters
used for file name including the delimiter (".") and three-character extension are indicated in parentheses.
ISO 9660 Level 1 (11 characters)
ISO 9660 Level 2 (31 characters)
Joliet (31 characters)
Up to 200 characters can be displayed in the long file name format. The media reproducible on this unit
has the following limitations:
Maximum number of nested folders: 15
Maximum number of files per disc: 796
Maximum number of folders per disc: 199
Maximum number of sessions per disc: 5
MP3 written in the formats other than the above may not be successfully played and their file names or
folder names may not be properly displayed.
MP3 Encoder and CD Writer Settings
Use the following settings when compressing audio data in MP3 data with the MP3 encoder.
Transfer bit rate : 32- 320 kbps
Sampling frequency : 16,22.05,24,32,44.1, 48kHz (Mp3)
When using a CD writer to record MP3 up to the maximum disc capacity, disable additional writing. For
recording on an empty disc up to the maximum capacity at once, check disc at once.
Entering ID3 Tag
This unit supports ID3 tag versions 1.0 and 1.1.
E - 23
Page 25

Writing Files into a Medium
When a medium containing MP3 data is loaded, the unit checks all data. If the medium contains many
folders or non-MP3 files, MP3 play will be delayed, it may take time for the unit to move to the next file, and
searches may not be performed smoothly. Loading such a medium may produce loud noise and cause
damage to the speakers. Do not attempt to play a medium containing a non-MP3 file with the MP3
extension or a medium containing non MP3 files.
Electronic Shock Protection
6 seconds for CDDA (CDA)
60 seconds for MP3 recorded at 44.1kHz, 128kbps
Bit Rates
The unit supports bit rates from 32 - 320 kbps.
Folder / File Playing Order
When selected for play, Folder Search, File Search or Folder Select, files and folders are accessed in the
order in which they were written by the CD writer. Because of this, the order in which they are expected to
be played may not match the order in which they are actually played. You may be able to set the order in
which MP3 are to be played by writing them onto a medium such as a CD-R with their file names beginning
with play sequence numbers such as "01" to "99". For example, a medium with the following folder/file
hierarchy is subject to Folder Search, File Search or Folder Select as shown below.
An outline of a CD-ROM with MP3 is shown below. Subfolders are shown as folders in the folder
currently selected.
ROOT
1 LEVEL 2 LEVEL 3 LEVEL 4 LEVEL
01
001.MP3
002.MP3
003.MP3
004.MP3
“NOT DISPLAY”
X
02
04
05
06
07
“NOT DISPLAY”
X
009.MP3
010.MP3
011.MP3
012.MP3
013.MP3
014.MP3
015.MP3
016.MP3
017.MP3
018.MP3
08
019.MP3
020.MP3
“NOT DISPLAY”
X
005.MP3
03
006.MP3
007.MP3
008.MP3
“NOT DISPLAY”
X
E - 24
09
021.MP3
022.MP3
023.MP3
The equipment assigns folder
numbers. The user can not
assign folder numbers.
It is not possible to check
folders that do not include MP3
files. (These folders will be
skipped without displaying the
folder number and name)
Page 26

Note of Multi-Session
The unit supports playback Multi-Sessions format with following conditions;
Example 1 : All sessions are composed with CDDA data.
The player should play total 10 Songs ( 10 Track ). That means, if all sessions are composed with CDDA
format, the player should plays whole CDDA tracks.
Session 1
CDDA (2 Track)
Session 2
CDDA (3 Track)
Session 3
CDDA (1 Track)
Session 4
CDDA (4 Track)
10 tracks are only displayed without directory and played sequentially in Browser
Example 2 : All sessions are composed with MP3/JPEG( XA format) data.
The player should display total 10 files. That means, if all sessions are composed with XA format, the
player should display whole XA format data files. At this time, 'Import session' information should not
be referred. ( That means, even if the disc is made without import session information, you have to
read whole sessions. )
Session 1
2 MP3 files
Session 2
2 MP3 files, 1 JPG file
Session 3
1 MP3 file
Session 2
2 JPG files, 2 MP3 files
Each session 1 ,session 2 , session 3 and session 4 folder within files and directories should be
created in root directory, and then total 7 files operates normally in Browser as usual (session 1
: 2 files , session 2 : 3files , session 3: 1 file, session 4: 4 files)
Example 3 : Sessions are composed with several data. ( CDDA and/or XA Format )
The player should display total 7 files. That means, if each session has not a same format, it should
check the last session and find out other session which has same data format as last session.
Session 1
CDDA (2 Track)
Session 2
2 MP3, 1 JPG
Session 3
CDDA (1 Track)
Session 4
2 JPG, 2 MP3
Each session 1 ,session 2 , session 3 and session 4 folder within files and directories should be
created in root directory. And then total 7 files operates normally in Browser as usual (session 1
: 0 file , session 2: 3files 2 tracks, session 3: 0 file, session 4: 4 files)
In case of below, the player will play 3 Audio CD tracks
Session 1
2 JPG, 2 MP3
Session 2
CDDA (2 Track)
Session 3
2 MP3, 1 JPG
Session 4
CDDA (1 Track)
: 5 tracks are displayed but 3 tracks played sequentially and session1 or 3 is skipped (session
1 : 1 track , session 2 : 2 tracks, session 3: 1 track, session 4: 1track )
Example 4: Enhance CD
If disc have 2 session and first session is CDDA file, then it must play first session and read to CDDA disc.
This case do not follow multi session rule.
Last Position Memory Playback
This unit can support last position memory playback for DVD disc, Audio CD, VCD and MP3 format disc
when the unit is Ignition on/off or Power on/off.
E - 25
Page 27

FILE Select
Pres the Track UP ( ) or Track DOWN ( ) button for less than one second to skip to next or previous file.
Press and Hold Track UP ( ) or Track DOWN ( ) button for more than one second to fast forward or
fast reverse of current file.
File/Folder Repeat play :
Press M3 button more than 3 seconds during playing MP3 disc for “repeat play” all files of the
current folder. And keep on repeat playing the current folder until “repeat play” is disabled. To
disable current folder “repeat play”, long press M3 button more than 3 seconds
Press M3 button less than 3 seconds to “repeat play” the current file. And keep on repeat Playing the
current file until the “repeat play” is disabled. To disable current file “repeat play”, press M3 button less
than 3 seconds
File/Folder Random play:
Press M4 button more than 3 seconds during playing MP3 disc to “random play” all files of the
current folder. To disable current folder “random play”, long press M4 button more than 3 seconds
Press M4 button less than 3 seconds is “random play” all files on the disc. To disable all file “ random
play”, press M4 button less than 3 seconds
Folder Up
Short press M6 button during playing MP3 disc to skip to the next folder
Folder Down
Short press M5 button during playing MP3 disc to skip to the previous folder
MP3 FILE OR FOLDER SEARCHING
This unit allows user to use the below methods for the file / folder searching:
1) Folder / files Navigate searching.
During MP3 file playback, Short press the BAND button, & the LCD will display “Navigate”. Under the
Navigate searching mode, use the “ VOLUME Up or Down button” to move the cursor Up or Down on the
TFT monitor. And “AUDIO” button serve as “OK” of confirmation of the selection. Use volume Up or Down
button to navigate through the Folders or Files displayed on the TFT monitor, short press AUDIO button to
enter into the selected Folder or as confirmation to play the selected file.
User has 10 seconds to adjust the particular item. If no selection is made within the 10 seconds
time out, the unit will resume to previous mode. User can also press AS/PS button for quick
return to previous mode without waiting the 10 seconds time out.
2) Top Level Folder up
Under the “ Navigate searching.” model, Short press BAND button. The LCD will display
“Top F”. Press the band Button repeatedly to move to one level up of the current Folder Level. Under the
Top Level mode, the “ VOLUME Up or Down BUTTON” can move the cursor Up or Down on the TFT
monitor. And “AUDIO” button as “OK” of confirmation of the selection. Use the volume Up or Down button
to navigate through up or down the Folders listed on the TFT monitor, short press AUDIO button to enter
into the selected Folder or as confirmation to play the selected file.
Folder / files
User has 10 seconds to adjust the particular item. If no selection is made within the 10 seconds
time out, the unit will resume to previous mode. User can also press AS/PS button as quick
return to previous mode without waiting the 10 seconds time out.
Program Play
The program play mode is able to operates while “Top Level” or “Navigate” operation. Under “Top Level”
or “Navigate” mode, the Track Up and Track down is operates as cursor Left / Right on the TFT monitor.
And “AUDIO” button as OK of confirmation of the selection.
For see “Program Play” for details operation
ID3 INFORMATION DISPLAY
If any MP3 file containing any ID3-TAG information, user can view these ID3-TAG information such as Track
title, Artist title, Album title, Year, Comment, etc, by pressing the AS/PS or OSD button repeatedly. These
ID3-TAG information will be displayed on the lower left hand corner of the TFT monitor.
E - 26
Page 28

Program Play
Program Memory Mode
Under playing CD/MP3 disc. This unit allow user to memorize the favor tracks or files into the play list.
The details operation as below:
1. Use (Up) / (Down) buttons on the remote control to navigate the highlight bar up or down
through the Play List to select the track you need to add into program memory.
2. Once find the desired track need to add, press (Right)button on the remote control to “ ”
(Add) . Then press “OK” on the remote control as confirmation of the selection.
3. If user want to Program Memory whole disc into memory. Under the “ ” (Add) mode, press “ “
(Down) to “ ” (Add All), then press “OK” on the remote control as confirmation of the selection.
Program Memory Playing Mode
1. Use (Right) buttons on the remote control to move the highlight bar to “Program List” on the
right side. Use (Up) / (Down) buttons on the remote control to navigate the highlight bar up
or down the memory list .
2. Once the highlight bar is on the desire track you want to play , press “OK” on the remote control
as confirmation of the selection.
Program Memory Delete Mode
1. Use (Right) buttons on the remote control to move the highlight bar to “Program List” on the
right side. Use (Up) / (Down) buttons on the remote control to navigate the highlight bar up
or down through the memory list
2. Stop the highlight bar on the track want to delete
3. Use (Left) button on the remote control move to “ “. (Delete), then pressing “OK” on the
remote control as confirmation of the selection.
4. User can select “ “ (Delete All) to Clear all the Program Memory List at once.
E - 27
Page 29

14. Multi-Format disc Operation
When a Multi-format disc inserted into the unit and the following picture will appear on the TFT
monitor. The details operates as below:
1.
Long Press “Random “ button (M4/RDM) on the control panel or Press “TITLE” on the Remote control
to switch among the 3 option pages of Music, Photo and Movie.
2.
The Music page is divided into 3 areas: Playback List, Program List and Edit Area in the middle.
User can press PLAY or ENTER on the remote control to view the highlighted folder in the playback
list , or play the corresponding audio files in the playback list or program list.
User can use the ADD, ADD ALL, DELETE and DELETE ALL options in the middle edit area to
proceed with the programming that will get into the program list.
To remove a file, simply move the highlight to the corresponding file under the program list, and press
CLEAR.
3.
The Photo page is divided into 3 areas: Playback List, Preview Window and Edit Area in the
middle.
User can press PLAY or ENTER on the remote control to view the highlighted folder in the
playback list .
If the highlighted folder you select is a picture file, a minimized version of the picture in the preview
window will be displayed on the right side of the Photo page.
After press ENTER on Slide Show in the middle edit area, all the pictures will be displayed in
order.
The SPEED in the edit area is used to adjust the time spent during the picture transition.
E - 28
Page 30

4.
In the Movie page, press PLAY or ENTER on the on the remote control to view the highlighted
folder or play the corresponding file.
The playback interface and operations of audio CD disc is very similar to that of Music. Please refer
to the related descriptions in AUDIO CD operations
During Multi-Format disc is playback. Short Press “BAND” button can activates “Top Level
Folder up “ and “Navigate”. Please refer to the related description in MP3 operation of the “MP3
File or Folder Searching”
E - 29
Page 31

15. DVD OPERATION
DVD Operation - Remote control
9
13
10
~
15
13
3
30
34
28
19
~
35
32
40
12
2
8
16
17
14
18
37
31
38
39
24
36
27
33
2) EJECT BUTTON ( )
Press the EJECT button to eject the disc or loading the disc.
17) PLAY/PAUSE ( )
Play: Press the PLAY button to resume the disc playback when the unit is under the stop mode.
The last play function will be started if the unit is under the resume stop mode.
Pause: Pause the disc playback that is currently playing.
18) STOP( )
Stop the current disc playback.
Press STOP to enter the resume stop mode. Press the PLAY button under the resume stop mode
to resume the playback from where you stop the the STOP button two times
playback. Press
consecutively to enter the clear stop mode. Under the clear stop mode, if the PLAY button is
pressed, the unit will resume the playback from the beginning of the disc.
8&9) FAST FORWARD& FAST BACK FORWARD( or )
Press the or buttons under the Play mode, unit will start to forward or rewind with each
consecutive press of the or buttons, user can view the disc at various speed.There are 4
speed levels for DVD discs in FWD/REV: X2, X4, X16, X100. There are 3 speed levels for disc
types other than DVD disc: X2, X4, X8.
Press the PLAY button to resume the playback at normal speed.
14) NEXT( )
When the NEXT button is pressed, the unit will automatically jump to the next chapter or track
and start the playback.
15) BACK( )
When the BACK button is pressed, the unit will automatically go back to the last chapter or track
and start the playback.
32) REPEAT
User can press the REPEAT button to repeat the whole disc or a specific track/chapter of the disc.
Press the REPEAT button to switch between different repeat modes.
When the REPEAT button is pressed, the repeat mode may differ depending on the disc
types. See the diagram below.
10~13) UP/DOWN/LEFT/RIGHT BUTTON
Use these buttons to move cursor up/down/left/right.
16) OK
Use this button to confirm the selection.
E - 30
Page 32

19~28) NUMERIC BUTTONS
Use when function need numeric Selection or Input , like in the GOTO function,
etc.
30A) DVD MENU
When a DVD disc is inserted in the unit:
1. The unit will automatically start the playback from the beginning of the disc, and then the DVD
MENU will be brought up.
2. Press the Up/Down/Left/Right button to move the highlight in the MENU.
3. Press OK button to confirm the selected item in the menu.
How to open the MENU while the disc is being played ?
Simply press “DVD MENU” or “TITLE” to recall the menu, Press “DVD MENU” or “TITLE” again
to resume playback .
30B) PBC (Play back Control)(For VCD disc only)
Some VCD and SVCD discs (especially Karaoke discs ) have disc menus. To select the contents
that user want to view. This type of menu can also be called PBC (Playback Control) MENU.
When this type of disc is being played:
1. When the PBC option is set to ON in the “Others” settings of the Setup Menu, the disc
playback will automatically start or stop at the PBC MENU picture.
2. Press PREV and NEXT to scroll thru previous/next MENU pages if available.
3. Use the 'NUMERIC' button to enter the number of the segment or track that you want to play.
For the segment or track numbered in two digits, simply enter these two digits consecutively.
If don't want to display this PBC MENU.
Simply set PBC option to OFF in the “Others” setting of the Setup Menu, and the PBC function
will be closed. The unit will resume the disc playback from the beginning, without showing
the PBC Menu.
If PBC has been turned off. How can it turned on again
Simply set PBC option to ON in the “Others” setting of the Setup Menu to restore the PBC
function. Note that after the PBC is turned on, the current playback will be stopped and the
PBC MENU will be displayed.
If no operation is performed within 10 seconds after the PBC MENU is displayed, the
unit will resume the playback from the first track.
34) OSD BUTTON
1. Press 'OSD” button to bring up the Console Menu, please refer to the following tables for
details Operations.
2. The Console function / Menu is only available in DVD/DVD Audio/DVD-VR/VCD discs, and the
available console function may be different depending on the type of disc.
E - 31
Page 33

DVD-VR Console
Item
Console Title
Console Chapter
Console Time
Console audio
and digital audio
output
Function (Press Up/Down
to select the item desired.)
Display the current Title
number and the total number
of the disc titles. User can jump
to the desired title number .
Display the current chapter
number and the total number
of the disc chapters. User can
jump to the desired chapter
number.
Display the time that the disc
playing time has elapsed. User
can directly input the desired
time from which user want to
start the playback.
Display the current audio
language and the digital audio
output. User can also switch to
other available audio language
and digital audio outputs.
Select Method
Press Left/Right or
enter digit, and then
press Enter to confirm.
Press Left/Right or enter
digit, and then press
Enter to confirm.
Press digit, and then
press Enter to confirm.
Press Left/Right or use
DVD AUDIO button.
Console Subtitle
Console Angle
Display the current subtitle
language used. User can also
switch to other subtitle
language available.
Display the current angle.
User can also switch to other
available angles.
Press Left/Right or use
Subtitle button.
Press Left/Right or use
Angle button.
E - 32
Page 34

DVD Audio Console
Item
Console Group
Console Track
Console Time
Console audio
and digital audio
output
Function (Press Up/Down
to select the item desired.)
Display the current group
number and the total number of
groups available. User can
select the desired group
number .
Display the current track
number and the total number
of tracks available. User can
select the desired track
number .
Display the time that the disc
playing time that has elapsed.
User can directly input the
desired time from which user
want to start the playback.
Display the current audio
language and the digital audio
output. User can also switch to
other available audio language
and digital audio outputs.
Select Method
Press Left/Right or
enter digit, and then
press Enter to confirm.
Press Left/Right or enter
digit, and then press
Enter to confirm.
Press digit, and then
press Enter to confirm.
Press Left/Right or use
DVD AUDIO button.
Console Subtitle
Console Angle
Console Page
VCD Console
Item
Console PBC
Console Chapter
Console Time
Console Audio
Display the current subtitle
language. User can also switch
to other available subtitle
language .
Display the current angle when
the AVTT is being played. User
can also switch to other
available angles.
Display the current page
number when the AOTT is
being played. User can also
switch to other pages.
Function (Press Up/Down
to select the item desired.)
Indicate the unit is currently
under the PBC ON mode. The
PBC ON mode can only be
displayed, and is not open for
changes.
Display the current chapter
number and the total number
of the disc chapters (PBC
OFF). User can jump to the
desired chapter number .
Display the time that the disc
playing time that has elapsed.
User can directly input the
desired time from which the
user want to start the playback.
The time search function is valid
for the current track only.
Display the current audio
language used. User can also
switch to other audio language
available.
Press Left/Right or use
Subtitle button.
Press Left/Right or use
Angle button.
Press Left/Right or use
Angle button.
Select Method
Press Left/Right or enter
digit, and then press
Enter to confirm.
Enter digit, and then
press Enter to confirm.
Press Digit, and then
press Enter to confirm.
E - 33
Page 35

35) MARK (BOOKMARK)
The bookmark function allows you to select scenes of a DVD disc such that user quickly find the
selections that the user has marked.
Press MARK button at any point you want to bookmark during playback. On the bookmark menu,
you will see the following picture. It indicates a bookmark has been set at this specified position.
Recall the bookmark by pressing MARK button again and then press Play or ENTER to begin
the playback at the bookmarked point.
33) ZOOM BUTTON
The ZOOM feature allows you to magnify a certain area of the images recorded on the DVD, VCD and
other image discs.
1. Press ZOOM button to enlarge the image by 4X.
2. Press ZOOM button again to enlarge the image by 16X.
3. Press Up/Down/Left/Right to select the area you want to magnify.
4. The third press of ZOOM will cancel the Zoom function and resume normal playback.
37) TITLE
When playing a data disc or Audio CD playback.Press TITLE to switch among the 3 option pages of
Music, Photo and Movie. Press title button to open the Title containing on the DVD disc during DVD
playback.
36) SUBTITLE
1. Press SUBTITLE button once to bring up the subtitle information which will be shown on the top
right corner of the screen. See the illustration below:
2. Each time you press SUBTITLE, you can switch to another subtitle available in the disc.
38) DVD AUDIO
Press DVD AUDIO button once to bring up the audio information which will be shown on the top right
corner of the screen. You will see the language selected and the digital audio output information as
illustrated below:
Each time you press DVD AUDIO, you can switch to another audio language and audio output
available in the disc.
39) ANGLE
Press ANGLE button once to bring up the angle information which will be shown on the top right
corner of the screen. See the illustration below:
Each time you press ANGLE, you can switch to another camera angle available in the disc.
E - 34
Page 36

System Set Up
Press Setup key on the remote control or Long Press ‘AS/PS’ button on the control panel to bring
up the System Setup Menu when the unit is under the stop/playback mode.
Press the SET UP button
When the cursor is located at the top of the on-screen display, press Left/Right arrow keys to
switch between different pages.
You can press Down arrow key to move to the setup page, and press Up/Down arrow keys to select
the setting that you want to change.
Open the selection list by pressing Right arrow key on the selected item. Change the selection by
using Up/Down arrow keys and ENTER key.
1. Setting the Audio Language
Menu Language is used to select the setup menu and OSD (On-screen Display) language used during
the disc playback and instructional operations. The language selection includes: English, Spanish,
Greek, Swedish, Dutch, Italian, and Poland, as following picture.
Disc Audio: When a DVD disc playback begin, this unit will automatically select the default audio
language of the unit. Please notice that if the language recorded in the disc is not available in the
language list in the disc menu, the language originally recorded on the disc will be used. If the disc is
equipped with a specific playback language, this specific language will be used.
The functions of Disc Subtitle and Disc Menu are similar to that of Disc Audio. They are used to set a
default playback language value for the DVD subtitle and Menu display language
E - 35
Page 37

2. DISPLAY Setup
You will first see the picture as shown on below after you enter the DISPLAY Setup Menu page.
TV Aspect: Depending on the type of television you have, the image adjustment offers 2 options for
your setting: 4:3 and 16:9. This item is used to display image data in the wide-screen film on the normal
TV set. The option 16:9 is used when the DVD player is connected to wide screen TV in Full Mode, and
the screen will display pictures in full size.
E - 36
Page 38

The Display Mode item can only be modified when the TV Display mode is set to 4:3. Two
options are provided: Letterbox and Panscan.
Letterbox: This image option will display the panoramic frame and might appear with black bars
Panscan: This image option will display pictures with the left and right edges of the picture being
at the top and bottom of the screen.
cut off so it fills the whole screen. It is selected for the normal TV set display. This mode
is selected when the picture is displayed in panoramic view and complete scan format.
TV Output : The Item is selecting output Video formats from PAL or NTSC, Auto default.
E - 37
Page 39

3. AUDIO Setup
The below screen will be display once entered into the AUDIO setup menu page.
Dolby Digital
Bitstream: Select “Bitstream” if you connect the main unit’s Digital Out jack to an amplifier or
other equipment with a Dolby Digital, DTS or MPEG decoder.
PCM: Select when connected to a two-channel digital stereo amplifier. DVDs encoded in Dolby
Digital, DTS or MPEG will be automatically down mixed to two-channel PCM audio.
Sample Freq.
The Sample Freq. item offers 2 options. If the connected receiver or amplifier is incapable of
processing digital input with sampling frequency of 96KHz, it will select 48KHz as the sampling
frequency to compress the signal to a standard signal. After the 48KHz frequency is selected, the
unit will automatically convert the 96KHz signal into the 48KHz signal, and then your system will be
able to execute the decoding on the signals.
If the receiver is capable of outputting digital signals with a sampling frequency of 96KHz, it will select
96KHz for the signal to be output as it is. After 96KHz frequency is selected, the unit will be able to
process all signals without any further operations required.
E - 38
Page 40

The Digital output is provided via the item 5.1 Digital Audio Amplifer.
ON: Digital audio output switch on that you can connect to extern digital audio receiver.
OFF: Digital audio output switch off.
The Dynamic Range Compression (DRC)
ON: select this option to turn on the Dynamic Range Compression so that dialogue remains clear
even at low volume levels.
OFF: select this option to turn off the Dynamic Range Compression, and have the soundtrack
presented exactly as it was created.
E - 39
Page 41

4. LOCK Setup
The below screen will be displayed once entered into the LOCK setup page.
The lock set up page is used to set the Parental Control.
The Rating item is used to set the rating level.
Before you entering into the item, the system will request you to input the password first.
The default password of this unit is 1234. After the password is entered correctly, the parental
control rating level can be changed.
If you didn't set any password for Parental Control, the system will request you to input a new
password.
If you make a mistake before pressing ENTER, press CLEAR and enter your 4-digit password
again.
After the new password is entered successfully, press Up/Down to change the parental control
rating level. Including the Unlock level, there are a total of 9 levels in the parental control rating
The parental control function is only valid after the disc is ejected. Operation can be
performed following the parental lock setting.
E - 40
Page 42

The Password item is used to set the new password or change the old password.
Before you enter into the item, the system will request you to input the old password
first. The default password of this unit is 1234. The new password can not be entered
unless the old password is input correctly.
5. Other Settings
The below screen will be displayed once entered into the OTHER setting page. This page is used to
set on the Load Default and Screen Saver.
E - 41
Page 43

DVD Operation - Control panel
2021 11
12 13
15 17
Once a DVD disc is inserted into the unit, the unit will automatically start the playback from the beginning of
the disc, and then the DVD MENU or ROOT or TITLE in the DVD disc will appear on the TFT monitor and
' ROOT '
will be displayed on the LCD of the unit. The below picture is an example of “DVD Menu” appear
on the TFT monitor.
There will be no Video output if the Parking Wire is NOT PROPERLY CONNECTED to the Hand
Brake Switch. The LCD will display “PARKING On” and will stay on the LCD for 5 seconds. User can
use the Volume Up or Down button to turn “PARKING” to “OFF” within the 5 seconds time out.
Once “Parking” is changed to “Off”, the TFT monitor will display the video signal regardless even if
the Parking Wire is NOT CONNECTED !
The “PARKING On” will keep scrolling through the LCD for every 20 seconds if user did not
select “PARKING Off” under the DVD or AV-In Mode!
For quick access Parking “On” & “Off” . User can Long Press ‘Mute’ button on the Front control
panel or Remote control
DVD Menu
During playback the DVD Menu or Root or Title of the disc, the below buttons on the control panel serve
the following functions:
Volume Knob as Cursor UP / DOWN to move the Highlight in the DVD MENU or ROOT or TITLE
Track Up / Down button as Cursor RIGHT / LEFT to move the Highlight in the DVD MENU or ROOT or
TITLE.
AUDIO button as ENTER to confirm the selected item in the DVD MENU or ROOT or TITLE
12) PLAY/PAUSE ( / M1)
During playback the DVD Menu or Root of the disc, user can Short press the “PLAY” (M1) button to
confirm the selected item in the DVD MENU or ROOT or TITLE. Once the DVD disc playback started
the LCD will display T01C01 0:00:03 (The current playback of: Title: Chapter: Playback Time). When
the DVD disc is playing, the PLAY button on the control panel serves the following function:
Play: Press PLAY to resume the disc playback when the unit is in “Stop” mode. The last
position play function will be started if the unit is under the resume stop mode.
Pause: Pause the disc playback that is currently being played.
E - 42
Page 44

13) STOP (STOP/M2)
When the DVD disc is playing, the “STOP” (M2) button on the control panel serves the following
function:
Stop the current disc playback. Press the STOP button to enter into resume stop mode.
Press PLAY under the resume stop mode to resume the playback from the position
where you stopped the playback previously.
Press STOP button two times to enter into the clear stop mode. Under the clear stop mode, if
the PLAY button is pressed, the disc will resume the playback from the beginning of the disc.
20) NEXT( )
When the NEXT button is pressed, the unit will automatically jump to the next chapter or track
and start the playback.
21) BACK( )
When the BACK button is pressed, the unit will automatically go back to the last chapter or track
and start the playback.
20/21) FAST FORWARD & FAST BACK FORWARD ( or )
When press the button or the button under the Play mode, the unit will start to fast forward
or rewind. The unit can fast forward or rewind discs at different speeds.
Pressing repeatedly the button or the button, can give different fast forward or
rewind speeds. There are 4 speed levels for DVD discs in FWD/REV mode: X2, X4, X16,
There are 3 speed levels for disc types other than DVD disc: X2, X4, X8.
Press PLAY to resume the playback at normal speed.
14) REPEAT (RPT/M3)
User can press the “REPEAT” (RPT/M3) button to repeat the whole disc or a specific
track/chapter of the disc. Press REPEAT button to switch between different repeat modes.
When REPEAT button is pressed repeatedly, The LCD will display “Repeat T01” for
repeat play of the current title, “Repeat C01” for repeat play current chapter.
The below icon which will be shown on the top left corner of the TFT Monitor;;
15) TITLE (RDM / M4)
While the DVD disc is being played, the function of “TITLE” (RDM / M4) button on the control
panel serves the following functions:
Short press “TITLE” button to recall the DVD menu or Root or Title contained on the DVD disc
during DVD playback. Press “TITLE” again to resume playback .
When playing a Multi-Format disc or a Audio CD, Press “TITLE” button to switch among the 3
option pages of Music, Photo and Movie.
Please refer to the related description in “Multi-format Disc operation” for detail
operation.
During playback the DVD Menu or Root or Title of the disc, the below buttons on the
control panel serve the following functions:
Volume Knob as Cursor UP / DOWN to move the Highlight in the DVD MENU or ROOT or
Track Up / Down button as Cursor RIGHT / LEFT to move the Highlight in the DVD MENU
or ROOT or TITLE.
AUDIO button as ENTER to confirm the selected item in the DVD MENU or ROOT or TITLE
E - 43
Page 45

17) DVD AUDIO ( M6)
When the DVD disc is being played, the function of “DVD AUDIO” ( M6) button on the control panel
serve the following functions:
The selection of Audio Language and Audio Output which are available on the current DVD
disc is being played. Each time pressing the “DVD AUDIO” will switch to another audio
language and audio output available in the disc.
When “DVD AUDIO” button is pressed repeatedly, The LCD will display “DVD Audio 01”
The number of “DVD Audio” display on the LCD is depending on how many Audio Language
and Audio Output are available for selection.
The below icon will be shown on the top left corner of the TFT Monitor. The selected language
selected and the digital audio output information as illustrated below:
11) OSD (AS/PS)
During DVD playback, the function of “OSD” (AS/PS) button on the control panel serves the following
functions:
Short Press “OSD” (AS/PS) button to bring up the Console Menu,
Please refer to the related description in “DVD Basic Operation Remote Control”
for details operation of “OSD” !
The Console function / Menu is only available in DVD/DVD Audio/DVD-VR/VCD discs, and the
available console function may differ depending on the type of disc.
The “OSD Menu” will be displayed on LCD and stay for 10 seconds. User has 10 seconds to
adjust the OSD item on the TFT monitor. If no selection is being made within the 10 seconds
time out, the unit will resume to previous mode. User can also press AS/PS button for quick
return to the previous mode without waiting the 10 seconds time out. Under the “OSD”
mode. The below buttons on the control panel serve the below functions:
Volume Knob as Cursor UP / DOWN to move the Highlight bar on the TFT Monitor.
Track Up / Down button as Cursor RIGHT / LEFT to move the Highlight bar on the TFT Monitor.
AUDIO button as ENTER to confirm the selected item on the TFT Monitor
11) SET UP (AS/PS)
While the DVD disc is being played or under stop mode, the “SET UP” (AS/PS) button on the
control panel serve the following function:
Long Press “SET UP” (AS/PS) button to bring up the System Setup Menu
Please refer to the related description in “DVD Basic Operation Remote Control”
for details operation of “Set Up” !
After pressing the “Set Up” button, the LCD will display “Set Up” and keep on blinking. User
can use the following buttons to adjust the “Set Up” items shown on the TFT monitor as
follow:
Volume Knob as Cursor UP / DOWN to navigate thru the Set Up Items shown on the TFT
Monitor.
Track Up / Down button as Cursor Left / Right / Previous / Select to navigate thru the
Set Up items shown on the TFT Monitor.
AUDIO button as ENTER to confirm the selected item shown on the TFT Monitor
Short Press “Set Up” button again or “Play” button to resume the DVD playback .
E - 44
Page 46

16. SPECIFICATION
DVD / CD Section
Compatible Format
Signal to Noise Ratio
Dynamic Range
Frequency Response
Channel Separation
Video Section
Color System
Video Output
Video Input
Audio Section
Max Output Power
Load Impedance (speakers)
Digital Output
Line out level / load
Line out Impedance
Auxiliary Input Section
Frequency response
Input Maximum Voltage
Input Impedance
Radio Section
FM
Frequency Range
Usable Sensitivity
Stereo Separation
S/N Ratio
See “10. Disc Note' for more details description
> 90 dB
> 9
0 dB
20Hz to 20Khz +/-3dB
2 Channel (Stereo) >60dB @1khz
NTSC / PAL
Composite 1.0 Vp-p (+/- 0.2)75 - ohm
Composite 1.0 Vp-p (+/- 0.2) 75 - ohm
80W x 4 channels
4 ohms
900mV
400mV / 10k ohm load
200 ohm
20Hz to 20KHz -3dB
1200 mV
4.7k ohm
87.5-107.9 MHz (200 kHz Space)
< 15dB at S/N 30 dB
25 dB at 1KHz
50 dB
AM(MW)
Frequency Range
Usable Sensitivity
S/N Ratio
General
Operating Voltage
Grounding System
Fuse:
Operating Temperature:
Unit Mounting Angle
530-1720 (10 kHz Space)
< 40dB at S/N 20dB
40 dB
DC 11 -14.4V
Negative Ground
15-Amp Mini ATM Type
0°C to 50°C
< 30
E - 45
Page 47

17. TROUBLE SHOOTING
Before going through the check list, check wiring connection. If any of the problems persist after
check list has been made, consult your nearest service dealer.
Symptom
No power
Disc cannot be
loaded or ejected
No sound
The operation keys
do not work
Sound skips.
The radio does not
work.
The radio station
automatic selection
does not work.
ERROR
Disc Error
Cause
The car ignition is not on.
The fuse is blown.
Presence of CD disc inside
the player.
Inserting the disc in reverse
direction.
Compact disc is extremely
dirty or defective disc.
Temperature inside the car is
too high.
Condensation.
Volume is in minimum.
Wiring is not properly
connected.
The built-in microcomputer is
not operating properly due to
noise.
The installation angle is
more than 30 degrees.
The disc is extremely dirt or
defective disc.
The antenna cable is not
connected.
The signals are too weak.
Mechanism Error
Maybe disc dirty / disc scratched
/disc upside down.
Solution
If the power supply is properly connected
to the car accessory terminal, switch the
ignition key to “ACC”
Replace the fuse.
Remove the disc in the player, then
put a new one.
Insert the compact disc with the
label facing upward.
Clean the disc or try to play a new one.
Cool off or until the ambient temperature
returns to normal.
Leave the player to off for an hour or so,
then try again.
Adjust volume to a desired level.
Check wiring connection.
Press the RESET button.
Front panel is not properly fixed into
its place
Adjust the installation angle to less
than 30 degrees.
Clean the compact disc. Then try to play a
new one.
Insert the antenna cable firmly.
Select a station manually.
Press the eject button to correct the problem.
If the error code does not disappear, consult
your nearest service dealer.
Replace the disc.
If at any time in the future you should need to dispose of this product please note
that Waste electrical products should not be disposed of with household waste.
Please recycle where facilities exist. Check with your Local Authority or retailer for
recycling advice.(Waste Electrical and Electronic Equipment Directive)
E - 46
Page 48

 Loading...