

Page 1

Page 2

WIRES CONNECTION
FRONT RIGHT RCA OUTPUT
RED
FRONT LEFT RCA OUTPUT
WHITE
BT ANTENNA
BLACK
FUS E 10 A
ISO socketAntenna Jack
CONNECTOR A
1.
2.
3.
4. CONSTANT +12VDC
5. Auto Antenna B+
6.
7. ACC+12VDC
8. GROUND
ISO SOCKET SKETCH
CONNECTOR B
1. Rear Right Speaker (+)
2. Rear Right Speaker (-)
3. Front Right Speaker (+)
4. Front Right Speaker (-)
5. Front Left Speaker (+)
6. Front Left Speaker (-)
7. Rear Left Speaker (+)
8. Rear Left Speaker (-)
SPECIFICATION
GENERAL
Supply Voltage DC 12 V. Negative Ground
Current Consumption Max.10A
Power Output 4 X 60W
Number of channels 2 STEREO channels.
Unit Dimensions 178[W] X 165[D] X 50[H] mm
7 X 6.5 X 1.97 inch
FM SECTION
Frequency range 87.5MHz -108MHz (Eur)
87.5MHz - 107.9MHz (USA)
Effective sensitivity 3uV.
I.F Frequency 10.7MHz.
AM SECTION
Frequency range 522KHz - 1620KHz (Eur)
522KHz - 1710KHz (USA)
Effective sensitivity 40dB.
I.F Frequency 450KHz
RCA LINE OUT
Output 1000mV @ CD MAX.
CD PLAYER
System MP3 Audio System.
Suitable CDs MP3, CD,CD-R,CD-RW Disc
Frequency characteristics 20Hz-100Hz < 5dB
10KHz-20KHz < 5dB.
S/N Ratio to CD 50dB [1KHz]
\
\
Page12
Page 3
In AUTO mode: Press the |<< o r >>| button, t o au tomatical ly TUNE UP/DOWN for
the station frequency,(If in MANUAL mode and without further operation,the unit will
change to AUTO mode a few second s later.)
B) Dur ing disc, USB p layback mode:
Pres s the >>| button br iefly to play n ext track.
Pres s the |<< button br iefly to play t he current tr ack from the be gi nning of it
if the playing time is more than 2 sec onds.
Pres s the |<< button br iefly to play t he previous t rack if the pla ying time is
less t han 2 seconds .
Pres s the >>| or |<< butt on and hold to sk ip forwards or backwards, release
to res ume normal pl ay back.
8.SE L(MENU) BUT TON AND VOLUME UP ( + )/ DN ( - ) KN OB
a) Pre ss the SEL but ton briefly, it is act ivated as sel ecting each m ode of E. VOL.
-> VOL UME ->BASS ->TREBLE -> BALANCE -> FADER ->
When s electing a de si red audio mod e, rotate the V OL knob to adjust the
audio effect.
In eac h mode, the wai ti ng time is abou t 5 seconds, an d the time waiting time
is ove r, it returns to t he l ast display m ode of tuner or CD mode.
The contro l mode of E.VOL is operated with following numeric display.
- VOL: (MI N) 0, ....... ......... .. ...45(MAX).
- BASS/TRE: -12, -11,............+11,+12
- BAL: 10L , ................................10R
- FAD: 10 R, ......... ..... ..... .. ..........10F
b) Whe n pressed longer 2 seconds , it i s activated a s cyclical mo de of following
func tions for use r’ s selection .
-> INV OL -> TA (ON/ OFF)
-> DSP (Rota te the VOL kno b to -> EQ ON/OFF
adjust the HOUR or MINUTE) -> LOUD ( ON /OFF)
-> BEE P (ALL /OFF/2ND) -> LO C ON/OFF (onl y for FM mode)
-> TAVOL -> MONO/STEREO (only for FM mode)
->EO N ON/OFF -> S....WF (ON/OFF)
-> REG O N/OFF -> AREA (EUR/USA)
-> AF (ON /OFF)
After selecting the desired mode, rotate the VOL knob to select one setup
item o f the desired m od e.
1) TA [TR AFFIC ANNOUN CEMENT]
When TA mode is on(TA is displ ayed on LCD), it wi ll begin to see k TA station
and TA SEEK will be di splayed on LC D for a while.
When t raff ic announce ment is trans mi tted:
(1)I f the unit is in US B or d isc mode, it wi ll switch to radio mode temporarily.
Temporar ily switch ov er to an EON link ed station when E ON detects a tr affi c
announcement on that other program, and TP will be displayed on LC D
(2)I f volume level is below 20, volume level is raised to 20, and returns to its
prev ious mode and v ol ume level whe n the traffic ann ou ncement is ov er.
(3)I f volume is adjusted during traffic announcement, only the traffic
announcement volume is valid.
Page 2
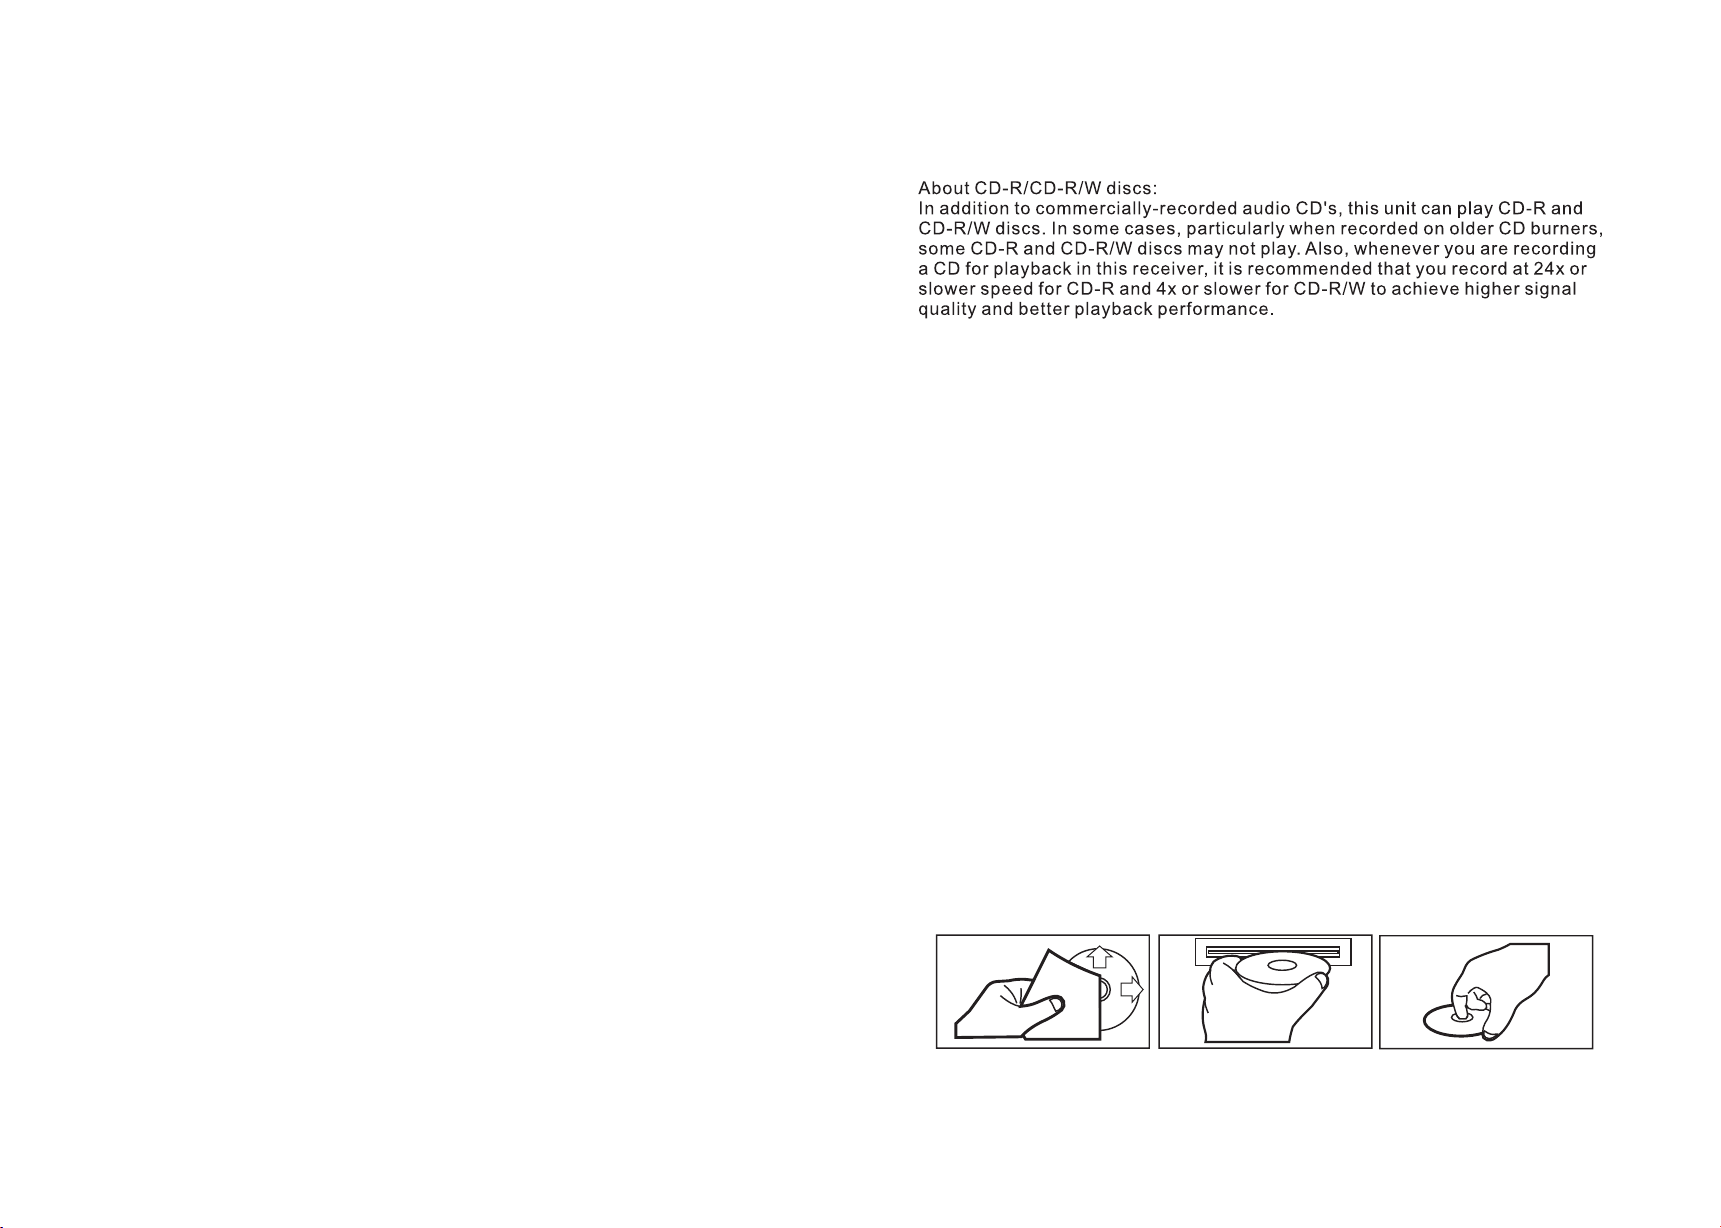
CARE FOR USING CD'S:
1. To keep the disc clean:
Do not attach any sticker or adhesive tape on the disc.
Handle the disc by its edge to keep the disc clean and do not touch the surface.
Before playing a disc, wipe it off with a clean, dust-free cleaning cloth.
Wipe the disc outwards from the disc center.
2. When one has already been inserted. Doing so may damage the unit. Insert a disc
with labeled surface up, or it will damage the unit.
3. Do not expose the disc to direct sunlight or nearby heat sources such as heating
vents, caliduct which can cause the disc to warp.
Do not leave disc in a car if it is parked in direct sunlight as that will lead to a
considerable rise in the temperature inside the car.
4. Do not use any secondhand or rented disc, usually, there is glue on the surface of
those discs, it will stop the unit working and damage it.
5. Always store the disc in its case for protection. Scratched up discs will produce poor
sound performance and cause CD player to skip.
6. In raining day or wet area, the moisture may form on the disc or the optical parts,
the playback may not be possible. If moisture forms on the disc, wipe it off with a
soft cloth.
If moisture forms on the optical parts of the unit, allow the unit to sit for about one
hour with power on.
7. Do not use solvents such as benzine or thinners. Commercially available cleaners
or anti-static spray will damage the unit.
Page 11
Page 4

MAINTENANCE OF REMOTE CONTROL
An insulation tag was installed in your remote by the manufacturer to prevent the
battery from draining. Removing the tag from the remote before using.
BATTERY INFORMATION:
Lithium Battery: CR2025 3V
Battery Life: Approximately 6 months.
Replacing the Battery from the Remote Controller:
1) Remove the battery holder by pressing the locking tab with your thumb
and pulling it out.
2) Replace the battery with the same type and the “+” side facing up.
3) Gently push in the holder until securely locked into place.
TA interruption function:
*
The curren t traffic announcement is cancelled by pressing this key. But the
TA mo de will not be off.
* When TA is on, SEEK, (SC AN), AUTO MEMORY function ca n be received o r
save d only when tra ffic p rogram identification code has been received.
2) AF [ALTERNATIVE FR EQUENCIES ]
When AF s witching mo de i s selected an d the state of AF sw itching mod e is
disp layed by AF segm en t in display.
Segm ent off: AF switch ing mode off.
Segm ent on: AF switchi ng mode on, and h as RDS information.
Segm ent flashin g: AF s witching mo de on, but RDS in formation i s not
rece ived yet.
When AF s witching mo de i s selected, t he radio chec ks the signal s trength of
AF all th e time. The interva l of checking t im e of each AFs depe nds on the
sign al strength o f cu rrent stati on, from a few mi nute for stro ng station to a few
seco nds for weak st at ion. Every ti me that new AF is st ronger than current
stat ion, it switc he s over to that fr equency for v ery short tim e, and
NEW FR EQUENCY is displa yed for 1-2 sec on ds. Because t he mute time of AF
swit ching or chec ki ng time is very s hort, it is alm ost inaudib le in case of
norm al program.
Duri ng FM mode, whe n AF is o n, SEEK, (SCA N), AUTO-MEMORY function c an
only r eceive and sa ve R DS program.
3)
DSP: W hen select th e DS P ,r otate the VOL knob to adjus t the hour /minute.
(Tu rning Left is f or adjustin g the minute an d right is for ad ju sting the hou r)
WARNING:
Do not recharge, disassemble or dispose of in fire.
Battery leakage may cause damage to the unit.
To avoid the risk of accident, keep batteries out of reach of children.
Page 1 0
4) BEE P ALL/ OF F/2ND
BEEP ALL: the b eep is genera ted when ever y key is pressed (e xcept the pow er
butt on, REL key an d EJECT key).
BEEP 2ND: th e beep is only ge nerated whe n an allotted double key is pressed
long ( 1 second).
BEEP OFF: th e beep sound is d isabled.
5) EON : In case of RDS mo de , when the EON ON , the EON progr ams will be sca n
auto matically, selec t EON OFF to stop the s can.
6) LOU D: When the vol ume level is bell ow half level , select LOUD O N mode to
enha nce bass soun d. It is advised th at LOUND ON mod e not be select w hen the
volu me level is hig h.
7) LOC : LOC ON mode imp ro ves recepti on in some area s where the sig nal is too
stro ng.(Note: L OC f unction onl y for FM mode.)
Page 3
Page 5

8).STERE/MONO
Select STEREO mode to improve the sound effect ,Select MONO mode to
decr ease noise an d make the soun d mo re clear when t he station signal is weak.
9).I NVOL: The radio swi tches to last v olume setting w hen the unit sw itches off.
9. SRC AND PTY (PROGRA M TY PE) BUTTON
Pres s the SRC butto n to c hange among t uner (radio ), disc (when a d isc is
loaded), USB (when an USB stick is inserted) and AUX mode.
<-->NEWS<-->AFFAIRS<-->INFO<-->SPORT<-->EDUCATE<-->DRAMA
<--> CULTU RE <-->SCIENCE<--> VARIED<-->POP M< -->ROCK M
<-->EASY M<-->LIGHT M<--> CLASSICS<-->OTHER M<-->WEATHER
<--> F INANCE <--> CH ILDREN<-- >SOCIAL<- ->RELIGION<-->PHONE IN
<-->TRAVEL<-->LEISURE<-->JAZZ<-->COUNTRY<-->NATION M
<-->OLDIES<-->FOLK M<-->DOCUMENT<-->TEST < -->ALARM
After s electing one of the PTY programs, press >>| or |<<,it will automatically
sear ch for the stat io n of the PTY progra m. I f the station o f the PTY program
does t o exist, it wil l di splay PTY NONE an d th en return bac k to the previous radio.
10. BA ND BUTTON
Duri ng radio mode:
Pres s this button b ri efly to selec t the radio bro adcasting b and you would
like t o hear. The AM/FM ban d is toggled cy clically th ro ugh the tunin g bands:
->FM 1 -> FM 2 -> FM 3 -> MW 1->MW 2 - >
Duri ng MP3 file in di sc, or USB mode:
Pres s this button to tu rn to display t he time slide r of current tr ack played.
11. APS BUTTON
1) In RA DIO mode:
Pres s this button b ri efly to displ ay for 5 second s the preset st ation on LCD.
Pres s and hold this b utton to enter in AP S mode, the rad io searches f rom the
current frequency and checks the signal strength level until 6 stat ions are found.
And th en the 6 statio ns f requencie s are preset to t he correspo nding preset
memo ry numbered bank.The auto-storage operation is implemented in the
each selected band. When the auto-storage operation is finished, the ra dio
executes the Preset Scan.
DESCRIPTION OF BUTTONS ON REMOTE CONTROL
1. POWER button
2. AP button
3. SCN(SCAN) button
4. CLK button
5. MODE button
6. BND(BAND) button
7. Number(0~9) buttons
8. * button
9. MUTE button
10. T-M button
11. TEL button
12. CLEAR button
13. # button
14. PTY button
15. TA button
16. AF button
17. >>| and |<< buttons
18. SEL button
19. + and - buttons
1
2
3
4
5
6
7
8
9
10
POWER
AP
SCN
MODE
*
MUTE
TOP
1
5
19
+
SELECT
CLK
BND
PTY
INT
RPT
3
2
7
6
90
T-M
18
AF
TA
RDM
4
8
#
CLEAR
17
16
14
15
13
12
11
2) Dur ing MP3 file in d isc, or USB/SD mo de:
In SD, U SB or MP3/WMA di sc p layback mod e, press APS but ton, it is acti vated
as cyc lical selec ting song mod e as f ollows:
-> TRACK SERIAL NUMBER SEARCH
-> FIR ST CHA RACTER SEAR CH
-> DIRECTORY SEARCH
A) In TRACK SE RIAL NUM BE R SEARCH mode , the LCD will di splay 001--- and
flas h the biggest d igit 0 that the SD ca rd, USB or MP3/ WMA disc contains. Rotate
the VO L knob to sele ct the number o f the flashin g digit from 0 ~ 9. Then press SEL
butt on to confirm a nd f lash next sma ller digit 0. W ith the same me ans, select t he
numb er of the flash ing digit. After f inishing in putting the n umber of all fl ashing
digit, press BND button to play the track of the corresponding number.
Page 4
Page 9
Page 6

6. To transfer t he audio of a fil e played by Mob ile Phone to th e Ca r Audio Player
If the mobile phone supports A2DP and could play audio or video files, whe n the
Mobile Phone plays an audio (For some Mobile Phones, you must selec t Play
by BT firstl y), the playi ng will be tran sferred to the Ca r Audio Player.
In A2DP mode, t he function s of the >>|, |<< a nd P LAY/PAUS E /MUTE buttons
are the same as one in disc mode(no fast forward /backward function s for the
>>|/|<< buttons). The other buttons av ailable in di sc mode are not a vailable.
In A2DP mode, p ressing the M ODE button ca n switch on betwe en the radio,
disc, USB, CARD and A2DP. But after entered the A2DP mode again, it will
resu me play back af te r you press the P LAY/PAUS E button.
B) In FIRST CHARACTER SEARCH mode, the LCD will display A**-- and flash th e
firs t character. R ot ate the VOL knob to input character by the order of A~Z and 0~9.
Pres s SEL button t o confirm and f lash the next c haracter. Wi th t he same means ,
select the character of the flashing place. After finishing inputtin g all the 3 characters,
pres s BND button an d then matched fi les will be scr olling on the L CD by rotatin g
the VO L knob. Fina lly press the B ND button to pl ay the track. I f th ere is not any fi le
matc hed, NO MATCH will be di splayed and t hen it will retur n to the beginn ing of
this t rack search m od e for inputti ng again.
C) In DI RECTORY SEAR CH mode, the LCD wi ll display th e root folder(if there
is not the root folder, it will f ind a root fold er named ROOT). Rotate the VOL knob
to select your desired folder and press BND button to play the fi rst track in th e
selected folder.
INSTALLATION METHOD
This is an anti-theft installation method.
The main unit wears a METAL MOUNTING SLEEVE.
Please connect the wiring, eg, the Power supply, the Speakers and the Antenna
according to the requirements of this Instruction Manual, then install the metal mounting
sleeve into the car as per the diagram illustrated below.
METAL
METAL
SUPPORT STRAP
SUPPORT STRAP
DASHBOARD
To remove the CD player out of the mounting sleeve,
insert the two supplied keys into the left and right side
slots of the chassis at the same time.
NOTE
Bef ore ins talli ng and op erati ng
the C D playe r, remov e the met al
mou nting s leeve i llust rated b y
the arrows.
To raise the anti-skip capability of the unit,
please ensure the metal support strap is
connected firmly to the car chassis.
METAL MOUNTING SLEEVE
Rem ove the t wo scre ws that p rotec t
the C D playe r durin g trans porta tion
bef ore ope ratin g the pla yer.
To properly fix the metal mounting
sleeve, bend the tabs of the sleeve
against the DASH BOARD with a
screwdriver.
UNIT CHASSIS
PLASTIC TRIM RING
FRONT PANEL
To attach the removable faceplate, insert the
right side of the faceplate into the right of the
CD player chassis first. Then push the left side
of the faceplate into the chassis until you hear
it “click”.
12-17. PRESET STATION MEMORY AND TOP/>||, INT, RPT, RDM BUTTONS
a)During radio mode
Go to an y preset stat io n by pressing one of the 6 preset stat ion (1-6).if on e of
thes e buttons is pr es sed for more th an 2 seconds , th e stations currently being
listened to will be memorized into the selected preset button.
b)Du ring disc, SD o r USB mode:
1) Pre ss the TOP/ >| | button brie fly to interr upt the playb ac k of the disc, SD o rUSB.
Pres s again to resu me n ormal playback of the disc, SD or USB.
Press the TOP/>|| button and hold for approximately 0.5 seconds to play the
firs t track of the disc , SD or USB.
2)Pr ess the INT button to p lay the first 1 0 se conds part of e ach track ,an d the
INTR O will be visib le o n the LCD display
Pres s and hold the IN T butt on to play the 10 f irst seconds of e ach track in de sired
fold er, and D-INT indica tor will be displayed on LCD. To disable the INTRO function,
press again INT button and current track will be playing normally, and INT OFF
indi cator disap pears from LCD.
3) Pre ss RPT button once to p lay the curre nt track repeat edly, and the RPT ONE
indicator displays LCD.
Duri ng MP3/WMA dis c, SD or USB mode, pr ess and hold th e RPT bu tton to play
the cu rrent folde r re peatedly, and th e D- RPT will be visib le on the LCD display.
In REP EAT mode, pre ss RPT button again t o disable the R EPEAT function and
RPT OFF disp lays on LCD.
4) Press the RDM button to play all tracks on disc in a rando m order, and RAN DOM
indicator displays on LCD.
In RDM m ode, press RD M bu tton again to s top playing i n random orde r and the
LCD wi ll display RD M OFF.
Pres s and hold the RD M bu tton to play th e current fol der in random o rder, and
the D- RDM will be vis ible on the LCD d is play.
Page 8
5)Pr ess the 5 and 6 but to n to move up and do wn 10 tracks at a t ime .
When t he remainin g to tal tracks ar e less than10 ,both butto ns are inacti ve .
Pres s and hold the 5 an d 6 buttons to select next or previous folder to be played.
Page 5
Page 7

18.AUX INPUT JACK
Pres s the mode butt on t o select auxi liary input p laying mode . Then y ou can
connect any matched external audio device to this socket. Use the volum e
knob t o adjust volu me .
19.USB SOCKET
In order to play the file in the USB stick, turn over the plastic cov er cap then
inse rt the USB stick in to the USB sock et. Th e system will change into the
USB mo de automati ca lly, and then play t he f irst file in th e USB.
20.SCA N BUTTON
Pres s it to scan up by on e ch annel step wi th station de tection ,If a v ail signal
has de tected ,the c ur rent freque ncy is blinke d within 5 seco nds ,then pre ss it
again to stop scan and remain the current frequency; otherwise ,the uni t
cont inue to scan up b y on e channel ste p with statio n detection 5 s econds later.
21. RE SET BUTTON
Befo re operatin g th e unit for the fi rst time, or af ter replaci ng the car batter y or
changing the connections. You must reset the unit.
Pres s this button w it h a cuspidal ob ject. This operat ion will eras e the clock
sett ing and some st or ed contents .
22.Flashing LED
When t he front cont ro l panel is removed this indicator flashes.
23.S D CARD SLOT
When y ou need to play t he f ile in the SD car d ,insert the S D card into the S D
card s lot ,the system w ill change in to the SD mode au tomatically, and then
play t he first file i n th e SD.
Note :When SD card a nd U SB stick are bo th inserted i nto their slo t or socket ,
the sy stem will change into the playback mode of th e la tter one.
Bluetooth Hands-Free System:
1. Pairing and Connection
1) Turn o n the Bluetoo th mode of the mobi le phone;
2)Select the item of Finding the Bluetooth Device and enter it.Afte r finishing t he
finding,it will show the name of the Bluetooth Device available. Sele ct it and
swit ch to the inter fa ce for passwo rd,
Inpu t the passwor d 0000 and ente r it . Th en it will show p ai r OK..
3) For some mobile phones,they can automatically connect with the BT dvice of
the ca r audio syste m an d after pairi ng is ok;for so me mobile phones,they need
to sel ect the paired BT device and press the CONNECTION button.When
connection is OK,the LCD of the car audio system will show CONNECT.
2. Use the mobile phone to do connection or disconnection
A) Use th e mobile phon e to do connect io n or disconne ction
1) In th e connection status, find the paired and connected Bluetooth Device,
then p ress the disc onnection b ut ton to do disco nnection.
2) In th e disconnec ti on status, fi nd the paired a nd disconnected Bluetooth
Device, then press the connection button to do connection.
B) Whe n turn on the pow er again(afte r Acc off ), the front pan el can search t he
phon e have pair aut omaticall y an d be connecti on. And it will ta ke you about
10-15 seconds.
Note:
In the c onnection s ta tus: Mobile p hone transf ers to the car au dio whenever
a dial ling takes pl ace; Mobile phone transfers to the car audio whenever
rece iving a call
.
3. Dia lling when in c onnection s ta tus
A) Dial with the mobile phone directly.
B) Pre ss the TEL butto n on t he remote con trol then i nput the phone number ,
,
pres s the TE L button a gain to execute t he dialling .
Note s: The t alking time w ill appear on L CD if diallin g is successful a nd it is
received.
Page 6
4. Accept/ End Call
A) During ringing, press TEL button to accept the call
D) Dur ing talking , press HAND UP butto n to end the call .
5. Talking volume level setting
At tal king status , us e the VOL kn ob to adjust th e sound outpu t, but this volume
leve l can't be rese rved.
Page 7
 Loading...