

Page 1

PDF created with FinePrint pdfFactory trial version http://www.pdffactory.com
Page 2

Preface
Thankyouforpurchasingthiscaraudioproduct.
Pleasereadthismanualcarefullybeforeoperatingthiscaraudioproduct.
Pleasekeepthismanualforfutureuse.Itwillbehelpfultoyouifyouareencounterany
operationalproblem.
Selectingfineaudioequipmentisonlythestartofyourmusicalenjoyment.
Nowitistimetoconsiderhowtomaximizetheenjoymentyouwillgetfrom
knowinghowtoworkyournewcarstereoreceiver.
Wehopeyouenjoyusingthisproductandencourageyoutoalwayslistenat
amoderate,safesoundleveltoavoidanypossiblehearingdamageorloss.
Ifyoulistentoexcessivelyloudsoundovertime,yourhearingcanadaptto
highervolumesandwhatsounds"normal"toyoumaybequiteharmfuland
cancauseyoutohavepermanenthearingloss.Sopleasepractice"safesound"
andalwayslistenatmoderate soundlevelsonly.
Startwithyourvolumecontrolatthelowestsetting,andslowlyincreasethelevel
untilyoucanhearitcomfortablyandclearly,freefromdistortion.
Onceyouhaveestablishedthiscomfortablesoundlevel,leaveitthere.
WARNING!
Toreducetheriskoffireorelectricshock,donotusetheunitintherainormoisture
environment.
Topreventdirectexposuretolaserbeam,donottryopentheenclosure.
Visibleandinvisiblelaserradiationwhenopenandinterlocksdefeated.
Toprotectourenvironment,donotdisposeofelectricalequipmentinthedomesticwaste.
Pleasereturnanyelectricalequipmentthatyouwillnolongerusetothecollectionpoints
providedfortheirdisposal.
Thishelpsavoidthepotentialeffectsofincorrectdisposalontheenvironmentandhuman
health.Thiswillcontributetotherecyclingandotherformsofreutilizationofelectricaland
electronicequipment.Informationconcerningwheretheequipmentcanbedisposedofcan
beobtainedfromyourlocalauthority.
Page1
PDF created with FinePrint pdfFactory trial version http://www.pdffactory.com
Page 3
SPECIFICATION
GENERAL
SupplyVoltageDC12V.NegativeGround
CurrentConsumptionMax.10A
PowerOutput4X60W
Numberofchannels2STEREOchannels.
UnitDimensions(LXWXH):7"X6.46"X1.97"
178X164X50mm
FMSECTION
Frequencyrange87.5MHz-107.9MHz
Effectivesensitivity3uV.
I.FFrequency10.7MHz.
AMSECTION
Frequencyrange530KHz-1710KHz
Effectivesensitivity40dB.
I.FFrequency450KHz
PreampOutput:1VMax
CDPLAYER
SystemMP3AudioSystem.
SuitableCDsMP3,WMA,CD,CD-R,CD-RWDisc
Frequencycharacteristics20Hz-100Hz<5dB
10KHz-20KHz<5dB.
S/NRatiotoCD50dB[1KHz]
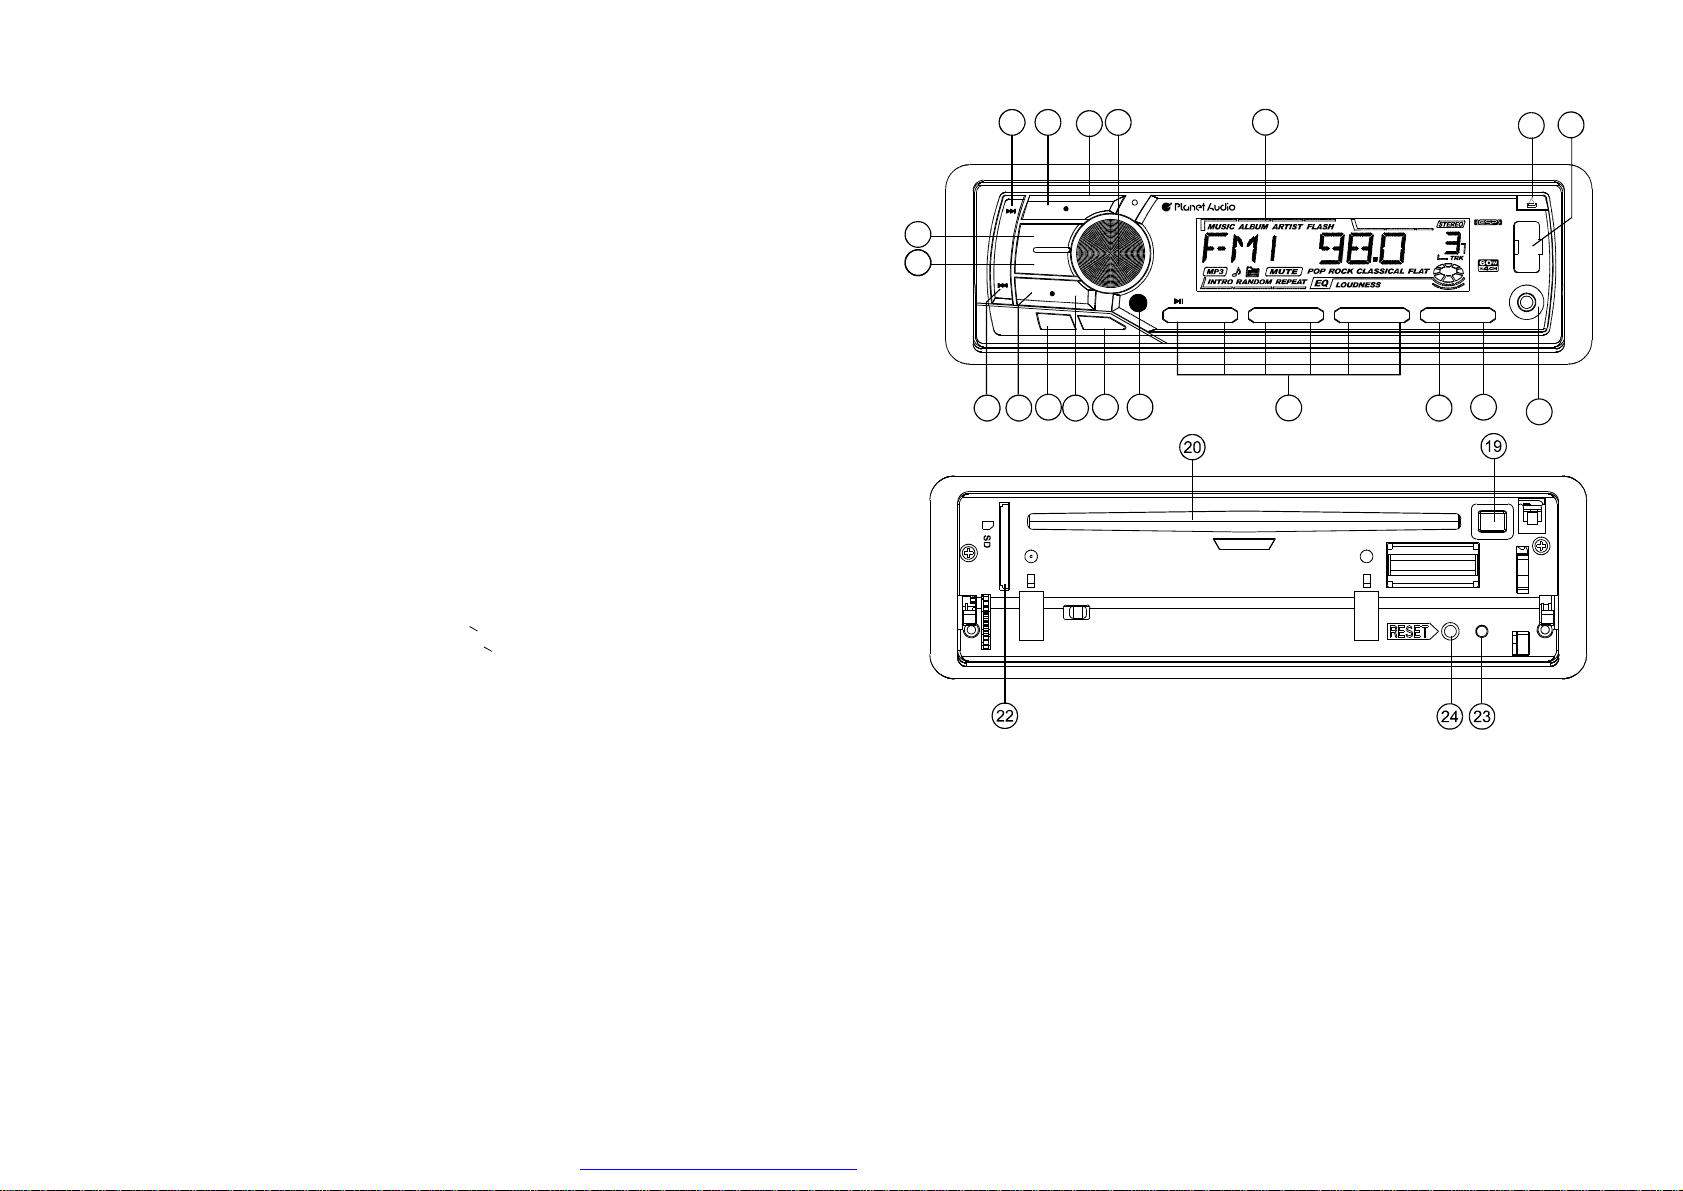
LOCATIONANDFUNCTIONOFCONTROLS
35
PWR
8
77
MODE
BAND
ST
MUTE
2
15
LOC
LOUD
14 1112 16
SEL
SCAN
179 106 13
4
INT43RPT1RDM
21
1
P385UA
USB
APS
5 62
CLK
AUX
18
Page13
PDF created with FinePrint pdfFactory trial version http://www.pdffactory.com
1.OPENBUTTON
PresstheOPENbuttontoflipdownthefrontcontrolpanel.
ThenadisccanbeinsertedintothediscslotorejectedbypressingtheEJbutton.
Afterflippingdownthefrontpanel,pushitleftwards,thenpulltherightsideofthe
paneloutwardstoremoveitfromtheunitchassis.
2.SELBUTTON(Select)ANDVOLKNOB
a)PresstheSELbuttonbriefly,itisactivatedasselectingeachmodeofE.VOL.
->VOLUME->BASS->TREBLE->BALANCE->FADER->
Whenselectingadesiredaudiomode,rotatetheVOLknobtoadjusttheaudio
effect.
Ineachmode,thewaitingtimeisabout5seconds,andthetimewaitingtime
isover,itreturnstothelastdisplaymodeoftunerorCDPmode.
ThecontrolmodeofE.VOLisoperatedwithfollowingnumericdisplay.
-VOL:(MIN)00,01,......46,47(MAX).
-BASS/TRE:-07,-06,...,00,...+06,+07
-BAL:0LR9,1LR9,...,9LR9,...,9LR1,9LR0
-FAD:0FR9,1FR9,...,9FR9,...,9FR1,9FR0
Page2
Page 4

b)Whenpressedandholdfor2seconds,itisactivatedascyclicalmodeof
followingfunctionsforusersselection.
’
->BEEP(ON/OFF)->USERSET(FLAT/CLASSIC/ROCK/POP)
->SUBW(ON/OFF)->VOL(LAST/DEFA)->CLK(ON/OFF)->CLK(12/24)mode.
Afterselectingthedesiredmode,rotatetheVOLknobtoselectonesetup
itemofthedesiredmode.
BEEPON/BEEPOFF
BEEPONmode:Thebeepisgeneratedwhenanykeyispressed.
BEEPOFFmode:Thebeepsoundisdisabled.
VOLLAST/VOLDEFA
VOLLAST:Theradioswitchesonattheactualvolumeithadwhenitwaslast
switchedoff.
VOLDEFA:AfterpressingSELbutton,AVOLwillbedisplayed.Thenyou can
pre-selectaconstantswitch-onvolumebyusingtheVOLknob.
CLKON/OFF
CLKON:Clockwillalwaysshowonthedisplaywhenpoweroff.
CLKOFF:Clockwilldisappearonthedisplaywhenpoweroff.
3.POWERON/OFF
Whentheunitispoweroff,theunitcomestoONbypressinganybuttononthe
frontpanel(excepttheOPENkey).Italsocanturnontheunittoinsertadisc,
SDcardorUSBFlashDriveintotheirslotsorsocket.Whentheunitispoweron,
pressandholdthepowerbuttonformorethan0.5seconds,theunitgoesinto
poweroffmode.
4.LCDDisplay
5&6.TUNE,SEEK,TRACK,SKIPUP/DOWNBUTTONS
a)DuringRADIOmode:
Pressthe>>|or|<<buttonshortlytomanualtuneup/downforthedesired
radiostationfrequencystepbystep.
Pressandholdthe>>|or|<<buttonforlonger0.5seconds,toautomatically
tuneup/downfortheradiostationfrequencyofstrongsignal.
b)Duringdisc,SD,MMC,USBplaybackmode:
Pressthe>>|buttonbrieflytoplaynexttrack.
Pressthe|<<buttonbrieflytoplaythecurrenttrackfromthebeginningofit
iftheplayingtimeismorethan2seconds.
Pressthe|<<buttonbrieflytoplaytheprevioustrackiftheplayingtimeis
lessthan2seconds.
Pressthe>>|or|<<buttonandholdtoskipforwardsorbackwards,release
toresumenormalplayback.
TROUBLESHOOTING
Beforeusingthechecklistpleasemakealltheconnectionsfirst.
Ifyoustillhavequestionsaftergoingthroughthechecklist,pleaseconsult
yourlocalcustomerservicerepresentative.
CommonSymptoms
Thereisnopower.
TheCDscannot
beloaded.
TheCDsareloaded
onlyhalfwayinto
theCDtray.
Thedevicedoes
notworkcorrectly
(EJECT,LOAD,
PLAY)
Thereisnosound.
Theoperationkeys
donotwork
Thesoundofthe
CDplayerskips
Noradioreception.
Inautomaticsearch
modetheradiodoes
notstopatatransmittingstation.
Thecarignitionisswitchedoff.
Thefusehasblown.
PresenceofCDdiscinsidetheplayer
Thetransportscrewshavenotbeen
removed.
Insertingthediscinupsidedown
ThesurfaceofCDisextremelydirty
oritisdamaged.
Temperatureinsidethecaristoo
high.
Thevolumecontrolissettoolow.
Thedevicehasnotbeencorrectly
connected.
1.Thebuilt-inmicrocomputerisnot
operatingproperlyduetonoise
2.Frontpanelisnotproperlyfixinto
itsplace
Theinstallationangleismorethan
30degrees
Thesurfaceoftheroadisuneven.
ThesurfaceofCDisextremelydirty
oritisdamaged.
Theantennacableisnotconnected. Inserttheantennacablefirmlyintothe
weak.
Cause
Solution
Ifthepowersupplyisproperlyconnectedto
thecaraccessory,switchtheignitionkeyto
ONor"ACC""".
Replaceanotherfuseaccordingtothewiring
diagram.
Removethediscintheplayerthenputanew
upward
Removethetransportscrewsbeforeusing.
Insertthecompactdiscwiththelabelfacing
upward
CleantheCDortryanotherCD,ifthisworks
correctly,thefirstCDisproperlydamaged.
Cooloffuntiltheambienttemperaturereturns
tonormal
Turnupthevolumeproperly.
Checkthepowerandearthconnection
accordingtothewiringdiagram.
1.Switchthedeviceoffandonagain.Orpress
theRESETbuttontoresumetheprogram.
2.Reinstallthefrontpanel
Adjusttheinstallationangletolessthan30
degrees
Waituntiltheroadbecomessmootherbefore
playingtheCD.
CleantheCDortryanotherCD,ifthisworks
correctly,thefirstCDisproperlydamaged.
antennasocketofthedevice.
Tuneintoaradiostationmanually.Thetransmissionsignalsaretoo
PDF created with FinePrint pdfFactory trial version http://www.pdffactory.com
Page12Page3
Page 5

CAREFORUSINGCD'S:
AboutCD-R/CD-R/Wdiscs:
Inadditiontocommercially-recordedaudioCD's,thisunitcanplayCD-Rand
CD-R/Wdiscs.Incomecases,particularlywhenrecordedonolderCDburners,
someCD-RandCD-R/Wdiscsmaynotplay.Also,wheneveryouarerecording
aCDforplaybackinthisreceiver,itisrecommendedthatyourecordat24xor
slowerspeedforCD-Rand4xorslowerforCD-R/Wtoachievehighersignal
qualityandbetterplaybackperformance.
1.Tokeepthediscclean:
Donotattachanystickeroradhesivetapeonthedisc.
Handlethediscbyitsedgetokeepthedisccleananddonottouchthesurface.
Beforeplayingadisc,wipeitoffwithaclean,dust-freecleaningcloth.
Wipethediscoutwardsfromthedisccenter.
2.Whenonehasalreadybeeninserted.Doingsomaydamagetheunit
withlabeledsurfaceup,oritwilldamagetheunit.
3.Donotexposethedisctodirectsunlightornearbyheatsourcessuchasheating
vents,caliductwhichcancausethedisctowarp.
Donotleavediscinacarifitisparkedindirectsunlightasthatwillleadtoa
considerableriseinthetemperatureinsidethecar.
4.Donotuseanysecondhandorrenteddisc,usually,thereisglueonthesurfaceof
thosediscs,itwillstoptheunitworkinganddamageit.
5.Alwaysstorethediscinitscaseforprotection.Scratchedupdiscswillproducepoor
soundperformanceandcauseCDplayertoskip.
6.Inrainingdayorwetarea,themoisturemayformonthediscortheopticalparts,
theplaybackmaynotbepossible.Ifmoistureformsonthedisc,wipeitoffwitha
softcloth.
Ifmoistureformsontheopticalpartsoftheunit,allowtheunittositforaboutone
hourwithpoweron.
7.Donotusesolventssuchasbenzineorthinners.Commerciallyavailablecleaners
oranti-staticspraywilldamagetheunit.
.Insertadisc
7.BANDBUTTON
Duringradiomode,presstheBNDbuttonbrieflytoselecttheradiobroadcasting
bandyouwouldliketohear.TheAM/FMbandistoggledcyclicallythroughthe
tuningbands:->FM1->FM2->FM3->AM1->AM2->.
8.MODEBUTTON
PresstheMODEbuttontochangeamongtuner(radio),disc(whenadiscis
loaded),SD/MMCcard(whenanSD/MMCcardisinserted),USB(whenan
USBFlashDriveisinserted)andAUXmode.
9.MUTEBUTTON
ThisbuttonservestoswitchtheMUTEDstateon/off.
PresstheMUTEbuttontosuppresstheloudspeakertemporarily,andpress
againtoresumelistening.Themutedstatewillbealsoreleasedwhenthe
MODE,SELbuttonispressedandVOLknobonthefrontpanelisused.
10.INFRAREDREMOTECONTROLSENSOR
11.APSBUTTON(Auto-storage/Presetscan)
Duringradiomode:
1)whenlongpressingformorethan1seconds,theradiosearchesfromthe
currentfrequencyandchecksthesignalstrengthleveluntil6stationare
found.Andthenthe6stationsfrequencyarepresettothecorresponding
presetmemorynumberedbank.Theauto-storageoperationisimplemented
intheeachselectedband.Whentheauto-storageoperationisfinished,the
radioexecutethePresetScan.
2)whenshortpressing,theradiosearchesforeachpresetstationinthecurrent
bandandholdsatthatpresetnumberfor 5secondswithreleasingmute,and
thensearchagain.
Indiscmode,MMC/SDorUSBmode,pressAPSbuttonrepeatedlytoselect
TRACKSEARCH,DIRECTORYSEARCHorFIRSTCHARACTERSEARCH
mode.
InTRACKSEARCHmode,theLCDwilldisplayTRKT000andflashthe
biggestdigit0thattheMMC/SDcard,USBorMP3disccontain.Rotatetheknob
toselectthenumberoftheflashingdigitfrom0~9.ThenpressSELbuttonto
confirmthenumberandflashnextsmallerdigit0.Withthesamemeans,select
thenumberoftheflashingdigit.Afterfinishingselectingthenumberofall
flashingdigit,pressSELbuttontoplaythetrackoftheselectedserialnumber.
InDIRECTORYSEARCHmode,theLCDwilldisplaytherootfolder(ifthereis
nottherootfolder,itwillfindarootfoldernamedROOT).Thenrotatetheknob
toselectyourdesiredfolder,FinallypressSELbuttontoplaythefirsttrackof
thefolder.
InFIRSTCHARACTERSEARCHmode,theLCDwilldisplayA-rotatetheknob
toselectfile'sfirstcharacterbytheorderofA~Zand0~9.Thenpress>>|or|<<
buttontoselectonefileitsfirstcharactersistheselectedone.FinallypressSEL
buttontoplaytheselectedfile.
PDF created with FinePrint pdfFactory trial version http://www.pdffactory.com
Page4Page11
Page 6

12.PRESETSTATIONMEMORYANDTOP/>||,INT,RPT,RDMBUTTONS
a)Duringradiomode:
Gotoanypresetstationbypressingoneofthe6presetstationbuttons(1-6).
Ifoneofthesebuttonsispressedformorethan2seconds,thestationcurrently
beinglistenedtowillbememorizedintotheselectedpresetbutton.
b)Duringdisc,SD/MMCorUSBmode:
1)PresstheTOP/>||buttonbrieflytointerrupttheplaybackofthedisc,SD/MMC
orUSB.Pressagaintoresumenormalplaybackofthedisc,SD/MMCorUSB.
PresstheTOP/>||buttonandholdforapproximately0.5secondstoplaythe
firsttrackofthedisc,SD/MMCorUSB.
2)PresstheINTbuttontosamplethefirst10secondspartofeachtrack,andthe
INTONwillbevisibleontheLCDdisplay.
IntheprocessofINT,pressINTbuttonagaintostopsamplingandtocontinue
playingthecurrenttrack,andtheLCDwilldisplayINTOFF.
3)PresstheRPTbuttononcetoplaythecurrenttrackrepeatedly,andtheRPT
ONEwillbevisibleontheLCDdisplay.
DuringMP3/WMAdisc,SD/MMCorUSBmode,presstheRPTbuttontwice
continuouslytoplaythecurrentfolderrepeatedly,andtheRPTDIRwillbe
visibleontheLCDdisplay.
IntheprocessofRPT,pressRPTbuttonagaintostopplayingrepeatedly
modeandtheLCDwilldisplayRPTOFF.
4)PresstheRDMbuttontoplayalltracksondiscinrandomorder,andtheRDM
ONwillbevisibleontheLCDdisplay.
IntheprocessofRDM,pressRDMbuttonagaintostopplayinginrandom
orderandtheLCDwilldisplayRDMOFF.
c)DuringthenormalplaybackofMP3/WMAdisc,SD,MMC,USB:
Presstheradiopresetbutton6and5tomoveupanddown10tracksatatime.
13.ST/MOBUTTON
InFMmode,presstheSTbrieflytoselectstereoormonosoundmode.
INSTALLATION
INSTALLATIONMETHOD
Thisisananti-theftinstallationmethod.
ThemainunitwearsaMETALMOUNTINGSLEEVE.
Pleaseconnectthewiring,eg,thePowerSupply,theSpeakersandtheAntenna
accordingtotherequirementsofthisInstructionManual,theninstallthemetal
mountingsleeveintothecarasperthediagramillustratedbelow.
METALSUPPORTSTRAP
DASHBOARD
METALMOUNTINGSLEEVE
Toremovetheunitoutofthemetalmountingsleeve,
insertthetwosuppliedKEYSintotheleftandrightside
slotsofthechassisatthesametime.Thenpullthechassis
outofthemetalmountingsleeveasshownintheright
illustration.
Toboostupthecapabilityofanti-jamming,
pleasemakesurefixtightlythesupport
strapintothemetaljointthatconnecttothe
chassisofthecar.
metal
Bendthetabsonthemetalmounting
sleeveagainsttheDASHBOARDwith
ascrewdriver.
UNITCHASSIS
PLASTICTRIMRING
FRONTPANEL
14.LOUDNESSBUTTON
Whenpressshortly,theLOUDmodeisturnedon,itstoenhancethebasssound
effectwhenthevolumelevelislow.Pressagaintocanceltheloudnesseffect.
15.LOC/DXBUTTON
RadiostationsearchmodeisdividedbythisLOC/DXswitch,thisbuttoncan
beusedtocontrolanattenuatorinthetunerduringsearch.
Inradiomode,presstheLOCbuttontochangelocalreceptionordistance
reception.Localmodeimprovesreceptioninsomeareaswherethesignal
istoostrong.
Note:ThisbuttonisonlyforFMreception.InAMmode,LOCisvoid.
16.CLOCKBUTTON
PresstheCLKbuttonbrieflytodisplaytimefor5secondsonthedisplay,and
thenreturnstoitspreviousdisplayunlessthebuttonispressedagain.
ThenpresstheCLKbuttonandholdformorethan1seconduntiltherealtime
flashesonthedisplay.ThenyoucanadjustHOURorMINUTEbyrotatingthe
VOLknob.
Page5
PDF created with FinePrint pdfFactory trial version http://www.pdffactory.com
NOTE
Beforemountingandoperating
theCDplayer,removethemetal
mountingsleeveillustratedbythe
arrows.
Pushthisresetbuttonwithacuspidal
objecttorenovatethedistortedprogram
oncetheprogramisdistorted.
Removethetwoscrewsthat
fixtheCDdeckmechanismplayer
duringtransportationbefore
mountingtheplayer.
EJECTKEY
RESETBUTTON
Page10
Page 7

WIRESCONNECTION
FRONTRIGHTRCAOUTPUT
RED
FRONTRCAOUTPUTLEFT
WHITE
SUBWOOFEROUTPUT
YELLOW
ANTENNAJACK
FIXEDISOCONNECTORA
1.
2.
3.
4.CONSTANT+12VDC
5.AUTOANTENNAB+
6.
7.ACC+12VDC
8.GROUND
REARRIGHT RCAOUTPUT
REARLEFT RCAOUTPUT
RED
WHITE
ISOSOCKET
FIXEDISOSOCKETSKETCH
FIXEDISOCONNECTORB
1.REARRIGHTSPEAKER(+)
2.REARRIGHTSPEAKER(-)
3.FRONTRIGHTSPEAKER(+)
4.FRONTRIGHTSPEAKER(-)
5
.FRONTLEFTSPEAKER(+)
6.FRONTLEFTSPEAKER(-)
7.REARLEFTSPEAKER(+)
8.REARLEFTSPEAKER(-)
17.SCANBUTTON
PresstheSCNbuttontoscantheradiofrequency.Ifavalidsignalhasdetected,
thecurrentfrequencywillbeholdandblinkingfor5seconds,thenpressSCN
againtostopscanandremainthecurrentfrequency;otherwise,theradiowill
goontoscantheotherradiofrequency5secondslater.
18.AUXINPUTJACK
Pressthemodebuttontoselectauxiliaryinputplayingmode.Thenyoucan
connectanymatchedexternalaudiodevicetothissocket.Usethevolume
knobtoadjustvolume.
19.EJECTKEY
Inthepoweronstate,theloadeddisccanbeejectedbypressingtheEJkey.
20.CDSLOT
21.USBPORT
WhenneedingtoplaythefileintheUSBFlashDrive,turnovertheplastic
covercaptheninserttheUSBFlashDriveintotheUSBPort.Thesystem
willchangeintotheUSBmodeautomatically,andthenplaythefirstfileinthe
USB.WhennoneedingtodoUSBoperation,pleasecovertheplasticcovercap.
22.SD/MMCCARDSLOT
WhenyouneedtoplaythefileintheSD/MMCcard,inserttheSD/MMCcard
intothecardslot.Thesystemwillchangeintothemodeautomatically,
andthenplaythefirstfileintheSD/MMC.
23.FLASHINGLED
Whenthefrontcontrolpanelisremovedthisindicatorflashes.
PDF created with FinePrint pdfFactory trial version http://www.pdffactory.com
24.RESETBUTTON
Beforeoperatingtheunitforthefirsttime,orafterreplacingthecarbatteryor
changingtheconnections.Youmustresettheunit.
Pressthisbuttonwithacuspidalobject.Thisoperationwillerasetheclock
settingandsomestoredcontents.
Page6Page9
Page 8

OPERATIONOFREMOTECONTROL
1.PowerOn/Off
2.MuteButton
3.
LoudnessButton
4.Level/MENUUPButton
8
14
5.SEL/MENU
Button
6.Level/MENUDownButton
7.MO/STButton
8.A.PButton
9
10
17
16
19
20
9.BandButton
10.ModeButton
11.Tune/SeekUpAndTrackSkipUp/FFButton
12.Tune/SeekDownAndTrackSkipDown/REWButton
13.SCANBUTTON
14.ClockDisplay/SettingButton
POWER
1
2
MUTE
CLK
MODE
TOP
4
RDM
1
12
AP
BAND
INT
2
5
4
SELECT
-
LOC
RPT
3
6
ST
LOUD
SCN
5
11
7
3
13
18
21
6
15
MAINTENANCEOFREMOTECONTROL
Aninsulationtagwasinstalledinyourremotebythemanufacturertopreventthe
batteryfromdraining.Removingthetagfromtheremotebeforeusing.
BATTERYINFORMATION:
LithiumBattery:CR20253V
BatteryLife:Approximately6months.
ReplacingtheBatteryfromtheRemoteController:
1)Removethebatteryholderbypressingthelockingtabwithyourthumb
andpullingitout.
2)Replacethebatterywiththesametypeandthesidefacingup.
3)Gentlypushintheholderuntilsecurelylockedintoplace.
“+
”
15.LOC/DXButton
16.CDTrackTOP/>||/RadioPreset1
17.CDTrackINT/RadioPreset2
18.CDTrackRPT/RadioPreset3
19.CDTrackRDM/RadioPreset4
20.RadioPreset5
21.RadioPreset6
Page7
PDF created with FinePrint pdfFactory trial version http://www.pdffactory.com
WARNING
:
Donotrecharge,disassembleordisposeofinfire.
Batteryleakagemaycausedamagetotheunit.
Toavoidtheriskofaccident,keepbatteriesoutofreachofchildren.
Page8
 Loading...