

P/N: 305-7607168-251257A SIZE: 140x215mm
14
15
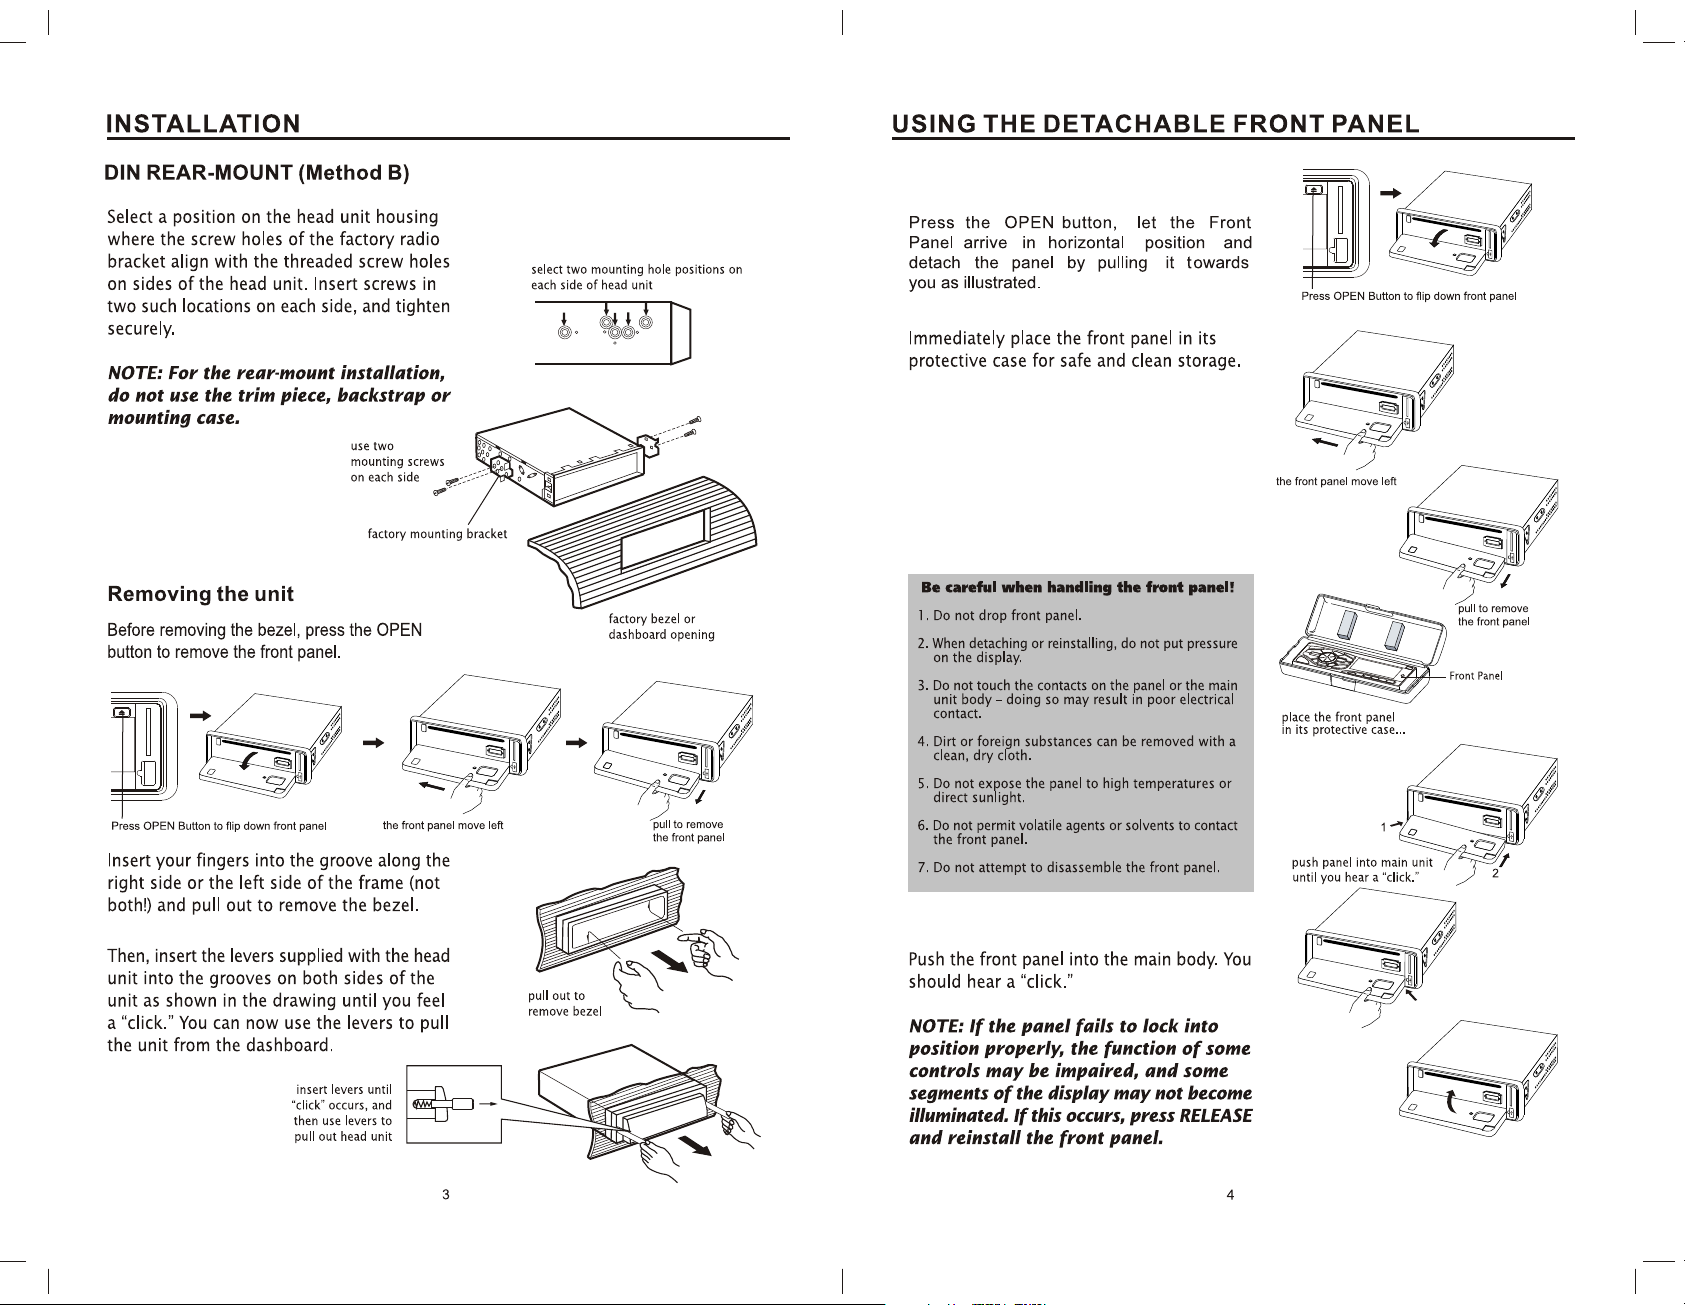
DETACHING THE FRONT PANEL
REINSTALLING THE FRONT PANEL

BLUETOOTH
SPEAKER
GENERAL CONTROLS
POWER Press any button to turn unit ON. To turn head unit off,
press and hold POWER.
OPEN Press to flip down the front panel.
DISP Selects radio frequency or clock display.
To set the clock:
1. With clock display selected, hold down (DISP) button until
clock display starts flashing.
2. Rotating VOL left to change minutes, VOL right to change
hours.
3. Press (DISP) button to start clock
NOTE for TWO SPEAKER SYSTEMS:
1. The following wires are not used and should be isolated:
GREEN VIOLET WHITE/BLACK GREY/BLACK
2. Keep the fader control AT CENTER POSITION to maintain the existing volume level
The Liquid Crystal Display will display the
current state of the unit.
BEEP MODE When press the AUDIO button for more than 2 seconds,
it is activated as selecting mode of these function.
BEEP ON: BEEP sound can hear from speaker when the buttons are
pressed.

RADIO CONTROLS AUDIO CONTROLS
SEEK MODE When press this button for more than 2 seconds, it is activated as selecting
mode of these function.
AUDIO BUTTON and ROTARY CONTROL Press the button repeatedly to
SEEK 1: When SEEK 1 mode is activated, AUTO SEEK SCAN is stopped when station is
detected even user still push SEEK button.
SEEK 2: Auto SEEK SCAN is not stopped even station is detected if user push SEEK
button. When release this SEEK button, then stop when station is detected.
TUNE BUTTONS When pressed for less than 1 second, these keys operate as manual
tuning mode. When pressed longer than 1 sec., they are operated as SEEK tuning mode.
If the keys are not pressed for 3 seconds, they will return to SEEK mode again.
BAND Push this switch to select the desired band. Selection is made in regular sequence
as FM1-FM2-FM3-AM1--AM2.
LOC Press to select between strong (LOC) and weak (DX) stations.
STATION PRESETS Six numbered preset button store and recall sta-tions for each band.
Storing a station:
1. Select a band (if needed).
2. Select a station.
3. Hold a preset button longer than one second. Preset station num-ber appears in the
display when station is saved.
Recall a station:
1. Select band (if needed).
2. Press a preset button for less than one second to select stored station.
SCAN This key is operated as RADIO SCAN. The operation is similar as normal search
but different thing is holding 5 seconds on every station detected in RADIO SCAN mode.
AS/PS Select six strong stations and store them in current band.
1. Select a band (if needed).
2. Hold AS/PS button for more than three seconds. The new stations replace stations
already stored in that band.
Preset Scan
Scan stations stored in current band
1. Select a band (if needed).
2. Touch AS/PS for more than one second but less than three seconds. Radio pauses
for five seconds at each station. Touch AS/PS again to stop scanning when desired
station is reached.
MO/ST When FM station is weak and disturbed, listening can be improve by pressing
MONO.
7
access Volume, Bass, Treble, Balance and Fader functions. Then use the
knob to adjust the selected function.
EQ Press repeatedly to cycle through five modes: POP M, ROCK M,
CLASS M, FLAT M or DSP OFF.
SUB Press and hold to engage subwoofer output.
MUTE Press to silence the receiver. Press again to return to normal
operation.
LOUD Press this button to increase the level of bass output.
SOURCE By pressing this key, user can select AUX/TUNER/CD-MP3/USB
or MMC/SD mode.

CD/MP3 PLAYBACK CONTROLS How to select MP3 files
TUNE/TRACK BUTTONS Press and release
to advance to next track or to return to the
beginning of the current track (track number
will be displayed). Press and hold to fast
forward or reverse. Play will begin at the point
when you release the button.
PAUSE Press to pause CD playback. Press
again to resume playback.
ESP MODE When press AUDIO button for
more than 2 seconds, it is activated as 12 sec.
or 45 sec. of ESP mode can be selected.
SHUFFLE Press to play ALL tracks on
the CD in random order.
REPEAT Press and release to
continuously repeat same track. Press
again to stop repeat cycle.
CD SCAN Press to hear first several
seconds of each track on current disc.
Press again to stop intro and listen to
intro last previewed.
EJECT Press to eject CD.
+10 10 TRACK UP SELECT:
(In case of MP3 files)
-10 10 TRACK DOWN SELECT:
(In case of MP3 files)
CD/MP3 Operation
To PLAY a CD gently insert a CD with the label side up into the disc slot. It will automatically
load and begin playing the first track.
To EJECT a CD release front panel and press EJECT to stop the CD playback and eject the
CD from the slot.
To PAUSE a CD press PAU to stop playback temporarily. Press again to resume playback.
To SKIP TRACKS press the or key to choose the next or preceding track.
To FAST FORWARD or REVERSE press and hold the or key to the desired
location on the disc. Releasing the button starts playback at the location.
To REPEAT a TRACK press RPT to continuously repeat the current track. Press again to
return to normal playback mode.
To PREVIEW ALL TRACKS press CD SCAN to play the first several seconds of each track.
Press it again to stop preview tracks.
To PLAY TRACKS IN RANDOM ORDER press SHUF to play ALL tracks on the CD in
random mode. Press again to cancel this function.
Controls behind faceplate
CD Loading/unloading slot.
LED This LED flashes when the faceplate is
removed.
RESET Press this button with a ballpoint pen or other thin object.
The reset button is to be activated for the following reason: Initial
installation of the unit when all wiring is completed. All the function
button do not operate. Error symbol on the display.
NOTE: If the unit does not function properly after you have
pressed the RESET button, clean the socket and the connector
on the rear of the front panel with a cotton swab soaked in
isopropyl alcohol and try again.

USB and SD/MMC operations
Insert SD/MMC card into the card slot. Support MP3 ID3 format music only.
Plug your USB memory driver stick directly or using USB cable.
Then automatically start to play.
CD MULTI SECTION MODE When press AUDIO button for more than 2
seconds, it is activated as selecting mode of these function.
2 sec.
ESP
SEL
SEL
CD MULTI ON/OFF mode is selected by rotary VOL left or right.
CD MULTI ON: Read multi section CD.
CD MULTI OFF: Read first section only.
* IMPORTANT INFORMATION:
BECAUSE OF THE GREAT VARIETY OF PRODUCTS WITH USB,SD AND MMC CARD
PORTS AND THEIR SOMETIMES QUITE MANUFACTURER-SPECIFIC FUNCTIONS WE
CAN NEITHER GUARANTEE THAT ALL DEVICES WILL BE RECOGNIZED NOR THAT
ALL OPERATING OPTIONS THAT ARE POSSIBLE IN THEORY WILL ACTUALLY WORK.
MULTI
VOL
CD MULTI ON/OFF
POWER Use to turn the CD receiver ON or OFF.
AUDIO Turning the VOL knob Right or Left, you can adjust
VOL/BASS/TREB/BAL/FAD. To select other functions, press the AUDIO button
shortly until the desired functions is shown on the display.
VOLUME Use to increase or decrease volume level.
SOURCE Press to choose desired audio source(Radio, CD,
Aux IN, USB, SD/MMC).
TUNE/SEEK and
In Radio mode: press and release to activate
manual seek function. Press and hold to engage
automatic tuning mode.
In CD mode: press and release to advance to next
track or to return to the beginning of the current
track(track number will be displayed).
Press and hold to fast forward or reverse, play will
begin at the point when you release the button.
DISP Selects radio frequency or clock display.
To set the clock:
1. With clock display selected, hold down (DISP)
button until clock display starts flashing.
2. Rotating VOL left to change minutes, VOL right
to change hours.
3. Press (DISP) button to start clock.
AS/PS Use to automatically scan and place six
strong stations into memory.
SHUFFLE Press to play ALL tracks on the CD in random order.
PAUSE Press to pause CD playback. Press again to resume playback.
SCAN Press this button to hear the first several seconds of each track of the disc is
played. Press again to stop intro and listen to track.
REPEAT Press and release to continuously repeat same track. Press again to stop
repeat cycle.
BAND Press this button to select the desired band. Selection is made in regular
sequence as FM1-FM2-FM3-AM1-AM2.
11 12

How to use Bluetooth in your Car Audio
1. You need to connect your mobile phone and car audio by pairing.
A. Press (+) button in Bluetooth Remote Box longer than 6 seconds.
The LED in Remote Box will blink fast. This mode is Pairing mode
stage. Note: To deactivate Pairing, Press (+) again longer than 3
seconds. LED will stop blinking.
B. Turn on the Bluetooth connection of the mobile phone. Perform Add
Bluetooth device. The mobile will search for any Bluetooth devices
within the range. Select “NAME_HF” and enter Passkey: “0000” to
connect to the car audio. (Please refer to the instruction manual of
your mobile phone for Bluetooth Pairing. Your mobile phone should
have Bluetooth function otherwise can not do the pairing).
TALK
MIC
2. After successful pairing, the LED in Bluetooth Remote will blink 1-2
times every 4 sec. This unit is in active mode waiting for incoming call.
3. You can hear ring tone from the car’s speaker if there’s an incoming call. Press TALK button
once to receive call. Press TALK button longer than 2 seconds will disconnect the call.
4. You can talk through Bluetooth Remote Mic and listen through car’s speaker and not through
your mobile. When talking, the LED in Bluetooth Remote is always on. You can adjust
speaker’s volume level using VOL +/- button.
5. To hang up, press TALK button once. Unit switch back to active mode again.
6. In active mode, press TALK button twice will redial last outgoing called number.
Here is a listing of current Bluetooth Mobile phones:
13 14

87.5 to 107.9 MHz
AM
530-1710KHz
450 KHZ
35dB VUsable Sensitivity
178(W) x 159(D) x 51(H) mm
Instructions on environment protectionDo not dispose of this product in the usual household
garbage at the end of its life-cycle; hand it over at a collection point for the recycling of electrical
and electronic appliances. The symbol on the product, the instructions for use or the packing will
inform about the methods for disposal.The materials are recyclable as mentioned in this marking.
By recycling, material re-cycling or other forms of reutilization of old appliances, you are making an
important contribution to protect our environment.
Please inquire at the community administration for the authorized disposal location.
15
 Loading...