

Page 1
SIP Internet
Telephony Gateway
VIP - 2 / 4 / 8 / 16 / 24 Series
Peer-to-Peer Quick Configuration for VIP-450
www.planet.com.tw
Copyright © PLANET Technology Corporation. Al l rights reserved.
Page 2
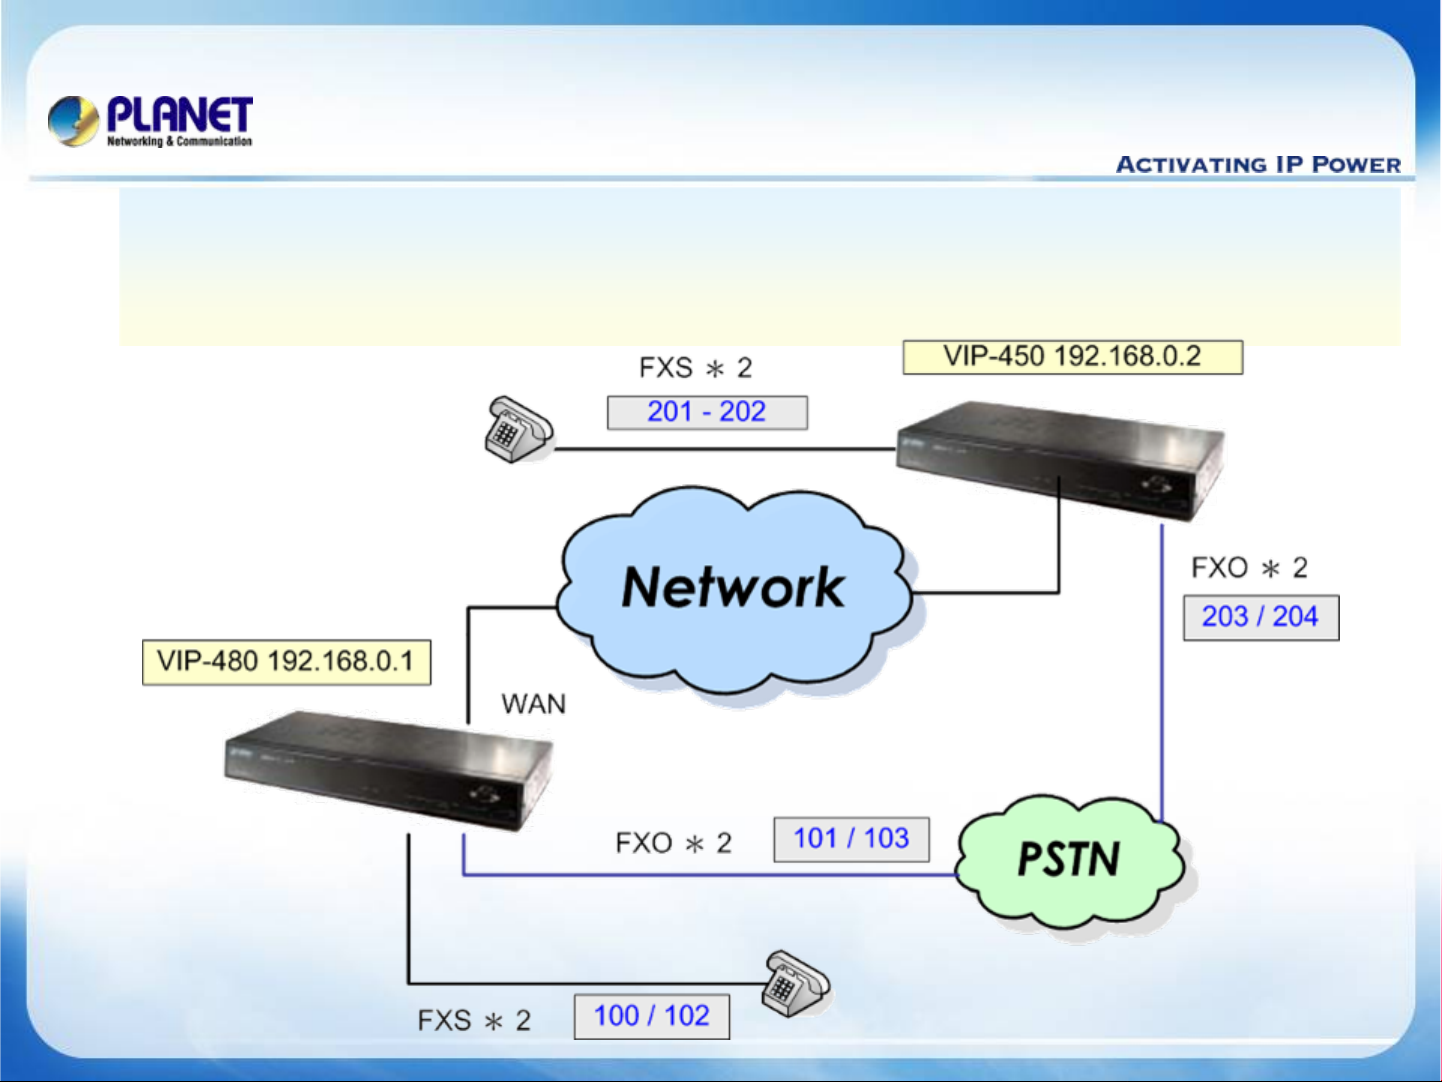
Scenarios explain: Peer-to-Peer Mode
We're using VIP-480 and VIP-450 to perform the calling party.
Please refer to the following descriptions and insert proper parameters
configurations into the each device for establish the voice communications.
www.planet.com.tw
2/ 13
Page 3
VoIP Gateway Quick Configuration
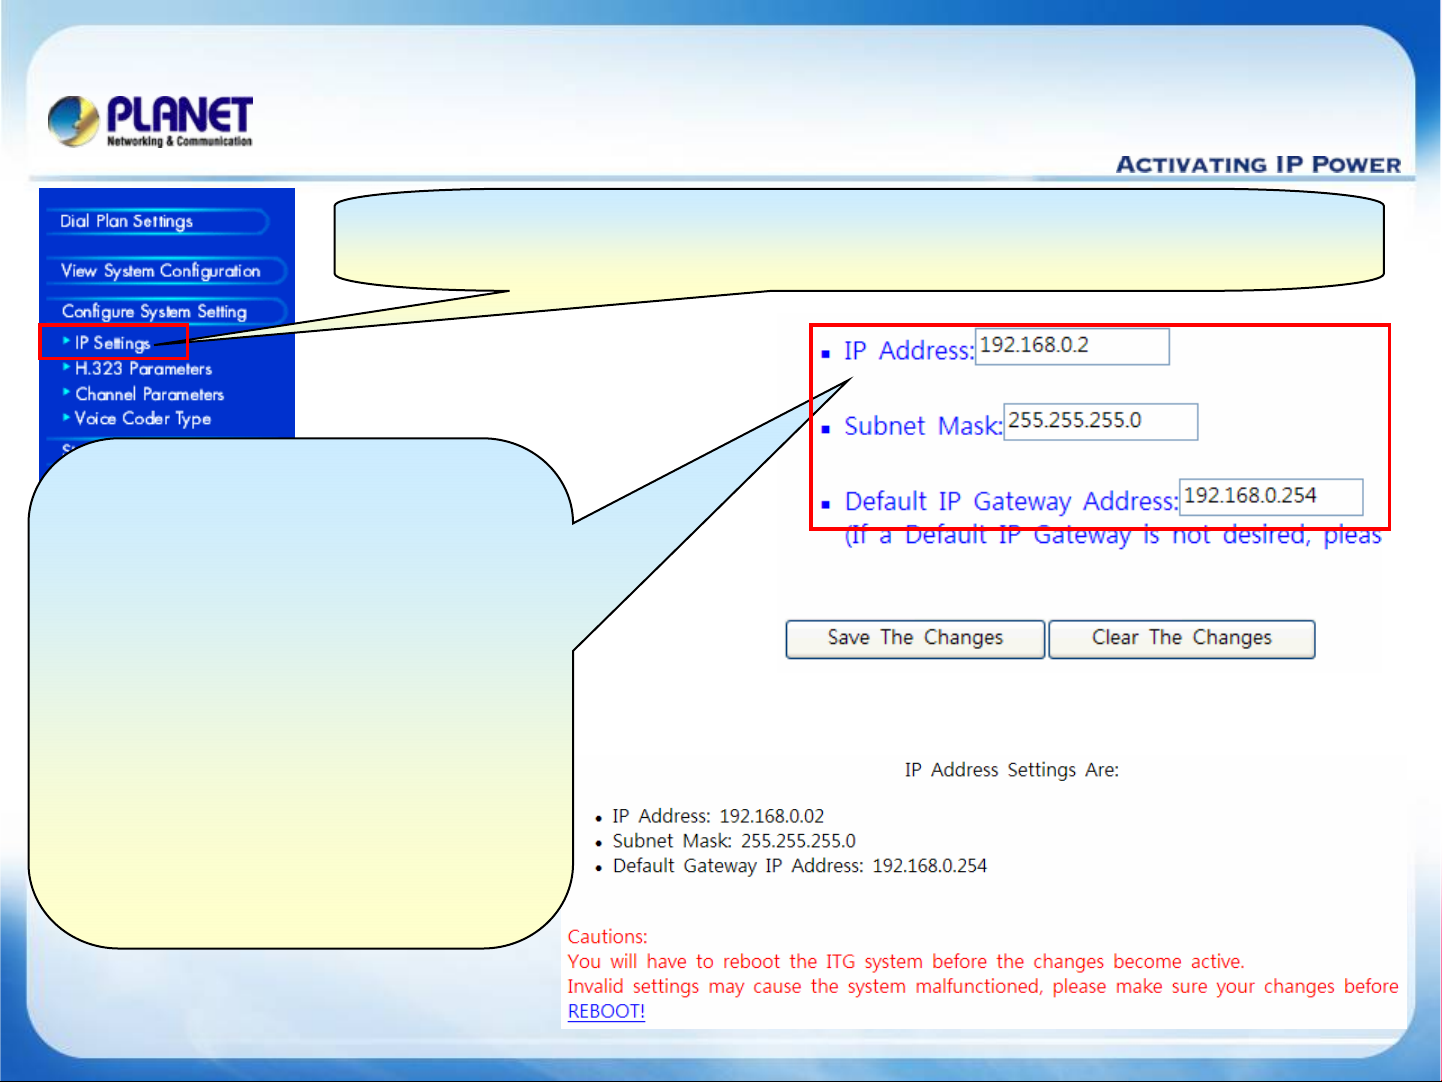
VoIP Gateway Quick Configuration
Select the [
Select the [
IP address for the gateway.
IP address for the gateway.
1
1
fill in a ipip
fill in a
IP Address :
IP Address :
Subnet Mask :
Subnet Mask :
Default IP gateway Address :
Default IP gateway Address :
192.168.0.254
192.168.0.254
Remember click
Remember click
Changes
Changes
parameters, it will be display red
parameters, it will be display red
address into field each.
address into field each.
192.168.0.2
192.168.0.2
255.255.255.0
255.255.255.0
Save The
Save The
button after modify the
button after modify the
Configure System Setting > IP Settings
Configure System Setting > IP Settings
] of
] of
VIP--
VIP
400
400
2
2
to
to
warning messages ,and then
warning messages ,and then
click
click
the IP address.
the IP address.
www.planet.com.tw
REBOOT
REBOOT
given into effect to
given into effect to
3/ 13
Page 4
VoIP Gateway Quick Configuration
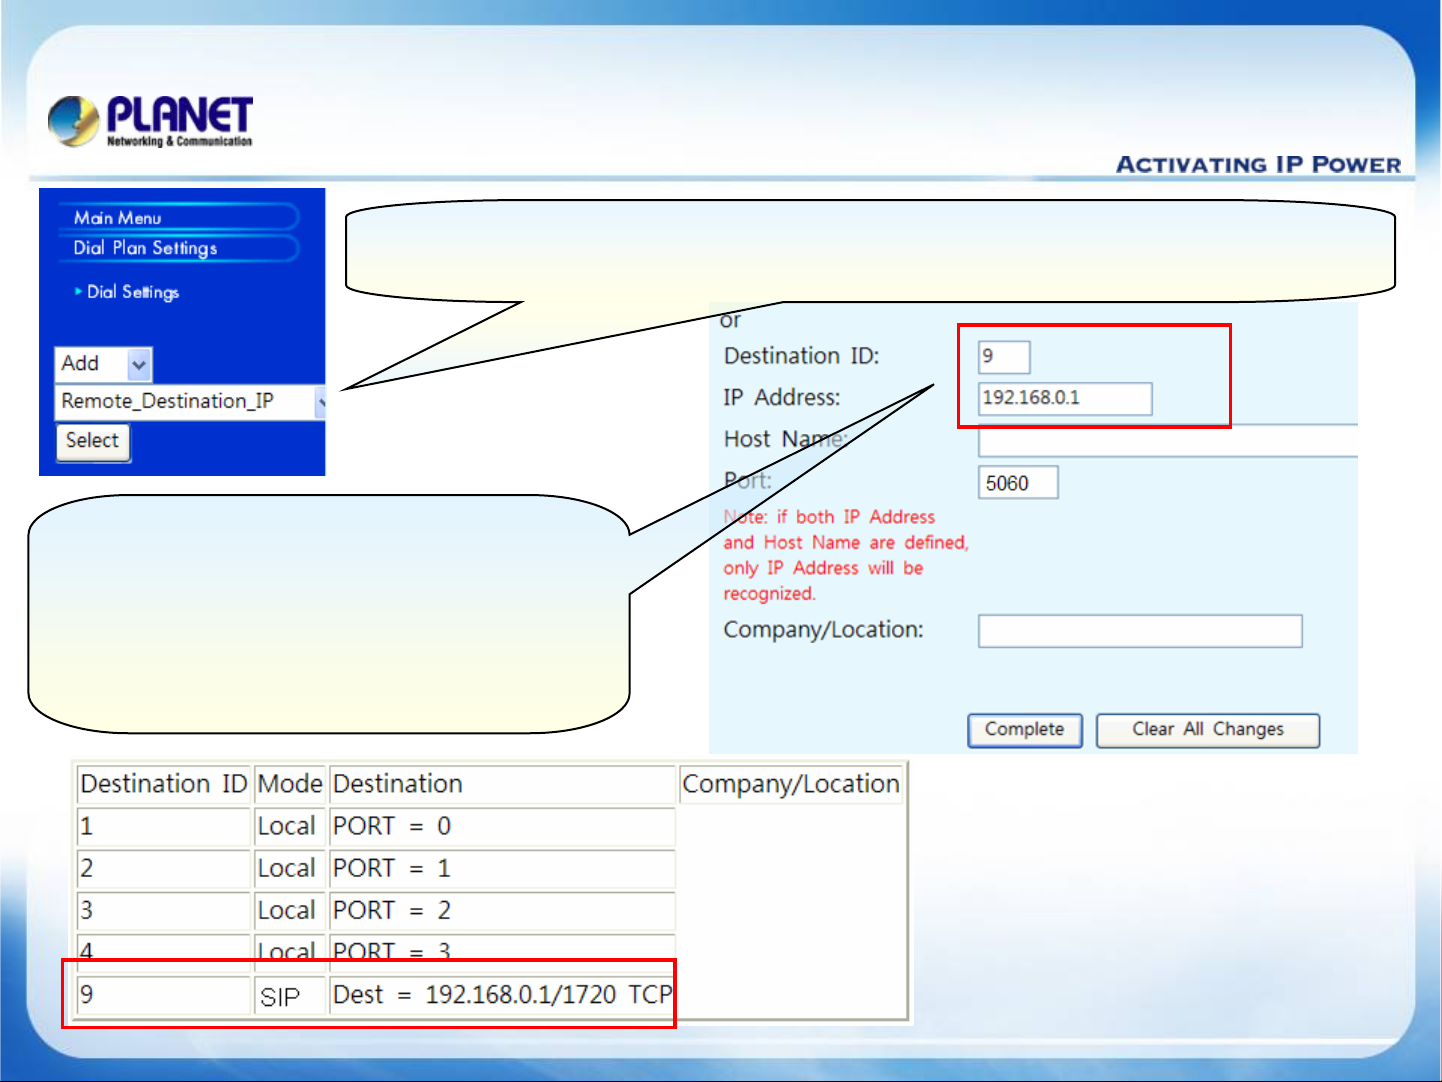
VoIP Gateway Quick Configuration
Select the [
Select the [
Gateway
Gateway
3
3
Add the remote gateway of
Add the remote gateway of
Destination ID : 99
Destination ID :
IP Address :
IP Address :
Port:
Port:
1720
1720
192.168.0.1
192.168.0.1
VIP--
VIP
Dial Plan Settings >
Dial Plan Settings >
to add remote host name for the gateway.
to add remote host name for the gateway.
000
000
Remote_Destination_IP
Remote_Destination_IP
4
4
] of
] of
www.planet.com.tw
4/ 13
Page 5
VoIP Gateway Quick Configuration
VoIP Gateway Quick Configuration
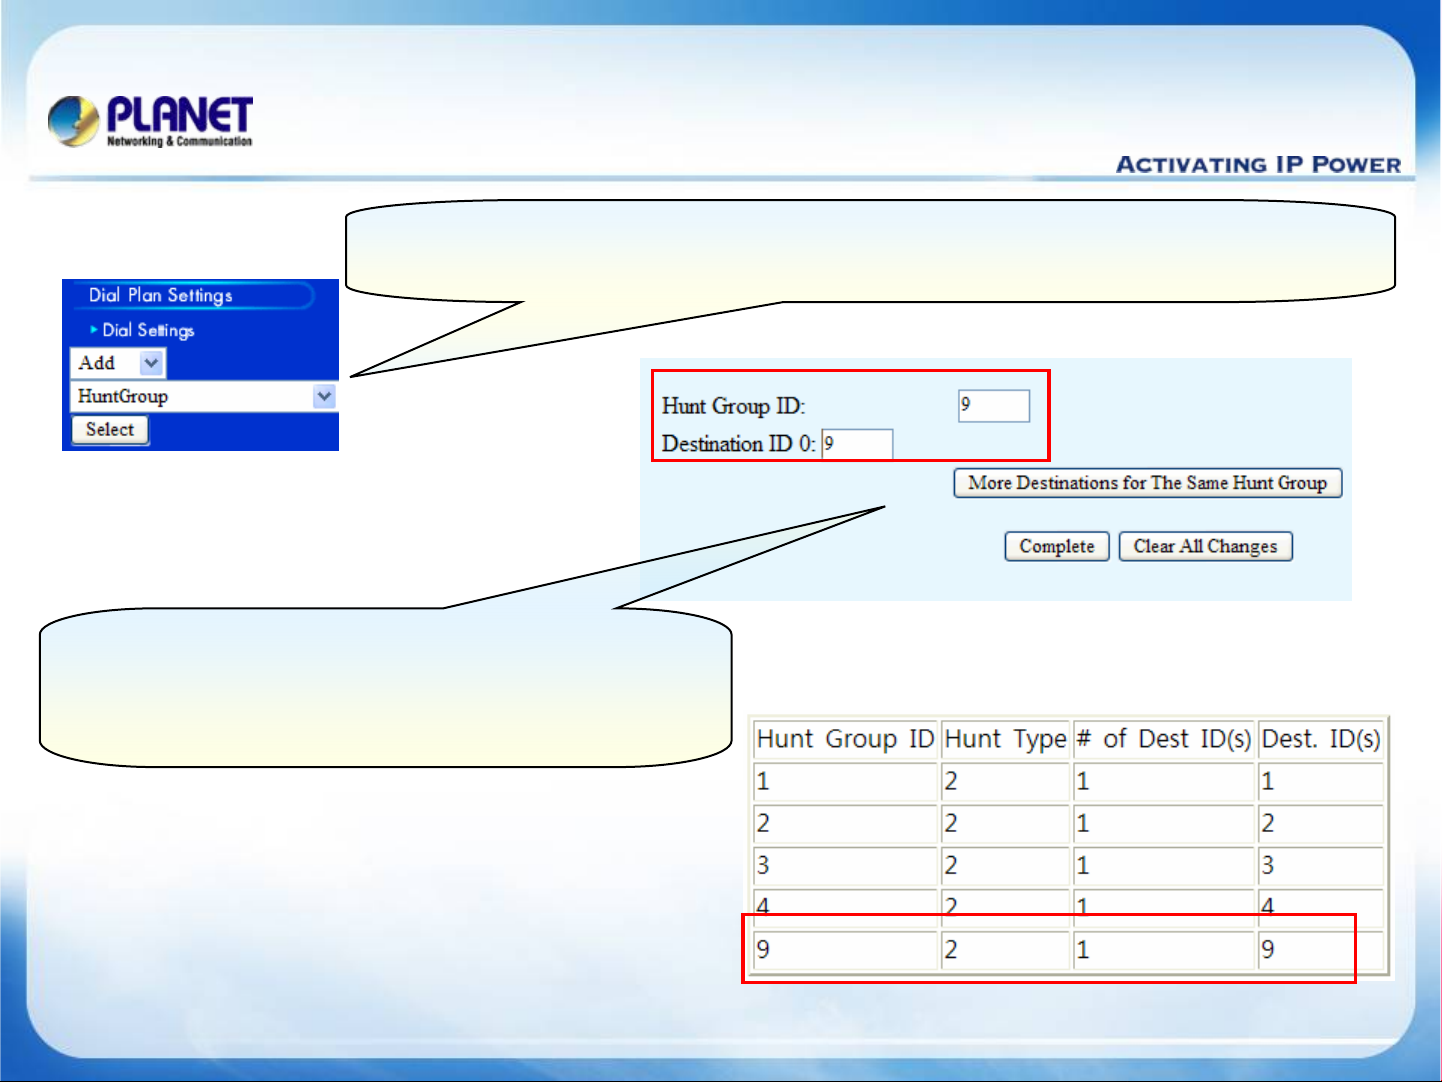
Add the hunt group of
Add the hunt group of
Hunt Group ID : 99
Hunt Group ID :
Destination ID 0: 99
Destination ID 0:
Select the [
Select the [
hunt group for remote host.
hunt group for remote host.
5
5
VIP--
VIP
400
400
Dial Plan Settings >
Dial Plan Settings >
HuntGroup
HuntGroup
6
6
] of
Gateway
] of
Gateway
to add
to add
www.planet.com.tw
5/ 13
Page 6
VoIP Gateway Quick Configuration
VoIP Gateway Quick Configuration
Select the [
Select the [
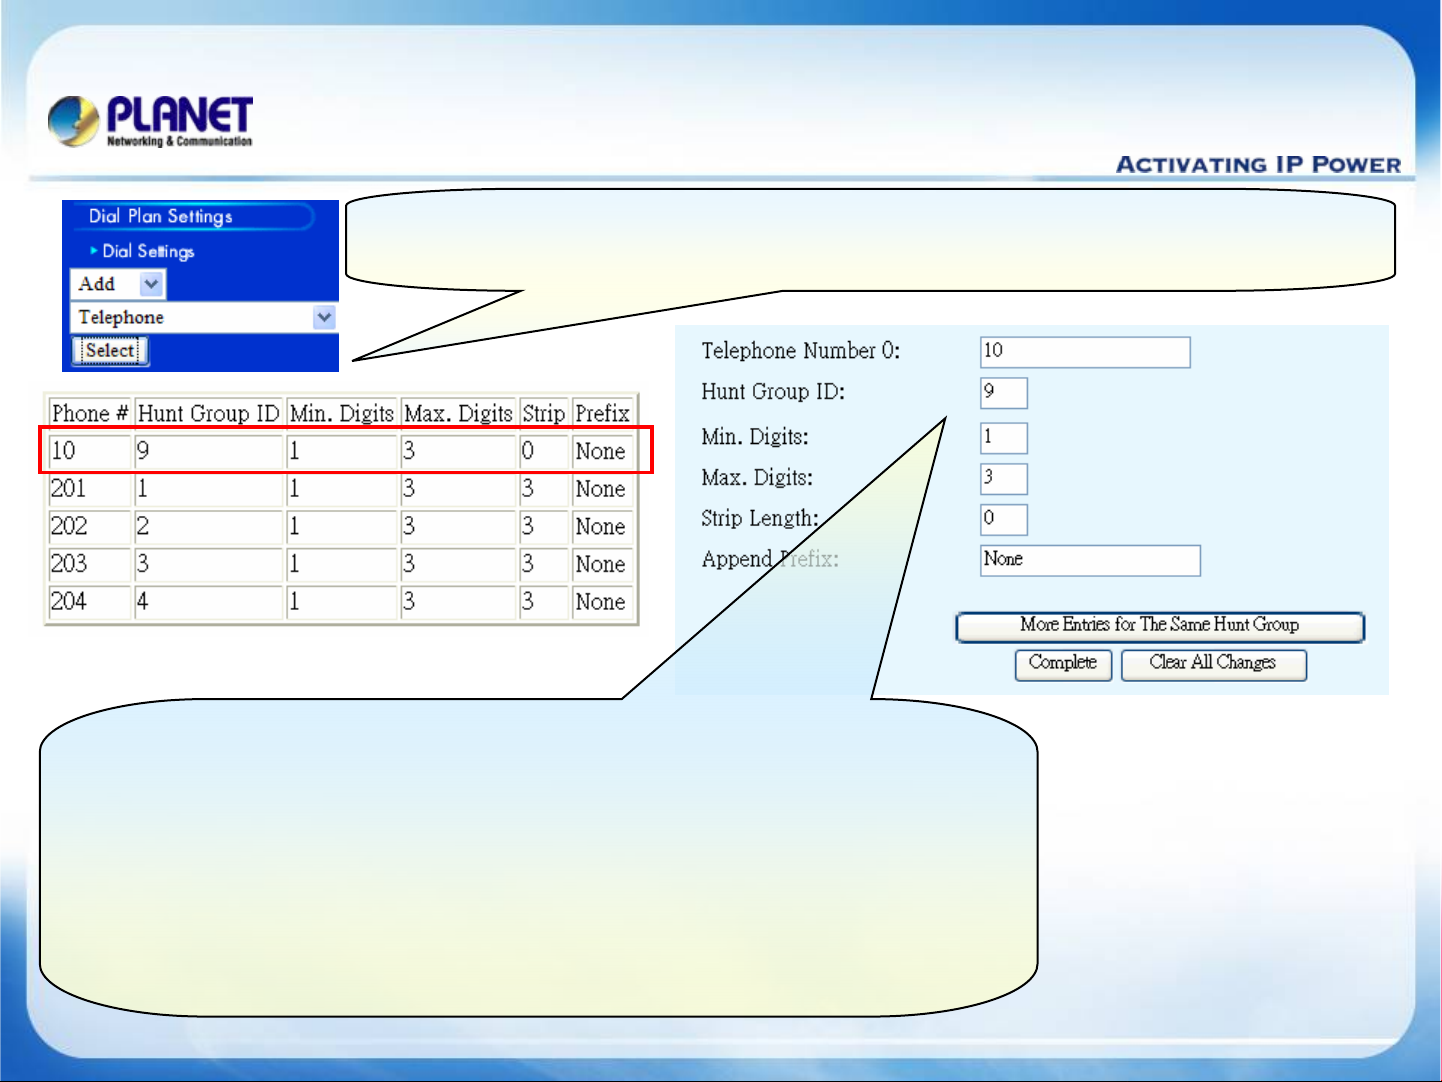
telephone number for the gateway.
telephone number for the gateway.
Add the Telephone Number of
Add the Telephone Number of
Telephone Number ():1010
Telephone Number ():
Dial Plan Settings > Telephone
Dial Plan Settings > Telephone
7
7
VIP--
VIP
000
000
] of
Gateway
] of
Gateway
to add
to add
8
8
Hunt Group ID : 99
Hunt Group ID :
Min. Digits: 11
Min. Digits:
Max. Digits: 33
Max. Digits:
Strip Length: 00
Strip Length:
Append Prefix:
Append Prefix:
www.planet.com.tw
None..
None
6/ 13
Page 7
VoIP Gateway Quick Configuration
VoIP Gateway Quick Configuration
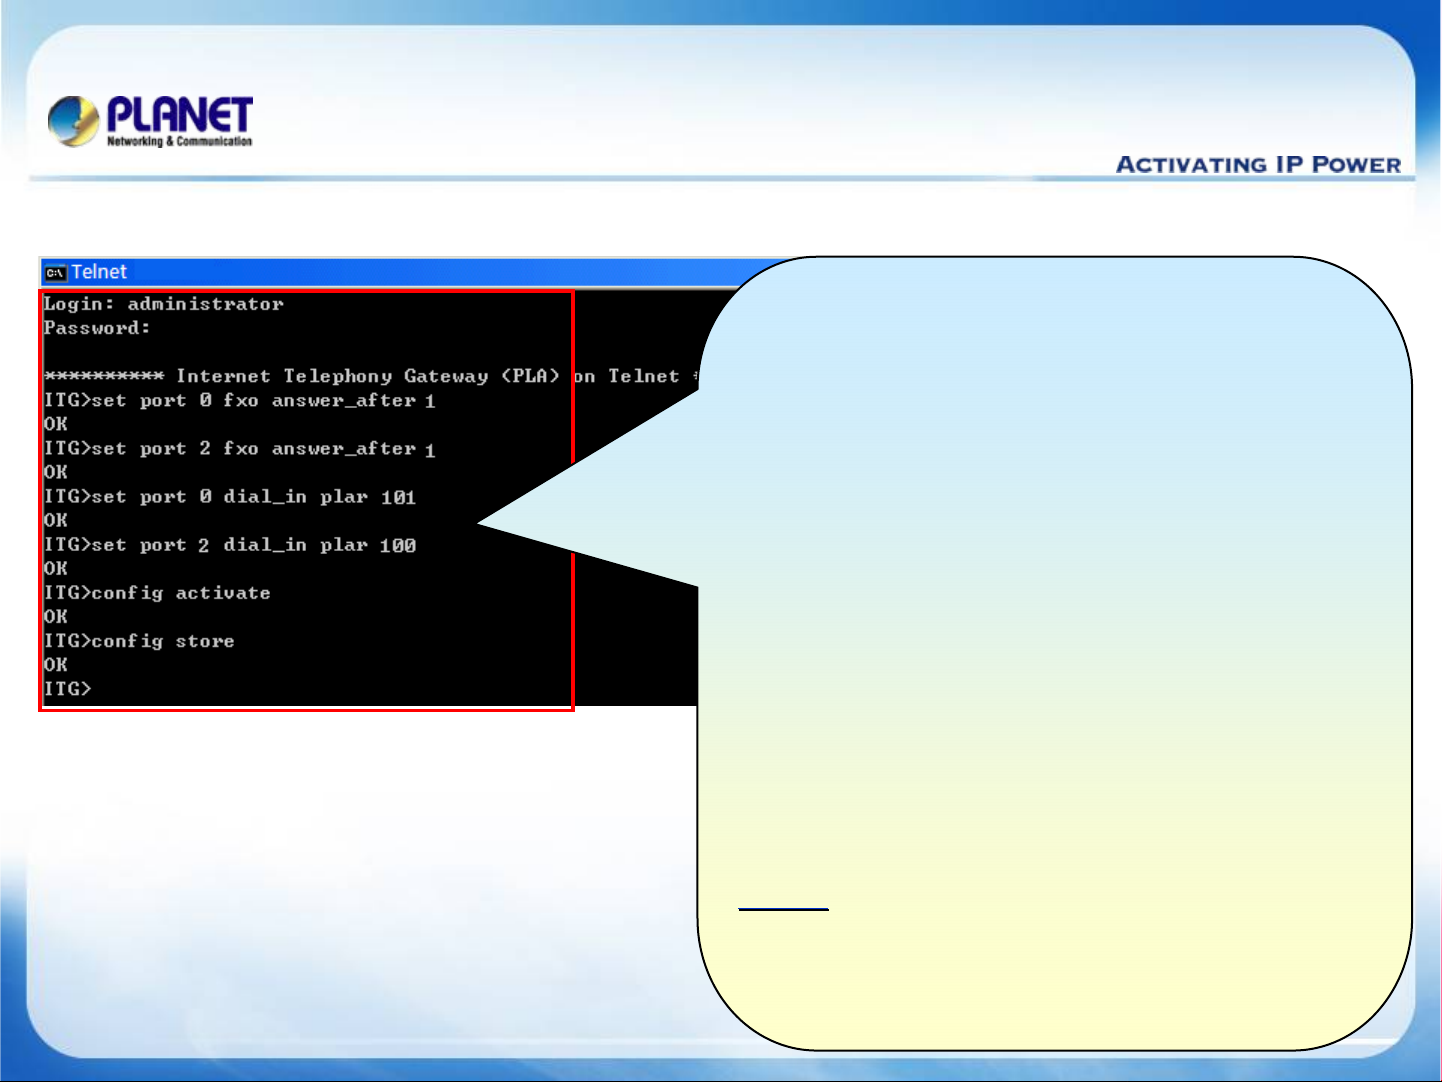
Please using telnet to setting the Port
Please using telnet to setting the Port
1 / 3 auto answer and hotline number
1 / 3 auto answer and hotline number
VIP-450
9
9
ITG>
ITG>
ITG>
ITG>
ITG>
ITG>
ITG>
ITG>
ITG>
ITG>
ITG>
ITG>
Note:
Note:
activate (Enable the modification)
activate (Enable the modification)
store (Save the modification)
store (Save the modification)
set port 0
set port 0
set port 2
set port 2
set port 0
set port 0
set port 2
set port 2
config
config
config
config
activate
activate
store
store
fxo
fxo
fxo
fxo
dial_in
dial_in
dial_in
dial_in
answer_after 11
answer_after
answer_after 11
answer_after
plar
plar
plar
plar
101
101
100
100
www.planet.com.tw
7/ 13
Page 8
VoIP Gateway Quick Configuration
VoIP Gateway Quick Configuration
Select the [
Select the [
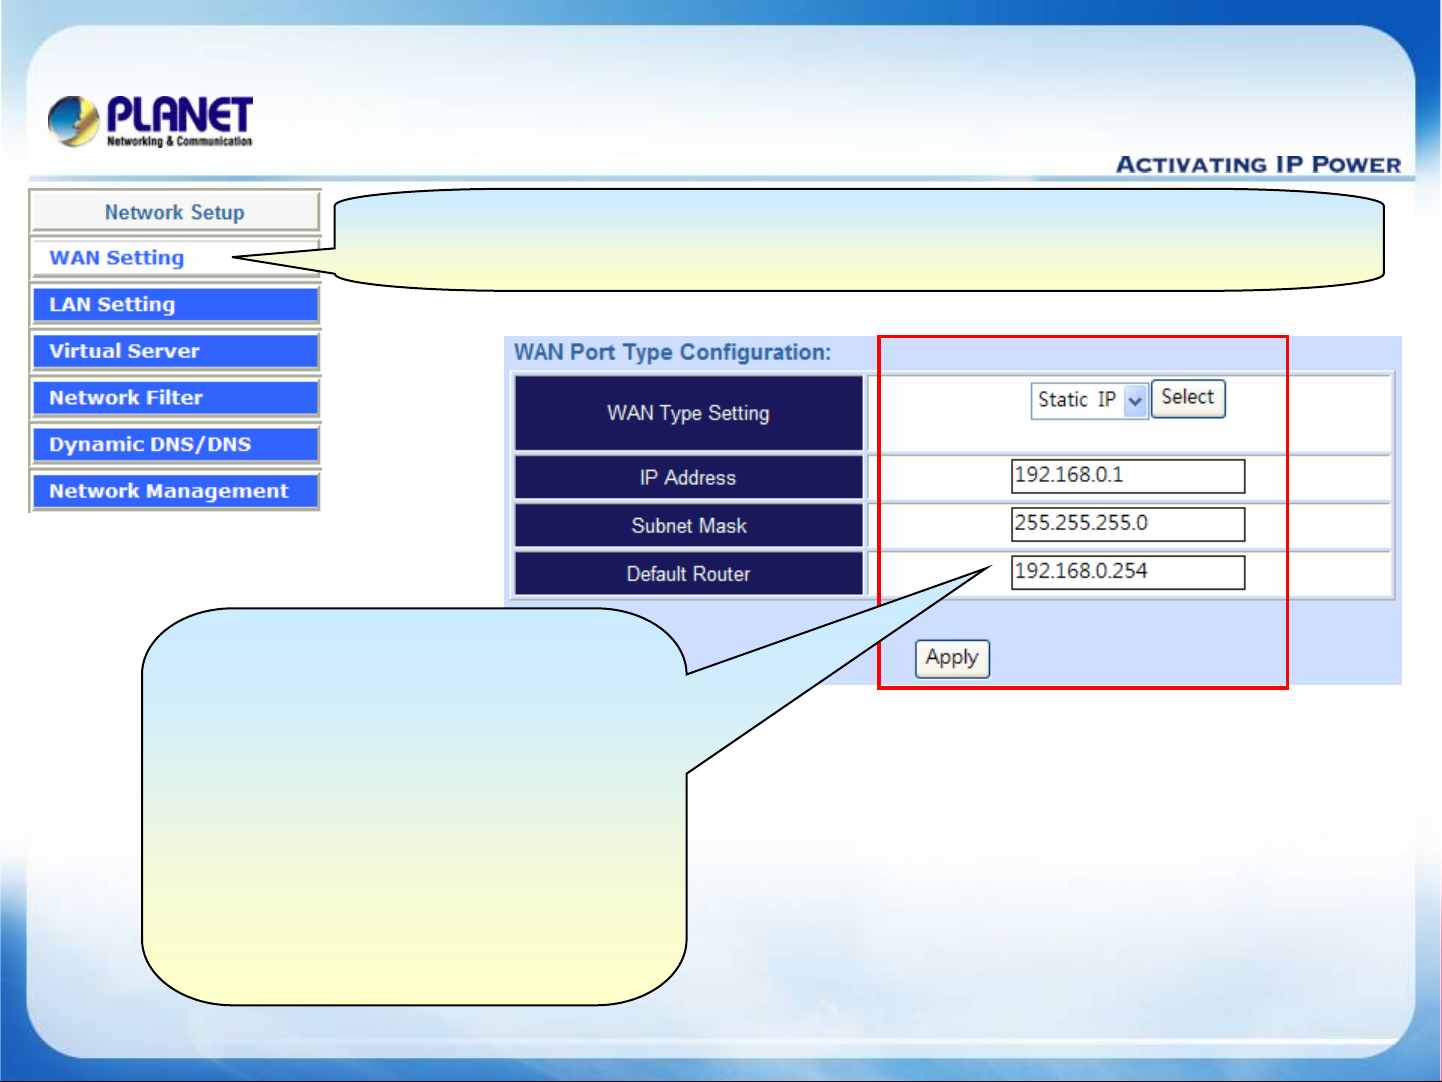
address for the gateway.
address for the gateway.
10
10
Please fill in a ipip
Please fill in a
field each.
field each.
WAN Type Setting :
WAN Type Setting :
IP Address :
IP Address :
address into
address into
192.168.0.1
192.168.0.1
Network Setup > WAN Setting
Network Setup > WAN Setting
Static IP
Static IP
11
11
] of
] of
VIP--
VIP
480
480
to IP
to IP
Subnet Mask :
Subnet Mask :
Default Router :
Default Router :
Remember click
Remember click
after modify the parameters.
after modify the parameters.
www.planet.com.tw
255.255.255.0
255.255.255.0
192.168.0.254
192.168.0.254
Apply
Apply
button
button
8/ 13
Page 9
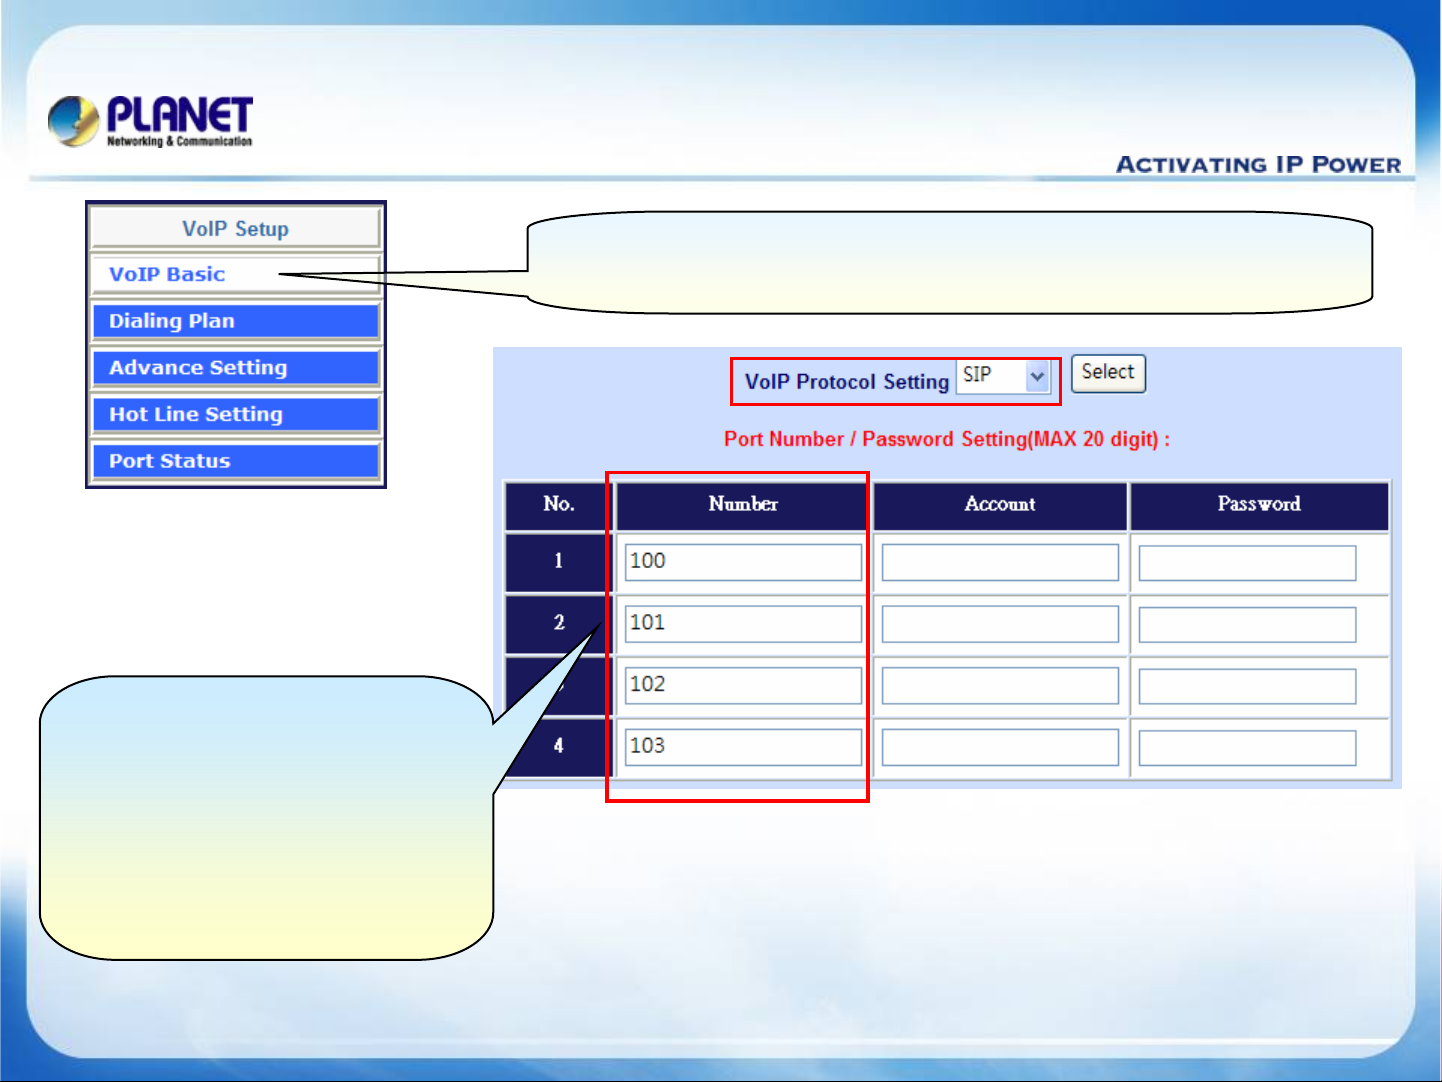
VoIP Gateway Quick Configuration
VoIP Gateway Quick Configuration
Use default port number
Use default port number
VoIP Protocol Setting:
VoIP Protocol Setting:
Port 1
Port 1
100
100
SIP
SIP
12
12
Select the [
Select the [
set up the Port Number
set up the Port Number
Advance--
Advance
>VoIP Basic
>VoIP Basic
Gateway
] of
] of
Gateway
13
13
to
to
Port 22
Port
Port 3
Port 3
Port 4
Port 4
www.planet.com.tw
101
101
102
102
103
103
9/ 13
Page 10
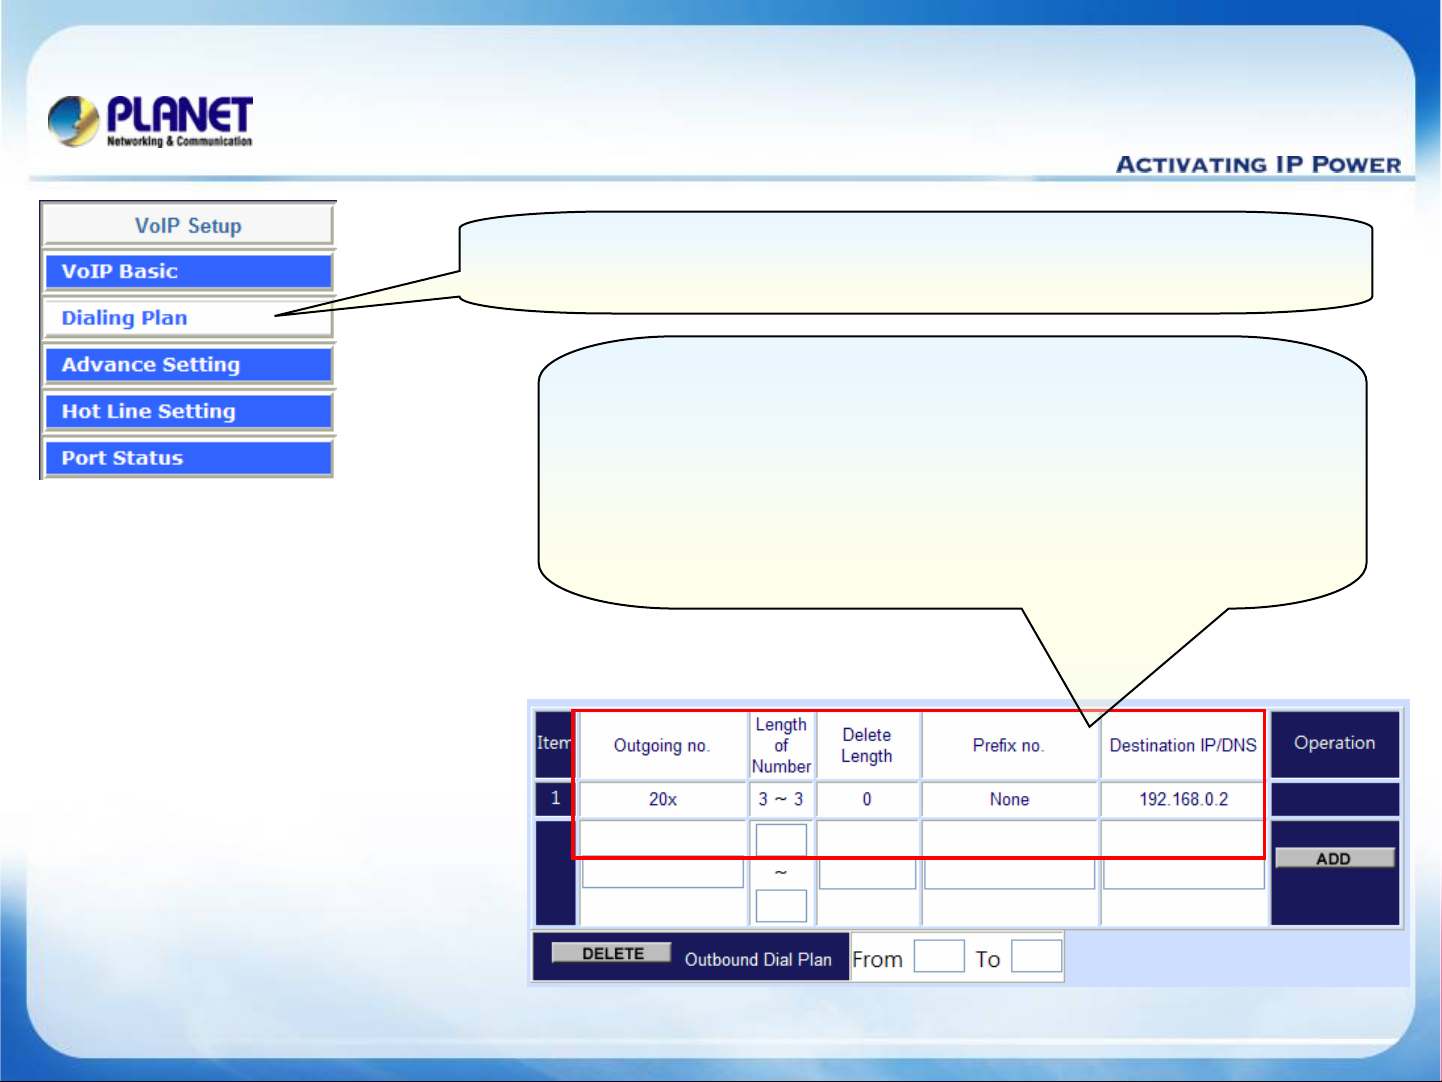
VoIP Gateway Quick Configuration
VoIP Gateway Quick Configuration
14
14
Select the [
Select the [
the outgoing dial plan for gateway call to IP phone used.
the outgoing dial plan for gateway call to IP phone used.
Outgoing no:
Outgoing no:
Length of Number:
Length of Number:
(The Number max/min allowed length you can dial )
(The Number max/min allowed length you can dial )
Destination IP/DNS:
Destination IP/DNS:
(phone IP address )
(phone IP address )
Advance--
Advance
20x
20x
>Dialing Plan
>Dialing Plan
3 ~ 3
3 ~ 3
192.168.0.2
192.168.0.2
Gateway
] of
] of
Gateway
15
15
to add
to add
www.planet.com.tw
10 / 13
Page 11
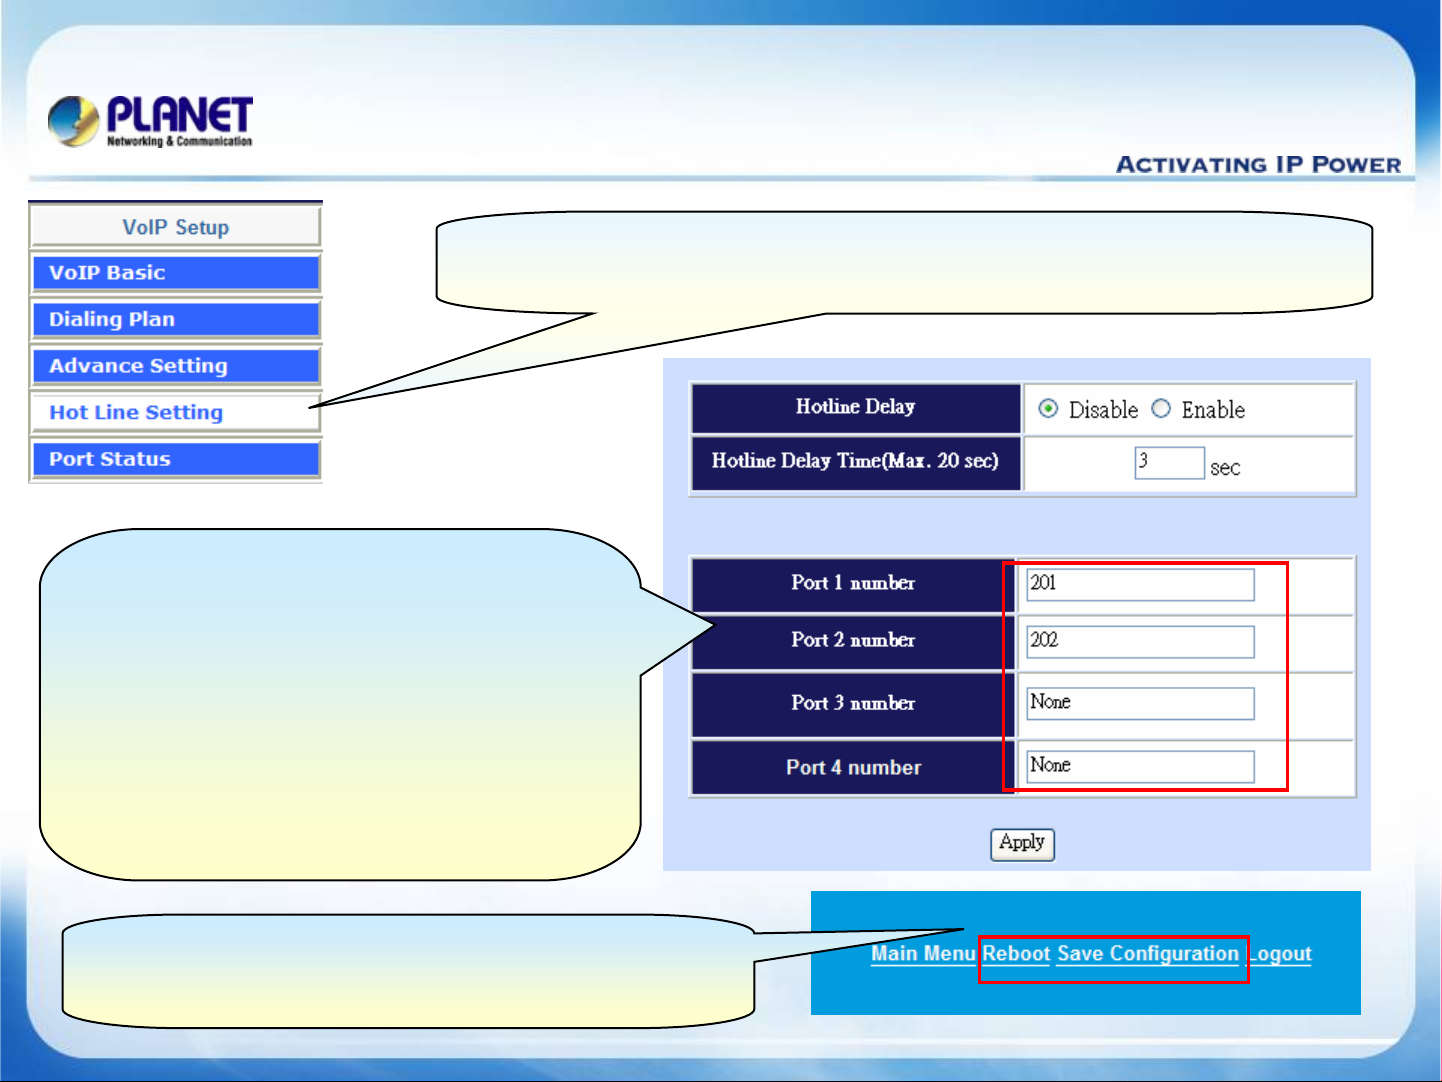
VoIP Gateway Quick Configuration
VoIP Gateway Quick Configuration
Select the [
Select the [
16
16
Hot Line Number Setting:
Hot Line Number Setting:
Port 1 number :
Port 1 number :
Port 2 number :
Port 2 number :
When an incoming call into the FXO
When an incoming call into the FXO
or pick up the telephone handset
or pick up the telephone handset
(FXS), it should be dialing to the
(FXS), it should be dialing to the
201
201
202
202
up the hot line number.
up the hot line number.
17
17
Advance--
Advance
>Hot Line Setting
>Hot Line Setting
] of
Gateway
] of
Gateway
to set
to set
setting number automatically.
setting number automatically.
Click the [
Click the [
save configuration and [
save configuration and [
www.planet.com.tw
Save Configuration
Save Configuration
Reboot]
Reboot]
] button to
] button to
System.
System.
18
18
11 / 13
Page 12
VoIP Gateway Quick Configuration
VoIP Gateway Quick Configuration
For example:
1. From VIP-480 FXS make call to remote VIP-450 FXS
Step 1. Please pick up the telephone handset when listen a dial-tone.
Step 2. Please input a number 201, 202
Step 3. And then the other side analog telephone should be ring at this time.
Step 4. it begin establish voice communication after pick up the handset.
Note :
If want to connected remote PSTN, please dialed 203 or 204, your should be get a dialtone from remote VIP-450 FXO port.
2. From VIP-480 FXS make phone call via Hot-line
Step 1. You only pick up the telephone handset, that should be dialed automatically.
Step 2. And then the other side analog telephone should be ring at this time.
Step 3. Wait the other side pick up the handset to establish voice communication begin.
Note :
Assume you assign a hotline number for FXO of VIP-480, that should be auto answer and
dialing to this number automatically when an incoming calls into the FXO interface.
www.planet.com.tw
12 / 13
Page 13
VoIP Gateway Quick Configuration
VoIP Gateway Quick Configuration
For example:
3. From VIP-450 FXS make call to remote VIP-480
Step 1. Please pick up the telephone handset when listen a dial-tone.
Step 2. Please input a number 100 or 102
Step 3. And then the other side analog telephone should be ring at this time.
Step 4. it begin establish voice communication after pick up the handset.
Note :
1) If wan to connected remote PSTN (VIP-480), please dialed 101 or 103, that should be
get a dial-tone from remote PSTN.
2) The Hot-Line dialing method of VIP-450 (Port 1, 3) please refer to the same step of
VIP-480 previously.
3) The mentioned parameters and network settings in this sample be carefully modified to
meet the real-world applications.
www.planet.com.tw
13 / 13
Page 14

www.planet.com.tw
 Loading...