

Page 1

SIP-50 SIP Proxy Server User’s Manual
SIP Proxy Server
SIP-50
User’s Manual
Page 2

SIP-50 SIP Proxy Server User’s Manual
Copyright
Copyright (C) 2005 PLANET Technology Corp. All rights reserved.
The products and programs described in this User’s Manual are licensed products of PLANET Technology, This User’s
Manual contains proprietary information protected by copyright, and this User’s Manual and all accompanying hardware,
software, and documentation are copyrighted.
No part of this User’s Manual may be copied, photocopied, reproduced, translated, or reduced to any electronic medium
or machine-readable form by any means by electronic or mechanical. Including photocopying, recording, or information
storage and retrieval systems, for any purpose other than the purchaser's personal use, and without the prior express
written permission of PLANET Technology.
Disclaimer
PLANET Technology does not warrant that the hardware will work properly in all environments and applications, and
makes no warranty and representation, either implied or expressed, with respect to the quality, performance,
merchantability, or fitness for a particular purpose.
PLANET has made every effort to ensure that this User’s Manual is accurate; PLANET disclaims liability for any
inaccuracies or omissions that may have occurred.
Information in this User’s Manual is subject to change without notice and does not represent a commitment on the part of
PLANET. PLANET assumes no responsibility for any inaccuracies that may be contained in this User’s Manual. PLANET
makes no commitment to update or keep current the information in this User’s Manual, and reserves the right to make
improvements to this User’s Manual and/or to the products described in this User’s Manual, at any time without notice.
If you find information in this manual that is incorrect, misleading, or incomplete, we would appreciate your comments and
suggestions.
CE mark Warning
This is a class A device, In a domestic environment, this product may cause radio interference, in which case the user may
be required to take adequate measures.
Trademarks
The PLANET logo is a trademark of PLANET Technology.
This documentation may refer to numerous hardware and software products by their trade names. In most, if not all cases,
these designations are claimed as trademarks or registered trademarks by their respective companies.
Customer Service
For information on customer service and support for the SIP Proxy Server, please refer to the following Website URL:
http://
www.planet.com.tw
Before contacting customer service, please take a moment to gather the following information:
♦ SIP Proxy Server serial number and MAC address
♦ Any error messages that displayed when the problem occurred
♦ Any software running when the problem occurred
♦ Steps you took to resolve the problem on your own
Revision
User’s Manual for PLANET SIP Proxy Server
Model: SIP-50
Rev: 1.0 (May, 2005)
Part No. EM-SIP50V1
Page 3

SIP-50 SIP Proxy Server User’s Manual
Table of Contents
CHAPTER 1:INTRODUCTION ....................................................................................................................... 1
1.1 FEATURES................................................................................................................................................. 1
1.2 PACKAGE CONTENTS ................................................................................................................................. 1
1.3 SIP PROXY SERVER FRONT VIEW .............................................................................................................. 2
1.4 SIP PROXY SERVER REAR PANEL .............................................................................................................. 3
1.5 SPECIFICATION .......................................................................................................................................... 4
CHAPTER 2:HARDWARE INSTALLATION .................................................................................................. 5
2.1 INSTALLATION REQUIREMENTS ................................................................................................................... 5
INSTALL SIP PROXY SERVER TO YOUR NETWORK................................................................................... 6
CHAPTER 3:GETTING STARTED.................................................................................................................7
3.1 INITIAL SETUP BY LCD PANEL .................................................................................................................... 7
3.2 LOGGING IN AS ADMINISTRATOR.................................................................................................................. 7
CHAPTER 4:WEB CONFIGURATION ........................................................................................................... 9
4.1 SYSTEM SETTINGS .................................................................................................................................... 9
4.1.1 Information ....................................................................................................................................... 9
4.1.2 Network.......................................................................................................................................... 10
4.1.3 Date/Time....................................................................................................................................... 10
4.1.4 Config..............................................................................................................................................11
4.1.7 Prefix Route ....................................................................................................................................11
4.1.8 Authorization .................................................................................................................................. 12
4.1.8 SNMP............................................................................................................................................. 13
4.1.9 Backup/Restore ............................................................................................................................. 13
4.1.10 Firmware Upgrade ....................................................................................................................... 15
4.1.11 Account......................................................................................................................................... 15
4.1.12 Reboot.......................................................................................................................................... 16
4.1.13 Logout .......................................................................................................................................... 16
4.2 SUBSCRIBER ........................................................................................................................................... 17
4.2.1 List.................................................................................................................................................. 17
4.2.2 Phone Status.................................................................................................................................. 19
4.2.3 Phone Call Status .......................................................................................................................... 19
4.2.4 Export / Import ............................................................................................................................... 20
4.2.5 Export CDR.................................................................................................................................... 20
4.2.6 Daily CDR ...................................................................................................................................... 22
Page 4

SIP-50 SIP Proxy Server User’s Manual
Chapter 1:Introduction
The PLANET SIP Proxy Server is a call-control platform with IETF Standard Protocol SIP. It enables company
to build scalable, reliable packet-voice networks. Deployed at the heart of a SIP network, the SIP Proxy server
can act as a stand-alone registrar server or a redirect server. The proxy server optimizes the productivity of
any SIP network by efficiently routing calls between application servers, voice gateways and IP endpoints.
The SIP-50 will automatic NAT transversal for signaling and voice stream. User can setup the VoIP gateway
or IP Phone in a private network easily, without the cumbersome settings of router.
1.1 Features
♦ SIP Proxy Server is RFC 3261 compliant. RFC 3261 is the latest IETF RFC for Session Initiation Protocol
♦ Operates as a stateful proxy or redirect proxy
♦ LCD panel for initial setup and network information display
♦ Remote configuration through standard web browser with SSL security
♦ Supports SNMP to simplify management
♦ Simple backup and restore of configuration files with full SSL protection
♦
1.2 Package Contents
The following items should be included:
♦ SIP Proxy Server
♦ Power Cord
♦ Quick Installation Guide
♦ User’s Manual and utility CD
♦ RJ-45 cable x 1
♦ Console cable x 1
If any of the contents are missing or damaged, please contact your dealer or distributor immediately.
- 1 -
Page 5
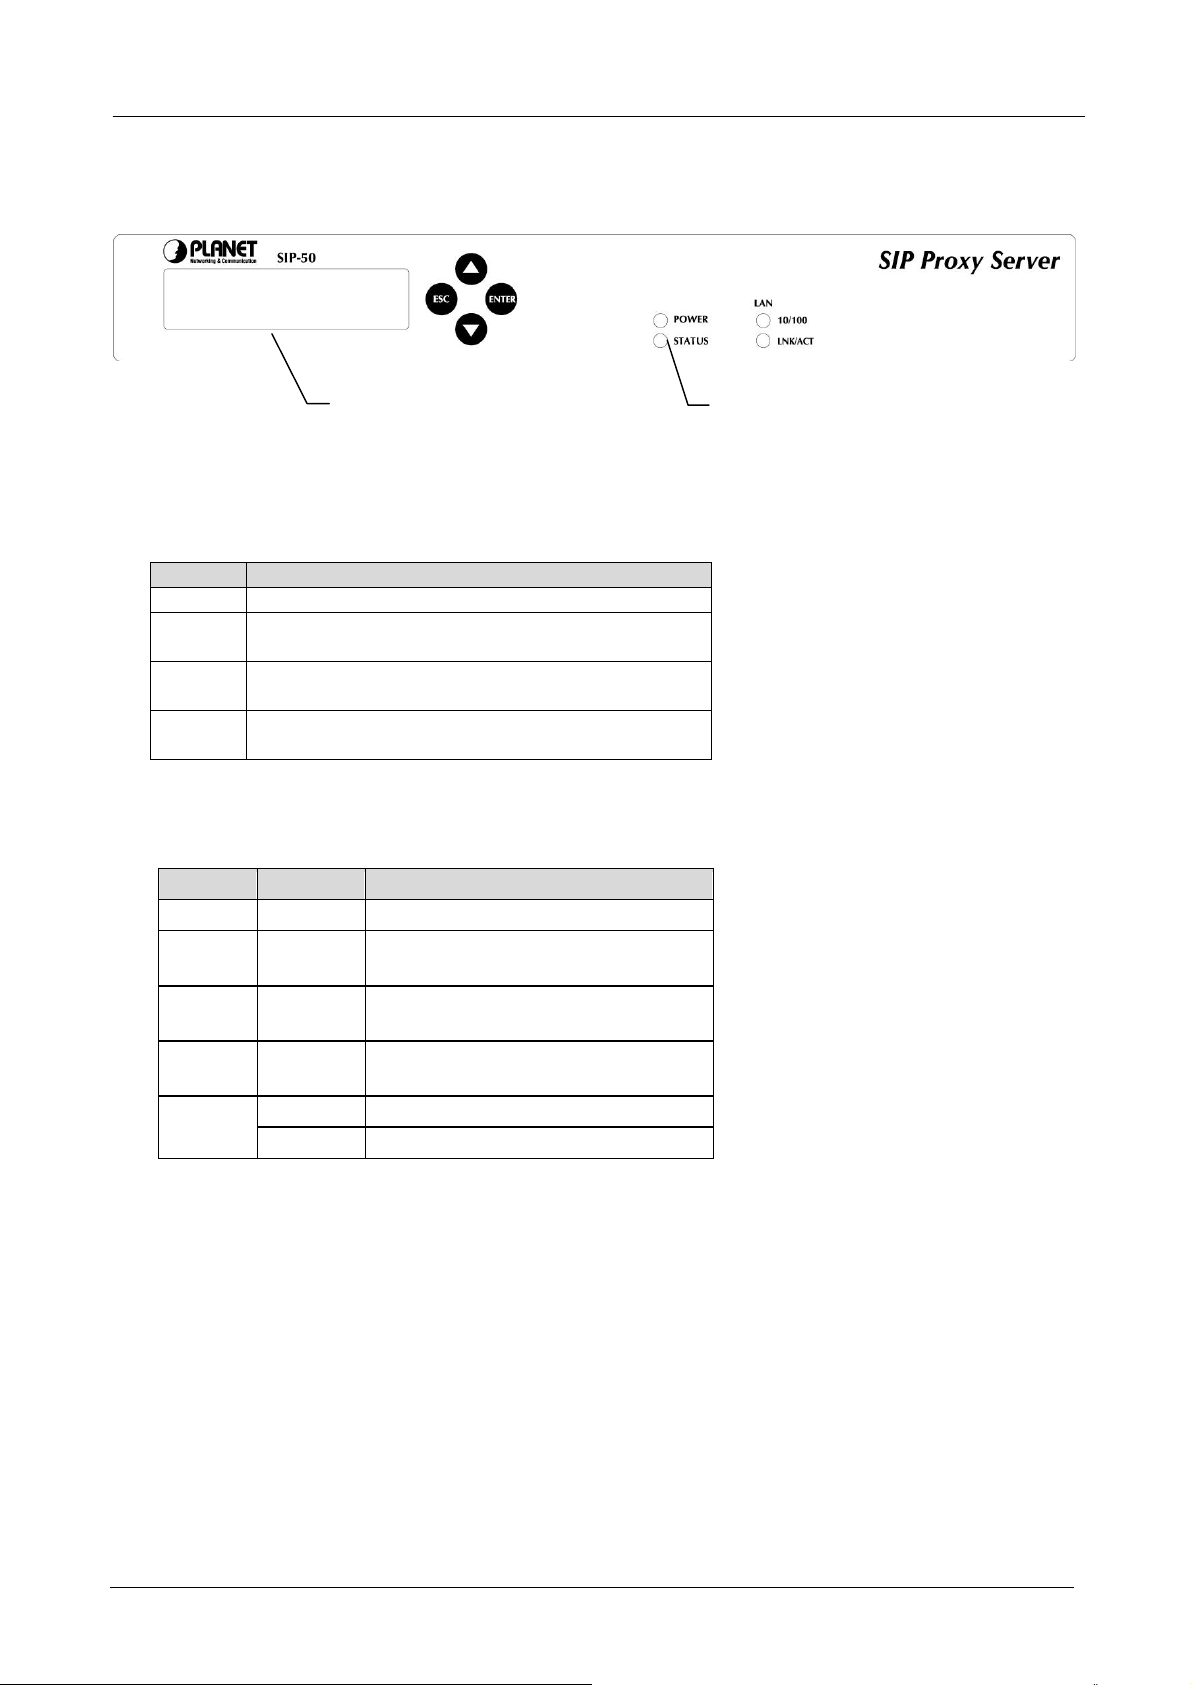
1.3 SIP Proxy Server Front View
- Front View:
SIP-50 SIP Proxy Server User’s Manual
LCD Panel
LED Panel
LCD Panel: Used to make IP settings, view IP settings, reboot system, show service information, reset
password and reset all configuration. It also show the average bandwidth usage for past 10 seconds when not
in configuration mode. Check section “Initial Setup by LCD panel” for detail on IP settings. The following
table shows the button function.
Button Function
(Enter) Used to select or confirm the selection
(ESC) Used to cancel the selection or back to previous
manual
(▲) Change to previous option or increase the number.
Press longer to increase the number by 10.
(▼) Change to next option or decrease the number.
Press longer to decrease the number by 10.
LED Panel: Used to show the system and connection status. The following table show the connection LED
definition.
LED Status Meaning
PWR Lit Green Indicates the device is receiving power
STATUS Lit Red Indicates the device is reading data
from memory
LNK Lit Green Link is established on machine LAN
interface
ACT Blink
Green
Lit Green Indicates the link operate on 100Mbps 100
Off Indicates the link operate on 10Mbps
Packets are transmitting or receiving
on LAN port
- 2 -
Page 6
t
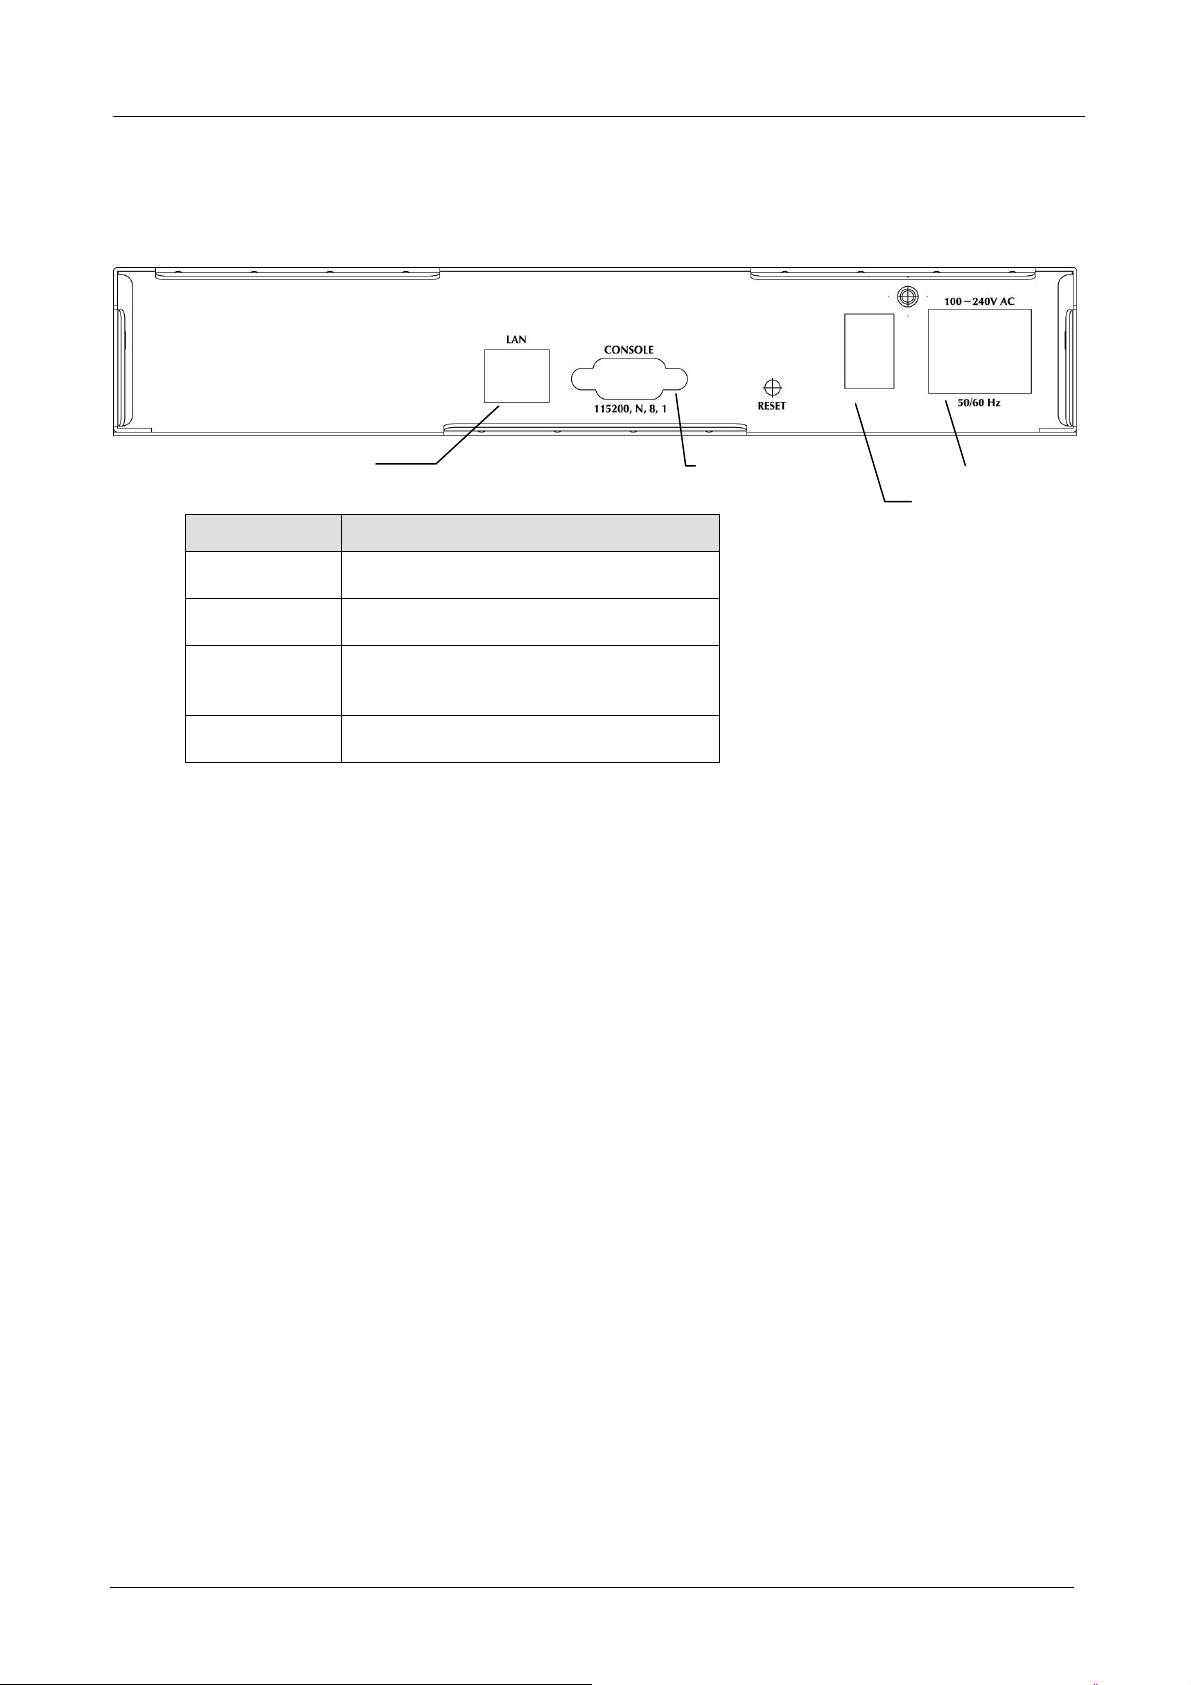
1.4 SIP Proxy Server Rear Panel
- Rear View:
LAN Port
Port Function
Power
On/Off Switch
LAN Port
Console
This is where you will connect the AC
power cord. 100~240VAC is allowed.
You can turn on/off this device by the
switch when the power cord is connected
This is where you will connect the RJ-45
line to your local switch or device. This
port is MDI interface
This port is reserved for manufacturer use
only
SIP-50 SIP Proxy Server User’s Manual
Console Por
Power
On / Off switch
- 3 -
Page 7

1.5 Specification
Product SIP Proxy Server
Model SIP-50
Hardware
Connections 10/100Base-TX
Button Hardware Reset
LCD Panel 16x2 characters LCD
System LED System: PWR, STATUS
Network: ACT, LNK, 100 for LAN ports
Power 100~240 VAC, 50~60Hz
Operating Environment Temperature: 5~40°C
Relative Humidity: 20%~90%
Dimension W x D x H 255 x 271 x 44
Regulatory FCC, CE Mark
Software
Standard Protocol Support
SIP Registrar
SIP Outbound Proxy Server
Telephony Features
NAT Traversal
AAA
Management
Max System Capacity
RFC 3261, RFC 2976, RFC 3263, RFC 2327, RFC 2833,
RFC 3581
SIP Registrar Dynamic Register Registrar
Authentication MD5
Stateful Proxy Server
Support Call-based Authentication MD5
Sequential & Parallel Call Forking
Support Inter-Proxy
Auto NAT User Detect
Call Transfer (client-based), Call Waiting, Call Hold,
3-Way Call Conference
Unconditional, No Answer, Busy
Prefix Route
NAT Traversal Support for Outbound and Inbound
Automatically NAT detection and RTP Proxy
Support NAT Partition
Intelligent RTP Proxy Resource Management
Daily CDR File in Local Storage
CDR auto export to ftp server
Registrar Authentication use external RADIUS Server
Console, SSH, SNMP, LCM and Web-based
Management
Browser-based Real Time Monitor
Password Security
User Account Manager
NTP time synchronization (SNTP V4)
Time Zone Support
Max Subscribers Support: 200
Max Concurrent Call: 50
Call Attempt per Seconds: 50 cps
Max Concurrent RTP Support for NAT user: 50
SIP-50 SIP Proxy Server User’s Manual
- 4 -
Page 8
SIP-50 SIP Proxy Server User’s Manual
Chapter 2:Hardware Installation
2.1 Installation Requirements
Before installing the SIP Proxy Server, make sure your network meets the following requirements.
- Mechanical Requirements
The SIP Proxy Server can be installed anywhere in the network The SIP Proxy Server can be placed on the
table or rack. Locate the unit near the power outlet.
- Electrical Requirements
The SIP Proxy Server is powered from 100/240 VAC. A standard IEC connector is used for the power cable.
Follow all applicable electrical codes. Frame ground should be tied to a common grounding point using
#18AWG cable.
NOTE: The SIP Proxy Server is a power-required device, it means, the SIP Proxy Server will not work until
it is powered. If your network will need to transmit voice data all the time, please consider use an
UPS (Uninterrupted Power Supply) for your SIP Proxy Server. It will prevent you from network data
loss and network downtime. In some area, installing a surge suppression device may also help to
protect your SIP Proxy Server from being damaged by unregulated surge or current to the SIP
Proxy Server.
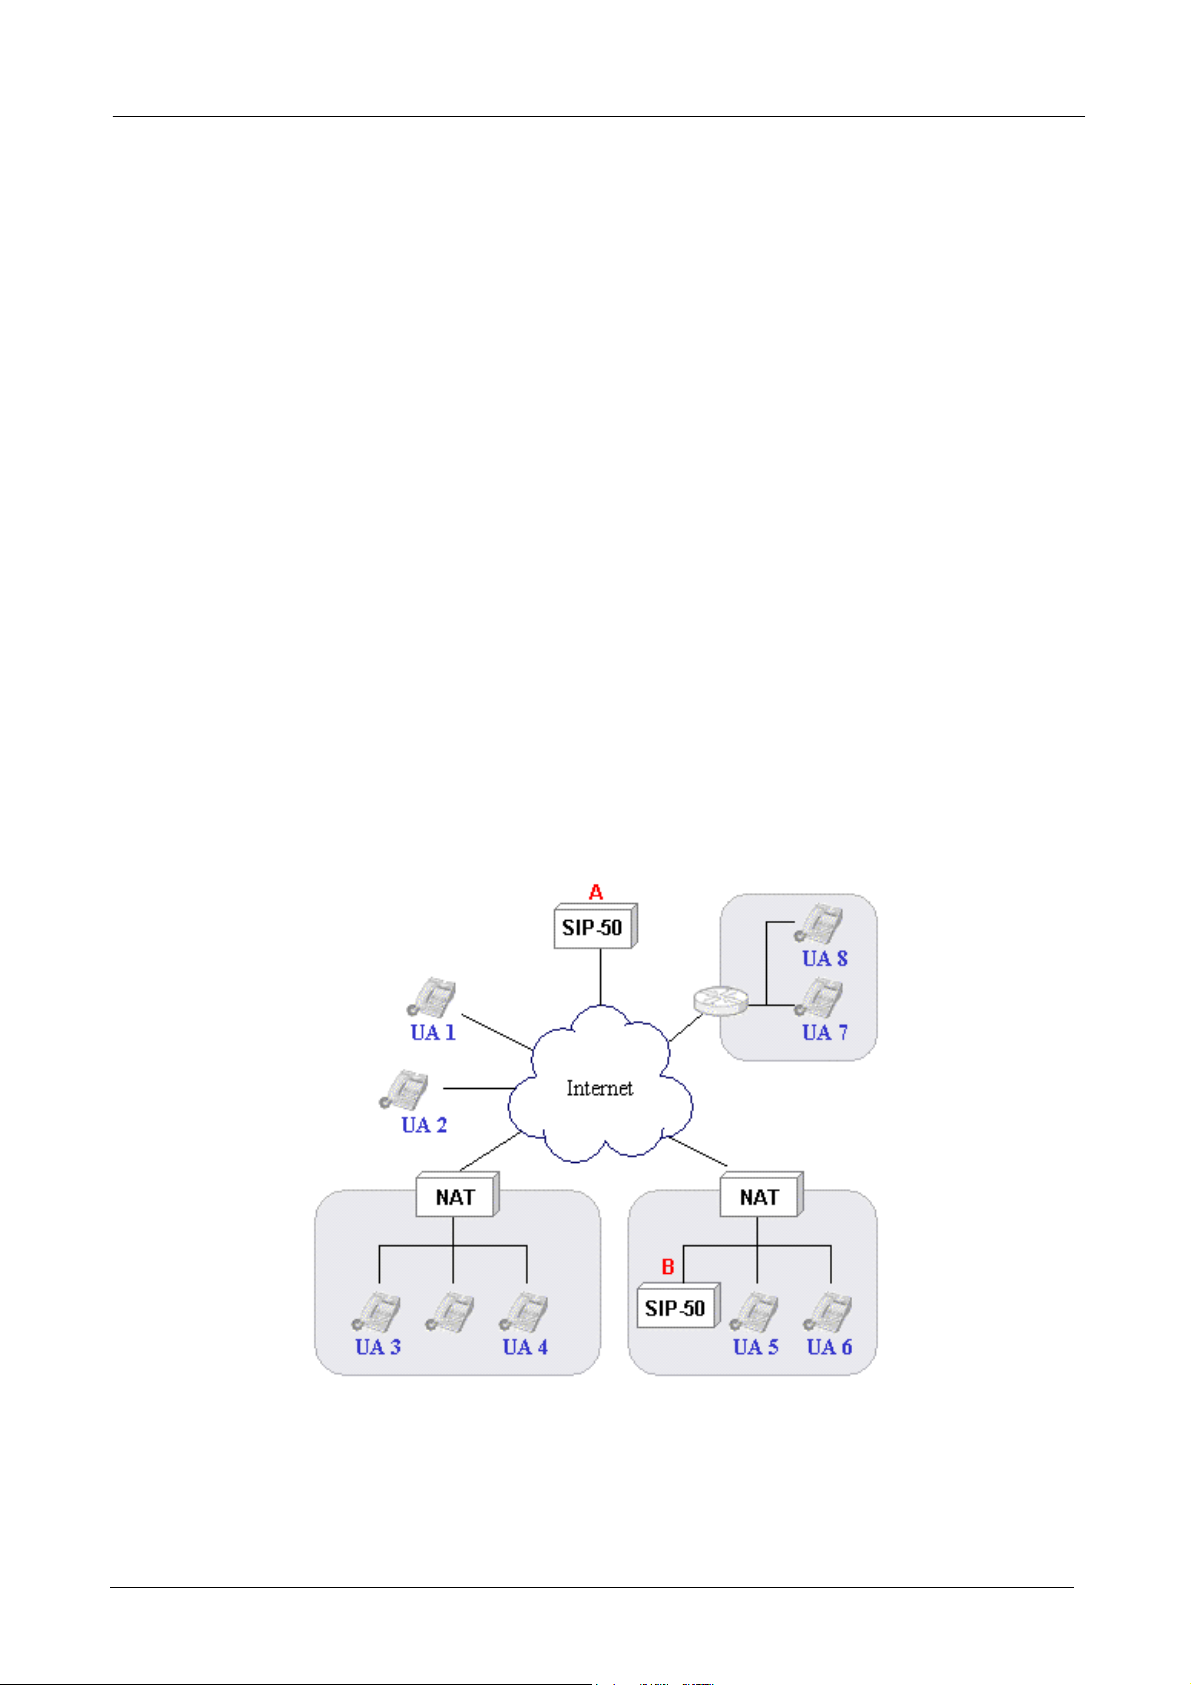
- Network Requirements
SIP Proxy sits in the core of a SIP network and routes calls among other proxy servers, voice gateways, IP
endpoints (such as IP phones), and application servers. In order for SIP Proxy Server to serve SIP network.
The deployment can be like below A or B.
- 5 -
Page 9

SIP-50 SIP Proxy Server User’s Manual
Install SIP Proxy Server to Your Network
- Choose an Installation Site
Select a suitable place on the network to install the SIP Proxy Server.
- Connect LAN Cables
Use standard LAN cables to connect your LAN side Switch or Hub to the LAN ports on SIP Proxy Server.
Both 10Base-T and 100Base-T connections can be used. The LAN and WAN port of SIP Proxy Server
support Auto-Negotiation to connect with best speed and duplex mode. The LAN port of SIP Proxy Server
is MDI port. Thus, you can just use straight network to connect the LAN port to your switch or hub.
- Power Up
Connect the supplied power cord to SIP Proxy Server and use the power switch that in rear panel to turn on
the SIP Proxy Server. Use only the power cord provided. Using a different one may cause hardware damage.
- Check the LEDs
The PWR LED should be ON. The STATUS LED should flash for about 1 to 2 minutes, then turn Off. This
LED will also flash when is reading data from the memory. The LAN’s LNK LED should be on. If the LED is
off, please check the network connection. In some case, you may need to use crossover cable to connect the
LAN port to your networks.
For more information, refer to Section 1.3 SIP Proxy Server Front View.
- 6 -
Page 10

SIP-50 SIP Proxy Server User’s Manual
Chapter 3:Getting Started
This chapter explains how to setup your computer to be a client to manage the SIP Proxy Server.
3.1 Initial Setup by LCD Panel
1. Press (ENTER) button to enter Select menu.
2. Choose Setup Network and press (ENTER) button to enter IP setup process.
SELECT:
Setup Network
3. Set the SIP Proxy Server IP address:
IP Address:
192.168.0.1
Please press (▲) or (▼) button to edit the SIP Proxy Server IP address. Press (ENTER) button to
edit next number. After editing all the number, press (ENTER) button to start the Network mask
configuration.
NOTE: You can press (▲) or (▼) longer for it the number to change in unit of 10.
4. Set the SIP Proxy Server subnet mask:
Netmask Address:
255.255.255.0
Please press ((▲) or (▼) button to edit the SIP Proxy Server IP address. Press (ENTER) button to
edit next number. After editing all the number, press (ENTER) button to start the Gateway
address configuration.
5. Set the SIP Proxy Server Gateway address:
Gateway Address:
192.168.0.254
Please press (▲) or (▼) button to edit the SIP Proxy Server IP address. Press (ENTER) button to
edit next number. After editing all the number, press (ENTER) button to save the configuration.
6. Confirm and Save Configuration:
Save Config?
Y(Enter) N(ESC)
If the configuration is Ok, please press (ENTER) button to save. Otherwise, press (ESC) button to
go back to SELECT Menu.
7. After you press (ENTER), the following message is shown:
。
Setup Network
Save OK....
Now the new IP settings is active and you can start on web management of the SIP Proxy Server.
3.2 Logging in as Administrator
Now you can communicate with SIP Proxy Server by web browser.
- 7 -
Page 11

SIP-50 SIP Proxy Server User’s Manual
Open the web browser and type http://192.168.0.1:8888/.
Machine will prompt for the login username/password, please log in SIP-50 with default user name is “admin”,
password “123“.
Then, you will enter SIP Proxy Server’s Configuration Menu.
- 8 -
Page 12

SIP-50 SIP Proxy Server User’s Manual
Chapter 4:Web Configuration
This chapter introduces how to configure the SIP Proxy Server to effectively control your SIP network.
On the top of the Web interface, there is three major menu of the SIP Proxy Server:
System Settings: The basic system configurations
Subscriber: The function that will be used to manage the subscriber
Logout: You can logout the management interface after finishing your configuration.
The SIP Proxy Server will need the three parameters before it to serve the IP endpoint: Config, (illustrated in
section 4.1.6), Authorization (illustrated in section 4.1.7) and Subscriber, (illustrated in section 4.2).
However, some of the configurations are also required. Please refer to the related section for the details.
4.1 System Settings
System settings menu contains three categories: “General” allows you to configure basic network
parameters, Internet connection bandwidth and date/time. “MISC” allows you to define SIP-50 parameter,
Prefix Route and Authorization which is needed for SIP network operation. “Admin” contains options to
setup SNMP, backup / restore settings, upgrade firmware, etc.
4.1.1 Information
This section shows information about the SIP Proxy Server
- 9 -
Page 13

SIP-50 SIP Proxy Server User’s Manual
4.1.2 Network
You can setup SIP Proxy Server network settings in this section.
♦ Host Name: Please assign a name that is easy to remember for SIP Proxy Server.
♦ Domain Name: Your local network domain name. The SIP Proxy Server will use this value as SIP
Domain.
♦ DNS Server: Your ISP’s DNS server IP or your DNS server IP.
♦ IP Address: Please assign an IP that is not in use by other device for SIP Proxy Server. The default IP
address of SIP Proxy Server is 192.168.0.1.
♦ Network Mask: Your local network subnet mask. For example, 255.255.255.0.
♦ Default Gateway: network default gateway. For example, 192.168.0.254.
♦ Save: Press save button to save all these configurations.
Note: If you have modified the IP address to a different IP subnet, you need to also modify the IP
address of management client’s IP address settings.
4.1.3 Date/Time
The Date/Time menu contains commands for setting SIP Proxy Server's time and date required for correctly
record the CDR. User can directly input the date and time or specify the NTP server for the device to
synchronize with time-server. Click on “Date/Time” in the system settings menu bar and the Date/Time
screen will appear as illustrated below:
♦ Date: Input the year and select the Date from the pull-down list respectively.
♦ Time: Select the Time from the pull-down list respectively.
♦ NTP Server: Local NTP (Network time protocol) server IP or DNS name. The system will auto adjust the
system time each day. If you want to manually configure the date and time, left this field blank.
Note: Please find below NTP server web address for your reference to set the time-server.
http://www.eecis.udel.edu/~mills/ntp/clock1a.htm
http://www.eecis.udel.edu/~mills/ntp/clock2a.htm
♦ Time Zone: System administrator must select the time zone for the region.
♦ Save: Press save button to save all these configurations. If you have input a NTP server IP address or
DNS name, the SIP Proxy Server will try to inquire the current time and update the Date and Time field.
- 10 -
Page 14

SIP-50 SIP Proxy Server User’s Manual
The Date/Time information will be used in the CDR system (refer to section 4.3). If your SIP Proxy Server can
reach to the Internet, you can find the nearest NTP server in the Internet for your SIP Proxy Server that should
provide the accurate date and time for the SIP Proxy Server.
4.1.4 Config
You can setup SIP Proxy Server parameter settings in this section.
♦ Call Validation Time(Sec): The timer to check periodically call is valid or not.
♦ SIP Port: The SIP port defines where the SIP traffic is expected.
4.1.7 Prefix Route
The prefix route function to provide a full array of stand-alone, call-routing capabilities. It executes effective
routing decisions based on: prefix number. Normally use to forward SIP INVITE request to another SIP Proxy
Server, PSTN gateway, MCU or other VOIP gateway. For prefix route manage, however, you can direct click
on New to add the services or click on Modify icon to modify and remove by click on the delete icon.
♦ New - Create new record.
♦ Prev - Go to previous page.
♦ 1, 2, … - First, second, … page.
♦ Next - Next page.
On the Action field of each service name, the following two buttons are provided:
- Modify the record
- Delete the record
- 11 -
Page 15

SIP-50 SIP Proxy Server User’s Manual
After clicking “New” or Modify button, the following prefix route record configuration page will be shown.
♦ Prefix Number: The Prefix number of URI that SIP-50 will match for.
♦ Destination Server: The SIP packet will forward to this server address.
After clicking Save or Cancel button, the Prefix Route page will be shown again. To edit the route record you
have configured, please click Modify button on the Action field. To remove the service you have configured,
please click Delete button on the Action field.
4.1.8 Authorization
The SIP Proxy Server support to uses Digest authentication to authenticate credentials provided by SIP
phones and gateways requesting the proxy's services. The authentication data can be obtained from local
database or RADIUS server.
♦ Authorization Type:
Disabled – Not authenticate the subscriber’s REGISTER method. This is default value.
Local – Use Local subscriber database as authorization data source. Please refer to Section 4.2.1 List to
manage it.
Radius – Use external Radius server as authorization data source.
♦ Authorization IP: RADIUS Authentication server IP address.
♦ Authorization Port: RADIUS Authentication server port number.
- 12 -
Page 16

SIP-50 SIP Proxy Server User’s Manual
♦ Secret Key: The shared secret key with Radius server.
♦ Max Retry: The maximum times of resend request.
♦ Respose Time (sec): The maximum time to wait for a reply from the RADIUS server.
♦ Save: Press save button to save all these configurations.
4.1.8 SNMP
Use the SNMP Configuration screen to display and modify parameters for the Simple Network Management
Protocol (SNMP). The device includes an on-board SNMP agent which monitors the status of its hardware, as
well as the traffic passing through it. A computer attached to the network, called a Network Management
Station (NMS), can be used to access this information. Access rights to the agent are controlled by community
string. To communicate with the device, the NMS must first submit a valid community string for authentication.
♦ Enable SNMP: Check this box to enable the SNMP function.
♦ Community Strings: A community entry authorized for management access. The network
management station must use same string to read the SNMP data from the device.
♦ System Location: Specifies the area or location where the device resides.
♦ Contact Information: Contact person for the device.
♦ Save: Press save button to save all these configurations.
4.1.9 Backup/Restore
You can easily backup and restore the current configuration of SIP Proxy Server.
♦ Backup: Press “Start” button on the Config Download row to download the configuration file of SIP Proxy
Server to your local client side. The following page will then be shown. Click “Save” to save the
configuration file.
- 13 -
Page 17

SIP-50 SIP Proxy Server User’s Manual
Note:
It is strongly recommended to backup your file configuration file whenever you have
complete the configurations.
♦ Restore: Press “Browse…” button to select the configuration file you have saved before.
Then press “Start” button to start upload configuration file to SIP Proxy Server.
- 14 -
Page 18

SIP-50 SIP Proxy Server User’s Manual
After confirm backup date and network settings, press “Restore” button to start restore all of the configurations
to SIP Proxy Server.
After restore is completed, a “Restore complete“ window prompts. Click “OK” to continue.
4.1.10 Firmware Upgrade
PLANET will announce new patch or firmware on the website for users. You can download the latest firmware
from the website and use this screen to upgrade.
4.1.11 Account
You can change the administrator’s user name and password when you log in on this window.
♦ Old Name: The old name you use to log in SIP Proxy Server
♦ New Name: The new name that you want to change.
♦ Old Password: Enter old password that you use before.
♦ New Password: The new password that you want to change.
♦ New Password Again: Confirm new password again.
♦ Save: Press “Save” button to save all the configurations.
After save is completed, the following window is prompted, click “OK” to continue.
- 15 -
Page 19

SIP-50 SIP Proxy Server User’s Manual
Note: For safety reason, it is strongly recommended to change the default password and store the password
in a safe place.
4.1.12 Reboot
You can reboot SIP Proxy Server from web and by Reset button on the rear side of this device.
4.1.13 Logout
You can logout the management interface after finishing your configuration.
- 16 -
Page 20

SIP-50 SIP Proxy Server User’s Manual
4.2 Subscriber
You can setup Subscriber and CDR in this section.
4.2.1 List
The List function allows the administrator to configure user names and passwords on the proxy so that
requests of SIP devices can be challenged before they are processed. The username and password entered
here must match the username and password entered on the device. The SIP Proxy Server uses Digest
authentication to authenticate credentials provided by SIP phones and gateways requesting the proxy's
services. Authentication must be enabled on the System Setting/MISC/Authorization.
♦ New - Create new user
♦ Prev - Go to previous page.
♦ 1, 2, … - First, second, … page.
♦ Next - Next page.
- Modify the existing user
- Delete the user
- 17 -
Page 21

SIP-50 SIP Proxy Server User’s Manual
Press “New” or Modify button, the link configuration page will be shown as the following. Please note that
Phone number and Authorization Name must be unique.
♦ Phone Number: The sip phone number for this user. In the SIP protocol, this phone number will be a
address with
phone_number@your-domain.com (e.g., sip:123@planet.com.tw.)
♦ Email: Email address.
♦ Authorization Name: The user name use to do authorization.
as phone number (e.g., "123") or a lower-case alphanumerical address starting with an alphabetical character (e.g.,
john.cheng)
It may be either a numerical address that same
♦ Password: The authorization name’s password.
♦ Confirmation password: Type password again.
♦ Save: Press “Save” button to save above configurations.
SIP
- 18 -
Page 22

SIP-50 SIP Proxy Server User’s Manual
4.2.2 Phone Status
The Phone Status will show all the phone of Subscriber List and it’s registration time. The administrator can
see all SIP devices that have successfully registered with the SIP Proxy Server. Each row pertains to a single
SIP device. The Phone Number column shows the status of the registration as dictated by the phone. If the
SIP devices have been registered. The Status icon will be green. When the expiration time is reached the
registration is no longer considered valid and the icon will be the red.
♦ Refresh Interval (second) - Force browser auto refresh this page in 10, 20 or 30 second.
♦ Page - First, second, … page.
♦ Renew - Clear registration info of all phone
♦ Phone Number Link - See the detail Phone Call Status of your chose, see Section 4.2.2.
4.2.3 Phone Call Status
The Phone Call Status will show all call records of this phone. It’s keep period of one week.
♦ Renew - Clear all the call records of this phone.
♦ Refresh Interval (second) - Force browser auto refresh this page in 10, 20 or 30 second.
♦ Phone Number - Change to another phone call status of your chose.
On the table, each item has 6 fields:
♦ Status - This call is still connected or not connected.
♦ From - The phone number that initial this call.
♦ To - The phone number that accept this call.
♦ Start Time - Call start time.
♦ End Time - Call end time.
♦ Connect Time - This call use time.
- 19 -
Page 23

SIP-50 SIP Proxy Server User’s Manual
4.2.4 Export / Import
This page allows you to export or import the subscriber list from a text file.
♦ Export User file: Export the subscriber data to a file named user_dump.txt in text format.
♦ Import User file: Click “Browse…” to select the subscriber file you want to import and then click “Start” to
import.
♦ Import Option: There are 3 options when import user file.
Keep Existing Records - This will keep existing records when import file record already existing.
Delete All Existing Records - This will delete all existing records and then import the file.
Overwrite Existing Records - This will overwrite existing records when import file record have the
same phone number.
Each item in the subscriber file has 4 fields and use “space” to divide each field. Please note that Phone
number and Authorization Name must be unique.
Field 1: Phone Number
Field 2: Email
Field 3: Authorization Name
Field 4: Password
An example is as the following:
506 john.cheng john.cheng@planet.com.tw 506
507 507 alvin@planet.com.tw 507
508 508 tom@planet.com.tw 508
4.2.5 Export CDR
This function allows you to send CDR file to a FTP server. The CDR data will compress as tgz format and sent
to FTP server at AM 4:00 every day. This data is suitable for you to make your own analysis and even billing.
The following parameters are required:
♦ Export Function: Enable or disable the export function.
♦ Server Type: The server type support FTP server.
♦ IP Address: The IP address of the FTP server.
♦ Port Number: The TCP port number used for FTP communication. The default port number for FTP is 21.
♦ Remote Dir: The directory used to store the CDR file. Please make sure you have created this directory
on the FTP server before make test.
- 20 -
Page 24

SIP-50 SIP Proxy Server User’s Manual
If this field is blank, the file will send the CDR file on the home directory of this ftp user account. E.g.,
C:\BACKUP FILE...................................................................................................................User ‘s Home
C:\BACKUP FILE\AAA ...........................................................................................................Sub directory
If you want send file on the home directory, please keep this field blank. If you want send file on the “AAA
“ directory, please fill up “AAA”.
♦ User Name: The user name used to login to FTP server.
♦ Password: The password used to login to FTP server.
♦ Save: Press “Save” button to save above configurations.
♦ Test: Test the connection status to FTP server. If the server is on-line and the remote directory, user
name and password are all correct, the SIP Proxy Server will upload a file named “test_upload” to the
remote directory and a small window will pop-up with message of “Server is ready”. Otherwise, it will show
“Can not connect to server”.
Once you click “Save”, the SIP Proxy Server will start to export the CDR file to FTP server at AM: 4:00 of
every day. The file name format of CDR file is “year-month-day.tgz” (e.g., 2005-03-22.tgz). Each file contains
many call records. The data format is as the following with an example:
From number To number Duration Starting Date Starting Time Ending Date Ending Time
507 506 00:01:11 2005-03-02 16:48:51 2005-03-02 16:50:02
♦ From number: The caller phone number, eg: 507
♦ To number: The call’s destination phone number, eg: 506
♦ Duration: The duration of the call in hours, minutes and seconds.
♦ Starting Date: The date of ACK method in SIP packet received by the SIP Proxy Server. This is the date
the call start. The date format is YYYY-MM-DD that YYYY is years, MM is months, and DD is days.
♦ Starting Time: The time of ACK method in SIP packet received by the SIP Proxy Server. This is the time
the call start.. The time format is HH:MM:SS that HH is hours, MM, is minutes, and SS is seconds.
- 21 -
Page 25

SIP-50 SIP Proxy Server User’s Manual
♦ Ending Date: The date of BYE method in SIP packet received by the SIP Proxy Server. This is the date
the call complete. The date format is YYYY-MM-DD that YYYY is years, MM is months, and DD is days.
♦ Ending Time: The time of BYE method in SIP packet received by the SIP Proxy Server. This is the time
the call complete. The time format is HH:MM:SS that HH is hours, MM, is minutes, and SS is seconds.
4.2.6 Daily CDR
This function allows you to download CDR file from web page. Each daily CDR file will be create AM: 4:00 of
every day. The SIP Proxy Server keep one week CDR file.
♦ Create Now: Create today’s CDR file immediately. It only packs the today’s record until now.
♦ Each date CDR file link: Click the daily link to directly download the CDR file.
- 22 -
Page 26

SIP-50 SIP Proxy Server User’s Manual
Chapter 5:Command Line Interface
SIP Proxy Server has a built-in command menu. You can configure SIP Proxy Server by entering commands
from menu.
You can access the CLI from a SSH session or terminal emulator connected to the RS-232 port on the back
panel.
5.1 Connection through Serial Port
The serial port of SIP Proxy Server is fixed at the following settings:
Baud rate 115,200
Number of data bit 8
Parity check None
Number of stop bit 1
Flow control None
To access SIP Proxy Server through the RS-232 serial port, follow the steps below:
1. Insert one end of the null-modem serial cable that came with SIP Proxy Server into the 9-pin RS-232 port
(labeled CONSOLE) on the back panel.
2. Insert the other end of the cable into your terminal’s serial port.
3. Configure the terminal so that settings for baud rate, number of data bit, parity check, number of stop bit
and flow control capability exactly match SIP Proxy Server’s console interface. (Refer to you terminal
documentation for more information about setting up these features).
4. Press <Return> from the terminal.
5. SIP Proxy Server displays the following prompts on the terminal and you are ready to access the CLI then.
The default name is admin and password is 84117341.
PLANET SIP50
sip50 login:
6. After login, SIP Proxy Server displays command menu.
SIP 50 Configuration Menu
1) Reset All Config
2) Debug Information Display
3) Reboot the system
q) Quit
Enter Selection:
5.2 Connection through SSH
The use SSH, you must have a SSH client program. Normally, you can use putty. It can download from
http://www.chiark.greenend.org.uk/~sgtatham/putty/download.html. (Refer to putty’s documentation for more
information about setting up). To access SIP Proxy Server from a remote host with SSH, perform the following
tasks:
- 23 -
Page 27

SIP-50 SIP Proxy Server User’s Manual
Task Prompt Type
From the remote host, run the ssh client and
connect to your SIP Proxy Server by the IP
address that you want to access
When SIP Proxy Server prompts “login as:”,
enter the user name “admin”
None IP Address and port number is 22
Login as: admin
When SIP Proxy Server prompts “password:”,
enter the password “84117341”.
Upon successfully entered the password, SIP Proxy Server displays command menu.
SIP 50 Configuration Menu
1) Reset All Config
2) Debug Information Display
3) Reboot the system
q) Quit
Enter Selection:
Password: 84117341
5.3 Command menu
Type the 1,2,3 or q to select the function.
5.3.1 Reset All Config
If there is system re-organization, firmware upgrade or improper parameters are loaded in SIP Proxy Server,
restoring factory default settings may help you to restore initial state of machine and restart configuration.
5.3.2 Debug Information Display
If there is problem occur, a look at the SIP Proxy Server running messages that will help you to find out the
problem.
5.3.3 Reboot the system
Use this the reboot the SIP Proxy Server.
- 24 -
 Loading...