

Page 1

Copyright
Copyright © 2006 by PLANET Technology Corp. All rights reserved. No part of this publication may be reproduced,
transmitted, transcribed, stored in a retrieval system, or translated into any language or computer language, in any
form or by any means, electronic, mechanical, magnetic, optical, chemical, manual or otherwise, without the prior
written permission of PLANET.
PLANET makes no representations or warrantie s, either expresse d or implied, with respect to the contents hereof
and specifically disclaims any warranties, merchantability or fitness for any particular purpose. Any software
described in this manual is sold or licensed "as is". Should the programs prove defective following their purchase,
the buyer (and not PLANET, its distributor, or its dealer) assumes the entire cost of all necessary servicing, repair,
and any incidental or consequential damages resulti ng from any defect in the software. Further, PLANET reserves
the right to revise this publication and to make changes from time to time in the contents hereof without obligation to
notify any person of such revision or changes.
All brand and product names mentioned in this manual are trademarks and/or registered
trademarks of their respective holders.
Revision
Quick Start Guide for PLANET 802.11a/b/g Wireless LAN Indoor MESH AP
Model: MAP-2100
Rev: 1.1 (April, 2006)
Part No. EMQ-MAP2100
Page 2

Table of Contents
1. Preference ...........................................................................................................................3
2. Package Contents................................................................................................................3
3. Before Installation ................................................................................................................3
4. Network Planning.................................................................................................................4
5. Hardware Installation Procedures........................................................................................7
6. Startup the MESH AP......................................................................................................... ..7
7. Startup the first client connection.........................................................................................9
8. Further Configuration.........................................................................................................13
Page 3

1. Preference
This Quick Start Guide illustrates basic information to start up the MAP-2100, please refer to the following
for the first time start up. More information can be found in the CD-ROM, it is strongly recommended to
check both documents to help you better understanding the Mesh Access Point.
2. Package Contents
The following items should be included:
• Indoor Mesh AP x 1
• Power Adapter x 1
• 2.4/5GHz Dipole Antenna x 2
• Quick Start Guide x 1
• Management Utility and User's manual CD x 1
If any of the above items are damaged or missing, please contact your dealer immediately.
3. Before Installation
1. For the MAP-2100, the default IP address will base on the MAC address of the device you get.
For example, the WAN MAC address: 00-30-4f-4b-09-30. The last two hexadecimal set, 09h and 30h
will be converted into decimal number, 9 and 48 as the IP address of the MAP-2100.
So, for MAP-2100, the IP address status will as following:
Î WLAN 0: 10.9.48.1 (Radio 1, Wireless Backhaul)
Î LAN / WLAN 1: 172.9.48.1 (Radio 2, Wireless AP & LAN)
The MAC address information can be found on the bottom of the MAP-2100.
For future maintain or support purpose, it is also suggested to list the MAC
Hint
3. To provide the Internet Access, the network should also provide the connectivity to the Internet for the
MAP-2100.
address of the MESH AP into a table for all the MESH AP you install. The
information can be used for future maintain such as device “Reset to default”
Page 4
r
4. Network Planning
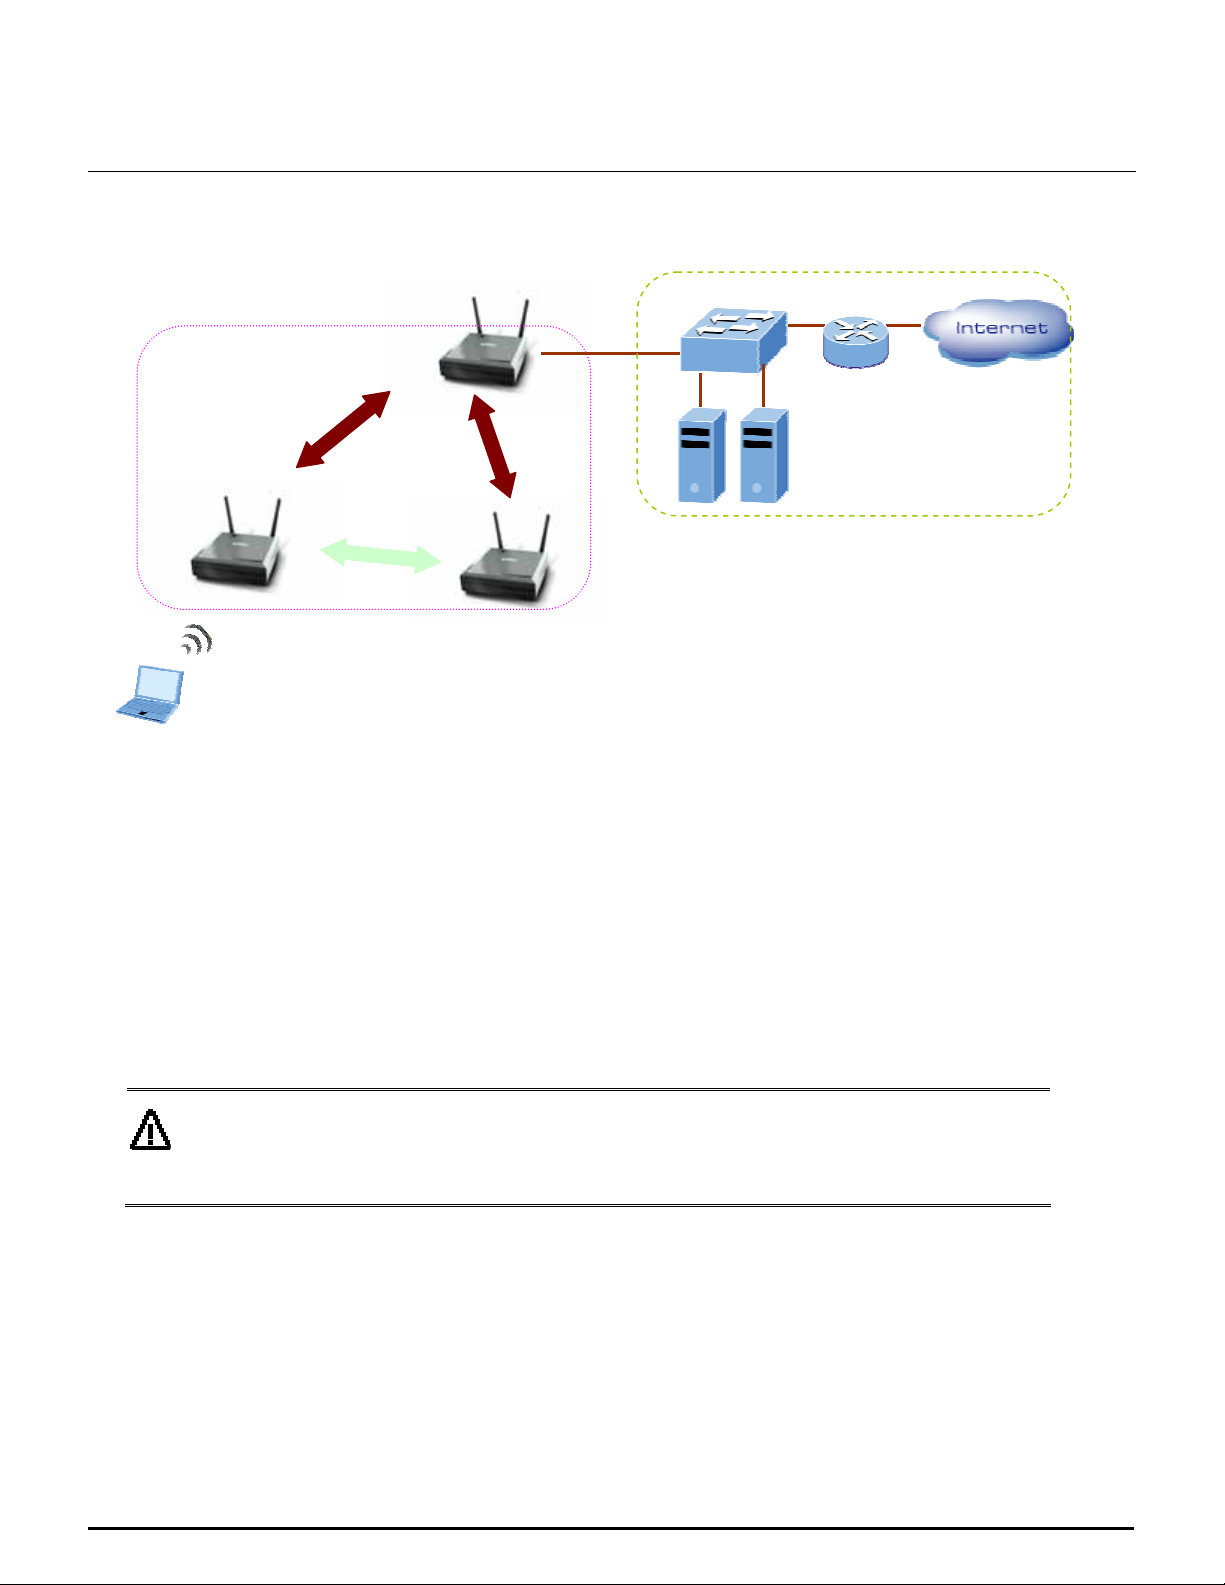
4.1 Installation topology
The basic MESH Network topology can be planned as following.
Ethernet Switch
Mesh Gateway
Router
Mesh Relay
DHCP Server
Mesh Relay
802.11b/g
Mobile User
[Optional]
RADIUS Server
MLRD Serve
1. The MAP-2100 can be configured either a gateway or a relay via web interface. The basic service set
can be one Mesh gateway and one or two Mesh relays.
2. The Internet connection is required if the mesh network planned to provide the connectivity for Internet
for all the mobile users.
3. RADIUS server or MLRD (Mobile Location Register Daemon) server are optional servers that vary on
the installation site.
Each MAP-2100 support up to 250 user registration, the basic set above then can support 750 users
registration. To expand the network coverage, simply just base on the real network environment to add on
the new Mesh Relay or Mesh Gateway.
The MAP-2100 supports 250-user registration; however, the overall network
Note
performance may vary on the real environment and application in many
aspects, such as the bandwidth to the Internet, the services / sessions that the
clients implement.
4.2 Installation consideration
4.2.1 Hardware
Please review the points below for the Hardware install consideration
Page 5

a. MAP-2100
y
The MAP-2100 can be configured either a gateway or a relay via web interface. When the
MAP-2100 is set in gateway mode, both of its WAN and LAN RJ-45 ports are functional. If the
MAP-2100 is configured in relay mode, its WAN port is not available.
b. IEEE802.11a or b/g
In general, it is suggested to fix the operating mode to IEEE802.11a as backhaul connection
(Radio 1) and IEEE802.11b/g as Access Point connection (Radio 2).
Please refer to your local regulation for the wireless frequency band. The
Note
MAP-2100 support 5GHz and 2.4GHz, in some area, please follow the local
regulation to configure the MAP-2100 to the correct frequency.
c. Antenna Type
In general, it is suggested to use omni-antenna for both backhaul and local AP. However, the
antenna installation will vary on environment.
Please refer to your local regulation for the wireless output power. The
Note
MAP-2100 support level output power adjustment. In some areas, please follow
the local regulation to configure the output power together with the antenna.
4.2.2 Network Subnet
The MAP-2100
use
172.xx.yy.zz/24
for local
network
service, and
10.xx.yy.zz/8
for backhaul
connection by
default.
The example
shows the
default setting
while the first
time boot up
the whole
system.
802.11b/g
Mobile User
Three MAP-2100 with WAN MAC address: 09-64, 09-6A, 10-2B will forming the default backhaul
network: 10.9.100.1, 10.93.106.1 and 10.16.43.1 as in the example, where 10.9.100.1 will be the
gateway of the 10.xx.yy.zz network.
Mesh Gateway
WAN MAC:00-30-4f-4b-09-64
WLAN1: 172.9.100.1
802.11b/g
Mobile User
Backhaul Network
Gateway: 10.9.100.1/8
: 10.9.106.1, 10.16.43.1
Rela
Mesh Relay
WAN MAC:00-30-4f-4b-09-6A
WLAN1: 172.
9.106.1
Mesh Relay
WAN MAC:00-30-4f-4bWLAN1: 172.16.43.1
802.11b/g
Mobile User
Router
10-2B
The three AP service networks will also base on the MAC address to forming the 172.xx.yy.zz/24
subnet as the default service IP subnet.
Page 6

Hint
1. You can see the text mode network topology from web interface of the
three MAP-2100. Or from the management utility. Please refer to the User
Guide or Management Utility Guide for more.
2. By default, WLAN 1 / LAN port of MAP-2100 are:
z NAT: ON.
z DHCP: ON
z Zero Configure (PnP IP): OFF
z WLAN 1 SSID: PLANET
z WLAN 1 SSID broadcast: OFF
z WLAN 1 Frequency band: Auto (802.11a/b/g)
3. It is suggested to start up the first installation from LAN port of MAP-2100
base on the default IP setting.
The above example shows the default network subnet setting of the Mesh network. For more
information of re-forming the whole network topology, such as re-structure the IP network, turn off the
NAT, turn on the backhaul security, etc, please refer to the user guide to have the MAP-2100
configured for the network.
4.2.2 Software consideration
The MAP-2100 provides the three management interfaces:
¾ Secured Web access
¾ Management utility
¾ SNMP
For the first time management, please follow the below section to access the MAP-2100 through web
browser.
The management utility help to central manage the MESH AP network. This utility can be installed in a
Windows PC that be located in the AP services network, for example, 172.xx.yy.zz/24 network, or can
be installed in the Internet. For more information about Management utility, please also refer to the
management utility guide.
To support mobile IP, the MLRD server is required. This MLRD server should be installed in the same
subnet to the Mesh Gateway for optimal performance. For more information about MLRD server,
please refer to the user guide of the MLRD server.
Page 7

5. Hardware Installation Procedures
Before you proceed with the installation, it is necessary that you have enough information about the
MAP-2100.
1. Locate an optimum location for the MAP-2100. Plan for the output frequency of the MAP-2100, 2.4GHz
or 5GHz.
2. Assemble the antennas to MAP-2100 follow the frequency band plan. Try to place them to a position
that can best cover your wireless network. The antenna’s position will enhance the receiving sensitivity.
When installing antenna(s), follow these general tips:
For most elevated antenna installations, we recommend you to ask the professional installers
for proper installation and safety.
For the safety reasons, you are
recommended never to touch a high-gain
antenna when it is transmitting or point it at
any part of your body.
Please, follow carefully the instructions
with your antenna.
Keep antennas away from metal
objects/obstructions (heating and
air-conditioning ducts, large ceiling trusses,
building superstructures, and major power
cabling runs).
Use a directional antenna when you
establish a link between two buildings. A
directional antenna must be properly
aligned to the point at the other antenna,
line-of-sight.
Radio 1
Backhaul
LAN Port
WAN Port
Reset button /
Restore Default
DIP Switch
Locate an omni-directional antenna in the middle of the desired coverage area if possible.
Place the antenna as high as possible to increase the coverage area.
Outdoor antennas should be mounted at a sufficient height to prevent the radio path from
above the obstructions such as trees and buildings.
Antenna towers should keep a safe distance from overhead power lines. The recommended
safe distance is twice the tower height.
3. Using Category 3 or higher UTP or STP cable, connect the LAN port of MAP-2100 to a 10Mbps or
10/100Mbps Ethernet hub or switch, and connect the management station to a hub or switch on the
same LAN.
4. Connect the power adapter to the receptor on MAP-2100 and plug the other end to a wall outlet or
power strip.
ONLY use the power adapter supplied with the MAP-2100. Otherwise, the
Note
product may be damaged.
Radio 2
Access Point
Power
Receptor
6. Startup the MAP-2100
To get the initial management of the MAP-2100, please follow the following steps.
1. Connect the MAP-2100’s LAN port to an active network.
2. Connect the PC to the network as well.
3. Check the WAN MAC address of the MAP-2100. For example, 00-30-4f-4b-09-64.
4. Convert the last two set of hexadecimal number into two decimal number. For example, (09H-64H), into
(9.100). Then the LAN/WLAN1 interface will use the IP address: 172.9.100.1 as default.
5. Setup the PC into the same IP subnet of the MAP-2100, for example, 172.9.100.2
Page 8

6. Key in the URL, https://172.9.100.1 to bring up the management interface of the MAP-2100.
7. The browser pop-up the user name and password request. Key in the
password and username with
“admin”
8. Now, the MAP-2100 is ready
for services
Page 9

7. Startup the first client connection
7.1 Knowing the default MESH AP setting
The default settings of MESH AP for
client access are as below:
Wireless Access Point:
[Network -> WLAN-> Radio2]
SSID: PLANET
Hide SSID: Enabled
Wireless Frequency: Auto
1. To make sure the first connection accurately, it is suggested to configure /
Hint
double check the Radio 2 to 802.11g.
2. Turn off Hide SSID can help to quick finding the AP if there is no security
concern for this first installation.
LAN IP Configuration:
[Local Services -> DHCP Server]
DHCP: Enable
Page 10

Access Configuration:
[Login Setup -> Login parameters]
Require User Login: Enable
Zero Config (PnP IP): Enable
With ”Require User Login” turned off, the manager can quickly use and check
Hint
client access without requiring user name, password.
With this feature turned ON, the MESH AP will ask for password, either from
Local User Database or from RADIUS where the setting are empty by default.
7.2 Steps to configure the client PC and get
connected to MESH AP
Please follow the steps below for the client PC setup.
In the following we will base on the 11g USB adapter as
example.
1. Configure the Wireless profile as the figure from
your client PC. That is, key in the SSID as PLANET.
2. The Wireless LAN adapters starts the connecting
once apply the setting.
Page 11

3. The link is connected.
4. Configure to make the Wireless adapter use DHCP to get the IP address. Then, with the command
IPCONFIG to check the IP address the PC get from the DHCP server. Then check if it matches the
WAN MAC address to the MESH AP you would like to test. As the example, the MESH AP is with MAC
address: 09h-64h (9.100), so, the IP address of the PC are 172.9.100.2.
Page 12

5. Now, the Wireless client gets the IP address from the MESH AP.
6. Then startup the Internet Browser. With “Require User Login” option disabled, the client should
access the Internet right away. And with require user login, the pop-up screen will ask for the
user name and password.
Page 13

8. Further Configuration
For advanced settings of MESH AP, please refer to the user’s manual in the CD. The CD will
including:
¾ User Guide for Web Management
¾ Management Utility
¾ User Guide for Management Utility
If you have any difficulty on resolving the problem while installing or using the device, please feel
free to contact your local dealer or PLANET Technical Support.
 Loading...