

Page 1
Internet Video Conference Phone
ICF-1601
User’s manual
Version 1.0
Page 2

Copyright
Copyright (C) 2010 PLANET Technology Corp. All rights reserved.
The products and programs described in this User’s Manual are licensed
products of PLANET Technology, This User’s Manual contains proprietary
information protected by copyright, and this User’s Manual and all
accompanying hardware, software, and documentation are copyrighted.
No part of this User’s Manual may be copied, photocopied, reproduced,
translated, or reduced to any electronic medium or machine-readable form
by any means by electronic or mechanical. Including photocopying,
recording, or information storage and retrieval systems, for any purpose
other than the purchaser's personal use, and without the prior express
written permission of PLANET Technology.
Disclaimer
PLANET Technology does not warrant that the hardware will work properly
in all environments and applications, and makes no warranty and
representation, either implied or expressed, with respect to the quality,
performance, merchantability, or fitness for a particular purpose.
PLANET has made every effort to ensure that this User’s Manual is accurate;
PLANET disclaims liability for any inaccuracies or omissions that may have
occurred.
Information in this User’s Manual is subject to change without notice and
does not represent a commitment on the part of PLANET . PLANET assumes
no responsibility for any inaccuracies that may be contained in this User’s
Manual. PLANET makes no commitment to update or keep current the
information in this User’s Manual, and reserves the right to make
improvements to this User’s Manual and/or to the products described in
this User’s Manual, at any time without notice.
If you find information in this manual that is incorrect, misleading, or
incomplete, we would appreciate your comments and suggestions.
CE mark Warning
The is a class B device, In a domestic environment, this product may cause
radio interference, in which case the user may be required to take
adequate measures.
2
Page 3

WEEE Warning
To avoid the potential effects on the environment and human
health as a result of the presence of hazardous substances in
electrical and electronic equipment, end users of electrical and
electronic equipment should understand the meaning of the
crossed-out wheeled bin symbol. Do not dispose of WEEE as unsorted
municipal waste and have to collect such WEEE separately.
Trademarks
The PLANET logo is a trademark of PLANET Technology . This
documentation may refer to numerous hardware and software products by
their trade names. In most, if not all cases, their respective companies
claim these designations as trademarks or registered trademarks.
Revision
User’s Manual for PLANET Internet Video Conference Phone:
Model: ICF-1601
Rev: 1.0 (February, 2010)
Part No. EM-ICF1601v1.doc
3
Page 4

Table of Contents
Chapter 1 Introduction..................................................................6
OVERVIEW...........................................................................................................................................6
FEATURES............................................................................................................................................6
PACKAGE CONTENT.............................................................................................................................6
PHYSICAL DETAILS.............................................................................................................................7
Chapter 2 Installation.................................................................... 9
GETTING START ..................................................................................................................................9
Chapter 3 LCD Menu .................................................................... 12
MAIN MENU.......................................................................................................................................12
PHONE BOOK ....................................................................................................................................12
All Contracts.............................................................................................................................13
Search.........................................................................................................................................14
Delete All...................................................................................................................................14
CALL LOGS........................................................................................................................................15
Total Calls..................................................................................................................................15
Answered...................................................................................................................................16
Dialed..........................................................................................................................................16
Missed.........................................................................................................................................17
SETTINGS..........................................................................................................................................17
System Settings......................................................................................................................17
Time Settings...........................................................................................................................22
Upgrade......................................................................................................................................22
Administrator...........................................................................................................................23
DIGITAL PHOTO FRAME....................................................................................................................27
INFORMAITON....................................................................................................................................28
Appendix A FAQ........................................................................... 29
Appendix B Specifications ........................................................... 40
4
Page 5

Safety Instructions
Please follow the following safety instructions while you’re using this
PLANET video phone, or you could damage this video phone and yourself.
1. Do not place this video phone in high-humid and / or hot environment,
like bathroom or kitchen. Please refer to the specification of this video
phone to understand the environmental requirements of this phone.
2. This video phone is designed for indoor use; do not use this phone at
places like garden or any other outdoor environment.
3. Do not point the video camera to strong light; it will damage the image
sensor.
4. If you want to place this phone at high places, please make sure that
the video phone is properly secured. Falling down from high places will
damage this phone!
5. Do not drag any connected cord with force; the terminal and cord will be
damaged.
6. Only use dry cloth with water to clean this video phone; do not use
alcohol or other chemical solution to clean this phone.
7. There’s no user-serviceable part inside this video phone; if the video
phone is not working properly , please contact the dealer of purchase to
ask for help.
8. Do not set the volume control of handset or headset to a too high
setting; high volume could damage your ear if you use this video phone
for too long time.
9. Do not put the video phone and / or A/C adapter on paper, cloth, or
other flammable materials.
10.If you smell something strange or even see smoke coming out from the
video phone or A/C adapter, disconnect the power cord immediately,
and call your dealer of purchase for help.
5
Page 6

Chapter 1 Introduction
Overview
PLANET’s Video Conferencing products, ICF-1601, bring you a video
conferencing experience through the Internet. No PC is required and
none of the usual complications of complex web camera, sound card and
software settings and specialized data connections. Furthermore, the
ICF-1601 has a built-in 5” LCD monitors in a telephone form factor ideal for
desktop use.
Both devices are SIP compliant, which means you can have a seamless
conferencing experience with other SIP compliant video conferencing
systems, voice gateway, IP phones, ATA and IP PBX System. With SIP
Proxy Server, MCU support, the ICF-1601 from PLANET make
communications with your business partners quick and cost-effective.
The ICF-1601 has multiple video inputs which can be used to connect to
external cameras for group meetings and/or a document camera for
showing detailed docum ents or photographs. With up to 30 fps frame r ate,
outstanding picture and sound quality , the PLANET Internet Video
Conferencing Phone offers you a superior communications experience via
the Internet.
1
Features
SIP version 2 (RFC 3261) compliant
5” Color TFT-LCD display with video/audio output function
Personalize phone ring tone
Supports frame rate up to 30 fps
User-friendly GUI Management
Support H.264 Video Codec and G.711and G.729A/B Audio Codec
Compatible with SIP 2.0 Proxy server and peer to peer mode
Built-in High Quality CMOS Camera
Superior voice quality with Automatic Gain Control(AGC) and Acoustic
Echo Cancellation(AEC) support
Built-in Digital photo frame
Package Content
The contents of your product should contain the following items:
Quick Installation Guide
User’s Manual CD
Ethernet cable x 1
Power Adapter
6
Page 7
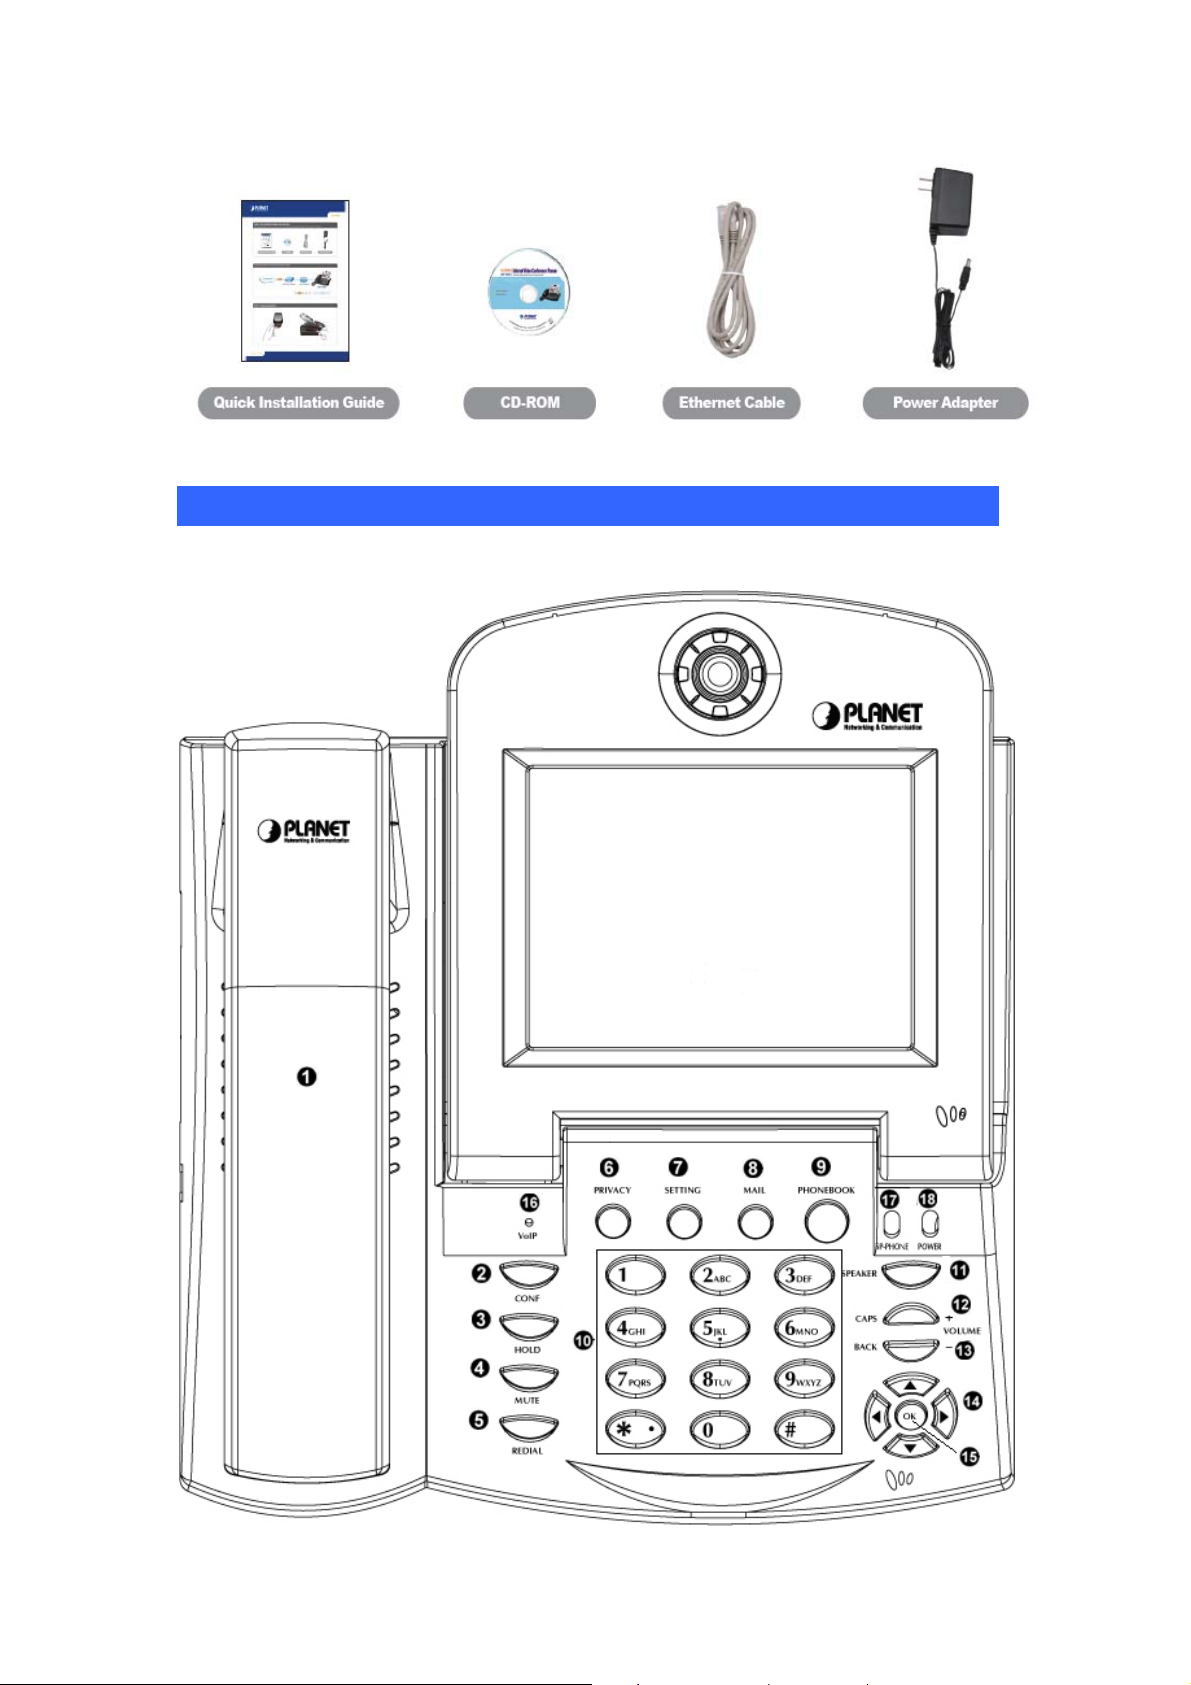
Physical Details
The following figure illustrates the components of ICF-1601
7
Page 8
Item No. Description Item No. Description
1 Handset 2 Conference key
3 Hold key 4 Mute key
5 Redial key 6 Privacy key
7 Setting key 8 Mail key
9 Phonebook key 10 Numeric Keypad
11 Speaker key 12 Volume + / Caps key
13 Volume - / Back key 14 UP/DOWN/LEFT/RIGHT
key
15 OK key 16 VoIP LED
17 SP-Phone LED 18 Power LED
LED Definition
Item No. Description Item No. Description
Power
Register
Green
Green
On Receiving Power
Off
Not receiving Power
On Ready to Dial
Off
Not ready to Dial
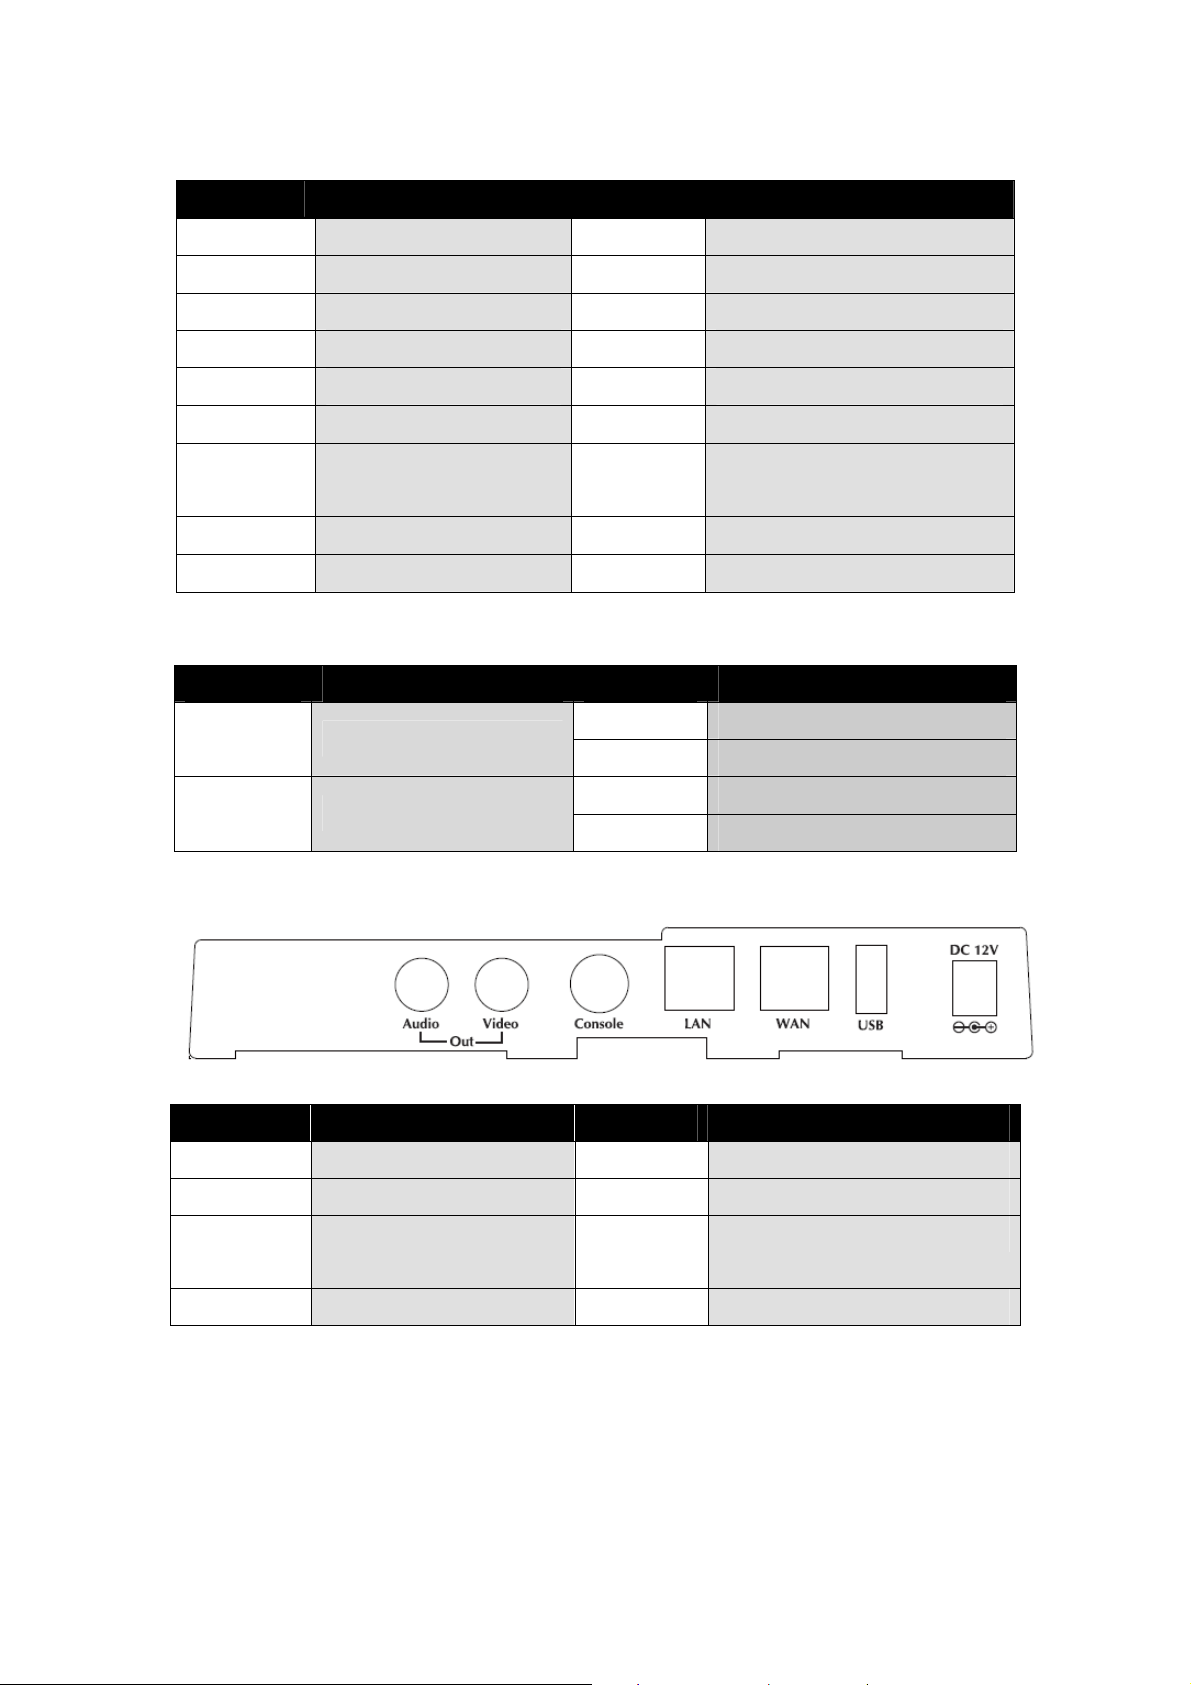
Rear View
Item No. Description Item No. Description
A Power Jack B USB
C WAN D LAN
E Console(For Factory
F
Video Out
Debug ONLY)
G Audio Out
8
Page 9
Chapter 2 Installation
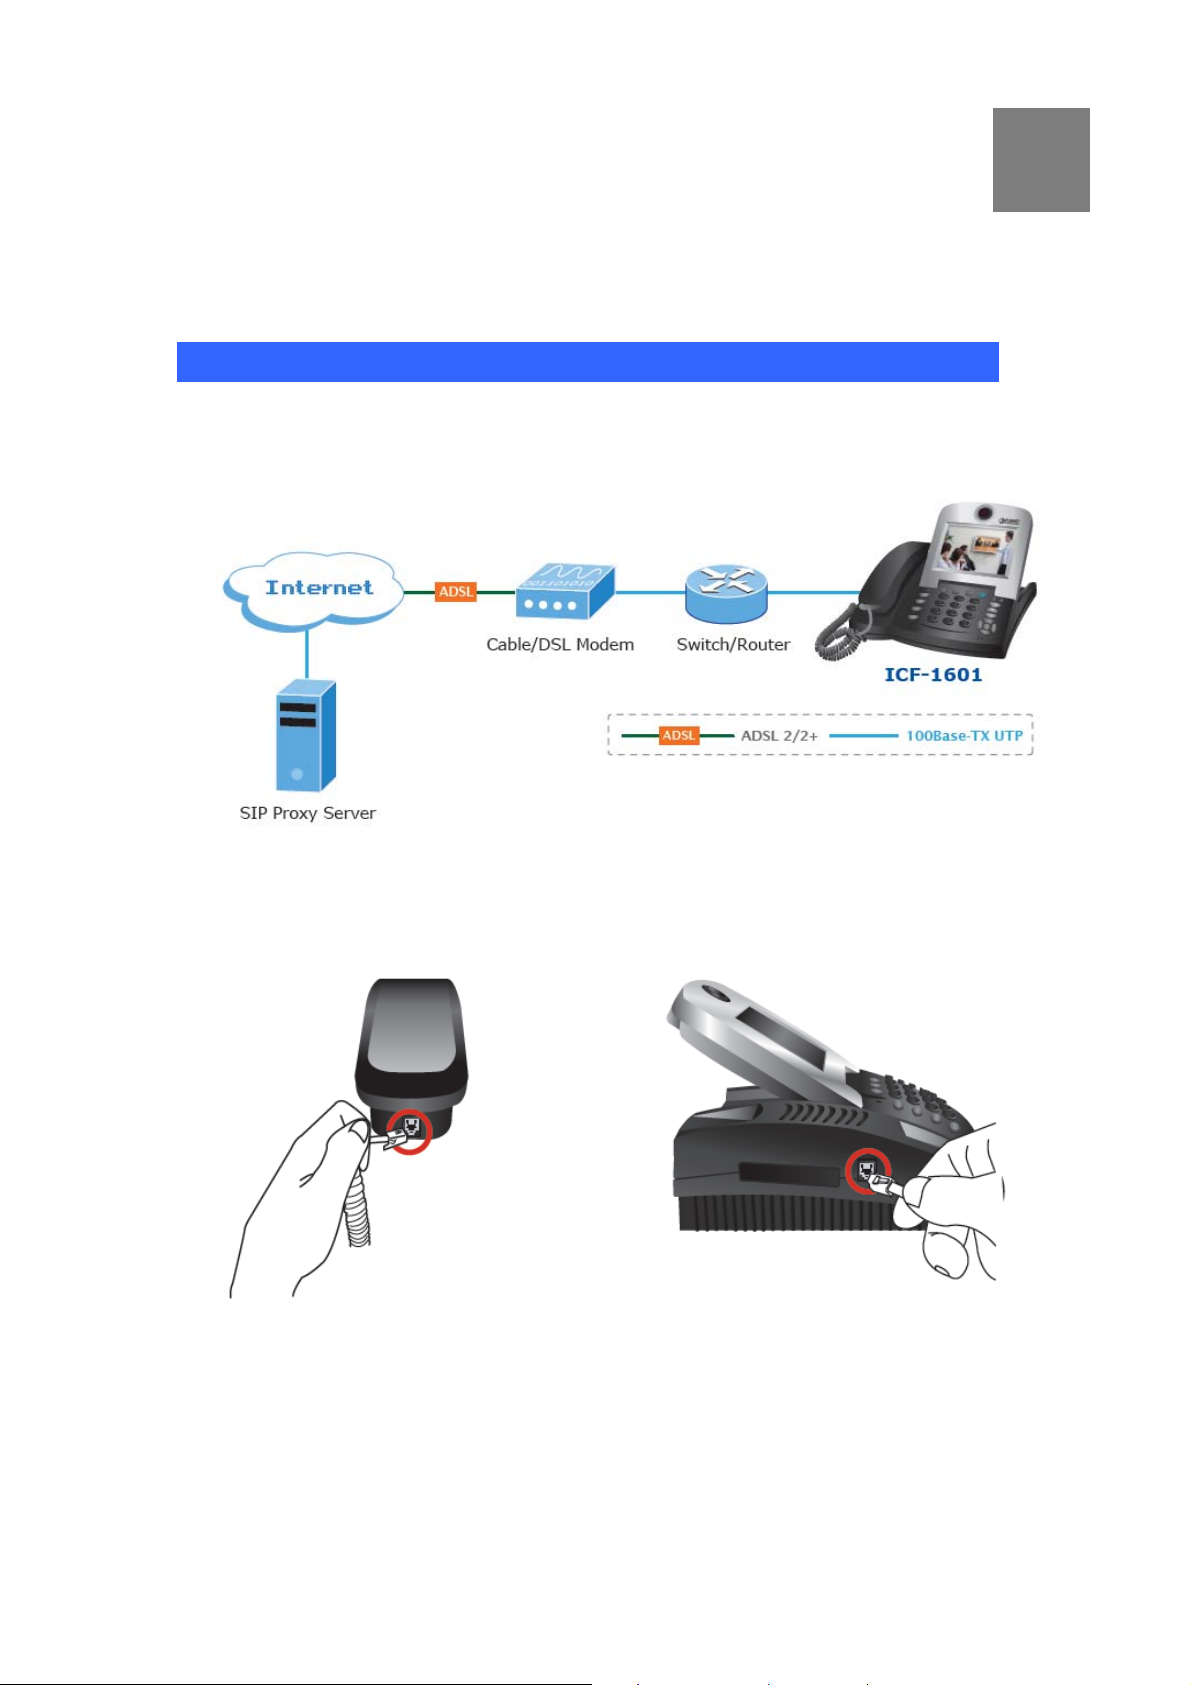
Getting Start
This chapter illustrates basic installation of ICF-1601, the processes is
shown as below.
2
Step1: Connecting Handset
Step2: Connecting Ethernet Cable
9
Page 10
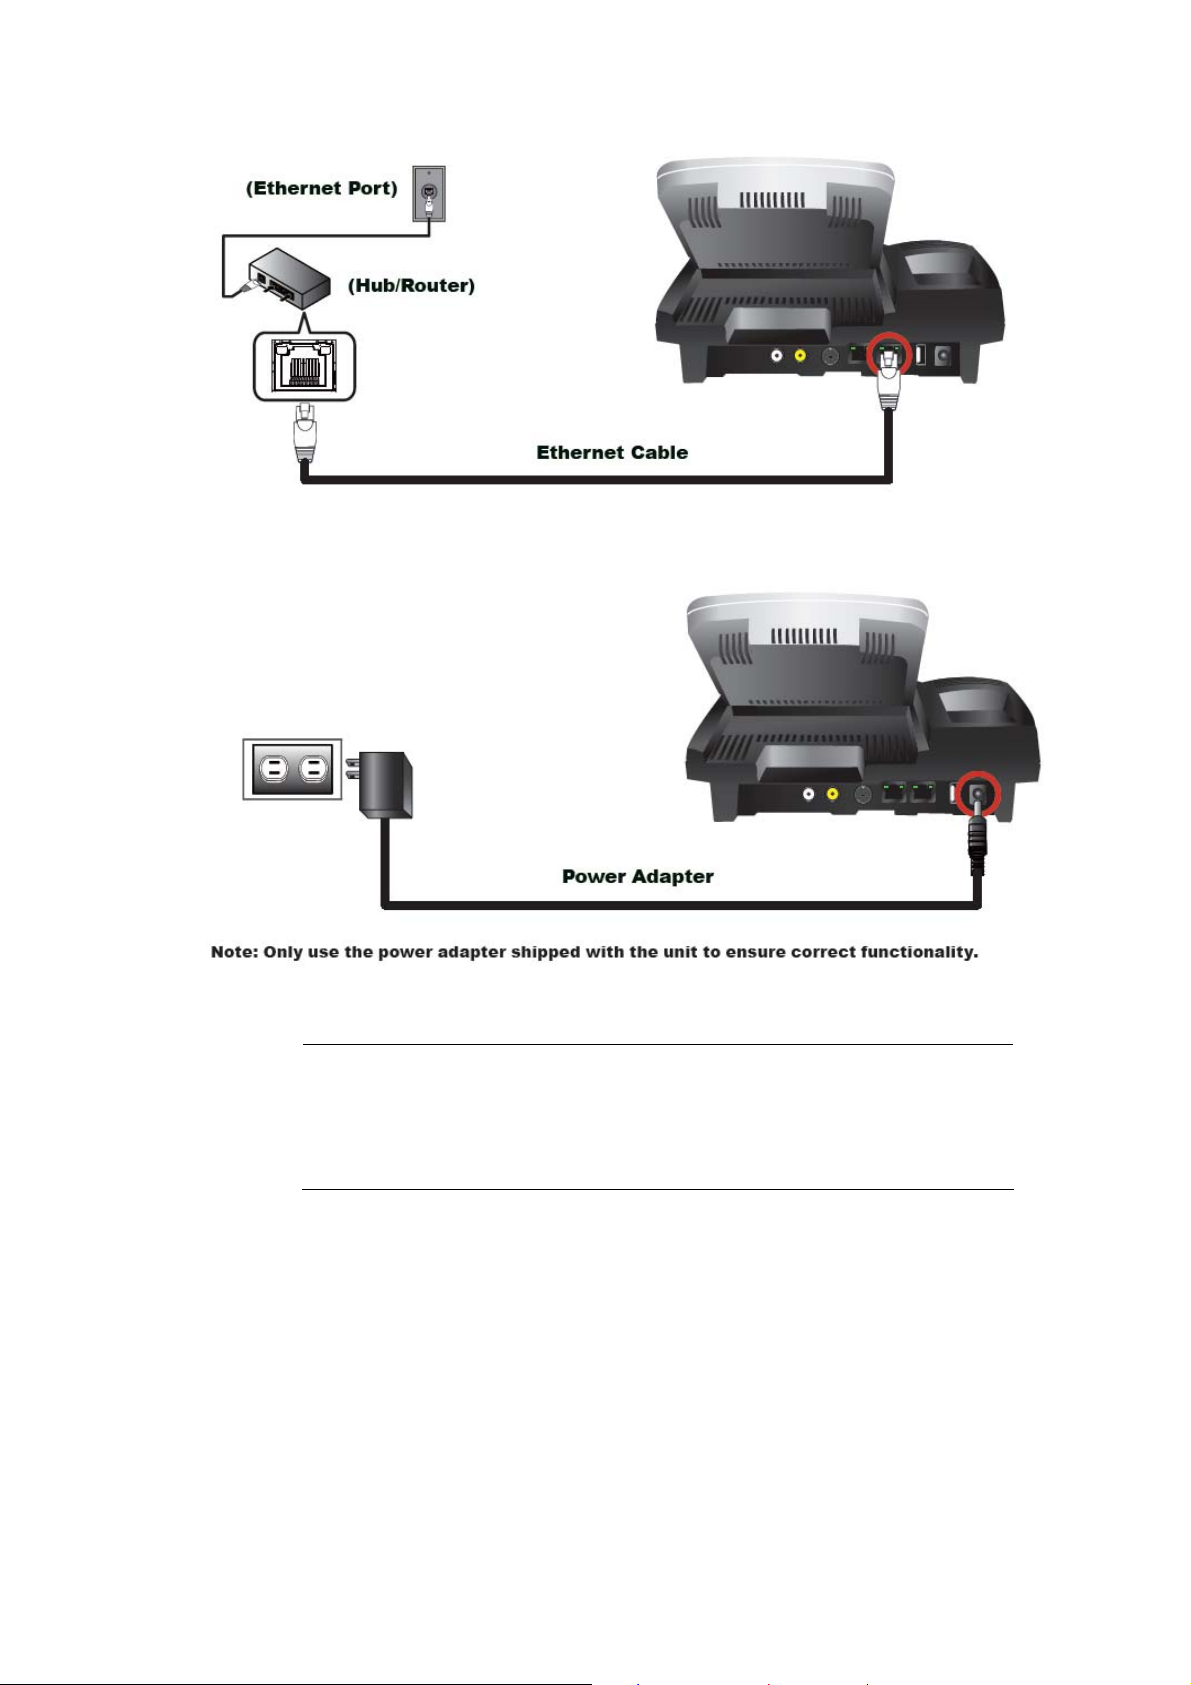
Step3: Connecting AC Power Adapter
"Note
Only use the power adapter shipped with the unit to ensure
correct functionality.
10
Page 11

Step4: Configure the Network
LCD menu configuration
1. Press 『Settings』to enter configuration menu.
2. Go to 『System Settings』Î 『Network』to configure the network
configuration.
3. Please base on your network to configure the network connection such
as Static or DHCP.
4. Select 『Net Settings』Î 『Bridge or NAT mode』and then select
『Interface』Î 『Fixed IP/DHCP/PPPoE』and press OK to choose the
network configuration.
5. If select 『Fixed IP』, you can press up/down key to configure the IP
address, then press OK to save the changes.
11
Page 12

Chapter 3 LCD Menu
Main Menu
When ICF-1601 connects to the power unit, the Welcome Screen will
display after finished boot-up sequence. Then, the phone will stay at Main
Menu.
3
And there are options for Phone book, Call log, Setting, Digital Photo Frame
and Device Information in this Main Menu.
Phone Book
In Main Menu, use the down arrow navigate key to move the cursor to
Phone Book option and press OK to enter Phone book setting page.
There are three options:
All Contracts, Search and Delete All.
12
Page 13
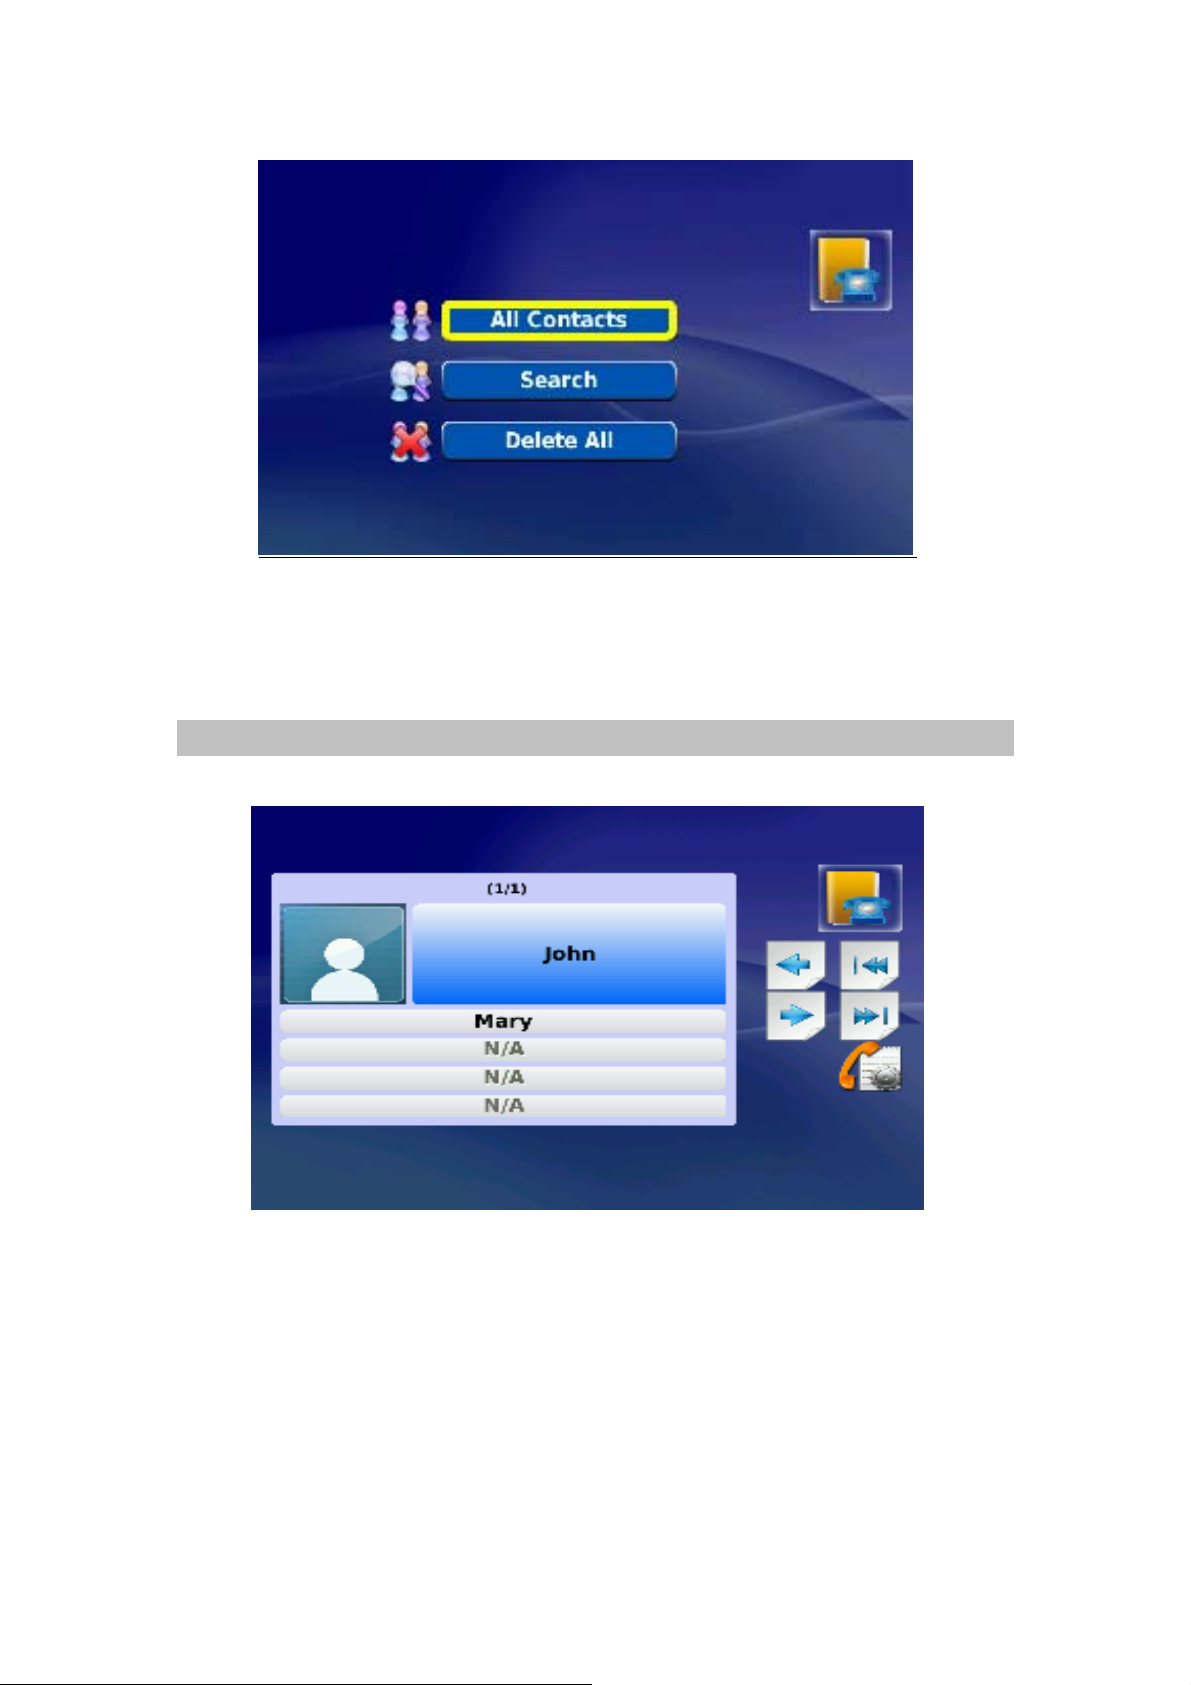
All Contacts:Shows all contact list
Search:Search for a specified phones from contact list
Delete All:Delete all from contact List
All Contracts
You can see All Contacts from this menu.
13
Page 14

Search
You can Search the contact either by name or number.
Delete All
Press YES to delete All Contracts, press NO to exit this option.
14
Page 15

Call Logs
In Main Menu use down arrow navigate key to move the cursor to Call Log
option and press OK to enter the setting page
Total Calls:Shows All calls
Answered:Shows All answered calls
Dialed:Shows All dial out calls
Missed:Shows All un-answered calls
Total Calls
To view the Total calls list.
15
Page 16

Answered
To view the Answered calls list.
Dialed
The view the Dialed Calls list.
16
Page 17

Missed
To view the Missed calls list.
Settings
In Main Menu use down arrow navigate key to move the cursor to Settings
option and press OK to enter the setting page. There are System Settings,
Time Settings, Upgrade and Administrator options.
System Settings
In the System Settings page, there are Network, Factory Reset, Sound and
Display options.
17
Page 18

[Network]
Network:Get into Network setting page
Network Interface Setting:
Setup IP method, Press Left/Right arrow navigate key to select DHCP
or PPPoE or Fixed IP.
I. DHCP: The DHCP server will provide an IP automatically
II. PPPoE: You need to setup Account number, Password
III. Fixed IP: You need to setup IP address, Subnet and Default
gateway
(Above setup value, please contact your ISP or network
administrator for assistance)
There is a stamp on the T op-Left LCD screen “
format you are typing.
"Note
For example: “1” means numeral, “A” is letter in capitalization
“a” is small letter and
” , it mentions which
and
[Factory Default]
In System Settings, and then select Factory Rest button
18
Page 19

After input the password(0000)and then you can start the factory reset,
and the phone will reboot/reset to factory default settings.
[Sound]
Sound Setting:Select System Settings and then select sound button
First page (1 of 2)
Ring Tone: Select Ring tone type
Ring Volume:Adjust Ring tone volume
Sound Effect Type :Select Sound Effect T ype (Connect 、Keypad、
Warning Tone)
Select Effect:Select Sound Effect Ring Type (Disable、Bell 1、
Bell 2、Bell 3)
Sound Volume:Select Sound Effect Ring volume
Audio Output:Select Audio Output interface(Internal、External)
19
Page 20

Page Two (2 of 2)
Speaker Volume:Adjust Hand free Speaker Volume
Handset Volume:Adjust Handset Volume
[Display]
Select System Settings Page, and then select Display button.
Page one (1 of 3)
Video Output :Select Video Output Interface (LCD、TV
OUT-PAL、TV OUT-NTSC)
LCD Brightness:Adjust brightness
Picture Capture:Select Screen snapshot storage device
Self View:Set self view On/Off during calls
20
Page 21

Page 2(2 of 3)
Power Saving :Screen Saving setting, 30/60/90 sec (enable
screen saving after phone not in use for 30/60/90 seconds)
Wallpaper:Wallpaper setting On/Off(If select On, need to select
source file)
Digital Photo Frame:Set Digital Photo Frame On/Off
Digital Photo Frame Delay:Set Digital Photo Frame Display
Interval Time (10/15/20 seconds)
Language: Select Video Phone operation language, currently it
supports for English only.
Page 3(3 of 3)
Upload Bandwidth:Select suitable bandwidth base on your
actual available bandwidth ICF-1601 provide 128K , 256K,384K,
512K selection
21
Page 22

Screen Size:Adjust Screen size, provide CIF and VGA options
Frame Rate:Adjust Frame Rate, Provide Low, normal, High
options
Video Codec:Select H.263 orH.264
Time Settings
Select System Settings, and then select Time Settings button
NTP: Select NTP server
D.S.T:Day Light Saving On/Off
G.M.T:Adjust Time Zone
Upgrade
Select System Settings page then select Upgrade button
Upgrade Method:Provide the firmware upgrade via FTP server,
and please refer to Appendix A FAQ
for more detail configuration.
22
Page 23

Administrator
Select System Settings, ant then select Administrator button.
Need to input password (1234) and then you can enter to advance settings
such as SIP, Proxy, DNS Setting, Audio Codec, Video Codec and LAN
Settings.
[SIP]
In SIP Setting , user need to input the account and the related informations.
In this page, please refer to your SIP provider or network administrator.
P2P Mode:Turn on/off the P2P mode. The default P2P mode is
OFF.
User Name:You can input the User Name you want to display.
Account ID :Y ou need to input the Accouont ID get from your ISP .
Password:Y ou need to input the Register Password get from your
ISP or network administrator.
23
Page 24

[Proxy]
Server Address:You need to input the Proxy Server get from
your ISP.
Server Port:Please types the port number get from your ISP.
Outbound Proxy:You can input the Outbound Proxy get from
your ISP. If your ISP does not provide the information, then you
can skip this item.
"Note
You can see the Register Status from VoIP LED on ICF-1601
[DNS Setting]
Then, you can set DNS server for the ICF-1601. A Domain Name system
(DNS) server is like an index of IP addresses and Web addresses. If you
type a Web address into you browser, a DNS server will find that name in its
index and find the matching IP address.
Most ISPs provide a DNS server for speed and convenience. Since your
Service Provider many connect to the Internet with dynamic IP settings, it
is likely that the DNS server IP addresses are also provided dynamically.
However, if there is a DNS server that you would rather use, you need to
specify the IP address below.
24
Page 25

Primary DNS:Enter the Primary DNS Server IP address get from
your ISP manually.
Second DNS: Enter the Secondary DNS Server IP address get
from your ISP manually.
[Audio Codec]
The Codec is used to compress the voice signal into data packets. Each
Codec has different bandwidth requirement.
Audio Codec: To determine the priority (G711uLaw, G711aLaw
and G729), selects one codec algorithm from the pull-down
menus individually.
25
Page 26

[Video Codec]
Video Bandwidth :Select suitable bandwidth base on your actual
available bandwidth ICF-1601 provide 128K, 256K,384K,512K
selection
Screen Size:Adjust Screen size, provide CIF and VGA options
Video Codec:Select H.263 or H.264
Frame Rate:Adjust Frame Rate, Provide Low, normal, High
options
[LAN Setting]
The following sections will explain more details of Network access setup.
The LAN setup includes two parts – LAN Interface and DHCP Settings.
26
Page 27

DHCP Server:Enable / Disable DHCP server. The default DHCP
Server is ON.
LAN IP:You may change the LAN IP address if needed. The LAN
IP address is provided to your internal network and cannot be
seen on the Internet. You can change the LAN IP address for your
requirements. Enter the IP address for your video phone, for
example, 192.168.1.1.
LAN Mask:Enter the subnet mask.
Leased IP Start / End: Enter the start IP / end IP address you
wish to use as the DHCP server's IP assignment.
Lease Time: Enter the amount of time you wish to lease out a
given IP address.
Digital Photo Frame
In Main Menu use down arrow navigate key move cursor to Digital Photo
Frame option and press OK to enter the setting page.
There are four options: Previous Picture, Next Picture, View Another
Picture, and Delete the Current Picture you can select to.
"Note
This feature need to work with the USB flash disk which attached
with ICF-1601. The format supports JPEG and resolution is 640 x
480.
27
Page 28

Informaiton
In Main Menu use down arrow navigate key move cursor to Information
option and press OK to Display system related information
SIP Server:Display Register ISP IP address
SIP Account:Display Register Video Phone Number
IP Address:Display IP address
Subnet Mask:Display Subnet mask info
Gateway:Display Gateway info
DNS: Display DNS server IP address
MAC Address:Display Phone MAC address
System Version:Display FW version in use
28
Page 29

Appendix A FAQ
Q1: Nothing is displayed on LCD display, or malformed text / graphic is
displayed.
A:
1. Check the connection between power jack of A/C adapter and the phone.
Make sure it’s securely connected.
2. Plug the A/C adapter into power outlet on the wall, if it’s not plugged in.
3. Please check the status of power outlet, maybe it’s not powered.
4. Disconnect the power jack and A/C adapter, and reconnect it again after
about 10 seconds.
5. Press “SPEAKER” button on the phone, or lift handset. If you can hear dial
tone, please return this IP phone to your dealer.
6. If the problem can not be solved by solutions listed above, please contact
your dealer of purchase for assistance.
Q2 : I can not hear dial tone.
A:
1. Please check the cable connection between IP phone and handset.
2. Replace the cable used to connect IP phone and handset with a new one.
(If you don’t have another cable, bring the old cable to a telephone /
computer store and show them, they can help).
3. If you can’t hear dial tone from handset, try to press ‘SPEAKER’ button on
the phone, to see if you can hear the dial tone. Please also check the
connection cable between handset and the phone.
4. Try a higher volume setting.
5. Try solutions of last scenario.
6. Contact your dealer if above solutions don’t work.
Q3 : I can not see my image / remote party can not see my image /
malformed image is displayed.
A:
• Make sure you set the “video privacy” setting to “OFF”
• If you think the image is flashing, please try a different camera frequency
• If you see strange color / malformed image displayed, please contact the
dealer of purchase for help.
29
Page 30

Q4 : How to upgrade firwmare?
A:
1. Firstly, it is necessary to install an ftp server on your PC, here we used
Gene6 FTP server to perform the test as the below example.
2. Add new users: 11111
3. Add the location of the firmware file from your PC.
30
Page 31

k
4. Configure the ICF-1601 LCD menu and fill the FTP server’s information such
as Server IP, Port, User Name and Password. And then please click on “Chec
for Upgrades” button to start upgrade firmware.
5. After upgraded success, you can see the logs from FTP server.
31
Page 32

When you use the FTP server, please remember to disable your
"Note
firewall or antivirus program, otherwise the FTP access will be
blocked.
32
Page 33

Q5: How to make P2P call?
A:
Please refer to the following descriptions and insert proper parameters
configurations into the device for establish the voice communications.
1. Please enable the P2P mode on both ICF-1601’s LCD menu:
LCD menu configuration
(1) Press 『Settings』to enter configuration menu.
(2) Go to 『Administrator Settings』Î 『SIP Setting』to configure the SIP
configuration.
(3) Please select 『on』to P2P Mode .
2. Configure the IP address of ICF-1601 on LCD menu.
LCD menu configuration
(1) Press 『Settings』to enter configuration menu.
(2) Go to 『System Settings』Î 『Network』to configure the network
configuration.
(3) Please base on your network to configure the network connection such as
Static or DHCP.
(4) Select 『Net Settings』and then select 『Interface』Î 『Fixed IP』
and press OK to choose the network configuration.
33
Page 34

3.Test the Scenario:
I.ICF-1601(1) presses “210.66.155.89” and then press OK to call
ICF-1601(2).
II.ICF-1601(2) presses “210.66.155.88” and then press OK to call
ICF-1601(1).
Q6: How to register to IP PBX server?
A:
Please refer to the following descriptions and insert proper parameters
configurations into the device for establish the voice communications.
1. Configuring the IPX-1900 and create the SIP extensions.
(1)Browse to “IP PBX Setup - > User Extensions Setup” configuration
menu.
(2)Click the “Add” button to create extension account ext.10 and ext.20
34
Page 35

2. Configuring the VIP-255PT and insert the SIP parameters.
(1)Please log in VIP-255PT and browser to “Account - > Account”
configuration menu. Insert the account/password information then save and
reboot machine. The sample configuration screen is shown below:
35
Page 36

(2) And then browser to “Account - > Server” configuration menu. Insert the
server information then save and reboot machine. The sample configuration
screen is shown below:
3. Configuring the ICF-1601 and insert the SIP parameters.
Then log in ICF-1601(1) via LCD menu.
LCD menu configuration
(1) Press 『Settings』to enter configuration menu.
(2) Go to 『Administrator Settings』Î 『SIP Setting』to configure the SIP
configuration.
Need to input password (1234) and then you can enter to
"Note
advance settings such as SIP, Proxy, DNS Setting, Audio
Codec, Video Codec and LAN Settings
36
Page 37

(3) Please select 『off』to P2P mode, and then please insert the SIP parameters
such as User Name, Account ID, Password, Server Address and Server Port.
By the way, the setting is same on the ICF-1601(2).
"Note
4. To see the register status on IPX-1900.
After both of devices have registered to IP PBX successfully , it could browse to
“Information -> PBX Extension Status” page to show the registration
status:
After register success, you can see the Register Status from
VoIP LED on ICF-1601
37
Page 38

5.Test the Scenario1:
All the phones can press the extension number to call each.
For example:
ICF-1601(1) can press “20” to call VIP-255PT and press “30” to call
ICF-1601(2), and so on.
6.Test the Scenario2_Call Transfer
※Attendant Transfer (#1)
Step1: 10 call 20
Step2: 20 press the buttons "#1 30” to transfer the call to 30. At meantime, 20
can talk to 30, and the background music on the 10 will also start until 20 hang
up the phone.
Step3: 30 can talk to 10
Step4: 30 and 10 both hang up the phones, then the conversation finished
※Blind Transfer (#2)
Step3: repeat step1-2, and 20 press the buttons "#2 30” to transfer the call to
30. The call will transfer to 30 immediately
Step4: 30 can talk to 10
Step5: 30 and 10 both hang up the phones, then the conversation finished
The ICF-1601 doesn’t define the “Call Transfer” key funciton,
"Note
so it is necessary to use the Call Transfer funcitons which
defined on Proxy servers.
38
Page 39

Q7: How to make 3-way conference call?
A:
Please refer to the following descriptions and insert proper parameters
configurations into the device for establish the voice communications.
Example1:
(1) A and B are in the process of conversation.
(2) A want to invite C to join their conversation.
(3) A press “HOLD” button to hold the conversation with B at first then input
the number of C (plus the “OK” k ey).
(4) C will ring up and pick up the handset to conversation with A.
(5)A press “CONF” button again, and they will entry the 3-Way conference
mode.
Example2:
(1) A and B are in the process of conversation.
(2) B wants to invite C to join their conversation.
(3)B press “HOLD” button to hold the conversation with B at first, and then
input the number of C (plus the “OK” key).
(4) C will ring up and pick up the handset to conversation with A.
(5)B press “CONF” button again, and they will entry the 3-Wa y conference
mode.
The 3-Way conference mode is only support audio mode, if you
"Note
need to use the video conference, it is necessary to connect to
Multipoint Control Unit such as PLANET MCU-1400/MCU-1900.
39
Page 40

Appendix B Specifications
Product Internet Video Conferencing Phone
Model ICF-1601
Hardware
Port 2 x 10/100Mbps RJ-45 ports
Camera CMOS module, 300K pixels QCIF, 30fps
USB 1 USB 2.0 (For connecting with USB flash disk)
Audio/Video Input 1 telephone handset
1 built-in microphone
Audio/Video Output 1 built-in 5” TFT LCD, adjustable angle
1 pair RCA Audio/Video output
1 built-in speaker
Protocols and Standard
Standard SIP2.0 (RFC 3261), and support Outbound Proxy
Configuration
Video Standard H.263, H.264
Audio Standard G.711a/u and G.729A/B
Internet protocol TCP/IP, UDP, RTP/RTCP
Echo cancellation G.167
LAN standard IEEE 802.3 Ethernet
IEEE 802.3u Fast Ethernet
Access Mode Static IP, DHCP and PPPoE
Phone Features
Keys 1 Speakerphone Key
1 Volume Up & Down keys
1 Conference key
1 Hold key
1 Mute key
Audio Features
1 Redial key
1 Privacy key
1 Setting key
1 Mail key
1 Phone book key
12 Numerical keys
Silence Suppression
Comfort noise generation(CNG)
40
Page 41

In-band DTMF & Out-of-band DTMF (RFC 2833)
Call progress tone generation
Acoustic Echo Cancellation
Dynamic Jitter buffer
Three-way audio conferencing
2-Way Video Call
PIP(Picture in Picture)
LCD Brightness Adjustment
Video Features
LCD Contrast Adjustment
LCD/TV Display Switch
Video Privacy (Audio Only)
Video Mute
Remote Video Display On/Off
Address Book
Phone setting
Message &
Network setting
Configuration
Call records
Service
Local Clock setting
Digital Photo Frame
Network and Configuration
Access Mode Static IP, DHCP and PPPoE
Management LCD GUI
Dimension (W x D x
216 x 206 x 180mm
H)
Operating
Environment
0 to 50 Degree C
10~85% humidity (non-condensing)
Power Requirement 12V DC, 1.5A
EMC/EMI FCC, CE Class B
41
Page 42

EC Declaration of Conformity
For the following equipment:
*Type of Product
*Model Number : ICF-1601
* Produced by:
Manufacturer‘s Name : Planet Technology Corp.
Manufacturer‘s Address: 11F, No 96, Min Chuan Road
Hsin Tien, Taipei, Taiwan, R.O.C.
is herewith confirmed to comply with the requirements set out in the Council Directive on the
Approximation of the Laws of the Member States relating to Electromagnetic Compatibility
Directive on (2004/108/EC).
For the evaluation regarding the EMC, the following standards were applied:
Note*: The power consumption of EUT is 8.123W, which is less than 75W and no limits apply.
Therefore it is deemed to comply with EN 61000-3-2 without any testing.
: Internet Video Conferencing Phone
Emission: EN 55022: 2006 +A1:2007, Class B
EN 61000-3-2:2006, Class A (See note* below)
EN 61000-3-3:1995 + A1:2001 + A2:2005
Immunity: EN 55024:1998 + A1:2001 + A2:2003
IEC 61000-4-2:2008 ED.2.0
IEC 61000-4-3:2006 + A1:2007 ED.3.0
IEC 61000-4-4:2004 ED.2.0
IEC 61000-4-5:2005 ED.2.0
IEC 61000-4-6:2008 ED.3.0
IEC 61000-4-8:2001 ED.1.1
IEC 61000-4-11:2004 ED.2.0
Responsible for marking this declarati o n i f the:
⌧ Manufacturer Authorized representative established within the EU
Authorized representative established within the EU (if applicable):
Company Name: Planet Technology Corp.
Company Address: 11F, No.96, Min Chuan Road, Hsin Tien, Taipei, Taiwan, R.O.C
Person responsible for making this declaration
Name, Surname Jonas Yang
Position / Title : Product Manager
Taiwan
20 Nov., 2009
Place Date Legal Signature
PLANET TECHNOLOGY CORPORATION
e-mail: sales@planet.com.tw http://www.planet.com.tw
11F, No. 96, Min Chuan Road, Hsin Tien, Taipei, Taiwan, R.O.C. Tel:886-2-2219-9518 Fax:886-2-2219-9528
 Loading...