

Page 1

3 Mega-Pixel 25M IR Outdoor Bullet PoE IP Camera
ICA-HM317
Quick Installation Guide
Page 2

Table of Contents
Chapter 1. Introduction .................................................................................... 3
1.1 Before Installation ............................................................................... 3
1.2 System Requirements .......................................................................... 3
Chapter 2. Physical Description and Installation .................................................. 4
2.1 ICA-HM317 3 Mega-Pixel Outdoor IR PoE IP Camera .............................. 4
2.1.1 ICA-HM317 Package Content ....................................................... 4
2.1.2 ICA-HM317 Physical Details ......................................................... 4
2.1.3 ICA-HM317 Installation ............................................................... 5
Chapter 3. Camera Windows Utility ................................................................... 6
3.1 ICA-HM317 IP Assignment ................................................................... 6
Further Information ........................................................................................10
Page 3

Chapter 1. Introduction
Thank you for purchasing the PLANET 3 Mega-Pixel 25M IR Outdoor Bullet PoE
IP Camera. It is versatile and high image solution of surveillance application for
day and night. With user friendly interface, it is an easy-to-use IP camera which is
designed for security application.
The PLANET IP Camera support Multi-Prole function can stands for simultaneously
video streams. These Network Cameras can generate H.264, MPEG-4 and M-JPEG
streaming simultaneously to different clients. Moreover, the resolution can be
different from one client to another. This state-of-art design is considerable to t in
various network environments.
1.1 Before Installation
Before installation, please be sure to read this quick installation guide and user’s
manual (CD) carefully to complete machine installation. This guide shows how to
quick set up the cameras, unless model name specied terms “IP Camera” will be
used for these models.
1.2 System Requirements
CPU Intel Core i3 2.5GHz
RAM 1024MB
Graphic card 128MB
Display Resolution 1024 x 768 24bits
Operating System Windows 2000, XP, 2003, 2008, Vista, Win7
Network Ethernet 10/100Base-TX
Browser Mozilla Firefox, IE7 or above, Chrome, Safari
3
Page 4
4
Chapter 2. Physical Description and Installation
Note
2.1 ICA-HM317 3 Mega-Pixel Outdoor IR PoE IP Camera
2.1.1 ICA-HM317 Package Content
IP Camera Unit x 1
Power Adapter x 1
Stand x 1
Screw Packet x 1
User’s Manual CD-ROM x 1
Quick Installation Guide x 1
If any of the above items are missing, please contact your dealer
immediately.
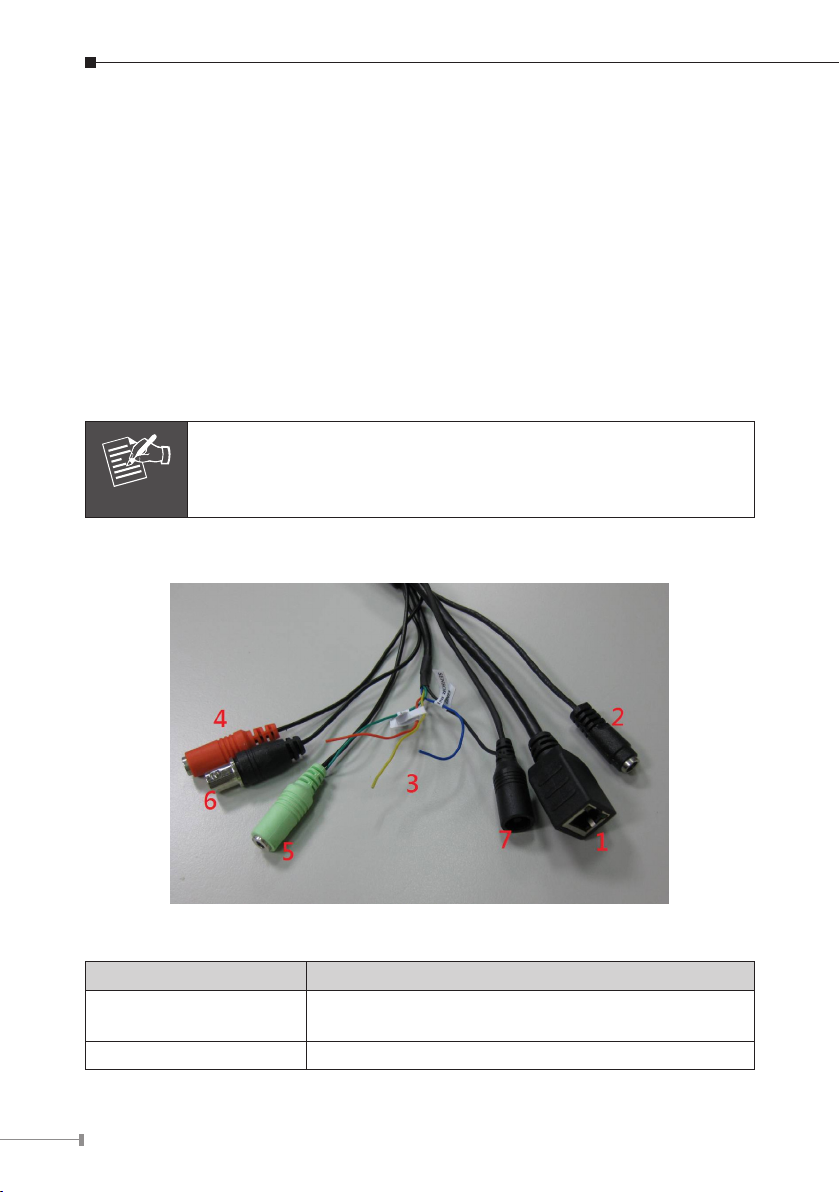
2.1.2 ICA-HM317 Physical Details
4
2
3
6
5
Descriptions for I/O cable set:
Item Description
1 - Ethernet
2 - Power DC power input, connect to AC power adapter
Connects to your local area network by Ethernet
cable.
17
Page 5

5
RS485D+: red
Note
RS485D-: yellow
3 - RS-485 & digital I/O
4 – Audio input
5 – Audio output
6 – TV output Connects to TV
7 – Reset Reset IP-cam device
Only use package power adapter supplied with the internet. Otherwise, the product may be damaged.
Alarm out: green
Sensor in: blue
GND: black
Connects to audio peripheral for audio input, like
microphone or other audio devices
Connects to external audio amplier or speakers
with built-in amplier. May require appropriate audio
jack converter (depends on the type of amplier /
speaker you’re using).
2.1.3 ICA-HM317 Installation
1. Connect Ethernet cable to IP camera’s Ethernet port.
2. Connect audio peripherals to audio in / audio out port. You can skip this step
if you don’t have audio peripherals.
3. Connect RS-485 peripherals to RS-485 port. You can skip this step if you
don’t have RS-485 peripherals.
4. Connect external video devices or video monitor to video monitor out port. You
can skip this step if you don’t have video peripherals.
**Video monitor output port is useful when you’re installing this IP camera.
5. Connect external I/O devices to DIDO port. You can skip this step if you don’t
have I/O peripherals.
6. Secure this IP camera on tripod or camera stand at the place you wish to install
this IP camera.
7. Connect AC power adapter to DC power input.
If everything’s ok, you should see the left LED light on LAN port light up. If not,
please recheck every step and try again, or ask your dealer of purchase for help.
Page 6

6
Chapter 3. Camera Windows Utility
This chapter shows how to quick set up your IP Camera. The IP Camera is with
the default settings. However to help you nd the networked camera quickly
the windows utility (PLANET IP Finder) can search the cameras in the network
that shall help you to congure some basic setting before you started advanced
management and monitoring.
Please insert the bundle CD disk into your CD/DVD-ROM drive. When the welcome
web page appears, please click your IP camera name on the IP camera list. Then
click the PLANET IPFinder hyperlink to start the PLANET IP Finder.
3.1 ICA-HM317 IP Assignment
1. Use “IP Finder” to assign an IP address of IP CAMERA.
The IP Finder software is in the attached CD named “IPFinder.exe”.
2. The GUI of IP Finder is as follows (Default IP: 192.168.0.20).
Page 7

7
Press l ‘Discover’ button to search for all IP Cameras on your local network
(make sure all IP Cameras are powered on and connect to local network rst).
When you nd any IP Camera, you can click on it and click ‘Link’ button to
connect to it by your web browser.
If you need to change a certain IP Camera’s IP address, you can also click on l
the IP Camera you wish to change IP address, then click ‘Change IP’ button to
change select IP Camera’s IP address setting.
Please make sure the subnet of PC IP address and IP CAM IP address are the l
same.
For Example:
IP CAM IP address: 192.168.0.20
PC IP address: 192.168.0.100
Page 8
8
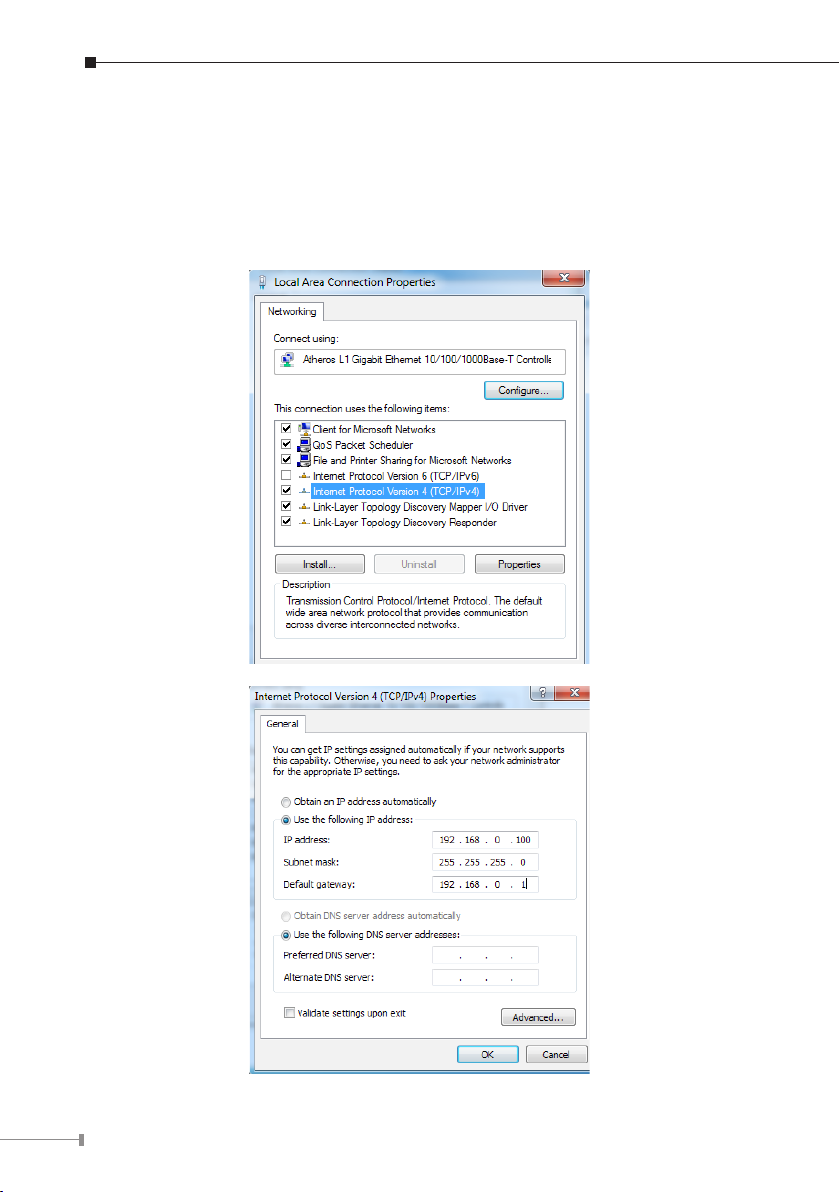
To Change PC IP addresses:
Control Panel Network Connections Local Area Connection Properties
Internet Protocol (TCP/IP) Properties
Please make sure your IP Camera and PC have the same Subnet. If not, please
change IP Camera IP subnet or PC IP subnet accordingly.
Page 9

9
A quick way to access remote monitoring is to left-click the mouse twice on a l
selected IP Camera listed on “Device list” of IP Finder. An IE browser will be
opened.
Then, please key in the default l “Username: admin” and “Password: admin”
in the following message box.
If the user name and password are input correctly, the following web page will l
be displayed.
Page 10

Further Information
This guide is used to help you startup your IP Camera settings. It is also
recommended to check the user manual in CD disk for more details of the system
and user conguration.
10
Page 11

This page is intentionally left blank
Page 12

This page is intentionally left blank
 Loading...