

Page 1

H.264 25-meter IR
Internet Camera
ICA-H312
User’s Manual
Version: 1.00
Date: May. 2009
1
Page 2

Copyright
Copyright © 2009 by PLANET Technology Corp. All rights reserved. No part of this publication
may be reproduced, transmitted, transcribed, stored in a retrieval system, or translated into any
language or computer language, in any form or by any means, electronic, mecha nical, magnetic,
optical, chemical, manual or otherwise, without the prior written permission of PLANET.
PLANET makes no representations or warranties, either expressed or implied, with respect to
the contents hereof and specifically disclaims any warranties, merchantability or fitness for any
particular purpose. Any software described in this manual is sold or licensed "as is". Should the
programs prove defective following their purchase, the buyer (and not PLANET, its distributor, or
its dealer) assumes the entire cost of all necessary servicing, repair, and any incidental or
consequential damages resulting from any defect in the software. Further, PLANET reserves the
right to revise this publication and to make changes from time to time in the contents hereof
without obligation to notify any person of such revision or changes.
All brand and product names mentioned in this manual are trademarks and/or
registered trademarks of their respective holders.
Federal Communication Commission Interference St atement
This equipment has been tested and found to comply with the limits for a Class B digital device,
pursuant to Part 15 of FCC Rules. These limits are designed to provide reasonable protection
against harmful interference in a residential installation. This equipment generates, uses, and
can radiate radio frequency energy and, if not installed and used in accordance with the
instructions, may cause harmful interference to radio communications. However, there is no
guarantee that interference will not occur in a particular installation. If this equipment does cause
harmful interference to radio or television reception, which can be determined by turning the
equipment off and on, the user is encouraged to try to correct the interference by one or more of
the following measures:
1. Reorient or relocate the receiving antenna.
2. Increase the separation between the equipment and receiver.
3. Connect the equipment into an outlet on a circuit different from that to which the receiver is
connected.
4. Consult the dealer or an experienced radio technician for help.
FCC Caution
To assure continued compliance. (example-use only shielded interface cables when connecting
to computer or peripheral devices). Any changes or modifications not expressly approved by the
party responsible for compliance could void the user’s authority to operate the equipment.
This device complies with Part 15 of the FCC Rules. Operation is subject to the Following two
conditions: ( 1 ) This device may not cause harmful interference, and ( 2 ) this Device must
accept any interference received, including interference that may cause undesired operation.
Federal Communication Commission (FCC) Radiation Exposure Statement
This equipment complies with FCC radiation exposure set forth for a n uncontrolled enviro nment .
In order to avoid the possibility of exceeding the FCC radio frequency exposure limits, human
proximity to the antenna shall not be less than 20 cm (8 inches) during normal operation.
2
Page 3

Safety
This equipment is designed with the utmost care for the safety of those who install and use it.
However, special attention must be paid to the dangers of electric shock and static electricity
when working with electrical equipment. All guidelines of this and of the computer manufacture
must therefore be allowed at all times to ensure the safe use of the equipment
.
CE Mark Warning
This is a Class B product. In a domestic environment, this product may cause radio interference,
in which case the user may be required to take adequate measures.
WEEE Regulation
To avoid the potential effects on the environment and human health as a result of the
presence of hazardous substances in electrical and electronic equipment, end users
of electrical and electronic equipment should understand the meaning of the
crossed-out wheeled bin symbol. Do not dispose of WEEE as unsorted municipal
waste and have to collect such WEEE separately.
Revision
User’s Manual for PLANET H.264 25-meter IR Internet Camera
Model: ICA-H312
Rev: 1.0 (May. 2009)
Part No. EM-ICAH312
3
Page 4

Table of Content
1. Introduction................................................................................................................ 6
1.1 Overview............................................................................................................. 6
1.2 Features.............................................................................................................. 6
1.3 Package Contents............................................................................................. 7
2. Basic Setup............................................................................................................... 8
2.1 System Requirements....................................................................................... 8
2.2 Physical Description.......................................................................................... 9
2.3 Hardware Installation...................................................................................... 11
2.3.1 Physical Installation ............................................................................. 11
2.4 Windows Utility Installation............................................................................. 12
2.5 Preparation....................................................................................................... 14
2.5.1 Search and View by PLANET IPWizard II........................................ 14
Search.............................................................................................................. 14
View.................................................................................................................. 15
2.5.2 Configure Network by PLANET IPWizard II..................................... 15
2.6 Using UPnP of Windows XP or Vista........................................................... 17
2.6.1 Windows XP.......................................................................................... 17
2.6.2 Windows Vista......................................................................................22
2.7 Install the Device behind a NAT Router....................................................... 23
2.8 Setup ActiveX to use the Internet Camera.................................................. 24
2.8.1 Internet Explorer 6 for Windows XP.................................................. 24
2.8.2 Internet Explorer 7 for Windows XP.................................................. 25
2.8.3 Internet Explorer 7 for Windows Vista............................................... 26
3. Web-based Management...................................................................................... 27
3.1 Introduction....................................................................................................... 27
3.2 Connecting to Internet Camera..................................................................... 27
3.3 Live View........................................................................................................... 29
3.4 ActiveX Control ................................................................................................ 32
3.4.1 Digital Zoom.......................................................................................... 33
3.4.2 Record.................................................................................................... 33
3.4.3 Snapshot................................................................................................ 34
3.4.4 Voice....................................................................................................... 34
3.4.5 Statistics................................................................................................. 35
3.4.6 About......................................................................................................35
3.5 Network Configuration....................................................................................36
3.5.1 Network.................................................................................................. 36
3.5.2 DDNS server......................................................................................... 38
3.5.3 PPPoE.................................................................................................... 39
3.5.4 Streaming..............................................................................................40
3.5.5 UPnP...................................................................................................... 41
3.5.6 IP Filter................................................................................................... 43
3.5.7 IP Notification........................................................................................ 44
3.6 Camera Configuration ..................................................................................... 46
3.6.1 Picture.................................................................................................... 46
3.6.2 PTZ Setting ........................................................................................... 47
4
Page 5

3.6.3 Preset Setting ....................................................................................... 48
3.6.4 Tour Setting ........................................................................................... 48
3.7 System............................................................................................................... 50
3.7.1 System................................................................................................... 50
3.7.2 Date & Time...........................................................................................51
3.7.3 Maintenance.......................................................................................... 52
3.8 Video.................................................................................................................. 54
3.8.1 Common................................................................................................54
3.8.2 H264 Profile........................................................................................... 55
3.8.3 MPEG4 Profile...................................................................................... 56
3.8.4 MJPEG Profile...................................................................................... 57
3.9 Audio Configuration......................................................................................... 58
3.10 User Privilege Access Configuration.......................................................... 59
3.11 E-Mail Configuration...................................................................................... 60
3.12 Object Detection............................................................................................ 61
3.13 Event Server Configuration.......................................................................... 62
3.13.1 FTP Server.......................................................................................... 62
3.13.2 TCP Server.......................................................................................... 63
3.13.3 HTTP Server....................................................................................... 64
3.13.4 SAMBA Server.................................................................................... 65
3.14 Event Schedule Configuration..................................................................... 66
3.15 Record Configuration.................................................................................... 69
Appendix A: Alarm I/O Connector................................................................................ 70
Appendix B: PING IP Address...................................................................................... 72
Appendix C: 3GPP Access........................................................................................... 73
Appendix D: Bandwidth and Video Size Estimation................................................. 74
Appendix E: DDNS Application.................................................................................... 75
Appendix F: Configure Port Forwarding Manually................................................. 80
Appendix G: Power Line Frequency ........................................................................... 83
Appendix H: Troubleshooting & Frequently Asked Questions............................. 84
Appendix I: Product Specification............................................................................. 89
5
Page 6

1. Introduction
This H.264 25-meter IR Internet Camera is an inexpensive fully scalable surveillance technology.
Because the H.264 25-meter IR Internet Cameras can be plugged into your existing local area
network infrastructure, you will potentially save thousands of dollars on unnecessary cabling.
The H.264 25-meter IR Internet Cameras is accessible via the LAN or Internet connection.
Connect your H.264 25-meter IR Internet Cameras directly to a local area network or xDSL
modem, and with Microsoft Internet Explorer you get instant, on demand video streams. Within
minutes you can set up the H.264 25-meter IR Internet Cameras to capture a video sequence to a
PC. The live video image can be uploaded to a website for the worl d to see or made avail able only
to select users on the network.
The PLANET internet camera support Multi-Profile function can stands for simultaneously video
streams. These Network Cameras can generate H.264, MPEG-4 and M-JPEG streaming
simultaneously to different clients. Moreover, the resolution can be different from one client to
another. This state-of-art design is considerable to fit in various network environments.
1.1 Overview
This user’s manual explains how to operate the H.264 25-meter IR Internet Cameras from a
computer. Basically, the user’s manual is written to be read on the computer display. However,
users might consider printing it out to access easily and read it before you operate the Network
Camera.
1.2 Features
• High quality of 1/3 inch color SONY CCD sensor in 25M IR distance
• Clear and High resolution of quality pictures for day and night
• Multi-profile encoder supports H.264 / MPEG-4 / M-JPEG video compression simultaneously
• 3GPP for 3G mobile remote applications
• LED used on ICA-H312 are 4 times brighter than ordinary IR LED
• Secure protection for current rejections
• Store-to-NAS function for save video files without operating soft ware
• Special mental base enhance s lighting and dissipating heat
• Weatherproof protection housing guards against the variou s weather
• Plug-N-Watch is able to simplify system integration of existing network environment
• Easy configure and manage ICA-H312 via Windows-based utility or web interface.
• Compliant with IEEE 802.3af standard PoE interface
• DDNS, PPPoE and FTP upload supporting provide more alternatives in surveillance network
• Motion Detection feature can monitor any suspicious movement in specific area
6
Page 7

1.3 Package Contents
User can find the following items in the package:
Internet Camera x 1
Power Adapter x 1
Camera Mount Kit x 1
User’s Manual CD x 1
Quick Installation Guide x 1
NOTE:
1. If any of the above items are missing, please contact your dealer immediately.
2. Using the power supply that is not the one included in internet camera packet
will cause damage and void the warranty for this product.
7
Page 8

2. Basic Setup
This chapter provides details of installin g and configuring the ICA-H312
2.1 System Requirements
Network Interface 10/100MBase-TX Ethernet
Monitoring System Recommended for Internet Explorer 6.0 or later
System Hardware · CPU: Pentium 4, 3.0GHz or above
· Memory Size : 512 MB (512 MB or above Recommended )
· VGA card resolution : 1024 x 768 or above
· VGA card memory : 64 M B or above
· Network bandwidth: In VGA resolution mode, minimum
upload bandwidth is 1Mbps.
NOTE:
The listed information is minimum system requirements only. Actual requirement will
vary depending on the nature of your environment.
8
Page 9
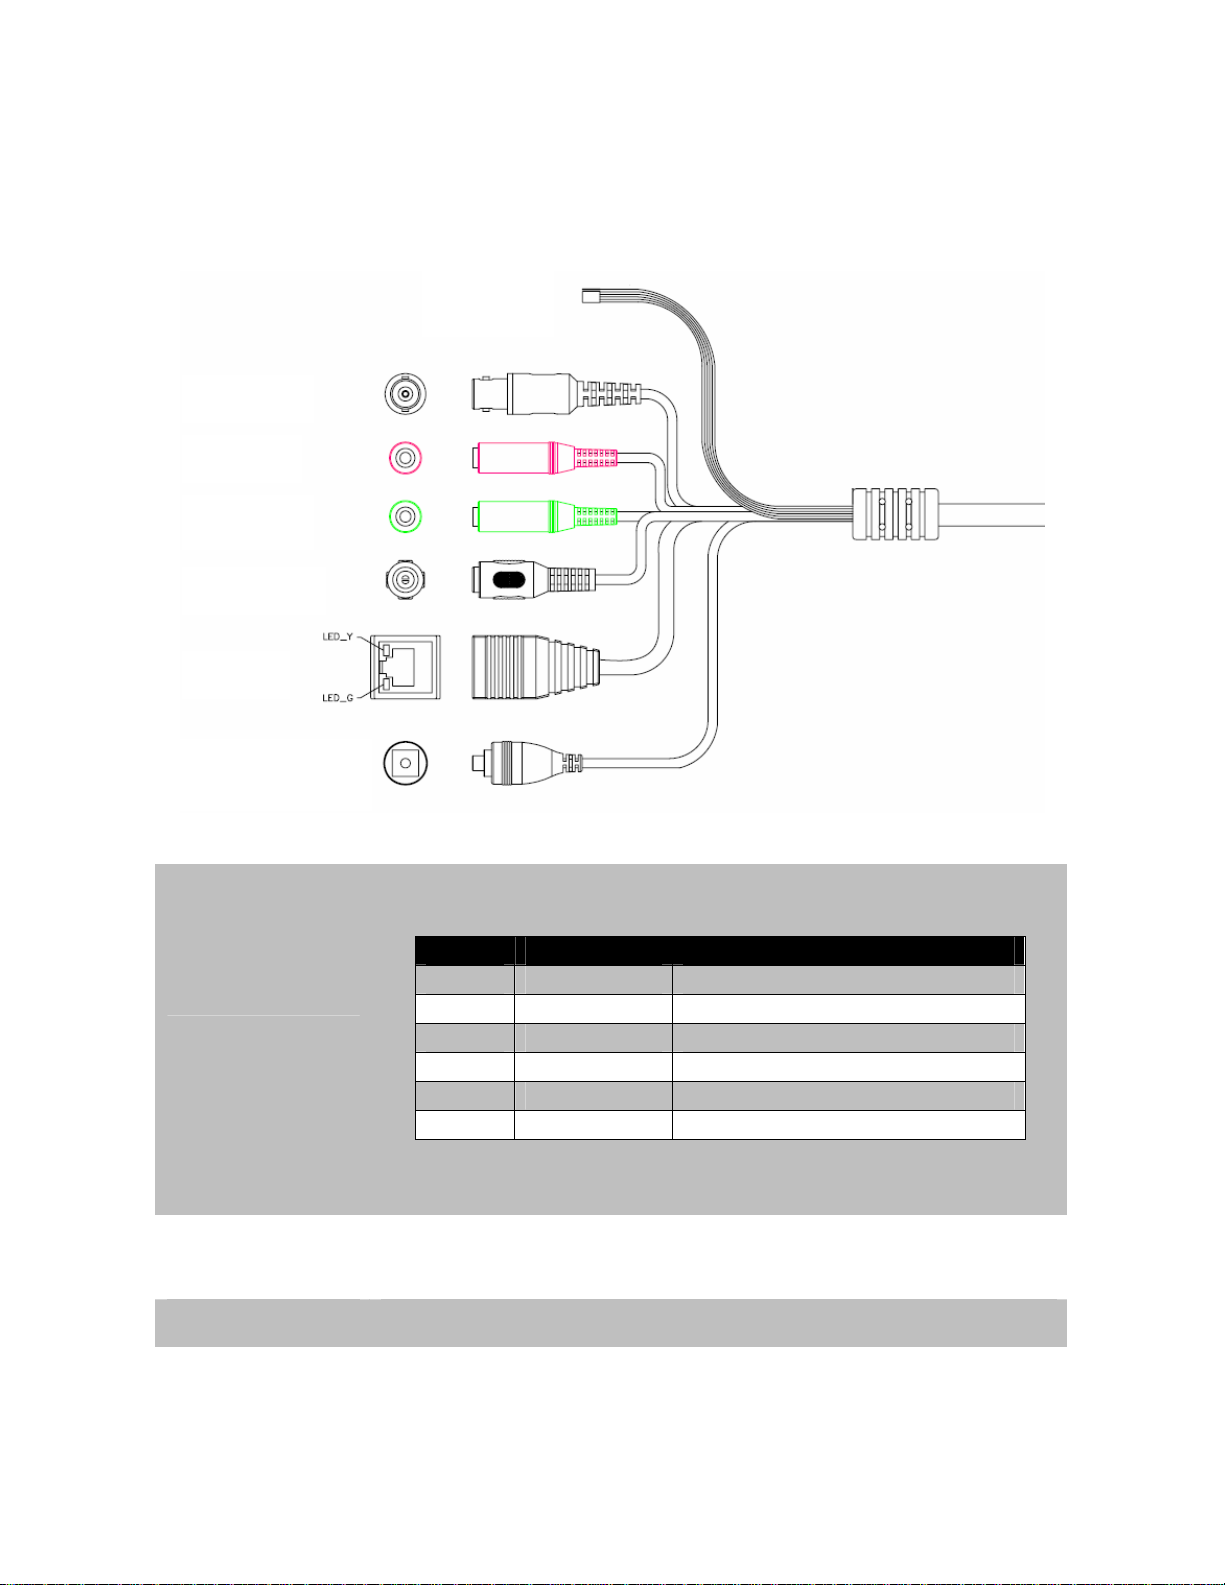
2.2 Physical Description
Identification of ICA-H312 cables
RS485 &
DI/DO
Video out
MIC in
Line out
12V DC in
RJ45
Reset Button
RS-485 & DIDO
Video out
(BNC connector)
Connect RS-485 to external scanner and connect to sensor in and alarm out
devices.
Name Cable Color Function
12VDC Brown/White DC 12V (50mA maximum)
GND Blue/White GND
D+ Purple/White RS485 data +
D- Gray RS485 data DI Green/White Digital signal input
DO Orange/White Digit al sign al output
NOTE: The RS-485 of ICA-H312 is mast er that can control extern al scanner.
The Network Camera also provides composite video output. User can use
BNC video cable to connect the Network Camera with a TV monitor or VCR.
MIC in (audio in) Connect a microphone to the network camera.
Line out (audio out)
Connect a loud speaker to the network camera. This function is for voice
alerting and two-way audio.
9
Page 10

DC-in Jack
RJ-45
The input power is 12VDC.
Note: ONLY use package power adapter supplied with the internet.
Otherwise, the product may be damaged.
Connects to 10Base-T Ethernet or 100Base-TX Fast Ethernet cabling. This
Ethernet port built N-Way protocol can detect or negotiate the transmission
speed of the network automatically. Please use Category 5 cable to connect
the Network Camera to a 100Mbps Fast Ethernet network switch or hub.
In the LAN socket, there are two LEDs embedded:
LAN LED (green color)
This LED will be flashing while network accessing via Ethernet.
Power & Wireless LED (orange color)
This LED is used to indicate whether DC power is on or not. In addition, this
LED will be flashing while the wireless accessing of the Camera.
This button is used to restore the all factory default settings. Sometimes
restarting the device will make the system back to a normal state. However, if
the system still got problems after rest art, user can restore the factory default
settings and install it again.
Reset Button
Restore the device:
a.) Press the button down continuously.
b.) Hold the button at least 5 seconds and release it. Then the device
has been restored to default settings and reboot again.
Note: Restoring the factory default setting will lose the all previous settings
included IP address forever. User needs to run the PLANET IPWizard II
program to search the device and configure it to let the device work properly
again.
10
Page 11

2.3 Hardware Installation
2.3.1 Physical Installation
1. Connect an Ethernet cable
Connect the LAN cable on the camera to the network device (hub or switch).
NOTE: If there has an IEEE802.3af PoE switch in your network, you can connect the
camera LAN cable to this PoE switch to obtain power. The power adapter is
unnecessary when internet camera is connected to a PoE switch.
2. Check the LAN LED
The LED is defined to identify LAN connection type. When LAN port is connected, the LED
will be green.
3 Attach the power supply
Plug in power adapter and connect to power source. After power on, the camera will start to
operate.
NOTE: 1. Only use the power adapter supplied with internet camera Otherwise, the
product may be damaged.
2. The power adapter is unnecessary when internet camera is connected to a
PoE switch. Otherwise, the product may be damaged when internet camera is
connected to a PoE switch and power adapter simultaneously.
4 Attach BNC connector (option)
Connect the video BNC connector to a monitor set if necessary check camera viewing angle and
focus.
5 Attach Speaker to camera (option)
If user needs not only video stream but also audio stream, then the speaker should be attached to
camera.
11
Page 12
2.4 Windows Utility Installation
This chapter shows how to quick set up your H.264 camera. The camera is with the default
settings. However to help you find the networked camera quickly the windows utility PLANET
IPWizard II can search the cameras in the network that shall help you to configure some basic
setting before you started advanced management and monitoring.
1. Insert the bundled CD into the CD-ROM drive to launch the auto-run program. Once
completed, a welcome menu screen will appear.
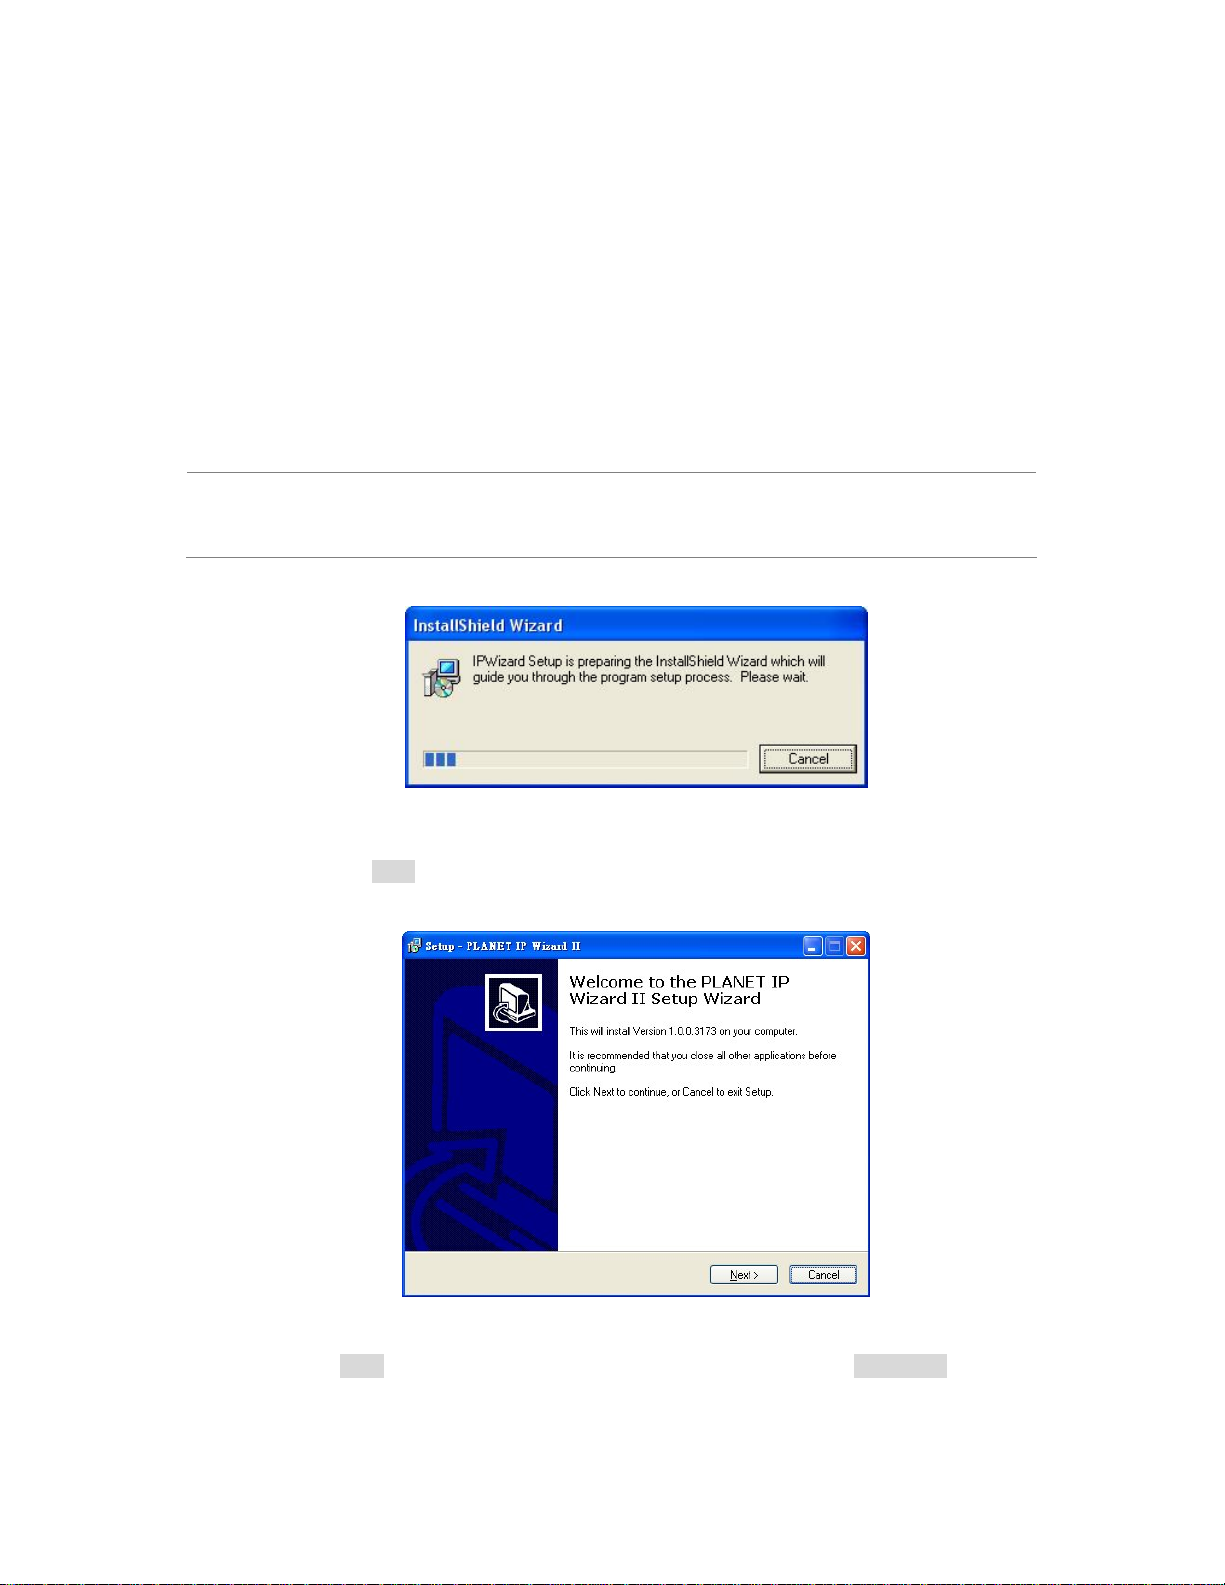
2. Click the “IPWizard” hyperlink; you will see the dialog box as below.
NOTE: If the welcome screen does not appear, click “Start” at the taskbar. Then, select
“Run” and type “D:\Utility\setup.exe”, assume D is your CD-ROM drive.
3. The “Welcome to the InstallShield Wizard for PLANET IPWizard II” prompt will display on the
screen and click “Next” to continue.
4. Please click “Next” to install with original settings, or you may click “Change…” button to
modify the install folder then press “Next” to continue.
12
Page 13
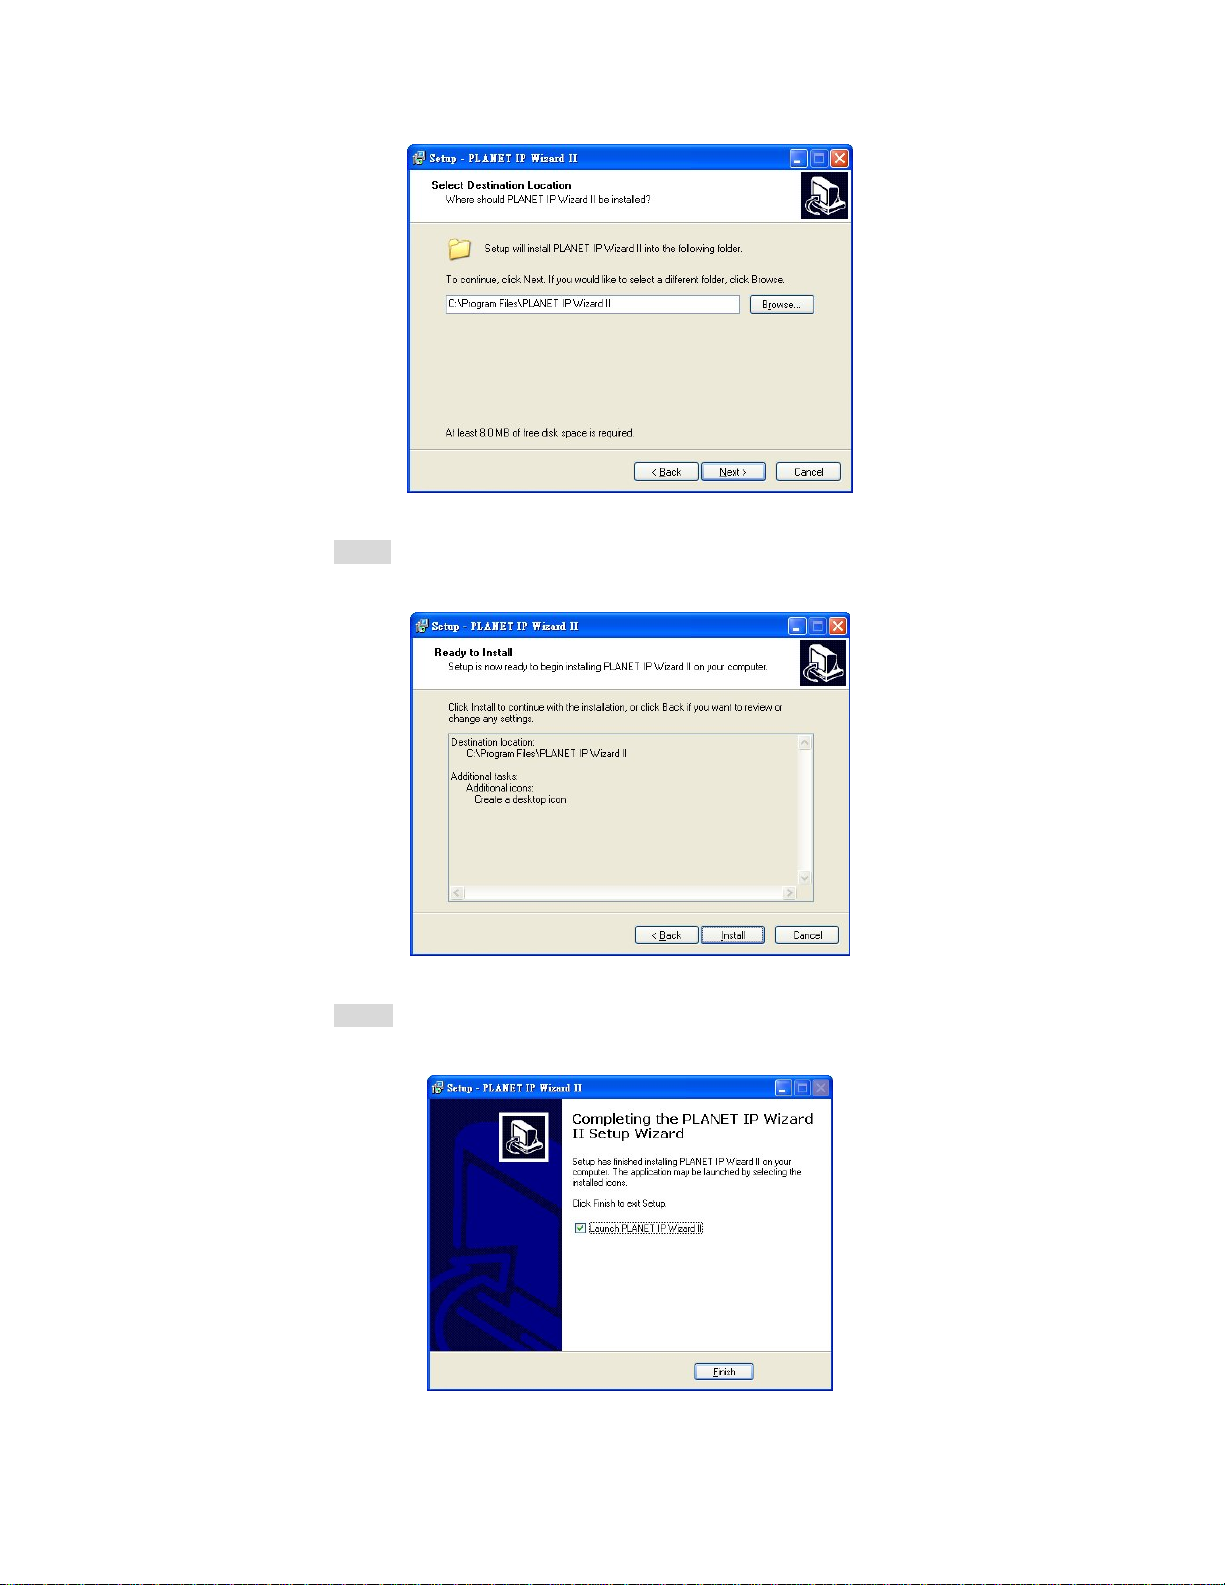
5. Please click “Install” to start the installation.
6. Please click “Finish” to complete the installation and launch program immediately.
13
Page 14
2.5 Preparation
When you installed the camera on a LAN environment, you may execute PLANET IPWizard II to
discover camera’s IP address and set up related parameters in the camera.
2.5.1 Search and View by PLANET IPWizard II
When you installed the Camera on a LAN environment, you have two easy ways to search your
Cameras by PLANET IPWizard II or UPnP discovery. Here is the way to execute PLANET
IPWizard II to discover Camera’s IP address and set up related parameter in a Camera.
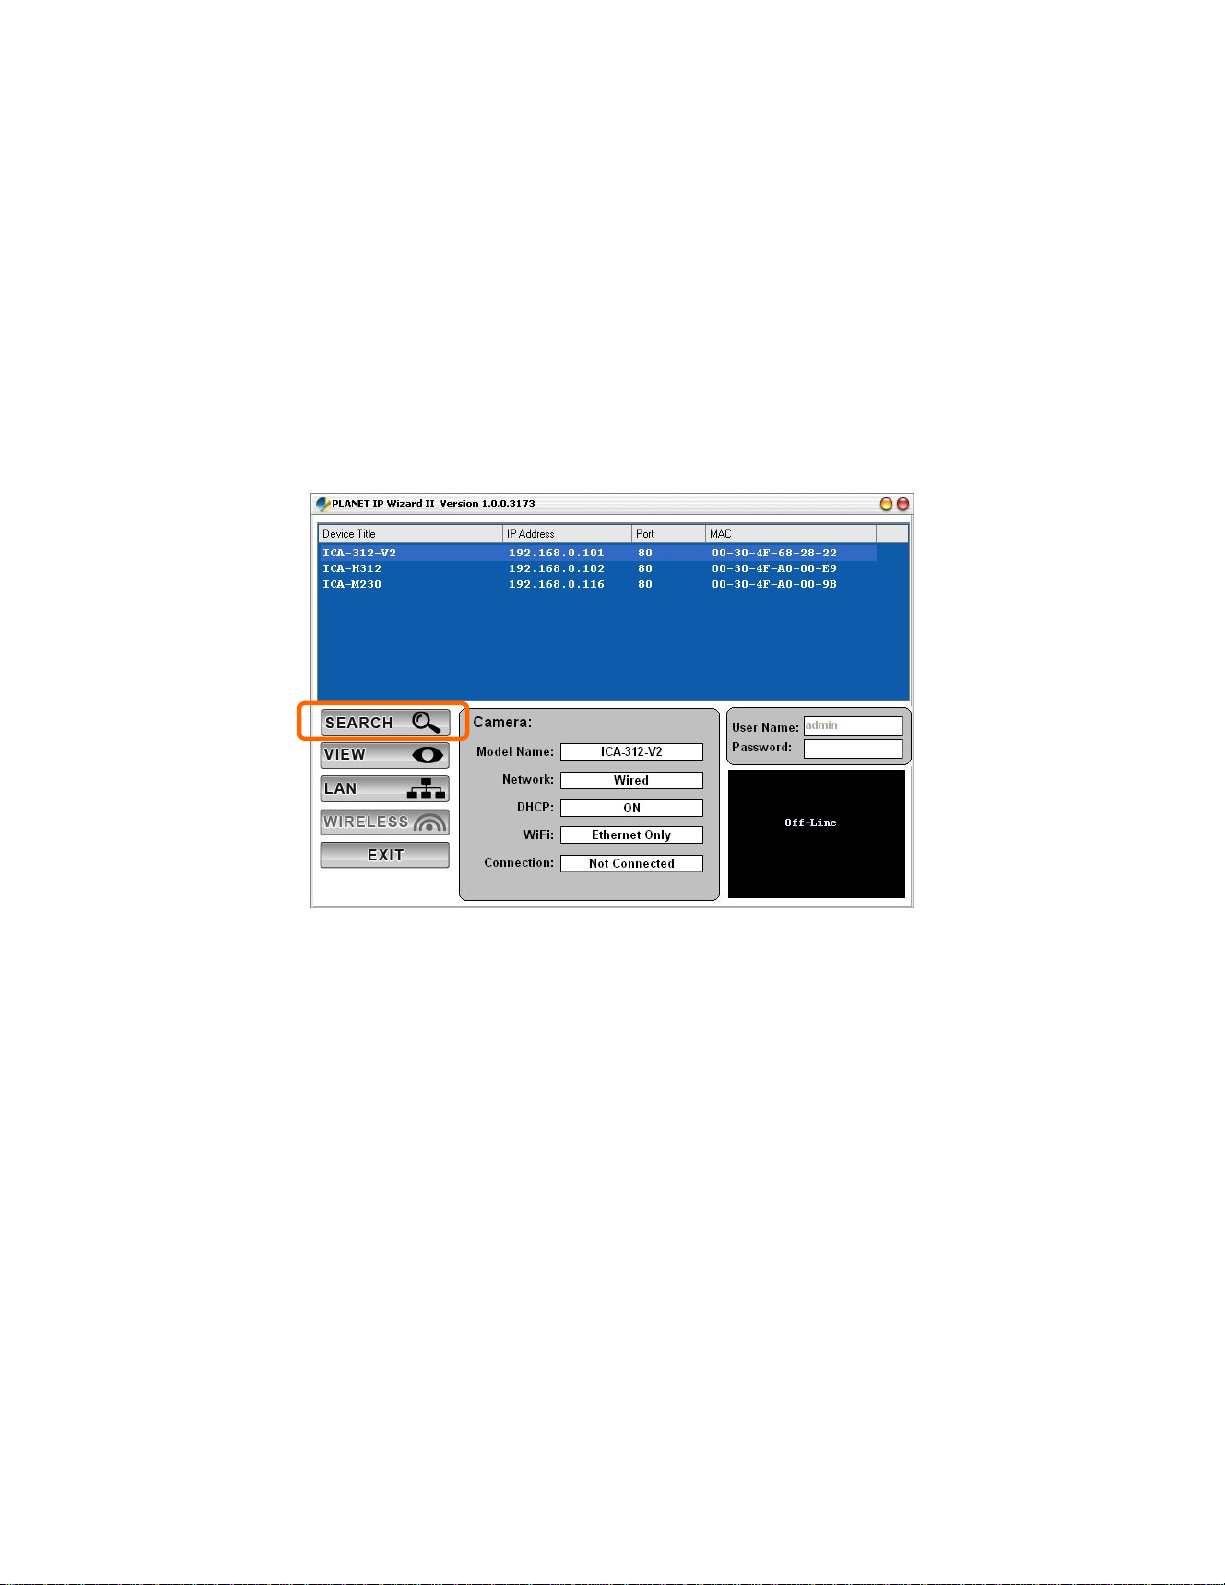
Search
When launch the PLANET IPWizard II, a searching window will pop up. PLANET IPWizard II is
starting to search Network Cameras on the LAN. The existed devices will be listed as below.
14
Page 15
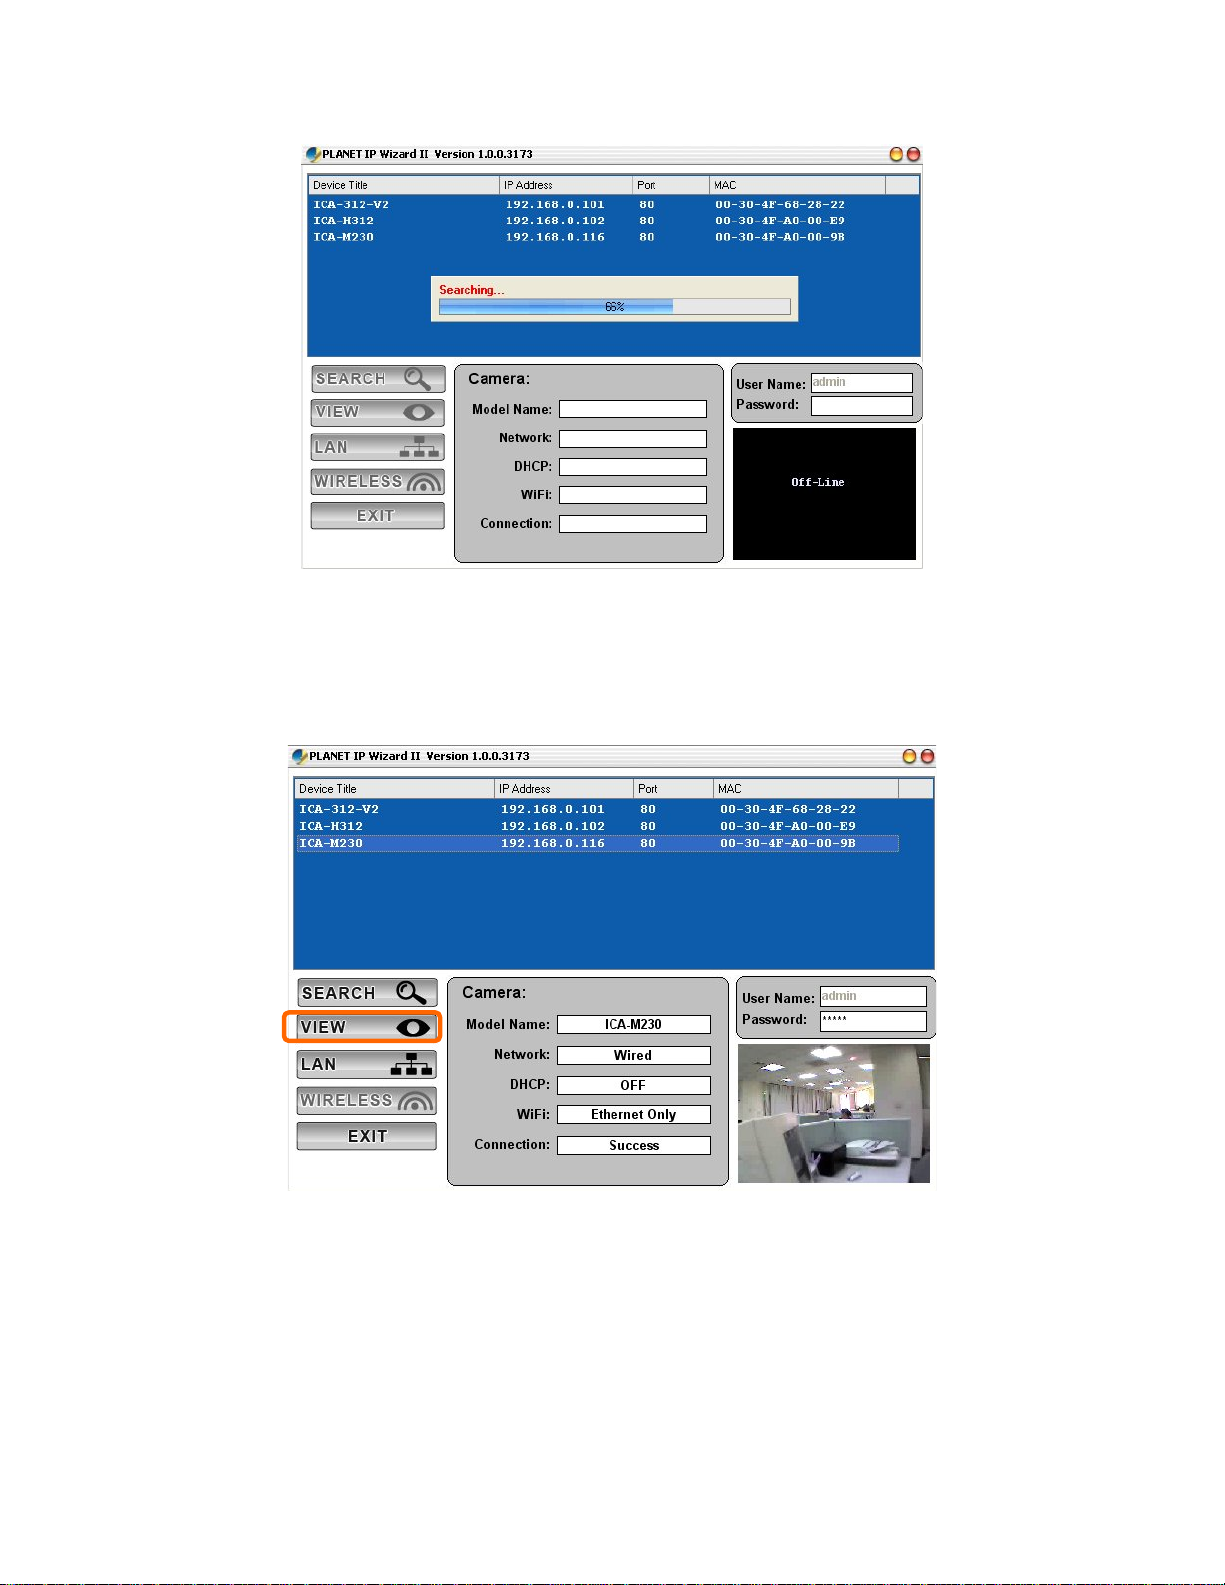
View
If PLANET IPWizard II finds network devices, View button will be available. Please select the
device you want to view and click the View button. Then you could see the video from camera
directly. Furthermore you could double click the left button of mouse to link to the network device
by browser.
2.5.2 Configure Network by PLANET IPWizard II
In case you want to change the IP related parameters of wired interface, please select the device
you want to configure and click the LAN button. Relative settings will be carried out as below.
15
Page 16
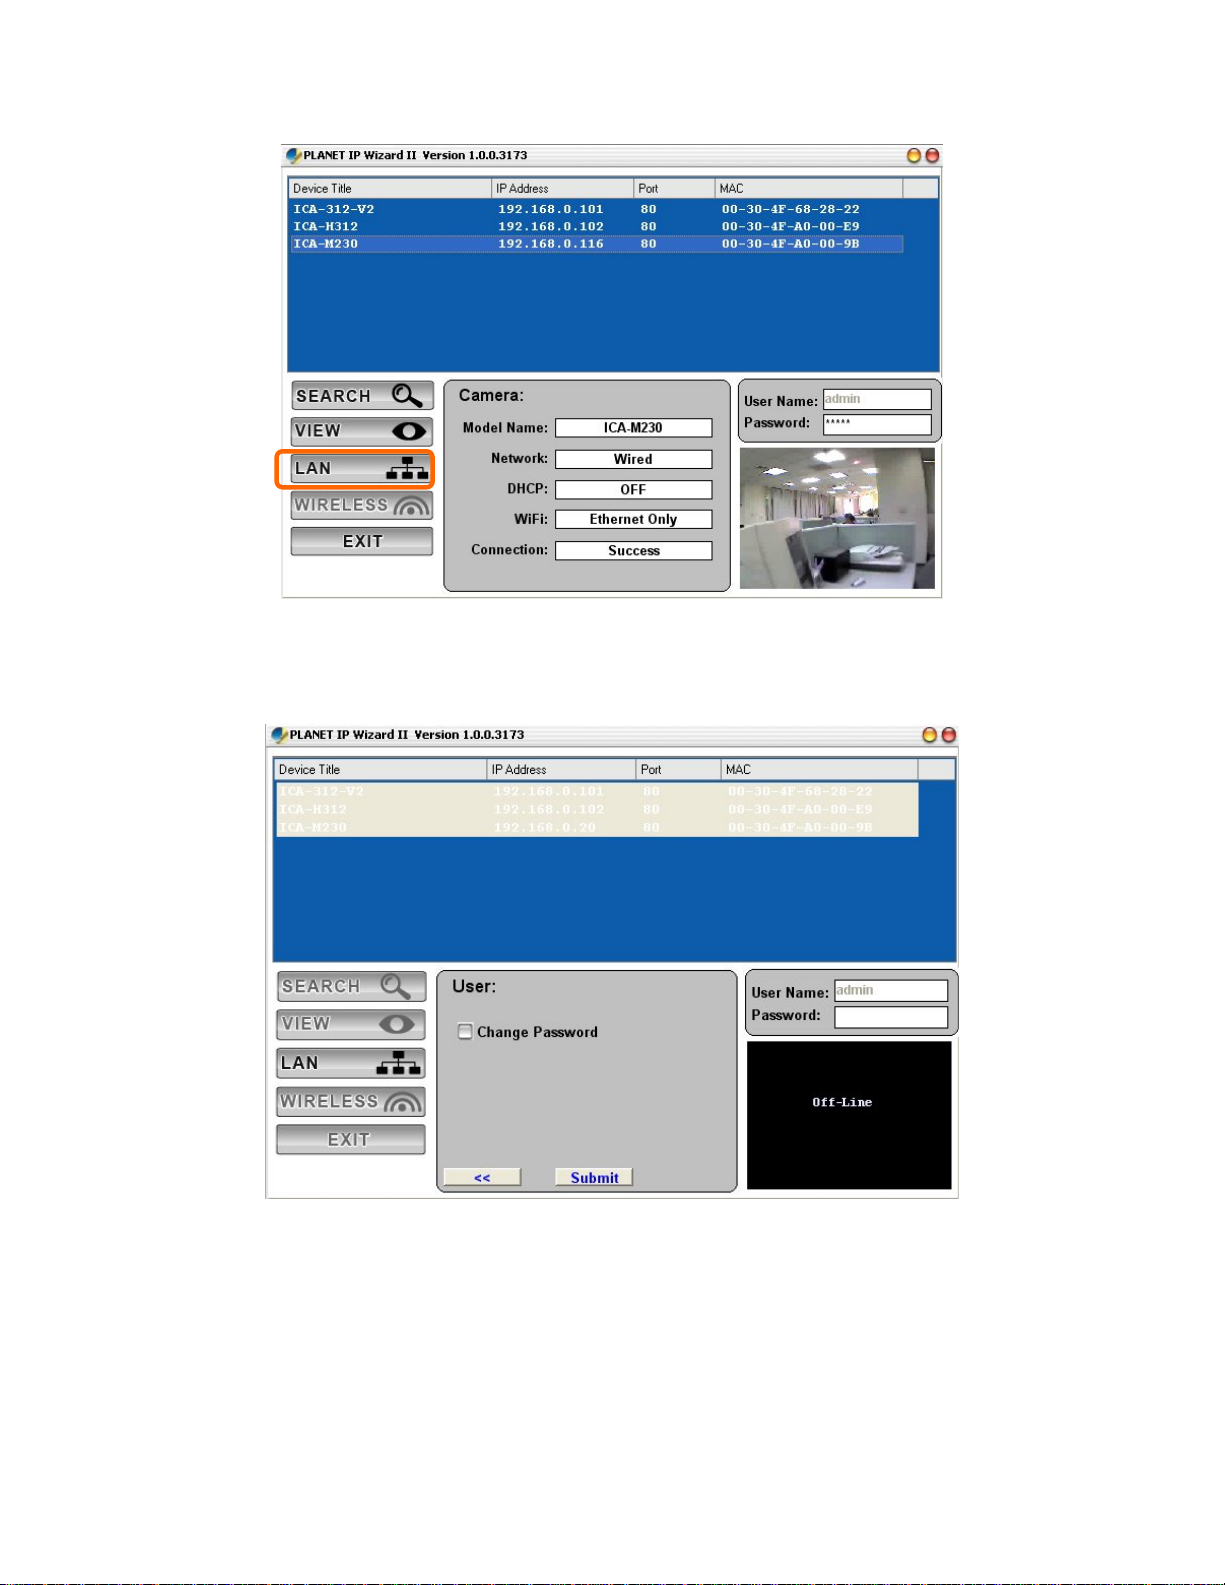
You could modify the relative settings of the selected device. Click “<<” button will quit the LAN
setting procedure and click “>>” button will move to next page as below.
In case, you do not want to change username and/or password, then just click “Submit” button to
perform your setting accordingly. Click “<<” button will go back to previous page.
If you like to change username and/or password of the device, just click the check button. Then,
the related fields will show up as below.
16
Page 17
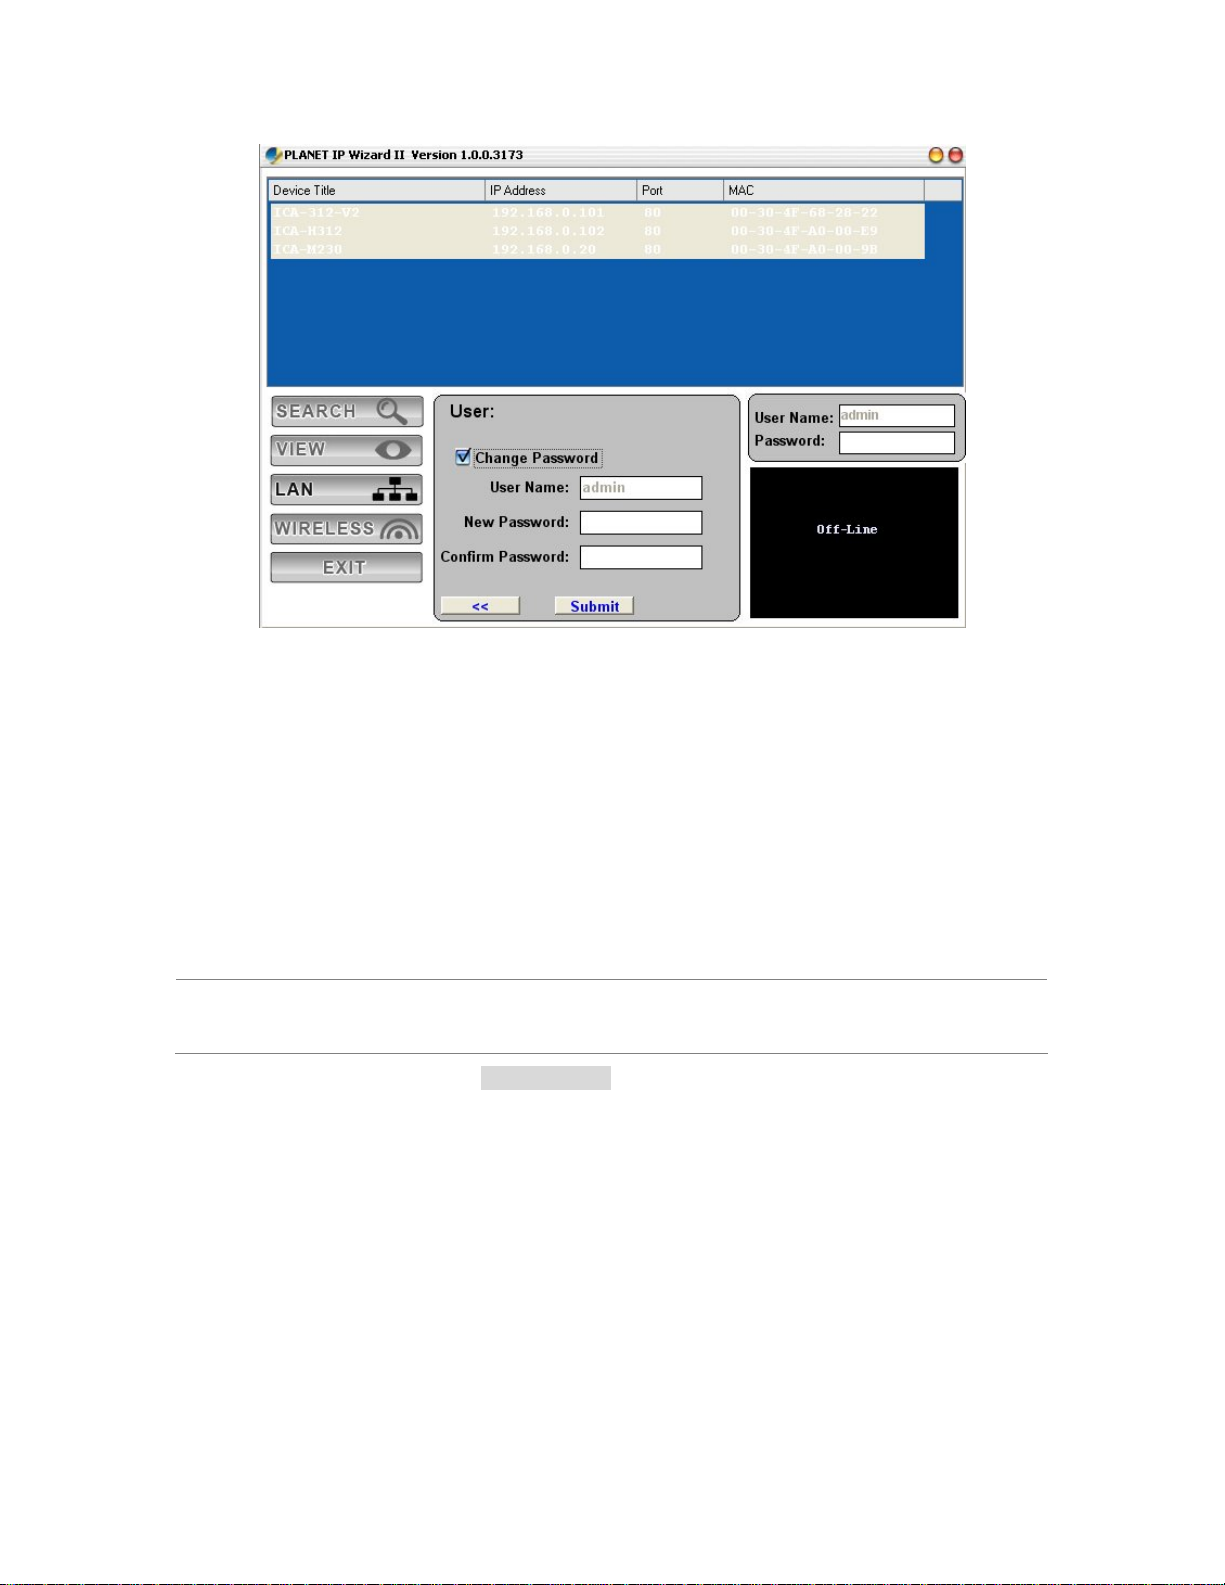
After keying in new username and password, click “Submit” button to perform your setting
accordingly. Click “<<” button will go back to previous page.
2.6 Using UPnP of Windows XP or Vista
2.6.1 Windows XP
UPnP™ is short for Universal Plug and Play, which is a networking architecture that provides
compatibility among networking equipment, software, and peripherals. This device is an UPnP
enabled device. If the operating system, Windows XP, of your PC is UPnP enabled, the device will
be very easy to configure. Use the following steps to enable UPnP settings only if your operating
system of PC is running Windows XP.
NOTE: Windows 2000 does not support UPnP feature.
Go to Start > Settings, and Click Control Panel
17
Page 18
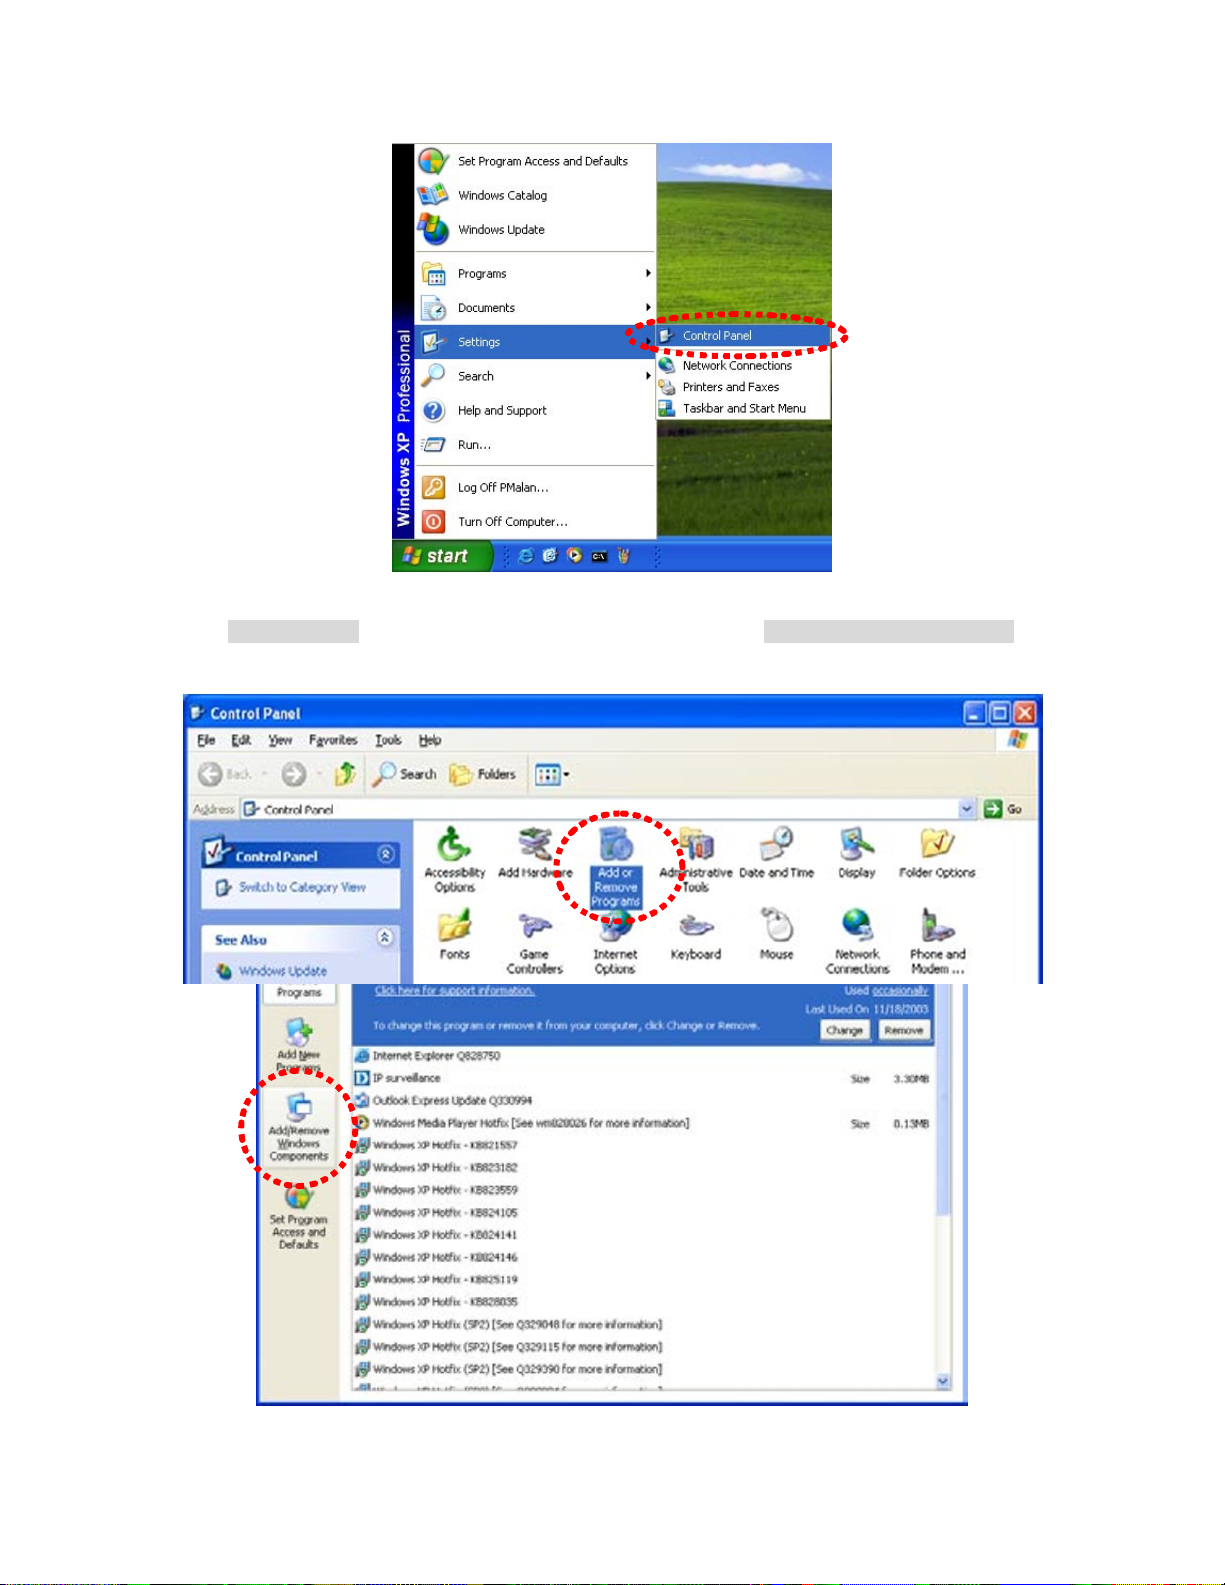
The “Control Panel” will display on the screen and double click “Add or Remove Programs” to
continue
The “Add or Remove Programs” will display on the screen and click Add/Remove Widows
Components to continue.
18
Page 19

The following screen will appear, select “Networking Services” and click “Details” to continue
The “Networking Services” will display on the screen, select “Universal Plug and Play” and click
“OK” to continue.
19
Page 20
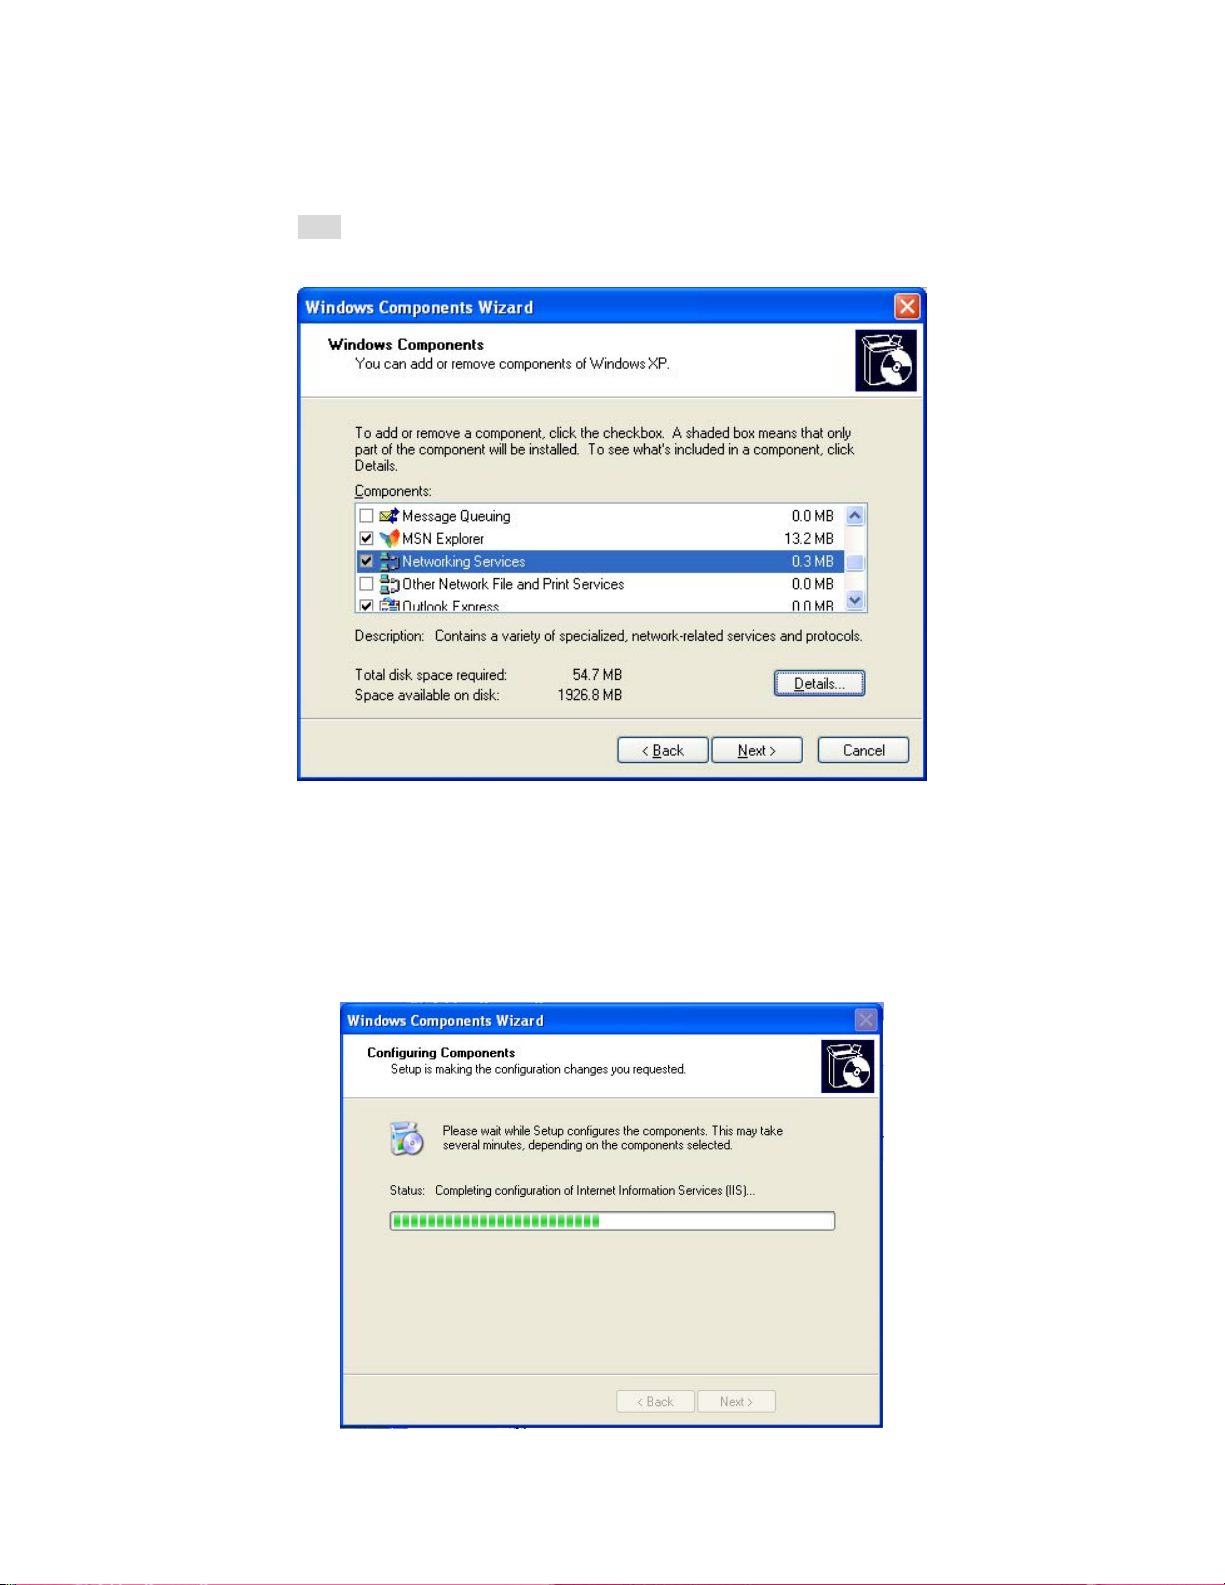
Please click “Next” to continue
The program will start installing the UPnP automatically. You will see the below pop-up screen,
please wait while Setup configures the components.
20
Page 21
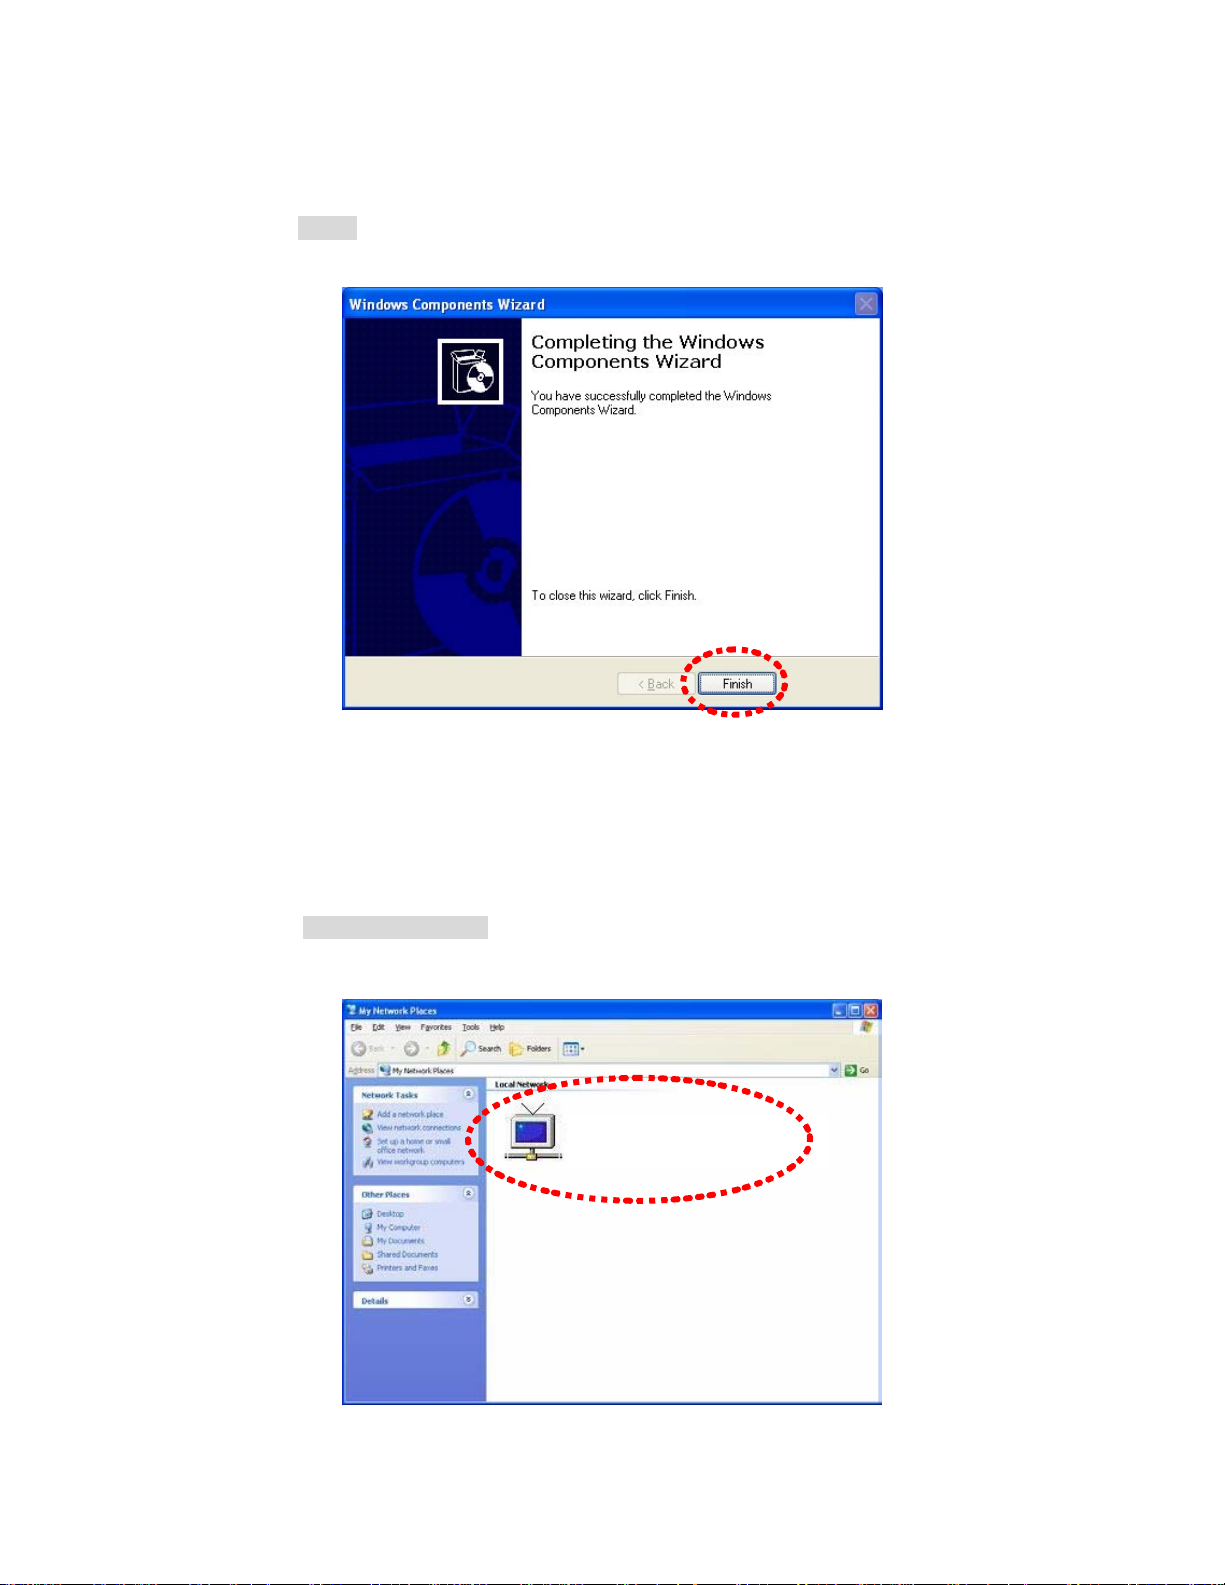
Please click “Finish” to complete the UPnP installation
Double-click “My Network Places” on the desktop, the “My Network Places” will display on the
screen and double-click the UPnP icon with internet camera to view your device in an internet
browser.
ICA-H312 00304f1a2244
21
Page 22
2.6.2 Windows Vista
UPnP™ is short for Universal Plug and Play, which is a networking architecture that provides
compatibility among networking equipment, software, and peripherals. This device is an UPnP
enabled device. If the operating system, Windows Vista, of your PC is UPnP enabled, the device
will be very easy to configure. Use the following steps to enable UPnP settings only if your
operating system of PC is running Windows Vista.
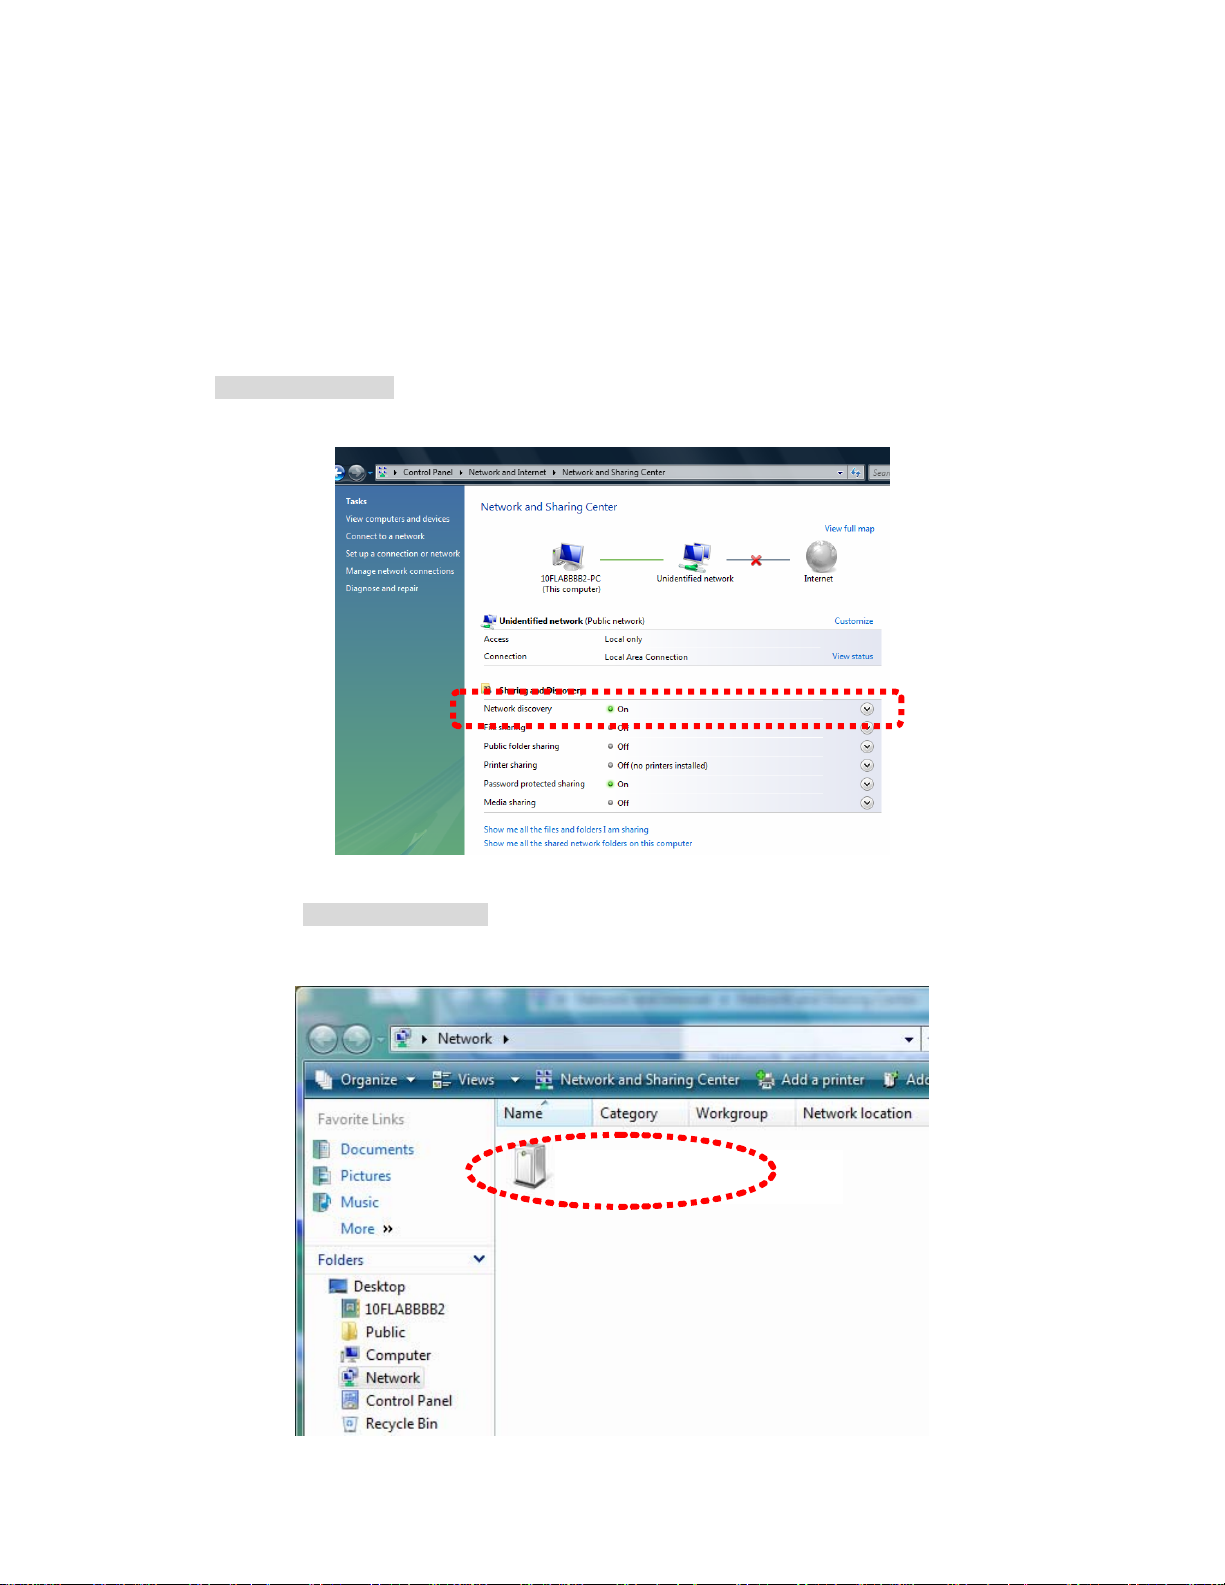
Go to Start > Control Panel > Network and Internet > Network and Sharing Center, and turn
on “Network Discovery”.
Double-click “My Network Places“ on the desktop, the “My Network Places” will display on the
screen and double-click the UPnP icon with internet camera to view your device in an internet
browser.
ICA-H312 – 00304fA15075
22
Page 23

2.7 Install the Device behind a NAT Router
Once installed, the device is accessible on your LAN. To access the device from the Internet you
must configure your broadband router to allow incoming data traffic to the device. If the device is
installed on the LAN with a router, then it may get a dynamic IP address from the DHCP server.
However, if the device wants to be accessed from the WAN, its IP address needs to be setup as
fixed IP, also the port forwarding or Virtual Server function of router needs to be setup.
However, if your NAT router supports UPnP feature, it can be very easy to achieve NAT traversal
automatically. To do this, enable the NAT-traversal feature, which will attempt to automatically
configure the router to allow access to the camera.
Installing the device with an UPnP router on your network is an easy 3–step procedure:
(1) Enable UPnP option of your NAT router
(2) Enable UPnP NAT traversal option of the Network Camera (default)
(3) Access your Network Camera by DIPS
(1) Enable UPnP option of your NAT router
To use UPnP IGD function (NAT traversal), you need to make sure the UPnP function is enabled
in your router. Most new home routers should support this function. Some of routers are default
enable and others are not. Please check user’s manual of your NAT router for detail.
(2) Enable UPnP NAT traversal option of the Network Camera
Refer to Setting Î Network Î UPnP page for detail NAT traversal setting. Note that this option
is default enabled.
(3) Access your Network Camera by DIPS
Refer to Setting Î System Î System page for detail DIPS information
23
Page 24
2.8 Setup ActiveX to use the Internet Camera
The internet camera web pages communicate with the internet camera using an ActiveX control.
The ActiveX control must be downloaded from the internet camera and installed on your PC. Your
Internet Explorer security settings must allow for the web page to work correctly. To use the
internet camera, user must setup his IE browser as follows:
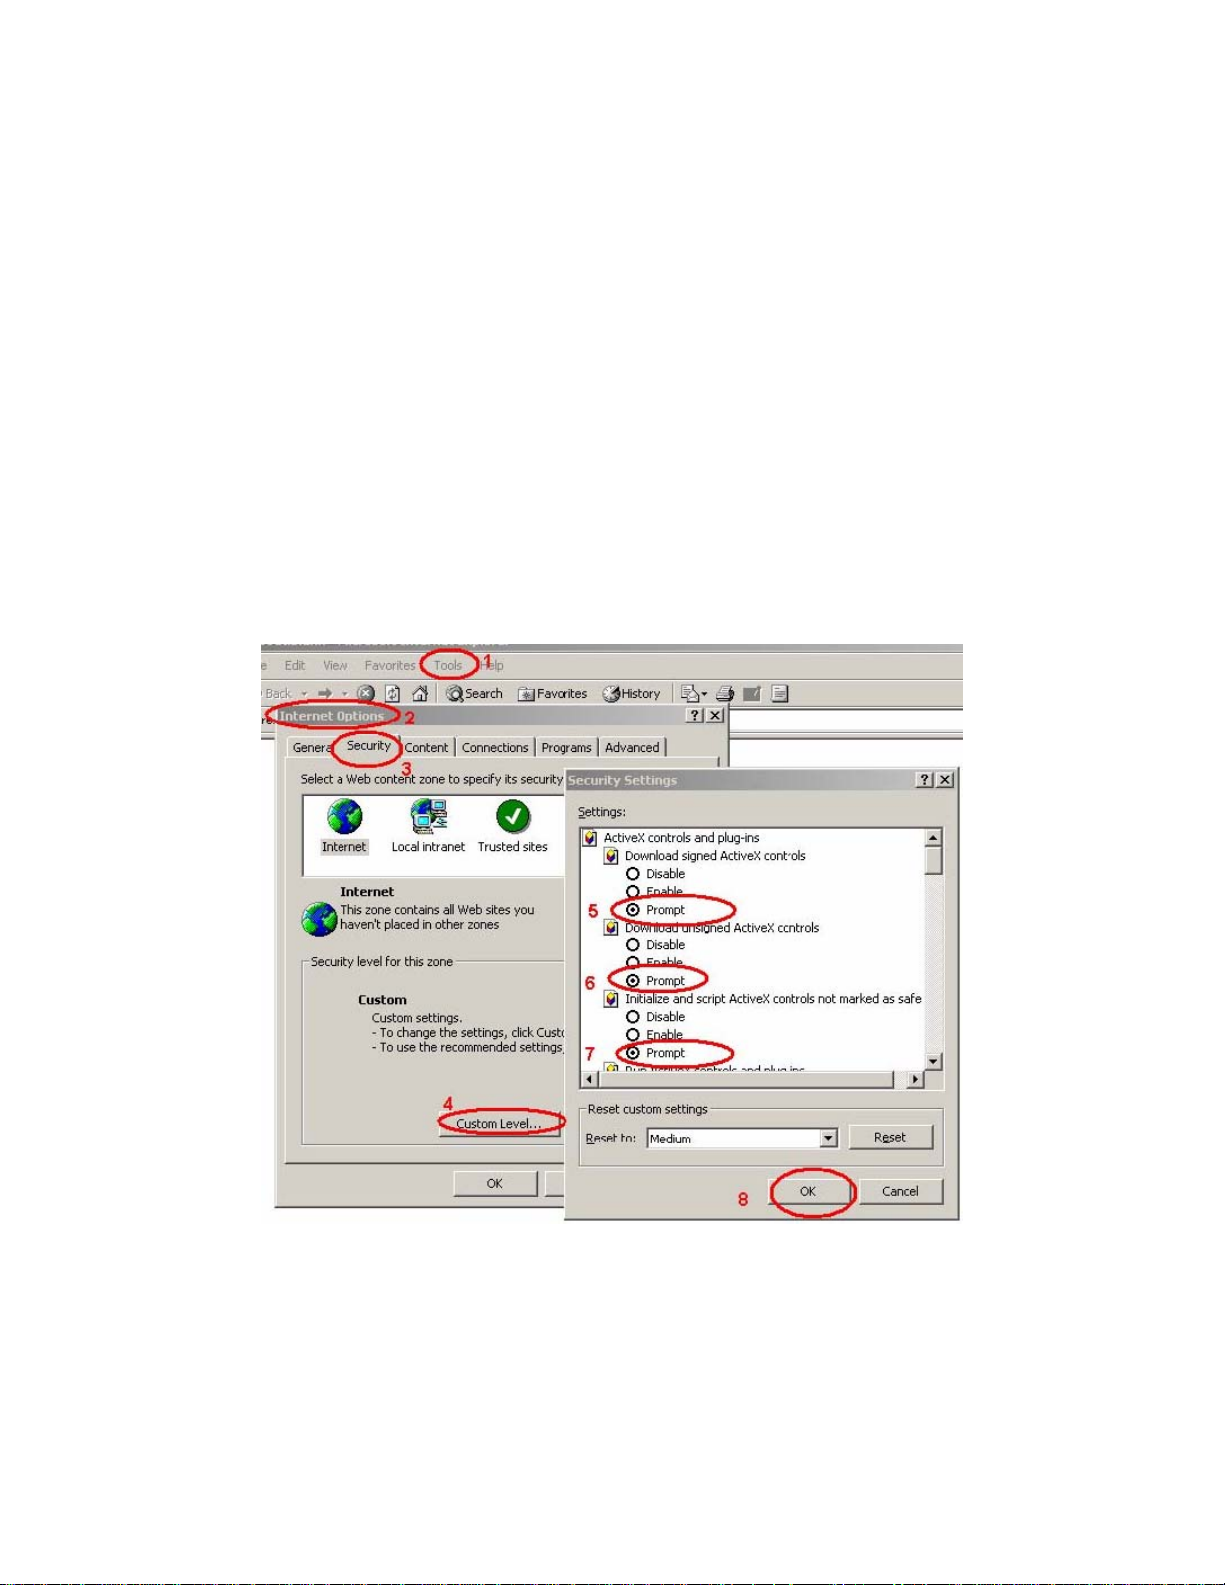
2.8.1 Internet Explorer 6 for Windows XP
From your IE browse Î ”Tools” Î ”Internet Options…” Î ”Security” ΔCustom Level…”, please
setup your “Settings” as follow.
Set the first 3 items
• Download the signed A ctiveX co ntrols
• Download the unsigned ActiveX controls
• Initialize and script the ActiveX controls not masked as safe to Prompt
By now, you have finished your entire PC configuration for internet camera.
24
Page 25
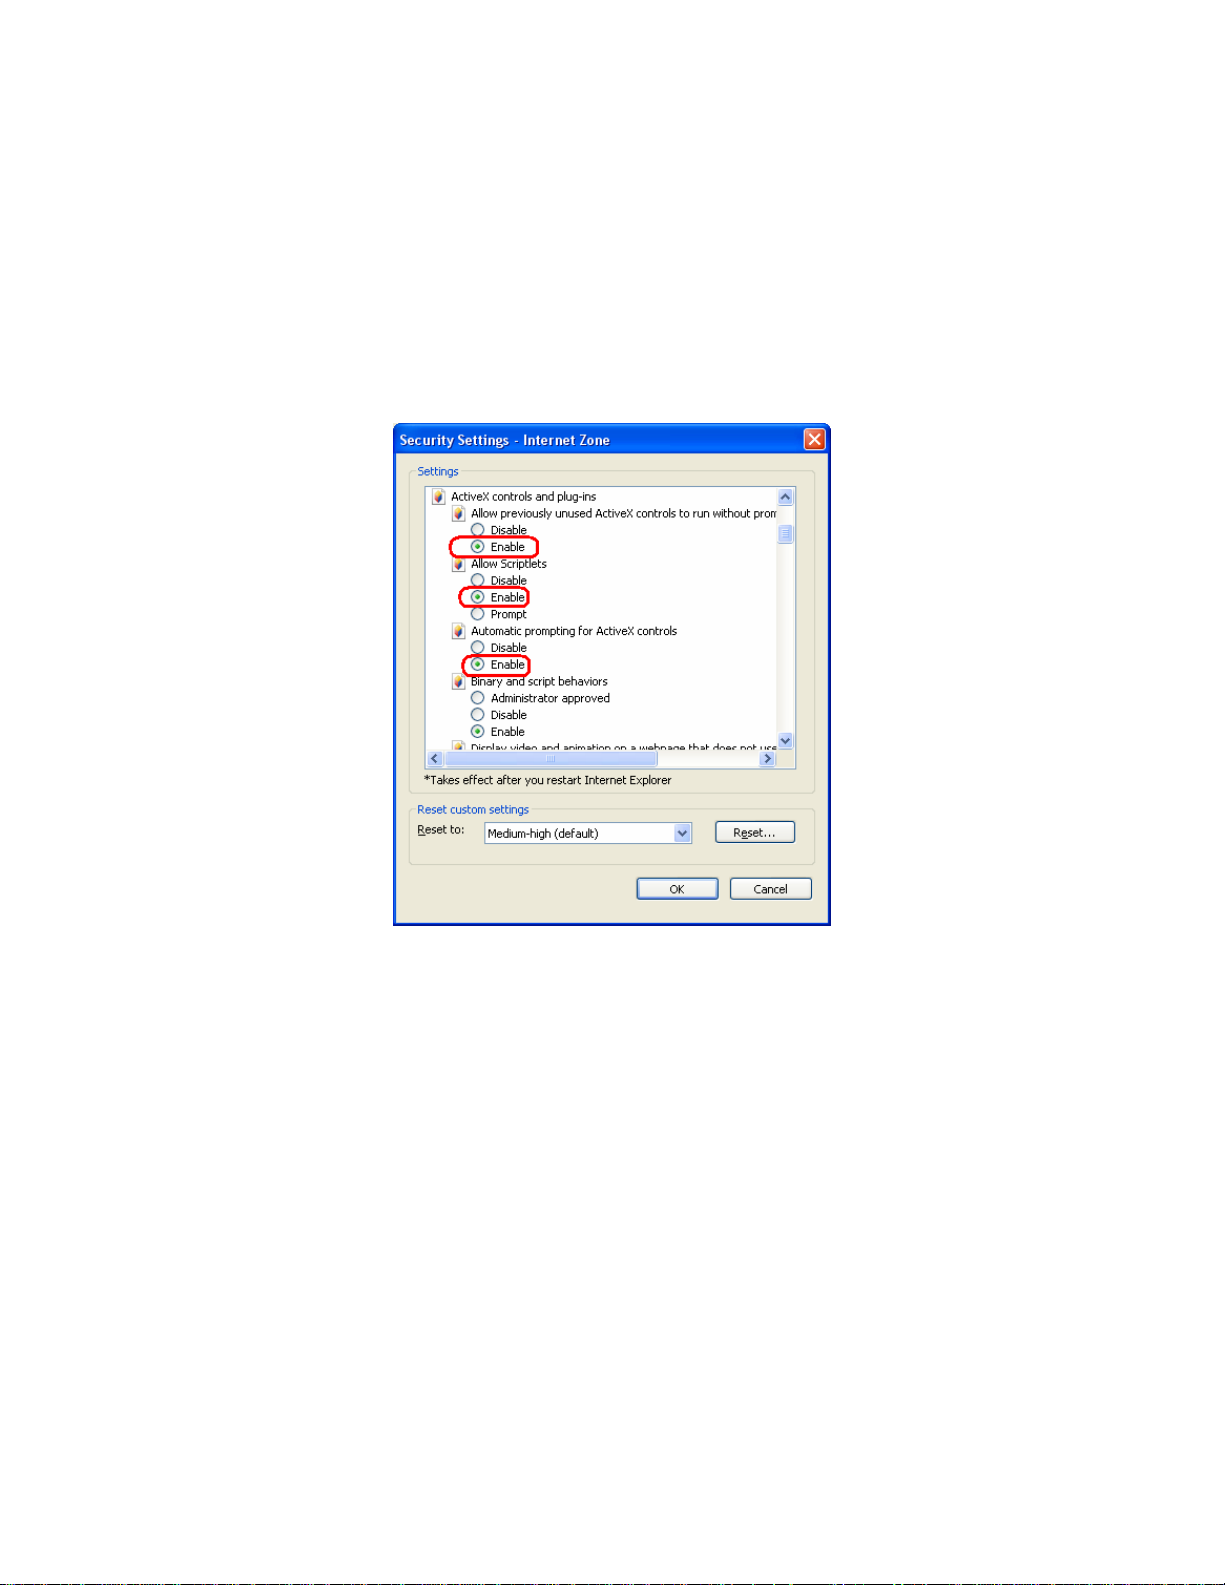
2.8.2 Internet Explorer 7 for Windows XP
From your IE browse Î ”Tools” Î ”Internet Options…” Î ”Security” ΔCustom Level…”, please
setup your “Settings” as follow.
Set the first 3 items
• Allow previously unused ActiveX control to run…
• Allows Script lets
• Automatic prompting for ActiveX controls
By now, you have finished your entire PC configuration for internet camera.
25
Page 26
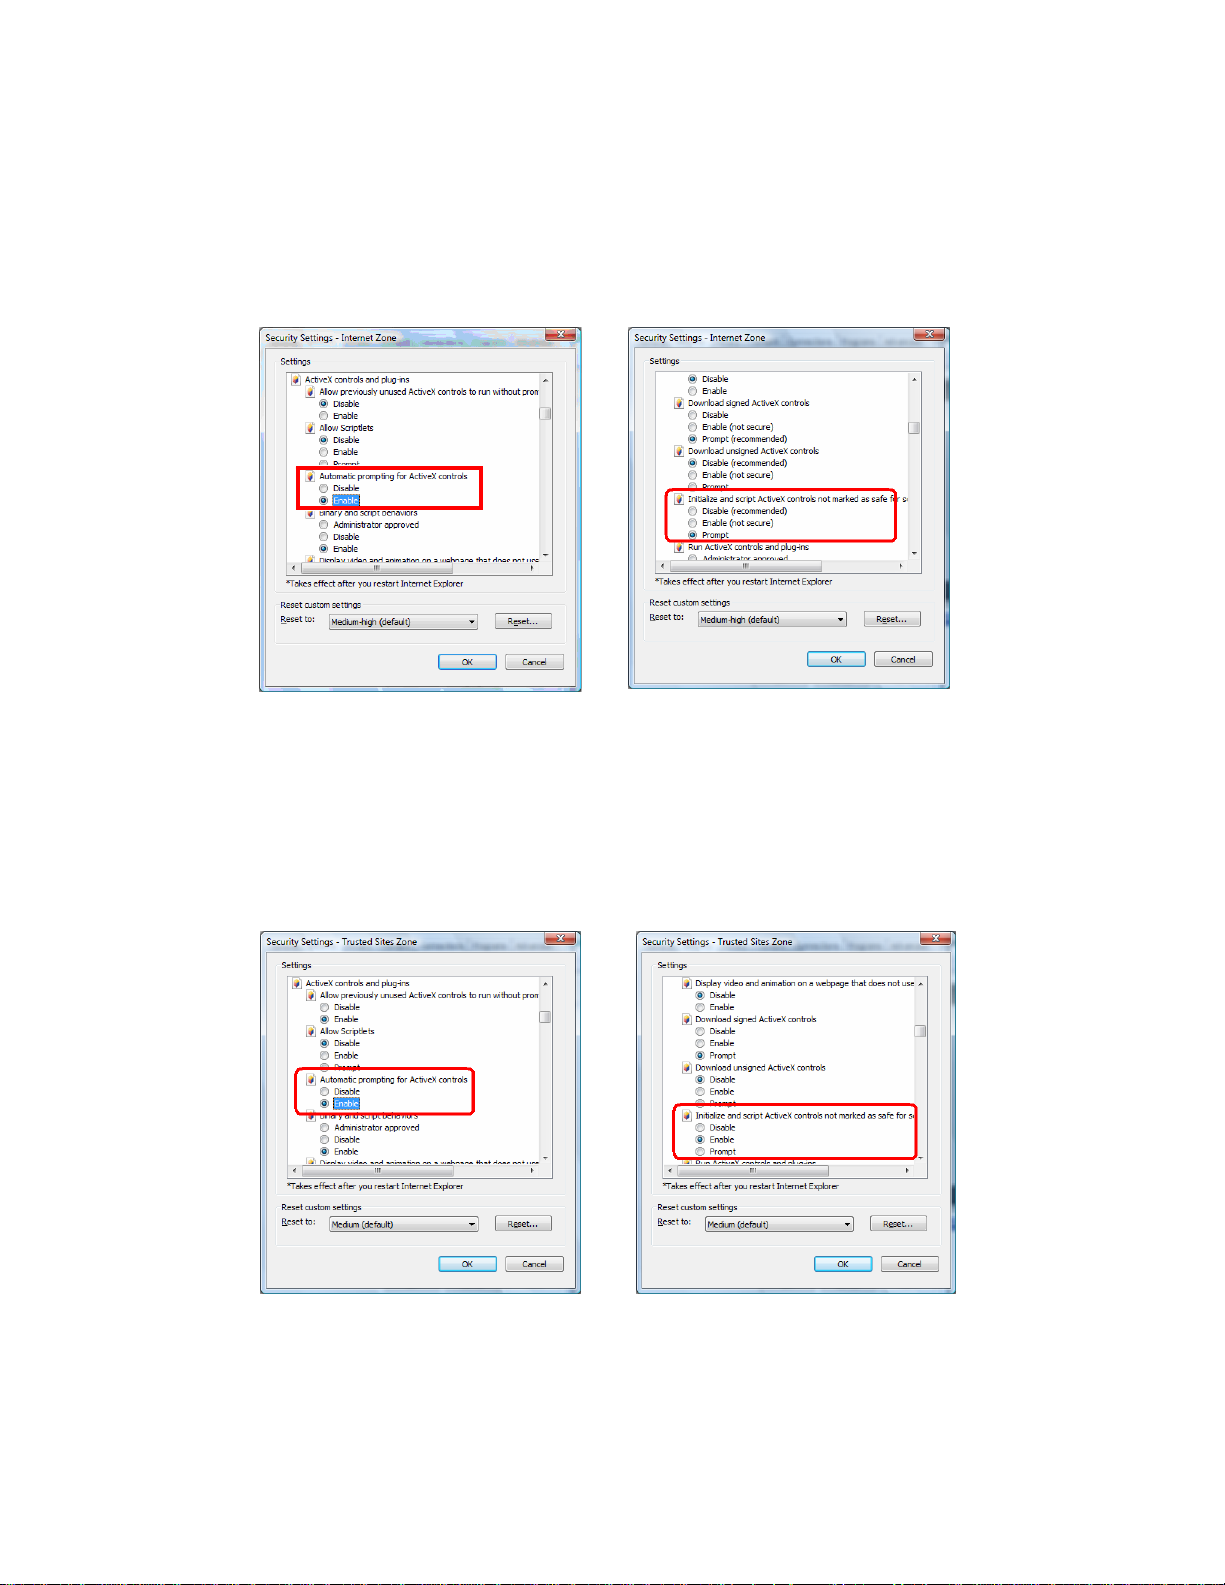
2.8.3 Internet Explorer 7 for Windows Vista
From your IE browse Î ”Tools” Î ”Internet Options…” Î ”Security” Î ”Internet” ΔCustom
Level…”, please setup your “Settings” as follow.
• Enable “Automatic prompting for ActiveX controls”
• Prompt “Initialize and script active controls not marked….”
From your IE browse Î ”Tools” Î ”Internet Options…” Î ”Security” Î ”Trusted Sites”
ΔCustom Level…”, please setup your “Settings” as follow.
• Enable “Automatic prompting for ActiveX controls”
• Prompt “Initialize and script active controls not marked….”
By now, you have finished your entire PC configuration for internet camera.
26
Page 27
3. Web-based Management
This chapter provides setup details of the internet camera’s Web-based Interface.
3.1 Introduction
The ICA-H312 can be configured with your Web Browser. Before configure, please make sure
your PC is under the same IP segment with internet camera.
3.2 Connecting to Internet Camera
z Use the following procedure to establish a connection from your PC to the camera.
z Once connected, you can add the camera to your Browser’s Favorites or Bookmarks.
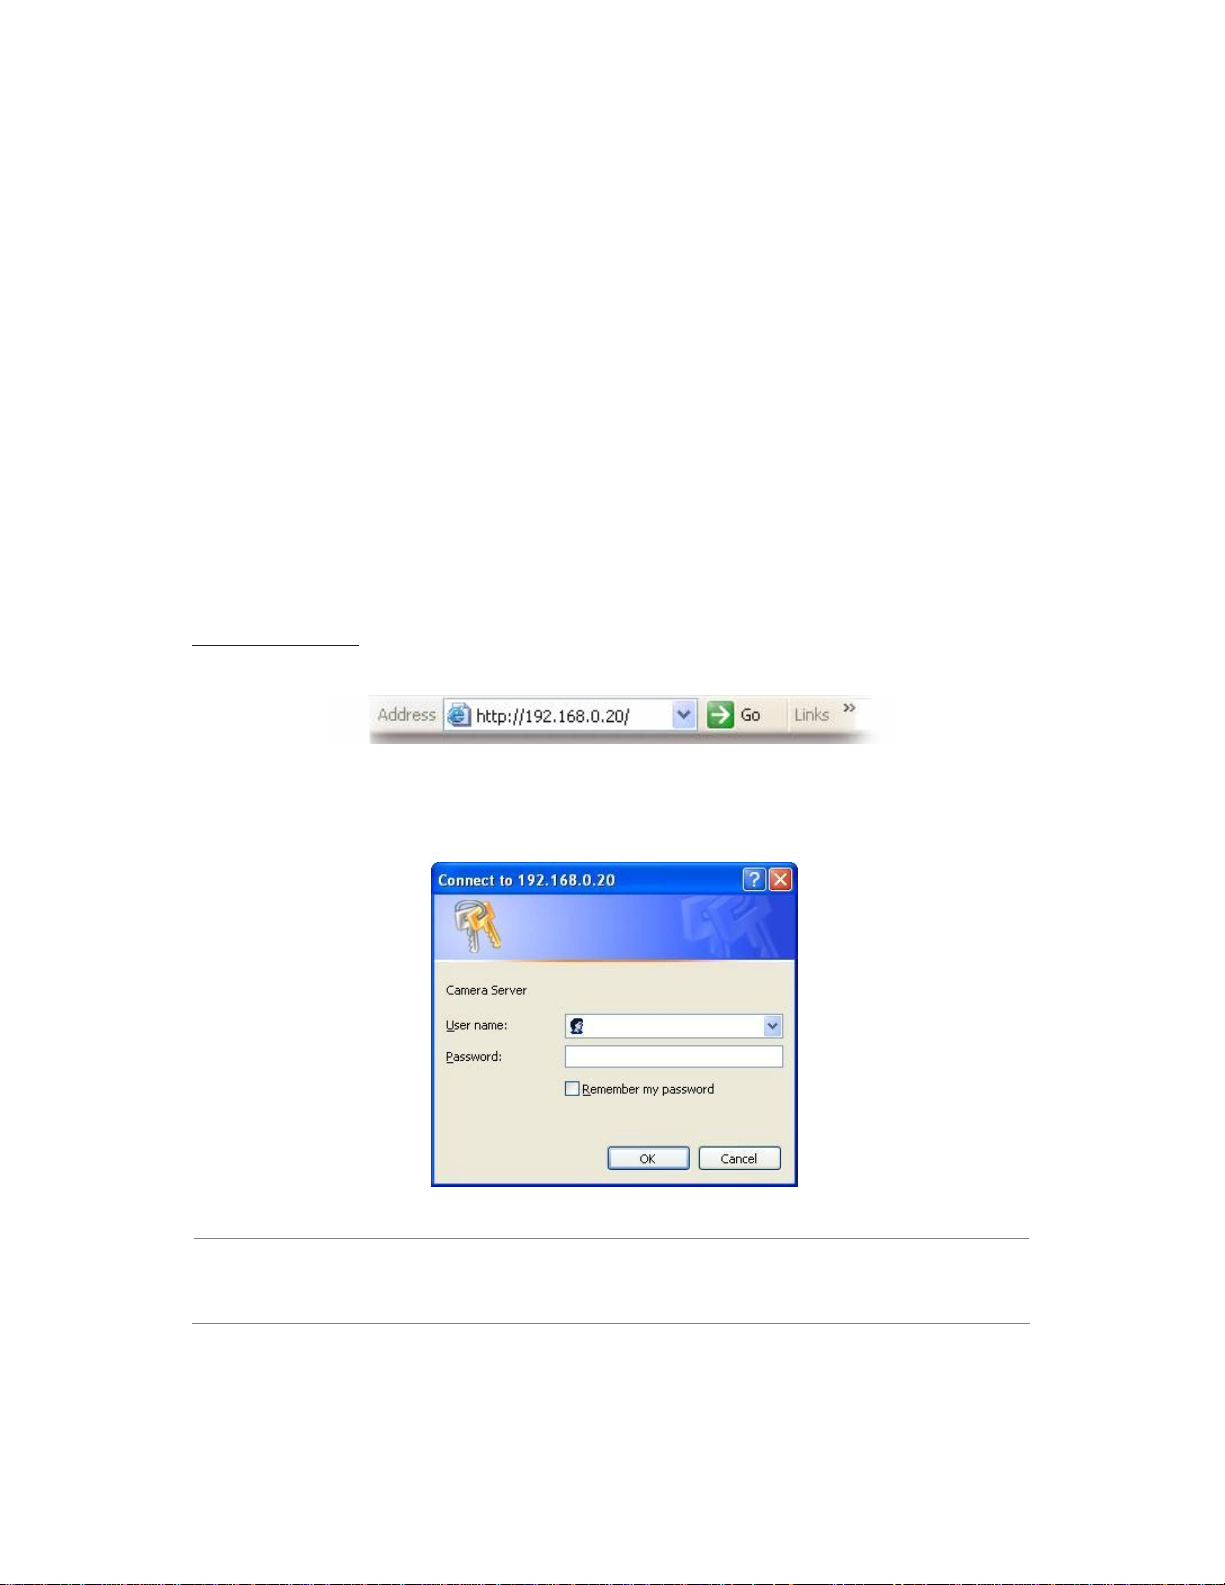
Start the web browser on the computer and type the IP address of the camera. The Default IP:
“ http://192.168.0.20
“
The login window of internet camera will appear, Default login username/password is :
admin/ <no password>
;
NOTE: If the User name and Password have been changed with PLANET IPWizard II,
please enter the new User name and Password here.
27
Page 28

Web browser may display the “Security Warming” window, select “Yes” to install and run the
ActiveX control into your PC.
After the ActiveX control was installed and run, the first image will be displayed.
NOTE: If you log in the camera as an ordinary user, setting function will be not available. If
you log in the camera as the administrator, you can perform all the settings
provided within the device.
28
Page 29

A
3.3 Live View
Start-up screen will be as follow no matter an ordinary users or an administrator.
Video Profile
ctiveX Control
Streaming Protocol
Language
Setting Menu
Image Flip
PTZ Control
Monitor Image Section
Monitor Image Section: The image shot by the camera is shown here. The date and
Video Profile: The camera support multi-profile for three compressions H264,
2-Way Audio: The internet camera supports 2-way audio function. User can
Video Information
Image Mirror
2-Way Audio
time are displayed at the top of the window.
MEPG-4 and M-JPEG simultaneously. User can chose the
proper and/or preferred profile here.
chose to enable or disable this function by toggling the icon
below
: Disable audio uploading function.
: Enable audio uploading function.
29
Page 30

Image Flip: According to camera position, user might need this function to
correct the view angle avoiding upside down. User can chose to
enable or disable this function by toggling the icon below.
: Disable audio uploading function.
: Enable audio uploading function.
Image Mirror: According to camera position, user might need this function to
correct the view angle. User can chose to enable or disable this
function by toggling the icon below.
: Disable vertical flip function.
: Enable vertical flip function.
ActiveX Control: The plug-in ActiveX control supports a lot of functions by
clicking the left mouse button. Note that this feature only
supports on the ActiveX control within Microsoft® Internet
Explorer.
Setting Menu: This function is detail setting for the camera that only available
for user logged into camera as administrator.
Item Action
Network
Camera Adjust camera parameters.
System
Video
Configure Network settings such as Wireless,
DHCP, DDNS, 3GPP, PPPoE and UPnP.
Configure system information, date & time,
maintenance, and view system log file.
Configure bit rate and frame rate of video
profiles.
Audio Configure audio parameters.
User Setup user name, password and login privilege.
30
Page 31

A
E-Mail Setup E-Mail configuration.
FTP
Object
Detection
Event
Schedule
Streaming Protocol: User can select proper streaming protocol according to
networking environment.
Language: The device could provide multiple languages to meet
customer’s requirement.
Video Information: Display video information including video format, resolution,
frame rate and bit rate.
This devise is a client site and configure
information to upload images to server.
Setup Object detection.
Configure the schedule while event triggered.
Camera Direction
Preset
Go Tour
uto Pan
Hide PTZ Control
Camera Speed
Tour
31
Page 32

Hide PTZ Control: Click the icon will hide the PTZ control function.
Camera Direction: Control camera up/down/left/right and home position.
Camera Speed: Choose the speed of Pan and Tilt.
Preset:
Tour: Select one of the camera tours. Camera tour is comprised by series of
Go Tour: Execute the selected camera tour.
Auto Pan: Execute the auto pan of camera. While auto pan is running, the
Add/Update the preset positions or go to one of these positions.
preset locations.
camera will swing the camera automatically. Note that the speed of
auto pan is fixed and cannot be adjustable.
3.4 ActiveX Control
The plug-in ActiveX control supports a lot of functions by clicking the left mouse button. Note that
this feature only supports on the ActiveX control within Microsoft® Internet Explorer.
On the ActiveX control icon, click the Left Mouse Button, then a menu pop-up. This menu provides
features that are unique to the ActiveX control. These features include:
• Digital Zoom,
• Record,
• Snapshot,
• Voice,
• Statistics,
• About
32
Page 33

3.4.1 Digital Zoom
Click Digital Zoom to active this function as above. User can drag or scale the box over the video
to adjust zoom ratio and position.
3.4.2 Record
Click Record to activate this function. Press Record button to start recording. The video file is
saved as ASF format into your local PC. While you want to stop it, press Stop to stop recording.
Select Browser, the pop-up window to select the save path and file name prefix, select OK to
continue.
After stop recording, list the files, this file is named as Video_yyyymmddhhmmss.asf
The ASF files can be display by the standard Windows Media Player, but it needs the DixectX 9.0
or later version to be installed.
NOTE: Default save path is “C:\Documents and Settings\All user\Desktop
33
Page 34

3.4.3 Snapshot
Click Snapshot to activate this function. Press Snapshot button to take a picture. The image file is
saved as JPEG format into your local PC. Select Browser, the pop-up window to select the save
path and file name prefix, select OK to continue.
If you like to retrieve the saved image, select the file to display the saved image by using any one
of graph editing tools.
NOTE: Default save path is “C:\Documents and Settings\All user\Desktop
3.4.4 Voice
Click Volume to activate this function. These have two control bars for speaker and microphone
volume. Scroll this control bar to adjust the audio attribute. Check the volume mute will mute the
speaker output.
34
Page 35

3.4.5 Statistics
Click Statistics to activate this function. A window will be popup to show the statistics information
of the streaming status.
NOTE: That this information is the statistics between the device and your local PC.
3.4.6 About
Click About to show the ActiveX information
35
Page 36

3.5 Network Configuration
Use this menu to configure the network to connect the device and the clients.
3.5.1 Network
This section provides the menu of connecting the device through Ethernet cable.
MAC address: Display the Ethernet MAC address of the device. Note that user cannot
change it.
Obtain an IP address
automatically
(DHCP):
IP Address: This address is a unique numbers that identifies a computer or device
Enable this checked box when a DHCP server is installed on the
network to issue IP address assignment. With this setting, the IP
address is assigned automatically. If this device cannot get an IP
address within limited tries, the device will assign a default IP address
for 192.168.0.20.
If you do not select “Obtain an IP address automatically”, then you
need to enter these network parameters by yourself.
on the WAN or LAN. These numbers are usually shown in groups
separated by periods, for example: 192.168.0.200
36
Page 37

Subnet Mask: Subnets allow network traffic between hosts to be separated based on
the network's configuration. In IP networking, traffic takes the form of
packets. IP subnets advance network security and performance to
some level by organizing hosts into logical groups. Subnet masks
contain four bytes and usually appear in the same "dotted decimal"
data. For example, a very common subnet mask in its binary
demonstration 11111111 11111111 11111111 00000000 will usually be
shown in the corresponding, more readable form as 255.255.255.0.
Gateway: A gateway is a piece of software or hardware that passes information
between networks. You'll see this term most often when you either log
in to an Internet site or when you're transient email between different
servers.
Obtain DNS from
DHCP:
Enable this checked box when a DHCP server is installed on the
network and provide DNS service.
Primary DNS: When you send email or position a browser to an Internet domain such
as xxxxx.com, the domain name system translates the names into IP
addresses. The term refers to two things: the conventions for naming
hosts and the way the names are control across the Internet.
Secondary DNS: The same function as DNS1. It is option not necessary
HTTP Port: The device supports two HTTP ports. The first one is default port 80
and this port is fixed. This port is very useful for Intranet usage. The
second HTTP port is changeable. Users could assign the second port
number of http protocol, and the WAN users should follow the port
number to login. If the http port is not assigned as 80, users have to
add the port number in back of IP address. For example:
http://192.168.0.20:8080.
Therefore, the user can access the device by either
http://xx.xx.xx.xx/, or
http://xx.xx.xx.xx:xxxx/ to access the device.
If multiple devices are installed on the LAN and also required to be
accessed from the WAN, then the HTTP Port can be assigned as the
virtual server port mapping to support multiple devices.
NOTE : When the configuration is finish, please click “OK” to save and enable
the setting.
37
Page 38

3.5.2 DDNS server
DDNS: Stands for Dynamic Domain Name Server
The device supports DDNS If your device is connected to xDSL directly, you might need this
feature. However, if your device is behind a NAT router, you will not need to enable this feature.
Because DDNS allows the device to use an easier way to remember naming format rather than an
IP address. The name of the domain is like the name of a person, and the IP address is like his
phone number. On the Internet we have IP numbers for each host (computer, server, router, and
so on), and we replace these IP numbers to easy remember names, which are organized into the
domain name. As to xDSL environment, most of the users will use dynamic IP addresses. If users
want to set up a web or a FTP server, then the Dynamic Domain Name Server is necessary. For
more DDNS configuration, please consult your dealer.
Your Internet Service Provider (ISP) provides you at least one IP address which you use to
connect to the Internet. The address you get may be static, meaning it never changes, or dyn amic,
meaning it’s likely to change periodically. Just how often it changes, depends on your ISP. A
dynamic IP address complicates remote access since you may not know what your current WAN
IP address is when you want to access your network over the Internet. The solution to the dynamic
IP address problem comes in the form of a dynamic DNS service.
The Internet uses DNS servers to lookup domain names and translates them into IP addresses.
Domain names are just easy to remember aliases for IP addresses. A dynamic DNS service is
unique because it provides a means of updating your IP address so that your listing will remain
current when your IP address changes. There are several excellent DDNS services available on
the Internet and best of all they’re free to use. One such service you can use is www.DynDNS.org.
You’ll need to register with the service and set up the domain name of your choice to begi n using it.
Please refer to the home page of the service for detailed instructions or refer to Appendix E for
more information.
38
Page 39

DDNS: To enable or disable the DDNS service here.
Server name: Choose the built-in DDNS server.
DDNS Host: The domain name is applied of this device.
User Name: The user name is used to log into DDNS.
Password: The password is used to log into DDNS.
3.5.3 PPPoE
PPPoE: Stands for Point to Point Protocol over Ethernet
A standard builds on Ethernet and Point-to-Point network protocol. It allows internet camera
connect to Internet with xDSL or cable connection; it can dial up your ISP and get a dynamic IP
address. For more PPPoE and Internet configuration, please consult your ISP.
It can directly connect to the xDSL, however, it should be setup on a LAN environment to program
the PPPoE information first, and then connect to the xDSL modem. Power on again, then the
device will dial on to the ISP connect to the WAN through the xDSL modem.
The procedures are
• Connect to a LAN by DHCP or Fixed IP
• Access the device, enter Setting Î Network Î PPPoE as below
39
Page 40

PPPoE: To enable or disable the PPPoE service here.
User Name: Type the user name for the PPPoE service which is provided by
ISP.
Password: Type the password for the PPPoE service which is provided by
ISP.
IP Address / Subnet
Mask / Gateway:
Status: Shows the Status of PPPoE connection.
Shows the IP information got from PPPoE server site.
3.5.4 Streaming
RTSP is a streaming control protocol, and a starting point for negotiating transports such as RTP,
multicast and Unicast, and for negotiating codecs. RTSP can be considered a "remote control" for
controlling the media stream delivered by a media server. RTSP servers typically use RTP as the
protocol for the actual transport of audio/video data.
40
Page 41

RTSP Port: Choose the RTSP port. The RTSP protocol allows a connecting client to start
a video stream. Enter the RTSP port number to use. The default value is
554.
RTP Port: Specify the range of transmission port number of video stream. The default
range is 50000 to 50999. User can specify a number between 1024 and
65535.
NOTE: 1. To use the 3GPP function, in addition to previous section, you might
need more information or configuration to make this function work.
2. To use the 3GPP function, it strongly recommends installing the
Networked Device with a public and fixed IP address without any firewall
protection.
3. Port 554 is the default for RTSP service. However, sometimes, some
service providers change this port number for some reasons. If so, user
needs to change this port accordingly.
Dialing procedure:
1. Choose a verified player (PacketVideo, Quicktime or Realplayer currently)
2. Use the following URL to access: rtsp://host/mpeg4/media.3gp
Where host is the host name or IP address of the camera.
Compatible 3G mobile phone:
Please contact your dealer to get the approved list of compatible 3G phone.
3.5.5 UPnP
UPnP is short for Universal Plug and Play, which is a networking architecture that provides
compatibility among networking equipment, software, and peripherals. This device is an UPnP
enabled Network Camera. If your operating system is UPnP enabled, the device will automatically
be detected and a new icon will be added to “My Network Places.” If you do not want to use the
UPnP functionality, it can be disabled
In addition, this device also provides UPnP IGD function for NAT traversal easily. Use NAT
traversal when your device is located on an intranet (LAN) and you wish to make it available from
the other (WAN) side of a NAT router. With NAT traversal properly configured, all HTTP traffic to
an external HTTP port in the NAT router will be forwarded to the device.
41
Page 42

UPnP: To enable or disable the UPnP service here.
Friendly Name: Shows the friendly name of this device here.
UPnP NAT Traversal: When enabled, the device will attempt to configure port mapping in
a NAT router on your network, using UPnP™. Note that UPnP™
must be enabled in the NAT router first.
Port Range: The port range will open in NAT router.
External IP address: Show the IP address and port for WAN access through Internet. If
NAT traversal is configured successfully, user can use this IP
address and port to access this device.
42
Page 43

3.5.6 IP Filter
You can enter different user’s IP address which are allowing enter or denying by the device.
IP Filter: To enable or disable the IP filter function here.
IP Filter Policy: Choose the filter policy where is denying or allowing.
43
Page 44

3.5.7 IP Notification
In case the IP address is changed, system is able to send out an email to alert someone if the
function is enabled.
SMTP Notification (e-mail):
Send To:
Subject: Type the subject/title of the E-mail.
TCP Notification:
TCP Server: Type the server name or the IP address of the TCP server.
TCP Port: Set port number of TCP server.
Message: The message will be sent to FTP server.
HTTP Notification: If enable this function, then the fields below need to be filled.
If enable this function, then the “Send to“ and “Subject” field
need to be filled.
Type the receiver’s e-mail address. This address is used for
reply mail.
If enable this function, then the “TCP Server“, “TCP Port”,
and “Message” fields need to be filled.
URL: Type the server name or the IP address of the HTTP server
44
Page 45

HTTP Login name: Type the user name for the HTTP server.
HTTP Login Password: Type the password for the HTTP server.
Proxy Address: Type the server name or the IP address of the HTTP Proxy.
Proxy Port: Set port number of Proxy.
Proxy Login name: Type the user name for the HTTP Proxy.
Proxy Login Password: Type the password for the HTTP Proxy.
Custom parameter: User can set specific parameters to HTTP server.
Message: The message will be sent to HTTP server.
45
Page 46

3.6 Camera Configuration
Use this menu to set the function of the camera of internet camera
3.6.1 Picture
Color Level:
Brightness: Large value will brighten camera.
Sharpness: Large value will sharpen camera.
Contrast: Large value will contrast camera heavily.
De-Noise: De-Noise can remove or lower unwanted noise and preserve fine
Video Input Offset: Use to adjust start point of captured video.
It changes the image shadows, midtones and highlights. Can adjust
an image's tonal range and contrast
details and edges.
46
Page 47

3.6.2 PTZ Setting
Camera Protocol: This device can connect to a PTZ camera or speed dome camera
and controls them thru RS485 interface.
Camera Address: This is the camera ID set in PTZ camera or speed dome camera.
Note
that please DO NOT changes the default value if unnecessary. If so,
user needs to check and set value properly for both sides.
Baud rate: This is the communication speed between network module and P/T
scanner.
NOTE: If need to change these parameters, user needs to check and set value properly for
both, network module and P/T scanner
47
Page 48

3.6.3 Preset Setting
This page provides the edit tool to modify or delete the “Preset Setting” item by item.
3.6.4 Tour Setting
Up to 64 positions can be preset, and the camera can be programming to move to the preset
position sequentially.
48
Page 49

Tour Name: The group name of the sequence of camera tour. The maximum number of
camera tour is 16.
Running: Enable or disable this camera tour.
Preset: Set the sequence of the tour. Maximum 16 points can be assigned. The
selected preset position is added in the Sequence list from 1 to 16.
Wait Time: Type a period of time during which the camera is to stay at each preset point,
between 0 to 36000 seconds.
NOTE: To use the camera tour function, user must preset some camera positions first. The
maximum number of preset points is 64.
49
Page 50

3.7 System
Use this menu to perform the principal settings of internet camera.
3.7.1 System
Device title: You can enter the name of this unit here. It’s very useful to identify the
specific device from multiple units.
Software version: This information shows the software version in the device.
Network LED Switch the LED light of this internet camera on or off, that Network
LEDs will stop working, in case you don’t want other people know the
camera is transferring data.
Power LED Switch the LED light of this internet camera on or off.
Log: User can check the system log information of the device, including the
Main Info, Appended Info, Operator IP, and so on …
Reload: Click this button; user can refresh the log information of the device.
50
Page 51

3.7.2 Date & Time
You can setup the time setting of internet camera, make it synchronized with PC or remote NTP
server. Also, you may select the correct time zone of your country.
Server Date
& Time:
PC Time: Displays the date and time of the connected PC
Adjust:
NTP server name: Type the host name or IP address or domain name of the NTP
NTP sync. Interval: Select an interval between 1 and 23 hours at which you want to
Time zone: Set the time difference from Greenwich Mean Time in the area
Displays the date and time of the device
Synchronize
with PC:
Manual setting: Click this option to set time and date manually
Synchronize
with NTP :
server.
adjust the device’s time referring to NTP server
where the device is installed.
Click this option to enable time synchronization
with PC time
Click this option if you want to synchronize the
device’s date and time with those of time server
called NTP server (Network Time Protocol)
Daylight saving: Check this item to enable daylight saving adjustment.
51
Page 52

Daylight Saving
Start Time:
Daylight Saving
Stop Time:
Daylight Saving
Offset:
3.7.3 Maintenance
Sets up the date and time of daylight saving start time.
Sets up the date and time of daylight saving stop time.
Sets up the date of daylight saving offset.
Default Settings
(Include the network
setting):
Default Settings
(Except the network
setting):
Backup Setting: To take a backup of all of the parameters, click this button. If
Recall the device hard factory default settings. Note that click
this button will reset all device’s parameters to the factory
settings (including the IP address).
The unit is restarted and most current settings are reset to
factory default values. This action will not reset the network
setting.
necessary, it will then be possible to return to the previous
settings, if settings are changed and there is unexpected
behavior.
52
Page 53

Restore Setting: Click the “Browse” button to locate the s aved backup file and
then click the “Restore Setting” button. The settings will be
restored to the previous configuration.
Firmware upgrade: The device supports new firmware upgrade.
1. Close all other application programs which are not
necessary for firmware update.
2. Make sure that only you access this device at this moment
3. Disable Motion Detection function.
4. Select “Firmware name”
5. Select the Firmware binary file.
Note: That it must make sure that the Firmware only applies to this device, once update, it
will be burned into FLASH ROM of system.
6. Once the firmware file was selected, select “Upgrade”.
7. The upgrade progress information will be displayed on the
screen.
8. A message will be shown while the firmware upgraded.
Once the upgrading process completed, the device will
reboot the system automatically.
9. Please wait for 80 seconds, and then you can use PLANET
IPWizard II to search the device again.
Warning !!! The download firmware procedure cannot be interrupted. If the power
and/or network connection are broken during the download procedure, it might
possibly cause serious damage to the device.
Please be aware that you should not turn off the power during updating the firmware
and wait for finish message.
Furthermore, do not try to upgrade new firmware if it’s not necessary.
System Restart: The device is restarted without changing any of the settings.
53
Page 54

3.8 Video
This device provides more video profiles as below to support different request to each client
simultaneously. Each user can choose his preferred video profile as his request independently.
3.8.1 Common
Text Overlay Setting: There are some important information can be embedded into
image, including date, time, and/or text.
54
Page 55

3.8.2 H264 Profile
It’s H.264 encoder mode in this profile.
Resolution: There are four resolutions in this profile: 4CIF, CIF and QCIIF.
Rate Control: Define s the rate control m ethod of this profile. There are two optio ns:
Constant Bit Rate (CBR) or Variable Bit Rate (VBR). For CBR, the
video bit rate is between low to high bandwidth based on different
resolutions. User can set the desired bit rate to match the limitation
of bandwidth. For VBR, user should choose the quality level to set
the video quality rather than bit rate. The quality level is between 1
and 100. The higher value can reach the better quality but of course
will consume higher bandwidth.
Max Frame Rate: Defines the targeted frame rate of this profile. For example, set the
frame rate to 15 fps, then the image will be updated for 15 frames
per second. User can set the desired max frame rate versus video
quality under the limited bandwidth.
GOP Control: Defines the Intra/Inter-frame (I/P) ratio of this profile. For example,
set the GOP to 30, then the video stream will have one Intra-frame
every 30 frames.
55
Page 56

3.8.3 MPEG4 Profile
It’s MPEG-4 encoder mode in this profile.
Resolution: There are three resolutions in this profile: D1(4CIF), CIF and QCIF.
Rate Control: Defines the rate control method of this profile. There are two options:
Constant Bit Rate (CBR) or Variable Bit Rate (VBR). For CBR, the
video bit rate is between low to high bandwidth based on different
resolutions. User can set the desired bit rate to match the limitation of
bandwidth. For VBR, user should choose the quality level to set the
video quality rather than bit rate. The quality level is between 1 and
100. The higher value can reach the better quality but of course will
consume higher bandwidth.
Max Frame Rate: Defines the targeted frame rate of this profile. For example, set the
frame rate to 15 fps, then the image will be updated for 15 frames per
second as possible. User need to set reasonable max frame rate
versus video quality under the limited bandwidth.
GOP Control: Defines the Intra/Inter-frame (I/P) ratio of this profile. For example, set
the GOP to 30, then the video stream will have one Intra-frame every
30 frames.
56
Page 57

3.8.4 MJPEG Profile
It’s M-JPEG mode in this profile.
Resolution: There are four resolutions in this profile: D1(4CIF), CIF, QCIF.
Rate Control: The quality level is between 1 and 100. The higher value can reach
the better quality but of course will consume higher bandwidth.
Max Frame Rate: Defines the targeted frame rate of this profile. For example, set the
frame rate to 15 fps, then the image will be updated for 15 frames
per second as possible. User need to set reasonable max frame rate
versus video quality under the limited bandwidth.
57
Page 58

3.9 Audio Configuration
Audio: To enable or disable audio function
Audio Mode: To select Simplex or Full duplex (2-way audio) mode
Input Gain: To adjust gain of input audio
Output Gain: To adjust gain of output audio
58
Page 59

3.10 User Privilege Access Configuration
Use this menu to set the user names and password of the Administrator and up to 10 users, and
access right of each user.
Viewer login: Select “Anonymous” to allow any one viewing the video once
connected. Otherwise, only users in database can view the
video after login.
Access right:
Add, update, and remove
of Users account:
Administrator can access every function in this device.
However, Viewers only can view the video and access
limited function.
Manage the user’s account of viewer user.
59
Page 60

3.11 E-Mail Configuration
You may setup SMTP mail parameters for further operation of Event Schedule. That’s, if users
want to send the alarm message out, it will need to configure parameters here and also add at
least one event schedule to enable event triggering.
SMTP Server: Type the SMTP server name or the IP address of the SMTP server.
Test: Send a test mail to mail server to check this account is available or
not.
SMTP Port: Set port number of SMTP service.
Select the authentication required when you send an e-mail.
SMTP Authentication:
Authentication User
Name:
Authentication
Password:
Disable: If no authentication is required when an e-mail is send.
Enable: If authentication is required when an e-mail is sent.
Type the user name for the SMTP server if Authentication is Enable.
Type the p assword for the SMTP server if Authentication is Enable.
E-mail From: Type the sender’s E-mail address. This address is used for reply
e-mails.
60
Page 61

E-mail To: Ty pe the receiver’s e-mail address.
E-mail Subject: Type the subject/title of the e-mail.
3.12 Object Detection
Use this menu to specify motion detection window 1 to window 4 and set the conditions for
detection while observing a captured image.
Add and Del: To add or delete the motion windows. User can specify up to 4
Included and/or Excluded windows to monitor the video captured by
this device. By dragging mouse on the image, you can change the
position and size of the selected motion window accordingly.
Included or Excluded
Window:
These windows can be specified as Included or Excluded type.
Included:
Windows target specific areas within the whole video image
Excluded:
Windows define areas within an Include window that should be
ignored (areas outside Include windows are auto m atically ignored)
61
Page 62

Name: Name of the specified motion window.
Object Size: Defines the object size of motion detection. The higher object size will
only larger objects trigger motion detection. The lower object size will
even small objects trigger motion detection too. Generally speaking,
the smaller size will be easier to trigger event.
Sensitivity Defines the sensitivity value of motion detection. The higher value will
be more sensitivity.
3.13 Event Server Configuration
3.13.1 FTP Server
You may setup FTP parameters for further operation of Event Schedule. That’s, if users want to
send the alarm message to an FTP server, it will need to configure parameters here and also add
at least one event schedule to enable event triggering as SMTP.
Name: User can specify multiple FTP paths as wish. Therefore, user
needs to specify a name for each FTP setting.
FTP Server: Type the server nam e or the IP address of the FTP server.
Test: Check the FTP server whether this account is available or not.
62
Page 63

FTP Login name: Type the user name for the FTP server.
FTP Login Password: Type the password for the FTP server.
FTP Port: Set port number of FTP service.
FTP Path: Set working directory path of FTP server.
FTP Passive Mode: Select passive or active mode connecting to FTP server.
3.13.2 TCP Server
In addition to send video file to FTP server, the device also can send event message to specified
TCP server.
Name: User can specify multiple TCP servers as wish. Therefore, user
needs to specify a name for each TCP server setting.
TCP Server: Type the server name or the IP address of the TCP server.
TCP Port Set port number of TCP server.
63
Page 64

3.13.3 HTTP Server
The device also can send event message to specified HTTP server.
Name: User can specify multiple HTTP servers as wish. Therefore, user
needs to specify a name for each HTTP server setting.
URL: Type the server name or the IP address of the HTTP server.
Test: Check the HTTP server whether it is available or not.
HTTP Login name: Type the user name for the HTTP server.
HTTP Login Password: Type the password for the HTTP server.
Proxy Address: Type the server name or the IP address of the HTTP Proxy.
Proxy Login name: Type the user name for the HTTP Proxy.
Proxy Login Password: Type the password for the HTTP Proxy.
Proxy Port: Set port number of Proxy.
64
Page 65

3.13.4 SAMBA Server
The device also can send video stream to specified SAMBA server.
Name: User can specify multiple HTTP servers as wish. Therefore, user
needs to specify a name for each HTTP server setting.
SAMBA Server: Type the server name or the IP address of the SAMBA server.
Test: Check the SAMBA server whether this account is available or not.
SAMBA Login name: Type the user name for the SAMBA server.
SAMBA Login Password: Type the password for the SAMBA server.
SAMBA Path: Set working directory path of SAMBA server.
65
Page 66

3.14 Event Schedule Configuration
This menu is used to specify the schedule of Events and activate the some actions provided by
this device.
Name: Name of the Event or Schedule.
Enable: Enable or disable this Event or Schedul e.
Type: Schedule start with Event trigger or Schedule trigger.
Enable Time: Define the feasible time slot.
Trigger by : Select the triggered sources with event trigger.
Action: Define the actions once event triggered.
66
Page 67

Example1
Send file to FTP server by motion triggered always:
1. Select event trigger
2. Enable time: start from 00:00 to 24:00 every day
3. Trigger by: Motion Area (Added in Object Detection page)
4. Action : Send FTP (Add in Event Server -> FTP Server page)
67
Page 68

Example2.
Send file to E-Mail server by motion triggered from Friday 18:00 to Saturday
06:00
1. Select event trigger.
2. Enable time: start from Friday 18:00 and keep work in 12 hours, so
it will stop on Saturday 06:00.
3. Trigger by : Motion Area (Added in Object Detection page)
4. Action : Send e-mail (Add in E-Mail page)
i. To email address: You need to input the receiver email
address.
ii. Subject: You could specify the email subject.
iii. Message: You could specify the email content.
68
Page 69

3.15 Record Configuration
User can choose the type of record file for event or schedule application.
Record File Type: Choose AVI or JPEG file format.
Record File Prefix: Define the prefix of recorded filename.
JPEG Picture Numbers Define the picture numbers of JPEG to be sent out.
69
Page 70

Appendix A: Alarm I/O Connector
Some features of the Camera can be activated by the external sensor that senses physical
changes in the area Camera is monitoring. These changes can include intrusion detection or
certain physical change in the monitored area. For examples, the external sensor can be a door
switch or an infrared motion detector. These devices are customer provided, and are available
from dealers who carry surveillance and security products. Electrically, they must be able to
provide a momentary contact closure.
This Camera provides wires for general I/O terminal and RS485 interface as below:
Cable for I/O connectors:
Name Cable Color Function
12VDC Brown/White DC 12V (60mA maximum)
GND Blue/White GND
D+ Purple/White RS485 data +
D- Gray RS485 data DI Green/White Digital signal input
DO Orange/White Digital signal output
User can refer to the schematic below to make a proper connection between I/O connector and
external sensor and output device.
70
Page 71

Explanation of External I/O Circuit Diagram:
CAUTION!
9 The low voltage/current circuits and high voltage/current circuits are in the
network camera circuit. The qualified electrician should do the wring not by
yourself incorrect wiring could damage network camera. You could receive
the fatal electric shock.
9 The external I/O is not capable of connecting directly to devices that require
large amounts of current. In some cases, a custom interface circuit (customer
provided) may have to be used. Serious damage to network camera may
result if a device is connected to the external I/O that exceeds its electrical
capability.
71
Page 72

Appendix B: PING IP Address
The PING (stands for Packet Internet Groper) command is used to detect whether a specific IP
address is accessible by sending a packet to the specific address and waiting for a reply. It’s also
a very useful tool to confirm internet camera installed or if the IP address conflicts with any other
devices over the network.
If you want to make sure the IP address of internet camera, utilize the PING command as follows:
z Start a DOS window.
z Type ping x.x.x.x, where x.x.x.x is the IP address of the internet camera.
The replies, as illustrated below, will provide an explanation to the problem.
If you want to detect any other devices conflicts with the IP address of internet camera, also can
utilize the PING command but you must disconnect the Internet camera from the network first.
72
Page 73

Appendix C: 3GPP Access
To use the 3GPP function, in addition to previous section, you might need more information or
configuration to make this function work.
Note
RTSP Port:
Port 554 is the default for RTSP service. However, sometimes, some service providers change
this port number for some reasons. If so, user needs to change this port accordingly.
Dialing procedure:
1. Choose a verified player (PacketVideo or Realplayer currently)
2. Use the following URL to access:
Where host is the host name or IP address of the camera.
Compatible 3G mobile phone:
Please contact your dealer to get the approved list of compatible 3G phone.
That to use the 3GPP function, it strongly recommends to install the Networked Device
with a public and fixed IP address without any firewall protection.
rtsp://host/mpeg4/media.3gp
73
Page 74

Appendix D: Bandwidth and Video Size Estimation
The frame rate of video transmitted from the internet camera depends on connection bandwidth
between client and server, video resolution, codec type, and quality setting of server. Here is a
guideline to help you roughly estimate the bandwidth requirements for your internet camera.
The required bandwidth depends on content of video source. The slow motion video will produce
smaller bit rate generally and fast motion will produce higher bit rate vice versa. Actual results
generated by the internet camera may be varying.
Image
Resolution
160 x 120
(QQVGA)
320 x 240
(QVGA)
640 x 480
(VGA)
1280x1024
(SXGA)
Average range of data
sizes for M-JPEG mode
3 ~ 6k byte per frame
8 ~ 20k byte per frame
20 ~ 50K byte per frame
100 ~ 200k byte per
frame
Average bit rate for
MPEG-4 mode
64kbps~256kbps
@ 30fps
256kbps~768kbps
@ 30fps
512kbps~2048kbps @
30fps
NA
Average bit rate for
H.264 mode
32kbps~192kbps
@ 30fps
192kbps~512kbps
@ 30fps
384kbps~1536kbps
@ 30fps
512kbps~3076kbps
@ 15fps
NOTE: Audio streaming also takes bandwidth around 5 kbps to 64kbps. Most xDSL/Cable
modem upload speeds may not even reach up to 128 kbps. Thus, you may not be able
to receive any video while streaming audio on a 128 kbps or lower connection. Even
though the upload speed is more than 128kbps, for optimal video performance,
disabling audio streaming will get better video performance.
74
Page 75

Appendix E: DDNS Application
1. Preface
If you have a Cable modem or xDSL, this is a great way to host your own Networked Device or
other TCP/IP Service. Get your own domain like www.yourname.com, www.yourname.com.tw
etc. (Note: This domain must be registered with Internic via registration authorities such as
Network Solutions, DirectNIC, Register.com etc). Your domain name's dynamic IP address is
automatically tracked by a DDNS server.
Host your own Networked Device and much more no matter what your computer's IP address
may be and even if you have dialup, DSL or cable modem internet connection where your
computer's IP address changes all the time!! DDNS service supports all top level domain
names including but not limited to .com, .net, .org, .to, .uk etc.
2. Ethernet Network Environment
Normally, DDNS service is only necessary for the users that could only obtain dynamic IP
addresses. As to the users that could obtain the static valid IP address, they do not usually
have to apply the DDNS service. Before we decide if DDNS is necessary for the users, we
have to check what kind of Ethernet network environment we have to install our Networked
Device on.
(1) Environment of Fixed Valid IP Network
If users could obtain valid IP addresses, they could save the effort to apply DDNS service.
Because the IP address in this environment is fixed, users could input the IP address or
domain name of demo site directly in the IE browser.
(2) Environment of Dynamic IP Net work
If users is under an environment of dynamic IP network (Dial-up xDSL), they have to apply a
domain name in advance. Then apply DDNS service. Finally setup the necessary information
of DDNS and PPPoE of the Networked Device in order to let the outside administrator be able
to access through internet.
3. Application Steps – DDNS & Domain Name
(1). Visit the following web site: http://www.dyndns.org/
(2). Click “Account”
75
Page 76

(3). After the columns show up at the left side, click “Create Account”.
(4). Fill the application agreement and necessary information.
a. Username
b. E-mail address and confirmation
c. Password and confirmation
d. Submit all the input information and finish creating an account
76
Page 77

Click these two options
(5). Check your e-mail mailbox. There will be an e-mail with a title “Your DynDNS Account
Information“. Click the hyperlink address to confirm the DDNS service that you just applied.
Then DDNS you applied activated.
Click to confirm
77
Page 78

(6). Enter the web page http://www.dyndns.org/
you just applied to login administration interface of DDNS server.
(7). If the correct username and password are input, you can see the following picture at the
top-right of the login page.
(8). Click the “Services”.
Input your account
again. Input your username and password that
78
Page 79

(9). Click the “ Dynamic DNS ”.
(10). Click the “Create Hosts”.
(11). We could create a domain name without any charge at this step. First, we input the host
name. (No.1) Then we pick a domain that is easy to remember. Finally (No.2), click the “Add
Host” to submit the domain name information. (No.3)
1
3
2
4. Setup the DDNS and PPPoE of Network Device
At last, users have to enter the web page of Networked Device and setup the necessary
information of DDNS and PPPoE after the application of DDNS service. Please check the user
manual to access the DDNS and PPPoE pages. After saving the modification, restart the
device. The external users could browse the Networked Device by the input of their domain
name.
79
Page 80

Appendix F: Configure Port Forwarding Manually
The device can be used with a router. If the device wants to be accessed from the WAN, its IP
address needs to be setup as fixed IP address, also the port forwarding or Virtual Server function
of router needs to be setup. This device supports UPnP traversal function. Therefore, user could
use this feature to configure port forwarding of NAT router first. However, if user needs to
configure port forwarding manually, please follow the steps as below:
Manually installing the device with a router on your network is an easy 3–step procedure as
following:
1. Assign a local/fixed IP address to your device
2. Access the Router with Your Web browser
3. Open/Configure Virtual Server Ports of Your Router
1. Assign a local/fixed IP address to your device
The device must be assigned a local and fixed IP Address that allows it to be recognized by the
router. Manually setup the device with a fixed IP address, for example, 192.168.0.100.
2. Access the Router with Your Web browser
The following steps generally apply to any router that you have on your network. The PLANET
WNRT-620 is used as an example to clarify the configuration process. Configure the initial settings
of the router by following the steps outlined in the router’s Quick Installation Guide.
If you have cable or DSL service, you will most likely have a dynamically assigned WAN IP
Address. ‘Dynamic’ means that your router’s WAN IP address can change from time to time
depending on your ISP. A dynamic WAN IP Address identifies your router on the public network
and allows it to access the Internet. To find out what your router’s WAN IP Address is, go to the
Status screen on your router and locate the WAN information for your router. As shown on the
following page the WAN IP Address will be listed. This will be the address that you will need to
type in your web browser to view your camera over the Internet. Be sure to uncheck the Reset IP
address at next boot button at the top of the screen after modifying the IP address. Failure to do
so will reset the IP address when you restart your computer.
80
Page 81

Your WAN IP Address will be listed here.
3. Open/set Virtual Server Ports to enable remote image viewing
The firewall security features built into the router and most routers prevent users from accessing
the video from the device over the Internet. The router connects to the Internet over a series of
numbered ports. The ports normally used by the device are blo cked from access over the Internet.
Therefore, these ports need to be made accessible over the Internet. This is accomplished using
the Virtual Server function on the router. The Virtual Server ports used by the camera must be
opened through the router for remote access to your camera.
Follow these steps to configure your router’s Virtual Server settings
z Click Enabled.
z Enter a unique name for each entry.
z Select Both under Protocol Type (TCP and UDP)
z Enter your camera’s local IP Address (e.g., 192.168.0.100, for example) in the Private
IP field.
z If you are using the default camera port settings, enter 80 into the Public and
Private Port section, click Add.
81
Page 82

A check mark appearing before the entry name will indicate that the ports are enabled.
NOTE: Some ISPs block access to port 80. Be sure to check with your ISP so that you can
open the appropriate ports accordingly. If your ISP does not pass traffic on port 80, you
will need to change the port the camera uses from 80 to something else, such as 8080.
Not all routers are the same, so refer to your user manual for specific instructions on
how to open ports.
Enter valid ports in the Virtual Server section of your router. Please make sure to check the box
on this line to enable settings. Then the device can be access from WAN by the router’s WAN IP
Address.
By now, you have finished your entire PC configuration for this device.
82
Page 83

Appendix G: Power Line Frequency
COUNTRY
Argentina 220V 50 Hz
Australia 230V* 50 Hz
Austria 230V 50 Hz
Brazil 110/220V* 60 Hz
Canada 120V 60 Hz
China 220V 50 Hz
Finland 230V 50 Hz
France 230V 50 Hz
Germany 230V 50 Hz
Hong Kong 220V* 50 Hz
India 230V 50 Hz
Italy 230V 50 Hz
Japan 100V 50/60 Hz*
Malaysia 240V 50 Hz
VOLTAGE FREQUENCY COMMENTS
*Neutral and line wires are reversed from that
used in Australia and elsewhere.
*Outlets typically controlled by adjacent
switch.
Though nominal voltage has been officially
changed to 230V, 240V is within tolerances
and commonly found.
*127V found in states of Bahia, Paran
(including Curitiba), Rio de Janeiro, Paulo and
Minas Gerais (though 220V may be found in
some hotels). Other areas are 220V only,
with the exception of Fortaleza (240V).
*Eastern Japan 50 Hz (Tokyo, Kawasaki,
Sapporo, Yokohoma, and Sendai); Western
Japan 60 Hz (Osaka, Kyoto, Nagoya,
Hiroshima)
Netherlands 230V 50 Hz
Portugal 230V 50 Hz
Spain 230V 50 Hz
Sweden 230V 50 Hz
Switzerland 230V 50 Hz
Taiwan 110V 60 Hz
Thailand 220V 50 Hz
*Outlets typically controlled by adjacent
switch.
United Kingdom 230V* 50 Hz
United States of America 120V 60 Hz
83
Though nominal voltage has been offici ally
changed to 230V, 240V is within tolerances
and commonly found.
Page 84

Appendix H:
Troubleshooting & Frequently Asked Questions
Features
The video and audio codec is
adopted in the device.
The maximum number of user
access the device simultaneously.
The device can be used outdoors
or not.
The network cabling is required for
the device.
The device utilizes H.264, MPEG-4 and M-JPEG triple compression
to providing high quality images. Where H.264 and MPEG-4 are
standards for video compression and M-JPEG is a standard for
image compression.
The audio codec is defined as AMR for 3GPP and G.711/G.726 for
RTSP streaming.
The maximum number of users is limited to 20. However, it also
depends on the total bandwidth accessed to this device fro m cli en ts.
The maximum data throughput of the device is around 20~25Mbps
for UDP mode and 10Mbps for HTTP mode. Therefore, the actual
number of connected clients is varying by streaming mode, settings
of resolution, codec type, frame rate and bandwidth. Obviously, the
performance of the each connected client will slow down when many
users are logged on.
The device is not weatherproof. It needs to be equipped with a
weatherproof case for outdoors using. However, equipped with a
weatherproof case might disable the audio function of the device.
Install this device
The device uses Category 5 UTP cable allowing 10 and/or 100
Base-T networking.
The device will be installed and
work if a firewall exists on the
network.
The username and password for
the first time or after factory default
reset
Forgot the username and
password
Forgot the IP address of the
device.
If a firewall exists on the network, port 80 is open for ordinary data
communication. The HTTP port and RTSP port need to be opened
on the firewall or NAT router.
Username = admin and leave password blank.
Note that it’s all case sensitivity.
Follow the steps below.
1. Restore the factory default setting by press pressing and holding
down more than 3 seconds on the device.
2. Reconfigure the device.
Check IP address of device by using the PLANET IPWizard II
program or by UPnP discovery or set the device to default by Reset
button.
84
Page 85

PLANET IPWizard II program
cannot find the device.
z Re-power the device if cannot find the unit within 1 minutes.
z Do not connect device over a router. PLANET IPWizard II
program cannot detect device over a router.
z If IP address is not assigned to the PC which running PLANET
IPWizard II program, then PLANET IPWizard II program cannot
find device. Make sure that IP address is assigned to the PC
properly.
z Antivirus software on the PC might interfere with the setup
program. Disable the firewall of the antivirus software during
setting up this device.
z Check the firewall setting of your PC or Notebook.
Internet Explorer does not seem to
work well with the device
Make sure that your Internet Explorer is version 6.0 or later. If you
are experiencing problems, try upgrading to the latest version of
Microsoft’s Internet Explorer from the Microsoft webpage.
PLANET IPWizard II program fails
to save the network parameters.
Network may have trouble. Confirm the parameters and connections
of the device.
UPnP NAT Traversal
Can not work with NAT router Maybe NAT router does not support UPnP function. Please check
user’s manual of router and turn on UPnP function.
Some IP cameras are working but
others are failed
Cannot access the login page and
other web pages of the Network
Camera from Internet Explorer
Maybe too many IP cameras have been installed on the LAN, and
then NAT router is out of resource to support more cameras. You
could turn off and on NAT router to clear out of date information
inside router.
Access this device
z Maybe the IP Address of the Network Camera is already being
used by another device or computer. To confirm this possible
problem, disconnect the Network Camera from the network first,
and then run the PING utility to check it out.
z Maybe due to the network cable. Try correcting your network
cable and configuration. Test the network interface by connecting
a local computer to the Network Camera via a crossover cable.
z Make sure the Internet connection and setting is ok.
z Make sure enter the IP address of Internet Explorer is correct. If
the Network Camera has a dynamic address, it may have
changed since you last checked it.
z Network congestion may prevent the web page appearing
quickly. Wait for a while.
The IP address and Subnet Mask of the PC and Network Camera
must be in the same class of the private IP address on the LAN.
z Make sure the http port used by the Network Camera, default=80,
85
Page 86

is forward to the Network Camera’s private IP address.
z The port number assigned in your Network Came ra might not be
available via Internet. Check your ISP for available port.
z The proxy server may prevent you from connecting directly to the
Network Camera, set up not to use the proxy server.
z Confirm that Default Gateway address is correct.
z The router needs Port Forwarding feature. Refer to your router's
manual for details.
z Packet Filtering of the router may prohibit access from an
external network. Refer to your router's manual for details.
z Access the Network Camera from the Internet with the global IP
address of the router and port number of Network Camera.
z Some routers reject the global IP address to access the Network
Camera on the same LAN. Access with the private IP address
and correct port number of Network Camera.
z When you use DDNS, you need to set Default Gateway and DNS
server address.
Image or video does not appear in
the main page.
How to check the device’s ActiveX
is installed on your computer
Internet Explorer displays the
following message: “Your current
security settings prohibit
downloading ActiveX controls”.
z If it’s not working after above procedure, reset Network Camera
to default setting and installed it again.
z The first time the PC connects to Network Camera, a pop-up
Security Warning window will appear to download ActiveX
Controls. When using Windows XP, or Vista, log on with an
appropriate account that is authorized to install applications.
z Network congestion may prevent the Image screen from
appearing quickly. You may choose lower resolution to reduce
the required bandwidth.
Go to C:\Windows\Downloaded Program Files and check to see if
there is an entry for the file “IPCamera Control”. The status column
should show “Installed”. If the file is not listed, make sure your
Security Settings in Internet Explorer are configured properly and
then try reloading the device’s home page. Most likely, the ActiveX
control did not download and install correctly. Check your Internet
Explorer security settings and then close and restart Internet
Explorer. Try to browse and log in again.
Setup the IE security settings or configure the individual settings to
allow downloading and scripting of ActiveX controls.
The device work locally but not
externally.
z Might be caused from the firewall protection. Check the Internet
firewall with your system or network administrator. The firewall
may need to have some settings changed in order for the device
to be accessible outside your LAN.
86
Page 87

z Make sure that the device isn’t conflicting with any other web
server running on your LAN.
z Check the configuration of the router settings allow the device to
be accessed outside your local LAN.
z Check the bandwidth of Internet connection. If the Internet
bandwidth is lower than target bit rate, the video streaming will
not work correctly.
The unreadable characters are
displayed.
Frame rate is slower than the
setting.
Blank screen or very slow video
when audio is enabled.
Image Transfer on e-mail or FTP
does not work.
Use the operating system of the selected language. Set the
Encoding or the Character Set of the selected language on the
Internet Explorer.
z The traffic of the network and the object of the image affect the
frame rate. The network congestion causes frame rate slower
than the setting.
z Check the bandwidth of Internet connection. If the Internet
bandwidth is lower than target bit rate, the video streaming will
not work correctly.
z Ethernet switching hub can smooth the frame rate.
z Your connection to the device does not have enough bandwidth
to support a higher frame rate for the streamed image size. Try
reducing the video streaming size to 160x120 or 320x240 and/or
disabling audio.
z Audio will consume 32 kbps. Disable audio to improve video.
Your Internet connection may not have enough bandwidth to
support streaming audio from the device.
z Default Gateway and DNS server address should be set up
correctly.
z If FTP does not work properly, ask your ISP or network
administrator about the transferring mode of FTP server.
Video quality of the device
The focus on the Camera is bad. The lens is dirty or dust is attached. Fingerprints, dust, stain, etc. on
the lens can degrade the image quality.
The color of the image is poor or
strange.
z Adjust White Balance.
z To insure the images you are viewing are the best they can be,
set the Display property setting (color quality) to 16bit at least and
24 bit or higher if possible within your computer.
z The configuration on the device image display is incorrect. You
need to adjust the image related parameters such as brightness,
contrast, hue and sharpness properly.
Image flickers. z Wrong power line frequency makes images flicker. Ma ke sure the
50 or 60Hz format of your device.
87
Page 88

z If the object is dark, the image will flicker. Make the condition
around the Camera brighter.
Noisy images occur. The video images might be noisy if the device is located in a very
low light environment. Make the condition around the camera
brighter or turn the White-light LED on.
Miscellaneous
Can not play the recorded ASF file Please installed Microsoft®’s DirectX 9.0 or later and use the
Windows Media Player 11.0 or later to play the AVI filed recorded by
the Device.
88
Page 89

Appendix I: Product Specification
Product ICA-H312
Camera Specification
Horizontal Resolution 420 TV Lines
Sensor 1/3” Color SONY CCD image sensor
NTSC System: 525lines 2:1 interlace
Frequency: 15,734Hz (H), 60Hz (V)
Pixel: 512 (H) x 491 (V)
PAL System: 625lines 2:1 interlace
Frequency: 15,625Hz (H), 50Hz (V)
Pixel: 512 (H) x 581 (V)
Gain Control Auto Gain Control (AGC)
White balance Auto
Focus Fixed
BLC Auto 2500°K ~ 9500°K
Sensitivity 0.1 Lux, 0Lux at IR on
Lens 6mm fixed focal F1.8
Video Output
IR LED
IR Wavelength
Image (Video Setting)
Video Encoder H.264 / MPEG-4 and M-JPEG simultaneously
Video Resolution D1 / CIF / QCIF 30fps for all resolution
Network and Configuration
Network Interface 1 x 10/100Mbps RJ-45
PoE interface 802.3af
Network Protocol
Browser / Software Microsoft ® Internet Explorer 6.0 or later, Cam Viewer Plus Lite/Pro
Hardware
Dimension 75 (D) × 138 mm (L)
Power Supply
Power Consumption IR on: 7W, IR off: 4.5W
Protection Class IP-66 classification
Operating
Temperature
Operating Humidity 20 ~ 80% (non-condensing)
Emission CE, FCC, PCT
Composite 1.0 Vp-p at 75 ohm
8Ø IR LED x 14pcs
850 mm
TCP/IP, HTTP, SMTP, FTP, NTP, DNS,
DDNS, DHCP, UPnP, RTSP, PPPoE, 3GPP
12V DC, 1.5A
IEEE802.3af
-20 ~ 50 Degree C
89
 Loading...