

Page 1

CCD Box PoE Internet Camera
ICA-700
User’ s Manual
Version 2.0
Date: April, 2009
Page 2

Copyright
Copyright (C) 2009 PLANET Technology Corp. All rights reserved.
The products and programs described in this User’s Manual are licensed products of PLANET
Technology, This User’s Manual contains proprietary information protected by copyright, and this
User’s Manual and all accompanying hardware, software, and documentation are copyrighted.
No part of this User’s Manual may be copied, photocopied, reproduced, translated, or reduced to
any electronic medium or machine-readable form by any means by electronic or mechanical.
Including photocopying, recording, or information storage and retrieval systems, for any purpose
other than the purchaser's personal use, and without the prior express written permission of
PLANET Technology.
Disclaimer
PLANET Technology does not warrant that the hardware will work properly in all environments and
applications, and makes no warranty and representation, either implied or expressed, with respect
to the quality, performance, merchantability, or fitness for a particular purpose.
PLANET has made every effort to ensure that this User’s Manual is accurate; PLANET disclaims
liability for any inaccuracies or omissions that may have occurred.
Information in this User’s Manual is subject to change without notice and does not represent a
commitment on the part of PLANET. PLANET assumes no responsibility for any inaccuracies that
may be contained in this User’s Manual. PLANET makes no commitment to update or keep current
the information in this User’s Manual, and reserves the right to make improvements to this User ’s
Manual and/or to the products described in this User’s Manual, at any time without notice.
If you find information in this manual that is incorrect, misleading, or incomplete, we would
appreciate your comments and suggestions.
FCC Warning
This equipment has been tested and found to comply with the limits for a Class A digital device,
pursuant to Part 15 of the FCC Rules. These limits are designed to provide reasonable protection
against harmful interference when the equipment is operated in a commercial environment. This
equipment generates, uses, and can radiate radio frequency energy and, if not installed and used in
accordance with the Instruction manual, may cause harmful interference to radio communications.
Operation of this equipment in a residential area is likely to cause harmful interference in which
case the user will be required to correct the interference at his own expense.
CE mark Warning
The is a class A device, In a domestic environment, this product may cause radio interference, in
which case the user may be required to take adequate measures.
Trademarks
The PLANET logo is a trademark of PLANET Technology. This documentation may refer to
numerous hardware and software products by their trade names. In most, if not all cases, these
designations are claimed as trademarks or registered trademarks by their respective companies.
WEEE Warning
To avoid the potential effects on the environment and human health as a result of
the presence of hazardous substances in electrical and electronic equipment, end
users of electrical and electronic equipment should understand the meaning of the
crossed-out wheeled bin symbol. Do not dispose of WEEE as unsorted municipal
waste and have to collect such WEEE separately.
Revision
User’s Manual for PLANET CCD Box PoE Internet Camera
Model: ICA-700
Rev: 2.0
Part No.: EM-ICA700v2
2
ICA-700 User Guide
Page 3

Table of Contents
1. Introduction.................................................................................................................. 5
1.1 Package Contents................................................................................................... 5
1.2 System Requirements............................................................................................. 6
1.3 Features.................................................................................................................. 6
1.4 Application............................................................................................................... 7
1.5 Outlook.................................................................................................................... 7
1.5.1 Rear Panel.................................................................................................. 8
1.6 Technical Specifications.......................................................................................... 9
2. Installation.................................................................................................................. 10
2.1 Physical Installation............................................................................................... 10
2.2 Software Installation...............................................................................................11
2.3 Software Quick Configuration................................................................................ 15
3. Viewing Live Video .................................................................................................... 20
3.1 Connecting ICA-700 via Ethernet.......................................................................... 20
3.2 General Options.................................................................................................... 23
3.2.1 Directly zoom in / out the image ............................................................... 24
3.2.2 Language.................................................................................................. 24
3.2.3 Setting ......................................................................................................25
3.2.4 Client setting............................................................................................. 25
3.2.5 Image setup.............................................................................................. 26
4. Basic Setting.............................................................................................................. 27
4.1 System.................................................................................................................. 29
4.1.1 Information................................................................................................ 29
4.1.2 Date/Time.................................................................................................30
4.1.3 Initialize..................................................................................................... 31
4.2 Camera................................................................................................................. 32
4.2.1 General ..................................................................................................... 32
4.2.2 MPEG4 – Computer view......................................................................... 34
4.2.3 MPEG4 – Mobile view .............................................................................. 36
4.2.4 MJPEG..................................................................................................... 38
4.3 Network................................................................................................................. 39
4.3.1 Information................................................................................................ 39
4.3.2 PPPoE......................................................................................................41
4.3.3 DDNS ....................................................................................................... 42
4.3.4 UPnP........................................................................................................ 43
4.3.5 IP Notification ........................................................................................... 44
4.4 Security................................................................................................................. 46
4.4.1 Account..................................................................................................... 46
4.4.2 HTTPS...................................................................................................... 47
5. Advance Setting......................................................................................................... 48
5.1 FTP client.............................................................................................................. 50
Dual Mode CCD Dome Internet Camera
3
Page 4

5.1.1 General ..................................................................................................... 50
5.1.2 Alarm sending........................................................................................... 51
5.1.3 Periodical sending.................................................................................... 53
5.2 SMTP.................................................................................................................... 55
5.2.1 General ..................................................................................................... 55
5.2.2 Alarm sending........................................................................................... 57
5.2.3 Periodical sending.................................................................................... 59
5.3 HTTP event........................................................................................................... 61
5.3.1 General ..................................................................................................... 61
5.3.2 Alarm sending........................................................................................... 62
5.4 Schedule............................................................................................................... 64
5.4.1 Setting ......................................................................................................64
5.5 Alarm buffer........................................................................................................... 65
5.5.1 Setting ......................................................................................................65
5.6 Motion detection.................................................................................................... 66
5.6.1 Setting ......................................................................................................66
5.7 system Log............................................................................................................ 67
5.7.1 Setting ......................................................................................................67
Appendix A --- Enable ActiveX options on your PC.................................................... 68
Appendix B --- Bandwidth Estimation .......................................................................... 69
Appendix C --- Mobile phone viewing.......................................................................... 70
4
ICA-700 User Guide
Page 5

1. Introduction
With the feature, simultaneously provides MPEG-4 and M-JPEG video streaming, the
PLANET ICA-700 is a CCD Box PoE Internet Camera which uses high resolution 1/3-inch
CCD sensor for capturing color images and CS-Mount optical lens. Compliant with IEEE
802.3af PoE (Power over Ethernet), it offers the benefit of easy deployment for users to
install the camera without concerning for located power outlet that provides the most
flexibility of IP surveillance.
2-Way audio feature can directly makes audio communication between local and remote
sides by adding external microphones and speakers. Besides web browsers, the ICA-700
also provides 3GPP capability that can remotely view the live video via a 3G mobile phone.
The ICA-700 supports the professional management software, PLANET Cam Viewer which
is a multi-camera video surveillance application, it can handle the ICA-700 to provide
monitoring, recording and event management functions. The Cam Viewer offers users to
setup a comprehensive and effective surveillance system quickly and easily. The PLANET
ICA-700 is the most cost efficient IP camera for multiplex occasions that could express
video and audio from everywhere at anytime over the Internet, and it can also provide a
professional security environment to protect people’s property and life.
1.1 Package Contents
Please inspect your package. The following items should be included in the package:
z 1 x ICA-700
z 1 x Power Adapter
z 1 x Camera Stand
z 1 x CD
z 1 x Quick Installation Guide
Dual Mode CCD Dome Internet Camera
5
Page 6

1.2 System Requirements
Network Interface 10/100Base-TX Ethernet
Monitoring System Recommended for Internet Explorer 6.0 or above
System Hardware · CPU: Pentium 4, 1.5GHz or above
· Memory Size : 512 MB or above
· VGA card resolution : 1024 x 768 or above
Optional:
· Sound Card (for PC)
· Microphone (for PC and ICA-700)
· Speaker (for PC and ICA-700)
1.3 Features
¾ Simultaneous MPEG-4 and M-JPEG dual codec
¾ Supports 2-Way audio
¾ 3GPP for 3G mobile remote application
¾ Provides 3 motion detection area
¾ FTP / SMTP alarm by motion detection
¾ Up to 30 fps in Full D1 resolution
¾ Supports CS mount lens
¾ IEEE 802.3af Power over Ethernet compliant
¾ UPnP for fast and easy installation
¾ Cam Viewer - Central management software supported
6
ICA-700 User Guide
Page 7
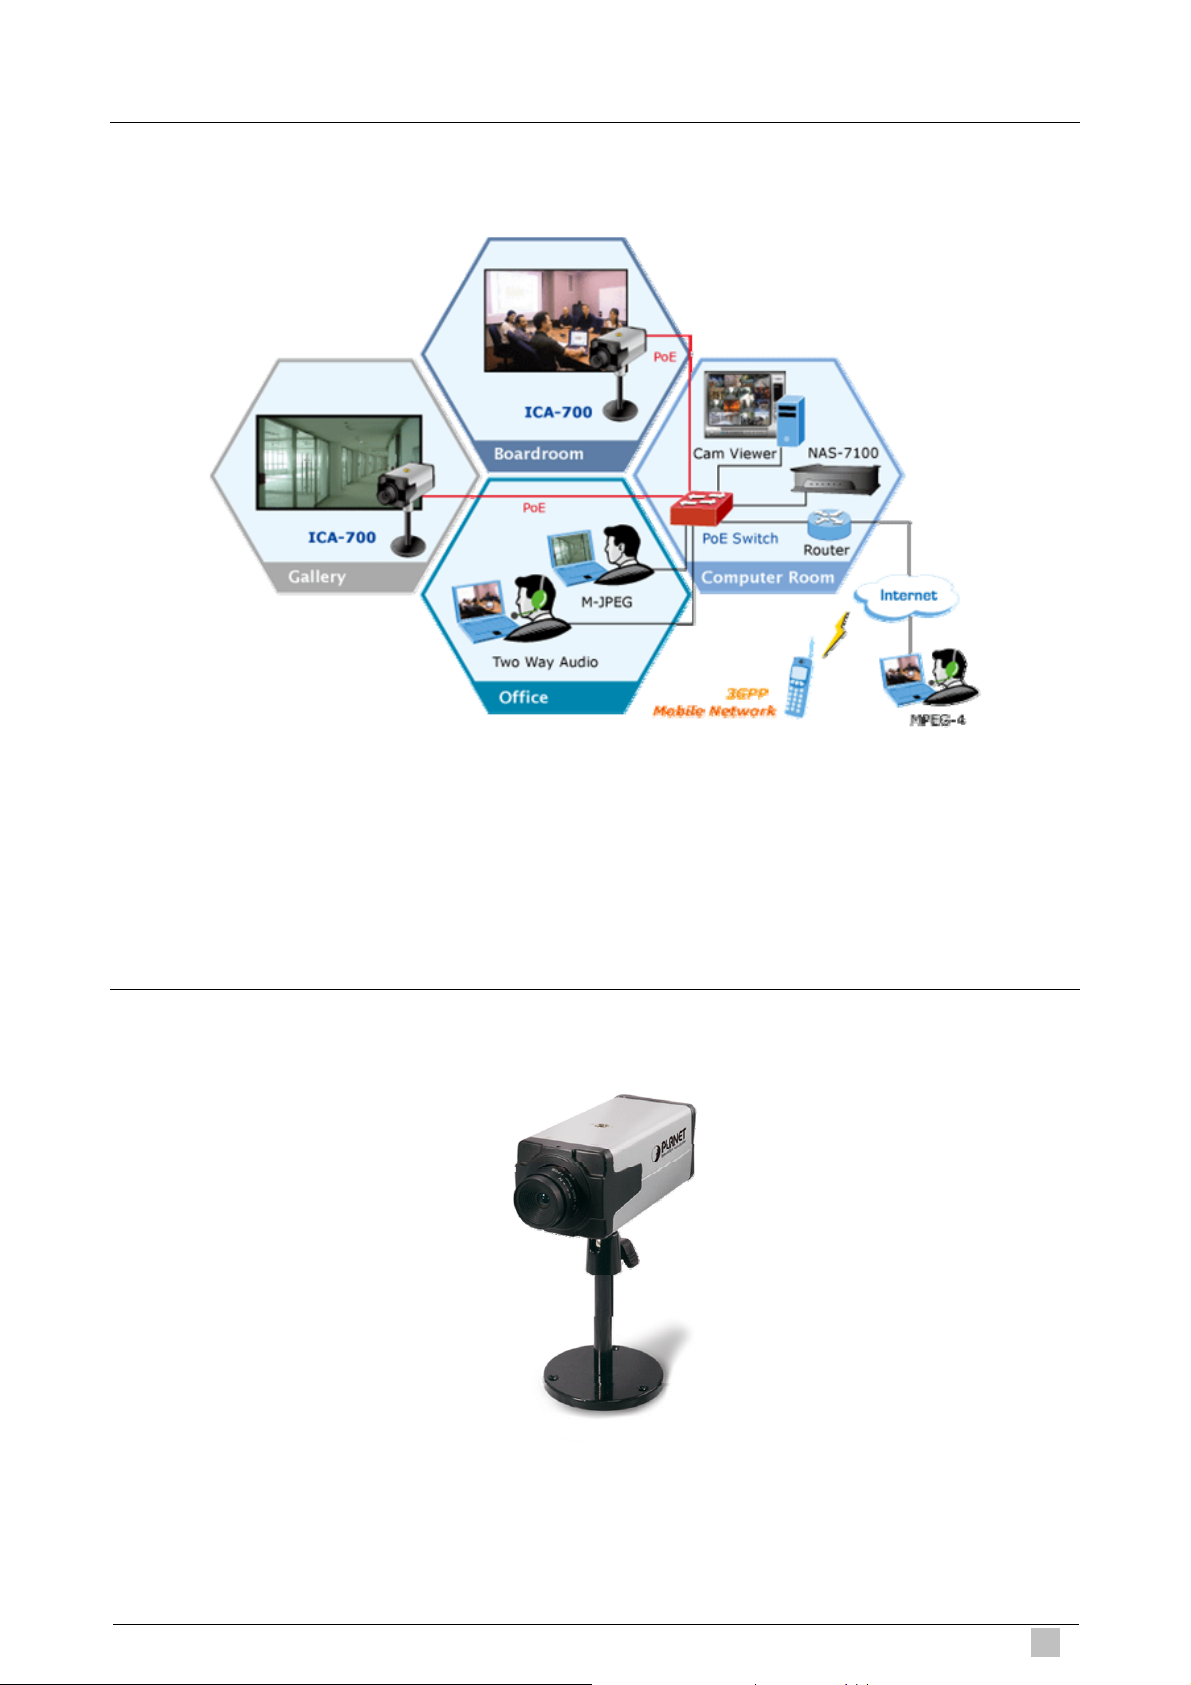
1.4 Application
Remote Monitoring Applications
1.5 Outlook
Dual Mode CCD Dome Internet Camera
7
Page 8
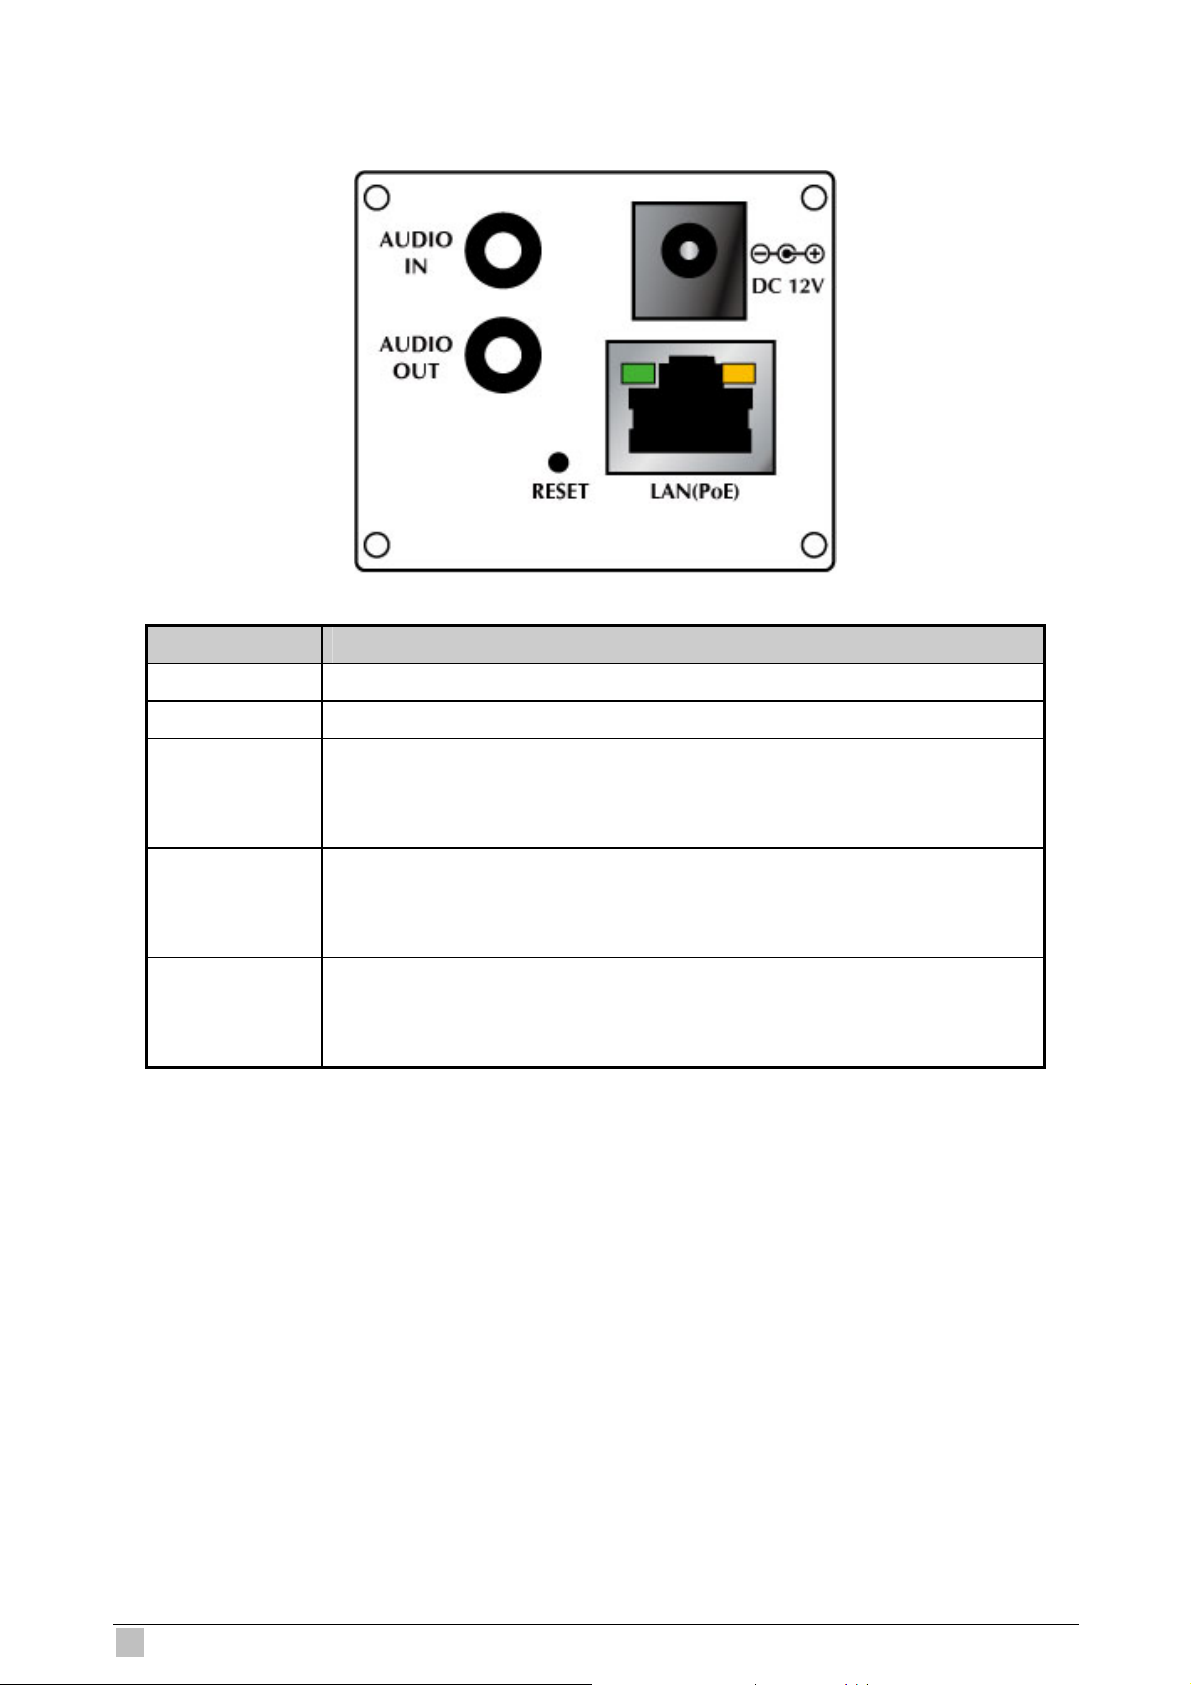
1.5.1 Rear Panel
Port Description
AUDIO IN An external microphone can be plugged in.
AUDIO OUT An external speaker can be plugged in.
Reset to manufacturer default valued and reboot.
RESET
DC 12V
LAN (PoE)
When pressed and held over 10 seconds, the settings of IP Camera will
be set to the default values.
Connect the supplied power adapter.
When this device is obtained power from PoE, you don’t have to attach
the power adapter.
Connect your Camera to a 10/100Base-TX hub or switch. It is compliant
with IEEE 802.3af PoE. Either mid-span PSE or end-span PSE
supported.
8
ICA-700 User Guide
Page 9

1.6 Technical Specifications
Video
Image Sensor 1/3” SHARP CCD
Horizontal Resolution 420 TVL
Lens
View Angle
Illuminator 0.1 Lux
Video Codec MPEG-4 / M-JPEG
Video Resolution Up to 30 fps @ 704x480 ; 352x240 ; 176x120
Image Control AWB, AEC, AGC
Audio
Audio Codec G.726 ADPCM, 64Kbps
Interfaces
LAN 1 x RJ-45, 10/100Base-TX, IEEE 802.3af
AUDIO
Network
Protocols
6 mm, F1.8 fixed iris lens
CS Mount type
Horizontal: 43 degree
Vertical: 33 degree
1 x Audio In
1 x Audio Out
TCP/IP, DHCP, PPPoE, ARP, ICMP, FTP, SMTP, DNS, DDNS,
NTP, UPnP, RTSP, RTP, HTTP, TCP, UDP
Management
Client Web browser / Cam Viewer software
Security Username and password authentication
Motion detection (3 areas definable)
Alarm and Event
Environment
Power Requirement 12VDC, 1.0A
Dimensions (W x D x H) 55.8 x 123 x 49.8 mm
Weight 370 g
Operating Temperature 0 ~ 50 Degree C
Emission CE, FCC
Triggered and scheduled events
Pre and post alarm buffer
Dual Mode CCD Dome Internet Camera
9
Page 10

2. Installation
The followings are instructions for setting up the IP camera. Refer to the illustration and
follow the simple steps to quickly install.
2.1 Physical Installation
1. Connect an Ethernet cable
Connect one end of an Ethernet cable to the LAN port located on the IP camera’s rear
panel and connect the other end to the network device (hub or switch).
2. Attach the external power supply
Attach the provided power adapter to the IP camera’s connector labeled "DC 12V" on the
rear panel. If this camera is obtained power from PoE, you don’t have to attach the power
adapter.
Note:
Please use the power adapter that is bundled in package. Using a power supply with a
different voltage rating will damage and void the warranty for this product.
3. Connect Microphone and Speaker
If you will use the 2-Way audio function, please connect microphone to Audio In and
speaker to Audio Out.
10
ICA-700 User Guide
Page 11
2.2 Software Installation
1. Insert the bundled product CD into CD-ROM drive to launch the autorun program.
2. When the web page displayed, please click your IP camera model name to next page.
Select and click the “Setup Tool” hyperlink on the menu to start the installation process.
Note:
If the CD’s menu does not appear, click “Start” on the task bar and select “Run” to type
“X:\Utility\SetupTool\SetupTool.exe”, assume X is your CD-ROM drive.
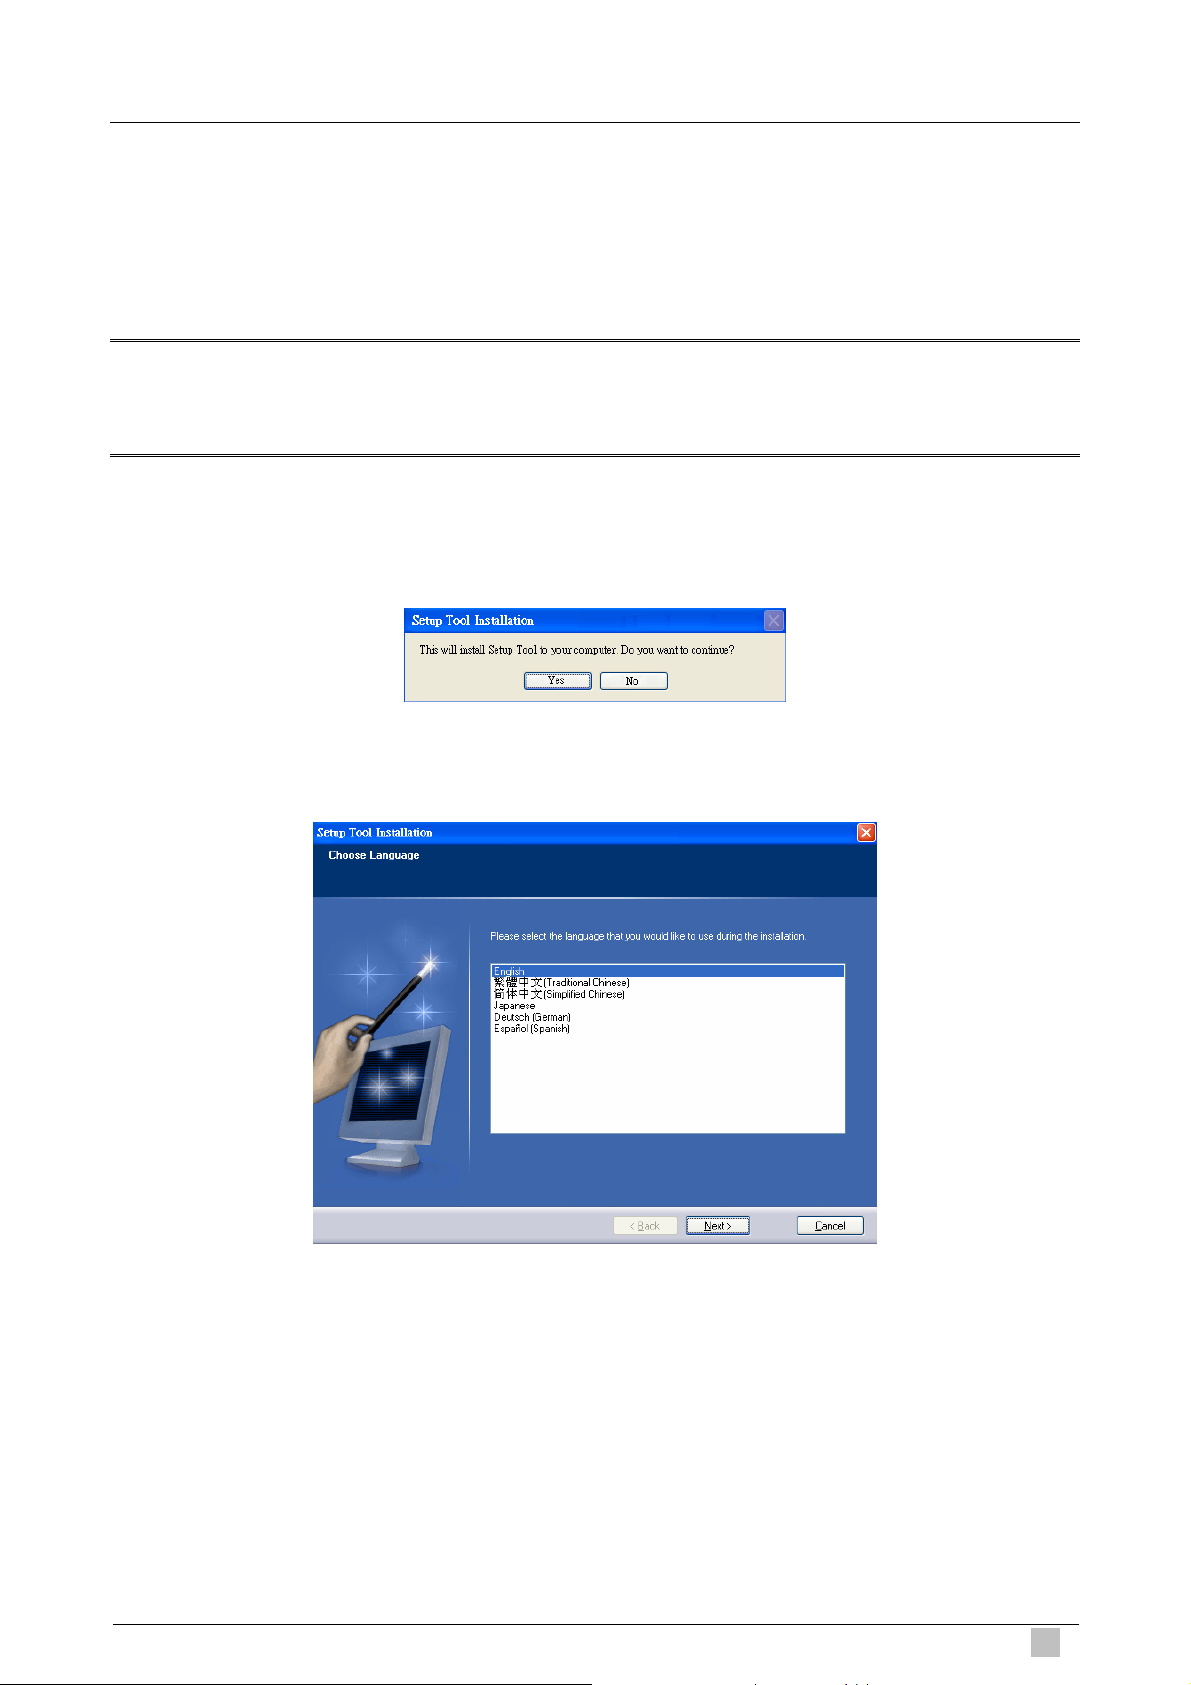
3. Click “Yes” to start the Setup Tool Installation.
4. Choose the language you need, and click “Next” to continue.
Dual Mode CCD Dome Internet Camera
11
Page 12
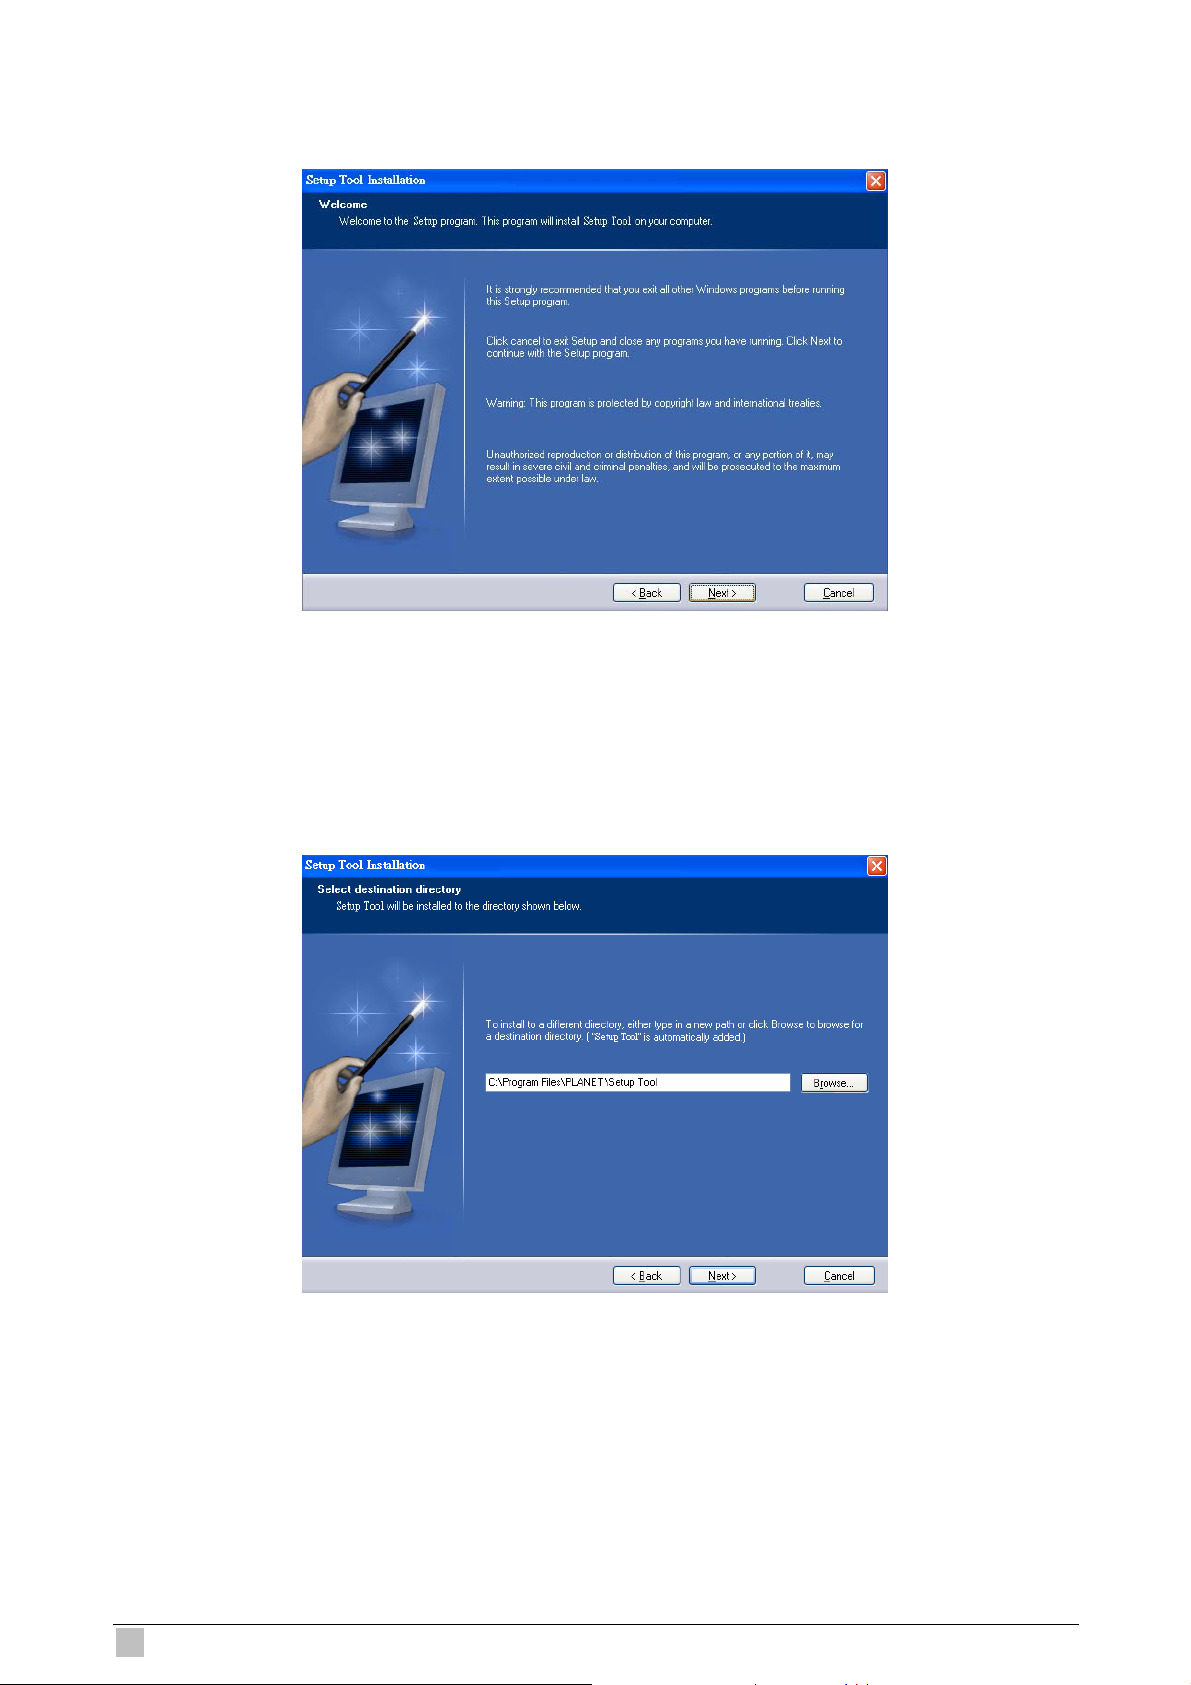
5. Follow the step for configuring the Setup Tool, and click “Next” to continue.
6. If you wish to install the Setup Tool in an alternative location, click “Browse”; otherwise
click “Next” to continue.
12
ICA-700 User Guide
Page 13
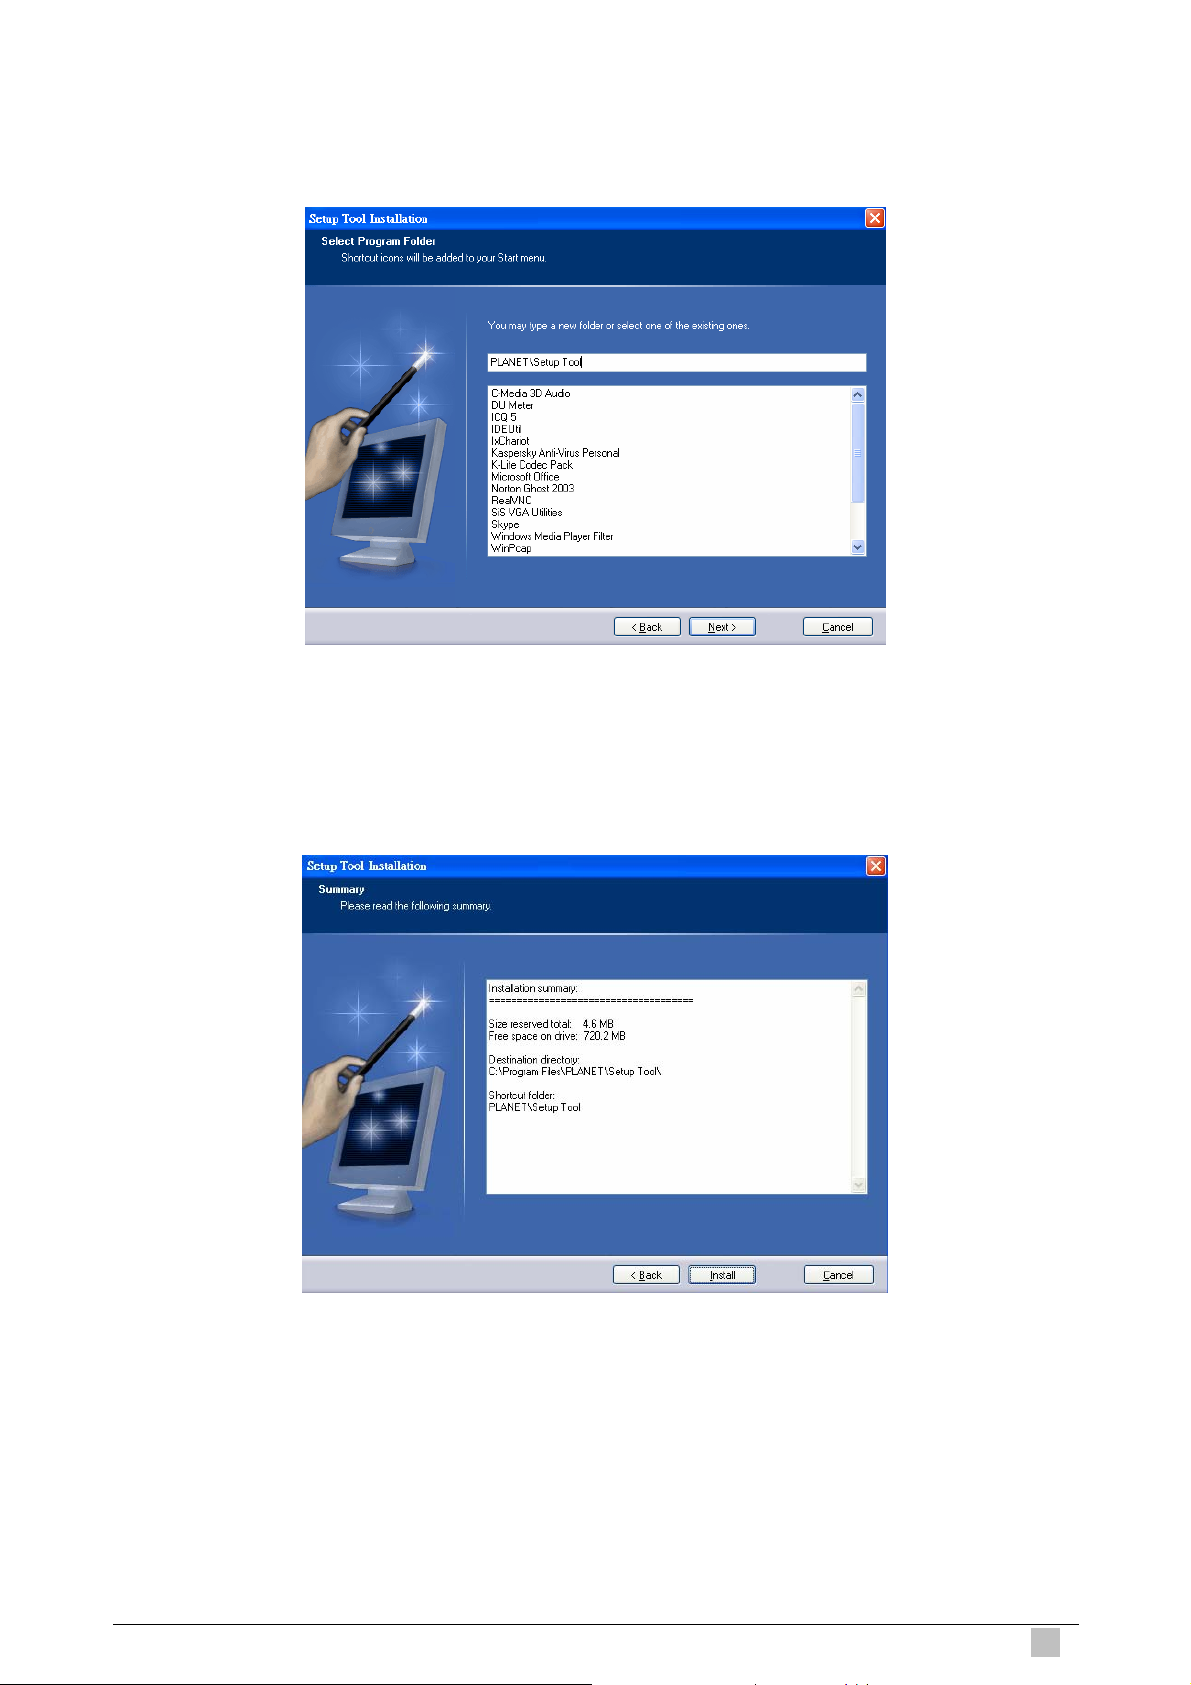
7. If you wish to install the Setup Tool in an alternative folder of star menu, type a new folder
or select one of the exiting ones; otherwise click “Next” to continue.
8. Check the installation summary, and click “Install” to install the Setup Tool.
Dual Mode CCD Dome Internet Camera
13
Page 14
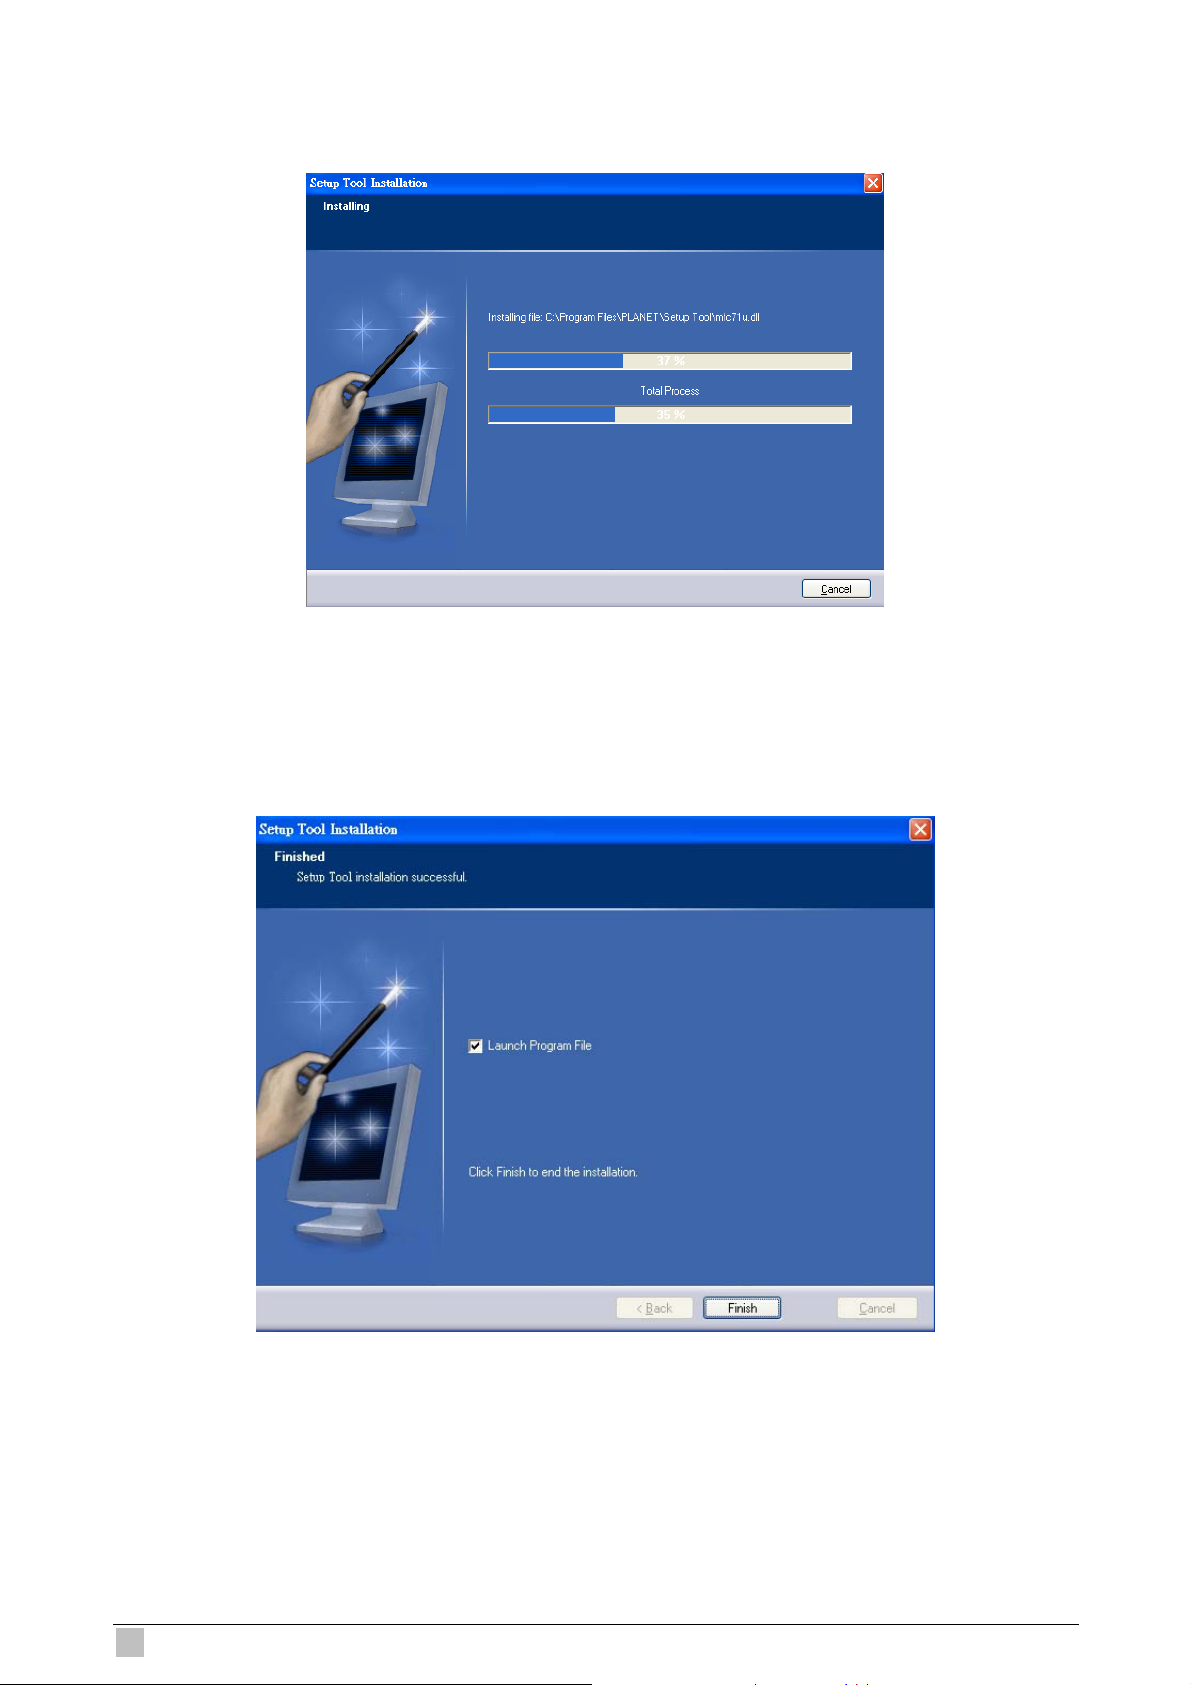
9. The program starts to install the Setup Tool in your computer.
10. The Setup Tool installation successful. Click “Finish” to complete the installation.
14
ICA-700 User Guide
Page 15
2.3 Software Quick Configuration
This section shows how to perform basic communication functions by Setup Tool.
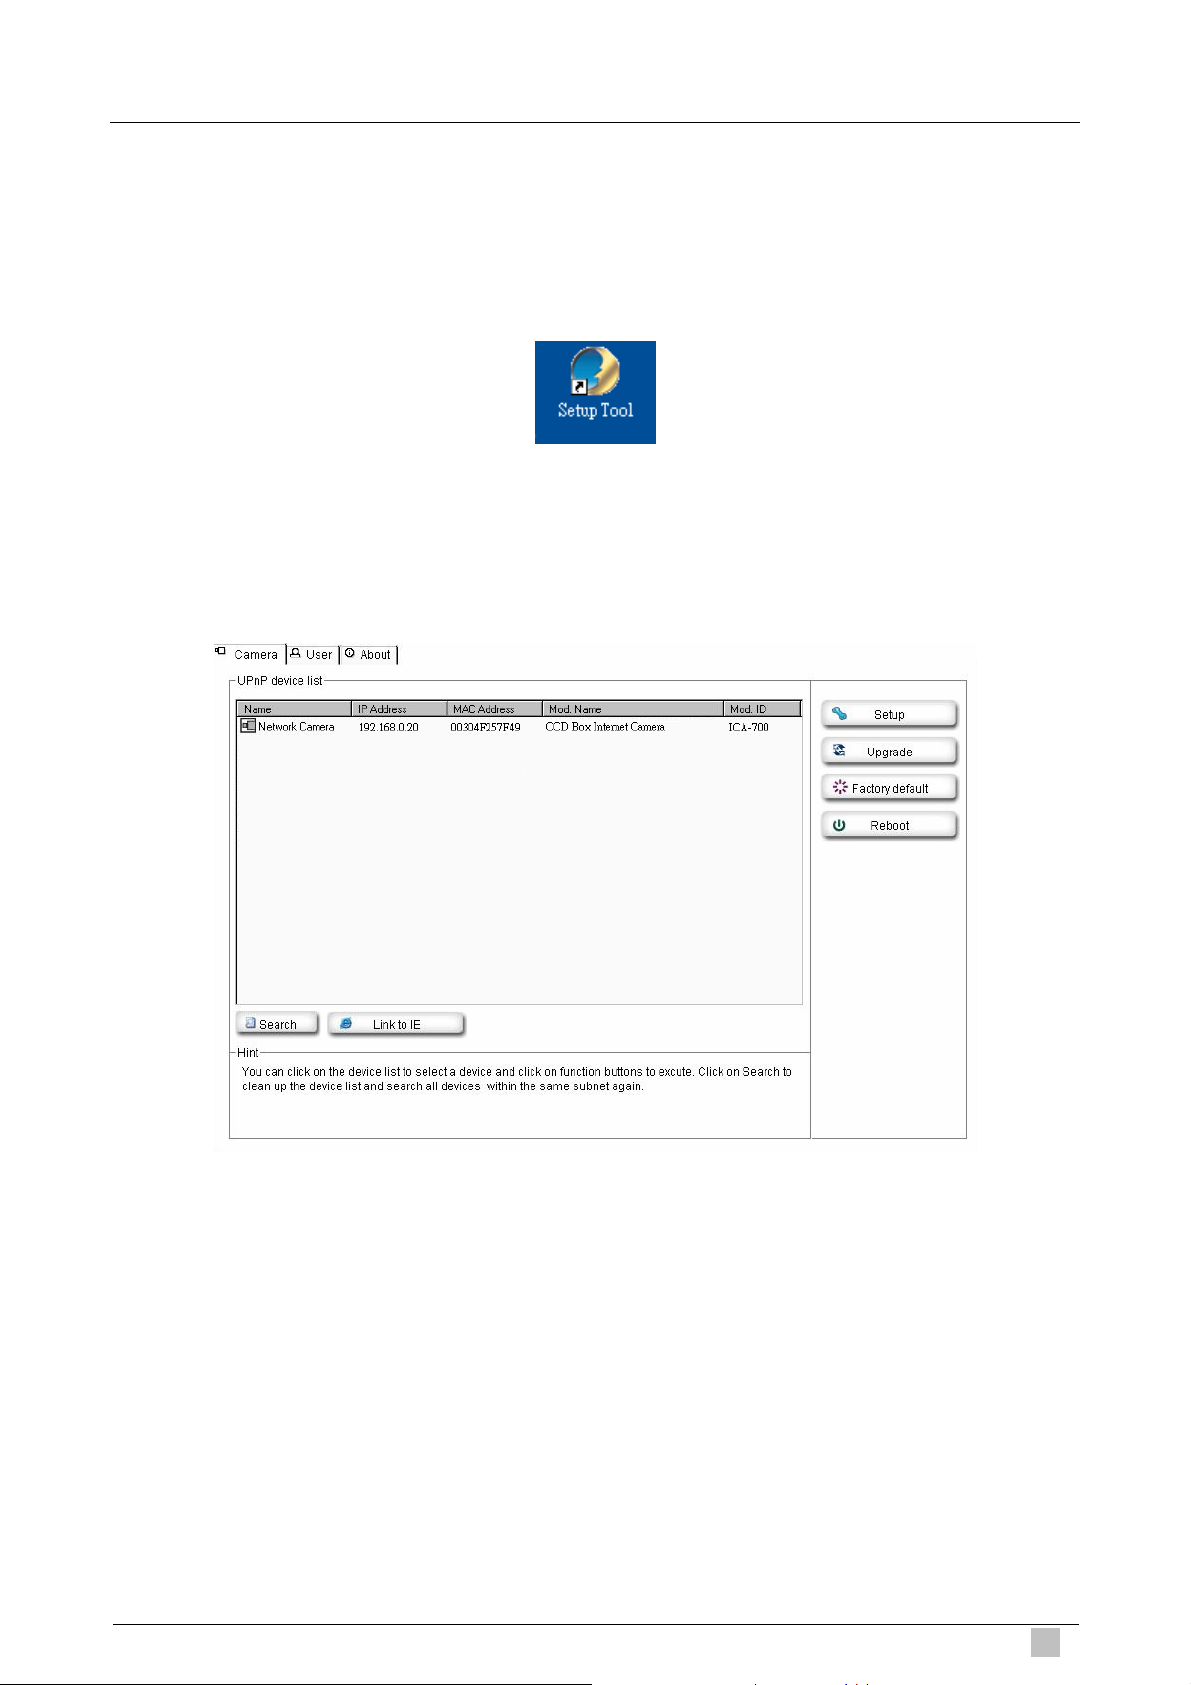
1. Double click the icon of Setup Tool on the desktop.
2. The Setup Tool screen will show up as below. It will automatically search and list the IP
cameras on your network.
Dual Mode CCD Dome Internet Camera
15
Page 16
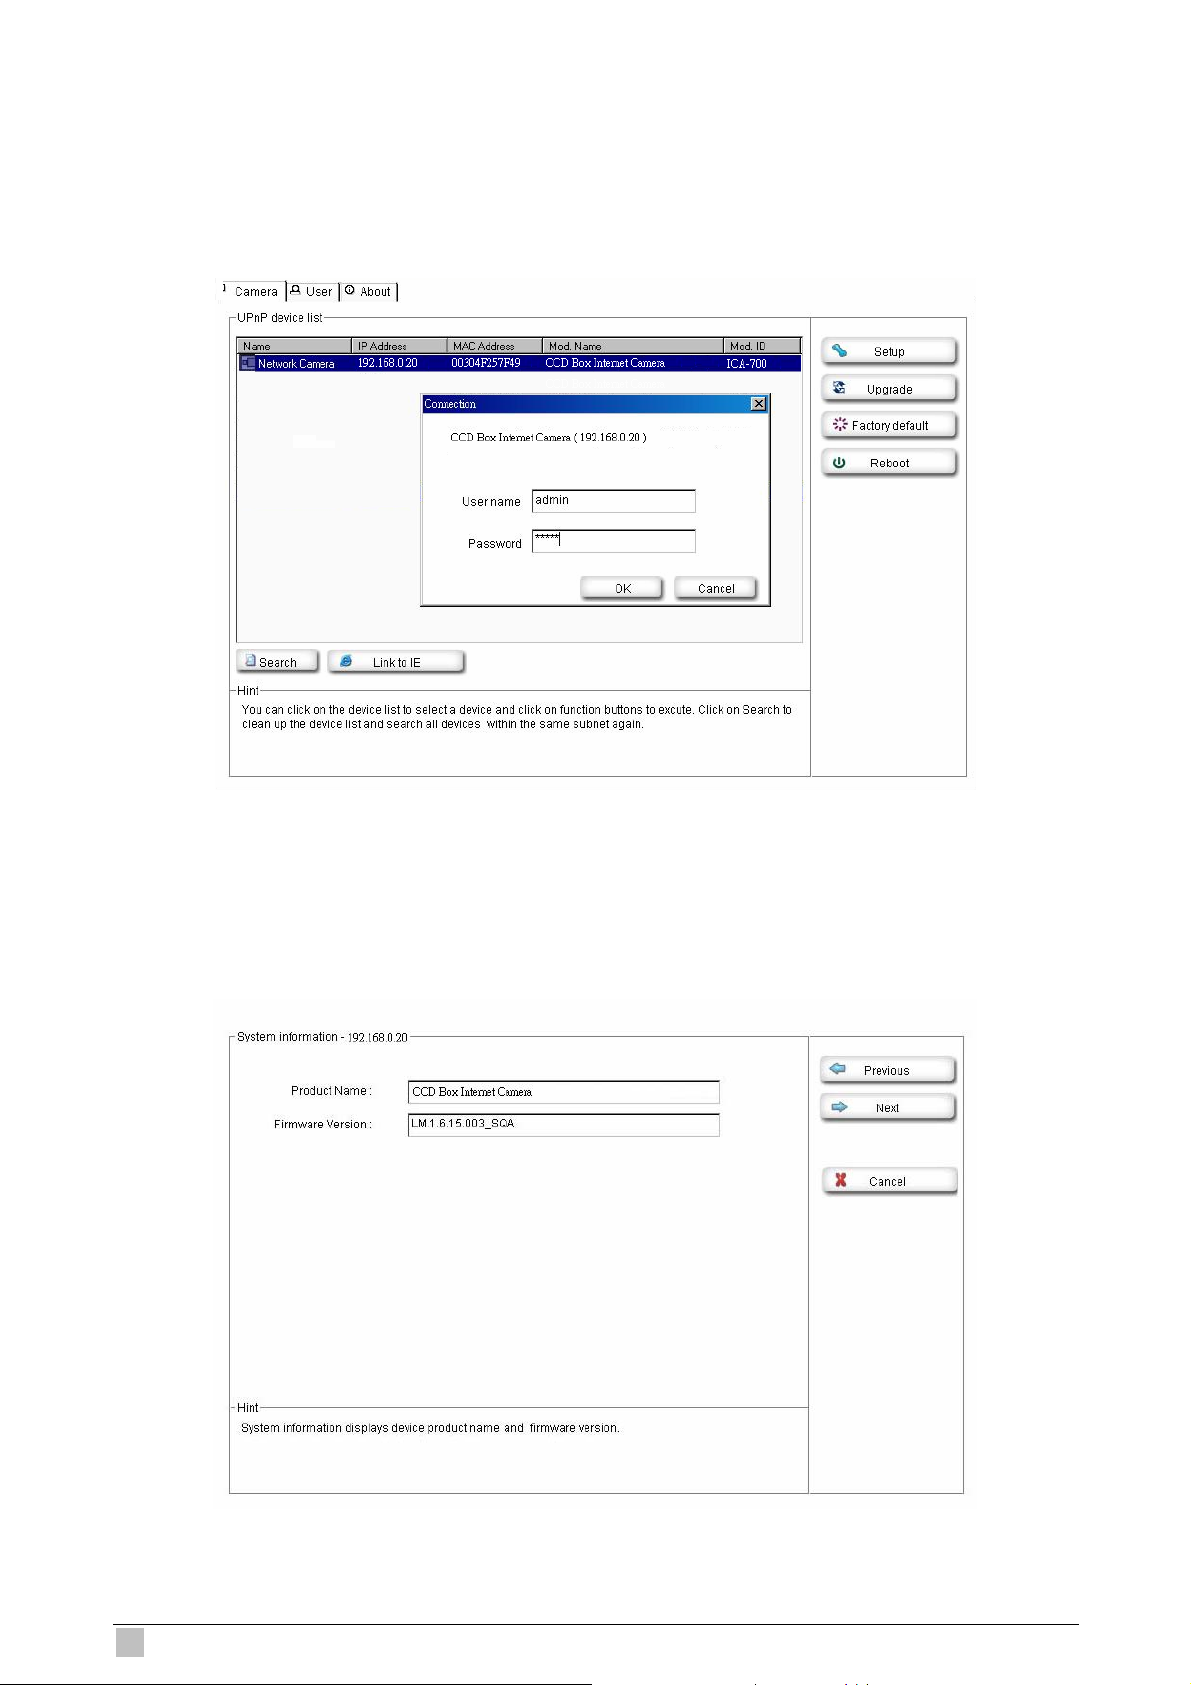
3. Select the IP camera you want, and then click the “Setup” button on the right side. The
login window will pop up. If the Administrator User Name and Password have been
changed, you will need to enter the new settings. In default values, please enter
“admin” for both User Name and Password. Then click “OK”.
4. On the following System information screen, it displays the Product Name, Firmware
Version and Hardware Version. Click on “Next” to continue.
16
ICA-700 User Guide
Page 17
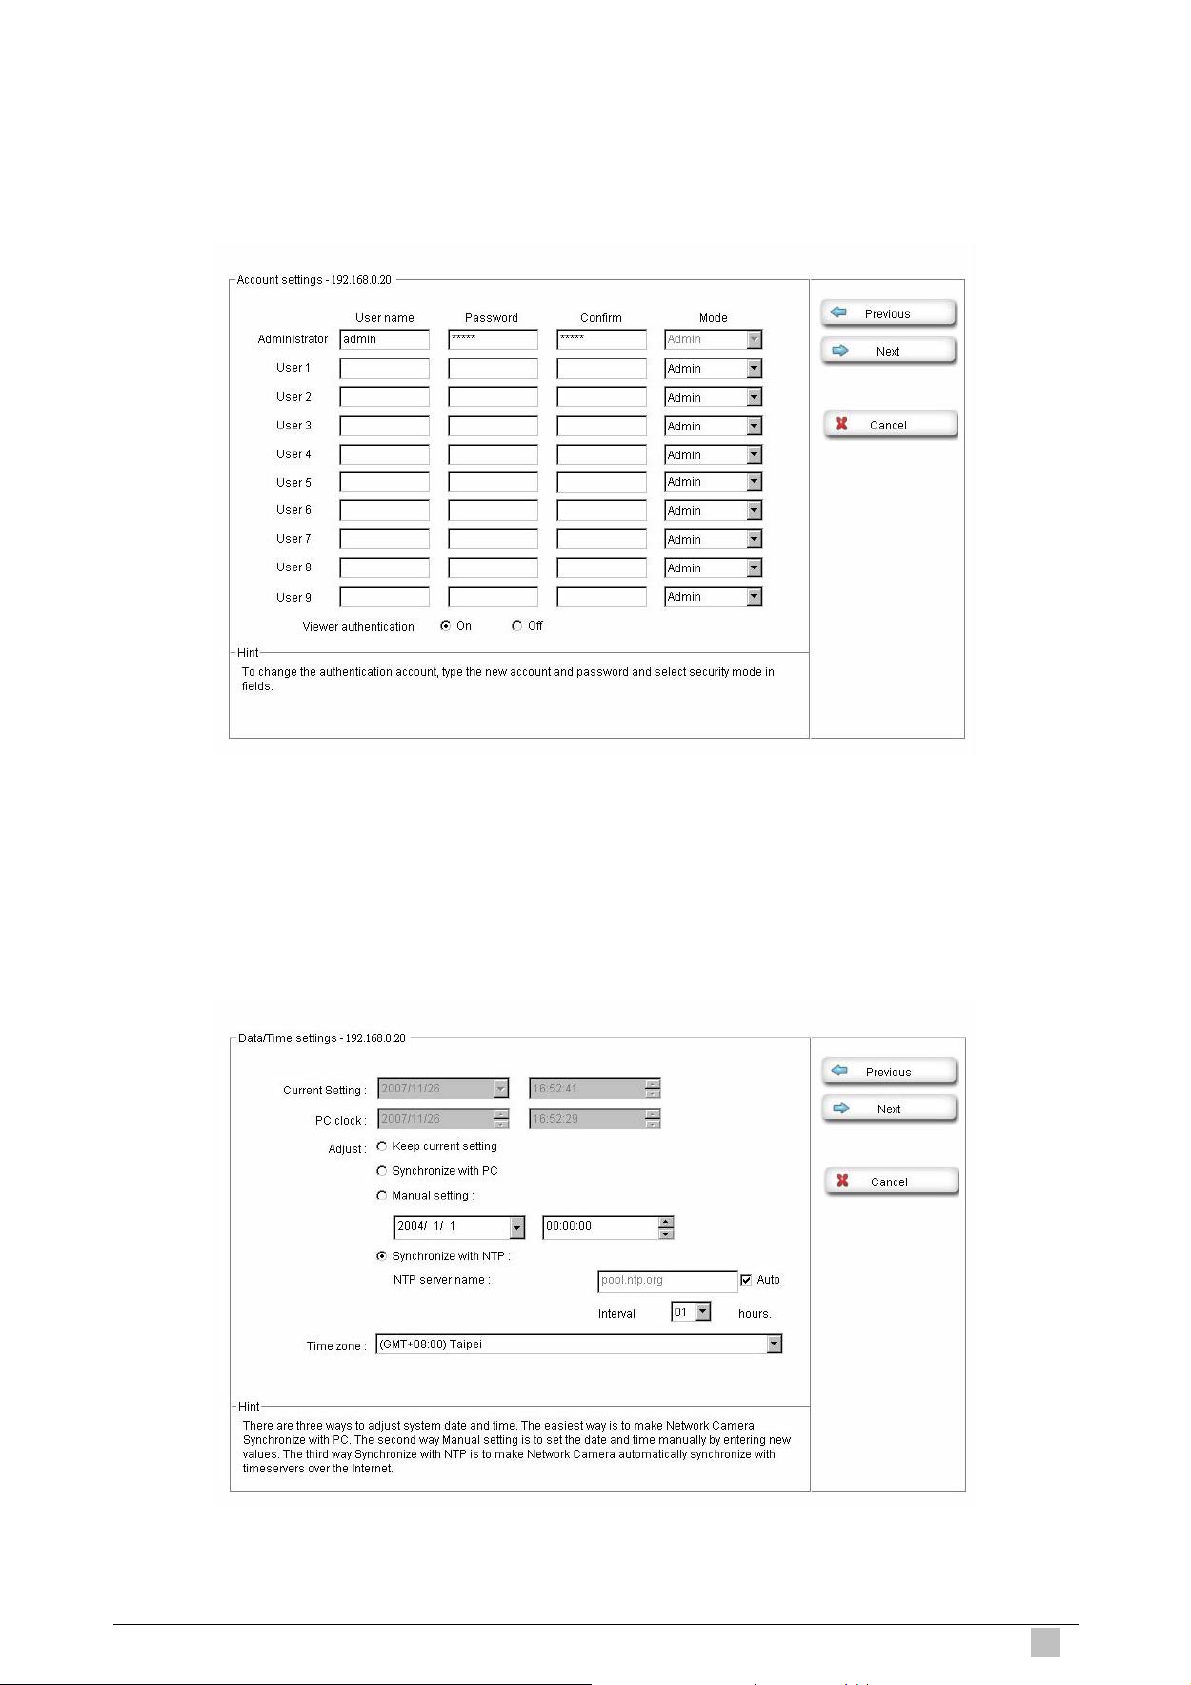
5. On the following Account settings screen, you can modify the Administrator login user
name and password. And you can add some user accounts as Admin, Operator or
Viewer. Please click “Next” to continue.
6. On the following Date/Time settings screen, you can adjust the date and time to
synchronize with PC, manual setting or synchronize with NTP server. Select the correct
Time Zone, then click “Next” to continue.
Dual Mode CCD Dome Internet Camera
17
Page 18
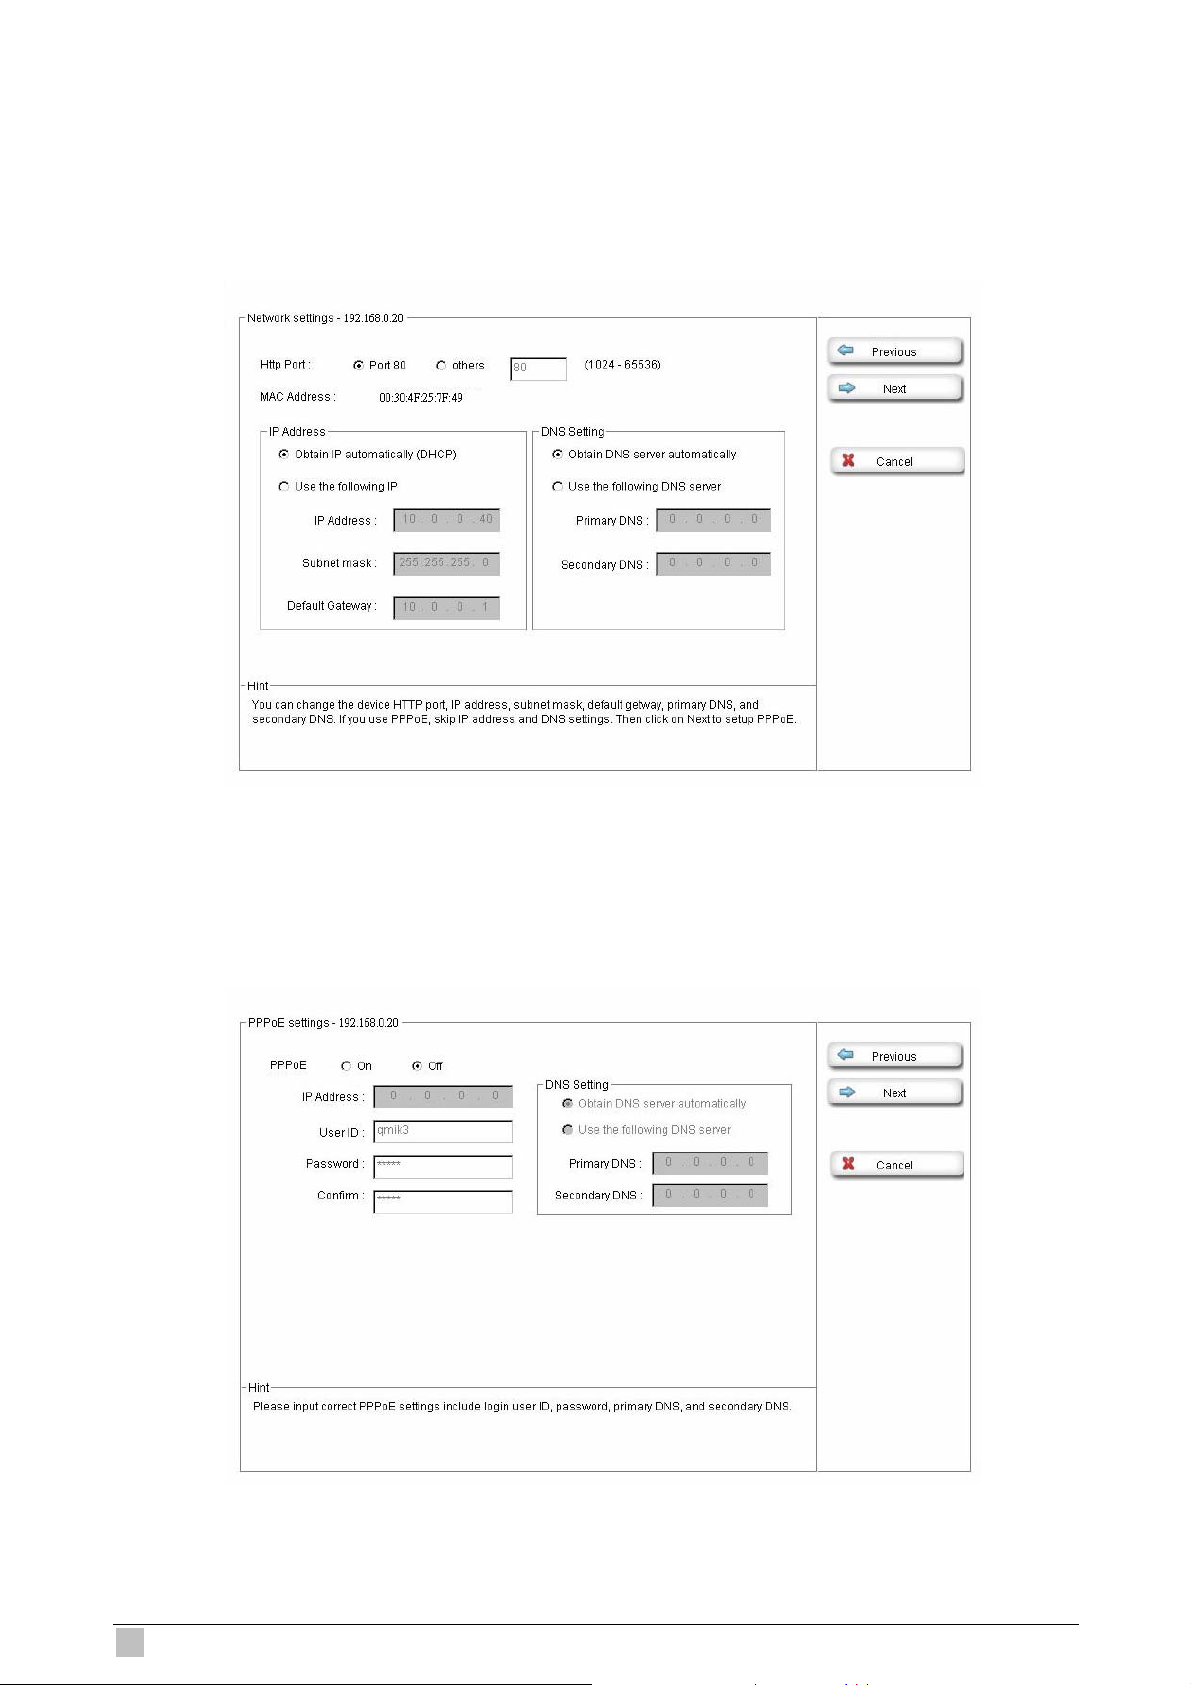
7. On the following Network settings screen, you can configure the device HTTP port
number, IP address, subnet mask, default gateway and DNS. If you are use PPPoE,
please select obtain automatically for IP address and DNS settings. Click “Next” to
continue.
8. On the following PPPoE settings screen, if you are use PPPoE connection, please select
“On” and fill the correct User ID and Password for dialling. Click “Next” to continue.
18
ICA-700 User Guide
Page 19
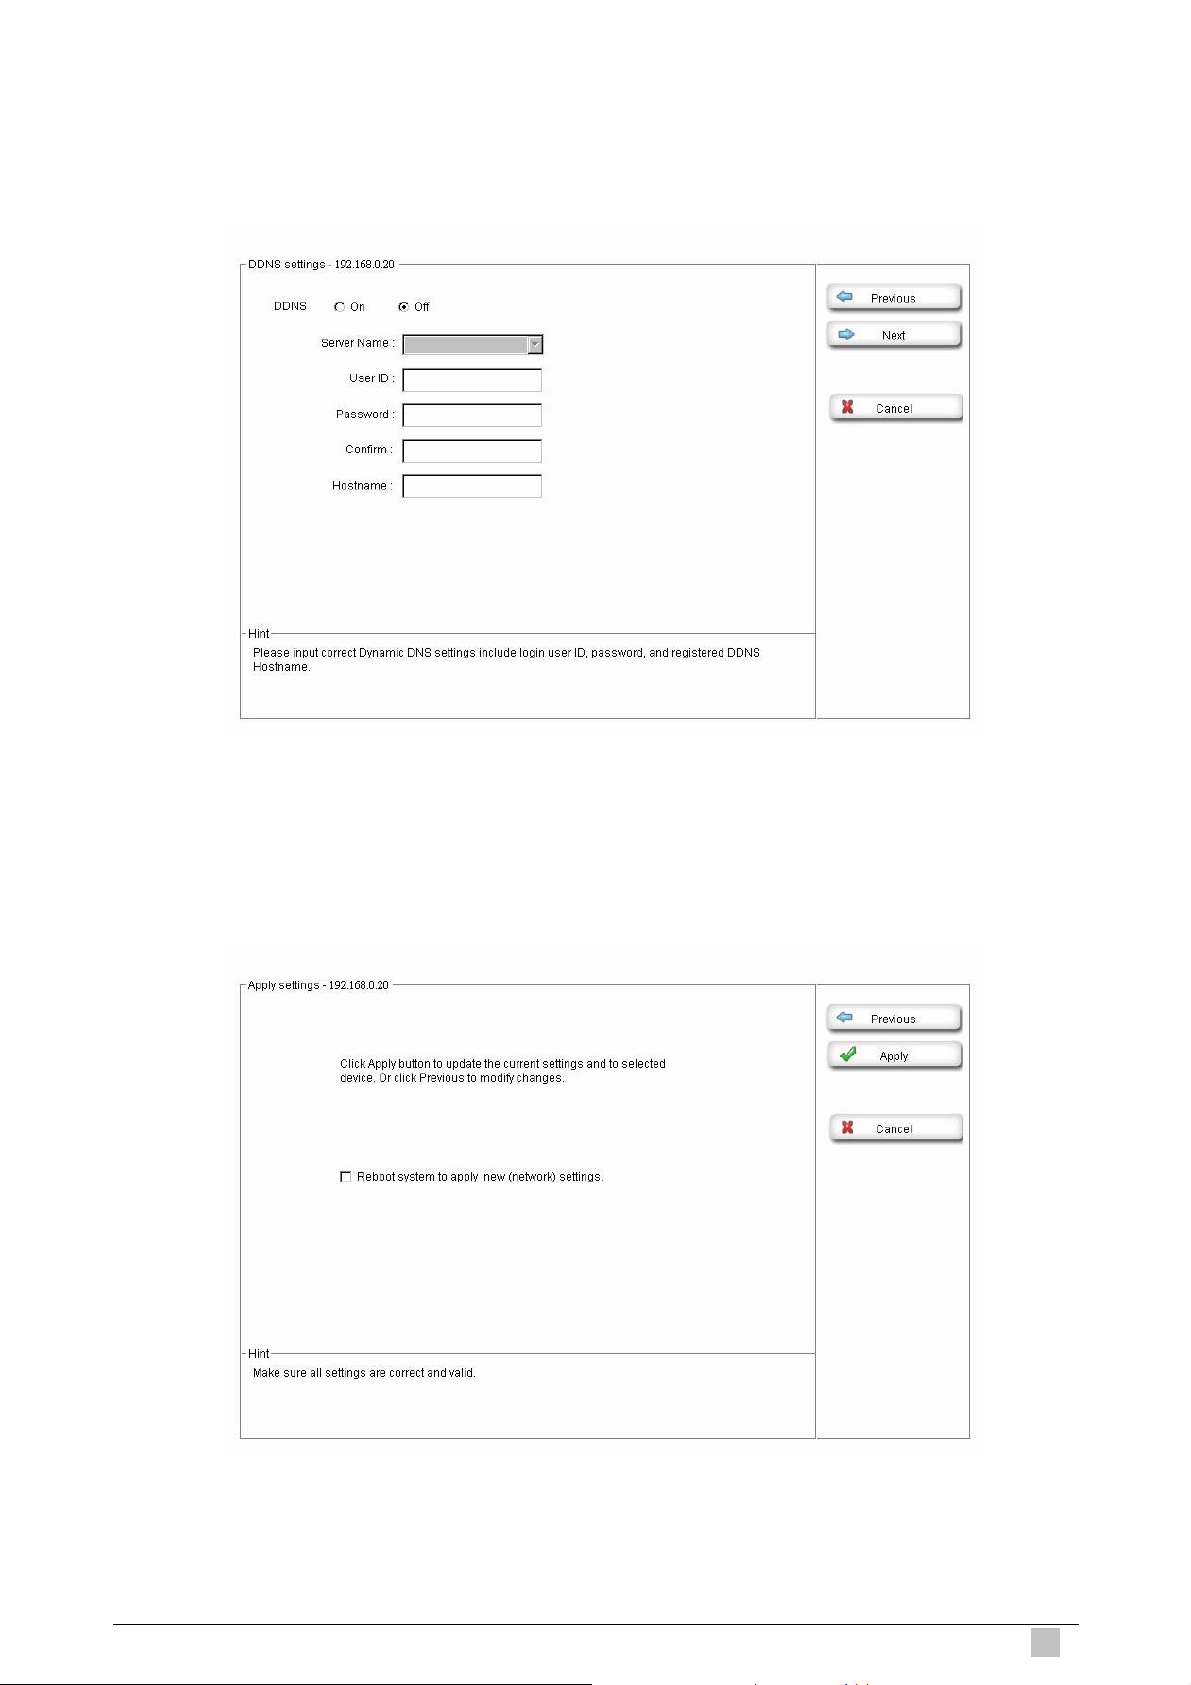
9. On the following DDNS settings screen, if you have registered the account from the
DDNS provider and want to use DDNS function, please select “On” to fill the correct
User ID, Password and Hostname for connecting. Click “Next” to continue.
10. In Apply settings screen. Please click “Apply” to finish the configuration, we will
suggest you check the “Reboot system to apply new settings” to let the camera work
with new settings. Or click “Previous” to check your settings.
After modifications, you may now connect the camera with new settings via web browser.
Dual Mode CCD Dome Internet Camera
19
Page 20
3. Viewing Live Video
This chapter introduces how to monitor the image from the IP camera by using Microsoft
web browser. The recommended browser for Windows is Internet Explorer 6.0.
3.1 Connecting ICA-700 via Ethernet
After finishing the Setup Tool, you can access the IP camera by using the browser.
1. Start the Web browser.
2. In the Address box, please enter "http://address”. The “address” is the LAN IP address
which up to your new configuration from Setup Tool.
Note:
The factory default setting of IP address will automatically obtain an IP address from DHCP server.
After obtaining, if there is no DHCP server on your network, the IP address will be “192.168.0.20”.
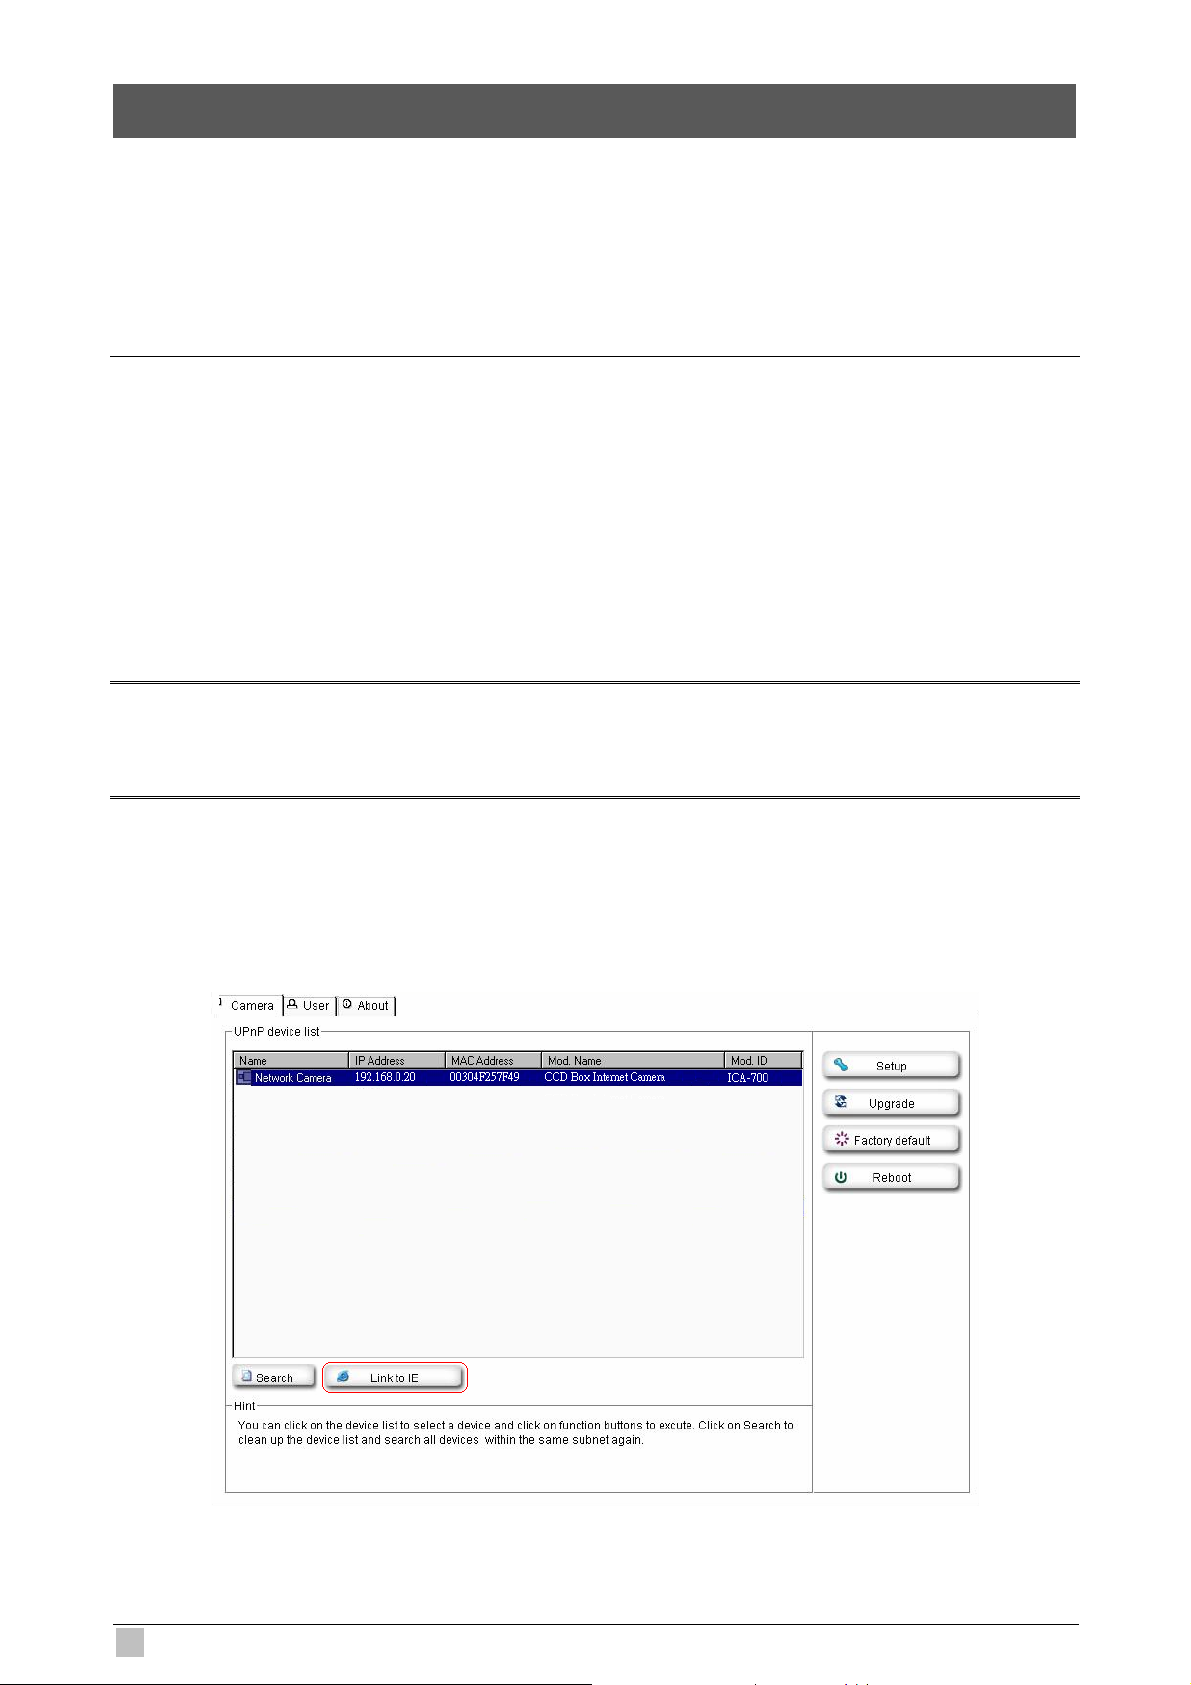
3. You can also use the Setup Tool to select a camera on device list, and click “Link to IE”
button to directly link to IE.
20
ICA-700 User Guide
Page 21
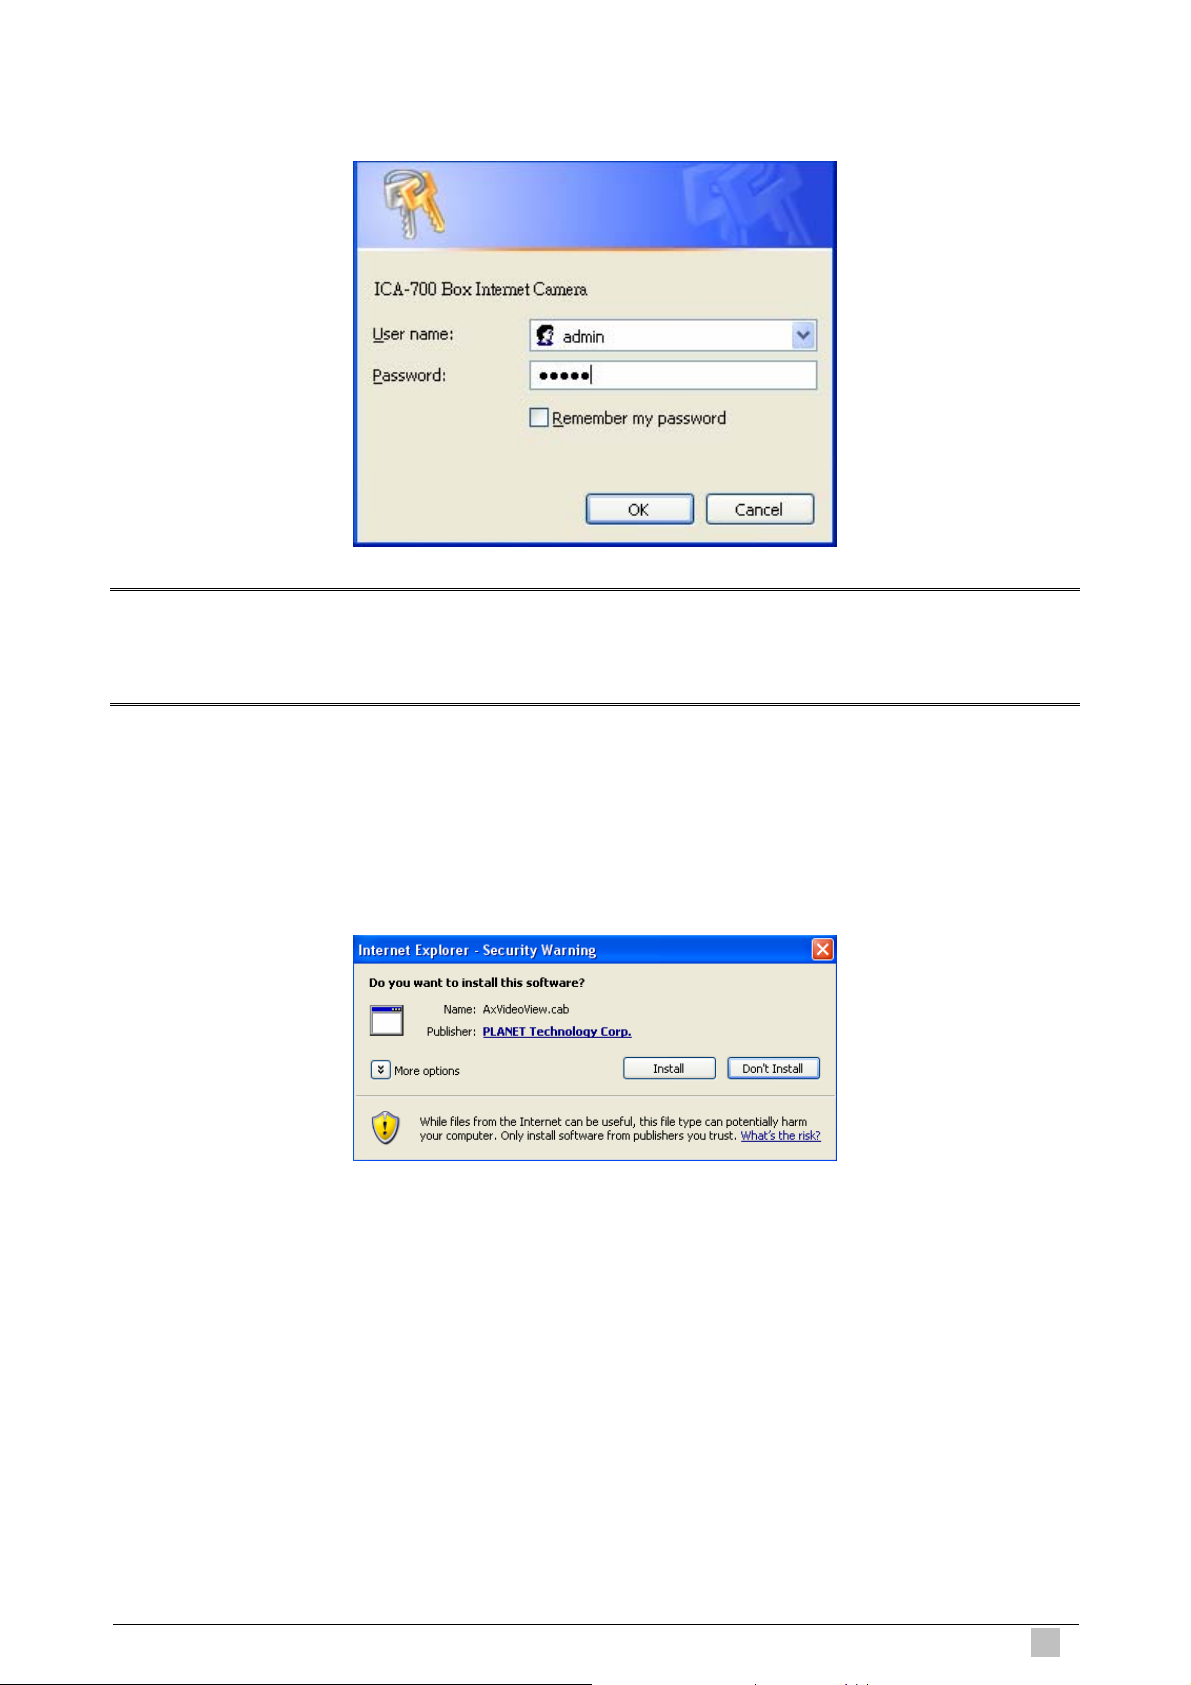
4. When you connect, the login page will be displayed as below.
Note:
1. The default user name and password both are “admin”.
2. The Administrator’s ID / Password can be configured on the “Account” of Security menu.
5. The first time you view the camera, you will be prompted to install an ActiveX component
as below. You must install this ActiveX component in order to view the video stream
in Internet Explorer. Click on "Install" to install.
Dual Mode CCD Dome Internet Camera
21
Page 22

6. After installing, you will be able to view the live video stream in its own window as below.
Note:
1. Video will start playing automatically. There might be a delay of a few seconds while the video
stream is buffered.
2. There are a number of options available on homepage, accessed by select list, button or icon.
The details are described in Chapter 3.2 – General Options.
22
ICA-700 User Guide
Page 23

3.2 General Options
Snapshot
Click to capture live image shot and store the picture in your computer.
Full Screen
Click to view the live video for full screen on your monitor.
Zoom
Click to display / close the zoom window.
Pause / Play
Click to pause / play the current video.
Stop
Click to stop the current video.
Record
Click to record the current video to the location you want.
Microphone turned On / Off
Click to turn on / off the microphone.
Speaker turned On / Off
Click to turn on / off the speaker.
Volume
If audio is enabled, use this slider to adjust the volume.
Dual Mode CCD Dome Internet Camera
23
Page 24

3.2.1 Directly zoom in / out the image
1. Click to display the zoom window.
2. Pull the
showed on th
e above window.
to adjust the zoom range, and it will be
. You can use the right click of your mouse to move the to anywhere on the window.
3
.2.2 Language
3
ou can click the pulldown box to select system language, including English, Traditional
Y
Chinese, Simplified Chinese, Deutsch, Japanese and Spanish.
24
ICA-700 User Guide
Page 25

3.2.3 Setting
dministrator can click this Setting bar to go to the setting page. The details are described
A
in Chapter 4 – Basic Setting & Chapter 5 – Advance Setting.
3.2.4 Client setting
client setting option, you can select the Mode, View size, Protocol, Video buffer.
In
Client setting
Mode
View Size
Protocol
Video buffer
Click the pulldown box een MPEG4 and MJPEG video to choose betw
compression mode.
play image resolution to 320X240 or 640X480. Select the desired dis
Select the transferring protocol from TCP, UDP and HTTP.
Turn the Video Buffer function On/Off. The Video Buffer fun
streaming more smoothly in unsteady network environment, but might cause
a little delay in live viewing.
Note:
1. MJPEG streaming is unavailable if RTSP mode is ON.
ction makes the
of Camera menu. 2. The RTSP function can be configured on the “General”
Dual Mode CCD Dome Internet Camera
25
Page 26

3.2.5 Image setup
ou can use the tool bar to optimize the Brightness, Contrast, Saturation and Hue here.
Y
26
ICA-700 User Guide
Page 27

4. Basic Setting
his Chapter provides basic setting details of the camera’s web-based management. The
T
camera can be configured via your web browser. That must have an IP address which is
compatible with your network.
ote:
N
The recommended method to ensure this to use the supplied windows-based Setup Tool is
described in Chapter 2.3 – Software Quick Configuration.
1. Click “Setting” on the left side of home page.
Dual Mode CCD Dome Internet Camera
27
Page 28

2. The welcome of setting page will be displayed as below.
3. The basic setting menu contains following options.
Information
System
Camera mputer view
Setting Basic
Network
Data/Time
Initialize
General
MPEG4
MJP
Informati
PPPoE
DDNS
> Co
> Mobile view
EG
on
UPnP
IP Notif
Account
Security
HTTPS
ication
28
ICA-700 User Guide
Page 29

4.1 System
4.1.1 Information
his page will be displayed after clicking “Basic > System > Information” of the setting
T
menu. It displays the system information of this camera.
Product name
Firmware version
Web version
Information
This displays the name of this product.
n. This displays the current firmware versio
This displays the current web version.
Dual Mode CCD Dome Internet Camera
29
Page 30

4.1.2 Date/Time
his page will be displayed after clicking “Basic > System > Date/Time” of the setting
T
menu. It allows you to adjust the date and time of this IP camera.
Current date/time
PC clock
Date/time format
Adjust
Date/Time
This displays the cur d time of the device. rent date an
This displays the date and time of the monitoring PC clock.
formats: Click the pulldown box to select among different time display
yyyy-mm-dd hh:mm:ss (year-month-day hour:minute:second),
mm-dd-yyyy hh:mm:ss (month-day-year hour:minute:second),
dd-mm-yyyy hh:mm:ss (day-month-year hour:minute:second).
Select one of four time adjusting modes:
Keep current setting:
Select this mode to keep
Synchronize with PC:
Select this mode to mak
Manual setting:
Select this mode t
Synchronize with NTP:
o manually adjust the date & time of the device.
the current date & time of the device.
e the date & time the same as the PC.
Time zone
30
Specify the NTP server n
time with the time server.
the area where the device is installed from the pulldown box.
ame and the Interval to synchronize the date &
ime difference from Greenwich Mean Time in Select the time zone and t
ICA-700 User Guide
Page 31

4.1.3 Initialize
his page will be displayed after clicking “Basic > System > Initialize” of the setting menu.
T
It allows you to maintain the system of this IP camera.
Reboot
Factory default
Backup setting data
Restore setting
Firmware upgrade
Initialize
Click this button to e device. A confirmation dialogue will reboot th
appear. Click OK to proceed.
Click this button to reset the de
confirmation dialogue will appear. Click OK to proceed. After
completing adjustments to the default settings, the device will
automatically. Do not turn off the device until the device reboots.
instructions on the browser to save the setting data file to your
specified location.
Load the saved set
the file in which the setting data is stored. Click OK, and the device is
adjusted according to the loaded data and restarted.
upgrading. A confirmation dialogue will appear. Click OK to start
ting data of the device. Click Browse and select
vice to the factory default settings. A
reboot
the Save the setting data of the device to a file. Click Save and follow
t the file for Upgrade the device software. Click Browse and selec
upgrading. The device will reboot upon completion.
Dual Mode CCD Dome Internet Camera
31
Page 32

4.2 Camera
4.2.1 General
his page will be displayed after clicking “Basic > Camera > General” of the setting menu.
T
On / Off
On / Off
Text overlay
RTSP
Enable / disable the RTSP function.
Deinterlace Filter
Enable / disable the Deinterlace filter function.
Overlay
Enables use ate/Time on the screen.
Text color:
Choose test color as Wh
Background color:
Choose background c
Alias:
Fill the
Date/Time:
Enable or dis
Display position:
rs to see D
ite or Black.
olor as White, Black or Transparent.
alias here.
able the Date/Time display.
Primacy mask
Off
32
Choose display pos
Disable Overlay function.
ition as Top or Bottom.
eo image. Enables users to conceal an area of the vid
ICA-700 User Guide
Page 33

Note:
Real Time Streaming Protocol. RTSP is supported by most of the media clients . (RealPlayer,
Media Player, QuickTime, etc…).
The primacy mask page is as below. You can adjust the mask size and position to a specified
area.
Dual Mode CCD Dome Internet Camera
33
Page 34

4.2.2 MPEG4 – Computer view
his page will be displayed after clicking “Basic > Camera > MPEG4 > Computer view” of
T
the setting menu.
RTSP port
Viewer
authent
Port range
ication
RTSP
The RTSP (Real reaming Protocol) is a standard for
connected clients to control streaming data (MPEG4) over th
World Wide Web. The default RTSP Port is 554. You can fill the
RTSP Port number (1024~65535) in the field provided.
Enable /disable the viewer authentication.
If the viewer authentication is ON, users vie
be requested to key-in username and password.
RTP Unicast streaming
The RTP tocol) is an Internet protocol for
transmitting real-time data such as audio and video. The default
port range is 5000 ~ 7999. You can fill the numbers (1024~65535
in the field provided.
(Real Time Transport Pro
RTP Multicast streaming
Time St
e
wing through RTSP will
)
On / Off
Multicast address
34
Enable g function. / disable multicast streamin
Specify the multicast server address.
ICA-700 User Guide
Page 35

Video port
Specify the transmission port number of the video data. You can fill
the numbers (1024~65535) in the field provided.
Audio port
Time-To-Live
Image size
Frame rate
Quality
data. You can fill Specify the transmission port number of the audio
the numbers (1024~65535) in the field provided.
Set the maximum TTL that multicast can pass through.
Computer View
Specify the work camera transmits.
You can choose among 704 × 480, 352 × 240 and 176
NTSC and 704 × 576, 352 × 288 and 176 × 144 for PAL.
10, 15, 20, 25, 30 fps. The unit “fps” stands for “frames sent per
second”.
Auto:
The qu
the frame rate.
Fixed Quality:
The selectable v
Excellent.
Fixed Bitra
image size the net
× 120 for
are 5, Set the frame rate of the MPEG4 image. Selectable values
ality and bitrate will be automatically decided according to
alues are Medium, Standard, Good, Detailed and
te:
Set the bit rate o
values are 64, 128, 256, 384, 512, 768, 1024, 1536 and 2048 kbps.
f MPEG4 image transmission for a line. Selectable
Note:
The selected frame rate and bit rate are a tentative value. The actual frame rate and bit rate may be
different according to the image size, the shooting scene or the network condition.
Dual Mode CCD Dome Internet Camera
35
Page 36

4.2.3 MPEG4 – Mobile view
his page will be displayed after clicking “Basic > Camera > MPEG4 > Mobile view” of
T
the setting menu.
RTSP port
Port range
On / Off
Multicast address
RTSP
The RTSP (Real Tim ming Protocol) is a standard for
connected clients to control streaming data (MPEG4) over th
Wide Web. The default RTSP Port is 554. You can fill the RTSP Port
number (1024~65535) in the field provided.
RTP Unicast streaming
The RTP ( col) is an Internet protocol for
transmitting real-time data such as audio and video. The default por
range is 9000 ~ 11999. You can fill the numbers (1024~65535) in the
field provided.
Enable / disable multicast streaming function.
Specify the multicast server address.
Specify the transmission port number of the video data. You can fill
Real Time Transport Proto
RTP Multicast streaming
e Strea
e World
t
Video port
36
the numbers (1024~65535) in the field provided.
ICA-700 User Guide
Page 37

Audio port
pecify the transmission port number of the audio data. You can fill S
the numbers (1024~65535) in the field provided.
Time-To-Live
Image size
Frame rate
Quality
Set the maximum TTL that multicast can pass through.
Mobile View
176 × 120 for mobile.
Set the frame rate of the MPEG4 image. Selectable values are 5, 10,
15, 20 fps. The unit “fps” stands for “frames sent per second”.
Fixed Bitrate:
Set the bit rate o
values are 16, 32, and 64 kbps.
f MPEG4 image transmission for a line. Selectable
Dual Mode CCD Dome Internet Camera
37
Page 38

4.2.4 MJPEG
his page will be displayed after clicking “Basic > Camera > MJPEG” of the setting menu.
T
Video/Audio port
number
Video/Audio port
number (SSL)
Image Size
Frame rate
Quality
MJPEG viewer port – Unicast streaming
Spec data. Specify an even
ify the transmission port number of the video
number from 1024 to 65534.
Specify the SSL transmission
even number from 1024 to 65534.
Specify the image size the network
among 704 × 480, 352 × 240 and 176 × 120 for NTSC and 704 × 576, 35
× 288 and 176 × 144 for PAL.
fps. The unit “fps” stands for “frames sent per second”.
Auto:
The qu
Fixed quality:
The selectable v
ality will be automatically decided.
alues are Medium, Standard, Good, Detailed and
port number of the video data. Specify an
camera transmits. You can choose
G image. Selectable values are 5, 10, 15 Set the frame rate of the MJPE
2
Excellent.
Note:
Unicast streaming: Specify the transmission port number of the video data and audio data used
38
ICA-700 User Guide
. when UDP (Unicast) is selected with the TCP/UDP transmission switching icon in the main viewer
Page 39

4.3 Network
4.3.1 Information
his page will be displayed after clicking “Basic > Network > Information” of the setting
T
menu. It displays the network information of this camera.
MAC address
Obtain an IP address
automatically (DHCP)
Use the following IP
address
Obtain DNS address
automatically
Information
Display the MA the device. C address of
If a DHCP server is installed on the netw
IP address is assigned by the DHCP server.
Select this when a fixed IP address is set.
IP address:
Enter the IP a
Subnet mask:
Enter the subne
Default gateway:
Enter the default ga
Select this to obtain the address of DNS server automatically.
ddress of the device.
t mask.
teway.
ork, to select this while the
Dual Mode CCD Dome Internet Camera
39
Page 40

Select this when you set the fixed DNS address.
Use the following DNS
address
HTTP port number
Primary DNS server:
Enter the IP address of
Secondary DNS server:
Enter the IP address of the
Select 80 in general situations.
If you want to use a port numbe
and enter a port number between 1024 and 65535.
the primary DNS server.
secondary DNS server, if necessary.
r other than 80, select the text box
Note:
When you have set the HTTP port number to a number other than 80 on the Network setting page
or in the Setup Program, access the device by typing the IP address of the device on the web
browser as follows:
Example: when HTT
P port number is set to 2000 Æ http://192.168.0.20:2000
40
ICA-700 User Guide
Page 41

4.3.2 PPPoE
his page will be displayed after clicking “Basic > Network > PPPoE” of the setting menu.
T
It allows you to configure the dial-up connection.
PPPoE
On / Off
IP address
User ID
Password
Re-type password
Obtain DNS server
address automatically
Use the following DNS DNS server:
server address
Enable/disable the PPPoE function.
Enter the user ID for authentication necessary for PPPoE
connections. Type it up to 64 characters.
connections. Type it up to 32 characters.
Re-type the password to confirm.
Select this when you set the fixed address as the IP address of DNS
server.
Primary
Enter the IP address of
E connecting with network. The IP address obtained at the PPPo
essary for PPPoE Enter the password for authentication nec
DNS server automatically. Select this to obtain the address of
the primary DNS server.
Dual Mode CCD Dome Internet Camera
Secondary DNS server:
Enter the IP address of the
secondary DNS server.
41
Page 42

4.3.3 DDNS
his page will be displayed after clicking “Basic > Network > DDNS” of the setting menu.
T
It allows you to configure the dynamic DNS connection.
DDNS
On / Off
Server name
User ID
Password
Re-type password
Host name
Enable/disable the DDNS function.
. Enter the name of the DDNS Server
Enter the user ID for authentication necessary for DDNS connections.
Type it up to 64 characters.
ntication necessary for DDNS connections. Enter the password for authe
Type it up to 32 characters.
firm. Re-type the password to con
Enter the host name that is registered to the DDNS server.
Note:
When you want to use DDNS function, you need to register an account in DDNS server first.
42
ICA-700 User Guide
Page 43

4.3.4 UPnP
his page will be displayed after clicking “Basic > Network > UPnP” of the setting menu. It
T
allows you to enable or disable the UPnP function.
Turn On UPnP port
forwarding
HTTP port
SSL port
MPEG4 viewer port
MPEG4 viewer port (SSL)
MJPEG viewer port
MJPEG viewer port (SSL)
UPnP
For opening a port in a router or firewall in a private network in
order to let a party from the outside world contact a user inside.
Enter the HTTP port number and default HTTP port is 80.
You can fill the numbers (1024~65535) in the field provided.
Enter the SSL port number and default SSL port is 443.
You can fill the numbers (1024~65535) in the field provid
Enter the MPEG4 viewer port number and default MPEG4
viewer port is 8090.
L viewer port and default is 8091. Enter the MPEG4 SS
Enter the MJPEG viewer port number and default MJPEG
viewer port is 8070.
L viewer port and default is 8071. Enter the MPEG4 SS
ed.
Dual Mode CCD Dome Internet Camera
43
Page 44

4.3.5 IP Notification
his page will be displayed after clicking “Basic > Network > IP Notification” of the
T
setting menu. It allows you to configure the IP Notification via SMTP.
On / Off
Notify type
SMTP server
name
Authentication
IP Notification
Enable/disable the I ction. P Notification fun
Select type of DHCP, Static IP and PPPoE will notify.
Type the SMTP server name up to 64 characters, or th
SMTP server.
Select the authentication required when you send an email.
On:
authentication is necessary an e-mail is sent, select one of the
When
authentication methods from the followings.
Off:
Selec
t if no authentication is necessary when an email is sent.
SMTP:
Select if
POP before SMTP:
SMTP authentication is necessary when an e-mail is sent.
e IP address of the
Select if POP before
sent.
44
SMTP authentication is necessary when an e-mail is
ICA-700 User Guide
Page 45

POP server name:
Recipient
e-mail add
Administrator
e-mail address
Subject
Message
ress
It is necessary when
Type the POP (receiving mail) server name up to 64 characters, or type the
IP address of the POP server. This setting is necessary when the SMTP
server which sends e-mails performs authentication using the POP user
account.
User nam
Type the user name and Pa
This setting is necessary when the SMTP server which sends e-mails
performs authentication.
Type the recipient e-Mail
to three recipient E-mail addresses.
used for reply mail and sending system messages from the SMTP server.
Type the subject/title of the e-Mail up to 64 characters. With respect to mail
which is sent according to the IP notification.
network information including IP, Port, MAC, Model and Serial..
e & Password:
the POP before SMTP is selected in Authentication.
ssword of the user who has the mail account.
address up to 64 characters. You can specify up
s up to 64 characters. This address is Type the Administrator e-Mail addres
rs. Default value provide Type the text of the E-mail up to 384 characte
Note:
When you set Authentication to On, be sure to select either or both SMTP or/and POP before
SMTP.
Dual Mode CCD Dome Internet Camera
45
Page 46

4.4 Security
4.4.1 Account
his page will be displayed after clicking “Basic > Security > Account” of the setting
T
menu. It allows you to modify and add users for accessing.
User name
Password
Re-type password
Viewer Mode
Viewer authentication
Account
Set a user name between 5 and 16 characters.
Set a password between 5 and 16 characters.
Re-type the password to confirm.
Set a user to Admin, Operator or Viewer mode.
Allows any viewer direct access to Live View.
46
ICA-700 User Guide
Page 47

4.4.2 HTTPS
his page will be displayed after clicking “Basic > Security > HTTPS” of the setting menu.
T
It allows you to access the IP camera via HTTPS.
Create & Install
Installed Certificate
HTTPS Connection Policy
HTTPS
Create a self-signed certificate for HTTPS to recognize.
e. Display or remove the properties of the installed certificat
Set HTTPS connection policy for different level of users.
Dual Mode CCD Dome Internet Camera
47
Page 48

5. Advance Setting
This Chapter provides advance setting details of the camera’s web-based management.
The camera can be configured via your web browser. That must have an IP address which
is compatible with your network.
Note:
The recommended method to ensure this to use the supplied windows-based Setup Tool is
described in Chapter 2.3 – Software Quick Configuration.
1. Click “Setting” on the left side of home page.
48
ICA-700 User Guide
Page 49

2. The welcome of setting page will be displayed as below.
3. The advance setting menu contains following options.
General
FTP client
SMTP
Setting Advance
HTTP event
Schedule Setting
Alarm buffer Setting
Alarm sending
Periodical sending
General
Alarm sending
Periodical sending
General
Alarm sending
Dual Mode CCD Dome Internet Camera
Motion detection Setting
System Log Setting
49
Page 50

5.1 FTP client
5.1.1 General
This page will be displayed after clicking “Advance > FTP client > General” of the setting
menu. It allows you to send the image or video to FTP server.
On / Off
FTP server name
User name
Password
Re-type password
Passive mode
Attached file type
Note:
FTP client
Enable/disable the FTP client function.
Type the FTP server name to upload still images up to 64 characters, or
the IP address of the FTP server.
Type the user name for the FTP server.
Type the password for the FTP server.
To confirm the password.
Set whether you use the passive mode of FTP server or not when
connecting to FTP server. Select On to connect to FTP server using the
passive mode.
Set attached file type to MPEG or MJPEG.
The frame rate and operability on the main viewer may decrease while a file is being transmitted by
the FTP client function.
50
ICA-700 User Guide
Page 51

5.1.2 Alarm sending
This page will be displayed after clicking “Advance > FTP client > Alarm sending” of the
setting menu. It allows you to send the image or video to FTP server with the alarm
detection.
On / Off
Remote path
Image file name
Suffix
Alarm sending
Enable/disable the Alarm sending function.
Type the path to the destination in FTP server up to 64 characters.
Type the file name you want to assign to the images when sending to the
FTP server. You can use up to 10 alphanumeric characters, - (hyphen)
and _ (underscore) for naming.
Select a suffix to add to the file name:
Date & time:
The date & time suffix is added to the Image file name. The date/time suffix
consists of lower two-digits of year (2 digits), month (2 digits), date (2
digits), hour (2 digits), minute (2 digits), second (2 digits), and consecutive
number (2 digits), thus 14-digit number is added to the file name.
Sequence number:
A consecutive number of 10 digits between 0000000001 and 4294967295
and two fixed digits 00 is added to the Image file name.
Dual Mode CCD Dome Internet Camera
51
Page 52

Alarm
Motion Detection
Use alarm buffer
Always
Schedule
Click it on for using Motion Detection function as a sensor.
You can set the motion detection function page.
Select Use alarm buffer when you forward the image/audio of before and
after the alarm detection (pre-alarm, post-alarm). If you do not select it,
only the image of the moment of the alarm detection is forwarded. Click
Alarm buffer to display the Alarm buffer setting menu.
Effective Period
The periodical sending is always effective.
You can specify the period when the periodical sending is effective in the
schedule setting in the other section. Click Schedule and the setting menu
for the effective period is displayed.
Note:
Motion Detection works only when the Video mode is set to MPEG4 and the Cropping is set to
Off.
52
ICA-700 User Guide
Page 53

5.1.3 Periodical sending
This page will be displayed after clicking “Advance > FTP client > Periodical sending” of
the setting menu. It allows you to send the image or video to FTP server with the setting
period.
On / Off
Remote path
Image file name
Suffix
Periodical sending
Enable/disable the Periodical sending function.
Type the path to the destination in FTP server up to 64 characters.
Type the file name you want to assign to the images when sending to the
FTP server. You can use up to 10 alphanumeric characters, - (hyphen)
and _ (underscore) for naming.
Select a suffix to add to the file name:
None:
The name of the sent file will be the Image file name.
Date & time:
The date & time suffix is added to the Image file name. The date & time
suffix consists of lower two-digits of year (2 digits), month (2 digits), date (2
digits), hour (2 digits), minute (2 digits) and second (2 digits), and
consecutive number (2 digits), thus 14-digit number is added to the file
name.
Dual Mode CCD Dome Internet Camera
53
Page 54

Sequence number:
A consecutive number is added to the Image file name.
Sequence number clear:
Click Clear and the suffix of the sequence number returns to 1.
Interval
Always
Schedule
Set the periodical sending is effective interval. Min value is 1 min and Max
value is 24 hour.
Effective Period
The periodical sending is always effective.
You can specify the period when the periodical sending is effective in the
schedule setting in the other section. Click Schedule and the setting menu
for the effective period is displayed.
54
ICA-700 User Guide
Page 55

5.2 SMTP
5.2.1 General
This page will be displayed after clicking “Advance > SMTP > General” of the setting
menu. It allows you to send the image via SMTP.
On / Off
SMTP server name
Authentication
e-Mail (SMTP)
Enable/disable the SMTP function.
Type the SMTP server name up to 64 characters, or the IP
address of the SMTP server.
Select the authentication required when you send an email.
On:
When authentication is necessary an e-mail is sent, select one of
the authentication methods from the followings.
Off:
Select if no authentication is necessary when an email is sent.
SMTP: Select if SMTP authentication is necessary when an
e-mail is sent.
Dual Mode CCD Dome Internet Camera
55
Page 56

POP before SMTP:
Select if POP before SMTP authentication is necessary when an
e-mail is sent.
POP server name:
It is necessary when the POP before SMTP is selected in
Authentication. Type the POP (receiving mail) server name up
to 64 characters, or type the IP address of the POP server. This
setting is necessary when the SMTP server which sends e-mails
performs authentication using the POP user account.
User name, Password:
Type the user name and Password of the user who has the mail
account. This setting is necessary when the SMTP server which
sends e-mails performs authentication.
Recipient e-mail address
Administrator e-mail
address
Subject
Message
Type the recipient e-Mail address up to 64 characters. You can
specify up to three recipient E-mail addresses.
Type the Administrator e-Mail address up to 64 characters. This
address is used for reply mail and sending system messages
from the SMTP server.
Type the subject/title of the e-Mail up to 64 characters. With
respect to mail which is sent according to the alarm detection
when Alarm sending of the alarm tab is set to On, the
characters standing for the sensor type added to the subject.
Type the text of the E-mail up to 384 characters. (A line break is
equivalent to 2 characters.)
Note:
When you set Authentication to On, be sure to select either or both SMTP or/and POP before
SMTP.
56
ICA-700 User Guide
Page 57

5.2.2 Alarm sending
This page will be displayed after clicking “Advance > SMTP > Alarm sending” of the
setting menu. It allows you to send the image via SMTP with the alarm detection.
On / Off
File attachment
Image file name
Suffix
Alarm sending
Enable/disable the Alarm sending function.
Set whether an image file is attached to the mail sent or not.
When On is selected, the image file made by the settings below is
attached. When Off is selected, only the message is sent.
Type the file name you want to assign to the images when sending to the
FTP server. You can use up to 10 alphanumeric characters, - (hyphen)
and _ (underscore) for naming.
Select a suffix to add to the file name:
None:
No suffix is added. The Image file name is assigned to the image to be
sent via an e-Mail.
Date & time:
The date & time suffix is added to the Image file name. The date/time suffix
consists of lower two-digits of year (2 digits), month (2 digits), date (2
digits), hour (2 digits), minute (2 digits), second (2 digits), and consecutive
number (2 digits), thus 14-digit number is added to the file name.
Sequence number:
A consecutive number of 10 digits between 0000000001 and 4294967295
and two fixed digits 00 is added to the Image file name.
Dual Mode CCD Dome Internet Camera
57
Page 58

Alarm
Motion Detection
Use alarm buffer
Always
Schedule
Click it on for using Motion Detection function as a sensor.
You can set the motion detection function page.
Select Use alarm buffer when you forward the image/audio of before and
after the alarm detection (pre-alarm, post-alarm). If you do not select it,
only the image of the moment of the alarm detection is forwarded. Click
Alarm buffer to display the Alarm buffer setting menu.
Effective Period
The periodical sending is always effective.
You can specify the period when the periodical sending is effective in the
schedule setting in the other section. Click Schedule and the setting menu
for the effective period is displayed.
Note:
Motion Detection works only when the Video mode is set to MPEG4 and the Cropping is set to
Off.
58
ICA-700 User Guide
Page 59

5.2.3 Periodical sending
This page will be displayed after clicking “Advance > SMTP > Periodical sending” of the
setting menu.
On / Off
Image file name
Suffix
Periodical sending
Enable/disable the Periodical sending function.
Type the file name you want to assign to the images when sending to the
FTP server. You can use up to 10 alphanumeric characters, - (hyphen)
and _ (underscore) for naming.
Select a suffix to add to the file name:
None:
The name of the sent file will be the Image file name.
Date & time:
The date & time suffix is added to the Image file name. The date & time
suffix consists of lower two-digits of year (2 digits), month (2 digits), date (2
digits), hour (2 digits), minute (2 digits) and second (2 digits), and
consecutive number (2 digits), thus 14-digit number is added to the file
name.
Sequence number:
A consecutive number is added to the Image file name.
Dual Mode CCD Dome Internet Camera
59
Page 60

Sequence number clear:
Click Clear and the suffix of the sequence number returns to 1.
Interval
Always
Schedule
Set the periodical sending is effective interval. Min value is 1 min and Max
value is 24 hour.
Effective Period
The periodical sending is always effective.
You can specify the period when the periodical sending is effective in the
schedule setting in the other section. Click Schedule and the setting menu
for the effective period is displayed.
60
ICA-700 User Guide
Page 61

5.3 HTTP event
5.3.1 General
This page will be displayed after clicking “Advance > HTTP event > General” of the
setting menu. It allows you to send the image or video to HTTP server.
On / Off
URL
Port
User ID
Password
Proxy server name
Proxy port number
Proxy user ID
Proxy password
Test Button
HTTP event
Enable/disable the HTTP event function.
Type the URL of the HTTP server.
Type the port number of HTTP server.
Type the user name for the HTTP server.
Type the password for the HTTP server.
Type the proxy server name.
Type the proxy server port number.
Type the user name for the proxy server.
Type the password for the proxy server.
You can use this button to test the HTTP connection.
Dual Mode CCD Dome Internet Camera
61
Page 62

5.3.2 Alarm sending
This page will be displayed after clicking “Advance > HTTP event > Alarm sending” of
the setting menu. It allows you to send the image or video to HTTP server with the alarm
detection.
On / Off
Motion detection
Parameter
Message
User alarm buffer
Parameter
Message
Alarm sending
Enable/disable the alarm sending function.
Alarm
Click it on for using Motion Detection function as a sensor. You can set
the motion detection function page.
Select Use alarm buffer when you forward the image/audio of before
and after the alarm detection (pre-alarm, post-alarm). If you do not
select it, only the image of the moment of the alarm detection is
forwarded. Click Alarm buffer to display the Alarm buffer setting menu.
62
ICA-700 User Guide
Page 63

Effective Period
Always
Schedule
The periodical sending is always effective.
You can specify the period when the periodical sending is effective in
the schedule setting in the other section. Click Schedule and the setting
menu for the effective period is displayed.
Note:
Motion Detection works only when the Video mode is set to MPEG4 and the Cropping is set to
Off.
Dual Mode CCD Dome Internet Camera
63
Page 64

5.4 Schedule
5.4.1 Setting
This page will be displayed after clicking “Advance > schedule > Setting” of the setting
menu.
Schedule selection
Mon to Sun
Start time
End time
Use the same time
schedule every day
Schedule
Select the list box to specify the schedule you want to set.
e-Mail (SMTP) – Alarm, e-Mail (SMTP) – Periodical, FTP – Alarm,
FTP – Periodical, Image memory – Alarm, Image memory –
Periodical, Alarm output – Alarm or Alarm output – Timer.
The time period on the right of the checked day is the effective period
of the schedule.
Fill the desired start time using a 24 hr clock.
Fill the desired end time using a 24 hr clock.
When this is checked, the Start time and End time set to Mon
(Monday) are applied to all days. In this case, the Start time and
End time of the other days than Mon (Monday) cannot be input.
64
ICA-700 User Guide
Page 65

5.5 Alarm buffer
5.5.1 Setting
This page will be displayed after clicking “Advance > Alarm buffer > Setting” of the
setting menu.
On / Off
Video mode
Pre-alarm period
Post-alarm period
Pre-alarm period
Post-alarm period
Alarm buffer
Enable/disable the Alarm buffer function.
Display the video mode.
Recording Capacity
Display the maximum recording capacity of image/audio before the
alarm detection.
Display the maximum recording capacity of image/audio after the alarm
detection.
Recording time
Type it with recording time of the image/audio before the alarm
detection.
Type it with recording time of the image/audio after the alarm detection.
Note:
The value of Recording capacity differs depending on Image size, Bitrate (for MPEG4) and Image
quality (for MPEG4 and MJPEG) in the camera setting menu.
Dual Mode CCD Dome Internet Camera
65
Page 66

5.6 Motion detection
5.6.1 Setting
This page will be displayed after clicking “Advance > Motion detection > Setting” of the
setting menu. It allows you to set detection areas.
Motion Detection
Area Screen
Threshold
Sensitivity
You can set the full screen or areas of the video image to be examined.
You can use the tool bar to set up-limit value. When detecting zone signals
are over setting value, it would carry on assigned work.
You can use the tool bar to set down-limit value. When detecting zone signals
are over setting value, it would carry on assigned work.
Note:
Be careful! Motion Detection function don’t work with Patrol function at same time.
66
ICA-700 User Guide
Page 67

5.7 system Log
5.7.1 Setting
This page will be displayed after clicking “Advance > System Log > Setting” of the setting
menu. It allows users to review any changes and events.
Enable remote log
Server Name
Server Port
System log window
Remote Log
Check the box to enable the remote log function.
Enter the address of the remote log server.
This sets the port number for remote log.
You can connect with default port 514 or enter the port number
(1024~65535) in the field provided.
Current Log
This is a log of system activity.
Dual Mode CCD Dome Internet Camera
67
Page 68

Appendix A --- Enable ActiveX options on your PC
Your Internet Explorer security settings must allow for the web page to work correctly. To
use the IP camera, user must setup his IE browser as follows:
From your IE browser Î ”Tools” Î ”Internet Options…” Î ”Security” ΔCustom Level…”,
please setup your “Settings” as follow.
Enable the 3 options as below,
• Download the signed ActiveX controls
• Download the unsigned ActiveX controls
• Initialize and script the ActiveX controls not masked as safe to Prompt
By now, you have finished your entire PC configuration.
68
ICA-700 User Guide
Page 69

Appendix B --- Bandwidth Estimation
The frame rate of video transmitted from the IP camera depends on connection bandwidth
between client and server, video resolution, codec type, and quality setting of server. Here
is a guideline to help you roughly estimate the bandwidth requirements for your IP camera.
The required bandwidth depends on content of video source. The slow motion video will
produce smaller bit rate generally and fast motion will produce higher bit rate vice versa.
Actual results generated by the IP camera may be varying.
MPEG4 @ 30fps / kbps
Quality 704*480 352*240 176*120
Excellent 2000 800 200
Detailed 850 250 80
Good 450 150 60
Standard 350 110 50
Medium 250 90 40
Note:
Audio streaming also takes bandwidth around 5 kbps to 64kbps. Most xDSL/Cable modem upload
speeds may not even reach up to 128 kbps. Thus, you may not be able to receive any video while
streaming audio on a 128 kbps or lower connection. Even though the upload speed is more than
128kbps, for optimal video performance, disabling audio streaming will get better video
performance.
Dual Mode CCD Dome Internet Camera
69
Page 70

Appendix C --- Mobile phone viewing
To use IP cameras via mobile phones, please make sure your RTSP is set to “ON” (Default
is “ON”). To change the settings of IP cameras, please refer to the “General of Camera
Settings” for details.
3G Mobile Phone viewing
For 3G mobile phone viewing, type “rtsp://<IP>:<PORT>/video.3gp” into your 3G web
browser. <IP> is the IP address of your IP camera, <PORT> is the RTSP port of your IP
camera (Default value is 8554).
Example: rtsp://100.10.10.1:8554/video.3gp
Note:
You can also use RTSP clients (RealPlayer, MPlayer, Windows Media Player, Quicktime…etc.) to
view RTSP streaming, just type in “rtsp://<IP>:<PORT>/video.3gp” as the Player’s URL.
2.5G Mobile Phone viewing
For 2.5G mobile phone viewing, type “<IP>/mobile.wml” into your 2.5G web browser. <IP>
is the IP address of your IP camera.
70
ICA-700 User Guide
 Loading...