

Page 1

User’s Manual
24-Port Gigabit 802.3at PoE
Web Smart Ethernet Switch
GSW-2400HPS
www.PLANET.com.tw
Page 2

User’s Manual of GSW-2400HPS
Trademarks
Copyright © PLANET Technology Corp. 2013.
Contents are subject to revision without prior notice.
PLANET is a registered trademark of PLANET Technology Corp. All other trademarks belong to their respective owners.
Disclaimer
PLANET Technology does not warrant that the hardware will work properly in all environments and applications, and makes no
warranty and representation, either implied or expressed, with respect to the quality, performance, merchantability, or fitness for
a particular purpose. PLANET has made every effort to ensure that this User's Manual is accurate; PLANET disclaims liability
for any inaccuracies or omissions that may have occurred.
Information in this User's Manual is subject to change without notice and does not represent a commitment on the part of
PLANET. PLANET assumes no responsibility for any inaccuracies that may be contained in this User's Manual. PLANET makes
no commitment to update or keep current the information in this User's Manual, and reserves the right to make improvements to
this User's Manual and/or to the products described in this User's Manual, at any time without notice.
If you find information in this manual that is incorrect, misleading, or incomplete, we would appreciate your comments and
suggestions.
FCC Warning
This equipment has been tested and found to comply with the limits for a Class A digital device, pursuant to Part 15 of the FCC
Rules. These limits are designed to provide reasonable protection against harmful interference when the equipment is operated
in a commercial environment. This equipment generates, uses, and can radiate radio frequency energy and, if not installed and
used in accordance with the Instruction manual, may cause harmf ul interference to radio communications. Operation of this
equipment in a residential area is likely to cause harmful interference in which case the user will be required to correct the
interference at whose own expense.
CE Mark Warning
This is a Class A product. In a domestic environment, this product may cause radio interference, in which case the user may be
required to take adequate measures.
Energy Saving Note of the Device
This power required device does not support Standby mode operation.
For energy saving, please remove the power cable to disconnect the device from the power circuit.
Without removing power cable, the device will still consume power from the power source. In view of Saving the Energy and
reducing the unnecessary power consumption. It is strongly suggested to remove the power connection for the device if this
device is not intended to be active.
WEEE Warning
To avoid the potential effects on the environment and human health as a result of the presence of
hazardous substances in electrical and electronic equipment, end users of electrical and electronic
equipment should understand the meaning of the crossed-out wheeled bin symbol. Do not dispose of
WEEE as unsorted municipal waste; collect such WEEE separately.
Revision
PLANET 24-Port 10/100/1000Mbps 802.3at PoE Web Smart Ethernet Switch User's Manual
FOR MODEL: GSW-2400HPS
REVISION: 1.0 (April.2013)
Part No: EM-GSW-2400HPS_v1.0 (2081-AK8070-000)
2
Page 3

User’s Manual of GSW-2400HPS
TABLE OF CONTENTS
1. INTRODUCTION....................................................................................................................6
1.1 Packet Contents ...........................................................................................................................................6
1.2 Product Description.....................................................................................................................................7
1.3 How to Use This Manual..............................................................................................................................9
1.4 Product Features..........................................................................................................................................9
1.5 Product Specifications ..............................................................................................................................11
2. INSTALLATION ................................................................................................................... 13
2.1 Hardware Description................................................................................................................................13
2.1.1 Switch Front Panel ..............................................................................................................................................13
2.1.2 LED Indications ...................................................................................................................................................14
2.1.3 Switch Rear Panel...............................................................................................................................................15
2.2 Install the Switch........................................................................................................................................16
2.2.1 Desktop Installation .............................................................................................................................................16
2.2.2 Rack Mounting.....................................................................................................................................................17
3. SWITCH MANAGEMENT....................................................................................................19
3.1 Requirements..............................................................................................................................................19
3.2 Management Access Overview.................................................................................................................20
3.3 Web Management Access.........................................................................................................................20
4. WEB CONFIGURATION......................................................................................................22
4.1 Main Web Page...........................................................................................................................................25
4.2 System.........................................................................................................................................................27
4.2.1 System Information..............................................................................................................................................27
4.2.2 IP Configuration...................................................................................................................................................28
4.2.3 User Configuration...............................................................................................................................................29
4.3 Layer 2 Features.........................................................................................................................................30
4.3.1 Port Configuration................................................................................................................................................30
4.3.2 VLAN................................................................................................................................................................... 32
4.3.2.1 VLAN Switching.........................................................................................................................................36
4.3.2.2 VLAN Port Configuration ...........................................................................................................................39
3
Page 4

User’s Manual of GSW-2400HPS
4.3.2.3 VLAN Setting Example:.............................................................................................................................41
4.3.3 QoS .....................................................................................................................................................................46
4.3.3.1 Port-based Priority Setting.........................................................................................................................47
4.3.3.2 Packet Scheduling.....................................................................................................................................48
4.3.4 Trunk....................................................................................................................................................................50
4.3.4.1 Trunk Group ..............................................................................................................................................51
4.3.5 Port Mirroring.......................................................................................................................................................53
4.3.6 Port Isolation........................................................................................................................................................56
4.3.7 Bandwidth Control ...............................................................................................................................................58
4.3.8 Jumbo Frame ......................................................................................................................................................60
4.3.9 Loop Protection ...................................................................................................................................................61
4.3.10 Green Networking..............................................................................................................................................62
4.4 Security .......................................................................................................................................................63
4.4.1 MAC Address.......................................................................................................................................................63
4.4.1.1 MAC Forwarding Table..............................................................................................................................64
4.4.1.2 Static MAC.................................................................................................................................................65
4.4.2 MAC Constrain....................................................................................................................................................66
4.4.3 Storm Control.......................................................................................................................................................68
4.5 Monitoring...................................................................................................................................................70
4.5.1 Port Statistics.......................................................................................................................................................70
4.5.2 Cable Diagnostics................................................................................................................................................71
4.6 Tools............................................................................................................................................................73
4.6.1 Maintenance........................................................................................................................................................73
4.6.1.1 Configuration Backup................................................................................................................................73
4.6.1.2 Configuration Upload.................................................................................................................................74
4.6.1.3 Web Firmware Upgrade ............................................................................................................................76
4.6.2 Factory Default....................................................................................................................................................78
4.6.3 Save Configuration..............................................................................................................................................79
4.6.4 Reboot.................................................................................................................................................................80
4.7 Logout .........................................................................................................................................................81
5. SWITCH OPERATION......................................................................................................... 82
5.1 Address Table.............................................................................................................................................82
5.2 Learning ......................................................................................................................................................82
5.3 Forwarding & Filtering...............................................................................................................................82
5.4 Store-and-Forward.....................................................................................................................................82
4
Page 5

User’s Manual of GSW-2400HPS
5.5 Auto-Negotiation
........................................................................................................................................83
6. POWER OVER ETHERNET OVERVIEW............................................................................ 84
7. TROUBLESHOOTING.........................................................................................................87
APPENDEX A..........................................................................................................................89
A.1 Switch's RJ-45 Pin Assignments 1000Mbps, 1000Base T.....................................................................89
A.2 10/100Mbps, 10/100Base-TX.....................................................................................................................89
5
Page 6

User’s Manual of GSW-2400HPS
1. INTRODUCTION
Thank you for purchasing PLANET 24-Port 10/100/1000Mbps 802.3at PoE+ Web Smart Ethernet Switch, GSW-2400HPS.
“Web Smart Switch” is also mentioned in this user’s manual to replace the GSW-2400HPS.
1.1 Packet Contents
Open the box of the Web Smart Switch and carefully unpack it. The box should contain the following items:
Check the contents of your package for the following parts:
The 802.3at PoE Web Smart Switch
Quick Installation Guide
User’s Manual CD
Power Cord
Rubber Feet
19” Rack Mount Accessory Kit
If any of these are missing or damaged, please contact your dealer immediately. If possible, retain the carton including the
original packing materials, and use them to repack the product in case there is a need to return it to us for repair.
x1
x1
x1
x1
x4
x1
6
Page 7
User’s Manual of GSW-2400HPS
1.2 Product Description
High-Performance, Cost-Effective Gigabit Networking Solution
The GSW-2400HPS is a Layer 2 24-Port 10/100/1000Mbps 802.3at PoE Web Smart Ethernet Switch which can handle
extremely large amount of data in a secure topology linking to an Enterprise backbone or high capacity network server with
48Gbps switching fabric. It supports reliable switching technology and advanced networking features which optimize the
installation and power management of network devices such as wireless access points (AP), Voice over IP (VoIP) phones,
and security video cameras.
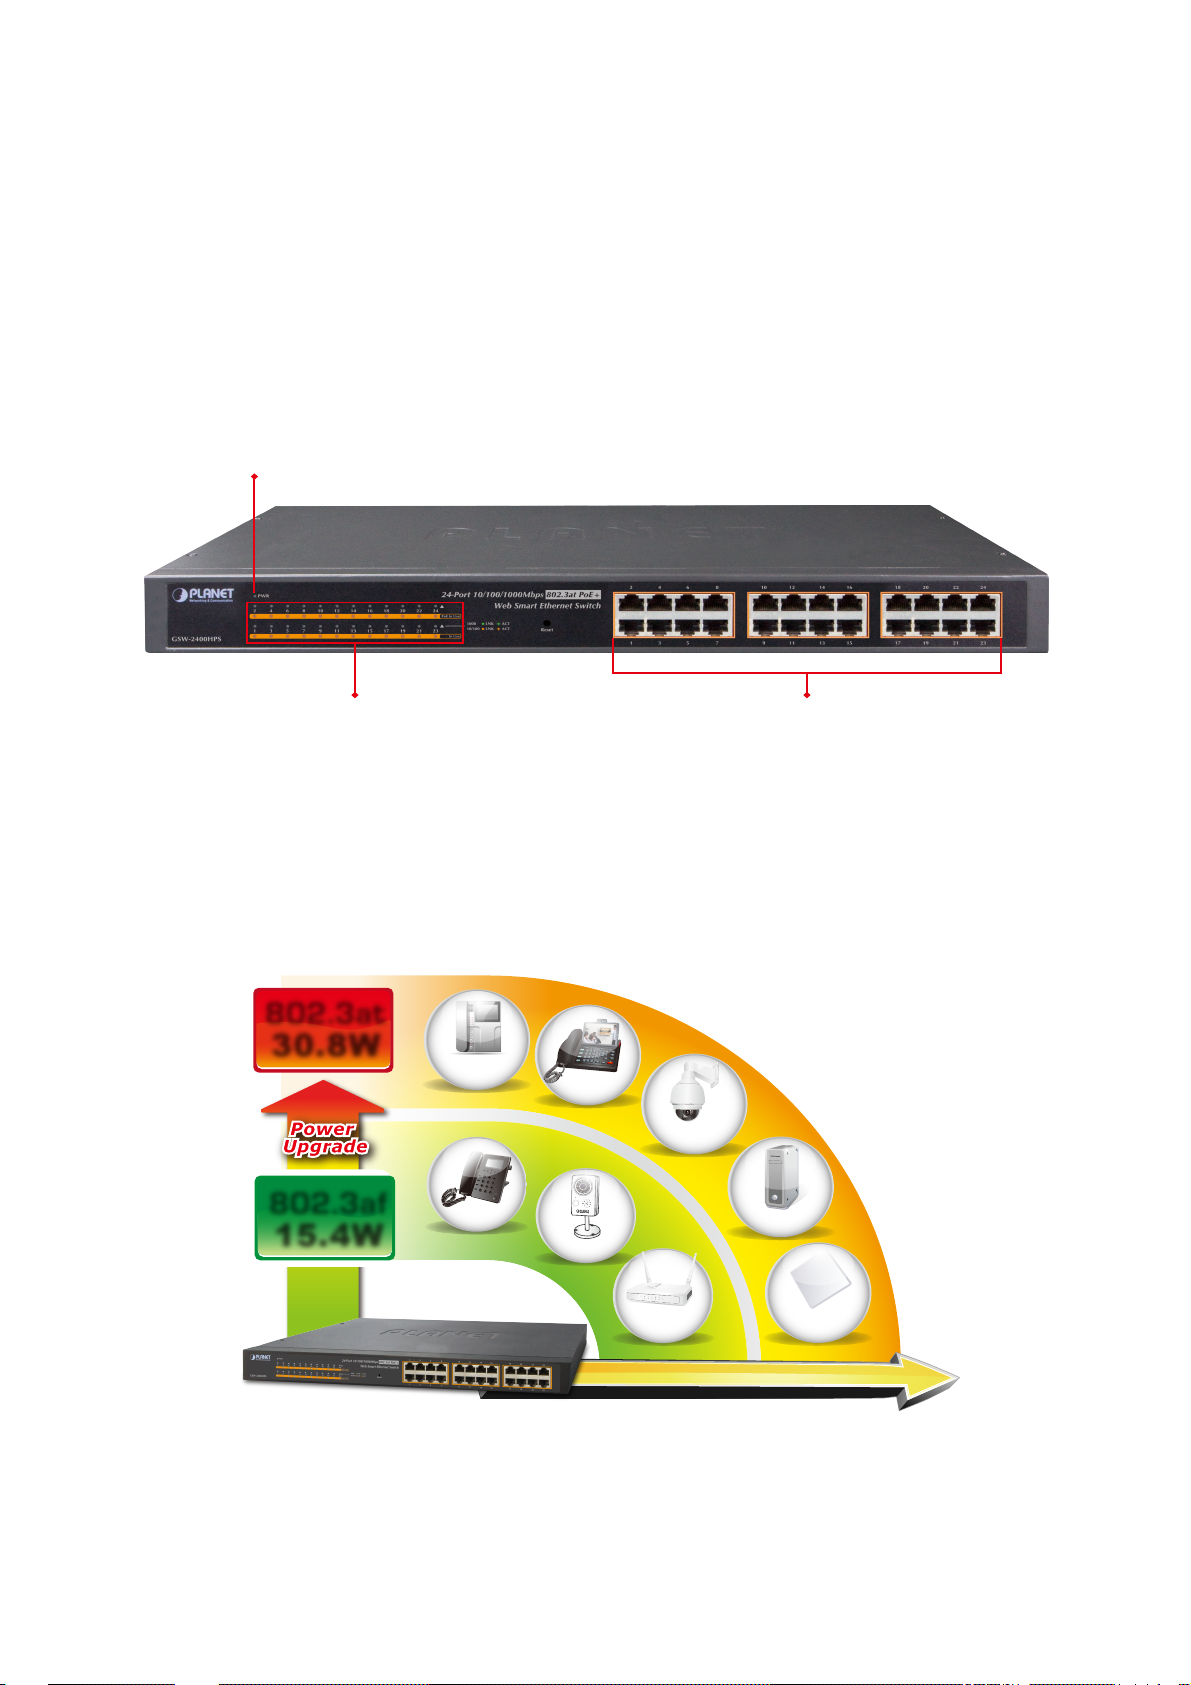
Power LED
24 x Gigabit 802.3at PoE PortsPoE & LNK/ACT Status
Centralized Power Management for Gigabit Ethernet PoE Networking
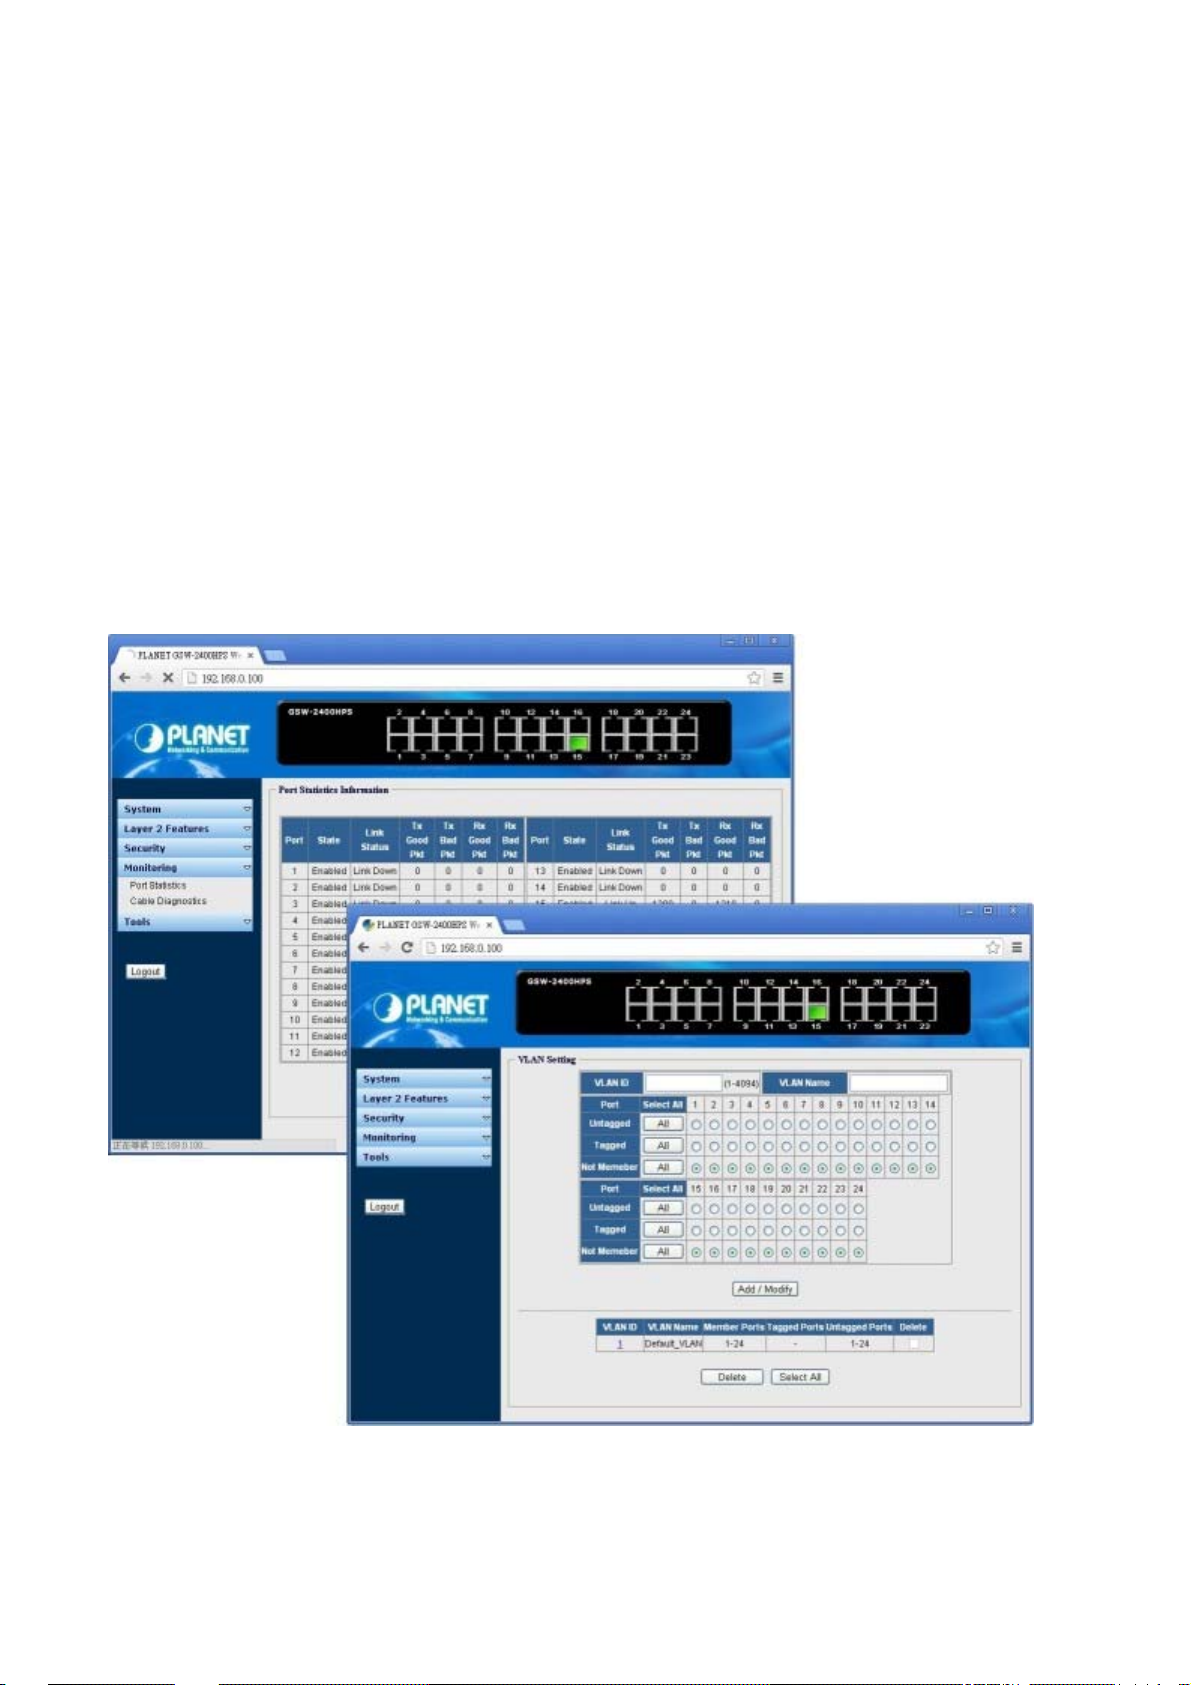
To fulfill the needs of higher power required PoE network applications with Gigabit speed transmission, the GSW-2400HPS
features high performance Gigabit IEEE 802.3af PoE (Up to 15.4 watts) and IEEE 802.3at PoE+ (Up to 30 watts) on all ports.
It perfectly satisfies the PoE IP camera which needs high power consumption such as IR, PTZ, Speed Dome cameras or even
Box type IP cameras with built-in fan and heater.
802.3at
30.8W
802.3af
15.4W
Door
Phone
IP Phone
Video
Phone
IP Camera
PTZ
Camera
Thin Client
Wireless
AP/Router
Power Requirement
WiMAX
AP/CPE
The PoE capabilities provided also help to reduce deployment costs for network devices as a result of freeing from restrictions
of power outlet locations.
Power and data switching are integrated into one unit, delivered over a single cable and managed
centrally. It thus eliminates cost for additional AC wiring and reduces installation time.
7
Page 8
User’s Manual of GSW-2400HPS
Robust Layer 2 Features
The GSW-2400HPS can be programmed for advanced switch management functions such as IEEE 802.1Q VLAN, QoS,
static trunk group, port mirroring, port isolation, in band / out band bandwidth control, jumbo frame setting, loop protection,
Green Networking, and static MAC, storm control. The GSW-2400HPS provides 802.1Q Tagged VLAN, and the VLAN groups
allowed will be maximally up to 32. Via aggregation of supporting ports, the GSW-2400HPS allows the operation of a
high-speed trunk combining multiple ports. It enables maximum up to 8 groups of 4 ports for trunking and supports fail-over as
well. The advanced features of QoS and network security included enable the GSW-2400HPS to offer effective data traffic
control for Enterprises, Government or campus another common Ethernet environment application.
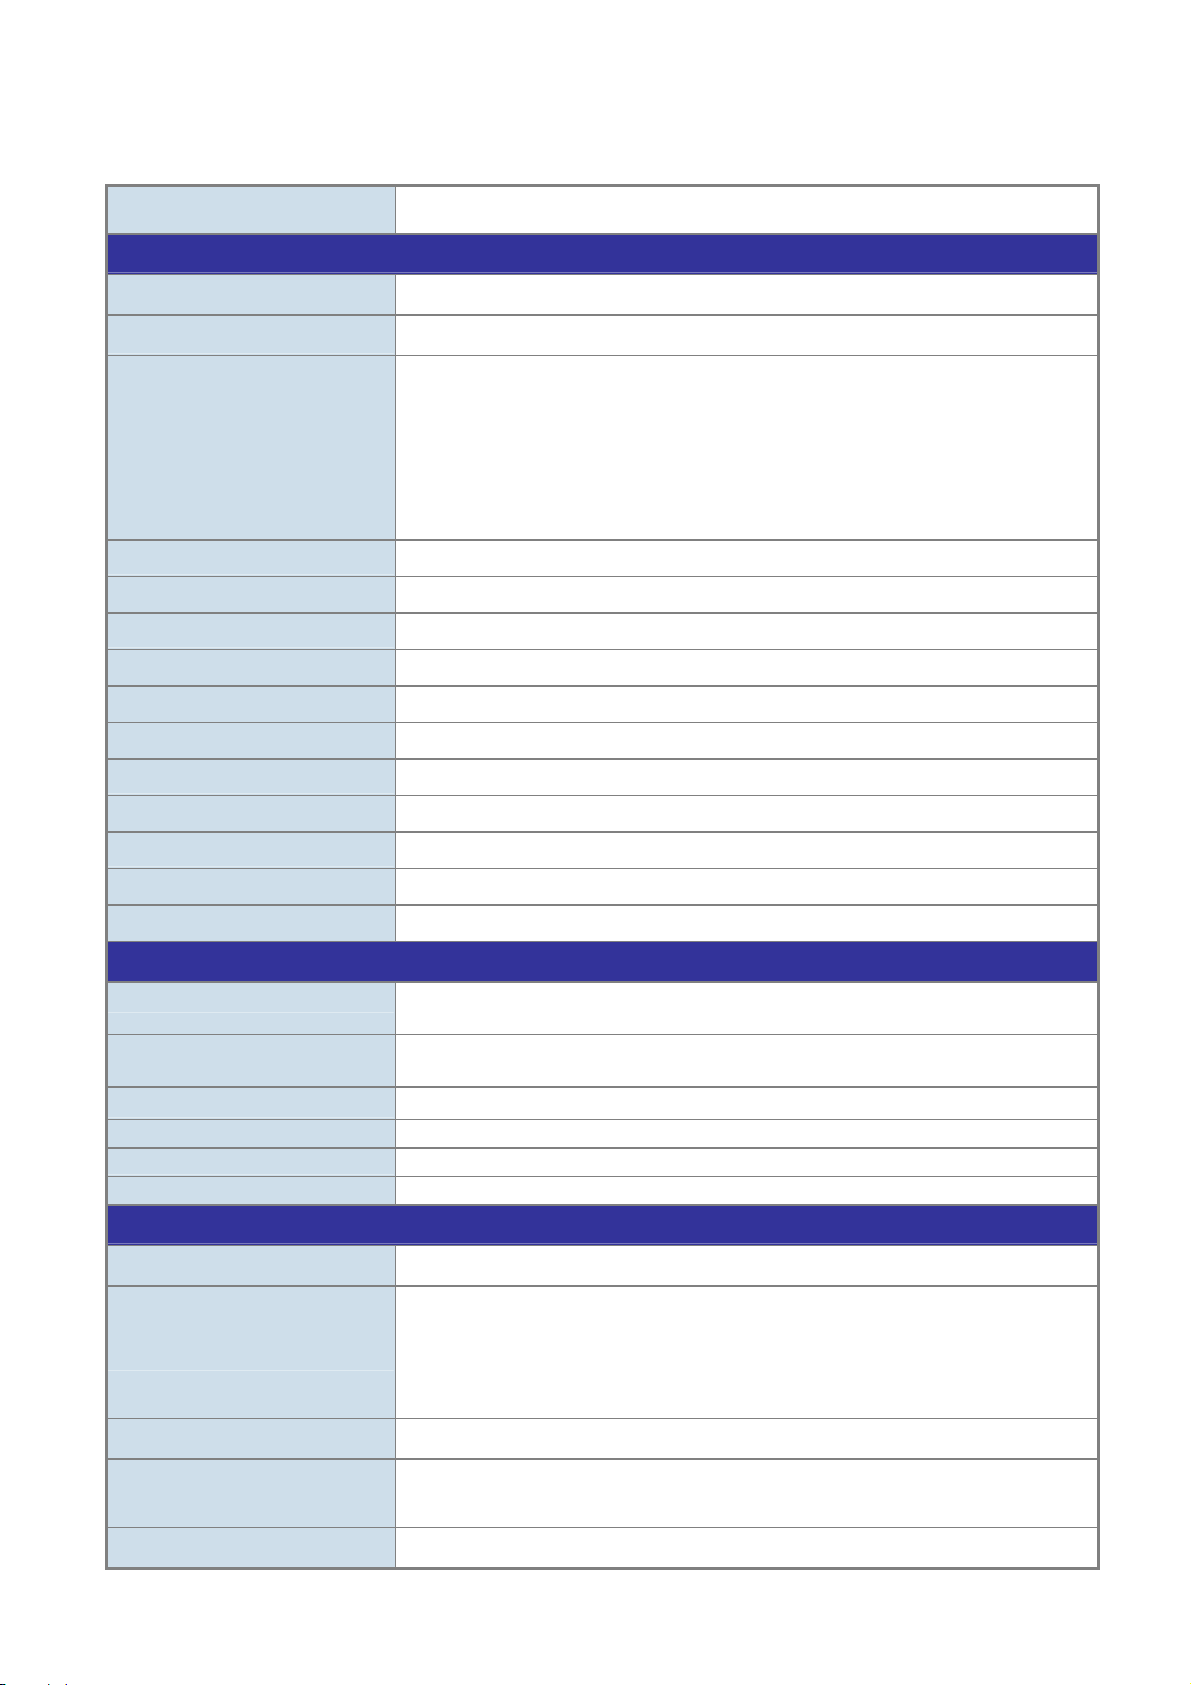
Friendly Web-based Management
For efficient management, the GSW-2400HPS is equipped with WEB management interfaces. With the built-in Web-based
management interface, the GSW-2400HPS offers an easy-to-use, platform-independent management and configuration
facility. The GSW-2400HPS supports configuration backup / restore function, this feature will help network administrator to
easily deploy multi GSW-2400HPS devices quickly.
8
Page 9

User’s Manual of GSW-2400HPS
1.3 How to Use This Manual
This User Manual is structured as follows:
Section 2, INSTALLATION
The section explains the functions of the Switch and how to physically install the Web Smart Switch.
Section 3, SWITCH MANAGEMENT
The section contains the information about the software function of the Web Smart Switch.
Section 4, WEB CONFIGURATION
The section explains how to manage the Web Smart Switch by Web interface.
Section 5, SWITCH OPERATION
The chapter explains how to do the switch operation of the Web Smart Switch.
Section 6, POWER OVER ETHERNET OVERVIEW
The chapter introduces the IEEE 802.3af / 802.3at PoE standard and PoE provision of the Web Smart Switch.
Section 7, TROUBSHOOTING
The chapter explains how to troubleshoot the Web Smart Switch.
Appendix A
The section contains cable information of the Web Smart Switch.
1.4 Product Features
Physical Port
24-Port 10/100/1000Base-T RJ-45 copper with IEEE 802.3at / 802.3af Power over Ethernet Injector function
Reset button for system factory default
Power over Ethernet
■ Complies with IEEE 802.3at High Power over Ethernet PSE
■ Complies with IEEE 802.3af Power over Ethernet PSE
■ Up to 24 ports of IEEE 802.3af / 802.3at devices powered
■ Supports PoE Power up to 30.8 watts for each PoE ports
■ Auto detects powered device (PD)
■ Circuit protection prevents power interference between ports
■ Remote power feeding up to 100m
Switching
■ Hardware based 10/100/1000Mbps Auto-Negotiation and Auto MDI/MDI-X
■ Flow control for Full Duplex operation and back pressure for Half Duplex operation
■ Integrates address look-up engine, supporting 8K absolute MAC addresses
■ 9K Jumbo Frame size support
■ Automatic address learning and address aging
9
Page 10

User’s Manual of GSW-2400HPS
Layer 2 Features
Prevents packet loss with back pressure (Half-Duplex) and IEEE 802.3x PAUSE frame flow control (Full-Duplex)
High performance of Store-and-Forward architecture and runt/CRC filtering eliminates erroneous packets to optimize
the network bandwidth
Supports VLAN
IEEE 802.1Q Tagged VLAN
Up to 32 VLANs groups, out of 4094 VLAN IDs
Supports Static Trunk
Maximum 8 trunk groups, up to 4 ports per trunk group
Up to 8Gbps bandwidth (Duplex Mode)
Provides Port Mirror (many-to-1)
Port Mirroring to monitor the incoming or outgoing traffic on a particular port
Port Isolation
1522 / 1536 / 1552 / 9216bytes Jumbo packet setting
Loop Prevention / Detection
Green Networking for energy saving
Quality of Service
Ingress / Egress Rate Limit per port bandwidth control
4 priority queues on all switch ports
Traffic classification:
- Port-based priority
Strict priority and Weight Fair Queue / Weighted Round Robin (WRR) policies
Security
Storm Control support
Broadcast / Multicast / Unknown-Unicast / Unknown-Multicast
MAC Security
MAC Forwarding Table
Static MAC
MAC Constrain
Management
IPv4 Web-based Management Interface
Firmware upgrade through Web interface
Configuration backup / restore through Web interface
Reset button for system reset to factory default
10
Page 11
1.5 Product Specifications
Product GSW-2400HPS
Hardware Specifications
User’s Manual of GSW-2400HPS
Copper Ports
PoE Injector Port
LED Indicate
Switch Processing Scheme Store-and-Forward
MAC Addrerss Table 8K entries
Switch Fabric 48Gbps / non-blocking
Throughput @ 64Kbytes 35.7Mpps
Share Data Buffer 3.5Mbit SRAM Packet Buffer
Flow Control IEEE 802.3x Pause Frame for Full-Duplex. Back pressure for Half-Duplex
Jumbo Frame 9216 Bytes
Dimensions (W x D x H) 445 x 207 x 45 mm (1U height)
Weight 2.76kg
24 10/ 1
24 80
System:
Port 1 to port 24:
00/1000Base-T RJ-45 Auto-MDI/MDI-X ports
2.3af / 802.3at PoE Injector Ports
Power (Green)
PoE In-Use (Orange)
1000 LNK / ACT (Green), 10/100 LNK / ACT (Orange)
Power Consumption Max. 25 Watts / 85 BTU
Power Requirements AC 100~240V, 50/60Hz, 4A max.
Power over Ethernet
PoE Standard
PoE Power Output
PoE Power Budget 300 watts
Number of PD, 7Watts 24
Number of PD, 15.4Watts 19
Number of PD, 30.8Watts 9
Layer 2 Function
Management Interfaces
Port Configuration
Port Statistics
IEEE 802.3af Power over Ethernet / PSE
IEEE 802.3at Enhancement Power over Ethernet / PSE
Per Port 52V DC, 300mA. Max. 15.4 watts (IEEE 802.3af)
Per Port 52V DC, 600mA. Max. 30 watts (IEEE 802.3at)
eb Browser
IPv4 W
Port disable / enable
Auto-negotiation 10/100/1000Mbps full and half duplex mode selection
Flow Control disable / enable
Display each port’s state, speed duplex mode, flow control status
Display each port’s state, link status, packet transmit / receive counter
VLAN
QoS
802.1Q Tagged Based VLAN
Up to 32 VLAN groups, out of 4094 VLAN IDs
4 priority queues on all switch ports
11
Page 12
User’s Manual of GSW-2400HPS
Traffic classification based, Strict priority and Weight Fair Queue / Weighted Round
Robin (WRR) policies
- Port-Based priority
Trunk
Port Mirroring
Port Isolation
Bandwidth Control
Storm Control
Jumbo Frame
Loop Protection
Green Networking
Security
Cable Diagnostics
Configuration Backup / Restore
Static T runk
Supports 8 groups of 4-Port trunk support
Port mirroring
s
Ye
Ingress / Egress Rate Limit per port
Broadcast / Multicast / Unknown-Unicast / Unknown-Multicast
1522 / 1536 / 1552 / 9216bytes Jumbo packet setting
Loop Prevention / Detection
le / Disable
Enab
MAC Security
MAC Forwarding Table
Static MAC
MAC Constrain
ort
Supp
Configuration backup / restore through Web interface
allows monitoring of the traffic across any port in real time
Firmware Upgrade
Standards Conformance
Regulation Compliance
Standards Compliance
Environment
Operating
Storage
Web interface
FCC Part 15 Cl
IEEE 802.3 10Base-T
IEEE 802.3u 100Base-TX
IEEE 802.3ab 1000Base-T
IEEE 802.3x Flow Control
IEEE 802.1p QoS
IEEE 802.1Q VLAN Tagging
IEEE 802.3af Power over Ethernet
IEEE 802.3at High Power over Ethernet
Temperature: 0 ~ 50 degrees C
Relative Humidity: 5~ 95% (non-condensing)
Temperature: -10~ 70 degrees C
Relative Humidity: 5~ 95% (non-condensing)
ass A, CE
12
Page 13
User’s Manual of GSW-2400HPS
2. INSTALLATION
This section describes the hardware features and installation of the Web Smart Switch on the desktop or rack mount. For easier
management and control of the Web Smart Switch, familiarize yourself with its display indicators, and ports. Front panel
illustrations in this chapter display the unit LED indicators. Before connecting any network device to the Web Smart Switch,
please read this chapter completely.
2.1 Hardware Description
2.1.1 Switch Front Panel
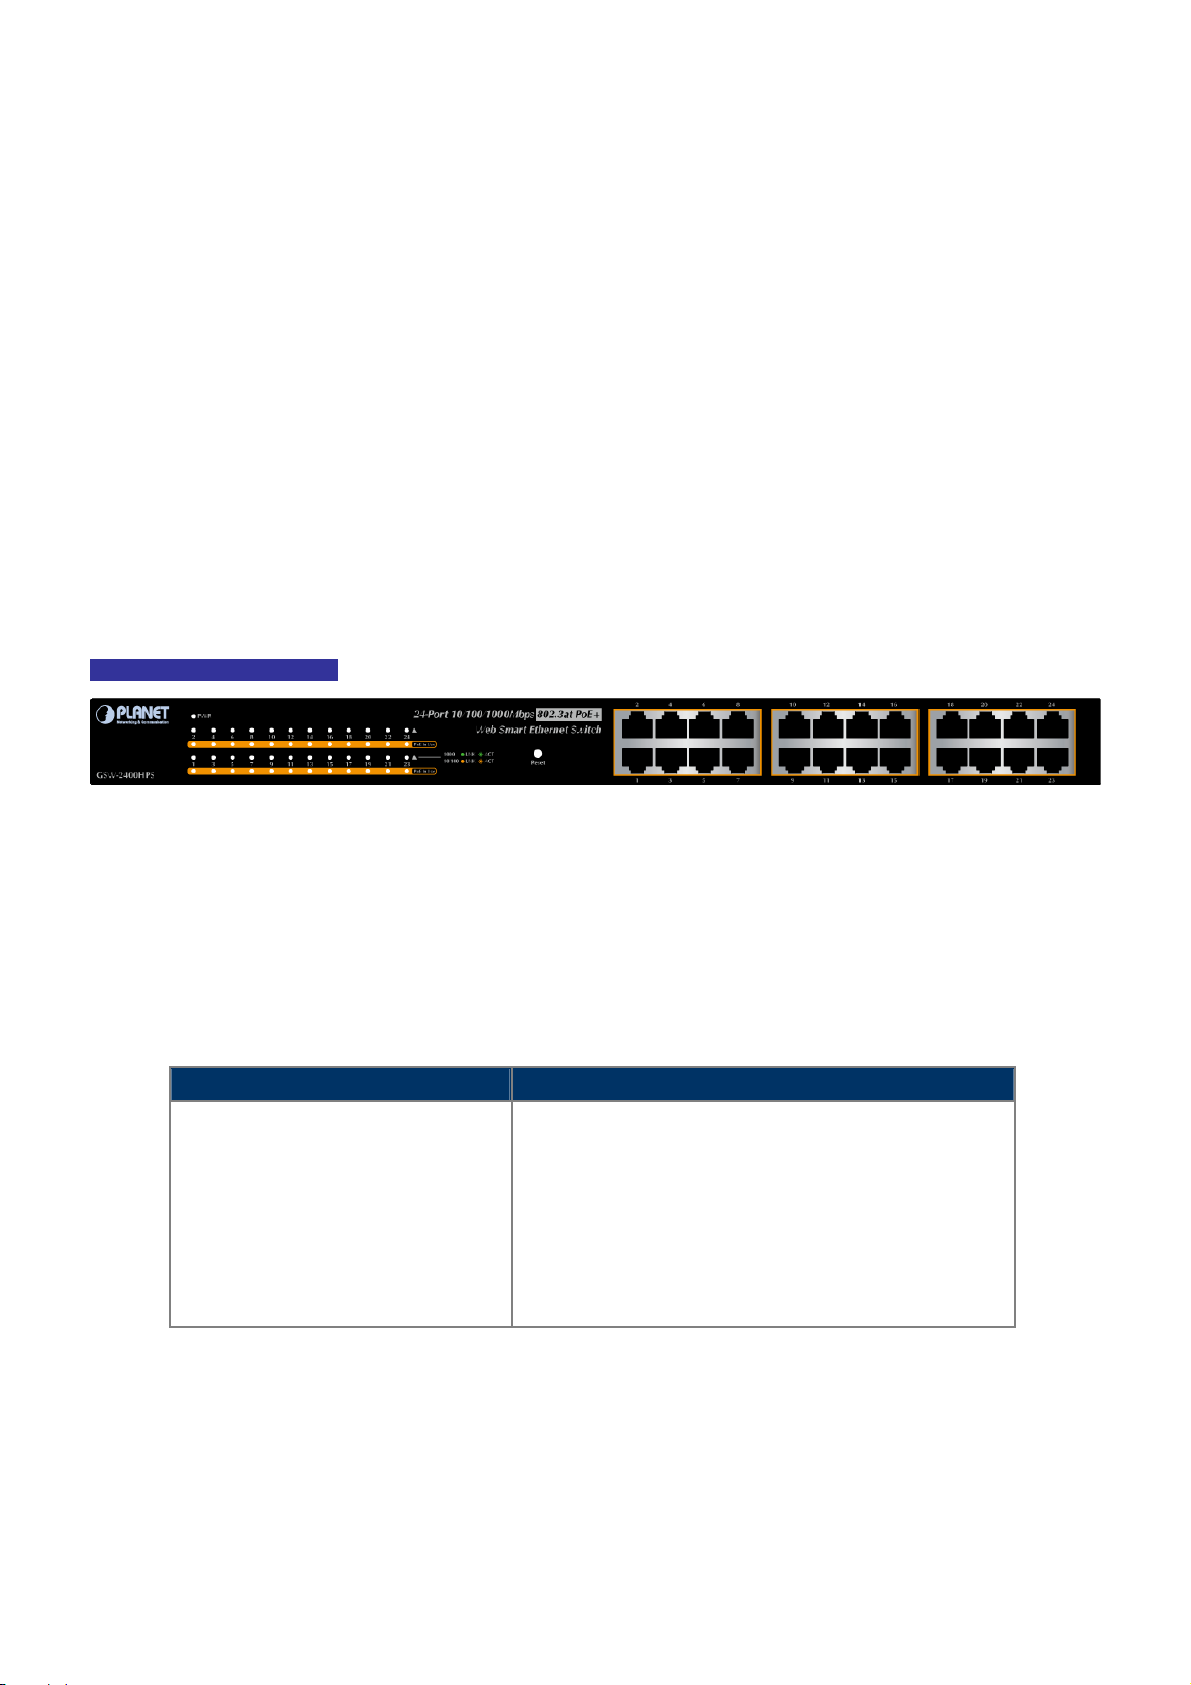
The unit front panel provides a simple interface monitoring the switch. Figure 2-1 shows the front panel of the Web Smart
Switch.
GSW-2400HPS Front Panel
Figure 2-1: GSW-2400HPS Front Panel
■ Gigabit TP Interface (802.3af / 802.3at PoE Injector)
10/100/1000Base-T Copper, RJ-45 Twist-Pair: Up to 100 meters.
■ Reset Button
In the middle of the front panel, the reset button is designed for reset and reboots the Web Smart Switch without turning off
and on the power. The following is the summary table of Reset button function:
Reset Button Pressed and Released Function
Reset the Web Smart Switch to Factory Default configuration.
The Web Smart Switch will then reboot and load the default
settings as below:
> 5 sec: Factory Default
。 Default Username: admin
。 Default Password: admin
。 Default IP address: 192.168.0.100
。 Subnet mask: 255.255.255.0
。 Default Gateway: 192.168.0.254
13
Page 14
User’s Manual of GSW-2400HPS
2.1.2 LED Indications
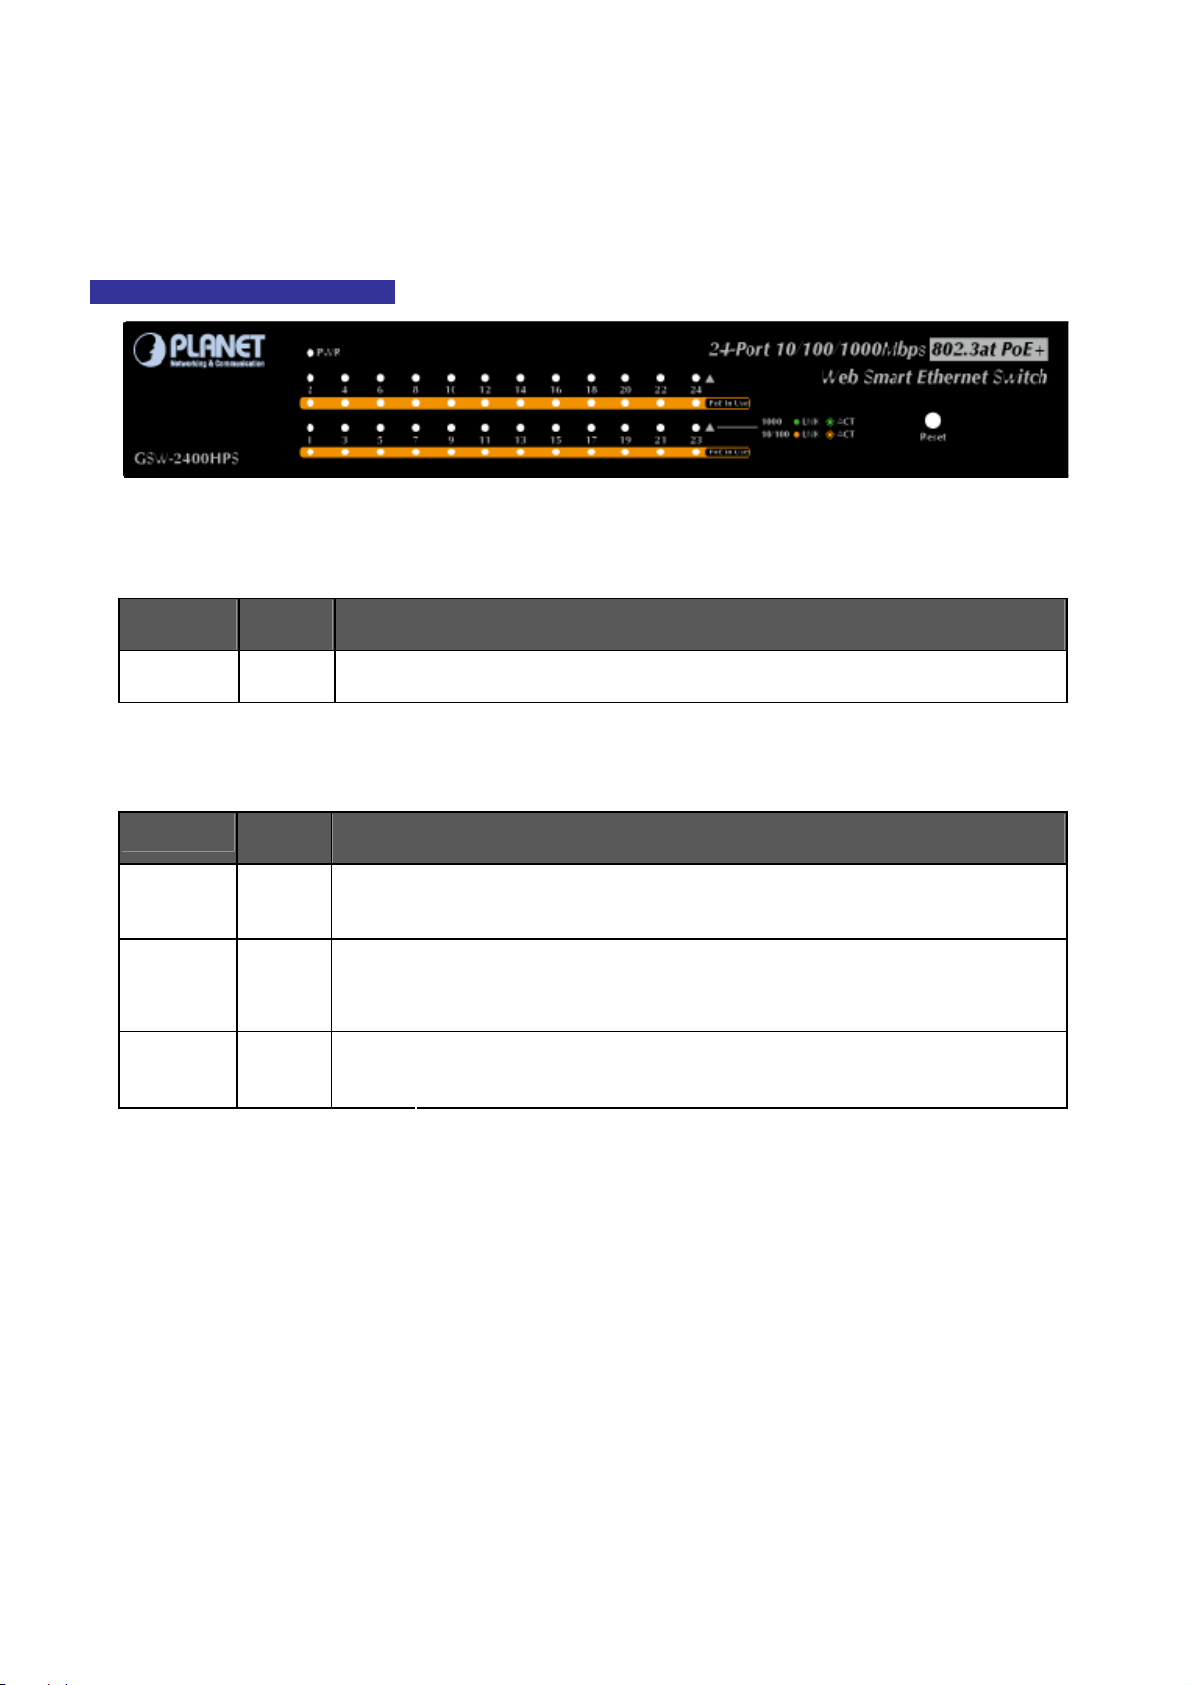
The front panel LEDs indicate instant status of port links, data activity and system power; help monitor and troubleshoot when
needed. Figure 2-2 shows the LED indications of Web Smart Switch.
GSW-2400HPS LED Indication
Figure 2-2: GSW-2400HPS LED Panel
■ System
LED Color Function
PWR Green
■ 10/100/1000Base-T interfaces
LED
1000
LNK/ACT
10/ 100
LNK/ACT
PoE In-Use Orange
Color Function
Green
Orange
Lights to indicate that the Switch has power.
Lights:
Blink:
Lights:
Blink:
Lights:
Off:
To indicate the link through that port is successfully established at 1000Mbps.
To indicate that the switch is actively sending or receiving data over that port.
To indicate the link through that port is successfully established at 10Mbps or
100Mbps.
To indicate that the switch is actively sending or receiving data over that port.
To indicate the port is providing 52VDC in-line power.
To indicate the connected device is not a PoE Powered Device (PD)
14
Page 15

User’s Manual of GSW-2400HPS
2.1.3 Switch Rear Panel
The rear panel of the Web Smart Switch indicates an AC inlet power socket, which accepts input power from 100 to 240V AC,
50-60Hz, 4A. Figure 2-3 shows the rear panel of Web Smart Switch.
GSW-2400HPS Rear Panel
Figure 2-3: Rear Panel of GSW-2400HPS
■ AC Power Receptacle
For compatibility with electric service in most areas of the world, the Web Smart Switch’s power supply automatically
adjusts to line power in the range of 100-240V AC and 50/60 Hz, 4A.
Plug the female end of the power cord firmly into the receptalbe on the rear panel of the Web Smart Switch. Plug the other
end of the power cord into an electric service outlet and then the power will be ready.
The device is a power-required device, meaning it will not work till it is powered. If your networks should
be active all the time, please consider using UPS (Uninterrupted Power Supply) for your device. It will
Power Notice:
prevent you from network data loss or network downtime.
In some areas, installing a surge suppression device may also help to protect your Web Smart Switch
from being damaged by irregular surge or current to the Switch or the power adapter.
15
Page 16
User’s Manual of GSW-2400HPS
2.2 Install the Switch
This section describes how to install your Web Smart Switch and make connections to the Web Smart Switch. Please read the
following topics and perform the procedures in the order being presented. To install your Web Smart Switch on a desktop or
shelf, simply complete the following steps.
2.2.1 Desktop Installation
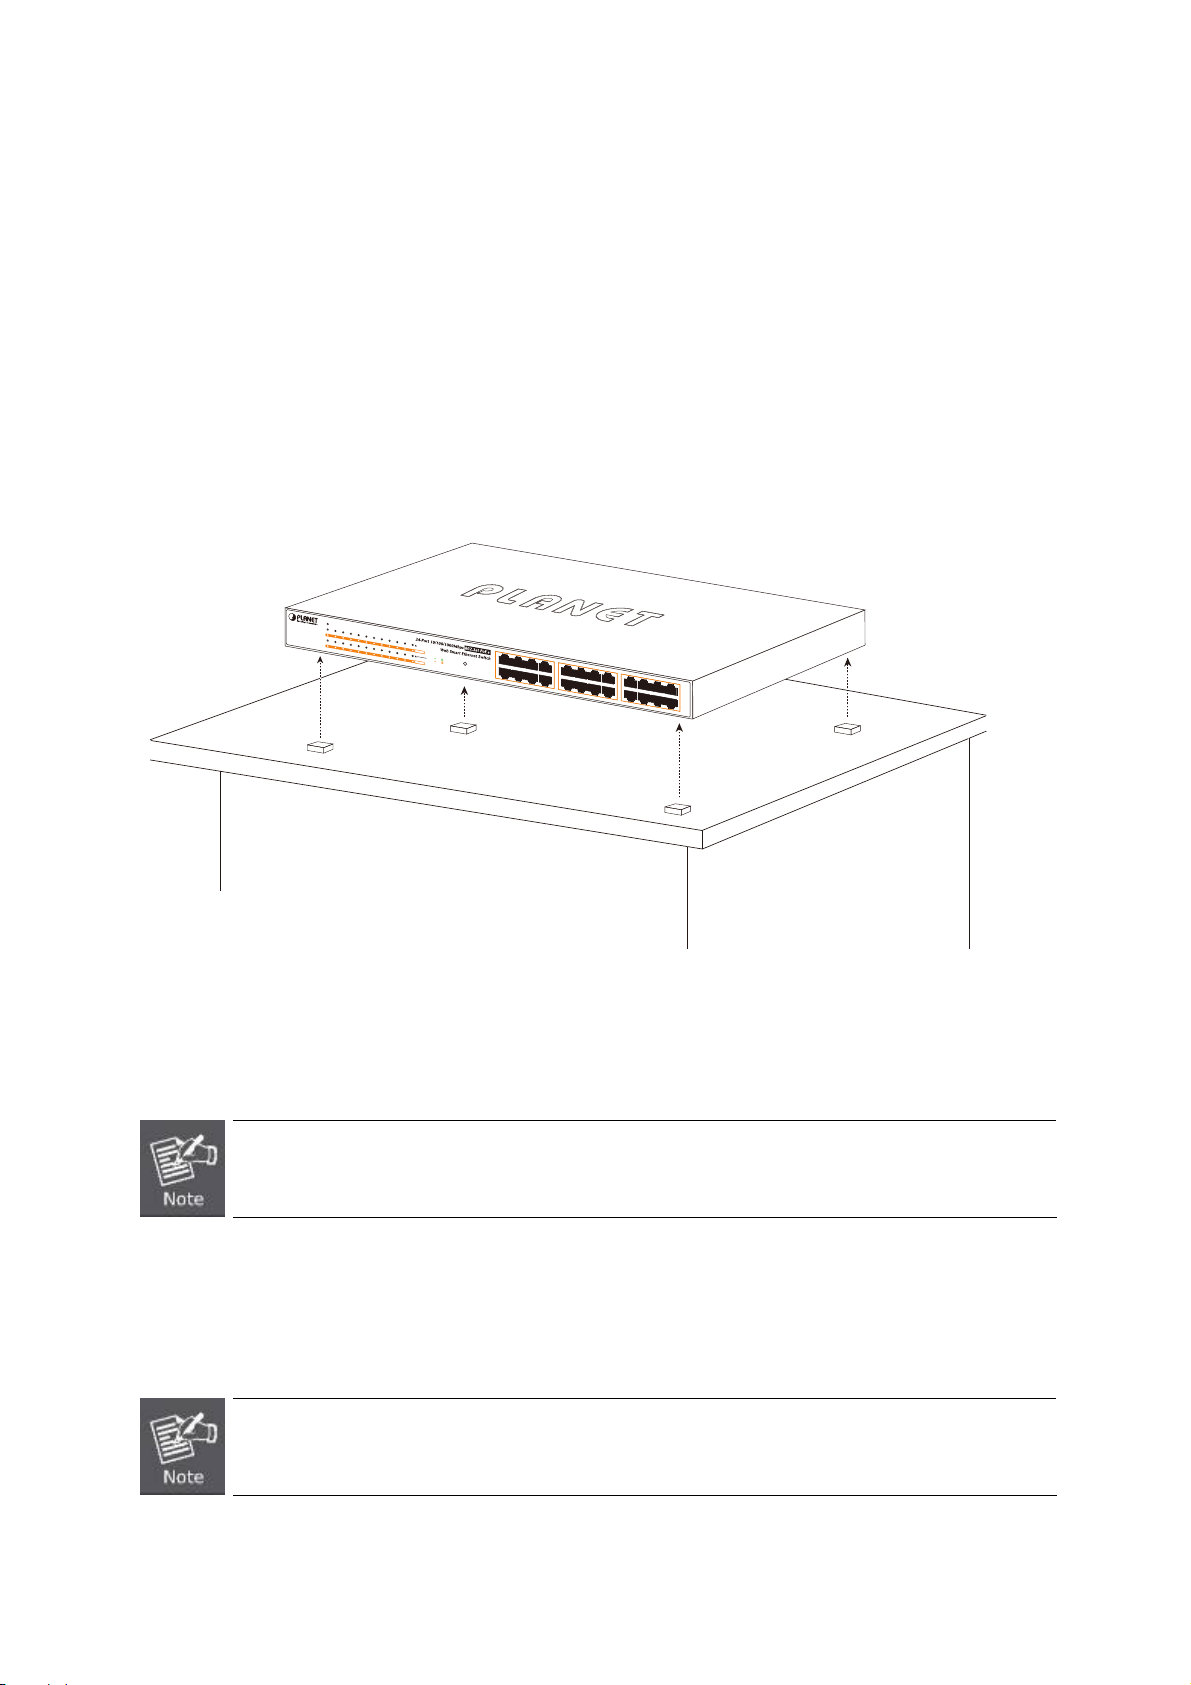
To install the Web Smart Switch on desktop or shelf, please follows these steps:
Step1: Attach the rubber feet to the recessed areas on the bottom of the Web Smart Switch.
Step2: Place the Web Smart Switch on the desktop or the shelf near an AC power source, as shown in Figure 2-4.
PWR
2 4 6 8 10 12 14 16
GSW-2400HPS
1
3 5 7 9 11 13 15
18
20
22
24
PoE In Use
17
19
21
1000 AC T
23
LNK
10/100 ACT
LNK
PoE In Use
2 4 6 8 10 12 14 16
Reset
1 3 5 7 9 11 13 15
18 20 22 24
17 19 21 23
Figure 2-4
: Place the Web Smart Switch on the Desktop
Step3: Keep enough ventilation space between the Web Smart Switch and the surrounding objects.
When choosing a location, please keep in mind the environmental restrictions discussed in Chapter 1,
Section 4, and Specifications.
Step4: Connect the Web Smart Switch to network devices.
Connect one end of a standard network cable to the 10/100/1000 RJ-45 ports on the front of the Web Smart Switch
Connect the other end of the cable to the network devices such as printer servers, workstations, routers, etc.
Connection to the Web Smart Switch requires UTP Category 5 network cabling with RJ-45 tips. For
more information, please see the Cabling Specification in Appendix A.
16
Page 17
User’s Manual of GSW-2400HPS
Step5: Supply power to the Web Smart Switch.
Connect one end of the power cable to the Web Smart Switch.
Connect the power plug of the power cable to a standard wall outlet.
When the Web Smart Switch receives power, the Power LED should remain solid Green.
2.2.2 Rack Mounting
To install the Web Smart Switch in a 19-inch standard rack, please follow the instructions described below.
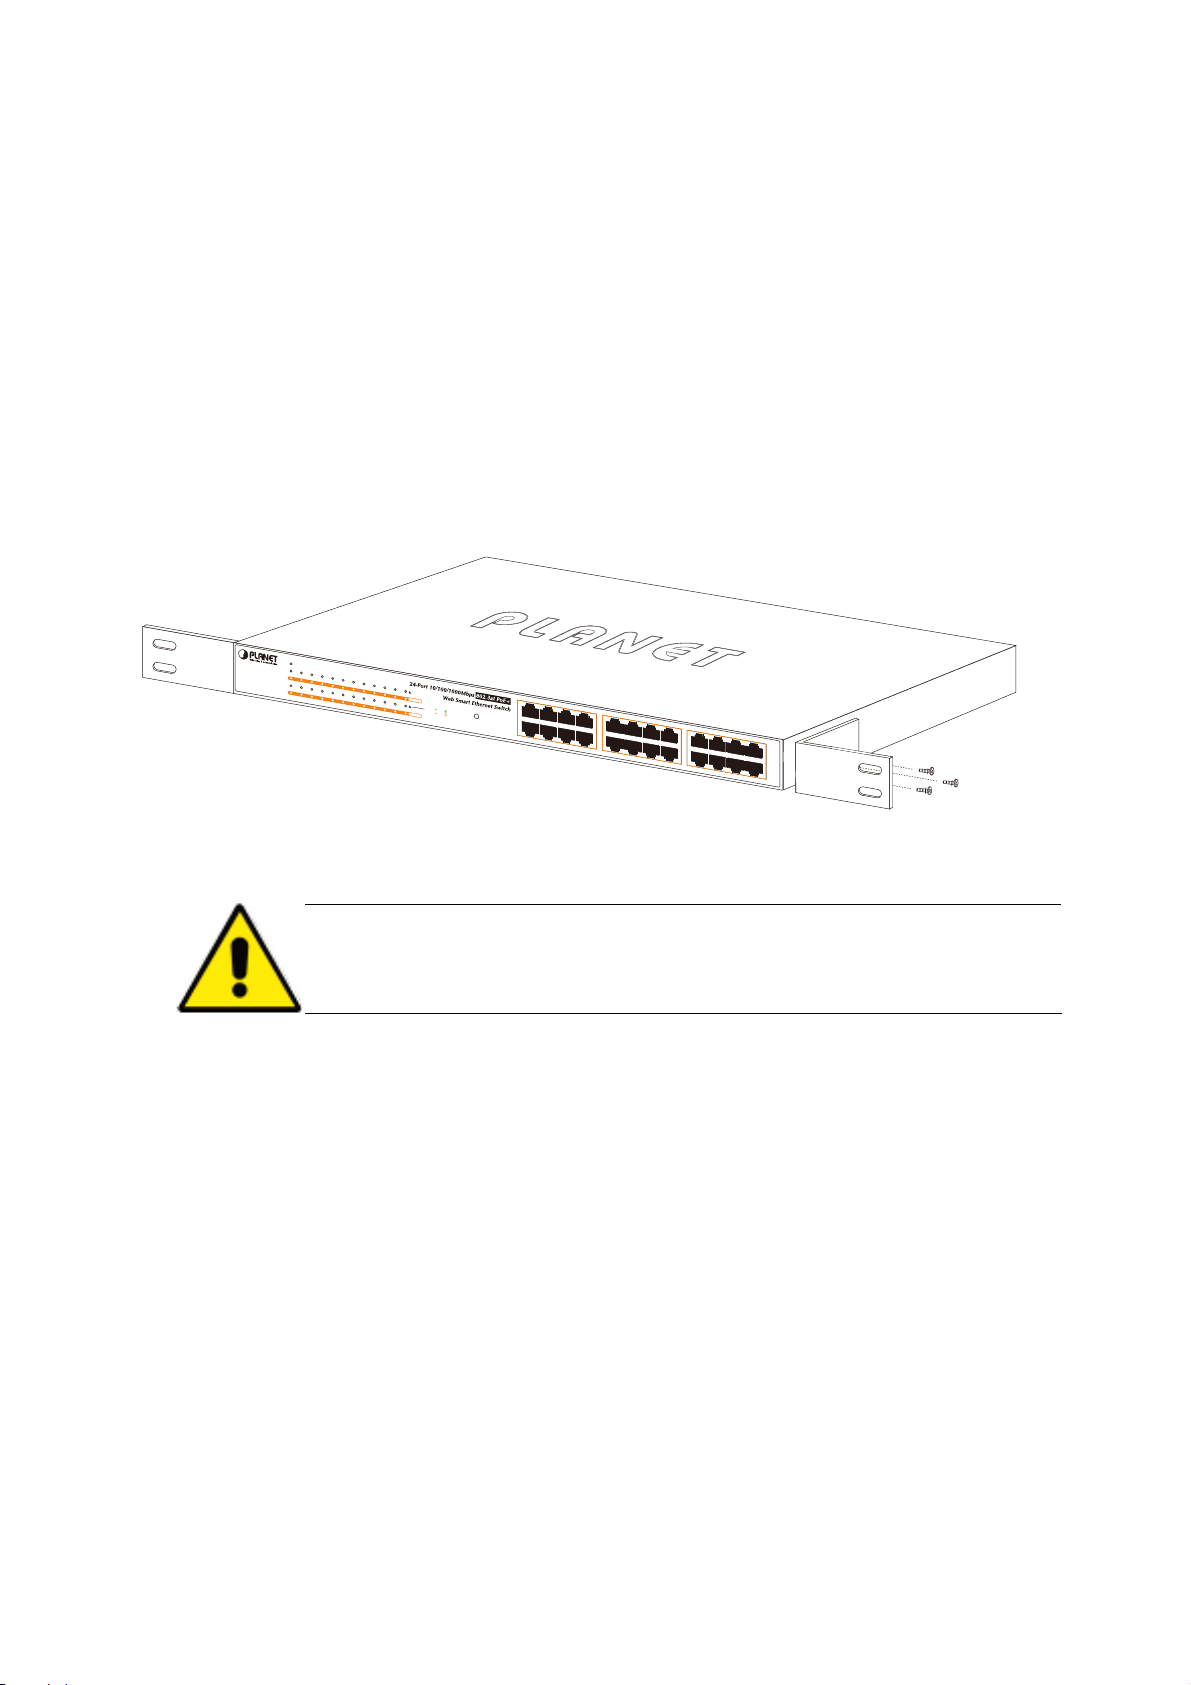
Step1: Place the Web Smart Switch on a hard flat surface, with the front panel positioned towards the front side.
Step2: Attach the rack-mount bracket to each side of the Web Smart Switch with supplied screws attached to the package.
Figure 2-5 shows how to attach brackets to one side of the Web Smart Switch.
PWR
2 4 6 8 10 12 14 16
GSW-2400HPS
1
3 5 7 9 11 13 15
18
20
22
24
PoE In Use
17
19
21
1000 ACT
23
LNK
10/100 ACT
LNK
PoE In Use
2 4 6 8 10 12 14 16
Reset
1 3 5 7 9 11 13 15
18 20 22 24
17 19 21 23
Figure 2-5: Attach Brackets to the Web Smart Switch
You must use the screws supplied with the mounting brackets. Damage caused to the parts by
using incorrect screws would invalidate the warranty.
Step3: Secure the brackets tightly.
Step4: Follow the same steps to attach the second bracket to the opposite side.
Step5: After the brackets are attached to the Web Smart Switch, use suitable screws to securely attach the brackets to the rack,
as shown in Figure 2-6.
17
Page 18

GSW-2400HPS
PWR
2 4 6 8 10 12 14 16
1
3 5 7 9 11 13 15
User’s Manual of GSW-2400HPS
18
20
22
24
PoE In Use
17
19
21
1000 ACT
23
LNK
10/100 AC T
LNK
PoE In Use
2 4 6 8 10 12 14 16
Reset
1 3 5 7 9 11 13 15
18 20 22 24
17 19 21 23
Figure 2-6: Mounting Web Smart Switch in a Rack
Step6: Proceeds with steps 4 and steps 5 of section 2.2.1 for Desktop Installation to connect the network cabling and supply
power to the Web Smart Switch.
18
Page 19

User’s Manual of GSW-2400HPS
3. SWITCH MANAGEMENT
This chapter explains the method that you can use to configure management access to the Web Smart Switch. It describes the
type of management applications and the communication and management protocols that deliver data between your
management device (workstation or personal computer) and the system. It also contains information about port connection
options.
This chapter covers the following topics:
Requirements
Management Access Overview
Web Management Access
3.1 Requirements
Workstation is installed with Ethernet NIC (Network Interface Card)
Workstations of subscribers running Windows XP/2003, Vista, Windows 7, MAC OS X, Linux, Fedora, Ubuntu or other
platforms compatible with TCP/IP protocols.
The above Workstation is installed with Web Browser and JAVA runtime enviro nment Plug-in.
Ethernet Port connection
Network cables - use standard network (UTP) cables with RJ-45 connectors.
It is recommended to use Internet Explore 7.0 or above to access the Web Smart Switch.
19
Page 20
User’s Manual of GSW-2400HPS
3.2 Management Access Overview
The Web Smart Switch gives you the flexibility to access and manage it using any or all of the following methods:
Web browser interface
The administration Web browser interface support is embedded in the Web Smart Switch software and is available for
immediate use. The web management method has its advantages. Table 3-1 shows the advantage and disadvantage of Web
management method.
Method Advantages Disadvantages
Web Browser
Ideal for configuring the sw itch remotely
Compatible with all popular browsers
Can be accessed from any location
Most visually appealing
Table 3-1: Web Management Methods Overview
Security can be compromised (hackers need
only know the IP address and subnet mask)
May encounter lag times on poor connections
3.3 Web Management Access
The Web Smart Switch offers management features that allow users to manage the Web Smart Switch from anywhere on the
network through a standard browser such as Microsoft Internet Explorer. After you set up your IP address for the switch, you can
access the Web Smart Switch’s Web interface applications directly in your Web browser by entering the IP address of the Web
Smart Switch.
Figure 3-1: Web Management
You can then use your Web browser to list and manage the Web Smart Switch configuration parameters from one central
location, Web Management requires either Microsoft Internet Explorer 7.0 or later, Safari or Mozilla Firefox 1.5 or later.
20
Page 21
User’s Manual of GSW-2400HPS
Figure 3-2: Web Main Screen of Web Smart Switch
21
Page 22
User’s Manual of GSW-2400HPS
4. WEB CONFIGURATION
This section introduces the configuration and functions of the Web-based management.
About Web-based Management
The Web Smart Switch offers management features that allow users to manage the Web Smart Switch from anywhere on the
network through a standard browser such as Microsoft Internet Explorer.
The Web-based Management supports Internet Explorer 7.0. It is based on Java Applets with an aim to reduce network
bandwidth consumption, enhance access speed and present an easy viewing screen.
By default, IE7.0 or later version does not allow Java Applets to open sockets. The user has to
explicitly modify the browser setting to enable Java Applets to use network ports.
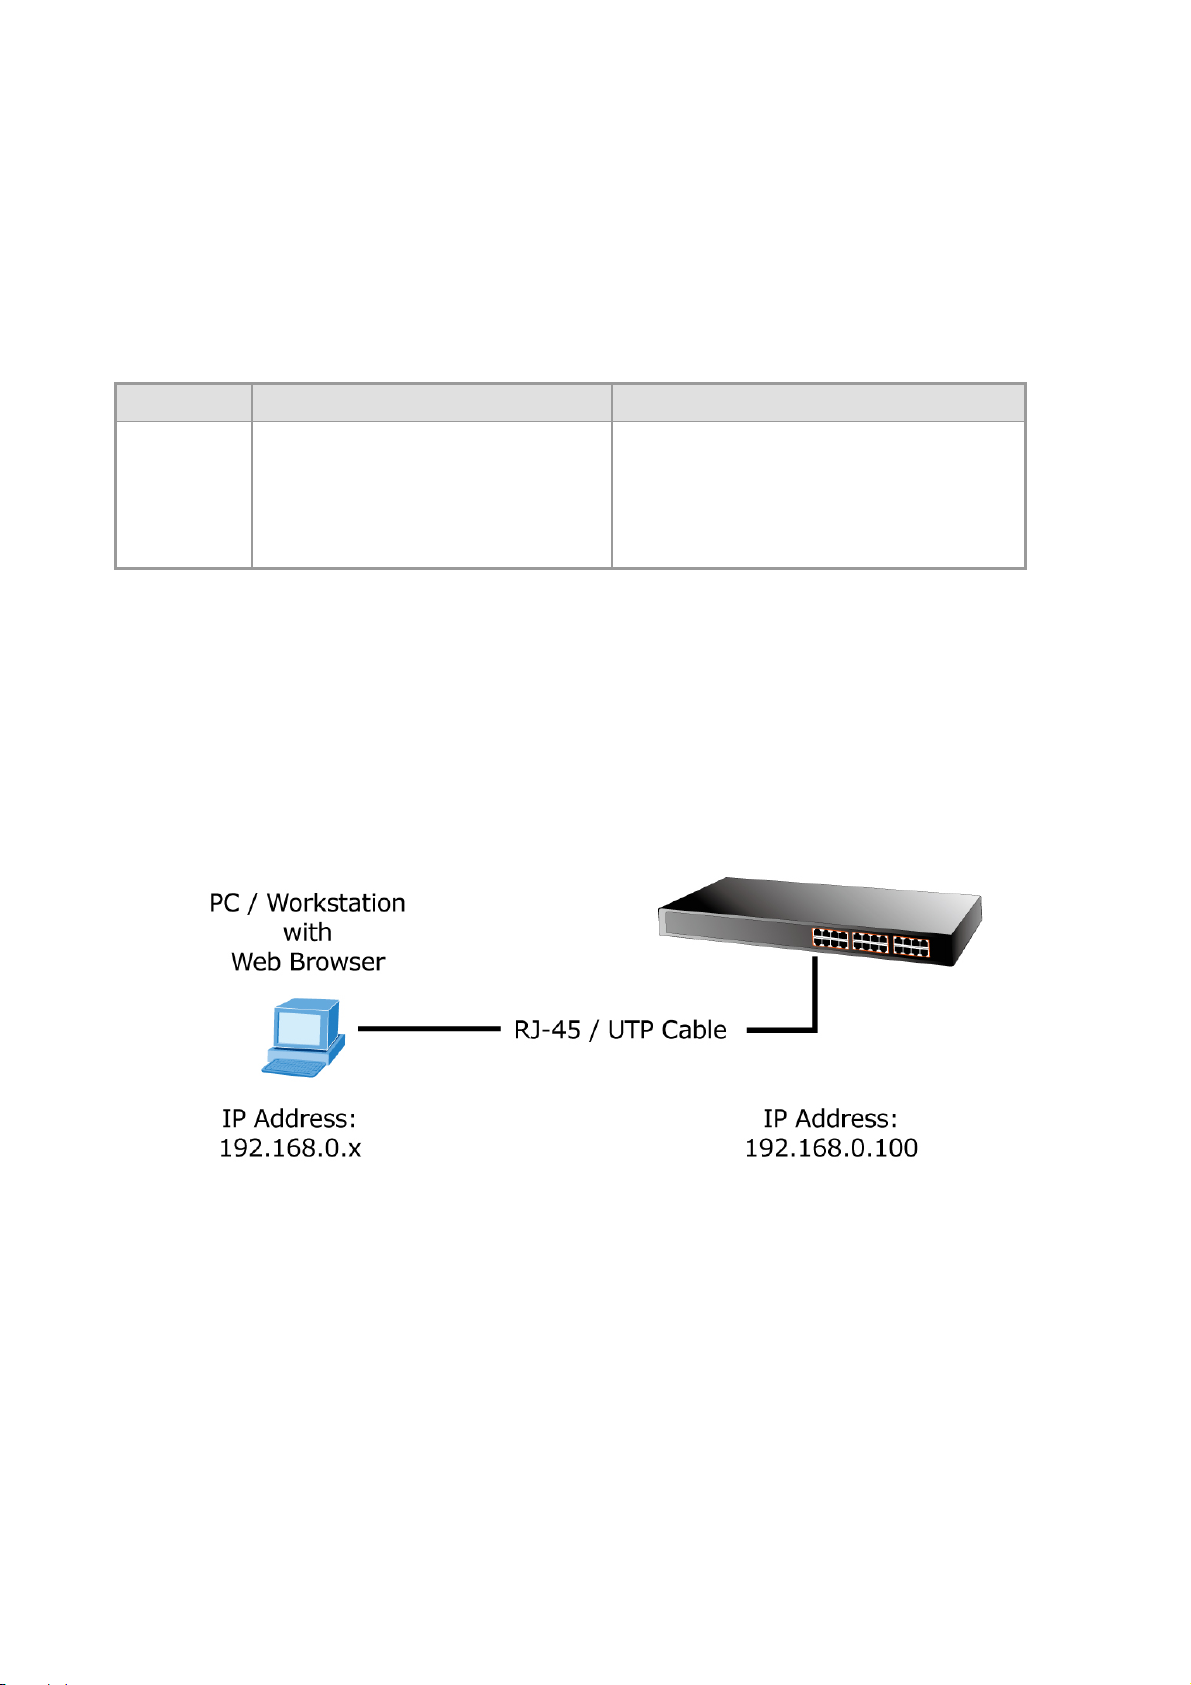
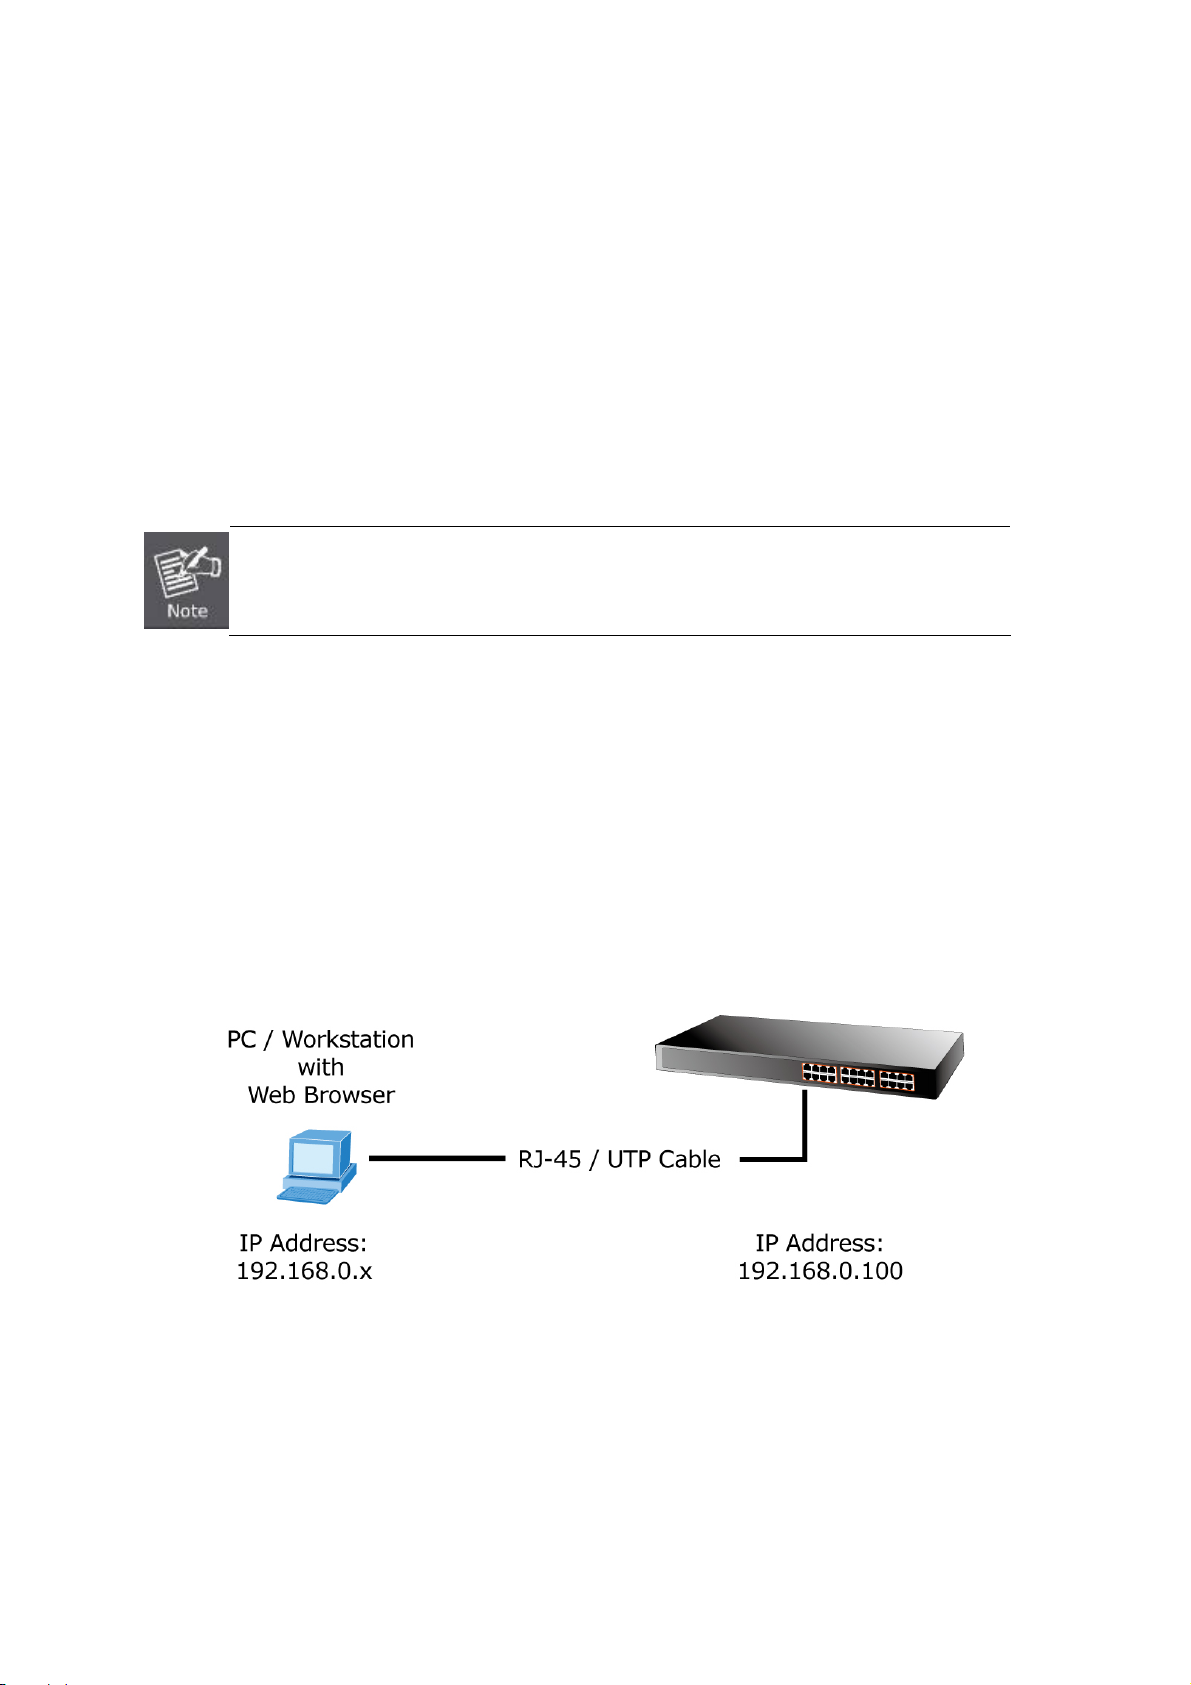
The Web Smart Switch can be configured through an Ethernet connection to make sure the manager PC must be set on the
same IP subnet address as the Web Smart Switch.
For example, the default IP address of the Web Smart Switch is 192.168.0.100, then the manager PC should be set at
192.168.0.x (where x is a number between 1 and 254, except 100), and the default subnet mask is 255.255.255.0.
If you have changed the default IP address of the Web Smart Switch to 192.168.1.1 with subnet mask 255.255.255.0, then the
manager PC should be set at 192.168.1.x (where x is a number between 2 and 254) to do the relative configuration on manager
PC.
Figure 4-1-1: Web Management
22
Page 23
User’s Manual of GSW-2400HPS
Logging on the Web Smart Switch
1. Use Internet Explorer 7.0 or above Web browser. Enter the factory-default IP address to access the Web interface. The
factory-default IP Address is as follows:
http://192.168.0.100
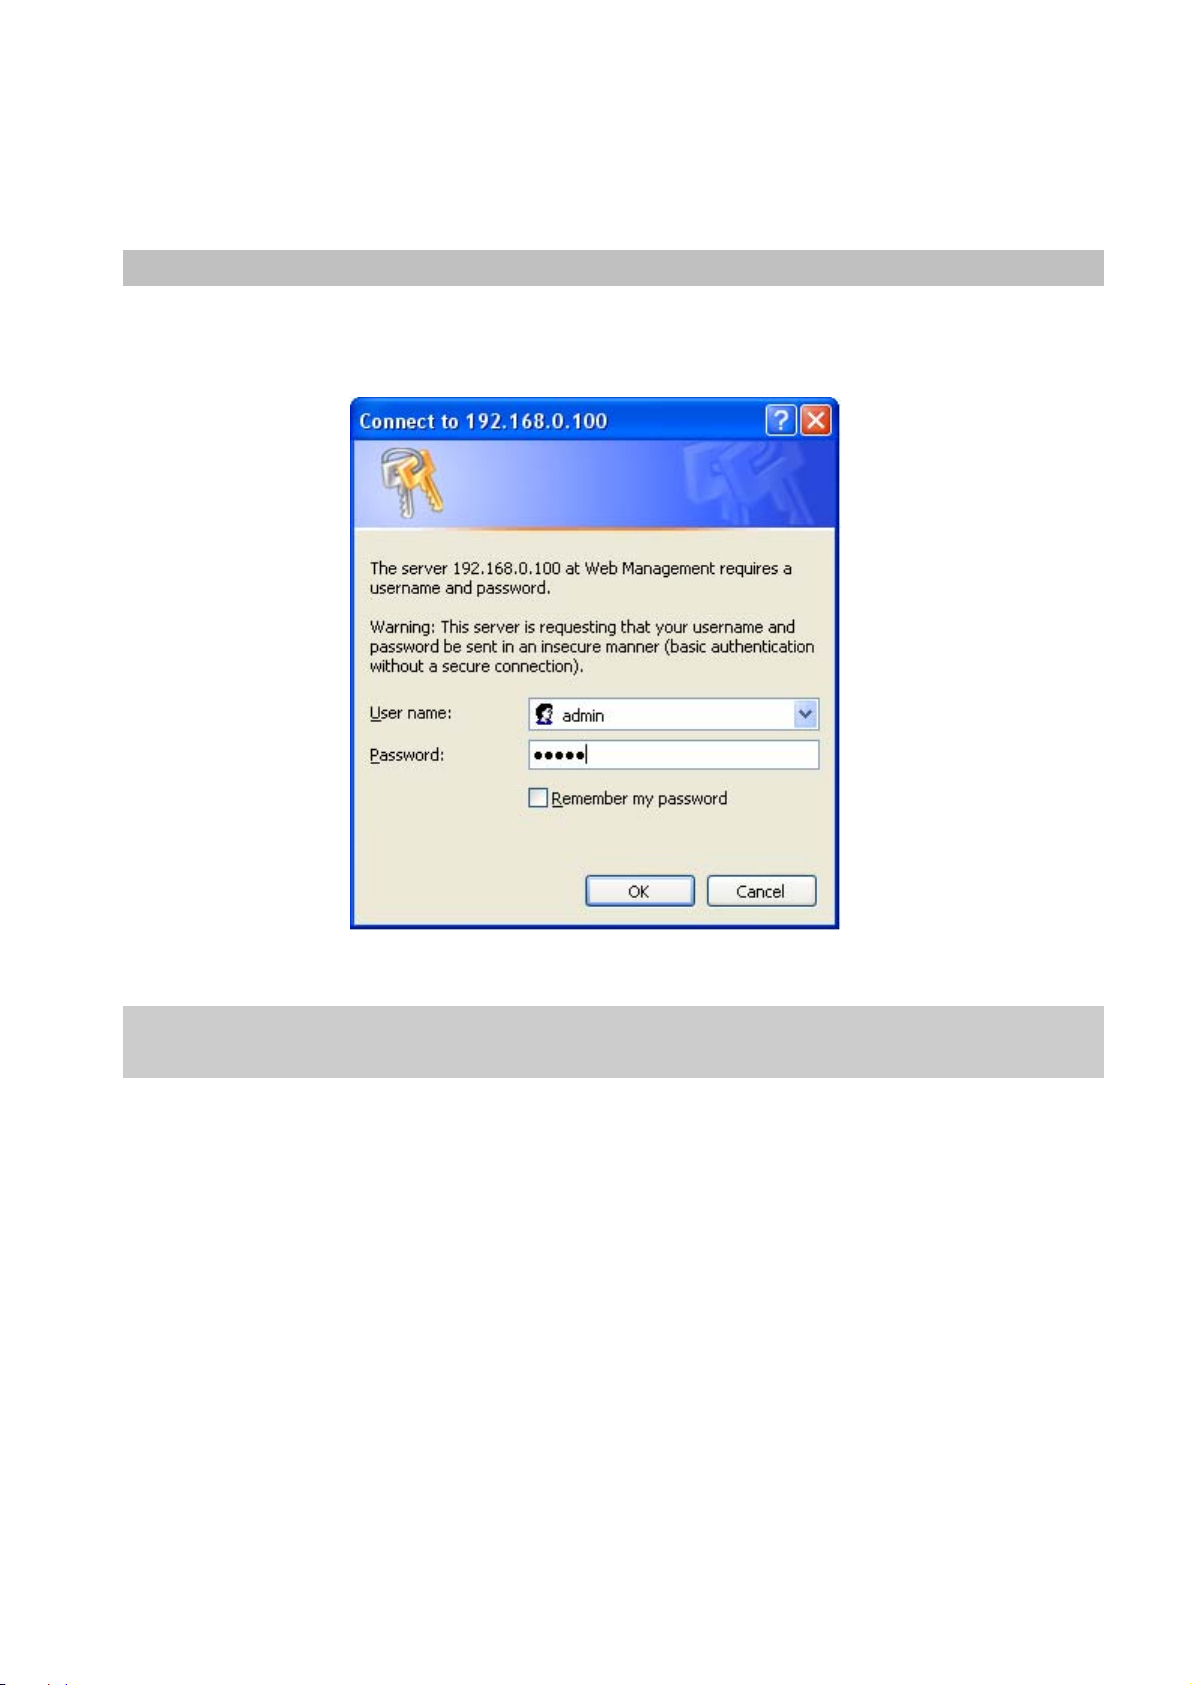
2. When the following login screen appears, please enter "admin" in both the default username and password fields to login
to the main screen of Web Smart Switch. The login screen in Figure 4-1-2 appears.
Figure 4-1-2: Web Login Screen
Default User Name: admin
Default Password: admin
After entering the username and password, the main screen appears as shown in Figure 4-1-3.
23
Page 24
User’s Manual of GSW-2400HPS
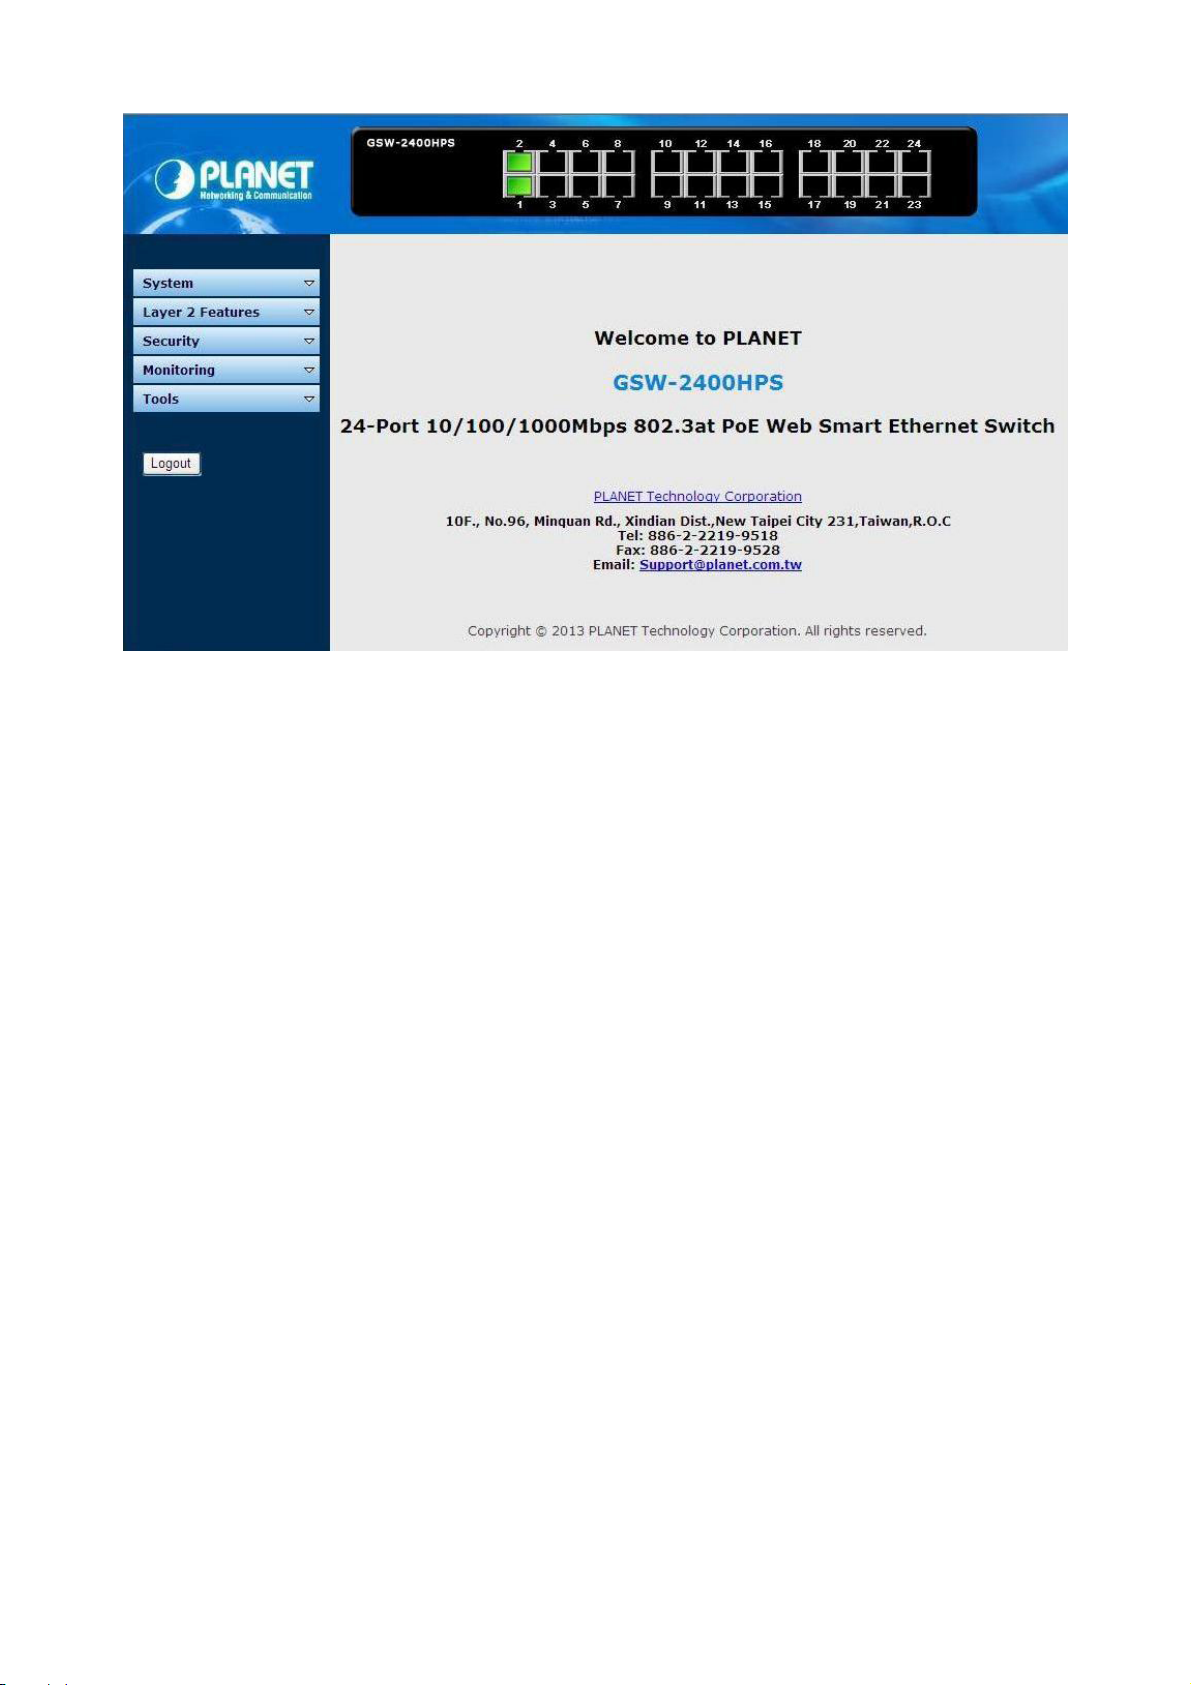
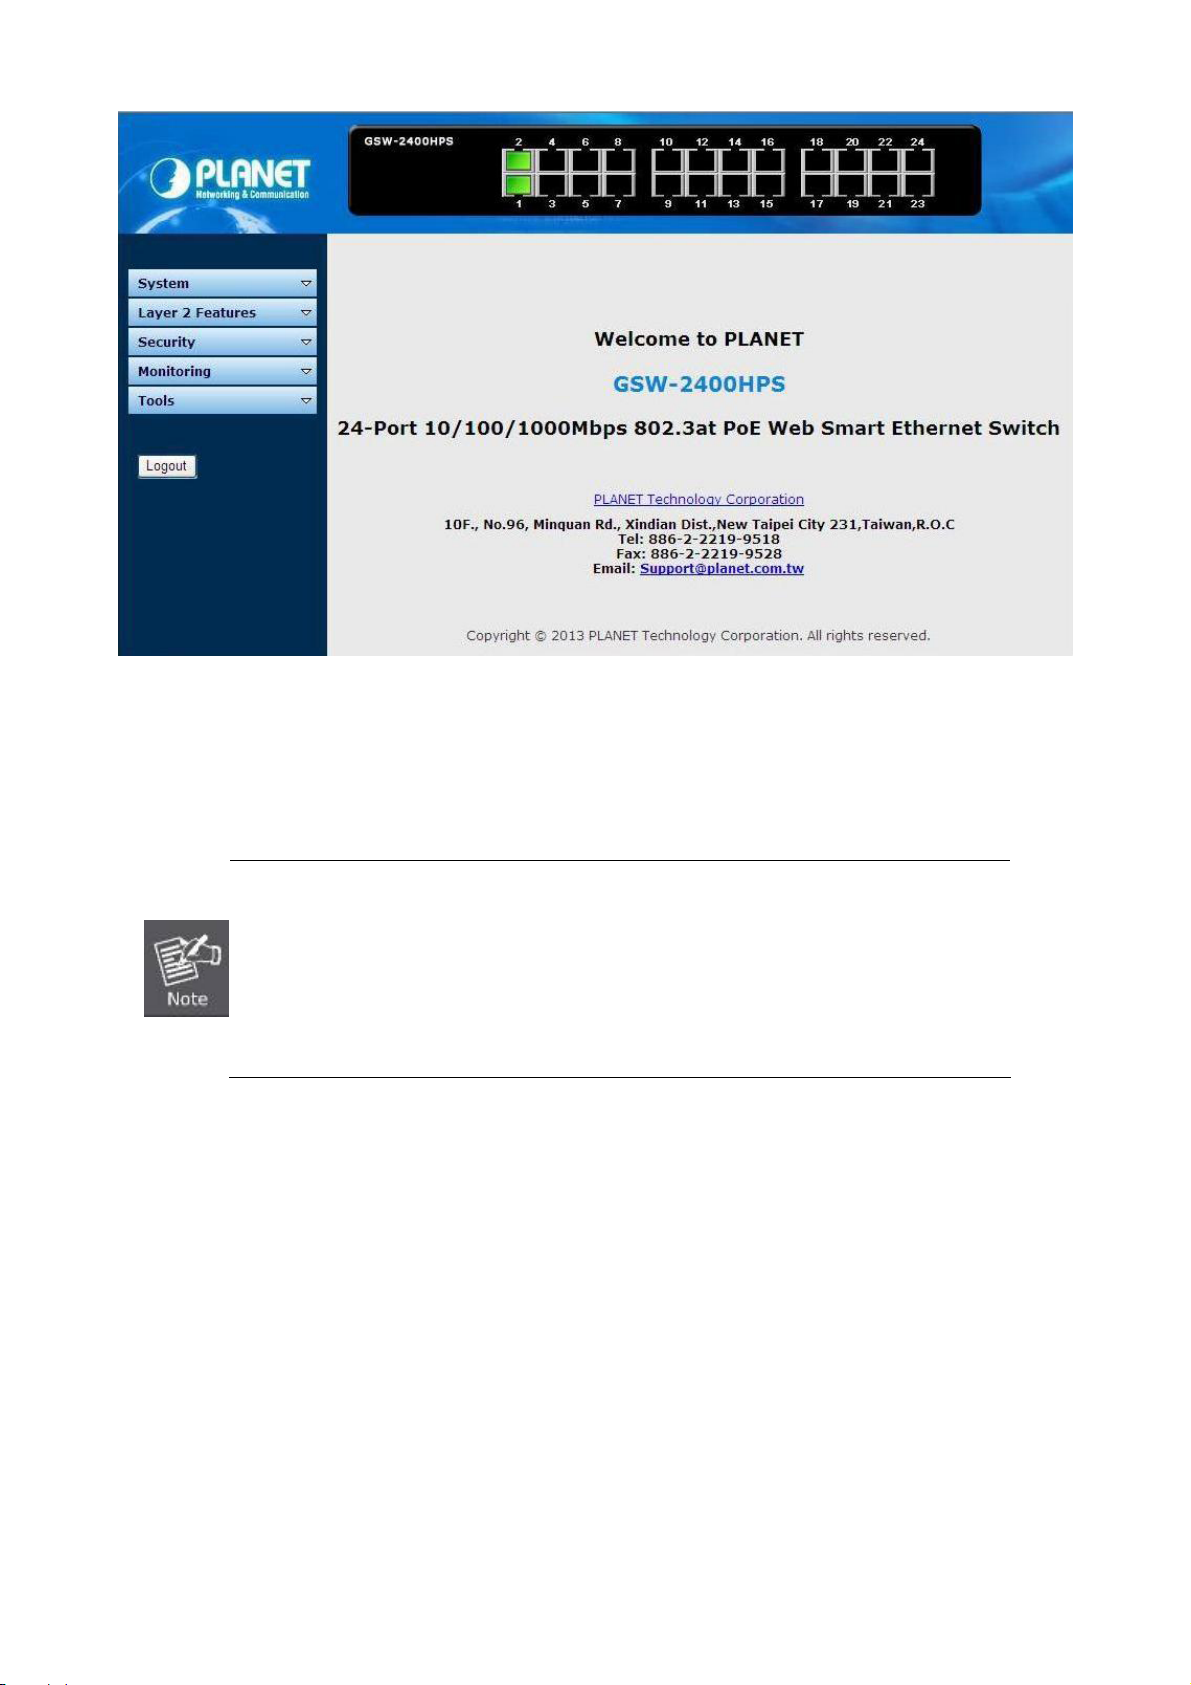
Figure 4-1-3: Web Main Screen of Web Smart Switch
Now, you can use the Web management interface to continue the switch management or manage the Web Smart Switch by
Web interface. The Switch Menu on the left of the web page let you access all the commands and statistics the Web Smart
Switch provides.
1. It is recommended to use Internet Explore 7.0 or above to access Web Smart Switch.
2. The changed IP address takes effect immediately after clicking on the Apply button. You
need to use the new IP address to access the Web interface.
3. For security reason, please change and memorize the new password after this first setup.
4. After the setup is completed, please choose “Tools” and click “Save Configuration” to
save the current configuration.
24
Page 25

User’s Manual of GSW-2400HPS
4.1 Main Web Page
The Web Smart Switch provides a Web-based browser interface for configuring and managing it. This interface allows you to
access the Web Smart Switch using the Web browser of your choice. This chapter describes how to use the Web Smart
Switch’s Web browser interface to configure and manage it.
Main Functions Menu
Main Screen
Copper Port Link Status
Figure 4-1-4: Main Page
Panel Display
The web agent displays an image of the Web Smart Switch’s ports. The Mode can be set to display different information for the
ports, including Link up or Link down and port disabled. The port status are illustrated as follows:
State Disabled Down Link
RJ-45 Ports
25
Page 26
User’s Manual of GSW-2400HPS
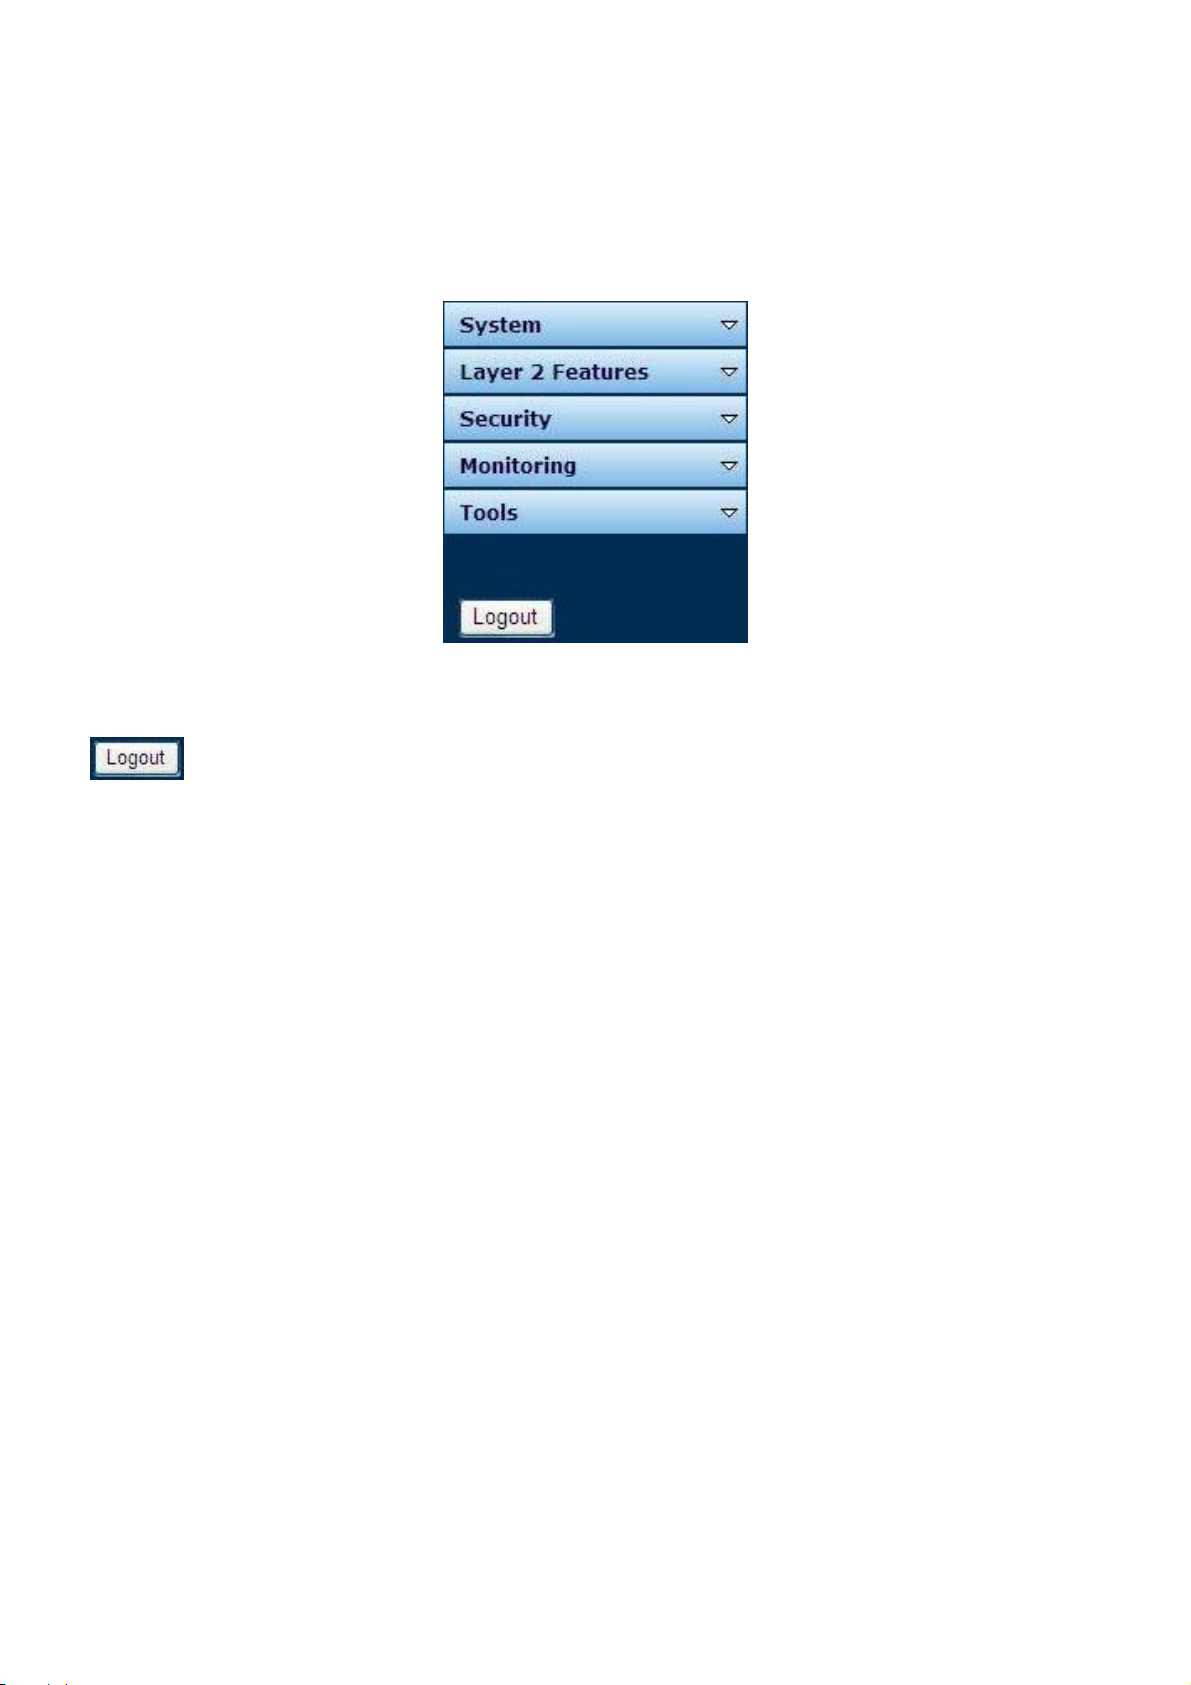
Main Menu
Using the onboard web agent, you can define system parameters, manage and control the Web Smart Switch, and all its ports,
or monitor network conditions. Via the Web-Management, the administrator can set up the Web Smart Switch by selecting the
functions those listed in the Main Function. The screen in Figure 4-1-5 appears.
Button
Figure 4-1-5: Web Smart Switch Main Functions Menu
: Click to logout the Web Smart Switch.
26
Page 27

User’s Manual of GSW-2400HPS
4.2 System
Use the System menu items to display and configure basic administrative details of the Web Smart Switch. Under the System
the following topics are provided to configure and view the system information. This section has the following items:
■ System Information The Web Smart Switch system information is provided here.
■ IP Configuration Configures the Web Smart Switch managed IP information on this page.
■ User Configuration
Configures new user name and password on this page.
4.2.1 System Information
The System Information page provides information of the current device. System Information page helps a switch administrator
to identify the system name, MAC address, IP address, subnet mask, gateway, firmware version and hardware version. The
screen in Figure 4-2-1 appears.
The page includes the following fields:
Object Description
System Name
MAC Addre ss
IP Address
Subnet Mask
Gateway
Firmware Version
Hardware Version
Figure 4-2-1: System Information Page Screenshot
Displ
ays the System Name on this field.
Displ
ays the MAC Address on this field.
Displ
ays the IP Address on this field.
Displ
ays the subnet mask on this field.
Displ
ays the gateway on this field.
Displ
ays the firmware version on this field.
Displays the hardware version on this field.
27
Page 28
User’s Manual of GSW-2400HPS
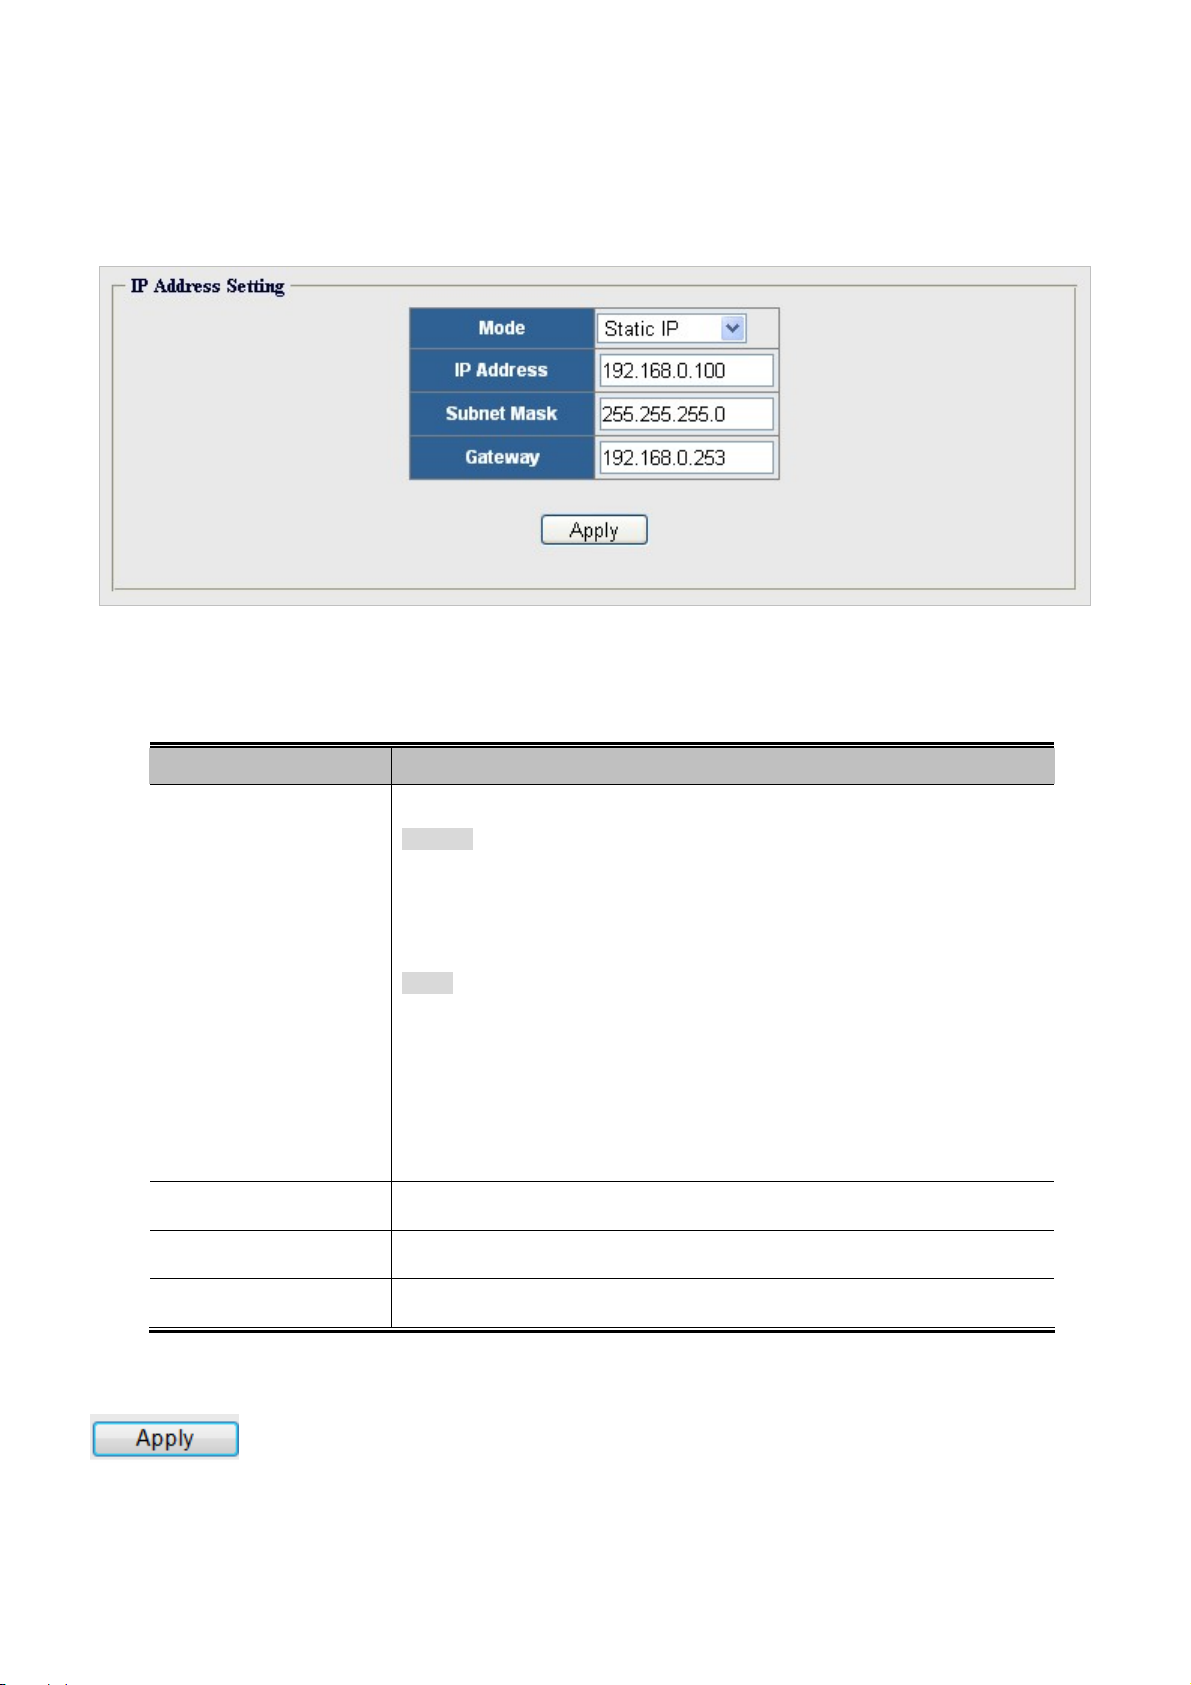
4.2.2 IP Configuration
The IP Configuration includes the IP Address, Subnet Mask and Gateway. The Configured column is used to view or change the
IP configuration. Fill up the IP Address, Subnet Mask and Gateway for the device. The screen in Figure 4-2-2 appears.
Figure 4-2-2: IP Address Setting Page Screenshot
The page includes the following fields:
Object Description
Mode
IP Address
Subnet Mask
Indicates the IP address mode operation. Possible modes are:
Static IP: Enable NTP mode operation.
When enable NTP mode operation, the agent forward and to transfer
NTP messages between the clients and the server when they are not on
the same subnet domain.
DHCP: Enable DHCP client mode operation.
Enable the DHCP client by checking this box. If DHCP fails and the
configured IP address is zero, DHCP will retry. If DHCP fails and the
configured IP address is non-zero, DHCP will stop and the configured IP
settings will be used. The DHCP client will announce the configured
System Name as hostname to provide DNS lookup.
Provid
es the IP address of this switch in dotted decimal notation.
Provid
esthe subnet mask of this switch dotted decimal notation.
Button
Gateway
: Click to apply changes.
Provid
es the IP address of the router in dotted decimal notation.
28
Page 29

User’s Manual of GSW-2400HPS
4.2.3 User Configuration
This page provides change in the username and password of the current users. After setup is completed, please press “Apply”
button to take effect. The system will ask for re-login web interface with new username and password as the screen in Figure
4-2-3 appears.
Figure 4-2-3: Local User Configuration Page Screenshot
The page includes the following fields:
Object Description
User Name
Password
Retype Password
Button
: Click to apply changes.
The name identifying the user.
Maximum length: 16 characters;
Enter the user’s new password here.
Maximum length: 8 characters.
e enter the user’s new password here again to confirm.
Pleas
29
Page 30

User’s Manual of GSW-2400HPS
4.3 Layer 2 Features
Use the Layer 2 Feature items to display and configure management functions of the Web Smart Switch. Under the Layer 2
Features, the following topics are provided to configure and view the management functions. This section has the following
items:
■ Port Configuration Configures port configuration settings on this page.
■ VLAN Configures the 802.1Q VLAN setting on this page.
■ QoS
■ Trunk Group
■ Port Mirroring
■ Port Isolation
■ Bandwidth Control
■ Jumbo Frame
■ Loop Protection
■ Green Networking
Configures the QoS setting on this page.
Configures the Trunk Group setting on this page.
Configures the source and target ports for mirroring on this page.
Configures Port Isolation setting on this page.
Configures Bandwidth Control setting on this page.
Configures Jumbo frame setting on this page.
Configures Loop Protection setting on this page.
Configures Green Networking setting on this page.
4.3.1 Port Configuration
This page displays current port configurations and status. Ports can also be configured here. The port settings relate to the
currently selected stack unit, as reflected by the page header. The table has one row for each port on the selected switch in the
stack and a number of columns, which are:
The Port Configuration screens in Figure 4-3-1 & Figure 4-3-2 appear.
The page includes the following fields:
Object Description
Port
State
Figure 4-3-1: Port Settings Page Screenshot
Select port number for this drop down list.
Indicates the port state operation. Possible state are:
Enable - Start up the port manually.
30
Page 31

User’s Manual of GSW-2400HPS
Disabled - Shutdown the port manually.
Speed Duplex
Flow Control
Button
Port Status
Select any available link speed duplex mode for the given switch port. Draw the
menu bar to select the mode.
Auto - Setup Auto negotiation.
10M Half - Setup 10Mbps Half duplex Force mode.
10M Full - Setup 10Mbps Full duplex Force mode.
100M Half - Setup 100Mbps Half duplex Force mode.
100M Full - Setup 100Mbps Full duplex Force mode.
Indicates the Flow Control operation. Possible status are:
Off - Shutdown the Flow Control function manually.
On - Start up the Flow Control function manually.
: Click to apply changes.
The page includes the following fields:
Object Description
Port
State
Speed Duplex
Flow Control
Figure 4-3-2: Port Status Page Screenshot
T
his is the logical port number for this row.
Displ
ays per port current state.
Displ
ays per port speed duplex mode setting and actual link status.
Displ
ays per port current flow control configuration and actual status.
31
Page 32

User’s Manual of GSW-2400HPS
4.3.2 VLAN
VLAN Overview
A Virtual Local Area Network (VLAN) is a network topology configured according to a logical scheme rather than the physical
layout. VLAN can be used to combine any collection of LAN segments with an autonomous user group that appears as a single
LAN. VLAN also logically segments the network into different broadcast domains so that packets are forwarded only between
ports within the VLAN. Typically, a VLAN corresponds to a particular subnet, although not necessarily.
VLAN can enhance performance by conserving bandwidth, and improve security by limiting traffic to specific domains.
A VLAN is a collection of end nodes grouped by logic instead of physical location. End nodes that frequently communicate with
each other are assigned to the same VLAN, regardless of where they are physically on the network. Logically, a VLAN can be
equated to a broadcast domain, because broadcast packets are forwarded to only members of the VLAN on which the
broadcast was initiated.
1. No matter what basis is used to uniquely identify end nodes and assign these nodes VLAN
This section has the following items:
VLAN Switching
VLAN Port Configuation
membership, packets cannot cross VLAN without a network device performing a routing
function between the VLANs.
2. The Web Smart Switch supports IEEE 802.1Q VLAN. The port untagging function can be used
to remove the 802.1 tag from packet headers to maintain compatibility with devices that are
tag-unaware.
3. The Web Smart Switch's default is to assign all ports to a single 802.1Q VLAN named
DEFAULT_VLAN. As the new VLAN is created, the member ports assigned to the new VLAN
will be removed from the DEFAULT_ VLAN port member list. The DEFAULT_VLAN has a VID
= 1.
IEEE 802.1Q VLAN
Creates and configures VLAN groups
Configures VLAN Port Configuration settings
In large networks, routers are used to isolate broadcast traffic for each subnet into separate domains. This Web Smart Switch
provides a similar service at Layer 2 by using VLANs to organize any group of network nodes into separate broadcast domains.
VLANs confine broadcast traffic to the originating group, and can eliminate broadcast storms in large networks. This also
provides a more secure, cleaner network environment.
An IEEE 802.1Q VLAN is a group of ports that can be located anywhere in the network, but communicate as though they belong
to the same physical segment.
VLANs help to simplify network management by allowing you to move devi c es to a new VLAN without having to change any
32
Page 33

User’s Manual of GSW-2400HPS
physical connections. VLANs can be easily organized to reflect departmental groups (such as Marketing or R&D), usage groups
(such as e-mail), or multicast groups (used for multimedia applications such as videoconferencing).
VLANs provide greater network efficiency by reducing broadcast traffic, and allow you to make network changes without having
to update IP addresses or IP subnets. VLANs inherently provide a high level of network security since traffic must pass through
a configured Layer 3 link to reach a different VLAN.
This Web Smart Switch supports the following VLAN features:
Up to 32 VLANs based on the IEEE 802.1Q standard
Port overlapping, allowing a port to participate in multiple VLANs
End stations can belong to multiple VLANs
Passing traffic between VLAN-aware and VLAN-unaware devices
■ IEEE 802.1Q Standard
IEEE 802.1Q (tagged) VLAN is implemented on the Switch. 802.1Q VLAN requiring tagging, which enables them to span the
entire network (assuming all switches on the network are IEEE 802.1Q-compliant).
VLAN allows a network to be segmented in order to reduce the size of broadcast domains. All packet s entering a VLAN will only
be forwarded to the stations (over IEEE 802.1Q enabled switches) that are members of that VLAN, and this includes broadcast,
multicast and unicast packets from unknown sources.
VLAN can also provide a level of security to your network. IEEE 802.1Q VLAN will only deliver packets between stations that are
members of the VLAN. Any port can be configured as either tagging or untagging.:
The untagging feature of IEEE 802.1Q VLAN allows VLAN to work with legacy switches that don't recognize VLAN tags
in packet headers.
The tagging feature allows VLAN to span multiple 802.1Q-compliant switches through a single physical connection and
allows Spanning Tree to be enabled on all ports and work normally.
Some relevant terms:
- Tagging - The act of putting 802.1Q VLAN information into the header of a packet.
- Untagging - The act of stripping 802.1Q VLAN information out of the packet header.
■ 802.1Q VLAN Tags
The figure below shows the 802.1Q VLAN tag. There are four additional octets inserted after the source MAC address. Their
presence is indicated by a value of 0x8100 in the Ether Type field. When a packet's Ether Type field is equal to 0x8100, the
packet carries the IEEE 802.1Q/802.1p tag. The tag is contained in the following two octets and consists of 3 bits of user priority,
1 bit of Canonical Format Identifier (CFI - used for encapsulating Token Ring packets so they can be carried across Ethernet
backbones), and 12 bits of VLAN ID (VID). The 3 bits of user priority are used by 802.1p. The VID is the VLAN identifier and is
used by the 802.1Q standard. Because the VID is 12 bits long, 4094 unique VLAN can be identified.
The tag is inserted into the packet header making the entire packet longer by 4 octets. All of the information originally contained
in the packet is retained.
33
Page 34

802.1Q Tag
User Priority CFI VLAN ID (VID)
3 bits 1 bits 12 bits
TPID (Tag Protocol Identifier) TCI (Tag Control Information)
2 bytes 2 bytes
User’s Manual of GSW-2400HPS
Preamble
Destination
Address
Source
Address
VLAN TAG
Ethernet
Data FCS
Type
6 bytes 6 bytes 4 bytes 2 bytes 46-1500 bytes 4 bytes
The Ether Type and VLAN ID are inserted after the MAC source address, but before the original Ether Type/Length or Logical
Link Control. Because the packet is now a bit longer than it was originally, the Cyclic Redundancy Check (CRC) must be
recalculated.
Adding an IEEE802.1Q Tag
Dest. Addr. Src. Addr. Length/E. type Data Old CRC
Original Ethernet
Dest. Addr. Src. Addr. E. type Tag Length/E. type Data New CRC
New T agg ed Packet
Priority CFI VLAN ID
■ Port VLAN ID
Packets that are tagged (are carrying the 802.1Q VID information) can be transmitted from one 802.1Q compliant network
device to another with the VLAN information intact. This allows 802.1Q VLAN to span network devices (and indeed, the entire
network – if all network devices are 802.1Q compliant).
Every physical port on a switch has a PVID. 802.1Q ports are also assigned a PVID for use within the switch. If no VLAN is
defined on the switch, all ports are then assigned to a default VLAN with a PVID equal to 1. Untagged packets are assigned the
PVID of the port on which they were received. Forwarding decisions are based upon this PVID, in so far as VLAN is concerned.
Tagged packets are forwarded according to the VID contained within the tag. Tagged packets are also assigned a PVID, but the
PVID is not used to make packet forwarding decisions, the VID is.
Tag-aware switches must keep a table to relate PVID within the switch to VID on the network. The switch will compare the VID of
a packet to be transmitted to the VID of the port that is to transmit the packet. If the two VID are different the switch will drop the
packet. Because of the existence of the PVID for untagged packets and the VID for tagged packets, tag-aware and tag-unaware
network devices can coexist on the same network.
A switch port can have only one PVID, but can have as many VIDs as the switch has memory in its VLAN table to store them.
34
Page 35

User’s Manual of GSW-2400HPS
Because some devices on a network may be tag-unaware, a decision must be made at each port on a tag-aware device before
packets are transmitted – should the packet to be transmitted have a tag or not? If the transmitting port is connected to a
tag-unaware device, the packet should be untagged. If the transmitting port is connected to a tag-aware device, the packet
should be tagged.
■ Default VLANs
The Switch initially configures one VLAN, VID = 1, called "default." The factory default setting assigns all ports on the Switch to
the "default". As new VLAN are configured in Port-based mode, their respective member ports are removed from the "default."
■ Assigning Ports to VLANs
Before enabling VLANs for the switch, you must first assign each port to the VLAN group(s) in which it will participate. By default
all ports are assigned to VLAN 1 as untagged ports. Add a port as a tagged port if you want it to carry traffic for one or more
VLANs, and any intermediate network devices or the host at the other end of the connection supports VLANs. Then assign ports
on the other VLAN-aware network devices along the path that will carry this traffic to the same VLAN(s), either manually or
dynamically using GVRP. However, if you want a port on this switch to participate in one or more VLANs, but none of the
intermediate network devices nor the host at the other end of the connection supports VLANs, then you should add this port to
the VLAN as an untagged port.
VLAN-tagged frames can pass through VLAN-aware or VLAN-unaware network interconnection
devices, but the VLAN tags should be stripped off before passing it on to any end-node host that
does not support VLAN tagging.
■ VLAN Classification
When the switch receives a frame, it classifies the frame in one of two ways. If the frame is untagged, the switch assigns the
frame to an associated VLAN (based on the default VLAN ID of the receiving port). But if the frame is tagged, the switch uses
the tagged VLAN ID to identify the port broadcast domain of the frame.
■ Port Overlapping
Port overlapping can be used to allow access to commonly shared network resources among different VLAN groups, such as
file servers or printers. Note that if you implement VLANs which do not overlap, but still need to communicate, you can connect
them by enabled routing on this switch.
■ Untagged VLANs
Untagged (or static) VLANs are typically used to reduce broadcast traffic and to increase security. A group of network users
assigned to a VLAN form a broadcast domain that is separate from other VLANs configured on the switch. Packets are
forwarded only between ports that are designated for the same VLAN. Untagged VLANs can be used to manually isolate user
groups or subnets.
35
Page 36

User’s Manual of GSW-2400HPS
4.3.2.1 VLAN Switching
This page is used for configuring the Web Smart Switch port VLAN. The VLAN per Port Configuration page contains fields for
managing ports that are part of a VLAN.
Understanding nomenclature of the Switch
■ IEEE 802.1Q Tagged and Untagged
Every port on an 802.1Q compliant switch can be configured as tagged or untagged.
Tagged:
Untagged:
Frame Leave
Leave port is tagged Frame remains tagged Tag is inserted
Ports with tagging enabled will put the VID number, priority and other VLAN information into the
header of all packets that flow into those ports. If a packet has previously been tagged, the port
will not alter the packet, thus keeping the VLAN information intact. The VLAN information in the
tag can then be used by other 802.1Q compliant devices on the network to make
packet-forwarding decisions.
Ports with untagging enabled will strip the 802.1Q tag from all packets that flow into those
ports. If the packet doesn't have an 802.1Q VLAN tag, the port will not alter the packet. Thus,
all packets received by and forwarded by an untagging port will have no 802.1Q VLAN
information. (Remember that the PVID is only used internally within the Switch). Untagging is
used to send packets from an 802.1Q-compliant network device to a non-compliant network
device.
Frame Income
Income Frame is tagged Income Frame is untagged
Leave port is untagged Tag is removed Frame remain untagged
Table 4-3-1: Ingress / Egress port with VLAN VID Tag / Untag Table
The VLAN setting screens in Figure 4-3-3 & Figure 4-3-4 appear.
36
Page 37

The page includes the following fields:
Object Description
User’s Manual of GSW-2400HPS
Figure 4-3-3: VLAN Setting Page Screenshot
VLAN ID
VLAN Name
Untagged
Tagged
Not Member
Button
Current VLAN Status
Indicates th
Indicates th
Select
VLAN-Tagged.
Select
Select
: Click to add new 802.1Q VLAN groups or modify existing 802.1Q VLAN group.
e ID of this particular VLAN. Available range is 1 to 4094.
e name of this particular VLAN. Maximum length: 16 characters;
s port number for this item to transmit outgoing frames without
s port number for this item to transmit outgoing frames with VLAN-Tagged.
s port number for this item that will not belong to any 802.1Q VLAN group.
The page includes the following fields:
Object Description
VLAN ID
VLAN Name
Figure 4-3-4: VLAN Status Page Screenshot
Displ
ays the current VLAN ID entry.
Displays the current VLAN Name.
37
Page 38

User’s Manual of GSW-2400HPS
Displ
Member Ports
Tagged Ports
Untagged Ports
ays the current member ports
Displ
ays the current tagged ports.
Displ
ays the current untagged ports.
Buttons
Delete
: Click to delete existing 802.1Q VLAN groups.
: Click to select all existing 802.1Q VLAN groups.
The Default VLAN 1 is root VLAN of Web Smart Switch and it cannot be deleted.
Click to choose the existing V
LAN group to delete.
38
Page 39

User’s Manual of GSW-2400HPS
4.3.2.2 VLAN Port Configuration
This page provides to configure VLAN Port Configuration parameter. The VLAN Port Configuration screens in Figure 4-3-5 &
Figure 4-3-6 appear.
Figure 4-3-5: VLAN Port Settings Page Screenshot
The page includes the following fields:
Object Description
Port
PVID
Button
: Click to apply changes.
Current Port VLAN Status
Selects port number for this drop-down list to assign PVID.
Allows to assign PVID for selected port. The range for the PVID is 1-4094.
The PVID will be inserted into all untagged frames entering the ingress port. The
PVID must be the same as the VLAN ID to make sure the port belongs to VLAN
group, or the untagged traffic will be dropped.
Figure 4-3-6: Port VLAN Status Page Screenshot
39
Page 40

The page includes the following fields:
Object Description
User’s Manual of GSW-2400HPS
Port
PVID
The Web Smart Switch port number of the logical port.
Displays the current PVID of each port.
40
Page 41

User’s Manual of GSW-2400HPS
4.3.2.3 VLAN Setting Example:
- Two Separate 802.1Q VLAN
- 802.1Q VLAN Trunk
Two Separate 802.1Q VLAN
The diagram shows how the Web Smart Switch handles Tagged and Untagged traffic flow for two VLANs. VLAN Group 2 and
VLAN Group 3 are separated VLAN. Each VLAN isolates network traffic, so only members of the VLAN receive traffic from the
same VLAN members. The screen in Figure 4-3-7 appears and Table 4-3-2 describes the port configuration of the Web Smart
Switch.
Figure 4-3-7: Two Separate VLAN Diagrams
VLAN Group VID Untagged Members Tagged Members
VLAN Group 1 1 Port-7~Port-24 N/A
VLAN Group 2 2 Port-1,Port-2 Port-3
VLAN Group 3 3 Port-4,Port-5 Port-6
Table 4-3-2: VLAN and Port Configuration
The scenario described as follows:
Untagged packet entering VLAN 2
1. While [PC-1] transmit an untagged packet enters Port-1, the Web Smart Switch will tag it with a VLAN Tag=2.
[PC-2] and [PC-3] will received the packet through Port-2 and Port-3.
2. [PC-4],[PC-5] and [PC-6] received no packet.
3. While the packet leaves Port-2, it will be stripped away it tag becoming an untagged packet.
4. While the packet leaves Port-3, it will keep as a tagged packet with VLAN Tag=2.
41
Page 42

User’s Manual of GSW-2400HPS
Tagged packet entering VLAN 2
1. While [PC-3] transmit a tagged packet with VLAN Tag=2 enters Port-3, [PC-1] and [PC-2] will received the packet
through Port-1 and Port-2.
2. While the packet leaves Port-1 and Port-2, it will be stripped away it tag becoming an untagged packet.
Untagged packet entering VLAN 3
1. While [PC-4] transmit an untagged packet enters Port-4, the Web Smart Switch will tag it with a VLAN Tag=3.
[PC-5] and [PC-6] will received the packet through Port-5 and Port-6.
2. While the packet leaves Port-5, it will be stripped away it tag becoming an untagged packet.
3. While the packet leaves Port-6, it will keep as a tagged packet with VLAN Tag=3.
For this example, set VLAN Group 1 as default VLAN, but only focus on VLAN 2 and VLAN 3 traffic
flows.
Setup steps
1. Create VLAN 2 Group
Add VLAN Group 2 with VID=2
Untagged Port : Port-1 & Port-2
Tagged Port : Port-3
2. Create VLAN 3 Group
Add VLAN Group 3 with VID=3
Untagged Port : Port-4 & Port-5
Tagged Port : Port-6
3. Remove VLAN Member for VLAN 1:
Remember to remove the Port 1 – Port 6 from VLAN 1 membership, since the Port 1 – Port 6 had been assigned to
VLAN 2 and VLAN 3.
Figure 4-3-8: Add new VLAN group, assign VLAN members for VLAN 2 and VLAN 3 and remove specified ports from VLAN 1
member
42
Page 43

It’s important to remove the VLAN members from VLAN 1 configuration. Or the ports would become
overlap setting. ( For the overlapped VLAN configuration, see the next sample of the VLAN
configuration.)
4. Assign PVID for each port:
Port-1,Port-2 and Port-3 : PVID=2
Port-4,Port-5 and Port-6 : PVID=3
The Per Port VLAN configuration in Figure 4-3-9 appears.
User’s Manual of GSW-2400HPS
Figure 4-3-9: Port 1-Port 6 VLAN Configuration
43
Page 44

User’s Manual of GSW-2400HPS
VLAN Trunking between Two 802.1Q Aware Switches
The most cases are used for “Uplink” to other switches. VLANs are separated at different switches, but they need to access
with other switches within the same VLAN group. The screen in Figure 4-3-10 appears.
Figure 4-3-10: VLAN Trunking Between Two 802.1Q VLAN Aware Switch Diagrams
Setup steps
1. Create VLAN 2 Group
Add VLAN Group 2 with VID=2
Untagged Port : Port-1, Port-2 & Port-3
Tagged Port : Port-7
2. Create VLAN 3 Group
Add VLAN Group 3 with VID=3
Untagged Port : Port-4, Port-5 & Port-6
Tagged Port : Port-7
44
Page 45

User’s Manual of GSW-2400HPS
As to the VLAN ports being connected to the hosts, please refer to two separate VLAN examples. The following steps will focus
on the VLAN Trunk port configuration.
1. Specify Port-7 to be the 802.1Q VLAN Trunk port.
2. Assign Port-7 to both VLAN 2 and VLAN 3 at the VLAN Member configuration page.
3. Define a VLAN 1 as a “Public Area” that overlapping with both VLAN 2 members and VLAN 3 members.
4. Assign the VLAN Trunk Port to be the member of each VLAN – which wants to be aggregated. For this sample, add Port-7
to be VLAN 2 and VLAN 3 member ports. The screen in Figure 4-3-11 appears.
Figure 4-3-11: VLAN Overlap Port Setting & VLAN 1 – The Public Area Member Assign
5. Specify Port-7 to be the 802.1Q VLAN Trunk port, and the Trunking port must be a Tagged port while egress.
6. Assign PVID for each port:
Port-1,Port-2 and Port-3 : PVID=2
Port-4,Port-5 and Port-6 : PVID=3
The screen in Figure 4-3-12 appears.
Figure 4-3-12: The Configuration of VLAN Trunk Port
Although the VLAN 2 members: Port-1 to Port-3 and VLAN 3 members: Port-4 to Port-6 also belong to VLAN 1. But with
different PVID settings, packets from VLAN 2 or VLAN 3 is not able to access to the other VLAN.
7. Repeat Steps 1 to 6 to set up the VLAN T runk port at the partner switch, add more VLANs to join the VLAN trunk and assign
the Trunk port to the VLANs.
45
Page 46

User’s Manual of GSW-2400HPS
4.3.3 QoS
Understanding QoS
Quality of Service (QoS) is an advanced traffic prioritization feature that allows you to establish control over network traffic. QoS
enables you to assign various grades of network service to different types of traf fic, such as multi-media, video, protocol-specific,
time critical, and file-backup traffic.
QoS reduces bandwidth limitations, delay, loss, and jitter. It also provides increased reliability for delivery of your data and
allows you to prioritize certain applications across your network. You can define exactly how you want the switch to treat
selected applications and types of traffic.
You can use QoS on your system to:
Control a wide variety of network traffic by:
Classifying traffic based on packet attributes.
Assigning priorities to traffic (for example, to set higher priorities to time-critical or business-critical applications).
Applying security policy through traffic filtering.
Provide predictable throughput for mult imedia applications such as video conferencing or voice over IP by minimizing
delay and jitter.
Improve performance for specific types of traffic and preserve performance as the amount of traffic grows.
Reduce the need to constantly add bandwidth to the network.
Manage network congestion.
To implement QoS on your network, you need to carry out the following actions:
1. Define a service level to determine the priority that will be applied to traffic.
2. Apply a classifier to determine how the incoming traffic will be classified and thus treated by the Switch.
3. Create a QoS profile which associates a service level and a classifier.
4. Apply a QoS profile to a port(s).
The QoS page of the Web Smart Switch provide Port-base mode can be selected. The Port-base mode rely on predefined
fields within the packet to determine the output queue.
Port-Base Priority Mode – Any packet received from the specify high priority port will treated as a high priority
packet.
The Web Smart Switch h supports four priority level queue, the queue service rate is based on the WRR(Weight Round
Robin) and WFQ (Weighted Fair Queuing) alorithm.
This section has the following items:
Port-based Priority Setting
Packet Scheduling
Configuration port-based priority.
Configuration packet scheduling.
46
Page 47

User’s Manual of GSW-2400HPS
4.3.3.1 Port-based Priority Setting
This page provides Port-based Priority. The Port-based Priority screens in Figure 4-3-13 & Figure 4-3-14 appear.
Figure 4-3-13: Port-based Priority Page Screenshot
The page includes the following fields:
Object Description
Port
Priority Queue
Button
: Click to apply changes.
Select port for this drop do
Select pri
Current Port-based Priority Status
wn list.
ority for this drop down list.
Figure 4-3-14: Port-based Priority Status Page Screenshot
47
Page 48

User’s Manual of GSW-2400HPS
The page includes the following fields:
Object Description
T
Port
Priority Queue
he switch port number of the logical port.
Displ
ay the current per port priority Queue.
4.3.3.2 Packet Scheduling
This page provides Packet Scheduling. The Packet Scheduling screens in Figure 4-3-15 & Figure 4-3-16 appear.
The page includes the following fields:
Object Description
Schedule Algorithm
Priority Queue
Weight
Button
: Click to apply changes.
Figure 4-3-15: Per Port Setting Page Screenshot
Select sche
Provid
Provid
dule algorithm mode.
e 4 priority queues.
e Strict Priority and 1 to 15 for this item.
48
Page 49

The page includes the following fields:
Object Description
Priority Queue
Figure 4-3-16: Per Port Setting Page Screenshot
Displ
ays the priority queues.
User’s Manual of GSW-2400HPS
Schedule Algorithm
Weight
Displ
ays the current schedule algorithm.
Displays the current Weight queue.
49
Page 50

User’s Manual of GSW-2400HPS
4.3.4 Trunk
Understanding Trunk
Port Aggregation optimizes port usage by linking a group of ports together to form a single Link Aggregated Groups (LAGs). Port
Aggregation multiplies the bandwidth between the devices, increases port flexibility, and provides link redundancy.
Each LAG is composed of ports of the same speed, set to full-duplex operations. Ports in a LAG, can be of different media types
(UTP/Fiber, or different fiber types), provided they operate at the same speed.
Aggregated Links can be assigned manually (Port Trunk) on the relevant links.
Aggregated Links are treated by the system as a single logical port. Specifically, the Aggregated Link has similar port attributes
to a non-aggregated port, including auto-negotiation, speed, Duplex setting, etc.
The Web Smart Switch supports the following Aggregation links :
Static LAGs (Port Trunk) – Force aggregared selected ports to be a trunk group.
Figure 4-3-17: Link Aggregation Example
Port link aggregations can be used to increase the bandwidth of a network connection or to ensure fault recover y. Link
aggregation lets you group up to 8 consecutive ports into a single dedicated connection bet ween any two the Switch or other
Layer 2 switches. However, before making any physical connections between devices, use the Link aggregation Configuration
50
Page 51

User’s Manual of GSW-2400HPS
menu to specify the link aggregation on the devices at both ends. When using a port link a ggregation, note that:
The ports used in a link aggregation must all be of the same media type (RJ-45, 100 Mbps fiber).
The ports that can be assigned to the same link aggregation have certain other restrictions (see below).
Ports can only be assigned to one link aggregation.
The ports at both ends of a connection must be configured as link aggregation ports.
None of the ports in a link aggregation can be configured as a mirror source port or a mirror target port.
All of the ports in a link aggregation have to be treated as a whole when moved from/to, added or deleted from a VLAN .
The Spanning Tree Protocol will treat all the ports in a link aggregation as a whole.
Enable the link aggregation prior to connecting any cable between the switches to avoid creating a data loop.
Disconnect all link aggregation port cables or disable the link aggregation ports before removing a port link aggregation to
avoid creating a data loop.
It allows a maximum of 8 ports to be aggregated at the same time. The Web Smart Switch support Gigabit Ethernet ports (up to
8 groups). If the group is defined as a LACP static link aggregationing group, then any extra ports selected are placed in a
standby mode for redundancy if one of the other ports fails. If the group is defined as a local static link aggregationing group,
then the number of ports must be the same as the group member ports.
Use the Link Aggregation Menu to display or configure the Trunk function. This section has the following items:
Trunk Group
Configures Trunk group configuration settings.
4.3.4.1 Trunk Group
This page is used to configure the turnk group. The Trunk Group Configuration screens in Figure 4-3-18 & Figure 4-3-19 appear.
Fig
The page includes the following fields:
Object Description
Group ID
Ports
ure 4-3-18: Trunk Group Setting Page Screenshot
Select
s trunk number for this drop down list.
Selects port number for this drop down list to esatablish Link Aggregation.
51
Page 52

Button
: Click to apply changes.
Trunk Group Information
Figure 4-3-19: Trunk Group Information Page Screenshot
The page includes the following fields:
Object Description
Group ID
Displ
ays the current trunk entry.
User’s Manual of GSW-2400HPS
Buttons
Ports
Select
Displ
ays the current member of Trunk group.
Select
s the existing turnk group to delete.
: Click to delete existing Trunk groups.
: Click to select all existing Trunk groups.
52
Page 53

User’s Manual of GSW-2400HPS
4.3.5 Port Mirroring
Configure port Mirroring on this page. This function provides to monitor network traffic that forwards a copy of each incoming or
outgoing packet from one port of a network Switch to another port where the packet can be studied. It enables the manager to
keep close track of switch performance and alter it if necessary.
To debug network problems, selected traffic can be copied, or mirrored, to a mirror port where a frame analyzer can be
attached to analyze the frame flow.
The Web Smart Switch can unobtrusively mirror traffic from any port to a monitor port. You can then attach a protocol
analyzer or RMON probe to this port to perform traffic analysis and verify connection integrity.
Figure 4-3-20: Port Mirror Application
The traffic to be copied to the mirror port is selected as follows:
All frames received on a given port (also known as ingress or source mirroring).
All frames transmitted on a given port (also known as egress or destination mirroring).
53
Page 54

Port Mirror Setting
The Port Mirror Setting screens in Figure 4-3-21 & Figure 4-3-22 appear.
Figure 4-3-21: Port Mirroring Settings Page Screenshot
The page includes the following fields:
Object Description
User’s Manual of GSW-2400HPS
Mirror Set Index
Mirror Mode
Mirroring Port
Mirrored Port List
Button
: Click to apply changes.
Port Mirroring Status
Choose “1” or “2” as Mirror Set Index
ose “RX” or “TX” as Mirror Mode on this page.
Cho
F
rames received and frames transmitted at mirrored ports are mirrored to this port.
F
rames received and frames transmitted at these ports are mirrored to the mirroring port.
.
Figure 4-3-22: Mirroring Status Page Screenshot
54
Page 55

The page includes the following fields:
Object Description
Mirror Set Index
Mirror Mode
Mirroring Port
Mirrored Port List
Displ
ay the Mirror set index information.
Displ
ay the current mirror mode status.
Displ
ay the current mirroring port.
Displ
ay the current mirrored port list.
User’s Manual of GSW-2400HPS
Button
Select
Select the e
: Click to delete existing Port Mirroring groups.
xisting port mirroring group to delete.
55
Page 56

User’s Manual of GSW-2400HPS
4.3.6 Port Isolation
The diagram shows how the Web Smart Switch handles isolated ports, and the each PC is not able to access each other PCs of
each isolated port. The screens in Figure 4-3-23 & Figure 4-3-24 appear.
Figure 4-3-23: Port Isolation Setting Page Screenshot
The page includes the following fields:
Object Description
Port
Port Isolation List
Button
: Click to apply changes.
Port Isolation Status
Cho
oses specific ports into Port Isolation list on this page.
Cho
oses specific ports into Port Isolation list on this page.
Figure 4-3-24: Port Isolation Status Page Screenshot
56
Page 57

The page includes the following fields:
Object Description
Port
Displ
ays per port number information.
User’s Manual of GSW-2400HPS
Port Isolation List
Displays the current port isolation list status.
57
Page 58

User’s Manual of GSW-2400HPS
4.3.7 Bandwidth Control
Configure the switch port rate limit for the switch port on this page. The settings relate to the currently selected stack unit, as
reflected by the page header. The screens in Figure 4-3-25 & Figure 4-3-26 appear.
Figure 4-3-25: Bandwdith Control Setting Page Screenshot
The page includes the following fields:
Button
Object Description
Port
Type
State
Rate (Kbit/sec)
: Click to apply changes.
Selects port number for this drop down list for bandwidth control setting.
Allows ingress or egress type for port rate.
Ingress: traffic control for incoming.
Egress: traffic control for outgoing.
es “Disable” and “Enable” bandwidth control on this page. The default value is
Provid
"Disable".
rovides input the rate for the port policer. The default value is "Unlimited", the
P
available range is 0-1048544, must be a multiple of 16.
58
Page 59

Band
width Control Status
User’s Manual of GSW-2400HPS
Figure 4-3-26: Bandwdith Control Status Page Screenshot
The page includes the following fields:
Object Description
Port
Ingress Rate (Kbit/sec)
Egress Rate (Kbit/sec)
Displ
ays per port number information.
Displays the current Ingress Rate (Kbit/sec) status.
Displays the current Egress Rate (Kbit/sec) status.
59
Page 60

User’s Manual of GSW-2400HPS
4.3.8 Jumbo Frame
This page provides to select the maximum frame size allowed for the switch port. The jumbo frame setting screen in Figure
4-3-27 appears.
Figure 4-3-27: Jumbo Frame Setting Page Screenshot
The page includes the following fields:
Object Description
Button
Jumbo Frame (Bytes)
: Click to apply changes.
Select any available maximum frame size for the Web Smart Switch. Possible
frame size are:
1522 Bytes
1536 Bytes
1552 Bytes
9216 Bytes (Default Value)
60
Page 61

User’s Manual of GSW-2400HPS
4.3.9 Loop Protection
This page provides to select the loop protection modes for the switch port. The loop protection setting screen in Figure 4-3-28
appears.
Figure 4-3-28: Loop Protection Setting Page Screenshot
The page includes the following fields:
Object Description
Button
Mode
Select any available loop protection modes for the Web Smart Switch. Possible
options are:
Disable
Loop Prevention (Default mode)
Loop Detection
: Click to apply changes.
61
Page 62

User’s Manual of GSW-2400HPS
4.3.10 Green Networking
This page provides to select the Green Networking modes for the Web Smart Switch. The green networking setting screen in
Figure 4-3-29 appears.
Figure 4-3-29: Green Networking Setting Page Screenshot
The page includes the following fields:
Object Description
Button
Mode
Selects any available green networking modes for the Web Smart Switch.
Possible options are:
Enable (Default mode)
Disable
: Click to apply changes.
62
Page 63

User’s Manual of GSW-2400HPS
4.4 Security
Use the Security items to display and configure security functions of the Web Smart Switch. Under security the following topics
are provided to configure and view the security functions: This section has the following items:
■ MA C A ddress Configures MAC Address settings on this page.
■ MAC Constrain Configures the MAC Constrain setting on this page.
■ Storm Control
Configures the Storm Control setting on this page.
4.4.1 MAC Address
Switching of frames is based upon the DMAC address contained in the frame. The Web Smart Switch builds up a table that
maps MAC addresses to switch ports for knowing which ports the frames should go to (based upon the DMAC address in the
frame). This table contains both static and dynamic entries. The static entries are configured by the network administrator if the
administrator wants to do a fixed mapping between the DMAC address and switch ports.
The frames also contain a MAC address (SMAC address), which shows the MAC address of the equipment sending the frame.
The SMAC address is used by the switch to automatically update the MAC table with these dynamic MAC addresses. Dynamic
entries are removed from the MAC table if no frame with the corresponding SMAC address has been seen after a configurable
age time.
Use the MAC Address items to display and configure MAC Address functions of the Web Smart Switch. Under MAC Address
the following topics are provided to configure and view the MAC Address functions: This section has the following items:
■ MAC Forwarding Table Configures MAC Forwarding Table settings o n this page.
■ Static MAC Configures the Static MAC setting on this page.
63
Page 64

User’s Manual of GSW-2400HPS
4.4.1.1 MAC Forwarding Table
This page provides MAC Forwarding Table for the Web Smart Switch. The MAC Forwarding Table screen in Figure 4-4-1
appears.
Figure 4-4-1: MAC Forwarding Table Page Screenshot
The page includes the following fields:
Object Description
Displ
No.
ays the item number.
Buttons
MAC Address
VLAN ID
Type
Port
Select
Indicates th
Displ
Indicates
T
he ports that are members of the entry.
Select
Entries”.
e physical address associated with this interface.
ays the VLAN ID of the entry.
whether the entry is a static or dynamic entry.
s the specific item for “Clear Dynamic Enries” or “Add To Static MAC
: Clear all dynamic entries.
: Click to add dynamic MAC address to static MAC address.
64
Page 65

User’s Manual of GSW-2400HPS
4.4.1.2 Static MAC
The static entries in the MAC table are shown on this page. The Static MAC Setting screens in Figure 4-4-2 & 4-4-3 appear.
Figure 4-4-2: Statics MAC Setting Page Screenshot
The page includes the following fields:
Object Description
MAC Address
VLAN ID
Port
Button
: Click to add new static MAC address.
Static MAC Status
Ph
ysical address associated with this interface.
ID of configure
Select
s port for this drop down list.
Figure 4-4-3: Statics MAC Status Page Screenshot
d VLAN (1-4094).
The page includes the following fields:
Object Description
No.
MAC Address
VLAN ID
Port
Select
T
his is the number for entries
T
he MAC address for the entry.
T
he VLAN ID for the entry.
Displ
ays the current port.
Selects the specific item for “Delete”.
65
Page 66

User’s Manual of GSW-2400HPS
Button
Delete
Check to de
: Click to delete existing static MAC address.
lete the entry.
4.4.2 MAC Constrain
This page provides MAC Constrain Setting and status for the Web Smart Switch. The MAC constrain setting screens in
Figure 4-4-4 & Figure 4-4-5 appear.
Figure 4-4-4: MAC
The page includes the following fields:
Object Description
Port
Status
L2 Constrain Number
Action
Button
Constrain Setting Page Screenshot
Select
s port for this drop down list.
Provides “Disable” and “Enable” MAC Constrain on this page. The default
value is "Disable".
Provides input the L2 Constrain Number and the available value is 0 to 16447.
Selects any available action modes for the Web Smart Switch. Possible options
are:
Trap to CPU (Default mode)
Drop
Forward
: Click to apply changes.
66
Page 67

User’s Manual of GSW-2400HPS
MAC Con
The page includes the following fields:
strain Status
Figure 4-4-5: MAC
Object Description
Constrain Status Page Screenshot
Displ
Port
Status
L2 Constrain Number
Action
ays per port number information.
Displ
ays per port current MAC Constrain Status.
Displays per port current L2 Constrain Number.
Displ
ays per port current action Status.
67
Page 68

User’s Manual of GSW-2400HPS
4.4.3 Storm Control
Storm control for the Web Smart Switch is configured on this page. There are four types of storm rate controls:
Broadcast storm rate control
Multicast storm rate control
Unknown Unicast storm rate control
Unknow Multicast storm rate contro.l
The unit of the rate can be made as pps (packets per second). The configuration indicates the permitted packet rate for
unknown unicast, multicast, unknown multicast, or broadcast traffic across the Web Smart Switch. The Storm Control
Configuration screens in Figure 4-4-6 & Figure 4-4-7 appear.
Figure 4-4-6: Storm Control Setting Page Screenshot
The page includes the following fields:
Object Description
Storm Type
Port
State
Rate (pps)
ype listed here: The settings in a particular row apply to the frame t
Broadcast (Default mode)
Multicast
Uknown Unicast
Uknown Multicast
Select
s port for this drop down list.
les (On) or disable (Off) the storm control status for the given storm type.
Enab
The rate unit is packet per second
available range is 0 to 1000000.
(pps); the 1 kpps is actually 1002.1 pps and
Button
: Click to apply changes.
68
Page 69

S
torm Control Information
User’s Manual of GSW-2400HPS
Figure 4-4-7: Storm Control Information Page Screenshot
The page includes the following fields:
Object Description
Port
Broadcast (pps)
Multicast (pps)
Unknown Unicast (pps)
Unknown Multicast (pps)
Displ
ays per port number information.
Displ
ays the current broadcast rate.
Displ
ays the current multicast rate.
Displays the current unknown unicast rate.
Displays the current unknown multicast rate.
69
Page 70

User’s Manual of GSW-2400HPS
4.5 Monitoring
Use the Monitoring items to display and configure Monitoring functions of the Web Smart Switch. Under monitoring the following
topics are provided to configure and view the monitoring functions: This section has the following items:
■ Port Statistics Displays per port statistics table on this page.
■ Cable Diagnostics Provides Cable Diagnostics on this page.
4.5.1 Port Statistics
This page provides an overview of state, link status and traffic statistics for all switch ports. The Port Statistics screen in
Figure 4-5-1 appears.
The page includes the following fields:
Object Description
Port
State
Link Status
Tx Good Pkt
Tx Bad Pkt
Rx Good Pkt
Figure 4-5-1: Port Statistics Table Page Screenshot
Displ
ays per port number information.
Displ
ays per port current state status.
Displ
ays per port current link status.
Displ
ays the number of transmitted good packets from per port.
Displ
ays the number of frames transmitted in error and the number of incomplete
transmissions from per port.
Displays the number of received good packets from per port.
70
Page 71

User’s Manual of GSW-2400HPS
Displ
Rx Bad Pkt
Button
: Clears the counters for all ports.
ays the number of frames received in error and the number of incomplete
transmissions from per port.
4.5.2 Cable Diagnostics
This page provides the Cable Diagnostics for all switch ports. The cable diagnostics screen in Figure 4-5-2 appears.
Figure 4-5-2: Cable Diagnostics Table Page Screenshot
71
Page 72

The page includes the following fields:
Object Description
Check
Port
Test Result
User’s Manual of GSW-2400HPS
Select
s specific port for run the cable diagnostics with this function.
Displ
ays per port number information.
Displ
ays per port current cable test result.
Button
Cable Fault Distance
: Click to apply changes.
Displays per port current cable fault distance.
72
Page 73

User’s Manual of GSW-2400HPS
4.6 Tools
Use the Tools items to display and configure Tools functions of the Web Smart Switch. Under Tools the following topics are
provided to configure and view the Tools functions: This section has the following items:
■ Maintenance Provides configuration backup / upload and web firmware upgrade on this
page.
■ Factory Default Provides factory default function on this page.
■ Save Configuration Provides save configuration function on this page.
■ Reboot Provides Web Smart Switch reboot function on this page.
4.6.1 Maintenance
Use the Maintenance menu items to display and configure backup / restore configurations, firmware upgrade of the Web Smart
Switch. Under maintenance the following topics are provided to backup, and restore the configuration and firmware upgrade.
This section has the following items:
■ Configuration Backup
■ Configuration Upload
■ Web Firmware Upgrade
This function provides backup the Web Smart Switch configuration.
This function provides restore the Web Smart Switch configuration.
This function provides Web Smart Switch firmware upgrade.
4.6.1.1 Configuration Backup
This function allows backup the current configuration of the Web Smart Switch to the managed PC. The configuration backup
screen in Figure 4-6-1 appears.
Figure 4-6-1: Configuration Backup Page Screenshot
Button
: Click to backup current configuration.
Once press the “Backup” button, the Web Smart Switch will ask to save current configuration file in managed PC. The
configuration file save screen in Figure 4-6-2 appears.
Figure 4-6-2: Configuration File Save Page Screenshot
73
Page 74

User’s Manual of GSW-2400HPS
Please choose “Save as” to save current configuration file in managed PC. The configuration file save screen in Figure 4-6-3
appears.
Figure 4-6-3: Configuration File Save Page Screenshot
4.6.1.2 Configuration Upload
This function allows the configuration file to be uploaded to the Web Smart Switch from the managed PC. The configuration
upload screen in Figure 4-6-4 appears.
Figure 4-6-4: Configuration Upload Page Screenshot
Buttons
: Click to search the configuration file in managed PC.
: Click to start the configuration file upload process.
74
Page 75

User’s Manual of GSW-2400HPS
Please choose “Browse” button to find the saved configuration file in the managed PC. The browse screen in
Figure 4-6-5 appears.
Figure 4-6-5: Configuration File Browse Page Screenshot
Please press the “Upload” button to start the configuration file upload process. The configuration file upl oad successfull y
screen in Figure 4-6-6 appears.
Figure 4-6-6: Configuration File Upload Successfully Page Screenshot
Please reboot the Web Smart Switch to take affect.
75
Page 76

User’s Manual of GSW-2400HPS
4.6.1.3 Web Firmware Upgrade
This function provides firmware upgrade for the Web Smart Switch. The firmware upgrade screen in Figure 4-6-7 appears.
Figure 4-6-7: Web Firmware Upgrade Page Screenshot
Buttons
: Click to search the firmware file in managed PC.
: Click to start the firmware upgrades process.
Please choose “Browse” button to find the firmware file in the managed PC. The firmware file serach screen in
Figure 4-6-8 appears.
F
igure 4-6-8: Firmware Search Screenshot
76
Page 77

User’s Manual of GSW-2400HPS
Please press the “Upgrade” button to start the firmware upgrade process. The firmware upgrade process screen in Figure
4-6-9 appears.
Figure 4-6-9: Firmware Upgrade Page Screenshot
Press “OK” button to start the firmware upgrade process. The firmware upgrade successfully screen in Figure 4-6-10 appears.
F
igure 4-6-10: Firmware Upgrade Successfully Page Screenshot
After the Web Smart Switch reboot, the firmware can be used.
77
Page 78

User’s Manual of GSW-2400HPS
4.6.2 Factory Default
This function provides reset configuration of Web Smart Switch to factory default mode. The factory default screens in Figure
4-6-11 & Figure 4-6-12 appear.
Figure 4-6-11: Factory Default Page Screenshot
Button
: Click to reset the configuration to factory default mode.
Figure 4-6-12: Factory Default Page Screenshot
After the “Factory Default” button is pressed, the system will load the default IP address settings as follows:
。 Default IP Address: 192.168.0.100
。 Subnet Mask: 255.255.255.0
。 Default Gateway: 192.168.0.254
78
Page 79

User’s Manual of GSW-2400HPS
4.6.3 Save Configuration
This function provides save the current configuration of the Web Smart Switch. The save configuration screens in Figure 4 - 6-13
& Figure 4-6-14 appear.
Figure 4-6-13: Save Configuration Page Screenshot
Button
: Click to save configuration.
Figure 4-6-14: Save Configuration Successfully Page Screenshot
79
Page 80

User’s Manual of GSW-2400HPS
4.6.4 Reboot
This page provides reboot function. The reboot screen in Figure 4-6-15 appears.
Figure 4-6-15: Reboot Page Screenshot
Button
: Click to reboot the system.
Press “Reboot” button and the Web Smart Switch will reboot automatically. The reboot screen in Figure 4-6-16 appears.
Figure 4-6-16: Reboot Page Screenshot
80
Page 81

4.7 Logout
This page provides logout function. The logout screen in Figure 4-7-1 appears.
Figure 4-7-1: Logout Page Screenshot
Button
User’s Manual of GSW-2400HPS
: Click to logout the Web Smart Switch.
81
Page 82

User’s Manual of GSW-2400HPS
5. SWITCH OPERATION
5.1 Address Table
The Switch is implemented with an address table. This address table is composed of many entries. Each entry is used to store
the address information of some node in network, including MAC address, port no, etc. This information comes from the
learning process of Ethernet Switch.
5.2 Learning
When one packet comes in from any port, the Switch will record the source address, port no. And the other related information
in address table. This information will be used to decide either forwarding or filtering for future packets.
5.3 Forwarding & Filtering
When one packet comes from some port of the Ethernet Switching, it will also check the destination address besides the source
address learning. The Ethernet Switching will look up the address-table for the destination address. If not found, this packet will
be forwarded to all the other ports except the port, which this packet comes in. And these ports will transmit this packet to the
network it connected. If found, and the destination address is located at different port from this packet comes in, the Ethernet
Switching will forward this packet to the port where this destination address is located according to the information from address
table. But, if the destination address is located at the same port with this packet coming in, then this packet will be filtered,
thereby increasing the network throughput and availability
5.4 Store-and-Forward
Store-and-Forward is one type of packet-forwarding techniques. A Store-and-Forward Ethernet Switching stores the incoming
frame in an internal buffer, do the complete error checking before transmission. Therefore, no error packets occurrs. It is the
best choice when a network needs efficiency and stability.
The Ethernet Switch scans the destination address from the packet-header, searches the routing table provided for the incoming
port and forwards the packet, only if required. The fast forwarding makes the switch attractive for connecting servers directly to
the network, thereby increasing throughput and availability. However, the switch is most commonly used to segment existence
hubs, which nearly always improves overall performance. An Ethernet Switching can be easily configured in any Ethernet
network environment to significantly boost bandwidth using conventional cabling and adapters.
Due to the learning function of the Ethernet switching, the source address and corresponding port number of each incoming and
outgoing packet are stored in a routing table. This information is subsequently used to filter packets whose destination address
is on the same segment as the source address. This confines network traffic to its respective domain and reduce the overall
load on the network.
The Switch performs "Store and forward"; therefore, no error packets occur. More reliably, it reduces the re-transmission rate.
No packet loss will occur.
82
Page 83

User’s Manual of GSW-2400HPS
5.5 Auto-Negotiation
The STP ports on the Switch have built-in "Auto-negotiation". This technology automatically sets the best possible bandwidth
when a connection is established with another network device (usually at Power On or Reset). This is done by detecting the
modes and speeds in the second of both devices which are connected and capable of. Both 10Base-T and 100Base-TX devices
can be connected with the port in either half- or full-duplex mode. 1000Base-T can be only connected in full-duplex mode.
83
Page 84

User’s Manual of GSW-2400HPS
6. POWER OVER ETHERNET OVERVIEW
What is PoE?
The PoE is an abbreviation of Power over Ethernet; the PoE technology means a system to pass electrical power safely, along
with data on Ethernet UTP cable. The IEEE standard for PoE technology requires Category 5 cable or higher for high power
PoE levels, but can operate with category 3 cable for low power levels. Power is supplied in common mode over two or more of
the differential pairs of wires found in the Ethernet cables and comes from a power supply within a PoE-enabled networking
device such as an Ethernet switch or can be injected into a cable run with a mid-span power supply.
The original IEEE 802.3af-2003 PoE standard provides up to 15.4 W of DC power (minimum 44 V DC and 350mA) to each
device. Only 12.95 W is assured to be available at the powered device as some power is dissipated in the cable.
The updated IEEE 802.3at-2009 PoE standard also known as PoE+ or PoE plus, provides up to 25.5 W of power. The 2009
standard prohibits a powered device from using all four pairs for power
The 802.3af / 802.3at define two types of source equipment: Mid-Span and End-Span.
Mid-Span
Mid-Span device is placed between legacy switch and the powered device. Mid-Span is tap the unused wire pairs 4/5 and 7/8 to
carry power, the other four is for data transmit.
End-Span
End-Span device is direct connecting with power device. End-Span could also tap the wire 1/2 and 3/6.
PoE System Architecture
The specification of PoE typically requires two devices: the Powered Source Equipment (PSE) and the Powered Device (PD).
The PSE is either an End-Span or a Mid-Span, while the PD is a PoE-enabled terminal, such as IP Phones, Wireless LAN, etc.
Power can be delivered over data pairs or spare pairs of standard CAT-5 cabling.
Powered Source Equipment (PSE)
Power sourcing equipment (PSE) is a device such as a switch
cable. The maximum allowed continuous output power per cable in IEEE 802.3af is 15.40 W. A later
specification, IEEE 802.3at, offers 25.50 W. When the device is a switch, it is commonly called an End-span
(although IEEE 802.3af refers to it as endpoint). Otherwise, if it's an intermediary device bet ween a non PoE
capable switch and a PoE device, it's called a Mid-span. An external PoE injector is a Mid-span device
that provides (sources) power on the Ethernet
.
Powered device
A powered device (PD) is a device powered by a PSE and thus consumes energy. Examples include wireless access points
Phones, and IP cameras. Many powered devices have an auxiliary power connector for an optional, external, power supply.
Depending on the PD design, some, none, or all power can be supplied from the auxiliary port, with the auxiliary port sometimes
acting as backup power in case of PoE supplied power failure.
How Power is Transferred Through the Cable
A standard CAT5 Ethernet cable has four twisted pairs, but only two of these are used for 10BASE-T and 100BASE-TX. The
specification allows two options for using these cables for power, shown in Figure 1 and Figure 2:
The spare pairs are used. Figure 1 shows the pair on pins 4 and 5 connected together and forming the positive supply, and the
84
, IP
Page 85

User’s Manual of GSW-2400HPS
pair on pins 7 and 8 connected and forming the negative supply. (In fact, a late change to the spec allows either polarity to be
used).
Figure 6-1: Power Supplied over the Spare Pins
The data pairs are used. Since Ethernet pairs are transformer coupled at each end, it is possible to apply DC power to the
center tap of the isolation transformer without upsetting the data transfer. In this mode of operation the pair on pins 3 and 6 and
the pair on pins 1 and 2 can be of either polarity.
Figure 6-2: Power Supplied over the Data Pins
85
Page 86

Power over Ethernet Powered Device
Voice over IP phones
Enterprise can install POE VoIP Phone, ATA and other
Ethernet/non-Ethernet end-devices to the central where UPS is installed
3~5 Watts
6~12 Watts
10~12 Watts
for un-interrupt power system and power control system.
Wireless LAN Access Points
Museum, Sightseeing, Airport, Hotel, Campus, Factory, Warehouse can
install the Access Point any where with no hesitation.
IP Surveillance
Enterprise, Museum, Campus, Hospital, Bank, can install IP Camera
without limits of install location – no need electrician to install AC sockets.
User’s Manual of GSW-2400HPS
3~12 Watts
3~25 Watts
PoE Splitter
PoE Splitter split the PoE 52V DC over the Ethernet cable into 5/12V DC
power output. It frees the device deployment from restrictions due to
power outlet locations, which eliminate the costs for additional AC wiring
and reduces the installation time.
High Power PoE Splitter
High PoE Splitter split the PoE 52V DC over the Ethernet cable into
24/12V DC power output. It frees the device deployment from restrictions
due to power outlet locations, which eliminate the costs for additional AC
wiring and reduces the installation time.
High Power Speed Dome
This state-of-the-art design is considerable to fit in various network
environments like traffic centers, shopping malls, railway stations,
warehouses, airports, and production facilities for the most
demanding outdoor surveillance applications- no need electricianto
install AC sockets.
30 Watts
Since the GSW-2400HPS per PoE port supports 52V DC PoE power output, please
check and assure the Powered Device (PD) acceptable DC power range is from 52V
DC. Otherwise, it will damage the Powered Device (PD).
86
Page 87

User’s Manual of GSW-2400HPS
7. TROUBLESHOOTING
This chapter contains information to help you solve issue. If the Web Smart Switch is not functioning properly, make sure the
Web Smart Switch is set up according to instructions in this manual.
■ The Link LED is not lit
Solution:
Check the cable connection and remove duplex mode of the Web Smart Switch.
■ Some stations cannot talk to other stations located on the other port
Solution:
Please check the VLAN settings, trunk settings, or port enabled / disabled status.
■ Performance is bad
Solution:
Check the full duplex status of the Web Smart Switch. If the Web Smart Switch is set to full duplex and the partner is set to
half duplex, then the performance will be poor. Please also check the in/out rate of the port.
■ Why the Web Smart Switch does not connect to the network
Solution:
1. Check the LNK/ACT LED on the Web Smart Switch
2. Try another port on the Web Smart Switch
3. Make sure the cable is installed properly
4. Make sure the cable is the right type
5. Turn off the power. After a while, turn on power again
■ 100Base-TX port link LED is lit, but the traffic is irregular
Solution:
Check that the attached device is not set to dedicate full duplex. Some devices use a physical or software switch to change
duplex modes. Auto-negotiation may not recognize this type of full-duplex setting.
87
Page 88

User’s Manual of GSW-2400HPS
■ Switch does not power up
Solution:
1. AC power cord not inserted or faulty
2. Check that the AC power cord is inserted correctly
3. Replace the power cord if the cord is inserted correctly. Check the AC power source is working by connecting a
different device in place of the switch.
4. If that device works, refer to the next step.
5. If that device does not work, check the AC power
Resetting IP Address, and Username and Password
To reset the IP address to the default IP Address “192.168.0.100”, and the user name and password to factory default mode
(default user name and password is admin). Press the hardware reset button on the front panel for about 5 seconds. After the
device is rebooted, you can login the management Web interface within the same subnet of 192.168.0.xx and default user
name and password.
Hardware Reset
88
Page 89

User’s Manual of GSW-2400HPS
APPENDEX A
A.1 Switch's RJ-45 Pin Assignments 1000Mbps, 1000Base T
Contact MDI MDI-X
1 BI_DA+ BI_DB+
2 BI_DA- BI_DB3 BI_DB+ BI_DA+
4 BI_DC+ BI_DD+
5 BI_DC- BI_DD6 BI_DB- BI_DA7 BI_DD+ BI_DC+
8 BI_DD- BI_DC-
Implicit implementation of the crossover function within a twisted-pair cable, or at a wiring panel, while not expressly forbidden,
is beyond the scope of this standard.
A.2 10/100Mbps, 10/100Base-TX
When connecting your 10/100Mbps Ethernet Switch to another switch, a bridge or a hub, a straight or crossover cable is
necessary. Each port of the Switch supports auto-MDI/MDI-X detection. That means you can directly connect the Switch to any
Ethernet devices without making a crossover cable. The following table and diagram show the standard RJ-45 receptacle/
connector and their pin assignments:
RJ-45 Connector pin assignment
Contact MDI
Media Dependant Interface
1 Tx + (transmit) Rx + (receive)
MDI-X
Media Dependant
Interface-Cross
2 Tx - (transmit) Rx - (receive)
3 Rx + (receive) Tx + (transmit)
4, 5 Not used
6 Rx - (receive) Tx - (transmit)
7, 8 Not used
89
Page 90

User’s Manual of GSW-2400HPS
The standard cable, RJ-45 pin assignment
The standard RJ-45 receptacle/connector
There are 8 wires on a standard UTP/STP cable and each wire is color-coded. The following shows the pin allocation and color
of straight cable and crossover cable connection:
Straight Cable SIDE 1 SIDE2
ite / Orange
12345678
12345678
Crossover Cable SIDE 1 SIDE2
12345678
12345678
SIDE 1
SIDE 2 8 = Brown
SIDE 1
1 = Wh
2 = Orange
3 = White / Green
4 = Blue
5 = White / Blue
6 = Green
7 = White / Brown
8 = Brown
ite / Orange
1 = Wh
2 = Orange
3 = White / Green
4 = Blue
5 = White / Blue
6 = Green
7 = White / Brown
1 = White / Orange
2 = Orange
3 = White / Green
4 = Blue
5 = White / Blue
Green
6 =
7 = White / Brown
1 = White / Green
2 = Green
3 = White / Orange
4 = Blue
5 = White / Blue
Orange
6 =
7 = White / Brown
SIDE 2 8 = Brown
Figure A-1: Straight-Through and Crossover Cable
Please make sure your connected cables are w ith the same pin assignment and color as the above picture before deploying the
cables into your network.
90
8 = Brown
2081-AK8070-000
Page 91

EC Declaration of Conformity
For the following equipment:
*Type of Product: 24-Port 10/100/1000Mbps 802.3at PoE Web Smart Ethernet Switch
*Model Number: GSW-2400HPS
* Produced by:
Manufacturer‘s
Manufacturer‘s Address: 10F., No.96, Minquan Rd., Xindian Dist.,
New Taipei City 231, Taiwan (R.O.C.)
is herewith confirmed to comply with the requirements set out in the Council Directive on the
Approximation of the Laws of the Member States relating to Electromagnetic Compatibility
Directive on (2004/108/EC).
For the evaluation regarding the EMC, the following standards were applied:
Responsible for marking this declarati o n i f the:
Name : Planet Technology Corp.
EN55022 (2006 + A1:2007 + A2:2010)
EN 61000-3-2 (2006 + A1:2009 + A2:2009)
EN 61000-3-3 (2008)
EN55024 (2010)
IEC 61000-4-2 (2008)
IEC 61000-4-3 (2006 + A1: 2007 + A2:2010)
IEC 61000-4-4 (2004 + A1:2010)
IEC 61000-4-5 (2005)
IEC 61000-4-6 (2008)
IEC 61000-4-8 (2009)
IEC 61000-4-11 (2004)
EN60950-1 (2006 + A11:2009 + A1:2010 +
A12:2011)
Manufacturer Authorized representative established within the EU
Authorized representative established within the EU (if applicable):
Company Name: Planet Technology Corp.
Company Address: 10F., No.96, Minquan Rd., Xindian Dist., New Taipei City 231, Taiwan
Person responsible for making this declaration
Name, Surname Kent Kang
Position / Title : Product Manager
(R.O.C.)
Taiwan 3
th
May, 2013
Place Date Legal Signature
PLANET TECHNOLOGY CORPORATION
e-mail: sales@planet.com.tw http://www.planet.com.tw
10F., No.96, Minquan Rd., Xindian Dist., New Taipei City, Taiwan, R.O.C. Tel:886-2-2219-9518 Fax:886- 2-2219-9528
 Loading...