

Page 1

Page 2

Trademarks
Copyright PLANET Technology Corp. 2002.
Contents subject to revision without prior notice.
PLANET is a registered trademark of PLANET Technology
Corp. All other trademarks belong to their respective owners.
Disclaimer
PLANET Technology does not warrant that the hardware will
work properly in all environments and applications, and makes
no warranty and representation, either implied or expressed,
with respect to the quality, performance, merchantability, or
fitness for a particular purpose.
PLANET has made every effort to ensure that this User’s
Manual is accurate; PLANET disclaims liability for any
inaccuracies or omissions that may have occurred.
Information in this User’s Manual is subject to change without
notice and does not represent a commitment on the part of
PLANET. PLANET assumes no responsibility for any
inaccuracies that may be contained in this User’s Manual.
PLANET makes no commitment to update or keep current the
information in this User’s Manual, and reserves the right to
make improvements to this User ’s Manual and/or to the
products described in this User’s Manual, at any time without
notice.
If you find information in this manual that is incorrect,
misleading, or incomplete, we would appreciate your comments
and suggestions.
FCC Warning
This equipment has been tested and found to comply with the
limits for a Class A digital device, pursuant to Part 15 of the FCC
Rules. These limits are designed to provide reasonable
protection against harmful interference when the equipment is
operated in a commercial environment. This equipment
generates, uses, and can radiate radio frequency energy and, if
not installed and used in accordance with the Instruction
manual, may cause harmful interference to radio
communications. Operation of this equipment in a residential
area is likely to cause harmful interference in which case the
user will be required to correct the interference at his own
expense.
2
PLANET GSW-1200S
Page 3

CE Mark Warning
This is a Class A product. In a domestic environment, this
product may cause radio interference, in which case the user
may be required to take adequate measures.
Revision
PLANET NOVASwitch User's Manual
FOR MODELS: GSW-1200S
Part No.: EM-GSW12V1
Before Starting
In this User's Manual, "Switch" is used for GSW-1200S, where
“switch” represent the third party switch.
GSW-1200S User's Manual
3
Page 4

TABLE OF CONTENTS
1. INTRODUCTION.......................................................1
1.1 PACKAGE CONTENTS........................................................1
1.2 HOW TO USE THIS MANUAL ..............................................1
1.3 PRODUCT SPECIFICATIONS................................................2
2. INSTALLATION.........................................................5
2.1 PRODUCT DESCRIPTION....................................................5
2.1.1 Product Overview..............................................................5
2.1.2 Product Features..............................................................6
2.1.3 GSW-1200S Front Panel..................................................7
2.1.4 LED Indicators..................................................................7
2.1.5 GSW-1200S Rear Panel..................................................8
2.2 I
NSTALLING A
2.2.1 Desktop or Shelf Mounting...............................................9
2.2.2 Rack Mounting..................................................................9
GSW-1200S...............................................8
3. CONFIGURATION...................................................11
3.1 PREPARING FOR CONFIGURATION....................................11
3.1.1 Connecting a PC or Terminal to the RS-232 Port...........11
3.1.2 Terminal Emulation Setup Program................................11
3.1.3 Power-up Self-test Status...............................................12
3.1.4 Log-in..............................................................................13
3.2 GETTING STARTED..........................................................14
3.2.1 General Guidelines.........................................................14
3.2.2 Main Menu Screen..........................................................15
3.2.3 System Configuration.....................................................17
3.2.4 Port Configuration...........................................................19
3.2.5 Port Trunking Configuration............................................20
3.2.6 Mirror Port Configuration................................................22
3.2.7 VLAN Configuration........................................................23
3.2.8 Priority Configuration......................................................25
3.2.9 Restart............................................................................27
3.2.10 Exit................................................................................28
4. SWITCH OPERATION............................................29
4.1 ADDRESS TABLE.............................................................29
4.2 LEARNING.......................................................................29
4.3 FORWARDING & FILTERING .............................................29
4
PLANET GSW-1200S
Page 5

4.4 STORE-AND-FORWARD ...................................................29
4.5 A
UTO-NEGOTIATION
........................................................30
5. TROUBLESHOOTING.............................................31
APPENDIX A SWITCH‘S RJ-45 PIN ASSIGNMENTS.33
A.1 1000MBPS,1000BASE T................................................33
A.2 10/100MBPS, 10/100BASE-TX......................................33
GSW-1200S User's Manual
5
Page 6

This page intentionally left blank!
6
PLANET GSW-1200S
Page 7

1. INTRODUCTION
1.1 Package Contents
Check the contents of your package for following parts:
l GSW-1200S.
l User's manual.
l Power cord.
l 19” rack mounting brackets.
l RS-232 cable.
If any of these pieces are missing or damaged, please contact
your dealer immediately. If possible, retain the carton including
the original packing material, and use them against to repack the
product in case there is a need to return it to us for repairing.
1.2 How to Use This Manual
This GSW-1200S User Manual is structured as follows:
§
Chapter 2, Installation
It explains the functions of GSW-1200S and how to physically
install the GSW-1200S.
§
Chapter 3, Configuration
It contains information about the smart function of GSW-1200S.
§
Chapter 4 Switch operation
It contains troubleshooting and specifications of GSW-1200S.
§
Appendices
It contains cable information of GSW-1200S.
GSW-1200S User's Manual
1
Page 8

1.3 Product Specifications
Model GSW-1200S
Standards
Protocol
Ports
Connector
Speed
Cabling Type
Topology
LEDs
Maximum Segment
Length
VLAN
Trunking
Port Mirroring
QoS
Jumbo Packet
Buffer Memory
MAC Address
Dimensions
(WxDxH)
Weight
System
Configuration
AC Power
IEEE 802.3, IEEE 802.3u, IEEE 802.3x,
IEEE 802.3ab.
CSMA/CD
12 10/100/1000 Mbps ports
RJ-45 connector
10/100Mbps at half duplex.
20/200/2000Mbps at full duplex
UTP/STP Category 5 or better
Star
PWR, Over Heat, Fan Failure for unit
10 Mbps, 100 Mbps, 1000 Mbps, ACT, FDX per port
100m (328 ft) over Category 5 twisted-pair cable or
better
12 Groups with overlapping
2, 4 and 6 port trunking with fail-over
1 mirrored port support
IEEE802.1p priority queuing and 4 priority queues per
port
Support 9K Bytes packet size
1M-byte packet memory
32K
430mm x240 mm x 44mm
3 kg
1 Console port, RS-232 for out of band management
100~240VAC, 50W, 50~60Hz, 1A
2
PLANET GSW-1200S
Page 9

Environmental
Requirements
EMC Certification
Operating temperature: 0℃ to 50℃ ( 32℉ to 122℉ )
Storage temperature: -40℃ to 70℃ ( -40℉ to 158℉ )
Operating humidity: 5% to 95% relative humidity,
non-condensing
Storage humidity: 5% to 95% relative humidity,
non-condensing
FCC, CE
GSW-1200S User's Manual
3
Page 10

This page intentionally left blank!
4
PLANET GSW-1200S
Page 11

2. INSTALLATION
This Chapter describes the functionalities of GSW-1200’s components
and guides how to install it on the desktop or rack. Basic knowledge of
networking is assumed. Please read this chapter completely before
continuing.
2.1 Product Description
The PLANET GSW-1200S provides 12 Gigabit Ethernet Switch ports.
The PLANET GSW-1200S delivers twelve ports worth of
high-performance, feature-rich integrated Gigabit Ethernet switching
over traditional copper cabling. It provides 12 Ethernet ports and is
capable of smart functions, such as VLAN, Port Trunking and Prot
Mirroring. GSW-1200S can be configured by out-of-band channel via the
console port (RS232) directly. Each port supports 10Mbps, 100Mbps,
and 1000Mbps as well as half/full mode and can be easily connected to
corporate backbones and servers.
2.1.1 Product Overview
PLANET GSW-1200S is a gigabit Ethernet switch with 12 RJ-45
10/100/1000 Mbps ports for high-speed network connectivity.
GSW-1200S can also automatically identify and determine the correct
transmission speed and half/full duplex mode of the attached devices
with its 12 ports. Plus, the Gigabit port, together with jumbo frame
feature supported, can handle extremely large amounts of data
transmission in a secure topology linking to a backbone or high-power
servers.
This product also supports store-and-forward forwarding scheme to
ensure low latency and high data integrity, eliminates unnecessary
traffic and relieves congestion on critical network paths. With an
intelligent address recognition algorithm, GSW-1200S could recognize
up to 32K different MAC address and enables filtering and forwarding at
full wire speed.
GSW-1200S User's Manual
5
Page 12

2.1.2 Product Features
§
Fully compliant with IEEE 802.3, IEEE 802.3u, IEEE 802.3x,
IEEE 802.3ab.
§
Twelve 10/100 Mbps auto-detecting half/full duplex and 1000
Mbps full duplex switch ports.
§
Features Store-and-Forward mode with wire-speed filtering and
forwarding rates.
§
Hardware based 10/100Mbps, half/full duplex and 1000Mbps full
duplex mode, flow control and auto-negotiation.
§
IEEE802.3x flow control for full duplex operation.
§
Backpressure for half duplex operation.
§
Integrated address look-up engine, support 32K absolute MAC
addresses.
§
Automatic address learning and address aging.
§
Embedded 1MB data packet memory.
§
Jumbo packet support with max. 9KB packet size.
§
Head of Line (HOL) blocking prevention.
§
Broadcast storm protection.
§
Auto MDI/MDI-X detection.
§
Up to 12 Port-based VLAN support.
§
Up to 6 groups of Trunk.
§
Port mirroring support.
§
QoS support with 4-level priority for switching.
6
PLANET GSW-1200S
Page 13

Lit: indicate the link through that port is
2.1.3 GSW-1200S Front Panel
Figure 2-1 shows a front panel of GSW-1200S.
Figure 2-1 PLANET GSW-1200S Front Panel
2.1.4 LED Indicators
LED Color
PWR Green Lit: Power on
Over Heat*1 Red Lit: indicate over limiting the operation
Fan Failure
10Mbps
100Mbps
1000Mbps
FDX
*2
Red Lit: indicate the two fans at rear panel not
Orange
Green
Green
Orange
temperature
active
Lit: indicate that the port is operating at
10Mbps.
Lit: indicate that the port is operating at
100Mbps.
Lit: indicate that the port is operating at
1000Mbps.
Lit: indicate that the connection made
Function
through the corresponding port is
running in Full Duplex mode.
ACT
Green
successfully established
Blink: indicate that the switch is actively
sending or receiving data over that port
GSW-1200S User's Manual
7
Page 14

*1
When the internal temperature is equal to or higher than 60
degree C, the Over Heat LED will light on. Once the
temperature is equal to or higher than 70 degree C, the buzzer
will make a continuous warning sound. Users can press the
buzzer On/Off button to turn off the buzzer.
*2
There are three fans in the unit. Normally, all of the fans are
running. If one of the two running fans at rear panel is failed,
the Fan Failure LED will light on.
2.1.5 GSW-1200S Rear Panel
The rear panel of the GSW-1200S has a Power Connector and two Fans
at the rear of the switch. Besides, a Buzzer ON/OFF button is placed
between. The power port is where you will connect the AC power cord.
(See Figure 2-2 of Rear Panel of GSW-1200S)
100-240VAC
50/60Hz
Figure 2-2
Buzzer
ON/OFF
Rear Panel of GSW-1200S
Power Notice:
1. The device is a power-required device, it means, it will not work till it is
powered. If your networks should active all the time, please consider
using UPS (Uninterrupted Power Supply) for your device. It will
prevent you from network data loss or network downtime.
2. In some area, installing a surge suppression device may also help to
protect your switch from being damaged by unregulated surge or
current to the Switch or the power adapter.
2.2 Installing a GSW-1200S
This section describes how to install your GSW-1200S Gigabit Ethernet
Switch and make connections to the switch. Please read the following
topics and perform the procedures in the order being presented.
PLANET GSW-1200S Gigabit Ethernet Switch do not need software
configuration. To install your GSW-1200S on a desktop or shelf, simply
complete the following steps.
8
PLANET GSW-1200S
Page 15

2.2.1 Desktop or Shelf Mounting
To install a GSW-1200S on a desktop or shelf, simply complete the
following steps:
Step1: Attach the rubber feet to the recessed areas on the bottom of the
switch.
Step2: Place the GSW-1200S on a desktop or shelf near an AC power
Step3: Keep enough ventilation space between the switch and the
Note:
restrictions discussed in Chapter 1.3, Specification.
Step4: Connect your GSW-1200S to network devices
Note:
cabling with RJ-45 tips. For more information, please see the Cabling
Specification in Chapter 1.3, Specification and Appendix.
Step5
When the GSW-1200S receives power, the Power LED should remain
solid Green.
source.
surrounding objects
When choosing a location, please keep in mind the environmental
A.
Connect one end of a standard network cable to the
10/100/100 RJ-45 ports on the front of the GSW-1200S.
B.
Connect the other end of the cable to the network devices
such as printer servers, workstations or routers…etc.
Connection to the Switch requires UTP Category 5 network
: Supply power to the Switch.
A.
Connect one end of the power cable to the GSW-1200S
B. Connect the power plug of the power cable to a standard wall
outlet.
2.2.2 Rack Mounting
To install the switch in a
described below.
Step1: Place your GSW-1200S on a hard flat surface, with the front
panel positioned towards your front side.
Step2: Attach a rack-mount bracket to each side of the switch with
supplied screws attached to the package. Figure 2-3 shows how
to attach brackets to one side of the switch.
19-inch
standard rack, follow the instructions
GSW-1200S User's Manual
9
Page 16

Figure 2-3 Attaching the brackets to the GSW-1200S
Caution:
You must use the screws supplied with the mounting brackets.
Damage caused to the parts by using incorrect screws would
invalidate your warranty.
Step3: Secure the brackets tightly.
Step4: Follow the same steps to attach the second bracket to the
opposite side.
Step5: After the brackets are attached to the switch, use suitable screws
to securely attach the brackets to the rack, as shown in Figure
2-4
Figure 2-4
Mounting the Switch in a Rack
Step6: Proceed with the steps 4 and steps 5 of session 2.2.1 Desktop
or Shelf Mounting
to connect the network cabling and supply
power to your switch.
10
PLANET GSW-1200S
Page 17

3. CONFIGURATION
Unlike the unmanaged switch (Dumb switch), GSW-1200S performs
series smart functions that make the switch operate more effectively.
This Chapter will describe the common usage of the Switch Smart
Configuration.
3.1 Preparing for configuration
3.1.1 Connecting a PC or Terminal to the RS-232 Port
When you are ready to configure the smart functions of the switch, make
sure you had connected the supplied RS-232 serial cable to the RS-232
port at the front panel of your GSW-1200S switch and your PC.
3.1.2 Terminal Emulation Setup Program
In Windows 95/98/2000/XP,launch “HyperTerminal”, create a new
connection, and adjust settings as below:
§
Emulation: VT-100 compatible
§
Baud per second: 38400
§
Data bits: 8
§
Parity: None
§
Stop bits: 1
§
Flow Control: None
To gain a demo, please see the Figure 3-1.
GSW-1200S User's Manual
11
Page 18

Figure 3-1
Port Settings for smart functions
3.1.3 Power-up Self-test Status
As the switch powers on, it goes through a self-test process to ensure
proper operations of the GSW-1200S hardware. A series of messages
will be displayed to show the test progress and result. When the test
completes successfully, the system will display a log-in message.
of the components fails during the test, you may need to contact
your local dealer and have the switch replaced.
successful Self-test menu of the Power-up System Self-diagnostic
Process.
12
Figure 3-2 shows a
PLANET GSW-1200S
If any
Page 19

Figure 3-2
Self-test menu of the Power-up System Self-diagnostic Process
3.1.4 Log-in
Log-in is required to access the command console after the self-test
completes successfully. The factory default user name and password is
admin
"
". You may change password in the System Menu. To access to
the Main Menu, please always enter the correct password. (See Figure
3-3)
Figure 3-3
GSW-1200S User's Manual
Log-in Message
13
Page 20

They only display information or messages and cannot
selection. The "Space" key starts the selection process
X key
The user can change them. The "Enter" key starts the
press the
The Status line is at the second line to the bottom. It is
description of the current object. The right area shows
READ/SELECT
READ/WRITE
keys
able to provide Arrow keys correctly, such as some
3.2 Getting Started
3.2.1 General Guidelines
GSW-1200S allows users to configure the machine via
menu-driven screens. To work within the menu, please follow the
guidelines shown in Table 3-1.
tems
I
Description
OBJECTS
INFO OBJECTS
COMMANDS
OBJECTS
LIST OBJECTS
VALUE OBJECTS
CURRENT
OBJECTS
Status Line
Objects are strings of characters on the screen. Each
object represents a distinct function. There are a few
kinds of objects.
be changed. The cursor never stops at them either.
They provide function trigger or menu navigation.
When highlighted, an "Enter" key triggers the object
and the function or navigation is performed.
They provide a list of predefined values for the
and "Enter" key confirms the selection. The Ctrl-
cancels the process and reverts the original value
edit process. The user can then input the desired
value. If the change value is not a desire one,
"Ctrl-X" to cancel the edit process.
There are many distinct objects on the command
screen. The one that is currently being accessed is
highlighted.
highlighted. The left area of the line shows the
ARROWS KEY
TAB KEY
14
the type of the object. There are 3 possible types:
The object is a List object
The object is a Value object
Nothing The object is either a selector to the
next menu level or a direct command.
Provides navigation functions. “ I”, “J”, “K” and “M”
and also be used to navigate.
The Tab key is used to access the next object. Some
terminal or terminal emulation program might not be
PLANET GSW-1200S
Page 21

When a list selection or text editing is being performed,
nu selection is being performed, the ESC key
When a List Object is performed, the Space key starts
versions of Microsoft HyperTerminal. The Tab key is
the only way to navigate the screen with those
terminals.
ENTER KEY
Ctrl-X key
ESC KEY
SPACE KEY
<Return>
The Enter key is used extensively to start a selected
function, to start or end the editing process, or to
access the next level of menu functions.
the Ctrl-X key can be used to cancel the change and
revert to original value.
When me
exit the current menu level and enters the upper level.
the selection and scrolls through the available choices.
A common menu item, exits the current menu level
Table 3-1
General Guideline within the Menu
3.2.2 Main Menu Screen
The main menu enables you to view and manage the GSW-1200S
settings. Use the "Arrow" keys to move the highlight over a selection.
Press the "Return" key to select and "Esc" key to return to the previous
selection. Please see Figure 3-4.
Figure 3-4 Main Menu Screen
GSW-1200S User's Manual
15
Page 22

System Configuration Menu
Displays the System Configuration Menu, which enables you to
change the password, aging time, Jumbo frame, logout time and
auto refresh time.
Port Configuration Menu
Displays the Port Configuration Menu, which allows you to
configure admin status, auto negotiation, speed/duplex and flow
control.
Port Trunking Configuration Menu
Displays the screen for trunking a group of ports together to
speed up data transmission.
Port Mirroring Configuration Menu
Displays the screen for selecting a port to monitor.
VLAN Configuration Menu
Displays options for configuring VLAN.
Priority Configuration Menu
Displays the options available for assigning varying degree of
priority to each port.
Restart Menu
Displays options for restarting the switch.
Exit
Highlighting this selection and pressing the “Enter” key will take
you out of the configuration.
16
PLANET GSW-1200S
Page 23

3.2.3 System Configuration
The following screen (Figure 3-5) is displayed when the System
Configuration
configuration menu to view and change the values. To change the
password, aging time, logout time or auto refresh time, use the "Arrow"
keys to move the highlight to the selection and then press the "Enter"
key. Entering the value for the highlighted selection. And then press
"Enter" again for confirmation.
Caution:
Record your new password in a safe place. There is NO method
of recovery if you forget or lost your password but return to us
for firmware code refresh.
Table 3-2 describes the objects that shown in the system configuration
menu screen.
heading is selected from the Main menu. Use the System
Figure 3-5
System Configuration Menu Screen
GSW-1200S User's Manual
17
Page 24

How long the Switch will keep an MAC
Object Default Description
Password
Aging Time
Jumbo
Frame
Logout Time
Auto Refresh
Time
admin The administrative password you
240
Disable
15 How long the Switch will automatically log
30 How often the Switch will refresh the
choose to assign for the switch.
address, which has had no activity in
its buffer memory. The higher the
value, the longer the Switch will
remember the MAC address before
dumping it. Maximum 1920 seconds.
designed to dramatically increase
end-to-end through-put and decrease
server processing by extending the
maximum Ethernet frame size to
2K,4K,8K,9K bytes
an inactive user out. 0 for no timeout.
Range: ( 0~99 minutes)
values on any screens in the menu.
Range: ( 0~99 seconds)
Table 3-2
18
Descriptions of the System Configuration Menu Objects
PLANET GSW-1200S
Page 25

3.2.4 Port Configuration
The following screen is displayed when the Port Configuration is
selected from the Main Menu. Use this menu to view or change the Port
Configuration information for each port. Note that the Link Status is
automatically determined by the Switch and cannot be changed. The
user can determine other information such as Admin Status, Auto
Negotiate, Speed/Duplex or Flow control. To change the setting, use the
"Arrow" keys to move the highlight to the selection and press the "Space
Bar" key to toggle back and forth between the options. Pressing "Enter"
key to confirm your option.
Table 3-3 describes the status and configuration objects for Gigabit
Ethernet ports.
Figure 3-6
GSW-1200S User's Manual
Port Configuration Menu Screen
19
Page 26

Object Type
Link Status
Admin Status
Auto
Negotiation
Speed / Duplex
current
Speed / Duplex
config
Flow Control
Table 3-3
The status of the link test, indicating a valid link
Info
partner.
"On" means a device is successful connect to
the port. "Off" means no device is connected.
Operational status of the port.
List
Default: Enabled
Auto Negotiation status of the port
List
Default: Enabled
Shows the current speed and duplex negotiation of
Info
the port.
The speed of these ports. The value can be
List
10HDX/10FDX/100TX-HDX/100TX-FDX/GIGAFDX
Flow control function enable/disable
Info
Status and Configuration of Gigabit Ethernet Port
Description
3.2.5 Port Trunking Configuration
The Port Trunking Configuration menu controls the port trunking or the
so-called “Link Aggregation” function. Several ports in the GSW-1200S
Gigabit Ethernet Switch can be bundled together to form a
higher-bandwidth trunk.
Figure 3-7 shows the Port Trunking Configuration Menu.
Figure 3-7
20
Port Trunking Configuration Menu
PLANET GSW-1200S
Page 27
Setting up a new trunk:
Please note that the trunk list should be empty when you first start the
Port Trunking Configuration function. To set up a new trunk, select the
<Add> function with the "Arrow" keys and then press the "Enter" key.
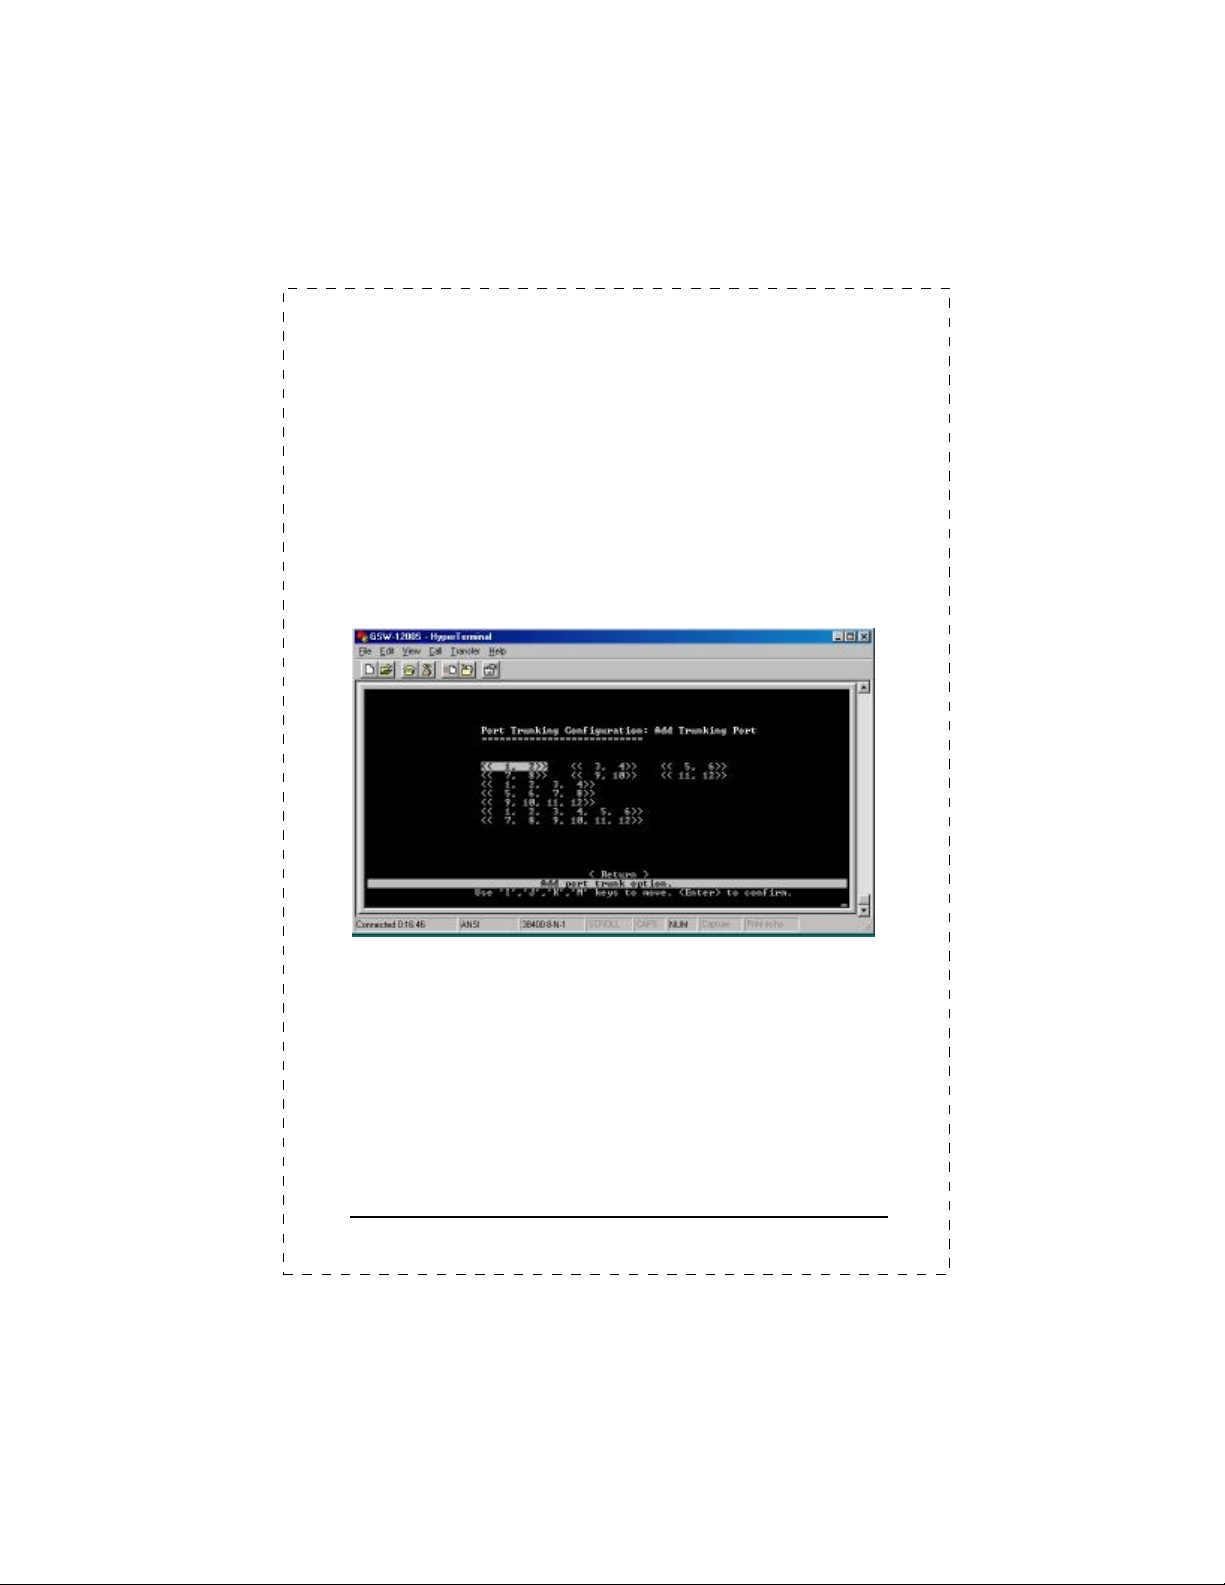
Add Trunking Port Screen
The
will display. (See Figure 3-8 Add
Trunking Port screen )
Each item shown in the Add Trunking Port screen represents a set of
ports that can be trunked together. Press "Enter" key on your desired
item to select the set as a new trunk. Note that selecting a set of ports
may cause other sets to be excluded in further selections. You may
select more than one set until the trunking ports are all being defined.
Figure 3-8 shows the example of the defined trunking ports.
Figure 3-8
The following shows the Trunking Configuration screen after trunking
ports are defined.
Add Trunking Port Screen
GSW-1200S User's Manual
21
Page 28
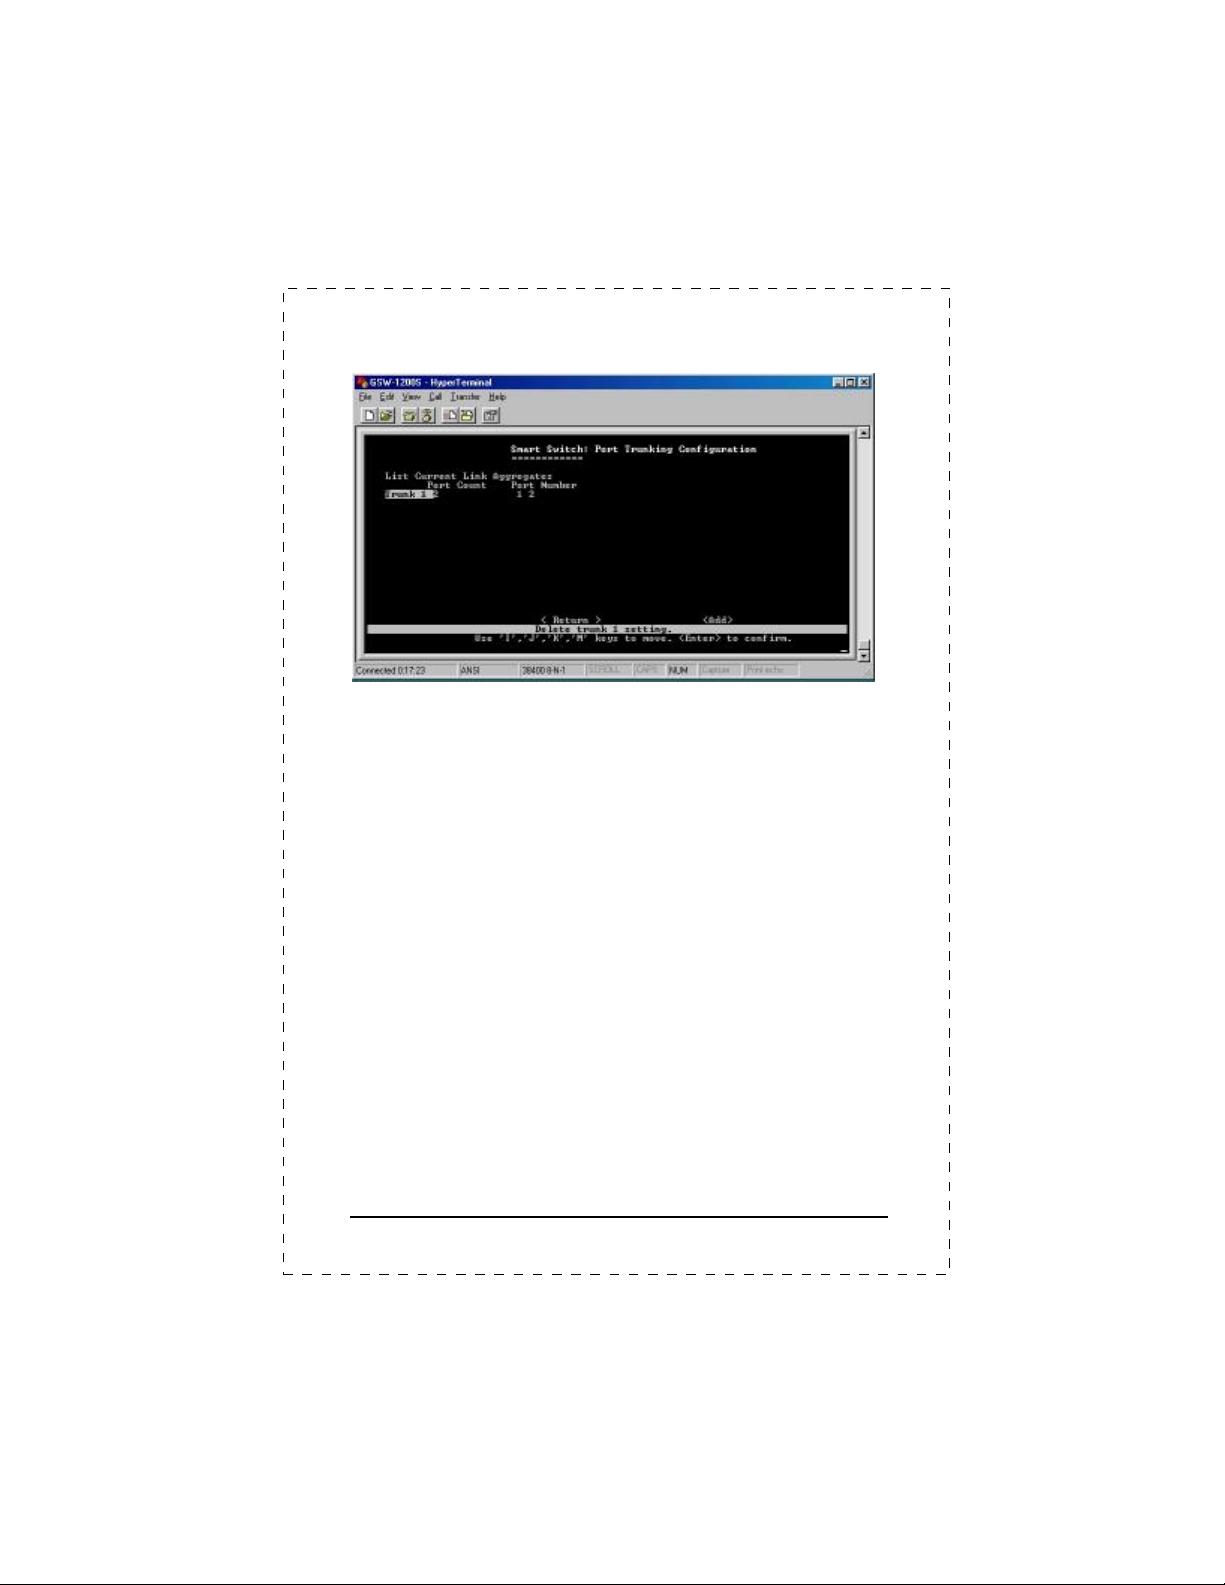
Figure 3-9
Deleting a trunk group:
To delete a trunk from the configuration process, simply highlight the
trunk group that you want to delete and then press the "Enter" key. Then,
the following question will appear in the status line:
Are you sure you want to perform this operation? (y/n)
Press the Y key to delete the selected trunk group.
Example of the Defined Trunking Ports
3.2.6 Mirror Port Configuration
To verify whether all the data is being transmitted and received properly,
GSW-1200S supports the mirror port configuration allowing users to
assign two different ports to carry the same data stream.
Figure 3-10 shows the menu of Mirror Port Configuration. Table 3-5
shows the descriptions of the Mirror Port Configuration Menu Objects.
To change the values of this menu, use the "Arrow" key to move the
highlight to the selection and press the "Space Bar" key to toggle back
and forth between the options. Pressing "Enter" key to confirm your
options.
22
PLANET GSW-1200S
Page 29

“Enable” or “Disable” the port mirroring function
Figure 3-10 Mirror Port Configuration
Object Type
Port Mirroring
Mirrored
Monitor port TX
Monitor Port RX
Table 3-5
Descriptions of the Port Mirroring Configuration Menu Objects
List
in the system.
Any port can be monitored.
List
Any port can monitor Transmitted Packets on the
List
mirrored port.
Any port can monitor Received Packets on the
List
mirrored port.
Description
3.2.7 VLAN Configuration
The VLAN Configuration sets up the VLAN configuration of the switch.
Users can use this configuration to segment their own networks into a
smaller subgroup and making this group as its own network.
The GSW-1200S supports 12 Port-based VLANs. It supports VLAN
overlapping which means one port can belong to multiple VLANs.
However, ports on VLAN 1 can not overlap with other VLANs.
GSW-1200S User's Manual
23
Page 30

Figure 3-11
VLAN Table Configuration Menu
Setting up a new VLAN:
To add a new Virtual LAN, select the <Add> function with the "Arrow"
keys and then press the "Enter" key. The
Please see Figure 3-12. To add a new VLAN, enter and edit the member
set of the VLAN. The <OK> functions take you back to the VLAN
Configuration Menu screen.
ADD VLAN
screen will display.
24
Figure 3-12
Add VLAN screen
PLANET GSW-1200S
Page 31

Deleting or Modifying a VLAN:
To delete or modify a VLAN from the VLAN Table, simply highlight the
VLAN that you want to delete or modify and then press the "Enter" key. It
will take you to the Modify VLAN Menu. Please see Figure 3-13. After
making new VLAN configuration, use the <Config> function to activate
the new settings. To delete the VLAN, use the <Delete> function to
delete it.
Figure 3-13 Modify VLAN screen
3.2.8 Priority Configuration
To decide which ports get the first right to send its data, you can set the
priority for the ports. Use the Port Priority Configuration Menu to change
the values within the screen.
The priority configuration sets the port-based priority function of the
system. PLANET GSW-1200S has 4 priority queues. Each frame can
be sent via higher or lower priority queue depending on the priority
setting of it with strict mode (see the Figure 3-14) or weighted
round-robin (see the Figure 3-15).
Use the "Arrow" key to move the highlight to the selection and press the
"Space Bar" key to toggle back and forth between the options. Press
"Enter" key for confirmation.
GSW-1200S User's Manual
25
Page 32

Figure 3-14
Port Priority Strict Mode Configuration Menu Screen
Figure 3-15
26
Port Priority Weight Round Robin Configuration Menu
Screen
PLANET GSW-1200S
Page 33

Only when higher
priority queue is empty, the packets
on lower priority queue got the chance
: The packets
on priority queue with higher weight
Each priority can be configured its
A description of the objects within the Port Priority Configuration Menu
shows in Table 3-7.
Object Type
Port Base
QoS setting
QoS Mode
setting
Port
Priority /
Weight
List “Enable” or “Disable” the Port Base
QoS setting function in the system.
List
Provide Strict mode and Weight
Round Robin mode in the system
Strict mode:
to send.
Weight Round Robin
got more chance to send.
List Four priority can be set on each port
List
weight
Decsription Values
0-3
0-15
Table 3-7 Descriptions of the Objects within the Port Priority
Menu
3.2.9 Restart
The Restart Menu is accessed from the Main Menu. The System Restart
Screen, as shown below, allows you to view or change the <Factory
default> or <Restart> values. Use the "Arrow" keys to move the highlight
to <Factory default> and press the "Enter" key. Then you will clear all the
configuration data and put the Switch back to factory default state. The
switch then restarted.
If you choose the <Restart> function, you will perform a reset of the
switch.
GSW-1200S User's Manual
27
Page 34

Figure 3-16
System Restart Main Screen
3.2.10 Exit
The Exit function would bring you out of the configuration of
GSW-1200S.
28
Figure 3-17
Exit of User Interface screen
PLANET GSW-1200S
Page 35

4. SWITCH OPERATION
4.1 Address Table
The Switch is implemented with an address table. This address
table composed of many entries. Each entry is used to store the
address information of some node in network, including MAC
address, port no, etc. This information comes from the learning
process of Ethernet Switch.
4.2 Learning
When one packet comes in from any port, the Switch will record
the source address, port no. and the other related information in
address table. This information will be used to decide either
forwarding or filtering for future packets.
4.3 Forwarding & Filtering
When one packet comes from some port of the Ethernet
Switching, it will also check the destination address besides the
source address learning. The Ethernet Switching will lookup the
address-table for the destination address. If not found, this packet
will be forwarded to all the other ports except the port which this
packet comes in. And these ports will transmit this packet to the
network it connected. If found, and the destination address is
located at different port from this packet comes in, the Ethernet
Switching will forward this packet to the port where this
destination address is located according to the information from
address table. But, if the destination address is located at the
same port with this packet comes in, then this packet will be
filtered. Thereby increasing the network throughput and
availability
4.4 Store-and-Forward
Store-and-Forward is one type of packet-forwarding techniques.
A Store-and Forward Ethernet Switching stores the incoming
GSW-1200S User's Manual
29
Page 36

frame in an internal buffer, do the complete error checking before
transmission. Therefore, no error packets occurrence, it is the
best choice when a network needs efficiency and stability.
The Ethernet Switch scans the destination address from the
packet-header, searches the routing table provided for the
incoming port and forwards the packet, only if required. The fast
forwarding makes the switch attractive for connecting servers
directly to the network, thereby increasing throughput and
availability. However, the switch is most commonly used to
segment existing hubs, which nearly always improves overall
performance. A Ethernet Switching can be easily configured in
any Ethernet network environment to significantly boost
bandwidth using conventional cabling and adapters.
Due to the learning function of the Ethernet switching, the source
address and corresponding port number of each incoming and
outgoing packet are stored in a routing table. This information is
subsequently used to filter packets whose destination address is
on the same segment as the source address. This confines
network traffic to its respective domain, reducing the overall load
on the network.
The Switch performs "Store and forward" therefore, no error
packets occur. More reliably, it reduces the re-transmission rate.
No packet loss will occur.
4.5 Auto-Negotiation
The STP ports on the Switch have built-in “Auto-negotiation”. This
technology automatically sets the best possible bandwidth when a
connection is established with another network device (usually at
Power On or Reset). This is done by detect the modes and
speeds at the second of both device is connected and capable of,
Both 10Base-T and 100Base-TX devices can connect with the
port in either Half- or Full-Duplex mode. 1000Base-T can be only
connected in Full-duplex mode.
30
PLANET GSW-1200S
Page 37

5. TROUBLESHOOTING
This chapter contains information to help you solve problems. If
Giga Switch is not functioning properly, make sure the Ethernet
Switch was set up according to instructions in this manual.
The Link LED is not lit
Solution:
Check the cable connection and remove duplex mode of the
Giga Switch
Some stations can not talk to other stations located on
The other port
Solution:
The address table may contain older information than of the
address table of that node. Please power down to refresh the
address information. Please also check VLAN configuration.
Performance is bad
Solution:
Check the full duplex status of the Ethernet Switch. If the
Ethernet Switch is set to full duplex and the partner is set to
half duplex, then the performance will be poor.
GSW-1200S User's Manual
31
Page 38

This page intentionally left blank!
32
PLANET GSW-1200S
Page 39

APPENDIX A SWITCH‘S RJ-45 PIN
ASSIGNMENTS
A.1 1000Mbps, 1000Base T
Contact MDI MDI-X
1 BI_DA+ BI_DB+
2 BI_DA- BI_DB3 BI_DB+ BI_DA+
4 BI_DC+ BI_DD+
5 BI_DC- BI_DD6 BI_DB- BI_DA7 BI_DD+ BI_DC+
8 BI_DD- BI_DC-
Implicit implementation of the crossover function within a
twisted-pair cable, or at a wiring panel, while not expressly
forbidden, is beyond the scope of this standard.
A.2 10/100Mbps, 10/100Base-TX
Contact MDI MDI-X
1 1 3
2 2 6
3 3 1
6 6 2
GSW-1200S User's Manual
33
Page 40

EM-GSW12V1
 Loading...