

Page 1

PLANET Technology Corp. GRT-101/401/402 User’s Manual
G.SHDSL Bridge/Router
GRT-101/GRT-401/GRT-402
User’s Manual
- -
1
Page 2

PLANET Technology Corp. GRT-101/401/402 User’s Manual
Copyright
Copyright (C) 2004 PLANET Technology Corp. All rights reserved.
The products and programs described in this User’s Manual are licensed products of PLANET
Technology, This User’s Manual contains proprietary information protected by copyright, and this User’s
Manual and all accompanying hardware, software, and documentation are copyrighted.
No part of this User’s Manual may be copied, photocopied, reproduced, translated, or reduced to any
electronic medium or machine-readable form by any means by electronic or mechanical. Including
photocopying, recording, or information storage and retrieval systems, for any purpose other than the
purchaser's personal use, and without the prior express written permission of PLANET Technology.
Disclaimer
PLANET Technology does not warrant that the hardware will work properly in all environments and
applications, and makes no warranty and representation, either implied or expressed, with respect to the
quality, performance, merchantability, or fitness for a particular purpose.
PLANET has made every effort to ensure that this User’s Manual is accurate; PLANET disclaims liability
for any inaccuracies or omissions that may have occurred.
Information in this User’s Manual is subject to change without notice and does not represent a
commitment on the part of PLANET. PLANET assumes no responsibility for any inaccuracies that may be
contained in this User’s Manual. PLANET makes no commitment to update or keep current the
information in this User’s Manual, and reserves the right to make improvements to this User’s Manual
and/or to the products described in this User’s Manual, at any time without notice.
If you find information in this manual that is incorrect, misleading, or incomplete, we would appreciate
your comments and suggestions.
CE mark Warning
The is a class B device, In a domestic environment, this product may cause radio interference, in which
case the user may be required to take adequate measures.
Trademarks
The PLANET logo is a trademark of PLANET Technology. This documentation may refer to numerous
hardware and software products by their trade names. In most, if not all cases, these designations are
claimed as trademarks or registered trademarks by their respective companies.
Revision
User’s Manual for PLANET G.SHDSL Bridge/Router:
Model: GRT-101/GRT-401/GRT-402
Rev: 3.0 (May. 2004)
Part No. EM-GRTV3
- -
2
Page 3

PLANET Technology Corp. GRT-101/401/402 User’s Manual
Table of Contents
CHAPTER 1 OVERVIEW................................................................................1
SOFTWARE FEATURES......................................................................1
SOFTWARE SPECIFICATIONS...........................................................1
ATM Protocol........................................................................................1
PPP Support.........................................................................................2
Routing Capability.................................................................................2
Bridging................................................................................................2
Configuration........................................................................................2
Network Management...........................................................................2
Hardware Specification.........................................................................3
CHAPTER 2 INSTALLATION.........................................................................4
2.1 FRONT PANEL LEDS.................................................................................4
2.2 REAR PANEL PORTS .................................................................................5
2.3 REAR PANEL CONNECTIONS......................................................................5
2.4 SETTING UP THE HARDWARE ENVIRONMENT ................................................7
CHAPTER 3 CONFIGURATION.....................................................................8
3.1 PURPOSE ................................................................................................8
3.2 LOGON PROCEDURE.................................................................................8
3.2.1 Serial console..................................................................................8
3.2.2 Telnet...............................................................................................9
3.2.3 Web browser...................................................................................9
3.3 WEB OPERATION AND QUICK INSTALLATION GUIDE ....................................10
3.3.1 Bridge Mode..................................................................................10
Web UI Configuration..........................................................................11
Console Configuration........................................................................12
3.3.2 Routing Mode for PPPoA and PPPoE with IP Sharing..................12
Web UI Configuration..........................................................................12
Console Configuration........................................................................13
3.3.3 Routing Mode for IPoA or EoA........................................................14
Web UI Configuration..........................................................................14
Console Configuration........................................................................15
3.3.4 LAN-to-LAN Connection with Bridge Mode.....................................16
Web UI Configuration..........................................................................16
- -
3
Page 4

PLANET Technology Corp. GRT-101/401/402 User’s Manual
STU-R (CO) side................................................................................16
STU-C (CPE) side..............................................................................17
Console Configuration........................................................................17
3.3.5 Advanced Setup............................................................................18
SHDSL................................................................................................18
WAN...................................................................................................19
Bridge.................................................................................................20
Route..................................................................................................21
NAT/DMZ............................................................................................23
Virtual Server......................................................................................24
3.3.6 Administration................................................................................25
Security...............................................................................................25
SNMP.................................................................................................26
Time Sync...........................................................................................27
Config Tool..........................................................................................28
Upgrade..............................................................................................29
Restart................................................................................................29
3.3.7 Status............................................................................................29
3.4 COMMAND LINE INTERFACE.....................................................................30
3.4.1 Multi-level password protection.....................................................31
3.4.2 Menu Driven Command Line Interface..........................................32
3.4.3 Command Line Interface Menu Tree.............................................32
3.4.4 Status............................................................................................38
3.4.5 Show.............................................................................................38
3.4.6 Write..............................................................................................38
3.4.7 Reboot...........................................................................................39
3.4.8 Ping...............................................................................................39
3.5 ADMINISTRATION ....................................................................................39
3.5.1 User Profile....................................................................................39
3.5.2 Security.........................................................................................40
3.5.3 SNMP............................................................................................40
3.5.4 Supervisor Password and ID.........................................................40
3.5.5 SNTP.............................................................................................41
3.6 UTILITY..................................................................................................41
3.7 EXIT......................................................................................................41
3.8 SETUP...................................................................................................42
3.8.1 Mode.............................................................................................42
3.8.2 SHDSL..........................................................................................42
- -
4
Page 5

PLANET Technology Corp. GRT-101/401/402 User’s Manual
3.8.3 WAN..............................................................................................43
3.8.4 Bridge............................................................................................44
3.8.5 Route.............................................................................................44
3.8.6 LAN...............................................................................................44
3.8.7 IP share.........................................................................................44
3.8.8 DHCP............................................................................................45
3.8.9 DNS proxy.....................................................................................45
3.8.10 Host name...................................................................................45
3.8.11 Default.........................................................................................45
3.9 CONNECTION MODE ...............................................................................46
3.10 BRIDGING MODE ..................................................................................46
3.10.1 Bridge management....................................................................46
3.10.2 Static bridge table........................................................................47
3.11 ROUTING MODE....................................................................................48
3.11.1 LAN setting..................................................................................48
3.11.2 Static routing table.......................................................................49
3.11.3 NAT/PAT......................................................................................50
3.11.4 DHCP server................................................................................53
3.11.5 DNS proxy...................................................................................53
3.12 WAN AND ATM VIRTUAL CONNECTION ..................................................54
3.12.1 SHDSL operation........................................................................54
3.12.2 ATM virtual connection................................................................56
3.12.3 ATM traffic shaping......................................................................57
3.12.4 WAN IP address..........................................................................58
3.12.5 ISP profile for PPP.......................................................................59
3.13 SYSTEM STATUS AND PERFORMANCE.....................................................60
3.14 USER PROFILE.....................................................................................61
3.15 MANAGEMENT SECURITY ......................................................................62
3.15.1 Telnet port number......................................................................63
3.15.2 Legal client IP..............................................................................63
3.16 SNMP SUPPORT .................................................................................64
3.16.1 SNMP community........................................................................64
3.16.2 SNMP trap...................................................................................65
3.17 BACKUP AND RESTORE CONFIGURATION ................................................66
3.17.1 Backup configuration...................................................................66
3.17.2 Restore configuration..................................................................67
3.18 SOFTWARE UPGRADE...........................................................................67
- -
5
Page 6

PLANET Technology Corp. GRT-101/401/402 User’s Manual
Chapter 1 Overview
Based on digital subscriber line (DSL) technology, PLANET’s G.SHDSL
products, GRT-101/GRT-401/GRT-402 provide an affordable, flexible, efficient
Internet access solution for SOHO customers while reducing deployment and
operational costs from service providers. Via sending and receiving user’s
datagram (often Internet service) over existing telephone lines,
GRT-101/GRT-401/GRT-402 concentrates all traffic onto a single high-speed
trunk for Internet activities or sharing a corporate intranet. Through the
simple-yet-powerful management UI of GRT-101/GRT-401/GRT-402, networks
administrators can complete a managed network deployment just in seconds.
SOFTWARE FEATURES
l Easy configuration and management with password control for various
application environments
l Efficient IP routing and transparent learning bridge to support
broadband Internet services
l VPN pass-through for safeguarded connections
l DMZ host / Multi-DMZ / Multi-NAT enables multiple workstations on the
LAN to access the Internet for the cost of IP address
l Fully ATM protocol stack implementation over SHDSL
l PPPoA and PPPoE support user authentication with PAP / CHAP /
MS-CHAP
l SNMP management with SNMPv1 / SNMPv2 agent and MIB II
l Getting enhancements and new features via firmware upgrade
l Built-in 4-port 10/100Mbps switch on GRT-401/GRT-402
l 4-wire supported in model GRT-402 double the bandwidth
SOFTWARE SPECIFICATIONS
ATM Protocol
ATM adaptation layer type 5 (AAL5)
VC multiplexing and LLC encapsulation
Multi-protocol over AAL5 (RFC 1483/2684 bridged and routed PDU)
Classical IP over ATM (RFC 1577 with MTU = 1500)
Up to 8 PVCs
Traffic shaping CBR/UBR
UNI 3.1/4.0 PVC
- -
1
Page 7

PLANET Technology Corp. GRT-101/401/402 User’s Manual
I.610 OAM F5 loopback
PPP Support
PPP (RFC 1661)
PPP over AAL5 (RFC 2364)
PPP over Ethernet (RFC 2516)
User authentication with PAP/CHAP/MS-CHAP
Routing Capability
Support IP/TCP/UDP/ARP/ICMP/IGMP protocols
IP routing with static routing and RIPv1/RIPv2 (RFC1058/2453)
IP multicast and IGMP proxy (RFC1112/2236)
Network address translation (NAT/PAT) (RFC1631)
NAT ALGs for ICQ/Netmeeting/MSN/Yahoo Messenger
DNS relay and caching (RFC1034/1035)
DHCP server (RFC2131/2132)
Bridging
IEEE 802.1D transparent learning bridge
Up to 128 MAC learning addresses
Configuration
Local console (RS232)
Telnet access
Web-based GUI (HTTP)
Multi-level password protection
Network Management
Web-based GUI for express setup, configuration and management
Menu-driven interface/Command-line interface (CLI) for local console and
Telnet access
Password protected management and access control list for administration
SNMP management with SNMPv1/SNMPv2c (RFC1157/1901/1905) agent
and MIB II (RFC1213/1493)
Software upgrade via web-browser/TFTP server
- -
2
Page 8

PLANET Technology Corp. GRT-101/401/402 User’s Manual
SHDSL, Power Status, WAN Link and Action Status, LAN
wire
Hardware Specification
WAN/LAN Ports RJ-11 SHDSL WAN port x1
10/100Mbps LAN port x1 on GRT-101
10/100Mbps LAN port x4 on GRT-401/GRT-402
Connector RJ-11 connector for WAN, RJ-45 connector for LAN
Cabling
Requirement
G.SHDSL : AWG26 or higher
10 /100 Base T: UTP/STP Category 3 or 5
LEDs
Link/Active (and 100M Status), Alram
Speed SHDSL: 64Kbps to 2.304Mbps or
128Kbps to 4.608Mbps (for GRT-402, 4mode)
LAN Switch: 10/100 Mbps
Power External power adapter 9V DC, 1000mA
Environmental Operating temperature: 0° to 45°C
Storage temperature: -10° to 70°C
Housing Plastic Case
Dimension 145 mm x 187 mm x 33 mm (L x W x H)
- -
3
Page 9
PLANET Technology Corp. GRT-101/401/402 User’s Manual
Chapter 2 Installation
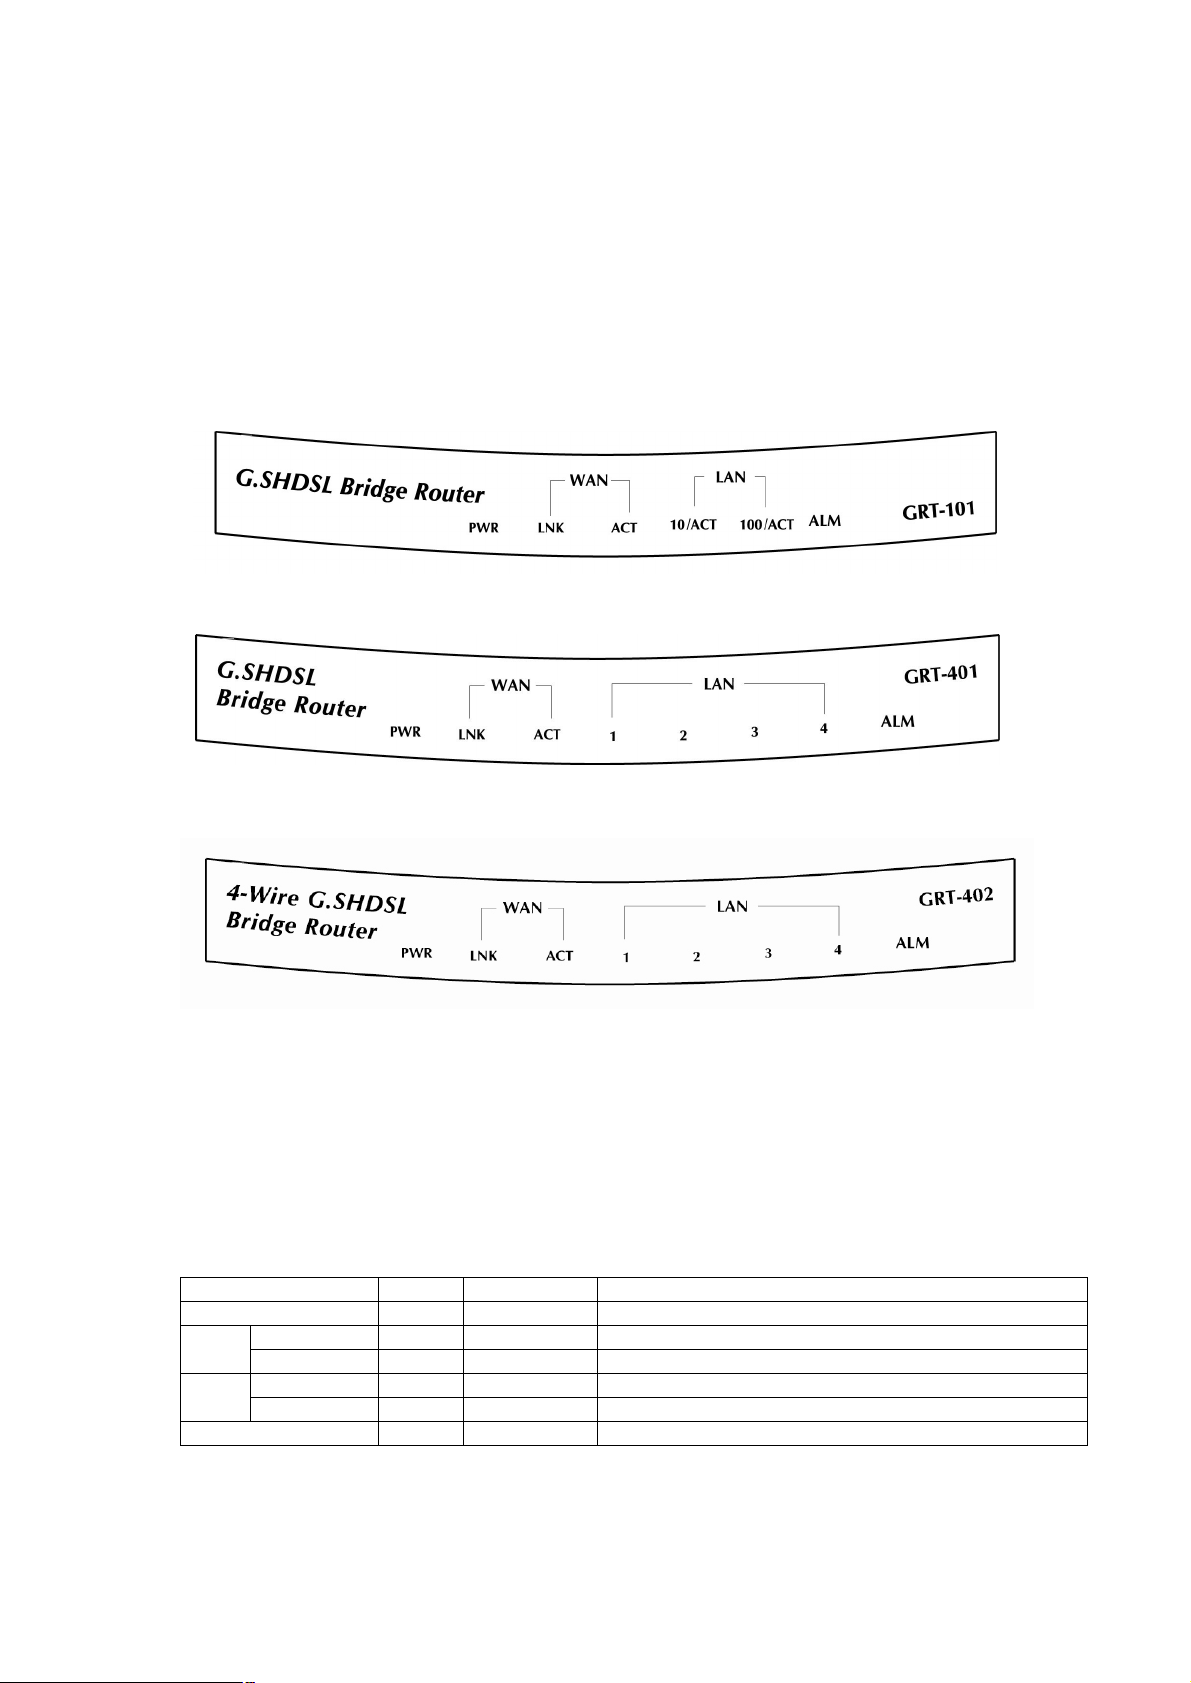
2.1 Front Panel LEDs
The LEDs on the front panel indicate the operational status of
GRT-101/GRT-401/GRT-402.
Figure 2-1 GRT-101 Front Panel
Figure 2-2 GRT-401 Front Panel
Figure 2-3 GRT-402 Front Panel
The following table describes the LEDs’ functions:
Table 2-1 GRT-101 LED Functions
WAN
LAN
LEDs Active
PWR On Green Power adaptor is connected to GRT-101/GRT-401
LNK On Green SHDSL line connection is established
ACT On Green Transmit or received data over SHDSL link
10/ACT On Green LAN Speed operates in 10M
100/ACT On Green LAN Speed operates in 100M
ALM On Red SHDSL connection disconnected
Color Description
- -
4
Page 10
PLANET Technology Corp. GRT-101/401/402 User’s Manual
Table 2-2 GRT-401/GRT-402 LED Functions
WAN
LAN
LEDs Active
PWR On Green Power adaptor is connected to GRT-101/GRT-401
LNK On Green SHDSL line connection is established
ACT On Green Transmit or received data over SHDSL link
1 On Green Transmit or received data over LAN 1
2 On Green Transmit or received data over LAN 2
3 On Green Transmit or received data over LAN 3
4 On Green Transmit or received data over LAN 4
ALM On Red SHDSL connection disconnected
Color Description
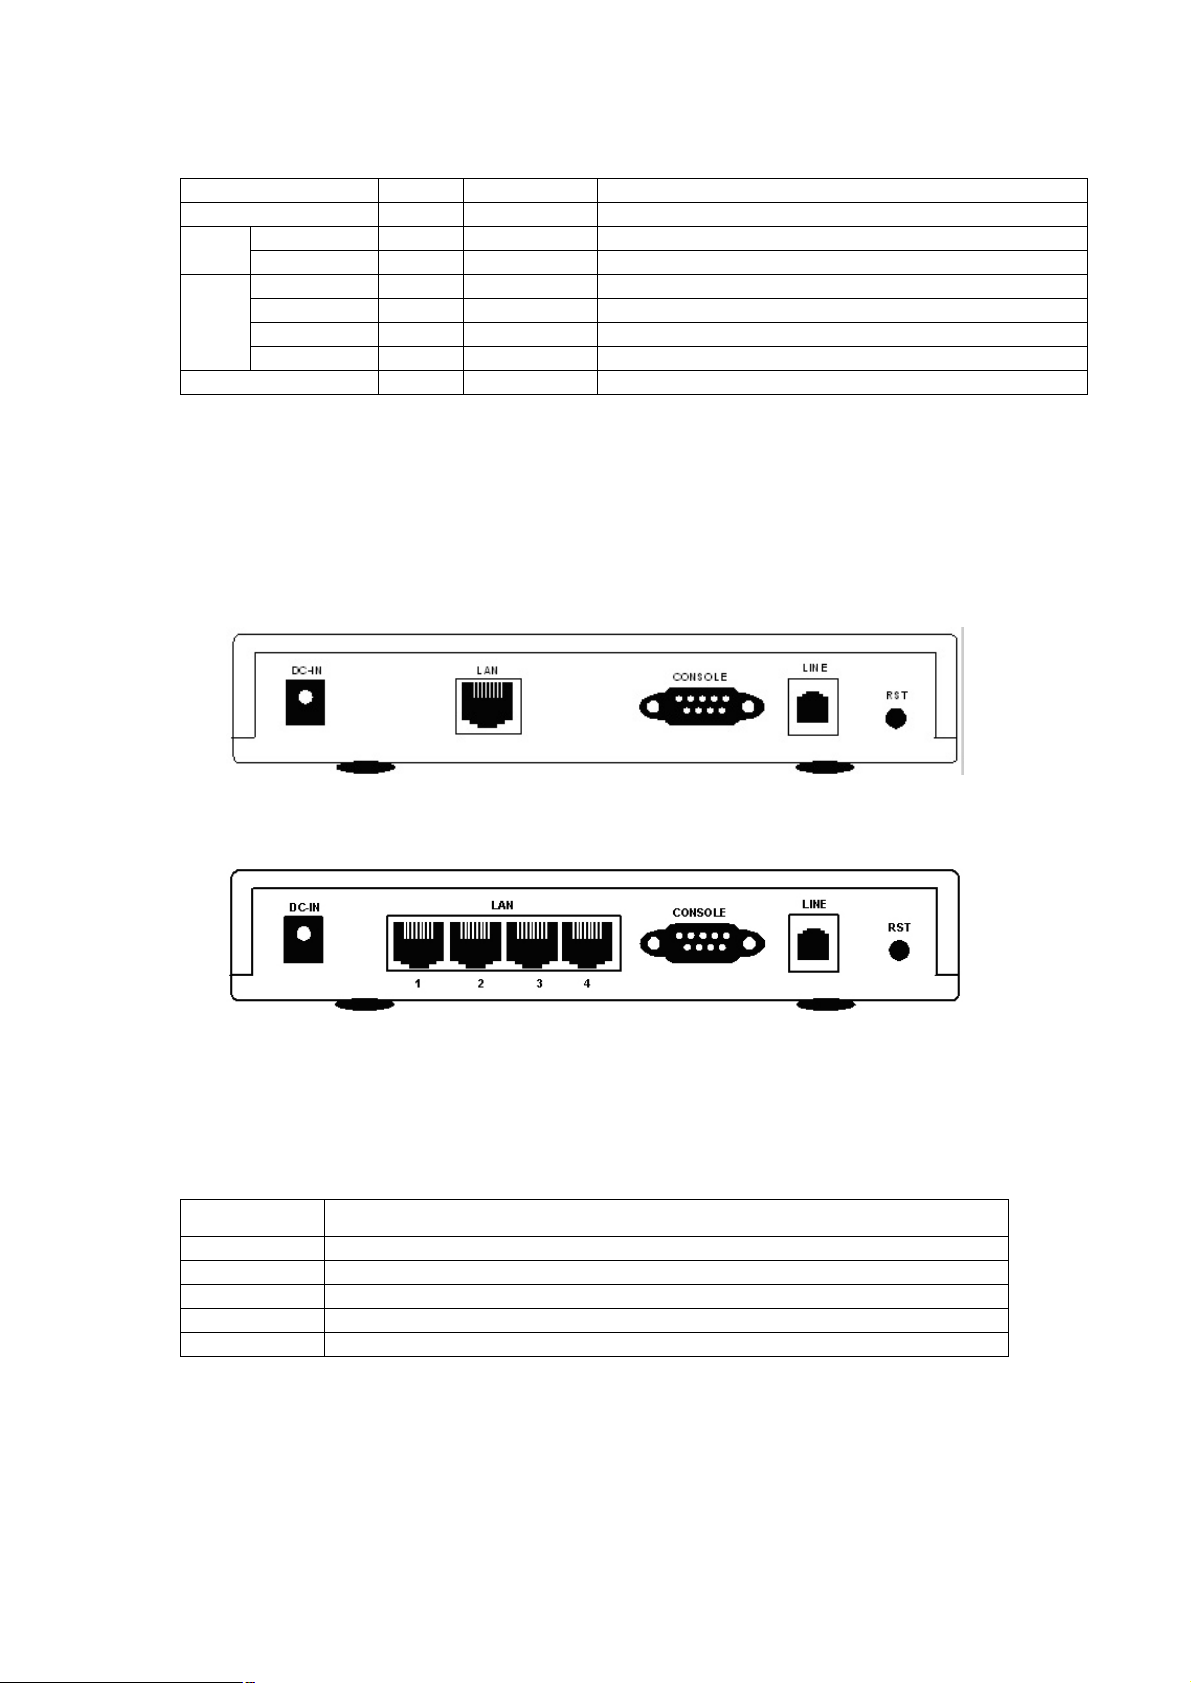
2.2 Rear Panel Ports
The connectors on the rear panel provide Power, LAN, CONSOLE and LINE
interfaces.
Figure 2-4 GRT-101 Rear Panel
Figure 2-5 GRT-401/GRT-402 Rear Panel
The following table describes the connectors’ functions:
Table 2-3 Connector Functions
Connectors
DC-IN Power adaptor inlet: Input voltage 9VDC
LAN Ethernet interface for LAN port (RJ-45)
CONSOLE RS- 232C (DB9) for system configuration and maintenance
LINE SHDSL interface for WAN port (RJ-11)
RST Reset button for factory default
Description
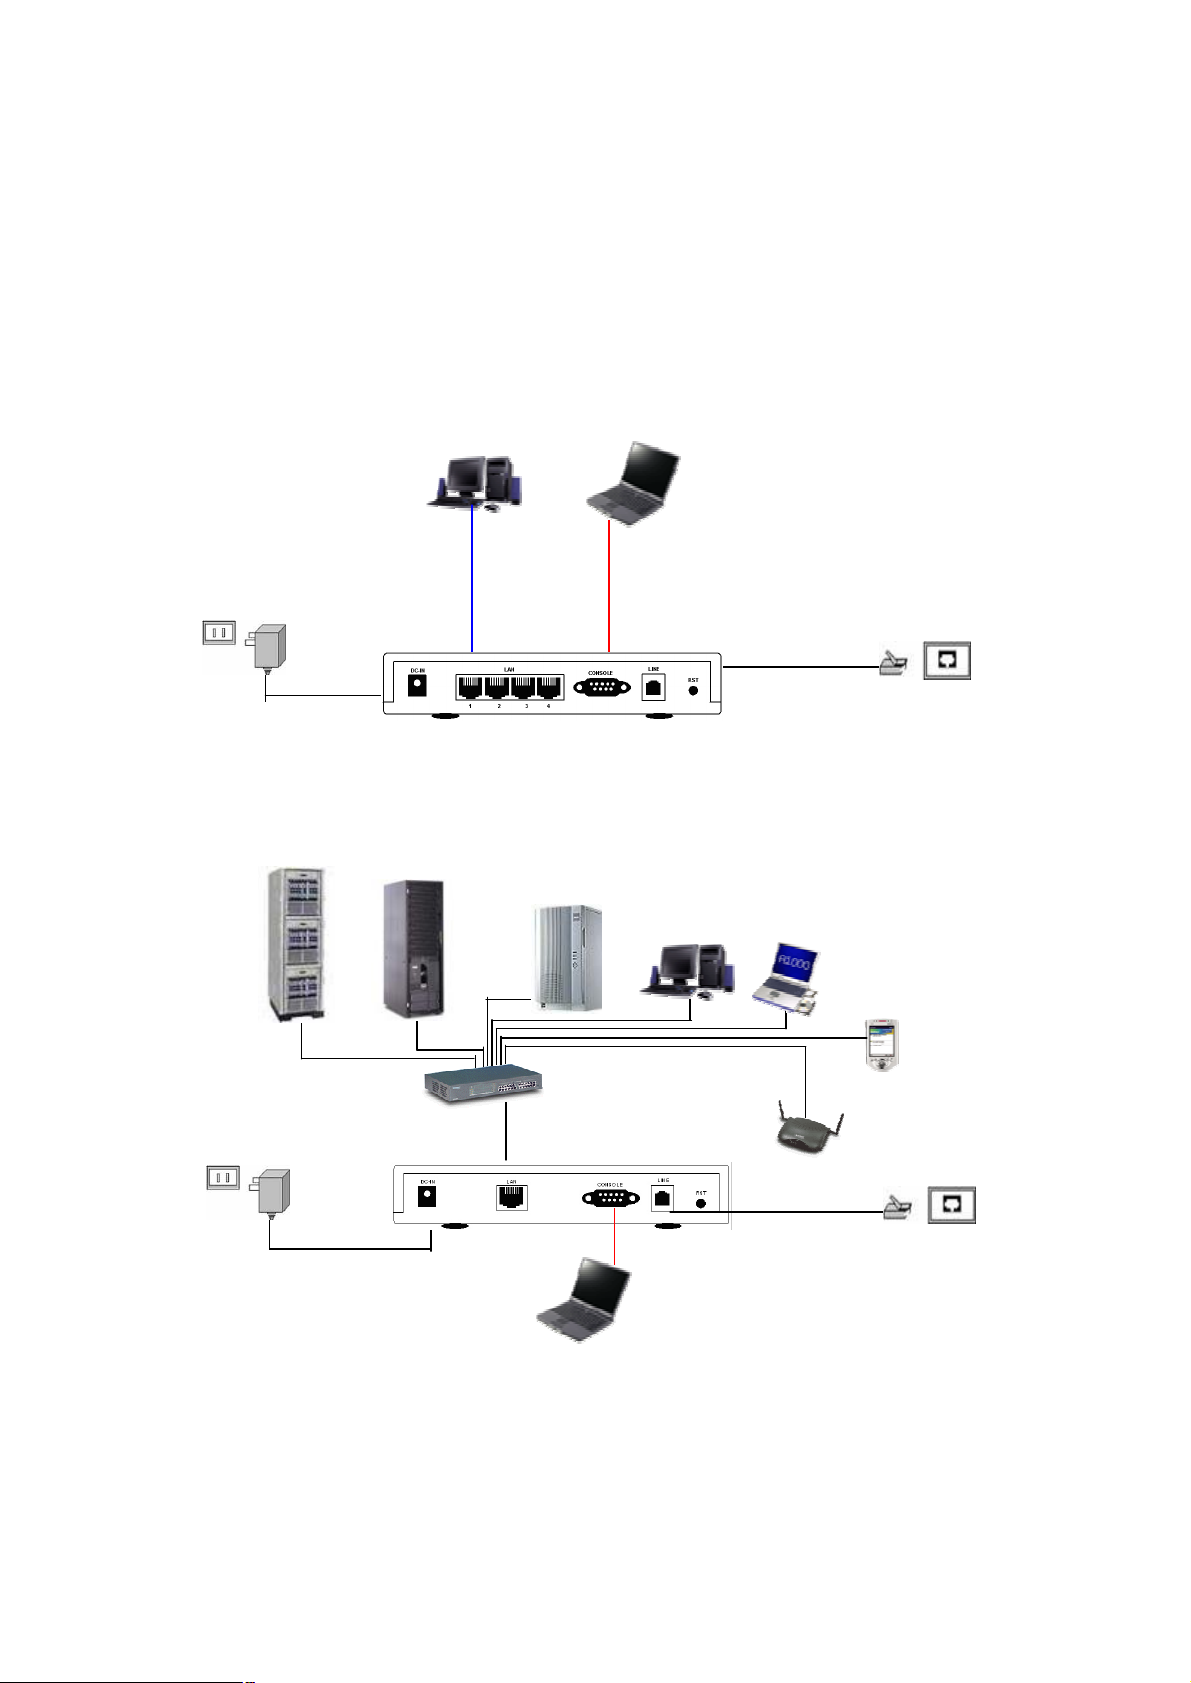
2.3 Rear Panel Connections
The figure shows the rear panel connections of GRT-101/GRT-401/GRT-402.
- -
5
Page 11
PLANET Technology Corp. GRT-101/401/402 User’s Manual
NB
Power
RJ-45
DB-9
Wall Jack
RJ-45 cable
File Server
NB
Mobile
Wireless LAN
The STU-R is a standalone and can able to place in desktop. All the external
wiring shall be located at the rear panel. The LAN port is a 10 Base-T /
100Base-TX auto-sensing and half/full duplex Ethernet interface and complied
with IEEE 802.3 / 802.3u respectively. The console (RS-232C) interface for
configuration is menu-driven operation and can also be configured through
Ethernet interface by Telnet or Web-based operation.
PC
Adapter
Server
cable
Cable
Figure 2-6 Direct Connection with PC or NB
Workstation
HUB/Switch
Wall Jack
PC
Device
DB-9
Figure 2-7 Connection with Switch or HUB
Note: GRT-401/GRT-402 support Auto-MDI (media dependence interface) that
auto-detect MDI or MDI-cross with link partner, a standard straight wire UTP
cable (EIA568) can be deployed to connect to a PC or Ethernet devices like
hub/switches. GRT-101 supports MDI interface only.
- -
6
Page 12

PLANET Technology Corp. GRT-101/401/402 User’s Manual
2.4 Setting up the hardware environment
Step 1: Connect the power adapter to the port labeled DC-IN on the rear
panel of the product.
Step 2: Connect the Ethernet cable.
If GRT-101 is directly connected to PC, the Ethernet cable has to be
used cross over one (refer to figure 2-6). If the product is connected
to hub or switch, be sure that the hub or switch supporting
auto-MDI/MDI-X or not. If yes, both crossover and non-crossover
Ethernet cable are suitable. If not, only non-crossover Ethernet cable
could be used (refer to figure 2-7). Since GRT-401 and GRT-402’s
LAN port supports auto-MDI/MDI-X, both crossover and
non-crossover Ethernet cable are suitable.
Step 3: Connect the phone cable to the product. Connect the other side of
phone cable to wall jack.
Step 4: Connect male end of RS-232 cable to the product and female end to
any free COM port in PC.
Step 5: Connect the power adapter by plugging power supply.
- -
7
Page 13

PLANET Technology Corp. GRT-101/401/402 User’s Manual
Chapter 3 Configuration
3.1 Purpose
This chapter provides information about configuring
GRT-101/GRT-401/GRT-402.
Note: After you have completed all necessary setting for GRT-101/GRT-401/GRT-402, make sure to write the new
configuration to NVRAM by “write” command and reboot the system, or all of your changes will not take effect.
3.2 Logon Procedure
There are three methods to logon to GRT-101/GRT-401/GRT-402: serial
console, Telnet, and web interface. For the first time configuration, perhaps
only the serial console mode could be used because applications requiring
Internet protocol (IP) communication, such as Telnet and web interface, are not
available unless a management IP is configured properly for your local
networking environment.
After connecting all the necessary cables described in Chapter 2 Installation,
power on GRT-101/GRT-401/GRT-402 and select one of the following
procedures to access GRT-101/GRT-401/GRT-402.
Note: It is recommended that only one configuration application is used to setup GRT-101/GRT-401/GRT-402 at any
given time, that is, Telnet, serial console and the web management interfaces should not be used simultaneously.
3.2.1 Serial console
Check the connectivity of the RS-232 cable from your computer to the serial
port of GRT-101/GRT-401/GRT-402. Start your terminal access program with
VT100 terminal emulation. Configure the serial link with baudrate of 9600, 8
data bits, no parity check, 1 stop bit, and no flow-control, and press the
SPACE key until the login screen appears. When you see the login screen,
you can logon to GRT-101/GRT-401/GRT-402.
User: admin
Password: *****
Note: If you have not set any user profile for GRT-101/GRT-401/GRT-402, enter the factory default user “admin”.
When the system prompts you for a password, type “admin” to enter GRT-101/GRT-401/GRT-402.
- -
8
Page 14

PLANET Technology Corp. GRT-101/401/402 User’s Manual
After you logon to GRT-101/GRT-401/GRT-402 and before proceeding any
further, check the software version of GRT-101/GRT-401/GRT-402 by the
command:
admin> show system
If firmware file is downloaded from our local distributor or FTP server, please
refer to TFTP command in the section 3.18 Software Upgrade for more
information on how to update GRT-101/GRT-401/GRT-402 firmware.
3.2.2 Telnet
Make sure the correct Ethernet cable is used for connecting the LAN port of
your computer to GRT-101/GRT-401/GRT-402. The LAN LNK indicator on the
front panel shall light if a correct cable is used. Starting your Telnet client with
VT100 terminal emulation and connecting to the management IP of
GRT-101/GRT-401/GRT-402, wait for the login screen appears. When you see
the login screen, you can logon to GRT-101/GRT-401/GRT-402.
User: admin
Password: *****
Note: The factory default management IP and subnet mask are of 192.168.0.1 and 255.255.255.0, respectively. To
change these setting, see section 3.10.1 Bridge management and 3.11.1 LAN setting for routing mode operation. If
you have not set any user profile for GRT-101/GRT-401/GRT-402, enter the factory default user “admin”. When the
system prompts you for a password, type “admin” to enter GRT-101/GRT-401/GRT-402. For more security issues for
remote management interfaces such as Telnet and web interface, see section 3.15 Management Security.
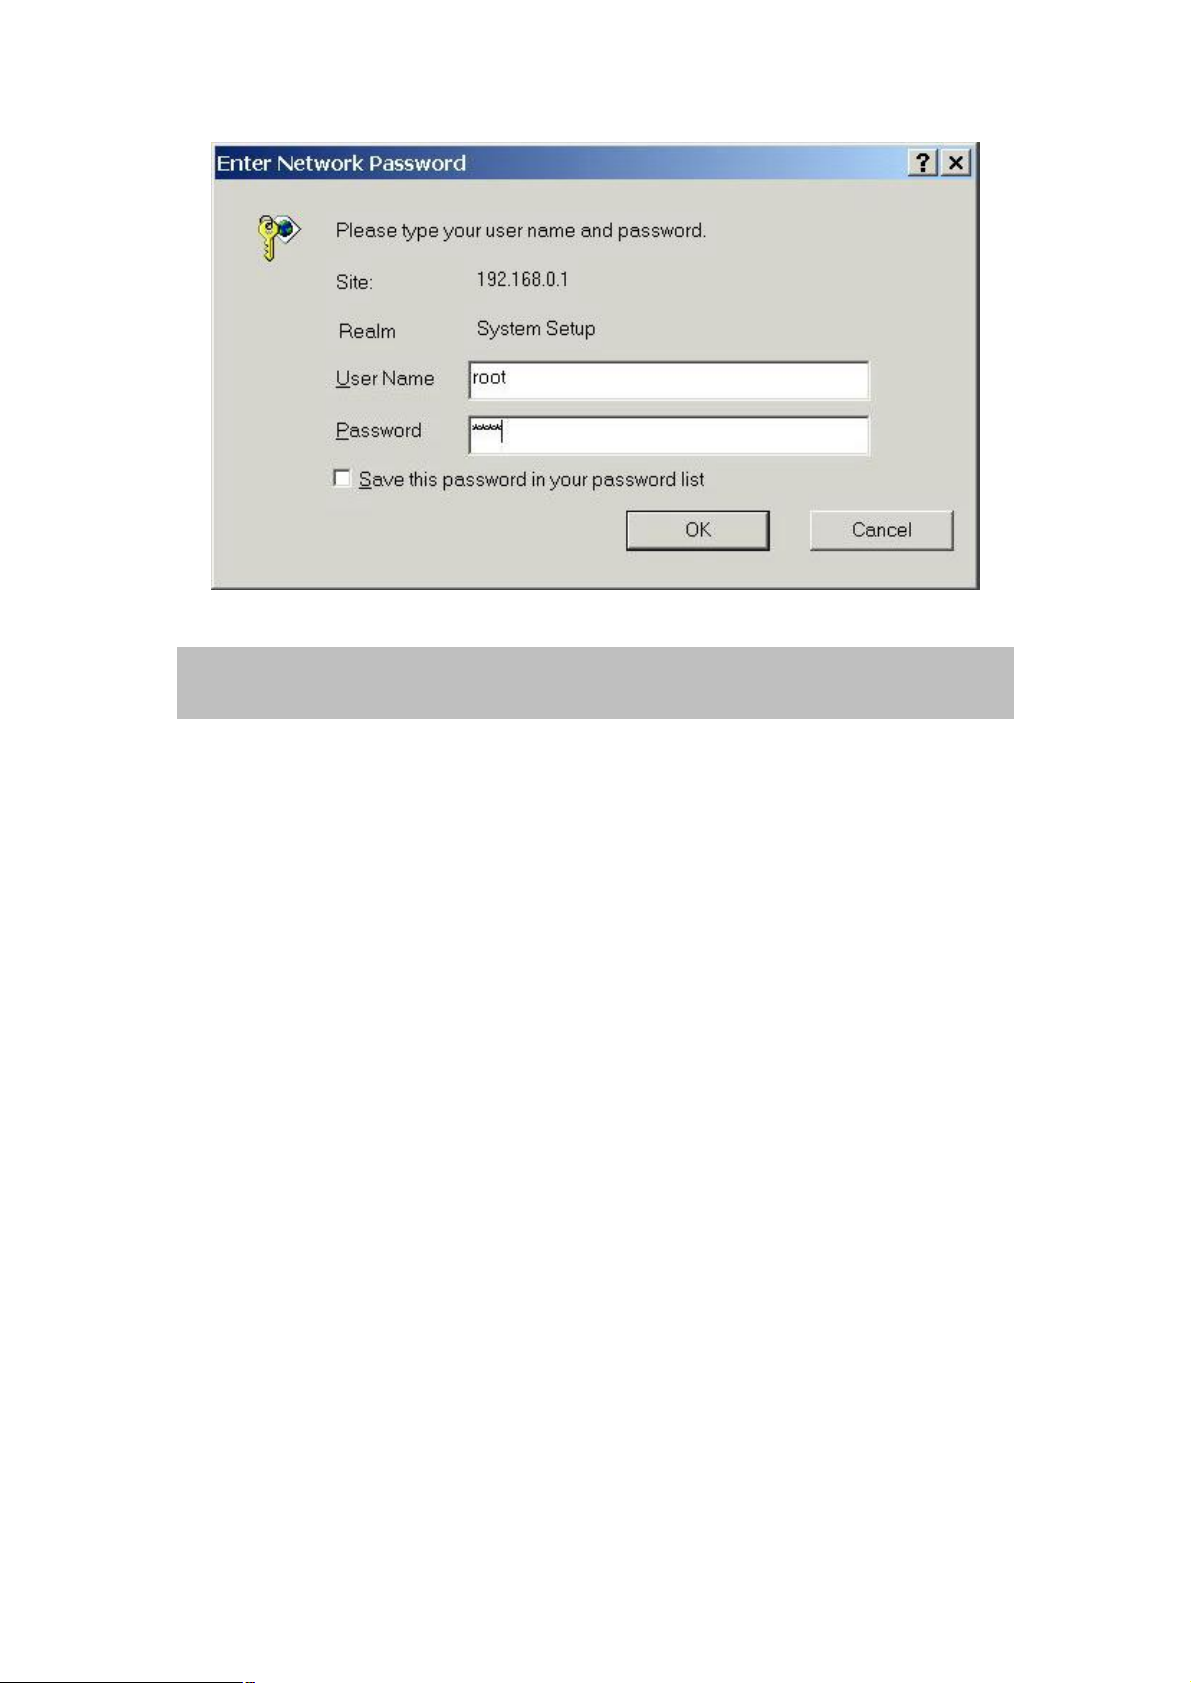
3.2.3 Web browser
Make sure the correct Ethernet cable is used for connecting the LAN port of
your computer to GRT-101/GRT-401/GRT-402. The LAN LNK indicator on the
front panel shall light if a correct cable is used. Starting your web browser and
connecting to the management IP of GRT-101/GRT-401/GRT-402, wait for the
login screen appears. When you see the login screen, you can logon to
GRT-101/GRT-401/GRT-402.
Note: The factory default management IP and subnet mask are 192.168.0.1 and 255.255.255.0 respectively. To
change these setting, see section 3.10.1 Bridge management and 3.11.1 LAN setting. If you have not change
- -
9
Page 15
PLANET Technology Corp. GRT-101/401/402 User’s Manual
password setting for web interface, enter the factory default user “root”. When GRT prompts you for a password, type
“root”. More security issues for remote management interfaces, please refer to section 3.15 Management Security.
3.3 Web operation and Quick Installation Guide
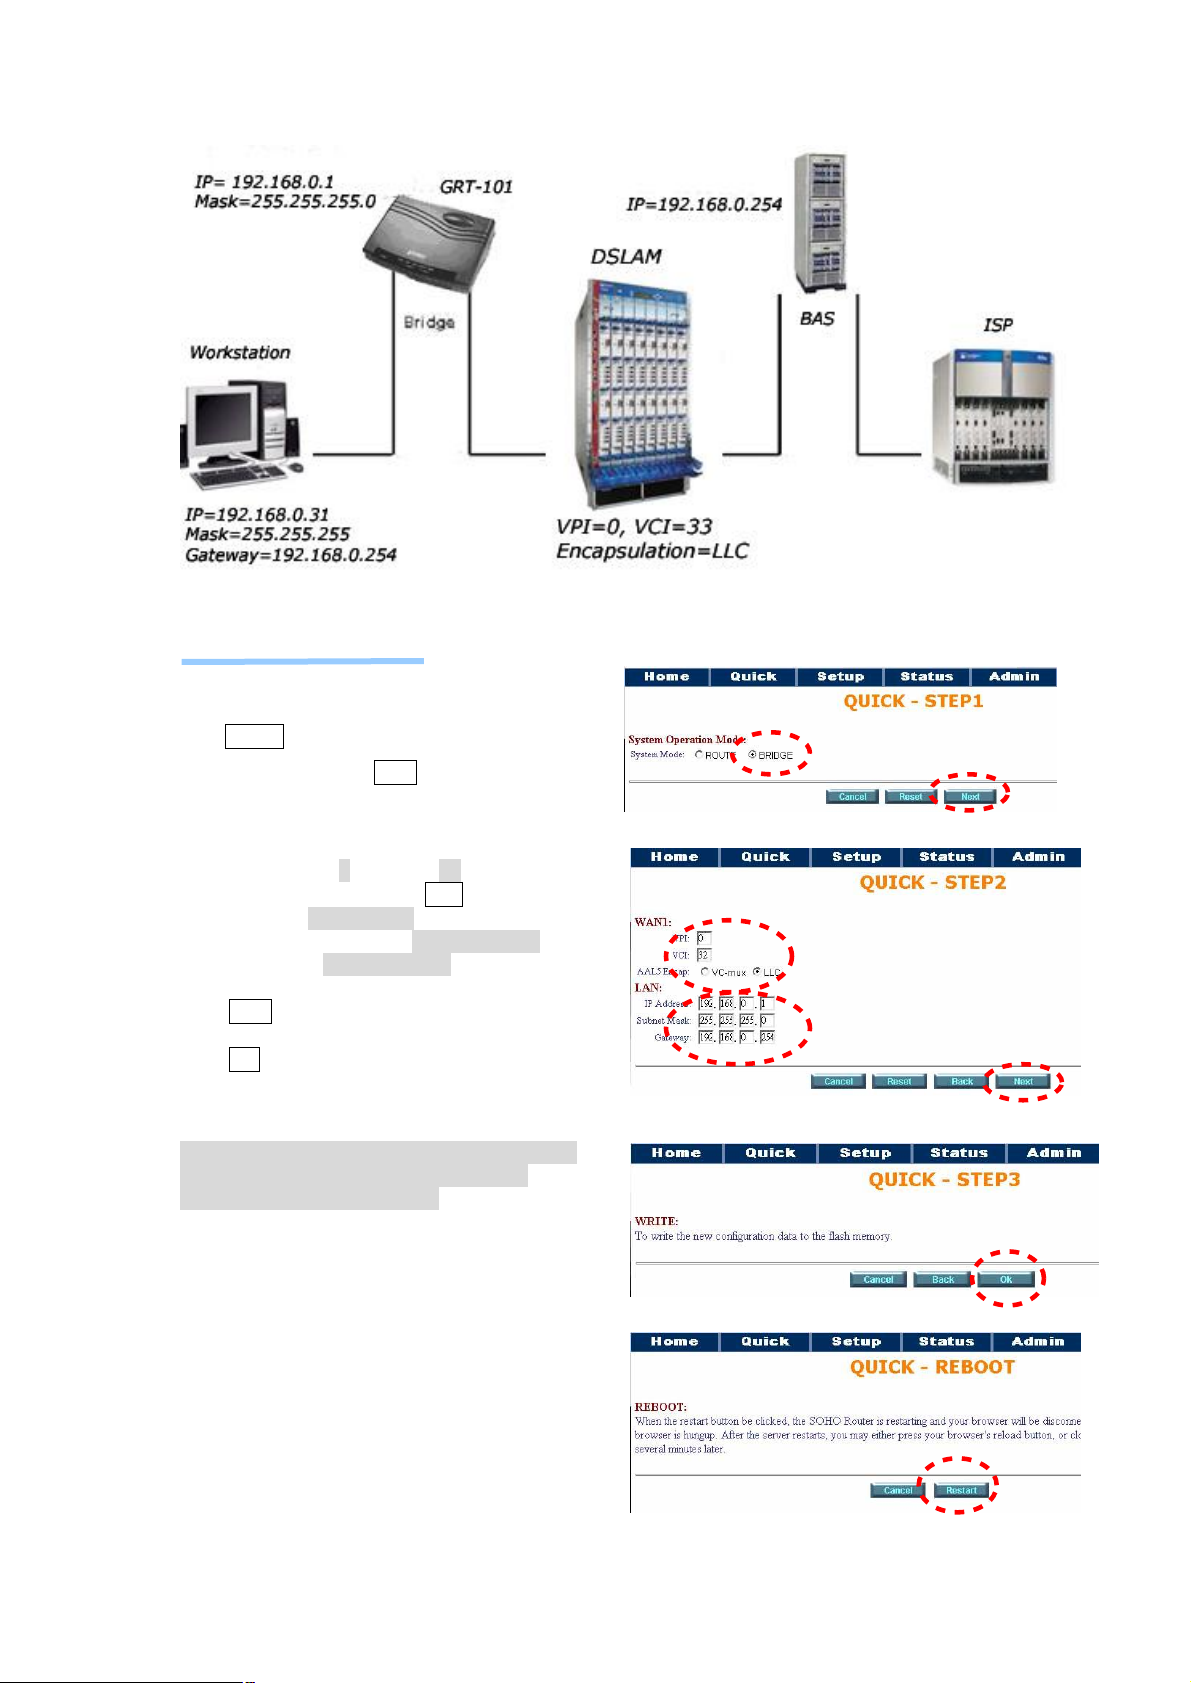
3.3.1 Bridge Mode
- -
10
Page 16
PLANET Technology Corp. GRT-101/401/402 User’s Manual
Web UI Configuration
After connection via web browser,
click Bridge to setup Bridging mode of the
Router and then click Next for the next setting.
Enter WAN1 VPI: 0 and VCI: 33.
Select WAN1 AAL5 Encap: LLC
Enter LAN IP: 192.168.0.1
Enter LAN Sub-net Mask: 255.255.255.0
Enter Gateway: 192.168.0.254 The Gateway
is directly pointed to the BAS IP.
Click Next
Click OK to write the new configuration data
to the flash memory of
GRT-101/GRT-401/GRT-402.
Note: You have to do that otherwise the new
configuration parameters will not affect
GRT-101/GRT-401/GRT-402.
Click Restart GRT-101/GRT-401/GRT-402
will reboot with the new setting.
- -
11
Page 17
PLANET Technology Corp. GRT-101/401/402 User’s Manual
Console Configuration
Do the following steps:
1 User : admin É password: admin É
2 enable É supervisor password: root É
3 setup É mode É Bridge É
4 wan É Interface number (1~8) : 1 É
Protocol É : Ethernet É
vpi_vci : 0 É
33 É
encap : LLC É
5 bridge É gateway É 192.168.0.254 É
6 lanÉaddressÉ 192.168.0.1 É
255.255.255.0É
7 (back to root) write É y É
y É(reboot)
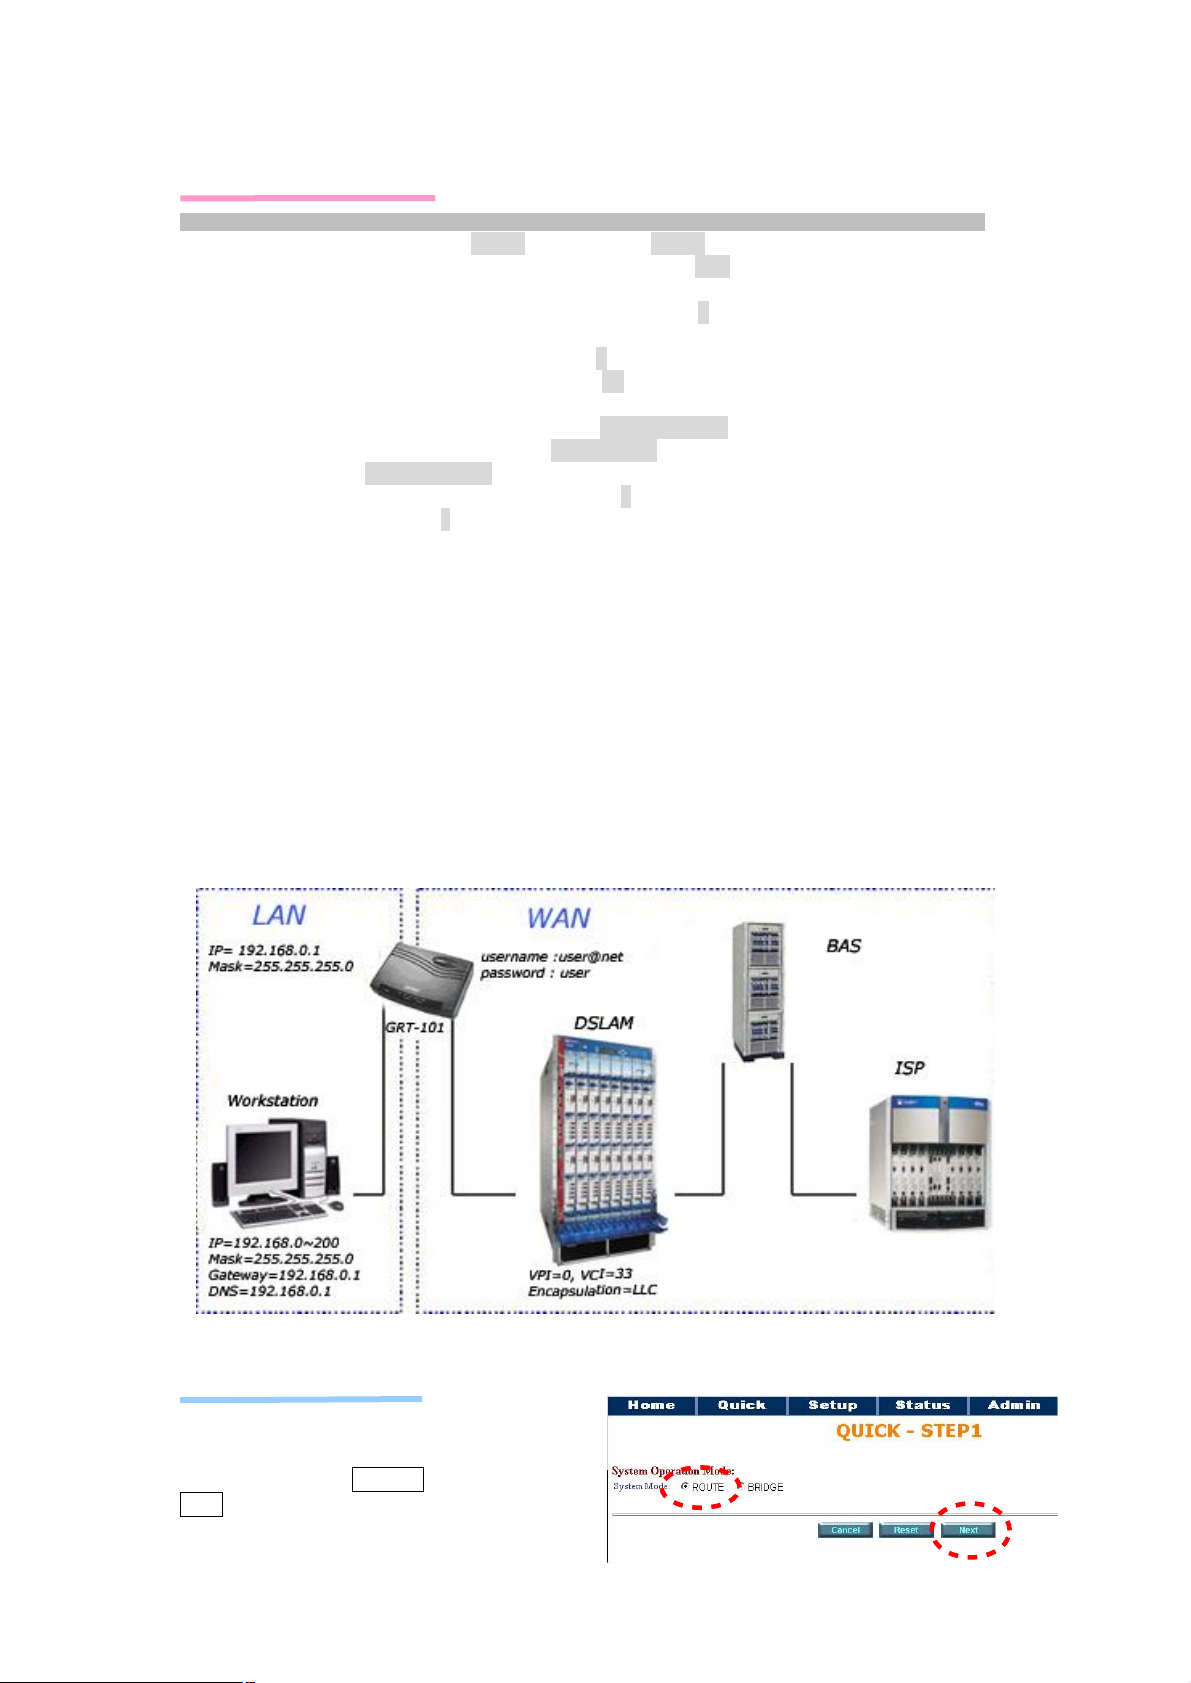
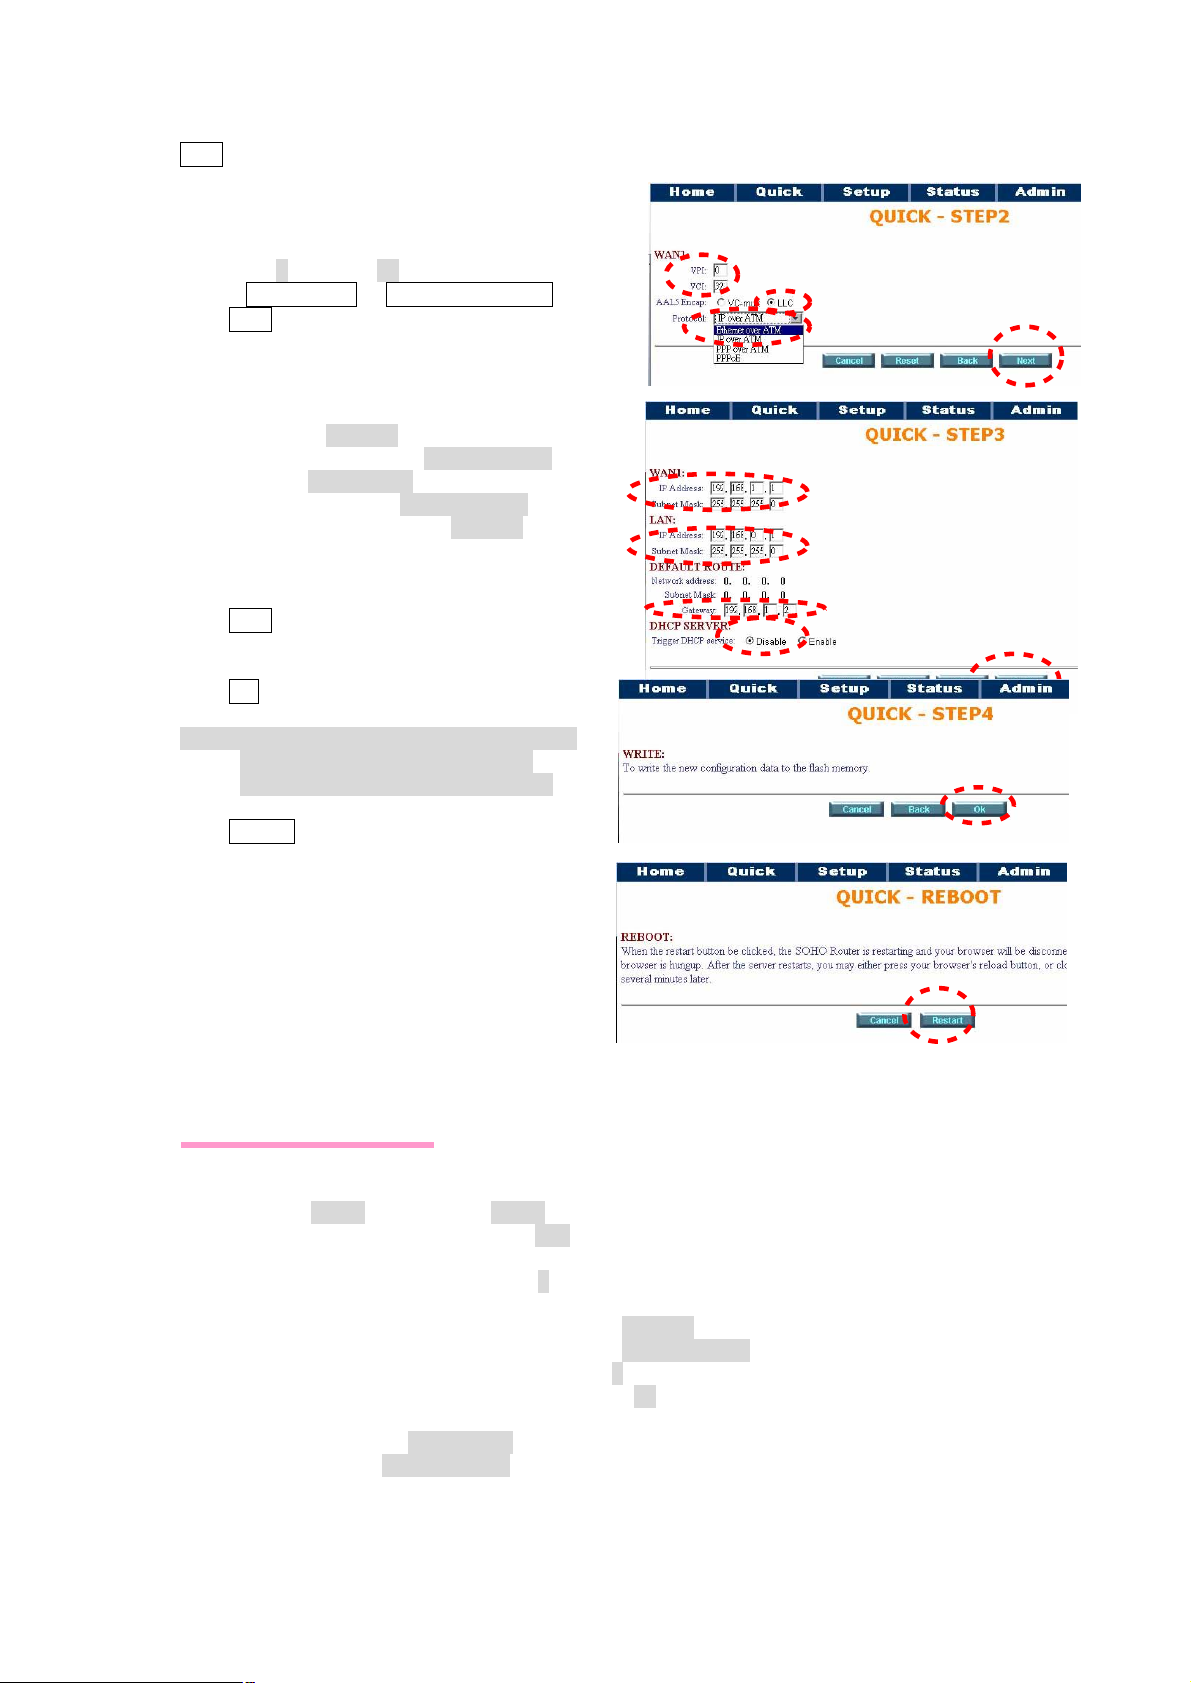
3.3.2 Routing Mode for PPPoA and PPPoE with IP Sharing
Web UI Configuration
For Route Mode with Point-to-Point Protocol
over ATM and Ethernet, follow the following
setting. First select ROUTE and then click
Next for setting others parameters.
- -
12
Page 18
PLANET Technology Corp. GRT-101/401/402 User’s Manual
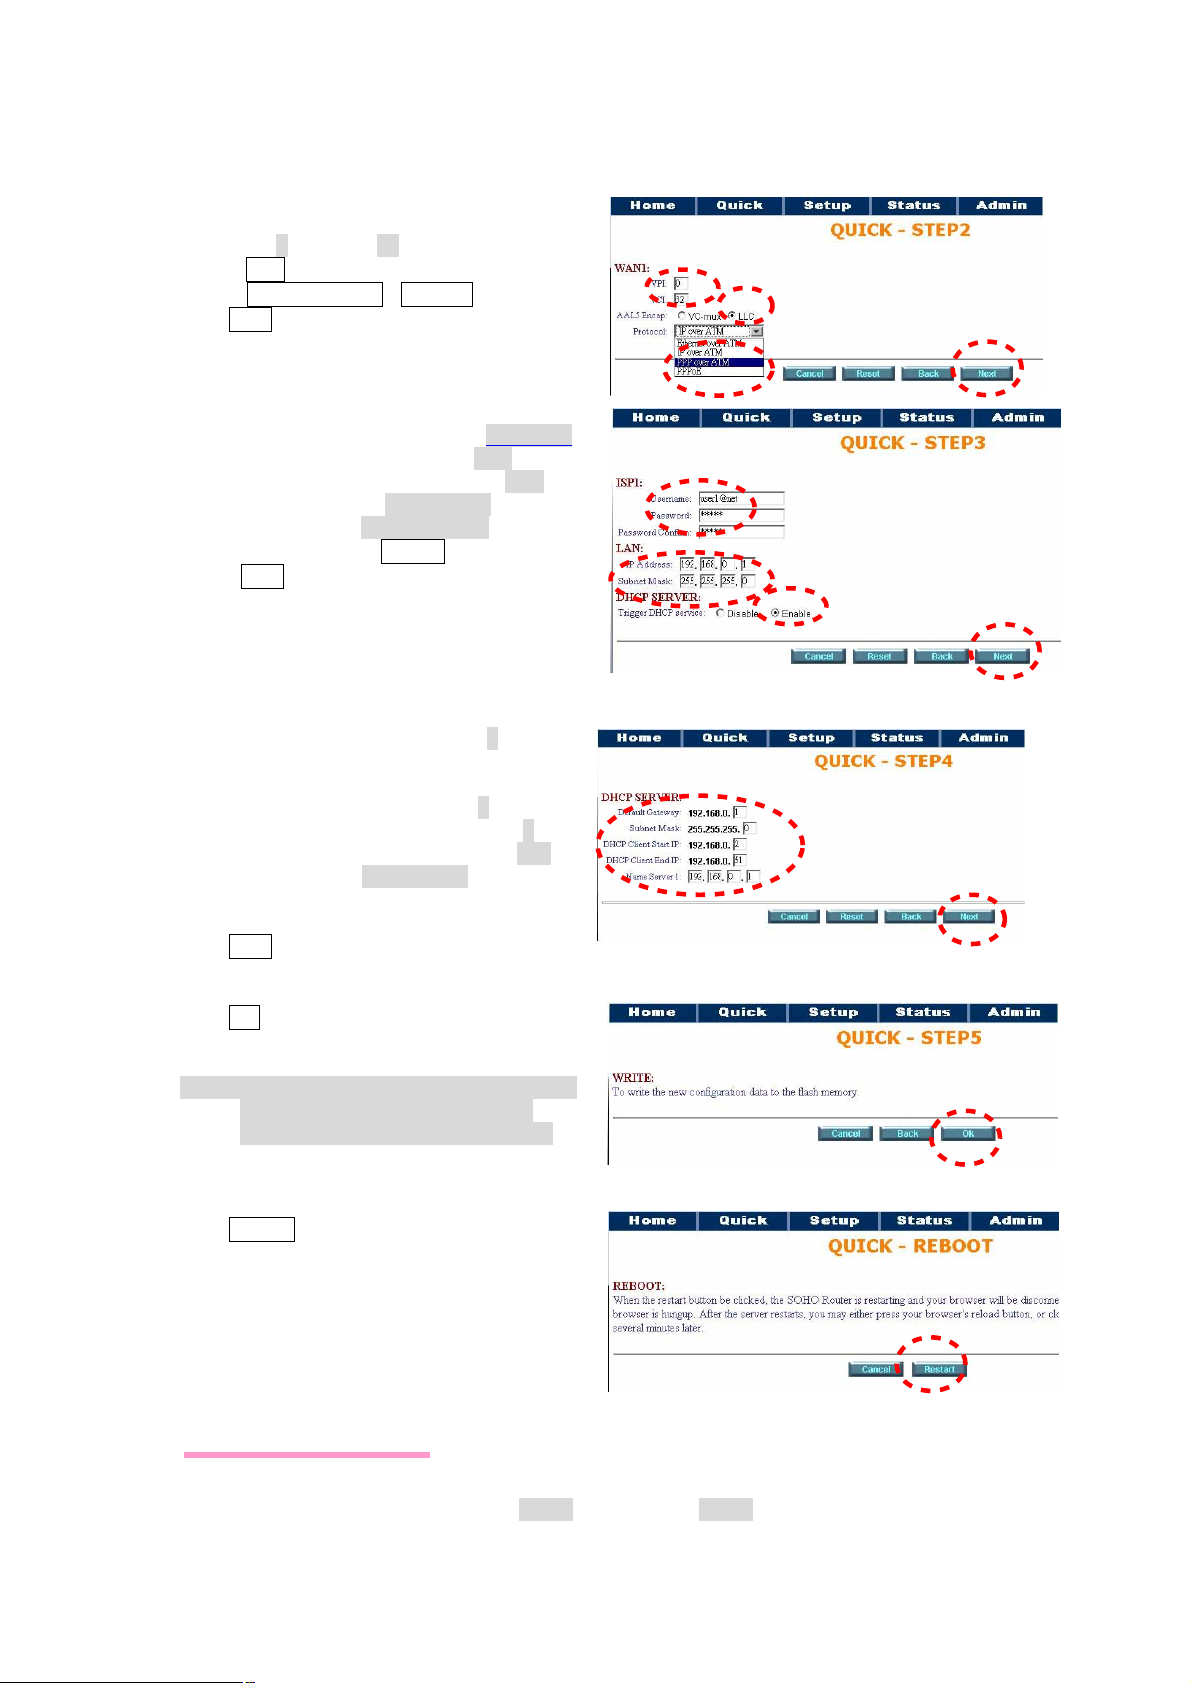
Enter VPI: 0 and VCI: 33
Select: LLC
Select: PPP over ATM or PPPoE
Click Next for ISP, LAN and DHCP server
setting.
Enter user name provided by ISP: user@net
Enter Password provided by ISP:user
Re-enter Password for confirmation: user
Enter LAN IP Address: 192.168.0.1
Enter Subnet Mask: 255.255.255.0
Select DHCP Service: Enable
Select Next for Dynamic Host Configuration
Protocol, DHCP, setting. For DHCP service
disable.
Enter Default Gateway: 192.168.0.1 The
Gateway is pointed to the LAN IP of
GRT-101/GRT-401/GRT-402.
Enter Subnet Mask: 255.255.255.0
Enter DHCP Client Start IP: 192.168.0.2
Enter DHCP Client End IP: 192.168.0.200
Enter Name Server: 192.168.0.1
The DNS server is embedded in
GRT-101/GRT-401/GRT-402.
Click Next to write the new setting.
Click OK to write the new configuration data
to the flash memory.
Note: You have to do that otherwise the new
configuration parameters will not
affect GRT-101/GRT-401/GRT-402.
Click Restart to reboot.
GRT-101/GRT-401/GRT-402 will reboot with
the new setting.
After rebooting, GRT-101/GRT-401/GRT-402
will work with the new configuration.
Console Configuration
Do the following steps:
1. User : admin É password: admin É
- -
13
Page 19
PLANET Technology Corp. GRT-101/401/402 User’s Manual
2. enable É supervisor password: root É
3. setup É mode É Route É
4. wan É Interface number (1~8) : 1 É
protocol É PPPoA or PPPoE É
vpi_vci É 0 É
33 É
encap É LLC É
isp Éaccount: user@net É
password: user É
idle time out: 0 ~ 300 É (the unit is in minute)
5. lan É address É 192.168.0.1 É
255.255.255.0 É
attrib É Virtual É
6. (back to root) write É y É
y É(reboot)
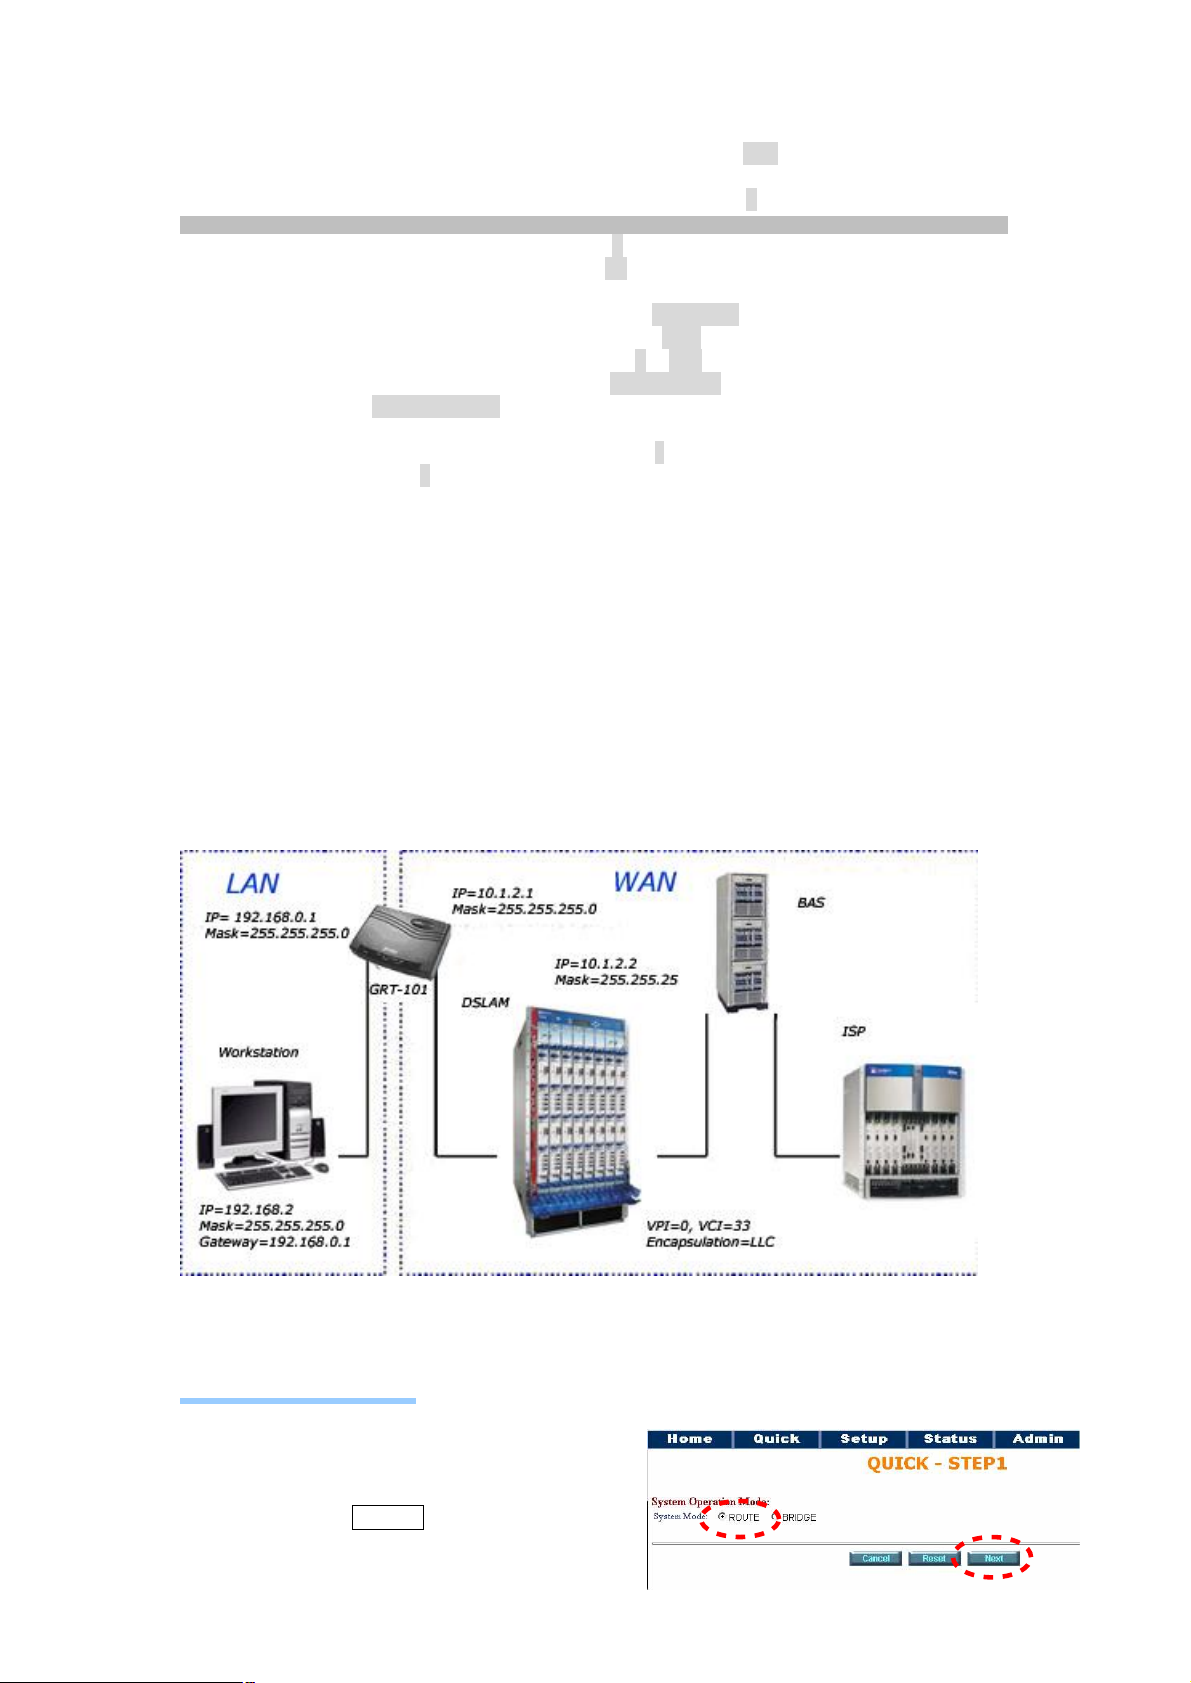
3.3.3 Routing Mode for IPoA or EoA
Web UI Configuration
For Route Mode with Classical IP over ATM
and Ethernet over ATM, follow the following
setting. First select ROUTE and then click
- -
14
Page 20
PLANET Technology Corp. GRT-101/401/402 User’s Manual
Next for setting others parameters.
Enter VPI: 0 and VCI: 33
Select: IP over ATM or Ethernet over ATM
Click Next
Enter WAN1 IP: 10.1.2.1
Enter WAN1 Subnet Mask: 255.255.255.0
Enter LAN IP: 192.168.0.1
Enter LAN Subnet Mask:255.255.255.0
Enter Default Route Gateway: 10.1.2.2
For DHCP enable setting, refer to DHCP
setting of Routing Mode with PPPoA or
PPPoE with IP Sharing .
Click Next
Click OK to write the new configuration data to
the flash memory.
Note: You have to do that otherwise the new
configuration parameters will not
affect GRT-101/GRT-401/GRT-402.
Click Restart to reboot.
GRT-101/GRT-401/GRT-402 will reboot with
the new
setting.
Console Configuration
Do the following settings:
1. User : admin É password: admin É
2. enable É supervisor password: root É
3. setup É mode É Route É
4. wan É Interface number (1~8) : 1 É
protocol É IPoA or EoA É
address É 10.1.2.1 É
255.255.255.0 É
vpi_vci É 0 É
encap É LLC É
5. lan É address É 192.168.0.1 É
255.255.255.0 É
attrib É virtual É
6. route É static É add É
- -
15
33 É
Page 21
PLANET Technology Corp. GRT-101/401/402 User’s Manual
IP address: 0.0.0.0
Subnet mask: 0.0.0.0
Gateway: 10.1.2.2
7. (back to root) write É y É
y É(reboot)
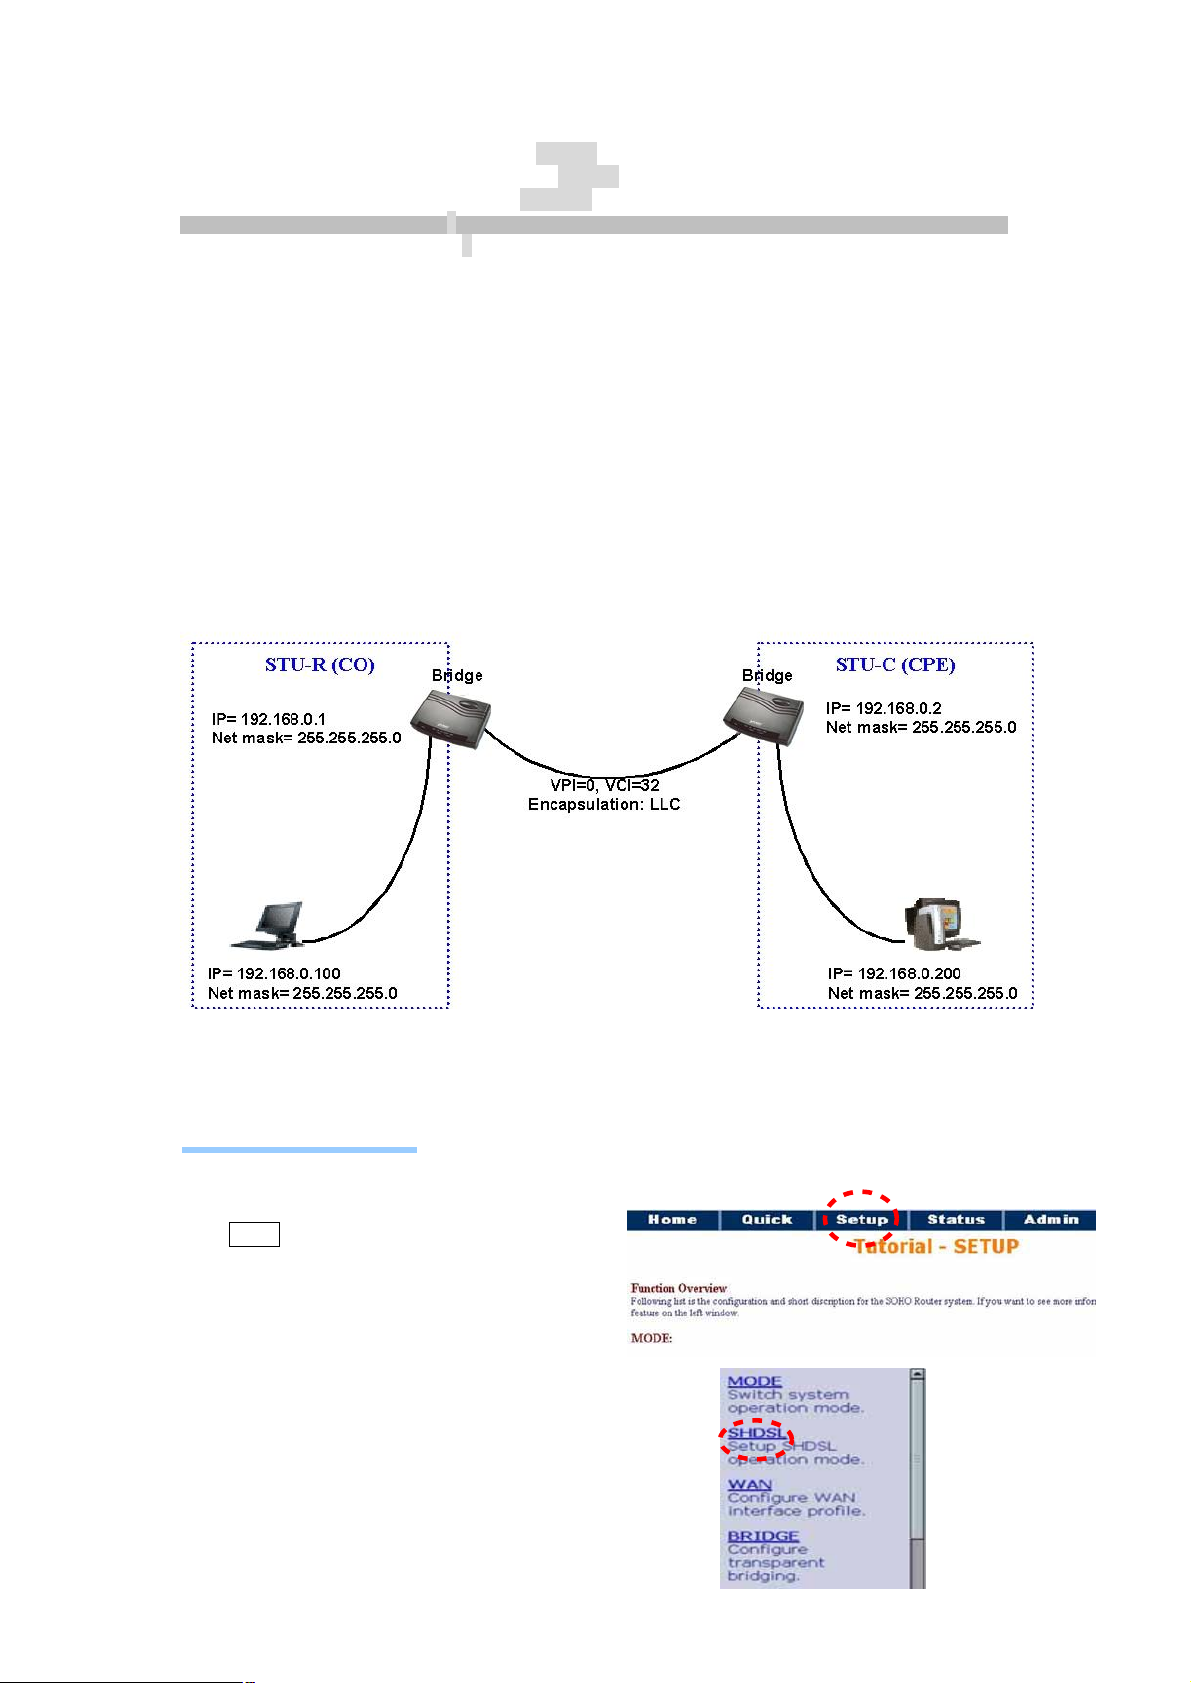
3.3.4 LAN-to-LAN Connection with Bridge Mode
Web UI Configuration
STU-R (CO) side
Click setup to setup the bridge as CO.
Follow the instruction.
Click SHDSL in left side scroll bar to setup the
SHDSL operation mode.
- -
16
Page 22

PLANET Technology Corp. GRT-101/401/402 User’s Manual
Click CO SIDE for setting the bridge as CO.
Click Finish for saving the setting.
Setup the CO Router in bridge mode. The
gateway of CO Router is pointed to LAN IP,
192.168.0.2, of CPE Router.
STU-C (CPE) side
Follow the above instruction. The only
difference in this configuration is that users
have to choose CPE SIDE instead of CO SIDE.
Setup the CPE Router in bridge mode. The
gateway of CPE Router is pointed to LAN IP,
192.168.0.1, of CO Router.
Console Configuration
Do the following steps in STU-R side:
1. User : admin É password: admin É
2. enable É supervisor password: root É
3. setup É mode É Bridge É
shdsl É STU-R É
4. wan É Interface number (1~8) : 1 É
5. lanÉaddressÉ 192.168.0.1É
255.255.255.0É
6. (back to root) write É y É
y É(reboot)
Do the following steps in STU-C side:
1. User : admin É password: admin É
2. enable É supervisor password: root É
3. setup É mode É Bridge É
shdsl É STU-C É
4. wan É Interface number (1~8) : 1 É
5. lanÉaddressÉ 192.168.0.2 É
255.255.255.0É
6. (back to root) write É y É
y É(reboot)
Protocol É : Ethernet É
vpi_vci : 0 É
33 É
encap : LLC É
Protocol É : Ethernet É
vpi_vci : 0 É
33 É
encap : LLC É
- -
17
Page 23

PLANET Technology Corp. GRT-101/401/402 User’s Manual
3.3.5 Advanced Setup
Advanced configuration contains SHDSL, WAN, Bridge, Route, NAT/DMZ and
Virtual server parameters.
SHDSL
You can setup the Annex type, data rate and SNEXT margin for SHDSL
parameters in SHDSL.
Click SHDSL
Annex Type: There are two Annex types, Annex A and Annex B, in SHDSL.
Link Type: For GRT-402 only, support two link type, 4-wire mode with 4.608
Mbps data rate and 2-wire mode with 2.304 Mbps data rate.
Data Rate: you can setup the SHDSL data rate in the multiple of 64kbps.
SHDSL SNEXT margin: the margin range is from –10 to 10.
The screen will prompt the
parameters that will be written in
machine. Be sure to confirm the
modified parameters before
rebooting and activating these
changes in
- -
18
Page 24

PLANET Technology Corp. GRT-101/401/402 User’s Manual
GRT-101/GRT-401/GRT-402.
Press Restart button to restart GRT-101/GRT-401/GRT-402 working with new
parameters or press continue to setup another parameter.
WAN
GRT-101/GRT-401/GRT-402 supports up to 8 PVCs for WAN connections. You
may specify these parameters in WAN configuration menu.
The WAN Number 1 will be the parameters setup in Basic Setup. If you want to
setup another PVC, you can configure them in WAN 2 to WAN 8.
Please enter the
necessary parameters.
After inserting the
parameters, please
press Finish to
complete WAN
configuration.
.
- -
19
Page 25

PLANET Technology Corp. GRT-101/401/402 User’s Manual
The screen will prompt the parameters that will be written in
GRT-101/GRT-401/GRT-402. Please confirm these parameters before
writing in machine.
Press Restart to restart GRT-101/GRT-401/GRT-402 working with new
parameters or press continue to setup another parameter.
Bridge
The bridge mode can be setup the static bridge parameters.
Click Bridge to start Bridge configuration.
Press Add to add the static bridge
information.
The screen will prompt the
parameters that will be written in
GRT-101/GRT-401/GRT-402. Check
the parameters before writing in
machine.
Press Restart to restart GRT-101/GRT-401/GRT-402 working with new
parameters or press continue to setup another parameter.
- -
20
Page 26

PLANET Technology Corp. GRT-101/401/402 User’s Manual
Route
If GRT-101/GRT-401/GRT-402 is connected to more than one network, it may
be necessary to set up a static route between them. A static route is a
pre-determined pathway that network information must travel to reach a
specific host or network.
With Dynamic Routing, you can enable GRT-101/GRT-401/GRT-402 to
automatically adjust to physical changes in the network’s layout. The
Cable/DSL Firewall Router, using the RIP protocol, determines the network
packets’ route based on the fewest number of hops between the source and
the destination. The RIP protocol regularly broadcasts routing information to
other routers on the network.
Click Route to modify the routing information.
To modify the RIP (Routing
information protocol) Parameters:
RIP Mode: Enable
Auto RIP Summary: Enable
Press Modify
RIP Mode: this parameter determines how the product handle RIP (Routing
- -
21
Page 27

PLANET Technology Corp. GRT-101/401/402 User’s Manual
information protocol). RIP allows it to
exchange routing information with
other router. If set to Disable, the
gateway does not participate in any
RIP exchange with other router. If set
Enable, GRT-101/GRT-401/GRT-402
broadcasts the routing table of
GRT-101/GRT-401/GRT-402 on the
LAN and incoporates RIP broadcast
by other routers into it’s routing table. If set silent, GRT-101/GRT-401/GRT-402
does not broadcast the routing table, but it accepts RIP broadcast packets that
it receives.
RIP Version: It determines the format
and broadcasting method of any RIP
transmissions by the gateway.
RIP v1: it only sends RIP v1 messages
only.
RIP v2: it send RIP v2 messages in
multicast and broadcast format.
Authentication required.
None: for RIP, there is no need of
authentication code.
Password: the RIP is protected by
password, authentication code.
MD5: The RIP will be decoded by
MD5 than protected by password,
authentication code.
Poison Reserve is for the purpose of
promptly broadcast or multicast the
RIP while the route is changed. (ex
shuting down one of
GRT-101/GRT-401/GRT-402 in
routing table)
Enable: machine will actively
broadcast or multicast the
information.
Disable: machine will not broadcast or multicast the information.
After modifying the RIP parameters, press finish.
The screen will prompt the modified parameter. Check the parameters and
perss Restart to restart GRT-101/GRT-401/GRT-402 or press Continue to
setup another parameters.
- -
22
Page 28

PLANET Technology Corp. GRT-101/401/402 User’s Manual
NAT/DMZ
NAT (Network Address Translation) is the translation of an Internet Protocol
address (IP address) used within one network to a different IP address known
within another network. One network is designated the inside network and the
other is the outside. Typically, a company maps its local inside network
addresses to one or more global outside IP addresses and reverse the global
IP addresses of incoming packets back into local IP addresses. This ensure
security since each outgoing or incoming request must go through a translation
process, that also offers the opportunity to qualify or authenticate the request or
match it to a previous request. NAT also conserves on the number of global IP
addresses that a company needs and lets the company to use a single IP
address of its communication in the Internet world.
DMZ (demilitarized zone) is a computer host or small network inserted as a
“neutral zone” between a company private network and the outside public
network. It prevents outside users from getting direct access to a server that
has company private data.
In a typical DMZ configuration for an enterprise, a separate computer or host
receives requests from users within the private network to access via Web sites
or other companies accessible on the public network. The DMZ host then
initiates sessions for these requests to the public network. However, the DMZ
host is not able to initiate a session back into the private network. It can only
forward packets that have already been requested.
Users of the public network outside the company can access only the DMZ
host. The DMZ may typically also have the company’s Web pages so these
could serve the outside world. However, the DMZ provides access to no other
company data. In the event that an outside user penetrated the DMZ host’s
security, the Web pages might be corrupted, but no other company information
would be exposed.
Press NAT/DMZ to setup the parameters.
If you want to enable the NAT/DMZ
functions, click Enable. Enable the
DMZ host Function is used the IP
address assigned to the WAN for
enabling DMZ function for the
virtual IP address.
Multi-DMZ: Some users who have
two or more global IP addresses
assigned by ISP can be used the
multi DMZ. The table is for the
mapping of global IP address and
virtual IP address.
Multi-NAT: Some of the virtual IP
- -
23
Page 29

PLANET Technology Corp. GRT-101/401/402 User’s Manual
addresses (eg: 192.168.0.10 ~ 192.168.0.50) collectively use two of the global
IP addresses (eg: 69.210.1.9 and 69.210.1.10). The Multi-NAT table will be
setup as;
Virtual Start IP Address: 192.168.0.10
Count: 40
Global Start IP Address:
69.210.1.9
Count: 2
Press Finish to continue.
The screen will prompt the
parameters that will be written in
GRT-101/GRT-401/GRT-402.
Check the parameters before
writing in GRT-101/GRT-401/GRT-402. Press Restart to restart
GRT-101/GRT-401/GRT-402 working with new parameters or Continue to
configure another parameter.
Virtual Server
For example: Specific ports on the WAN interface are re-mapped to services
inside the LAN. As only 69.210.1.8 (e.g., assigned to WAN from ISP) is visible
to the Internet, but does not actually have any services (other than NAT of
course) running on gateway, it is said to be a virtual server. Request with TCP
made to 69.210.1.8:80 are remapped to the server 1 on 192.168.0.2:80, other
requests with UDP made to 69.210.1.8:25 are remapped to server 2 on
192.168.0.3:25.
Click Virtual Server to configure the parameters.
Type the necessary parameters
then click Finish.
Press Restart to restart
GRT-101/GRT-401/GRT-402 or
press continue to setup another
function.
- -
24
Page 30

PLANET Technology Corp. GRT-101/401/402 User’s Manual
3.3.6 Administration
This session introduces security and simple network management protocol
(SNMP) and time synchronous.
Security
For system secutiry, suggest to change the default user name and password in
the first setup otherwise unauthorized persons can access
GRT-101/GRT-401/GRT-402 and change the parameters.
There are three ways to configure GRT-101/GRT-401/GRT-402, Web browser,
telnet and serial console.
Press Security to setup the parameters.
For greater security, change the
Supervisor ID and password for the
gateway. If you don’t set them, all
users on your network can be able to
access the gateway using the default
IP and Password root.
You can authorize five legal users to
access GRT-101/GRT-401/GRT-402
via telnet or console. There are two UI
modes, menu driven mode and
command mode to configure
GRT-101/GRT-401/GRT-402.
Legal address pool will setup the legal
IP addresses from which authorized
person can configure the gateway.
This is the more secure function for
network administrator to setup the
legal address of configuration.
Click Finish to finish the setting.
The browser will prompt the
configured parameters and check it
before writing into
GRT-101/GRT-401/GRT-402.
- -
25
Page 31

PLANET Technology Corp. GRT-101/401/402 User’s Manual
Press Restart to restart the gateway working with the new parameters and
press Continue to setup other parameters.
SNMP
Simple Network Management Protocol (SNMP) is the protocol not only
governing network management, but also the monitoring of network devices
and their functions.
GRT-101/GRT-401/GRT-402 can generate SNMP traps to indicate alarm
conditions, and it relies on SNMP community strings to implement SNMP
security. This gateway support MIB II.
Click SNMP to configure the parameters.
In the table of current community pool,
you can setup the access authority.
In the table of current trap host pool,
you can setup the trap host.
Press Modify to modify the community
pool.
SNMP status: Enable
Access Right: Deny for deny all access
Access Right: Read for access read
- -
26
Page 32

PLANET Technology Corp. GRT-101/401/402 User’s Manual
only
Access Right: Write for access read and write.
Community: it serves as password for access right.
After configuring the community pool, press OK.
Click Modify to modify the trap host
pool.
Version: select version for trap host.
IP: type the trap host IP
Community: type the community
password.
Press OK to finish the setup.
The browser will prompt the configured parameters and check it before writing
into GRT-101/GRT-401/GRT-402.
Press Restart to restart the gateway working with the new parameters and
press Continue to setup other parameters.
Time Sync
Time synchronization is an essential element for any business that relies on an
IT system. The reason for this is that these systems all have clocks that are the
source of time for files or operations they handle. Without time synchronization,
time on these systems varies with each other or with the correct time and this
can cause-, firewall packet filtering schedule processes to fail, security to be
compromised, system log exposures with wrong data.
Click TIME SYNC.
There are two synchronization
modes: Sample Network Time Protocol (SNTP) and synchronization with PC.
For synchronization with PC, select Sync with PC. The gateway will
synchronize the time with the
connecting PC.
SNTP is the acronym for Simple
Network Time Protocol, which is
an adaptation of the Network
- -
27
Page 33

PLANET Technology Corp. GRT-101/401/402 User’s Manual
Time Protocol (NTP) used to synchronize computer clocks in the Internet.
SNTP can be used when the ultimate performance of the full NTP
implementation.
For SNTP, select SNTP v4.0.
SNTP service: Enable
Time Server: All of the time server around the world can be used but suggest
to use the time server nearby.
Time Zone: you have to choose the right time zone.
Press Finish to finish the setup. The browser will prompt the configured
parameters and check it before writing into GRT-101/GRT-401/GRT-402.
Config Tool
This configuration tool has three functions: load Factory Default, Restore
Configuration and Backup Configuration.
Press Config Tool.
Choose the function and then press finish.
Ø Load Factory Default function: it will load the factory default parameters to
the gateway.
Note: If this function is chosen, and activated. All of the settings in
GRT-101/GRT-401/GRT-402 will be restored to factory default configurations.
Ø Restore Configuration: Sometime the configuration will be crushed
unintentionally. Restore configuration will help you to recover the backup
configuration easily.
² Click Finish after selecting Restore Configuration.
² Browse the route of backup file then press finish.
GRT-101/GRT-401/GRT-402 will automatically restore the saved
configuration.
Ø Backup Configuration: After
configuration, suggest to use
the function to backup your
router parameters in the PC.
² Select the Backup
Configuration and then press
Finish.
Browse the place of backup file named backup. Press Finish.
GRT-101/GRT-401/GRT-402 will automatically backup the configuration.
- -
28
Page 34

PLANET Technology Corp. GRT-101/401/402 User’s Manual
Upgrade
You can upgrade the gateway using the upgrade function. Press Upgrade.
Browse the file and press OK
button to upgrade. The system will
reboot automatically after finishing.
Restart
For restarting GRT-101/GRT-401/GRT-402, click the Restart in UTILITY menu.
Press Restart to reboot
GRT-101/GRT-401/GRT-402.
3.3.7 Status
You can monitor the SHDSL status including mode, Tx power and Bitrate and
Performance information including SNR margin, atteunation and CRC error
count.
LAN status will prompt the MAC address, IP address, Subnet mask and DHCP
client table.
WAN status will display the WAN interface information.
You can view the routing table in the status of route.
Interface status inculdes LAN and WAN statistics information.
- -
29
Page 35

PLANET Technology Corp. GRT-101/401/402 User’s Manual
3.4 Command Line Interface
For serial console and Telnet management, GRT-101/GRT-401/GRT-402
implements two operational interfaces: command line interface (CLI) and
menu driven interface. The CLI mode provides users a simple interface, which
is better for working with script file. The menu driven interface is a user-friendly
interface to general operations. The command syntax for CLI is the same as
that of the menu driven interface. The only difference is that the menu driven
interface shows you all of available commands for you to select. You don’t
need to remember the command syntax and save your time on typing the
whole command line.
The following figure gives you an example of the menu driven interface. In the
menu, you scroll up/down by pressing key I / K, select one command by key L,
and go back to a higher level of menu by key J. For example, to show the
system information, just logon to GRT-101/GRT-401/GRT-402, move down the
cursor by pressing key K twice and select “show” command by key L, you shall
see a submenu and select “system” command in this submenu, then the
system will show you the general information.
In this chapter, all configuration procedures are explained by command line
examples with necessary parameters. When operating in the menu driven
interface, just select the corresponding command items from the menu
hierarchy to configure the same setting.
- -
30
Page 36

PLANET Technology Corp. GRT-101/401/402 User’s Manual
Note: GRT-101/GRT-401/GRT-402 invokes menu driven interface when first time logon with default user profile
“admin”. Both interfaces have on-line help information. To get on-line help, type “?” for CLI mode or press CTRL+Q
for menu driven interface.
3.4.1 Multi-level password protection
When you login via serial console or Telnet, GRT-101/GRT-401/GRT-402
defaults to a program execution (read-only) privileges to you. To change the
configuration and write changes to nonvolatile RAM (NVRAM), you must work
in enable mode. Follow the steps below to invoke the enable mode:
admin> enable
Supervisor password: ****
Note: The supervisor password is the same as that for web management interface. If you have not change password
setting for the web interface of GRT-101/GRT-401/GRT-402, enter “root” to enter GRT-101/GRT-401/GRT-402. For
more security issues for remote management interfaces such as Telnet and web interface, see section 3.15
Management Security.
You are now in enable mode. The system prompt appears:
admin#
Follow the steps below to change the user interface:
To select menu driven interface for user profile 1 (default user profile), enter:
- -
31
Page 37

PLANET Technology Corp. GRT-101/401/402 User’s Manual
admin# admin user modify 1 attrib menu
The following command select CLI mode for user profile 1:
admin# admin user modify 1 attrib command
To save your changes enter:
admin# write
To enable your changes, reboot the system:
admin# reboot
For the menu interface, there is a method to enable CLI mode temporarily for
script input. By pressing CTRL+U simultaneously, you can see the CLI system
prompt in the command line window:
Command Line Window...
admin#
Press CTRL+U again in the command line window to back to the menu driven
interface.
Note: See section 3.14 User Profile for more information on how to add, delete, modify, and list user profile.
3.4.2 Menu Driven Command Line Interface
Before applying any changes into machine, it is suggested to ensure the
modifications, and operations in GRT-101/GRT-401/GRT-402’s CLI menu
driven configurations.
Following table is the main CLI menu.
Keystroke
[UP] or I Move to above field in the same level menu.
[DOWN] or K Move to below field in the same lever menu.
[LEFT] or J Move back to previous menu.
[RIGHT] or L Move forward to submenu.
[ENTER] Move forward to submenu.
[TAB] To choose another parameters.
Ctrl + C To quit the configuring item.
Ctrl + Q For help
Description
3.4.3 Command Line Interface Menu Tree
Command line menu tree are shown in the following figures. All of the
- -
32
Page 38

PLANET Technology Corp. GRT-101/401/402 User’s Manual
configuration commands are placed in the subdirectories of Enable protected
by supervisor password. On the other hand, unauthorized user cannot change
any configurations but viewing the status and configuration of
GRT-101/GRT-401/GRT-402 and using ping command to make sure machine
network status.
- -
33
Page 39

PLANET Technology Corp. GRT-101/401/402 User’s Manual
- -
34
Page 40

PLANET Technology Corp. GRT-101/401/402 User’s Manual
- -
35
Page 41

PLANET Technology Corp. GRT-101/401/402 User’s Manual
- -
36
Page 42

PLANET Technology Corp. GRT-101/401/402 User’s Manual
To start machine configuration, please move the cursor “ >>” to enable and
press enter key. GRT-101/GRT-401/GRT-402 will prompt for password for
enable mode, insert the supervisor password. (Default supervisor password is
root.) .
---------------------------------------------------------------------Command: enable <CR>
Message: Please input the following information.
Supervisor password: ****
---------------------------------------------------------------------In this sub menu, you can setup management parameters, upgrade machine
firmware, backup and restore system configurations via utility menu.
>> enable Modify command privilege
setup Configure system
status Show running system status
- -
37
Page 43

PLANET Technology Corp. GRT-101/401/402 User’s Manual
show View system configuration
write Update flash configuration
reboot Reset and boot system
ping Packet internet groper command
admin Setup management features
utility TFTP upgrade utility
exit Quit system
3.4.4 Status
You can view running system status of SHDSL, WAN, route and interface via
status command.
Move cursor “ >> “ to status and press enter.
>> shdsl Show SHDSL status
wan Show WAN interface status
route Show routing table
interface Show interface statistics status
3.4.5 Show
You can view the system information; configuration and configuration in
command script by show command.
Move cursor “ >> “ to show and press enter.
>> system Show general information
config Show all configuration
script Show all configuration in command script
3.4.6 Write
For any changes of configuration, you must write the new configuration to
EPROM using write command and reboot GRT-101/GRT-401/GRT-402 to
take affect.
Move cursor to “ >> “ to write and press enter.
---------------------------------------------------------------------Command: write <CR>
Message: Please input the following information.
Are you sure? (y/n): y
----------------------------------------------------------------------
- -
38
Page 44

PLANET Technology Corp. GRT-101/401/402 User’s Manual
3.4.7 Reboot
To reboot GRT-101/GRT-401/GRT-402, use reboot command. Move cursor to
“ >> “ to write and press enter.
--------------------------------------------------------------------Command: reboot <CR>
Message: Please input the following information.
Do you want to reboot? (y/n): y
---------------------------------------------------------------------
3.4.8 Ping
Ping command will be used to test the connection of router. Move cursor “ >>
“ to ping and press enter.
--------------------------------------------------------------------Command: ping <ip> [1~65534|-t] [1~1999]
Message: Please input the following information.
IP address <IP> : 10.0.0.1
Number of ping request packets to send (TAB select): 1~65534
Data size [1~1999]: 32
---------------------------------------------------------------------
3.5 Administration
You can modify the user profile, telnet access, SNMP (Simple Network
Management Protocol), supervisor information and SNTP (Simple Network
Time Protocol) in machine enable mode.
For configuration the parameters, move the cursor “ >> “ to admin and press
enter.
>> user Manage user profile
security Setup system security
snmp Configure SNMP parameter
passwd Change supervisor password
Id Change supervisor ID
sntp Configure time synchronization
3.5.1 User Profile
You can use user command to clear, modify and list the user profile. You can
setup at most five users to access GRT-101/GRT-401/GRT-402 via console
- -
39
Page 45

PLANET Technology Corp. GRT-101/401/402 User’s Manual
port or telent in user profile table however users who have the supervisor
password can change the configuration of GRT-101/GRT-401/GRT-402. Move
the cursor “ >> “ to user and press enter key.
>> clear Clear user profile
modify Modify the user profile
list List the user profile
You can delete the user by number using clear command. If you do not make
sure the number of user, you can use list command to check it. Modify
command is to modify an old user information or add a new user to user
profile.
3.5.2 Security
Security command can be configured ten legal IP address for telnet access
and port number.
Move the cursor “ >> “ to security and press enter. The default legal address
is 0.0.0.0. It means that there is no restriction of IP to access
GRT-101/GRT-401/GRT-402 via telnet.
>> port Configure telent TCP port
ip_pool Legal address IP address pool
list Show security profile
3.5.3 SNMP
Simple Network Management Protocol (SNMP) is the protocol not only
governing network management, but also the monitoring of network devices
and their functions. GRT-101/GRT-401/GRT-402 can generate SNMP traps to
indicate alarm conditions, and it relies on SNMP community strings to
implement SNMP security. This router support MIB II.
Move the cursor “ >> “ to snmp and press enter.
>> community Configure community parameter
trap Configure trap host parameter
3.5.4 Supervisor Password and ID
The supervisor password and ID are the last door for security but the most
important. Users who access GRT-101/GRT-401/GRT-402 via web browser,
console port or telnet have to use the ID and password to configure
GRT-101/GRT-401/GRT-402. Suggest to change the ID and password.
- -
40
Page 46

PLANET Technology Corp. GRT-101/401/402 User’s Manual
3.5.5 SNTP
Time synchronization is an essential element for any business that relies on an
IT system. The reason for this is that these systems all have clocks that are the
source of time for files or operations they handle. Without time synchronization,
time on these systems varies with each other or with the correct time and this
can cause- virtual server schedule processes to fail and system log exposures
with wrong data. There are two methods to synchronize time, synchronize with
PC or SNTPv4. If you choose synchronize with PC,
GRT-101/GRT-401/GRT-402 will synchronize with PC. If you choose SNTPv4,
GRT-101/GRT-401/GRT-402 will use the protocol to synchronize with the time
server.
Move the cursor “ >> “ to sntp and press enter.
>> method Select time synchronization method
service Tigger SNTP v4.0 service
time_server1 Configure time server 1
time_server2 Configure time server 2
time_server3 Configure time server 3
updaterate Configure update period
time_zone Configure GMT time zone offset
list Show SNTP configuration
3.6 Utility
There are three utility tools, upgrade, backup and restore, embedded in the
firmware. You can update the new firmware via TFTP upgrade tools and
backup the configuration via TFTP backup tool and restore the configuration
via TFTP restore tool. For upgrade, TFTP server with the new firmware will be
supported by supplier but for backup and restore, you must have your own
TFTP server to backup and restore the file.
Move the cursor “ >> “ to utility and press enter.
>> upgrade Upgrade main software
backup Backup system configuration
Restore Restore system configuration
3.7 Exit
If you want to exit the system without saving, use exit command to quit
- -
41
Page 47

PLANET Technology Corp. GRT-101/401/402 User’s Manual
system.
3.8 Setup
All of the setup parameters are located in the subdirectories of setup. Move the
cursor “ >> “ to setup and press enter.
>> mode Switch system operation mode
shdsl Configure SHDSL parameters
wan Configure WAN interface profile
bridge Configure transparent bridging
route Configure routing parameters
lan Configure LAN interface profile
ip_share Configure NAT/PAT parameters
dhcp Configure DHCP parameters
dns_proxy Configure DNS proxy parameters
hostname Configure local host name
default Restore factory default setting
3.8.1 Mode
The product can act as routing mode or bridging mode. The default setting is
routing mode. You can change the system operation mode by using mode
command. Move the cursor “ >> “ to mode and press enter.
--------------------------------------------------------------------Command: setup mode <Route|Bridge>
Message: Please input the following information.
System operation mode (TAB select) <Route>: Route
---------------------------------------------------------------------
3.8.2 SHDSL
You can setup the SHDSL parameters by the command shdsl. Move the
cursor “ >> “ to shdsl and press enter.
>> mode Configure SHDSL mode
link (GRT-402 only) Configure SHDSL link
n*64 Configure SHDSL data rate
type Configure SHDSL annex type
clear Clear current CRC error count
margin Configure SHDSL SNR margin
There are two types of SHDSL mode, STU-R and STU-C. STU-R means the
terminal of central office and STU-C customer premises equipment.
- -
42
Page 48

PLANET Technology Corp. GRT-101/401/402 User’s Manual
GRT-402’s link type will be 2-wire or 4-wire mode according to the product.
4-wire product can be worked under 2-wire mode.
You can setup the data rate by the multiple of 64Kbps- n is from 0 to 32. If you
configure n is 0, the product will perform as adaptive mode.
There are two types of SHDSL Annex type, Annex-A and Annex-B.
Clear command can clear CRC error count.
Generally, you cannot need to change SNR margin, which range is from 0 to
10.
3.8.3 WAN
GRT-101/GRT-401/GRT-402 supports up to 8 PVC, private virtual circuit, and
so you can setup eight WAN, WAN1 to WAN8. Move the cursor “ >> “ to wan
and press enter. To setup WAN1, type 1.
--------------------------------------------------------------------Command: setup wan <1~8>
Message: Please input the following information.
Interface number <1~8>: 1
---------------------------------------------------------------------
>> protocol Link type protocol
address IP address and subnet mask
vpi_vci Configure VPI/VCI value
encap Configure encapsulation type
qos Configure VC QoS
isp Configure account name, password and idle time
list WAN interface configuration
There are four types of protocols, IPoA, EoA, PPPoA and PPPoE, which is
supported by your ISP.
For PPPoA and PPPoE, you do not need to setup IP address and subnet
mask.
There is an unique VPI and VCI value for Internet connection supported by ISP.
The range of VIP is from 0 to 255 and VCI from 0 to 65535.
There are two types of encapsulation types, VC-Mux and LLC.
You can setup virtual circuit quality of service, VC QoS, using qos command.
There are two QoS class, UBR and CBR. The peak cell rate can be configured
from 64kbps to 2400kbps.
ISP command can configure account name, password and idle time. Idle time
are from 0 minute to 300 minutes.
You can review the WAN interface configuration via list command.
- -
43
Page 49

PLANET Technology Corp. GRT-101/401/402 User’s Manual
3.8.4 Bridge
You can setup the bridge parameters in bridge command. If the product is
configured as a router, you do not want to setup the bridge parameters. Move
the cursor “ >> “ to bridge and press enter.
>> gateway Default gateway
static Static bridging table
You can setup default gateway IP via gateway command.
You can setup 20 sets of static bridge in static command.
3.8.5 Route
You can setup the routing parameters in route command. If the product is
configured as a bridge, you do not want to setup the route parameters. Move
the cursor “ >> “ to route and press enter.
>> static Configure static routing table
RIP Configure RIP tool
You can setup 20 sets of static route in static command.
3.8.6 LAN
>> address LAN IP address and subnet mask
attrib NAT network type
3.8.7 IP share
>> nat Configure network address translation
pat Configure port address translation
dmz Configure DMZ host function
For more NAT, PAT and DMZ information, review NAT/DMZ section.
- -
44
Page 50

PLANET Technology Corp. GRT-101/401/402 User’s Manual
3.8.8 DHCP
>> generic Configure generic DHCP parameter
fixed Configure fixed host IP address list
list Show DHCP configuration
For more DHCP information, review DHCP server section.
3.8.9 DNS proxy
You can setup three DNS servers in the product. The number 2 and 3 DNS
servers are option. Move cursor “ >> “ to dns_proxy and press enter.
---------------------------------------------------------Command: setup dns_proxy <IP> [IP] [IP]
Message: Please input the following information.
DNS server 1 (ENTER for default) <168.95.1.1>: 10.0.10.1
DNS server 2: 10.10.10.1
DNS server 3:
----------------------------------------------------------
3.8.10 Host name
Enter local host name via hostname command. Move cursor “ >> “ to
hostname and press enter.
------------------------------------------------Command: setup hostname <name>
Message: Please input the following information.
Local hostname (ENTER for default) <SOHO>: test
-------------------------------------------------
3.8.11 Default
If you want to restore factory default, first move the cursor “ >> “ to default and
then press enter.
--------------------------------------------------------------------Command: setup default <name>
Message: Please input the following information.
Are you sure? (Y/N): y
---------------------------------------------------------------------
- -
45
Page 51

PLANET Technology Corp. GRT-101/401/402 User’s Manual
3.9 Connection Mode
GRT-101/GRT-401/GRT-402 supports two connection modes: bridging and
routing. Currently, it comes pre-configured with routing mode. Note that,
routing mode and bridging mode cannot be used simultaneously.
To let GRT-101/GRT-401/GRT-402 operate in bridging mode, type:
admin# setup mode bridge
To save changes enter:
admin# write
To enable your changes, reboot the system:
admin# reboot
To set GRT-101/GRT-401/GRT-402 operating in routing mode, enter:
admin# setup mode route
To save your changes enter:
admin# write
To enable your changes, reboot the system:
admin# reboot
3.10 Bridging Mode
Note: This section is for bridging mode operation only.
When GRT-101/GRT-401/GRT-402 operates in bridging mode, it behaves like
a wire connecting a local PC directly to a service provider’s network. Bridge
data is encapsulated using the RFC1483 protocol to enable data transport.
GRT-101/GRT-401/GRT-402 currently supports IEEE 802.1D transparent
learning bridge.
3.10.1 Bridge management
You can manage GRT-101/GRT-401/GRT-402 using Telnet either from LAN
- -
46
Page 52

PLANET Technology Corp. GRT-101/401/402 User’s Manual
interface or from Wide Area Network (WAN) interface. The following procedure
shows how to set up GRT-101/GRT-401/GRT-402 for bridging management
with IP = 192.168.0.1, subnet mask = 255.255.255.0, and gateway IP =
192.168.0.254:
admin# setup lan 1 address 192.168.0.1 255.255.255.0
admin# setup bridge gateway 192.168.0.254
The IP address should be an IP address on the same network as that of the
“far-end” station. The gateway IP address should be the IP address of the
far-end station that is used to route the LAN packets.
To save your changes enter:
admin# write
To enable your changes, reboot the system:
admin# reboot
Note: The IP address that is assigned to GRT-101/GRT-401/GRT-402, must be an IP address that is on the same
network segment (subnet) that is being bridged. Assigning IP addresses in this fashion enables access via Telnet/web
to GRT-101/GRT-401 for management functions. See section 3.15 Management Security for more information on
security issues.
3.10.2 Static bridge table
This GRT-101/GRT-401/GRT-402 supports a transparent learning bridge,
which will establish the bridge table automatically from the incoming data.
Therefore, it is unnecessary to setup the static bridge table manually. In case
you need to arrange the static bridge table, see the description below.
The following commands show how to setup the static bridge table by “add”
command.
admin# setup bridge static add lan_port forward
admin# setup bridge static add wan1_port filter
admin# setup bridge static add mac 00:30:4f:00:00:01
Note: You must perform the above procedure in the sequence as shown, i.e., port attributes first and MAC finally.
To list the content of the table, use the “list” command:
admin# setup bridge static list
Static Bridging Parameters
- -
47
Page 53

PLANET Technology Corp. GRT-101/401/402 User’s Manual
1. MAC Address : 00:30:4f:00:00:01
<Interface Operation>
LAN 1(Forward) WAN 1( Filter) WAN 2( Filter) WAN 3( Filter)
WAN 4( Filter) WAN 5( Filter) WAN 6( Filter) WAN 7( Filter)
WAN 8( Filter)
To modify the first entry in the table, use the “modify” command:
admin# setup bridge static modify 1 mac 00:30:4f:00:00:01
admin# setup bridge static modify 1 lan_port filter
admin# setup bridge static modify 1 wan1_port forward
To delete the first entry of the table, use the “delete” command:
admin# setup bridge static delete 1
To save your changes, enter:
admin# write
3.11 Routing Mode
Note: This section is for routing mode operation only.
Routing is often confused with bridging, which performs a similar function. The
principal difference is that bridging occurs at a lower level (MAC layer)
whereas routing occurs at a higher level, e.g., IP layer. And because routing
occurs at a higher level, it can perform more complex analysis to determine the
optimal path for the packet.
GRT-101/GRT-401/GRT-402 supports IP routing, which can be static and/or
RIPv1/v2 updating. Also, several applications, such as NAT/PAT, DHCP server,
and DNS proxy, etc., are included for LAN management and control.
3.11.1 LAN setting
To setup GRT-101/GRT-401/GRT-402 LAN interface with IP address of
192.168.0.1 and subnet mask of 255.255.255.0, use the following command:
admin# setup lan 1 address 192.168.0.1 255.255.255.0
To save your changes, enter:
admin# write
- -
48
Page 54

PLANET Technology Corp. GRT-101/401/402 User’s Manual
3.11.2 Static routing table
In order to pass data through a network and onto the Internet or WAN, you
might need to add the IP addresses of gateways to the static routing table.
Follow the instructions below to build a static routing table manually by adding
or deleting entries in the table.
For example, to add a route to network address 140.182.1.0 with subnet mask
of 255.255.255.0 via gateway at 140.182.2.254:
admin# setup route static add 140.182.1.0 255.255.255.0 140.182.2.254
To set a default route with gateway of 140.182.2.254, use the below command:
admin# setup route static add 0.0.0.0 0.0.0.0 140.182.2.254
In general, it is not recommended to add multiple entries with the format of
default route (network address 0.0.0.0 with subnet mask of 0.0.0.0). If there
are multiple entries with the format of default route in the static routing table,
the system will automatically select only one entry to be the default route
among these entries with resolvable gateway.
Note: For most WAN protocols, a valid default route with resolvable gateway on WAN side must be set to work
properly. However, for PPP connections, GRT-101/GRT-401/GRT-402 will add default route to ISP gateway
automatically, and hence it is unnecessary to add a default route manually.
To enable RIP updating with auto summary for routing table, type:
admin# setup route rip generic Enable Enable
For detailed configuration about RIPv1/RIPv2, please refer to the on-line help
message by the following commands:
admin# setup route rip lan 1
admin# setup route rip wan 1
Note: Each WAN port could be configured independently for RIPv1/RIPv2 updating of routing table.
To show the configuration, use the list command:
admin# setup route rip list
- -
49
Page 55

PLANET Technology Corp. GRT-101/401/402 User’s Manual
To save your changes, enter:
admin# write
3.11.3 NAT/PAT
NAT can be used to share an Internet connection, to reduce the requirement
for publicly assigned IP addresses, to expand an existing network without
affecting existing IP based account schemes, and to hide an internal network
schema from public networks.
It is often used in the situation where only one IP address could be assigned
for the network, such as a PPP connection to an local ISP, e.g., when your
local ISP uses protocols of “PPPoA” or “PPPoE” over the ATM VC, you get a
dynamic public IP at the WAN port from your local ISP. All requests originating
from the LAN (private network) have their source IP addresses replaced with
the public IP address. Only one IP address is visible from the public network.
To setup this GRT-101/GRT-401/GRT-402 working for the above example,
enter:
admin# setup lan 1 attrib Virtual
Also, make sure to delete all entries in the NAT/PAT IP pools by the following
commands:
admin# setup ip_share nat virtual delete <1~5>
admin# setup ip_share nat global delete <1~5>
admin# setup ip_share nat fixed delete <1~128>
admin# setup ip_share pat clear <1~10>
Note: The maximum number of hosts on the LAN (private network) is limited to be of 253 in dynamic NAT.
To save your changes, enter:
admin# write
In some cases, the number of externally visible IP addresses is greater than
one and less than the host number being hidden behind GRT-101/GRT-401/
GRT-402. You could configure GRT-101/GRT-401/GRT-402 such that it acts
as follows. Each time a request is made from a host on the LAN, which is
included in virtual IP pool, e.g., pool 3: 192.168.0.2~192.168.0.25.
GRT-101/GRT-401/GRT-402 chooses an external IP address already
- -
50
Page 56

PLANET Technology Corp. GRT-101/401/402 User’s Manual
configured in the corresponding global IP pool 3 (e.g., 69.210.1.2~69.210.1.7,
which is assigned from your local ISP) that is currently unused, and then
performs the translation. This type of situation is only possible when the
number of hosts having concurrent requests to the external network is equal to
or less than the number of external IP addresses on GRT-101/GRT-401/
GRT-402. To setup GRT-101/GRT-401/GRT-402 working for the above
situation where WAN 1 is used to connect to the corresponding ISP, use the
below commands:
admin# setup lan 1 attrib Virtual
admin# setup ip_share nat global interface 3 1
admin# setup ip_share nat global range 3 69.210.1.2 6
admin# setup ip_share nat virtual range 3 192.168.0.2 24
To show the configuration, use the list command:
admin# setup ip_share nat global list
admin# setup ip_share nat virtual list
Note: The IP translation only works between global and virtual IP pools with the same range number. Totally there are
5 NAT global and 5 NAT virtual IP pools for this purpose.
To save your changes, enter:
admin# write
In the above example, it might happen that packets from some hosts will be
dropped when the number of hosts having concurrent requests to the external
network is greater than the number of external IP addresses. If it is necessary
to guarantee that some hosts (e.g., 192.168.0.31~192.168.0.33) can access
Internet at any time, you can use the fixed IP address mapping pool with extra
external IP addresses 69.210.1.8~69.210.1.10, also given from ISP via WAN
1:
admin# setup lan 1 attrib Virtual
admin# setup ip_share nat fixed interface 1 1
admin# setup ip_share nat fixed modify 1 192.168.0.31 69.210.1.8
admin# setup ip_share nat fixed interface 2 1
admin# setup ip_share nat fixed modify 2 192.168.0.32 69.210.1.9
- -
51
Page 57

PLANET Technology Corp. GRT-101/401/402 User’s Manual
admin# setup ip_share nat fixed interface 3 1
admin# setup ip_share nat fixed modify 3 192.168.0.33 69.210.1.10
To show the configuration, use the list command:
admin# setup ip_share nat fixed list
Note: The maximum number of entries in the NAT fixed IP address mapping pool is 128.
To save your changes, enter:
admin# write
Another function provided by this GRT-101/GRT-401/GRT-402 NAT/PAT is the
virtual server mapping. Specific ports on the WAN interface (e.g., WAN 1) are
re-mapped to services inside the LAN. As only 69.210.1.8 (e.g., assigned to
WAN 1 from ISP) is visible to the Internet, but does not actually have any
services (other than NAT off course) running on GRT-101/GRT-401/GRT-402,
it is said to be a virtual server. For example, requests with TCP made to
69.210.1.8:80 are remapped to the server 1 on 192.168.0.2:80, other requests
with UDP made to 69.210.1.8:25 are remapped to server 2 on 192.168.0.3:25.
To set GRT-101/GRT-401/GRT-402 for the above NAT function, use:
admin# setup lan 1 attrib Virtual
admin# setup ip_share pat modify 1 interface 1
admin# setup ip_share pat modify 1 port 80
admin# setup ip_share pat modify 1 server 192.168.0.2 80
admin# setup ip_share pat modify 1 protocol TCP
admin# setup ip_share pat modify 1 name httpd
admin# setup ip_share pat modify 2 interface 1
admin# setup ip_share pat modify 2 port 25
admin# setup ip_share pat modify 2 server 192.168.0.3 25
admin# setup ip_share pat modify 2 protocol UDP
admin# setup ip_share pat modify 2 name mail
To show the configuration, use the list command:
admin# setup ip_share pat list
- -
52
Page 58

PLANET Technology Corp. GRT-101/401/402 User’s Manual
Note: The maximum number of service mapping supported by GRT-101/GRT-401/GRT-402 is 10.
To save your changes, enter:
admin# write
3.11.4 DHCP server
The DHCP server application automatically assigns IP addresses to DHCP
clients. Follow the steps below to enable the DHCP applications. The example
sets a DHCP server, which could service 50 DHCP clients. The available IP
addresses for DHCP clients are located from 192.168.0.2 to 192.168.0.51. In
this example, the LAN environment is configured with gateway of 192.168.0.1
and subnet mask of 255.255.255.0. The IP address of 168.95.1.1 is set as a
DNS server.
admin# setup dhcp generic active Enable
admin# setup dhcp generic ip_range 192.168.0.2 50
admin# setup dhcp generic gateway 192.168.0.1
admin# setup dhcp generic netmask 255.255.255.0
admin# setup dhcp generic name_server1 168.95.1.1
In most applications, the value of gateway IP address is the same as the LAN
IP address of GRT-101/GRT-401/GRT-402. The value of name server IP
address should point towards a valid host that provides DNS lookup service.
These parameters should be configured correctly, or computers on the LAN
may not access Internet.
Note: If the DNS proxy has been configured properly, the “name_server1” field in the above DHCP configuration
should be set with the LAN IP address of GRT-101/GRT-401/GRT-402.
To save your changes, type:
admin# write
3.11.5 DNS proxy
DNS is the naming system for IP based networks and the naming service that
is used to locate computers on the Internet. A DNS proxy receives DNS
request from computers on the LAN, translates them into the encoding on DNS
- -
53
Page 59

PLANET Technology Corp. GRT-101/401/402 User’s Manual
protocol, and forwards to the real DNS server. To enable the DNS proxy,
please correctly set up the DNS proxy so that it can point towards real DNS
servers on the Internet. The following example shows you how to setup the IP
addresses of real DNS servers:
admin# setup dns_proxy 168.95.1.1 168.95.192.1 140.92.61.55
Note: For PPP connections, GRT-101/GRT-401/GRT-402 will get DNS server IPs from ISP and assign them into DNS
proxy automatically if they have been pre-configured by the local ISP.
The maximum number of DNS servers is limited to 3. To save your changes,
enter:
admin# write
3.12 WAN and ATM Virtual Connection
GRT-101/GRT-401/GRT-402 has two types of WAN ports: physical WAN port
(SHDSL) and logical WAN ports (WAN 1~8). The physical WAN port connects
GRT-101/GRT-401/GRT-402 to the WAN. The logical WAN port or ports allow
you to create virtual WAN connections for plural destinations. When
configuring the physical WAN port, you can change the SHDSL physical layer
protocol setting. To configure logical WAN ports, you must provision ATM
virtual connections for each logical connection. The instructions for each are
shown below.
3.12.1 SHDSL operation
There are two SHDSL operation modes: STU-R and STU-C.
GRT-101/GRT-401/GRT-402 supports both operation modes and
automatically trains up to the ideal line speed. This enables the maximum
operative rate as determined by the central office SHDSL equipment, or you
could configure the connection rate directly.
Note: Optimal line rates are dependent upon the central office equipment base and optimal line conditions.
Follow the procedure below to change SHDSL physical layer setting.
To set the SHDSL operation mode to STU-R, enter:
- -
54
Page 60

PLANET Technology Corp. GRT-101/401/402 User’s Manual
admin# setup shdsl mode STU-R
To set the SHDSL operation mode to STU-C, enter:
admin# setup shdsl mode STU-C
To set link type to 4 wire, enter:
Only GRT-402 support 4 wire phone line to connect, it also allow to assign link
type by actually connection type.
admin# setup shdsl link 4-Wire
To set link type to 2 wire, enter:
admin# setup shdsl link 2-Wire
Also, GRT-101/GRT-401/GRT-402 allows you to assign the connection rate
directly by setting the N parameter of “n*64” command:
admin# setup shdsl n*64 <0~36>
where “0” indicates that the adaptive mode will be used to automatically train
up to the ideal line speed. The other valid value of N parameter ranges
between 3 and 36. Do not set the N value to 1 or 2. For example, to configure
the SHDSL physical layer data rate to 256kbps, enter:
admin# setup shdsl n*64 4
For different region, you might need to set up the SHDSL type to be “Annex_A”
or “Annex_B” by the following command:
admin# setup shdsl type Annex_B
Note that, to let your setting take effect, you have to save your changes and
reboot the system by enter:
admin# write
- -
55
Page 61

PLANET Technology Corp. GRT-101/401/402 User’s Manual
3.12.2 ATM virtual connection
There are two types of ATM connections: (1) virtual paths, identified by virtual
path identifiers (VPI); and (2) virtual circuit, identified by the combination of a
VPI and a virtual circuit identifier (VCI). Also, there are two encapsulation
methods for carrying bridged and routed PDUs in the payload field of ATM
adaptation layer (AAL) type 5, which are defined in RFC 1483, multi-protocol
encapsulation over AAL 5. The LLC encapsulation method multiplexes multiple
protocols on a single ATM virtual circuit. Each protocol is identified in the 802.2
LLC header of the packet. The VC based multiplexing method carries each
protocol on a separate ATM virtual circuit. This method is sometimes used in
private networks, in which PVC creation is very economical.
Note: Each VC is expressed as WAN x, where x is a number between 1 and 8. GRT-101/GRT-401/GRT-402 comes
pre-configured with one ATM VC (WAN 1 with VPI/VCI = 0/32) already established. The WAN 1 port is ready to send
and receive network traffic via IPoA protocol with LLC encapsulation. You may need to modify the pre-configured ATM
VC when communicating across your local ISP network.
For bridging mode operation, you should select Ethernet over ATM (RFC 1483
bridged Ethernet) as the ATM protocol. For routing mode operation,
GRT-101/GRT-401/GRT-402 supports Ethernet over ATM (RFC 1483 bridged
Ethernet), IP over ATM (RFC 1483 routed IP/RFC 1577), PPP over ATM (RFC
2364), and PPP over Ethernet (RFC 2516). The following example enables the
ATM VC WAN 3 with protocol of Ethernet over ATM:
admin# setup wan 3 protocol Ethernet
where the selectable parameters corresponding to the above ATM protocols
are “Ethernet”, “IPoA”, “PPPoA”, and “PPPoE”. To disable the pre-configured
ATM VC WAN 1, enter:
admin# setup wan 1 protocol Disable
The valid ranges for the VPI is from 0 to 255. For the VCI, it is between 0 and
65535.
The following example set the VPI/VCI = 0/135 for ATM VC WAN 3
admin# setup wan 3 vpi_vci 0 135
To change the encapsulation from default LLC to VC-Mux for ATM VC WAN 3
admin# setup wan 3 encap VC-Mux
- -
56
Page 62

PLANET Technology Corp. GRT-101/401/402 User’s Manual
To review the new configuration you have changed for WAN 3, type:
admin# setup wan 3 list
WAN Interface Parameters
Int. Link IP Address/ Netmask VPI/ VCI Encap. QoS PCR
---- -------- ----------------------------- --------- ------ --- ---WAN 1 Disable
WAN 2 Disable
WAN 3 Ethernet 192.168.3.1/ 255.255.255.0 0/ 135 VC-Mux UBR 2400
WAN 4 Disable
WAN 5 Disable
WAN 6 Disable
WAN 7 Disable
WAN 8 Disable
To save the new WAN port configuration, enter:
admin# write
3.12.3 ATM traffic shaping
The objectives of ATM traffic management are to deliver quality-of-service
(QoS) guarantees for the multimedia applications and provide overall
optimization of network resources. Currently, GRT-101/GRT-401/GRT-402
supports two kinds of ATM QoS service: constant bit rate (CBR) and
unspecified bit rate (UBR). The CBR connection involves a static amount of
bandwidth allocated for those applications of video, voice, and circuit
emulation. The bandwidth is characterized by the peak cell rate (PCR) in the
configuration. The UBR connection allows you to define the PCR too. However,
it has the lowest priority and is with no QoS guarantees. The range of the PCR
is from 64 to 2400Kbps.
To set the class of the ATM traffic shaping for WAN 3 to CBR with PCR of
512Kbps, enter:
admin# setup wan 3 qos class CBR
admin# setup wan 3 qos pcr 512
To review the new configuration you have changed for WAN 3, type:
- -
57
Page 63

PLANET Technology Corp. GRT-101/401/402 User’s Manual
admin# setup wan 3 list
WAN Interface Parameters
Int. Link IP Address/ Netmask VPI/ VCI Encap. QoS PCR
---- -------- ----------------------------- --------- ------ --- ---WAN 1 Disable
WAN 2 Disable
WAN 3 Ethernet 192.168.3.1/ 255.255.255.0 0/ 135 VC-Mux CBR 512
WAN 4 Disable
WAN 5 Disable
WAN 6 Disable
WAN 7 Disable
WAN 8 Disable
To save the new WAN port configuration, enter:
admin# write
3.12.4 WAN IP address
Note: This sub-section is for routing mode operation with protocol of “Ethernet” and/or “IPoA” only. For PPP
connections, it is unnecessary to set the WAN port IP address and subnet mask.
To set the WAN 3 with IP address of 192.168.3.3 and subnet mask of
255.255.255.0, follow the following example:
admin# setup wan 3 address 192.168.3.3 255.255.255.0
To review the new configuration you have configured, type:
admin# setup wan 3 list
WAN Interface Parameters
Int. Link IP Address/ Netmask VPI/ VCI Encap. QoS PCR
---- -------- ----------------------------- --------- ------ --- ---WAN 1 Disable
WAN 2 Disable
WAN 3 Ethernet 192.168.3.3/ 255.255.255.0 0/ 135 VC-Mux CBR 512
WAN 4 Disable
WAN 5 Disable
- -
58
Page 64

PLANET Technology Corp. GRT-101/401/402 User’s Manual
WAN 6 Disable
WAN 7 Disable
WAN 8 Disable
To save the new WAN port configuration, enter:
admin# write
3.12.5 ISP profile for PPP
Note: This sub-section is for routing mode operation only.
If your local ISP uses protocols of “PPPoA” or “PPPoE” over the ATM VC, you
may need to setup the username and password information provided from
your local ISP. The maximum length of username and password for ISP
setting is limited to 51. The following command configures the ISP profile for
WAN 3 with username “pppoa3@isp.com”, password “Fuyg47ds”, and idle
timeout of 10 minutes:
admin# setup wan 3 isp pppoa3@isp.com Fuyg47ds 10
To review the new configuration you have configured, type:
admin# setup wan 3 list
Int. ISP account username Idle time
---- --------------------------------- --------WAN 1
WAN 2
WAN 3 pppoa3@isp.com 10
WAN 4
WAN 5
WAN 6
WAN 7
WAN 8
Note: The ISP account information would not be shown if the corresponding WAN port is disabled. The account
information is provided from your local ISP. Please ask your local ISP if you do not know the username and password.
The “PPPoA” and “PPPoE” protocols are designed based on the concept of
“dial-on-demand”. Each time a request is made from a host on the LAN,
GRT-101/GRT-401/GRT-402 checks the link status of the WAN ports and
transfers the packets if the link status is active. When the link status is not
- -
59
Page 65

PLANET Technology Corp. GRT-101/401/402 User’s Manual
active, it performs login procedure with the account information of ISP profiles
and then transfers the packets if login successfully. Once the link has been
established successfully, GRT-101/GRT-401/GRT-402 continuously monitors
the traffic over WAN links. The “PPPoA” or “PPPoE” section will be cut off if
there are no packets over the links during the period of idle timeout. The valid
value for idle timeout is from 0 to 300 minutes. The idle timeout of “0” means
that the session connects always even there is no traffic over the WAN link. To
save the new WAN port configuration, enter:
admin# write
Note: Currently, the section timeout is set to be 10 minutes. Also, WAN 1 has the highest priority to dial if multiple WAN
ports are enabled with PPPoA/PPPoE protocols while WAN 8 has the lowest one. In most applications,
PPPoA/PPPoE protocols must work with NAT/PAT. Please refer to section 3.11.3 NAT/PAT for details.
3.13 System Status and Performance
Use the “status” command to display GRT-101/GRT-401/GRT-402 activities.
To see a list of applications and interfaces that provide status, enter:
admin# status ?
shdsl <CR> Show SHDSL status
wan <CR> Show WAN interface status
route <CR> Show routing table
To display specific information, for example, for the SHDSL interface status
and performance, enter:
admin# status shdsl
<SHDSL Status>
SHDSL mode :SHDSL CPE Side
Bitrate :512kbps
Tx Power :13.5dBm
Current SNR Margin :10.8dB
Attenuation :35.8dB
CRC Error Count :0
SHDSL Remote Side Status
Current SNR margin :10dB
Attenuation :35dB
- -
60
Page 66

PLANET Technology Corp. GRT-101/401/402 User’s Manual
CRC Error Count :0
These statistics are:
• CRC error count — The cyclic redundancy check error count.
• Attenuation —The difference in decibels (dB) between the power level
received at the near end versus the power level transmitted from the far end.
• Signal-to-Noise (SNR) Margin — The SNR margin represents the amount of
increased received signal (in decibels) relative to the noise power level that the
unit is designed to tolerate without disconnecting from the network.
To display status of WAN ports, enter:
admin# status wan
WAN IP address / NetMask VPI/ VCI Enc Protocol Active
----- --------------- --------------- --- ----- ------ -------- -----WAN1 192.168. 1. 1/255.255.255. 0 0/ 32 LLC IPoA Yes
To list active route status currently, type:
admin# status route
Flag Destination / Netmask / Gateway Interface Portname
---- ------------------------------------------ ------------ -------- S 0.0.0.0/ 0.0.0.0/ 200.0.8.254 200.0.8.1 WAN1
C 200.0.8.0/ 255.255.255.0/ directly 200.0.8.1 WAN1
C 192.168.0.0/ 255.255.255.0/ directly 192.168.0.218 LAN
C 127.0.0.1/255.255.255.255/ directly 127.0.0.1 Loopback
3.14 User Profile
GRT-101/GRT-401/GRT-402 comes pre-configured with user profile 1 already
established, that is, user “admin” with password of “admin” and menu driven
user interface. The maximum number of user profiles is limited to 5. You can
add, delete, modify, or list the user profiles with the commands in the following
examples.
To change anyone of the user name and password, you must provide both
items together. For example, to change the password only to “76gu94t” for
user profile 1 (default user name “admin”), enter:
admin# admin user modify 1 profile admin 76gu94t
For user profile 1 with password “76gu94t”, to change the username to “titan”
- -
61
Page 67

PLANET Technology Corp. GRT-101/401/402 User’s Manual
type:
admin# admin user modify 1 profile titan 76gu94t
Certainly, you can change both user name and password in one command line.
The maximum length of user name and password is limited to 19.
To set the user interface for an existing user profile, e.g., user profile 1, use
“modify” and “attrib” commands:
admin# admin user modify 1 attrib command
The following commands add a new user profile 2 “test” with password
“83fdi7s”, and set the user interface to menu mode:
admin# admin user modify 2 attrib menu
admin# admin user modify 2 profile test 83fdi7s
Note: You must perform the above procedure in the sequence as shown.
To show all user profiles with attributes, type:
admin# admin user list
Legal access user profile
No User Name UI Mode
---- ------------------ ---------- 1 titan Command
2 test Menu
3 (Empty)
4 (Empty)
5 (Empty)
To delete user profile 2, enter:
admin# admin user clear 2
To save your changes, enter:
admin# write
3.15 Management Security
Since you can manage GRT-101/GRT-401/GRT-402 using Telnet and web
browser over the network either from LAN interface or from WAN interface, the
management security is important that it prevents invalid access to
GRT-101/GRT-401/GRT-402 from Internet. There are extra two levels of
- -
62
Page 68

PLANET Technology Corp. GRT-101/401/402 User’s Manual
protection for GRT-101/GRT-401/GRT-402 Telnet and web servers except
login password control:
3.15.1 Telnet port number
You can specify the TCP port number of the Telnet server other than the
default TCP port number 23 so that Telnet access to default port number
cannot reach GRT-101/GRT-401/GRT-402. The example below shows you
how to setup the Telnet TCP port number from default 23 to 47:
admin# admin security port 47
The valid range of the Telnet port number is between 1 and 65534. To show
which TCP port number is set to allow access to GRT-101/GRT-401/GRT-402,
type
admin# admin security list
Configuration generic parameter
Telnet listening TCP port : 47
To save your changes, enter:
admin# write
3.15.2 Legal client IP
You could assign the legal client IP addresses such that only Telnet clients and
web browsers at the legal client IP addresses can access GRT-101/GRT-401/
GRT-402. The following example specifies a legal IP address 192.168.0.6 in
the pool.
admin# admin security ip_pool modify 1 192.168.0.6
The maximum number in the legal IP pool is limited to 10. To show how many
legal client IP addresses are configured to allow access to GRT-101/GRT-401/
GRT-402, enter:
admin# admin security list
Legal client IP address
No Legal IP Address
---- ------------------
- -
63
Page 69

PLANET Technology Corp. GRT-101/401/402 User’s Manual
1 192.168.0.6
2 (Empty)
3 (Empty)
4 (Empty)
5 (Empty)
6 (Empty)
7 (Empty)
8 (Empty)
9 (Empty)
10 (Empty)
An empty table means there is not any constraint on the Telnet client and web
browser IP addresses. The example below deletes the first IP entry from the
legal IP address pool.
admin# admin security ip_pool clear 1
To save your changes, enter:
admin# write
Note: GRT-101/GRT-401/GRT-402 comes pre-configured without any constraint on the legal access IP addresses of
Telnet clients and web browsers for convenience. However, it is very important to setup management security to
prevent invalid access to GRT-101/GRT-401/GRT-402 from Internet.
3.16 SNMP Support
In addition to managing GRT-101/GRT-401/GRT-402 by means of the
command-line applications and web browsers, you can manage the unit by
using a simple network management protocol (SNMP) management station.
GRT-101/GRT-401/GRT-402 can generate SNMP traps to indicate alarm
conditions, and it relies on SNMP community strings to implement SNMP
security. Currently, SNMP (RFC 1157) and SNMPv2c (RFC 1901) agents are
implemented. Also, the management information bases (MIBs) supported by
GRT-101/GRT-401/GRT-402 include MIB II right now.
3.16.1 SNMP community
The below example adds GRT-101/GRT-401/GRT-402 into a SNMP
community “private”, with read/write access right for SNMP managers in the
same community.
- -
64
Page 70

PLANET Technology Corp. GRT-101/401/402 User’s Manual
admin# admin snmp community 1 edit enable private read_write
To show the setting of SNMP communities with access right, type:
admin# admin snmp community 1 list
SNMP Community Pool
No Community Access Right
---- -------------------------------- ----------------- 1 private Read_Write
2 (Empty)
3 (Empty)
4 (Empty)
5 (Empty)
To disable the SNMP community 1, enter the following command:
admin# admin snmp community 1 edit disable private read_write
To save your changes, enter:
admin# write
3.16.2 SNMP trap
GRT-101/GRT-401/GRT-402 can generate alarm conditions to SNMP
manager via SNMP traps. The following example configures trap 1 with
SNMPv2c encapsulation. The SNMP manager is located at 192.168.0.254
with community “private”.
admin# admin snmp trap 1 edit 2 192.168.0.254 private
To show the setting of SNMP communities with access right, type:
admin# admin snmp trap 1 list
SNMP Trap Host Pool
No Trap IP Address Version
---- -------------------------------- ------------------ ------ 1 private 192.168.0.254 2
2 (Empty)
3 (Empty)
4 (Empty)
5 (Empty)
- -
65
Page 71

PLANET Technology Corp. GRT-101/401/402 User’s Manual
To disable the SNMP trap 1, enter the following command:
admin# admin snmp trap 1 edit disable 192.168.0.254 private
To save your changes, enter:
admin# write
3.17 Backup and Restore Configuration
Remember to backup a copy of your configuration file after you have
completed configuration of GRT-101/GRT-401/GRT-402 so you can easily
recover it when necessary.
3.17.1 Backup configuration
Use “show script” command to dump the system current configuration in script
commands. The following is an example.
admin# show script
Showing System Configuration...
setup mode Route
setup shdsl mode STU-R
setup shdsl n*64 0
setup shdsl type Annex_A
setup shdsl margin 0
setup wan 1 protocol IPoA
setup wan 1 address 192.168.1.1 255.255.255.0
setup wan 1 vpi_vci 0 32
setup wan 1 encap LLC
setup wan 1 qos class UBR
setup wan 1 qos pcr 2400
setup wan 1 isp test test 10
...
admin snmp trap 3 edit Disable 192.168.0.254 private
admin snmp trap 4 edit Disable 192.168.0.254 private
admin snmp trap 5 edit Disable 192.168.0.254 private
admin#
After dumping the configuration, use the copy and paste function provided by
- -
66
Page 72

PLANET Technology Corp. GRT-101/401/402 User’s Manual
your terminal access program or Telnet program to save it to a text file. Don’t
miss any script command line, or you would loss part of the configuration.
Note: With “show script” command, the password is printed with “*” instead of the real password characters for security.
Therefore, the backup configuration does not contain the password information. Remember to recover correct
password information manually after the backup procedure by a text editor. There is no command that could show the
password information. You should save your password in a safe place for any eventuality.
3.17.2 Restore configuration
Before you restore the old configuration back to GRT-101/GRT-401/GRT-402,
make sure to clear the whole setting back to the factory defaults first with the
following command:
admin# setup default
Are you sure? (y/n): y
Set OK!
admin#
To restore the configuration, copy the content of the whole configuration file,
which was saved according to section 3.17.1 Backup configuration, and paste
them into the console CLI via your Telnet program or terminal access program.
Watch the system messages to ensure every command was accepted by the
system successfully.
Note: The Telnet program is recommended during backup process. If only the serial port could be used, carefully add
some delay by adjust the line and/or character delay for your terminal access program so that all command could be
accepted by the system without error. Also, the configuration file backup with “show script” command has the
password printed with “*” instead of the real password characters for security. Therefore, remember to recover correct
password information manually before the restore procedure.
To save your restored configuration and let it take effect, enter:
admin# write
and reboot the system.
3.18 Software Upgrade
You check the software version of GRT-101/GRT-401/GRT-402 by the
command:
admin# show system
- -
67
Page 73

PLANET Technology Corp. GRT-101/401/402 User’s Manual
General system information
Model :08A2
Software Version :101029E4
CPU :MPC850SR(rev.B)
RAM :4MB
Flash :2MB
Chipset :AD20msp930
Firmware Version :3130BE6B
Hostname :SOHO
System Time :152DAY/18HR/12MIN
If GRT-101/GRT-401/GRT-402 is out of date, get the latest version from your
service provider by the trivial file transfer protocol (TFTP). The TFTP allows
you to transfer new software images to upgrade GRT-101/GRT-401/GRT-402.
Refer to section 3.17.1 Backup configuration to backup a copy of your
configuration file before upgrading it so you can easily recover the
configuration when necessary.
The following example shows you how to get a kernel software image from a
TFTP server 192.168.0.200, where the image file name is “kernel.bin”:
admin# upgrade kernel 192.168.0.200 kernel.bin
TFTP server IP address: 192.168.0.200
Upgrade filename: kernel.bin
Connecting...
Download
Byte Transferred : 624641 bytes
Complete
Transfer Complete, Replace Now? (y/n): y
Writing flash....................... OK!
Do you want to reboot? (y/n): y
Be sure to write the new image to NVRAM and immediately reboot the device
to activate it. When you log back onto GRT-101/GRT-401/GRT-402 after the
reboot, then you can use the “show system” command to verify the version of
the new firmware that is active, and restore your configuration.
Note: All configurations will be cleared during the upgrading procedure. Make sure that you have a backup
configuration file before you start the upgrading procedure. See section 3.17.1 Backup configuration for details.
- -
68
 Loading...