

Page 1

Table of Contents
Chapter 1 Overview 1
Chapter 2 Package Content 1
Chapter 3 Hardware Description 2
3.1 Front Panel 2
3.2 Rear View 2
Chapter 4 Physical Connection and DMZ Operation Mode 3
4.1 Transparent Mode Connection Example 3
4.2 NAT Mode Connecting Example 4
Chapter 5 Quick Setup 5
5.1 Web Configuration 5
5.2 Configure WAN interface 6
5.3 Configure DMZ interface 8
Chapter 6 Further Configuration 9
Page 2

This page is intentionally left blank
Page 3

Chapter 1
Overview
Thank you for purchases CS-500, the content security gateway. This Content Security
Gateway provides the multiple functions in one unit including VPN, Firewall, Content
Filtering, Email Anti-Virus and Anti-Spam, etc. Please refer to the following sections for
quick setup of your security gateway. And please also refer to the user manual for more
details.
This quick installation guide includes the following sections:
1. Package Content
2. Hardware Description: Hardware outlook and panel description
3. Physical connection and DMZ operation mode
4. Quick setup: Quick setup through Web browser
Chapter 2
Package Content
• Content Security Gateway
• User’s Manual CD-ROM
• This Quick Installation Guide
• Power Adapter
If any of the above items are missing or damaged, contact your local dealer for support.
1
Page 4
3
Chapter 3
Hardware Description
This section shows the front panel out look and its LED indications and rear panel
outlook.
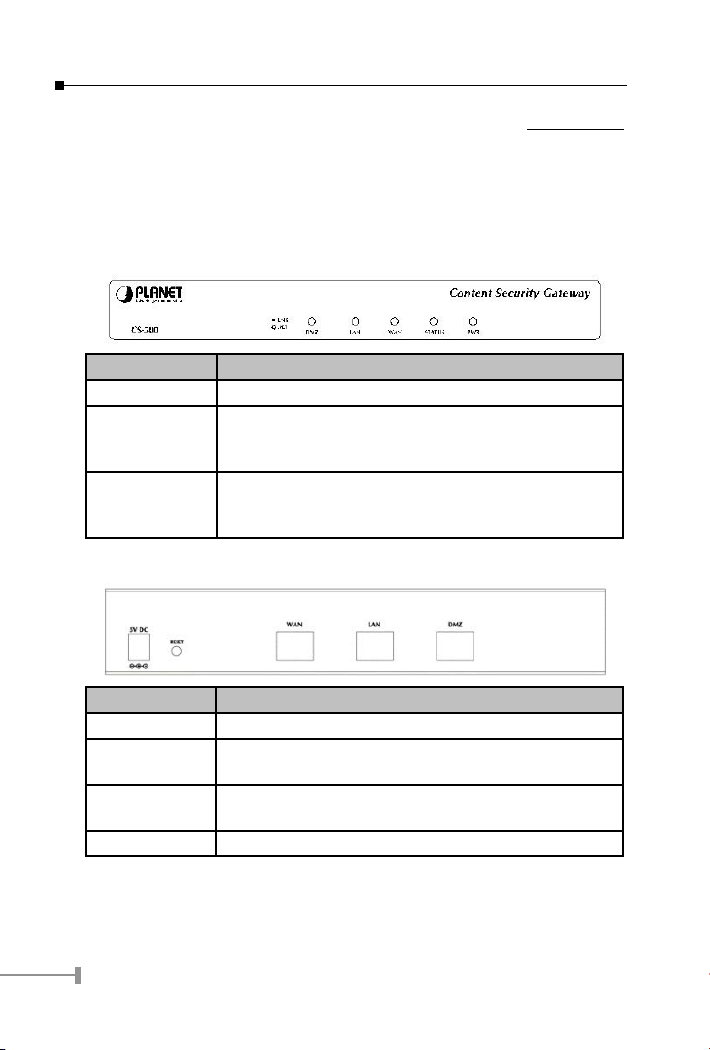
3.1 Front Panel
LED Description
PWR Power is supplied to this device.
STATUS Blinks to indicate this devise is being turned on and boot-
ing. After one and half minutes, this LED indicator will stop
blinking, it means this device is now ready to use.
WAN, LAN, DMZ Steady on indicates the port is connected to other network
device.
Blink to indicates there is traffic on the port
3.2 Rear View
Port / button Description
RESET Press this button to restore to factory default settings.
WAN Connect to your xDSL/Cable modem or other Internet con-
nection devices
LAN Connect to your local PC, switch or other local network
device
DMZ Connect to your server or other network device
2
Page 5

Chapter 4
Physical Connection and DMZ Operation Mode
This section describes the three different operation mode of CS-500, DMZ disable, NAT
mode and DMZ transparent mode.
CS-500 DMZ port supports three operation modes, Disable, NAT and Transparent. In
Disable mode, the DMZ port is not active. In transparent mode, CS-500 works as proxy
with forward DMZ packet to WAN and forward WAN packet to DMZ. The DMZ and WAN
side IP addresses are in the same subnet.
In NAT mode, DMZ side user will share one public IP address of WAN port to make Internet
connection. Please nd the following two pictures for example.
4.1 Transparent Mode Connection Example
3
Page 6

5
The IP addresses of WAN and DMZ are on the same subnet. This application is suitable if
you have a subnet of IP addresses from your ISP and you do not want to change any IP
conguration on the subnet.
4.2 NAT Mode Connecting Example
DMZ and WAN IP addresses are on the different subnet (as shown in the gure above).
This provides higher security level then transparent mode.
4
Page 7

Chapter 5
Quick Setup
5.1 Web Conguration
STEP 1:
Connect both the Administrator's PC and the LAN port of the Content Security Gateway
to a hub or switch. Make sure there is a link light on the hub/switch for both connections.
The CS-500 has an embedded web server used for management and conguration. Use
a web browser to display the congurations of the Content Security Gateway (such as
Internet Explorer 4 (or above) or Netscape 4.0(or above) with full java script support).
The default IP address of the Content Security Gateway is 192.168.1.1 with a subnet
mask of 255.255.255.0. Therefore, the IP address of the Administrator PC must be in the
range between 192.168.1.2 192.168.1.254.
If the company's LAN IP Address is not subnet of 192.168.1.0, (i.e. LAN IP Address is
172.16.0.1), then the Administrator must change his/her PC IP address to be within the
same range of the LAN subnet (i.e. 172.16.0.2). Reboot the PC if necessary.
By default, the CS-500 is shipped with its DHCP Server function enabled. This means the
client computers on the LAN network including the Administrator PC can set their TCP/IP
settings to automatically obtain an IP address from the Content Security Gateway.
The following table is a list of private IP addresses. These addresses may not be used as
a WAN IP address.
10.0.0.0 ~ 10.255.255.255
172.16.0.0 ~ 172.31.255.255
192.168.0.0 ~ 192.168.255.255
STEP 2:
Once the Administrator PC has an IP address on the same network as the Content
Security Gateway, open up an Internet web browser and type in http://192.168.1.1
in the address bar.
A pop-up screen will appear and prompt for a username and password. A username and
password is required to connect to the Content Security Gateway. Enter the default login
username and password of Administrator (see below).
Username: admin
Password: admin
Click OK.
5
Page 8

7
5.2 Congure WAN interface
After entering the username and password, the Content Security Gateway WEB UI screen
will display. Select the Interface tab on the left menu then click on WAN below it.
Click on Modify button of WAN, the following page is shown.
PPPoE (ADSL User): This option is for PPPoE users who are required to enter a
username and password in order to connect.
Username: Enter the PPPoE username provided by the ISP.
Password: Enter the PPPoE password provided by the ISP.
IP Address provided by ISP:
Dynamic: Select this if the IP address is automatically assigned by the ISP.
Fixed: Select this if you were given a static IP address. Enter the IP address
that is given to you by your ISP.
6
Page 9

Service-On-Demand:
The PPPoE connection will automatically disconnect after a length of idle time
(no activities). Enter in the amount of idle minutes before disconnection. Enter
0 if you do not want the PPPoE connection to disconnect at all.
For Dynamic IP Address (Cable Modem User): This option is for users who are
automatically assigned an IP address by their ISP, such as cable modem users. The
following elds apply:
MAC Address: This is the MAC Address of the device. Some ISPs require specied MAC address. If the required MAC address is your PC s, click Clone MAC
Address.
Hostname: This will be the name assign to the device. Some cable modem ISP
assign a specic hostname in order to connect to their network. Please enter
the hostname here. If not required by your ISP, you do not have to enter a
hostname.
Domain Name: You can specify your own domain name or leave it blank.
User Name: The user name is provided by ISP.
Password: The password is provided by ISP.
For Static IP Address: This option is for users who are assigned a static IP Address
from their ISP. Your ISP will provide all the information needed for this section such as
IP Address, Netmask, Gateway, and DNS. Use this option also if you have more than one
public IP Address assigned to you.
IP Address: Enter the static IP address assigned to you by your ISP. This will
be the public IP address of the WAN port of the device.
Netmask: This will be the Netmask of the WAN network. (i.e.
255.255.255.0)
Default Gateway: This will be the Gateway IP address.
Domain Name Server (DNS): This is the IP Address of the DNS server.
For PPTP (European User Only): This is mainly used in Europe. You need to know the
PPTP Server address as well as your name and password.
User Name: The user name is provided by ISP.
Password: The password is provided by ISP.
IP Address: Enter the static IP address assigned to you by your ISP, or obtain
an IP address automatically from ISP.
PPTP Gateway: Enter the PPTP server IP address assigned to you by your ISP.
Connect ID: This is the ID given by ISP. This is optional.
BEZEQ-ISRAEL: Select this item if you are using the service provided by BEZEQ in Israel.
Service-On-Demand: The PPPoE connection will automatically disconnect after
a length of idle time (no activities). Enter in the amount of idle minutes before
7
Page 10

9
disconnection. Enter 0 if you do not want the PPPoE connection to disconnect at all.
Ping: Select this to allow the WAN network to ping the IP Address of the Content Security
Gateway. This will allow people from the Internet to be able to ping the Content Security
Gateway. If set to enable, the device will respond to echo request packets from the WAN
network.
WebUI: Select this to allow the device WEBUI to be accessed from the WAN network. This
will allow the WebUI to be congured from a user on the Internet. Keep in mind that the
device always requires a username and password to enter the WebUI.
5.3 Congure DMZ interface
Depends on your network requirement, you can disable the DMZ port, or make DMZ port
transparent to WAN or enable NAT function on it.
To congure the DMZ port, select the Interface tab on the left menu, then click on DMZ,
the following page is shown.
5.4 Congure Policy
STEP 1:
Click on the Policy tab from the main function menu, and then click on Outgoing (LAN to
WAN) from the sub-function list.
STEP 2:
Click on New Entry button.
STEP 3:
When the New Entry option appears, enter the following conguration:
Source Address select Inside_Any
Destination Address select Outside_Any
Service - select ANY
Action - select Permit
Click on OK to apply the changes.
8
Page 11

STEP 4:
The conguration is successful when the screen below is displayed.
Please make sure that all the computers that are connected to the LAN port have their
Default Gateway IP Address set to the Content Security Gateway's LAN IP Address (i.e.
192.168.1.1). At this point, all the computers on the LAN network should gain access to
the Internet immediately. If a Content Security Gateway lter function is required, please
refer to the Policy section in the user's manual.
Chapter 6
Further Configuration
The above steps introduce simple conguration for CS-500. For further conguration,
please refer to the user's manual on the CD.
9
Page 12

This page is intentionally left blank
10
 Loading...