

Page 1
EN
PRINTING & CONSTRUCTION MANUAL
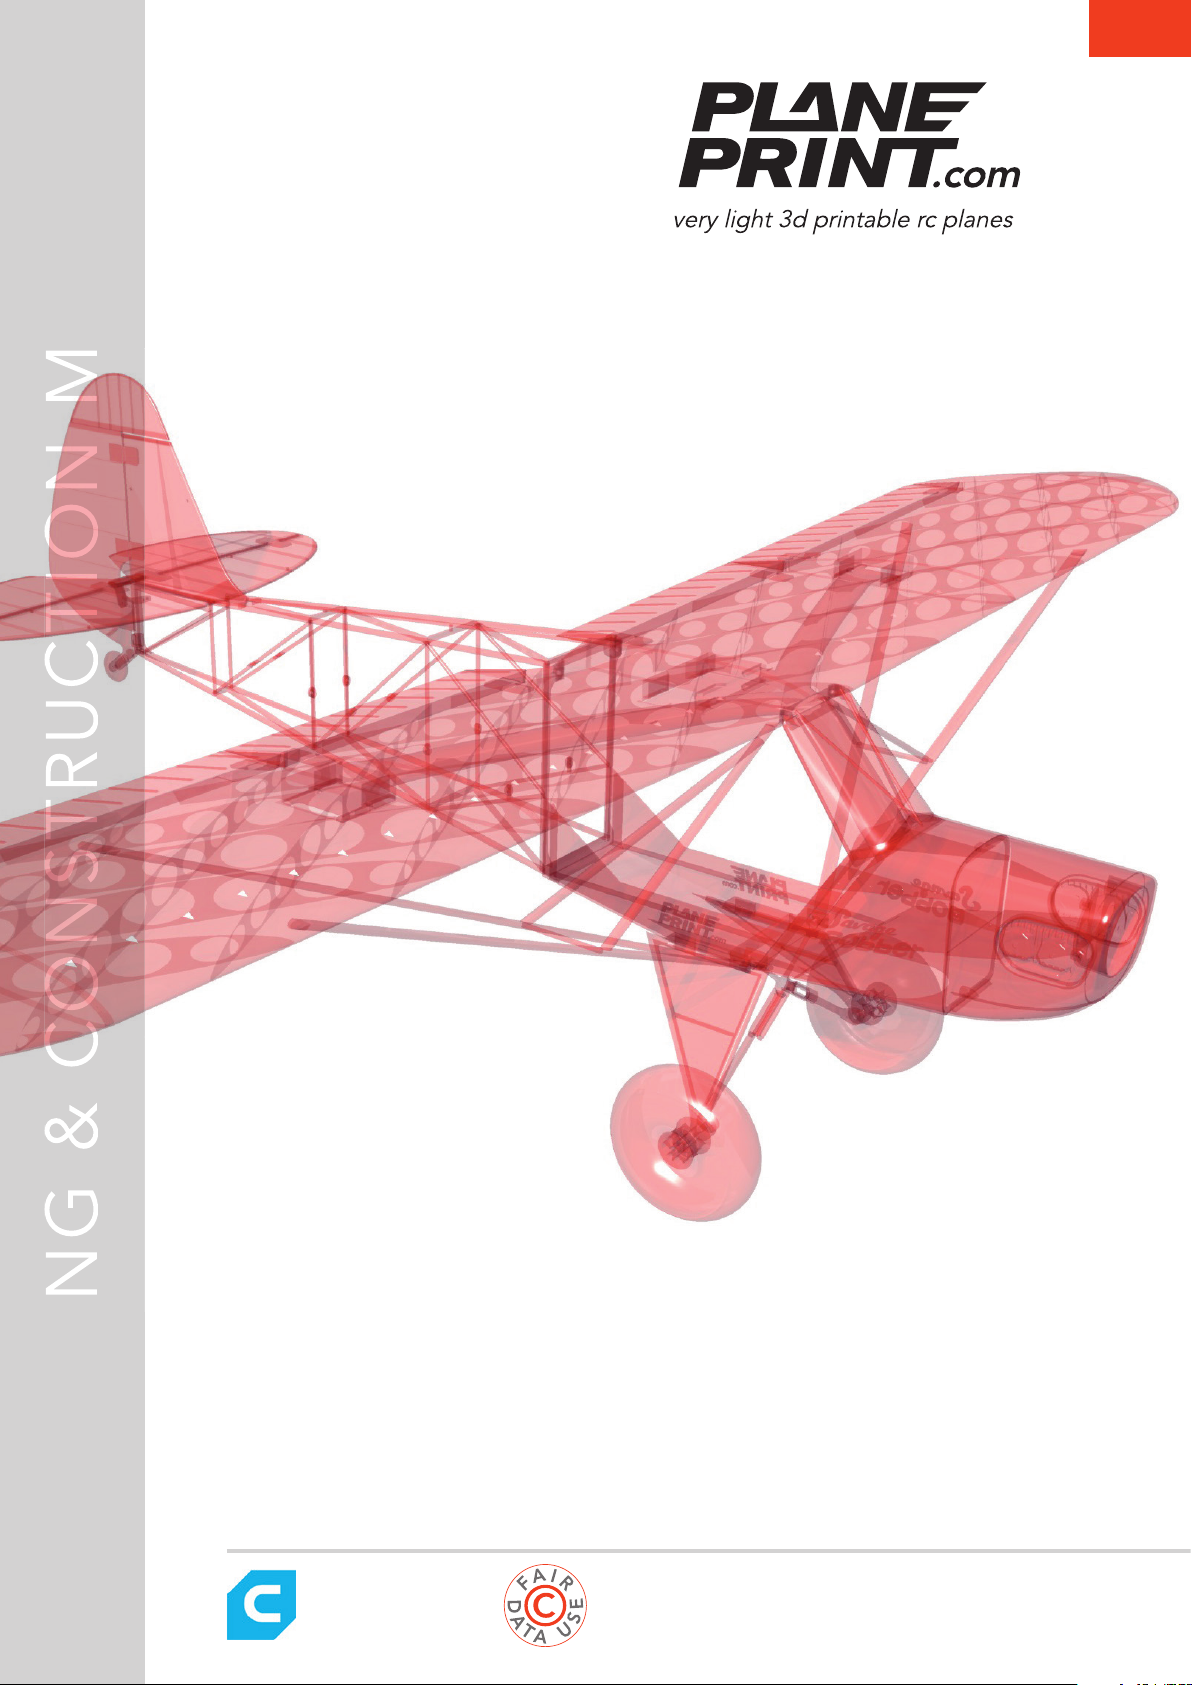
ZLIN „SAVAGE BOBBER“
• Detailed Semiscale model in 3D lightweight construction.
• Real 1 wall construction (Currently only supported by CURA!).
• Wingspan 900mm (35.4 inches). Designed for micro sized electronics.
WATCH OUT!
This 3D print model
is specially optimized
for CURA.V3 2020
STL DATA FOR DOWNLOADING
AT
www.planeprint.com
Page 2
EN
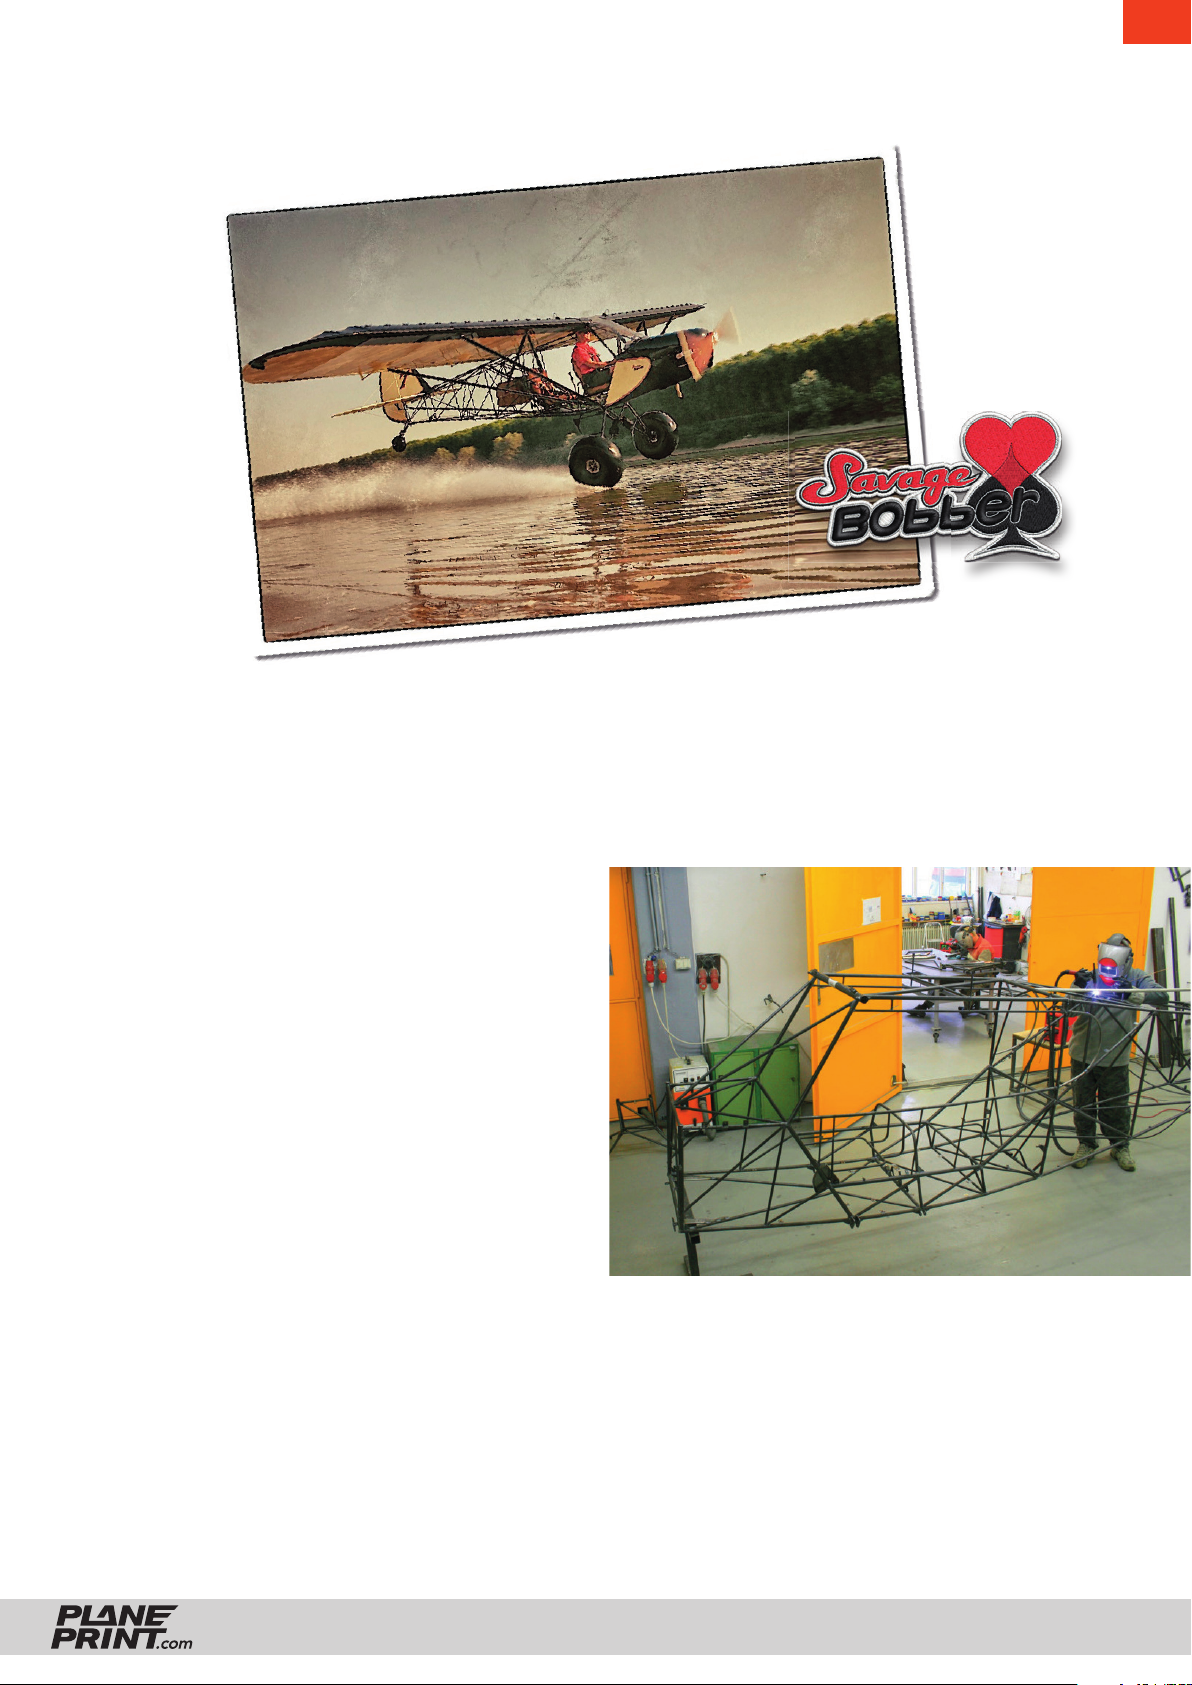
The Savage went into production between 1997
and 1998 in Italy. The idea was to develop an aircraft with good handling and STOL properties, in
the classic, proven design and traditional construction, which is economical and easy to build but also
to repair.
Inspired by one of the 20th century aviation legends
- the Piper Cub - several prototypes were built by
SAVAGE designers, aeronautical engineers Bonaldo,
Franchini and Vizzini (the latter had worked for Aeritalia and was a long time before joining Aermacchi
at Boeing in Seattle) which should form the basis for
the fi nal Savage in the ULM category.
Designed with the most advanced CAD design and
simulation software (CATIA, Solidworks and NASTRAN), the Savage has undergone an intensive validation process for on-board static testing and testing to meet the most stringent industry standards
for lightweight aircraft design and manufacturing.
Shortly after its conception and prior to its offi cial
launch, the Savage won fi rst prize in 1999 as the
Best Plan-Built Ultralight at the Experimental Aircraft
Association meeting in Carpi, Italy. In 1999, the production of the Savage was relocated to the Czech
Republic and since then, the aircraft manufacturer
Zlin Aviation S.r.o. carried out. The highest quality
aviation materials from the USA, Italy and France are
processed by the most competent staff.
By May 2014, more than 280 Savages had been delivered to various countries worldwide. Zlin Aviation
is always looking for new markets and dealers. Do
not hesitate to contact Zlin if you think you want to
become part of the dealer network.
Courtesy of Zlin Aviation S.r.o.
ZLIN SAVAGE BOBBER
PRINTING & CONSTRUCTION MANUAL
© PLANEPRINT
2
Page 3

You may wonder why this 3D model is suitable exclusively for CURA right?
The most important thing about small RC model airplanes is always the ratio of size to weight.
The lighter a model is, the better its flight characteristics and also the flight time is significantly
increased.
With our unique design process, we manage to make Weights relevant items in a true 1-wall prin-
ting process for the outer skin but also for the filling offer. So we save weight while maintaining the
necessary stability.
Here we show you how to get started from a standard CURA profile Make settings. For this model
we only need 4, easy to create profiles.
It is absolutely necessary to observe the information provided by PLANEPRINT.com in order:
to slice the component correctly. However, it may make sense to perfect your 3D printing by
additionally performing several hiring activities depending on your printer and the filament used.
EN
For slcng ll Plnprnt
modls, four profls hv
to b crtd n Cur
PROFILE P1_fullbod
PROFILE P2_hollowbod
PROFILE P3_surfc
PROFILE P4_flx
You cn fnd th dscrpton t
wwwplnprntcom/prnt
Importnt for th
1-wll-prnt
In order to print airfoils of the lowest possible weight with high stability, it is necessary to print with only one wall line (Nozzle 0.4
mm). Decisive here is the adhesion between
the layers! To achieve this, you must print at
a much higher temperature than normal. As
a guideline, 230 ° C is a good starting point.
The parts-cooling fan should be set to 0% or
a maximum of 20%. Since not every printer
works the same, it may be necessary to make
small adjustments to these settings.
The development of a complex, airworthy RC flight model to express on any standard 3D printer is
a very complex and extensive process. Therefore, we appeal to your fairness not to forward the STL
data you have acquired to third parties. Our STL files are provided with indelible copyright watermarks that can be verified at any time.
Thank you for your understanding and have fun with your PLANEPRINT MODEL!
ZLIN SAVAGE BOBBER
PRINTING & CONSTRUCTION MANUAL
© PLANEPRINT
3
Page 4
EN
ZLIN SAVAGE BOBBER
PRINTING & CONSTRUCTION MANUAL
© PLANEPRINT
4
Page 5
1_
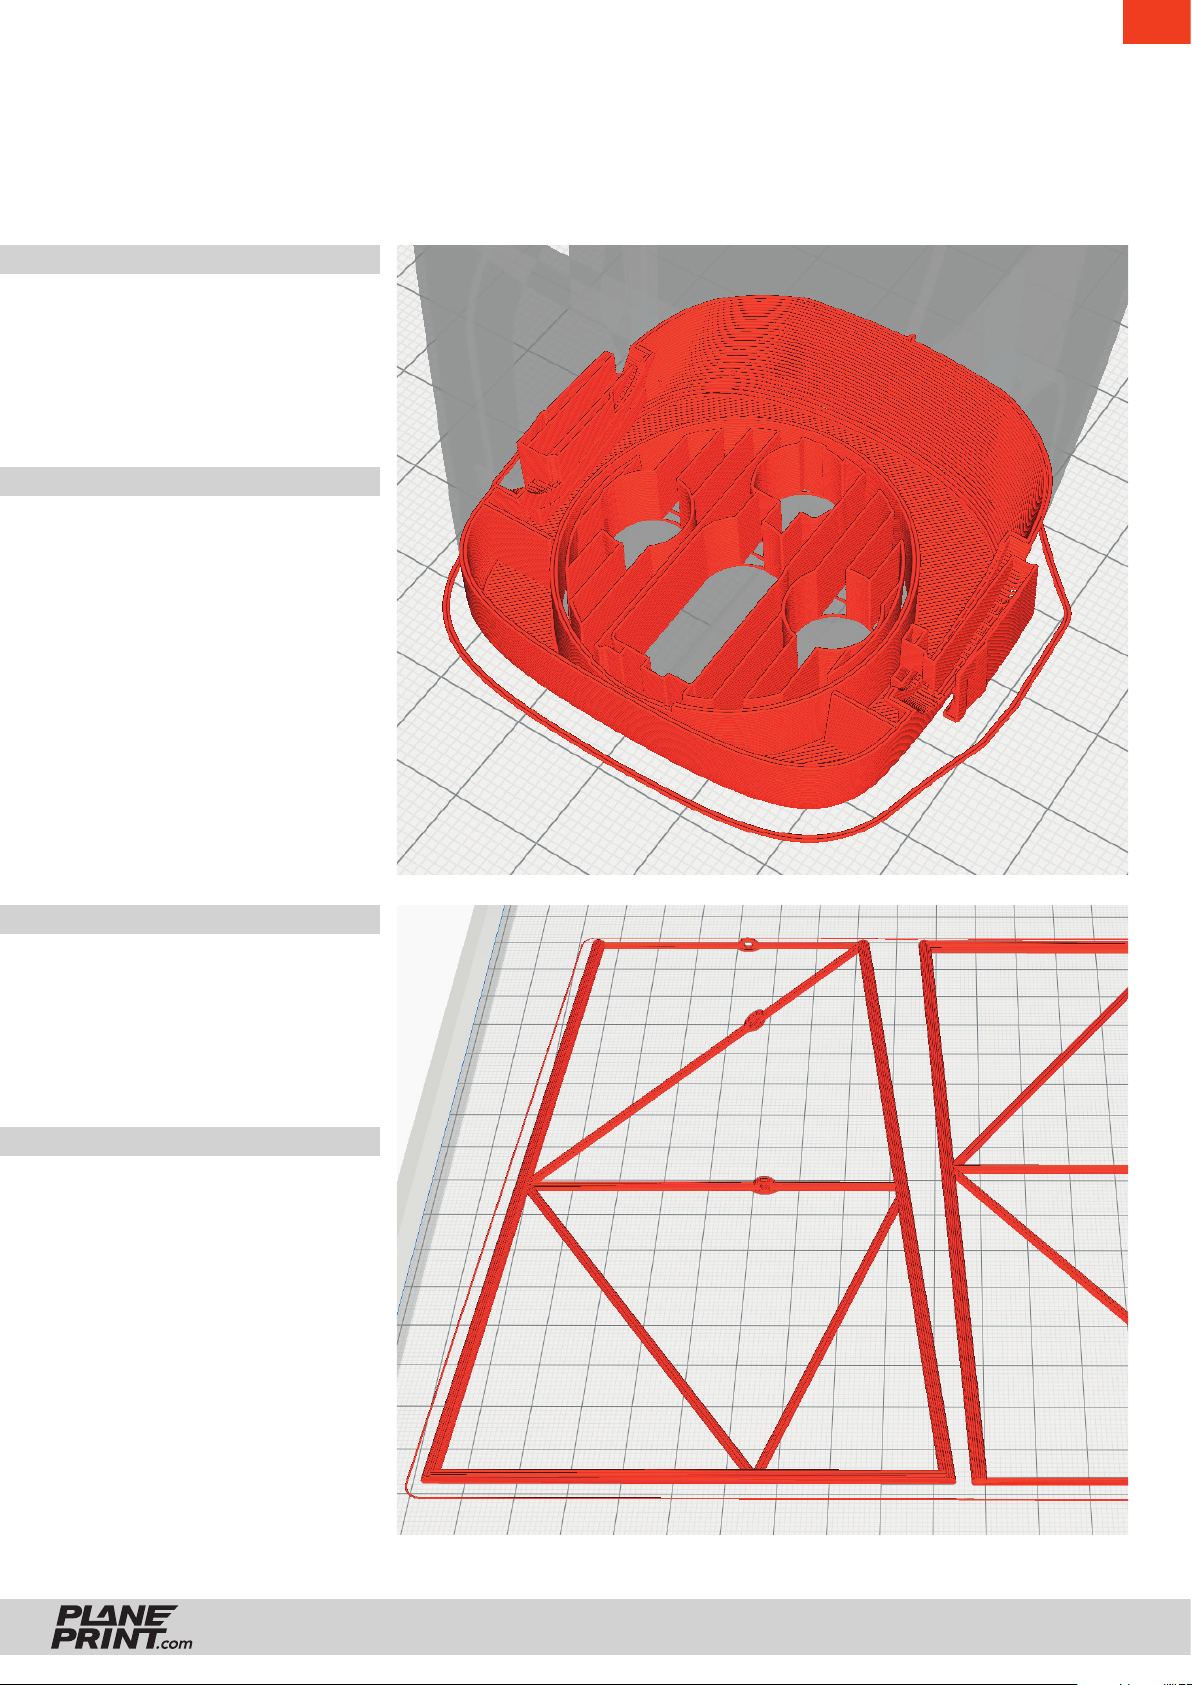
The following parts must be sliced with the profile P1_FULLBODY.
Recommended additional settings are listed in the screenshots.
INFO
STL File: COWLING_p1.stl
Material: PLA
Weight: ~ 20 g
(without support)
ADDITIONAL SETTINGS
• Generate support
• Support Overhang Angle 55°
• Support Wall Line Count 0
EN
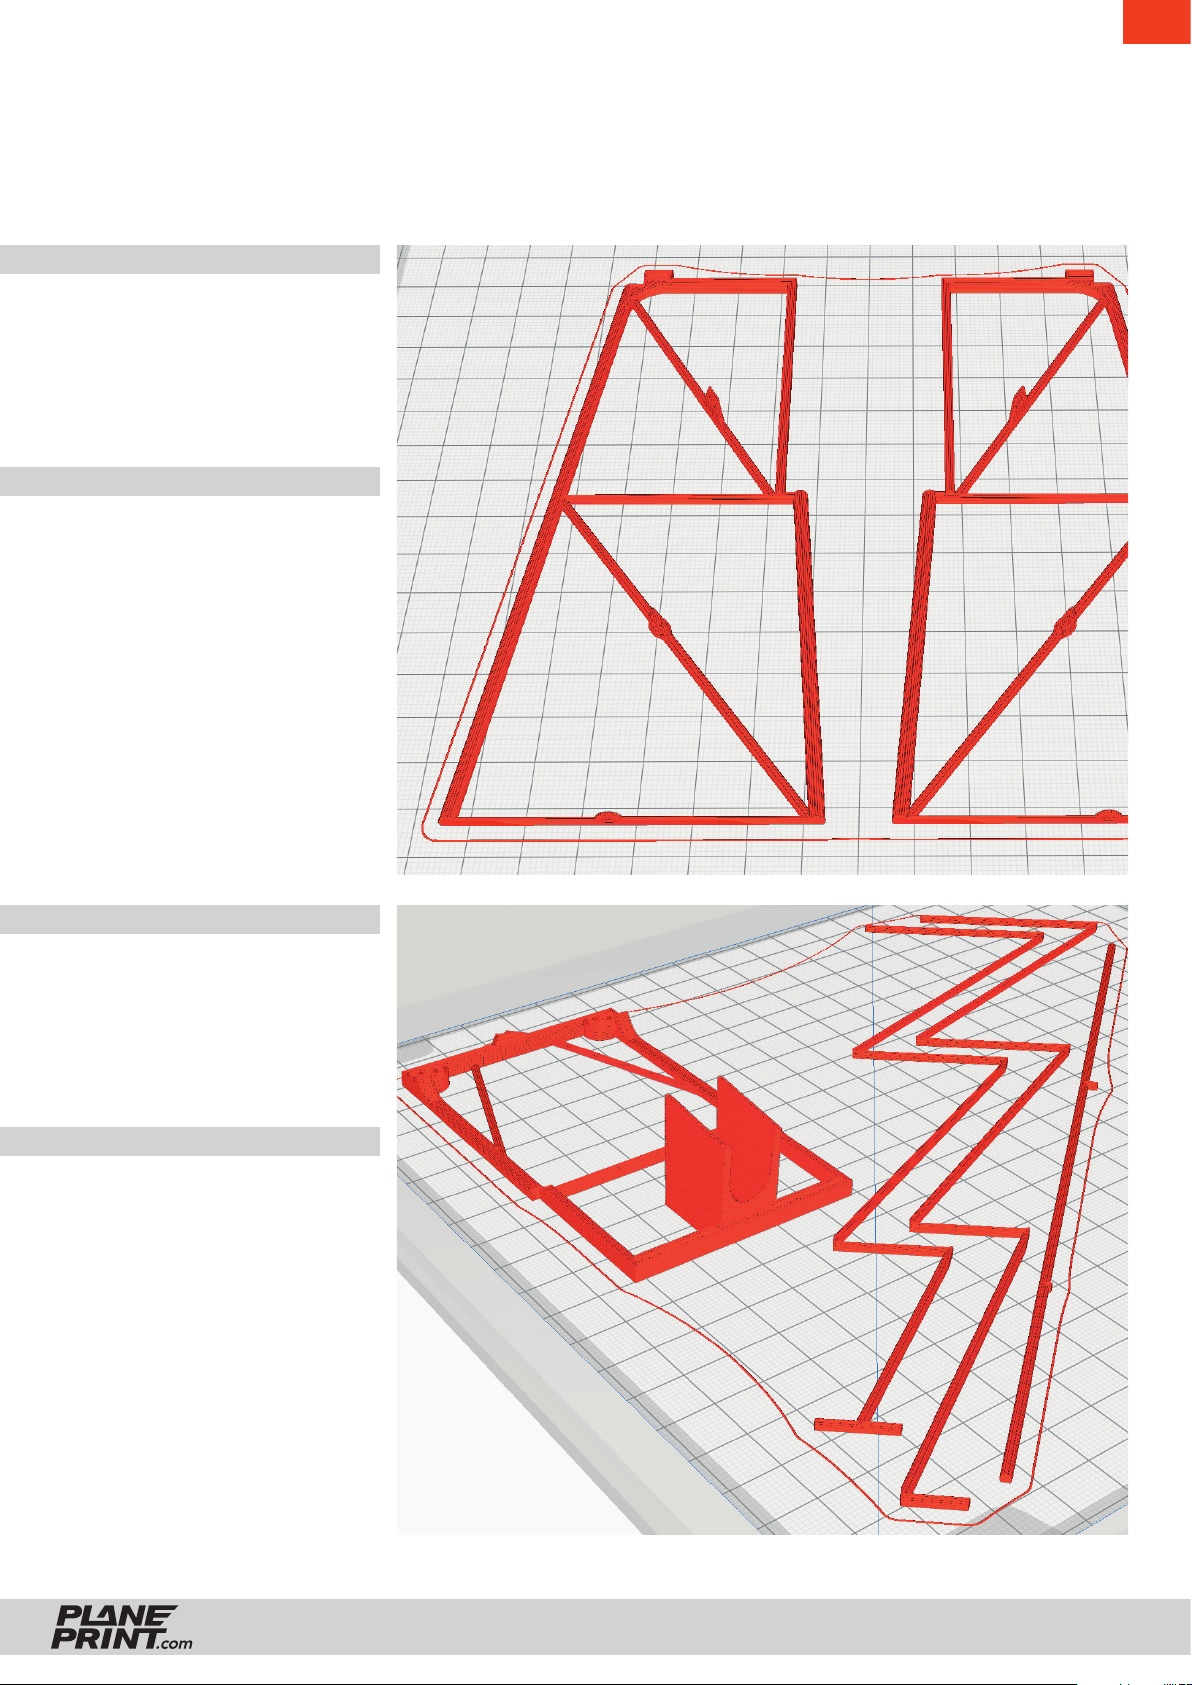
INFO
STL file: GRID-1_p1.stl
Material: PLA or Carbon
Weight: ~ 10 g
ADDITIONAL SETTINGS
None required
ZLIN SAVAGE BOBBER
PRINTING & CONSTRUCTION MANUAL
© PLANEPRINT
5
Page 6
1_
INFO
STL file: GRID-2_p1.stl
Material: PLA or Carbon
Weight: ~ 8 g
ADDITIONAL SETTINGS
None required
EN
INFO
STL file: GRID-3_p1.stl
Material: PLA or Carbon
Weight: ~ 9 g
ADDITIONAL SETTINGS
None required
ZLIN SAVAGE BOBBER
PRINTING & CONSTRUCTION MANUAL
© PLANEPRINT
6
Page 7
1_
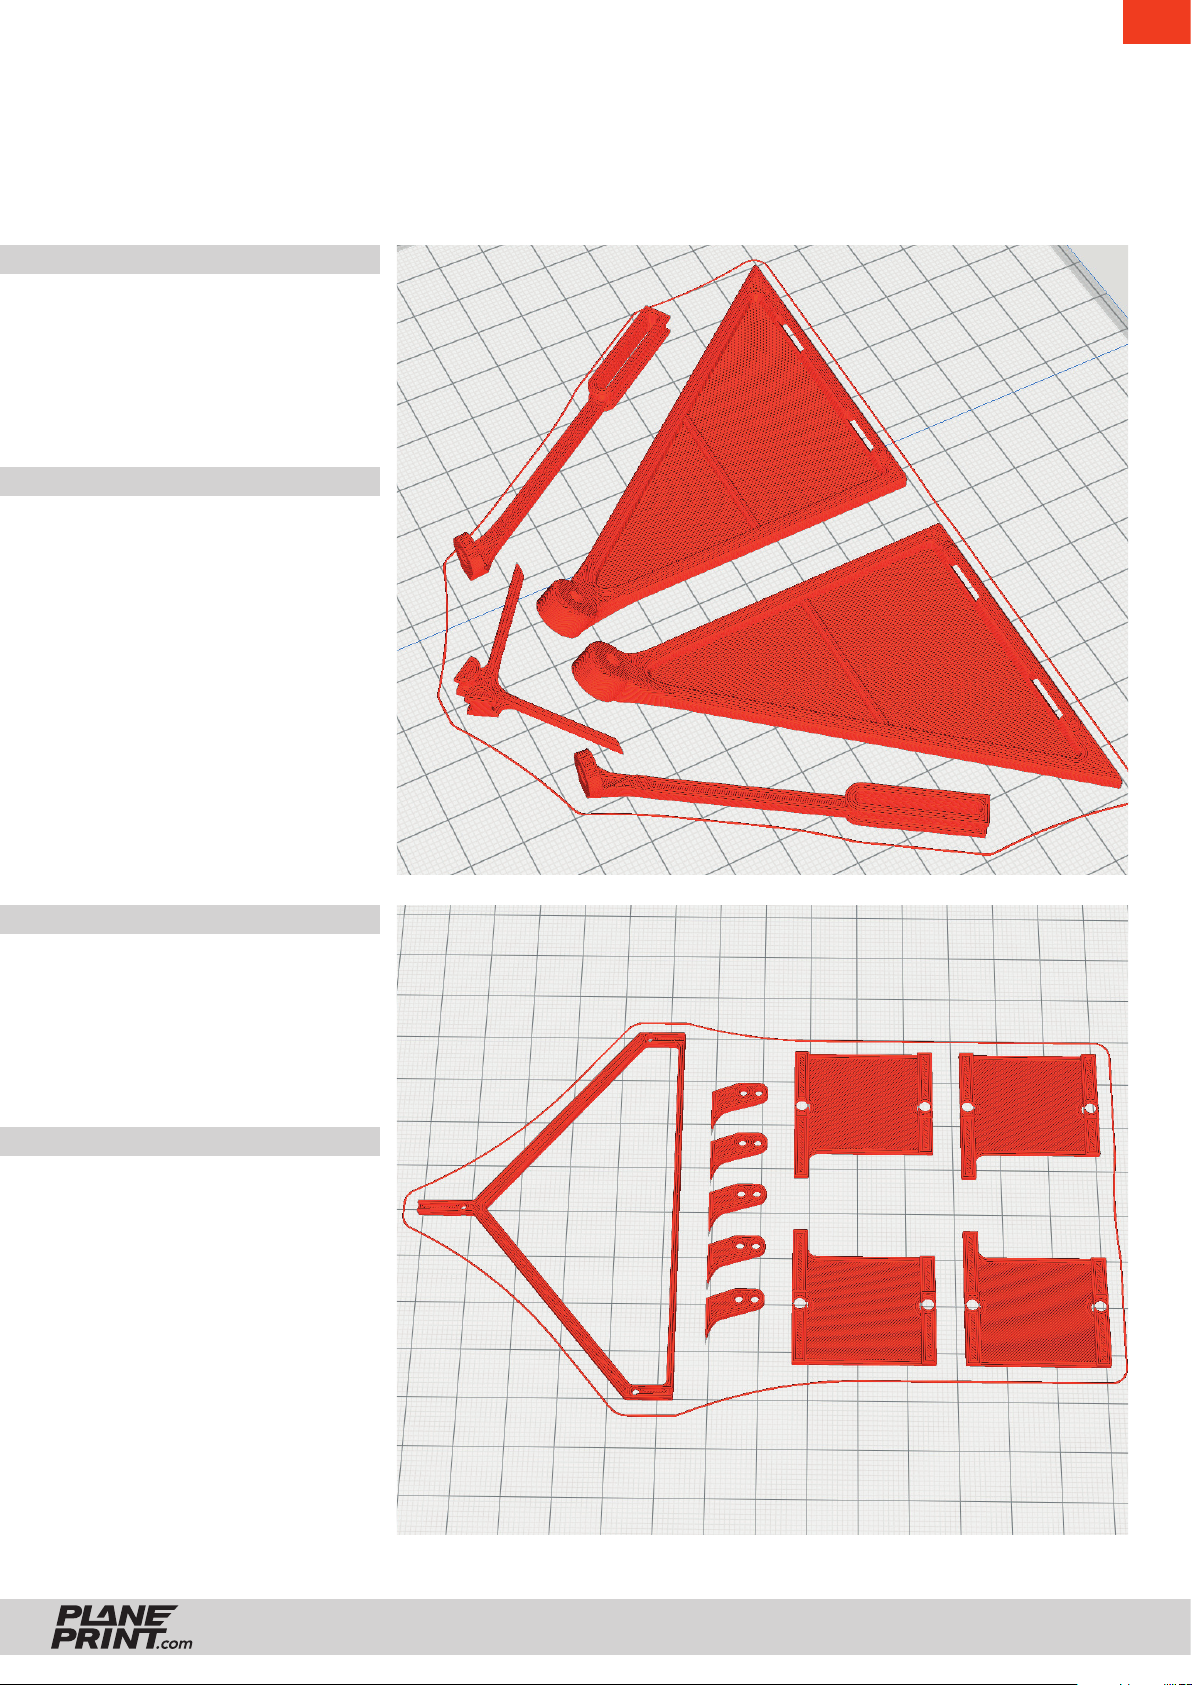
INFO
STL file: LANDING GEAR_p1.stl
Material: PLA or Carbon
Weight: ~ 11 g
ADDITIONAL SETTINGS
• as needed support structure
activate
EN
INFO
STL file: PARTS_p1.stl
Material: PLA
Weight: ~ 4 g
ADDITIONAL SETTINGS
None required
ZLIN SAVAGE BOBBER
PRINTING & CONSTRUCTION MANUAL
© PLANEPRINT
7
Page 8
1_
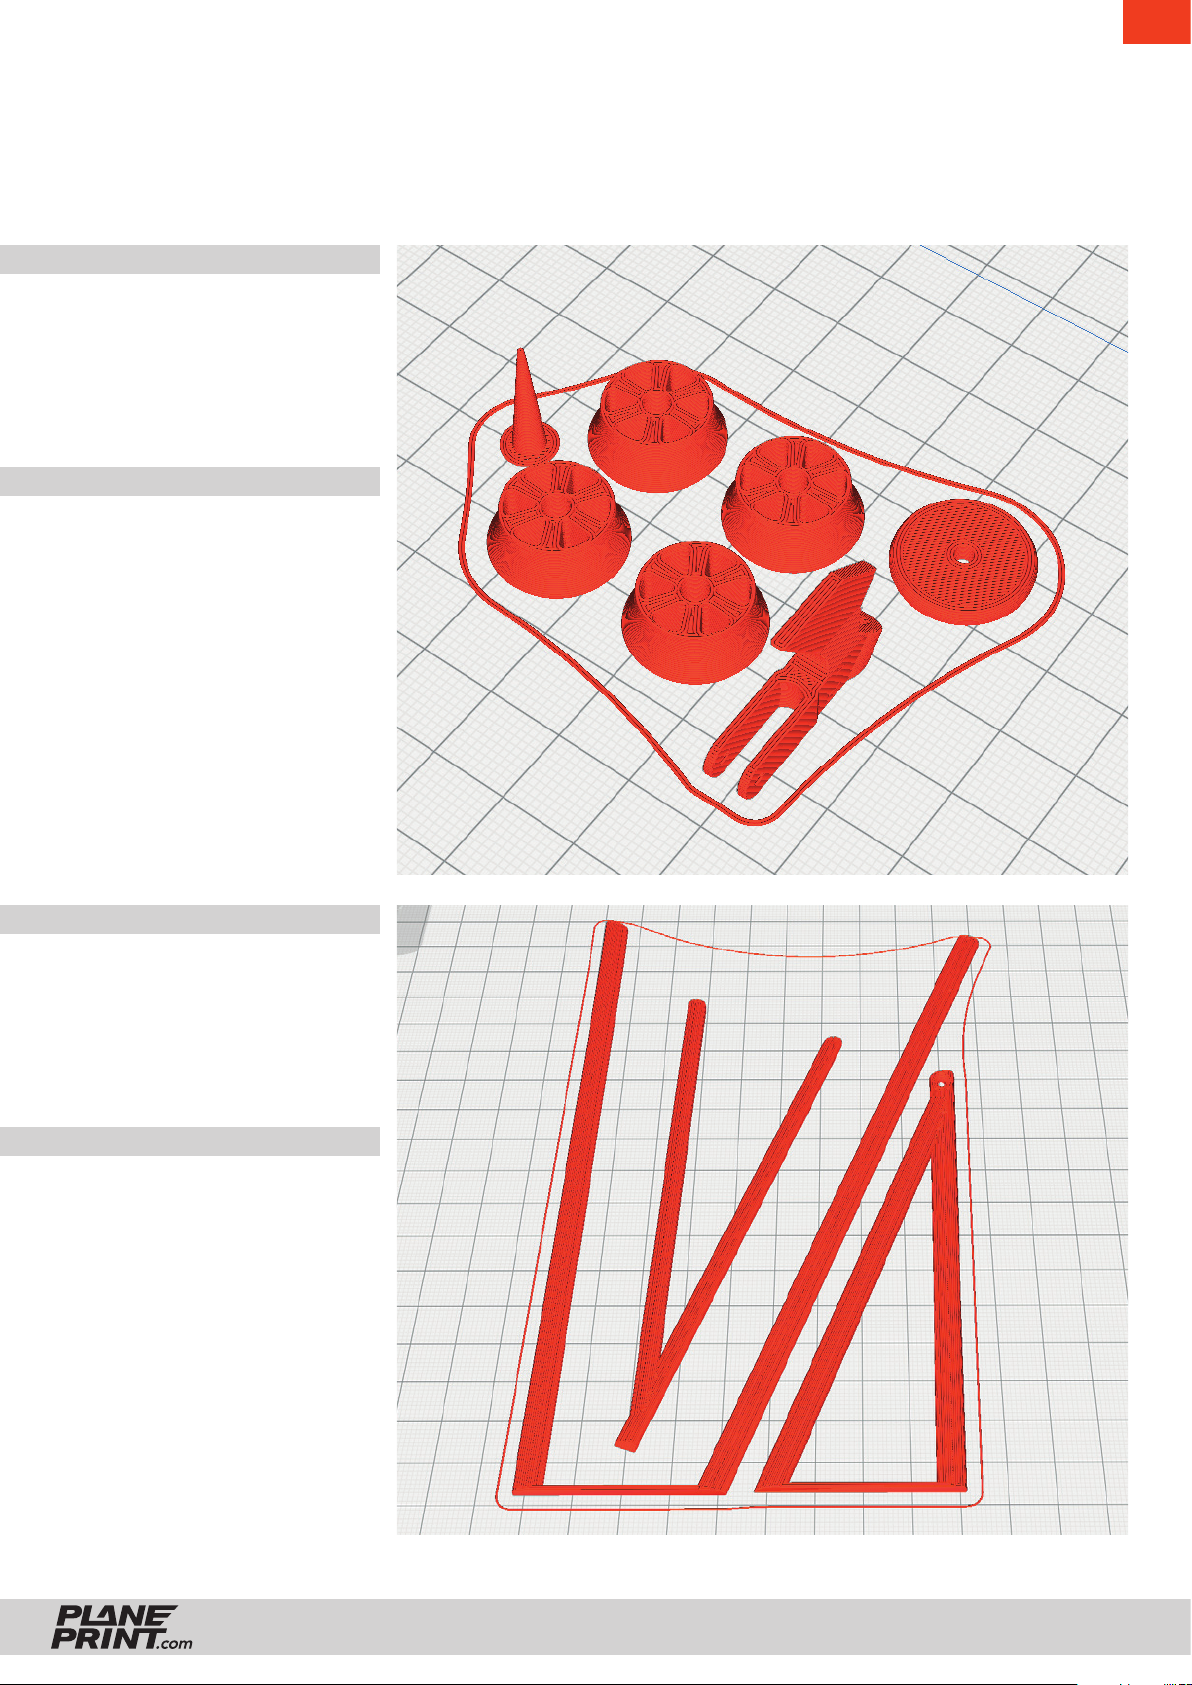
INFO
STL file: RIMS_p1.stl
Material: PLA
Weight: ~ 5 g
ADDITIONAL SETTINGS
• as needed support structure
activate
*
EN
* This cone improves printing and can then
be thrown away.
INFO
STL files: STRUT-L_p1.stl
STRUT-R_p1.stl
Material: PLA
Weight: ~ 12 g
ADDITIONAL SETTINGS
None required
ZLIN SAVAGE BOBBER
PRINTING & CONSTRUCTION MANUAL
© PLANEPRINT
8
Page 9
2_
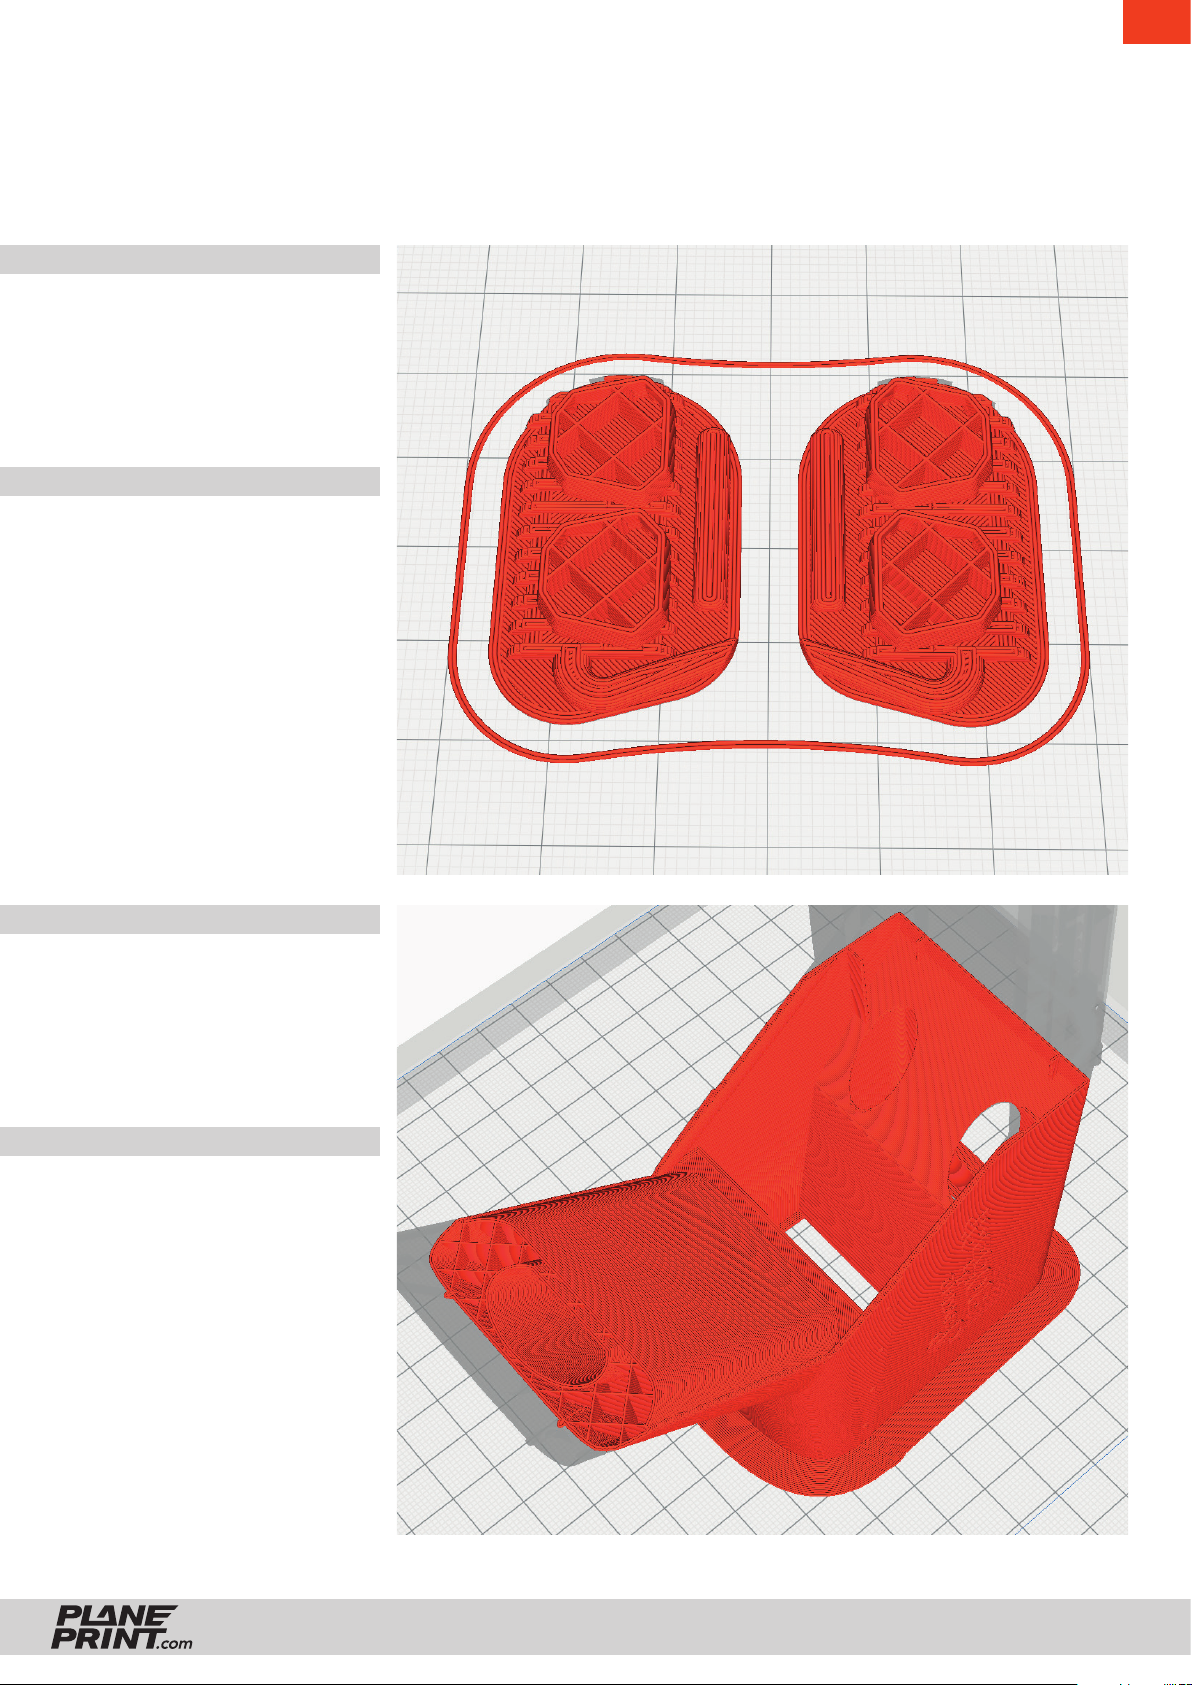
The following parts must be sliced with the profile PROFILE P2_HOLLOWBODY.
Recommended additional settings are listed in the screenshots.
INFO
STL file: ENGINE_p2.stl
Material: PLA
Weight: ~ 3 g
ADDITIONAL SETTINGS
None required
EN
INFO
STL file: FUSELAGE_p2.stl
Material: PLA
Weight: ~ 47 g
ADDITIONAL SETTINGS
None required
ZLIN SAVAGE BOBBER
PRINTING & CONSTRUCTION MANUAL
© PLANEPRINT
9
Page 10
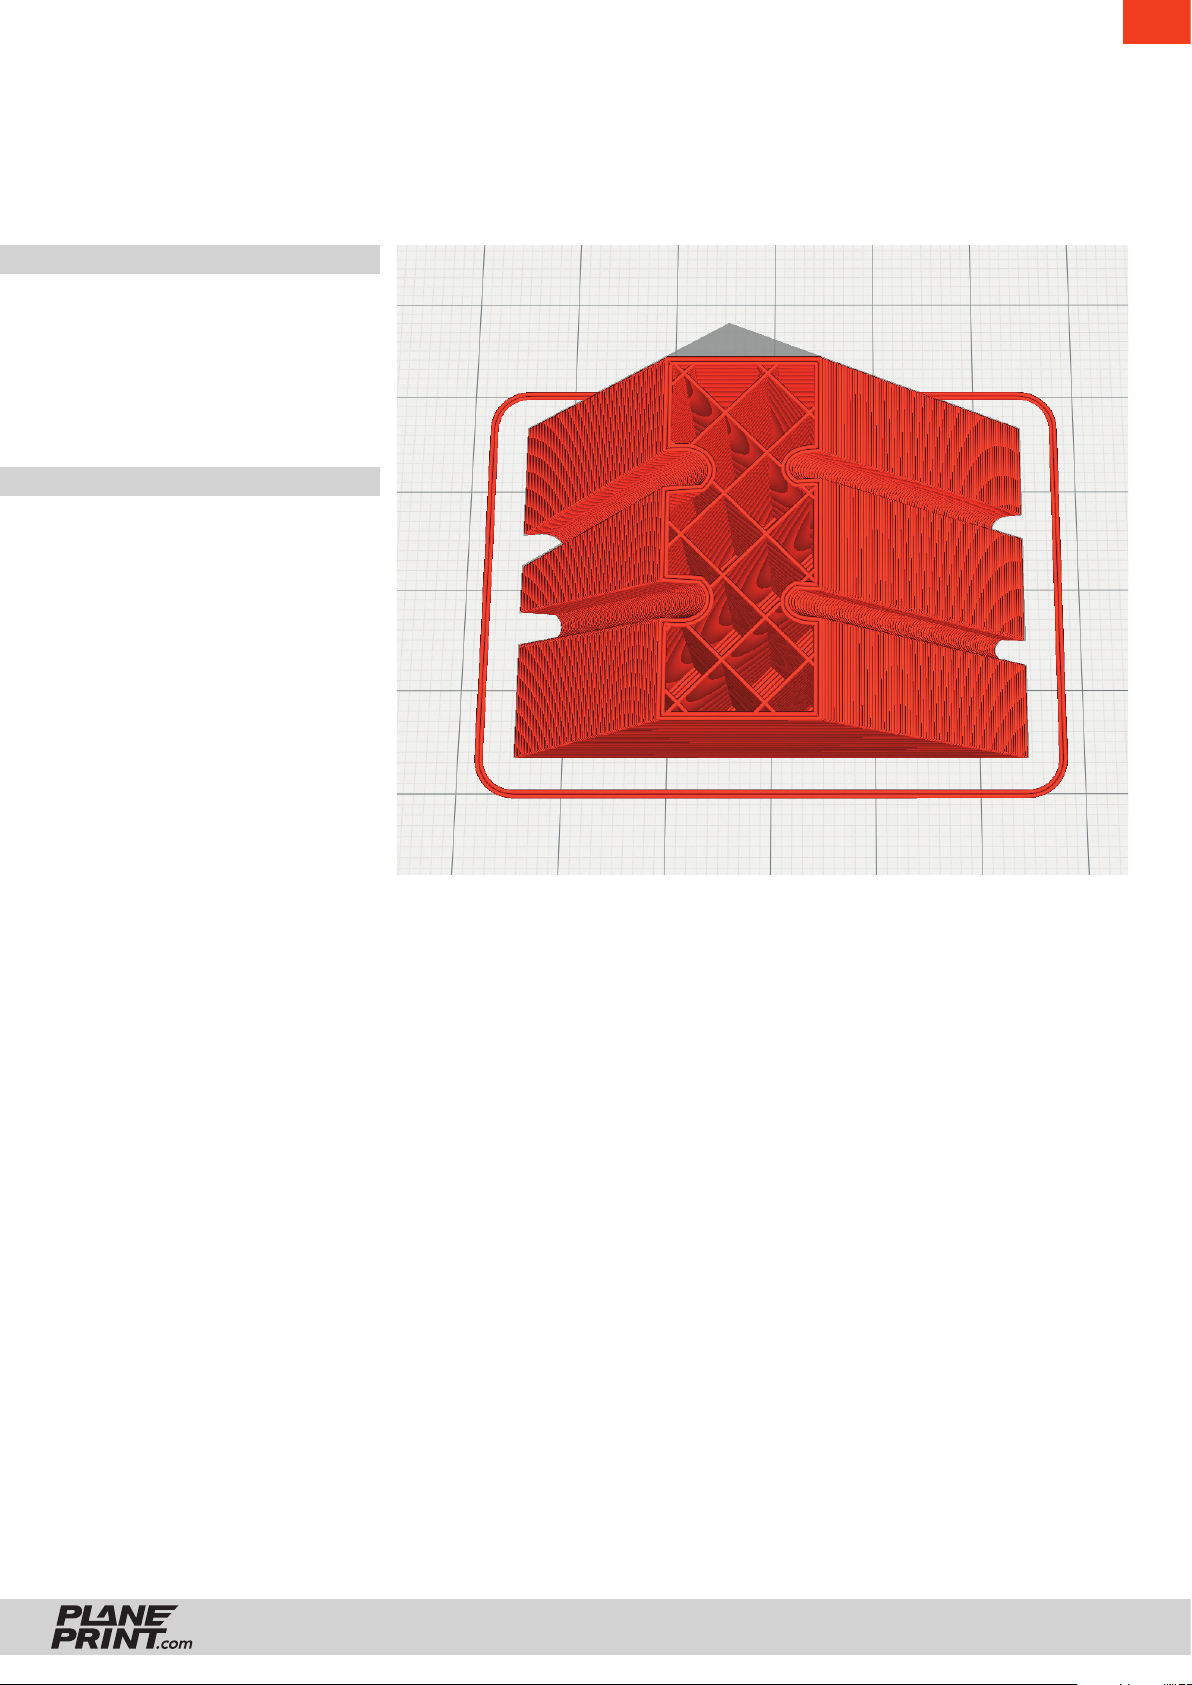
2_
INFO
STL file: TEMPLATE_p2.stl
Material: PLA
ADDITIONAL SETTINGS
None required
EN
ZLIN SAVAGE BOBBER
PRINTING & CONSTRUCTION MANUAL
© PLANEPRINT
10
Page 11
3_
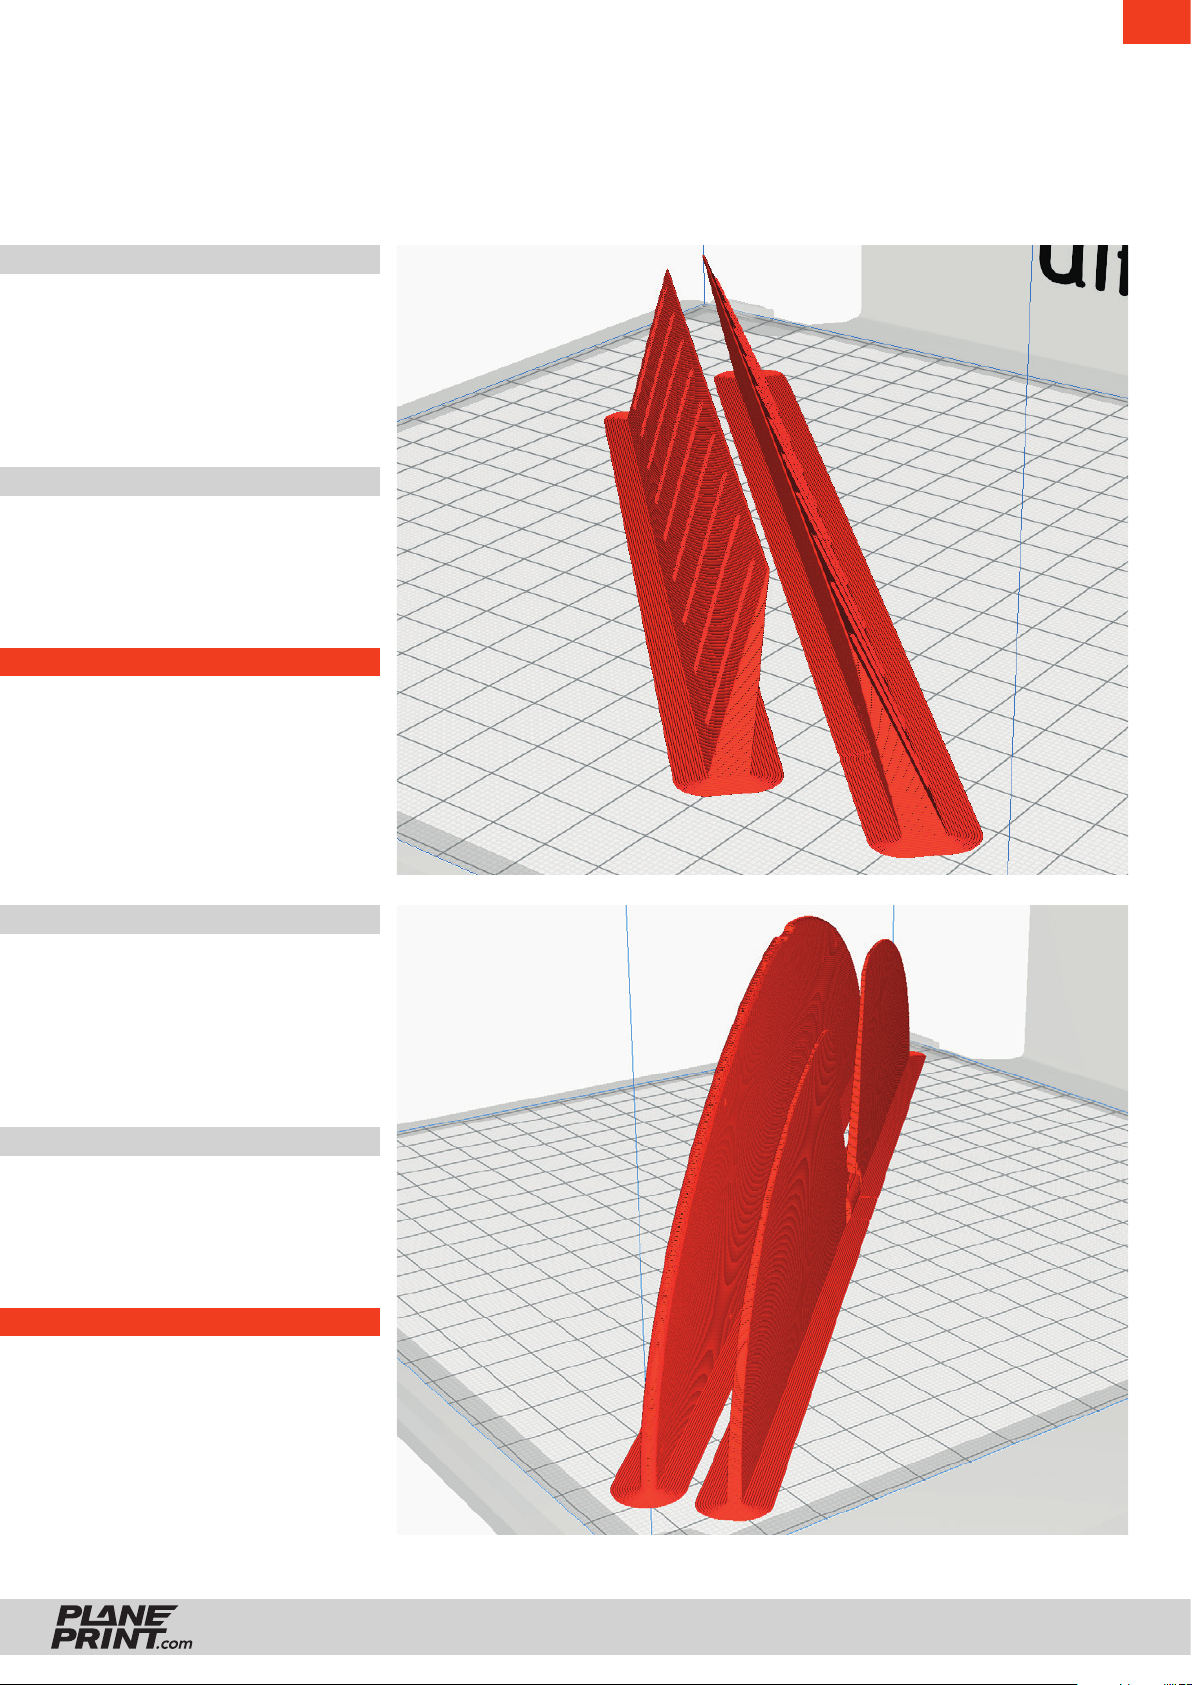
The following parts must be sliced with the profile PROFILE P3_SURFACE (1 Wall Print).
Recommended additional settings are listed in the screenshots.
INFO
STL files: AILERON-L_p3.stl
AILERON-R_p3.stl
Material: PLA
Weight: ~ 14 g
ADDITIONAL SETTINGS
None required
EN
PLEASE NOTE
The slots for the hinges hinges rest
on the pressure plate and must be
opened slightly with the cutter.
Please be carful!
INFO
STL file: ELEVATOR_p3.stl
Material: PLA
Weight: ~ 29 g
ADDITIONAL SETTINGS
None required
PLEASE NOTE
The slots for the hinges hinges rest
on the pressure plate and must be
opened slightly with the cutter.
Please be carful!
ZLIN SAVAGE BOBBER
PRINTING & CONSTRUCTION MANUAL
© PLANEPRINT
11
Page 12
3_
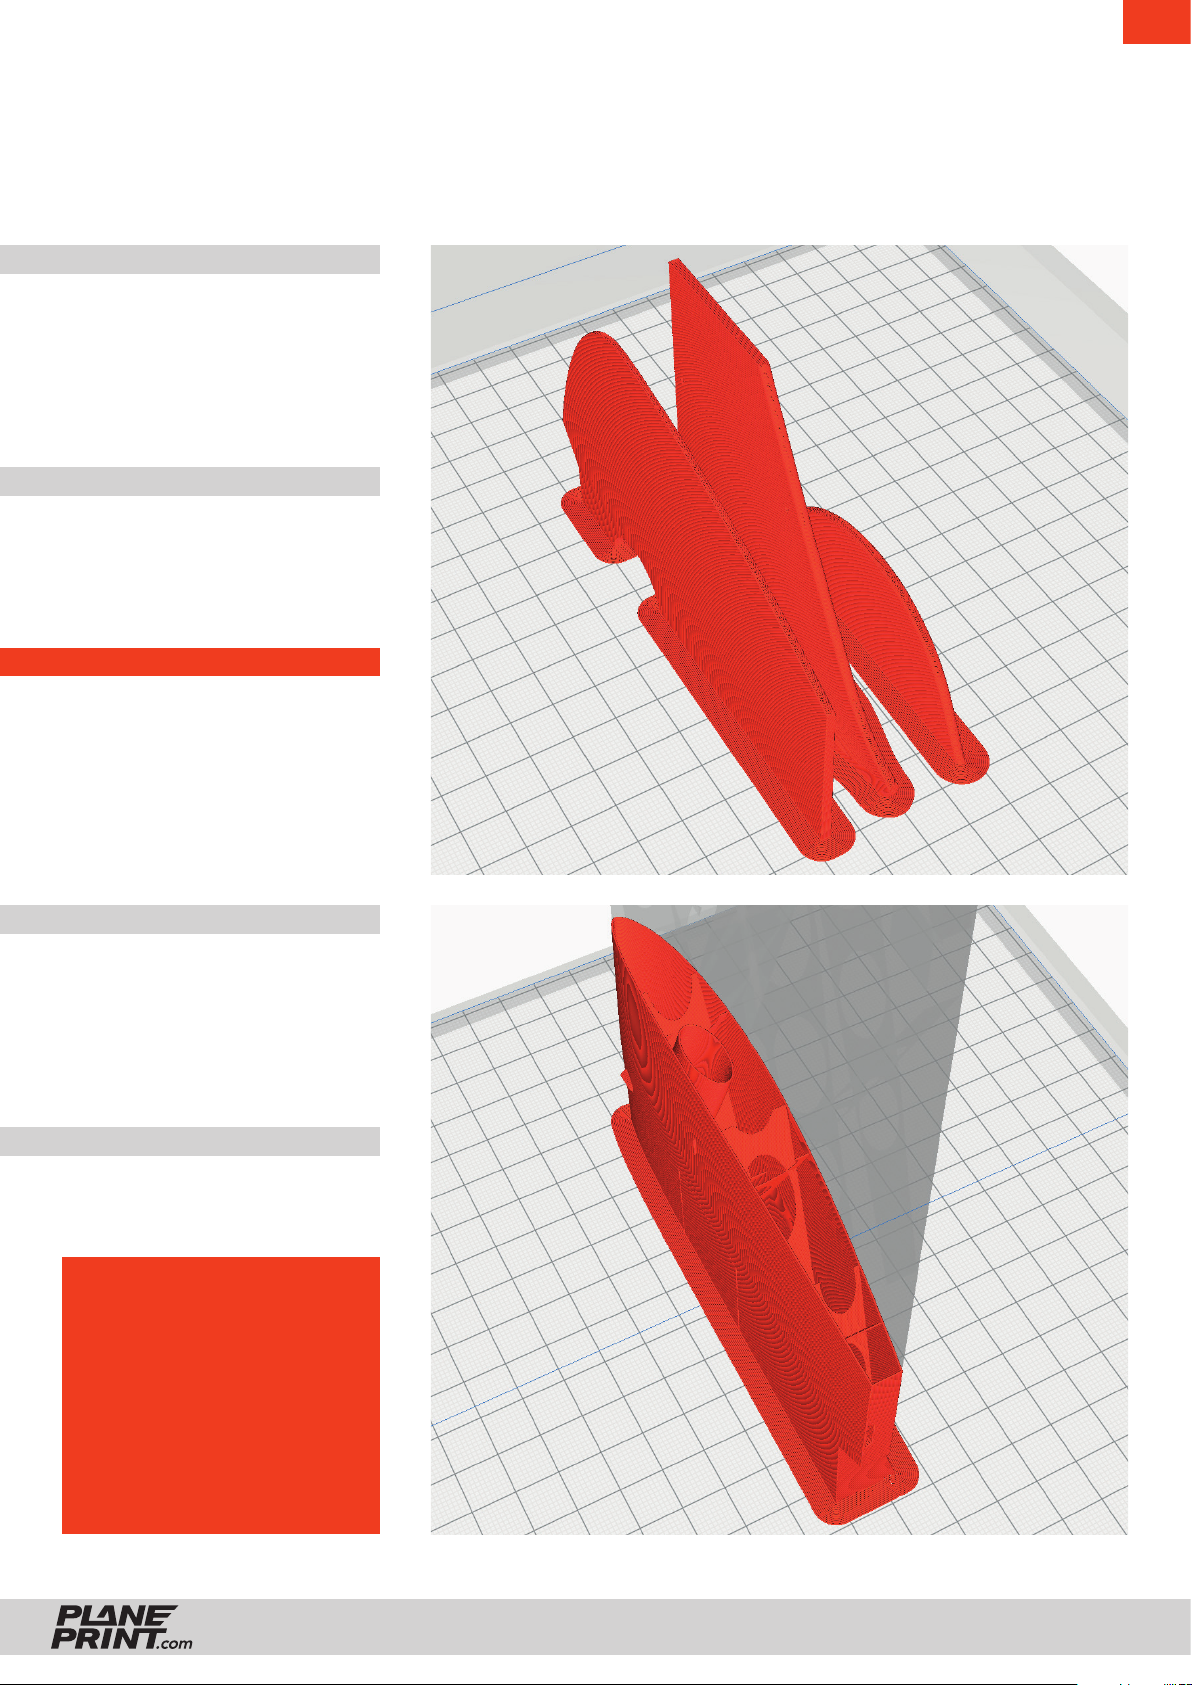
INFO
STL file: RUDDER_p3.stl
Material: PLA
Weight: ~ 15 g
ADDITIONAL SETTINGS
• as needed support structure
activate
EN
PLEASE NOTE
The slots for the hinges rest on the
pressure plate and must be opened slightly with the cutter.
Please be careful!
INFO
STL files: WING-INSIDE-L_p3.stl
WING-INSIDE-R_p3.stl
Material: PLA
Weight: ~ 33 g
ADDITIONAL SETTINGS
None required
CAUTION:
All P3_SURFACE parts should
be printed one at a time,
otherwise slicing errors may
occur. In addition, the surface
will exhibit fewer blobs and
oozing defects if the print
head doesn’t move from one
component to another.
ZLIN SAVAGE BOBBER
PRINTING & CONSTRUCTION MANUAL
© PLANEPRINT
12
Page 13
3_
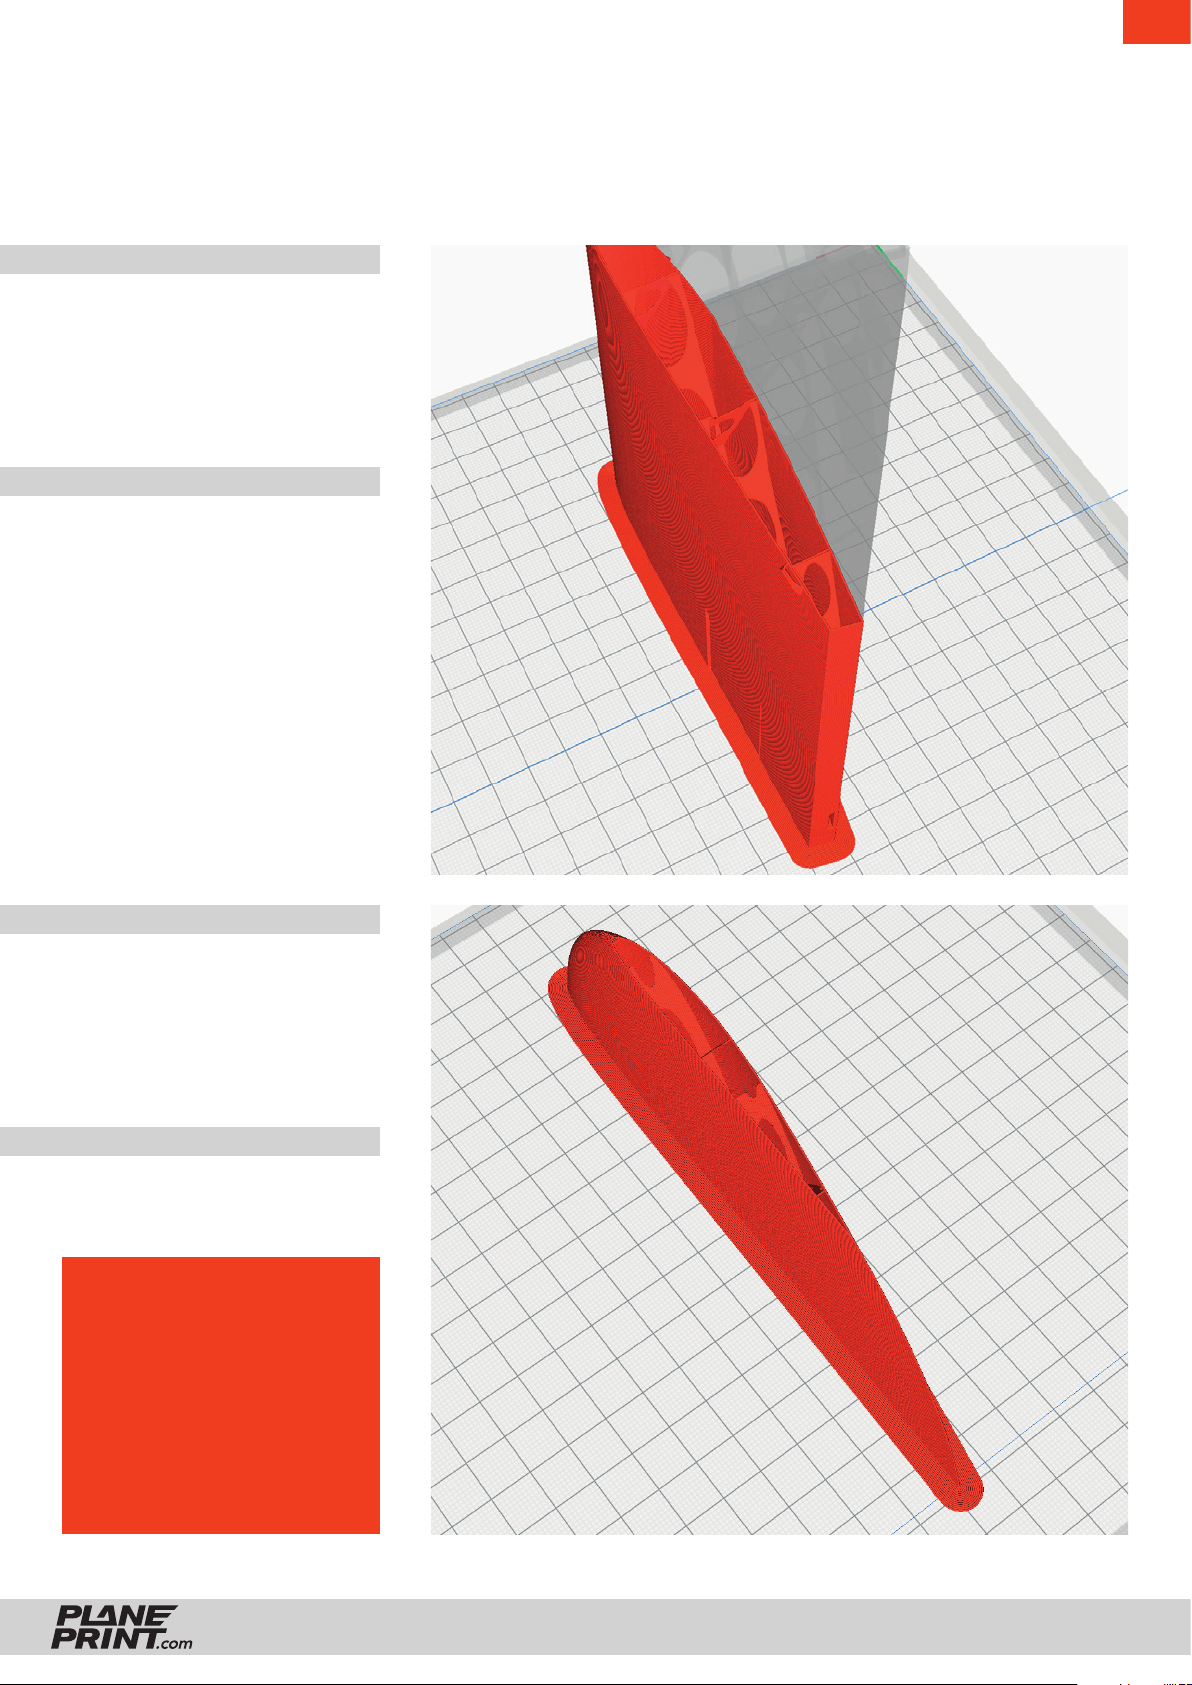
INFO
STL files: WING-OUTSIDE-L_p3.stl
WING-OUDSIDE-R_p3.stl
Material: PLA
Weight: ~ 31 g
ADDITIONAL SETTINGS
None required
EN
INFO
STL files: WINGIP-L_p3.stl
WINGTIP_p3.stl
Material: PLA
Weight: ~ 9 g
ADDITIONAL SETTINGS
None required
CAUTION:
All P3_SURFACE parts should
be printed one at a time,
otherwise slicing errors may
occur. In addition, the surface
will exhibit fewer blobs and
oozing defects if the print
head doesn’t move from one
component to another.
ZLIN SAVAGE BOBBER
PRINTING & CONSTRUCTION MANUAL
© PLANEPRINT
13
Page 14
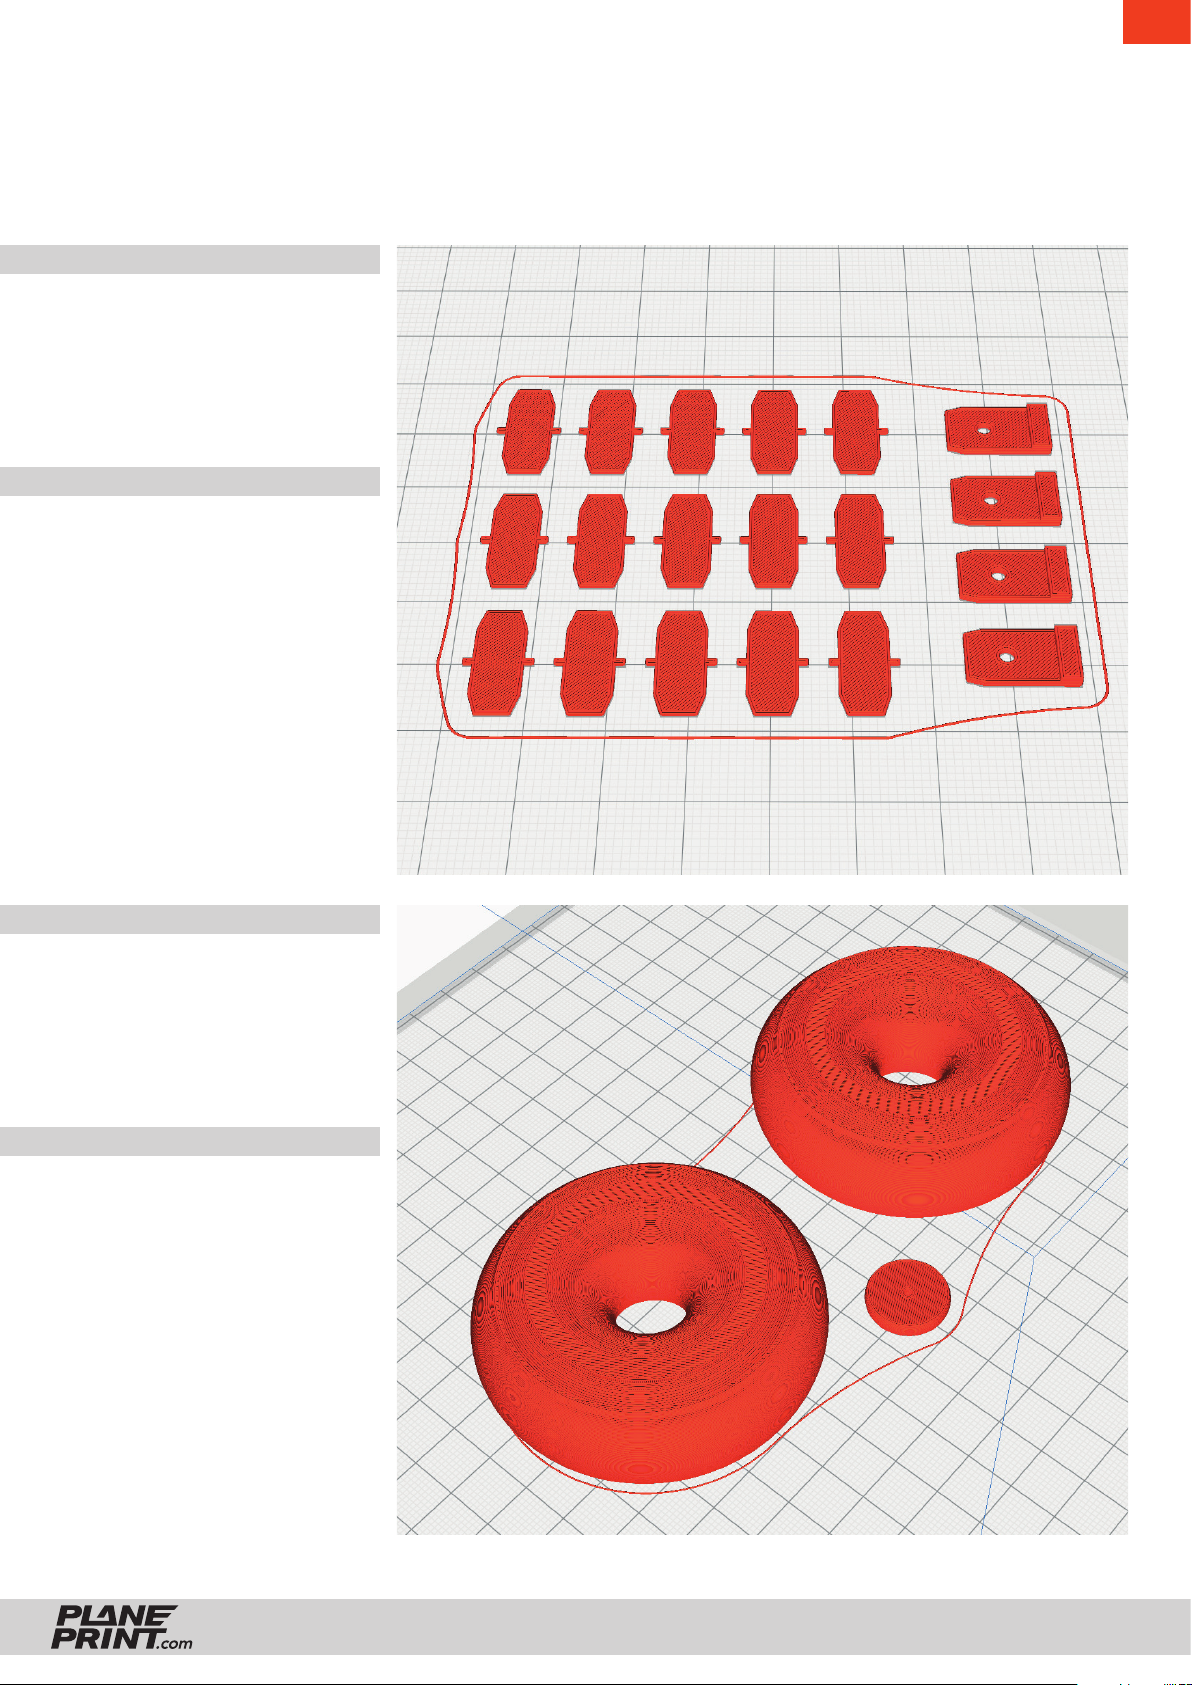
4_
The following parts must be sliced with the profile PROFILE P4_FLEX (flexible materials).
Recommended additional settings are listed in the screenshots.
INFO
STL file: HINGES_p4.stl
Material: TPU soft or
mittelhart
Weight: ~ 2 g
ADDITIONAL SETTINGS
None required
EN
INFO
STL file: WHEELS_p4.stl
Material: TPU soft or
medium hard
Weight: ~ 32 g
ADDITIONAL SETTINGS
None required
ZLIN SAVAGE BOBBER
PRINTING & CONSTRUCTION MANUAL
© PLANEPRINT
14
Page 15
EN
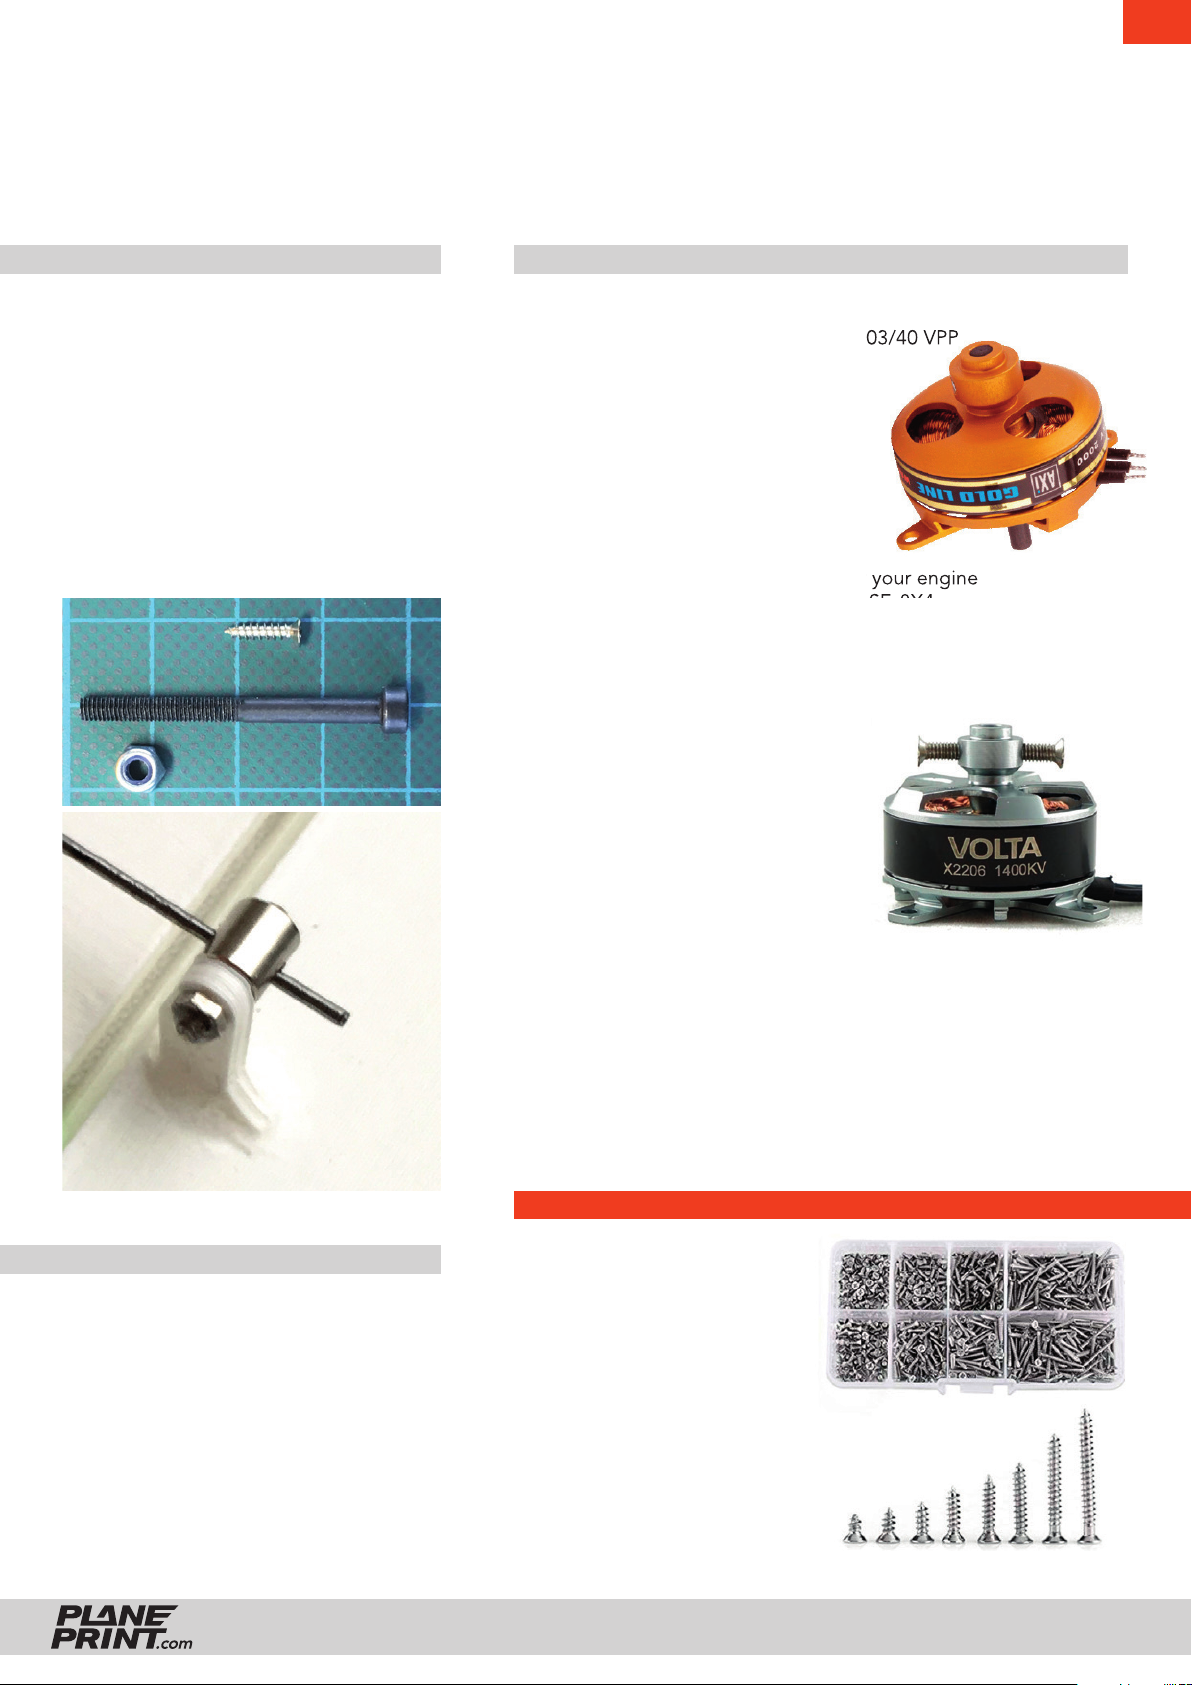
MATERIALS
• tapping screws M2*10 11 Pieces
• metal screws M3*35 2 Pieces
• stop nut M3 2 Pieces
• CA super glue, liquid and liquid medium
• Activator
• hair gums ~ 15 mm
• carbon rod Ø 1,2 mm 1 m
• servo extension cable 50 cm
• double-sided adhesive tape (padded)
• steel wire Ø 1mm
• rod connection 6 Pieces
RC COMPONENTS
STANDARD ENGINE 2S
Engine: e.g. AXI 2203/40 VPP
BEC-Controller: suitable for your engine
Prop: APC 8X3,8 SF, 8X4
Battery pack (~ 50 g): 2S LiPo-Akku ca. 950 MAH
PERFORMANCE ENGINE 3S
Engine: e.g. Volta 2206/1400 kV
TOOLS
• Cutter knife
• Philips screwdriver
• Needle nose pliers
BEC-Controller: suitable for your engine
Prop: APC 8X4,7
Battery pack (~ 50 g): 3S LiPo-Akku 600-800 MAH
5 X PICCO-Servo e.g. PLANET-HOBBY ECO PLUS
(max. 23x26x8 mm): PICCO 8 DIGITAL SERVO
or Diamond D47
TIPP
We recommend the
purchase of a small range of
screws, which can be used
for all future PLANEPRINT
models.
Simply search the Internet
for: M2 Flat Head Tapping
Screw Assortment …
ZLIN SAVAGE BOBBER
PRINTING & CONSTRUCTION MANUAL
© PLANEPRINT
15
Page 16
EN
ZLIN SAVAGE BOBBER
PRINTING & CONSTRUCTION MANUAL
© PLANEPRINT
16
Page 17
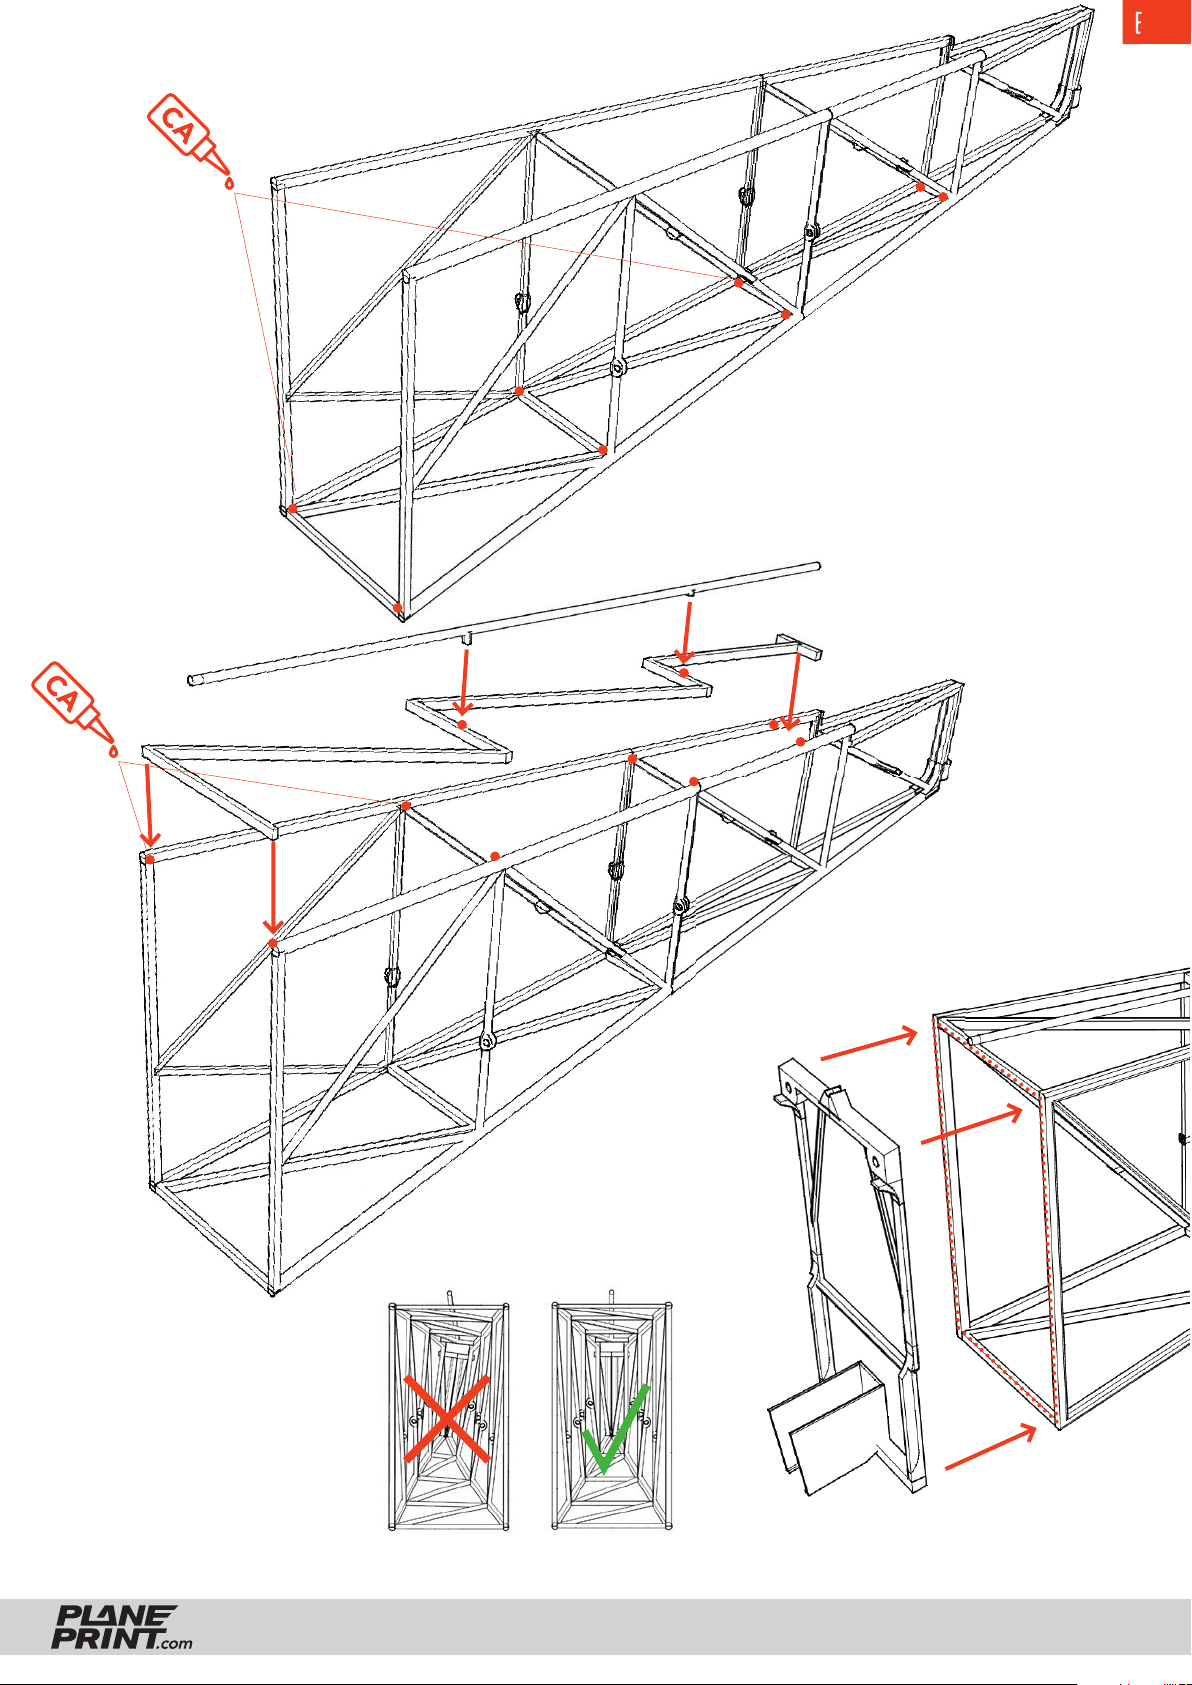
1
EN
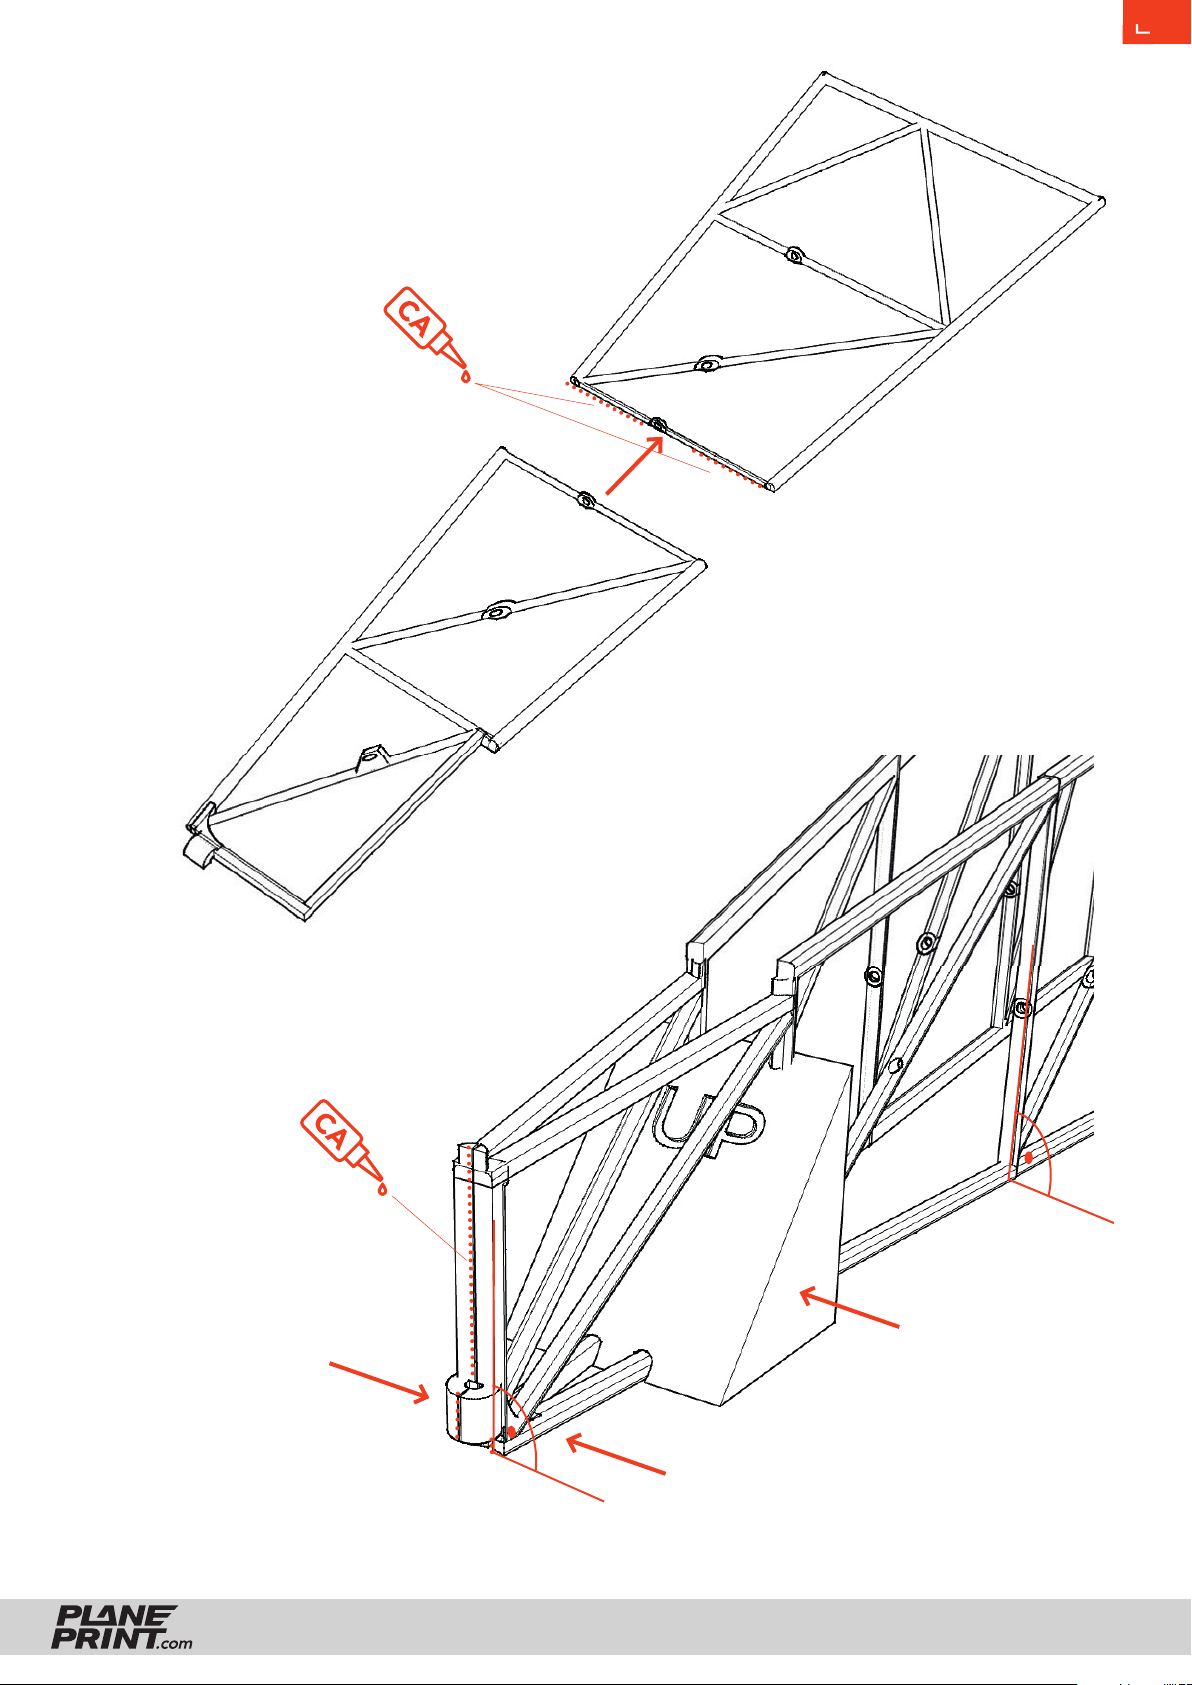
1 x right
1 x left
2
use the template to
align the side parts
exactly vertical!
Squeeze fi rmly down
ZLIN SAVAGE BOBBER
PRINTING & CONSTRUCTION MANUAL
© PLANEPRINT
17
Page 18
3
EN
4
5
ZLIN SAVAGE BOBBER
PRINTING & CONSTRUCTION MANUAL
© PLANEPRINT
18
Page 19
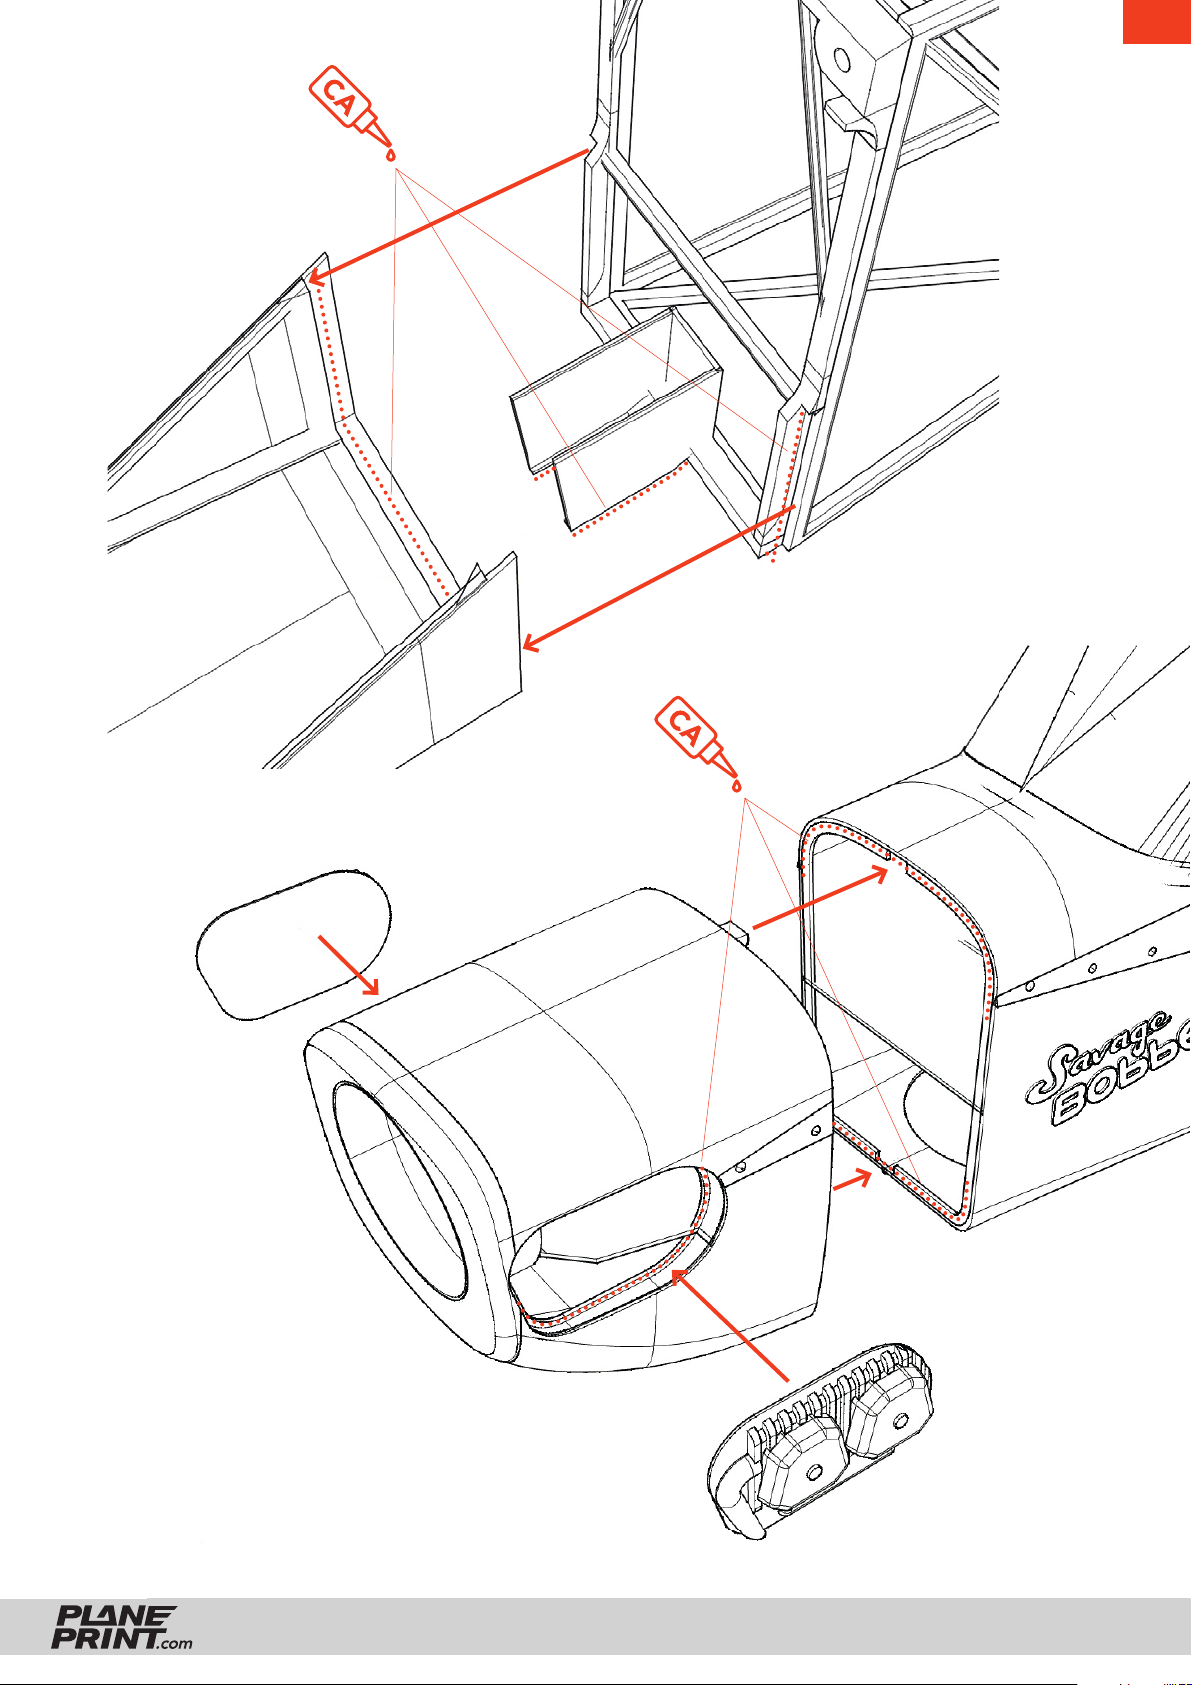
6
EN
7
ZLIN SAVAGE BOBBER
PRINTING & CONSTRUCTION MANUAL
© PLANEPRINT
19
Page 20
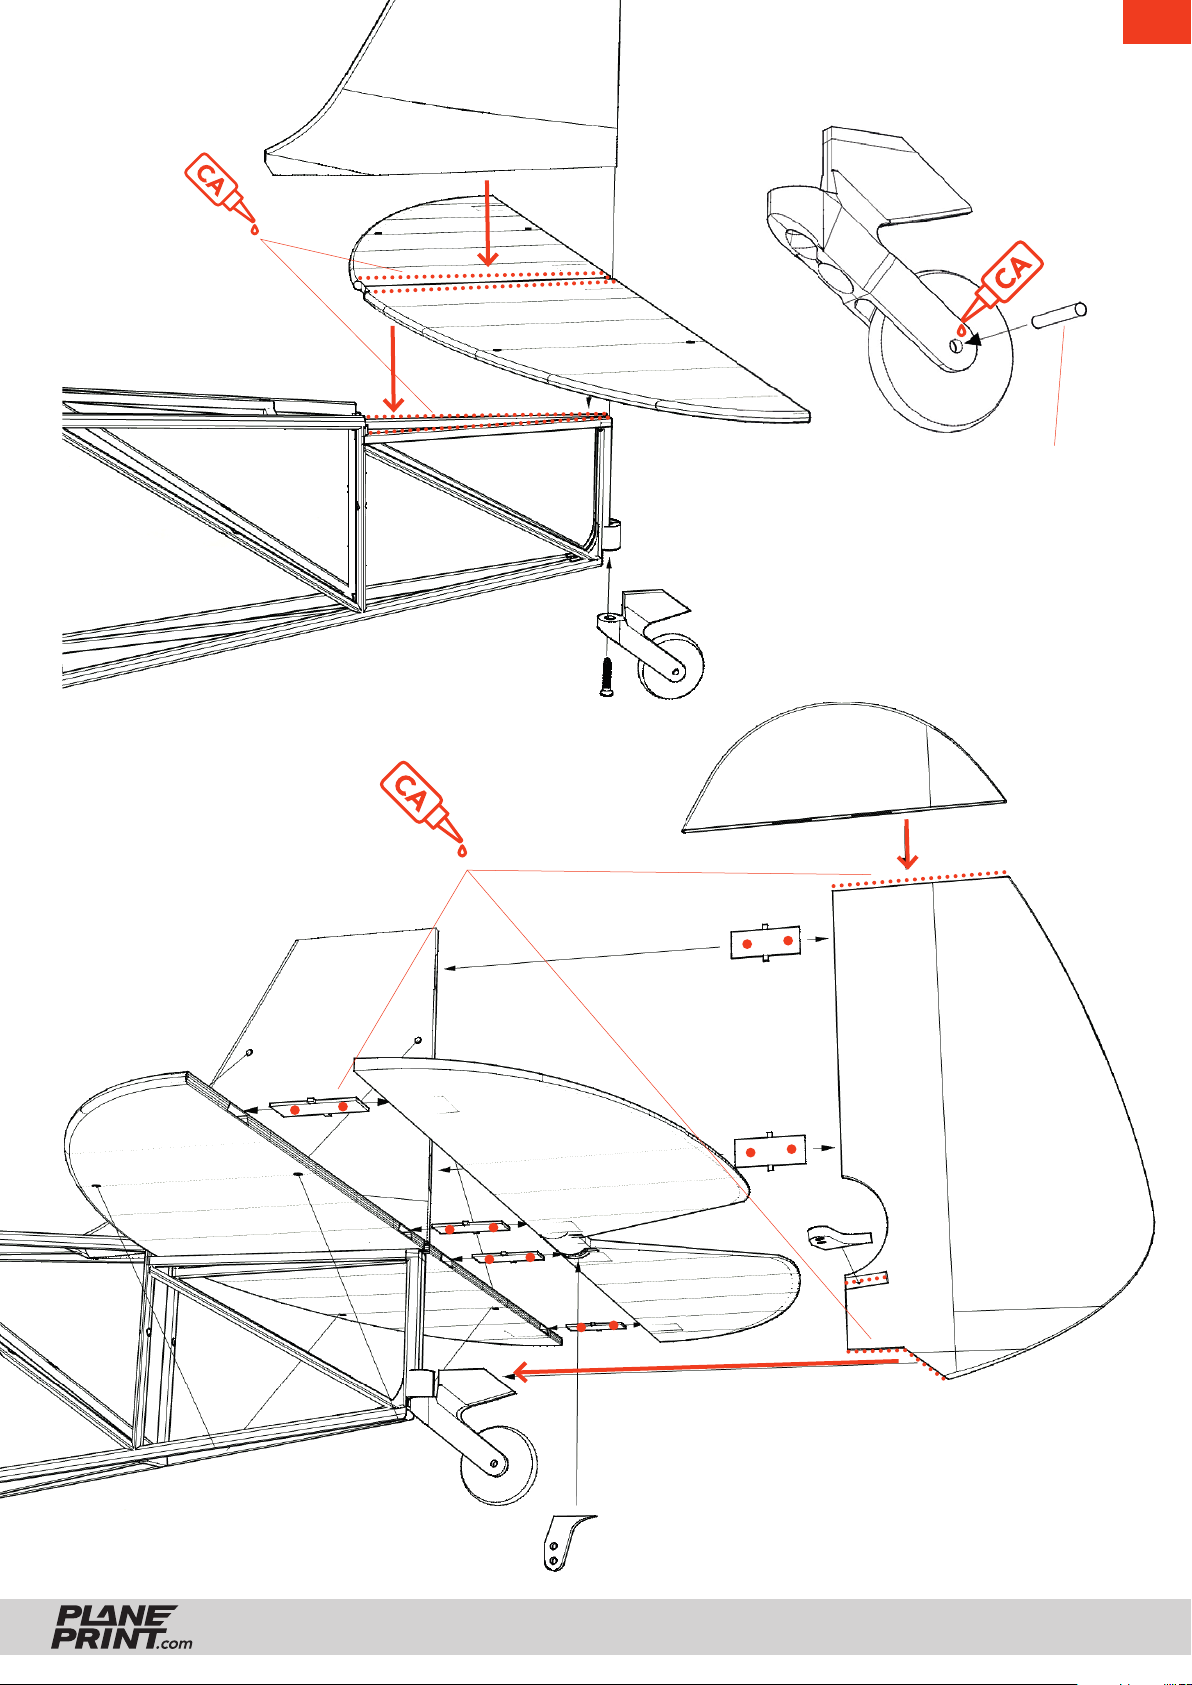
8
EN
carbon rod 1,2 mm
Attention: do not stick
the wheel!
9
tapping screw M2
ZLIN SAVAGE BOBBER
PRINTING & CONSTRUCTION MANUAL
© PLANEPRINT
20
Page 21
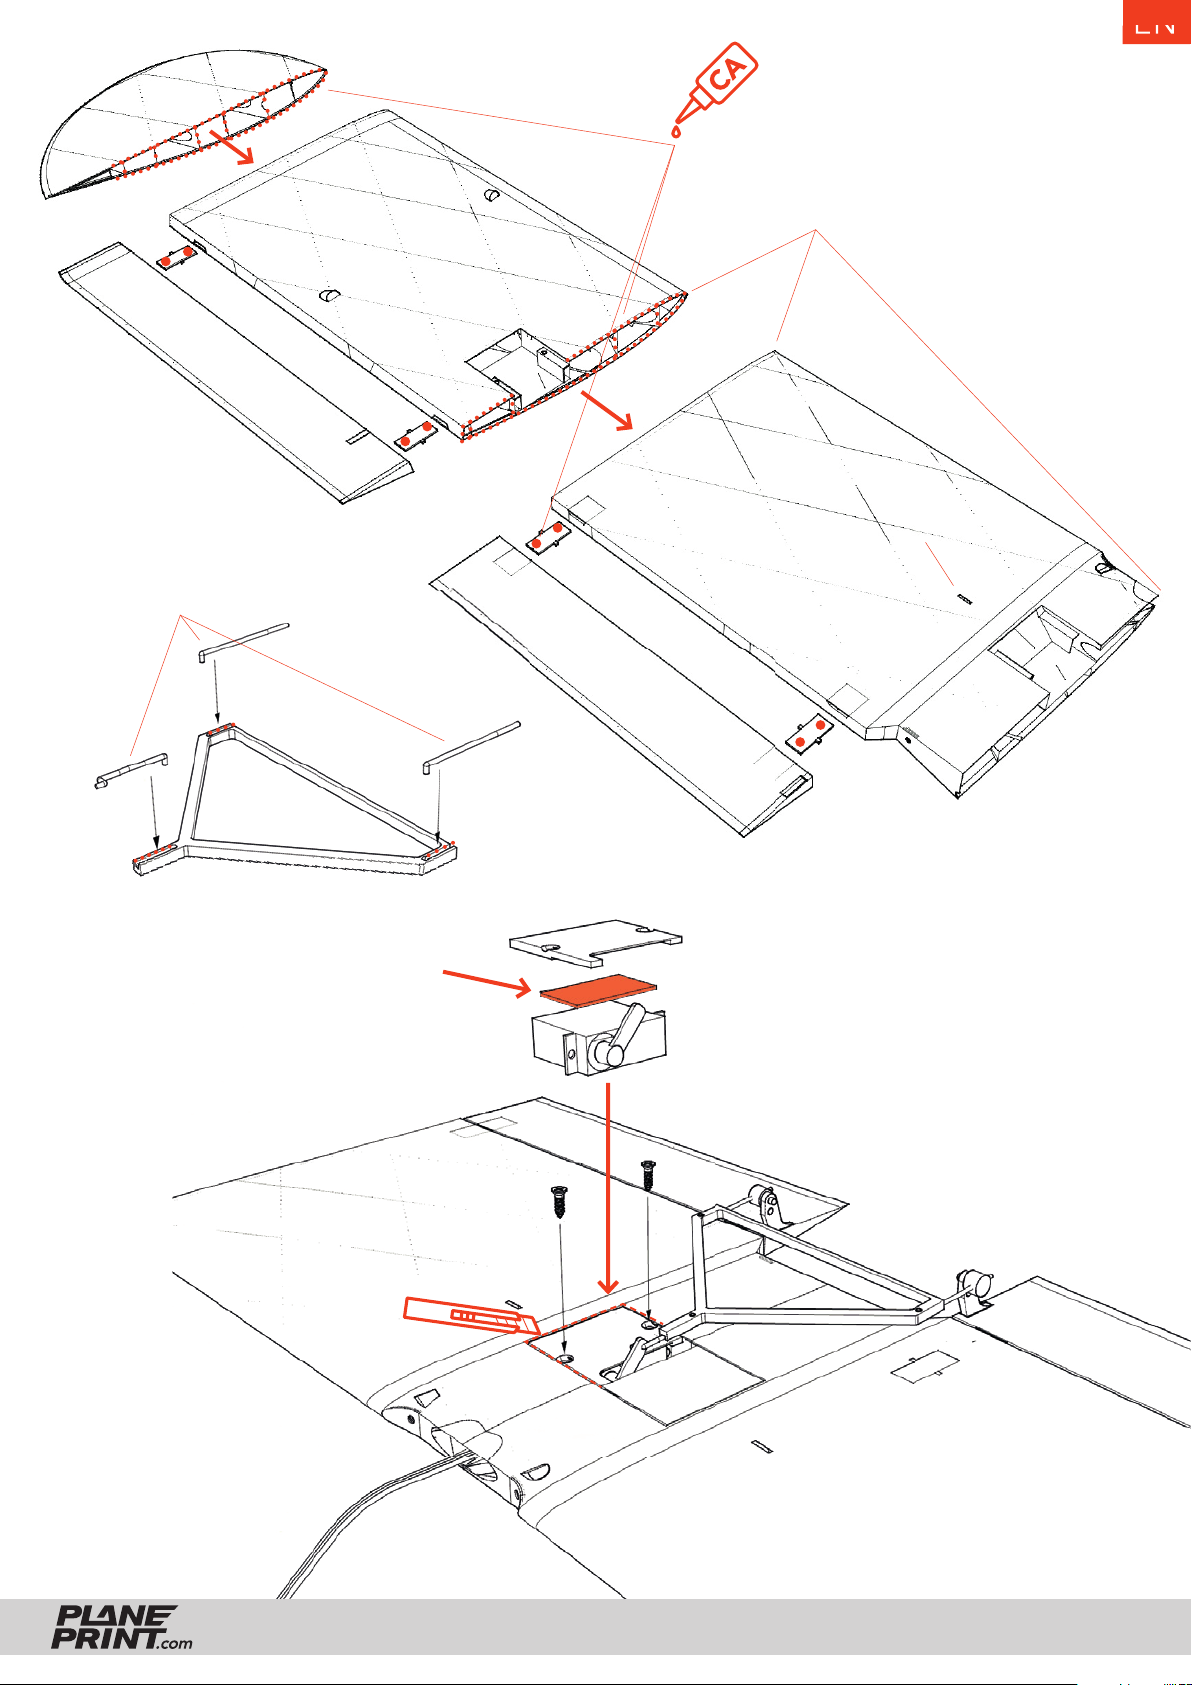
steel wire Ø 1 mm
EN
For a stable connection,
these adhesive surfaces
should be ground slightly
with a sanding block.
center of gravity (CG)
double-sided adhessive tape
(padded)
tapping screws M2
Be careful when
handling the cutter!
ZLIN SAVAGE BOBBER
PRINTING & CONSTRUCTION MANUAL
© PLANEPRINT
21
Page 22
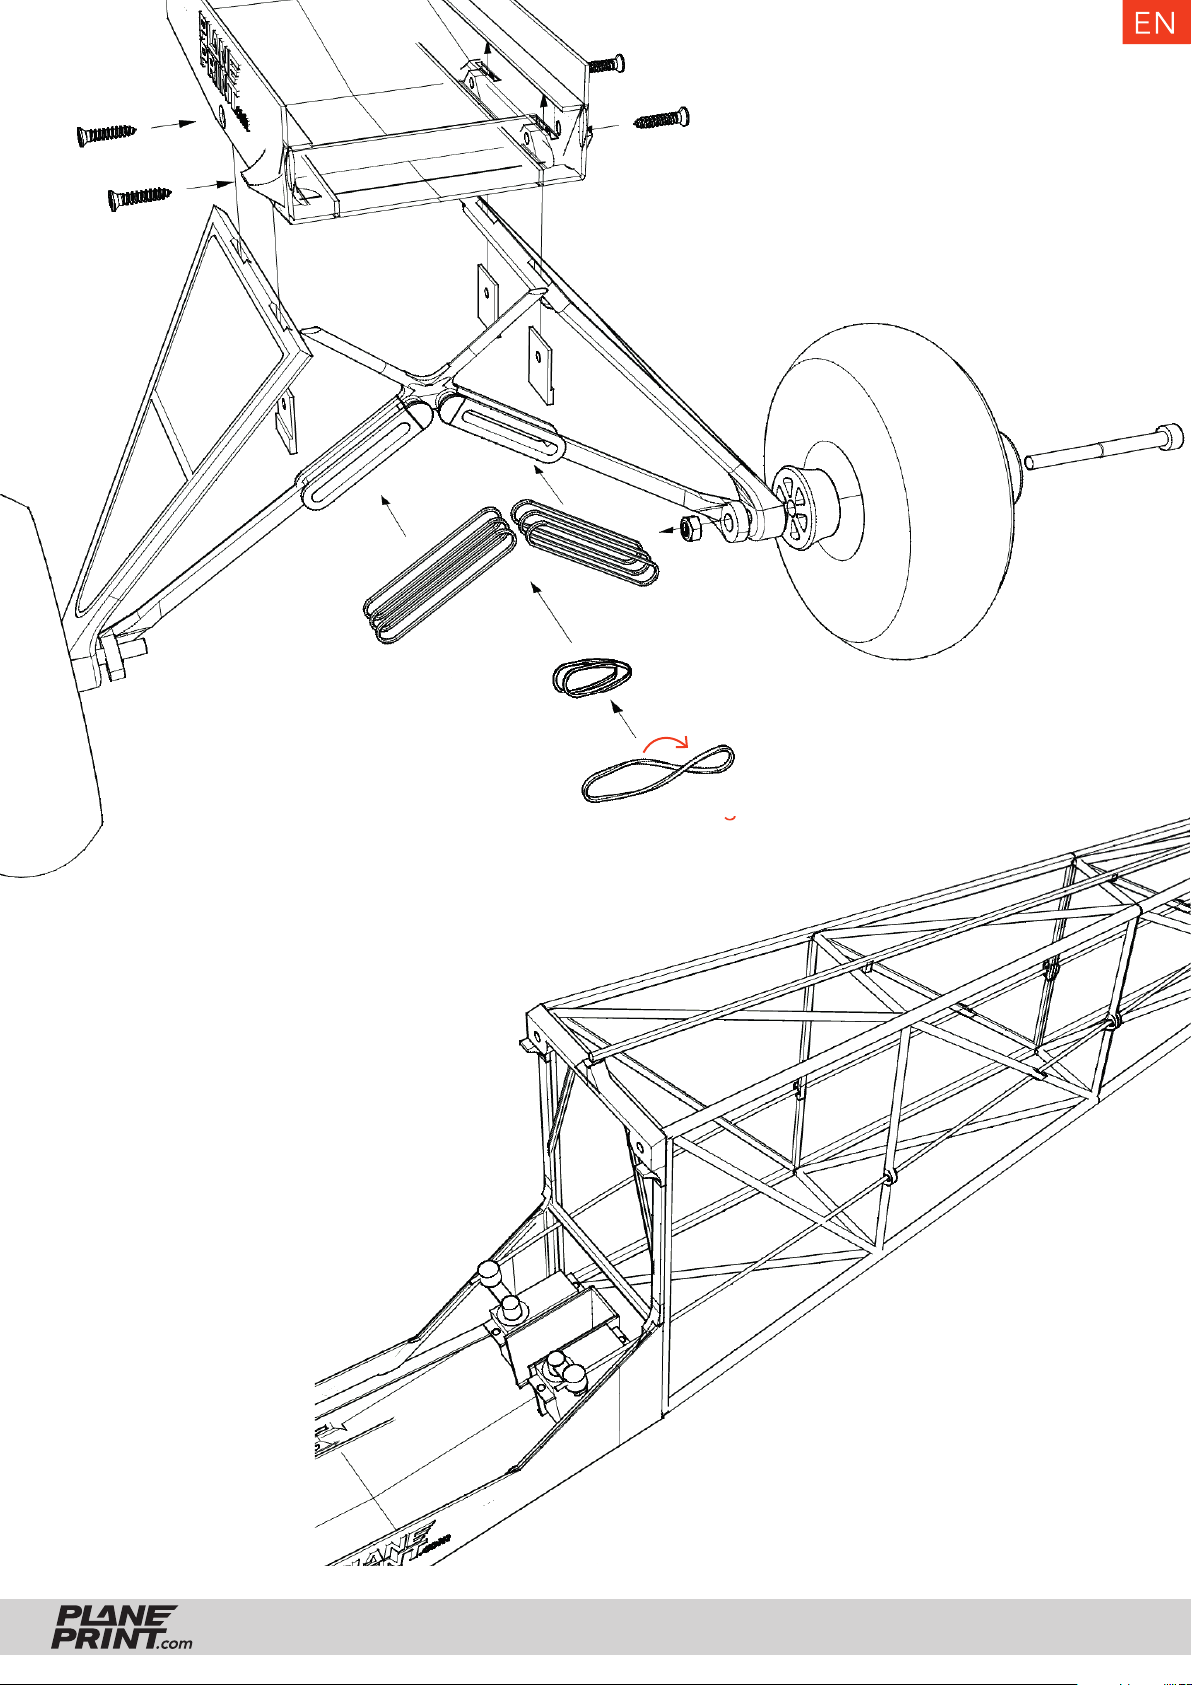
tapping screws M2
stop nut
EN
screw M3
Servos for rudder and elevator
with double-sided adhesive tape
(padded) and fi x with carbon rod
Ø 1.2 mm
fold double or triple
hair gum
ZLIN SAVAGE BOBBER
PRINTING & CONSTRUCTION MANUAL
© PLANEPRINT
22
Page 23
EN
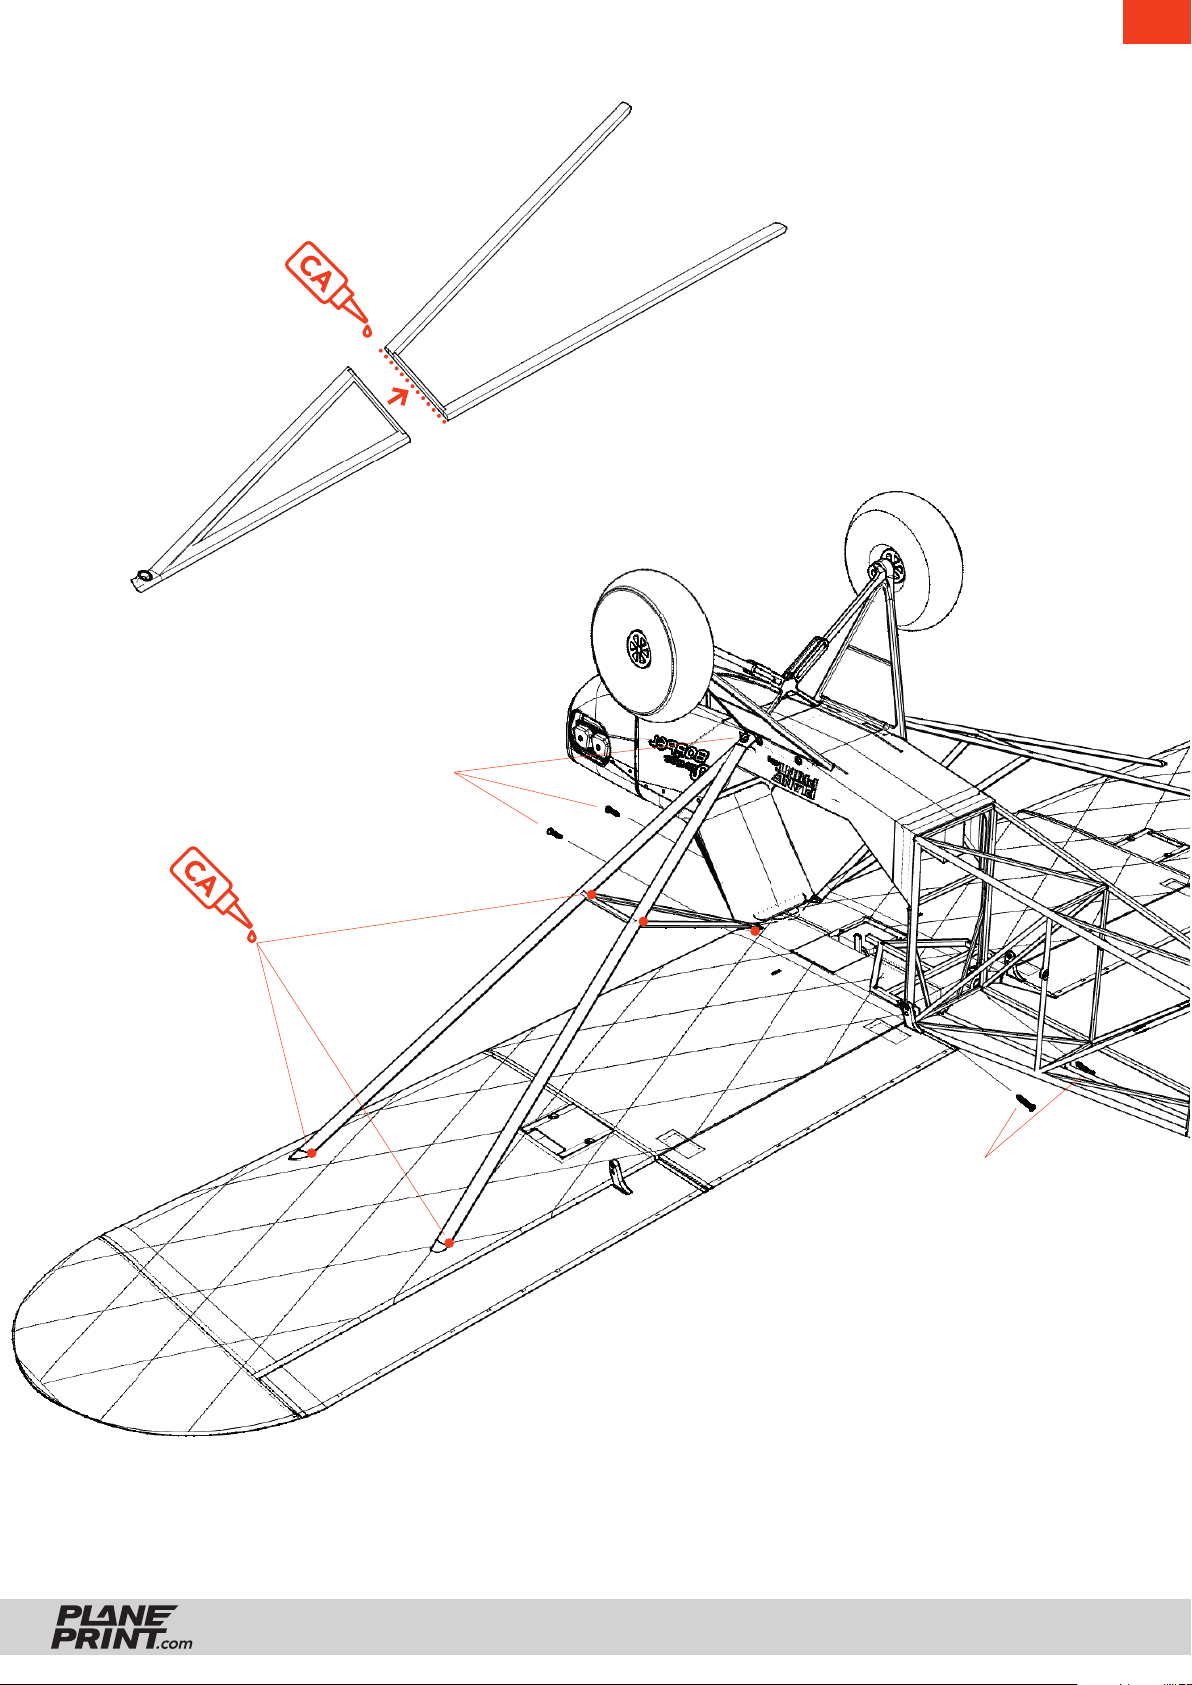
tapping screws M2
tapping screws M2
Assembly of the wing struts:
First screw the struts to the fuselage
then use CA adhesive applied at the
marked attachment points.
ZLIN SAVAGE BOBBER
PRINTING & CONSTRUCTION MANUAL
© PLANEPRINT
23
Page 24
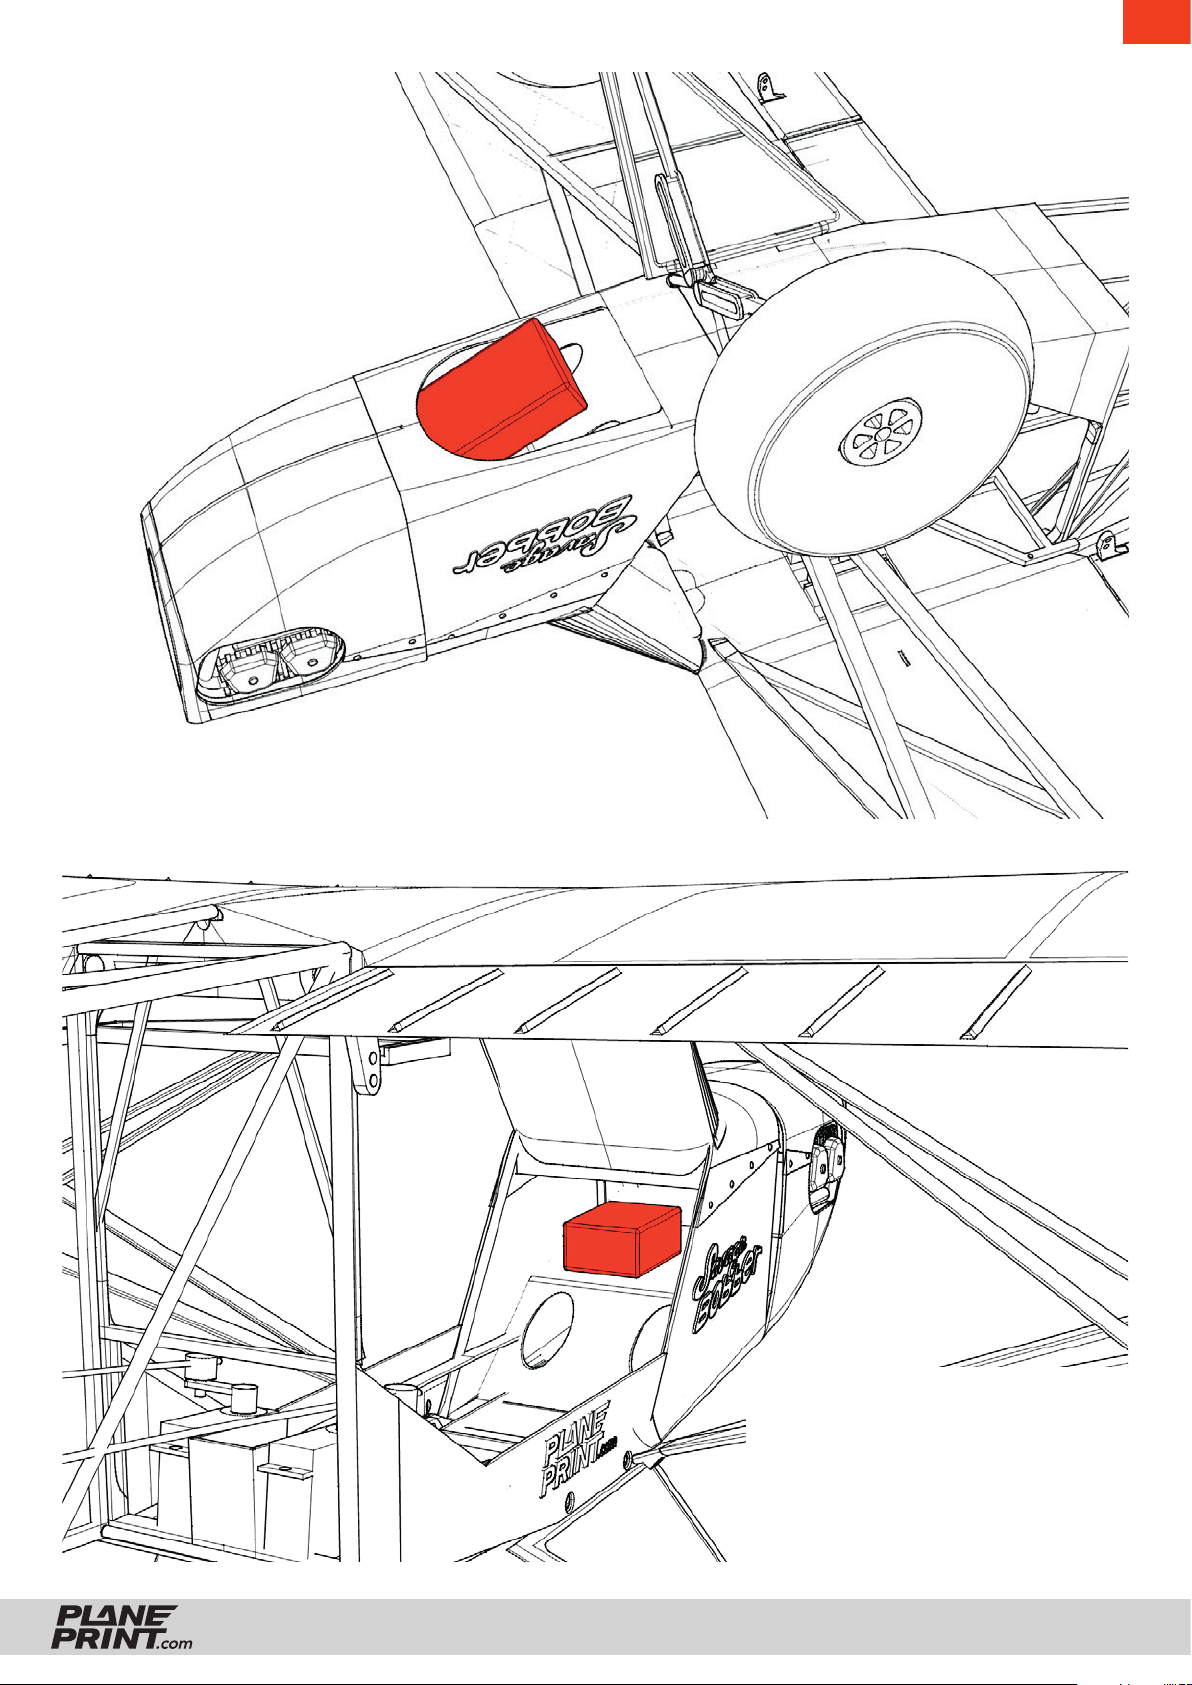
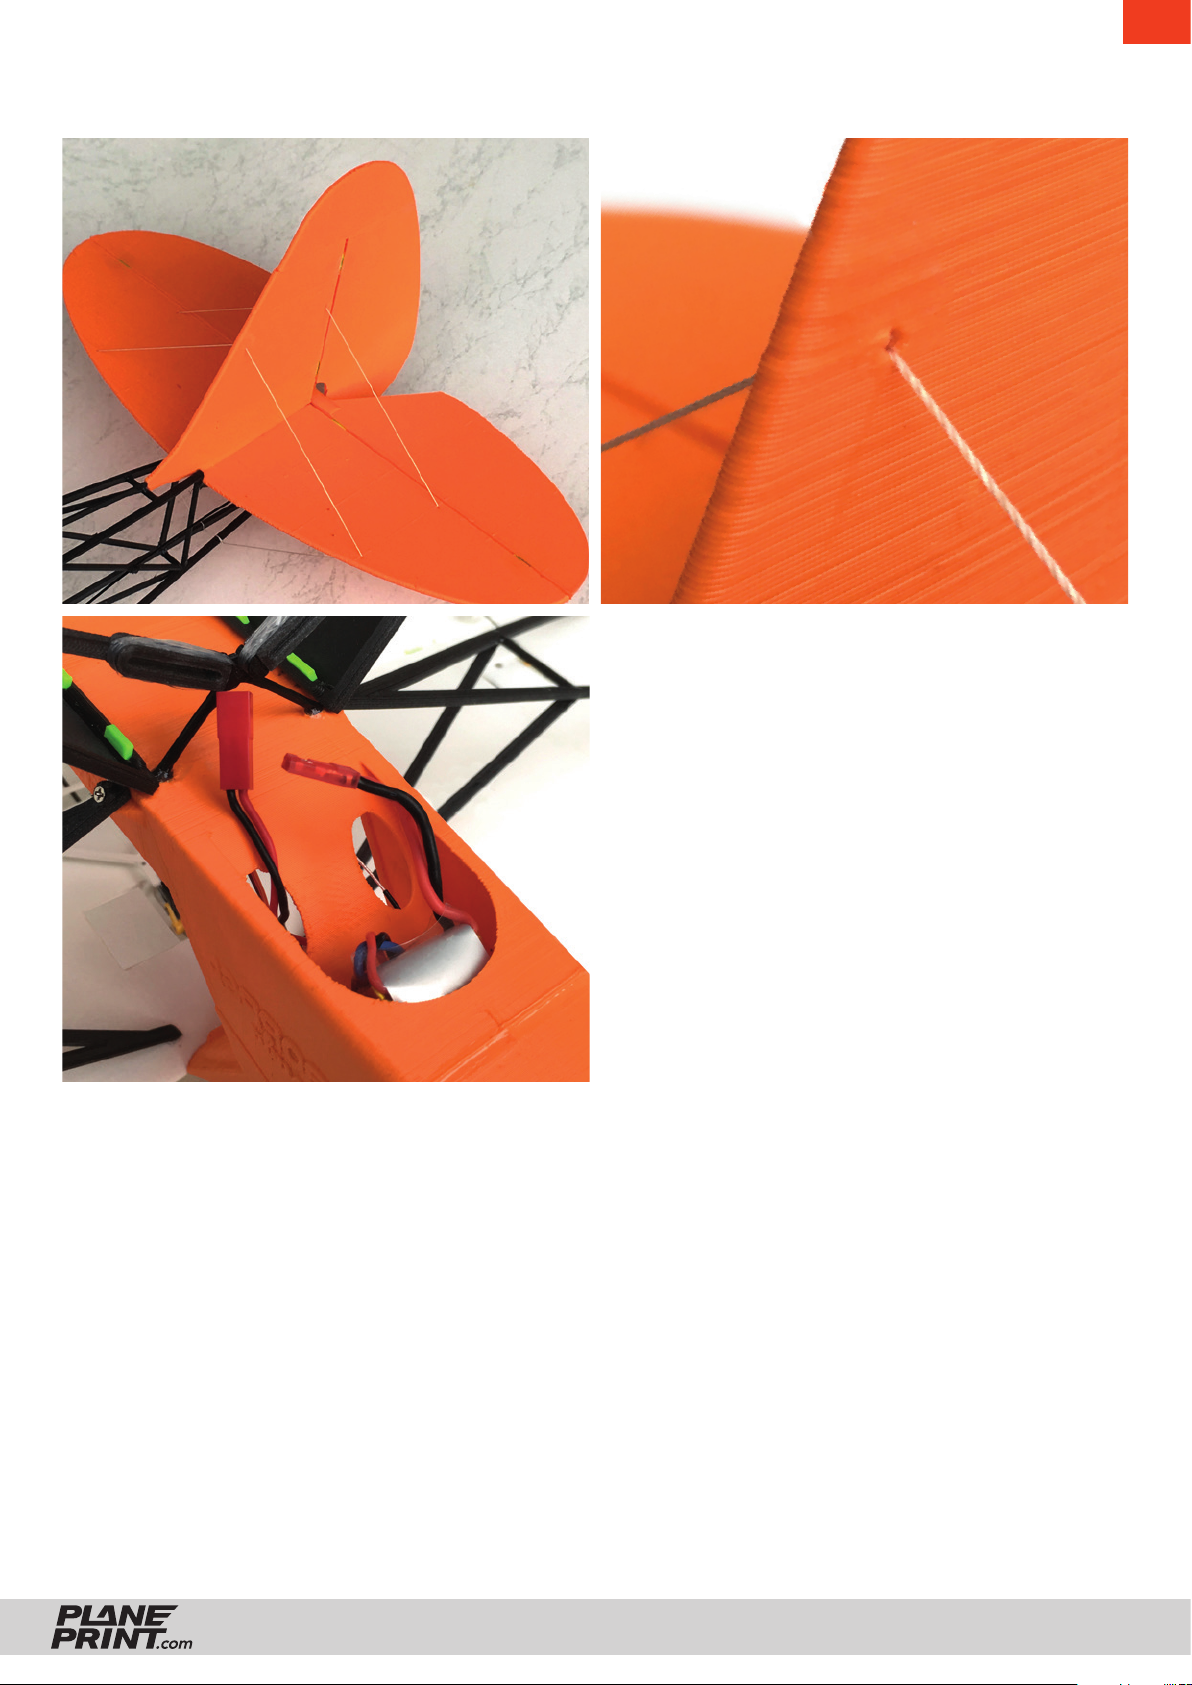
Battery installation: Secure the
LiPo battery in the slot provided
using self-adhesive Velcro tape.
Adjust the battery position so that
the plane balances at the recommended center of gravity (CG).
EN
ZLIN SAVAGE BOBBER
Recommended location for the
receiver. The cables of the aileron and flap servos are led down
through the cable channel of the
windshield.
PRINTING & CONSTRUCTION MANUAL
© PLANEPRINT
24
Page 25
EN
ZLIN SAVAGE BOBBER
PRINTING & CONSTRUCTION MANUAL
© PLANEPRINT
25
Page 26
EN
ZLIN SAVAGE BOBBER
PRINTING & CONSTRUCTION MANUAL
© PLANEPRINT
26
Page 27
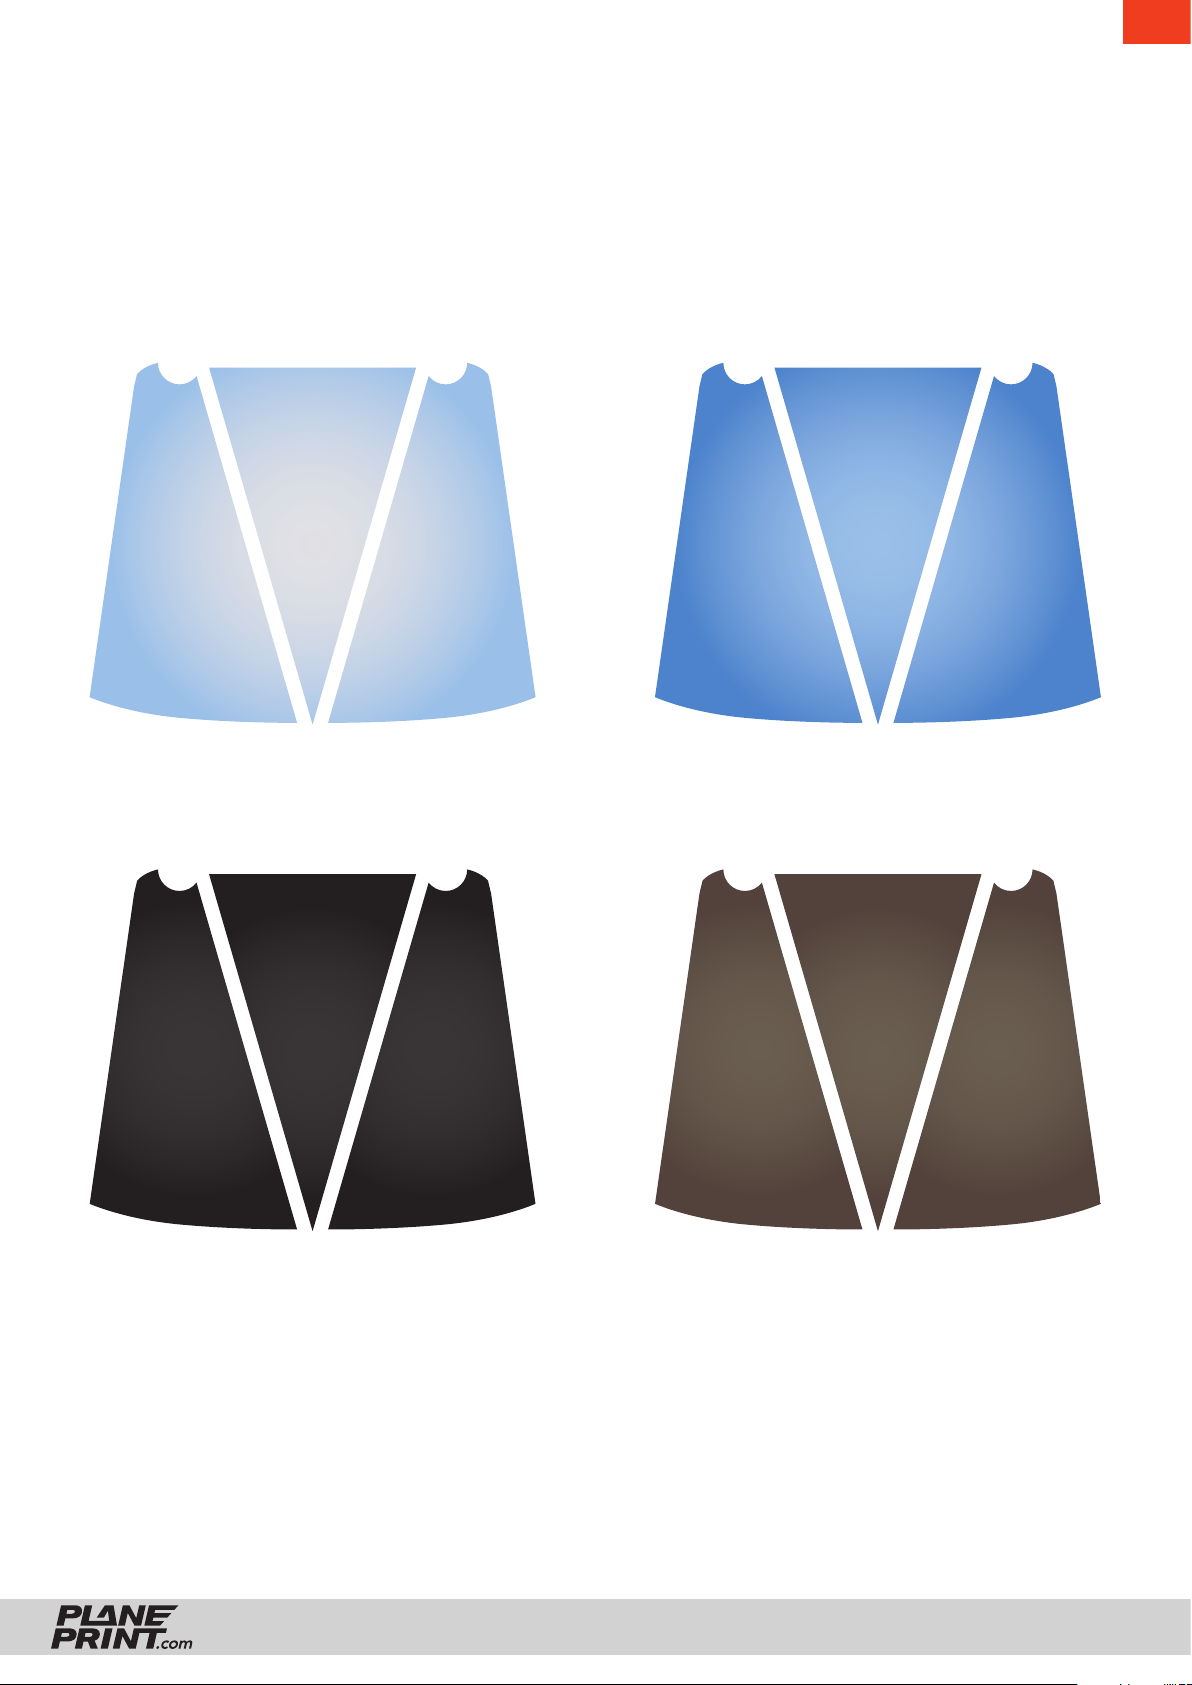
Simply print this page out on adhesive film or label paper, cut out and stick on.
IMPORTANT: the print must be set to 100% page size, so that the size fits exactly!
EN
ZLIN SAVAGE BOBBER
PRINTING & CONSTRUCTION MANUAL
© PLANEPRINT
27
Page 28
EN
After installing the electronics and setting up the transmitter, check that the control surfaces are aligned correctly.
Set the transmitter trim to zero. The ailerons should be aligned with the trailing edge of the wing tip. Then align the
flaps with the ailerons. The elevator should be aligned with
TRANSMITTER CONFIGURATION
1. Select empty (Acro) model
2. Wing type: 2 ailerons, 1 flap
3. Reversing the direction of servo
as required (see control function)
4. Servo adjustment all: 100%
SETTING THE SERVO TRAVEL
Aileron = 14 mm
= 12 mm
Elevator = 28 mm
= 28 mm
the horizontal stabilizer and the rudder to the vertical stabilizer. Change the position of the moving parts by changing
the length of the linkage from the servo arm to the control
horn. In-flight adjustments can be made later with the trim.
EXPO SETTING
ADVANCED BEGINNER
Aileron 15 % 30 %
Elevator 15 % 30 %
Rudder 15 % 30 %
FLIGHT TIMER
Flight time will vary depending on the battery size.
Expect 5 minutes under normal circumstances; however, it may be possible to fly for much longer. It is
a good idea to be conservative with the flight timer
until you gain experience with your airplane.
Rudder = 29 mm
= 29 mm
Flaps half = 10 mm full = 20 mm
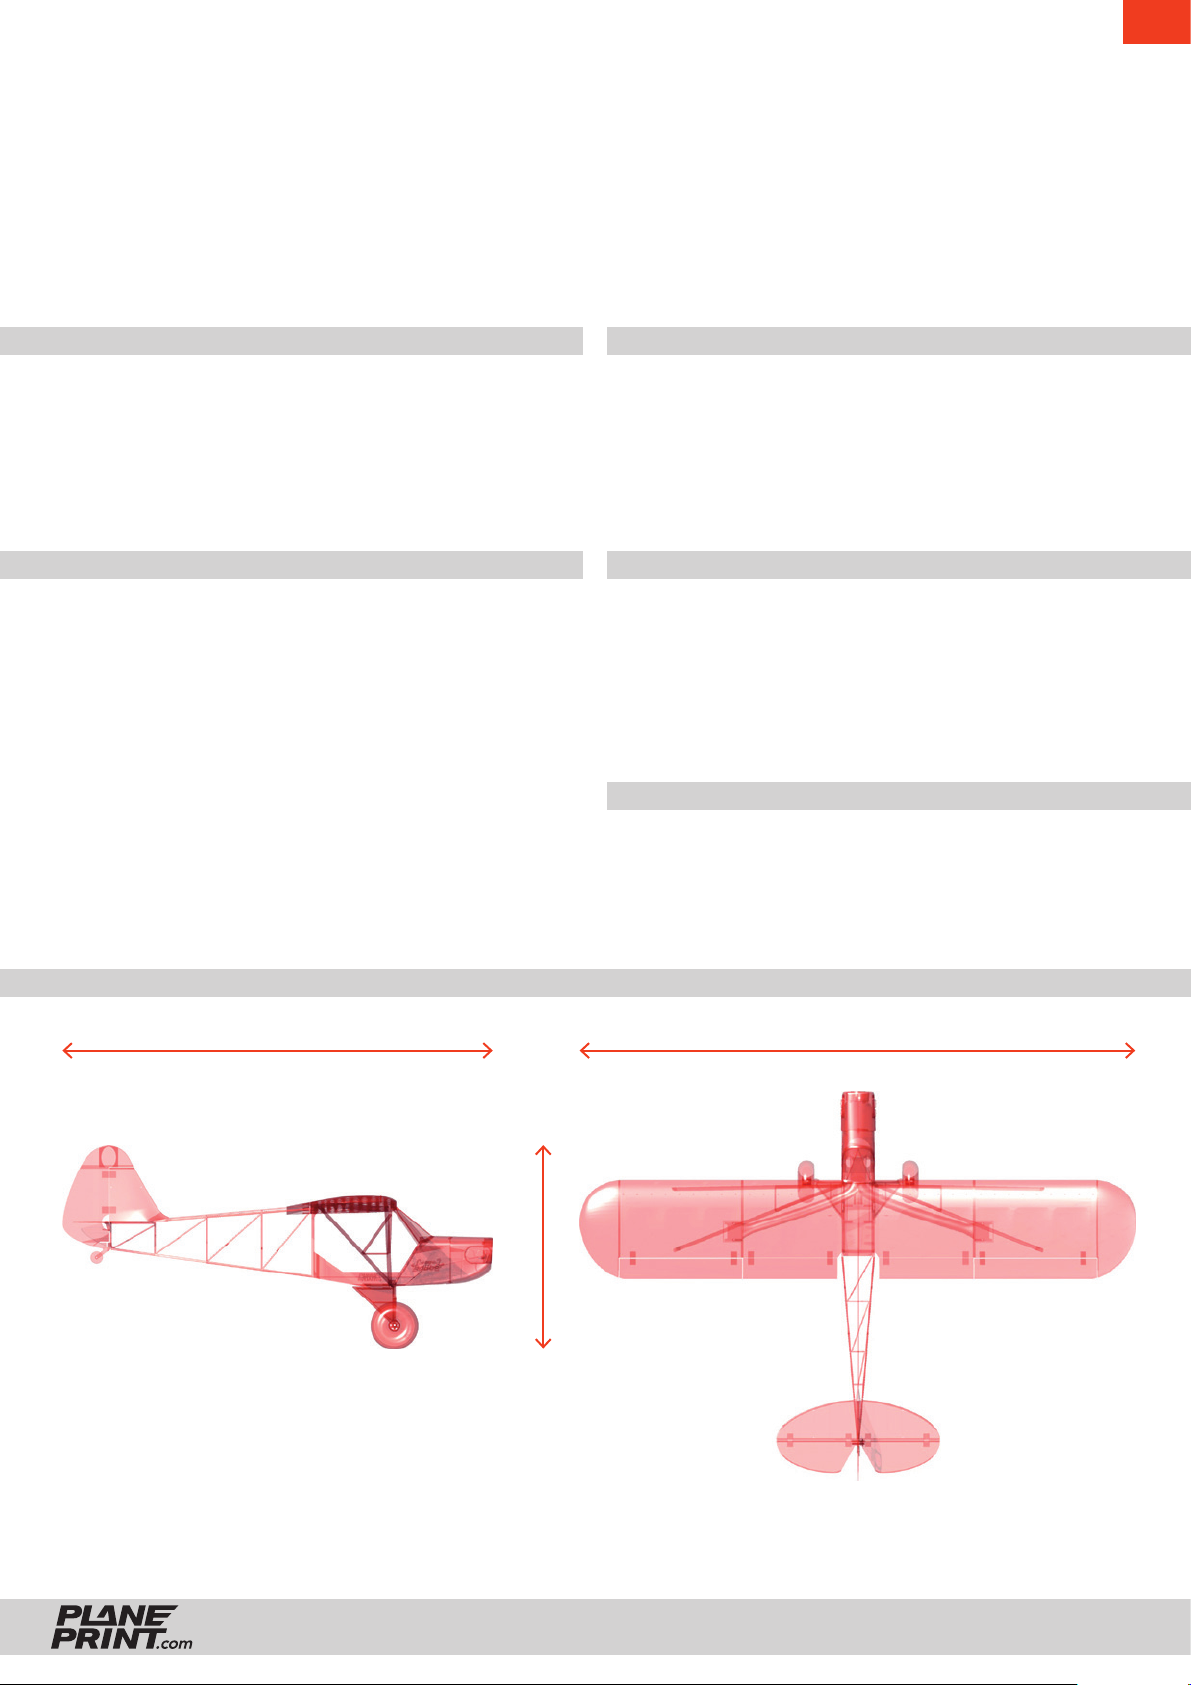
TECHNICAL SPECIFICATIONS
CENTER OF GRAVITY (CG)
57 mm behind the leading edge (see markings on the
wing). For the first flight we recommend to move the
center of gravity about 5 mm further forward.
900 mm628 mm
297 mm
FLYING WEIGHT:
490 – 550 g, depending on features and 3D printing
ZLIN SAVAGE BOBBER
PRINTING & CONSTRUCTION MANUAL
© PLANEPRINT
28
Page 29
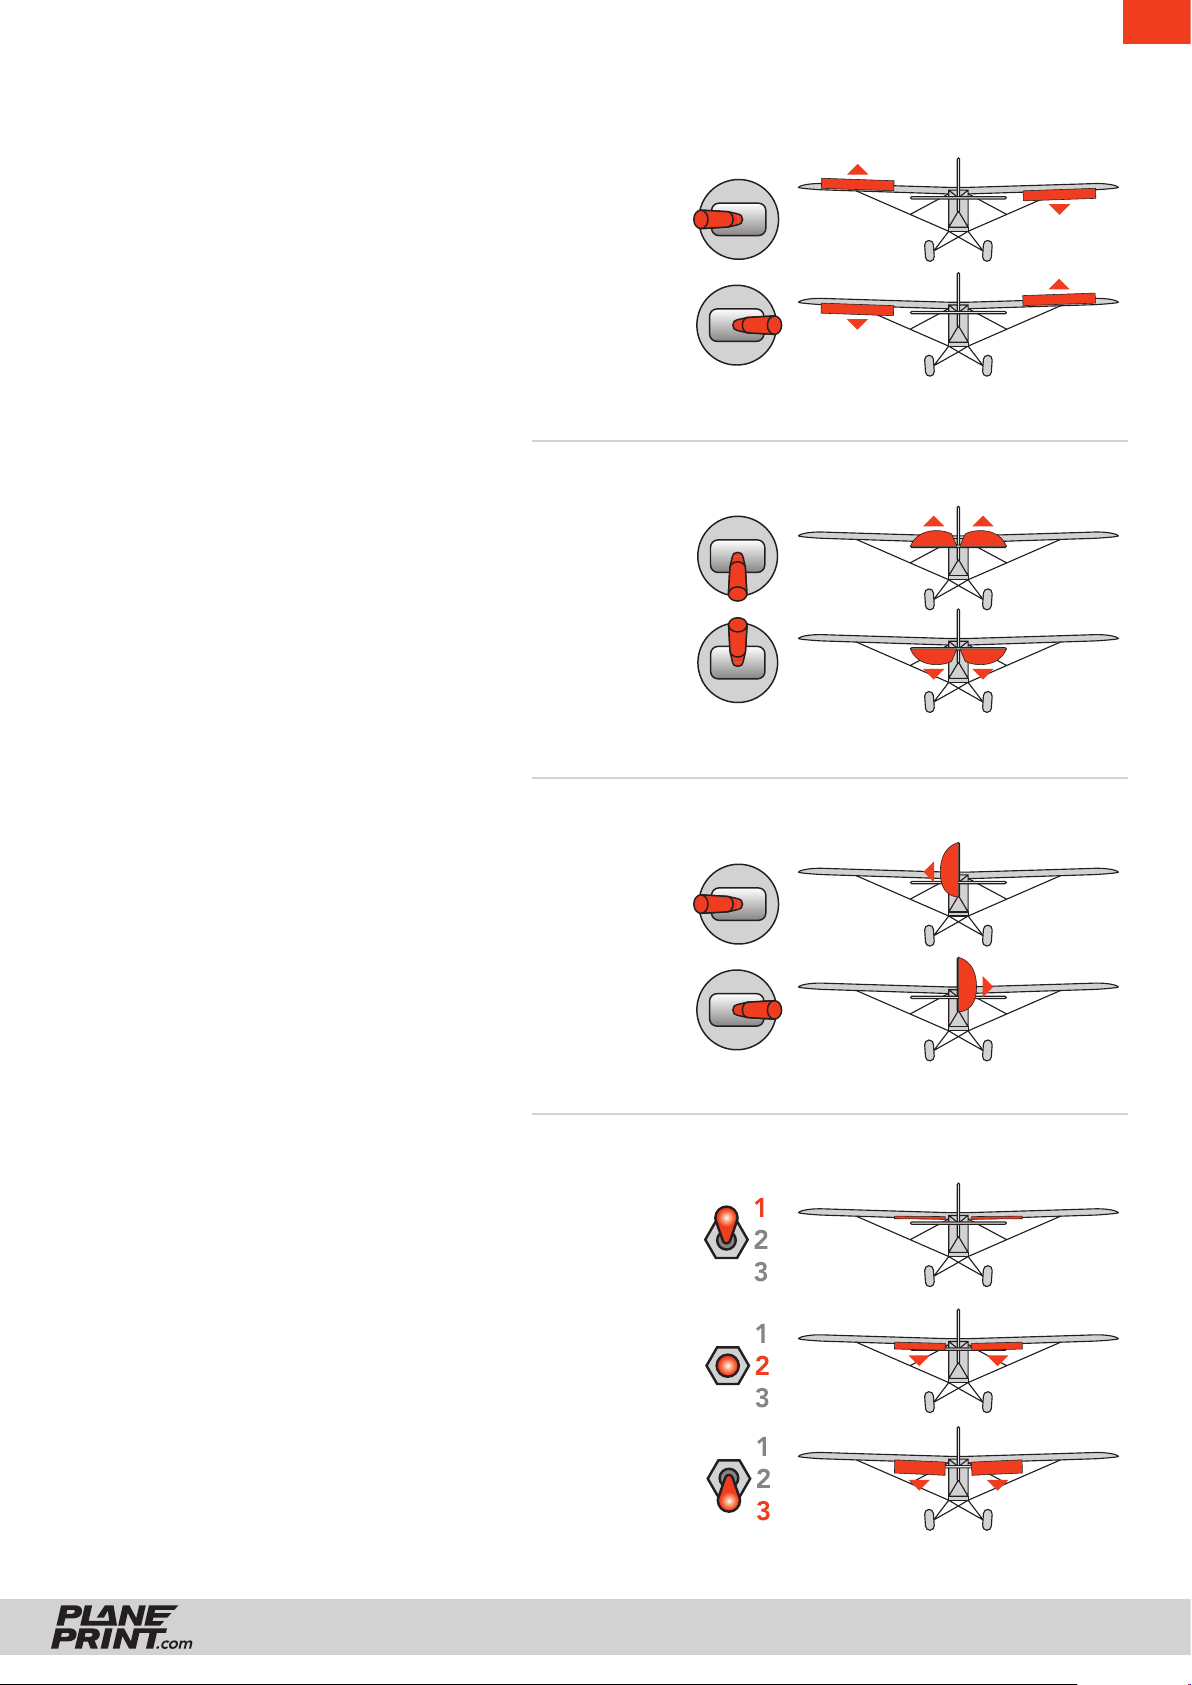
Turn on the transmitter and connect the battery. When checking the control directions, look
at the aircraft from behind.
EN
1. Move the aileron lever to the left. The right
aileron should move down and the left
aileron should move up so that the aircraft
tilts to the left.
2. Move the aileron lever to the right. The right
aileron should move up and the left aileron
down so that the aircraft is tilting to the
right.
3. Pull back the elevator lever. The elevators
should move up, causing the aircraft to rise.
4. Push the elevator lever forward. The elevator should move down so that the aircraft
sinks.
5. Move the rudder lever to the left. The rudder should move to the left.
6. Move the rudder lever to the right. The rudder should move to the right
7. Move the flap switch to position 2. The flaps
should move down by the set value „half“.
AILERON
ELEVATOR
8. Move the flap control switch to position 3.
The flaps should move down by the set
value „whole“.
RUDDER
FLAPS
ZLIN SAVAGE BOBBER
PRINTING & CONSTRUCTION MANUAL
© PLANEPRINT
29
Page 30

14
NOT FOR CHILDREN UNDER 14 YEARS.
THIS IS NOT A TOY!
EN
By using the download data, an RC model airplane, called
„model“ for short, can be manufactured using a 3D printer.
As a user of this model, only you are responsible for safe
operation that does not endanger you or others, or that
does not damage the model or property of others.
PLANEPRINT.com assumes no responsibility for damage to
persons and property caused by pressure, transport or use
of the product. Filaments, printing supplies, hardware or
consumables that can not be used after faulty 3D printing
will not be replaced by PLANEPRINT.com in any way.
When operating, always keep a safe distance from your
model in all directions to avoid collisions and injuries.
This model is controlled by a radio signal. Radio signals can
be disturbed from outside without being able to influence
it. Interference can lead to a temporary loss of control.
Always operate your model on open terrains, far from cars,
traffic and people.
Always follow the instructions and warnings for this product
and any optional accessories (servos, receivers, motors,
propellers, chargers, rechargeable batteries, etc.) carefully.
Avoid water contact with all components that are not specially designed and protected. Moisture damages the electronics.
Never take an item of the model or accessory in your mouth
as this can lead to severe injuries or even death.
Never operate your model with low batteries in the transmitter or model.
Always keep the model in view and under control.
Use only fully charged batteries.
Always keep the transmitter switched on when the model
is switched on.
Always remove the battery before disassembling the model.
Keep moving parts clean and dry at all times.
Always allow the parts to cool before touching them.
Always remove the battery after use.
Make sure that the Failsafe is properly set before the flight.
Keep all chemicals, small parts and electrical components
out of the reach of children.
We develop our models to the best of our knowledge and belief.
We accept no liability for consequential damage and injuries
caused by improper use. Please be careful when handling motors,
batteries and propellers and only move your model with insurance
and in approved places!
Never operate the model with damaged wiring.
Never touch moving parts.
© PLANEPRINT.com, A-6020 Innsbruck, Conradstraße 6, [email protected]
© Design STL files by René Marschall • Layout: marschall designlab, marschall.cc
PRINTING & CONSTRUCTION MANUAL
ZLIN SAVAGE BOBBER
© PLANEPRINT
30
 Loading...