

Page 1

XP37W
LCD TV
USER’S GUIDE
www.planar.com
Page 2

Table of contents
1. General Information ......................................................................................................... 3
2. Safety Precautions ............................................................................................................. 5
3. Features .............................................................................................................................. 7
4. Ports.................................................................................................................................... 8
5. Control Buttons ................................................................................................................. 9
6. Accessories ......................................................................................................................... 10
7. Remote Control ................................................................................................................. 11
8. Summary of Remote Control Functions ......................................................................... 12
9. Connections & Applications............................................................................................... 13
10. Controls & Adjustments
A. General Adjustments......................................................................................................... 16
Turning the LCD TV On and Off ..................................................................................... 16
Viewing the Menus and On-Screen Displays ................................................................... 16
Switching between PC/HD/S-Video/TV/Component Modes........................................... 17
Switching Language Modes.............................................................................................. 17
Setting the Sleep Timer..................................................................................................... 18
Adjusting the Volume ....................................................................................................... 18
B. PC mode Adjustments....................................................................................................... 19
Adjusting the Contrast and Backlight Settings ................................................................. 19
Adjusting PC Settings ....................................................................................................... 19
Adjusting Sound Settings.................................................................................................. 20
Viewing Picture-in-Picture (PIP) Settings ........................................................................ 23
C. General TV mode Adjustment .......................................................................................... 26
Adjusting the TV Settings................................................................................................. 26
Sound Options................................................................................................................... 26
Adjusting Picture Settings ................................................................................................ 27
Memorizing Channels....................................................................................................... 28
Changing Channels ........................................................................................................... 30
Using Parent Control ........................................................................................................ 31
Setting Up Your Personal ID Number (PIN) .................................................................... 32
How to Set up Restrictions Using the "Blocking Movie" function .................................. 36
Child Lock ........................................................................................................................ 37
Viewing Closed Captions ................................................................................................. 38
D. DTV System...................................................................................................................... 39
1
Page 3

Channel Scan .................................................................................................................... 39
Auto Scan.......................................................................................................................... 40
Manual Scan ..................................................................................................................... 42
Time Zone......................................................................................................................... 44
Channel Control................................................................................................................ 45
DTV Rating Setting .......................................................................................................... 48
Rating( Lock Programs by Rating ) .................................................................................. 49
Closed Caption Options .................................................................................................... 50
INFO ................................................................................................................................. 51
MTS( Multi-track Language Selection-Design ) .............................................................. 52
Favorite Channel List........................................................................................................ 53
Selecting Digital Channels................................................................................................ 54
Freezing the Picture .......................................................................................................... 54
E. Other Functions ............................................................................................................... 55
11. Programming Remote Control ........................................................................................ 56
A. Direct Device Code Setup................................................................................................. 56
B. Searching for a Device Code ............................................................................................ 57
C. Device Codes .................................................................................................................... 58
12. Troubleshooting................................................................................................................. 64
13. PC Input Preset Timing Table ........................................................................................ 67
14. Specifications ..................................................................................................................... 68
2
Page 4
General Information
This 37” wide active matrix TFT (thin film transistor) liquid crystal monitor is designed for use as
a stand alone TV as well as a display device for video electronics appliances and personal
computers.
Important Information
Warning: To reduce the risk of fire or electric shock, do not expose this product to rain or
moisture.
CAUTION
Risk of electric
shock. Do not open.
Caution: To reduce the risk of electric shock, do not attempt to disassemble or modify this
device. There are no user-serviceable parts inside. Refer any service issues to
qualified service personnel.
Caution: FCC/ CSA regulations state that any unauthorized changes or modifications to this
equipment may void the user's authority to operate it.
Important: One Federal Court has held that unauthorized recording of copyrighted TV programs is
an infringement of U.S. copyright laws. Certain Canadian programs may also be copyrighted and
any unauthorized recording in whole or in part may be in violation of these rights.
WARNING:
Do not leave stationary images, patterns, PIP windows, or letterbox images on the screen for
prolonged periods of time as this may result in permanent damage to the LCD panel. This
type of damage is not covered under warranty. The following are examples of, but not
limited to, potentially hazardous display output: side bar images, video game patterns, closed
captioning, channel logos and letterbox black bars. To prevent this type of damage, it is
recommended to display constantly moving images that fill the screen as often as possible.
According to industrial standards for LCD display technology; there are a certain number of
allowable defective pixels. Although we produce panels with more than 99.9% active cells,
there still may be some cells that do not produce light or remain constantly lit. For further
information, please contact sales or technical support.
3
Page 5

Thank You for Choosing This Product
Your new LCD TV was built utilizing the latest advancements in television technology. We are
proud to offer you a product that will provide convenient, dependable service and enjoyment for
years to come.
4
Page 6
Safety Precautions
1. Cleaning: Unplug the power cord from the AC outlet before cleaning the product. Use a damp
cloth to clean the product. Do not use liquid cleaners or aerosol cleaners.
2. Water and moisture: Do not use the product near water or areas of high moisture content such
as swimming pools, bathtubs or wet basements.
3. Heat sources: Keep the product away from heat sources such as radiators, heaters, stoves and
other heat-generating products (including amplifiers).
4. For added protection during a lightning storm or for extended periods of non-use, unplug the
power cord from the wall outlet and disconnect the antenna (if used). This will prevent damage
to the product due to power line surges.
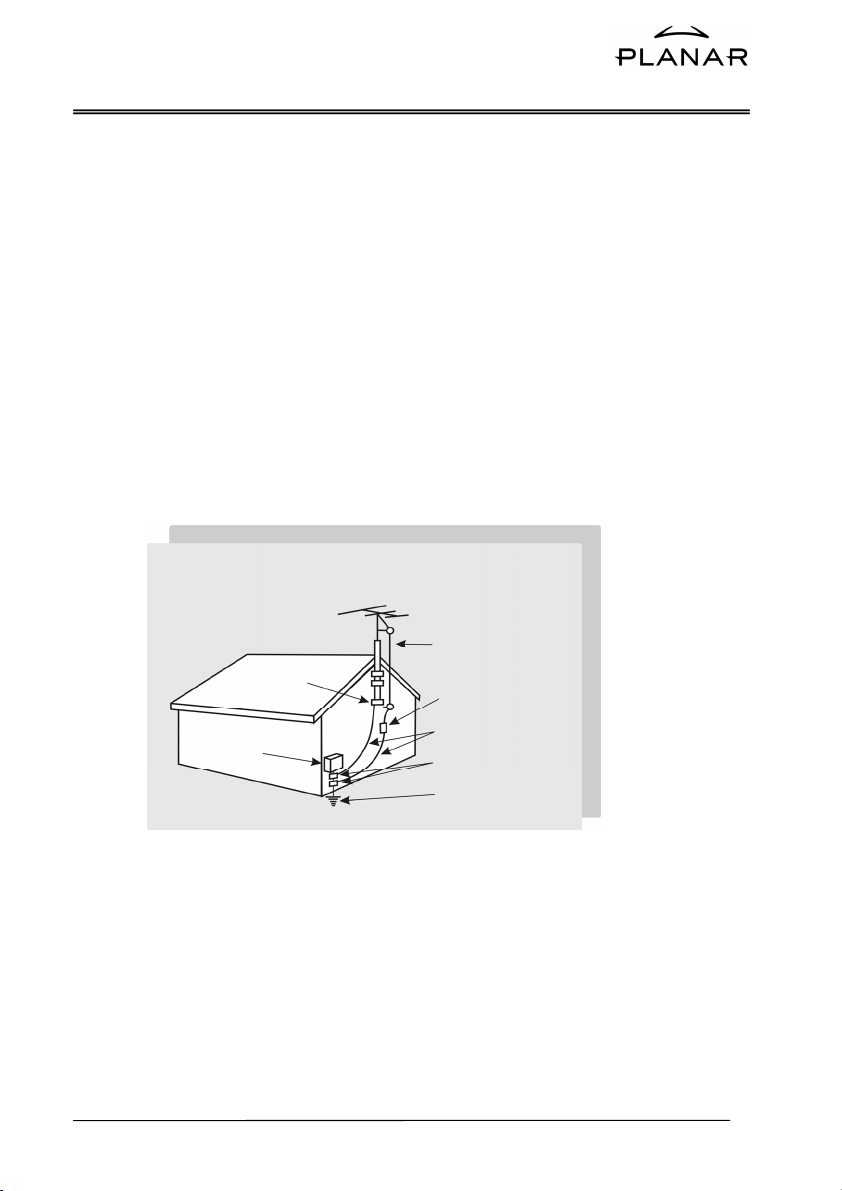
5. If an outside antenna is connected to the product, make sure the antenna is properly grounded
so as to provide some protection against voltage surges.
Electric service
equipment
Example of antenna grounding
As per national electrical code
Ground clamp
Antenna lead in wire
Antenna discharge
unit
Grounding conductors
Ground clamps
Power service
grounding
Electrode system
5
Page 7

6. Lamp(s) Contain Mercury. Dispose According to Local, State, Federal Laws.
7. Stand: Do not place the product on an unstable
cart, stand, tripod or table. Placing the product
on an unstable base can cause the product to
fall, resulting in serious personal injuries as
well as damage to the product. Use only a cart,
stand, tripod, bracket or table recommended by
the manufacturer or sold with the product. Use
only mounting hardware recommended by the
manufacturer.
8. Use care when moving the product on a rolling cart. Sudden stops, excessive force and uneven
floor surface can cause the product to fall from the cart.
9. Ventilation: The vents and other openings in the cabinet are designed for ventilation. Do not
cover or block these vents and openings as insufficient ventilation can cause overheating
and/or shorten the life of the product. Do not place the product on a bed, sofa, rug or other
similar surfaces since they can block ventilation openings. This product was not designed to
operate in an enclosed environment. Don't place the product in an enclosed space such as a
bookcase or rack, unless proper ventilation is provided or the manufacturer's instructions are
followed.
10. The LCD panel used in this product is made of glass. Therefore, it can break if the product is
dropped or struck.
11. During the LCD panel lifespan it is normal for a few pixels to become defective. Non-active
pixels may appear on the screen as fixed points of red, blue or green. Refer pixel policy
questions to the reseller for further clarification on acceptable loss.
12. An outside antenna system should not be located in the vicinity of overhead power lines or
other electrical conduits. When installing an outside antenna, use extreme caution to prevent
the antenna from coming into contact with said items, as contact with them may be fatal.
6
Page 8

Features
List of Features
Your TV is designed with the latest technology and is a high-performance unit that includes the
following special features:
¾ Multiple input sources including Antenna terminal for Analog / Digital, D-SUB connector,
HDMI connector, Composite, S-Video, and Component ports.
¾ Easy-to-use remote control and on-screen-display (OSD) menu system.
¾ PIP (picture in picture) mode for displaying multiple sources at the same time on the same
screen.
¾ Built-in 10W dual channel speakers , audio out , and sub-woofer out .
¾ Fine-tuning control for the sharpest picture possible. (OTA TV viewing only).
¾ Built-in multi-channel sound decoder for stereo and bilingual broadcasts.
¾ Automatic channel program for up to 125 channels.
¾ Automatic sleep timer control from 10 to 120 minutes in 10-minute increments.
¾ Automatic Power Off feature after 10 minutes without a signal.
¾ Adjustable picture and sound settings that are stored in the TV's memory.
¾ Component video input for high definition TV programming (HDTV ready), resolution up to
720p, 1080i.
¾ Automatic Picture Control (APC) and Aspect Ratio Control (ARC) functions for end user
customization of viewing preferences.
¾ Built-in 3D comb filter and 3D de-interlacing for best possible picture quality.
7
Page 9
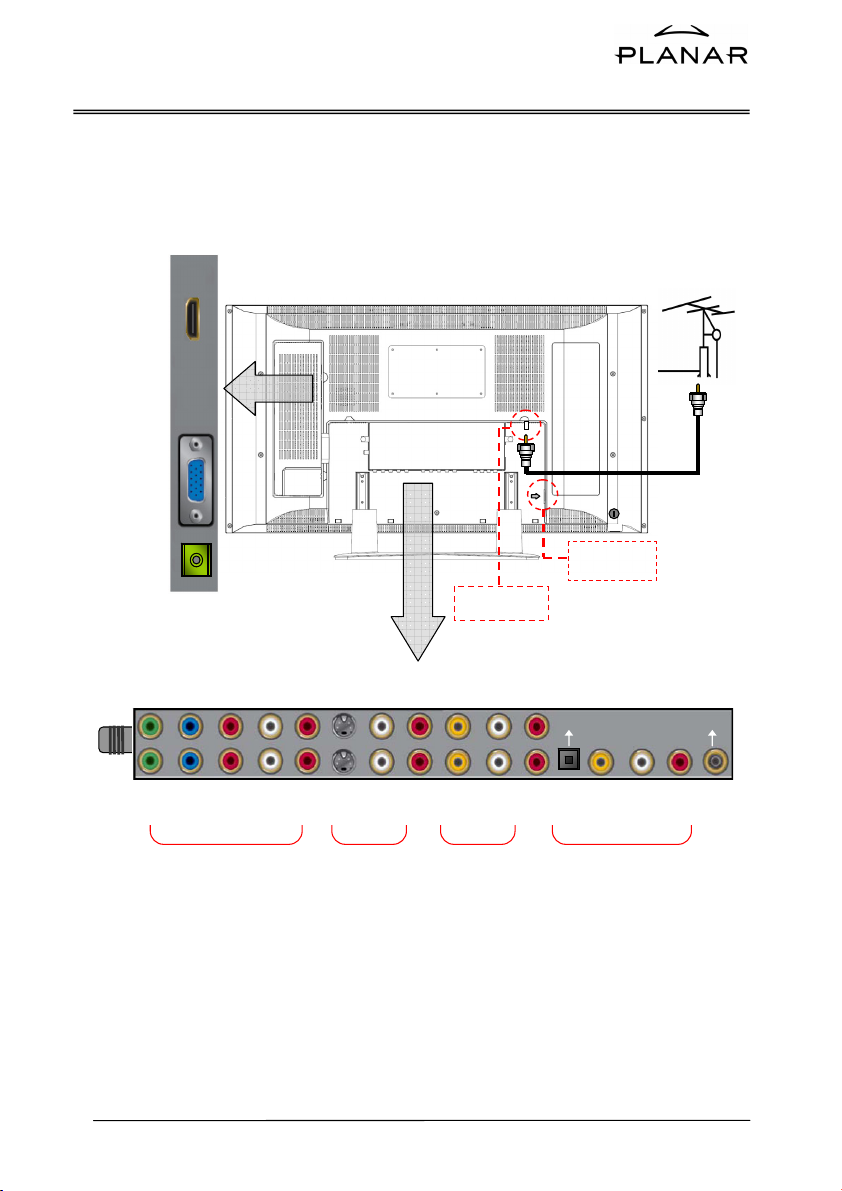
Ports
Y
r
/
HDMI
D-SUB
AUDIO IN
RF IN
ANALOG TV
Interface I
AC POWER
SOCKET
RF IN
Interface II VIDEO BOX
PDIF
Y1 Pb1 Pr1 L1 R1 SV1 L1 R1 AV1 L1 R1
2 Pb2 Pr2 L2 R2 SV2 L2 R2 AV2 L2 R2 AV L R
Component IN S-Video IN Composite IN Video & Audio OUT
VHF / UHF
Antenna
Subwoofe
S
8
Page 10
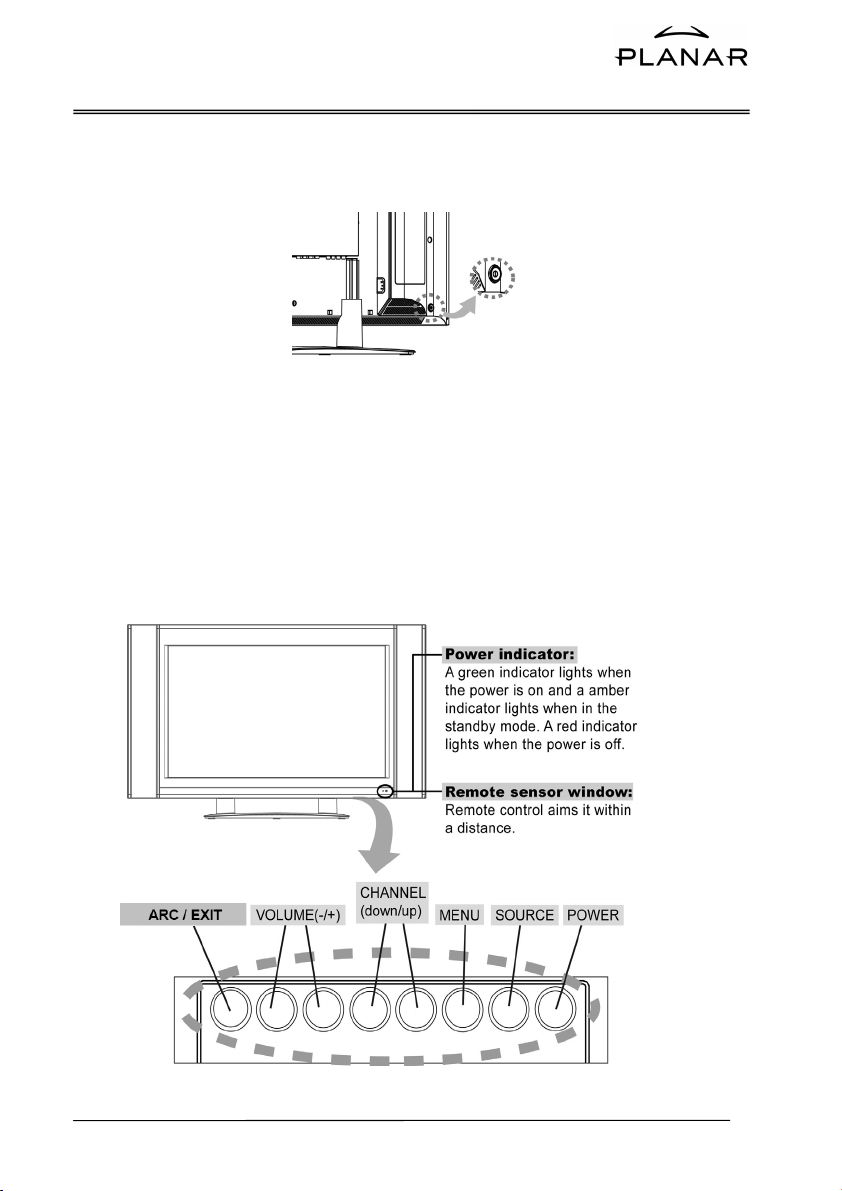
Control Buttons
Main Power Switch
Before operating the LCD display or remote control, users must press MAIN POWER switch to
ON. The MAIN POWER switch is located at the bottom-left back of the LCD display (near by
Power Inlet).
Function Key
These buttons control your TV’s basic features, including the on-screen mean. To use advanced
features, you must use the remote control.
POWER: turn the LCD-TV on or off.
SOURCE: select the input source ( PC, HDMI, AV1, AV2, SV1, SV2, YPBPR1, YPBPR2, TV).
MENU: display the main menu.
CHANNEL (
VOLUME (+/-): increase or decrease the volume.
ARC/ EXIT:
down or up): change the channel.
select the display output mode (TV source: Panorama, Normal, Full, Zoom1,Zoom2,
PC source: Full, Normal).
9
Page 11
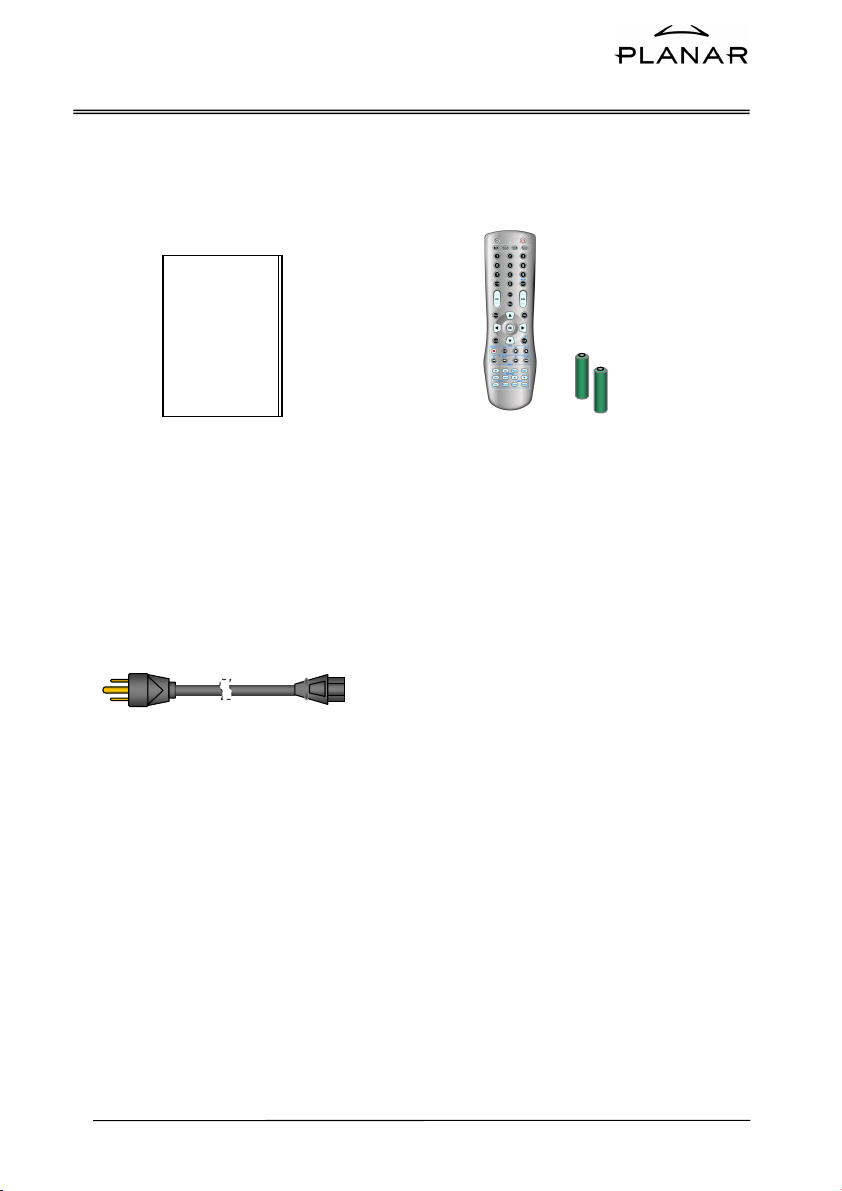
Accessories
LCD - TV
USER’S MANUAL
User’s manual
Power Cord
Remote control & Batteries (AAA x2)
10
Page 12
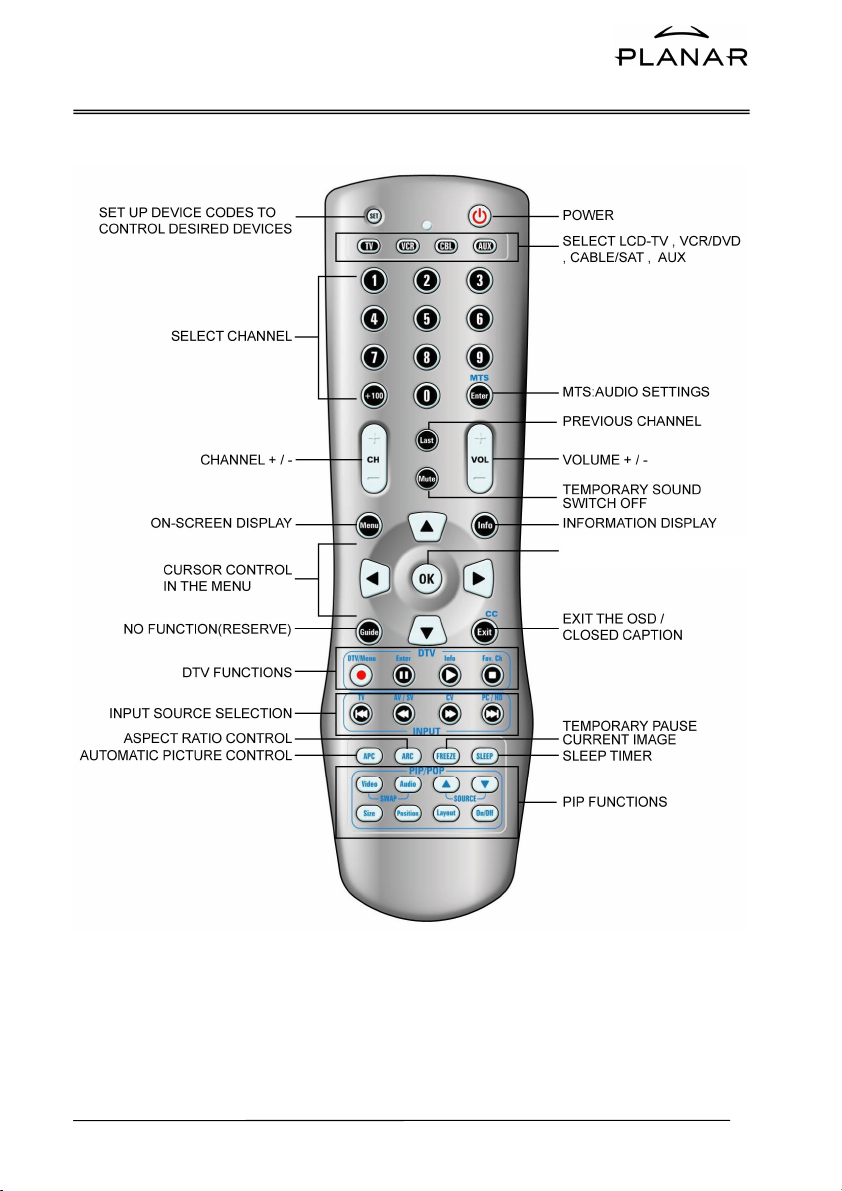
Remote Control
SELECT TV RATING
11
Page 13

Summary of Control Button
b
b
m
play
p
(
/
p
→
AV2→
p
(
)
d
p
p
b
r
play
p
PPoowweerr ccoonnttrrooll
POWER button Turn the TV on or off
Selecting the primary signal source
TV button Switch to TV mode
AV / S V
CV
utton Switch to CV (component) mode (YPBPR)
PC/HD button Switch to PC and HDMI
Menu Settings
Menu button Display the on-screen menu
Exit / CC button As the Menu is appeared : Exit a menu or sub-menu
UP/DOWN/LEFT/RIGHT
TV Changing Channels
UP button Press Up to change the channel
DOWN button Press Down to change the channel
0~9 ; +100 button To manually select channels
Last button Return to the previous viewed channel
Sound Control
VOL+ button Increase volume level
VOL- button Decrease volume level
Mute button Tem
MTS button
PIP Control
On
Off button Enable/Disable PIP viewing window
△/▽ button
SIZE button Toggle PIP window size: Small / Meddle / Large
Audio / Video button Toggle audio/video source between the primary display
Position button Move the PIP window
Layout button Change the display modes with primary display and the
Other Function
ARC button (Aspect Ratio Control)
APC button (Automatic Picture Control) Toggle screen luminosity between STANDARD,
SLEEP button Select a
FREEZE button Tem
Guide
DTV Control
DTV/ Menu Switch to Digital TV mode / Display DTV MENU
Ente
DTV setting confirmation
Info
Fav. CH DTV favorite channel list
Other Devices Function
TV Control this LCD-TV (default).
VCR Control DVD
CBL Control Cable Converter or Satellite.
AUX Control Audio Am
SET Press to program the remote control to provide control
utton Switch to AVand S-Video (composite and Y/C mode)
ode
At the Video Mode: Dis
Access menu items
orarily turn off audio
Cycle through stereo, mono or separate audio program
SAP) multi-channel sound services
Select PIP in
and the PIP window
PIP window
Toggle the picture mode between normal→Zoom1 →
Full→Panorama→Zoom2.
In PC mode, only has Full and Normal
BRIGHT, MOVIE ,an
utton No function
orary pause current image
Display current channel/Input source/signal format/DTV
information
of other devices.
ut source: TV→AV 1
ex: PIP / POP
re-set time for automatic power down.
the Closed Caption text
SV1→SV2
osition
MANUALmodes.
er or VCR.
lifier.
12
Page 14
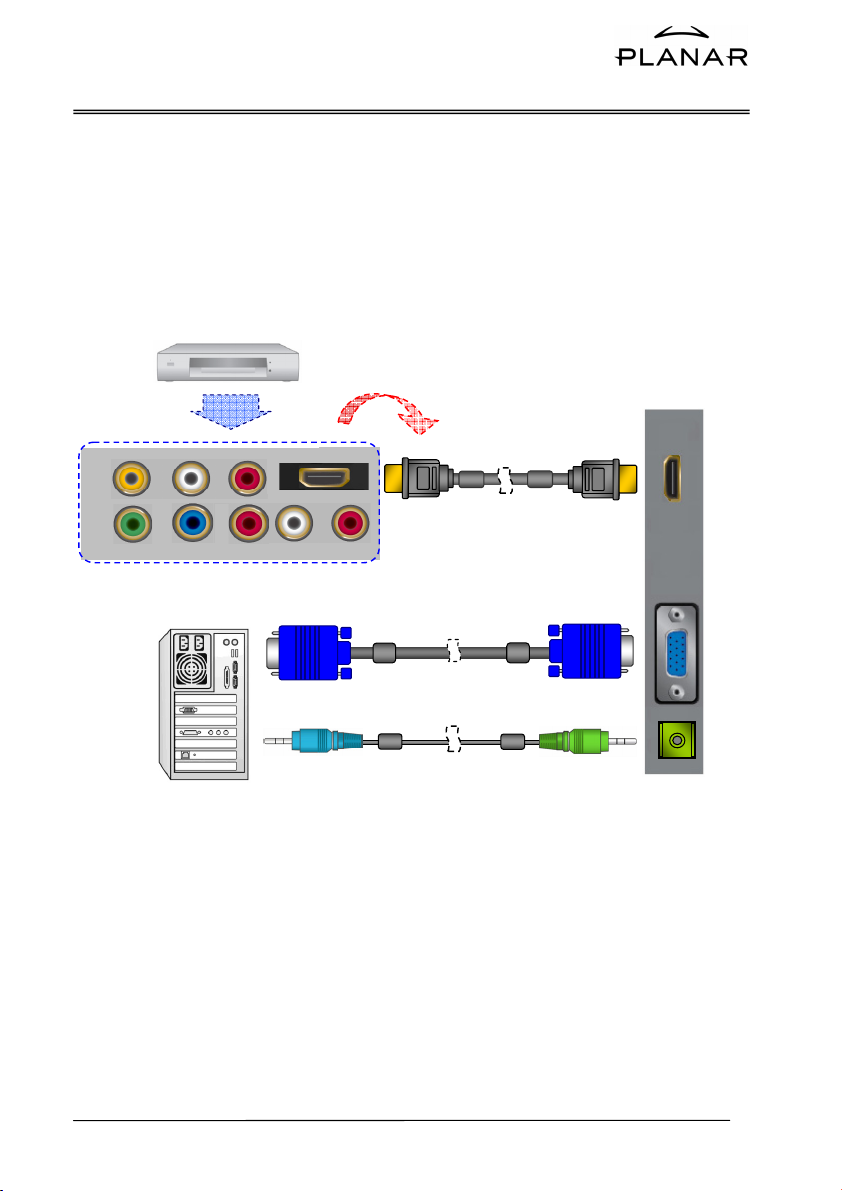
Connections & Applications
* How to connecting Video Device via HDMI ?
This can be applied only if there is the HDMI Output connector on the external device.
(ex. DVD Player or Set-top Box…)
* How to connecting Video Device via D-SUB ?
Note: No sound connector is needed for an HDMI to HDMI connection.
VIDEO DEVICE
VIDEO L R HDMI
Y Pb
Pr L R
PC
Interface I
HDMI to HDMI Cable
HDMI
D-SUB
AUDIO IN
13
Page 15
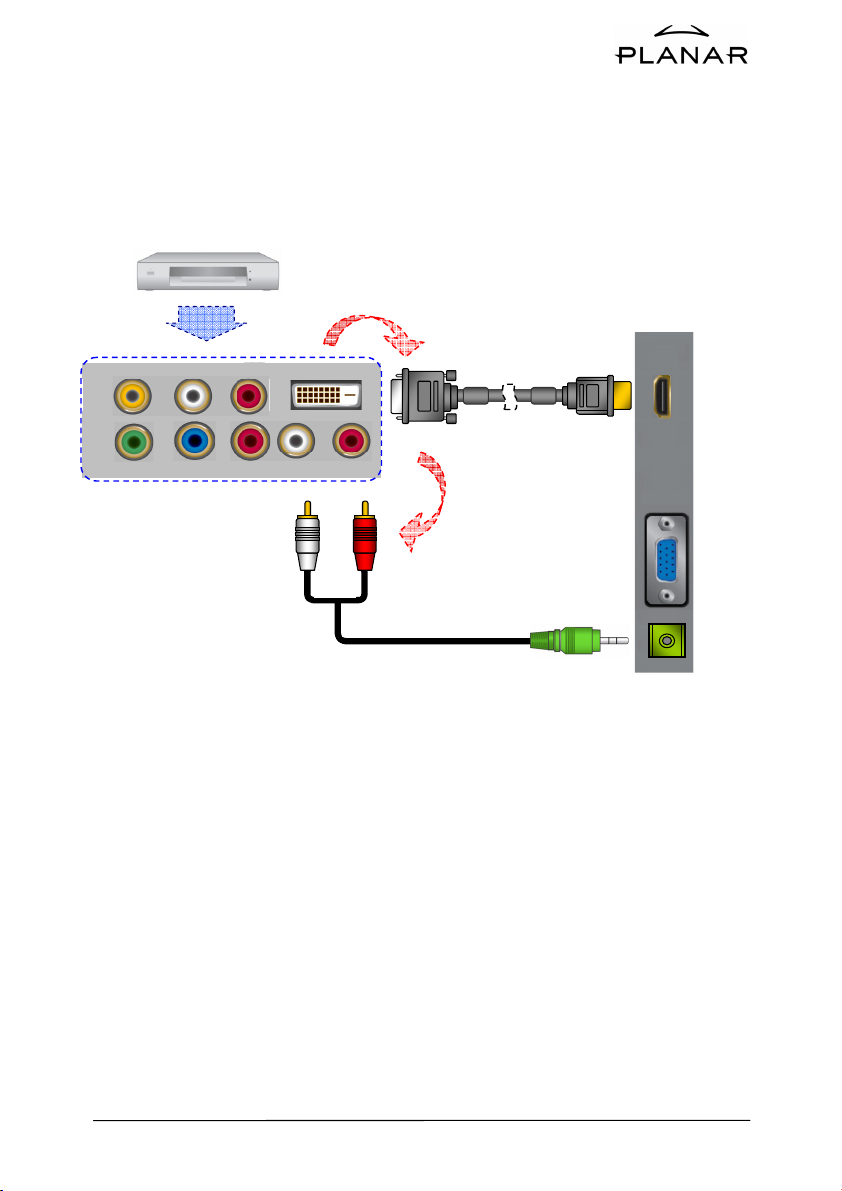
* How to connecting Video Device via DVI –HDMI ?
This can be applied only if there is the HDMI Output connector on the external device.
(ex. DVD Player or Set-top Box…)
1. Connect a DVI-to-HDMI cable or DVI-HDMI adapter between the HDMI/DVI connector
2. Connect an audio cable between the PC AUDIO IN jack on the TV and AUDIO OUT jack
VIDEO DEVICE
1.
VIDEO L R DVI / HDCP
Y Pb Pr L R
DVI to HDMI Cable
2.
On the TV and the DVI connector on the DVD player/ Set-top box.
On the DVD player/ Set-top box.
Interface I
HDMI
D-SUB
AUDIO IN
14
Page 16
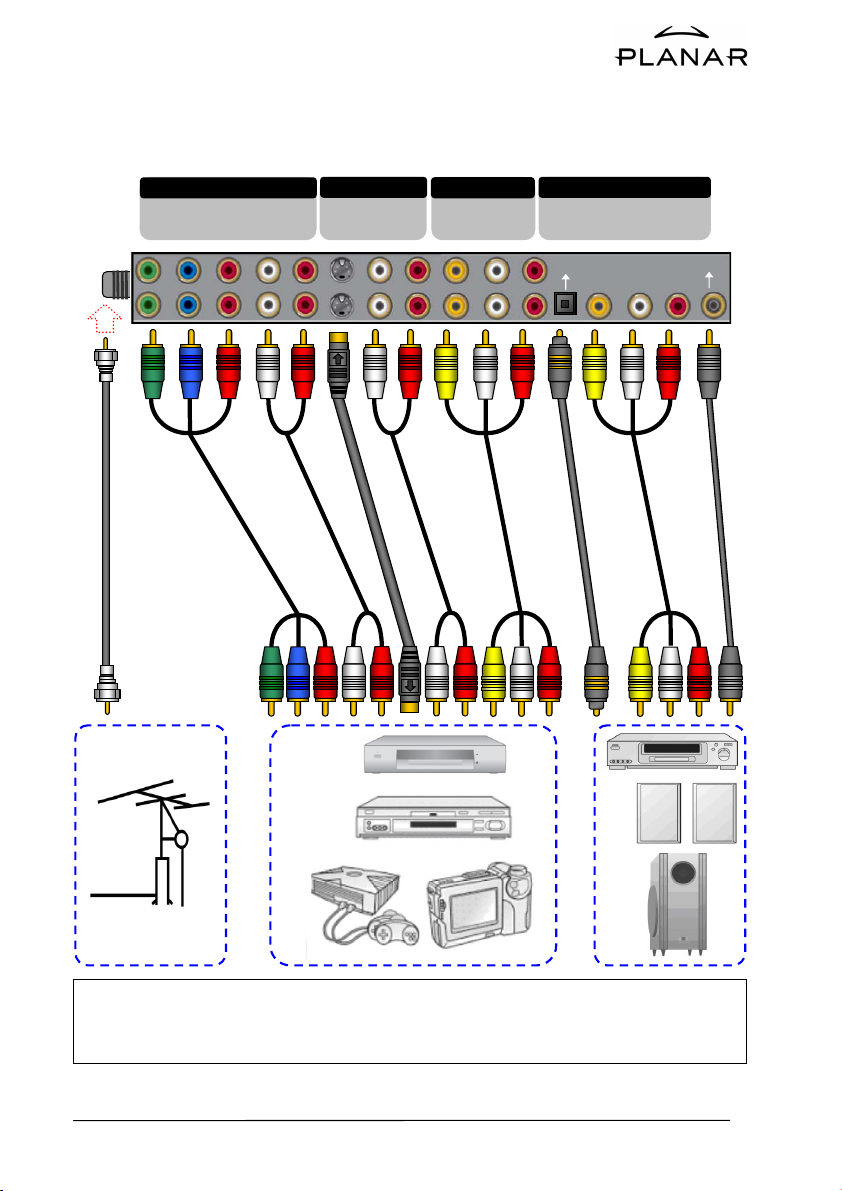
* How to connecting Video Device via general cable ?
V
Y
r
b
RF IN
ANALOG T
Component IN S-Video IN Composite IN Video & Audio Out
1 Pb1 Pr1 L1 R1 SV1 L1 R1 AV1 L1 R1
Pb2 Pr2 L2 R2 SV2 L2 R2 AV2 L2 R2 AV L R
Y2
Interface II VIDEO BOX
S/PDIF
Subwoofe
This TV accept different Video Input, if video device has a connector with better quality, please
connect the better one. The sequence of video quality is Component, S-video, Video from the
est quality to the normal one.
15
Page 17

Controls & Adjustment
A. General Adjustment
Turning the LCD TV On and Off
Plug the power cable into the AC-in socket located on the left rear of the LCD TV. Plug the other
end into an electrical socket. Press the main
Once the main power button is engaged, press the power button on the remote control or use the
power button located within the control buttons panel on underside of the TV to turn the TV on.
The power status light found in the lower right hand corner of the TV indicates the following:
Power On (TV, Video mode) --- Green light。
Power off --- Red light。
PC mode --- Green light。
Power Saving (PC mode)
--- Amber light。
Note: If “NO SIGNAL” appears for 10 minutes under TV or Video mode, the set will
automatically power off.
Viewing the Menus and On-Screen Displays
POWER button located on the back of the left speaker.
16
MENU
POWER
1. With the Power on, press the Menu Button.
The main menu appears on the screen.
2. Press the ◁
or ▷ button to select one of the menu
options. Then press the △ or ▽ button to access the
sub-menu.
3. Press the ◁
or ▷ button to make adjustments.
4. Press the Exit button to exit from the menu or Press
the Menu
to return to the previous screen.
Page 18
Switching PC/HD / Video / S-Video/ TV / Component Modes
1. Turn on the power.
2. Select an input source as described below:
to switch to TV mode.
to switch to PC and HDMI mode.
(Analog or Digital)
to switch to AV and S-Video mode.
to switch to YPBPR mode (Component).
to switch to DTV mode (ATSC).
VIDEO
SOURCE
TV
PC/HD
AV/ SV
CV
DTV/Menu
button
button
button
button
button
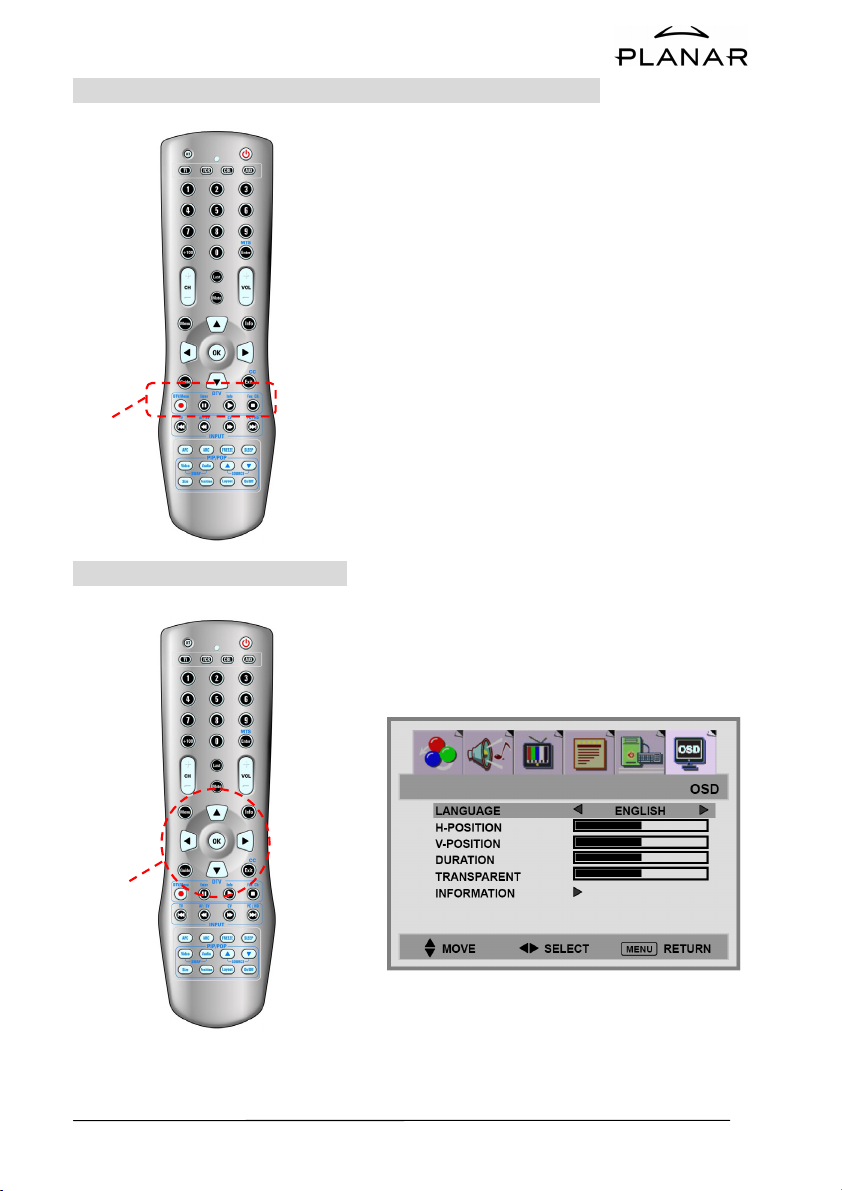
Switching Language Modes
1. Press the Menu button to display OSD from the main
menu.
2. Press the △ or ▽ button to access LANGUAGE
options.
CONTROL
BUTTONS
3. Press the◁ or ▷ button to select the desired
language mode.
4. Press the Exit button to exit from the menu or press
the Menu
to return to the previous screen.
17
Page 19
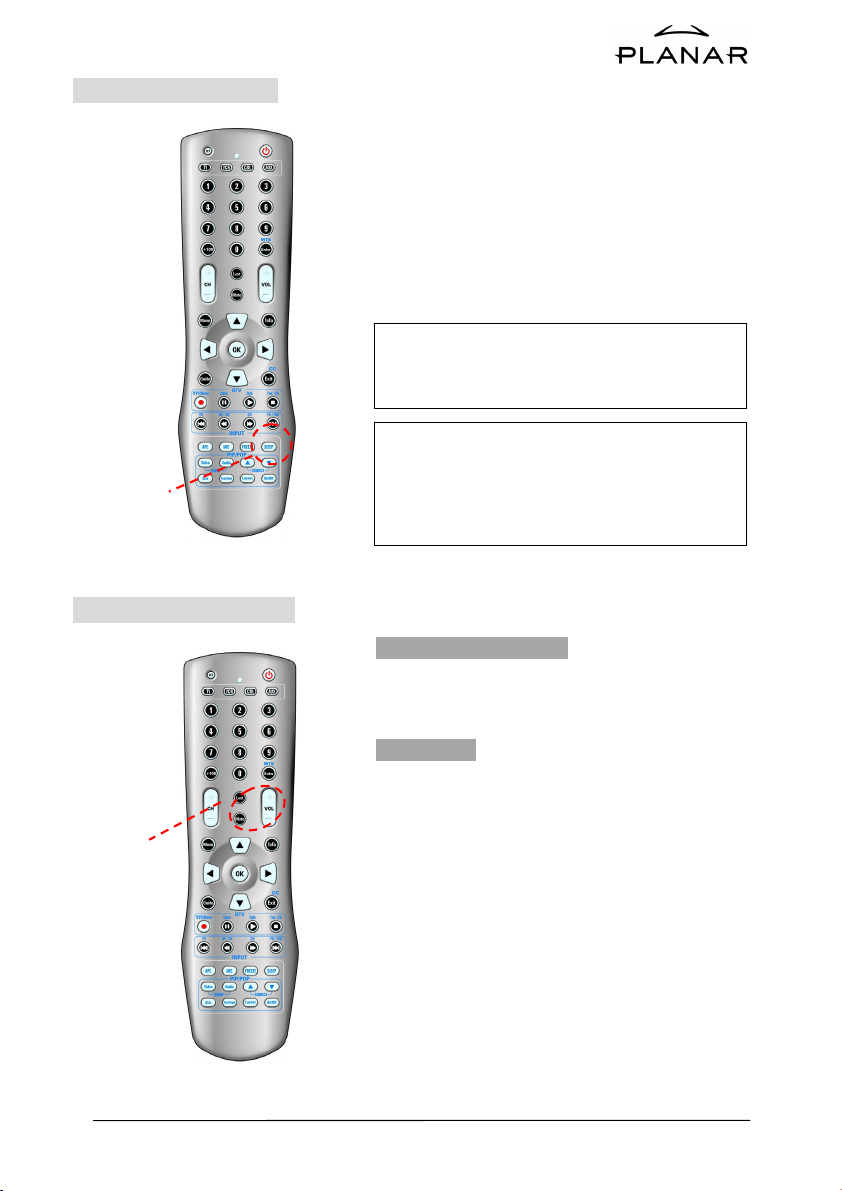
Setting the Sleep Timer
g
SLEEP
Adjusting the Volume
You can set the Sleep Timer to automatically turn off
the LCD TV.
1. Press the
SLEEP button to display the Sleep Timer
screen.
2. Press the
SLEEP button to set the sleep timer (in 10
minute increments).
10 min →20 min → 30 min →40 min→ 50 min
→ 60 min →70 min →80min →90min →100min
→110min→120min→ OFF
Note:
1. The Sleep Timer screen automatically
disappears in 10 seconds.
2. The TV will automatically power off if no
nal is detected for 10 minutes.
si
Using Volume Control
Press the VOL (+) or VOL (-) button to increase or
decrease the volume level.
Using Mute
At any time, you can temporarily turn off the sound
using the Mute button.
VOL+/-
MUTE
1. Press the Mute button and the sound turns off. A
MUTE text will appear on the screen denoting the
sound is muted.
2. Press Mute again or the
VOL (+ ) or VOL (-)
button to return audio back to the previous level.
18
Page 20
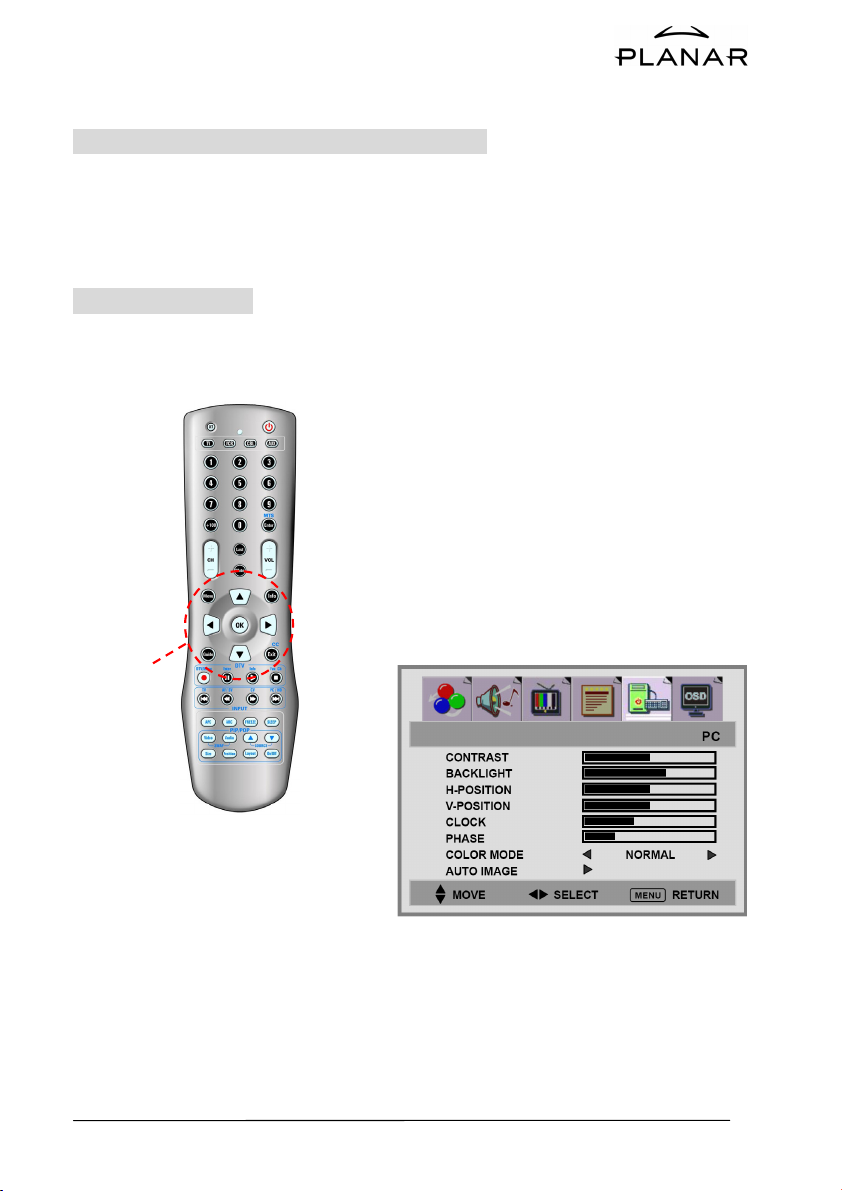
B. PC Mode Adjustment
Adjusting the Contrast & Black light Settings
Each viewing mode supports separate adjustments for black light and contrast levels. PC mode is
best viewed with middle black light and contrast levels as compared to other modes.
Adjusting PC Settings
ANALOG INPUT
1. Press the PC / HD button to set the main display
to PC mode. Press the Menu button to display
PC from the main menu.
2. Press the △ or ▽ button to access PC
sub-menu.
3. Press the ◁ or ▷ button to select the settings
for adjustment.
4. Press the Exit button to exit from the menu or
to return to the previous screen.
CONTROL
BUTTONS
press the Menu
19
Page 21
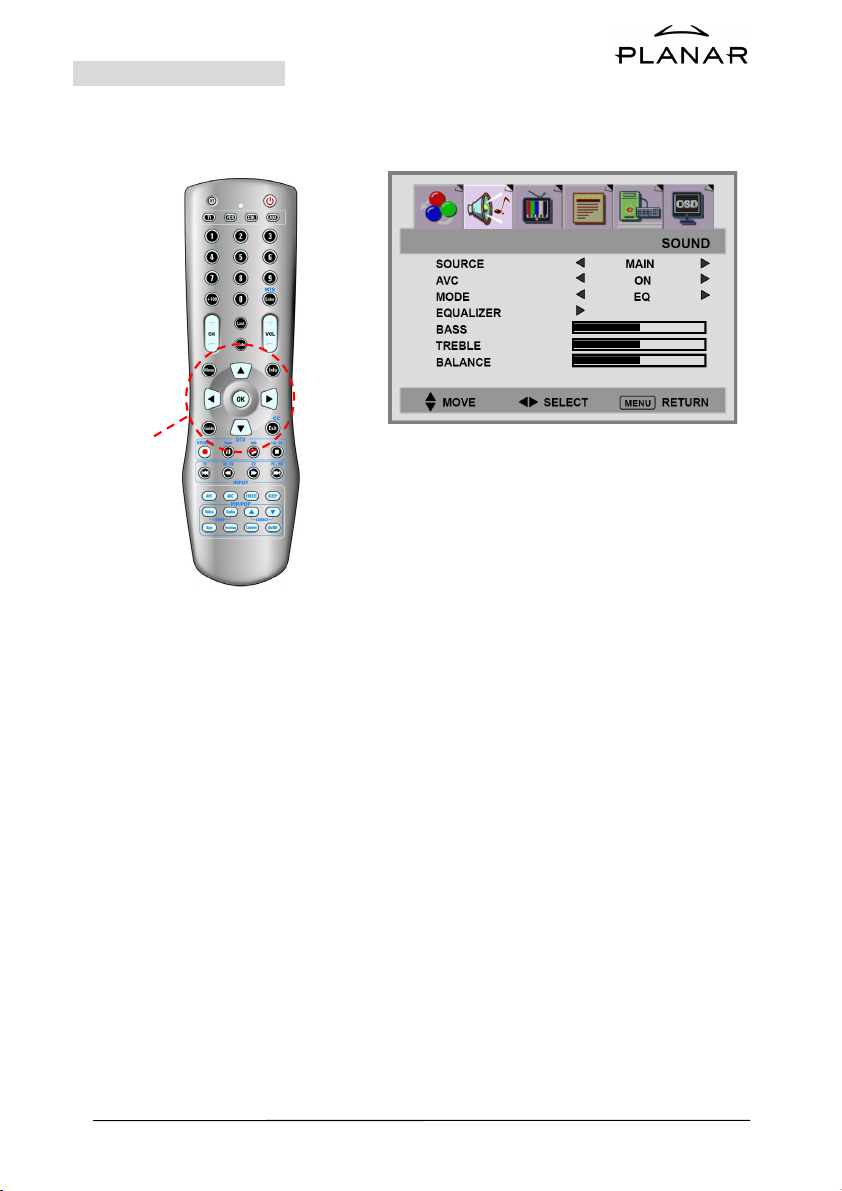
Adjusting Sound Settings
CONTROL
BUTTONS
1. Press the Menu button to display SOUND from the
main menu.
2. Press the △ or ▽ button to access SOUND
sub-menu.
3. Press the ◁ or ▷ button to select the settings.
4. Press the Exit button to exit from the menu or press
the Menu
to return to the previous screen.
AVC:
You can set AVC(Auto Volume Control ) options to
ON or OFF.
a. ON – For general use, like commercial
advertisment, AVC can avoid the sound turns up
or down suddenly.
OFF– For special sound effect, like opera or
symphony, volume can be performed in
accordance with the orginal sound level.
20
Page 22

CONTROL
BUTTONS
EQUALIZER:
a. Press the △ or ▽ button to access
EQUALIZER
option.
b. Press the ▷ button to enter EQUALIZER
menu.
c. There are 6 EQUALIZER modes available:
﹝MANUAL﹞,﹝POP﹞,﹝JAZZ﹞
﹝VOICE﹞, ﹝ROCK﹞, ﹝CLASSIC﹞
d. Selecting the MANUAL pre-set allows you to
manually adjust the frequency response.
e. Settings for POP , JAZZ , VOICE , ROCK and
CLASSIC are pre-configured.
You can’t change these settings.The frequency
response are as below:
21
Page 23

MANUAL: POP:
JAZZ: VOICE:
ROCK: CLASSIC:
22
Page 24

Viewing Picture-in-Picture ( PIP)
PIP: While viewing content on the main display, you have the option to select a secondary signal
as a sub-display in a picture in picture window. This feature allows you to watch two video
sources simultaneously.
Activating Picture-in-Picture
1. Press the Menu button to display FUNCTION
From the main menu.
2. Press the or button to △▽ access FUNCTION
sub-menu.
3. Press the ▽ button to select MULTI MODE option.
4. Press the ◁ or ▷ button to select the PIP or
POP mode.
CONTROL
BUTTONS
z OFF: Only show the primary source (No PIP/POP).
z PIP: Show PIP in a window.
Note: Used the Remote Control to
.
Enable the PIP function
1. Press the PIP ON/OFF button.
2. Press the △ or ▽ button to select
the PIP source.
23
Page 25

z POP: Show PIP side by side with the main source.
CONTROL
BUTTON
PIP Function
Control Key
Note: Numbers of Video source cannot be displayed at
the same time.( refer to the Table on page25 )
Note: Used the Remote Control to Enable the PIP function
1. Press the PIP ON/OFF button.
2. Press the △ or ▽ button to select the PIP source.
5. Press the or and△▽ ▷ button to access
MULTI PICTURE option.
24
Page 26

6. Press the or △▽ button to select the settings for
adjustment.
z SUB SOURCE : You can select PIP source.
z SIZE : Three different PIP sizes.﹝SMALL﹞,
﹝MIDDLE﹞,﹝LARGE﹞
z H-POSITION / V-POSITION : Press the W / X
button can make PIP window move from corner to
corner on the TV screen.
z SWAP: To exchange the display of main source and
sub-source.
z Tab le
Sub
Main
PC
HDMI
YPBPR 1
YPBPR 2
DTV
SV1
SV2
AV 1
AV 2
TV
PC HDMI YPBPR 1 YPBPR 2 DTV SV1 SV2 AV1 AV2 TV
X X X X X O O O O O
X X X X X O O O O O
X X X X X O O O O O
X X X X X O O O O O
X X X X X O O O O O
O O O O O X X X X X
O O O O O X X X X X
O O O O O X X X X X
O O O O O X X X X X
O O O O O X X X X X
25
Page 27

C. General TV Mode Adjustment
Adjusting the TV settings
1. Press the TV button to set the main display to TV
CONTROL
BUTTONS
Sound Options
Choosing a Multi-Channel Sound (MTS)
Soundtrack
Depending on the particular program being broadcast,
you can listen to Stereo, Mono or a Separate Audio
Program. (SAP audio is usually a foreign-language
translation).
MTS
mode. Press the Menu button to display TV
CHANNEL from the main menu.
CONTROL
BUTTONS
26
Page 28

Adjusting Picture Settings
1. Press the Menu button to display PICTURE from
the main menu. Then press the △ or ▽ button to
select PICTURE MODE option.
CONTROL
BUTTONS
.
2. Press the ◁ or ▷ button to enter the USER
menu.
3. Press the △ or ▽ button to select the desired
item. Then press the ◁ or ▷
button to adjust
ranges from minimum to maximum
4. Press the Menu button to return to the previous
screen or exit from the sub-menu.
27
Page 29

Memorizing Channels
Your TV can memorize and store all of the available channels for both standard broadcast (antenna)
and cable channels. After the available channels are memorized press the △
view stored channels. You can also view any channel (even non-memorized) by directly entering
the channel digits via the remote control.
There are three steps to memorizing channels:
1. Selecting a TV signal input source
2. Memorizing the available channels (automatically)
3. Adding/Erasing channels (manually)
Selecting the TV Signal Source
Before your television can begin to memorize
available channels, you must specify the type of signal
source that is connected to the TV (i.e., an antenna or
a cable system).
1. Press the TV button to set the main display to TV
mode. Press the Menu button to display TV from
the main menu.
2. Press the △ or ▽ button to select the SOURCE
option.
3. Press the ◁ or ▷
button to select between
Antenna, AIR , CATV , HRC , IRC source signals.
CONTROL
BUTTONS
or ▽ button to
28
Page 30

CONTROL
BUTTONS
Storing Channels (Automatic Method)
1. Press the Menu
from the main menu .Then press the ▽
bottom to display TV CHANNEL
button to
select the AUTO SCAN option.
2. Press the ▷ button to run through all of the
available channels and store them in memory.
It may take a few minutes to acquire the available
channels.
Adding and Erasing Channels (Manual
Method)
1. Press the Menu
bottom to display TV CHANNEL
from the main menu .
2. Press the ▽
button to select the ADD/ERASE
option.
CONTROL
BUTTONS
29
Page 31

Changing Channels
This LCD TV turner provides the ability to display up to 125 channels (1 to 125).
To select a channel, enter the channel number using 1 to 3 digit numbers.
Using the Channel Buttons
1. Press the channel (+ ) or channel (-) button to change
channels.
channel (+ ) or channel (-) button,
CONTROL
BUTTONS
When you press the
the channels move up or down in sequence. You will
see all the channels that have been memorized, (the
channels must be memorized). You will not see
channels that were either erased or not memorized.
Directly Accessing Channels
Enter the channel number using the numeric buttons to
go directly to the channel desired.
For example, to go to channel 27, press “
The TV will change to channel 27.
Using the direct access method you can access any
available channel including non-memorized and erased
channels. To select a channel over 100, press the +100
button. (For example, to go to channel 122, press
+100”, then “2”, and then “2”).
“
2”then “7”.
30
Page 32

Using Parent Control
The Parent Control feature allows you to block channels from being viewed unless an unlock
PIN code is correctly entered.
Before Parent Control restrictions can be utilized, you must first create a PIN number.
1. Press the TV button .
2. Press the Menu button to display FUNCTION from
the main menu.
3. Press the ▽ button to select the PARENT
CONTROL option.
NUMBER
BUTTONS
CONTROL
BUTTONS
4. Press the ▷ button to enter the BLOCKING
PASS WOR D menu.
31
Page 33

5. Enter your 4-digit PIN when you have finished
entering the PIN. If the PIN is not correct, main
menu will appear again.
NUMBER
BUTTONS
NOTE: The factory default PIN code is 0000.
6. After entering a valid PIN number, the all of Parent
Control sub options will appear. Press the △ or ▽
button to select the sub-menu.
CONTROL
BUTTONS
Setting Up Your Personal ID Number (PIN)
1. Press the △ or ▽ button to select the CHANGE
PASSWORD.
NUMBER
BUTTONS
CONTROL
BUTTONS
32
Page 34

NUMBER
BUTTONS
CONTROL
BUTTONS
2. Press the ▷ button to enter the BLOCKING
PASSWORD menu.
3. Enter your new 4-digit PIN XXXX,and the
BLOCKING CONFIRM menu will be on the
screen.
CONFIRM _ _ _ _
4. Enter the 4-digit PIN the same as step3 XXXX
again, IF the PIN is correct, “OK” will be on the
screen.
If the PIN is not correct, main menu will appear
again.
33
Page 35

CONTROL
BUTTONS
CONFIRM OK
.
5. When you have finished entering the PIN, new
setting to be operation.
How to Enable / Disable Parent Control
Under the PARENT CONTROL sub-options:
1. Press the △ or ▽
button to select the V-CHI P.
2. Press the ◁ or ▷
button to select the V-CHIP
ON or OFF.
3. Press the △ or ▽ button to select TV-RATING.
34
Page 36

TV-Y Young children
TV-Y7 Children 7 and over
--------------------------------------
TV-G General audience
TV-PG Parental guidance
TV-14 Viewers 14 and over
TV-MA Mature audience
ALL :
FV : Fantasy violence
: Violence
V
: Sexual situation
S
: Adult language
L
: Sexual suggestive dialog
D
4. Press the ▷
button to enter the TV-RATING,
Rating menu will appear.
5. Press the OK key to select Content BLOCK
or UNBLOCK.
6. Press the Exit or Menu buttons to jump-out the
setting menu. TV-Rating function is operation.
TV-RATING
TV-PG
PASSWORD _ _ _ _
If the channel is set to a restricted channel, the
parent control will automatically block it, and
the BLOCK menu will appear.
35
Page 37

Setting up restrictions using the “BLOCKING MOVIE” function.
The MOVIE-RATING option utilizes the Motion Picture Association of America (MPAA) ratings
system for determining blocked programming. When the parent control lock is enabled, the TV
will automatically block any programs that are coded with objectionable ratings.
Under the PARENT CONTROL sub-options:
1. Press the △ or ▽ button to select
MOVIE-RATING.
CONTROL
BUTTONS
2. Press the ◁ or ▷ buttons to select the rating
level.
3. Press the Exit or Menu buttons to jump-out the
setting menu. MOVIE-Rating function is operation.
If you want to disable the Parent Control ,Press
the ◁ or ▷
to OFF. All locked channels will be released
button to select the V-CHIP item
automatically.
36
Page 38

MOVIE-RATING
R
PASSWORD _ _ _ _
Child Lock
If the channel is set to a restricted channel, the
parent control will automatically block it, and
the BLOCK menu will appear:
G : General audience (no restrictions).
: Parental guidance suggested.
PG
: Parents strongly cautioned.
PG13
: Restricted. Children under 17 should be accompanied
R
by an adult.
: Adults only under 17.
NC17
X
: No Children
1. Press the TV button .
2. Press the Menu button to display FUNCTION from
the main menu.
3. Press the ▽ button to select the CHILD LOCK
option.
4. Press the ◁ or ▷ buttons to enable / disable the
function key of front cover.
[ON]: Function key is locked.
[OFF]: Function key is active.
CONTROL
BUTTONS
NOTE :You can use MEMORY RECALL t o reset to factory settings.
37
Page 39

Viewing Closed Captions
This LCD TV has the ability to decode and display closed caption content if supported by the
program. These captions are usually used for the hearing impaired or for foreign language
translations. Most VCR's can record the closed caption signal from television programs. Most
pre-recorded commercial videotapes also provide closed captioning as well. Refer to the closed
caption symbol within your television programming guide and on the videotape packaging in
order to properly configure the closed captioning function:
Note: The Caption feature does not work with Component Video / PC / HDMI input source.
CC Button
You can press the Exit / CC
button on remote control to
select this function.
1. Press the TV button to set the main display to TV
mode. Press the Menu button to display
FUNCTION from the main menu .
2. Press the △ or ▽ button to select
CLOSED CAPTION option.
3. Press the ◁ or ▷ button to select between closed
captioning modes CC1, CC2, CC3, CC4, TEXT1,
TEXT2, TEXT3, and TEXT4. If you don’t want to
display captions, set the caption mode to “OFF”.
4. Press the Exit or Menu buttons to jump-out the
setting menu. Closed-Caption function is operation.
38
Page 40

D. DTV System
Channel Scan
Before you can use any of the channel buttons (CH +
be scanned and memorized.
CONTROL
BUTTONS
Initial Screen
The first time the receiver is powered on, you will see
the message as below.
As the signal is weak or the signal is not received ,
you will see the message as below.
1. Press the Menu button to display
DTV-CHANNEL from the main menu. Then you
will see the DTV-CHANNEL sub-menu.
/ -, Fav.Ch), the available channels must first
39
Page 41

Auto Scan
To automatically scan your channels, follow these steps:
1. Press the Menu button to display
DTV-CHANNEL from the main menu ,and then
press the △ or ▽ button to select
AUTO SCAN option.
2. Press the ◁ or ▷ button to enter the Auto Scan
menu.
3. Press the Enter to search channel.
4-1
MENU
Button
ENTER
Button
MENU
Button
ENTER
Button
40
Page 42

4. Once the digital TV signal is scanned, the channel
number and the program name are shown on the
“Scan List”.
5. No channel is found.
You will see the message as below:
0
6. Press the Menu button to exit the screen.
41
Page 43

Manual Scan
You can add channels manually if they aren't detected by the Auto Scan utility using the following
steps:
NUMBER
BUTTONS
CONTROL
BUTTONS
1. Press the Menu button to display
DTV-CHANNEL from the main menu.
2. Press the △ or ▽ button to select the
MANUAL SCAN option, and then press` the ▷
button to enter the Manual Scan menu.
3. Press the Enter button when the messages “press
﹝Enter﹞key to confirm system.” are shown then
insert the channel number.
25
Input channel No. and confirm it.
42
Page 44

MENU
Button
ENTER
Button
4. If the ATSC signal is found and locked, you will
see the Status message “Add No.XX 8VSB channel
success". Press Exit or Menu to leave the menu
and watch the program, or to scan other channels.
5. If the signal is not locked, you will see a "no
channel" message. You can scan the signal again or
refer to the signal level bar “Signal” for aligning
the direction of the antenna to improve the signal.
6. When the signal is locked you can check the signal
level.
7. Press the Exit button to return to the main menu or
press the Menu button to exit the menu system.
0
Add No. 10 8VSB channel successfully.
43
Page 45

Time Zone
MENU
Button
ENTER
Button
1. Press the Menu button to display
DTV-CHANNEL from the main menu.
2. Press the △ or ▽ button to select
TIME ZONE option.
3. Press the ▷ button to enter the TIME ZONE
settings.
.
44
4. Press the Enter button to highlight the input
column, and then press ◁ or ▷ buttons to
change the time zone 30 minutes at a time.
5. Press the Menu or Exit buttons to exit the menu
system.
If you are receiving a digital signal, the Receivers time
will be set automatically.
Page 46

Channel Control
CONTROL
BUTTONS
Change Passwords
1. Press the Menu button to display
DTV-CHANNEL from the main menu.
2. Press the △ or ▽ button to select
CHANNEL CONTROL option.
3. Press ▷ button to enter the sub-menu.
45
Page 47

NUMBER
BUTTONS
4. Press the ▷ button to enter the PASS WO RD
menu.
CONTROL
BUTTONS
5. Enter your new 4-digit PIN twice. If the PIN is not
correct, main menu will appear again.
6. when you have finished entering the PIN, new
setting to be operation.
46
Page 48

CONTROL
BUTTONS
Fav. CH
Button
Edit Favorite Channel
You can block access to channels or add them to your
favorites list using the following steps:
Under the CHANNEL CONTROL options:
1. Press the △ or ▽ button to select
CHANNEL EDIT item.
2. Press the ▷ button to enter the CHANNEL
EDIT menu.
3. On the “Edit Channel” menu, press △ or ▽ to
highlight Edit, and then press Enter.
4. To block channels, press ◁ or ▷ and △ or ▽
buttons to highlight the channel BLOCK column
and press Enter.
5. To add channels to the favorite channel list, press
◁ or ▷ and △ or ▽ buttons to highlight the
FAV. column and press Enter.
47
Page 49

DTV Rating Setting
This menu lists both MPAA and USTV (FCC) Parental ratings. You can independently lock the
MPAA and TV ratings. The locked ratings are indicated by the lock symbol.
Under the CHANNEL CONTROL options:
1. Press the △ or ▽ button to select
RATING item.
CONTROL
BUTTONS
Note: When a locked program is accessed, you will see the message
"Program is rating blocked" on the screen.
2. Press the ▷ button to enter the RATING
CONTROL menu.
3. Press ◁ or ▷ and △ or ▽ buttons and the
ENTER button to activate the appropriate
restrictions for either the MPAA rating system or
the USTV(FCC) rating system.
48
Page 50

Rating ( Lock Programs by Rating )
Explanation of the MPAA and TV (FCC) Rating Systems:
USTV (FCC) Age-Based Ratings
TV-Y All children. The themes and elements in this program are specifically designed for a
very young audience, including children from ages two to six.
TV-Y7 Directed to older children. Themes and elements in this program may include mild
physical or comedic violence, or may frighten children under the age of seven.
TV-G General audience. The program contains little or no violence, no strong language, and
little or no sexual dialogue or situations.
TV-PG Parental guidance suggested. The program may contain infrequent coarse language,
limited violence, some suggestive sexual dialogue and situations.
TV-14 Parents strongly cautioned. This program may contain sophisticated themes, sexual
content, strong language and more intense violence.
TV-MA Mature audiences only. This program may contain mature themes, profane language,
graphic violence and explicit sexual content.
USTV (FCC) Content Category
V Violence. S Sexual content.
L Offensive language. D Dialogue and sexual innuendo.
FV Fantasy or cartoon violence.
MPAA Rating System (Movies)
G General audience. No restriction.
PG Children under 13 should be accompanied by an adult.
PG-13 Parental guidance suggested. Children under 13 should be accompanied by an adult.
R Restricted. Viewers should be 17 or older.
NC-17 Not classified. Viewers should be 17 or older.
X Adults only.
* USTV (FCC) ratings: When the rating that you select is locked (as indicated by the green lock symbol), all of the content-based
ratings are locked within the rating group. For example, locking the TV-G rating locks all of its contents
(V, S, L, and D). More restrictive ratings (TV-PG, TV-14, and TV-MA) and all of their contents are also
automatically locked.
* MPAA ratings: The particular rating that you have selected will be locked. In addition, more restrictive ratings will be
locked as well.
* Neither USTV (FCC) ratings nor MPAA ratings apply to news programs.
49
Page 51

Closed Caption Options
At Digital TV mode. follow these steps to turn on closed captioning:
You must use the remote control to enable / disable the function.
If the I-Plate indicates that there is Closed Caption data on the current channel, pressing the CC or
Exit / CC button on the remote control will display the C.C. Options list on the TV screen.
1. Press the Exit / CC button to display the C.C.
Options.
CC
Button
ENTER
Button
2. Press the △ or ▽ button to select C.C
rating.
3. Press the Enter button to confirm it.
4. Press the Menu or Exit to exit setting.
50
Page 52

INFO ( Information-Plate )
When you are watching digital channels, you can view the current program name and relevant
information by pressing the “INFO” button to show I-Plate on screen.
Current Program
After pressing the Info button, the I-Plate appears
including this information:
- TV Station Name
- Current Channel Number
- Current Local Time
- Program Name
- Program start and end time
- Picture resolution
- Closed Caption
- Audio System (PCM)
- Program Rating Information
Next Program
Press the ▷ button to display information for the
NEXT program. Press the ◁ button to display
CC
Button
ENTER
Button
information for the PREVIOUS program.
Extended Program Information
1. Press the Info button again to display extended
program information for the current TV channel.
2. Press the Info button again to close the I-Plate or
Extension window, or press the Exit button to exit
the I-Plate window.
51
Page 53

MTS ( Multitrack Language Selection-Design )
1. Press the Enter / MTS button to display the
MTS
Button
ENTER
Button
Multi-language window.
2. Use △ or ▽ keys to highlight the language you
want and press Enter.
3. Press the Exit button to close the language window.
52
Page 54

Favorite Channel List
Fav. CH
Button
1. When you are watching broadcast or cable TV
channels, you can press the “FAV” button on the
remote control to display the Favorite Channel
List.
2. Use ◁ or ▷ keys to select the input source
program lists.
3. Use △ or ▽ keys to highlight the program you
want and press the Enter button.
Note: The channel table of the Receiver will follow settings in this menu. To
view ATSC channels only, select the ATSC channel list. To browse
all of the ATSC channels, select the “All” channel list. If you are
browsing ATSC channels and would like to switch to.
53
Page 55

Selecting Digital Channels
Freezing the Picture
Selecting digital channel numbers is different from
selecting traditional channel numbers. For example,
To select digital channel number: 10 - 2
(1) press numeric key “1” and “0”
(2) press the “▷ “button
(3) press the numeric key “2”
1. Press the “FREEZE” button on the remote control
to freeze the picture. The "Freeze" message will
appear in the upper right corner of the screen.
2. Pressing the “FREEZE” button again will release
the picture.
54
Page 56

E. Other Functions
1. Channel +/ - :
Under TV mode,
2. Volu m e +/ - :
Under any display mode, “
3. ARC (Aspect Ratio Control):
˙Full : Expands 4:3 video sources both vertically and horizontally to fill the entire screen
while keeping the original aspect ratio..
˙Normal : Sets the aspect ratio to 4:3. There will be black bars to the left and right sides of the
image.
˙Panorama : This mode expands the width of 4:3 video sources evenly to fill the 16:9 screen.
There will be distortion as all four edges of the image are stretched, creating less distortion at
the center of the screen.
˙Zoom 1: Extends the image height to fill the screen by stretching the image vertically.
˙Zoom 2
purpose.
(In PC mode, only has Full and Normal)
4. APC (Automatic Picture Control):
Automatic Picture Control allows you to easily set the screen luminosity based upon your
environment. If in a well lit viewing area it may be necessary to turn up the screen intensity via
the APC "BRIGHT" setting to make the image viewable. Likewise if in a dark viewing area it
may be necessary to turn down the screen intensity via the APC "MOVIE" setting. Toggle the
APC button to scroll through the four APC modes to select the mode that best suits your
situation.
5. MTS (Multi-Television-Sound):
˙There are three supported MTS modes: “Mono”, “Stereo” or “SAP” (Secondary Audio
Program).
˙This LCD TV has the ability to decode stereo or SAP broadcasts.
Channel +/ - keys are for changing channels.
Vo l u m e +/ -” are for adjusting sound volume.
: Same as”16:9 Zoom”, but the button edge of the screen pulls up a little for the subtitle
55
Page 57

Programming Remote Control
A. Direct Device Code Setup
Although your Remote Control is set up to provide control of this TV, you can specify other
devices to be controlled, according to the following steps.
[MODE] → <<SET>> (2 blinks) → 5- digit device codes (2 blinks)
STEP 1 Locate the desired device in the Device code list.
STEP 2 Select the [MODE] by pressing VCR, CBL, or AUX.
[MODE]
TV Locked to this TV (Default) -------
VCR
CBL
AUX
STEP 3 Depress and hold <<SET>> button for a minimum of 3 seconds until LED blinks twice.
STEP 4 Enter the 5-digit code for the desired device. The LED blinks once for every digit
entered except for the last digit, where it shall blink twice to confirm that a valid code
has been programmed.
NOTE
* Each digit must be entered within 10 seconds, or the Remote Control shall exit
programming state.
* Two short LED blinks indicate recognition of the code, after which device control via
the remote is enabled.
* A long LED display indicates non-recognition of the code, at which time the code
should be re-entered.
Example: [VCR]
Device Assignment
Universal VCR, DVD, PVR 2
Universal Cable, Satellite, Video Accessory 0
Universal Tuner, Amplifier, CD, Mini Disc.
And Misc. Audio, Home Automation
→
<<SET>> (2 blinks)
→[2]→[0]→[0]→[3]→[5]
Device
Group no.
3
(2 blinks).
56
Page 58

B. Searching for a Device Code
If none of the codes listed under Device Codes list match your device, you can search for a set of
commands that will work. Your Remote will sample all the codes in its system to find one that
will allow you to control your device. As the Remote searches its library, it starts with the most
popular device in the category and works through to the end. To cycle through each available
device code and sample its functions:
[MODE]→ <<SET>> (2 blinks)→ [9] [9] [1] (2 blinks) →[Device Group No.] (2 blinks)→
[POWER] → [CH +] →[CH +]→[CH +] →… [SET] (2 blinks)
[MODE]
TV Locked to this TV (Default)
VCR
CBL
AUX
STEP 1 Select the [MODE] by pressing VCR, CBL, or AUX.
STEP 2 Depress and hold <<SET>> button for a minimum of 3 seconds until LED blinks twice.
STEP 3 Enter the code sequence [9][9][1]. The LED blinks once for every digit entered except
for the last digit, where it shall blink twice to confirm that [9][9][1] are entered
correctly.
STEP 4 Press POWER button. Then, pressing CH+ repeatedly to cycle through each
corresponding function until your device turns off (or on).
STEP 5 Pressing SET button will store the new device code and returns to normal operation.
The LED blinks twice in confirmation.
Example:
[VCR ]→<<SET>> (2 blinks) →[9]→[9]→[1] (2 blinks) → [2]
(2 blinks) →[POWER]→[CH +] →[CH +]→… [SET] (2 blinks).
Device Assignment
Universal VCR, DVD, PVR
Universal Cable, Satellite, Video Accessory
Universal Tuner, Amplifier, CD, Mini Disc. And
Misc. Audio, Home Automation
Device
Group
No.
-------2
0
3
57
Page 59

C. Device Codes
The following sections list the available device codes for each device mode button. If there is
more than one code listed for device, enter the first one, and then try the POWER button. If the
device turns on (or off), the code is correct. If it does not, try the next code. Repeat until you find
a code that works.
Cable Converters
ABC 00003, 00008, 00014 Paragon 00000
Americast 00899 Philips 00317, 01305
Bell & Howell 00014 Pioneer
Bell South 00899 Pulsar 00000
Clearmaster 00883 Quasar 00000
ClearMax 00883 RadioShack 00883
Coolmax 00883 Regal 00279, 00273
Daeryung
Digi 00637 Samsung 00000, 00144
Director 00476 Scientific Atlanta
Dumont 00637 Sony 01006
Gehua 00476 Starcom 00003, 00014
General
Instrument
GoldStar 00144 Supermax 00883
Hamlin 00009, 00273 Tocom 00012
Hitachi 00014 Torx 00003
Jerrold
KNC 00008 Trans PX 00276
LG 00144 Tristar 00883
Memorex 00000 TS 00003
Motorola
MultiVision 00012 Viewmaster 00883
Pace 01877, 00237 Vision 00883
Panasonic 00000, 00008, 00107 Vortex View 00883
Panther 00637 Zenith 00000, 00525, 008 99
01877, 00877, 00477,
00008
00476, 00810, 00276,
00003, 00014
00476, 00810, 00276,
00003, 00012, 00014
00476, 00810, 00276,
01254, 01376
Runco 00000
Supercable 00276
Toshiba 00000
V2 00883
01877, 00877, 00144,
00533
01877, 00877, 00477,
00008
58
Page 60

Satellite Receivers
AlphaStar 00772 NEC 01270
Chaparral 00216 Next Level 00869
Crossdigital 01109 Panasonic 00247, 00701
00392, 00566, 00639,
01142, 00247, 00749,
DirecTV
Dish Network
System
Dishpro 01005, 00775, 01505 Proscan 00392, 00566
Echostar 01005, 00775, 01505 Proton 01535
Expressvu 00775 RadioShack 00869
GE 00566
General
Instrument
GOI 00775
Goodmans 01246 SKY 00856
Hisense 01535 Sony 00639, 01640
Hitachi 00819, 00222, 01250 Star Choice 00869
HTS 00775 Tivo 01142, 01442
Hughes Network
Systems
I-Lo 01535 UltimateTV 01640, 01392
JVC 00775 Uniden 00724, 00722
LG 01414, 01226 US Digital 01535
Magnavox 00724, 00722 USDTV 01535
Memorex 00724 Voom 00869
Mitsubishi 00749 Zenith 00856, 01856
Motorola 00869 --------------- --------------------------
01749, 00724, 00819,
01856, 01076, 01109,
00099, 01392, 01640,
01442, 01414, 01108
01005, 00775, 0150 5 Philips
00869
01142, 00749, 01749,
01442
Paysat 00724
01142, 00749, 01749,
00724, 01076, 00722,
00099, 01442
RCA
Samsung
Sanyo
Toshiba
00392, 00566, 00855,
00143, 01392
01276, 01109, 01108
01219
00749, 01749, 00790,
01285
59
Page 61

Audio Amplifiers
Bose 30674 Sansui 30321
GE 30078 Shure 30264
JVC 30331 Sony 30689
Marantz 30321 Soundesi gn 30078
Nakamichi 30321 Victor 30331
NEC 30264 Wards 30078
Optimus 30395 Yamaha 30354, 30133
Realistic 30395 --------------- ----------------------------
Audio Amp/Tuners
ADC 30531 Onkyo 30842, 30135
Aiwa 31405, 31243, 30121 Optimus
Anam 31609, 31074 Panasonic 31518, 30039
Audiotronic 31189 Philips 31189, 31269
Bose 31229 Pioneer
Capetronic 30531 Proscan 31254
Carver 31189 Qisheng 31609
Coby 31263 Quasar 30039
Denon 31360, 31142, 30904 RadioShack 31263
Fonmix 31360 RCA
Glory Horse 31263 Sharper Image 31263
Harman/Kardon 30110 Silsonic 30176
Hitachi 31273 Sony
Inkel 30027 Soundesign 30670
Integra 30135 Stereophonics 31023
JBL 30110 Sunfire 31313
JVC 30074, 31263 Teac 31074, 31267
Kenwood 31313, 31570, 30027 Technics 31308, 31518, 30039
KLH 31428 Thorens 31189
Magnavox 31189, 31269, 30531 Victor 30074
Marantz 31189, 31269, 30039 Wards 30014
MCS 30039 Yamaha 30176, 31276, 31176
31023, 30670, 30531,
31074
31023, 30150, 30014,
30630, 30531
31023, 31609, 31254,
30531, 31074
31058, 31441, 31258,
31759
60
Page 62

y
ABS 21972 Gatewa
Admiral 20048, 202 09 GE 20060, 20035, 20240
Aiko 20278 General 20045
Aiwa 20037, 20479 Go Video 20432
Alienware 21972 GoldStar 20037, 20 209, 20038,
America Action 20278 Haojie 20240
American High 20035 Harman/Kardon 20081, 20038
Amoisonic 20479 Harwood 20072
Anam 20162, 20037, 20240, Hewlett Packard 21972
Anam National 20162 HI-Q 20047
Asha 20240 Hitachi 20037, 20042, 20055
Audiovox 20037, 20278 Howard 21972
Beaumark 20240 HP 21972
Bell & Howell 20104
Broksonic
Calix 20037 JVC 20045, 20067
Canon 20035 KEC 20037, 20278
Carver 20081 Kenwood 20067, 20038
CCE 20072, 20278 KLH 20072
Changhong 20048, 20081 Kodak 20035, 20037
Citizen 20037, 20278 Kolin 20043
Colt 20072 LG
Craig 20037, 20047, 20240, Logik 20072
Curtis Mathes 20060, 20035, 20162 LXI 20037
Cybernex 20240 Magnavox 20035, 20039, 2 0081
CyberPower 21972 Magnin 20240
Daewoo 20045, 20104, 20278 Marantz 20035, 20081
Dell 21972 Marta 20037
Denon 20042 Matsushita 20035, 20162
DirecTV 20739 Media Center PC 21972
Durabrand 20039, 20038
Electrohome 20037 Memorex 20035
Electrophonic 20037 MGA 20240, 2004 3
Emerex 20032 MGN Technology 20240
Emerson
Fisher 20047, 20104 Mind 21972
Fuji 20035, 20033 Minolta 20042
Fujitsu 20045 Mitsubishi 20067, 20043
20184, 20121, 20209,
20002, 20479
20035, 20037, 20184,
20240, 20045, 20121,
20043, 20209, 20002,
20278, 20479
VCR
Hughes Network
Systems
iBUYPOWER 21972
MEI
Microsoft 21972
21972
20042, 20739
20037, 20045, 20042,
20209, 20038
20035, 20162, 20037,
20048, 20039, 20047,
20240, 20104,20209,
20479
61
Page 63

VCR
Motorola 20035, 20048 Scott 20184, 20045, 20121,
MTC 20240 Sears
Multitech 20072 Sharp 20048, 20209
NEC
Newave 20037 Shogun 20240
Nikko 20037 Singer 20072
Noblex 20240 Son ic Blue 20616
Northgate 21972
Olympus 20035 STS 20042
Optimus 21062, 20162, 20037,
Orion 20184, 20209, 20002, Systemax 21972
Panasonic 21062, 20035, 20162,
Penney 20035, 20037, 20240,
Pentax 20042 Ta tung 20045, 20067
Philco 20035, 20479 Technics 20035, 20162
Philips 20035, 20081, 20739, Teco 20035, 20037, 20048,
Pilot 20037 Teknika 20035, 20037
Pioneer 20042, 20067 Tivo 20636, 20618, 2 1503,
Polk Audio 20081 TMK 20240
Profitronic 20240 Toshiba
Proscan 20060 Totevision 20037, 20240
Protec 20072 Touch 21972
Pulsar 20039 Unitech 20240
Qisheng 20060 Vector 20045
Quasar 20035, 20162 Vector Research 20038
Radix 20037 Victor 20067
Randex 20037 Video Concepts 20045
RCA 20060, 20035, 20240,
Realistic 20035, 20037, 20048,
ReplayTV 20616 Viewsonic 219 72
Runco 20039
Sampo 20037, 20048 White 20209, 20072
Samsung 20240, 20045, 204 32 XR -1000 20035, 20072
Sanky 20048, 20039 Yamaha 20038
Sansui 20067, 20209, 20479 Ze nith 20039, 20033, 20209,
Sanyo 20047, 20240, 20104 ZT Group 21972
20035, 20037, 20048,
20104, 20067, 20038
20048, 20104, 20432
20616, 20225
20042, 20038
20042, 20880
20047, 20104
Shintom 20072
Sony 20035, 20032, 20033,
Sylvania 20035, 20081, 20043
Tagar Systems 21972
Tashiko 20037
Videomagic 20037
Videosonic 20240
Wards
20035, 20037, 20047,
20042, 20104
20636, 21972
20045, 20042, 20067,
20043, 21503
21008, 21972
20060, 20035, 20048,
20047, 20081, 20240,
20042, 20072
62
Page 64

DVD Player
Aiwa 20641, 21912 Microsoft 20522
Akai
Allegro 20869 Mitsubishi 21521, 20521
Apex Digital
Blaupunkt 20717 Norcent 21003
Blue Parade 20571 Onkyo 20503, 20627 , 21924,
Broksonic 20695 Oritron 20651, 21980
Changhong 20627, 21061 Panasonic 20490, 21762, 21990
CineVision 20869 Philips 20503, 20539, 20646,
Coby 21086 Pioneer 20525, 20571
Curtis Mathes 21087 Polaroid 21086, 21061
CyberHome
Daewoo 20833, 21172, 20869 Portland 2077 0
Denon 20490 Proscan 20522
DVD2000 20521 Qwestar 20651
Emerson 20591, 20675 RCA 20522, 20 571, 20717,
Enterprise 20591 Rio 20869
Fisher 21919 Rotel 20623
Funai 20675 Sampo 20752, 20698
Gateway 21158, 210 73 Samsung
GE 20522, 20717 Sansui 20695
Go Video
Greenhill 20717 Sharp 20630, 20752
Harman/Kardon 20582, 2070 2 Sharper Image 21117
Hitachi 20573, 20664, 21919 Sherwood 20770
Hiteker 20672 Shinco 20717
Initial 20717 Shinsonic 20533
Integra 20627, 21924 Sonic Blue 20869, 21099
JBL 20702 Sony
JVC 20558, 20623, 20867 SVA 20717
Kenwood 20490, 20534 Sylvania 20675
KLH 20717, 21 020, 21149 Symphonic 20675
Koss 2065 1, 21980 Teac 20717, 21 984, 20809
Lasonic 20798 Technics 20490
LG 20591, 20869, 2 0801 Theta Digital 20571
Liquid Video 21980 Toshiba 20503, 20695
Lite-On 21158, 21058 Urban Concepts 20503
Loewe 20511 Xbox 20522
Magnavox
Marantz 20539 Zeni th 20503, 2059 1, 20869
Memorex 20695 ---------------------- ---------------- ------------
20770
20672, 20717, 20797, 21061,
20796, 21056, 21937, 20794,
21020, 21915
21024, 21023, 21129, 20816,
2111 7
20744, 20833, 21099, 20783,
21075, 20869, 21730
20503, 20539, 21976, 21914,
20675
Mintek 20717
Nesa 20717
Polk Audio 20539
20490, 20573, 21932,
21075, 20820
Sanyo 20695
20533, 20864, 21033,
21904, 21903
Yamaha 20490, 20539, 20545
63
Page 65

Troubleshooting
There is no picture or sound.
‧ Make sure the AC adapter is connected.
‧ Verify that there is a valid source signal.
‧ Make sure the correct input mode is selected.
‧ Make sure the master power switch has been turned on.
There is no picture from AV.
‧ Make sure the BRIGHTNESS is properly adjusted.
‧ The florescent lamp may have reached the end of its life.
Contact an authorized service center.
‧ Make sure the video source is plugged into the composite
video-in port.
There is no sound.
‧ Make sure the volume is not set to minimum.
‧ Make sure the sound is not muted
‧ Make sure that headphones are not connected
.
There is no picture or sound, just noise.
‧ The source signal may be weak.
‧ Your provider may be experiencing difficulties.
‧ Check your input connections.
64
Page 66

Picture is not clear.
‧ The source signal may be weak.
‧ The provider may be experiencing difficulties.
‧ Check input connections.
Picture is light or improperly tinted.
‧ Check the Hue, Saturation and Color adjustments.
‧ Reset the TV to the factory default settings.
The picture is too dark.
‧ Select a different APC mode.
‧ Check the PICTURE and BRIGHTNESS adjustments.
‧ The fluorescent lamp may have reached the end of its life.
Contact an authorized service center.
Remote control does not work.
‧ Install new batteries.
‧ Make sure the remote sensor window isn’t blocked.
The picture is not sharp.
‧ The signal source may be weak.
‧ The provider may be experiencing difficulties.
‧ Check input connections.
65
Page 67

The picture moves.
‧ The source signal may be weak.
‧ The provider may be experiencing difficulties.
‧ Check input connections.
The picture is doubled or tripled.
‧ The source signal may be weak.
‧ Check input connections.
The picture is spotted.
‧ There may be interference from other appliances nearby or
around the LCD TV.
There are stripes on the screen or colors fade.
‧ There may be interference from other appliances.
‧ There may be interference between the video source cable and
the power cable. Make sure the power and video cables are not
touching.
‧ Check the Hue, Saturation and Color adjustments.
66
Page 68

PC / DVI Timing Table
H. Freq
Mode
Mode
Name
No.
Resolution
VGA 60HZ
1
640*480
MAC VGA
2
640*480
VGA 75HZ
3
640*480
US TEXT
4
720*400
5
768* 576
SVGA
6
60HZ
800*600
SVGA
7
75HZ
800*600
XGA 60HZ
8
1024*768
XGA 70HZ
9
1024*768
WSGA
10
1280*768
WSGA
11
1360*768
STB
(KHZ)
H. Polarity
V. F req
V. P ol ari ty
(HZ)
31.469
59.941 - -
35.000
66.667
37.5
75.0
31.469
70.0 87
31.250
50
37.879
60.317
46.875
75.0
48.363
60.004
56.476
70.069
47.708
60
47.712
60.000
-
-
-
+
-
-
-
-
+
+
+
+
-
-
-
-
-
-
+
+
Pixel
Hor.
CLK
(MHZ)
25.175
30.24 864 640 96 64 525 480 39 3
31.5 840 640 120 64 500 480 16 3
28.322 900 720 54 108 449 400 35 2
29.75 952 768 124 32 625 576 29 13
40.0 1056 800 88 128 628 600 23 4
49.5 1056 800 160 80 625 600 21 3
65.0 1344 1024 160 136 806 768 29 6
75.0 1328 1024 144 136 806 768 29 6
80 1676 280 198 136 795 768 23 3
85 1792 1360 256 112 795 768 18 6
Hor.
Tota l
Display
800 640 48 96 525 480 33 2
H. Back
Porch
Hor.
Sync
Width
Ver..
Tota l
Ver.
Display
V. B ac k
Porc h
Ver.
Sync
Width
HDMI / HDCP Timing
Mode
No.
1 480i
2 480p
3 720p
4 1080i
Mode Name Resolution
67
Page 69

Specifications
ITEMS SPECIFICATION
Screen Size 37.07” TFT-LCD Panel (CMO)
Aspect Ratio 16:9
Resolution 1920 x 1080
Display Area (opening)
H x V
Panel
TV Function
Video Input
PC Input
Audio Input
Video Output Composite (RCA jack ) TV (analog) x 1
Audio Output
Feature
Power
Dimension W x H x D 1111.3mm * 632.3mm * 279.7mm
Weight (net) Without Accessories 26.5 Kg
Pixel Pitch 0.1425 mm x 0.4275 mm x RGB
Display colors 16,777,216 colors
Contrast Ratio (for AI) 1000 : 1 (typ.)
Brightness (center) 600 cd / m
Viewing Angle (CR>10) 176o Hor. / 176o Ver. (typ.)
Response Time (GTG) 8 ms (typ.)
Broadcasting System Analog : NTSC M / N , Digital* : ATSC
Receiving Channel Analog : PLL181Ch., CATV 125Ch Digital* : 54M Hz~864M Hz
Sound System Analog : MTS+SAP ,
Resolution Analog : 480i Digital* : 1080i, 720p,480p, 480i
Data Broadcasting Close Caption , V - Chip
Composite Signal CVBS x 2
Y, C Signal S-Video x 2
Component Signal Y Pb Pr x 2 (720P / 1080i , HDTV ready )
VGA Connection D-Sub 15 pin x 1
Scanning Frequency f
Audio 1
Audio 2 Component x 2
Audio 3 PC x 1
HDMI Connection HDMI 19 pin
Speaker ( build-in) 10W + 10W (rms) @THD < 10% ( 7W + 7W @ THD < 1% )
Line Out Left / Right / Subwoofer
S / PDIF
Function Keys Power , Source , Menu , Up/Down(Channel) , +/-(Volume) , Aspect .
Video Performance
Audio Performance Equalizer , Subwoofer , Auto Volume Control (AVC) .
Other Control Sleep Timer , Auto Power Off .
Power Supply AC 100V ~ 240V , 50 / 60Hz
Power Consumption 250 W
820.8 mm x 461.7 mm
2
(typ.)
31.5K ~ 75KHz / fV = 56 ~ 75Hz
H =
Composite x 2
S - Video x 2
x 1 (HDMI 1.0 / HDCP 1.1)
Analog : None
Digital : Dolby AC3 / PCM / MPEG
Picture in Picture (PIP) , Picture on Picture (POP) , 3D Comb-filter ,
3D De-interlace , Aspect Ratio Control (ARC) , Auto Picture Control
Video Enhance , Noise Reduction .
68
Page 70

Planar Systems, Inc.
Customer Service
Online Support:http://www.planar.com/support
Email:PlanarSupport@planar.com
Tel :1-866-PLANAR-1 (1-866-752-6271)
Hours:M-F, 8am-8pm Eastern Time (5am-5pm Pacific Time)
©2006 Planar Systems, Inc. Planar is a registered trademark of Planar Systems, Inc.
Other brands and names are the property of their respective owners.
Technical information in this document is subject to change without notice.
E030057208
 Loading...