

Page 1

Invitium™ Medical Workstation
Tk7 and Tn4
OPERATIONS MANUAL
www.planar.com
Page 2

Copyright © 2003, Planar Systems, Inc. All rights reserved.
020-0275-01A
Corporate Headquarters
Planar Systems, Inc.
1195 N.W. Compton Drive
Beaverton, OR 97006-1992 USA
Phone: +1 (503) 748-1100
Fax: +1 (503) 748-1493
Americas Medical Sales
Planar Systems, Inc.
400 Fifth Avenue
Waltham, MA 02451-8738 USA
Phone: +1 (781) 895-1155
Fax: +1 (781) 895-1133
Europe, Middle East, and Africa Medical Sales
Planar Systems N.V.
Leuvensesteenweg 122c
B-3191 Hever, Belgium
Phone: +32-15-500-190
Fax: +32-15-500-199
E-mail: medicalsales@planar.com
medicalsupport@planar.com
URL: www.planar.com
Part Number:
The information in this document is subject to change without notice. Do not reproduce,
transmit, or store this document in a retrieval system without prior written permission of
Planar Systems, Inc.
Planar is a registered trademark and Invitium is a trademark of Planar Systems, Inc.
IBM is a registered trademark and PS/2 is a trademark of International Business Machines
Corporation. Microsoft and Windows are registered trademarks of Microsoft Corporation.
All other trademarks and trade names are the property of their respective companies.
Page 3
U.S. Federal Communications Commission (FCC) Requirements
This device was tested and complies with the limits for a Class B digital device, pursuant to
Part 15 of the FCC Rules. These limits are designed to provide reasonable protection against
harmful interference in a residential installation. This equipment generates, uses, and can
radiate radio frequency energy and, if not installed and used in accordance with the
instructions, may cause harmful interference to radio communications.
There is no guarantee that interference will not occur in a particular installation. If this
equipment does cause harmful interference to radio or television reception, which can be
determined by turning the equipment off and on, the user is encouraged to try to correct the
interference by one or more of the following measures:
• Reorient or relocate the receiving antenna.
• Increase the separation between the equipment and the receiver.
• Connect the equipment to an outlet on a circuit different from that to which the
receiver is connected.
• Consult the dealer or an experienced radio/TV technician for help.
Changes or modifications to this equipment not expressly approved by the
party responsible for compliance could void the user’s authority to operate
the equipment.
To comply with the limits for an FCC Class B computing device, always use
the shielded signal cord supplied with this unit. The FCC warns that changes
or modification of the unit not expressly approved by the party responsible for
compliance could void the user’s authority to operate the equipment.
Canadian Documentation Notice - Class B Computing Devices
This digital apparatus does not exceed the Class B limits for radio noise emissions from digital
apparatus as set out in the Radio Interference Regulation of the Canadian Department of
Communications.
“Le present appareil numerique n’emet pas de bruits radioelecinques depassant
les limires applicables aux appareils numeriques de la class B prescrites dans le Reglement
sure le brouiliage radioelectrique edicte par le minstere des Communications du Canada.”
Regulatory Compliance
This system was tested and complies with IEC/EN 60601-1, UL 2601-1, and CAN/CSA C22.2
No. 601.1 medical safety standards. It is the system integrator or configurer’s responsibility to
test and ensure that the entire system complies with applicable electromagnetic compatibility
(EMC) laws.
iii
Page 4
European Union Declaration of Conformity for Medical Applications
A Declaration of Conformity exists for these products. To obtain a copy, contact Planar and
request the “Declaration of Conformity” document number below.
• Tk7 – 001-0014-04
• Tn4 – 001-0014-09
Certifications
• IEC/EN 60601-1:1990 + A1 + A2 for sale to the medical market
• IEC 60601-1-2:2001 as it applies to this system (informative data)
• Underwriters Laboratory to medical standards UL 2601-1 and CAN/CSA C22.2
No. 601.1 M1990 for sale in the United States and Canada
• Carries the CE mark for sale in the European Community
Symbol Explanations
This information identifies and describes the symbols found on the Invitium.
Proof of conformity to applicable European Economic Community
Council directives and harmonized standards published in the
official journal of the European Communities.
Product is certified with respect to electric shock, fire, mechanical
and other hazards only in accordance with US 2601-1 and
CAN/CSA C22.2 No. 601.1 and IEC 60601-1 for medical
equipment. If this mark appears with the indicators
C and US, the product is certified for the United States and
Canadian markets, meeting the applicable United States and
Canadian standards.
E 226863
UL 2601-1
CAN/CSA C22.2
NO.601.1
IEC 60601-1
Tested to comply with FCC Class B standards.
Consult accompanying documents.
Indoor use only.
iv Invitium Operations Manual
Page 5

Warranty Information
Planar Systems, Inc. warrants that the goods sold hereunder are free of defects in materials
and workmanship, and such goods substantially conform to the specifications furnished by
Planar and to any drawings or specifications furnished to Planar by the Buyer if approved by
Planar. This warranty is effective only if Planar receives notice of such defect or
nonconformance during the period of the warranty. Planar’s sole and exclusive liability for
breach of warranty shall be, at Planar’s option, to repair or replace the Planar product(s) with
refurbished units or provide a credit to buyer in the amount of the purchase price.
Commencement of warranty
The warranty period begins on the date of shipment.
Duration of warranty
The goods sold hereunder are warranted for a period of one year from the date of shipment
unless otherwise agreed to by Buyer and Planar. No extension of the warranty will be given
during the time the goods are in Planar’s possession.
Place of repair or replacement
To obtain warranty service, Buyer must notify Planar of the defect before expiration of the
warranty period and request a Return Material Authorization number. Return the product in its
original configuration to obtain warranty service from Planar. Do not return goods to Planar
without prior authorization. Buyer is responsible for packaging and shipping the defective
goods to the Planar Service Facility located at Beaverton, Oregon, with shipping charges
prepaid.
Limitation of warranty
The foregoing warranty shall not apply to defects resulting from (a) improper or inadequate
maintenance by Buyer; (b) unauthorized modification of the goods; (c) operation of the goods
outside of the environmental specifications of the goods; (d) neglect, misuse, or abuse of the
goods; or (e) modifications or integration with other goods not covered by Planar’s warranty
when such modifications or integration increases the likelihood of damage to the goods.
The warranty is given by Planar in lieu of any other warranties, express or implied. Planar
disclaims any implied warranties of merchantability or fitness for a particular purpose.
Planar’s responsibility to repair or replace defective products is the sole and exclusive remedy
provided to the buyer for breach of this warranty. Planar is not liable for any indirect, special,
incidental, or consequential damages irrespective of whether Planar has advance notice of
the possibility of such damages.
Technical assistance
The warranty set forth above shall not be enlarged, diminished, or affected by, and no
obligation or liability shall arise from Planar, any authorized dealer, or any other person’s
rendering of technical advice, assistance, or services in connection with the buyer’s order of
the goods furnished hereunder. The Buyer is not relying on Planar’s skill or judgment to select
or furnish suitable goods.
Installation
Planar makes no warranty with respect to any installation of Planar’s product(s) by Planar,
any authorized dealer, or any other person.
v
Page 6
About This Manual
Read this manual before you unpack your Planar Invitium™ medical workstation.
Chapter 1, Overview
Chapter 2, Installing the
Invitium
Chapter 3, Troubleshooting Problem solving
Intended use, components, options, and
mounting solutions
Setting up and connecting
Audience
This manual assumes you have experience installing and using computers.
Refer technical issues to your Invitium vendor or system administrator.
Conventions
Symbol Description
A caution that can prevent potential damage to
hardware or software.
A warning that can prevent personal injury.
Related documentation
• Invitium Quick Setup Guide
• Invitium Battery Pack Manual
• Invitium Specification Sheet
vi Invitium Operations Manual
Page 7

Clean the Display
Drip protection is in accordance with the IPX1 rating defined in the
IEC/EN60529 standard.
1 Dampen a soft cloth with an approved cleaning solution.
2 Wipe the screen lightly until no residue remains.
Note Do not spray cleaners directly on the screen.
Approved cleaning solutions
• WexCide
• Ovation
• Fantastic
• Formula 409
• 1.6% aqueous ammonia
• 70% isopropyl alcohol
• “Green soap” USP (United States Pharmacopoeia)
• Cidex
• 0.5% Chlorhexidine in 70% isopropyl alcohol
• Sodium Hypochlorite (bleach) 10%
(2.4% glutaraldehyde solution)
Service and Support
There are no internal user-serviceable components. Return the system to your
Invitium vendor to maintain product warranty.
vii
Page 8

Page 9

Contents
Chapter 1: Overview.................................................................................. 1
Standard Equipment ................................................................................................................1
Optional Equipment.................................................................................................................2
System Configuration...............................................................................................................3
Supported Mounting Solutions..............................................................................................4
Chapter 2: Installing the Invitium........................................................... 5
Guidelines...................................................................................................................................5
Precautions.................................................................................................................................6
Attach the Mounting Fixture ..................................................................................................7
Open the Clamshell ..................................................................................................................9
Connect the Cables .................................................................................................................10
Start the Invitium ....................................................................................................................12
Adjust the Display ..................................................................................................................13
Install Additional Software...................................................................................................14
Chapter 3: Troubleshooting ................................................................... 15
Invitium does not start...........................................................................................................15
Invitium freezes or displays an error message..................................................................15
Problem-Solving Tips.............................................................................................................16
Index.......................................................................................................... 17
ix
Page 10

Page 11
Overview
Your Planar Invitium medical workstation is designed for point-of-care use in the
medical environment. With appropriate cables and AC power adapter or battery
pack, the Invitium complies with applicable safety and regulatory EMC standards
worldwide.
The Invitium meets these requirements:
• Class I system under the MDD, intended for patient proximity use
• Medically certified for patient safety and proximity (UL 2601 and IEC 60601)
• Withstands high-impact jarring, ingress of liquids, and hospital-grade
disinfectants
Standard Equipment
Note
Tk7 only
▲
For specifications, refer to the Invitium Specification Sheet in the
documentation kit or posted on www.planar.com/medical/
medical_workstation.asp.
1
Page 12

Optional Equipment
Equipment Description
Keyboard PS/2 or USB-compliant keyboard.
Mouse PS/2 or USB-compliant mouse.
Power Adapter
Battery Pack
Touch Screen 8-wire resistive touch screen (not shown).
Mounting Fixture
Medical Cart
External, 12-volt, double-insulated power adapter works from 90 to
240 Vac at 50 to 60 Hz. Equipped with an IEC320 appliance
coupler, attached power cable, and U.S. or European medical-grade
3 m power cable. Light-emitting diode (LED) indicates power. Input
voltage range meets U.S. and European standards.
Provides 8 hours of system operation at a nominal load of 48 watts.
Refer to the Invitium Battery Pack Manual.
Erogotron mounting fixtures comply with the Video Electronics
Standards Association (VESA) Flat Panel Monitor Physical Mounting
Interface (FPMPMI) standard. (See page 5.)
Available individually, or as part of a packaged solution that includes
the Invitium, battery, cart, and cables. (See page 5.)
2 Invitium Operations Manual
Page 13

System Configuration
The configuration for some models may differ slightly.
Invitium Workstation
Clamshell cover
(open below to show
connections)
Microphone
3
4
Ethernet
input
PC audio
(line) input
Keyboard
Wireless
PC card
PC card
slots
Antenna
Power
ports
Video/
audio
COM
ports
1
2
USB
ports
Central processing unit (CPU)
The Invitium uses convection cooling, in which internal thermal management directs
heat to an array of cooling vents. Convection cooling eliminates noise and improves
reliability.
There is no fan inside the CPU. CPUs with internal fans are unsuitable for the
hospital environment because airborne contaminants can build up inside the fan
and reduce cooling efficiency.
Overview 3
Page 14

Supported Mounting Solutions
The VESA mounting plate on the Invitium allows the use of standard mounting
hardware. VESA FPMPMI-compliant mounting solutions are available through
Planar Systems, Inc. Contact your Invitium vendor or visit the Planar web site.
www.planar.com/medical/medicalworkstation.asp
▲ Desktop stand ▲ Vertical lift ▲ Wall mount
▲ Sample of medical carts
4 Invitium Operations Manual
Page 15

Installing the Invitium
Guidelines
Operating
• Operate within 32° to 104° Fahrenheit (0° (zero) to 40° Celsius)
• Store within -4° to 149° Fahrenheit (-20° to 65° Celsius)
• Allow proper ventilation for sufficient airflow and heat dissipation
Mounting
• Supports 23 lb
• VESA-compatible, 75 mm or 100 mm pa t t ern
• Mounting hardware meets the Occupational Health and Safety
Administration (OSHA), National Fire Protection Association (NFPA)
5
Page 16

Precautions
• Secure all electrical cables. Replacement cables are available from Planar.
• Firmly grasp the Invitium with two hands and place it in its original
packaging when moving it to a different location.
Caution – Electrical and fire hazards
• Install where the temperature range is 32° to 104° Fahrenheit
(0° (zero) to 40° Celsius). Usage outside that range can damage
the system.
• Plug the Invitium into a grounded power outlet to safeguard
the system from power surges.
• Use only the supplied power adapter or battery pack. Other
units may damage the Invitium.
• Disconnect the Invitium from its power source if it gets wet,
cables are damaged, or if it falls. Contact your Invitium vendor.
• Do not block the vents on the back of the Invitium or install it in
a built-in enclosure. Blocked vent s cause excessive heat to build
up inside the system.
Warning – Personal injury
Do not open the computer casing. There is dangerous voltage inside
and risk of electrical shock. Contact your Invitium vendor for
assistance.
Warning – Personal injury
6 Invitium Operations Manual
While installing and operating this transmitter and ante nna
combination the radio frequency exposure limit of 1mW/cm2 may be
exceeded at distance close to the antennas installed. Therefore, the user
must maintain a min imum distance of 20cm from the antenna at all
times.
Page 17

Attach the Mounting Fixture
Use four 4 mm 0.7 pitch stainless steel screws of the appropria te length for a tight
fit. You need 4 mm of the screw’s threads engaged in the Invitium’s VESA plate for
proper support.
1 Install the mounting fixture. (Refer to the vendor documentation.)
2 Attach the Invitium to the fixture using the VESA panel on the back
of the Invitium.
• If the VESA panel on the fixture has sl otte d upper screw holes, secure the top
two screws to the Invitium’s VESA panel, and then slide the Invitium onto
the fixture.
• If the holes are not slotted, have another person support the Invitium against
the fixture while you secure the screws.
Installing the Invitium 7
Page 18
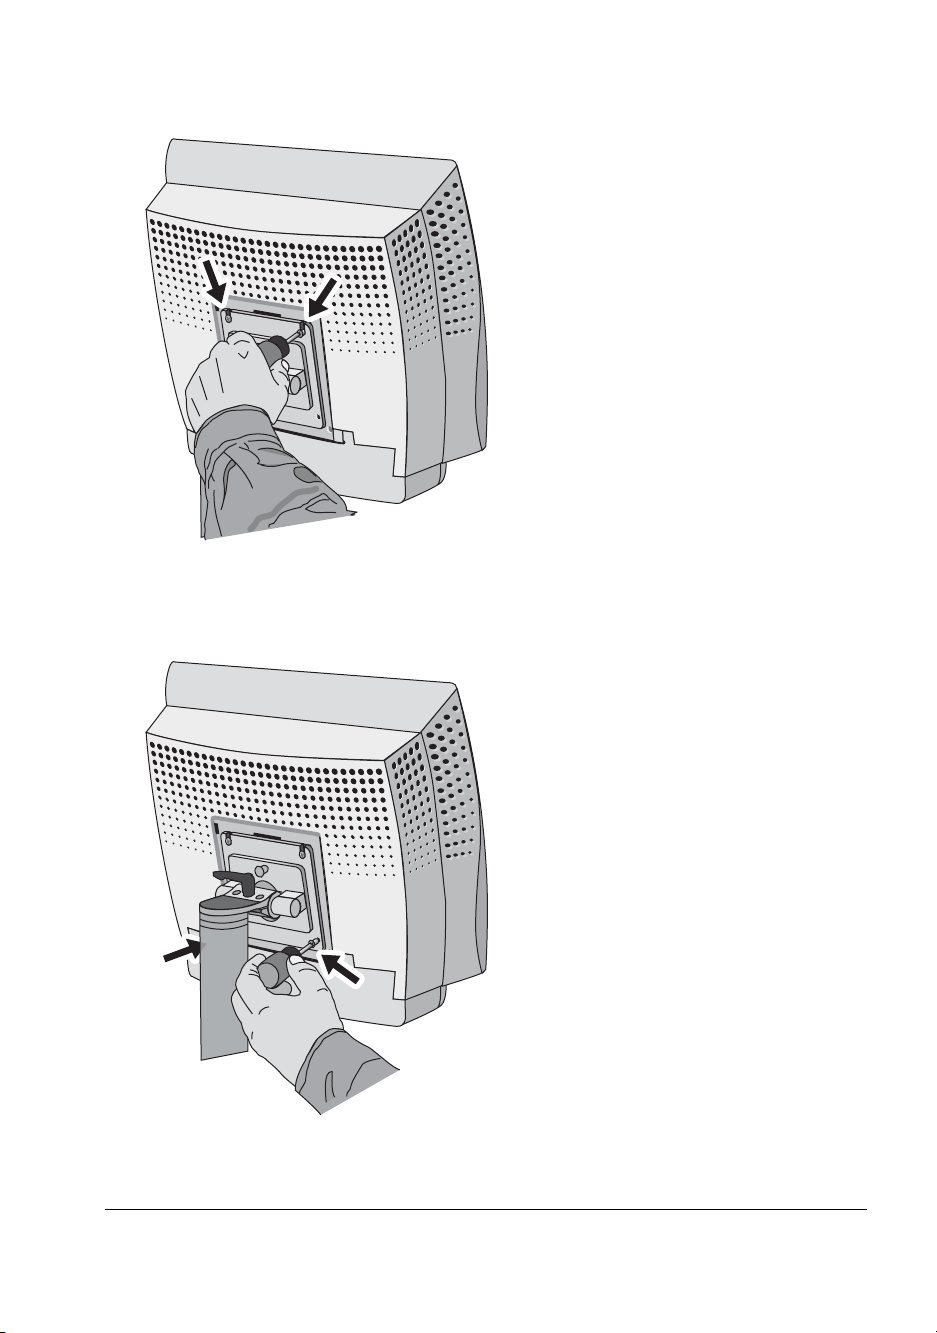
3 Tighten the top two screws through the fixture’s mounting plate.
4 Insert and tighten the bottom two screws through the mounting plate.
8 Invitium Operations Manual
Page 19
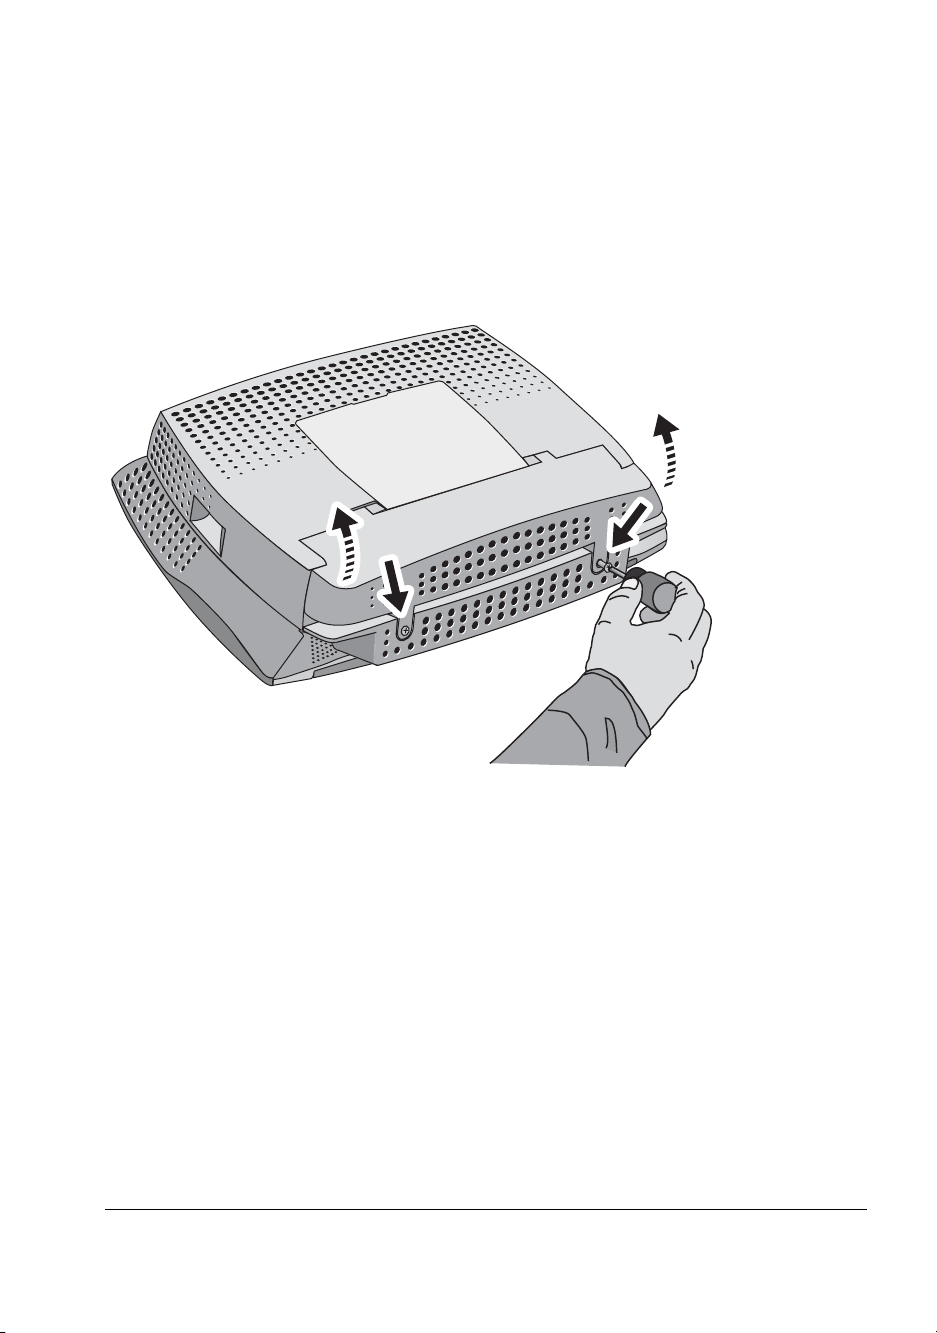
Open the Clamshell
1 Tilt or rotate the Invitium away from the mounting fixture to allow the clamshell
to open fully.
Accessing the connector bay differs depending on the mounting fixture.
Note
2 Loosen the screws on the portion of the clamshell located below the VESA
mounting plate on the Invitium.
3 Open the clamshell.
Installing the Invitium 9
Page 20
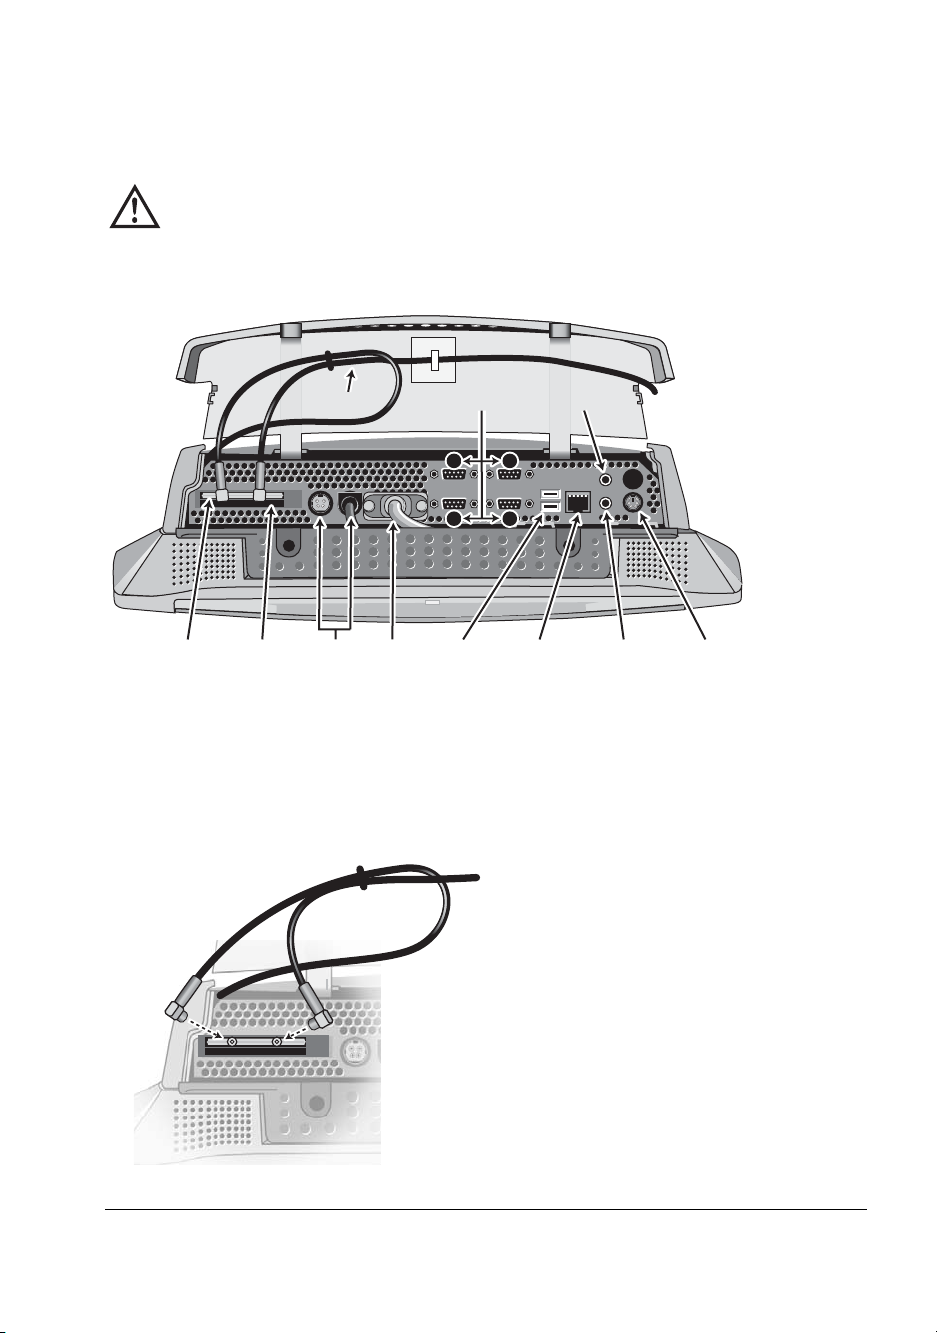
Connect the Cables
1 Connect the keyboard, mouse, and other peripherals.
Caution – Electrical hazard
PC audio is connected through the video/audio cable. Do not
disconnect the video/audio cable or connect another display to
this port.
Microphone
3
4
Ethernet
input
PC audio
(line) input
Keyboard
Wireless
PC card
PC card
slots
Antenna
Power
ports
Video/
audio
COM
ports
1
2
USB
ports
2 Install the PCMCIA wireless network card, if appropriate.
• Slide the network card into the PC card slot until it locks into place.
• Attach the gold connectors on the antenna to the two pinholes on the
protruding side of the card.
10 Invitium Operations Manual
Page 21
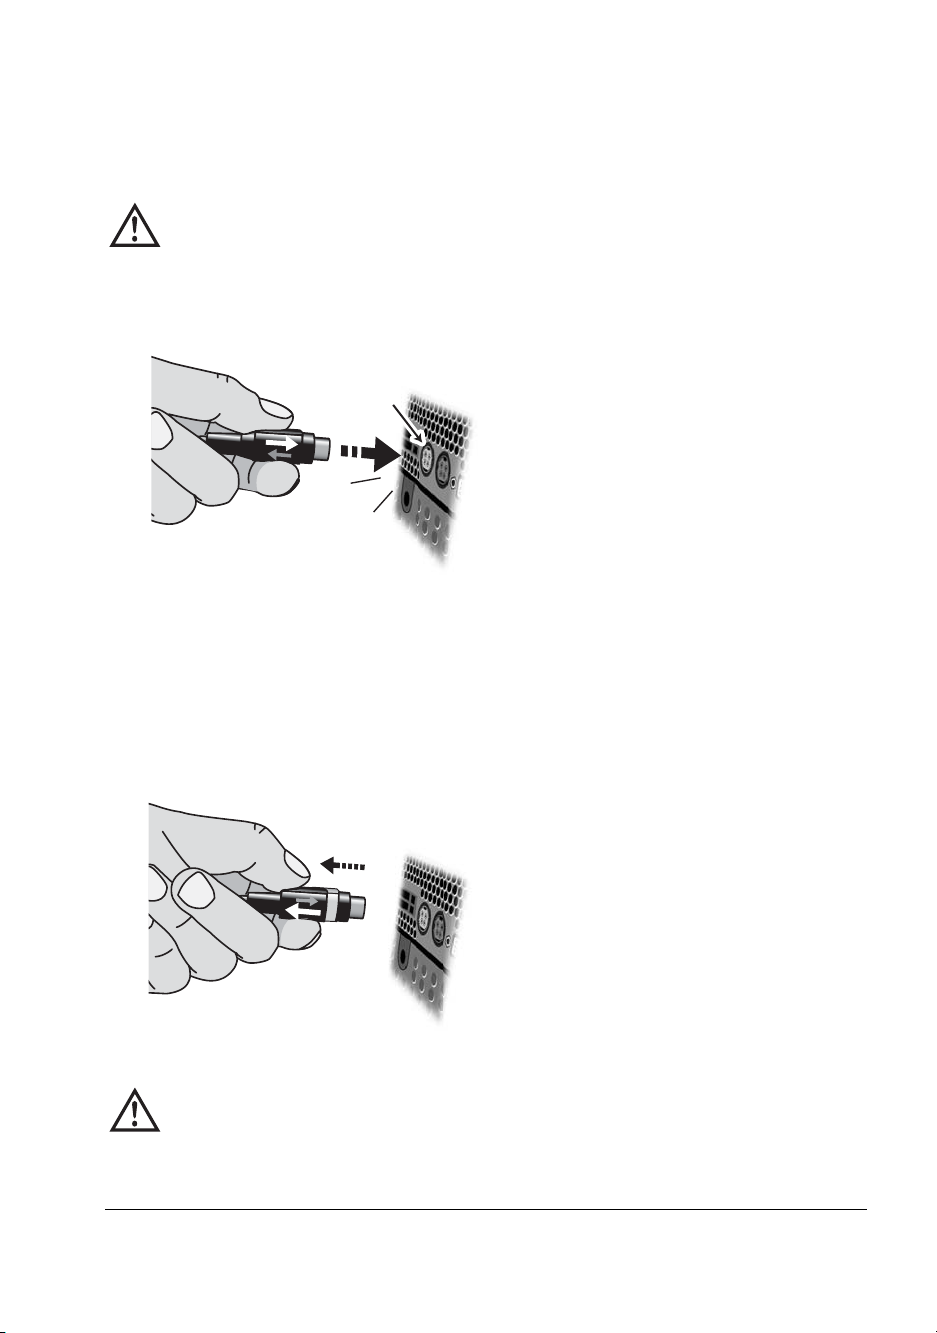
3 Connect the power adapter.
Align the pins on the DC connector with the holes in the power port and push
the connector until it locks into place.
Caution – Hardware damage
Do not force the connector into the power port. The pins may
bend if they do not align with the holes.
click!
4 Close the clamshell and fasten the screws.
To disconnect the power adapter
1 Grasp the base of the DC connector and pull it back ge ntly.
2 Keeping the base pulled back, tug the power adapter out.
Caution – Hardware damage
Do not pull the power adapter by the cable. Damage to the
cable may occur.
Installing the Invitium 11
Page 22

12 Invitium Operations Manual
Page 23

Start the Invitium
Press the power switch to the on (|) position.
Power switch
Installing the Invitium 13
Page 24
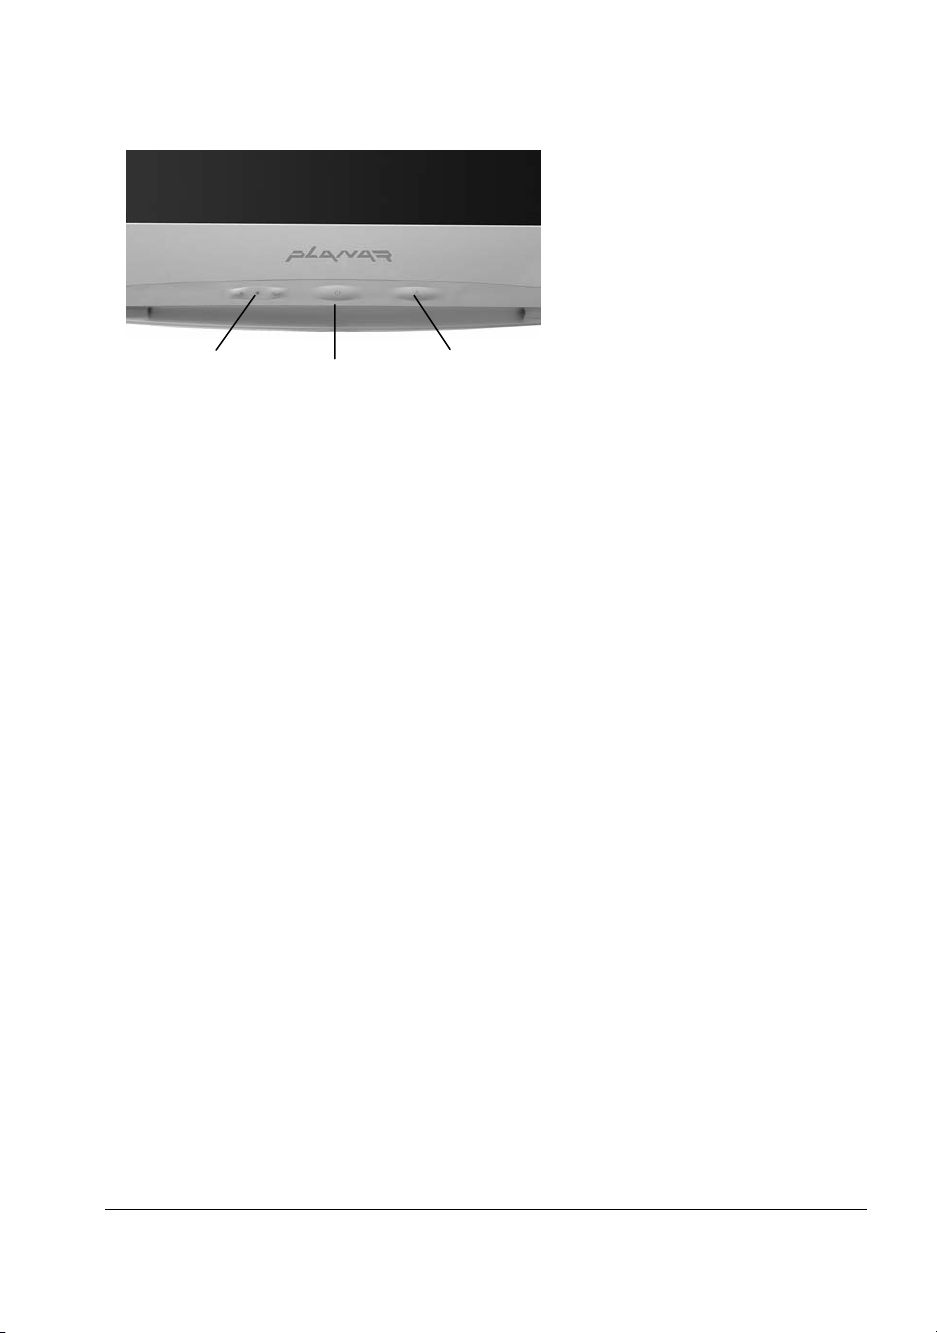
Adjust the Display
Brightness
Display power
Keyboard light
Keyboard light
Brightness
Press the + or – control to adjust display brightness.
Display power
Press the display power button to toggle power on or off.
Keyboard light
Place the keyboard directly under the light. Press the keyboard light to
brighten the keyboard during night use. The light turns off after 30 minutes.
14 Invitium Operations Manual
Page 25

Install Additional Software
The Invitium comes with the Windows operating system and d rivers installed. You
can customize the system configuration by installing additio nal soft ware.
Tn4
Changes to the configuration are preserved on the flash disk. To assure compatibility,
the software image can only be updated in its entirety.
Certified combi nations of drivers and applications are available. Contact your
Invitium vendor or visit www.planar.com.
Tk7
1 Attach an external drive to a USB port (no driver is required).
2 Install the software.
Installing the Invitium 15
Page 26

Index
A
about the system, 1–4
adapter, power, 2
additional software, installing, 14
adjusting the display, 13
antenna, 10
attaching
cables, 9–11
mounting fixture, 7–8
display
cleaning, ix
controls, 13
documentation, related, viii
E
equipment
optional, 2, 4
standard, 1
error message, 15
B
battery pack, 2
brightness, adjusting, 13
C
carts, medical, 4
certifications, vi
clamshell, opening, 9
cleaning solutions, ix
cleaning the display, ix
components, system, 1
configuration, 3
connecting the cables, 9–11
connector bay, 3, 10
conventions, documentation, viii
cooling system, 3
D
declaration of conformity, vi
detaching the power adapter, 11
detergents for cleaning the display, ix
F
FCC requirements, v
fixtures, supported mounting, 4
G
guidelines, installation, 5
I
illuminating the keyboard, 13
installing
guidelines, 5
mounting fixture, 7–8
K
keyboard, 2
keyboard light, 13
L
light, keyboard, 13
17
Page 27

M
maintaining the display, ix
manufacturer’s declaration
electromagnetic emissions, vi
electromagnetic immunity, vi
medical carts, 2, 4
mounting fixture
attaching, 7–8
guidelines, 5
supported, 4
mounting fixtures, 2
mouse, 2
N
network card, 10
O
on/off switch, 12
opening clamshell, 9
operating environment, 3
optional equipment, 2, 4
overview, 1–4
P
power button, display, 13
powering up, 12
precautions, 6
problem solving, 16
R
regulatory requirements, v, 1
related documentation, viii
S
safety, 6
service, ix
solutions for cleaning the display, ix
specifications, operating environment, 3
standard equipment, 1
starting up, 12
support, ix
system components, 1
T
tips, problem solving, 16
troubleshooting
error message, 15
problems and suggestions, 16
PCMCIA card, 10
ports, 10
ports, system, 3
power adapter, 2
connecting, 11
detaching, 11
18 Invitium Operations Manual
W
warranty, vii
wireless network card, 10
workspace, guidelines, 5
 Loading...