

Page 1
Dome Surgery Review Cart
The portability of the Dome Surgery Review Cart allows you to implement a DICOM-compliant, PACS referral viewing station—
on demand—in any area of a healthcare facility. When it is fully integrated, the cart consists of the computer unit that you
supply and these components:
•Review cart for attaching a computer and two displays • Dome CXtra software for DICOM compliance
•Dual Dome displays for side-by-side image review • Cleanable keyboard and mouse
•Display controller and driver • Power adapters (display dependent)
To facilitate integration at your location, Planar has partially assembled the review cart by prerouting power and video cables.
You need only to install the display controller into your computer, attach the computer and the displays to the cart, and
connect the power and video cables. Check the display documentation for safety guidelines on handling the components.
System requirements
Check that the computer unit you are mounting to the cart
meets the requirements of the Dome displays, display
controller and driver, and Dome CXtra software.
Dome P2 or Q2 display using the EX2 display controller
•Intel Pentium 4/Xeon clocked at 2.0 GHz (or faster),
AMD Athlon/Opteron with 2000+ rating (or faster)
•Microsoft Windows XP or Windows 2000
operating system
•AGP 8X/4X bus with full height AGP slot: H 4.2"
• 256 MB system memory (512 MB or more
recommended)
• CD-ROM drive
• 300 Watt (or greater) power supply
Dome CX display using the DX or DX2 display controller
•Intel Pentium 4/Xeon clocked at 2.0 GHz (or faster),
AMD Athlon/Opteron with 2000+ rating (or faster), or
equivalent CPU
•Microsoft Windows XP or Windows 2000
operating system
•Full height half length PCI slot: H 4.2" x L 6.95"
(PCI64/66 slot recommended for maximum
performance)
• 256 MB system memory (512 MB or
more recommended)
• CD-ROM drive
• 200 Watt (or greater) power supply
Computer specifications
Your computer unit must not exceed these specifications:
•Weight – 35 lb (16 kg)
•Size (W x H x D) – 7.5" x 16" x 20"
(190 mm x 406 mm x 508 mm)
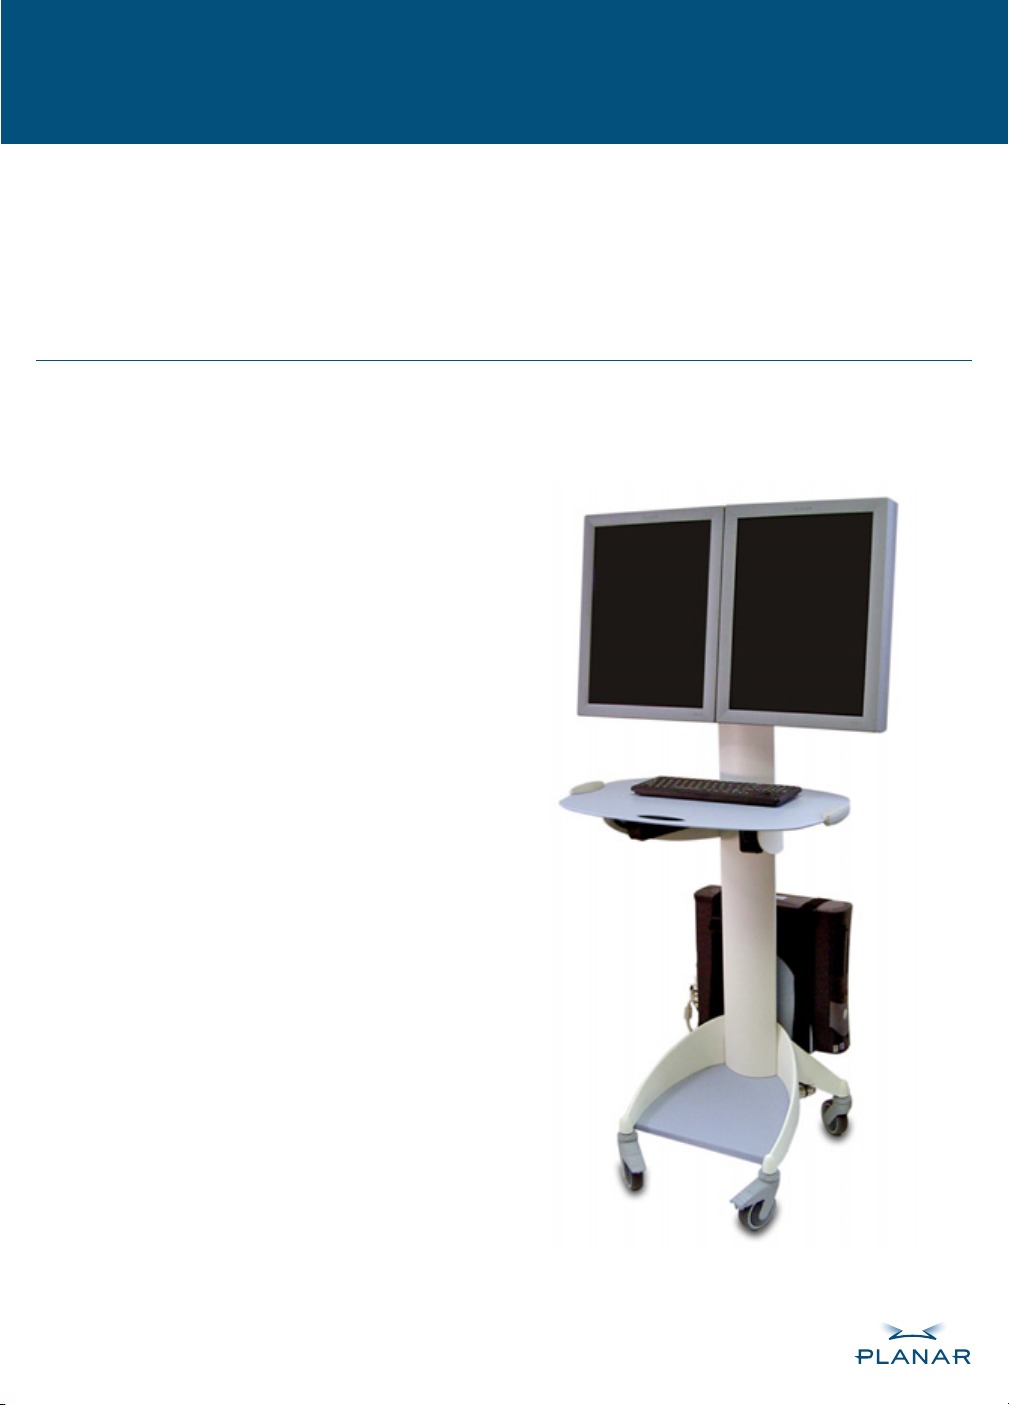
Here, dual Dome C3i displays are mounted to the cart.
Other display configurations may have variations for
power supply connection and peripherals.
Page 2
ONE: Check the Package Contents
Confirm that you received these items.
•Box 1: Preconfigured cart, containing:
–Video and power cables (2 each),
routed
–Power supplies (2), mounted,
as required per display
–Keyboard and mouse
–Display mounts with VESA 100-mm
hole pattern, attached
–Power strip (4 outlets), mounted
and routed
–Computer straps (3)
–Tie cables (5)
•Box 2: Dual display unit
– Screws, Phillips buttonhead (8)
–Display controller
–Driver software
–Display documentation
–Dome CXtra Edition
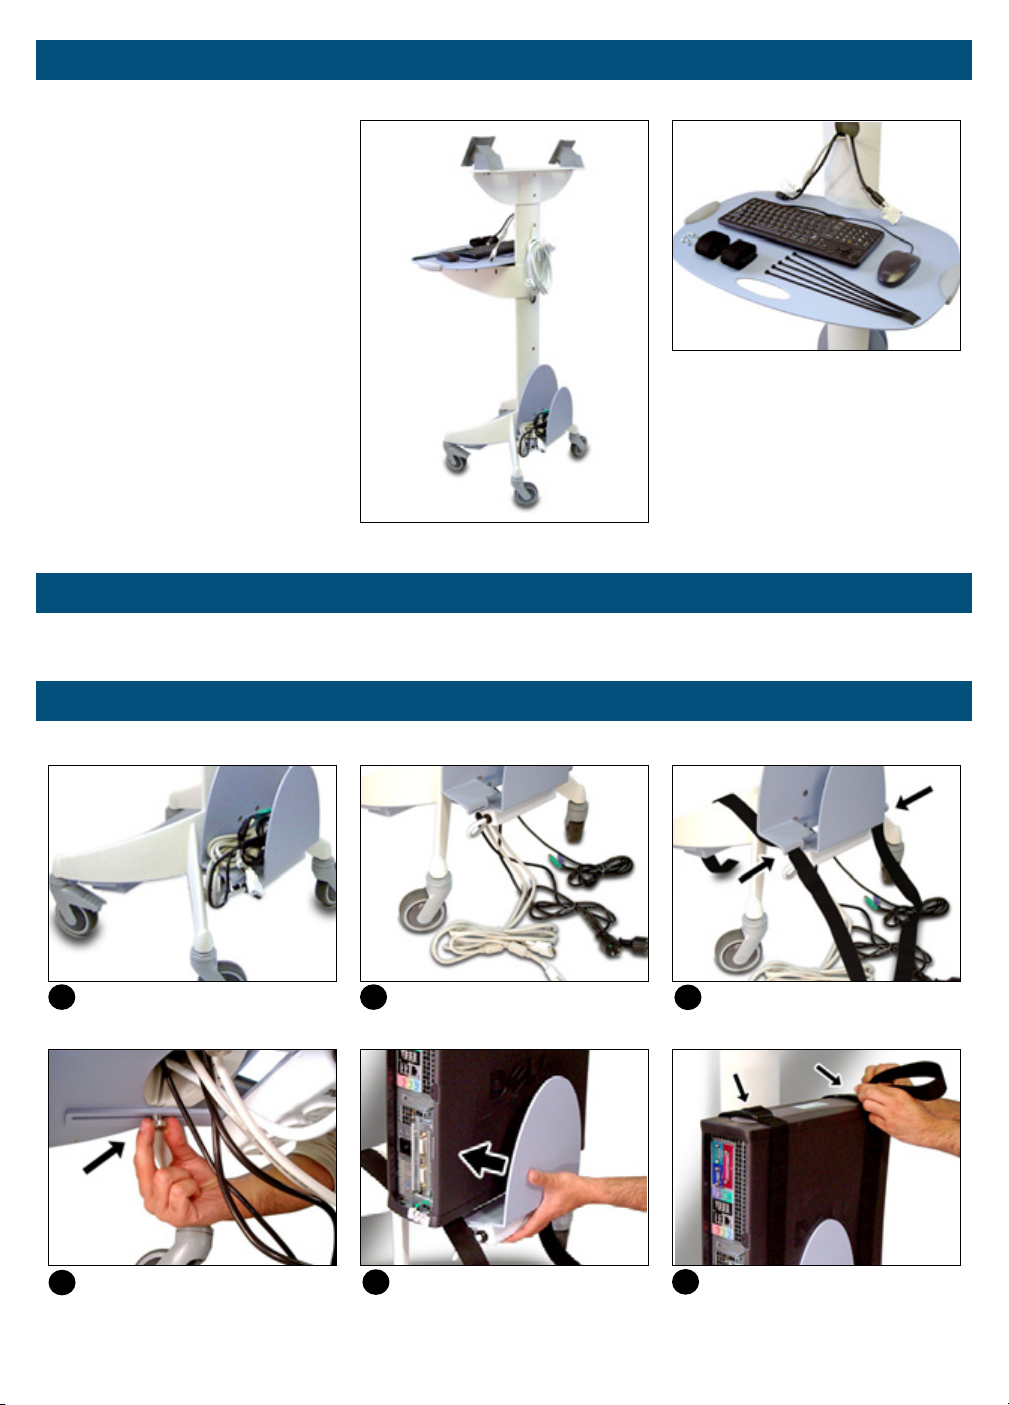
Cart as shipped.
Video and power cables routed through
the column of the cart, keyboard and mouse,
and binding materials.
TWO: Install the Display Controller
Install the display controller into your computer before you attach the computer to the cart. Refer to the display
documentation for instructions.
THREE: Attach the Computer
Be sure to thread the straps through the slits on each side of the cradle and center the computer unit in the cradle.
1
Position the cart so that you face
the rear. Lock the front wheels.
4
Turn the two thumbscrews underneath the unit counterclockwise to
extend the cradle.
2
Remove cables bundled on
the cradle.
5
Place the computer in the cradle
and push in the cradle extension to fit.
Retighten the thumbscrews.
3
Thread the straps through the slits
on the bottom of the cradle.
6
Secure the computer straps.
See “Tips” for how to secure larger
computer units.
Page 3

FOUR: Attach the Dual Displays
Mounting the displays to the cart is a two-person task. Have one person hold the display in place, while the other
secures the displays to the display mounts.
1
Attach the first display to a display
mount and secure the two top screws.
2
Rotate the display to landscape
mode to secure the two bottom
screws. Repeat steps 1 and 2 for
the second display.
3
Slide the display mounts toward
the center so that the dual displays
are side by side.
FIVE: Connect the Cords and Cables
Refer to the display documentation for proper connection of the video cables, that is, from the display to the display
controller. After you make the connections, you can check that all the cables are neatly routed and firmly attached to the cart.
1
Plug the power and video cables
into each display. The video cable for
the first display is marked with tape.
2
Plug the power cord into
the computer.
3
Plug the video cables into the
computer. (The cable for the first
display plugs into the top port.)
4
Plug the keyboard and mouse
cables into the computer.
5
Plug all power cords into the
power strip. Thread tie cables through
the cradle slits, bundle the excess
length of the cables, and secure the
tie cables around the bundles.
6
Plug the power strip cord into
a grounded outlet. Refer to the display
documentation before powering on
the system.
SIX: Install the Software
To finish the integration, install the display driver and the Dome CXtra software onto the computer hard drive.
•First install the display driver. Refer to the display documentation for instructions.
•Then install the Dome CXtra Edition. Refer to the software documentation for instructions.
Page 4

Tips
•For larger computers, wrap the third strap horizontally around the computer and the back plate of the cradle.
•Attach the excess length of the video cables to one side of the cradle and attach the excess length of the power and
peripheral cables to the other side. See item 5 of the procedure “FIVE: Connecting the Cords and Cables.”
•Use the hook on the back of the cart to coil the AC power cord when the system is not in use.
•Always lock the front wheels before using the cart.
•Use caution when maneuvering the cart over cables and thresholds.
Cart Configurations Available
Dome RP2
Dual Dome P2 displays
EX2 display controller and driver
Dome CXtra Desktop Edition
Dome RC2
Dome RQ2
Dual Dome Q2 displays
EX2 display controller and driver
Dome CXtra QX Edition
Dome RC3
Dome Surgery Review Cart
Dual Dome C2 displays
DX display controller and driver
Dome CXtra CX Edition
America Sales
Planar Systems, Inc.
1195 NW Compton Drive
Beaverton, OR 97006-1992 USA
phone (503) 748-1100
fax (503) 748-1493
© 2004 Planar Systems, Inc. All rights reserved.
Dome is a registered trademark of Planar Systems, Inc.
020-0336-00A
Medical Sales
Planar Systems, Inc.
400 Fifth Avenue
Waltham, MA 02451-8738 USA
phone (781) 895-1155
fax (781) 895-1133
Dual Dome C3i displays
DX2 display controller and driver
Dome CXtra CX Edition
Europe & Asia-Pacific Sales
European Representative
Planar Systems, Inc.
Olarinluoma 9, P. O. Box 46
FIN-02201 Espoo, Finland
phone + 358 9 420 01
fax + 358 9 420 0200
This mobile unit forms the base of
all the display configurations.
•Video and power cables prerouted.
•Cleanable keyboard and
mouse included.
•Binding materials provided.
Customer Support
•Visit www.planar.com
• E-mail medicalsupport@planar.com
• Call (866) PLANAR1 and select
Option 4.
 Loading...