

Page 1
Page 2

Planar Systems, Inc.
1195 NW Compton Drive
Beaverton, OR 97006-1992
www.planar.com
Customer Service
Planar provides the following technical support services:
Internet Support
For support available 24/7 visit Planar's Online Technical Support at
www.planar.com/support. Our Online Technical Support is where you'll find solutions to many
common problems, download documentation, view answers to frequently asked questions
(FAQs) and get troubleshooting advice, or email Planar your support question.
Talk to a Customer Service Representative
To contact Planar's Customer First(TM) Technical Support Service call 1.866.PLANAR.1
(866.752.6271). This service is available 5am - 5pm Pacific Time, 8am - 8pm Eastern Time,
Monday through Friday.
Contact Us
24x7 Online Technical Support: http://www.planar.com/support
Email: PlanarSupport@planar.com
Tel: 1-866-PLANAR1 (866) 752-6271
Hours: M-F, 5am - 5pm Pacific Time, 8am - 8pm Eastern
Page 3

The information contained in this document is subject to change without notice.
This document contains proprietary information that is protected by copyright. All rights
are reserved. No part of this document may be reproduced, translated to another language or stored in a retrieval system, or transmitted by any means, electronic,
mechanical, photocopying, recording, or otherwise, without prior written permission.
Windows is a registered trademark of Microsoft, Inc.
Other brand or product names are trademarks of their respective holders.
Important Recycle Instruction:
LCD Lamp(s) inside this product contain mercury. This product may contain
other electronic waste that can be hazardous if not disposed of properly. Recycle or
dispose in accordance with local, state, or federal Laws. For more information,
contact the Electronic Industries Alliance at WWW.EIAE.ORG
disposal information check WWW.LAMPRECYCLE.ORG
. For lamp specific
.
Page 4

Page 5

Table of Contents
Usage Notice
Precautions ................................................................................. 2
Introduction
About the Product ....................................................................... 3
Package Overview...................................................................... 4
Installation
Product Overview........................................................................ 5
Start Your Installation .................................................................. 8
1
User Controls
Front Panel Controls ................................................................... 11
How to Use the OSD Menus....................................................... 12
On-Screen Display Menus.......................................................... 13
Appendices
Troubleshooting........................................................................... 14
Warning Signal ............................................................................ 15
Product Dimensions....................................................................
Compatibility Modes ...................................................................
Pivot Software Installation...........................................................
16
17
18
Page 6
2
Usage Notice
Warning- To prevent the risk of fire or shock hazards, do not
expose this product to rain or moisture.
Warning- Please do not open or disassemble the product as this
may cause electric shock.
Precautions
Follow all warnings, precautions and maintenance as recommended
in this users manual to maximize the life of your unit.
Do:
q Turn off the product before cleaning.
q Use only a dry soft cloth or clean room wiper when cleaning the
LCD Display screen surface.
q Use a soft cloth moistened with mild detergent to clean the display
housing.
q Use only a high quality and safety approved AC/DC power adapter.
q Disconnect the power plug from the AC outlet if the product is not
going to be used for an extended period of time.
Don’t:
q Do not touch the LCD Display screen surface with sharp or hard
objects.
q Do not use abrasive cleaners, waxes or solvents for your cleaning.
q Do not operate the product under the following conditions:
- Extremely hot, cold or humid environment.
- Areas susceptible to excessive dust and dirt.
- Near any appliance generating a strong magnetic field.
- Place in direct sunlight.
Page 7

Introduction
About the Product
Having a 21.3 LCD dsiplay with an active matrix, thin-film transistor (TFT)
liquid crystal display (LCD), this product also demonstrate the following
outstanding features.
q Dual Analog and Digital signal input
q 21.3” diagonal screen size
q 1600 x 1200 high resolution
q Wide Viewing Angle Technology
q 31.5 ~ 91.1 kHz horizontal scan
q 56 ~ 85 Hz refresh rate
q Auto Adjustment and Re-scaling function
3
q High quality full screen re-scaling capability
q Multilingual OSD user controls
q VESA DPMS power saving
q Video capability
q Audio capability
q Kensington lock capability
Page 8
Pivot Software
( Optional )
4
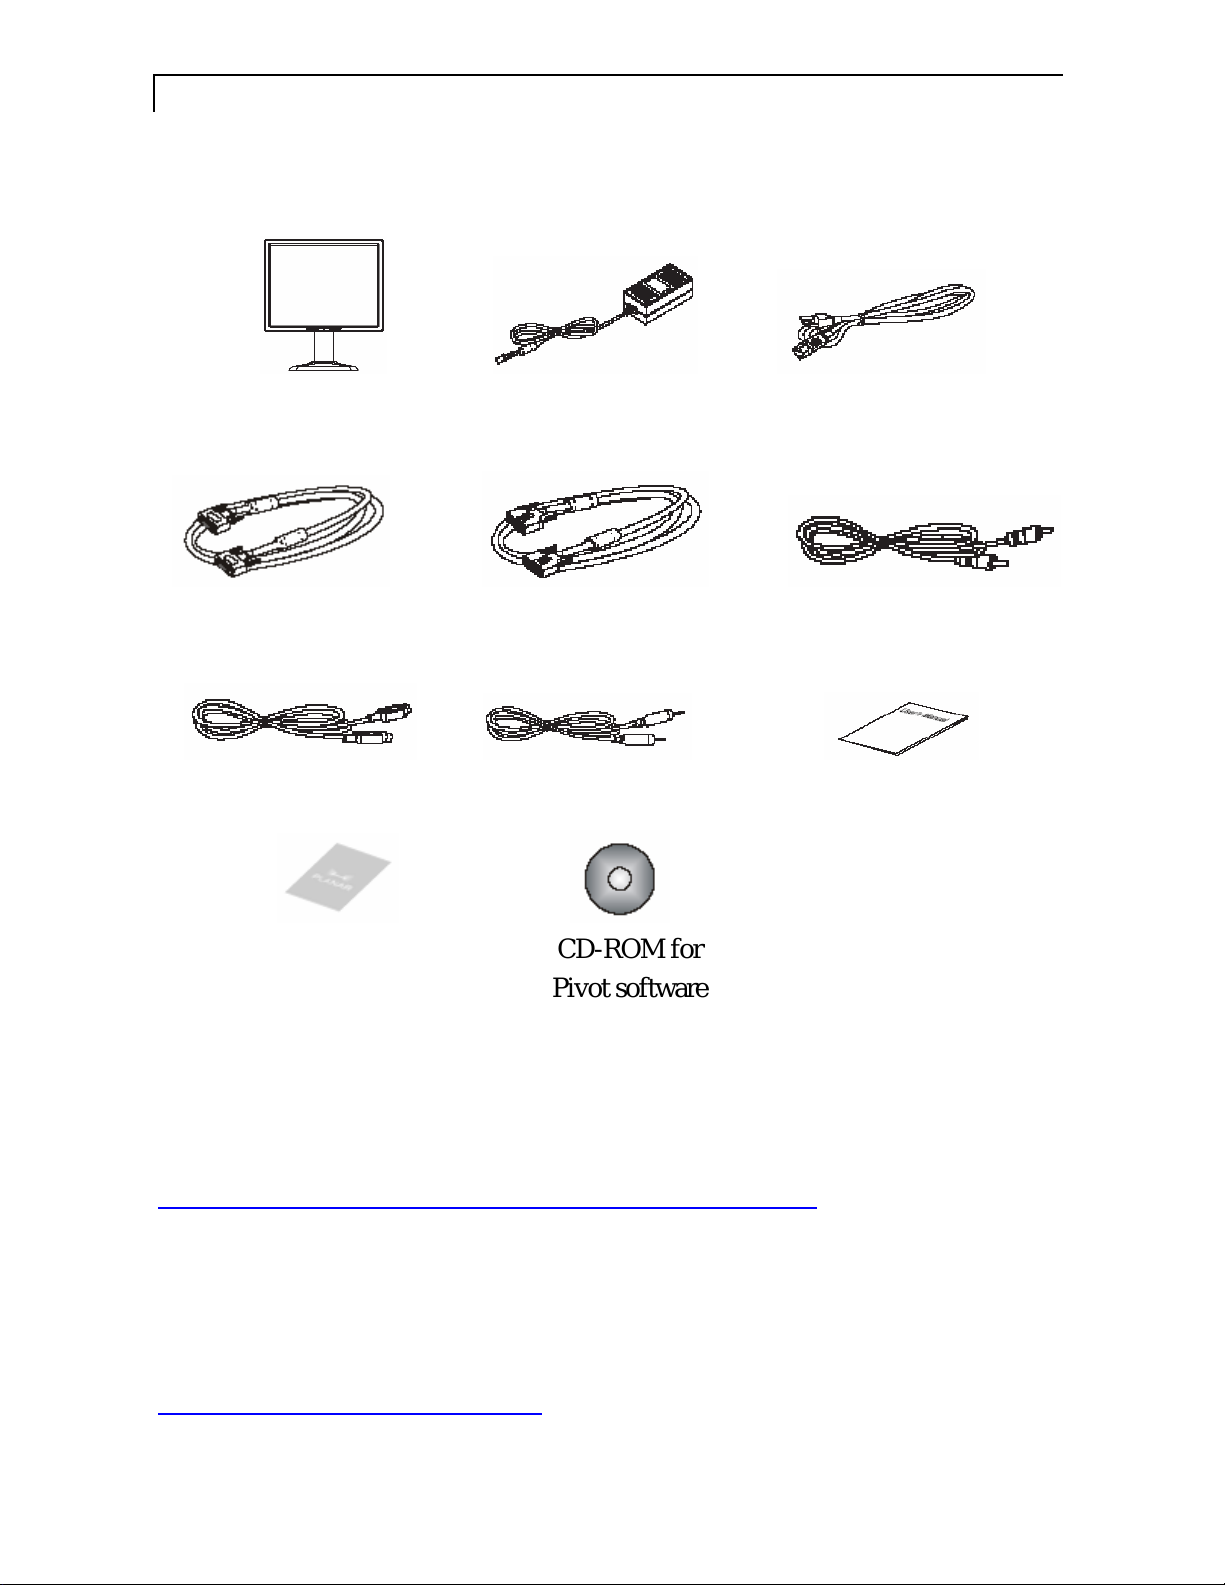
Package Overview
LCD Display Power Adapter Power Cord
VGA Signal Cable DVI-D Cable Audio-In Cable
S-Video Cable Video Cable User’s Guide
Landing Strip
Register Your Planar Products Today
Thank you for choosing Planar. To assure you receive all the benefits of
your Planar product and services, register your Planar product today. Visit
our website to register your product at
http://www.planar.com/support/product_registration.html
Cables, Replacement Lamps and Accessories
To find cables, replacement lamps and accessories for your Planar projector,
LCD monitor, touchscreen or other Planar products visit our online store at
www.PlanarOnline.com or find other stores who carry Planar products at
http://www.planar.com/howtobuy
CD-ROM for
Pivot software
Page 9

Installation
Product Overview
u
Front View
Panel
Controls
u
Back View
5
Liquid Crystal Display
(LCD Display)
Stand
Kensington Security
Lock Slot
Connector Ports (Inside the back cover)
Audio
Composite
DC-In
DVI Input
Port
Analog
Input Port
VIDEO
Video
S-VIDEO
S-Video
Page 10

6
u
Tilt
Grasp the LCD Display with both hands and adjust the tilt as desired.
Tilt Angle:-5° ~ 35°
u
Kensington Security Slot
The monitor can be secured to your desk or any other fixed object with
Kensington lock security products. Kensington lock is not included.
Kensington Security Slot
Page 11

K
VESA Mount on your monitor
This monitor conforms to the VESA Flat Panel Mounting Physical
Mounting Interface Standard which defines a physical mounting interface
for flat panel monitors, and corresponding standards for flat panel monitor
mounting devices, such as wall and table arms.The VESA mounting
interface is located on the back of your monitor.
The VESA Mounting slots of this model are located inside the rear cover
(shown in the following figure).
To mount the monitor on a swing arm or other mounting fixture, follow
the instruction included with the mounting fixture to be used.
Slots
100mm
7
100mm
VESA
Mounting
Interface
Warning!
Please select the proper screws!
The depth from plastic back cover to the bottom of the screw hole is
8mm.The spec is M4 screw.
Page 12

8
Start Your Installation
u
Connecting the Display (Figure 10.1)
To setup this display, please refer to the following figure and procedures.
1. Be sure all equipment is turned off.
2. Connect the DC power cord to the power connector; plug one end of the
AC power cord into the power adapter, and the other end into an
electrical outlet().
3. For the PC with Analog output: Connect the VGA signal cable from
display VGA input connector to the 15-pin connector of your host
computer and tighten the screws().
4. For the PC with DVI digital output: Connect the DVI signal cable to the
connector of the display card in your computer; connect the other side to
the DVI-D input port of your display. Tighten the screws().
5. If your video source uses a round, four-prong S-Video connector,
please use the S-Video cable().
6. If your video source uses a round, one-prong composite video connector,
please use the video cable().
7. If your audio source uses a round, one-prong composite audio connector,
please use the audio cable().
8. Turn on your computer, display and video source.
Notice:To ensure the LCD Display will work well with your computer,please
configure the display mode of your graphics card to make it less than or
equal to 1600 x 1200 resolution and make sure the timing of the display
mode is compatible with the LCD screen. We have listed the “Compatibility
Modes” of this LCD screen in appendices for your reference.
Page 13

Figure 10.1
Video Cable
Audio Cable
S-Video Cable
9
Power
Adapter
& Power
Cord
DVI-D
Cable
VGA
Cable
VIDEO
S-VIDEO
Page 14

10
Page 15

User Controls
Front Panel Controls
11
nocI/oNlortnoCnoitcnuF
UNEMnottubuneM.sunemDSOehtpopoT
TCELESotuA/tceleS
!
"
DELrewoP
hctiwSrewoP
suniM/suniMssenthgirB
sulP/sulPssenthgirB
smetitnemtsujdaehttcelesoT
orf
.egami
saerceD.1
saercnI.1
CL
.sunemDSOm
"tnemtsujdaotuA"ehtetavitcaoT
mumitponaniatbootnoitcnuf
fossenthgirbehtse
.egamiyalpsideht
ehtfoeulavehtsesaerceD.2
.smetitnemtsujda
fossenthgirbehtse
.egamiyalpsideht
ehtfoeulavehtsesaercnI.2
.smetitnemtsujda
siyalpsidehtsetacidnineerG.1
.nodenrut
yalpsidehtsetacidnirebmA.2
.edomevas-rewopnisi
ehtotrewopehtffO/nOsehctiwS
.yalpsiDD
Page 16

12
How to Use the OSD Menus
1.Press the “MENU” button to pop up the “on-screen menu” and to
select among the four Main Menus.
2.Choose the adjustment items by pressing the “SELECT” button.
3.Adjust the value of the adjustment items by pressing the “
or “
” button.
"
4.After a period of inactivity.*(base on a user setting) the OSD menus
will automatically disappear .
!
”
Page 17

On-Screen Display Menus
13
Main Menu Menu Level 1 Menu Level 2 Description ADJ Scale
DISPLAY
IMAGE
Icon 1
POSITION
COLOR
PIP CONTROL
Icon 2 Allows you to choose the signal ( VGA/DVT/Composite/S-Video )
Icon 3
Icon 4
Icon 5 Factory Reset
Icon 6
Note : The symbol ( * ) means the VGA signal only
The symbol ( ** ) means the VGA/Composite/S-Video signal
Brightness To adjust the brightness. 0 ~ 100
Contrast To adjust the contrast of the image. 0 ~ 100
Hue Adjusts the red-green color balance of the image. -45+45
Saturation Adjusts the image from black and white to full saturated colour. 0 ~ 100
Flesh-tone off/Week/Soft/Strong
Black Level * To adjust black level of the image 0 ~ 100
Scaling 1:1/Full/Aspect
Auto Adjust * Select
Phase *
Clock *
Sharpness ** Adjusts the sharpness of the image.
Zoom In/Out
Zoom Horizontal Pan Left/Right
Zoom Vertical Pan Up/Down
Vertical * Changes the vertical position of the image 0 ~ 255
Horizontal * Changes the horizontal position of the image 0 ~ 255
sRGB On/Off
Gamma Correction Off/1.8/2.2
Color Temperature
Red Adjusts Red colour intensity 0 ~ 255
Green Adjusts Green colour intensity 0 ~ 255
Blue Adjusts Blue colour intensty 0 ~ 255
PIP Mode Allows you to select PIP, PAP model, or Off.
PIP Size Allows you to adjust size of display ( Small/Med./Large )
Vertical Changes the vertical position of the PIP window 0 ~ 100
Horizontal Changes the horizontal position of the PIP window 0 ~ 100
Vertical Adjusts the vertical position of the OSD 0 ~ 255
Horizontal Adjusts the horizontal position of the OSD 0 ~ 255
Transparency Changes the opaqueness of the OSD background. 0 ~ 10
Time out Adjusts the amount of time the OSD menu remains to display 5 ~ 60
OSD Zoom On/Off
Volume To adjust the sound volume.
Mute Allows you to disable the sound immediately.
Synchoronizes the signal timing of the display to that of the
graphics card. When you experience an unstable to flickering
image,use this function to make an adjustment.
Changes the displays data frequency to match the frequency of
your graphics card. When you experience a vertical flickering
bar,use this function to make an adjustment.
User / 6500k / 9300k
Allow you to choose the OSD menu language (
English/Chinese/Japanese/French/German/Spanish/Italian/Korean
)
To return the display parameters of the current mode to their
factory default settings.
0 ~ 255
0 ~ 255
0 ~ 50
Page 18

14
Appendix
Troubleshooting
If you are experiencing trouble with the LCD display, refer to the
following trouble shooting. If the problem persists, please contact
your local dealer or our service center.
Problem: No image appears on screen.
Check that all the I/O and power connectors are correctly and
"
well connected as described in the “Installation” section.
Make sure the pins of the connectors are not crooked or broken.
"
Problem: Partial image or incorrectly displayed image.
Check to see if the resolution of your computer is higher than that of the
"
LCD Display .
Reconfigure the resolution of your computer to make it less than or equal
"
to 1600 x 1200.
Problem: Image has vertical flickering line bars.
Use “Frequency” to make an adjustment.
"
Check and reconfigure the display mode of the vertical refresh rate of your
"
graphics card to make it compatible with the LCD Display.
Problem: Image is unstable and flickering
Use “Tracking” to make an adjustment.
"
Problem: Image is scrolling
Check and make sure the VGA signal cable (or adapter) is well connected.
"
Check and reconfigure the display mode of the vertical refresh rate of
"
your graphics card to make it compatible with the LCD Display .
Problem: Vague image (characters and graphics)
Use “Frequency” to make an adjustment. If this problem still exists,
"
use “Tracking” to make an adjustment.
Page 19

Warning Signal
Sometimes you may see warning messages for this LCD Display.
This means that the LCD Display cannot correctly receive the signal
from the computer graphics card.
"No Signal
This message means that the LCD Display has been powered on but it
cannot receive any signal from the computer graphics card. Check all the
power switches, power cables, and VGA signal cable.
"Out Of Range
This message means that the signal of the computer graphics card is not
compatible with the LCD Display . When the signal is not included in the
compatibility mode we have listed in the Appendices of this manual, the
LCD Display will show this message.
15
Page 20

16
Product Dimensions
533.14mm/20.98”
482.28 mm / 18.98”
Front View
64.5mm/2.54”
Side View
T op View
222.00mm/8.74”
Page 21

Compatibility Modes
edoMnoituloseR)zH(ycneuqerF)zHk(ycneuqerF.H
AGVMBI053x046075.13
AGVMBI084x046065.13
AGVMBI004x027075.13
17
AGVASEV084x0462
AGVASEV084x046575.73
AGVASEV084x046583.34
AGVSASEV006x008651.53
AGVSASEV006x008069.73
AGVSASEV006x008271.84
AGVSASEV00
AGVSASEV006x008587.35
AGXASEV867x4201064.84
AGXASEV867x4201075.65
AGXASEV867x4201570.06
AGXASEV867x4201587.86
AS
EV468x2511575.76
AGXSASEV4201x0821060.46
AGXSASEV4201x08215708
AGXSASEV4201x0821581.19
AGXUASEV0021x0061060.57
6x008579.64
79.73
caMelppA084
caMelppA084x046760.53
caMelppA426x238577.94
caMelppA867x4201572.06
orciMnuS009x2511668.16
orciMnuS009x2511671.17
x046769.43
Page 22

18
Pivot Software Installation
Follows are the procedures for pivot software set up.
1. Insert the Pivot Pro CD-ROM into the CD-ROM driver.
2. Run the Start_Pivot program and select the pivot option to install
portrait displays software on your computer.
3. Restart your computer. To Change orientation, right click anywhere on
the desktop and select Rotate 0, 90, 180, or 270 from the menu. Now
hold the edges of your display and rotate it.
4. Start exploring the benefits of your new portrait monitor. Web pages,
E-mail, reports and letters are best viewed in portrait orientation. They
can be viewed and edited without the need to scroll the page.
Page 23

Page 24

Planar Systems, Inc
1195 NW Compton Drive
Beaverton, OR 97006-1992
www.planar.com
© 2006 Planar Systems, Inc.
Planar is a registered trademark of Planar Systems, Inc. Other brands and
names are the property of their respective owners. Technical information in
this document is subject to change without notice.
P/N:36.61604G002 Rev.D
020-0454-00A
 Loading...