

Page 1

PR5020
Projector
HOW TO PROGRAM
BY RS232
www.planar.com
Page 2
Rev. 00
How To Program By RS232
Projection Display Serial Interface
6-1 RS232 Setting
Baud rate:
Parity check:
Data bit:
Stop bit:
Flow Control
9600
None
8
1
None
Minimum delay fo r next command: 1ms
6-2 Control Command Structure
The command is structured by the He ader code, command code, data code and end code.
Most of the commands are structured except some for the compatibility issue with other
projectors.
Header code Command code Data code End code
HEX 7Eh Command Data 0Dh
ASCII ‘~’ Command Data
CR
6-3 Control Sequence
The projector may send a return code after it received a command. If the command isn’t
received correctly, the projector will not send the return code
6-4 Operation Command
The operation commands execute the basic operation setting of this projector.
Operation ASCII HEX
Power On ※
~ P N CR ※
7Eh 50h 4Eh 0Dh
Power Off ~ P F CR 7Eh 50h 46h 0Dh
Auto Image ~ A I CR 7Eh 41h 49h 0Dh
Input Select RGB ~ S R CR 7Eh 53h 52h 0Dh
Input Select RGB2 ~ S G CR 7Eh 53h 47h 0Dh
Input Select DVI ~ S D CR 7Eh 53h 44h 0Dh
Input Select Video ~ S V CR 7Eh 53h 56h 0Dh
Input Select S-Video ~ S S CR 7Eh 53h 53h 0Dh
Input Select Component ~ S Y CR 7Eh 53h 59h 0Dh
Company Confidential Planar_______________________ Delta____________
1
2006/08/10
Page 3
Rev. 00
Input Select Wireless ~ S W CR 7Eh 53h 57h 0Dh
* Power On command will not work for 1 minute after the power off command triggered.
CR :
Carriage Return.
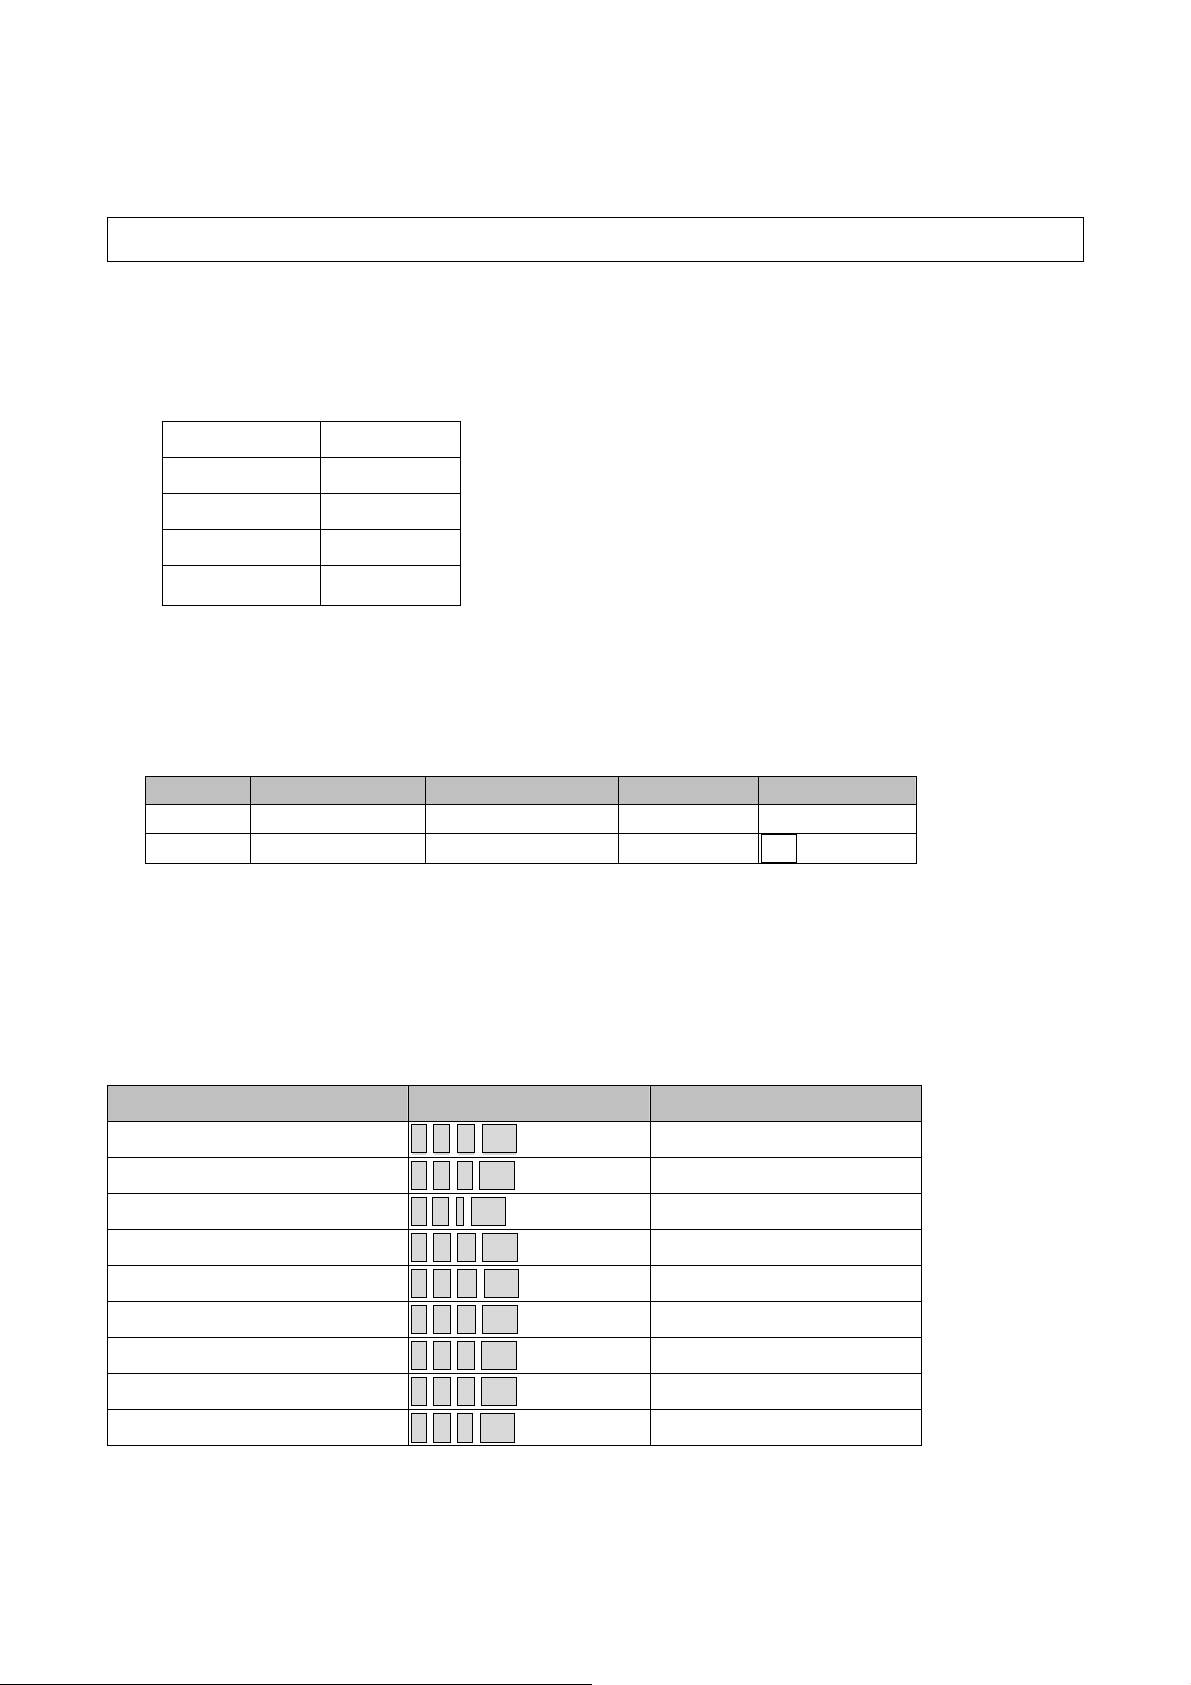
6-5 Remote Command
The remote commands simulate the code send from IR remote handset.
Button’s name ASCII HEX
UP arrow ~ r U CR 7Eh 72h 55h 0Dh
DOWN arrow ~ r D CR 7Eh 72h 44h 0Dh
LEFT arrow ~ r L CR 7Eh 72h 4Ch 0Dh
RIGHT arrow ~ r R CR 7Eh 72h 52h 0Dh
POWER ~ r P CR 7Eh 72h 50h 0Dh
EXIT ~ r E CR 7Eh 72h 45h 0Dh
INPUT ~ r I CR 7Eh 72h 49h 0Dh
AUTO ~ r A CR 7Eh 72h 41h 0Dh
KEYSTONE+ ~ r K CR 7Eh 72h 4Bh 0Dh
KEYSTONE- ~ r J CR 7Eh 72h 4Ah 0Dh
MENU ~ r M CR 7Eh 72h 4Dh 0Dh
STATUS ~ r S CR 7Eh 72h 53h 0Dh
MUTE ~ r T CR 7Eh 72h 54h 0Dh
ZOOM+ ~ r Z CR 7Eh 72h 5Ah 0Dh
ZOOM- ~ r Y CR 7Eh 72h 59h 0Dh
BLANK ~ r B CR 7Eh 72h 42h 0Dh
FREEZE ~ r F CR 7Eh 72h 46h 0Dh
VOLUME+ ~ r V CR 7Eh 72h 56h 0Dh
VOLUME- ~ r W CR 7Eh 72h 57h 0Dh
Enter ~ r N CR 7Eh 72h 4Eh 0Dh
Company Confidential Planar_______________________ Delta____________
2
2006/08/10
Page 4

Rev. 00
6-6. Set Value Command
ITEM
Brightness
ASCII
~ s B ? CR ※
HEX
7Eh 73h 42h ?h 0Dh
Contrast ~ s C ? CR 7Eh 73h 43h ?h 0Dh
Color ~ s R ? CR 7Eh 73h 52h ?h 0Dh
Tint ~ s N ? CR 7Eh 73h 4Eh ?h 0Dh
Scaling ~ s A ? CR 7Eh 73h 41h ?h 0Dh
Color Tempera ture ~ s T ? CR 7Eh 73h 54h ?h 0Dh
Projection Mode ~ s J ? CR 7Eh 73h 4Ah ?h 0Dh
? : ASCII Da ta
Data Range
ITEM
Set Data Range
Source
Brightness 0 ~ 100 ALL
Contrast 0 ~ 100 ALL
Color 0 ~ 100 Video/S-Video/Component
Tint 0 ~ 100 Video/S-Video/Component
Scaling 0: 4:3 1: 16:9 ALL
Color Tempera ture 0:Cool 1:Normal 2:Warm ALL
Projection Mode 0:Front 1:Rear 2:Rear+Ceiling
ALL
3:Ceiling
Attention: Data range may be different for different models
Example 1. Adjust Brightness value to 100
Send Command : ~sB100CR
Example 2. Adjust Color Temperature to Warm
Send Command : ~sT2CR
Company Confidential Planar_______________________ Delta____________
3
2006/08/10
Page 5

Rev. 00
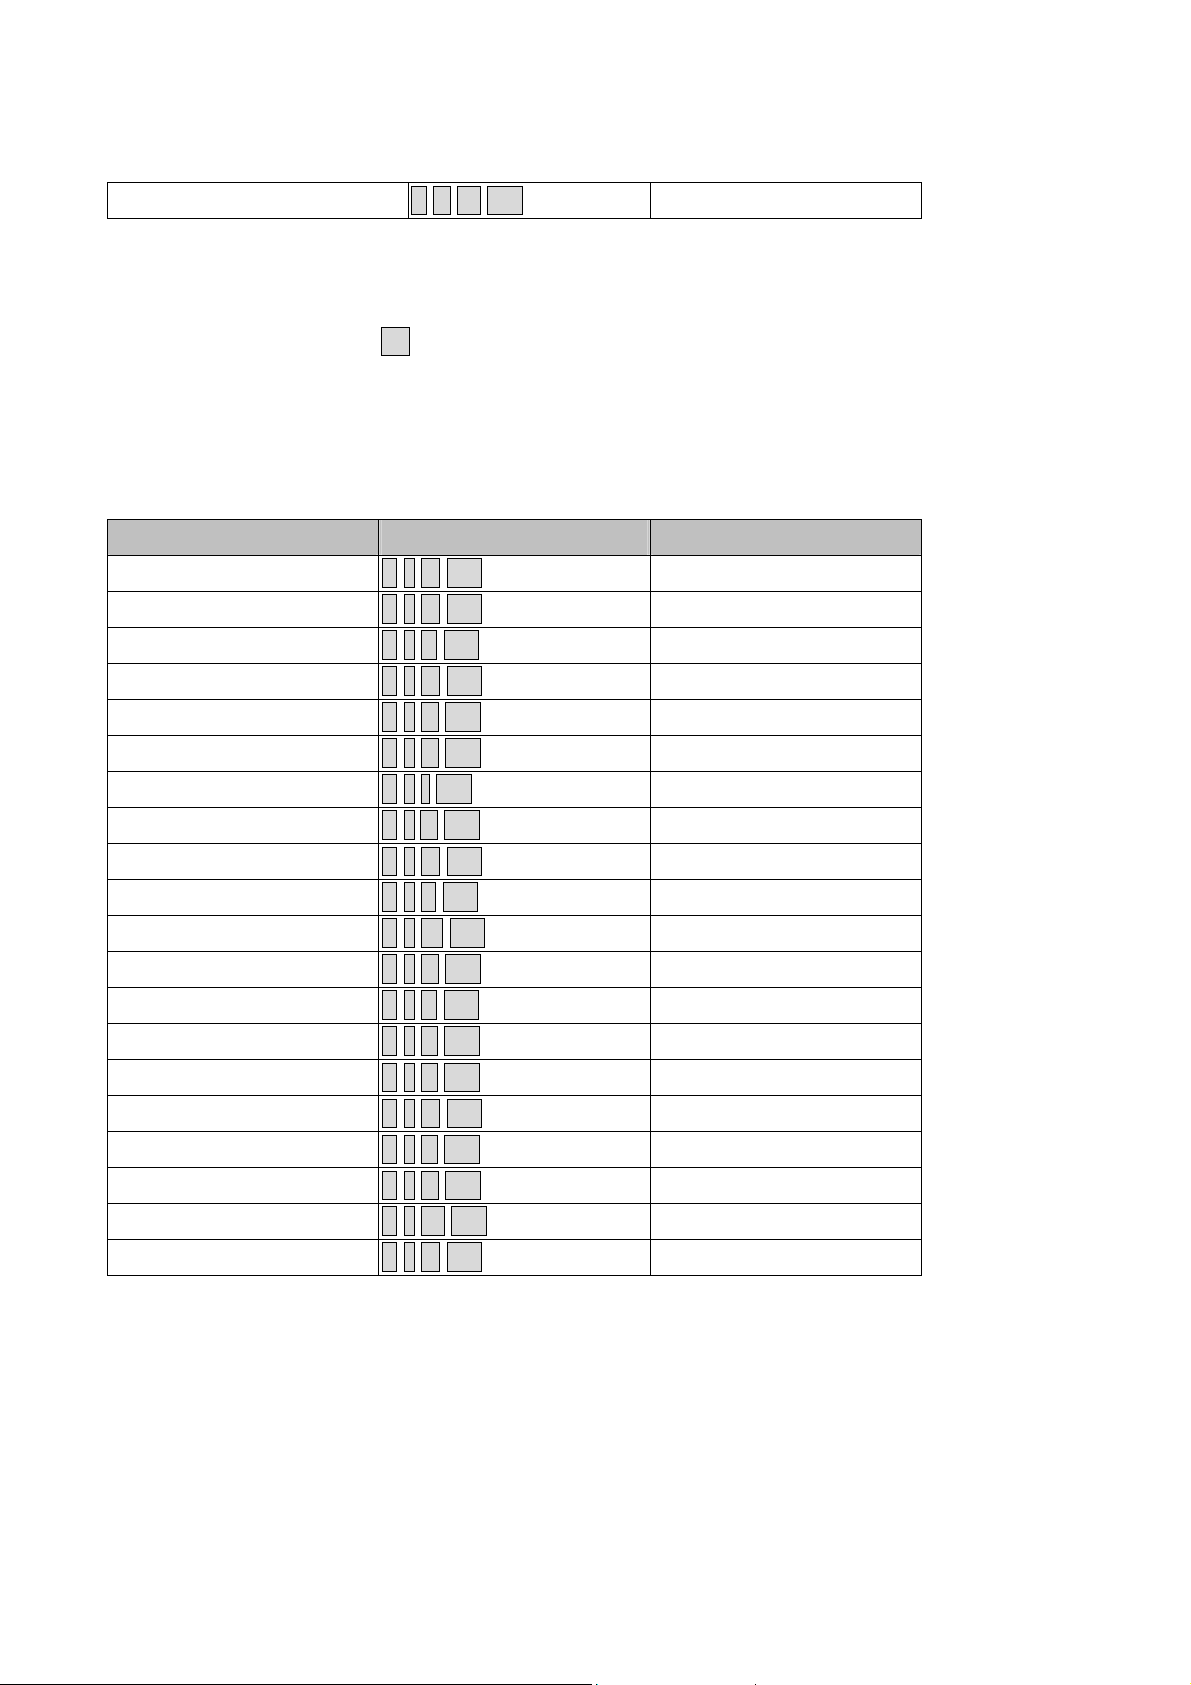
6-7. Query Command
ITEM ASCII HEX
Software Version ~ q V CR 7Eh 71h 56h 0Dh
Power State ~ q P CR 7Eh 71h 50h 0Dh
Input Select ~ q S CR 7Eh 71h 53h 0Dh
Lamp Hours ~ q L CR 7Eh 71h 4Ch 0Dh
Brightness ~ q B CR 7Eh 71h 42h 0Dh
Contrast ~ q C CR 7Eh 71h 43h 0Dh
Color (Video) ~ q R CR 7Eh 71h 52h 0Dh
Tint (Video) ~ q N CR 7Eh 71h 4Eh 0Dh
Scaling ~ q A CR 7Eh 71h 41h 0Dh
Color Tempera ture ~ q T CR 7Eh 71h 54h 0Dh
Projection Mode ~ q J CR 7Eh 71h 4Ah 0Dh
Response message
ITEM
Response Message
examples
Software Version …..
Power State
Input Select
RGB DVI Video S-Video
Component DVD HDTV
Lamp Hours 2000
Brightness 100
Contrast 100
Color (Video) 100
Tint (Video) 100
Scaling 4:3 16:9
Color Tempera ture Cool N ormal Warm User
Projection Mode Front Rear+Ceiling Rear Ceil ing
Example 1. Get Brightness value
Send Command : ~qBCR
Response : 100
On Off
Example 2. Get Color Temperature
Send Command : ~qTCR
Response : Warm
Company Confidential Planar_______________________ Delta____________
4
2006/08/10
Page 6

Rev. 00
6-8. Hyper Terminal setting guide
6-8-1 Connect the RS232 Cable between your computer and Pr ojector。
6-8-2 Open HyperTerminal ,
Window2000/XP HyperTerminal path:
Start \ Programs \ Accessories \ Communications \ HyperTerminal。
6-8-3 Setting the HyperTerminal parameter:
Step 1. Type the connection name .
Company Confidential Planar_______________________ Delta____________
5
2006/08/10
Page 7

Rev. 00
Step2 . Choose the COM port for your RS232 Cable connected to.
Step3. In Bits per second choose “ 9600 ” and in Flow control choose “ None ”。
Company Confidential Planar_______________________ Delta____________
6
2006/08/10
Page 8

Rev. 00
Step4. Click the File and choose Properties to setting Keyboard parameter 。
Step5. In Setting page , choose Emulation type for your keyboard.
Company Confidential Planar_______________________ Delta____________
7
2006/08/10
Page 9

Rev. 00
Step6. Click ASCII Setting icon to setup ASCII code parameter.
Step7. Mark Send Line ends with line feeds and Echo typed characters locally and click OK bottom to
complete setting.
Company Confidential Planar_______________________ Delta____________
8
2006/08/10
 Loading...