

Page 1
Pr
oduct Man
PDP 42"
ual
Page 2
·Safety precautions
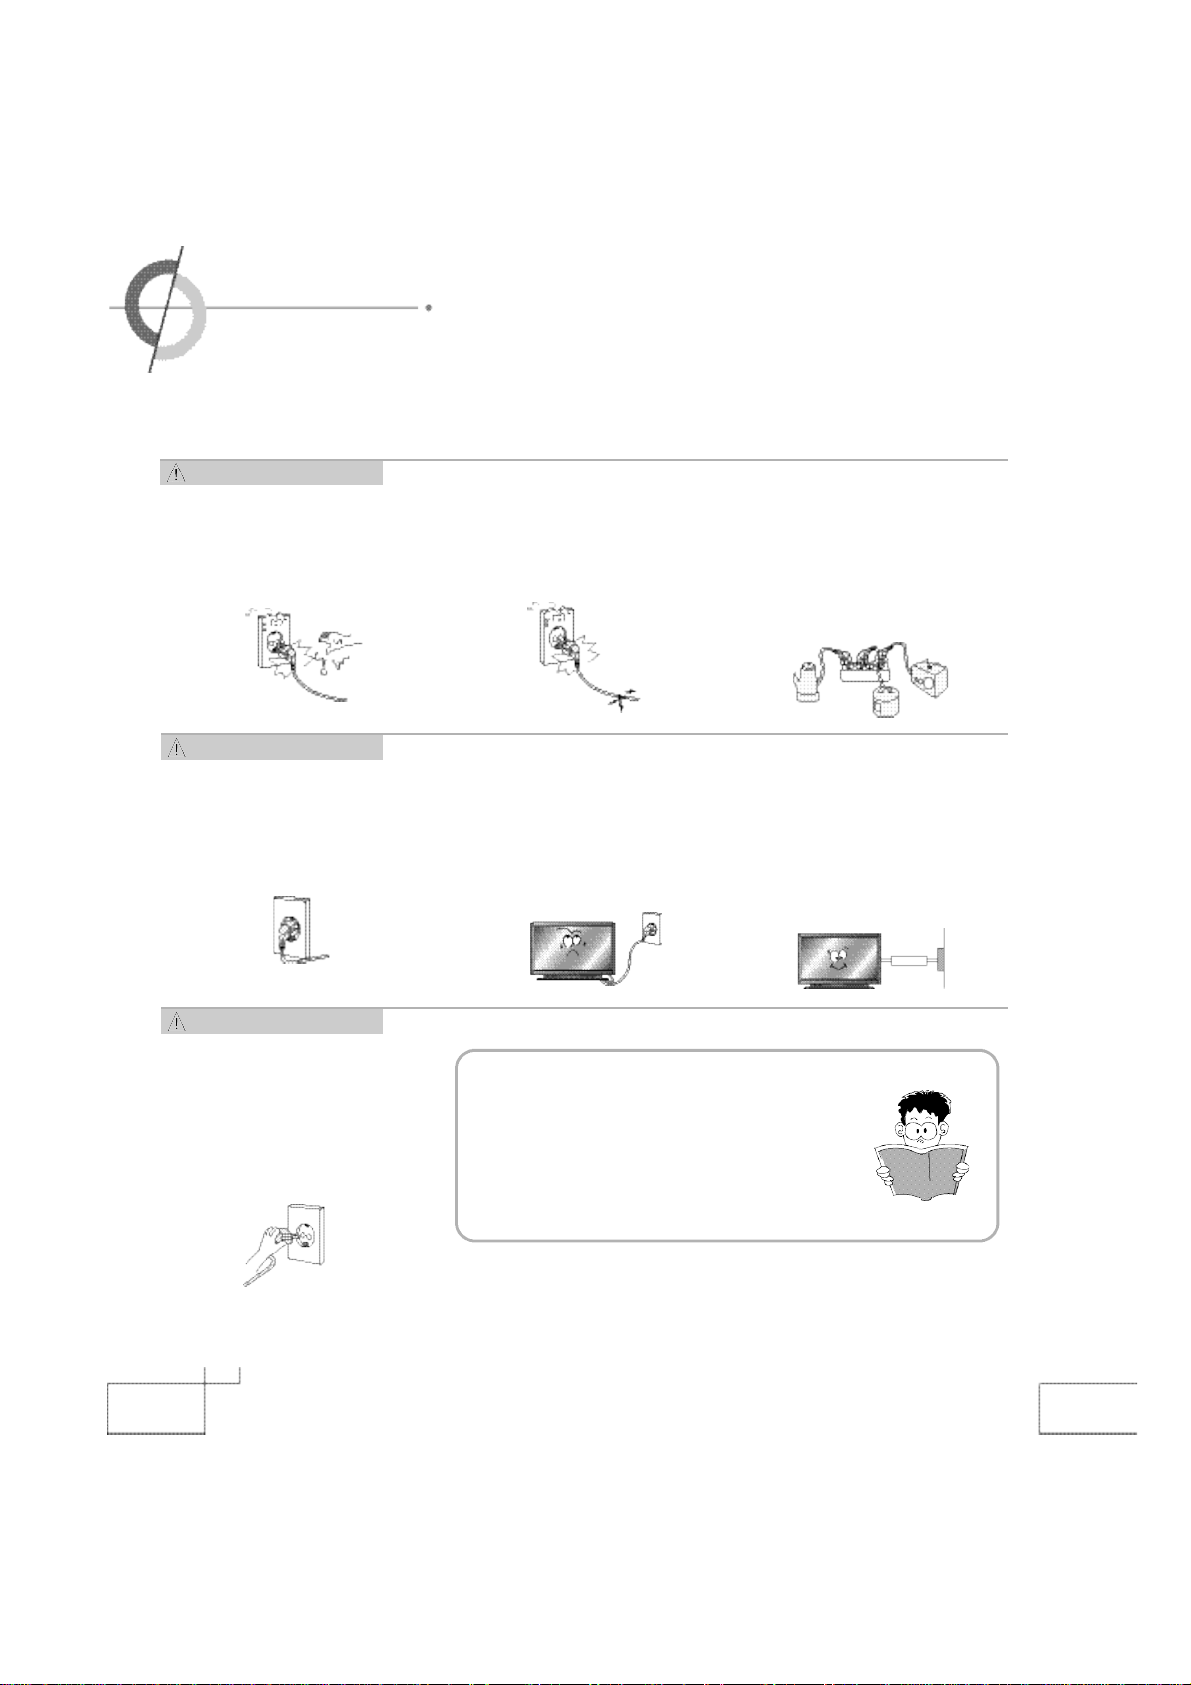
Power Supply
- Warning
AC plug should not be touched
with wet hands. It may cause an
electric shock.
·It can cause an electrical shock.
Power Supply
- Warning
Fully insert the plug into the outlet.
·If the connection is unstable, it mayc a u s e
a fire.
Power Supply
-
Caution
Do not use damaged electric cord/
plug, or loose outlet.
·It can cause an electric shock or a fire.
Be careful not to forcibly bend the
electric cords or press them with a
heavy object.
·It may cause an electric shock or a
fire.
Do not use multiple devices in an
outlet at the same time to avoid the
overload.
·It may cause a fire due to overheating
from the outlet.
Be sure to ground the PDP power
source.
·It may cause an electric shock if it has a
failure or electrical leakage. Only use
the proper power cord supplied with
PDP and connect it to an outlet with a
ground terminal.
When unplugging the AC cord, pull
out by holding the plug itself and
not by pulling on the cord.
·If the power cord is damaged. it maycause
a fire.
2
This manual describes how to operate
the PDP properly and safely. Please
read this manual carefully. This manual
should be retained for future reference.
Page 3
W a r n i ng : Serious injury or fatal injury may occur, if the indicated warning is not followed.
C a u t i on : Minor injury or product damage may occur, if the indicated caution is not followed.
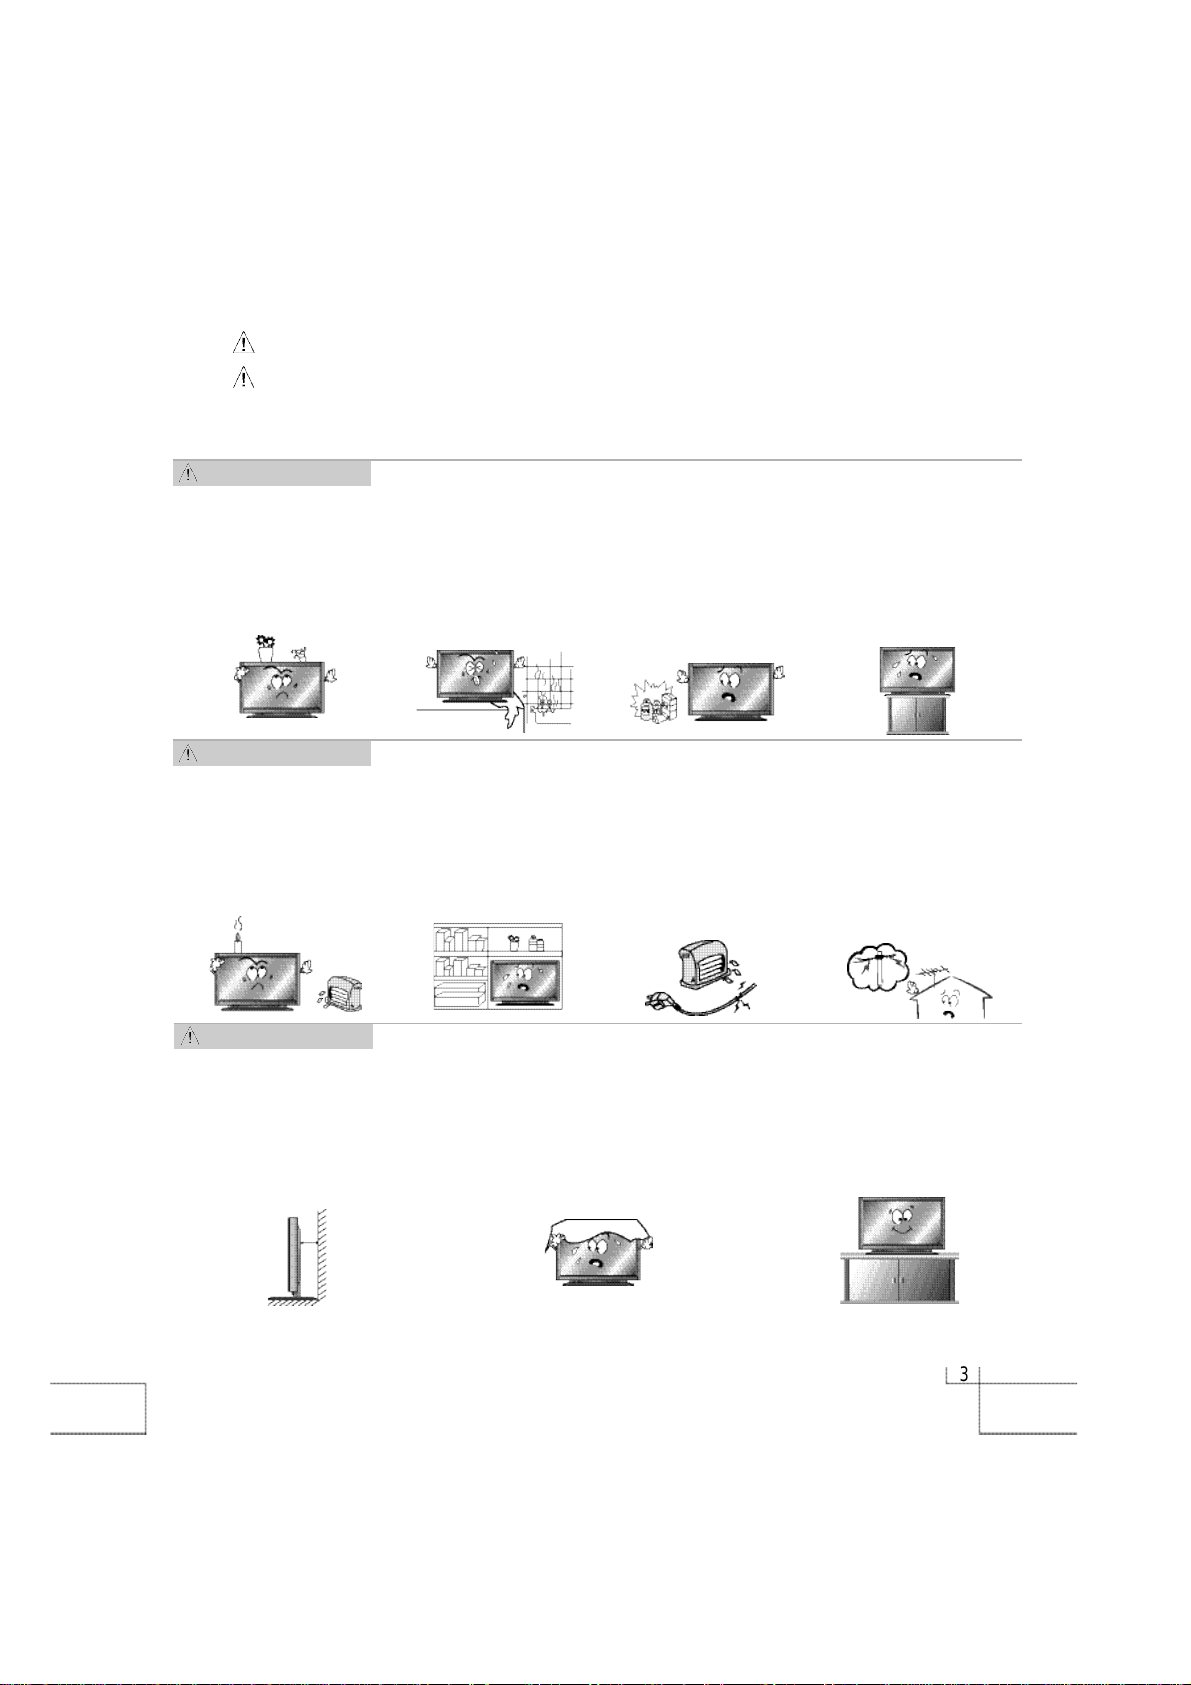
I n s t a l l a t i o n
- Warning
Do not place any liquid and
foreign objects on or above
the PDP.
·It may cause an electric shock
and a fire. Contact your dealer
for service.
I n s t a l l a t i o n
- Warning
Do not put candles, mosquito incense, cigarette
lighters, a heater, or any
other source of heat on or
near the PDP.
·
It may cause a fire.
I n s t a l l a t i o n
-
Caution
Do not install the PDP where
water (rain) drops can enter
the enclosure, or where
there is oil or humidity.
·
It may cause an electric
shock, a fire, failure or transformation.
Do not install in poorly
ventilated locations such
as bookcases or closets.
·
It may cause a fire due to
high temperature.
Do not use or keep it in a
place where combustible
sprays or inflammable
materials are kept.
·
It may cause an explosion or
a fire.
Do not place the electric
cord or the plug near an
electric heater.
·
The coating on the electric
cords and the plug may melt
and cause a fire or an electric
s h o c k .
Do not install the PDP in an
unstable location with a
smaller support area than
the PDP. It may fall and
cause injury.
·
It should be installed on a flat,
stable location.
Install the antenna firmly
and away from high-voltage wires and communication cables.
·
If the antenna touches the
high-voltage wire, it may
cause an electric shock or a
fire.
The PDP should be installed a
small distance away from walls
or other solid objects in order
to maintain ventilation and to
prevent heat damage.
Blockage of the ventilatior with
table covers or curtains can
cause a fire due to the
increased temperature inside
the monitor.
Be sure to install the monitor
on a level surface.
33
Page 4
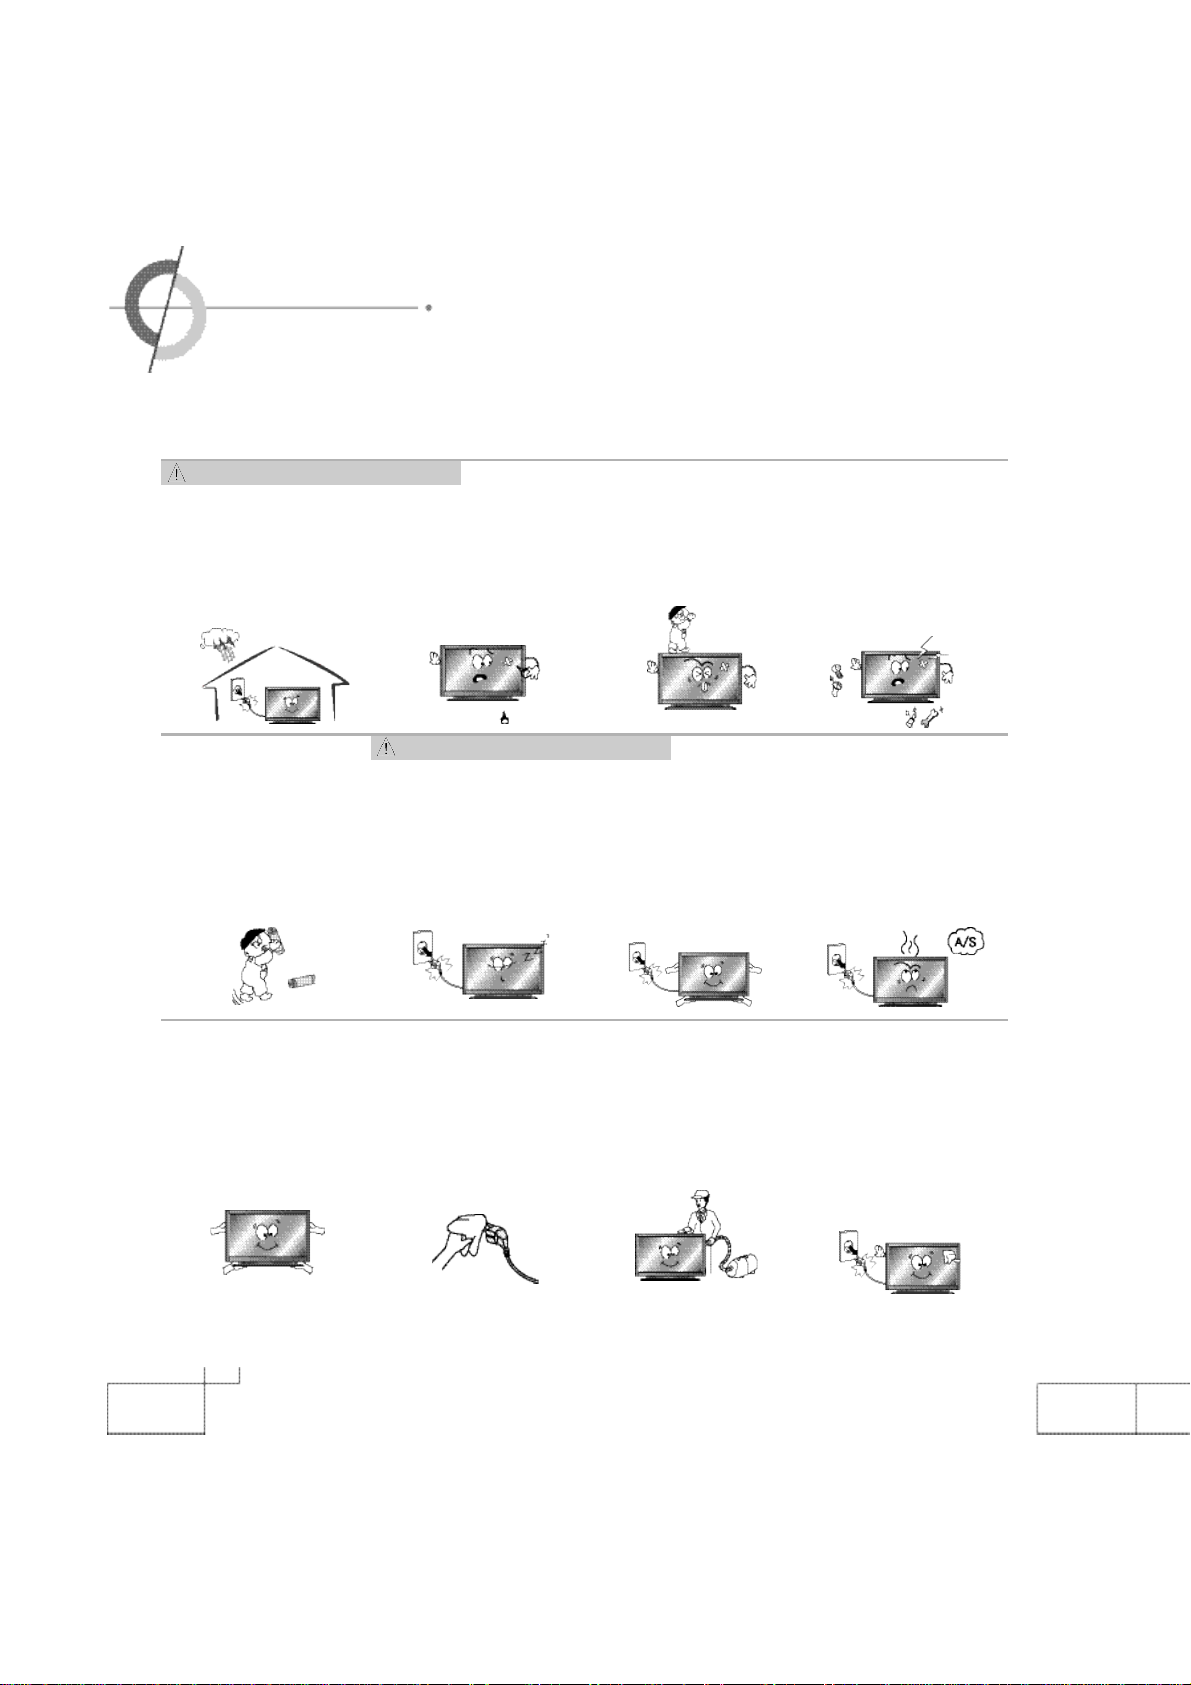
·Safety precautions
Usage and Maintenance -
During a thunderstorm,
unplug the power cord
and never touch the
antenna cable.
·It can cause an electric
shock or a fire.
When removing the batteries in the remote control,
please place the batteries
in a location out of children's reach . It must be
disposed properly.
W a r n i n g
Do not insert any foreign
objects such as wires and
drills into the PDP ventilation
slots or the A/V terminal.
·It may cause an electric
shock or a fire.
Usage and Maintenance -
Unplug the PDP if you do
not intend to use it for a
long time. The generation
of heat, insulation degradation or the accumulation of
dust may cause an electric
f i r e .
Do not allow children to
play with the PDP.
·It may falls or flip over and
may cause serious injury.
Caution
When moving the PDP, turn off
the power switch and unplug the
power cord from the outlet. Make
sure that the external connection
cords are unplugged (such as
antenna cable and input cables)
prior to moving.
·
The electrical cords may get
damaged and cause an electric
shock or a fire.
Never attempt to disassemble, repair or modify
the PDP.
·It may cause an electric
shock or a fire. If it requires
repair, contact your dealer.
If the PDP is emitting smoke
or an unusual smell, immediately turn off the power and
unplug the power cord.
·
It may cause an electric shock
or a fire. Contact your dealer
for the service.
When transporting the PDP,
at least two people should
carry it. If it is dropped, serious injury may occur.
4
The plugs and connectors
must be free of dust or
water before use. It may
cause an electric shock or
a fire.
To clean the interior of the
PDP, contact your dealer for
service. A fire or failure may
occur, if it is not cleaned.
When cleaning the PDP,
unplug the electric cord
and wipe with a soft and
dry cloth. Never clean with
chemicals such as industrial glaze, wax, benzene,
alcohol, thinner, aromatic,
lubricant, detergent, or a
damp cloth.
Page 5
Considerations for Usage
Still image (immovable) screen may cause permanent damage to PDP.
1.
Lengthy display of still images from video games, banners, graphics and others may fatally damage
the screen.
2.
When using Picture-In-Picture, permanent damage may occur if the sub-image screen stays on the
corner of screen for a long time.
3. When using the PDP in 4:
the plasma panel. It is recommended that you use 16:9 or Panorama format. (Image burn-in can be
avoided by using "Panel Protection" function or a screen-saver. However, once image burn-in
occurs, it may not disappear completely. An image will be dimmed as the image is displayed long
time or repeatedly.)
※
Any damage to the PDP caused by improper usage (such as image burn-in) shall not be covered
by the warranty.
3 formats with sidebars for a long period of time, it may cause damage to
Defective pixels that can be seen on PDP screen. (illuminated spots, bright spots,
scotoma , blind spot, blinking)
Generally, PDP consists of about 1.22 million pixels and having defective pixels is possible. A PDP
with a number of defective pixels below a certain number is not considered defective. The limited
number of defective pixels does not affect the performance or reliability of the PDP. The standard of
inspection regarding defective pixels is the same or better as the competitor's offering on similar PDP.
It is not subject to replacement or a refund. We will do our best to minimize the defective pixel as best
as we can.
5
Page 6

·Contents
·
Safety precautions
-
Power Supply
-
Installation
-
Usage and Maintenance
·
Considerations for Usage
·
Contents
⋯⋯⋯⋯⋯⋯⋯⋯⋯⋯⋯⋯⋯⋯⋯⋯⋯⋯⋯⋯⋯⋯⋯⋯2
⋯⋯⋯⋯⋯⋯⋯⋯⋯⋯⋯⋯⋯⋯⋯⋯⋯⋯⋯⋯⋯⋯⋯⋯⋯3
⋯⋯⋯⋯⋯⋯⋯⋯⋯⋯⋯⋯⋯⋯⋯⋯⋯⋯⋯4
⋯⋯⋯⋯⋯⋯⋯⋯⋯⋯⋯⋯⋯⋯⋯⋯⋯⋯⋯ 5
⋯⋯⋯⋯⋯⋯⋯⋯⋯⋯⋯⋯⋯⋯⋯⋯⋯⋯⋯⋯⋯⋯⋯⋯⋯ 6 ~ 7
User Guidance Information
·
Names of each part
·
Options
·
Accessories
·
Installing the PDP
-
Installing on a wall
-
Installing on a desktop
·
Remote controller
-
Functions of remote controller buttons
-
Inserting batteries into remote controller
⋯⋯⋯⋯⋯⋯⋯⋯⋯⋯⋯⋯⋯⋯⋯⋯⋯⋯⋯⋯⋯⋯⋯⋯⋯⋯ 1 0
⋯⋯⋯⋯⋯⋯⋯⋯⋯⋯⋯⋯⋯⋯⋯⋯⋯⋯⋯⋯ 8 ~ 9
⋯⋯⋯⋯⋯⋯⋯⋯⋯⋯⋯⋯⋯⋯⋯⋯⋯⋯⋯⋯⋯⋯⋯⋯⋯1 1
⋯⋯⋯⋯⋯⋯⋯⋯⋯⋯⋯⋯⋯⋯⋯⋯⋯⋯⋯⋯⋯ 1 2
⋯⋯⋯⋯⋯⋯⋯⋯⋯⋯⋯⋯⋯⋯⋯⋯⋯⋯⋯ 1 3
⋯⋯⋯⋯⋯⋯⋯⋯⋯⋯⋯⋯ 1 4
⋯⋯⋯⋯⋯⋯⋯⋯⋯⋯⋯ 1 5
Connection
·
Connecting to the VCR
·
Connecting to the Cable TV
·
Connecting to the Camcorder/ Video game console
·
Connecting to the DVD player
·
Connecting to the DTV receiver
·
Connecting to the PC
⋯⋯⋯⋯⋯⋯⋯⋯⋯⋯⋯⋯⋯⋯⋯⋯⋯⋯⋯ 1 6
⋯⋯⋯⋯⋯⋯⋯⋯⋯⋯⋯⋯⋯⋯⋯⋯⋯ 1 7
⋯⋯⋯⋯⋯⋯ 1 8
⋯⋯⋯⋯⋯⋯⋯⋯⋯⋯⋯⋯⋯⋯⋯⋯ 1 9
⋯⋯⋯⋯⋯⋯⋯⋯⋯⋯⋯⋯⋯ 20 ~ 21
⋯⋯⋯⋯⋯⋯⋯⋯⋯⋯⋯⋯⋯⋯⋯⋯⋯⋯ 22 ~ 23
Basic Use
·
Powering the PDP
·
Selecting input source
·
Volume
⋯⋯⋯⋯⋯⋯⋯⋯⋯⋯⋯⋯⋯⋯⋯⋯⋯⋯⋯⋯⋯⋯⋯⋯⋯⋯⋯ 2 6
·
Mute
⋯⋯⋯⋯⋯⋯⋯⋯⋯⋯⋯⋯⋯⋯⋯⋯⋯⋯⋯⋯⋯⋯⋯⋯⋯⋯⋯⋯ 2 6
⋯⋯⋯⋯⋯⋯⋯⋯⋯⋯⋯⋯⋯⋯⋯⋯⋯⋯⋯⋯⋯ 2 4
⋯⋯⋯⋯⋯⋯⋯⋯⋯⋯⋯⋯⋯⋯⋯⋯⋯⋯⋯⋯ 2 5
6
Page 7
·
Still
⋯⋯⋯⋯⋯⋯⋯⋯⋯⋯⋯⋯⋯⋯⋯⋯⋯⋯⋯⋯⋯⋯⋯⋯⋯⋯⋯⋯ 2 6
·
Info
⋯⋯⋯⋯⋯⋯⋯⋯⋯⋯⋯⋯⋯⋯⋯⋯⋯⋯⋯⋯⋯⋯⋯⋯⋯⋯⋯⋯ 2 6
·
Menu
⋯⋯⋯⋯⋯⋯⋯⋯⋯⋯⋯⋯⋯⋯⋯⋯⋯⋯⋯⋯⋯⋯⋯⋯⋯⋯⋯ 2 7
Application
·
PSM (Picture Status Memory)
·
Adjusting the screen in USER mode
·
ARC (Aspect Ratio Control)
·
Watching PIP
·
PC mode
·
Color Tone (Pre-Set)
·
Color Tone (Manual adjustment)
·
SSM (Sound Status Memory)
·
Equalizer
·
Stereo
·
Reset
·
Language
·
Half Tone
·
Panel Protection
·
PBP Mode
·
Current Time setting
·
On Time/ Off Time (Time setting)
·
On Time Volume
·
Sleep Timer
⋯⋯⋯⋯⋯⋯⋯⋯⋯⋯⋯⋯⋯⋯⋯⋯⋯⋯⋯⋯⋯⋯⋯⋯ 3 1
⋯⋯⋯⋯⋯⋯⋯⋯⋯⋯⋯⋯⋯⋯⋯⋯⋯⋯⋯⋯⋯⋯⋯⋯ 32 ~ 33
⋯⋯⋯⋯⋯⋯⋯⋯⋯⋯⋯⋯⋯⋯⋯⋯⋯⋯⋯⋯ 3 4
⋯⋯⋯⋯⋯⋯⋯⋯⋯⋯⋯⋯⋯⋯⋯⋯⋯⋯⋯⋯⋯⋯⋯⋯⋯⋯ 3 7
⋯⋯⋯⋯⋯⋯⋯⋯⋯⋯⋯⋯⋯⋯⋯⋯⋯⋯⋯⋯⋯⋯⋯⋯⋯⋯⋯ 3 8
⋯⋯⋯⋯⋯⋯⋯⋯⋯⋯⋯⋯⋯⋯⋯⋯⋯⋯⋯⋯⋯⋯⋯⋯⋯⋯⋯ 3 9
⋯⋯⋯⋯⋯⋯⋯⋯⋯⋯⋯⋯⋯⋯⋯⋯⋯⋯⋯⋯⋯⋯⋯⋯⋯ 4 0
⋯⋯⋯⋯⋯⋯⋯⋯⋯⋯⋯⋯⋯⋯⋯⋯⋯⋯⋯⋯⋯⋯⋯⋯⋯⋯ 4 1
⋯⋯⋯⋯⋯⋯⋯⋯⋯⋯⋯⋯⋯⋯⋯⋯⋯⋯⋯⋯⋯⋯ 4 2
⋯⋯⋯⋯⋯⋯⋯⋯⋯⋯⋯⋯⋯⋯⋯⋯⋯⋯⋯⋯⋯⋯⋯⋯⋯ 4 3
⋯⋯⋯⋯⋯⋯⋯⋯⋯⋯⋯⋯⋯⋯⋯⋯⋯⋯⋯⋯⋯ 4 4
⋯⋯⋯⋯⋯⋯⋯⋯⋯⋯⋯⋯⋯⋯⋯⋯⋯⋯⋯⋯⋯⋯ 4 6
⋯⋯⋯⋯⋯⋯⋯⋯⋯⋯⋯⋯⋯⋯⋯⋯⋯⋯⋯⋯⋯⋯⋯⋯ 4 7
⋯⋯⋯⋯⋯⋯⋯⋯⋯⋯⋯⋯⋯⋯⋯⋯ 2 8
⋯⋯⋯⋯⋯⋯⋯⋯⋯⋯⋯⋯⋯ 2 9
⋯⋯⋯⋯⋯⋯⋯⋯⋯⋯⋯⋯⋯⋯⋯⋯⋯ 3 0
⋯⋯⋯⋯⋯⋯⋯⋯⋯⋯⋯⋯⋯⋯⋯ 3 5
⋯⋯⋯⋯⋯⋯⋯⋯⋯⋯⋯⋯⋯⋯⋯⋯ 3 6
⋯⋯⋯⋯⋯⋯⋯⋯⋯⋯⋯⋯⋯⋯⋯ 4 5
Maintenance and Service Part
·
Trouble shooting
·
Supporting display mode
·
Specifications
·
User Information
⋯⋯⋯⋯⋯⋯⋯⋯⋯⋯⋯⋯⋯⋯⋯⋯⋯⋯⋯⋯ 48 ~ 50
⋯⋯⋯⋯⋯⋯⋯⋯⋯⋯⋯⋯⋯⋯⋯⋯⋯⋯⋯ 5 1
⋯⋯⋯⋯⋯⋯⋯⋯⋯⋯⋯⋯⋯⋯⋯⋯⋯⋯⋯⋯⋯⋯⋯⋯ 5 2
7
Page 8
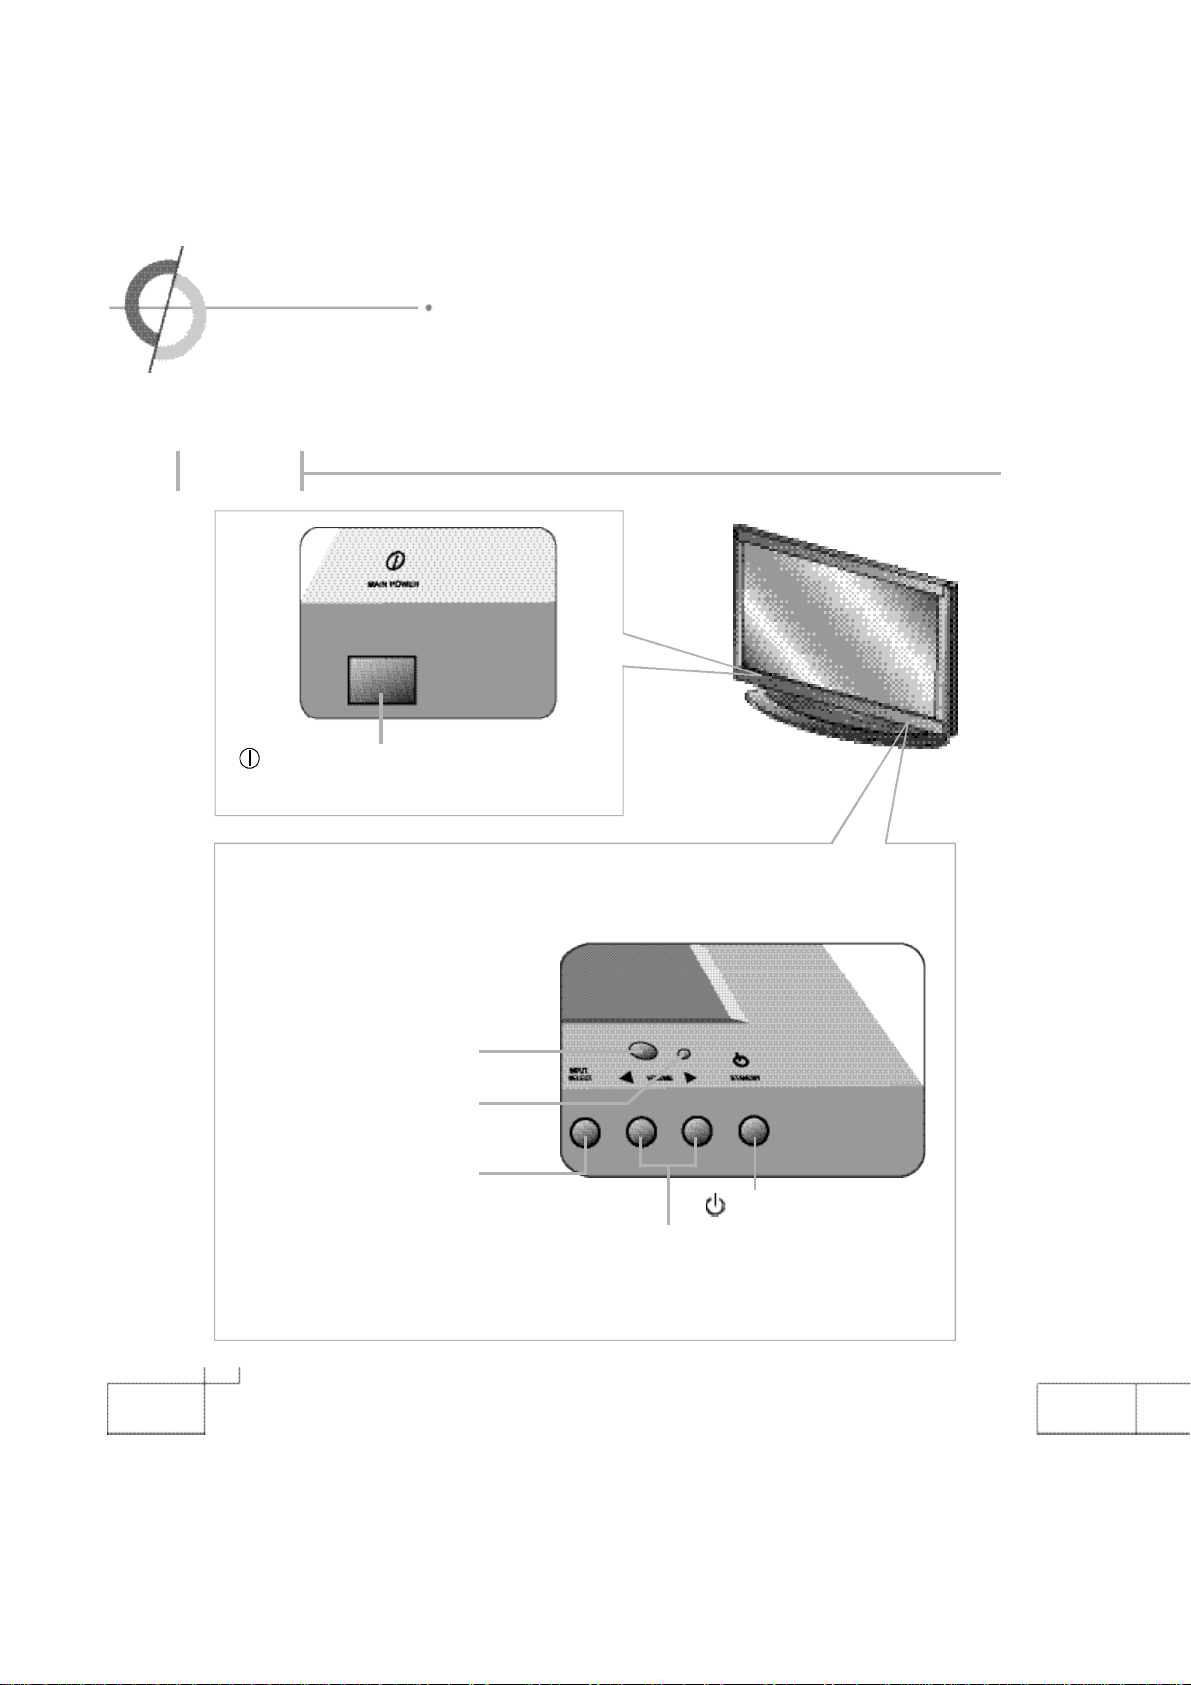
·Names of each part
Front View
Main Power Button
-
Please turn off the main power switch, if the PDP will not be
used for a long period of time.
Remote controller Receiving Sensor
Power Supply Indication Lamp
Input Selection Button
Standby : Red
O
n : Green
8
Standby
Volume ◀,▶ B u t t o n
Page 9
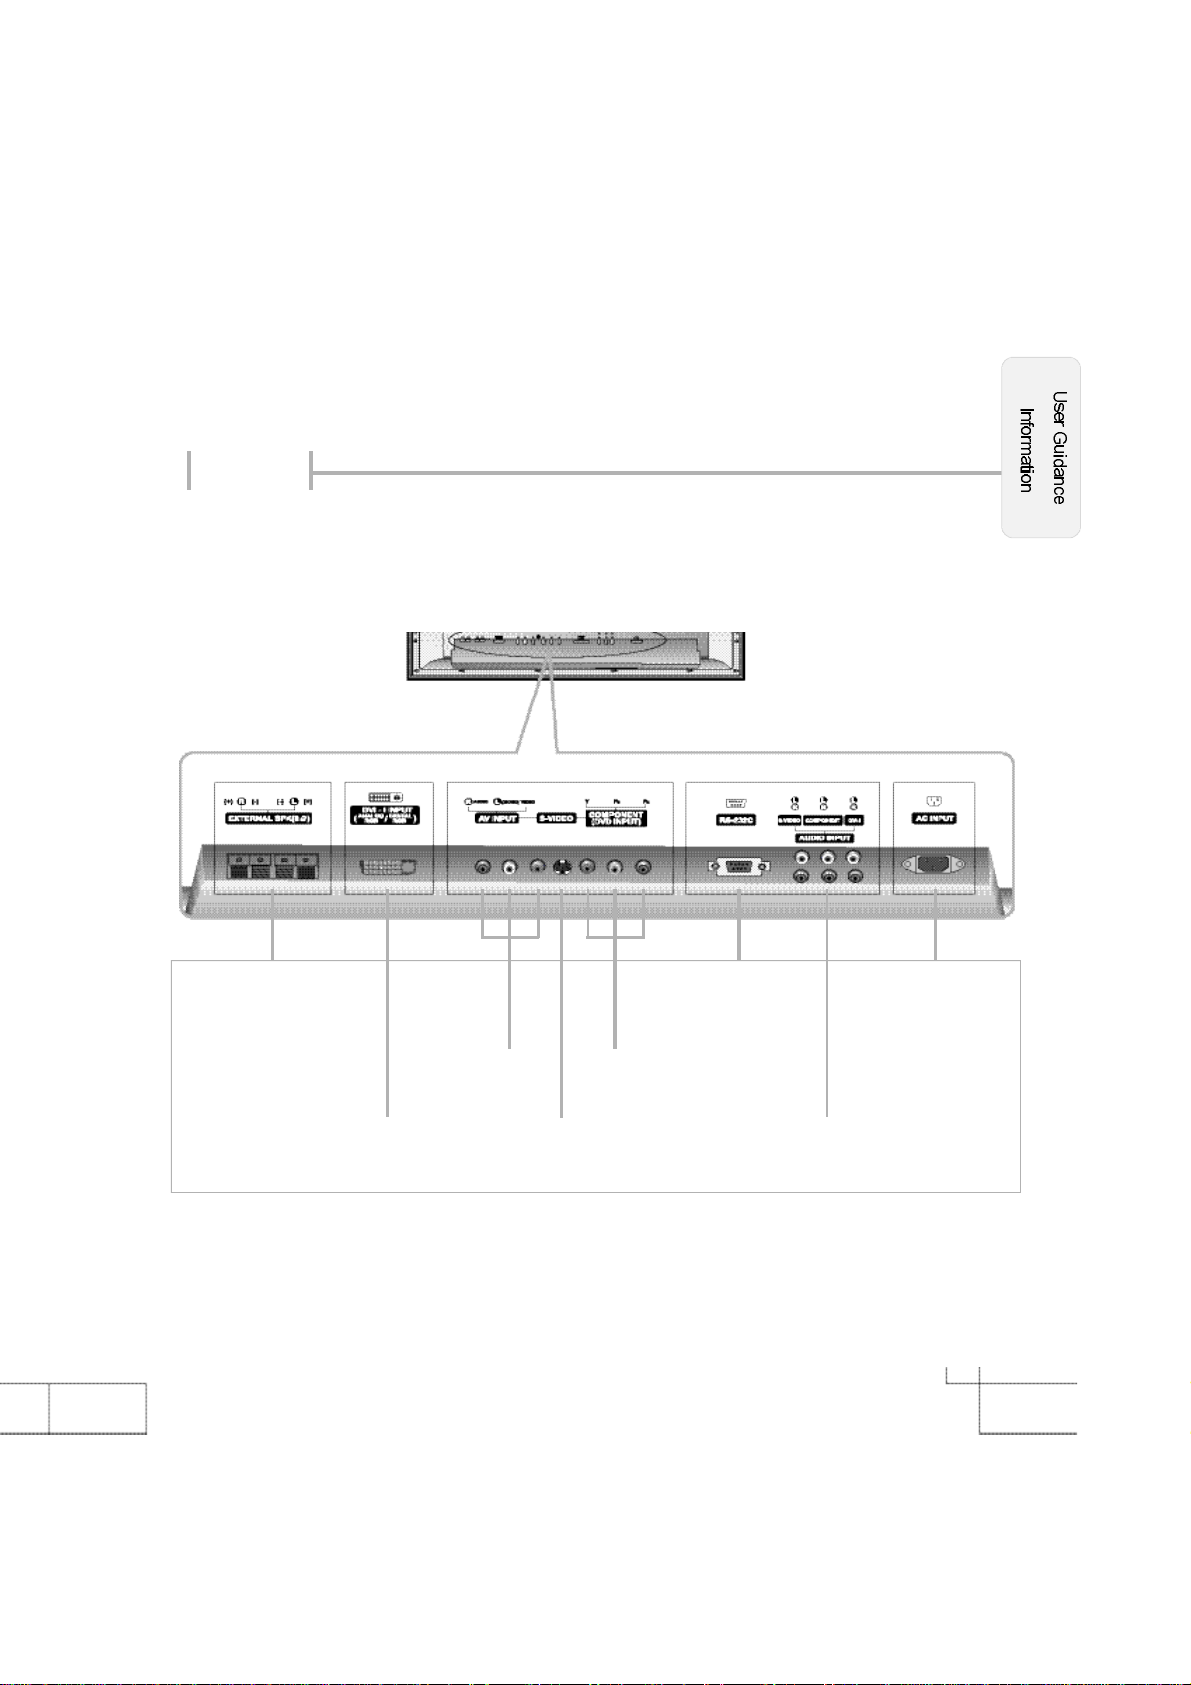
Back View
Terminal (8Ω)
AV input (composite)
RGB PC Input Terminal
(VGA / SVGA / XGA)
Terminal
Component (DVD / DTV)
(480i/480p /720p/1080i)
S-Video Terminal
RS-232C TerminalExternal Speaker Connection
Input Terminal
AC Input Terminal
Audio Input Terminal
(S-Video, Component, DVI)
9
Page 10
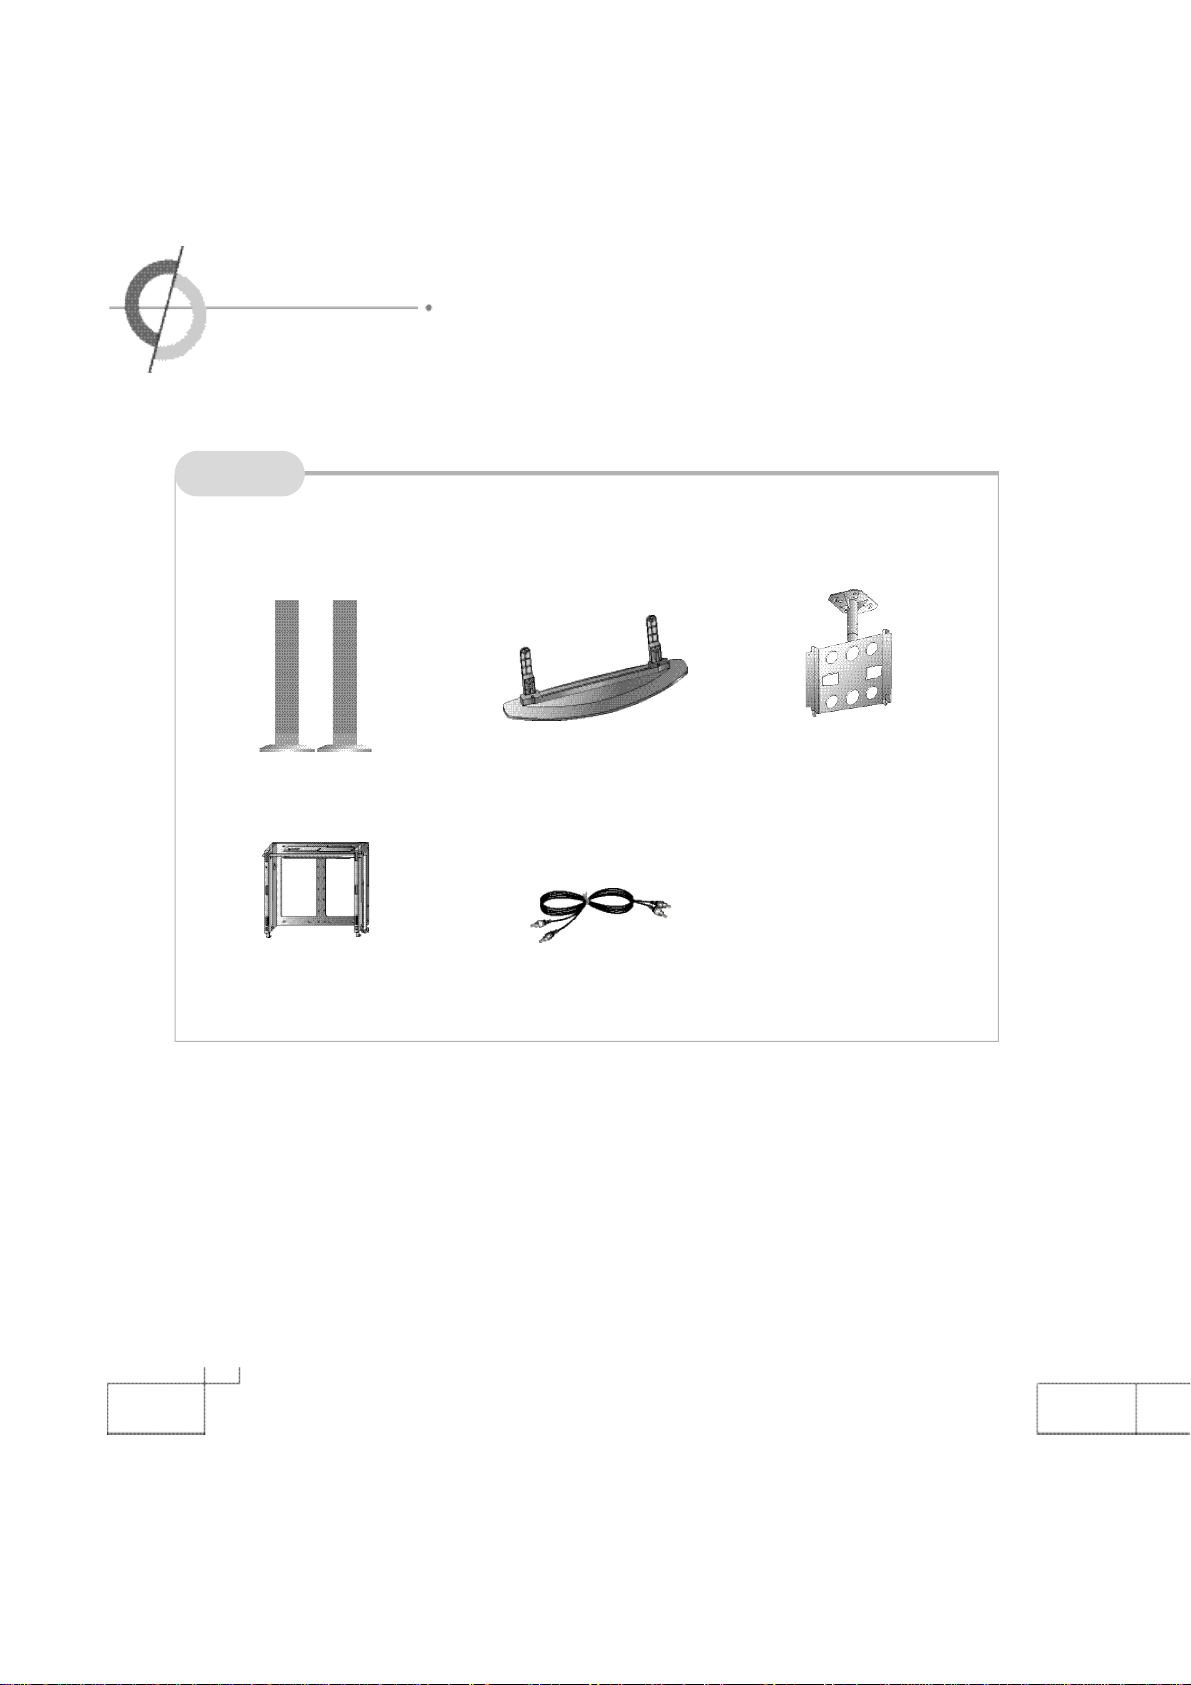
·Options
Options
※
To improve the quality of the PDP, specification is subject to change without notice. Please
contact your dealer for current options available.
S p e a k e r
Adjustable - Angle
Wall mount
Desktop Stand
Audio Cable
Ceiling - M o u n t
B r a c k e t
1 0
Page 11

Accessories
※
The configuration of the components may look different from the following illustration.
RGB Cable
Power Cord
Video Cable : U.S.A only
User's Manual
Remote Controller
Scart-RCA
: Europe only
: Middle East only
C a b l e
Battery 1.5V( AAA×2)
DVI Adapter
1 1
Page 12
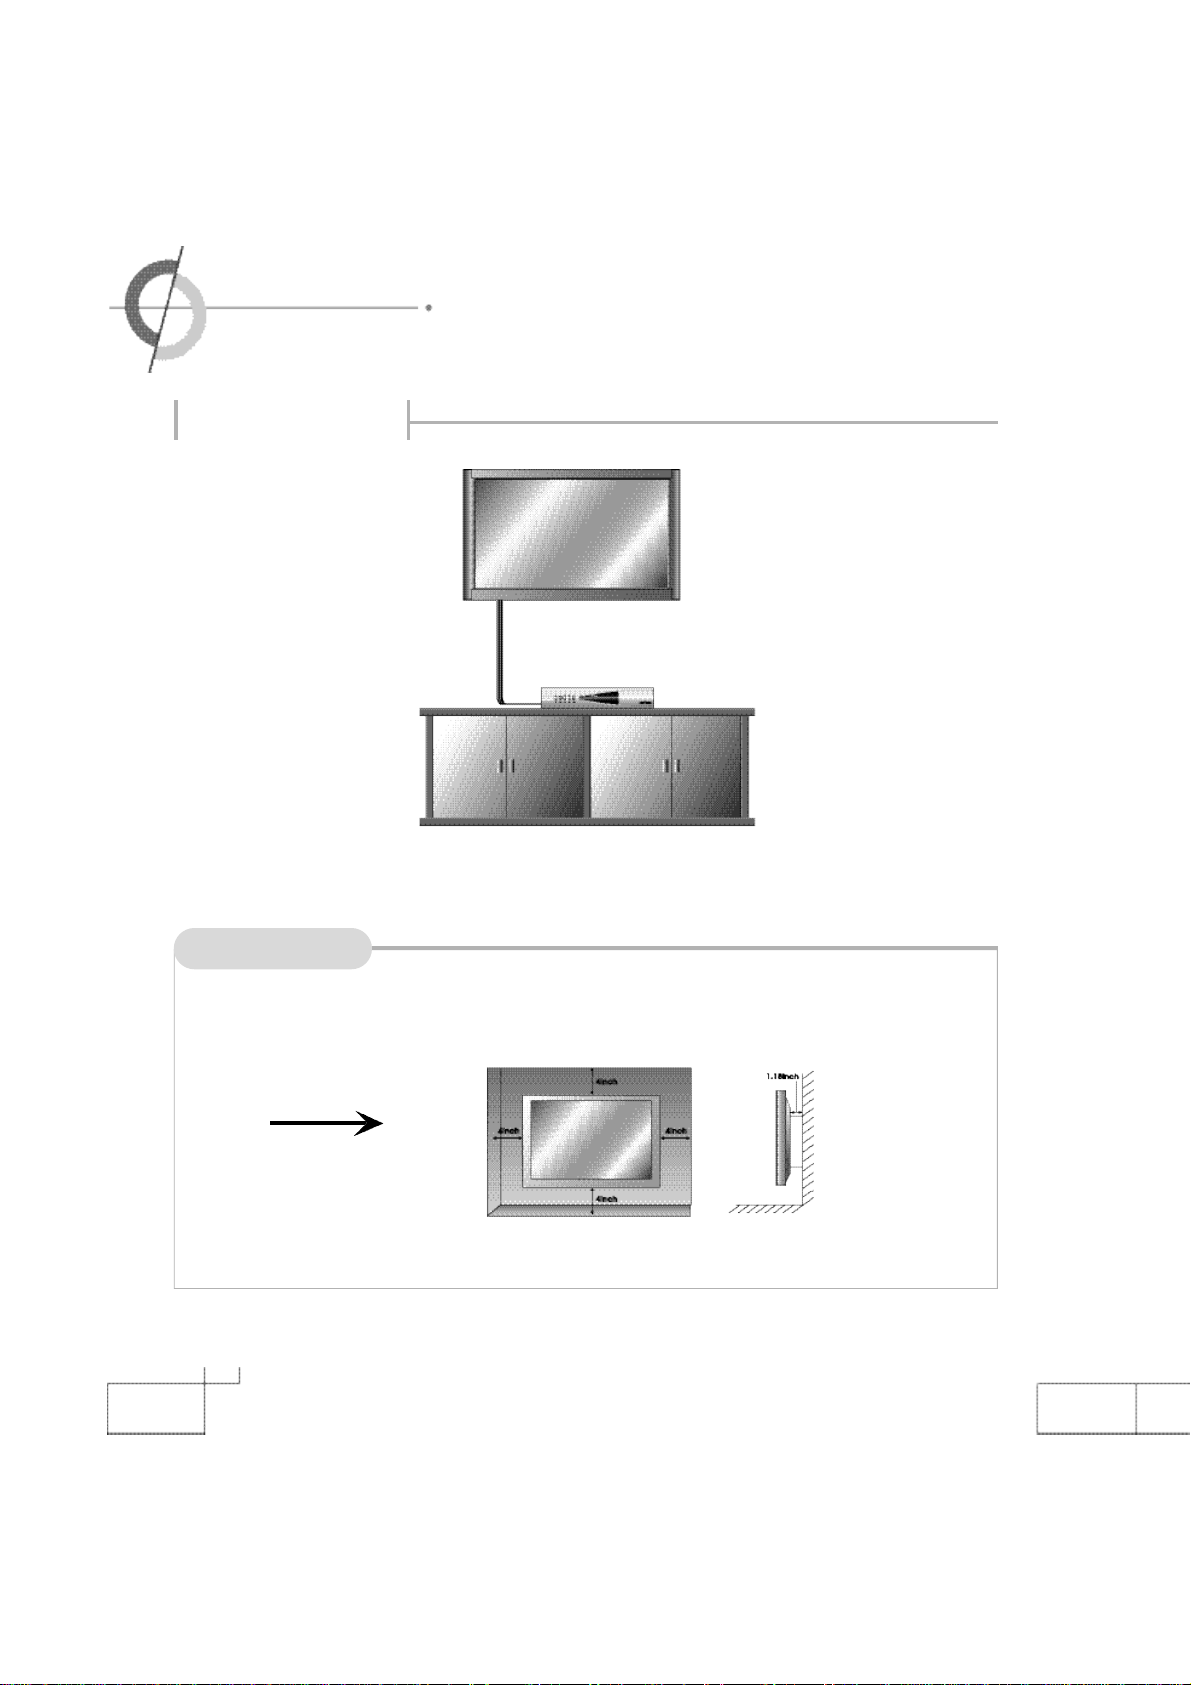
·Installing the PDP
Installing on the wall
▶ You can install PDP in wall-mounted style as shown in the figure above.
Things to consider
·Please secure enough space for safe use. (Please refer to A and B.)
·Installation of the PDP in an improperly ventilated location can cause a fire or damage to the
A
(
Usage of wall-mount)
※
Contact your dealer to purchase the "Adjustable-angle wall mount" required for wall-mounted installation.
1 2
PDP due to increased temperature.
Page 13

Installing on a desktop
·
This is not floor-standing unit.
▶
You can install PDP in a desktop style as shown in the figure above.
Things to consider
·Do not install on an unstable location with support area smaller than the PDP.
·
Please refer to the desktop stand user's manual for details of installation.
B
(
Usage of stand)
※
Please contact your dealer to purchase the "speakers".
1 3
Page 14

·Remote controller
※
Functions of remote controller buttons
The remote controller is using Infra-Red (IR). Point it towards the front of the PDP. The remote controller may not
work correctly if it is operated out of range or out of angle.
1 4
Page 15

If remote controller does not work
1. Check the polarity (+,-) of the batteries in the remote controller.
2. Check that the batteries have power.
3. Check that the PDP is powered and that it is properly plugged in.
4.
Check if any three-wavelength lamp, special fluorescent or neon sign is turned on near the PDP.
Inserting batteries into remote controller
1. Firmly press the ▼ part on the
cover and slide the cover in the
direction indicated by the arrow.
2.
Insert the batteries, making sure that
the polarities are correct.
3. Close the cover.
CAUTION : Risk of explosion if battery is replaced by an incorrect type.
Dispose of used batteries according to the national code (Recycling program).
How to use remote controller
·
The remote controller should be operated within 3
the IR receiver on the front of the PDP.
·
Used batteries should be disposed properly.
0feet(7m) and 30˚to the left and the right of
1 5
Page 16

·Connecting to the VCR
·Connecting to the Cable TV
Connecting to the VCR
Connecting to the AV Input (composite) terminal
Connect the audio/video cable from audio/ video output terminal of VCR
( R ) ( L )
A u d i o V i d e o
S - V i d e o
< VIDEO >
to the AV Input terminal of PDP. (yellow is for video, white is for audio
(left), red is for audio (right)).
Connecting to the S-Video terminal
(Use S-Video cable for better image)
Connect the S-Video cable from S-Video terminal of VCR to S-Video terminal of the PDP.
Connect the audio cable from the audio output terminal of VCR to the SVideo audio input terminal of PDP.
<Back view of the monitor>
How to watch VCR on the PDP
1. Turn on the PDP monitor and press on the remote controller.
2. Use to select Composite or S-Video and then press .
3. Turn on the VCR, insert the tape and then press the Play button.
1 6
Page 17

Connecting to the Cable TV
<Back view of the monitor>
In order to watch cable TV, subscribe to your local cable TV company
and install a separate converter (Set-Top-Box).
( R ) ( L )
A u d i o V i d e o S - V i d e o
Connecting to the AV Input (composite) terminal
Connect the audio/ video cable from audio/ video output terminal of the SetTop-Box to the AV Input terminal of PDP. (yellow is for video, white is for
audio (left), red is for audio (right)).
Connecting to the S-Video terminal
(Use S-Video cable for better image)
Connect the S-Video cable from S-Video terminal of Set-Top-Box to S-Video
<Cable broadcasting receiver >
terminal of the PDP.
Connect the audio cable from the audio output terminal of Set-Top-Box to the
S-Video audio input terminal of PDP.
How to watch a cable TV
1. Turn on the PDP monitor and press on the remote controller.
2. Use to select Composite or S-Video and then press .
3. Turn on Set-Top-Box and then select the channel you want.
1 7
Page 18

·Connecting to the Camcorder/ Video game console
·Connecting to the DVD player
Connecting to the Camcorder/ Video game console
Connecting to the AV Input (composite) terminal
Connect the audio/ video cable from audio/ video output terminal of the
( R ) ( L )
camcorder/ video game console to the AV Input terminal of the PDP. (yel
low is for video, white is for audio (left), red is for audio (right)).
<Back view of the monitor>
-
A u d i o V i d e o
<Camcorder/ Game machine>
S - V i d e o
Connecting to the S-Video terminal
(Use S-Video cable for better image.)
Connect the S-Video cable from the S-Video terminal of camcorder/video
game console to the S-Video terminal of PDP.
Connect the audio cable from the audio output terminal of camcorder/
video console unit to the S-Video audio input terminal of PDP.
How to watch
1. Turn on the PDP and press on the remote controller.
2. Use to select Composite or S-Video and then press .
3.
Turn on the camcorder or video game and set to video mode.
(Please refer to the user's manual of camcorder/video game for more information.)
4. Insert tape into camcorder and press Play button or insert disc into the video game console.
1 8
Page 19

Connecting to the DVD player
Y
< D V D >
P
R
P
B
( R ) ( L )
A u d i oV i d e o
<Back view of the monitor>
Connecting to the component terminal
·
Connect component video cable from the component video out
put terminal of DVD player to the component terminal (Y, PB,
PR) of the PDP.
·
Connect audio cable from the audio output terminal of DVD
player to the component audio input terminal of the PDP.
·
You can make S-Video connection or AV Input (composite) con
nection instead of connecting to component terminal. (Please
refer to page 16 on connection method)
·
DVD component output terminal is indicated by Y, PB, PRor Y,
CB, CR.
-
-
How to watch DVD
1. Turn on the PDP monitor and press on the remote controller.
2. Use to select component and then press .
3. Turn on DVD player and press Play button.
1 9
Page 20

·
Connecting to the DTV receiver
Connecting to the Component terminal/ Connecting to the DVI-I terminal
<Back view of the monitor>
( R ) ( L ) ( R ) ( L )
COMPONENT RGBCOMPONENT
A u d i o
<Digital broadcasting>
RGB
V i d e o
P
Y
RPB
Connecting to the component terminal/ Connecting to the RGB terminal
·
A separate Set-Top-Box may be required to receive digital broadcasting.
·
In 1080i mode of DTV mode, the screen size selection is disabled, but fixed to 16:9 the screen size
does not change.
Connecting to the component terminal
Connect component video cable from the component video output terminal of DTV receiver to the com
ponent terminal (Y, PB, PR) of the PDP.
Connect audio cable from the audio output terminal of DTV receiver to the component audio input termi
nal of the PDP.
·
You can make S-Video connection or AV-Input connection instead of connecting to component termi
nal. (Please refer to page 16 on connection method)
·
DTV component output terminal is indicated by Y, PB, PRor Y, CB, CR.
2 0
-
-
-
Page 21

Connecting to the DVI-I terminal
Some of DTV receivers (Set-Top-Box) have an RGB connector (D-sub 15 pin) instead of a component
output. The DVI adapter, which provides this connection terminal for the PDP, may be used for this con
nection.
Connect the DVI adapter into the VGA cable and connect to the PDP DVI-I input terminal. Connect the
other end of the cable to D-sub output terminal of DTV receiver.
Connect audio cable from the audio output terminal of DTV receiver to the DVI-I audio input terminal of
the PDP.
-
How to watch DTV
1. Turn on the PDP monitor and press on the remote controller.
2. Use to select component and then press .
3. When connecting DVI-I terminal, use to select RGB1(Analog) and then press .
4. Turn the DTV receiver on and select the channel that you want.
·
DTV video output of 480p or 720p will show the clear and detail image of screen.
2 1
Page 22

·Connecting to the PC
Connecting to the DVI-I terminal
Connecting to the Analog RGB
Connecting to the Analog RGB terminal
Connect DVI adapter into VGA D-Sub cable, then connect to the PDP DVI-I input terminal. Connect the
other end of the VGA Cable to D-sub Video output terminal of PC.
Connect audio cable from the audio output terminal of PC to DVI audio input terminal of the PDP.
(PC audio cable is not included and should be purchased separately.)
※
PC audio works only if a Sound Card is installed.
Connecting to the Digital RGB
Connect DVI cable from the DVI output terminal of PC to the DVI-I input terminal of the PDP.
Connect audio cable from the audio output terminal of PC to the DVI audio input terminal of the PDP.
(The DVI cable and the audio cable should be purchased. Contact your dealer.)
2 2
Page 23

How to use as PC Monitor
1. Turn on the PDP and press on the remote controller.
2.
Use to select RGB1(Analog) and then press .
(If the PC output is set to Digital, select RGB2(Digital).)
3. This PDP does not support Plug & Play function. When setting the PDP, select default.
4. Set the PC video output mode to VGA (640×480)/ SVGA (800×600)/ XGA (1024×768). In the
mode higher than SXGA (1280×
your PC video format to less than XGA mode. (Please refer to page 51 for the modes that PDP
supports)
1024), "Out of Range" message appears. Be sure to change
2 3
Page 24

·
Powering the PDP
·Selecting input source
Prior to using the PDP
Insert the power plug.
Connect external equipment properly.
·Please use only after carefully reading this manual.
·
Check the power connection to the AC outlet and the connection of AC input to the PDP.
Power On/ Off
·
To turn the PDP on :
Press the "Main Power" button of PDP and then press the "Standby" button.
·
To turn the PDP off :
Press "Standby" button on the PDP and then press the "Main Power" button.
Turning the main power switch off will save energy. It is the same as unplugging the power cord.
If ON Time setting is set, the main power should be ON.
·
To turn on/off by remote controller :
Press the POWER button of remote controller (If the PDP is not turned on, check that the "Main Power"
button on the PDP main body is turned on. The main power indicator will light up red if turned on).
2 4
CAUTION -
After turning off the main Power, please wait at least more than 3 seconds to turn the
main power back on.
Page 25

Selecting input source
Select the required input using in the pop up menu by pressing and then select
with .
Press Composite button, S-VIDEO button, COMPONENT button, RGB1 button, and RGB2 button
on the remote.
Ex) When selecting Analog RGB, press RGB1 button.
2 5
Page 26

·VOLUME - Adjusting the volume·MUTE - To mute the sound
·STILL - T
o pause the screen
·INFO - To check the current state
·MENU - Checking the menu
VOLUME - Adjusting the volume
Press for the volume increasing and press or decreasing.
MUTE - To mute the sound
Press . If you press the button again, the sound turns back on.
STILL - To pause the screen
Press . If you press the button again, the screen moves again.
INFO - To check the current state
Press . The current settings are displayed. It automatically disappears after
three (3) seconds.
2 6
Page 27

MENU - Checking the menu
If input selections are "AV Input (composite)", "S-video", and "Component", the video menu is activated.
If input selections are "RGB1" or "RGB2", the computer menu is activated.
The remote controller should be used for detailed menu settings and to change the settings.
Press .
Use to move the cursor bar up and down in the menu as shown in the figure.
Use to move to sub menu and store the setting value.
Use to leave the main menu.
[ Video Mode ]
[ Computer Mode ]
[ Sound Mode ]
[ Equalizer ]
[ Setup Mode ]
[ Timer Mode ]
2 7
Page 28

·PSM (Picture Status Memory)
·
Adjusting the screen in USER mode
PSM (Picture Status Memory)
Press .
Press
repeatedly to select the desired screen.
Standard Dynamic
Movie
Mild Game
User
Press .
1. Press to move to .
2. Press to get into a sub menu.
3. Select the required mode with .
·
Standard : It is the best screen setting (factory setting).
·
Dynamic : Select when using the PDP in a brightly lit environment.
·
Movie : Select when watching a movie. Then, *Film mode is operated.
·
Mild : Select when using the PDP in a dimly lit environment.
·
Game : Select to enjoy the Video games.
·
User : Select to set user's preferences.
※ Film mode - It makes video that originated from film smoother, more continuous.
W a r n i ng
: Shadow image could remain on Dynamic mode due to image sticking phenomenon.
2 8
Page 29

Adjusting the screen in USER mode
This is available when input signals are one of "AV input
·
Adjustment is possible either in one of preset modes or in User mode.
·
User defined values are stored in the User mode.
Press .
1. Press to move to .
2. Press to get into a sub menu.
3. Select the item to adjust with .
4. Adjust the setting value with .
Press after the adjustments are made.
(composite)", "S-Video", and "Component".
To leave from the main menu, press again.
User Mode
·
Brightness : It adjusts the brightness of the image.
·
Contrast : It adjusts the contrast of image.
·
Color : It adjusts the intensity of the color.
·
Tint : It adjusts the natural tint of the image.
·
Sharpness : It adjusts the clarity of the image.
2 9
Page 30

·ARC (Aspect Ratio Control)
·Watching PIP
ARC (Aspect Ratio Control)
Press .
Press repeatedly to select the desired screen size.
16 : 9
Zoom
16 : 9
4 : 3
Panorama
Zoom
Panorama
Screen Size
·
16 : 9 - It is a full screen size format.
·
Zoom - It enlarges the natural screen factor by approx. 5 %
·
Panorama - It makes 4:3 format fit into 16 : 9 format with minimal loss in content.
·
4 : 3 - It is the standard format of broadcasting.
4 : 3
3 0
Page 31

Watching PIP (Picture In Picture)
Press .
The followings will be displayed : Press
PIP [Large] PIP [Small] PBP
This function will work on Analog RGB, Digital RGB, Composite, S-video, and Component signals as inputs to
main screen and Composite, S-Video and Component (480i) as inputs to sub-screen.
When watching PIP, the main screen and the sub-screen may have differences in the quality of screen color.
PBP only works in S-Video, Composite, Component (480i) input signals.
to activate PBP at once.
Normal
PIP Input(Changing the input signal of PIP)
The following sub-screen will be selected in order :
Press .
1. Composite / 2. S-Video / 3. Component.
※ Component input will display only 480i input.
PIP position (Moving the sub picture)
As you press
※
If the sub-screen does not appear, (only a black screen is shown)
check to see that input terminal is connected.
, the location changes as illustrated next.
PIP Swap (How to exchange the main screen from sub screen)
Press
, and the main/sub screen will be exchanged.
※ This does not work in Analog RGB, Digital RGB, and
Component (480p, 720p, 1080i).
PIP Sound Swap (How to exchange the sound from the main to sub)
Press , the audio of the main/sub screen is exchanged.
PBP MODE (How to exchange the PBP mode)
Press , the mode of the PBP is exchanged from 1
6 : 9 to 4 : 3.
3 1
Page 32

·PC mode
Adjusting the computer screen
This is an auto adjustment for Analog RGB only.
Auto adjustment
On Analog RGB use Auto adjustment, When the screen is not focused or centered.
1. Press .
2. You may have to press multiple times to auto-adjust properly.
3. If manual compensation is required, adjust it manually.
※
Auto Adjustment works only on Analog RGB signals.
3 2
Page 33

Manual adjustment
Use this if fine adjustment is required after auto adjustment.
Press .
1. Press to move to .
2. Press to get into the sub menu.
3. Select the item to adjust with .
4. Adjust the setting value w i t h .
Press after making adjustments to return to the previous menu.
Press it again to leave the menu.
User Mode
·
Brightness : It adjusts the brightness of the image.
·Contrast : It adjusts the contrast of the image.
·
Phase : It adjusts the phase shift of the image. Use when image appears blurry or out of focus.
·H-Position : It moves the image on the screen horizontally.
·
V-Position : It moves the image on the screen vertically.
※
Phase, H-Position, V-Position are not adjustable in Digital RGB(RGB2).
3 3
Page 34

·Color Tone (Pre-set)
·Color Tone (Manual adjustment)
Color Tone (Pre-set)
P r e s s .
1. Press to move to .
2. Press to get into a sub menu.
3. Select the item "Color Tone" with .
4. Select the required color among "Cool", "Normal", "Warm", and "User" with
Press after making adjustments to
return to the previous menu.
Press it again to leave the menu.
User Mode
·Cool : This results in a blueish tone.
·Normal : This is standard color setting.
·Warm : This results in a reddish tone.
·
User : The user adjustable color of basic color segment of red, green and blue.
3 4
.
Page 35

Color Tone (Manual adjustment)
P r e s s .
1. Press to move to .
2. Press to get into a sub menu.
3. Select the item "Color Tone" with .
4. Select "User" with .
5. Press .
6. Select the item to adjust with .
7. Adjust the setting value with .
Press after making adjustments to return to the previous menu.
Press it again to leave the menu.
3 5
Page 36

·
SSM (Sound Status Memory)
·
Equalizer
SSM (Sound Status Memory)
Listening to the selected sound:
Press .
※
Select the pre-set sound mode by pressing the SSM button.
Standard
Press .
1. Press to move to .
2. Press to get into sub menu.
3. Select one of the pre-set modes with .
Press after the selection to return to the previous menu.
Press it again to leave the menu.
Music
Movie
User
Modes
·Standard : It is the flat sound setting with no equalizer effect at all.
·Music : It is preset for music listening.
·
Movie : It is preset sound for watching a movie.
·Speech : It is preset for hearing vocal audio clearly.
·
User : Select when listening to the sound to user's preference.
(Please refer to page 37 Equalizer.)
Speech
3 6
Page 37

Equalizer
Adjustment is possible in any equalizer mode and will be stored in the user mode.
Press .
1. Press to move to .
2. Press to get into the sub menu.
3. Select equalizer with .
4. Press , then the equalizer menu pop up.
5. Select the menu with and adjust
the setting value with .
Press after making adjustments to return to the previous menu.
Press again to leave the menu.
User Mode
·Volume : It adjusts the sound volume.
·Balance : It adjusts the volume of speakers on the left and the right.
·Equalizer : It adjusts the volume by frequency bands and the user can select the desired sound quality.
3 7
Page 38

·Stereo
·Reset
Stereo (How to set stereo)
If
the stereo to mono.
Press .
1. Press to move to .
2. Press to get into the sub menu.
3. Select "Stereo" with .
TV signal reception is poor, the separation of stereo will be bad and noisy. In this occasion, set
4. Select "Stereo" with .
Press after making adjustments to return to the previous menu.
Press it again to leave the menu.
3 8
Page 39

Reset (Factory default)
It resets all of the parameters to the factory default.
Press .
1. Press to move to .
2. Press to get into the sub menu.
3. Reset by pressing .
Press
※
The PDP will turn off then turn back on in few seconds. The parameters will be set to factory default.
after making adjustments to return to the previous menu.
3 9
Page 40

·Language
·Half Tone
Language
It adjusts the language of the OSD(On Screen Display) menu.
Press .
1. Press to move to .
2. Press to get into the sub menu.
3. Select the "Language" with
4. Select the desired language with .
Press after making adjustments to return to the previous menu.
Press it again to leave the menu.
.
4 0
Page 41

Half Tone
It changes the background color of the menu frame.
It can be set in a semitransparent or opaque manner.
Press .
1. Press to move to .
2. Press to get into the sub menu.
3. Select "Half Tone" menu with .
4. Select "On (Semitransparent)" or "Off (Opaque)" by pressing .
Press after making adjustments to return to the previous menu.
Press it again to leave the menu.
4 1
Page 42

·Panel Protection
·PBP Mode
Panel Protection (How to set the panel protection function)
※
It is recommended that the panel protection mode be used on a paused/ frozen screen or on a screen
on which a company's logo remains for a long period.
※
There is a possibility that screen flickers during changing panel protection mode. But, it is not a defect.
Press .
1. Press to move to .
2. Press to get into the sub menu.
3. Select the required panel protection mode with .
Press after making adjustments to return to the previous menu
Press it again to leave the menu.
·
Scroll : This is a function that scrolls a screen at 10 second intervals.
·
Bright Down : This is a function that lowers brightness of the screen for panel protection.
·All : Scroll and Bright Down mode are simultaneously operated.
·Off : Panel Protection mode is not operated.
CAUTION
-
This function does not fully prevent the image sticking that occurs when the fixed
screen continues for long, due to the feature of the panel.(Please refer to page 5)
.
4 2
Page 43

PBP Mode
·
It changes the ratio of the PBP screen from 16:9 to 4:3.
Press .
1. Press to move to
2. Press
3. Select "PBP Mode" menu with .
4. Select "Mode 1" or "Mode 2" by pressing .
Press after making adjustments to return to the previous menu.
Press it again to leave the menu.
to get into the sub menu.
.
PBP Modes
·Mode 1 : It makes 16:9 PBP ratio.
·Mode 2 : It makes 4:3 PBP ratio.
4 3
Page 44

·Current Time setting
·On Time / Off Time (Time setting)
Current Time ( How to set the current time)
It sets the current time and then the automatic turn on/off can be set.
The time settings are retained only if the main power is on. If the Main power is off, the time
is reset. To retain the time setting, do not turn the main power switch off.
Press .
1. Press to move to .
2. Press to get into the sub menu.
Move to "Hour" with
Move to "Minute" with
Move to "AM" with and then select "AM" or "PM" with .
Press after adjustment to return to the previous menu.
Press it again to leave the menu.
Once "Current Time" is set, "On Time", "Off Time", "On time volume" settings are adjustable.
and adjust "Current Hour" with
and then adjust "Current Minute" with .
.
4 4
Page 45

On Time / Off Time (Time setting)
Current Time must be set correctly for this function to work.
Press .
1. Press to move to .
2. Press to get into the sub menu.
3. Select "On Time" or "Off Time" with .
Move to "Hour" with and then adjust the desired "Hour" with .
Move to "Minute" with
Move to "AM" with
Move to "Off" with and then select "On" with .
Press
Press it again to leave the menu.
after making adjustments to return to the previous menu.
and then adjust the desired "Minute" with
and then select "AM" or "PM" with
.
.
4 5
Page 46

·On Time Volume
·Sleep Timer
On Time Volume (How to set the volume)
Current time must be set correctly for this function to work.
Press .
1. Press to move to .
2. Press to get into the sub menu.
3. Select "On Time Volume" with .
4. Adjust the desired volume value with
Press
Press it again to leave the menu.
after making adjustments to return to the previous menu.
4 6
.
Page 47

Sleep Timer
It sets time to make automatic turn off for the sleeping.
Press .
The selection of the sleep timer will appear.
Sleep Timer: OFF
Sleep Timer:
120 Minute
Sleep Timer:
15 Minute
Sleep Timer:
90 Minute
Sleep Timer:
30 Minute
Sleep Timer:
60 Minute
To disable the sleep timer set it to "Sleep Timer: OFF" by pressing .
※
After the sleep timer appears on the screen for more than 20 seconds without pressing the
"Sleep" button, the appeared sleep timer is automatically set.
※
To check the current "Sleep timer" setting, press once.
※
Reset the sleep timer again, after the PDP power is turned off.
4 7
Page 48

·T
rouble shooting
In case a problem occurs with your PDP TV, please take the following steps first.
If you still have the problem, turn the power off and contact your dealer or an authorized
service center.
• Screen related Matters
The screen does not appear.
The screen appears too
slowly after the power is turned on.
Screen is too bright or too dark. Perform brightness adjustment or Contrast adjustment.
Screen is too large or too small. Adjust the screen size. (Please refer to page 38)
Stripes appear on the screen
and it shakes. electric drills.
Screen appears in black and white. Adjust the screen in user mode. (Please refer to page 37)
Simultaneous Screen
does not appear.
The screen does not move.
Computer Input Screen is abnormal.
Automatic Turn On does not work.
Problem Action
Is the power plug pulled out? Insert the power plug. Turn
the main power button on and press the power button of
the remote controller.
This problem occurs for a brief time in the process of
image elimination processing in order to hide temporary
screen noise that occurs when the power is turned on. But
if the screen does not come after 1 minute has passed,
contact your dealer or an authorized service center.
(Please refer to page 37)
Stop using wireless telephones, hair driers and
Check that PDP TV and external equipment are
connected.
pressing sub-screen selection.
Press the STILL button. (Please refer to page 28) Check if
the Pause button is pressed on external equipment.
Execute automatic adjustment by pressing AUTO ADJ
button. If the screen is still abnormal after automatic
adjustment, perform manual fine adjustment. Please refer
to page 41.
Automatic Turn On function works only when turning the
PDP TV off with the remote controller or Standby button.
Check the inputs of simultaneous screen by
4 8
Page 49

• Sound related Matters
Problem Action
Screen appears,
but there is no sound.
Lots of noise (static) occurs.
1. Press the "Mute"button. (page 26)
2. Increase the sound by pressing volume adjustment
button.
3. Check if voice terminal of external input is connected
properly.
4. Check if speaker cables are connected properly.
5. If it is on PIP mode, convert audio of main screen
and sub-screen by pressing S/SWAP.
6. Select and check the other input.
If the sound still does not work and the other channels
are the same after you have done as the above, contact
your dealer or an authorized service center.
When connecting a Set-Top-Box, check that it is on stereo
broadcasting. If it is, the TV channel may not be available or
the reception may be bad. Select "Mono" (Please refer to
page 38) Check the audio source with another player. If that
source is good, contact your dealer or an Authorized service
center.
4 9
Page 50

·Trouble shooting
·Supporting display mode
• Others
Problem
remote controller does not work. 1. Check if main power is On.
2. Check that the batteries of the remote controller were
loaded properly.
3.
Check to see if any obstacle exists between the PDP TV
and the remote controller and remove it, if any.
4. If the batteries have no power, replace them with two
new batteries.
PDP TV makes strange noise.
PDP TV indication lamp is On. The red means the Stand-by power is ON. It will take a
This PDP TV is for household use and registered as suitable on electromagnetic waves.
Therefore, you can use it in every location as well as residential areas.
It is the noise when the mechanism expands or contracts
from to changes to the environment due to factors such
as humidity, temperature, etc. It is not a failure.
few seconds to turn off as the main power is off.
Action
5 0
Page 51

Supporting display mode
It is optimal screen when the resolution is 640 x 480.
Resolution Horizontal Frequency (KHz) Vertical Frequency (Hz)
31.47 60
640×480
720×400
800×600
1024×768
Considerations in Installation
If any signal of unsupported resolution is input, the "Out of Range" message appears.
37.86 72
37.50 75
31.47 70
35.15 56
37.88 60
48.88 72
46.88
48.36 60
56.48 70
60.02 75
75
5 1
Page 52

·MEMO
·Specifications
Component Mode
[
Y, CB(
PB), CR( PR)
]
Resolution Horizontal Frequency (KHz) Vertical Frequency (Hz)
7 2 0×4 8 0 15.73 6 0 . 0 0 SDTV, DVD 480i
7 2 0×4 8 0 1 5 . 6 3 5 0 . 0 0 SDTV, DVD 576i
7 2 0×4 8 0 31.47 5 9 . 9 4 SDTV, 480p
1 2 8 0×7 2 0 45.00 6 0 . 0 0 HDTV, 720p
1 2 8 0×7 2 0 44.96 5 9 . 9 4 HDTV, 720p
1 9 2 0×1 0 8 0 33.75 6 0 . 0 0 HDTV, 1080i
1 9 2 0×1 0 8 0 33.72 5 9 . 9 4 HDTV, 1080i
Specifications
Aspect Ratio 16 : 9
Screen Size (H×V) 920.1×518.4mm
Resolution 852×480(Wide VGA)
Cell pitch (H×V) 0.36(H)×1.08(V)mm
Displayable Colors 16.77M(256×256×256)
Brightness 1000cd/㎡(w/o filter)
Contrast 1200:1
Color Temperature 9500。K
Viewing Angle 160。
Input signal
RGB Input
AC Input AC100-240V~, 50/60Hz, 4A
Power Consumption 320W
If any signal of unsupported resolution is input, the "Out of Range" message appears.
NTSC, PAL-M, PAL-N, PAL, SECAM,
SD, HD, VGA, SVGA, XGA
DVI-Ⅰ(Analog/Digital RGB)
5 2
Page 53

MEMO
Page 54

·MEMO
·User information
MEMO
Page 55

User information
Note: This equipment has been tested and found to comply with the
limit for a Class B digital device, pursuant to part 15 of the FCC
Rules. These limits are designed to provide reasonable protection
against harmful interference when the equipment is operated in a
commercial environment.
This equipment generates, uses and can radiate radio frequency
energy and, if not installed and used in accordance with the instruc
tion manual, may cause harmful interference to radio communications.
Operation of this equipment in a residential area is likely to cause
harmful interference in which case the user will be required to connect the interference at his own expense.
-
Change or modification not expressly approved by the party respon
sible for compliance could void the user’s authority to operate the
equipment.
This is a class B product. In a domestic environment this product
may cause radio interference in which case the user may be
required to take adequate measures.
-
 Loading...