

Page 1
PD4010
PD7010
PD7060
User's Manual
Page 2

Planar Systems, Inc.
Corporate Headquarters
1195 NW Compton Drive
Beaverton, OR 97006-1992
Planar Customer Support
Telephone:
US: 1-866-PLANAR1 (866) 752-6271
Outside US: (503) 748-5799
E-mail: PlanarSupport@planar.com
Online Technical Library: http://www.planar.com/support
Hours: M-F, 8am - 8pm ET, 12pm - 12am GMT
2
Page 3

Copyright
CAUTION
This publication, including all photographs, illustrations and software, is protected under international
copyright laws, with all rights reserved. Neither this manual, nor any of the material contained herein,
may be reproduced without written consent of the author.
© Copyright October, 2006
Disclaimer
The information in this document is subject to change without notice. The manufacturer makes no representations or warranties with respect to the contents hereof and specifi cally disclaims any implied
warranties of merchantability or fi tness for any particular purpose. The manufacturer reserves the right
to revise this publication and to make changes from time to time in the content hereof without obligation
of the manufacturer to notify any person of such revision or changes.
Trademark Recognition
Kensington is a U.S. registered trademark of ACCO Brand Corporation with issued registrations and
pending applications in other countries throughout the world.
All other product names used in this manual are the properties of their respective owners and are acknowledged.
Important Safety Information
Congratulations on purchasing the DLP projector!
It is strongly recommended that you read this section carefully before using
Important!
Symbols Used
Warning symbols are used on the unit and in this manual to alert you of hazardous situations.
The following styles are used in this manual to alert you to important information.
Important!
CAUTION
the projector. These safety and usage instructions will ensure that you enjoy
many years of safe use of the projector. Keep this manual for future reference.
Provides additional information on the topic at hand.
Provides additional information that should not be overlooked.
Alerts you to situations that may damage the unit.
Alerts you to situations that may damage the unit, create a hazardous environment, or cause personal injury.
Throughout this manual, component parts and items in the OSD menus are denoted in bold font as in
this example:
“Push the Menu button on the remote control to open the Main menu.”
3
Page 4

General Safety Information
•
Do not open the unit case. Aside from the projection lamp, there are no user-serviceable parts
in the unit. For servicing, contact qualifi ed service technician.
•
Follow all warnings and cautions in this manual and on the unit case.
•
The projection lamp is extremely bright by design. To avoid damage to eyes, do not look into
the lens when the lamp is on.
•
Do not place the unit on an unstable surface, cart, or stand.
•
Avoid using the system near water, in direct sunlight, or near a heating device.
•
Do not place heavy objects such as books or bags on the unit.
Power Safety
•
Only use the supplied power cord.
•
Do not place anything on the power cord. Place the power cord where it will not be in the way
of foot traffi c.
•
Remove the batteries from the remote control when storing or not in use for a prolonged period.
Replacing the Lamp
Replacing the lamp can be hazardous if done incorrectly. Refer to “Replacing the Projection Lamp” on
page 31 for clear and safe instructions for this procedure. Before replacing the lamp:
•
Unplug the power cord.
•
Allow the lamp to cool for about one hour.
Important Recycle Instructions:
Lamp(s) inside this product contain mercury. This product may contain other electronic waste that can be
Hg
hazardous if not disposed of properly. Recycle or dispose in accordance with local, state, or federal Laws.
For more information, contact the Electronic Industries Alliance at WWW.EIAE.ORG.
For lamp specifi c disposal information check WWW.LAMPRECYCLE.ORG.
Disposal of old Electrical & Electronic Equipment (Applicable throughout the European Union and other
European countries with separate collection programs)
This symbol found on your product or on its packaging, indicates that this product should not be
treated as household waste when you wish to dispose of it. Instead, it should be handed over to
an applicable collection point for the recycling of electrical and electronic equipment. By ensuring
this product is disposed of correctly, you will help prevent potential negative consequences to the
environment and human health, which could otherwise be caused by inappropriate disposal of this
product. The recycling of materials will help to conserve natural resources. This symbol is only valid
in the European Union. If you wish to discard this product, please contact your local authorities or
dealer and ask for the correct method of disposal.
Cleaning the Projector
•
Unplug the power cord before cleaning. Refer to “Cleaning the Projector” on page 33.
•
Allow the lamp to cool for about one hour.
Page 5

Regulatory Warnings
Before installing and using the projector, read the regulatory notices in the “Regulatory Compliance” section on page 45.
Main Features
Theater image right at home
•
Compatible with all major video standards including NTSC, PAL, and SECAM
•
High defi nition resolution (1280 x 720 for PD7010 and PD7060 only), and 16:9 wide-screen
•
resolution from any HD source.
Supports resolutions up to WXGA at 16.7 million colors to deliver crisp, clear images
•
•
Flexible setup allows for front and rear projections
•
Line-of-vision projections remain square, with advanced keystone correction for angled
projections
•
Input source can be set for automatic detection
About This Manual
This manual is intended for end users and describes how to install and operate the DLP projector.
Wherever possible, relevant information—such as an illustration and its description—has been kept on
one page. This printer-friendly format is both for your convenience and to help save paper, thereby protecting the environment. It is suggested that you only print sections that are relevant to your needs.
Register Your Planar Product Today
Thank you for choosing Planar. To assure you receive all the benefi ts of your Planar product and ser-
vices, register your Planar product today. Visit our web site:
http://www.planar.com/support/product_registation.html
Cables, Replacement Lamps and Accessories
To fi nd cables, replacement lamps and accessories for your Planar projector, LCD monitor, touchscreen,
or other Planar products, visit our online store:
stock Planar products at
http://www.planar.com/howtobuy.
http://www.PlanarOnlone.com or fi nd other stores that
5
Page 6

Table of Contents
GETTING STARTED
Packing Checklist ................................................................................................................................................... 7
A Tour of the Projector .......................................................................................................................................... 8
Remote Control Functions .................................................................................................................................. 12
Remote Control Operating Range ...................................................................................................................... 13
Projector and Remote Control Buttons .............................................................................................................. 13
SETUP AND OPERATION
Inserting the Remote Control Batteries ............................................................................................................. 14
Connecting Input Devices ................................................................................................................................... 15
Starting and Shutting down the Projector ......................................................................................................... 16
Adjusting the Projector Level ............................................................................................................................. 17
Adjusting the Focus and Zoom ........................................................................................................................... 18
ON-SCREEN DISPLAY (OSD) MENU SETTINGS
OSD Menu Controls ............................................................................................................................................. 19
Setting the OSD Language .................................................................................................................................. 20
OSD Menu Overview ............................................................................................................................................ 21
Image Menu .......................................................................................................................................................... 22
Display Menu ....................................................................................................................................................... 25
Advanced Menu ................................................................................................................................................... 27
Language Menu ................................................................................................................................................... 28
User Color Menu .................................................................................................................................................. 29
Service Menu ....................................................................................................................................................... 30
MAINTENANCE AND SECURITY
Replacing the Projection Lamp ........................................................................................................................... 31
Resetting the Lamp .............................................................................................................................................. 33
Cleaning the Projector ......................................................................................................................................... 33
Using the Kensington® Lock .............................................................................................................................. 34
TROUBLESHOOTING
Tips for Troubleshooting ..................................................................................................................................... 35
LED Error Messages ............................................................................................................................................ 36
Common Problems and Solutions ...................................................................................................................... 37
SPECIFICATIONS
Hardware Specifi cations ...................................................................................................................................... 39
Input/output Connectors ..................................................................................................................................... 40
TIMING MODE TABLE
Projector Dimensions .......................................................................................................................................... 44
REGULATORY COMPLIANCE
FCC Warning ......................................................................................................................................................... 45
Canada .................................................................................................................................................................. 45
Safety Certifi cations ............................................................................................................................................. 45
EN 55022 Warning ................................................................................................................................................ 45
6
Page 7

GETTING STARTED
Packing Checklist
Carefully unpack the projector and check that the following items are included.
DVI to HDMI Adaptor
(PD4010 only)
DLP Projector
Power Cord
(By country)
Remote Control
(with two AAA batteries)
Component Video
PD4010
PD7010
PD7060
Cable
User's Guide
CD-ROM
(This User’s Manual)
User’s Guide
Contact your dealer immediately if any items are missing, appear damaged, or if the unit
does not work.
7
Page 8
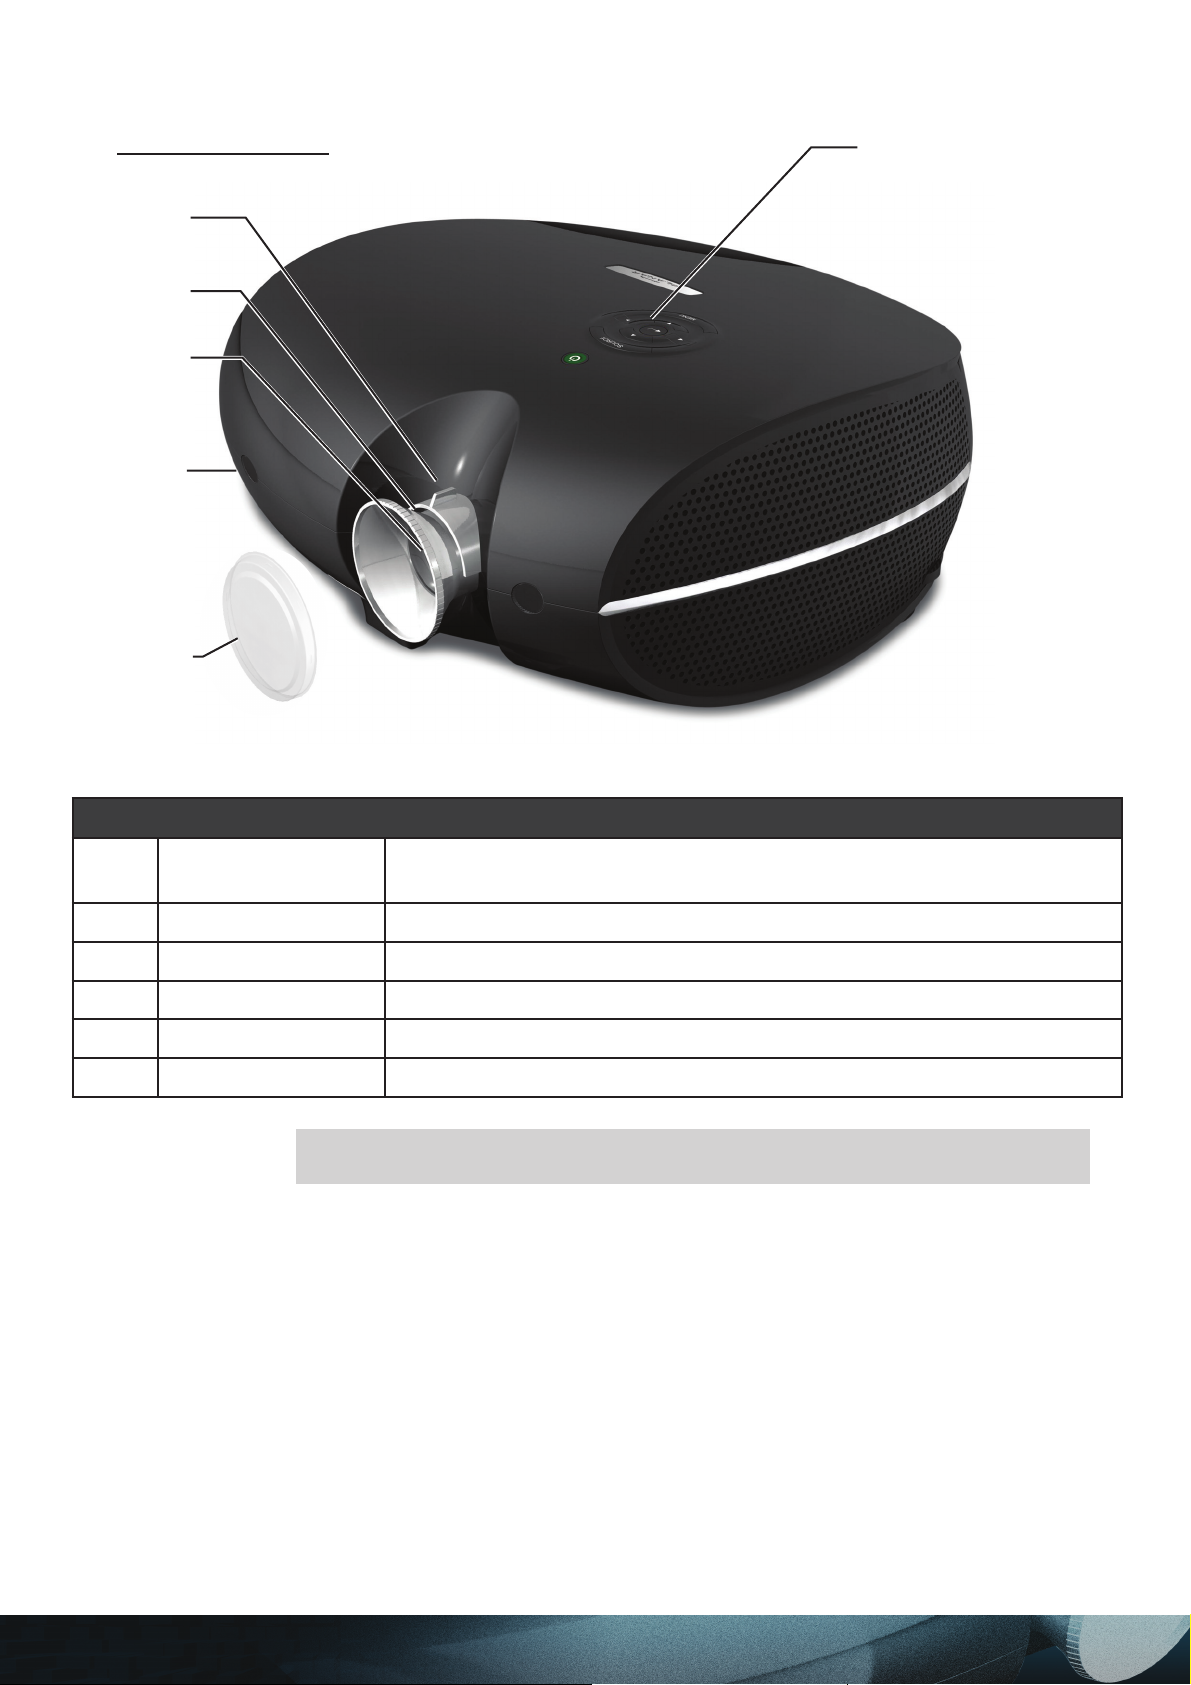
A Tour of the Projector
Front-right View
2
3
4
5
6
1
ITEM LABEL DESCRIPTION
1 Control panel
2 Lens zoom Enlarges the projected image
3 Focus Focuses the projected image
4 Lens Remove Lens Cover before use
5 Front IR receiver Receiver for IR signal from remote control
6 Lens cover
Important!
Ventilation openings on the projector allow for good air circulation, which
keeps the projector lamp cool. Do not obstruct any of the ventilation openings.
Operates the onscreen display. Refer to the next page for a description
of the buttons
Attach the lens cover to protect lens when not in use
8
Page 9
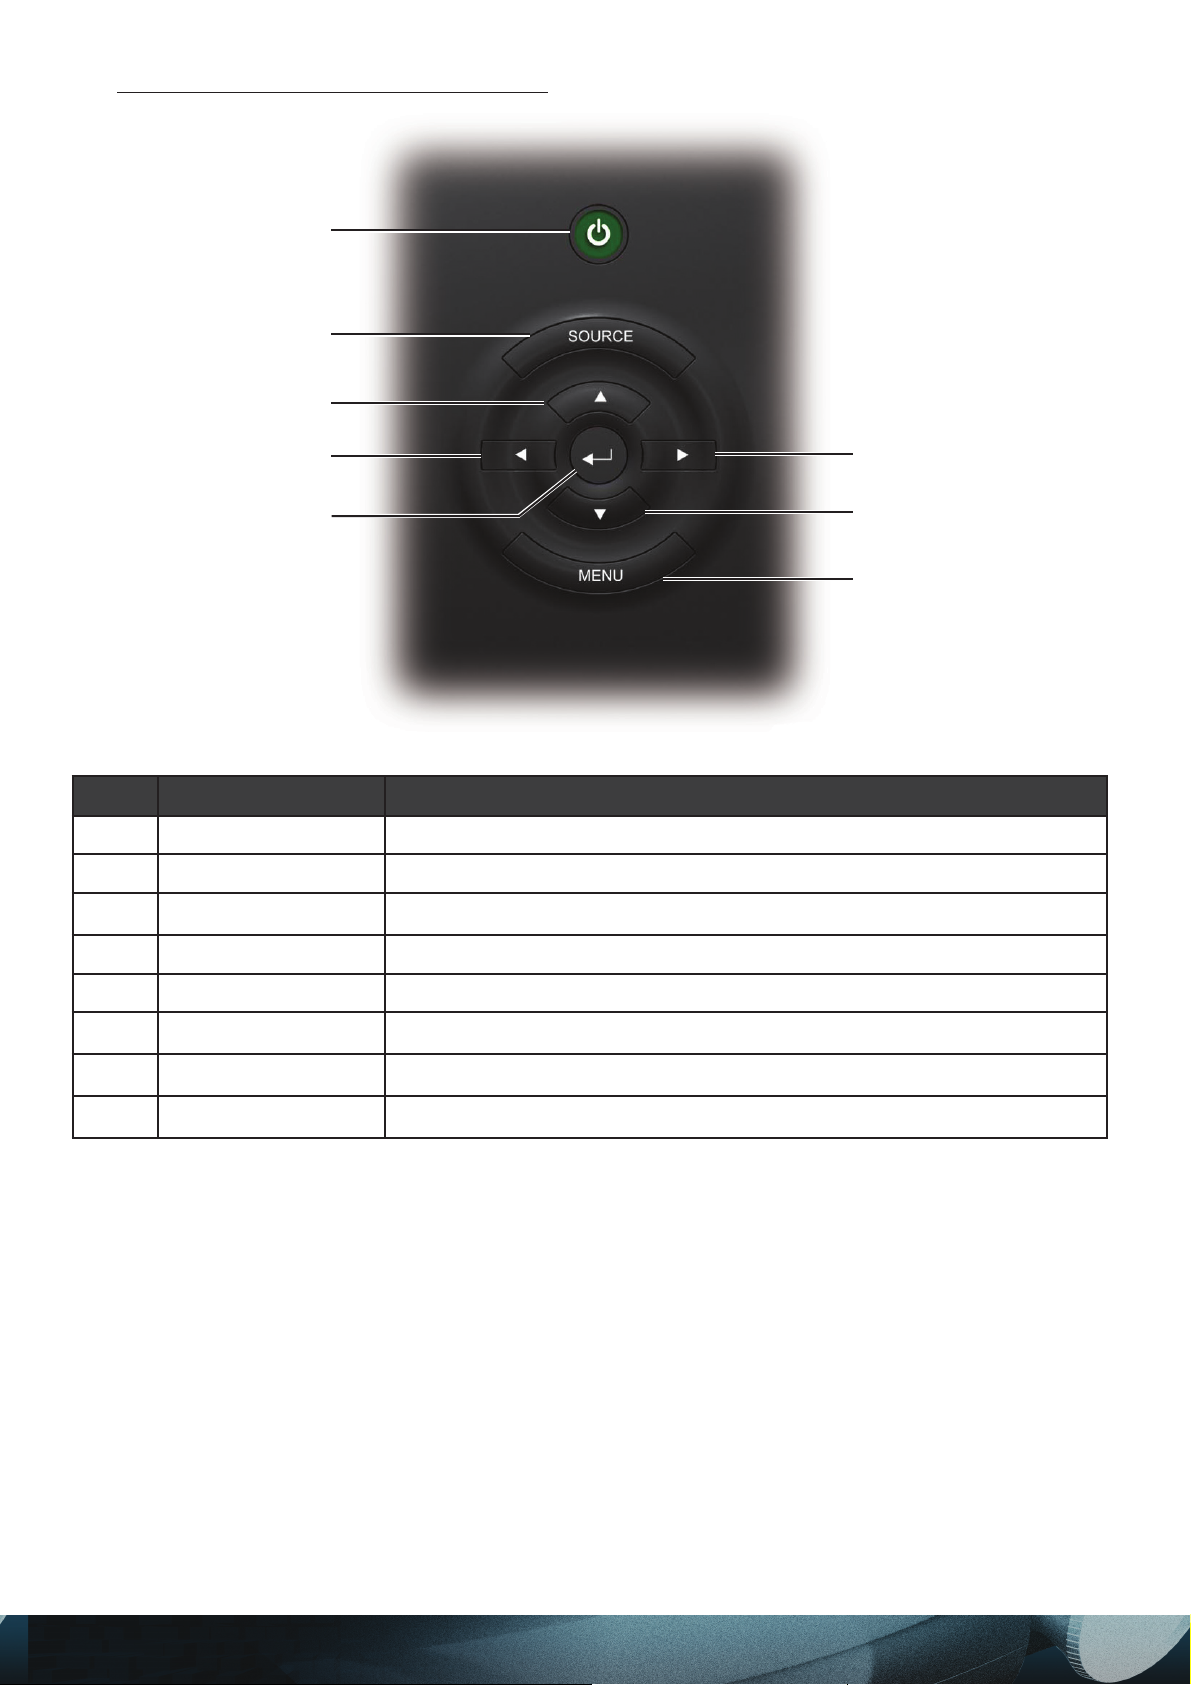
On-screen Display (OSD) Buttons
1
2
3
4
5
ITEM LABEL DESCRIPTION
1 Power Turns the projector on or off
2 Source Detects the input device
3 Up cursor
4 Left cursor Navigates and changes settings in the OSD
5 Enter Changes settings in the OSD
6 Right cursor
Navigates and changes settings in the OSD
Navigates and changes settings in the OSD
6
7
8
7 Down cursor
8 Menu Opens and exits the OSD
Navigates and changes settings in the OSD
9
Page 10
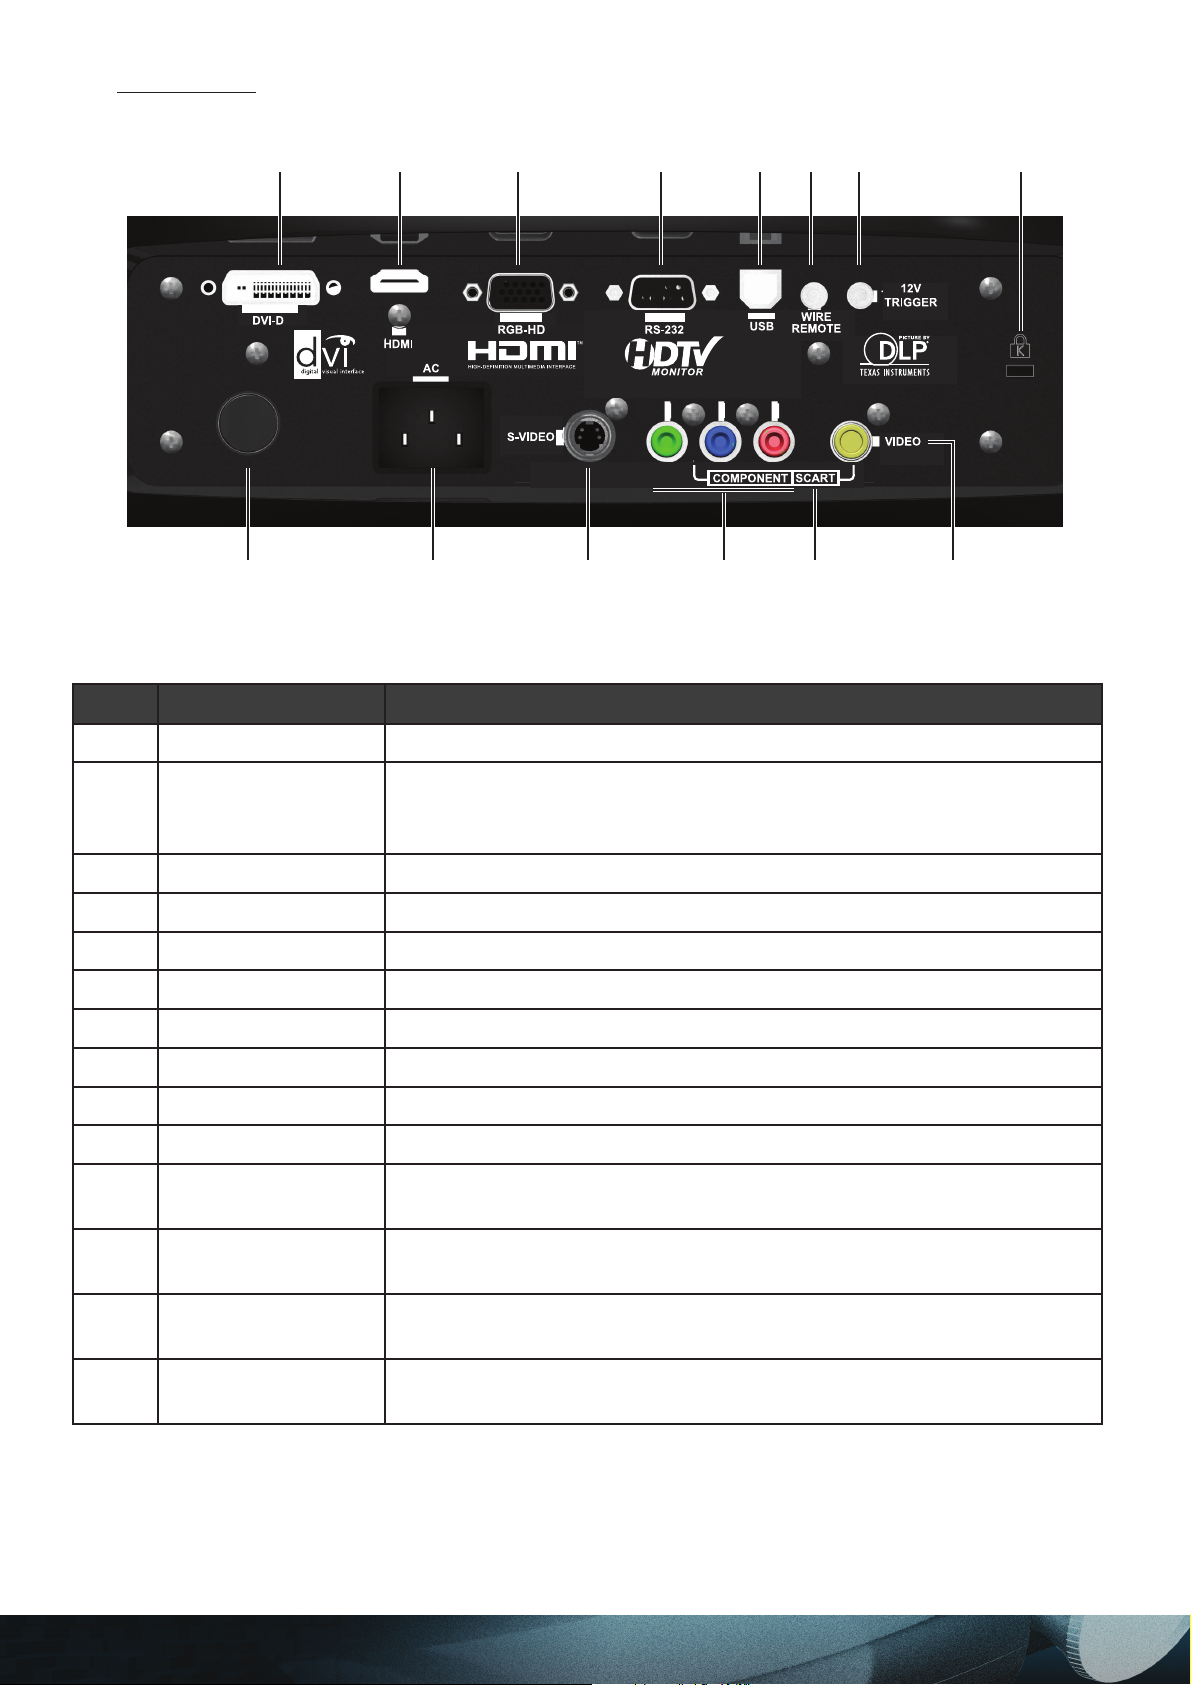
Rear Ports
123 4567
Y
See User's Manual for SCART
9
10 11
Pr / CrPb / Cb
12 13
ITEM LABEL DESCRIPTION
8
14
1 DVI-D Connect the computer cable from a computer or video source
Connect a High-Defi nition Multimedia Interface cable from home the-
2 HDMI
ater and consumer electronics equipment (Only in models PD7010
and PD7060)
3 RGB HD in Connect a VGA cable (not supplied) from a computer
4 RS-232 Installation control
5 USB Connect the USB cable (not supplied) from a computer
6 Wired remote Connect a wired remote control device
7 Trigger 12V 3.5mm mini-jack trigger provides a 12 volt, 0.25 amp DC output
8 Security lock Secure to permanent object with a Kensington® Lock system
9 Rear IR receiver Receiver for IR signal from remote control
10 Power Connect the supplied power cord
11 S-Video
12 Component
13 SCART
Connect S-Video cable (not supplied) from a video device to the
S-Video jack
Connect component video cables from a video device to the Y,
Pb/Cb, and Pr/Cr RCA jacks
Connect SCART video cables (SCART to the Y, Pb/Cb, Pr/Cr and
yellow Video-In jack, not supplied) from a video device
14 Video-in
Connect a composite video cable (not supplied) from a video device to
the yellow RCA jack
10
Page 11
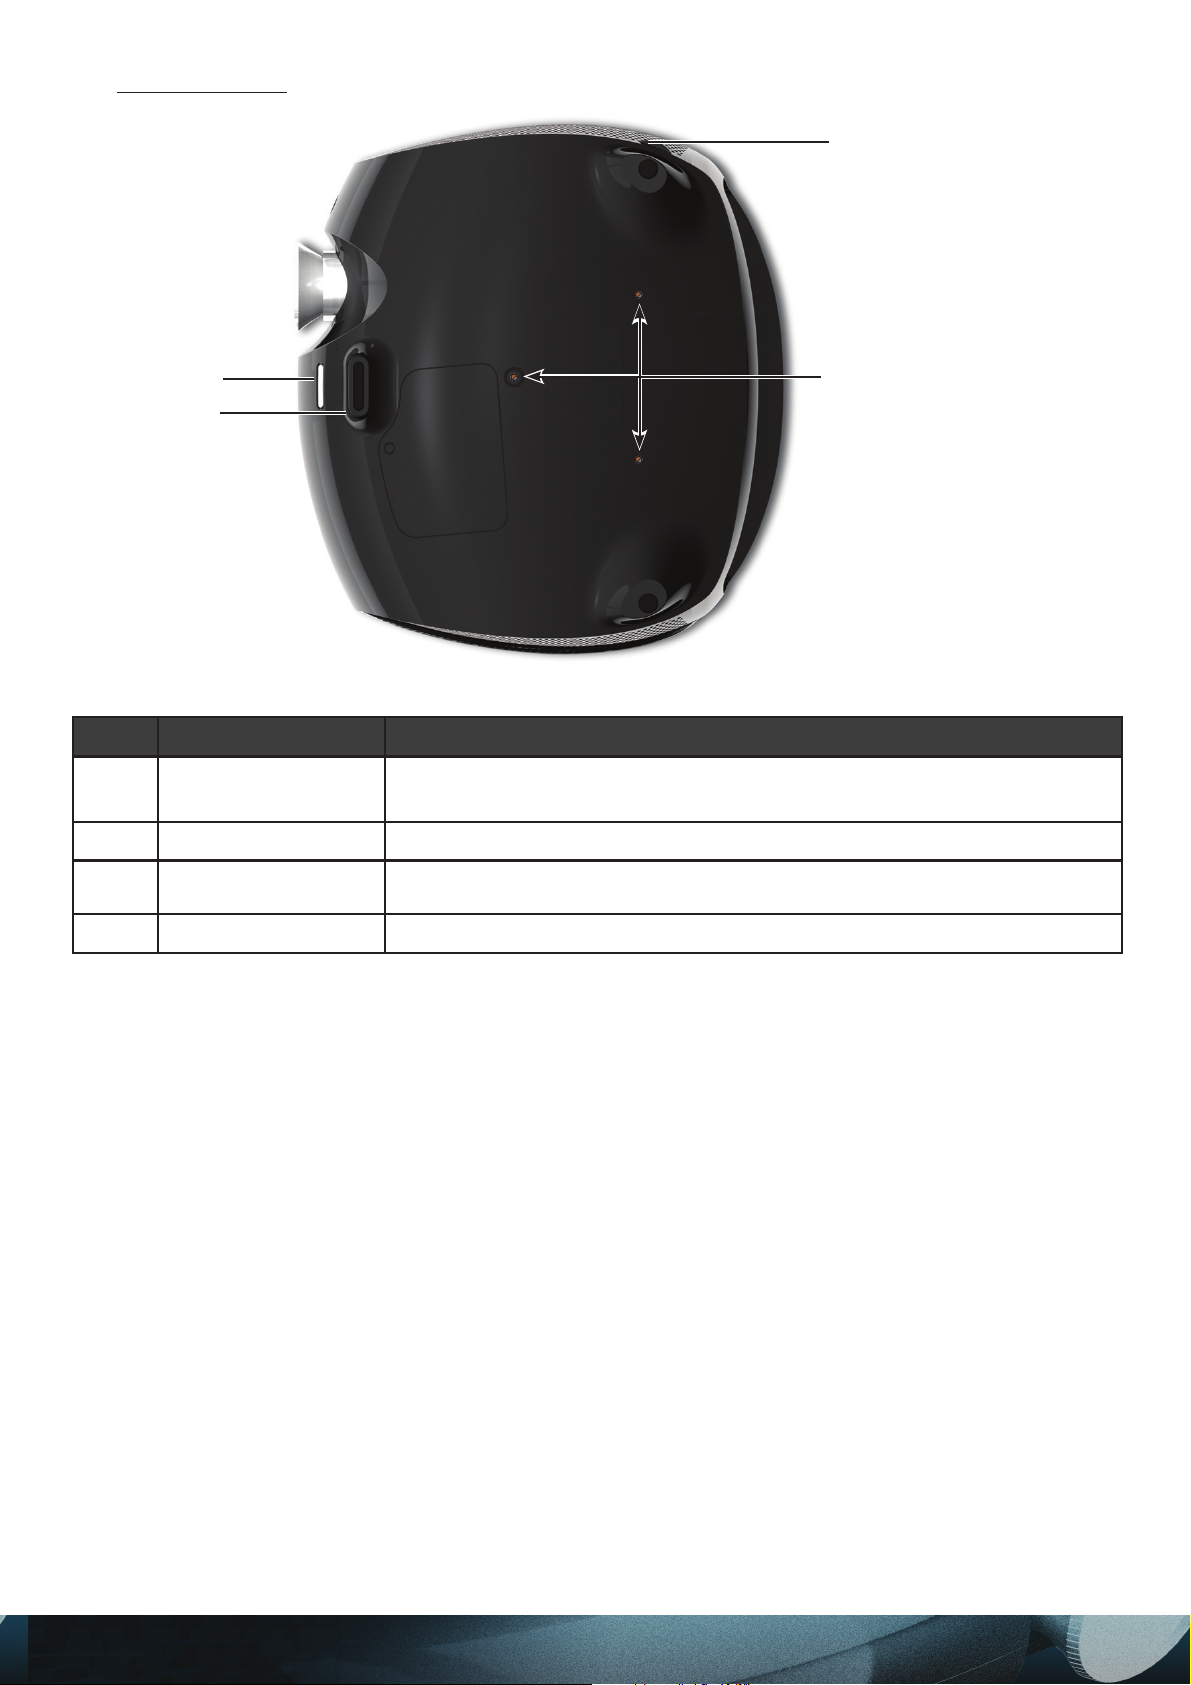
Bottom View
2
3
4
1
ITEM LABEL DESCRIPTION
1
2 Tilt adjuster Adjust angle of the picture
3
4 Height adjuster Adjuster drops down when adjuster button is pushed
Ceiling support
holes
Height adjuster
button
Contact your dealer for information on mounting the projector on a
ceiling
Push to release height adjuster
11
Page 12
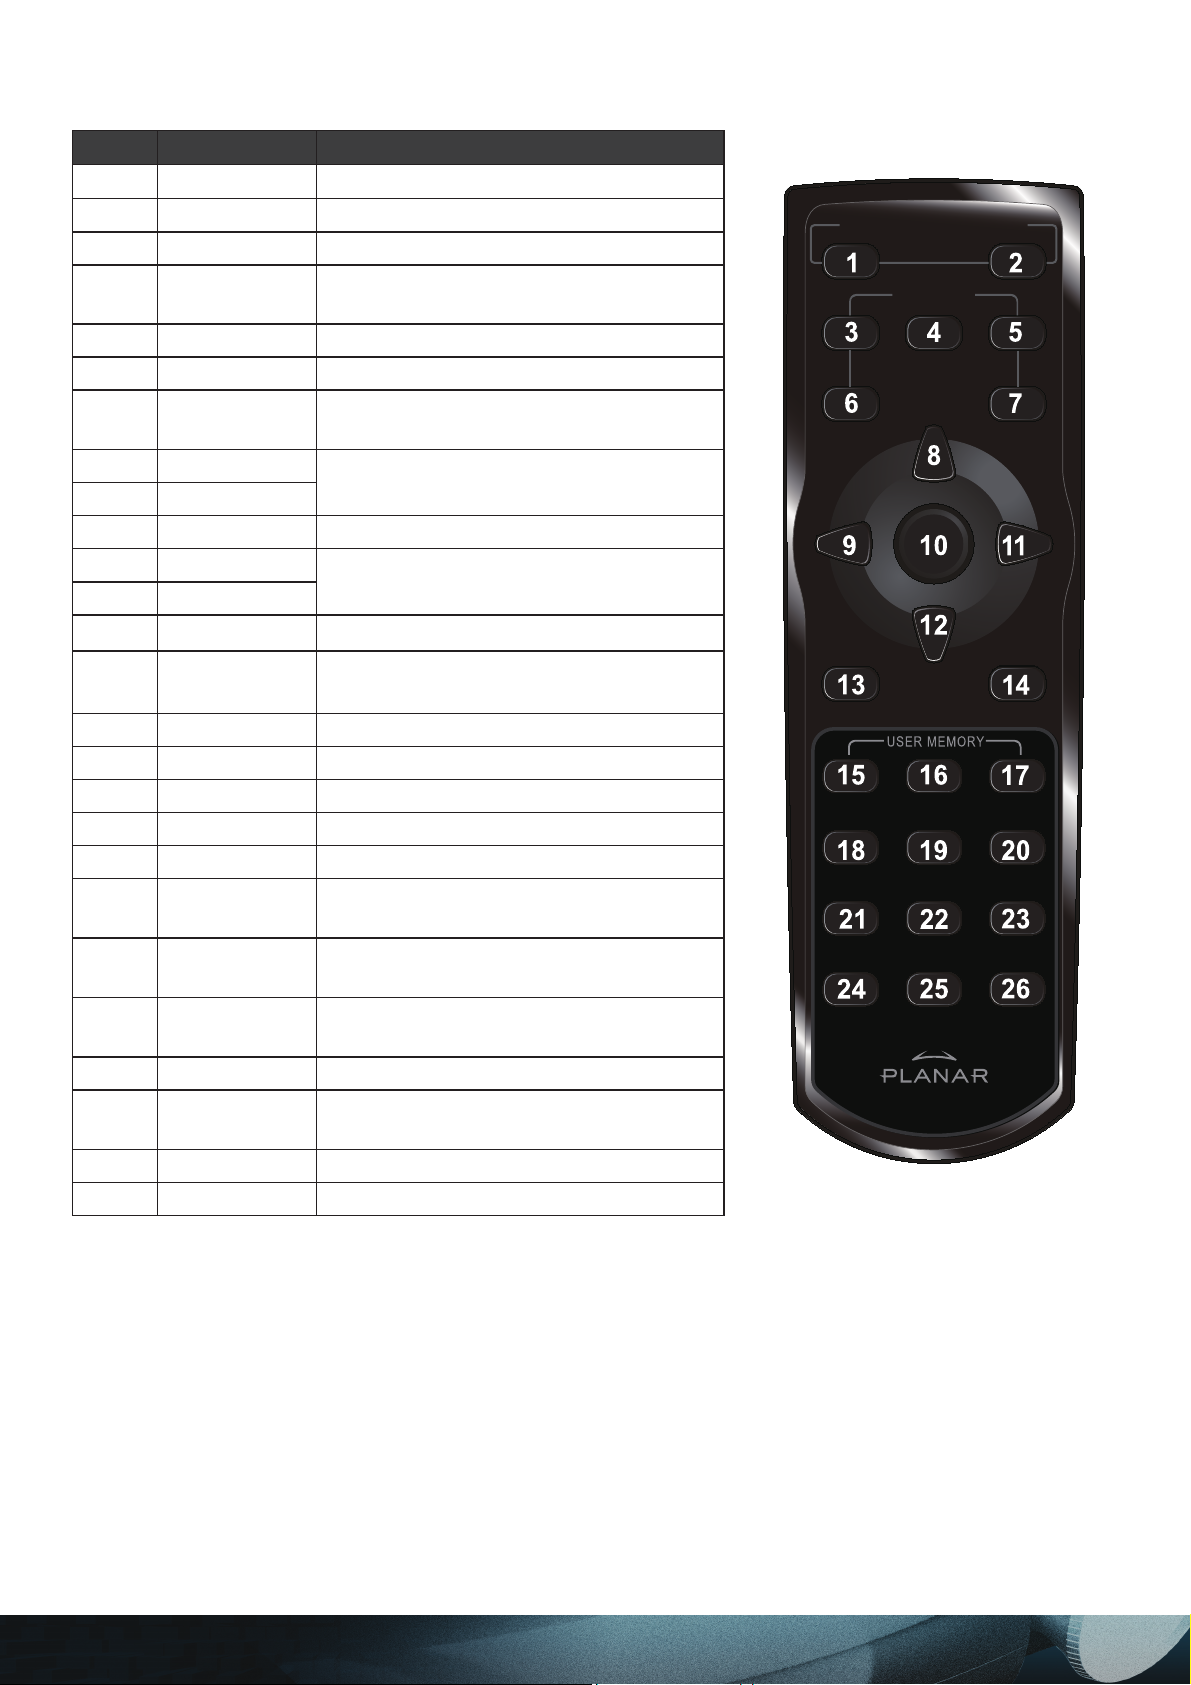
Remote Control Functions
ITEM LABEL DESCRIPTION
1 Power on Turns projector power on
2 Power off Turns projector power off
3 Source 1 User confi gurable (Default: HDMI)
4 Source 2
5 Source 3 User confi gurable (Default: DVI-D)
6 Source 4 User confi gurable (Default: PC)
7 Source 5
8 Up cursor
9 Left cursor
10 Enter Changes settings in the OSD
11 Right cursor
12 Down cursor
13
Menu Opens the OSD
User confi gurable
(Default: Component)
User confi gurable
(Default: Video/S-Video)
Navigates and changes settings in the
OSD
Navigates and changes settings in the
OSD
ON ─ POWER ─ OFF
SOURCE
1
45
23
14
Exit
Exits OSD menus or menu selection
fi elds
15 Hot key 1 User memory setting 1
16 Hot key 2 User memory setting 2
17 Hot key 3 User memory setting 3
18 Contrast Adjusts screen contrast
19 Brightness Adjusts screen brightness
20 Aspect ratio
21 Gamma
22 Overscan
Toggles aspect ratio:
16:9 → Letterbox → 4:3 → Native
Toggles gamma: Film → Video → Cinema → PC → Photo
Toggles overscan:
Off → Crop → Zoom
23 Keystone Adjusts keystone
24 Auto
Automatically synchronizes display
settings in RGB mode
25 Blank Makes the screen blank
26 LED Turns back LED light on and off
12
Page 13
Remote Control Operating Range
The remote control uses infrared transmission to control the projector. It is not necessary to point
the remote directly at the projector. Provided you are not holding the remote control perpendicular
to the sides, the remote control functions within a radius of about 10 meters (33 feet) and 30
degrees above or below the projector level. If the projector does not respond to the remote control,
move a little closer.
Avoid using the remote control with bright fl uorescent lighting turned on.
1.
Certain high-frequency fl uorescent lights can disrupt remote control operation.
Be sure nothing obstructs the path between the remote control and the projec-
2.
Important!
tor. If the path between the remote control and the projector is obstructed, you
can bounce the signal off certain refl ective surfaces such as projector screens.
The buttons and keys on the projector have the same functions as the cor-
3.
responding buttons on the remote control. This user’s manual describes the
functions based on the remote control.
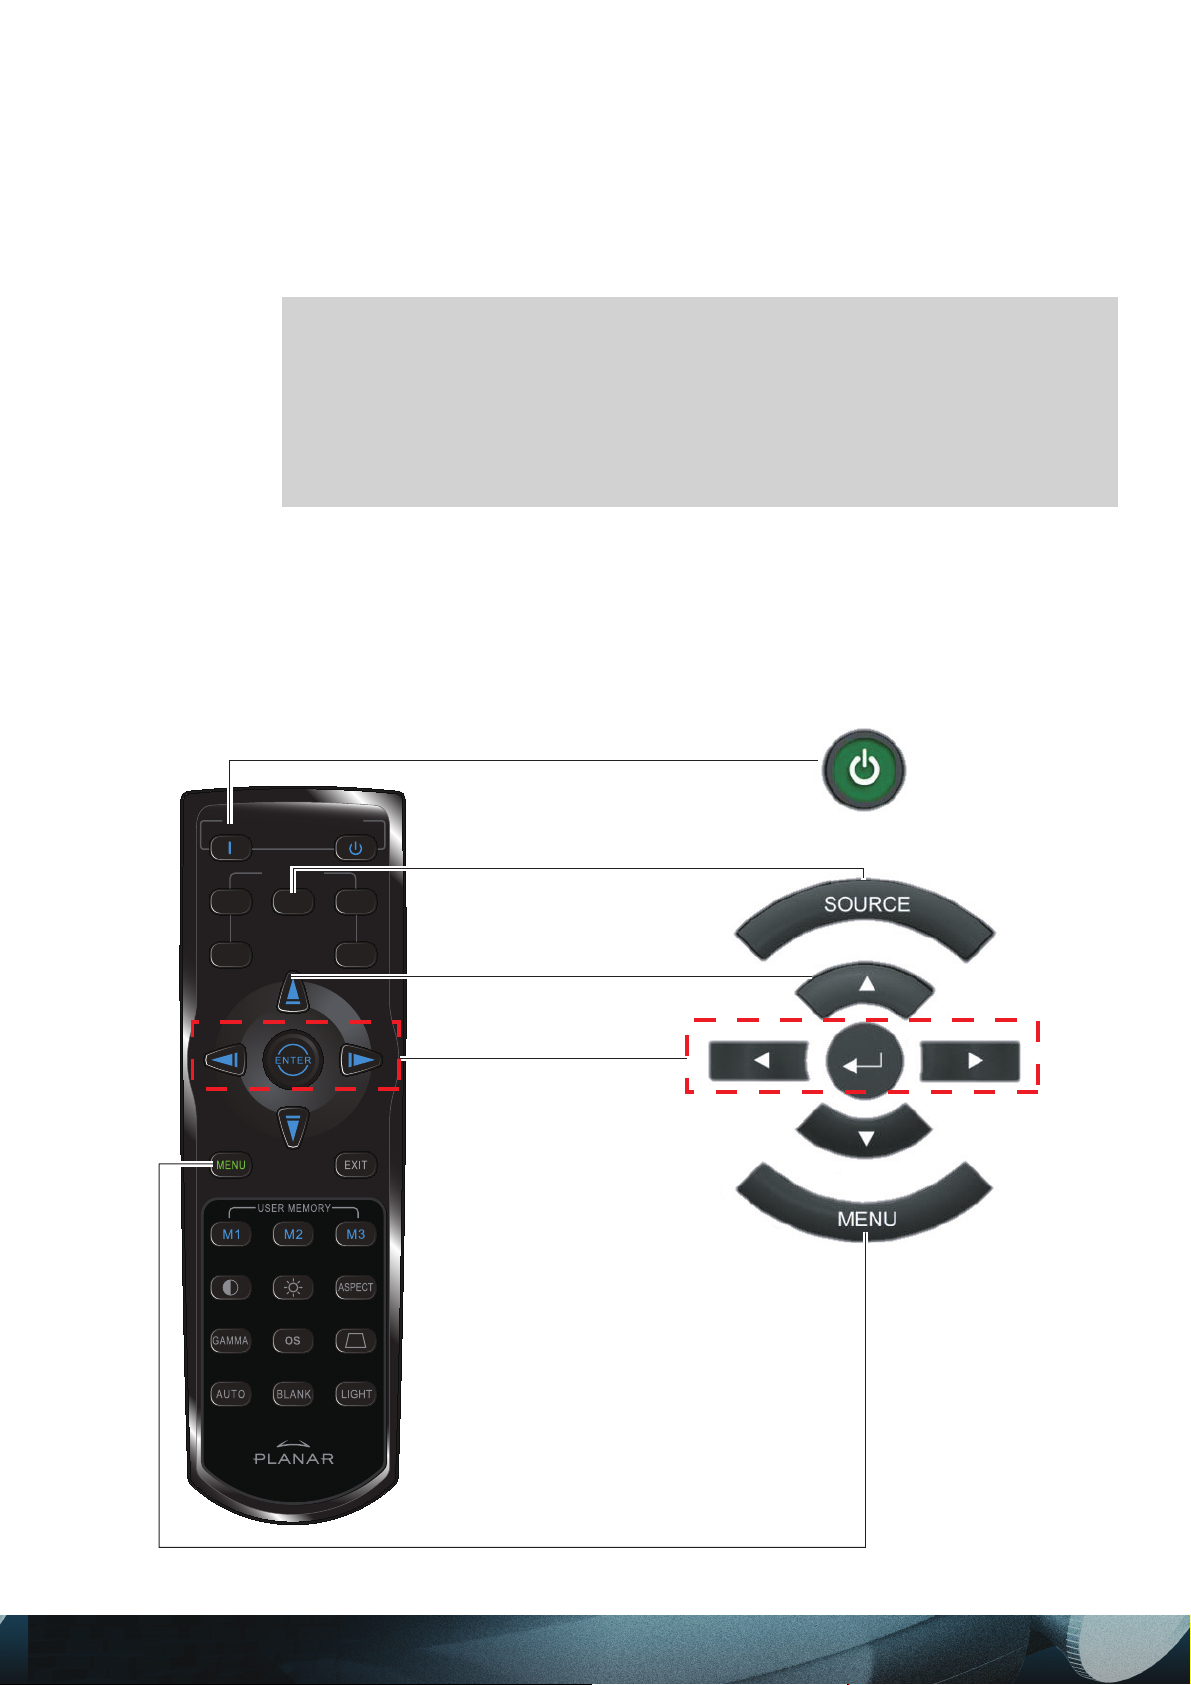
Projector and Remote Control Buttons
The projector can be operated using the remote control or the buttons on the top of the projector.
All operations can be carried out with the remote control; however the buttons on the projector are
limited in use. The following illustration shows the corresponding buttons on the remote control
and on the projector.
ON ─ POWER ─ OFF
SOURCE
1
45
23
13
Page 14
SETUP AND OPERATION
CAUTION
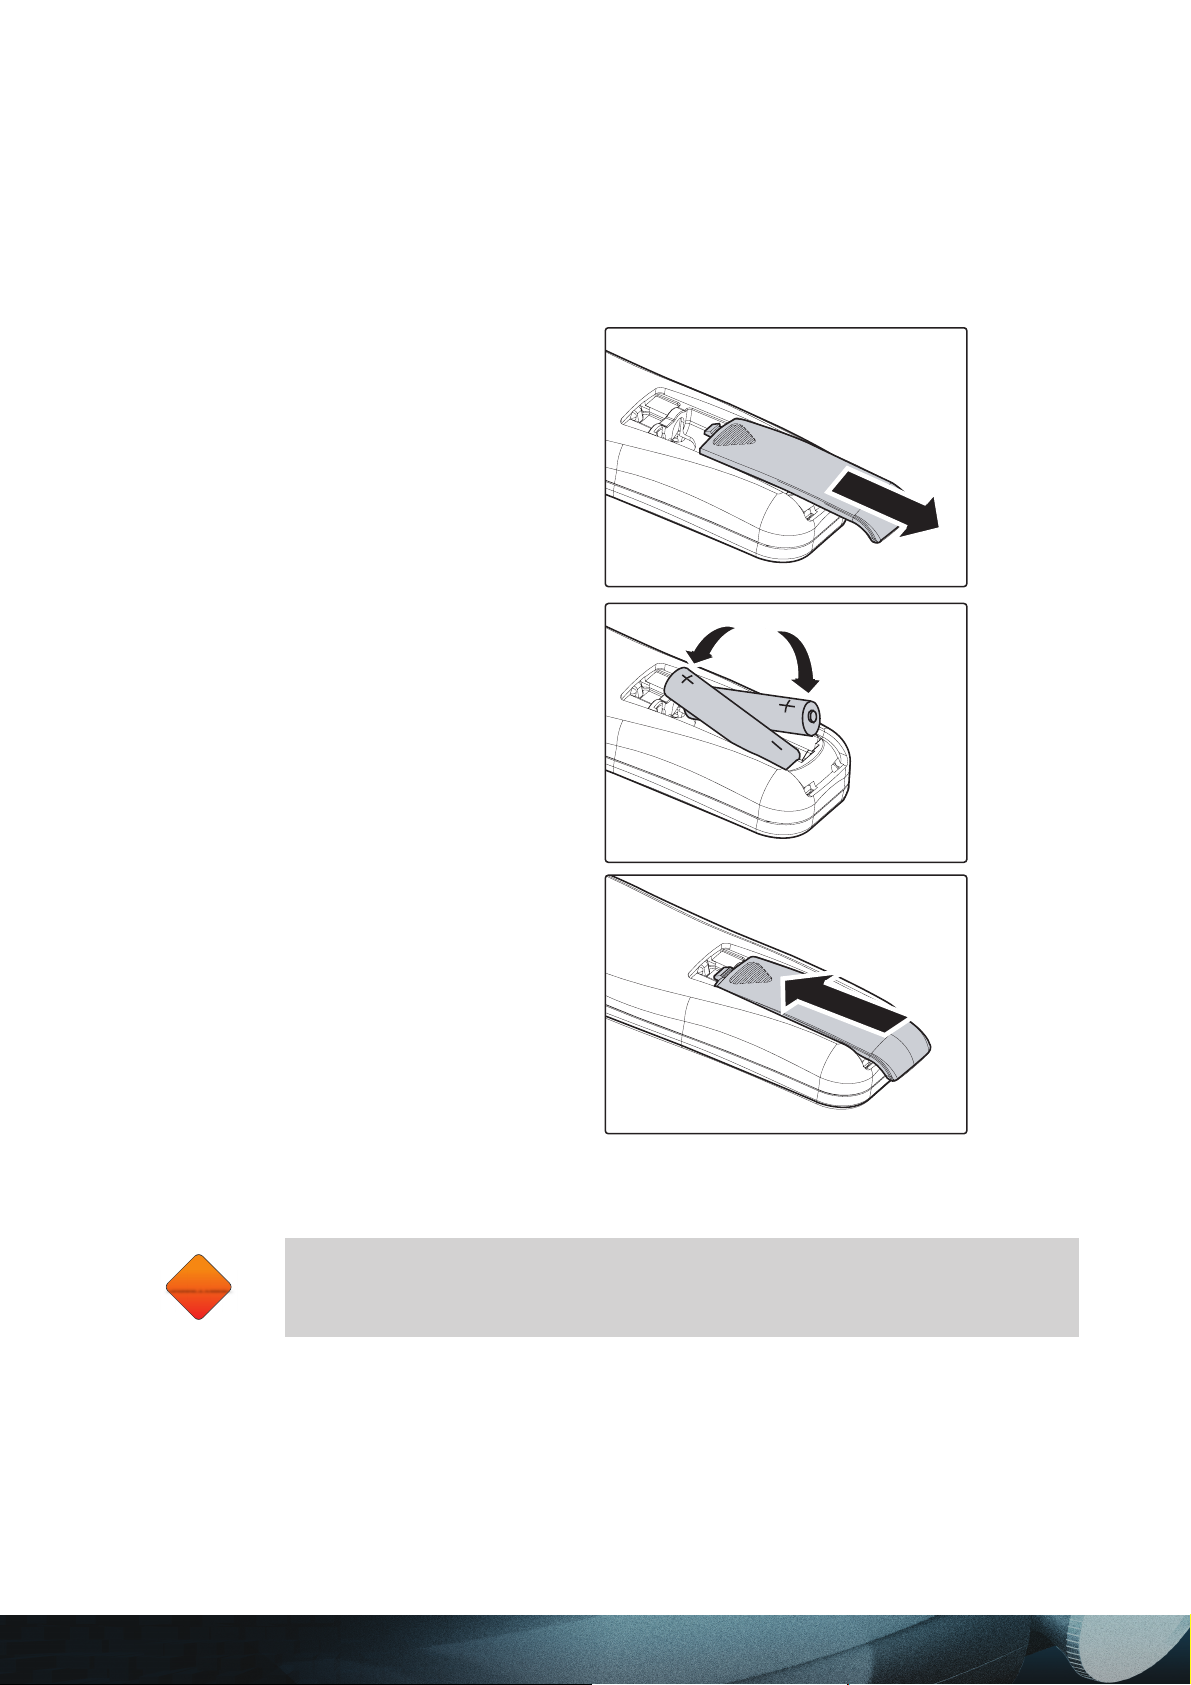
Inserting the Remote Control Batteries
Remove the battery compart-
1.
ment cover by sliding the cover
in the direction of the arrow.
Insert the supplied batteries tak-
2.
ing note of the polarity (+/-) as
shown here.
Replace the cover.
3.
CAUTION
Only use AAA alkaline batteries.
1.
Dispose used batteries according to local ordinance regulations.
2.
Remove the batteries when not using the projector for prolonged periods.
3.
14
Page 15

Connecting Input Devices
A PC or notebook computer as well as video devices can be connected to the projector at the
same time. Video devices include DVD, VCD, and VHS players, as well as movie camcorders ,
digital still cameras and high defi nition sources. Check the user manual of the connecting device
to confi rm it has the appropriate output connector.
As a safety precaution, disconnect all power to the projector and connecting
devices before making connections.
15
Page 16

Starting and Shutting down the Projector
Remove the lens cover.
1.
Connect the power cord to the projector.
2.
Connect the other end to a wall outlet.
Press the Power button. The Power LED
3.
on the projector turns on. Turn on the connected devices.
The language selection screen appears
4.
(Initial setup only). Select the desired language.
1. Press the cursor ▲▼ button until
Language is highlighted.
2. Press the cursor ◄ ► or Menu button
to confi rm the language, and close the
OSD.
If more than one input device is connected,
5.
press the source button to search.
Press the Power button to turn off the pro-
6.
jector. The Powering Down screen appears.
Note: Pressing the Power button again
within fi ve (5) seconds cancels powering
down the projector.
When the Power LED stops fl ashing, the
7.
projector goes on standby mode.
Do not unplug the power cord until the Power LED stops fl ashing, indicating
the projector has cooled down.
16
Page 17

Adjusting the Projector Level
Take note of the following when setting up the projector:
• The projector table or stand should be level and sturdy.
• Position the projector so that it is perpendicular to the screen.
• Be sure cables are not in the way or can cause the projector to be knocked over.
1.
To raise the level of the projector, lift the
projector and press the height-adjuster
button [A].
A
The height adjuster drops down [B].
2.
3.
B
To lower the level of the projector, press
the height-adjuster button and push
down on the top of the projector.
To adjust the angle of the picture, turn
the tilt adjuster right or left until the desired angle has been achieved.
17
Page 18

Adjusting the Focus and Zoom
1.
2.
Locate the image zoom and focus
adjustment rings on the projector.
Use the image zoom control to resize the
projected image and screen size.
Zoom Focus
3.
Rotate the image focus control to sharpen
the projected image.
18
Page 19

ON-SCREEN DISPLAY (OSD) MENU SETTINGS
OSD Menu Controls
The projector has an OSD that lets you make image adjustments and change various settings.
When the projector is turned on, any connected devices are detected. If the connected device is
a PC, press the appropriate keys on the computer keyboard to switch the display output to the
projector. (Check the user manual of the PC to determine the appropriate Fn key combination to
change display output.)
Navigating the OSD
You can use the remote control cursor buttons or the buttons on the top of the projector to navigate
and make changes to the OSD. The following illustration shows the corresponding buttons on the
remote control and on the projector.
To open the OSD, press the
1.
Menu button.
There are six menus. Press
2.
the cursor
through the menus.
3.
Press the cursor
move up and down in a menu.
4.
Press
settings, and then press Enter
to confi rm the new setting.
5.
Press Menu to close the OSD
or leave a submenu.
◄ ► button to move
▲▼ button to
◄ ► to change values for
Depending on the video source not all items in the OSD are available. For example, the Horizontal/Vertical Position items in the Setup menu can only be
modifi ed when connected to a PC. Items that are not available cannot be ac-
cessed and are grayed out.
19
Page 20

Setting the OSD Language
You may want to reference the OSD on your projector while reading this section. Set the OSD
language to your preference before continuing. (The default language is English.)
1.
Press the Menu button. The Image menu appears.
2.
Press the cursor ◄ ► button until Language is highlighted.
Press the cursor ▲▼ button until the desired Language is highlighted.
3.
Press the Menu button to confi rm the language, and close the OSD.
4.
20
Page 21

OSD Menu Overview
Use the following illustration to quickly fi nd a setting or determine the range for a setting.
Image
Brightness 0 ~ 100
Contrast 0 ~ 100
Sharpness
Color Temperature
Color Saturation
0 ~ 100
Color Tint 0 ~ 100
Gamma
Color Space
Video Standard
Auto Source
Selection
Source Select
Source Enable
(1) 0
(2) 25
(3) 50 *
(4) 75
(5) 100
(1) 9300K
(2) 7500K
(3) 6500K *
(4) 5000K
(1) Film
(2) Video
(3) Cinema
(4) PC
(5) Photo
(1) Auto *
(2) RGB
(3) REC709
(4) REC610
(1) Auto *
(2) NTSC
(3) PAL
(4) SECAM
(1) On
(2) Off *
(1)
RGB
(2)
DVI
(3)
HDMI
(4)
Comp.
(5)
Video
(6)
S-Video
(7)SCART
(8)Hot Key
Settings
(1) Full
(2) RGB
(3) Comp.
(4) DVI
(5) Video
(6) S-Video
(7) HDMI
(8) SCART
Advanced
(1)RGB
(2)Comp.
(3) DVI
(4) Video
(5) S-Video
(6) HDMI
(7) SCART
Blank Color
Menu Position
Translucent Menu
Projection Type
Power Mode
Save Memory
Auto Power Off
Auto Power On
Phase 0~100
Freq. Tracking 0~100
Resync
(1) Black *
(2) Blue
(3) Gray
(4) Red
(5) Green
(1) 1 *
(2) 2
(3) 3
(4) 4
(5) 5
(1) 0%
(2) 25%
(3) 50% *
(4) 75%
(5) 100%
(1) Front *
(2) Rear
(3) Front &
Ceiling
(4) Rear &
Ceiling
(1) Eco *
(2) Normal
(3) Boost
(1) M1 *
(2) M2
(3) M3
(1) On
(2) Off *
(1) On
(2) Off *
(1) Execute
User Color
Red Gain 0 ~ 100
Green Gain 0 ~ 100
Blue Gain 0 ~ 100
Red Offset 0 ~ 100
Green Offset 0 ~ 100
Blue Of
fset 0 ~ 100
Note: The default value for
all User Color settings is 50.
Notes: * indicates the default value.
Hot key setting is programmable for input signals.
PD4010 supports HDMI through the DVI-D connector
via included adapter.
Display
H. Position 0 ~ 100
V. Position 0 ~ 100
Keystone
Aspect Ratio
White Peaking
Logo Display
Video Overscan
(1) 16:9 *
(2) Letter Box
(3) Native
(4) 4:3
(1) 0 *
(2) 10
(3) 20
(4) 30
(5) 50
(6) 60
(7) 70
(8) 80
(9) 90
(10) 100
(1) On *
(2) Off
(1) Crop
(2) Zoom
(3) Off *
Language
English
French
German
Italian
Spanish
Swedish
Chinese-Simplified
Chinese-Traditional
Japanese
Korean
Portuguese
Russian
Service
Model Name
Unit S/N
Software Version
Active Source
Pixel Clock
Signal Format
H/V Refresh Rate
SyncType
Lamp Hours
Lamp Hour Reset
T est Pattern
(1) None *
(2) Solid
(3) Checker
Board
(4) Vertical
Ramp
(5) Horizonal
Ramp
(6) Grid
(7) Horizontal
Lines
(8) Vertical
Lines
(9) Diagonal
Lines
(10) Splash
Screen
21
Page 22

Image Menu
Press the Menu button to open the OSD menu. Press the cursor ◄ ► button to move to the
Image menu. Press the cursor ▲▼ button to move up and down in the Image menu. Press ◄ ►
to change values for settings, and then press Enter to confi rm the new setting.
ITEM DESCRIPTION DEFAULT
Brightness
Contrast
Sharpness
Color
temperature
Color
saturation
Color tint
Gamma
Press the cursor ◄ ► button to adjust the brightness.
(Range: 0 – 100)
Press the cursor ◄ ► button to adjust the contrast.
(Range: 0 – 100)
Press the cursor ◄ ► button to adjust the display sharpness
(Range: 0-100)
Press the cursor ◄ ► button to adjust the video tint/hue.
(Options: 9300K – 7500K – 6500K – 5000K)
Press the cursor ◄ ► button to adjust the video saturation.
(Range: 0 – 100)
Note: Color saturation is available for Video and S-Video modes
only.
Press the cursor ◄ ► button to adjust the video tint/hue.
(Range: 0 – 100)
Note: Color tint is available for Video and S-Video modes only.
Press the cursor ◄ ► button to adjust the gamma correction of the
display.
(Options: Film, Video, Cinema, Photo, PC)
50
50
50
6500K
50
50
PC [VGA]
Video [DVI,
HDMI,
Component,
Video,
S-Video,
and SCART]
Color space
Video
standard
Press the cursor ◄ ► button to adjust the color space.
(Options: Auto – RGB – YPbPr- YCbCr)
Auto
Note: Color space is available for component, PC, HDMI, and DVI
modes only.
Press the cursor ◄ ► button to adjust the Video Standard.
(Options: Auto, NTSC, PAL, SECAM)
Auto
Note: Video standard is available for Video and S-Video modes
only.
22
Page 23

ITEM DESCRIPTION DEFAULT
Auto source
selection
Press the cursor ◄ ► button to enable auto source selection. OFF
Press the cursor button ◄ ► to manually select the source. The
following screen appears.
Press the cursor button ▲▼ to move up and down the menu.
Press the cursor button to select an input source:
RGB: select RGB input to display images from a computer.
DVI: select Digital Video Input for digital display quality.
Source select
HDMI: select High-Defi nition Multimedia Interface. HDMI is a
digital, point-to-point interface for video signals designed as a
single-cable solution for home theater and consumer electronics
equipment.
Component: select component video as the input source.
Component video maintains the three YUV video signals in three
separate channels and provides a sharper image than composite video and S-Video.
Video: select composite video as the input source. Composite
video combines all three YUV video signals into one channel.
NTSC, PAL and SECAM television are examples of composite
video sources. S-Video and component video provide a sharper
image than composite video.
S-Video: select Super Video as the input source. S-Video combines the three YUV video signals into two channels. S-Video
provides a sharper image than composite video, but is not as
good as component video.
SCART: SCART connectors are prevalent in Europe. SCARTs
are used to hook up VCRs and DVD players to TV sets.
—
Source enable
Hot Key Settings: Press the cursor button to set hot keys.
Press Enter to enable selection of the source (Auto source selection must be enabled).
23
Full
Page 24

OSD menu Functions Available for Connected Source
FUNCTION RGB DVI HDMI
Brightness x x x x x x x
Contrast x x x x x x x
Sharpness x x x x x x x
Color Temp x x x x x x x
Color Saturation x x x
Color Tint x x x
Gamma x x x x x x x
Color Space x x x x
Video Standard x x
COMPONENT
VIDEO
COMPOSITE
VIDEO
S-VIDEO SCART
x = available to video source
24
Page 25

Display Menu
Press the Menu button to open the OSD menu. Press the cursor ◄ ► button to move to the
Display menu. Press the cursor ▲▼ button to move up and down in the Display menu. Press
◄ ► to change values for settings, and then press Enter to confi rm the new setting.
ITEM DESCRIPTION DEFAULT
Horizontal
position
Vertical
position
Keystone
Press the cursor ◄ ► button to move the image left or right.
(Range: 0 – 100)
Press the cursor ◄ ► button to move the image up or down.
(Range: 0 – 100)
Press the cursor ◄ ► button to enter the Keystone screen. Press
cursor ◄ ► button to correct the left and right distortion of the projected image. Press cursor ▲▼ button to up and down distortion
of the image. Press the Enter button to enable and disable Keystone correction. (Range: - 50 – +50)
50
50
0
Aspect ratio
Press the cursor ◄ ► button to toggle between the 4:3 standard
format, Letter Box, Native, and the 16:9 High Defi nition TV (HDTV)
format.
.
25
16:9
Page 26

ITEM DESCRIPTION DEFAULT
White Peaking increases the output in the brightest whites without
changing the blacks and dark grays. It crushes the whites slightly,
but it does not appear to clip them or seriously obscure white de-
White
peaking
Logo
display
Video
overscan
tail. If you prefer a stronger image, adjust toward the maximum
setting. For a smoother, more natural image, adjust toward the
minimum setting.
Press the cursor ◄ ► button to adjust the white peaking.
(Range: 0 – 100)
Press ◄ ► to enable or disable if the logo displays when the projector starts, and when no source is detected.
(Options: ON – OFF)
Press the cursor ◄ ► button to set Video Overscan.
(Options: Crop, Zoom, OFF)
Setup Menu Functions Available for Connected Source
0
ON
OFF
FUNCTION RGB DVI HDMI
Brightness x x x x x x x
Contrast x x x x x x x
Sharpness x x x x x x x
Color Temp x x x x x x x
Color Saturation x x x
Color Tint x x x
Gamma x x x x x x x
Color Space x x x x
Video Standard x x
x = available to video source
OMPONENT
C
V
IDEO
COMPOSITE
V
IDEO
S-VIDEO SCART
26
Page 27

Advanced Menu
Press the Menu button to open the OSD menu. Press the cursor ◄ ► button to move to the
Advanced menu. Press the cursor ▲▼ button to move up and down in the Confi g menu.
Press
◄ ► to change values for settings, and then press Enter
to confi rm the new setting.
ITEM DESCRIPTION DEFAULT
Blank screen
Menu position
Translucent
menu
Projection
type
Power mode
Save memory
Auto power off
Auto power on
Phase
Press the cursor ◄ ► button to select a background color for the
blank screen. (Options: Black – Red – Green – Blue – White)
Press the cursor ◄ ► button to position the OSD on screen.
(Options: Left, Right, Center, Down, Up)
Press the cursor ◄ ► button to set menu screen translucency.
(Options: 0, 25, 50, 75, 100%)
Press the cursor ◄ ► button to choose from four projection methods:
Desktop mount, front of screen
Desktop mount, rear of screen
Ceiling mount, front of screen
Ceiling mount, rear of screen
Press the cursor button to set power mode options.
(Options: Eco (economy), Normal, Boost (bright)) Eco mode uses
less power and extends lamp life, but decreases lamp brightness.
Saves the current confi guration to memory. Three memory spaces
are provided: M1, M2, M3.
Press the cursor button to enable or disable automatic shut-down
of lamp after 10 minutes of inactivity. (Options: ON – OFF)
Press the cursor button to enable or disable automatic start-up of
lamp. (Options: ON – OFF)
Press the cursor ◄ ► button to adjust the A/D sampling clock.
(Range: 0 - 180)
Black
Left top
50%
Desktop
front
Eco
—
OFF
OFF
50
27
Page 28

ITEM DESCRIPTION DEFAULT
Freq. tracking
Resync
Reset
Press the cursor ◄ ► button to adjust the A/D sampling number.
(Range: 0 - 180)
Press the cursor ◄ ► button to determine the time-out delay of
the OSD
(Range: 10 – 20 sec.).
Resets Video Type, Video AGC, Projection, and Digital Zoom to
default values
The Confi g menu functions are available to all video sources.
50
15
—
Language Menu
Press the Menu button to open the OSD menu. Press the cursor ◄ ► button to move to the
Language menu. Press the cursor
Select the value, and then press Enter to confi rm the new setting.
▲▼ button to move up and down in the Language menu.
ITEM DESCRIPTION DEFAULT
Press the cursor ◄ ► to select the desired language.
Language
Language options: English, French, German, Italian, Spanish,
Swedish, Chinese-Simplifi ed, Chinese-Traditional, Japanese, Ko-
rean, Portuguese, Russian
The Language menu functions are available to all video sources.
28
English
Page 29

User Color Menu
Press the Menu button to open the OSD menu. Press the cursor ◄ ► button to move to the
Tool menu. Press the cursor ▲▼ button to move up and down in the Tool menu. Press Enter to
confi rm the new setting.
ITEM DESCRIPTION DEFAULT
Red gain
Green gain
Blue gain
Red offset
Green offset
Blue offset
Press the cursor ◄ ► button to adjust the red color level.
(Range: 0 - 100)
Press the cursor ◄ ► button to adjust the green color level.
(Range: 0 - 100)
Press the cursor ◄ ► button to adjust the blue color level.
(Range: 0 - 100)
Press the cursor ◄ ► button to adjust the red offset level.
(Range: 0 - 100)
Press the cursor ◄ ► button to adjust the green offset level.
(Range: 0 - 100)
Press the cursor ◄ ► button to adjust the blue offset level.
(Range: 0 - 100)
50
50
50
50
50
50
29
Page 30

Service Menu
Press the Menu button to open the OSD menu. Press the cursor ◄ ► button to move to the
Service menu. Press the cursor
ITEM DESCRIPTION DEFAULT
Model name
Unit S/N Displays the serial number of the device.
Software
version
Active source Displays the active source.
Pixel clock Displays information about the sampling rate.
Signal format Displays information about the type of signal format.
H/V refresh
rate
Sync type Displays information about the sync type signal.
Lamp hours
Lamp hour
Reset
Test pattern
Displays the model name of the device
(PD4010, PD7010 or PD7060)
Displays information about the software version.
Displays the refresh horizontal and vertical refresh rates.
Shows the number of hours lamp has been in use for Eco and
Normal modes.
After replacing the lamp, this item should be reset. Refer to “Replacing the Projection Lamp” on page 31.
Displays information about the type of test pattern (Range: None,
Solid, Checkerboard, Vertical Ramp, Horizontal Ramp, Grid, Horizontal Lines, Vertical Lines, Diagonal Lines, Splash Screen).
▲▼ button to move up and down in the Service menu.
These
items are
display
only.
None
30
Page 31

MAINTENANCE AND SECURITY
Replacing the Projection Lamp
Planar recommends changing the projection lamp after a warning message displays Warning:
Lamp life time Over. It should only be replaced with a certifi ed replacement part, which you can
order from your local dealer.
The lamp contains a certain amount of mercury and should be disposed of
1.
Important!
according to local ordinance regulations.
Avoid touching the glass surface of the new lamp: Doing so may shorten
2.
its operation life.
Be sure to turn off and unplug the projector at least an hour before replacing
the lamp. Failure to do so could result in a severe burn.
Loosen the screw on the lamp
1.
compartment cover.
Open the lamp compartment
2.
cover.
31
Page 32

Remove the three screws from
3.
the lamp module.
Lift the module handle up.
4.
Pull fi rmly on the module
5.
handle to remove the lamp
module.
Reverse steps 1 to 5 to install
6.
the new lamp module.
32
Page 33

Resetting the Lamp
CAUTION
After replacing the lamp, you should reset the lamp hour counter to zero. Refer to the following:
1.
2.
3.
4.
5.
Press the Menu button to open the OSD
menu.
Press the cursor ◄ ► button to move to
the Service menu.
Press the cursor ▲▼ button to move
down to Lamp Hour Reset.
Press the cursor ◄ ► or Enter button.
A message screen appears.
Press the cursor buttons in this order:
▼ ▲ ◄ ►.
The Status menu appears again showing
the Lamp Hours reset to zero.
Cleaning the Projector
Cleaning the projector to remove dust and grime will help ensure trouble-free operation.
Be sure to turn off and unplug the projector at least an hour before clean-
1.
ing. Failure to do so could result in a severe burn.
Use only a dampened cloth when cleaning. Do not allow water to enter the
2.
ventilation openings on the projector.
3.
If a little water gets into the projector interior while cleaning, leave unplugged in a well-ventilated room for several hours before using.
4.
If a lot of water gets into the projector interior when cleaning, have the projector serviced.
Cleaning the Lens
You can purchase optic lens cleaner from most camera stores. Refer to the following to clean the
projector lens.
Apply a little optic lens cleaner to a clean soft cloth.
1.
(Do not apply the cleaner directly to the lens.)
Lightly wipe the lens in a circular motion.
2.
CAUTION
Do not use abrasive cleaners or solvents.
1.
To prevent discoloration or fading, avoid getting cleaner on the projector
2.
case.
33
Page 34

Using the Kensington® Lock
If you are concerned about security, attach one end of a security cable to a permanent object and
the other to the Kensington slot and a projector.
Contact your vendor for details on purchasing a suitable Kensington security
cable. The security lock corresponds to Kensington’s MicroSaver Security
System. If you have any comment, contact: Kensington, 2853 Campus Drive,
San Mateo, CA94403, U.S.A. Tel: 800-535-4242, http://www.Kensington.com.
34
Page 35

TROUBLESHOOTING
These guidelines provide tips to deal with problems you may encounter while using the projector. If
the problem remains unsolved, contact your dealer for assistance.
Often after time spent troubleshooting, the problem is traced to something as simple as a loose
connection. Check the following before proceeding to the problem-specifi c solutions.
•
Use some other electrical device to confi rm that the electrical outlet is working.
•
Ensure the projector is turned on.
•
Ensure all connections are securely attached.
•
Ensure the attached device is turned on.
•
Ensure a connected PC is not in suspend mode.
•
Ensure a connected notebook computer is confi gured for an external display. (This is
usually done by pressing an Fn-key combination on the notebook.)
Tips for Troubleshooting
In each problem-specifi c section, try the steps in the order suggested. This may help you to solve
the problem more quickly.
Try to pinpoint the problem and thus avoid replacing non-defective parts.
For example, if you replace batteries and the problem remains, put the original batteries back and
go to the next step.
Keep a record of the steps you take when troubleshooting: The information may be useful when
calling for technical support or for passing on to service personnel.
35
Page 36

LED Error Messages
Before cooling, the LED will blink three (3) times in two (2) second intervals. The LED message is
defi ned by the blinking sequence. A long blink is defi ned as 1 second. A short blink is defi ned as
0.3 seconds. The LED messages are listed below:
ERROR CODE MESSAGE LED FLASH
Environment Over Temperature 1 long blink / 1 short blink
DMD Over Temperature 1 long blink / 2 short blinks
Lamp Over Temperature 1 long blink / 3 short blinks
Fan1 Locked
1 long blink / 4 short blinks
Fan2 Locked
Fan3 Locked
Fan4 Locked 2 long blinks / 4 short blinks
DMD Initial Fail 3 long blinks / 1 short blink
Lamp Initial Fail 3 long blinks / 2 short blinks
Ballast UART Error 3 long blinks / 3 short blinks
Temperature Sensor Fail 3 long blinks / 4 short blinks
Inter Lock Open 4 long blinks / 1 short blink
2 long blinks / 2 short blinks
2 long blinks / 3 short blinks
36
Page 37

Common Problems and Solutions
This section describes some common problems and their solutions.
Image Problems
Problem: No image appears on the screen
1. Verify the settings on your notebook or desktop PC.
2. Turn off all equipment and power up again in the correct order.
Problem: The image is blurred
1. Adjust the Focus on the projector.
2. Press the Auto button on the remote control or projector.
3. Ensure the projector-to-screen distance is within the 7-meter (23-feet) specified range.
4. Check that the projector lens is clean.
Problem: The image is wider at the top or bottom (trapezoid effect)
1. Position the projector so it is as perpendicular to the screen as possible.
2. Use the Keystone button on the remote control or projector to correct the problem.
Problem: The image is reversed or upside down
Check the Projection setting on the Utility menu of the OSD.
Problem: The image is streaked
1. Set the Frequency and Tracking settings on the Utility menu of the OSD to the default
settings.
2. To ensure the problem is not caused by a connected PC’s video card, connect to another
computer.
Problem: The image is fl at with no contrast
Adjust the Contrast setting on the Image menu of the OSD.
Problem: The color of the projected image does not match the source image.
Adjust the Color Temperature and Gamma settings on the Image menu of the OSD.
Lamp Problems
Problem: There is no light from the projector
1. Check that the power cable is securely connected.
2. Ensure the power source is good by testing with another electrical device.
3. Restart the projector in the correct order and check that the Power LED is green.
4. If you have replaced the lamp recently, try resetting the lamp connections.
5. Replace the lamp module.
6. Put the old lamp back in the projector and have the projector serviced.
Problem: The lamp goes off
1. Power surges can cause the lamp to turn off. Press the power button twice to turn off the
projector. When the Power LED is on, press the power button.
2. Replace the lamp module.
3. Put the old lamp back in the projector and have the projector serviced.
37
Page 38

Remote Control Problems
Problem: The projector does not respond to the remote control
1. Direct the remote control towards remote sensor on the projector.
2. Ensure the path between remote and sensor is not obstructed.
3. Turn off any fluorescent lights in the room.
4. Check the battery polarity.
5. Replace the batteries.
6. Turn off other Infrared-enabled devices in the vicinity.
7. Have the remote control serviced.
38
Page 39

Hardware Specifi cations
MODEL PD4010 PD7010 PD7060
SPECIFICATIONS
TI DMD 0.55-inch x 1, 12
Display type
Resolution 480p (854x480) 720p (1280x720) 720p (1280x720)
Color 16.7 Million (24-bits/pixel)
Weight 4kg / 8.8lbs
Projection
distance
Projection screen
size
Projection lens Manual zoom; manual focus
Zoom ratio 1.16:1
Horizontal
keystone
correction
Vertical
keystone
correction
degrees, DDR DMD with
DDP2000
0.76 to 3.81 meters (30 to
150 inches)
N/A +/- 40 degrees +/- 40 degrees
TI DMD 0.65-inch x 1, 12
degrees, LVDS DMD with
DDP3020
1.5 to 7 meters (59 to 275 inches)
0.88 to 4.45 meters (35 to
175 inches)
+/- 15 degrees
TI DMD 0.65-inch x 1, 12
degrees, LVDS DMD with
DDP3020
0.88 to 4.45 meters (35 to
175 inches)
Projection
methods
Data
compatibility
SDTV/EDTV/
HDTV
Video
compatibility
H-Sync 15,31 - 70 kHz 15,31 - 90 kHz 15,31 - 90 kHz
V-Sync 50 - 85 Hz 50 - 85 Hz 50 - 85 Hz
Safety
certifi cation
Operation
temperature
Dimensions See “Projector Dimensions” on page 44
Power
consumption
IBM PC or compatibles
(VGA, SVGA, XGA), Mac
480i, 576i/480p,
576p/720p, 1080i
NTSC/NTSC 4.43, PAL (B/G/H/I/M/N 60), SECAM
FCC-B, UL, c-UL, TUV-GS, CB, CE, CCC, ICES-003 (class B), C-Tick, NOM, WEEE,
RoHS, PCT, MIC/EK
Typical 255W (normal mode); Typical 230W (Eco mode)
Desktop front/rear; ceiling front/rear
IBM PC or compatibles
(VGA, SVGA, XGA,
SXGA), Mac
480i, 576i/480p,
576p/720p, 1080i, 1080p
10° C ~ 35° C
IBM PC or compatibles
(VGA, SVGA, XGA,
SXGA), Mac
480i, 576i/480p,
576p/720p, 1080i, 1080p
Stand By < 1 watt
Lamp Boost mode: 230W; normal mode: 200W; Eco mode: 180W
39
Page 40

Input/output Connectors
MODEL PD4010 PD7010 PD7060
PC RGB RGB RGB /DVI-D
Video
Security Kensington slot
Composite video (RCAx1)
Mini-jack to S-Video (Mini-DIN)
Component (RCA x3)
DVI-D (HDCP)
None HDMI (HDCP) HDMI (HDCP)
40
Page 41

PD4010 Projection distance and size table
MAX. SCREEN SIZE
(WIDE)
Projection
Distance
1.50 0.95 0.83 0.47 0.83 0.72 0.41
2.40 1.52 1.33 0.75 1.32 1.15 0.65
2.80 1.77 1.55 0.87 1.54 1.34 0.76
3.20 2.03 1.77 0.99 1.76 1.54 0.86
3.60 2.28 1.99 1.12 1.98 1.73 0.97
4.00 2.54 2.21 1.24 2.20 1.92 1.08
4.40 2.79 2.43 1.37 2.42 2.11 1.19
4.80 3.04 2.65 1.49 2.65 2.31 1.30
5.20 3.30 2.87 1.62 2.87 2.50 1.40
5.60 3.55 3.09 1.74 3.09 2.69 1.51
7.00 4.44 3.87 2.18 3.86 3.36 1.89
*Units of measurements: meters
Diagonal Width Height Diagonal Width Height
1.8:1
M
AX. SCREEN SIZE
(TELE)
2.1:1
MAX. SCREEN SIZE
(WIDE)
Projection
Distance
59.06 37.43 32.63 18.35 32.54 28.36 15.96
94.49 59.90 52.20 29.36 52.07 45.38 25.53
110.24 69.88 60.90 34.26 60.75 52.95 29.78
125.98 79.86 69.60 39.15 69.43 60.51 34.04
141.73 89.84 78.31 44.05 78.11 68.08 38.29
157.48 99.83 87.01 48.94 86.78 75.64 42.55
173.23 109.81 95.71 53.83 95.46 83.20 46.80
188.98 119.79 104.41 58.73 104.14 90.77 51.06
204.72 129.77 113.11 63.62 112.82 98.33 55.31
220.47 139.76 121.81 68.52 121.50 105.89 59.57
275.59 174.70 152.26 85.65 151.84 132.37 74.46
*Units of measurements: inches
Diagonal Width Height Diagonal Width Height
1.8:1
MAX. SCREEN SIZE
(TELE)
2.1:1
41
Page 42

PD7010. PD7060 Projection distance and size table
MAX. SCREEN SIZE
(WIDE)
Projection
Distance
1.50 1.12 0.98 0.55 0.98 0.85 0.48
2.40 1.80 1.57 0.88 1.56 1.36 0.77
2.80 2.10 1.83 1.03 1.83 1.59 0.89
3.20 2.40 2.09 1.18 2.09 1.82 1.02
3.60 2.70 2.35 1.32 2.35 2.05 1.15
4.00 3.00 2.61 1.47 2.61 2.27 1.28
4.40 3.30 2.88 1.62 2.87 2.50 1.41
4.80 3.60 3.14 1.76 3.13 2.73 1.53
5.20 3.90 3.40 1.91 3.39 2.95 1.66
5.60 4.20 3.66 2.06 3.65 3.18 1.79
7.00 5.25 4.58 2.57 4.56 3.98 2.24
Diagonal Width Height Diagonal Width Height
1.8:1
MAX. SCREEN SIZE
(TELE)
2.1:1
*Units of measurements: meters
MAX. SCREEN SIZE
(WIDE)
Projection
Distance
59.06 44.29 38.60 21.71 38.50 33.55 18.87
94.49
110.24 82.67 72.05 40.53 71.86 62.63 35.23
125.98
141.73 106.29 92.64 52.11 92.40 80.53 45.30
157.48
173.23 129.90 113.22 63.69 112.93 98.43 55.36
188.98
204.72 153.52 133.81 75.27 133.46 116.32 65.43
220.47
Diagonal Width Height Diagonal Width Height
70.86 61.76 34.74 61.60 53.69 30.20
94.48 82.34 46.32 82.13 71.58 40.26
118.09 102.93 57.90 102.66 89.48 50.33
141.71 123.51 69.48 123.19 107.37 60.40
165.33 144.10 81.06 143.73 125.27 70.46
1.8:1
MAX. SCREEN SIZE
(TELE)
2.1:1
275.59 206.67 180.12 101.32 179.66 156.59 88.08
*Units of measurements: inches
42
Page 43

TIMING MODE TABLE
The projector can display several resolutions. The following table outlines the resolutions that can
be displayed by the projector.
SIGNAL RESOLUTION FREQ. V FREQ. H VIDEO S-VIDEO SCART COMPONENT RGB DVI-D HDMI
VESA
Apple Macintosh
640x480 59.94 31.47
640x480 72.81 37.86
640x480 74.99 37.49
640x480 85 43.27
800x600 56.25 35.15
800x600 60.32 37.88
800x600 72.19 48.08
800x600 75 46.87
800x600 85.06 53.67
1024x768 60 48.36
1024x768 70.07 56.47
1024x768 75.03 60.02
1024x768 85.03 68.28
1280x1024 60.02 63.98
640x480 66.59 34.99
832x624 74.54 49.72
––– – ○○○
––– – ○○○
––– – ○○○
––– – ○○○
––– – ○○○
––– – ○○○
––– – ○○○
––– – ○○○
––– – ○○○
––– – ○○○
––– – ○○○
––– – ○○○
––– – ○○○
––– – ○○○
––– – ○○○
––– – ○○○
NTSC NTSC-J 59.94 15.73
PAL/SECAM PAL, SECAM 50 15.63
480I 59.94 15.73
576I 50 15.63
SDTV
480P 59.94 31.47
576P 50 31.25
1035I 60 33.75
1080I 50 28.12
1080I 60 33.75
HDTV
720P 50 37.5
720P 60 45
1080P 60 67.5
Ο : Frequency supported
— : Frequency not supported
The native resolution for the PD7010 and PD7060 is 1280 x 720. The native resolution for the
PD4010 is 854 x 480. Resolution other than native mode may be displayed with uneven size of
text or lines.
○○○ ○ –––
○○○ ○ –––
––– ○ –––
––– ○ –––
––– ○ ––○
––– ○ ––○
––– ○ ––○
––– ○ ––○
––– ○ ––○
––– ○ ––○
––– ○ ––○
––– ○ ––○
43
Page 44

Projector Dimensions
For ceiling installations, use approved mounting hardware and M4 screws with
a maximum screw depth of 10 mm (0.39 inch).
44
Page 45

REGULATORY COMPLIANCE
FCC Warning
This equipment has been tested and found to comply with the limits for a Class B digital device
pursuant to Part 15 of the FCC Rules. These limits are designed to provide reasonable protection
against harmful interference when the equipment is operated in a commercial environment.
This equipment generates, uses, and can radiate radio frequency energy and, if not installed
and used in accordance with the instruction manual, may cause harmful interference to radio
communications. Operation of this equipment in a residential area is likely to cause harmful
interference in which case the user will be required to correct the interference at his own expense.
Changes or modifi cations not expressly approved by the parties responsible for compliance could
void the user’s authority to operate the equipment.
Canada
This class B digital apparatus complies with Canadian ICES-003.
Safety Certifi cations
FCC Class B, UL, c-UL, CE, TUV-GS, CCC, PCT, MIC/EK
EN 55022 Warning
This is a Class B product. In a domestic environment, it may cause radio interference, in which
case the user may be required to take adequate measures. The typical use is in a conference
room, meeting room, or auditorium.
45
Page 46

Planar Systems, Inc.
Corporate Headquarters
1195 NW Compton Drive
Beaverton, OR 97006-1992
Planar Customer Support
Telephone:
US: 1-866-PLANAR1 (866) 752-6271
Outside US: (503) 748-5799
E-mail: PlanarSupport@planar.com
Online Technical Library: http://www.planar.com/support
Hours: M-F, 8am - 8pm ET, 12pm - 12am GMT
©2006 Planar Systems, Inc. Planar is a registered trademark of Planar System, Inc.
Other brands and names are the property of their respective owners.
Technical Information in this document is subject to change without notice.
020-0522-00 REV. A
 Loading...