

Page 1
Media Player Unit
AC Power Adapter
12V DC output
Standard 3.5 mm to
RCA AV Cables
Ethernet Cable
Quick Start Guide
Wi-Fi
Antenna
Quick Start Guide
(this guide)
A USB keyboard is required to change system settings.
USB Keyboard required
(not included)
CF card cover/remover
(pre-installed on unit)
RS-232 adapter
Documentation
Planar
®
ContentSmart™ Media Player MP-3450
This quick start guide provides a walkthrough of the set up process. For
complete documentation and product manual refer to the CD or please visit:
www.PlanarDigitalSignage.com/ContentSmart
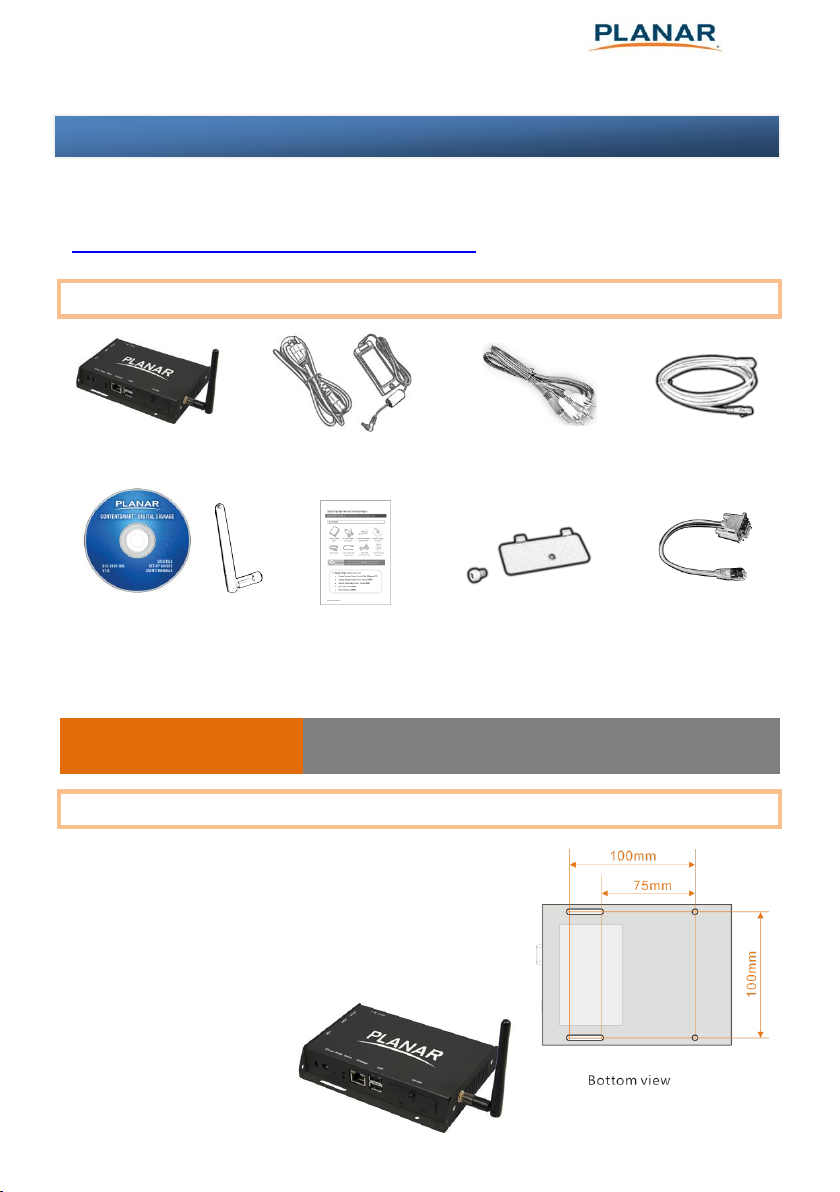
Box Contents
Mounting and Installation
The Planar® ContentSmart™ MP-3450 media
player can be attached to mounting posts on the
back of screens or inside cabinetry with the builtin VESA MIS-D100 (100mmx100mm) compatible
mounting flange.
ATTACH the wireless
antenna as shown.
Screw antenna clockwise
onto the post.
Page 2
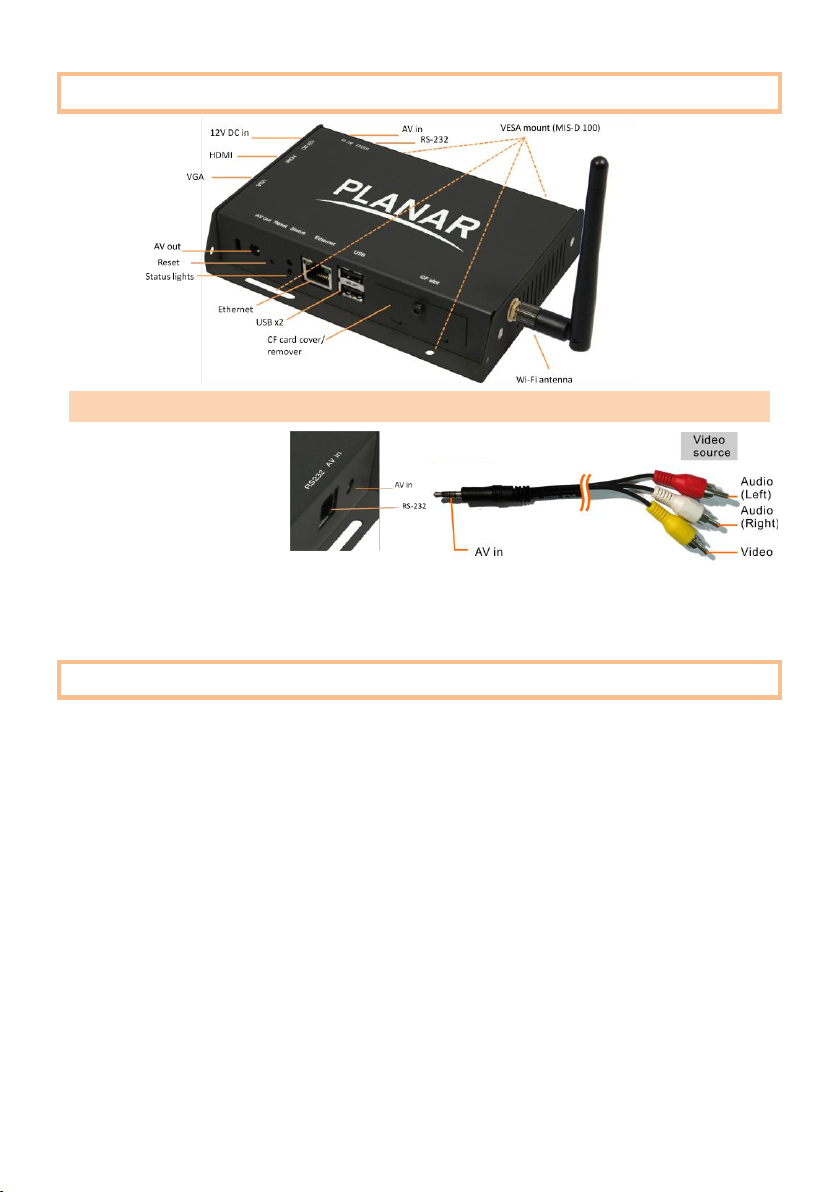
Port connections
The AV in port lets you
attach TV tuners, live
video camera signals,
pre-recorded videos, and
more via the 3.5mm composite video/audio cable. NTSC/PAL mode is selected
automatically. Also refer to your software documentation to enable display.
Video input connection
System setup
1 ATTACH a video cable (either VGA or HDMI) to your display and the
appropriate port on the media player.
→ When using VGA, your display must support XGA (1024x768) resolution
or greater. Connect audio using the included AV cable.
→ When using HDMI, audio and video are sent over a single HDMI cable.
2 ATTACH the AC power adapter to the media player.
→ Immediately, the green Status LED on the main unit lights up.
020-1194-00A
Page 3

3 SET your display to the correct input mode
(VGA/HDMI)
→ You should see the player boot up screen.
4 WAIT while player boots up (up to 60
seconds)
→ once you see “Welcome” on screen,
the unit is ready for content update or
menu configuration.
5 PLUG IN a USB keyboard to the unit’s
USB port
→ the player will enter the graphical menu system in approx. 30 sec.
6 NAVIGATE the menus using your keyboard arrows
(up), (down), (left), (right) to move the selection, (Space
bar) to select, (Enter) to confirm, and (ESC) to cancel
→ find and set the correct time/date AND time zone.
IMPORTANT: time zone must be set correctly in the menus or via
management software for scheduled playback.
→ (Wireless model only) Using the USB keyboard, select a wireless
network and provide security information to connect to your wireless
access point.
→ (OPTIONAL) Set a Password in the menus to prevent unauthorized
changes. IMPORTANT: setting a password will hide the menus. To reenter the menu, press CTRL-ALT-DEL and enter the password. If you
forget the password, see Reset player to factory defaults.
7 SAVE settings and exit the menu, then REMOVE the USB keyboard.
→ The player will reboot with new settings in place. Settings are now
retained even if you remove the power.
→ For advanced player configuration, such as static IP, proxy server,
time server, display option, and security settings, visit:
www.PlanarDigitalSignage.com/ContentSmart for more information.
Page 4

Content Management
Please consult the software documentation for information specific to your
management solution.
Troubleshooting
Why is there no video output on composite video connectors?
The player outputs video over HDMI and VGA by default. To switch to
composite video output, connect a HDMI or VGA display, then select PAL or
NTSC output from the menu system (see System setup).
If both Ethernet & Wi-Fi are available, which connection will take priority?
If both connections are available, Ethernet will take priority for data transfer.
When Ethernet is not available or disconnected, system will try to use Wi-Fi
connection.
How do I remove an inserted CF card?
You can install a CF card to replace the 4GB internal memory. The card slot is
located behind a metal plate (the CF card cover/remover). To remove an
inserted CF card, remove the screw and use the CF card
cover/remover’s metal hooks to pull out the card.
Reset player to factory defaults
If modifying settings cause unintended results or if you have forgotten your
password please reset the player. All stored content will also be removed.
1. Disconnect power cable from the player unit
2. Press and hold the RESET button
3. Connect the power cable while holding the RESET button
until status light flashes (about 15 seconds)
4. Please wait while the system drive is being formatted
020-1194-00A
 Loading...