

Page 1

LX1200TR Touch Monitor
USER’S MANUAL
www.planar.com
Page 2

Usage Notice ........................................................................................................................................................................... 3
Precautions ..........................................................................................................................................................................3
In a vehicle .......................................................................................................................................................................3
Cleaning the monitor ...................................................................................................................................................... 3
Introducing the Planar LX1200TR Touch Monitor..............................................................................................................4
Front View............................................................................................................................................................................4
Bottom View ........................................................................................................................................................................ 5
Features............................................................................................................................................................................ 5
Package Contents................................................................................................................................................................6
Installing the LX1200TR........................................................................................................................................................ 7
Before Installing...................................................................................................................................................................7
Step 1 — Mounting the Monitor......................................................................................................................................... 7
Step 2 — Connecting the Monitor...................................................................................................................................... 8
Step 3 — Installing the Touch Screen Driver....................................................................................................................11
Using the LX1200TR............................................................................................................................................................ 13
Monitor Controls................................................................................................................................................................ 13
Turning the Monitor On and Off ....................................................................................................................................... 14
Using the Touch Screen..................................................................................................................................................... 14
Navigating the Touch Screen ........................................................................................................................................ 14
Cleaning the Monitor......................................................................................................................................................... 14
Appendices............................................................................................................................................................................. 15
Troubleshooting the Monitor............................................................................................................................................ 15
Specifications..................................................................................................................................................................... 16
Dimensions ....................................................................................................................................................................16
Video Specifications ...................................................................................................................................................... 17
Electrical Specifications .................................................................................................................................................17
Electromagnetic Compatibility (EMC)........................................................................................................................... 17
Immunity Characteristics............................................................................................................................................... 18
Safety.............................................................................................................................................................................. 18
Environmental Specifications........................................................................................................................................ 18
Connectors..................................................................................................................................................................... 19
Support and Service.............................................................................................................................................................. 20
LX1200TR User’s Manual (020-0512-00A) Page 2 of 20
Page 3

Usage Notice
WARNING: TO AVOID FIRE OR SHOCK HAZARDS, DO NOT EXPOSE THE MONITOR TO RAIN OR MOISTURE.
WARNING: TO AVOID THE RISK OF ELECTRIC SHOCK, DO NOT OPEN OR DISASSEMBLE THE MONITOR.
DOING SO WILL VOID THE WARRANTY.
Precautions
To maximize the life and safe use of your unit, always be sure to follow the warnings, precautions,
and maintenance recommendations in this user’s manual.
In a vehicle
• The monitor should be visible to the driver only if it is used for navigation, system control, or
vehicle information. If the monitor will be used for other purposes, it should be installed in such
a way that it will only operate while the vehicle is not moving (such as when the parking brake is
in use), or so that its display is not visible to the driver. Review all applicable state and local laws
and regulations to make sure the monitor is used properly and safely.
• Avoid using the monitor for extended times while the vehicle is not running, or the monitor
could drain the vehicle’s battery.
Cleaning the monitor
• Always turn off the unit before cleaning.
• Use only a dry soft cloth when cleaning the LCD touch-panel surface.
• Use a soft cloth moistened with mild detergent, isopropyl alcohol, or window cleaners to clean
the display housing.
• Never touch the surface of the display with a sharp object.
• Never use abrasive cleaners, waxes, or solvents to clean the unit.
LX1200TR User’s Manual (020-0512-00A) Page 3 of 20
Page 4
Introducing the Planar LX1200TR Touch Monitor
The LX1200TR is a high-performance, rugged touch monitor intended for demanding
environments, such as those inside motor vehicles. The monitor features a 12.1-inch diagonal liquid
crystal display, with SVGA resolution, bright enough to be read in full sunlight. The monitor also
includes stereo speakers, and a sturdy magnesium enclosure that can withstand shock and
vibration.
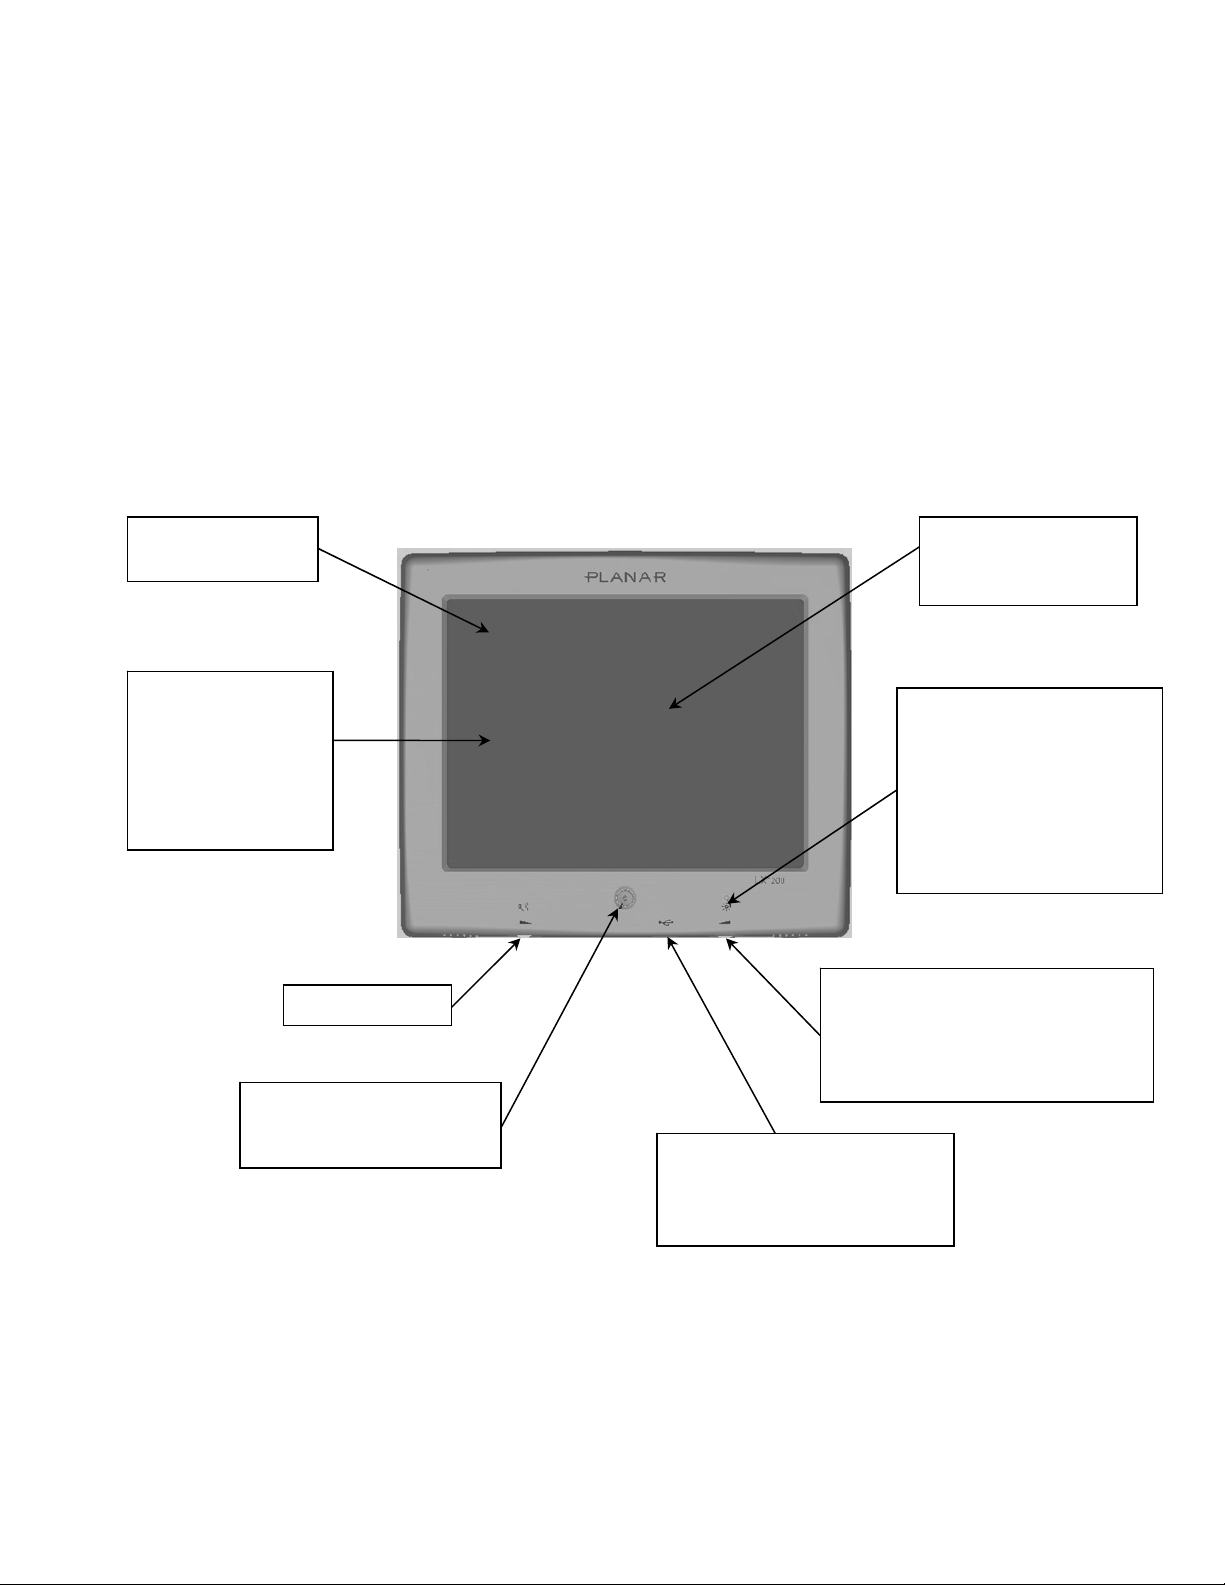
Front View
12.1-inch diagonal
screen size
SVGA (800 x 600)
resolution (supports
1024 x 768 XGA
and 640 x 480 VGA
resolutions) —
displays up to 16.7
million colors
Volume control
“All in one” power
button — controls power
to the remote computer
Touch screen
provides an intuitive
software interface
Power indicator LED:
Green: power on, all
systems OK
Amber: screen
brightness turned fully
down (“blanked”)
Red: no video input
Off: DC power off
Brightness control — allows you to
easily adjust the screen to the light
condition, and to quickly hide the
information on the screen (“screen
blanking”)
USB port (Type A, accessible
from the front) for connecting
a peripheral device (a second
connection is on the back)
LX1200TR User’s Manual (020-0512-00A) Page 4 of 20
Page 5
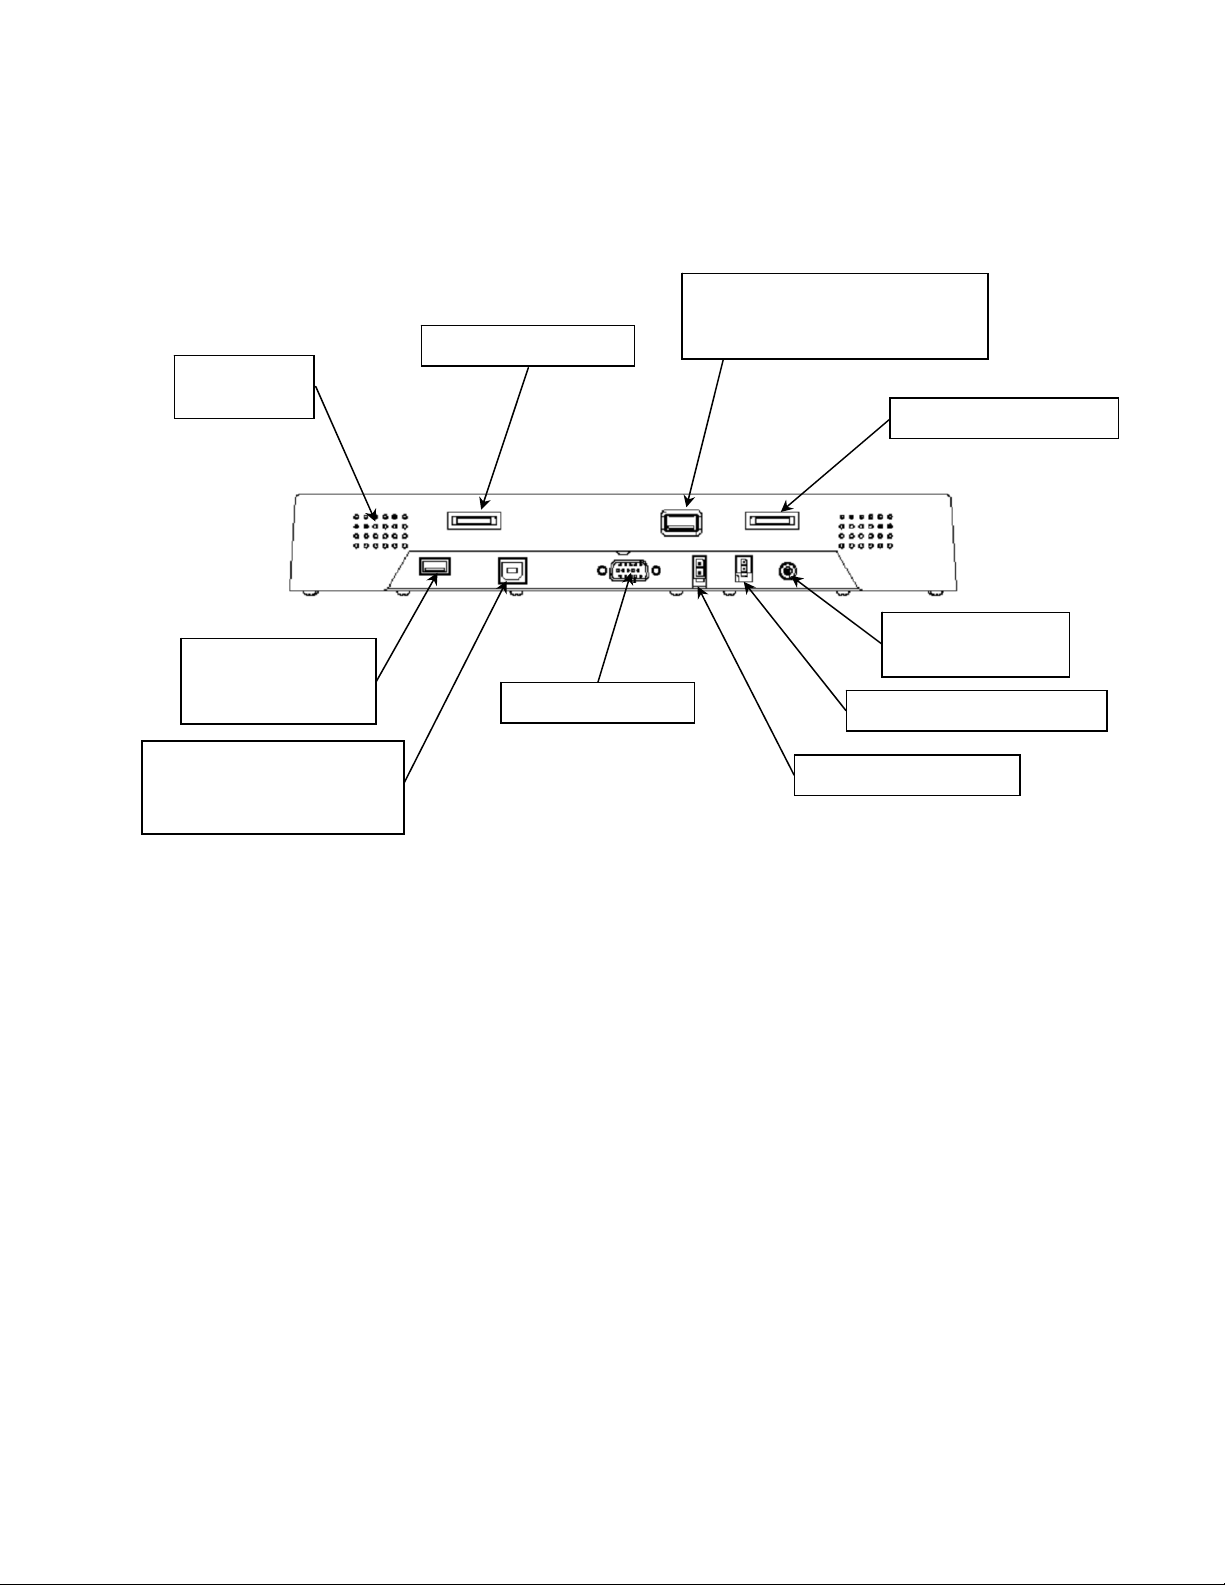
Bottom View
g
Speaker (on
each side)
USB port (Type A)
for connectin
peripheral device
a
Volume control dial
VGA signal input
USB port (Type A, accessible
from the front) for connecting a
peripheral device
Brightness control dial
Audio input
(3.5mm jack plug)
Power interrupt connector
USB port (Type B) for
connecting the touchscreen
to the remote computer
12 VDC power input
Features
• The brightness control allows you to easily adjust the display to match the ambient light, from
full sunlight to night, even while wearing gloves. Its convenient dial design also enables you to
quickly hide the information on the screen when needed (“screen blanking”).
• The monitor’s transflective display uses reflected light from the environment — even direct
sunlight —to provide a bright image that can be easily viewed under any lighting conditions.
• The monitor’s autosync function eliminates the need for adjusting the monitor for the best
image— the monitor automatically makes any needed adjustments whenever it is powered up
or the display mode is changed.
• Two Type A USB connections are available for connecting peripheral devices such as a
keyboard, mouse, or USB drive.
• The monitor supports standard VGA signal input — native 800 x 600 SVGA resolution —
as well as 1024 x 768 XGA and 640 x 480 VGA.
• The monitor’s magnesium enclosure is splash-resistant, and designed to withstand shock and
vibration for greater endurance and reliability.
LX1200TR User’s Manual (020-0512-00A) Page 5 of 20
Page 6
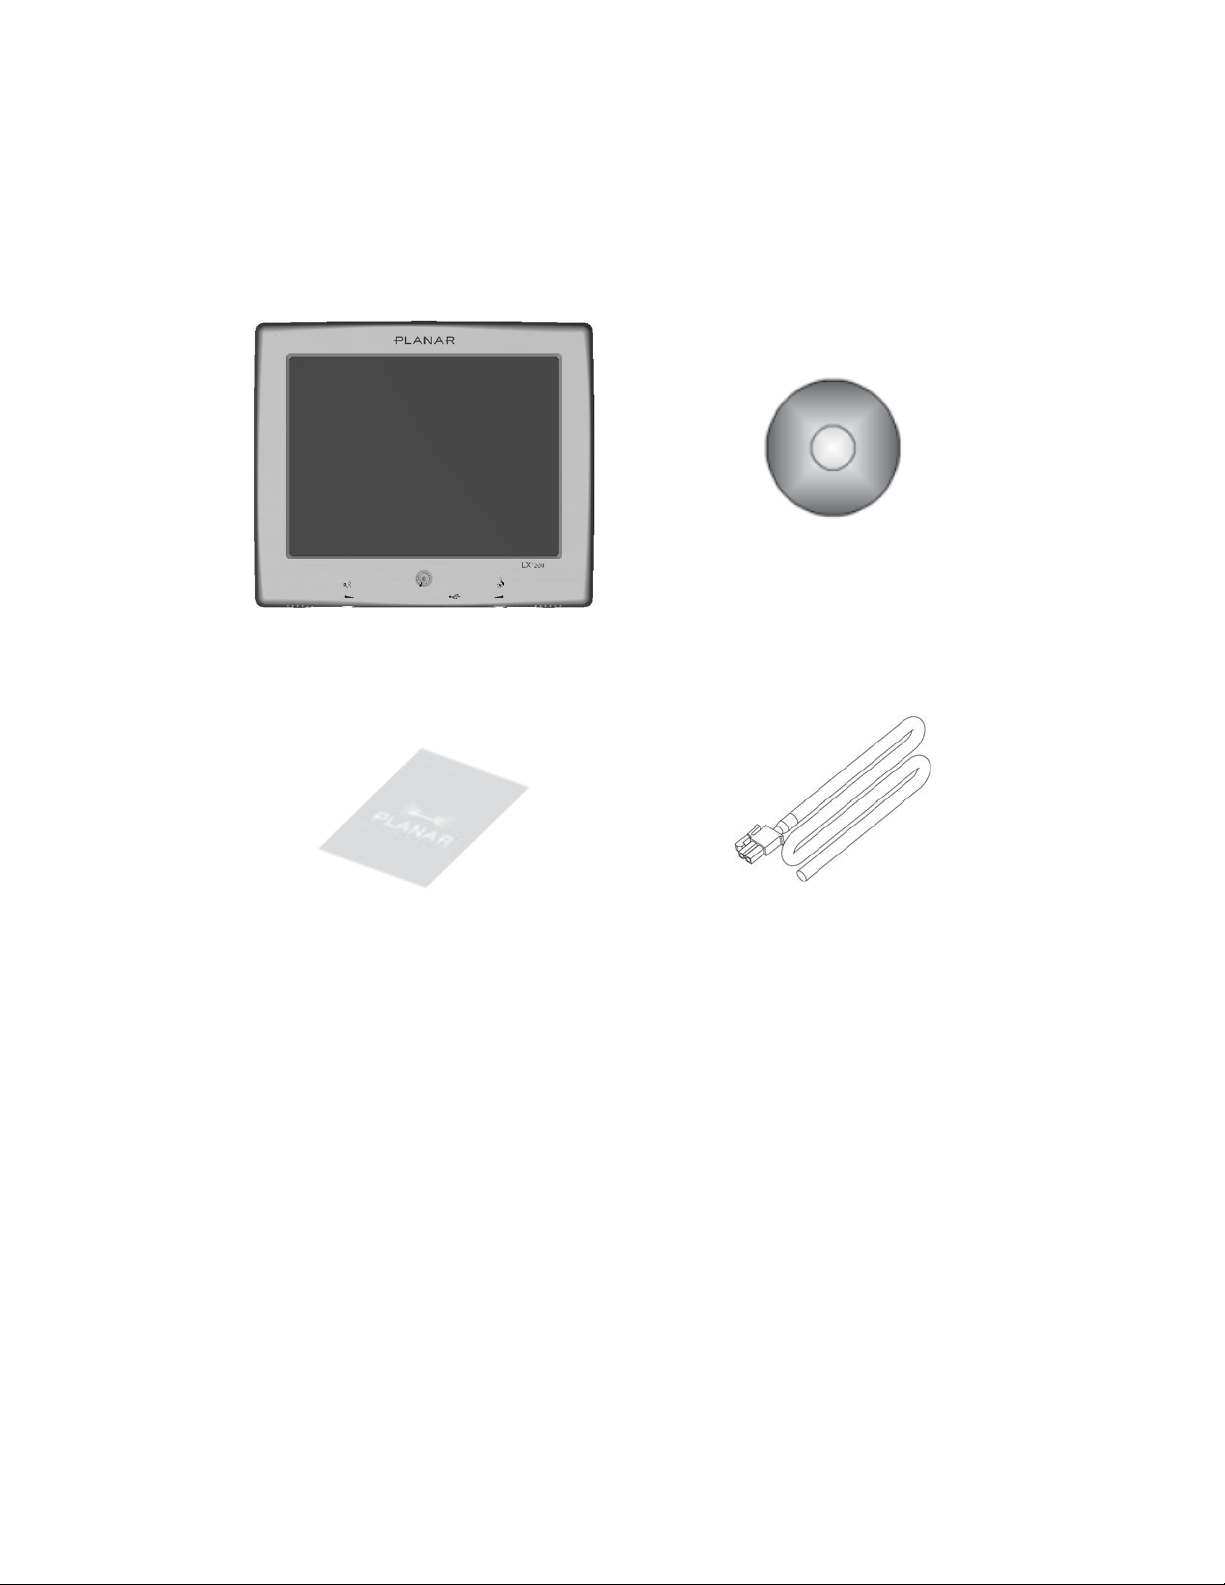
Package Contents
The following items are shipped with the display.
please contact Planar.
If any of these are not in the shipping container,
Touch Screen Driver
Installation CD-ROM
Planar Landing Strip — includes
Power Input Cable
safety, warranty, and
Planar contact information
Note: Mounting hardware and connecting cables sold separately.
LX1200TR User’s Manual (020-0512-00A) Page 6 of 20
Page 7

Installing the LX1200TR
Installing the LX1200TR monitor consists of three steps:
1. Mounting the monitor using the mounting interface built into the monitor’s back cover —
see below.
2. Connecting the monitor to the computer and power source — see page 8.
3. Installing the touch screen driver software — see page 11.
Before Installing
Keep the following in mind while installing the monitor.
• The monitor should be visible to the driver only if it is used for navigation, system control, or
vehicle information. If the monitor will be used for other purposes, it should be installed in such
a way that it will only operate while the vehicle is not moving (such as when the parking brake is
in use). Review all applicable state and local laws and regulations to make sure the monitor is
used properly and safely.
• The installed monitor must not interfere with the driver’s vision.
Step 1 — Mounting the Monitor
The back of the LX1200TR includes a mounting interface that you can use to mount the monitor on
a swing arm or other LCD monitor fixture, as follows.
IMPORTANT: FOR BEST RESULTS, USE THE MOUNTING HOLES AROUND THE EDGES OF THE MONITOR.
1. Mount the fixture in its planned location according to the instructions included with the fixture.
2. Attach the monitor to the fixture using the attachments on the back of the monitor, shown in
the following diagram.
Notes: Use only a Planar-approved mounting bracket for in-vehicle use.
Mounting bracket and hardware are not included with the monitor, and must be
obtained separately.
Use the proper M4 x 0.7 screws for attaching the monitor to the mounting fixture.
For low-vibration environments, the back of the monitor includes a VESA Standard
100mm mounting pattern.
LX1200TR User’s Manual (020-0512-00A) Page 7 of 20
Page 8

Step 2 — Connecting the Monitor
Once the LX1200TR is mounted in place, connect it to the computer (or other video source) and the
12 VDC power supply as follows.
Note: This procedure refers to connections to and from the computer. However,
depending on your particular hardware configuration, these connections may be to a
dock or other device rather than directly to the computer.
1. As needed, route any data and power cables from the computer to the monitor.
2. Make sure the computer is turned off.
3. Connect the 12 VDC power supply cable to the monitor’s power supply.
Notes: Use a 5-Amp fuse in line to the power source.
Also, to extend battery life, you should install a device that shuts off power to the
monitor while the monitor is inactive. (An example is First Mobil Technologies’
Voltage Armor product. www.firstmobiletechnologies.com.)
LX1200TR User’s Manual (020-0512-00A) Page 8 of 20
Page 9

4. Connect the power supply and power interrupt cables (for the All-In-One power switch, if your
computer or docking station is so equipped) to the connectors on the bottom of the monitor.
See the following diagram for connector locations.
Notes: If needed, connect an audio cable to the audio port on the monitor, and to the
headphone or audio line output connector on the computer.
If an external keyboard or other USB device will be used with the monitor, plug it into
either of the monitor’s Type A USB connectors.
Two USB devices can be connected to the monitor.
The following figure shows typical connections.
LX1200TR User’s Manual (020-0512-00A) Page 9 of 20
Page 10

5. Turn on power to the computer. The monitor then turns on as soon as it receives a video signal
from the computer, and its LED turns green.
Also, the first time the monitor is powered up, it automatically displays a test pattern of
repeating colored screens (black, white, red, green, and blue) until video a video signal is
detected.
6. The LX1200 monitor is Windows plug and play compatible. Install the monitor’s driver software
and configure the monitor’s touch screen as needed — see below.
Note: For best results, adjust the display mode of the computer to a resolution of 800 x 600,
and a refresh rate of 60 Hz.
LX1200TR User’s Manual (020-0512-00A) Page 10 of 20
Page 11

Step 3 — Installing the Touch Screen Driver
Before using the monitor for the first time if desired, install its driver software from the Touch
Screen Driver Installation CD-ROM included with the monitor or from www.planar.com/support.
Note: The LX1200 touchscreen monitor is Plug-and-Play compatible, and requires only
Microsoft Windows ® 2000 or XP and a USB connection to operate.
For enhanced touch screen features (including drag and drop, touch activation on
lift-off, enhanced touch accuracy, and calibration you can load the touch screen
driver from the “Touch Screen Driver Installation” CD included with the monitor.
Please note: the LX1200 is Microsoft Windows® HID (Human Interface Device) compatible. No
additional software driver is required for general operation of the monitor. Simply plug in the USB
cable to the monitor and computer and power up. The computer will automatically recognize and
operate the LX1200 monitor.
The following Microsoft Windows operating systems are supported by the Planar touch driver:
Microsoft Windows 2000 and XP.
Driver Installation Process:
1. Be sure that the USB cable is not connected to the PC.
2. Load the CD-Rom.
3. Click on setup file.
4. Click Run
5. Click Next
6. Read and accept the license agreement
LX1200TR User’s Manual (020-0512-00A) Page 11 of 20
Page 12

7. Click 10 or 12 bit controller
8. Click finish
9. Reconnect the USB cable to the computer prior to use.
10. Please note: if the touch screen isn’t active, simply reboot your system.
Please read "Readme.txt" located in the unzipped file folder for additional information and
assistance.
LX1200TR User’s Manual (020-0512-00A) Page 12 of 20
Page 13

Using the LX1200TR
Monitor Controls
Power indicator LED
Volume control
Brightness control
Power button
Control Function
Volume control dial Increases and decreases the volume of the display.
Power button Turns the connected computer on and off — see page 14 for
details.
Power indicator LED Shows the power state of the monitor:
Green: power is on, all systems OK
Amber: display brightness is fully turned down (“blanked”)
Red: the monitor is receiving no video input
Off: DC power is off
Brightness control dial Increases and decreases the brightness of the display. Turning the
dial all the way clockwise will “blank” the display to hid
information if needed.
LX1200TR User’s Manual (020-0512-00A) Page 13 of 20
Page 14

Turning the Monitor On and Off
The monitor’s power button controls power to the
and off according to whether it is receiving a video signal.
• To turn on the computer, press the power button on the front of the monitor. The monitor then
turns on when it receives a good video signal from the computer (and the monitor’s power
indicator turns from red to green).
• To turn off the computer, press the power button again.
Note: Be sure to configure the computer’s power options, including how the computer
responds when the power button is pressed. See Windows on-line help for details.
The monitor goes into standby whenever the computer is put into sleep or into
hibernation.
computer
. The monitor itself turns its display on
Using the Touch Screen
The LX1200TR’s touch screen allows you to operate the computer by touching the screen with a
finger or stylus, rather than using a mouse or keyboard.
CAUTION: NEVER TOUCH THE SURFACE OF THE DISPLAY SCREEN WITH A SHARP OBJECT.
Navigating the Touch Screen
• To click an item, tap the item once.
• To double-click an item, tap the item twice rapidly.
• To drag an item, touch the item, and then drag it along the screen to the new location.
• To move the cursor, touch the screen and move the cursor as needed.
Cleaning the Monitor
Clean the monitor’s touch screen periodically to keep the display image bright and sharp, and to
keep the touch screen functions working properly.
• Always turn off the monitor before cleaning.
• Clean the touch screen only with a dry soft cloth.
If this does not clean the screen adequately, use water or mild glass or window cleaner (
does not contain ammonia
CAUTION: DO NOT APPLY LIQUIDS TO THE DISPLAY.
• Clean the monitor housing with a soft cloth moistened with mild detergent, 70% isopropyl
alcohol, 1.6% aqueous ammonia, or household window cleaners.
)
applied to the cloth, and not to the display
.
that
• Never apply abrasive cleaners, waxes, or solvents to the monitor.
LX1200TR User’s Manual (020-0512-00A) Page 14 of 20
Page 15

Appendices
Troubleshooting the Monitor
If you have trouble with the LX1200TR monitor, try to solve the problem using the suggestions in
the following lists
If the problem persists, please contact Planar (see “Contact Information” at the end of this Manual).
Note: Refer to the computer’s documentation for help with configuring the computer’s
Problem: No image appears.
• Make sure the brightness is not turned all the way down.
• Make sure all data and power cables are properly connected to the monitor and to the
computer and power supply — see page 8 for details.
• Make sure the pins on the cables and connectors are not crooked or broken.
• Make sure the computer is functioning properly, and has not entered power-saving mode. (You
may also want to disable the computer’s power-saving feature.)
in the order shown
settings.
.
Problem: The image is cut off or distorted.
• Make sure the computer’s image resolution is set to one of these resolutions: 800 x 600 (SVGA),
1024 x 768 (XGA), or 640 x 480 (VGA).
Problem: The image is scrolling.
• Make sure the VGA signal cable is securely connected at both ends.
Problem: No sound.
• Make sure the volume is not turned completely down.
• Make sure the audio cable is securely connected at both ends.
• Make sure the computer’s audio is not muted.
Problem: The monitor does not appear to respond to the touch screen.
• Make sure the USB cable to the computer is securely connected at both ends.
LX1200TR User’s Manual (020-0512-00A) Page 15 of 20
Page 16

Specifications
Dimensions
• Size: 313 mm (12.3 in) width x 267 mm (10.5 in) height x 46 mm (1.8 in) thickness
• Screen size: 12.1 inch diagonal
• Weight: 5 kg maximum
LX1200TR User’s Manual (020-0512-00A) Page 16 of 20
Page 17

Video Specifications
• Input: standard VGA
• Resolution: SVGA (800 x 600); supports 1024 x 768 (XGA) and 640 x 480 (VGA)
• Response time: < 35 ms (typical)
• Viewing angle: 140° horizontal, 45° up, 55° down (typical)
• Brightness: 315 cd/m
• Brightness in high ambient light conditions: 1000 cd/m
2
, transflective panel (typical)
2
• Contrast: > 250:1 at ambient illumination level ≤ 5 lux (typical)
• Autosync: on power-up and any change of video mode, will automatically detect any
supported video resolution and display the image accordingly
Electrical Specifications
• Power input: 12 VDC nominal
• Power input voltage range: 8 to 18 VDC, with transient protection resident on the monitor
• Maximum power: 25 W
• Typical power: less than 17 W
• Power consumption in power-saving (standby) mode: 0.7 W
• Speaker/amplifier power: 2 W per speaker
Electromagnetic Compatibility (EMC)
• ESD, 6 kV contact and 8 kV air discharge
• Emissions
47 CFR. Part 15, Subpart B, Class B – Conducted and Radiated Tests
CE EMC Directive 89/336/EEC
EN55022:1998+A1:2000+A2:2003; Class B Conducted & Radiated Test
EN61000-3-2:2000, Class D Harmonic Current Emissions
EN61000-3-3:1995+A1:2001 Voltage Fluctuations and Flicker
LX1200TR User’s Manual (020-0512-00A) Page 17 of 20
Page 18

Immunity Characteristics
• EN55024:1998+A1:2001
• IEC 61000-4-2:2001 Electrostatic Discharge Immunity Test
• IEC 61000-4-3:2002 Radiated Radio-Frequency Electromagnetic Field Immunity Test
• IEC 61000-4-4:1995+A1:2000+A2: 2001 Electrical Fast Transient/Burst Immunity Test
• IEC 61000-4-5:2001 Surge Immunity Test
• IEC 61000-4-6:2001 Immunity to Conducted Disturbances, Induced by Radio-Frequency Fields
• IEC 61000-4-8:2001 Power Frequency Magnetic Field Immunity Test
• IEC 61000-4-11:2001 Voltage Dips, Short Interruptions and Voltage Variations Immunity Tests
Safety
• UL/CSA 60950-1
Environmental Specifications
Temperature
• Operating: -10 to 55 °C
• Operating
Survival: -25 to 65 °C
• Storage: -30 to 75 °C
Humidity
• Operating: 5 to 90% RH, 40 °C, non-condensing
• Non-operating: 5 to 93% RH, non-condensing
Altitude
• Operating: 10,000 ft (IEC 60068 PT2-13, 4 hours)
• Non-operating: 15,000 ft (IEC 60068 PT2-13, 4 hours)
Vibration
• Operating (random): 10 to 500 Hz, 3.0 G rms acceleration, 3 hours per axis
Shock
• Operating/Non-operating: 50 G, 11 ms duration, ½ sine, 3 shocks per axis (IEC 60068 PT2-27)
LX1200TR User’s Manual (020-0512-00A) Page 18 of 20
Page 19

Connectors
• J1: Video input
15 pin D-Sub VGA, female, Zhangjiagang SBFR15 or equivalent
• J2: Power interrupt
CviLux CP35 2P*H00 (black); terminal part number 43030-0007
Mating connector is Molex Micro Fit Jr., Molex part number 43025-0200, terminal part
number 43030-0007.
The power interrupt switch is connected to a single pole single throw normally open push
button (SPST N.O) switch. This can be connected to your docking station or computer’s
power button.
• J3: Audio input
3mm jack
• J4: USB upstream Type B
Type B for connecting to the computer
• J5: DC power input
Chassis-mounted, two-pin connector (Molex Mini Fit Jr Header
5569 Molex p/n 39-30-0020)
The table below lists the connector’s pin assignments, and the
figure at right shows the physical layout as seen by the interface
cable from the DC power source.
Pin number Signal
1 (Square) Positive input voltage (12V)
2 (D-Shape) Return (GND)
• J7, J8: USB downstream Type A
LX1200TR User’s Manual (020-0512-00A) Page 19 of 20
Page 20

For connecting peripheral USB devices, powered (I assume??)
Support and Service
Planar is a U.S. company based in Beaverton, Oregon and Espoo, Finland, with a world-wide sales
distribution network. Full application engineering support and service are available to make the
integration of Planar displays as simple and quick as possible for our customers.
RMA Procedure: For a Returned Material Authorization number, please contact Planar Systems, Inc.
with the model number(s) and serial number(s). When returning goods for repair, please include a
brief description of the problem, and mark the outside of the shipping container with the RMA
number.
Planar Systems, Inc.
Customer Service
24x7 Online Technical Support: http://www.planar.com/support
Email: PlanarSupport@planar.com
Americas Support
1195 NW Compton Drive
Beaverton, OR 97006-1992
Tel: 1-866-PLANAR-1 (1-866-752-6271)
Hours: M-F, 8am-8pm Eastern Time (5am-5pm Pacific Time)
Europe and Asia-Pacific Support
Olarinluoma 9 P.O. Box 46
FIN-02201 Espoo, Finland
Tel: +358-9-420-01
Hours: M-F, 7:00am - 4pm CET
© 2006 Planar Systems, Inc. 05/06 Planar is a registered trademark of Planar Systems, Inc.
Other brands and names are the property of their respective owners.
Technical information in this document is subject to change without notice.
LX1200TR User’s Manual (020-0512-00A) Page 20 of 20
 Loading...