

Page 1
QUICK LINKS
Contents
Index
Regulatory Compliance
Product Information
Warranty
GETTING STARTED
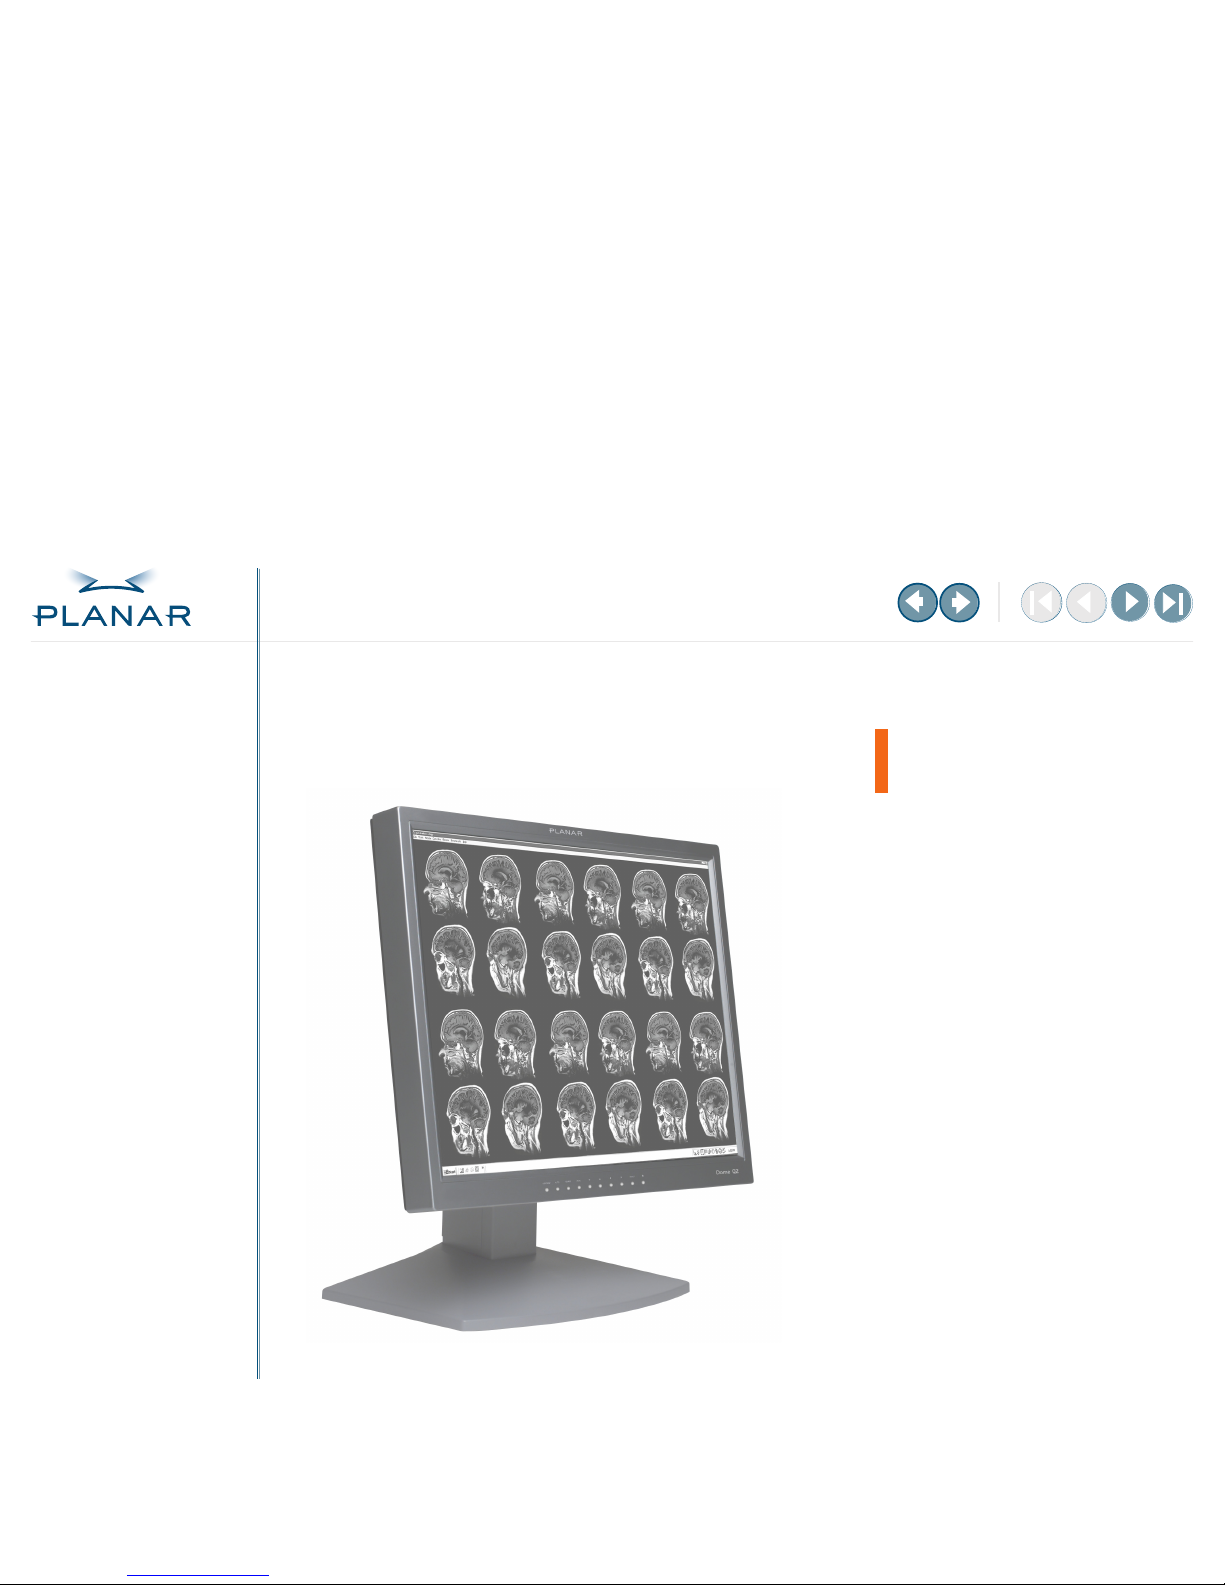
About the Q2 Display
Check Package Contents
Identify Components
Position the Display
Desk Stand Features
INSTALLING THE DISPLAY
Install AX1 Controller
Connect Cables
Install Display Driver
Adjust Display Properties
OPERATING THE DISPLAY
Front-Panel Controls
Screen Adjustments
Dome CXtra Software
APPENDIXES
Troubleshooting
Specifications
USB Connections
Power Management System
Driver Removal
Dome
®
Q2 Display
AX1 Display Controller
Reference Guide
www.planar.com
Page 2
QUICK LINKS
Contents
Index
Regulatory Compliance
Product Information
Warranty
GETTING STARTED
About the Q2 Display
Check Package Contents
Identify Components
Position the Display
Desk Stand Features
INSTALLING THE DISPLAY
Install AX1 Controller
Connect Cables
Install Display Driver
Adjust Display Properties
OPERATING THE DISPLAY
Front-Panel Controls
Screen Adjustments
Dome CXtra Software
APPENDIXES
Troubleshooting
Specifications
USB Connections
Power Management System
Driver Removal
ii
Dome Q2 Display
Planar Systems, Inc. © 2005. All rights reserved.
Information in this document has been carefully checked for accuracy; however, no guarantee is
given to the correctness of the contents. This document is subject to change without notice. Planar
provides this information as reference only. Reference to other vendors’ product does not imply
any recommendation or endorsement.
This document contains proprietary information protected by copyright. No part of this manual
may be reproduced by any mechanical, electronic, or other means, in any form, without prior
written permission of the manufacturer.
Planar and Dome are registered trademarks and Q2 and CXtra are trademarks of
Planar Systems, Inc. All other trademarks are the property of their respective owners.
DOCUMENT HISTORY
June 2005 020-0413-00 A
America Sales
Planar Systems, Inc.
1195 NW Compton Drive
Beaverton, OR 97006-1992 USA
(503) 748-1100 phone
(503) 748-1493 fax
Medical Sales
Planar Systems, Inc.
400 Fifth Avenue
Waltham, MA 02451-8738 USA
(781) 895-1155 phone
(781) 895-1133 fax
Europe & Asia-Pacific Sales
Planar Systems, Inc.
Olarinluoma 9, P. O. Box 46
FIN-02201 Espoo, Finland
+ 358 9 420 01 phone
+ 358 9 420 0200 fax
[email protected]
[email protected]
www.planar.com
Page 3
iii
Dome Q2 Display
QUICK LINKS
Contents
Index
Regulatory Compliance
Product Information
Warranty
GETTING STARTED
About the Q2 Display
Check Package Contents
Identify Components
Position the Display
Desk Stand Features
INSTALLING THE DISPLAY
Install AX1 Controller
Connect Cables
Install Display Driver
Adjust Display Properties
OPERATING THE DISPLAY
Front-Panel Controls
Screen Adjustments
Dome CXtra Software
APPENDIXES
Troubleshooting
Specifications
USB Connections
Power Management System
Driver Removal
Contents
Regulatory Compliance. . . . . . . . . . . . . . . . . . . . . . . . . . . . . . . . . . .
iv
Product Information . . . . . . . . . . . . . . . . . . . . . . . . . . . . . . . . . . . . .
vi
About the Dome Q2 Display . . . . . . . . . . . . . . . . . . . . . . . . . . . . . . . .
1
Package Contents . . . . . . . . . . . . . . . . . . . . . . . . . . . . . . . . . . . . . . .
2
Identify the Components . . . . . . . . . . . . . . . . . . . . . . . . . . . . . . . . . . .
3
Position the Display . . . . . . . . . . . . . . . . . . . . . . . . . . . . . . . . . . . . . .
6
Features of the Desk Stand. . . . . . . . . . . . . . . . . . . . . . . . . . . . . . . . .
7
Install the AX1 Display Controller . . . . . . . . . . . . . . . . . . . . . . . . . . .
8
Connect the Cables . . . . . . . . . . . . . . . . . . . . . . . . . . . . . . . . . . . . . . .
9
Install the Display Driver . . . . . . . . . . . . . . . . . . . . . . . . . . . . . . . . .
10
Adjust the Display Properties . . . . . . . . . . . . . . . . . . . . . . . . . . . . . .
11
Front-Panel Controls . . . . . . . . . . . . . . . . . . . . . . . . . . . . . . . . . . . .
12
Screen Adjustments . . . . . . . . . . . . . . . . . . . . . . . . . . . . . . . . . . . . .
13
Enhancements with Dome CXtra Software . . . . . . . . . . . . . . . . . . . .
17
Troubleshooting . . . . . . . . . . . . . . . . . . . . . . . . . . . . . . . . . . . . . . . .
18
Display Specification . . . . . . . . . . . . . . . . . . . . . . . . . . . . . . . . . . . .
21
Controller Specification . . . . . . . . . . . . . . . . . . . . . . . . . . . . . . . . . .
23
USB Hub Specification. . . . . . . . . . . . . . . . . . . . . . . . . . . . . . . . . . .
24
Using USB Connections . . . . . . . . . . . . . . . . . . . . . . . . . . . . . . . . . .
25
Power Management System . . . . . . . . . . . . . . . . . . . . . . . . . . . . . . .
26
Driver Removal . . . . . . . . . . . . . . . . . . . . . . . . . . . . . . . . . . . . . . . .
27
Index . . . . . . . . . . . . . . . . . . . . . . . . . . . . . . . . . . . . . . . . . . . . . . . .
28
Dome QX Display – Standard Warranty Overview . . . . . . . . . . . . . . .
30
Page 4
QUICK LINKS
Contents
Index
Regulatory Compliance
Product Information
Warranty
GETTING STARTED
About the Q2 Display
Check Package Contents
Identify Components
Position the Display
Desk Stand Features
INSTALLING THE DISPLAY
Install AX1 Controller
Connect Cables
Install Display Driver
Adjust Display Properties
OPERATING THE DISPLAY
Front-Panel Controls
Screen Adjustments
Dome CXtra Software
APPENDIXES
Troubleshooting
Specifications
USB Connections
Power Management System
Driver Removal
iv
Dome Q2 Display
Regulatory Compliance
FCC Compliance Statement
Note: This equipment has been tested and found to comply within the limits of a Class B
digital device, pursuant to Part 15 of the FCC Rules. These limits are designed to provide
reasonable protection against harmful interference in a residential installation. This
equipment generates, uses, and can radiate radio frequency energy and, if not installed
and used in accordance with the instruction, may cause harmful interference to radio
communications. However, there is no guarantee that interference will not occur in
a particular installation. If this equipment does cause harmful interference to radio or
television reception, which can be determined by turning the equipment off and on,
the user is encouraged to try to correct the interference by using one or more of the
following measures:
•
Reorient or relocate the receiving antenna.
•
Increase the separation between the equipment and the receiver.
•
Connect the equipment into an outlet on a circuit different from that
to which the receiver is connected.
•
Consult the dealer or an experienced radio/TV technical for help.
Caution: Changes or modifications not expressly approved by the party responsible for
compliance could void the user’s authority to operate the equipment. Only the peripherals
(digital input/output devices, terminals, printers, etc.) certified to comply with the Class B
limits may be attached to this monitor. Operation with non-certified peripherals is likely to
result in interference to radio and TV reception. Only shielded signal cables may be used
with this system.
–MORE–
Page 5
QUICK LINKS
Contents
Index
Regulatory Compliance
Product Information
Warranty
GETTING STARTED
About the Q2 Display
Check Package Contents
Identify Components
Position the Display
Desk Stand Features
INSTALLING THE DISPLAY
Install AX1 Controller
Connect Cables
Install Display Driver
Adjust Display Properties
OPERATING THE DISPLAY
Front-Panel Controls
Screen Adjustments
Dome CXtra Software
APPENDIXES
Troubleshooting
Specifications
USB Connections
Power Management System
Driver Removal
v
Dome Q2 Display
Canadian DOC Notice
This Class B digital apparatus meets all requirements of the Canadian Interference–
Causing Equipment regulations.
CE Conformity Notice
Products with the “CE” Marking comply with the EMC Directive (89/336/EEC) and LOW
VOLTAGE Directive (73/23/EEC) issued by the Commission of the European Community.
Compliance with these directives implies conformity to the following European Norms:
•
EN 55022 Radio Frequency Interference
•
EN 50082-1:1992 Electromagnetic Immunity
•
EN 60555-2 Power Line Harmonics
•
EN 60555-3 Voltage Fluctuations
•
EN 60950 Product Safety
Page 6
QUICK LINKS
Contents
Index
Regulatory Compliance
Product Information
Warranty
GETTING STARTED
About the Q2 Display
Check Package Contents
Identify Components
Position the Display
Desk Stand Features
INSTALLING THE DISPLAY
Install AX1 Controller
Connect Cables
Install Display Driver
Adjust Display Properties
OPERATING THE DISPLAY
Front-Panel Controls
Screen Adjustments
Dome CXtra Software
APPENDIXES
Troubleshooting
Specifications
USB Connections
Power Management System
Driver Removal
vi
Dome Q2 Display
Product Information
Safety precautions
Observe the following precautions for the proper installation, use, and servicing
of the Dome® Q2 display, and to ensure personal safety.
•
Use only the power cord supplied with the unit. The power cord is the main disconnection
device. Ensure that the power outlet is easily accessible after installation.
•
Plug the power cord into a grounded power outlet. Do not use overloaded outlets or
extension cords.
•
Replace any cord or cable that is frayed or damaged with another of the same type and
rating, as supplied by Planar. The safety and regulatory listings and certifications are
based on the cable supplied by Planar.
•
Do not open the display. Refer all servicing to qualified technicians to maintain your
warranty. The display contains no user-serviceable parts. Some internal parts carry
high voltages, even when it is turned off.
•
Avoid personal injury. Set up the display on a sturdy and level surface. Use only the
mounting options approved for the display.
•
Prevent fire or hazards. Always turn the display off when it is unattended or not in
use for long periods of time. Unplug the display during lightning storms or when it
is expected to be unattended or not used for extended periods of time.
•
Do not push objects into the cabinet openings.
•
Do not add accessories that have not been designed for use with the display.
Avoiding hazards
Improper use of the display and its
accessories may result in electric
shock or fire hazards. Follow all
precautions listed in this section.
–MORE–
Page 7
QUICK LINKS
Contents
Index
Regulatory Compliance
Product Information
Warranty
GETTING STARTED
About the Q2 Display
Check Package Contents
Identify Components
Position the Display
Desk Stand Features
INSTALLING THE DISPLAY
Install AX1 Controller
Connect Cables
Install Display Driver
Adjust Display Properties
OPERATING THE DISPLAY
Front-Panel Controls
Screen Adjustments
Dome CXtra Software
APPENDIXES
Troubleshooting
Specifications
USB Connections
Power Management System
Driver Removal
vii
Dome Q2 Display
Installation precautions
•
Place the power cord where it is free of equipment and foot traffic. Do not allow
anything to rest or roll over the power cord.
•
Do not set up the display near a window. Exposing the display to rain, water,
moisture, or direct sunlight can damage it.
•
Do not cover or obstruct the display ventilation with cloth or other materials.
•
Do not set up the display in a built-in enclosure unless proper ventilation is
provided.
•
Do not set up the display near a heat source.
•
Do not rub or strike the display screen with any hard object, or apply excessive
pressure to the screen. Otherwise, the active matrix LCD screen could be
damaged permanently.
•
Store the display in an environment with a temperature range from -20 to
65 degrees Celsius. Storing your display outside this range could result in
permanent damage.
•
Do not expose the display to liquid or drop it. If the case has been damaged,
the unit may pose a shock or fire hazard. Unplug the unit immediately and
call customer support for assistance.
•
Do not remove the back cover or disassemble the display unit. There are no user-
serviceable parts inside.
Service requirements
Unplug the display from the outlet and
refer servicing to qualified personnel
when any one of these events occur:
•
The power cord or plug is damaged
or frayed.
•
Liquid has been spilled inside the
display.
•
The display has been exposed to
rain or water.
•
The display does not operate when
you follow the instructions. Adjust
only those controls covered in the
instructions. Improper adjustment of
other controls may result in damage.
•
The display has been dropped or
the cabinet has been damaged.
•
The display exhibits a distinct change
in performance.
•
Snapping or popping from the
display is continuous or frequent
while the display is operating.
Some displays may make sounds
when being turned on or off, or
when changing video modes
Do not service the display yourself.
Opening the covers may expose you
to voltage or other hazards.
–MORE–
Page 8
QUICK LINKS
Contents
Index
Regulatory Compliance
Product Information
Warranty
GETTING STARTED
About the Q2 Display
Check Package Contents
Identify Components
Position the Display
Desk Stand Features
INSTALLING THE DISPLAY
Install AX1 Controller
Connect Cables
Install Display Driver
Adjust Display Properties
OPERATING THE DISPLAY
Front-Panel Controls
Screen Adjustments
Dome CXtra Software
APPENDIXES
Troubleshooting
Specifications
USB Connections
Power Management System
Driver Removal
viii
Dome Q2 Display
Cleaning precautions
Always apply the cleaning substance to a clean, nonabrasive cloth and then wipe the screen
and display case. Cleaners applied directly to the display could leak inside the display case
and cause damage.
To clean the display
1
Switch the power off and unplug the power cord.
2
Dampen a clean, nonabrasive cloth with the cleaning substance.
3
Wipe the screen gently with the dampened cloth.
4
Dry the screen with a clean nonabrasive cloth to remove any residue.
Storing and shipping
Store the display in its original carton when it is not in operation for extended periods of
time. Also use the original packing materials and carton when shipping the display.
Cleaning the display
Do not apply pressure to the
LCD screen.
Do not use chemically treated dust
cloths to clean the LCD screen.
Do not pour, spray, or splash any
cleaning liquid onto the LCD screen
or display case.
Page 9
QUICK LINKS
Contents
Index
Regulatory Compliance
Product Information
Warranty
GETTING STARTED
About the Q2 Display
Check Package Contents
Identify Components
Position the Display
Desk Stand Features
INSTALLING THE DISPLAY
Install AX1 Controller
Connect Cables
Install Display Driver
Adjust Display Properties
OPERATING THE DISPLAY
Front-Panel Controls
Screen Adjustments
Dome CXtra Software
APPENDIXES
Troubleshooting
Specifications
USB Connections
Power Management System
Driver Removal
1
Dome Q2 Display
About the Dome Q2 Display
The Dome® Q2 display system consists of a 20.1-inch, TFT LCD panel and an AX1
controller and driver. Specifically, the architecture of the Q2 display incorporates
AMLCD TFT technology to yield higher levels of brightness. The AX1 controller is
an advanced workstation graphics accelerator based on a high-bandwidth, parallel
pipeline geometry and rendering architecture. It supports the landscape-to-portrait
rotation commonly needed for viewing medical images.
Each display is individually characterized and offers the following key features.
See the display specification for more information.
•
Maintains mid-level grayscale dynamic range of 766 shades of gray
•
Supports video standard of 1600 x 1200
•
Maintains high level of brightness, high contrast ratios, and wide viewing angles
•
Offers front-panel controls to adjust screen parameters with built-in OSD menus
•
Has VESA standard for optional wall-mounting
The AX1 controller supports the PCI Express bus for communication between the
graphics subsystem and the workstation processor and can drive dual digital panels.
See controller specification for more information.
The Dome CXtra software enhances the functionality of the Q2 display for viewing
medical images in referral settings. Dome CXtra provides a range of value-added
services, such as DICOM calibration, AAPM TG18 acceptance testing, error reporting,
and enterprise management.
Before installing the display system, review the
safety precautions and installation
precautions. Once your display system is in operation, follow the guidelines for
cleaning and servicing your unit.
System requirements
Computer system
•
Intel Pentium 4/Xeon;
AMD Athlon 64/K7/XP
or compatible
•
Motherboard with free
PCI Express slot
•
256 MB RAM
•
CD-ROM drive
•
Power supply, 300 watts or greater
Operating system
Either:
•
Windows XP with Service Pack 1
(or higher)
•
Windows 2000 with Service Pack 4
(or higher)
Optional
Dome CXtra software
Page 10
QUICK LINKS
Contents
Index
Regulatory Compliance
Product Information
Warranty
GETTING STARTED
About the Q2 Display
Check Package Contents
Identify Components
Position the Display
Desk Stand Features
INSTALLING THE DISPLAY
Install AX1 Controller
Connect Cables
Install Display Driver
Adjust Display Properties
OPERATING THE DISPLAY
Front-Panel Controls
Screen Adjustments
Dome CXtra Software
APPENDIXES
Troubleshooting
Specifications
USB Connections
Power Management System
Driver Removal
2
Dome Q2 Display
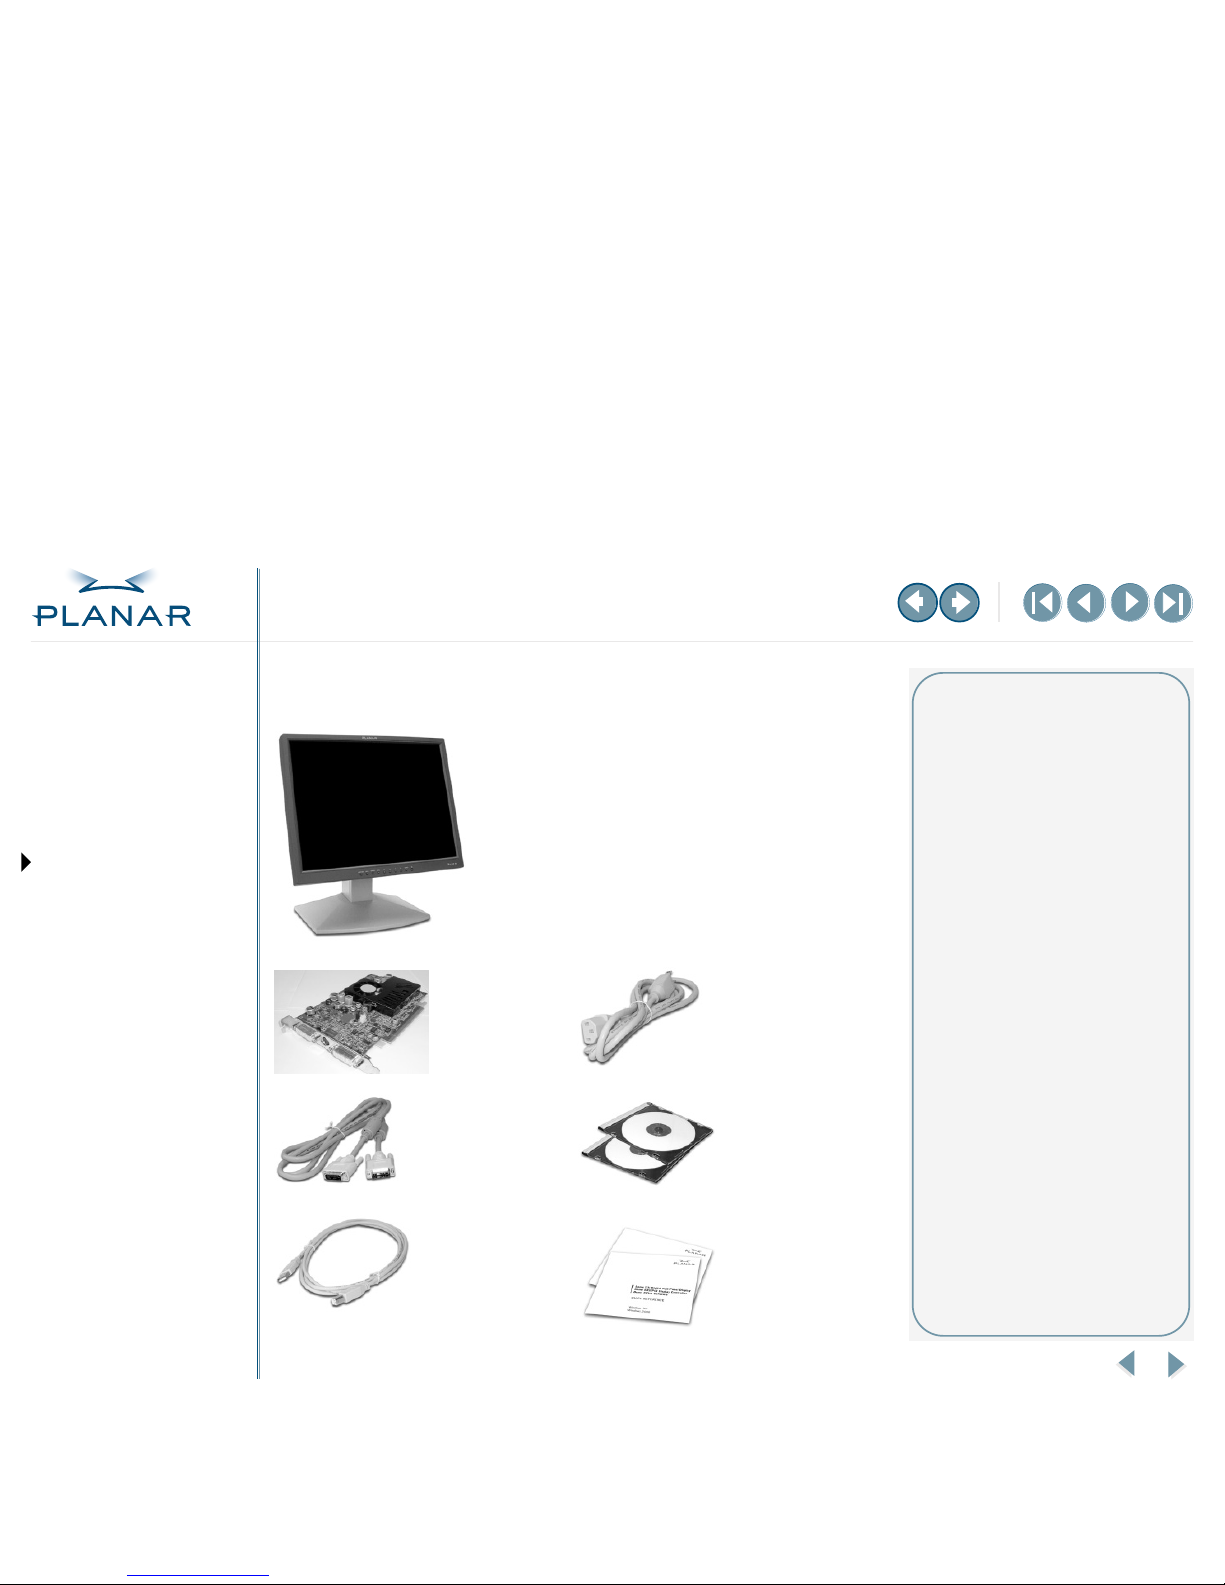
Package Contents
AX1 display
controller
AC power cord
DVI video cable
CD-ROMs with
display driver and
Dome CXtra
software
USB cable
Quick references
for Dome Q2
display and
Dome CXtra
software
Unpacking and handling tips
If any item is missing or damaged,
notify your dealer immediately.
Unpack the Q2 display and its
accessories carefully. Improper
handling may damage or break
the LCD glass.
Place the display in a location that
allows sufficient airflow to ensure
proper ventilation. But avoid setting
up the unit near a window with
strong sunlight. You will have
difficulty seeing the screen with
glare reflecting off the display.
Avoid touching the screen with your
fingers or objects. Skin oils are hard
to remove from the screen.
Mounting and security options
The Q2 display accepts a VESAcompliant mounting interface pad.
You can connect the display to
another type of desktop stand or
wall-mounted object.
The display has a Kensington
Security Slot that allows you to
secure the display with a locking
cable. You can purchase the cable
at most computer stores.
Q2 LCD panel
mounted on
desk stand
Page 11
QUICK LINKS
Contents
Index
Regulatory Compliance
Product Information
Warranty
GETTING STARTED
About the Q2 Display
Check Package Contents
Identify Components
Position the Display
Desk Stand Features
INSTALLING THE DISPLAY
Install AX1 Controller
Connect Cables
Install Display Driver
Adjust Display Properties
OPERATING THE DISPLAY
Front-Panel Controls
Screen Adjustments
Dome CXtra Software
APPENDIXES
Troubleshooting
Specifications
USB Connections
Power Management System
Driver Removal
3
Dome Q2 Display
Identify the Components
Review illustrations of the front panel, back panel, and side panel to identify
display controls and ports.
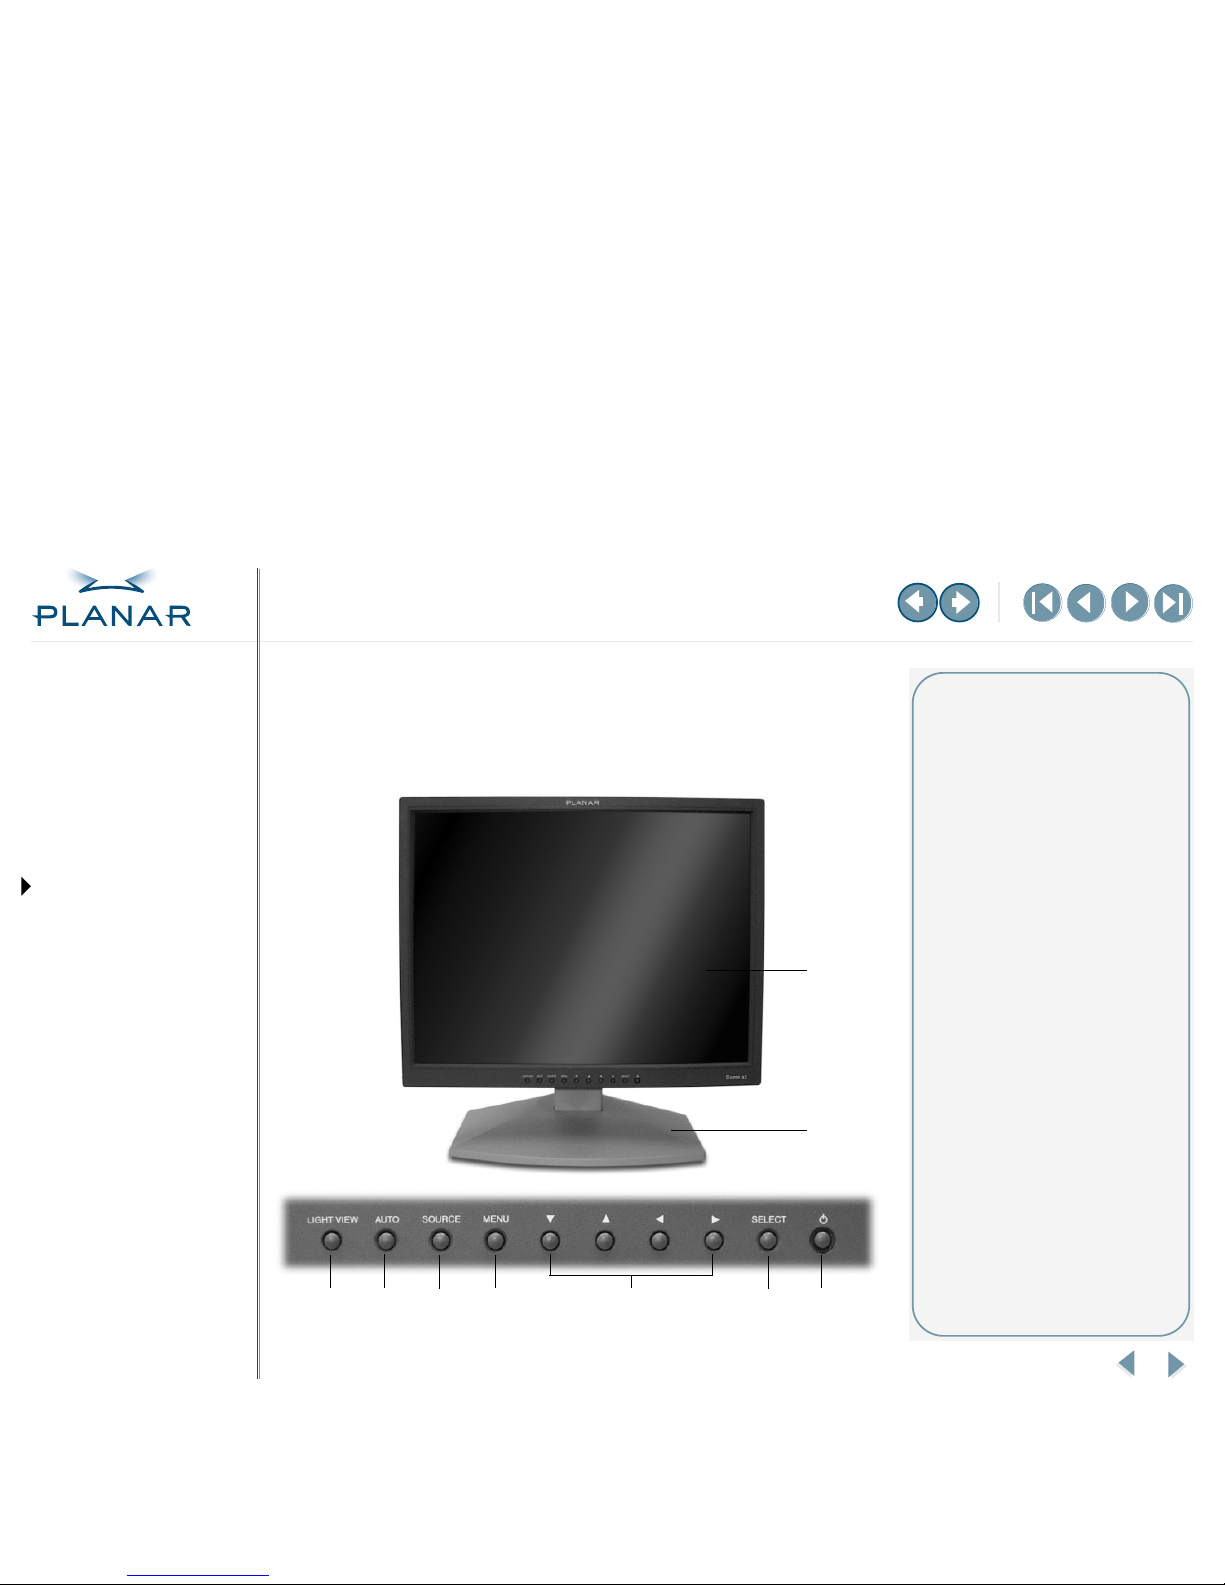
Front panel
1
2
3
4
5
6
7
8
9
Legend
1 LCD screen
A 20.1-inch AMLCD. Supports
resolutions up to 1600 x 1200.
2 Desk stand
Flat-surface support for the
display. Allows you to adjust the
display to various viewing angles.
3 Light View
Non-functioning in digital mode.
4 Auto
Non-functioning in digital mode.
5 Source
Activates the digital connector.
6 Menu
Enters or exits the OSD.
7 Navigation buttons
Allows you to choose or adjust
items in the onscreen display
(OSD).
8 Select
Enters a selection on the OSD.
9 Display screen power switch and
DPMS indicator
Turns the display screen on or off.
The surrounding LED indicator
lights up green when the display
operates normally. With the
display in energy-saving mode,
the indicator changes to amber.
Page 12
QUICK LINKS
Contents
Index
Regulatory Compliance
Product Information
Warranty
GETTING STARTED
About the Q2 Display
Check Package Contents
Identify Components
Position the Display
Desk Stand Features
INSTALLING THE DISPLAY
Install AX1 Controller
Connect Cables
Install Display Driver
Adjust Display Properties
OPERATING THE DISPLAY
Front-Panel Controls
Screen Adjustments
Dome CXtra Software
APPENDIXES
Troubleshooting
Specifications
USB Connections
Power Management System
Driver Removal
4
Dome Q2 Display
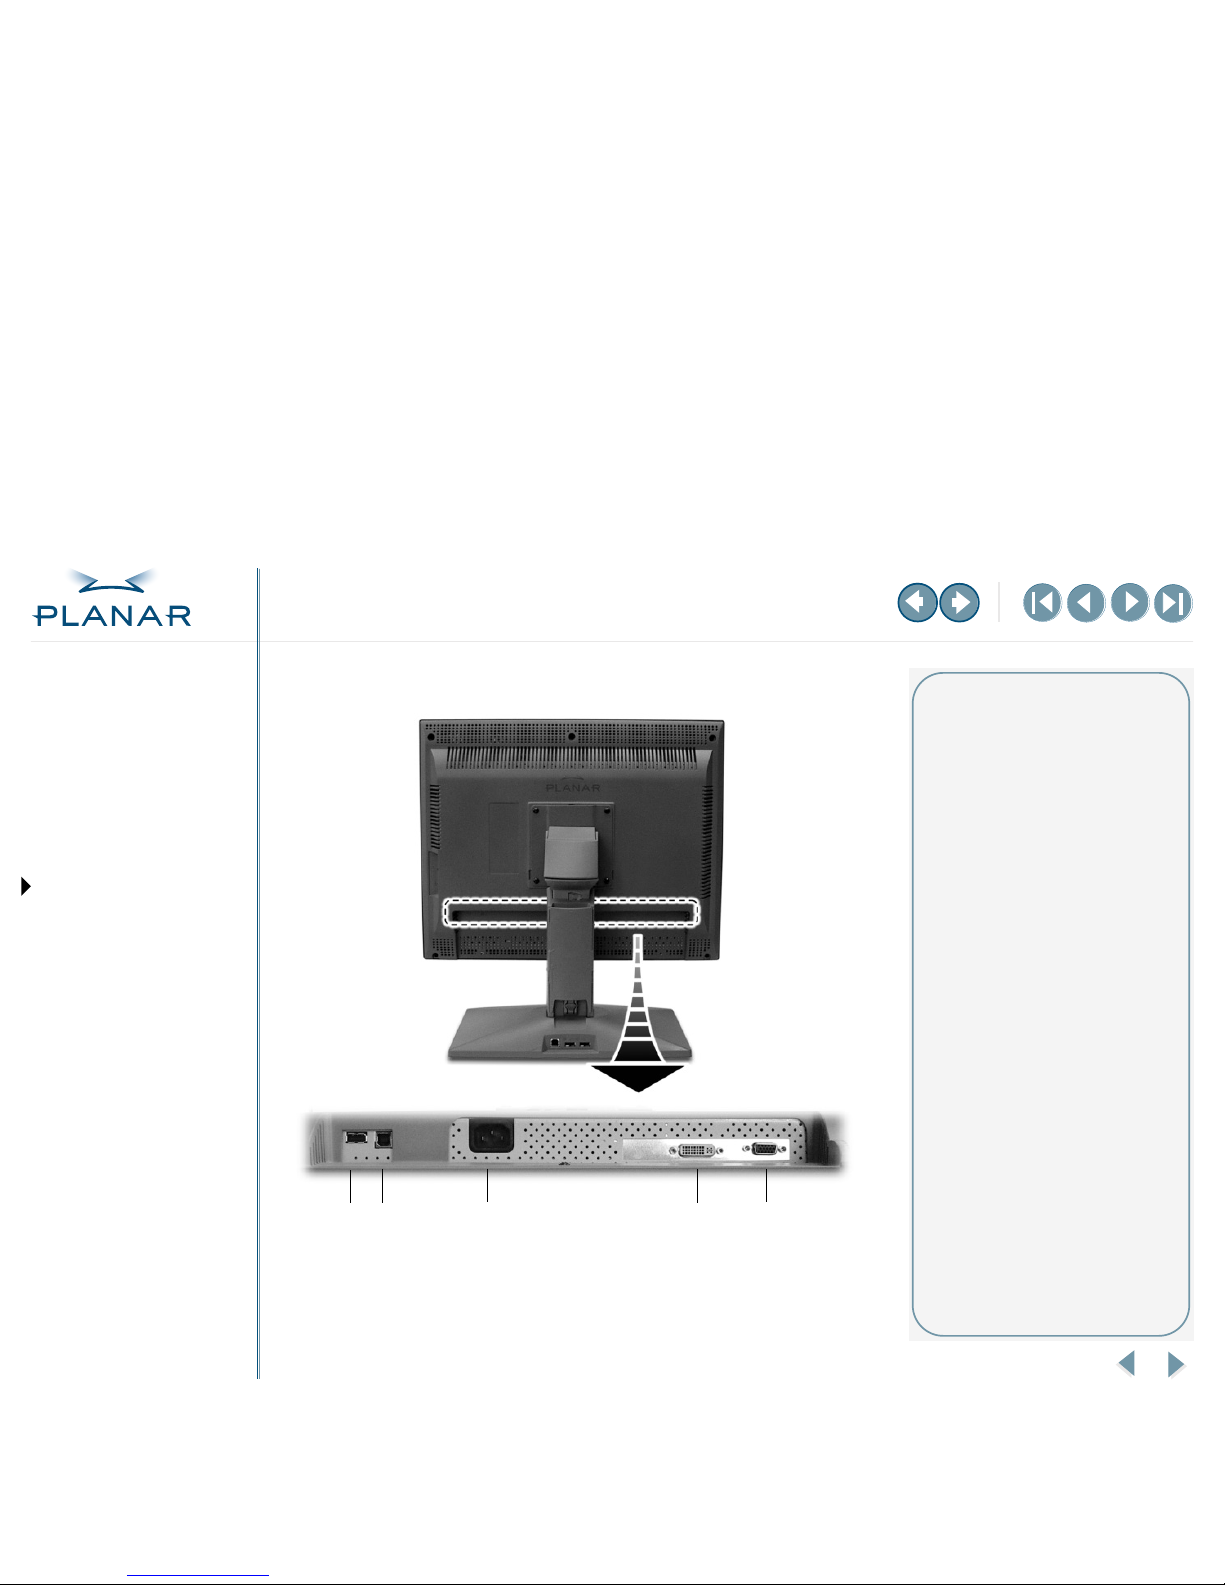
Back panel
1
2
3
4
5
Legend
1 USB downstream port
2 USB upstream port
3 Power cord port
4 DVI connector port
5 D-Sub connector
Non-functioning for digital mode.
Page 13
QUICK LINKS
Contents
Index
Regulatory Compliance
Product Information
Warranty
GETTING STARTED
About the Q2 Display
Check Package Contents
Identify Components
Position the Display
Desk Stand Features
INSTALLING THE DISPLAY
Install AX1 Controller
Connect Cables
Install Display Driver
Adjust Display Properties
OPERATING THE DISPLAY
Front-Panel Controls
Screen Adjustments
Dome CXtra Software
APPENDIXES
Troubleshooting
Specifications
USB Connections
Power Management System
Driver Removal
5
Dome Q2 Display
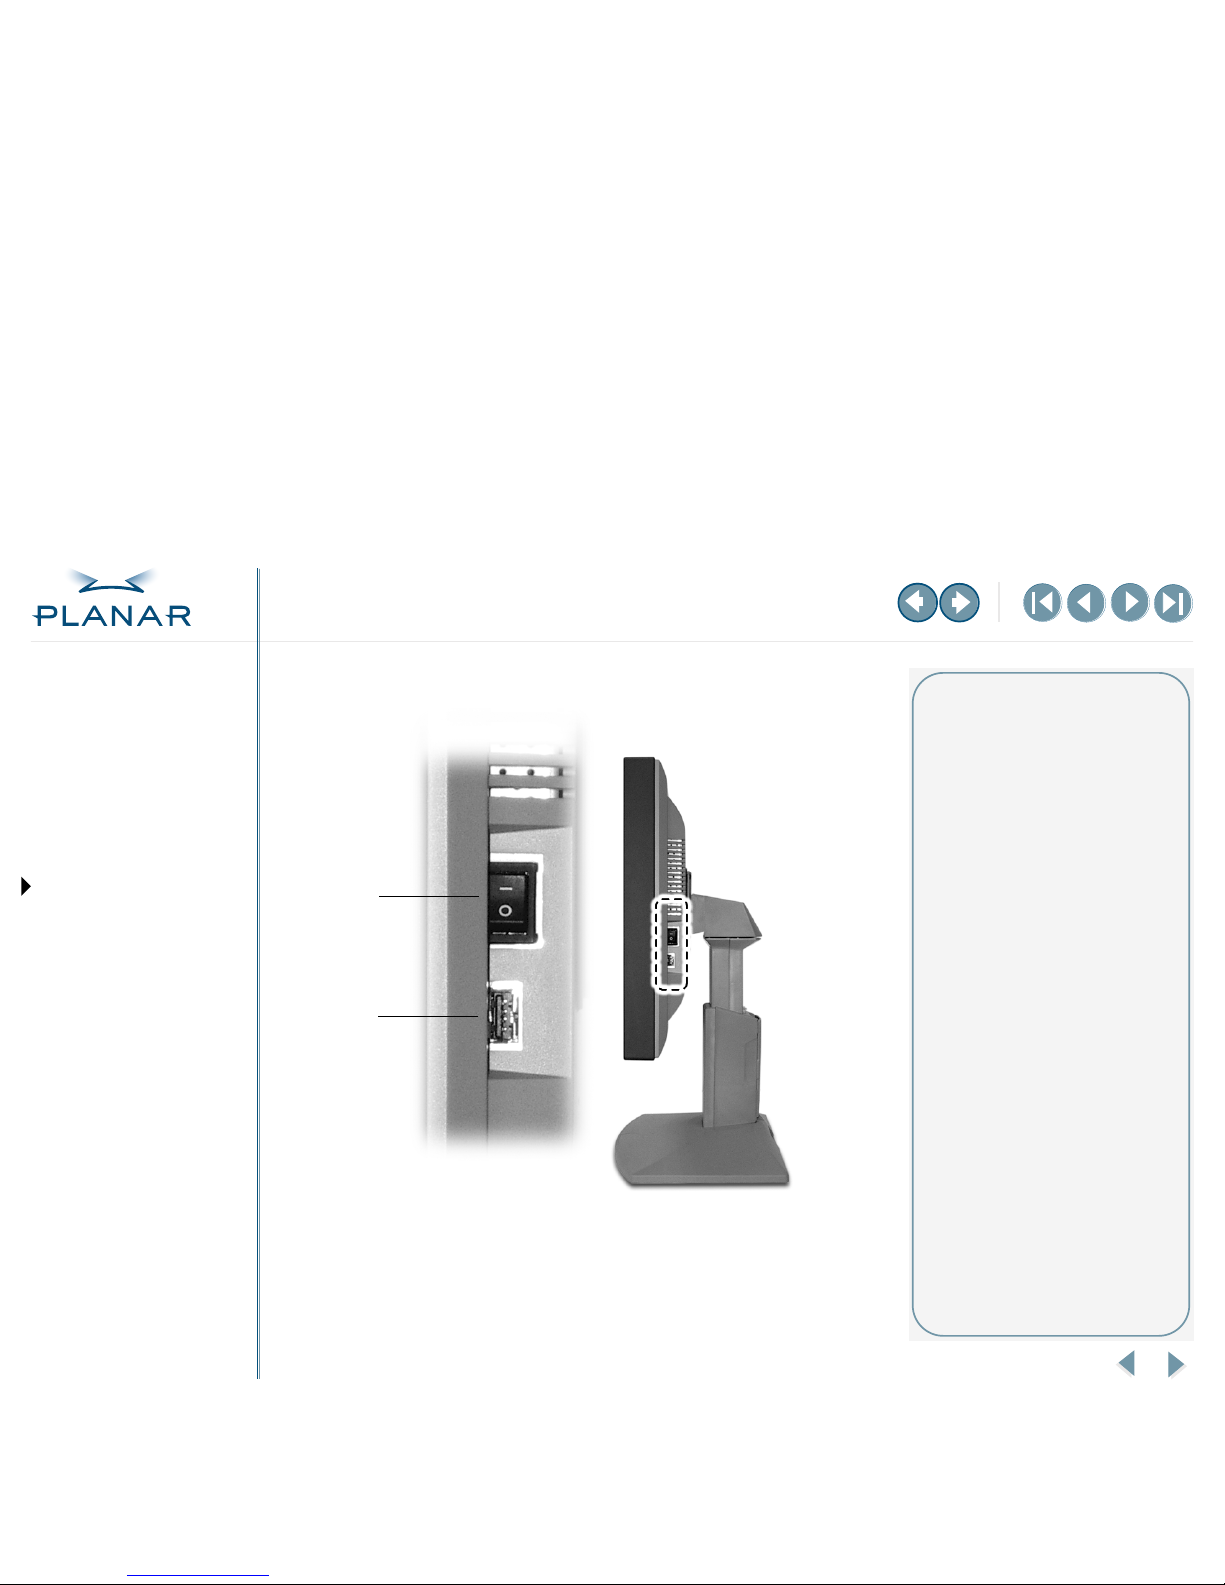
Side panel
The power switch on the side of the display is the master power control. The switch
must be on for the front power switch and the display USB ports to be operational.
1
2
Legend
1 Power switch for display unit
Turns the entire unit on or off
2 USB downstream port
Page 14
QUICK LINKS
Contents
Index
Regulatory Compliance
Product Information
Warranty
GETTING STARTED
About the Q2 Display
Check Package Contents
Identify Components
Position the Display
Desk Stand Features
INSTALLING THE DISPLAY
Install AX1 Controller
Connect Cables
Install Display Driver
Adjust Display Properties
OPERATING THE DISPLAY
Front-Panel Controls
Screen Adjustments
Dome CXtra Software
APPENDIXES
Troubleshooting
Specifications
USB Connections
Power Management System
Driver Removal
6
Dome Q2 Display
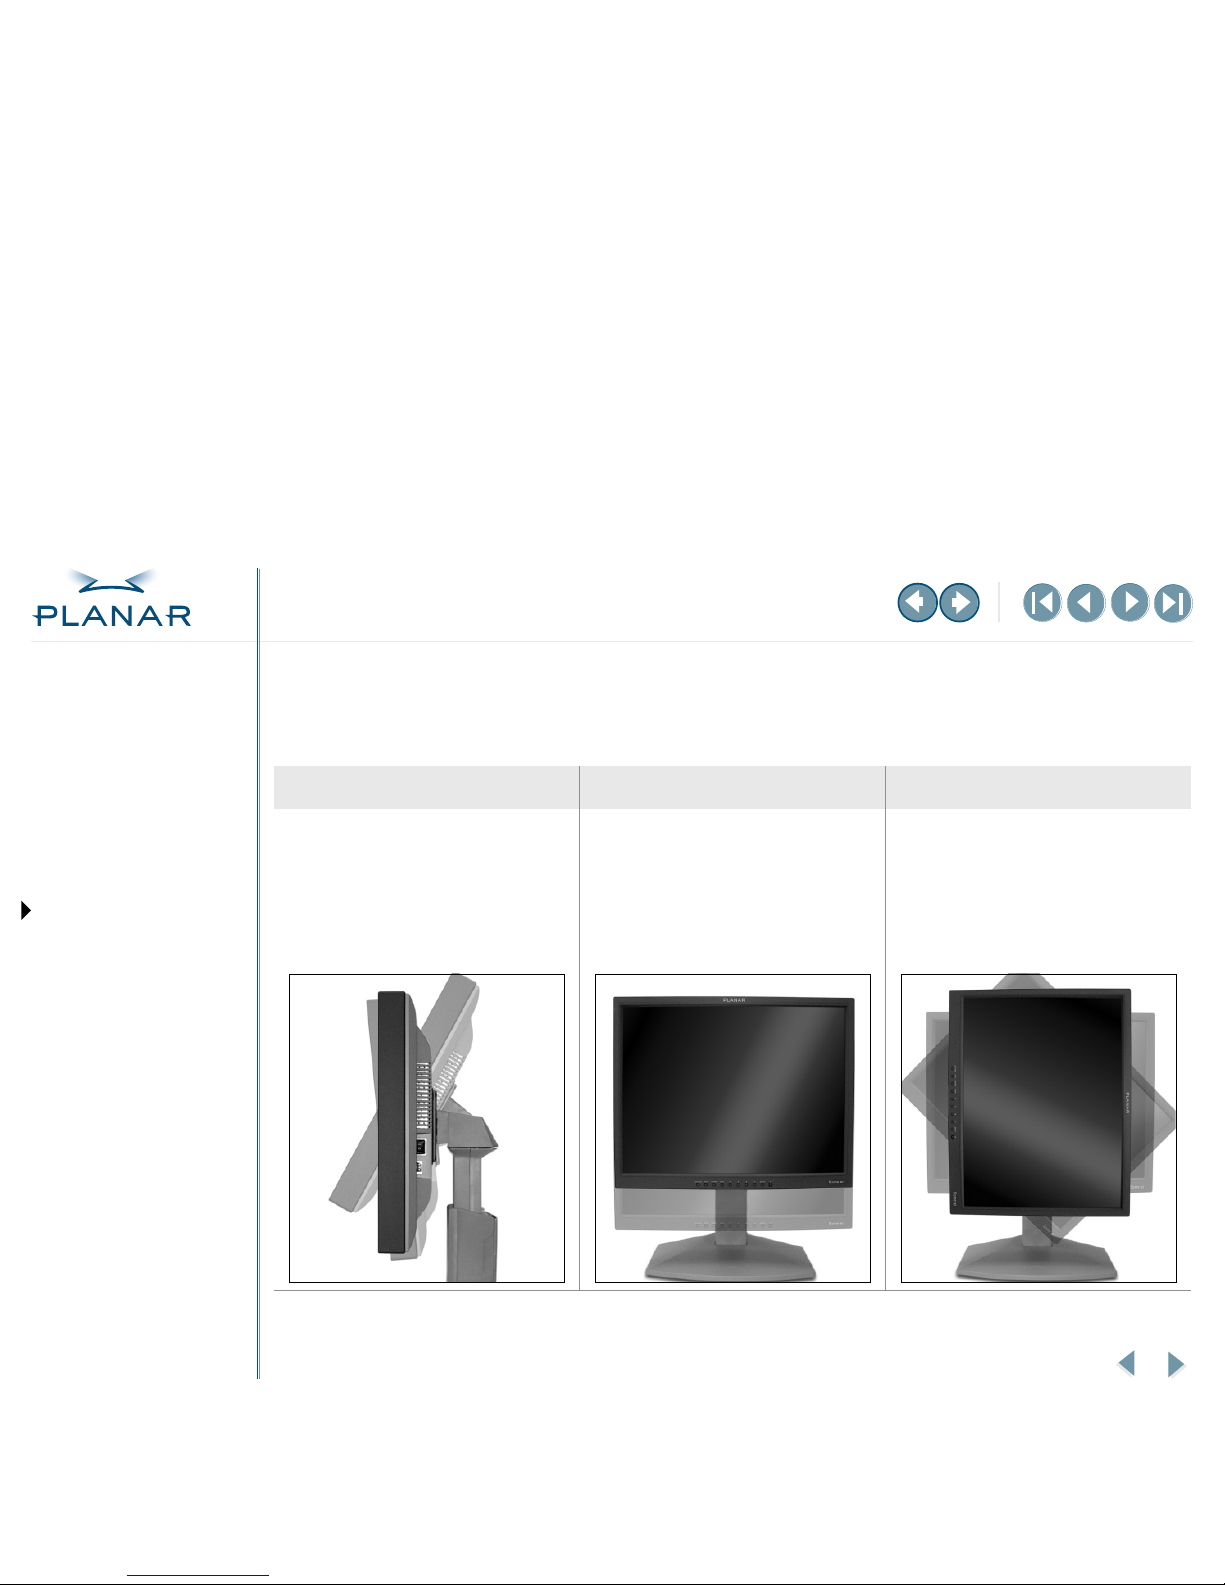
Position the Display
You can adjust the tilt, height, and orientation of the display to maintain an ergonomic and comfortable viewing position.
Select a suitable workspace for the display. You need a stable, level, and clean surface near a wall outlet.
Tilt range Height range Orientation
The tilt angle of the display screen
ranges from -5° downward to 30°
upward. Adjust the position of the
display for maximum comfort.
The display has a height range of
80 mm (3.15 in). Unfasten the lock at
the top of the desk stand (slide it to the
left) then raise or lower the panel to
adjust the height.
You can rotate the display between
landscape and portrait modes. Use
both hands to turn the display 90°
clockwise to go from landscape to
portrait. Reverse the direction to go
from portrait to landscape.
Page 15
QUICK LINKS
Contents
Index
Regulatory Compliance
Product Information
Warranty
GETTING STARTED
About the Q2 Display
Check Package Contents
Identify Components
Position the Display
Desk Stand Features
INSTALLING THE DISPLAY
Install AX1 Controller
Connect Cables
Install Display Driver
Adjust Display Properties
OPERATING THE DISPLAY
Front-Panel Controls
Screen Adjustments
Dome CXtra Software
APPENDIXES
Troubleshooting
Specifications
USB Connections
Power Management System
Driver Removal
7
Dome Q2 Display
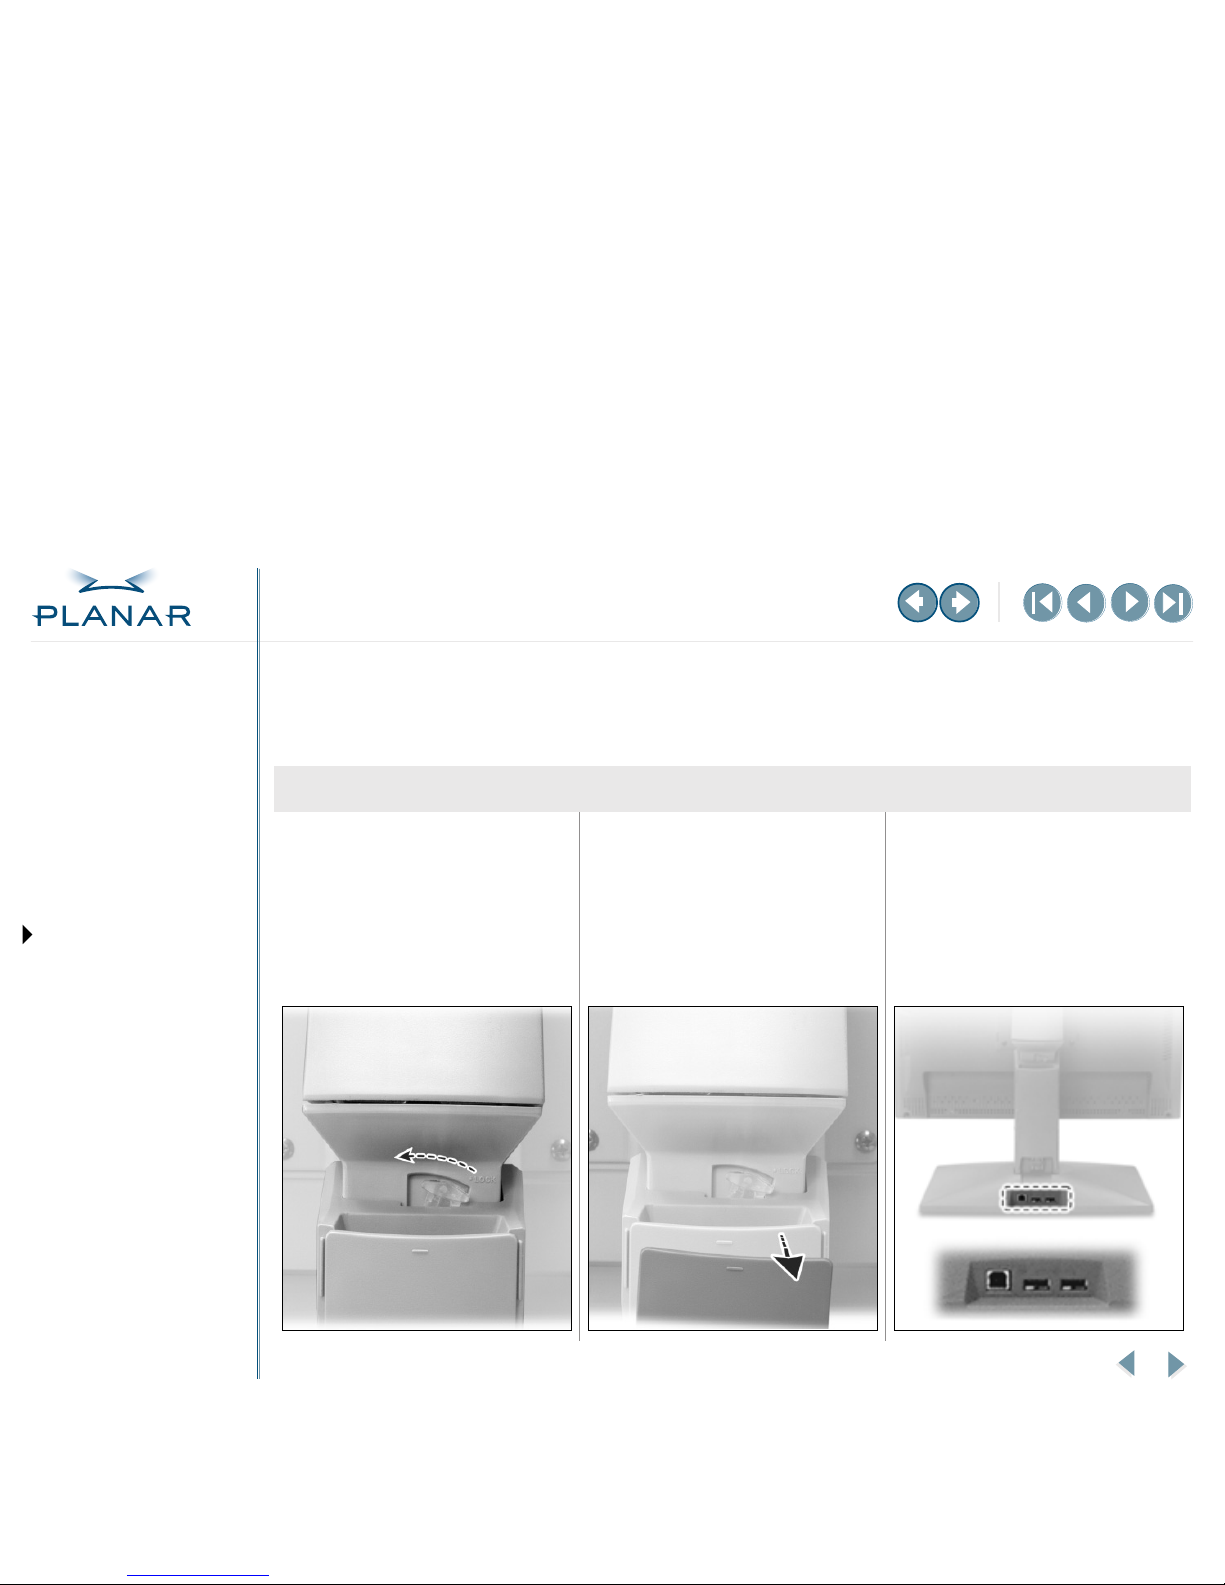
Features of the Desk Stand
With the desk stand, you can reposition the height of your display, neatly tuck away cords and cables, and
expand the configuration of your display system with an additional USB hub.
Stand lock Stand cover USB hub
Move the lever to the left to unfasten the
stand lock. Raise or lower the display to
adjust the adjust display height.
Press the PUSH button at the bottom
of the desk stand. Next, pull the stand
cover down and out to remove it. Thread
the power cord and DVI cable through
the length of the stand.
Use a USB cable to connect the
upstream port on the desk stand to
the downstream port on your USBcompliant computer or other hub.
Connect USB-compliant peripherals to
downstream ports on the desk stand.
See “Using USB Connections” on
page 25 for more information
Page 16
QUICK LINKS
Contents
Index
Regulatory Compliance
Product Information
Warranty
GETTING STARTED
About the Q2 Display
Check Package Contents
Identify Components
Position the Display
Desk Stand Features
INSTALLING THE DISPLAY
Install AX1 Controller
Connect Cables
Install Display Driver
Adjust Display Properties
OPERATING THE DISPLAY
Front-Panel Controls
Screen Adjustments
Dome CXtra Software
APPENDIXES
Troubleshooting
Specifications
USB Connections
Power Management System
Driver Removal
8
Dome Q2 Display
Install the AX1 Display Controller
Remove any existing graphics card and its driver from your computer system
before you install the AX1 controller and driver. Also disable any onboard
graphics capability on the motherboard. See safety precautions to the right.
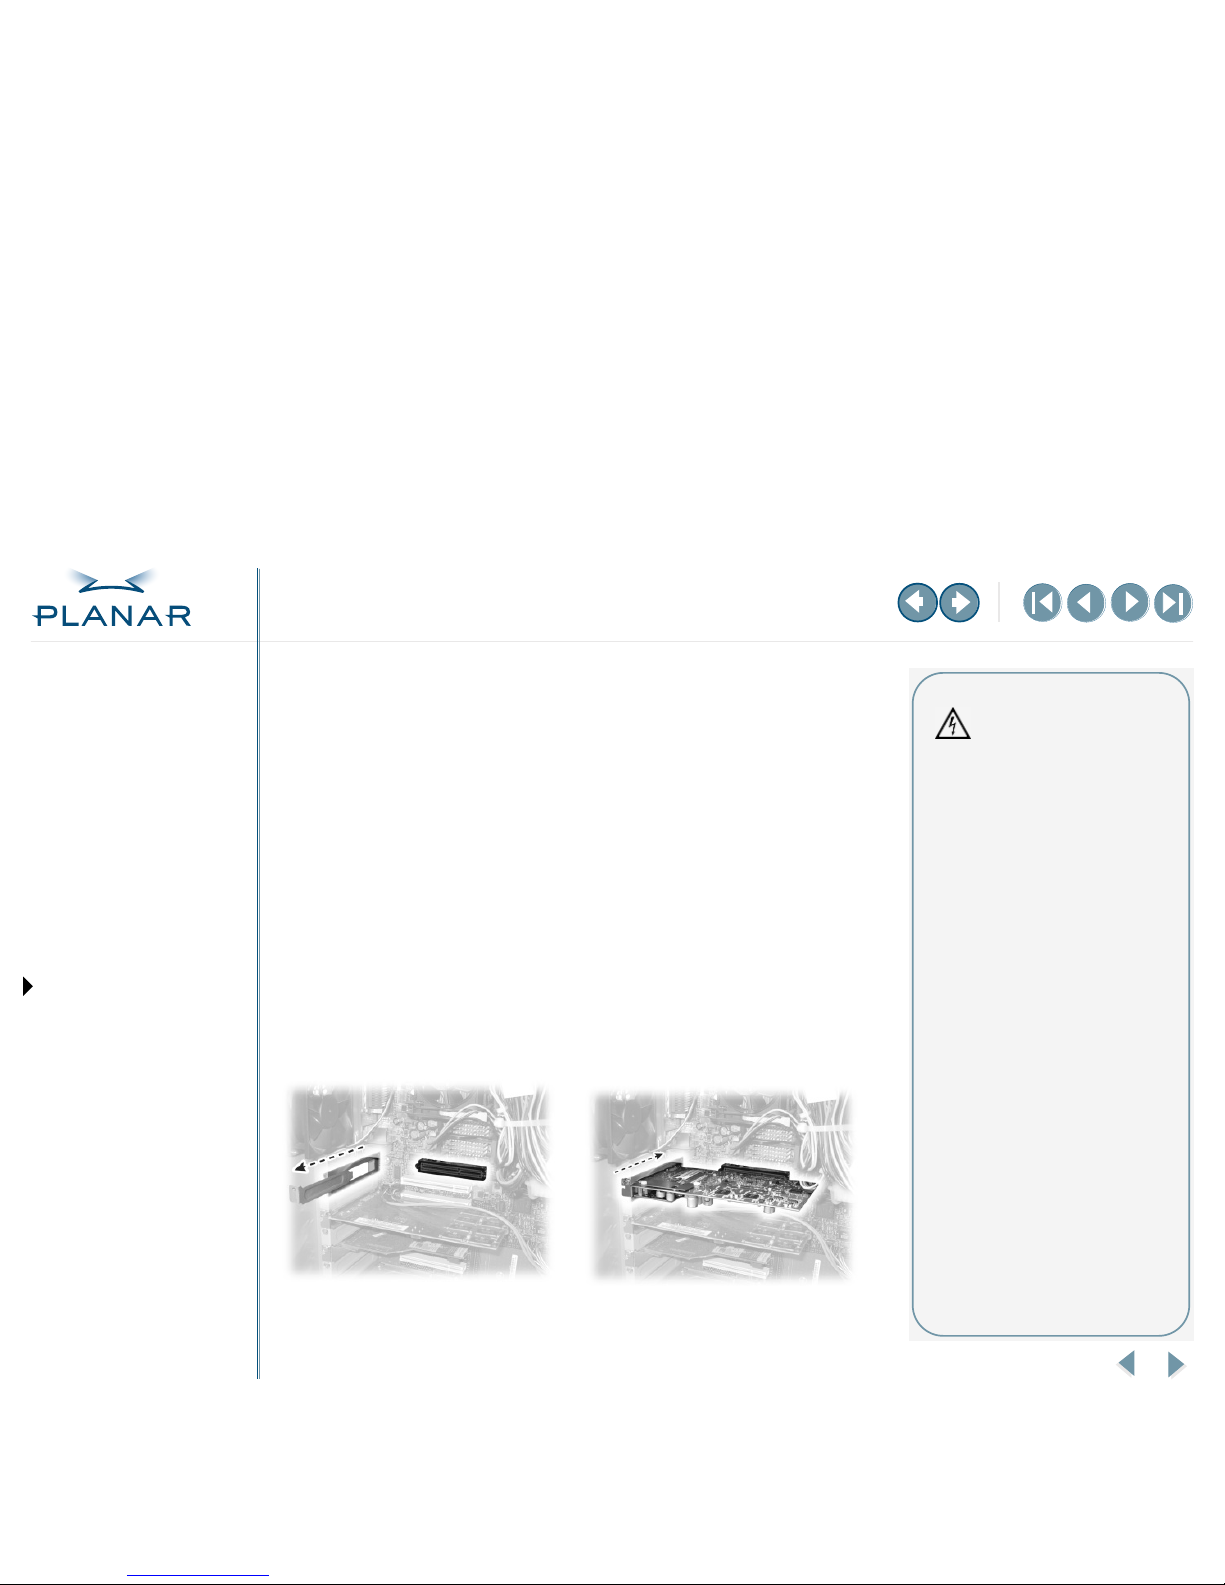
To install the controller
1 Turn off your computer and all peripherals. Disconnect all cables from
your computer. Leave the power cord plugged in for grounding.
2 Remove the computer cover, then remove any existing graphics card and
video signal cable, if necessary.
3 Remove the blank bracket from the PCI Express slot. (See left photo, below.)
4 Insert the AX1 controller into the slot, align the connector pins, and
press the board down until it is firmly seated. (See right photo, below.)
5 Secure the mounting bracket, and reattach the cover and the peripherals.
Remove blank bracket for PCI Express slot Install AX1 controller
Warning
If you are disconnecting a peripheral
or removing a component from the
system board, wait 10 to 20 seconds
after you turn off the computer.
Make sure the standby power LED
has gone out.
If you leave the computer on, you
could get an electric shock and cause
damage to system components.
Remove the AX1 display controller
slowly from its package and staticshielding bag to prevent an
electrostatic discharge.
Static electricity can damage the
controller. When touching the board
or parts of the motherboard, take
these precautions:
• Wear an antistatic wrist strap.
• Discharge your body’s static
electricity repeatedly by touching
the power supply or the metal
surface of the computer chassis.
Page 17
QUICK LINKS
Contents
Index
Regulatory Compliance
Product Information
Warranty
GETTING STARTED
About the Q2 Display
Check Package Contents
Identify Components
Position the Display
Desk Stand Features
INSTALLING THE DISPLAY
Install AX1 Controller
Connect Cables
Install Display Driver
Adjust Display Properties
OPERATING THE DISPLAY
Front-Panel Controls
Screen Adjustments
Dome CXtra Software
APPENDIXES
Troubleshooting
Specifications
USB Connections
Power Management System
Driver Removal
9
Dome Q2 Display
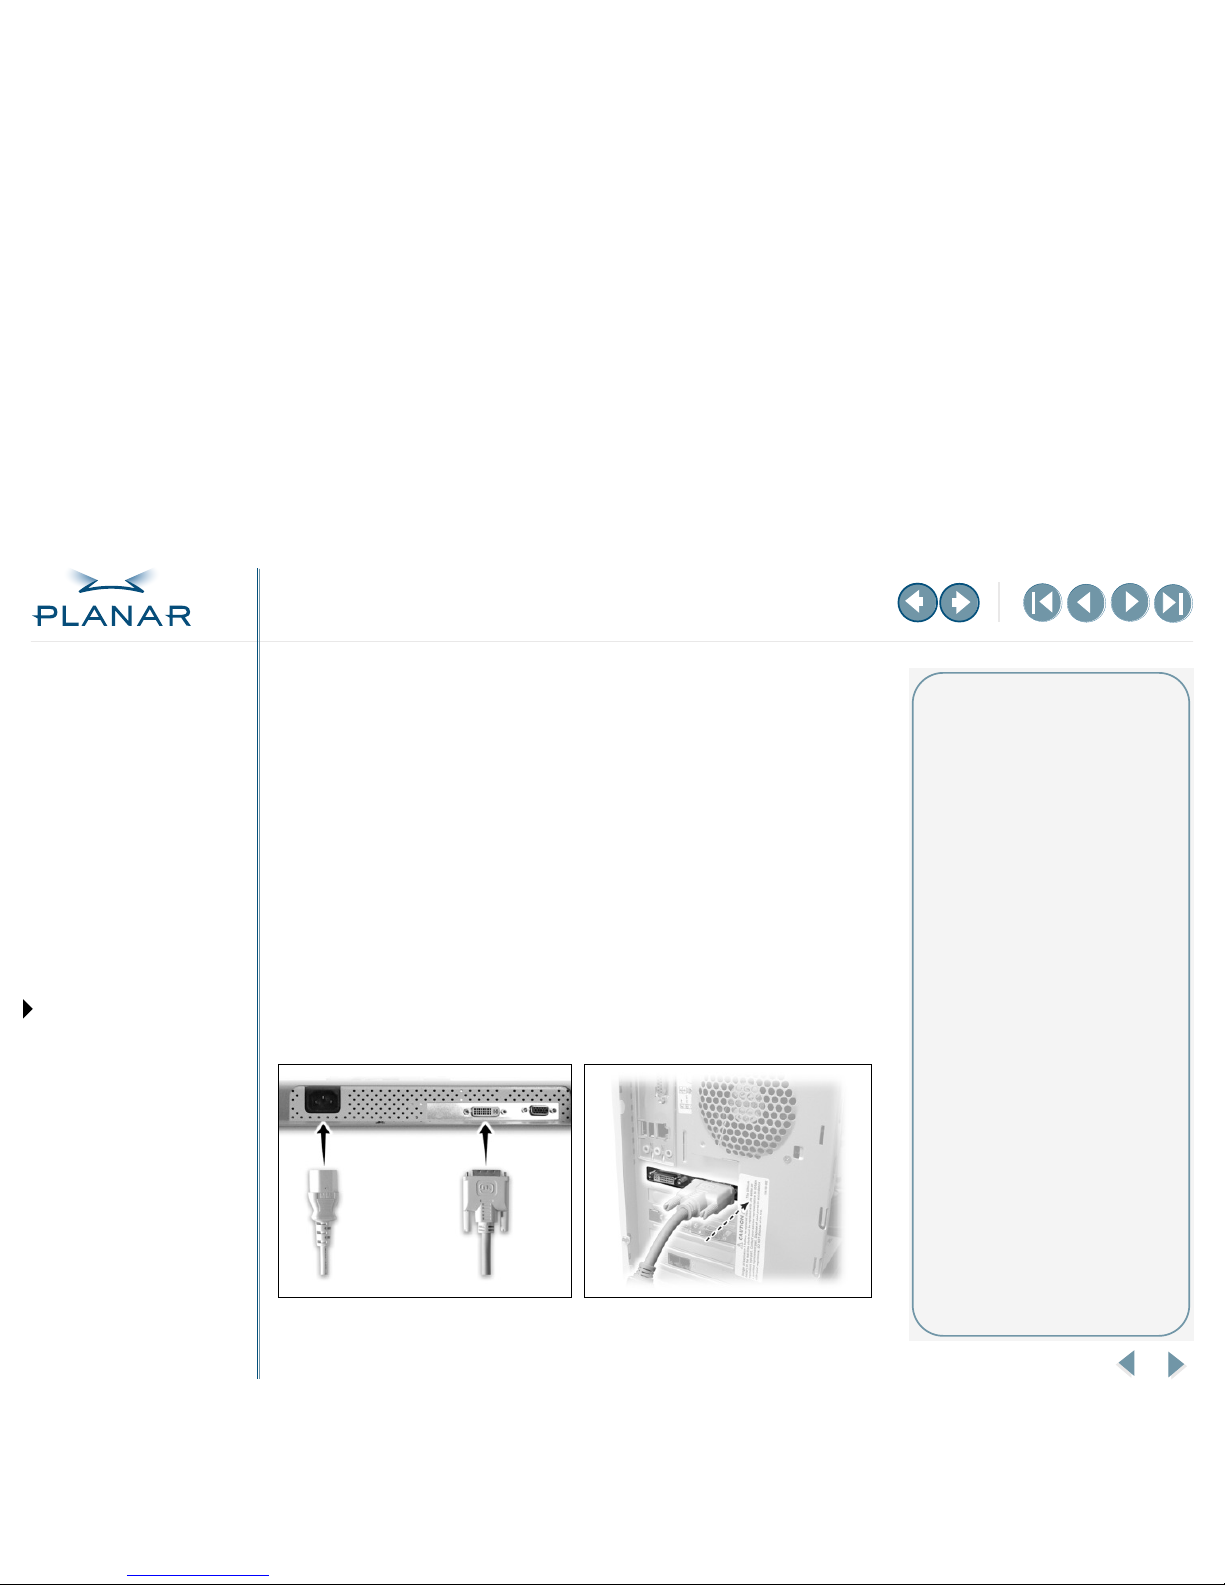
Connect the Cables
Use only the cables and power cord supplied with the Q2 display.
To connect the display
1 Press the PUSH button on the desk stand cover and remove the stand cover.
(See sidebar for how to thread the DVI cable and power cord on the stand.)
2 Plug one end of the video signal cable to the DVI port on the display.
Tighten the thumbscrews to secure the connection.
3 Plug in the power cord on the connector plate.
4 Plug the other end of the DVI cable into the video port on the installed
AX1 controller. Use DVI port #1 if you are installing only one display.
5 Plug the other end of the power cord into a grounded outlet.
6 Reattach the stand cover.
7 Power on your display first, then the computer.
Power cord and DVI cable connections DVI cable connection for a single display
Installation tips
Easy access to ports
For displays mounted on a desk
stand, rotate the screen from
landscape to portrait for easy access
to the ports. If you need to place
your display face down, lower it
carefully on a protective cloth to
protect the screen.
Threading cables
Thread the cables and power cord
through the back of the stand. Make
sure the cables run through the
notches. To reattach the stand cover
correctly, align the hooks with the
slots on the stand. Press the cover
into place. A click sound signals
a secure connection.
Restarting
Turn on your display before you turn
on your computer. Failing to do so
could damage the display.
Page 18
QUICK LINKS
Contents
Index
Regulatory Compliance
Product Information
Warranty
GETTING STARTED
About the Q2 Display
Check Package Contents
Identify Components
Position the Display
Desk Stand Features
INSTALLING THE DISPLAY
Install AX1 Controller
Connect Cables
Install Display Driver
Adjust Display Properties
OPERATING THE DISPLAY
Front-Panel Controls
Screen Adjustments
Dome CXtra Software
APPENDIXES
Troubleshooting
Specifications
USB Connections
Power Management System
Driver Removal
10
Dome Q2 Display
Install the Display Driver
Upon restarting your computer system, you must log on with administrator
privileges. On both Windows XP and Windows 2000 systems, Service Pack 1 or
higher must be installed.
To install the display driver
1 Start the system. Click Cancel on the Found New Hardware Wizard dialog box.
2 Insert the Planar Installation CD to run the SETUP.EXE utility.
3 Click Next on the Welcome dialog.
4 Click Yes to the license agreement. The installation starts.
5 Follow the onscreen instructions to complete the installation.
Planar recommends that you select the Express installation option.
6 When the Setup complete message appears, select Yes, I want to restart
my computer now and click Finish.
To configure the display
1 Right-click the desktop and select Properties > Settings.
2 Set the resolution to 1600 x 1200.
3 Click the Advanced button and select the Monitor tab.
4 Set the refresh rate to 60 Hz.
5 Click OK until you return to the desktop.
Installation tips
Restarting
Upon restart, your computer is running
in a basic video mode. With a correctly
installed controller, the operating
displays various messages during
the boot process.
If you have problems restarting,
see Troubleshooting.
SETUP utility
If the installation program does not
start automatically, do the following:
1 Click Start in the Windows task bar.
2 Click Run.
3 Browse to select SETUP.EXE from
the root directory of the Planar
Installation CD.
4 Click OK.
Display setup
After you install the driver, you can
use the Display Properties menu to
set up the display configuration.
Video settings
Use only the resolution 1600 x 1200.
Other resolution settings may produce
less than optimal results.
Page 19
QUICK LINKS
Contents
Index
Regulatory Compliance
Product Information
Warranty
GETTING STARTED
About the Q2 Display
Check Package Contents
Identify Components
Position the Display
Desk Stand Features
INSTALLING THE DISPLAY
Install AX1 Controller
Connect Cables
Install Display Driver
Adjust Display Properties
OPERATING THE DISPLAY
Front-Panel Controls
Screen Adjustments
Dome CXtra Software
APPENDIXES
Troubleshooting
Specifications
USB Connections
Power Management System
Driver Removal
11
Dome Q2 Display
Adjust the Display Properties
Use the Display Properties dialog box in the Control Panel to make changes to
the video settings or to set up a dual-display configuration.
To set the display orientation
1 Right-click the desktop and select Properties > Settings.
2 Select the monitor that you want to change. Click Advanced.
3 Click the Monitor tab. Make sure the check box for Hide modes that
this monitor cannot display is empty (unchecked).
4 Click the Rotation tab.
• Check Standard Landscape for landscape mode.
• Check Rotate 90 Left or Right for portrait mode.
5 Click Yes to save the setting.
6 Click OK until to return to the desktop.
To use a dual-display configuration
1 Right-click the desktop and select Properties > Settings.
2 Click the monitor icon 2.
3 Select Extend my Windows desktop onto this monitor.
4 Set resolution and color quality for the second display.
5 Click Apply or OK.
About rotation
The orientation you select on
the Rotation tab in the Display
Properties dialog box directs (or
changes) the output of the AX1
controller. Turn the display screen
to landscape or portrait to match
your selection.
Dual-display setup
Make sure both displays are properly
connected to the AX1 controller.
Turn on both displays before you
start your computer system.
Page 20
12
Dome Q2 Display
QUICK LINKS
Contents
Index
Regulatory Compliance
Product Information
Warranty
GETTING STARTED
About the Q2 Display
Check Package Contents
Identify Components
Position the Display
Desk Stand Features
INSTALLING THE DISPLAY
Install AX1 Controller
Connect Cables
Install Display Driver
Adjust Display Properties
OPERATING THE DISPLAY
Front-Panel Controls
Screen Adjustments
Dome CXtra Software
APPENDIXES
Troubleshooting
Specifications
USB Connections
Power Management System
Driver Removal
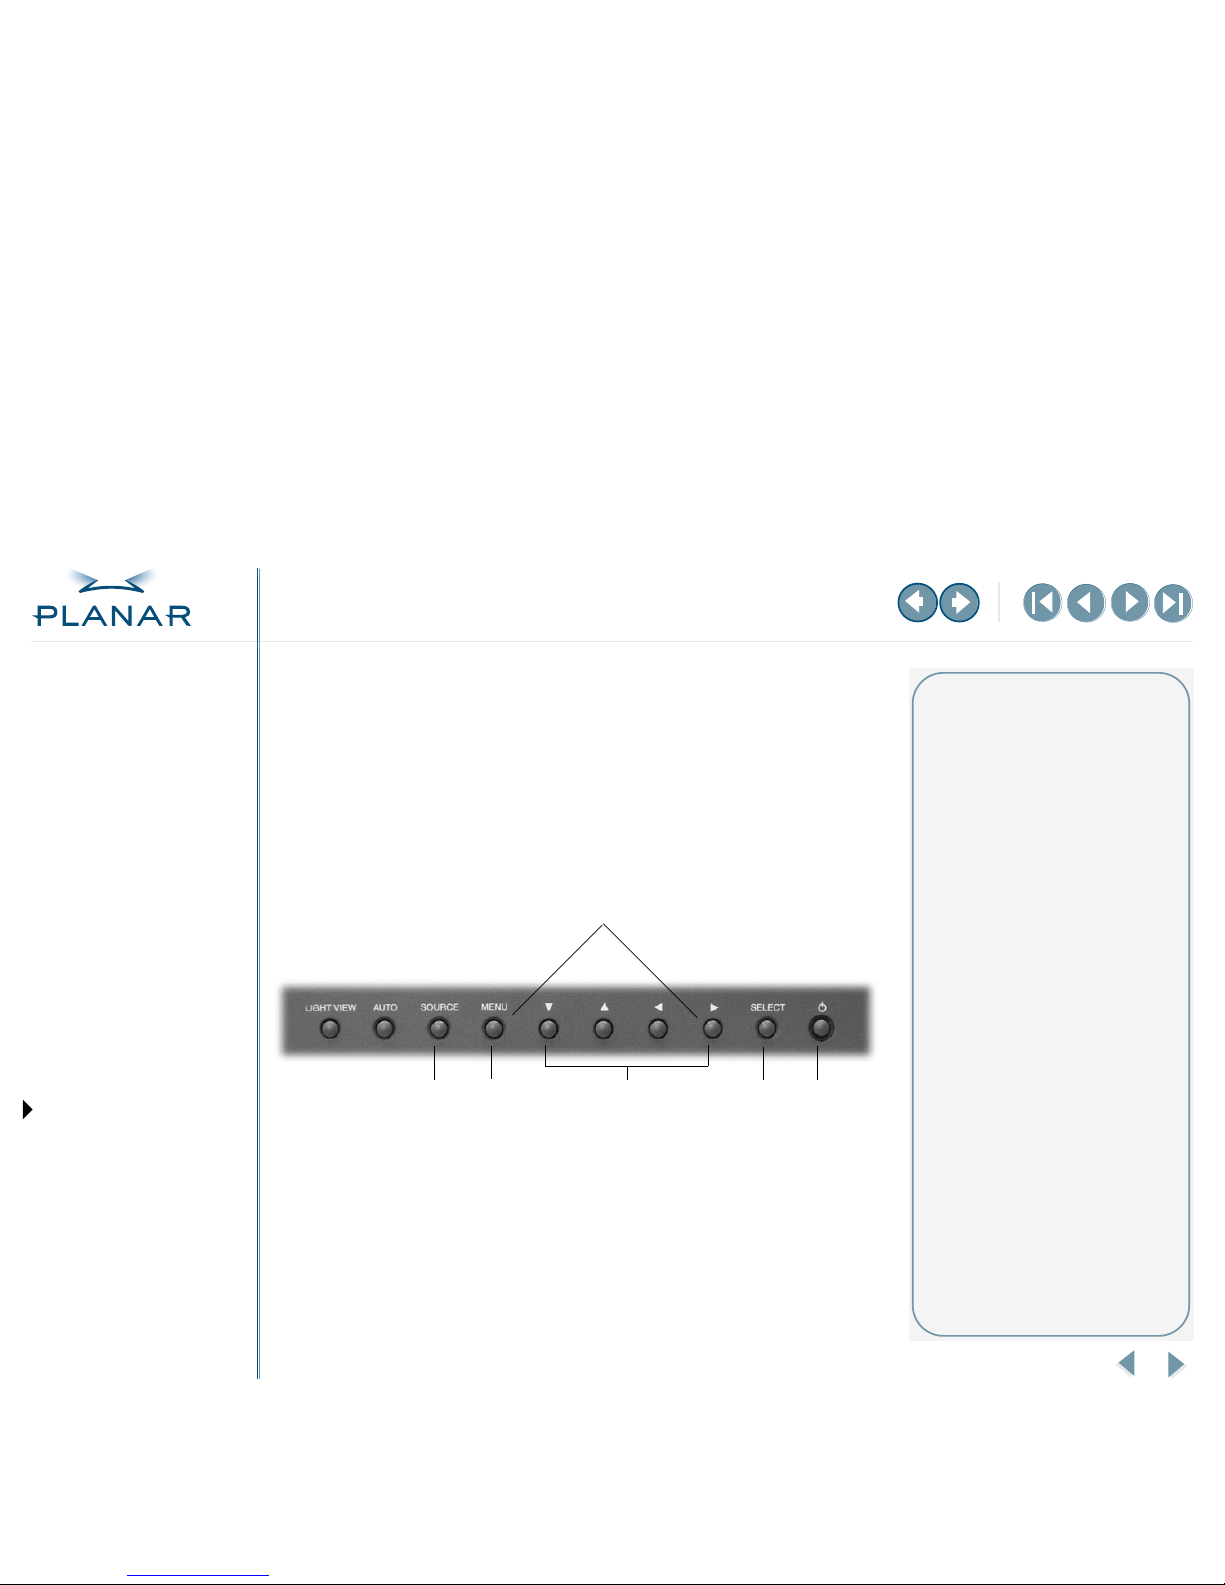
Front-Panel Controls
The onscreen display (OSD) menu is the user interface for controlling various
aspects of the Q2 display. With it you can easily adjust functions such as brightness,
OSD horizontal and vertical position, and language and transparency.
This display is originally manufactured as a dual-mode display able to operate in
either analog or digital mode. Thus, some front-panel controls may not be relevant
to the configuration of the Q2 display as a digital unit. See page 3.
2
3
4
5
6
1
Legend
1 Controls Locked/Unlocked
Press the Menu and RIGHT
buttons simultaneously for
3 seconds to lock or unlock
the current control settings.
2 Source button
Press to make the DVI Digital
connector active (Source >
UP or DOWN to highlight
DVI DIGITAL > Select).
3 Menu button
Press to enter or exit the
onscreen display.
4 Navigation buttons
Press UP, DOWN, LEFT, or RIGHT
button to choose or adjust items
in the onscreen display.
5 Select button
Press to enter a selection in
the onscreen display.
6 Display power switch and
DPMS indicator
Press to turn the display on or
off. The power indicator lights up
green when the display operates
normally. The color changes to
amber when the display is in
energy-saving mode.
Page 21
13
Dome Q2 Display
QUICK LINKS
Contents
Index
Regulatory Compliance
Product Information
Warranty
GETTING STARTED
About the Q2 Display
Check Package Contents
Identify Components
Position the Display
Desk Stand Features
INSTALLING THE DISPLAY
Install AX1 Controller
Connect Cables
Install Display Driver
Adjust Display Properties
OPERATING THE DISPLAY
Front-Panel Controls
Screen Adjustments
Dome CXtra Software
APPENDIXES
Troubleshooting
Specifications
USB Connections
Power Management System
Driver Removal
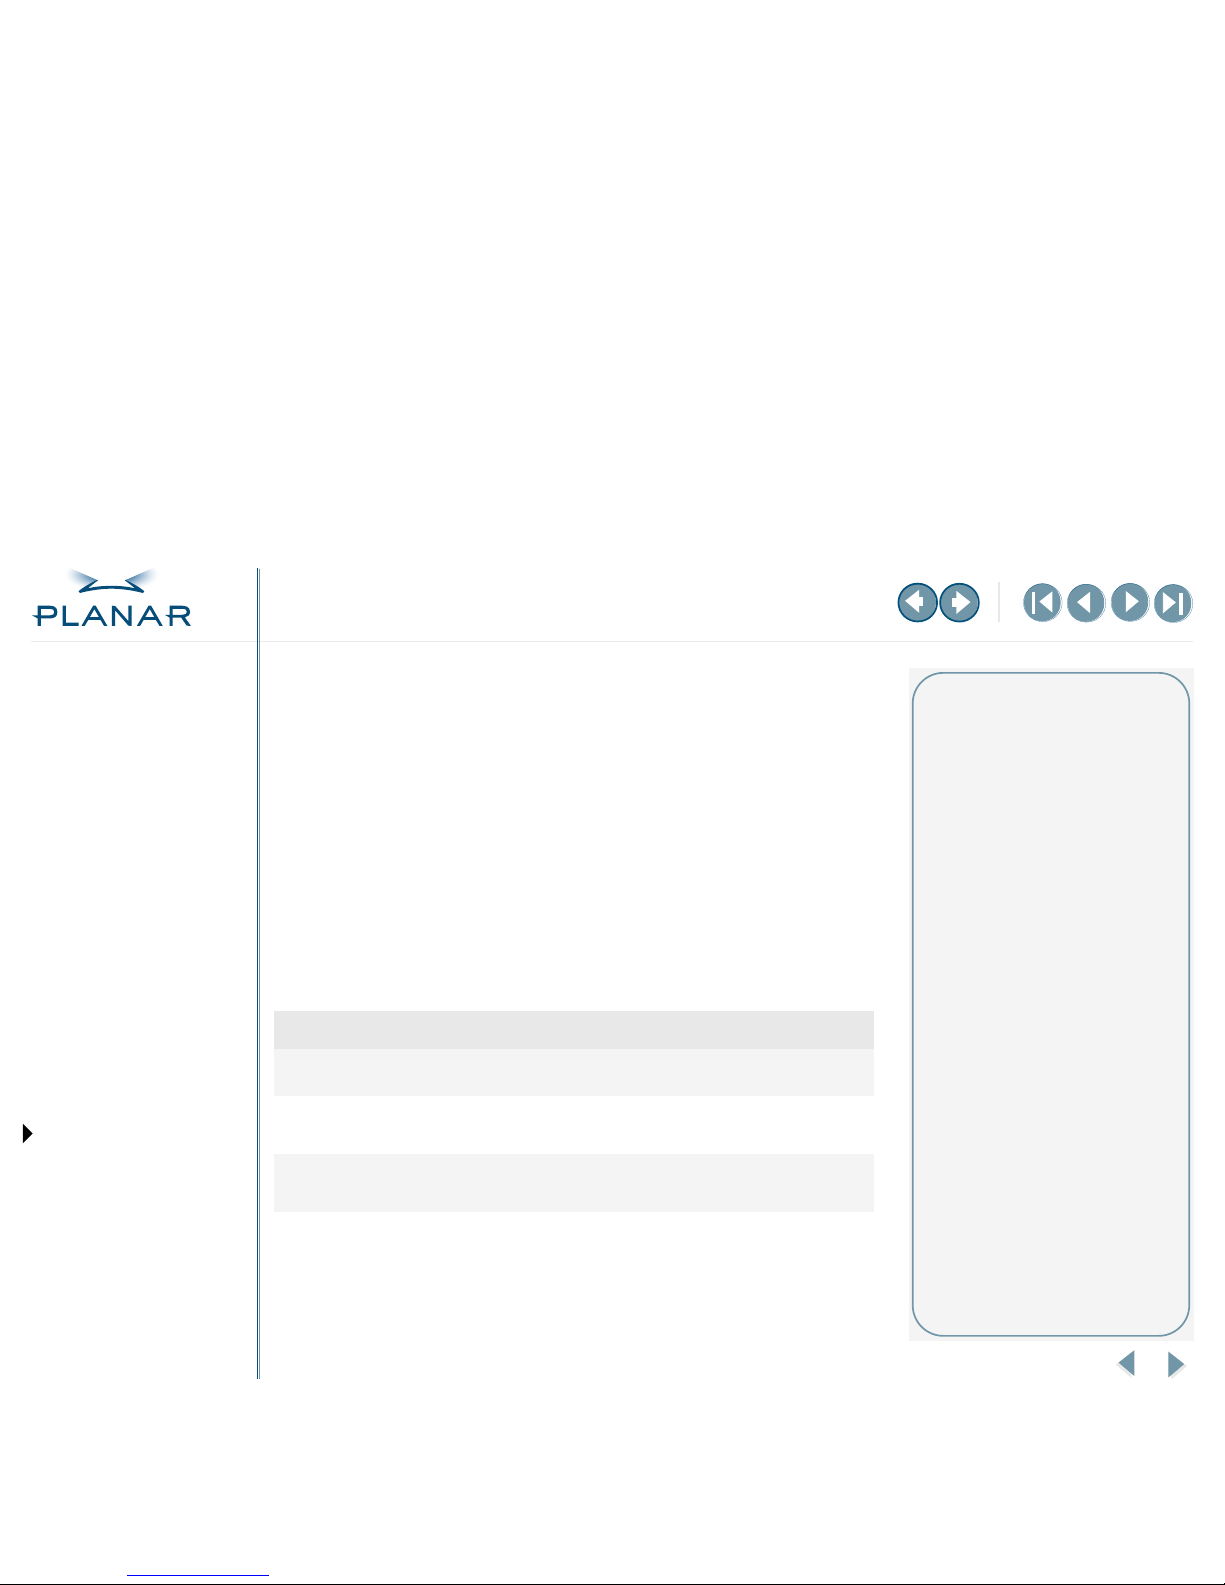
Screen Adjustments
Use the front-panel controls and OSD menus to adjust brightness, language and
transparency, and horizontal and vertical positions of the display screen.
To adjust the display screen
1 Press the Menu button. The main menu of the OSD appears.
2 To access a control, navigate with the Up or Down button.
3 Press the Select button when the submenu you want is highlighted.
4 Use the Up, Down, Left, or Right buttons to adjust the value.
5 Press the Select button to accept the changes.
6 Press the Menu button to exit the OSD control system.
Main Menu Submenu Description
Contrast/brightness Brightness
Adjusts the brightness of
the screen (See footnote.)
Setup
Language
Customizes the screen status for your
operating environment
Transparency
OSD position
Horizontal
Adjusts the position of the
OSD window on the screen
Ver tical
Initial operation
Allow the display to stabilize for
at least 30 minutes before making
image adjustments.
–MORE–
Page 22
14
Dome Q2 Display
QUICK LINKS
Contents
Index
Regulatory Compliance
Product Information
Warranty
GETTING STARTED
About the Q2 Display
Check Package Contents
Identify Components
Position the Display
Desk Stand Features
INSTALLING THE DISPLAY
Install AX1 Controller
Connect Cables
Install Display Driver
Adjust Display Properties
OPERATING THE DISPLAY
Front-Panel Controls
Screen Adjustments
Dome CXtra Software
APPENDIXES
Troubleshooting
Specifications
USB Connections
Power Management System
Driver Removal
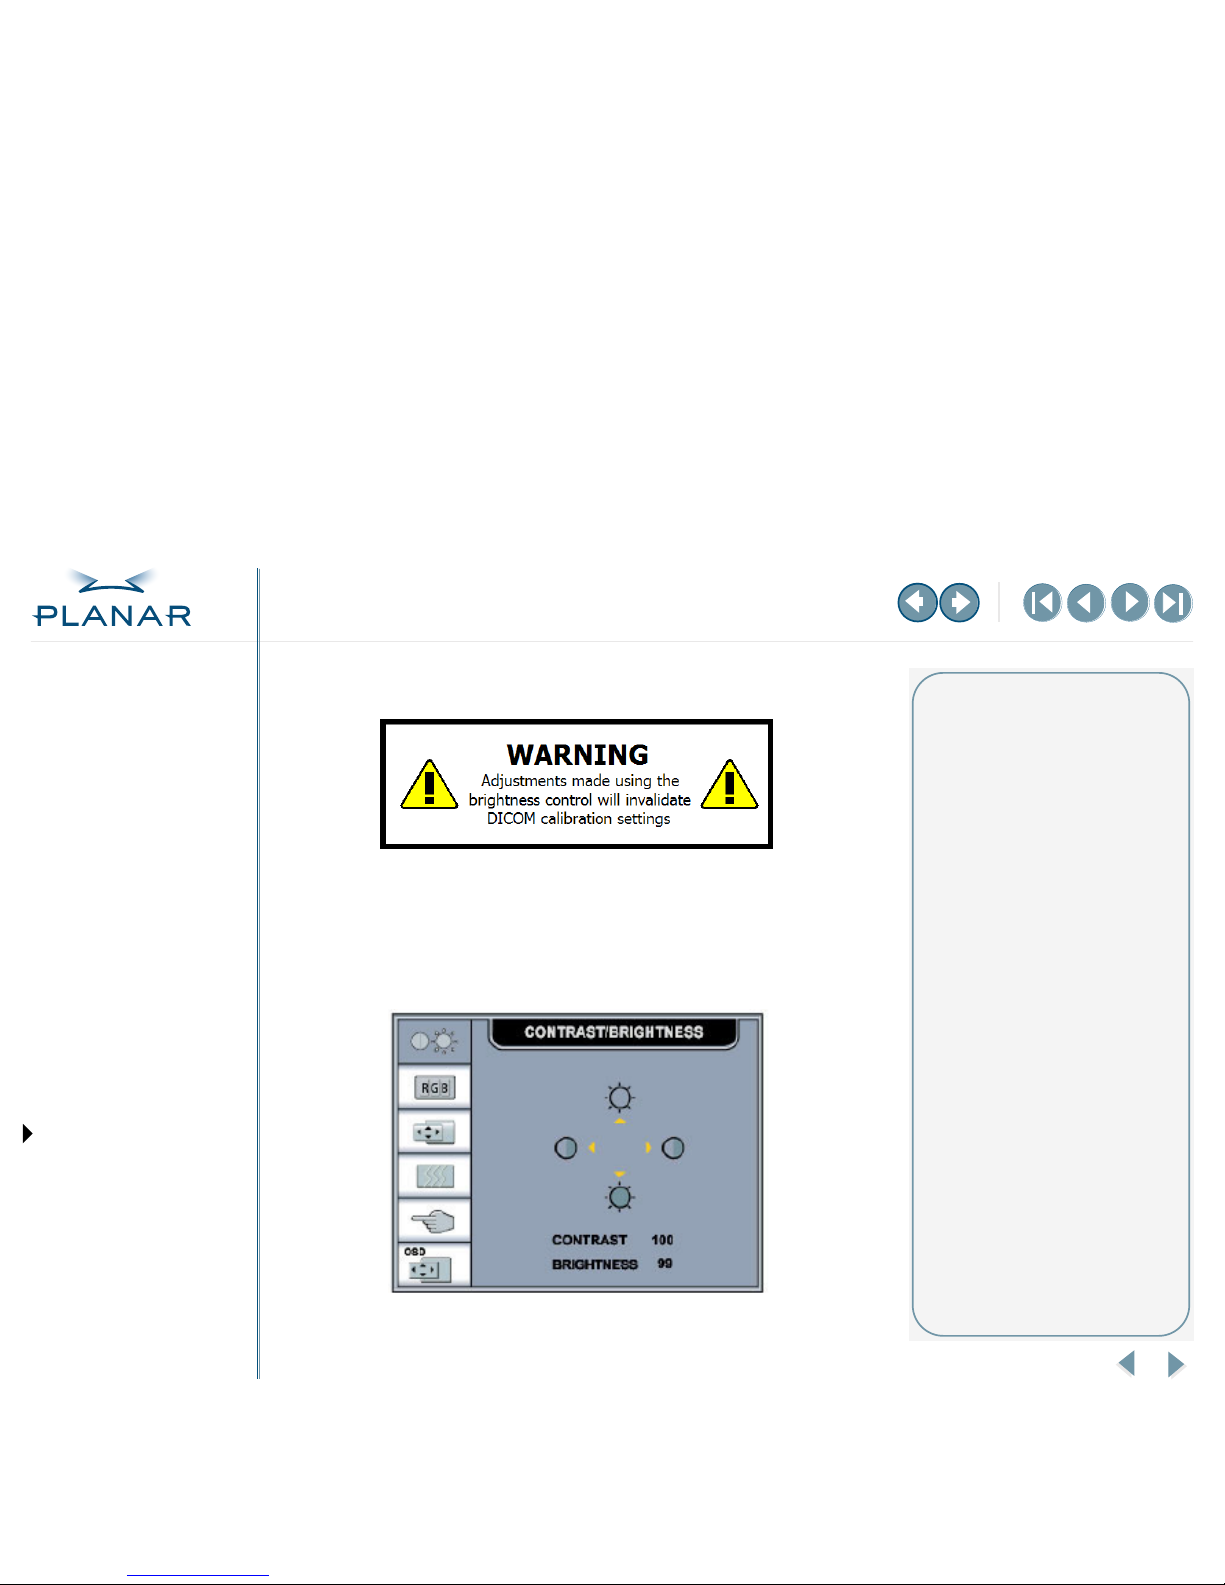
Brightness
When you highlight the Brightness menu and press Select, you see this message.
The warning is applicable for current calibration settings when you are using
the Dome CXtra software and have the DICal service installed.
To adjust brightness
Press Select after the warning appears. Next, use the UP or DOWN button to
enter a new brightness level. Then press Menu to exit.
DICOM calibration
Refer to the Dome CXtra User Guide for
more information.
–MORE–
Page 23
15
Dome Q2 Display
QUICK LINKS
Contents
Index
Regulatory Compliance
Product Information
Warranty
GETTING STARTED
About the Q2 Display
Check Package Contents
Identify Components
Position the Display
Desk Stand Features
INSTALLING THE DISPLAY
Install AX1 Controller
Connect Cables
Install Display Driver
Adjust Display Properties
OPERATING THE DISPLAY
Front-Panel Controls
Screen Adjustments
Dome CXtra Software
APPENDIXES
Troubleshooting
Specifications
USB Connections
Power Management System
Driver Removal
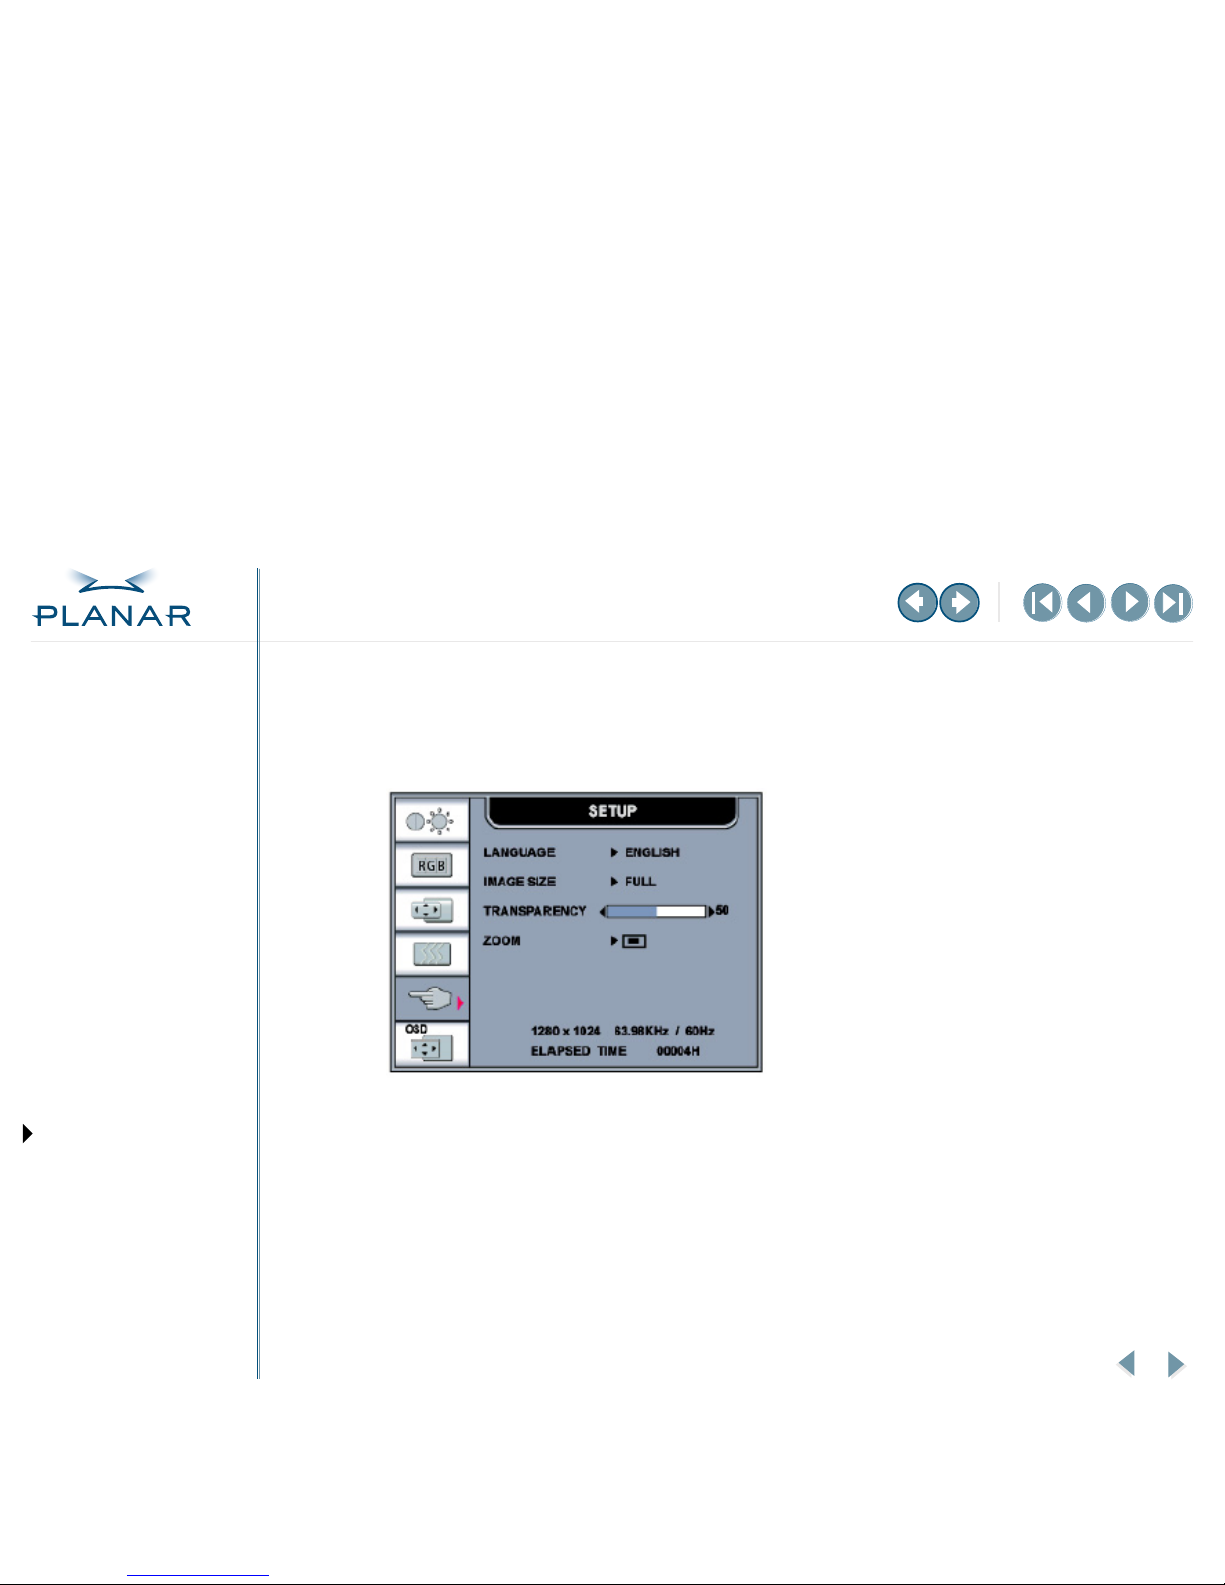
Setup
Only language and transparency are valid choices on the Setup menu.
Language. Choose the language in which the control names are displayed.
Transparency. Adjust the transparency of the OSD menu screen.
–MORE–
Page 24
16
Dome Q2 Display
QUICK LINKS
Contents
Index
Regulatory Compliance
Product Information
Warranty
GETTING STARTED
About the Q2 Display
Check Package Contents
Identify Components
Position the Display
Desk Stand Features
INSTALLING THE DISPLAY
Install AX1 Controller
Connect Cables
Install Display Driver
Adjust Display Properties
OPERATING THE DISPLAY
Front-Panel Controls
Screen Adjustments
Dome CXtra Software
APPENDIXES
Troubleshooting
Specifications
USB Connections
Power Management System
Driver Removal
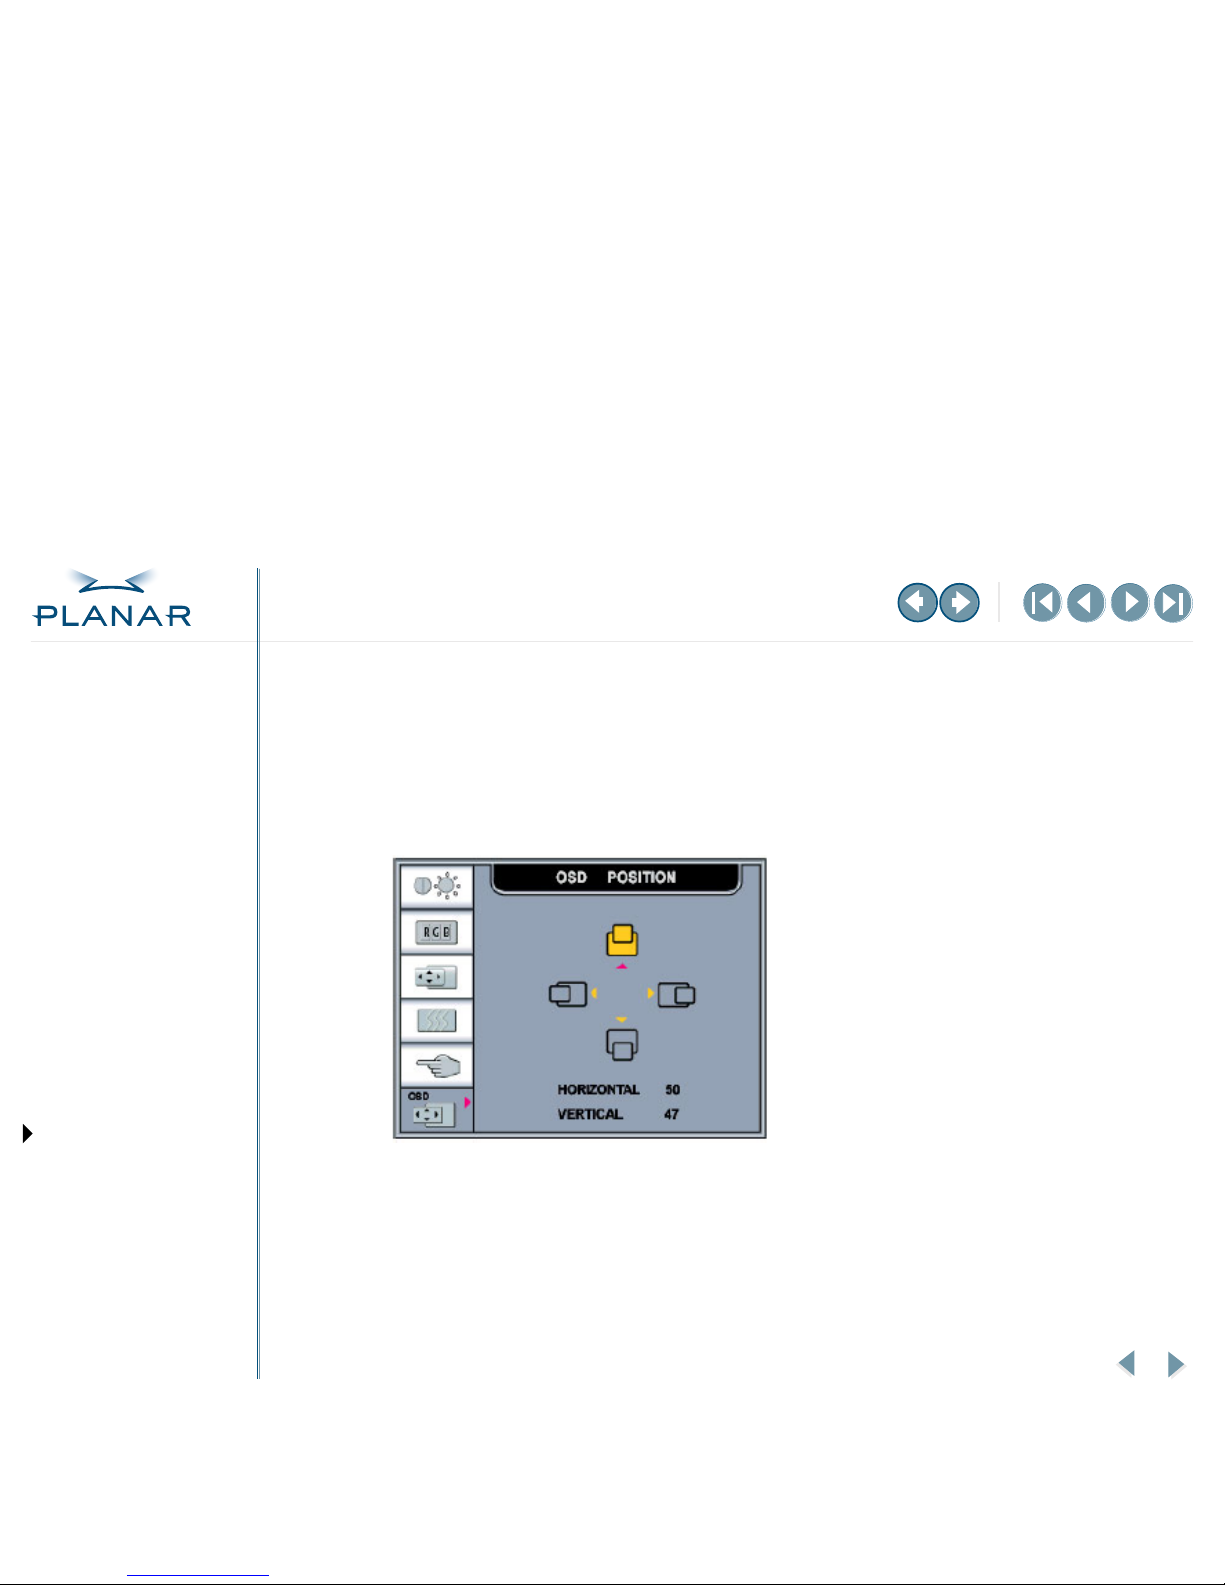
OSD position
Use the OSD Position menu to adjust the placement of the pop-up window on
the display screen.
Horizontal position. Adjust the horizontal position of the OSD window on
the display screen.
Vertical position. Adjust the vertical position of the OSD window on
the display screen.
Page 25
17
Dome Q2 Display
QUICK LINKS
Contents
Index
Regulatory Compliance
Product Information
Warranty
GETTING STARTED
About the Q2 Display
Check Package Contents
Identify Components
Position the Display
Desk Stand Features
INSTALLING THE DISPLAY
Install AX1 Controller
Connect Cables
Install Display Driver
Adjust Display Properties
OPERATING THE DISPLAY
Front-Panel Controls
Screen Adjustments
Dome CXtra Software
APPENDIXES
Troubleshooting
Specifications
USB Connections
Power Management System
Driver Removal
Enhancements with Dome CXtra Software
The Dome® CXtra™ software enhances the functionality of the Q2 display for
viewing medical images in referral settings. Dome CXtra allows you to monitor
and maintain your Q2 display locally or from a remote location using any SNMP
console application.
The advantages of Dome CXtra includes consistent grayscale presentation of
images, as a result of conformance with the DICOM Grayscale Standard Display
Function. Dome CXtra allows you to schedule the backlight saver and check for
DICOM conformance.
You can run display acceptance tests, including the recommendations of
the American Association of Physicists in Medicine Task Group 18 and
the DIN test standards.
Dome CXtra is an optional software package. Without the Dome CXtra configuration,
however, the Dome Q2 display has none of the advantages of the class-leading
Dome calibration solutions. For more information, visit
www.planar.com.
Dome CXtra services,
• Reporting. Access service
information, view events and
history, and check events related
to error conditions.
• DICal. Check DICOM conformance
and calibrate the display based on
the DICOM Grayscale Standard
Display Function. (Photometer
required.)
• AAPM TG18 Test. Use
recommendations from the AAPM,
Task Group 18 to test the display.
• DIN Test. Perform the German
standard test for measuring display
performance.
• Backlight Saver. Schedule sleep for
the display backlights.
• Privilege. Limit users who can
change display parameters.
• Test Patterns. View test patterns
that demonstrate the image quality
of the display.
• Enterprise Management. Manage
your displays from a central
location using any SNMP console
application.
Page 26
18
Dome Q2 Display
QUICK LINKS
Contents
Index
Regulatory Compliance
Product Information
Warranty
GETTING STARTED
About the Q2 Display
Check Package Contents
Identify Components
Position the Display
Desk Stand Features
INSTALLING THE DISPLAY
Install AX1 Controller
Connect Cables
Install Display Driver
Adjust Display Properties
OPERATING THE DISPLAY
Front-Panel Controls
Screen Adjustments
Dome CXtra Software
APPENDIXES
Troubleshooting
Specifications
USB Connections
Power Management System
Driver Removal
Troubleshooting
Problem Possible Solution
Computer does not restart properly after
installation of AX1 controller
Verify that the installation instructions were followed correctly.
Check that the controller is properly connected to the display. Make sure
a single display is connected to DVI port #1.
Check the connections to the video and power cables. Secure them as necessary.
Restart your computer in Safe mode. Upon starting, press and hold F8 until you see
the Windows Advanced Options menu. Use the arrow keys to select Safe Mode, and
press Enter.
Check the system configuration of the operating system for the interrupt assignment.
No image appears Check that the power cord is securely connected to the display port and to
the grounded outlet.
Press the Power button to turn on the display.
Move the mouse or strike a key on the keyboard to awaken the display from
power-saving mode.
Check that the display is turned on.
Check that the computer is turned on.
Check that the scanning frequency is in a horizontal range from 31 to 94 kHz and
a vertical range from 60 to 85 Hz.
Check that the signal cable is securely connected to the display port and to
the controller board.
–MORE–
Page 27
19
Dome Q2 Display
QUICK LINKS
Contents
Index
Regulatory Compliance
Product Information
Warranty
GETTING STARTED
About the Q2 Display
Check Package Contents
Identify Components
Position the Display
Desk Stand Features
INSTALLING THE DISPLAY
Install AX1 Controller
Connect Cables
Install Display Driver
Adjust Display Properties
OPERATING THE DISPLAY
Front-Panel Controls
Screen Adjustments
Dome CXtra Software
APPENDIXES
Troubleshooting
Specifications
USB Connections
Power Management System
Driver Removal
Display indicates “Controls Locked” Press the Menu and right arrow buttons simultaneously for about 3 seconds,
until the message “Controls Unlocked” appears.
Display image is incorrect Check the display settings in the Control Panel (Control Panel > Display > Settings) to
see if the frequency or the resolution were changed. If so, readjust the video card to
the recommended resolution.
Check the display settings in the Control Panel (Control Panel > Display > Settings) to adjust to
the recommended resolution and to adjust your display image to the ideal setting.
Check that the signal cable is properly connected. Use a screwdriver to secure
the connection.
Make sure the video card is properly installed.
Check that the screen is set to interface mode. If so, change it to the resolution recommended,
1600 x 1200.
Make sure the power voltage is high enough. It must be higher than AC100 – 240 V 50/60 Hz.
Screen image defect appears Check the current resolution and refresh rate settings in Display Properties and
adjust as necessary.
Display driver not found Install the display driver found that driver CD that shipped with the display. Or download it
from Planar Customer Support.
USB function is inoperative Check that the USB cable is connected securely to the display and the USB device.
Check that the computer and its operating system are USB-compliant.
Power source warning audio signal The AX1 controller requires an internal auxiliary DC power source. Check that the connections
for the power extension cable are secure.
Problem Possible Solution
–MORE–
Page 28
20
Dome Q2 Display
QUICK LINKS
Contents
Index
Regulatory Compliance
Product Information
Warranty
GETTING STARTED
About the Q2 Display
Check Package Contents
Identify Components
Position the Display
Desk Stand Features
INSTALLING THE DISPLAY
Install AX1 Controller
Connect Cables
Install Display Driver
Adjust Display Properties
OPERATING THE DISPLAY
Front-Panel Controls
Screen Adjustments
Dome CXtra Software
APPENDIXES
Troubleshooting
Specifications
USB Connections
Power Management System
Driver Removal
Controller not performing optimally Check the Information tab on the Display Properties dialog box.
Operating system warns that the controller
is not configured properly
Check the driver installation and make sure that the software is correctly loaded for
your operating system.
Reinstall the driver.
Dual displays not functioning Make sure both displays are securely connected to the controller.
Make sure both displays are on before you start the computer.
Check the setting on the Display Properties dialog box. Make sure the check box for
Extend my Windows desktop onto this monitor is selected.
Address and interrupt conflicts Ensure that the I/O and memory addresses reserved for the controller are not used by
other hardware devices.
The integrated onboard VGA controller uses the following addresses (hex):
I/O Addresses:
Standard VGA I/O: 3B0-3DF
Memory Addresses:
Video RAM: A000-BFFF
Video ROM: C000-C7FF
There may be problems if your controller does not receive an interrupt or if a system interrupt
is used for more than one device.
Check the system configuration utility of your operating system for the interrupt assignments.
Problem Possible Solution
Page 29
21
Dome Q2 Display
QUICK LINKS
Contents
Index
Regulatory Compliance
Product Information
Warranty
GETTING STARTED
About the Q2 Display
Check Package Contents
Identify Components
Position the Display
Desk Stand Features
INSTALLING THE DISPLAY
Install AX1 Controller
Connect Cables
Install Display Driver
Adjust Display Properties
OPERATING THE DISPLAY
Front-Panel Controls
Screen Adjustments
Dome CXtra Software
APPENDIXES
Troubleshooting
Specifications
USB Connections
Power Management System
Driver Removal
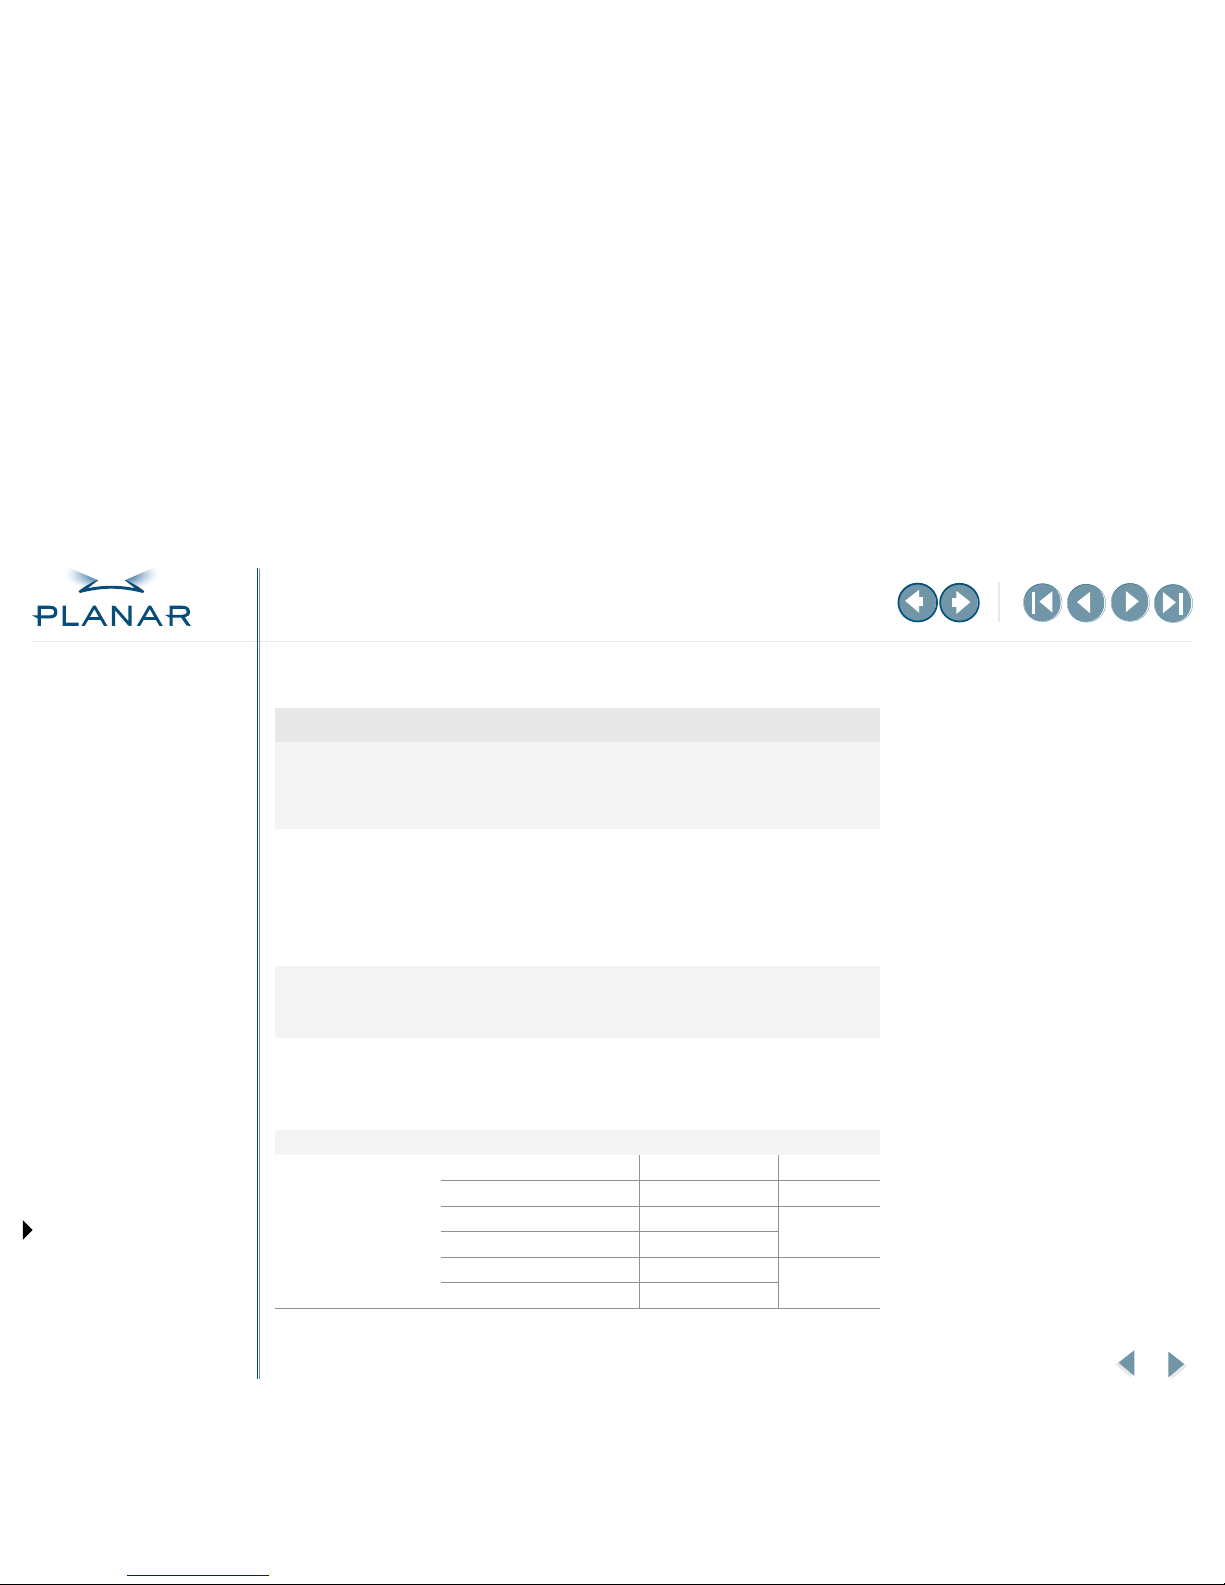
Display Specification
Q2 Specification
Display unit 20.1 inch (51 cm) flat-panel active matrix TFT LCD
Antiglare coating
20.1 inches viewable
0.255 mm pixel pitch
Sync input Horizontal frequency 30 to 80 kHz (automatic)
Ver tical frequency 56 to 85 Hz (automatic)
Input form Separate TTL, positive/negative
Composite TTL positive/negative
SOG (sync on green)
Digital
Video input Signal input DVI-I connector
Input form Analog (0.7Vp p/75 ohm)
Digital
Resolution Max Analog - VESA 1600 x 1200 @ 60 Hz
Digital - VESA 1600 x 1200 @ 60 Hz
VESA 1280 x 1024 @ 70 Hz
Recommended VESA 1600 x 1200 @ 60 Hz
Plug and Play DDC 2B+EDID built-in USB hub: 1 uplink and 2 downlink ports
Power consumption Status Consumption* LED Color
Normal 60 W (65 W ) Green
DPM stand-by/suspend ≤5 W (10 W )
Amber
DPM off ≤3 W (10 W )
Power key off ≤3 W (10 W )
Off
Power cutoff switch off ≤1 W
* ( ) with USB
–MORE–
Page 30
22
Dome Q2 Display
QUICK LINKS
Contents
Index
Regulatory Compliance
Product Information
Warranty
GETTING STARTED
About the Q2 Display
Check Package Contents
Identify Components
Position the Display
Desk Stand Features
INSTALLING THE DISPLAY
Install AX1 Controller
Connect Cables
Install Display Driver
Adjust Display Properties
OPERATING THE DISPLAY
Front-Panel Controls
Screen Adjustments
Dome CXtra Software
APPENDIXES
Troubleshooting
Specifications
USB Connections
Power Management System
Driver Removal
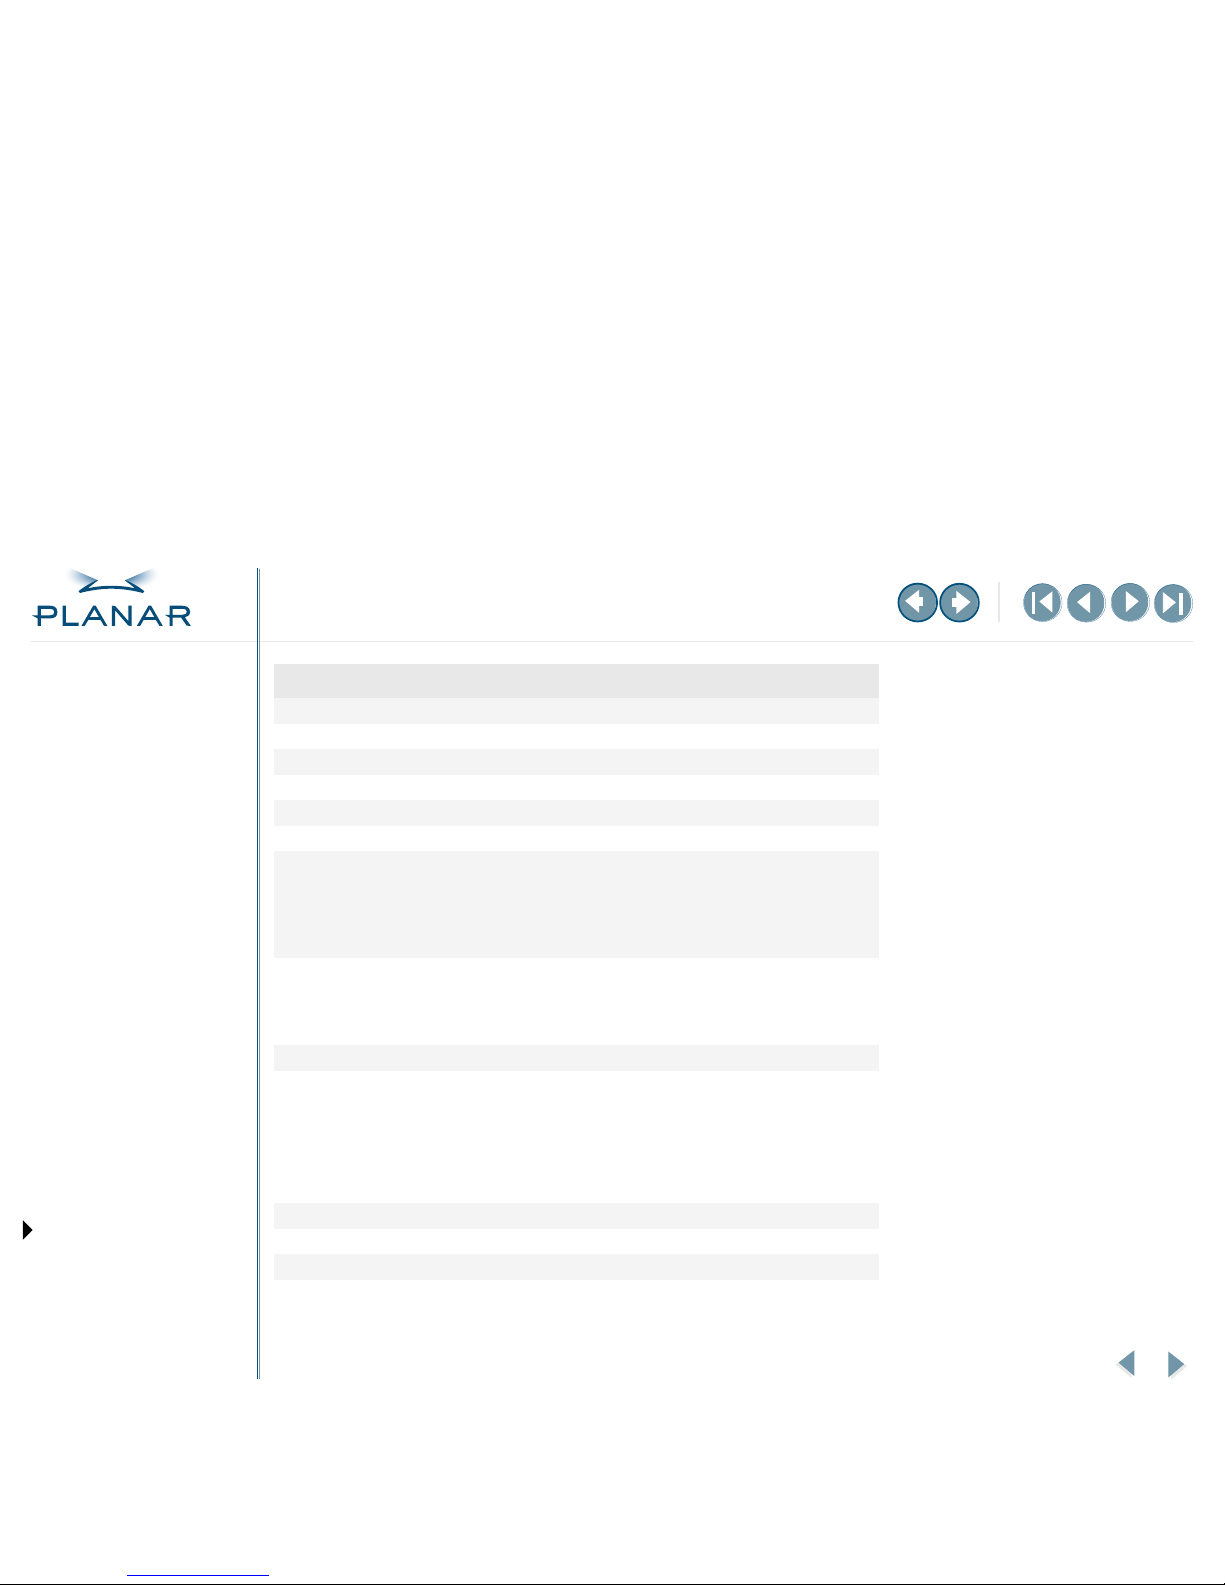
Palette 766 shades of gray
Viewing angle 170° horizontal/vertical
Contrast ratio 1000:1 (typical)
Brightness 700 cd/m
2
(typical)
Signal cable 15-pin to 15-pin D-sub cable, DVI-D cable (detachable)
Maximum pixel clock 135 MHz
Dimensions and weight
(with tilt-swivel stand)
Width 44.60 cm / 17.56 inches
Height 44.56 cm / 17.54 inches (Min)
52.56 / 20.69 inches (Max)
Depth 23.73 cm / 9.34 inches
Net 10.06 kg (22.18 lb)
Tilt-swivel range Tilt range -5° downward ~ 30° upward
Swivel range 90°
Height range 80 mm / 3.15 inch
Rotate 90° clockwise (landscape to portrait)
Power input AC 100 –240 V ~ 50/60 Hz 1.2A
Environmental
conditions
Operating conditions
Temperature 10° to 35° Celsius
Humidity 10% to 80% noncondensing
Storage conditions
Temperature -20° to 60° Celsius
Humidity 5% to 95% noncondensing
Tilt-swivel stand Attached (O), Detached ( )
Mounting option Compatible with 100-mm VESA mounting standard
Power cord Wall-outlet type or PC-outlet type
Q2 Specification
Page 31
23
Dome Q2 Display
QUICK LINKS
Contents
Index
Regulatory Compliance
Product Information
Warranty
GETTING STARTED
About the Q2 Display
Check Package Contents
Identify Components
Position the Display
Desk Stand Features
INSTALLING THE DISPLAY
Install AX1 Controller
Connect Cables
Install Display Driver
Adjust Display Properties
OPERATING THE DISPLAY
Front-Panel Controls
Screen Adjustments
Dome CXtra Software
APPENDIXES
Troubleshooting
Specifications
USB Connections
Power Management System
Driver Removal
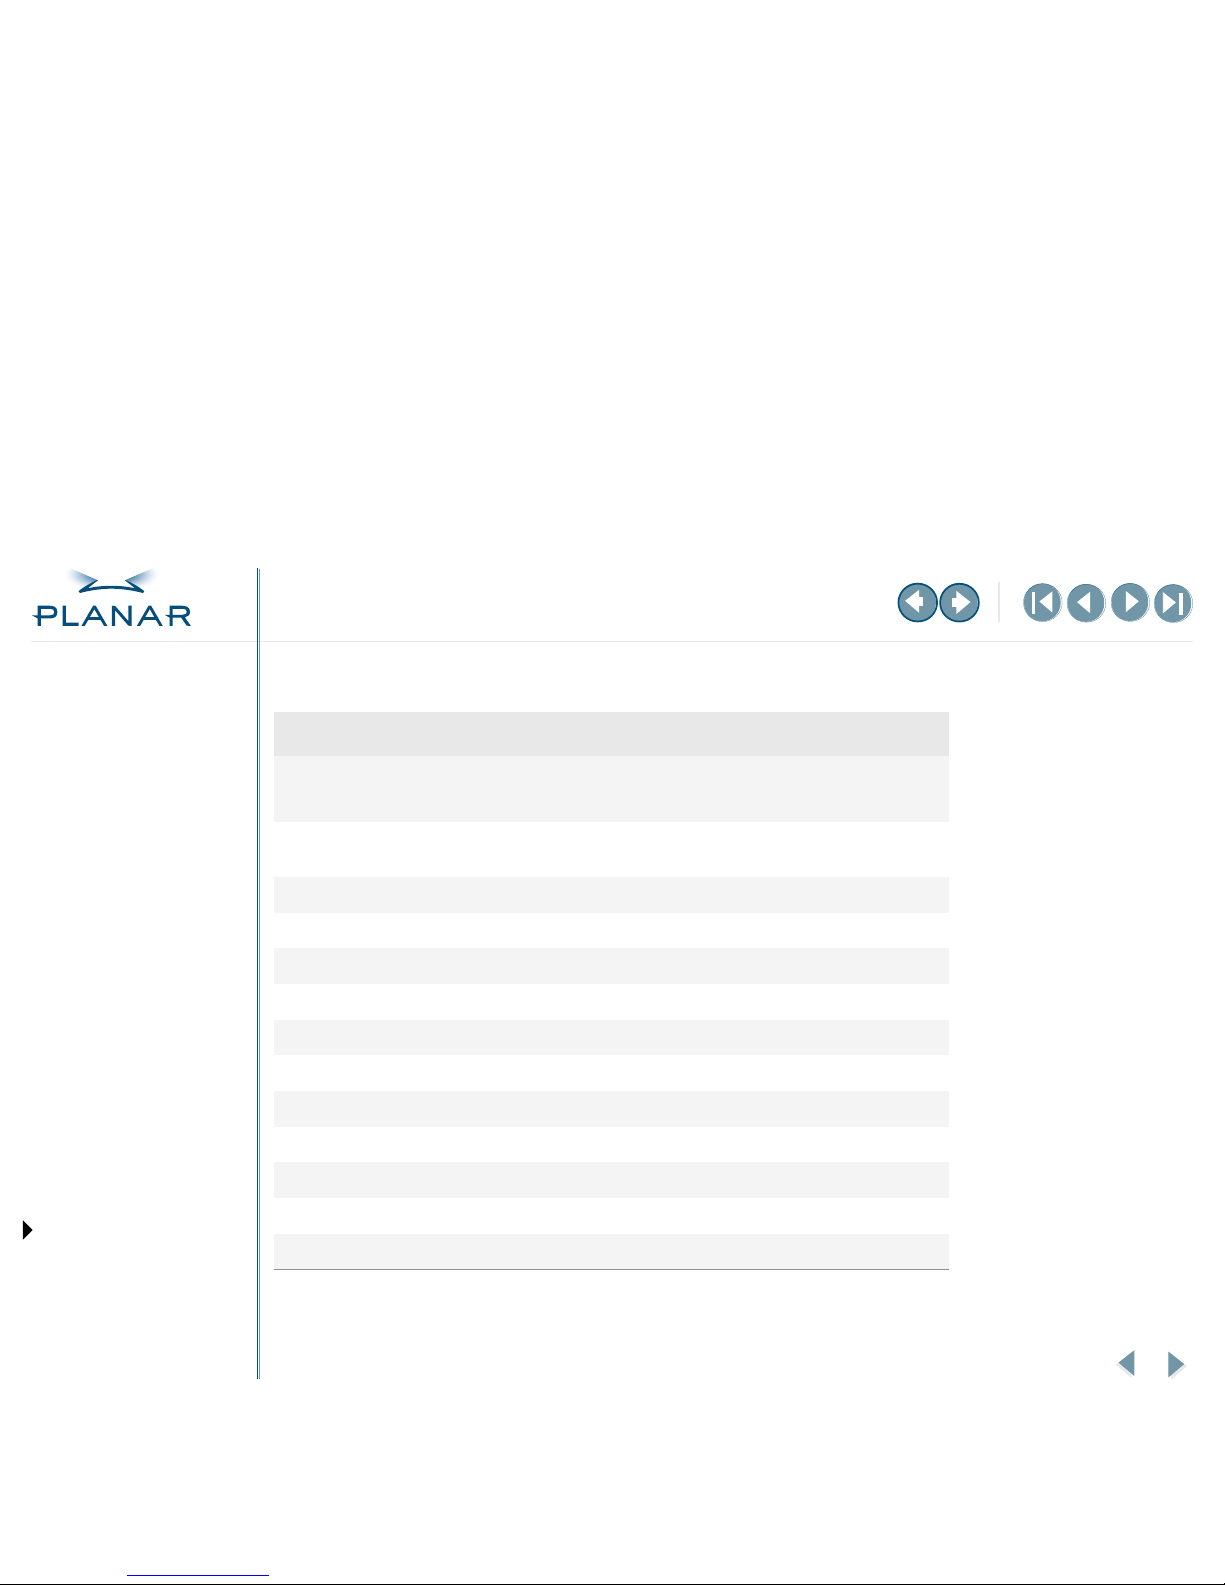
Controller Specification
Parameter Description
Operating environment
•Windows XP with Service Pack 1 (or higher)
•Windows 2000 with Service Pack 4 (or higher)
System requirements Intel Pentium 4/Xeon;
AMD Athlon 64/K7XP or compatible
Memory configuration 128 MB DDR unified
Memory interface 128 bit
Memory bandwidth 12.8 GB/sec
Bus system PCI Express
Geometry engines 2
Pixel pipelines 4
Dual screen support DVI-I + DVI-I
Dual link -
Stereo 3D support Ye s
Ver tices per sec 250 M
Pixels per sec 2.0 G
Page 32
24
Dome Q2 Display
QUICK LINKS
Contents
Index
Regulatory Compliance
Product Information
Warranty
GETTING STARTED
About the Q2 Display
Check Package Contents
Identify Components
Position the Display
Desk Stand Features
INSTALLING THE DISPLAY
Install AX1 Controller
Connect Cables
Install Display Driver
Adjust Display Properties
OPERATING THE DISPLAY
Front-Panel Controls
Screen Adjustments
Dome CXtra Software
APPENDIXES
Troubleshooting
Specifications
USB Connections
Power Management System
Driver Removal
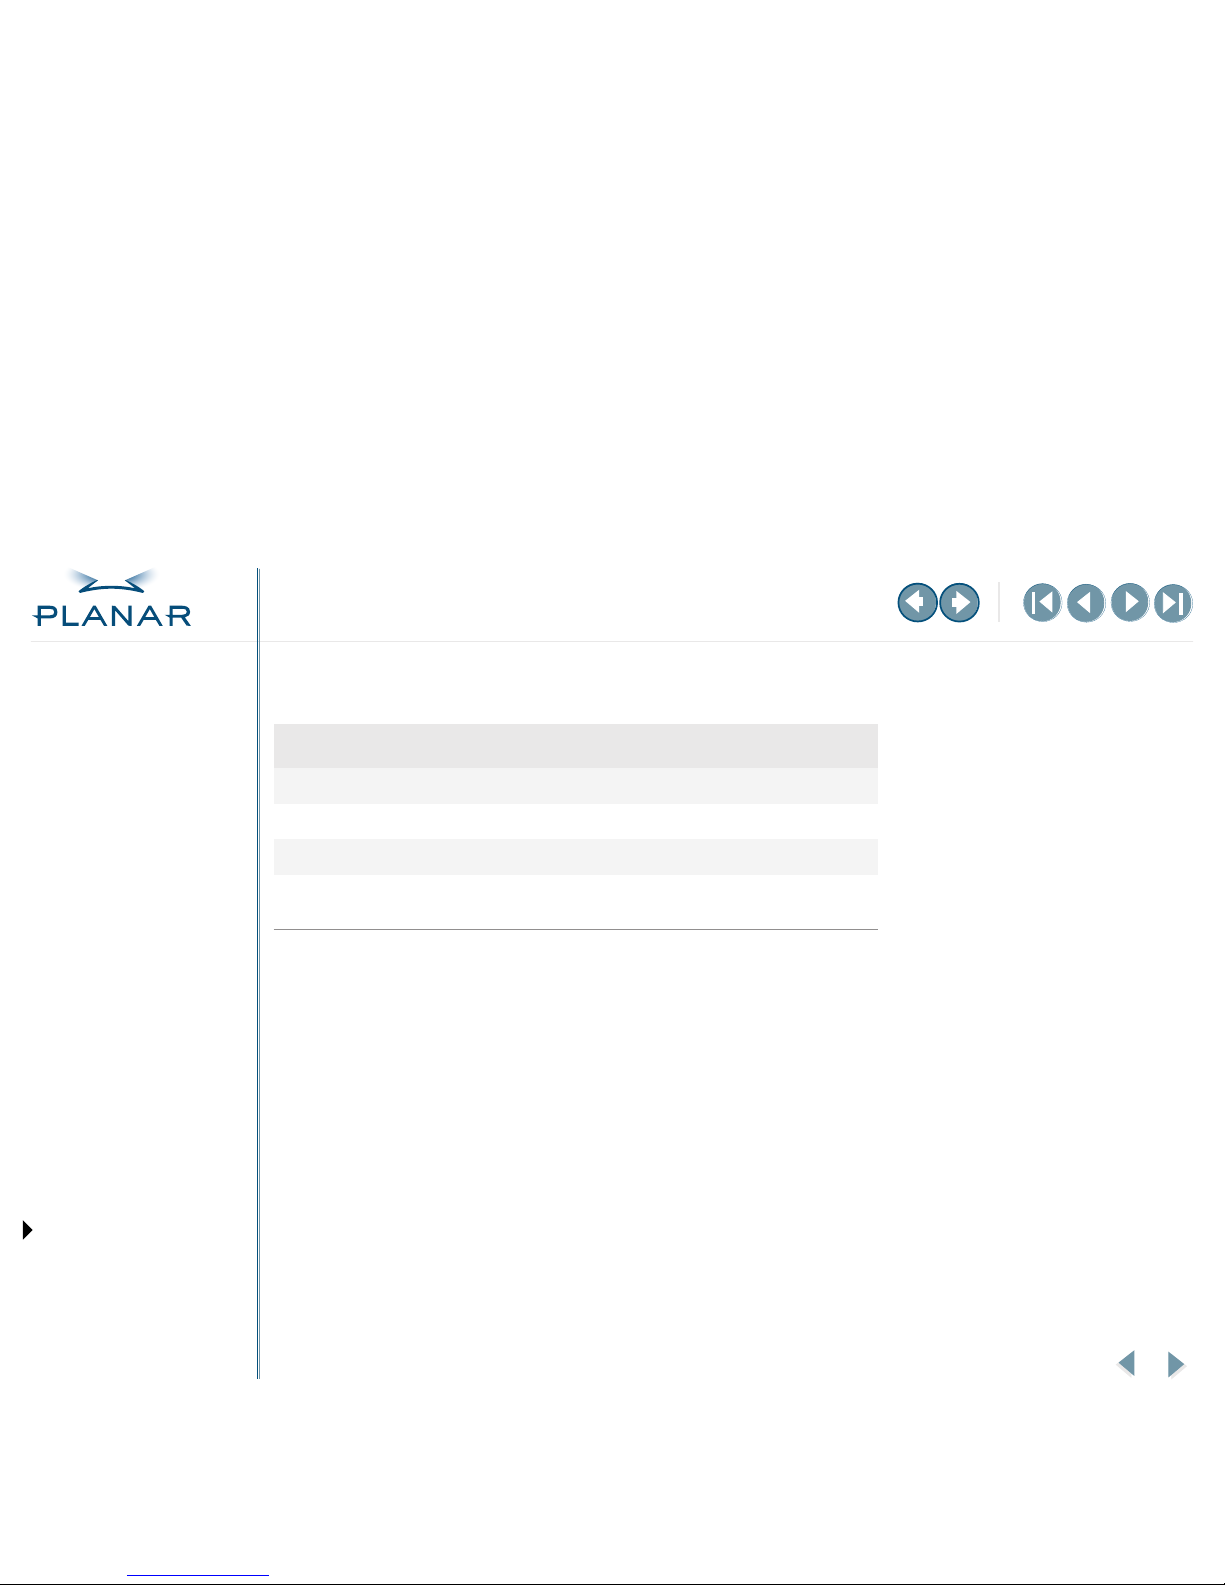
USB Hub Specification
Parameter Specification
USB Standard Rev. 1.1 complied self-powered hub
Downstream power supply 500mA for each (MAX)
Communication speed 12 Mbps (full), 1.5 Mbps (low)
USB port
1 upstream port
2 downstream ports
Page 33
25
Dome Q2 Display
QUICK LINKS
Contents
Index
Regulatory Compliance
Product Information
Warranty
GETTING STARTED
About the Q2 Display
Check Package Contents
Identify Components
Position the Display
Desk Stand Features
INSTALLING THE DISPLAY
Install AX1 Controller
Connect Cables
Install Display Driver
Adjust Display Properties
OPERATING THE DISPLAY
Front-Panel Controls
Screen Adjustments
Dome CXtra Software
APPENDIXES
Troubleshooting
Specifications
USB Connections
Power Management System
Driver Removal
Using USB Connections
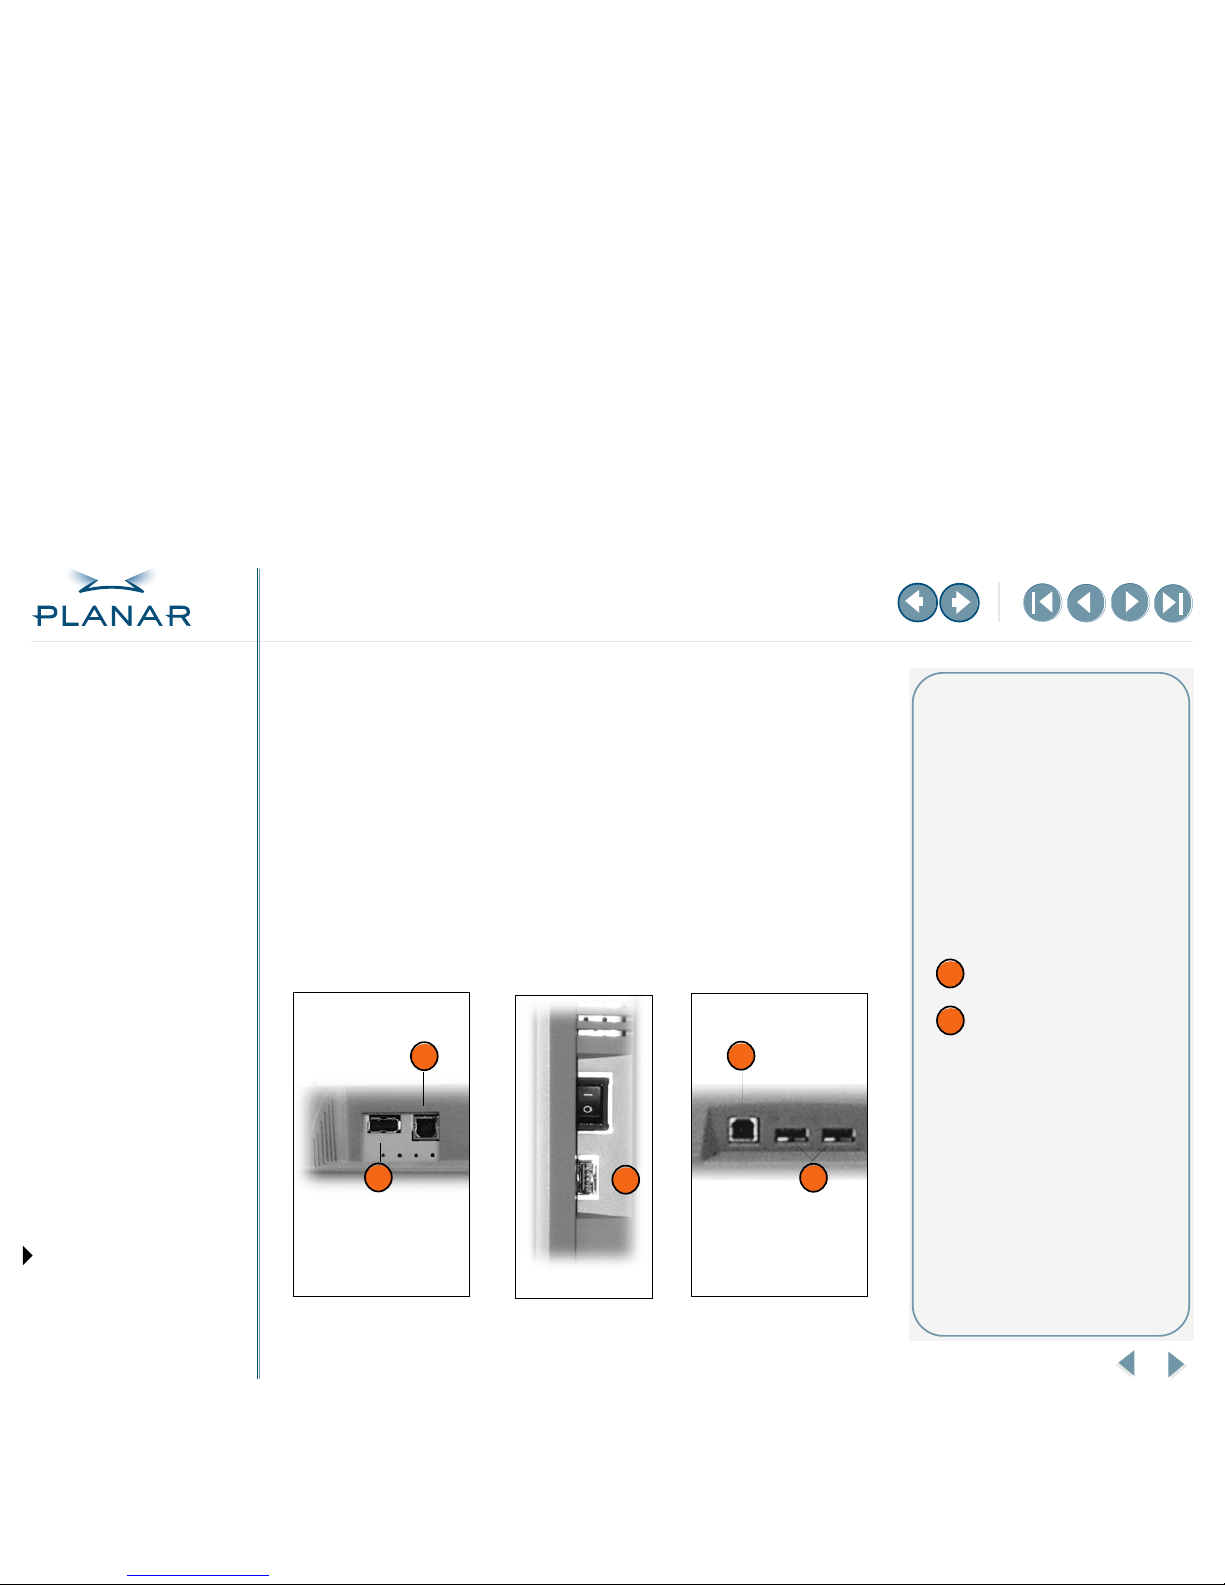
Both the Q2 display and the desk stand have an integrated self-powered USB hub
that allows you to attach USB devices (such as a keyboard or mouse) to your display
rather than to your computer.
To use the USB ports
1 Use the USB cable to connect the upstream port on the display or desk stand
to the downstream port on your USB-compliant computer or other hub.
2 Connect your USB-compliant peripherals to the downstream ports on
the display or the desk stand.
See the back panel, side panel, and desk stand for another view. See the
USB specification for more information.
B
A
Display, back
A
Display, side
B
A
Desk stand, bottom
USB tips
To activate the USB hub function,
the display must be connected to a
USB-compliant computer or another
hub with the USB cable.
Even if the display is in power-saving
mode, the USB devices function
when they are connected to the
USB ports (both the upstream and
downstream) of the display.
Legend
B
A
USB A (downstream) port
USB B (upstream) port
Page 34
26
Dome Q2 Display
QUICK LINKS
Contents
Index
Regulatory Compliance
Product Information
Warranty
GETTING STARTED
About the Q2 Display
Check Package Contents
Identify Components
Position the Display
Desk Stand Features
INSTALLING THE DISPLAY
Install AX1 Controller
Connect Cables
Install Display Driver
Adjust Display Properties
OPERATING THE DISPLAY
Front-Panel Controls
Screen Adjustments
Dome CXtra Software
APPENDIXES
Troubleshooting
Specifications
USB Connections
Power Management System
Driver Removal
Power Management System
The Q2 display complies with the VESA DPMS standard. This standard provides four
power-saving modes, based on the display detecting the horizontal or vertical sync
signal. The following table describes the four modes.
Mode Horizontal Sync Ver tical Sync LED Color
Normal On On Green
Standby Off On Amber
Suspend On Off Amber
Off Off Off Amber
Awakening the display
The display awakens to normal
mode when you move the mouse or
strike the keyboard.
Page 35
27
Dome Q2 Display
QUICK LINKS
Contents
Index
Regulatory Compliance
Product Information
Warranty
GETTING STARTED
About the Q2 Display
Check Package Contents
Identify Components
Position the Display
Desk Stand Features
INSTALLING THE DISPLAY
Install AX1 Controller
Connect Cables
Install Display Driver
Adjust Display Properties
OPERATING THE DISPLAY
Front-Panel Controls
Screen Adjustments
Dome CXtra Software
APPENDIXES
Troubleshooting
Specifications
USB Connections
Power Management System
Driver Removal
Driver Removal
You need to log on with administrator privileges to remove the display driver.
Before removing the driver, close all open applications and temporarily disable any
anti-virus software that is running on your computer system.
To remove the display driver:
1 Open the Control Panel.
2 Open the Add/Remove Programs tool.
3 Select the AX1 Display Driver from the list of software programs.
4 Click Remove. The Planar uninstall dialog box appears.
5 Click Yes to remove the AX1 display driver.
6 Click Yes to restart your computer.
Follow the safety instructions to remove the controller from your computer.
See the “Warning” on page 8.
Removing the controller
When removing the controller
from your computer, follow the
same safety precautions you use
to install it.
To remove the controller:
1 Shut down the computer.
2 Detach video cable.
3 Remove the cover.
4 Ground yourself by touching
the power supply box.
5 Remove screws for the
mounting bracket.
6 Remove the controller.
7 Detach the power extension
cable.
8 Reassemble your computer.
Page 36
QUICK LINKS
Contents
Index
Regulatory Compliance
Product Information
Warranty
GETTING STARTED
About the Q2 Display
Check Package Contents
Identify Components
Position the Display
Desk Stand Features
INSTALLING THE DISPLAY
Install AX1 Controller
Connect Cables
Install Display Driver
Adjust Display Properties
OPERATING THE DISPLAY
Front-Panel Controls
Screen Adjustments
Dome CXtra Software
APPENDIXES
Troubleshooting
Specifications
USB Connections
Power Management System
Driver Removal
28
Dome Q2 Display
Index
A
adjusting
display position
6
display properties
11
screen parameters
12, 13
AGP slot
8
avoiding electrostatic discharge
8
B
back panel 4
Brightness menu
14
C
cables, connecting 9
calibration, DICOM
17
changing video setting
11
cleaning display
viii
components, identifying
3
configuring driver
10
connecting
display cables
9
power cord
9
contents, package
2
controller
installing
8
specification
23
controls, display
12
customer support
32
D
desk stand 3
lock and cover
7
DICOM calibration
17
display
adjusting properties
11
adjusting screen parameters
12, 13
back panel
4
cleaning
viii
connecting cables/cords
9
controls, menu
12
driver installation
10
driver removal
27
front panel
3
height range
6
installing driver
10
orientation
6
overview
1
rotating screen
11
servicing
vii
setting dual configuration
11
side panel
5
single installation
9
specification
21
tilt range
6
troubleshooting
18
Dome CXtra software
1, 17
DPMS standard
26
driver
configuring
10
installing
10
dual-display configuration
11
DVI connector
4
E
electrostatic discharge, avoiding 8
F
front panel 3
controls
12
navigation buttons
3
H
handling/unpacking tips 2
horizontal OSD position
16
I
identifying components 3
information
product
vi
regulatory
iv
technical
21
installation
precautions
vii
tips
9, 10
installing
controller
8
L
landscape/portrait mode 6
language selection. See Setup menu
LCD screen
3
M
menu
Brightness
14
OSD position
13
Setup
15
Menu button
12
mounting/security options
2
–MORE–
Page 37
QUICK LINKS
Contents
Index
Regulatory Compliance
Product Information
Warranty
GETTING STARTED
About the Q2 Display
Check Package Contents
Identify Components
Position the Display
Desk Stand Features
INSTALLING THE DISPLAY
Install AX1 Controller
Connect Cables
Install Display Driver
Adjust Display Properties
OPERATING THE DISPLAY
Front-Panel Controls
Screen Adjustments
Dome CXtra Software
APPENDIXES
Troubleshooting
Specifications
USB Connections
Power Management System
Driver Removal
29
Dome Q2 Display
N
navigation buttons 12
O
options, mounting/security 2
orientation mode
6
OSD position menu
13
P
package contents 2
portrait/landscape mode
6
power
management system
26
master switch
5
screen switch and indicator
3, 12
power cord
4
connecting
9
precautions
cleaning
viii
installation
vii
safety
vi
product information
vi
R
refresh rate 11
regulatory information
iv
removing
controller
27
display driver
27
resolution
11
rotating display screen
11
S
safety precautions vi
security/mounting options
2
servicing display
vii
Setup menu
15
shipping/storing
viii
side panel
5
software, Dome CXtra
17
Source button
12
specification
controller
23
display
21
USB
24
storing/shipping
viii
T
technical assistance 32
tips
handling/unpacking
2
installation
9, 10
unpacking/handling
2
USB
25
transparency selection. See Setup menu
troubleshooting
18
U
uninstalling display driver 27
unpacking/handling tips
2
USB
connection
25
port
4, 5
specification
24
tips
25
using front-panel controls
12
V
vertical OSD position 16
VESA DPMS
26
video setting, changing
11
viewing angle
6
W
warranty 30
Page 38
30
Dome Q2 Display
QUICK LINKS
Contents
Index
Regulatory Compliance
Product Information
Warranty
GETTING STARTED
About the Q2 Display
Check Package Contents
Identify Components
Position the Display
Desk Stand Features
INSTALLING THE DISPLAY
Install AX1 Controller
Connect Cables
Install Display Driver
Adjust Display Properties
OPERATING THE DISPLAY
Front-Panel Controls
Screen Adjustments
Dome CXtra Software
APPENDIXES
Troubleshooting
Specifications
USB Connections
Power Management System
Driver Removal
Dome QX Display – Standard Warranty Overview
Summary
• Standard 1-year “repair and return” warranty
• Industry-leading 5-year backlight warranty
1
• Typical repair turnaround time of 10 business days
Standard Warranty Return Procedure
As a Planar Standard Warranty customer, you must follow the procedure below if you
have a non-functioning Dome QX display. The Planar customer service staff will attempt to
correct any minor issues that may be causing the problem. Once Planar has determined
that you have a non-functioning product, Planar will arrange for return and repair of the
non-functioning product.
1 Contact Planar via the web at http://www.planar.com/support. In North America, call
(866) PLANAR1 (866.752.6271). In Europe, call +358 9 420 01 or send your info by fax
to +358 9 420 0200. You must have the model number, serial number, and proof-ofpurchase available.
2 Planar customer service staff will attempt to correct any minor issues that may be
causing the problem. If we are unable to correct the problem to your satisfaction,
we will issue a Return Material Authorization (RMA).
3 You must return the product, as specified, to Planar Systems. Planar will validate the
defect, repair the unit, and return the unit to you. The typical turnaround time is
10 business days.
1If, within 5 years of initial purchase, the maximum output of the Dome QX warranty is
determined by Planar Systems to be less than 250 cd/m
2
, Planar will repair or replace
the display, at its sole discretion.
–MORE–
Page 39
31
Dome Q2 Display
QUICK LINKS
Contents
Index
Regulatory Compliance
Product Information
Warranty
GETTING STARTED
About the Q2 Display
Check Package Contents
Identify Components
Position the Display
Desk Stand Features
INSTALLING THE DISPLAY
Install AX1 Controller
Connect Cables
Install Display Driver
Adjust Display Properties
OPERATING THE DISPLAY
Front-Panel Controls
Screen Adjustments
Dome CXtra Software
APPENDIXES
Troubleshooting
Specifications
USB Connections
Power Management System
Driver Removal
Summary Limitations and Exclusions of Dome Displays
1 The customer must provide original proof of purchase of the display system.
2 Warranty is void on any product with a defaced, modified, or removed serial number.
3 Warranty is void on any product with damage, deterioration, or malfunction resulting
from the following:
a) Accident, misuse, neglect, fire, water, lightning, or other acts of nature, unauthorized
product modification, or failure to follow instructions supplied with the product.
b) Repair or attempted repair by anyone not authorized by Planar.
c) Any damage of the product due to shipment.
d) Removal or installation of the product.
e) Causes external to the product, such as electric power fluctuations or failure.
f) Use of supplies or parts not meeting the Planar specifications.
g) Normal wear and tear.
h) Any other cause, which does not relate to a product defect.
4 Warranty excludes removal, installation, and setup service charges.
Limitation of Implied Warranties
THERE ARE NO WARRANTIES, EXPRESS OR IMPLIED, WHICH EXTEND BEYOND THE
DESCRIPTION CONTAINED HEREIN INCLUDING THE IMPLIED WARRANTY OF
MERCHANTABILITY AND FITNESS FOR A PARTICULAR PURPOSE.
–MORE–
Page 40
32
Dome Q2 Display
QUICK LINKS
Contents
Index
Regulatory Compliance
Product Information
Warranty
GETTING STARTED
About the Q2 Display
Check Package Contents
Identify Components
Position the Display
Desk Stand Features
INSTALLING THE DISPLAY
Install AX1 Controller
Connect Cables
Install Display Driver
Adjust Display Properties
OPERATING THE DISPLAY
Front-Panel Controls
Screen Adjustments
Dome CXtra Software
APPENDIXES
Troubleshooting
Specifications
USB Connections
Power Management System
Driver Removal
Exclusion of Damages
THE LIABILITY OF PLANAR IS LIMITED TO THE COST OF REPAIR OR REPLACEMENT OF
THE PRODUCT. PLANAR SHALL NOT BE LIABLE FOR THE FOLLOWING:
1 DAMAGE TO OTHER PROPERTY CAUSED BY ANY DEFECTS IN THE PRODUCT,
DAMAGES BASED UPON INCONVENIENCE, LOSS OF USE OF THE PRODUCT, LOSS OF
TIME, LOSS OF PROFITS, LOSS OF BUSINESS OPPORTUNITY, LOSS OF GOODWILL,
INTERFERENCE WITH BUSINESS RELATIONSHIPS, OR OTHER COMMERCIAL LOSS,
EVEN IF ADVISED OF THEIR POSSIBILITY OF SUCH DAMAGES.
2 ANY OTHER DAMAGES, WHETHER INCIDENTAL, INDIRECT, CONSEQUENTIAL OR
OTHERWISE.
3 ANY CLAIM AGAINST THE CUSTOMER BY ANY OTHER PARTY.
Effect of Local Law
This warranty gives you specific legal rights, and you may have other rights, which vary from
locality to locality. Some localities do not allow limitations on implied warranties and/or do
not allow the exclusion of incidental or consequential damages, so the above limitations and
exclusions may not apply to you.
Technical assistance
In North America, call 1 (866) PLANAR1
between 8
A.M. and 5 P.M. Pacific time,
Monday through Friday, or send
a description of your technical
issues and e-mail address to
In Europe, call +358 9 420 01 between
8
A.M. and 4 P.M. Finnish time (Eastern
European time), Monday through
Friday, or send a description of your
technical issues and e-mail address to
 Loading...