

Page 1

Dome Q2 Display
EX2 Display Controller
Dome CXtra Software
QUICK REFERENCE
Windows XP
Windows 2000
Page 2
Before You Begin
Check that your system meets these requirements and
runs one of these Microsoft operating systems.
System Requirements
Intel Pentium 4, Xeon AMD
•
Athlon XP/MP/Opteron or
compatible
Motherboard with free
•
AGP 8x/4x slot
256 MB RAM
•
Correct AGP GART chipset
•
driver installed for motherboard
CD-ROM drive
•
Power supply, 300 watts or
•
greater
You must install the correct AGP chipset driver
before you install the EX2 controller and driver.
To check the chipset on your computer
1 Right-click My Computer and select Properties.
2 Click the Hardware tab and select Device
Manager.
3 Scroll the list to select System Devices.
4 Scroll to list to AGP controller. The name of
the chipset manufacturer appears as the
device name.
Operating System
Windows XP
•
Windows 2000 with
•
Service Pack 1
(or higher)
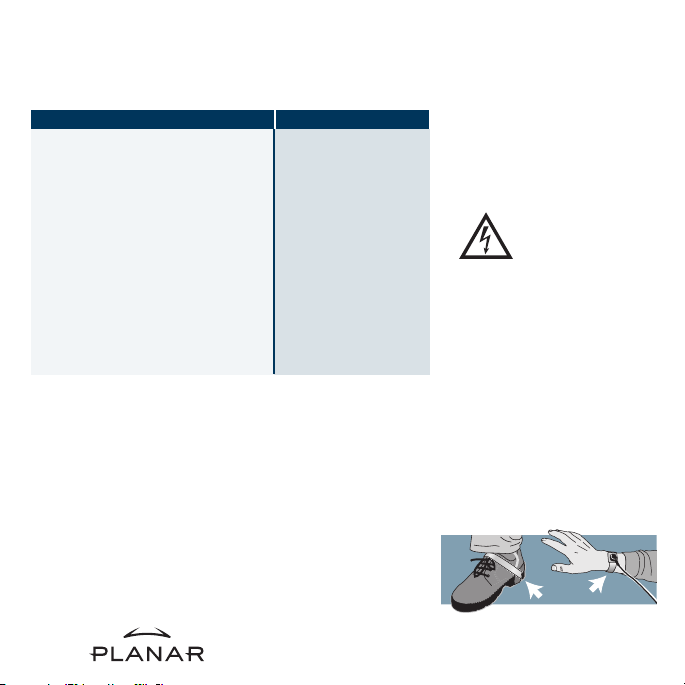
Warning
Avertissement
Avvertenza
Advertencia
Warnung
Wear an antistatic heel or wrist
strap when installing the board
and display to avoid damage to
computer components.
2
Page 3
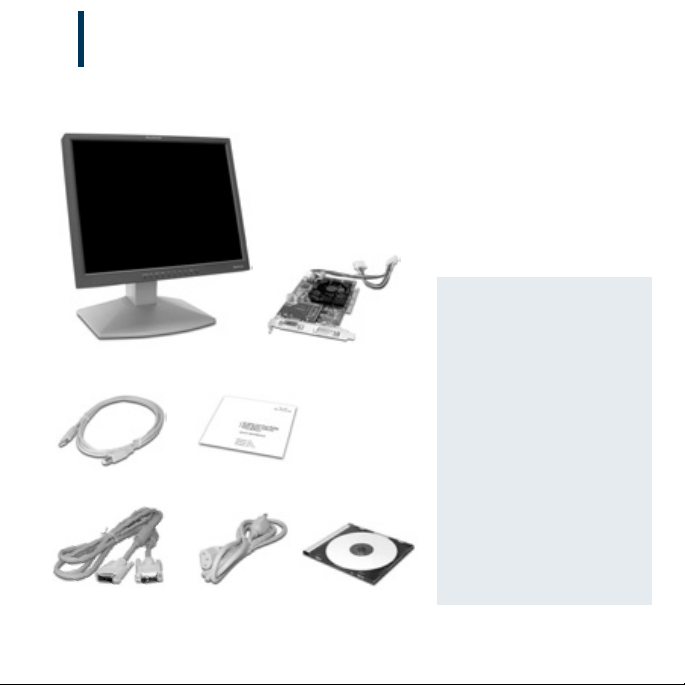
Unpacking the Display
1
Check the contents of your Dome Q2 display package for all the items shown here.
Save the original packing materials for storage and shipping.
Guidelines
Use both hands to lift
•
Dome Q2 digital flat panel
USB cable
DVI-to-DVI video cable Power cord Driver software
quickreference
EX2 display controller
Dome Q2
or adjust the display.
Avoid touching the
•
display screen.
Do not set up the display
•
in areas with sudden
temperature changes
and strong light sources.
Do not block the vents on
•
the back of the display.
Do not remove the back
•
cover or disassemble
the display.
3
Page 4
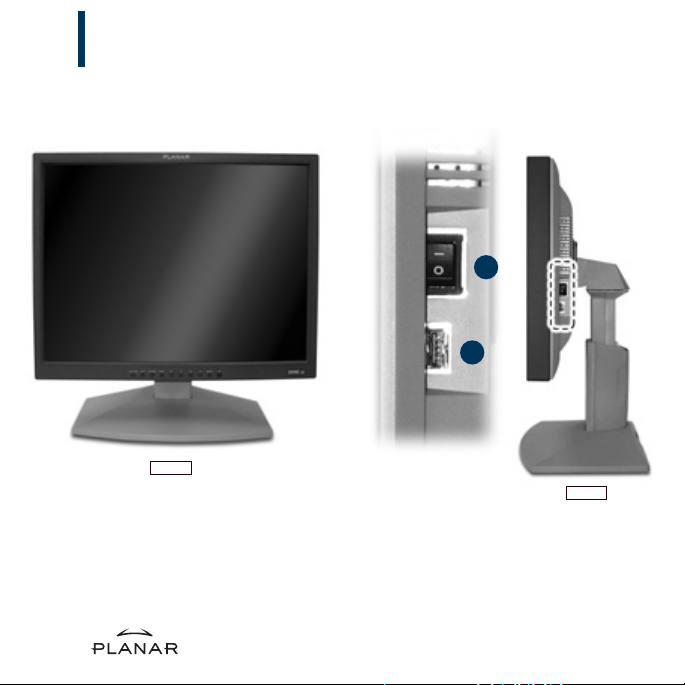
Identifying the Components
2
Review illustrations of the front panel, side interface, and back panel to identify
display controls and ports.
1
2
Front
Side
See page 12 for information on
the front panel controls.
4
The power switch on the side of the display
is the master power control.The switch must
be on for the front power switch and the
USB ports to be operational.
Page 5
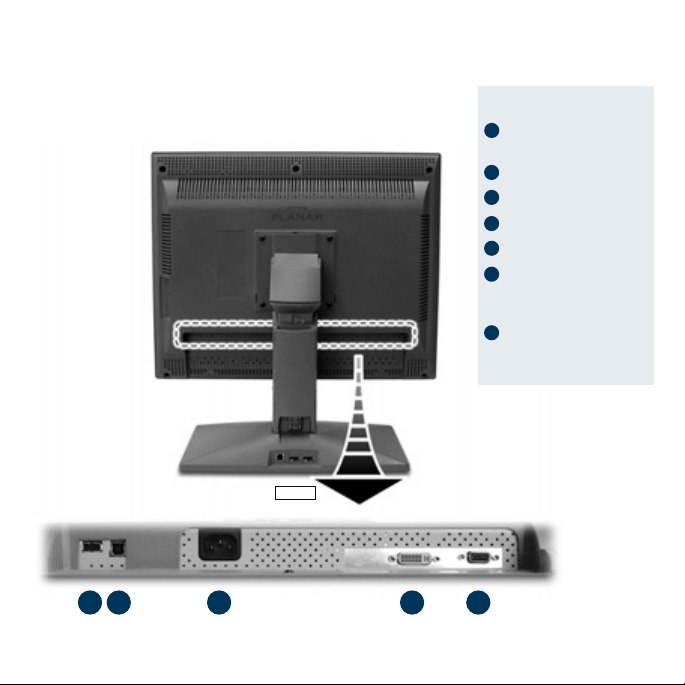
Back
3 4 5 6 7
Legend
1 Power switch to turn the
display unit on or off
2 USB downstream port
3 USB downstream port
4 USB upstream port
5 Power cord port
6 DVI port to connect
the display to the
Ex2 display controller
7 D-Sub port,
non-functioning
for digital mode
5
Page 6

Installing the Display Controller
3
Turn your computer off. Leave the power cord plugged into the grounded outlet.
Remove any existing graphics card and its driver from your computer system before
you install the EX2 display controller and driver. Also disable any onboard graphics
capability on the motherboard.
To install the controller
1 Turn off your computer and all peripherals.
Disconnect all cables from the back of your
computer.
2 Remove the computer cover.
3 Remove any existing graphics card and
video signal cable, if necessary.
4 Remove the blank bracket from
the available AGP slot.
5 Insert the display controller into the AGP slot,
align the connector pins, and press the
board down until it is firmly seated.
6 Use the power extension cable to connect the
display controller to the computer’s hard drive
connector.Connect the A plug to the controller,
the B plug to the computer power supply,
and the C plug to the hard drive connector.
Blank bracket
Open AGP slot
EX2 display
controller installed
6
Page 7

7 Secure the mounting bracket.
8 Reattach the computer cover and the peripherals.
A
B
C
7
Page 8

Connecting the Cables
4
Use only the cables and power cord supplied with the Dome Q2 display.
1 Press the PUSH button on the desk stand
and remove the stand cover.
2 Plug one end of the video signal cable to
the DVI port on the display.Tighten the
thumbscrews to secure the connection.
3 Plug the power cord into the power input
port on the interface plate.
4 Plug the other end of the DVI cable into
the video port on the installed display
controller.Use DVI port #1 if you are
installing only one display.
Power cord
5 Plug the other end of the power
cord into a grounded outlet.
6 Reattach the stand cover.
7 Power on your display first, then
the computer.
EX2 display
controller installed
DVI cable
Connection
for a single
display
DVI cable
8
Page 9

Installing the Display Driver
5
Upon restarting your computer system, you must log on with administrator privileges.
On Windows 2000 systems,Service Pack 1 or higher must be installed.
To install the display driver
1 Click Cancel on the Found New Hardware Wizard dialog box. Click No on the
System Settings Change window when prompted to restart the computer.
2 Insert the Planar Installation CD to run the SETUP.EXE utility.
3 Click Install under Software Install, then click Next.
4 Click Yes to the license agreement.The installation starts.
5 Follow the onscreen instructions to complete the installation.Planar recommends that
you select the Express installation option.
6 When the Setup complete message appears, select Yes, I want to restart my computer
now and click Finish.
After restarting, you may see the message Digital Signature Not Found. Click Yes or Continue
to complete the driver installation.
To configure the display
1 Right-click the desktop and select Properties > Settings.
2 Set the resolution to 1600 x 1200.
3 Click the Advanced button and select the Monitor tab.
4 Set the refresh rate to 60 Hz.
5 Click OK until you return to the desktop.
9
Page 10

Adjusting the Display Properties
6
The display driver installs two additional tabs on the Display Properties dialog box in
the Control Panel.Use the Rotation tab to select the orientation of the display. Use the
Information tab to retrieve controller-specific hardware and driver information. Also use
the dialog box to set up a dual-display configuration.
To set the display orientation
1 Right-click the desktop and select Properties > Settings.
2 Select the monitor that you want to change.
3 Click Advanced.
4 Click the Monitor tab. Make sure the check box for Hide modes that this monitor
cannot display is empty (unchecked).
5 Click the Rotation tab.
Check Standard Landscape for landscape mode.
•
Check Rotate 90 Left or Right for portrait mode.
•
6 Click Yes to save the setting.
7 Click OK until to return to the desktop.
To retrieve controller and driver information
Click Display Properties > Settings > Advanced > Information.
10
Page 11

To use a dual-display configuration
1 Right-click the desktop and select Properties > Settings.
2 Click the monitor icon 2.
3 Select Extend my Windows desktop onto this monitor.
4 Set resolution and color quality for the second display.
5 Click Apply or OK.
About video settings
For best results,use the resolution
1600 x 1200. Other resolution settings
may produce less than optimal results.
11
Page 12

Using the Panel Controls
7
The Onscreen Display menu is the user interface for controlling various aspects of the
Dome Q2 display.With it you can easily adjust functions such as brightness, OSD horizontal
and vertical position, and language and transparency. This display is originally manufactured
as a dual-mode display able to operate in either analog or digital mode.Thus, some front panel
controls may not be relevant to the configuration of the Dome Q2 display as a digital unit.
1
2
3
Legend
1 Controls Locked/Unlocked
Press the Menu and Right buttons simultaneously for 3 seconds to locked or unlocked the
current control settings.
2 Source button
Press to make the DVI Digital connector
active (Source > Up or Down to highlight
DVI DIGITAL > Select).
3 Menu button
Press to enter or exit the onscreen display.
12
4
4 Navigation buttons
Press Up, Down,Left, or Right button to choose
or adjust items in the onscreen display.
5 Select button
Press to enter a selection in the onscreen
display.
6 Display power switch and DPMS indicator
Press to turn the display on or off.The power
indicator lights up green when the display
operates normally.The color changes to amber
when the display is in energy-saving mode.
5 6
Page 13

Making Screen Adjustments
8
Use the front panel controls and OSD menus to adjust brightness, language and
transparency,and horizontal and vertical positions of the display screen.
To adjust the display screen
1 Press the Menu button. The main menu of the OSD appears.
2 To access a control, navigate with the Up or Down button.
3 Press the Select button when the submenu you want is highlighted.
4 Use the Up, Down, Left, or Right button to adjust the value.
5 Press the Select button to accept the changes.
6 Press the Menu button to exit the OSD control system.
Main Menu Submenu Description
Contrast/brightness
Setup
OSD position
Brightness Adjusts the brightness of
•
Language Customizes the screen status
•
Transparency for your operating environment
•
Horizontal Adjusts the position of the
•
Ver tical OSD window on the screen
•
the screen (See note.)
About brightness
When you highlight the Brightness menu
and press Select, you see this message.
The warning is applicable for current calibration settings when you are
using the Dome CXtra software and have the DICal service installed.
13
Page 14

Enhancements with Dome CXtra Software
TheDome CXtra software enhances the functionality of the Dome Q2 display for viewing
medical images in referral settings. Dome CXtra allows you to monitor and maintain
the display locally or from a remote location using any SNMP console application.
The advantages of Dome CXtra includes consistent grayscale presentation of images,
as a result of conformance with the DICOM Grayscale Standard Display Function.You can
run display acceptance tests, including the recommendations of the American Association
of Physicists in Medicine, Task Group 18 and the DIN test standards.Dome CXtra is an
optional software package. For more information, visit www.planar.com.
CXtra Services, QX Edition
Reporting service. Access service information,view events and history,
•
and check events related to error conditions.
DICal service. Check DICOM conformance and calibrate the display based
•
on the DICOM Grayscale Standard Display Function. (Photometer required.)
AAPM TG18 Test service. Use recommendations from the American Association
•
of Physicists in Medicine, Task Group 18 to test the display.
DIN acceptance service. Perform the German standard test for measuring
•
display performance.
Backlight saver service. Schedule sleep for the display backlights.
•
Privilege service. Limit users who can change display parameters.
•
Test patterns service.View test patterns that demonstrate the image
•
quality of the display.
Enterprise management service. Manage displays from a central location
•
using any SNMP console application.
14
Page 15

Cleaning the LCD Screen
1 Unplug the power supply before cleaning
the display.
2 Dampen a soft, clean cloth with water or
a mild cleanser.
3 Wipe the screen gently with the dampened cloth.
4 Use a dry, soft, clean cloth to wipe off the residue.
Always wipe off water and other stains
immediately to avoid damage to the screen.
Do not use or spray liquid,
aerosol, ammonia,or other
alcohol-based cleaners on
the display or screen.
Some chemical cleaners
may damage the display
and its case.
Do not touch the LCD screen
with your fingers. Skin oils
are hard to remove from
the screen.
Do not saturate the cleaning
cloth. Liquid that drips
on the glass may seep
into the display case.
15
Page 16

America Sales
Planar Systems, Inc.
1195 NW Compton Drive
Beaverton, OR 97006-1992 USA
phone + 1 (503) 748-1100
fax + 1 (503) 748-1493
Medical Sales
Planar Systems, Inc.
400 Fifth Avenue
Waltham, MA 02451-8738 USA
phone + 1 (781) 895-1155
fax + 1 (781) 895-1133
Europe & Asia-Pacific Sales
Planar Systems, Inc.
Olarinluoma 9, P.O. Box 46
FIN-02201 Espoo, Finland
phone + 358 9 420 01
fax + 358 9 420 0200
For more information
Download the full versions of the Dome Q2 Display and Dome CXtra QX Edition
guides and the latest drivers from the Planar web site.
Customer Support
• Visit www.planar.com
• E-mail medicalsupport@planar.com
• Call (866) PLANAR1
Copyright © 2004 Planar Systems, Inc.Planar, Dome,CXtra, and DICal are either registered trademarks or
trademarks of Planar Systems,Inc. Technical information in this document is subject to change without notice.
020-0328-00B
 Loading...