

Page 1

PLANAR 40" LCD MANUAL www.planar.com
Page 2

1
Precautions ............................................................................................... 2
Before First Use
Names and Functions.......................................................................... 3,4
Check Accessories ................................................................................. 3
Outer Dimension.................................................................................. 5,6
Installation ......................................................................................... 7-10
LCD Monitor Instructions
Adjusting the Screen............................................................................. 11
Adjustment Items............................................................................. 11-13
Mode..................................................................................................... 14
Adjustment Procedure
Before Adjustment...................................................................... 15,16
Adjustment for
computer screen
A. Picture Menu.................................................................... 17-21
B. Advanced Menu............................................................... 21-23
C. Picture in picture Menu.................................................... 23-28
D. Advanced picture in picture Menu.................................... 29,30
E. Options Menu................................................................... 31-33
F. Utilities Menu.................................................................... 34,35
Adjustment for Composite Video/S-Video/Component Video
screen
A. Picture Menu.................................................................... 36-41
B. Advanced Menu............................................................... 42-44
C. Video Menu........................................................................... 44
D. Options Menu................................................................... 45,46
E. Utilities Menu.................................................................... 47,48
Additional Functions
Shortcut Menu............................................................................ 49-50
Power Management System ........................................................... 51
Plug and Play .................................................................................. 51
Maintenance............................................................................................ 52
Troubleshooting
Fault Finding......................................................................................... 53
Screen Display...................................................................................... 53
Specifications
Table of Preset Data............................................................................. 55
Cable Pin Arrangement ........................................................................ 56
Monitor Specifications........................................................................... 57
Table of contents
Page 3

2
Precautions
Placement precautions
• Avoid placing the unit in humid or dusty places, or where it will be exposed
to excessive heat (direct sunlight, heaters, etc.)
• Do not step on or set anything on the AC power cord. DAMAGE TO THE
AC POWER CORD IS A SAFETY RISK AND CAN CAUSE A FIRE.
• Install the unit only on a stable and smooth surface.
• Do not connect the unit to the same AC outlet with appliances that
generate large amounts of interference (such as heaters with thermostats,
appliances with motors, etc.). It is best to use a completely separate
electrical outlet.
• Keep the unit away from water or small objects. If they accidentally enters
the unit, unplug the AC power cord immediately. DO NOT PLUG IN THE
UNIT AGAIN.
• Never cover the rear ventilators with cloth or something.
Handling precautions
•"WARNING: The AC power cord and cables on this product contains
chemicals, including lead, known to the State of California to cause cancer,
and birth defects or other reproductive harm. Wash hands after handling."
• Avoid bending, kinking or damaging the AC power cord.
• Never insert or remove the power cord with wet hands. Also, be sure to
hold cord by the plug when removing it from the outlet.
• Do not remove any parts that are held in place with screws. (The unit does
not contain any user-serviceable items.)
• Maintain standard room temperature (5˚C to 35˚C, or 41˚F to 95˚F) during
use. Do not subject the unit to shock or vibration. Do not move the unit
while it is in use.
• A rapid increase in room temperature in cool weather can cause
condensation to form inside the unit. If this occurs, wait at least 15 minutes
after turning the unit on before attempting to operate it.
Microsoft and Windows are registered trademarks of Microsoft Corporation in
the U.S.A. and other countries.
European Norm Compatibility / CE
This machine is provided with the CE-mark and therewith corresponding to the norms that are
valid for its operation at present. Thus the effective guidelines on the electromagnetic compatibility
89/336/EWG and safety regulations according to low voltage guideline 73/23/EWG and
93/68/EWG are guaranteed. Mutual disturbances with other electronic appliances are normally
excluded, if those also are in accordance with valid norms.
Sporadically disturbances cannot, however, be excluded. The product is in conformity with the
directives of the valid European guideline.
Page 4
3
Before First Use
Names and Functions
Display Screen
Front View
Check Accessories
Check that the main unit and all accessories are present.
¡¡
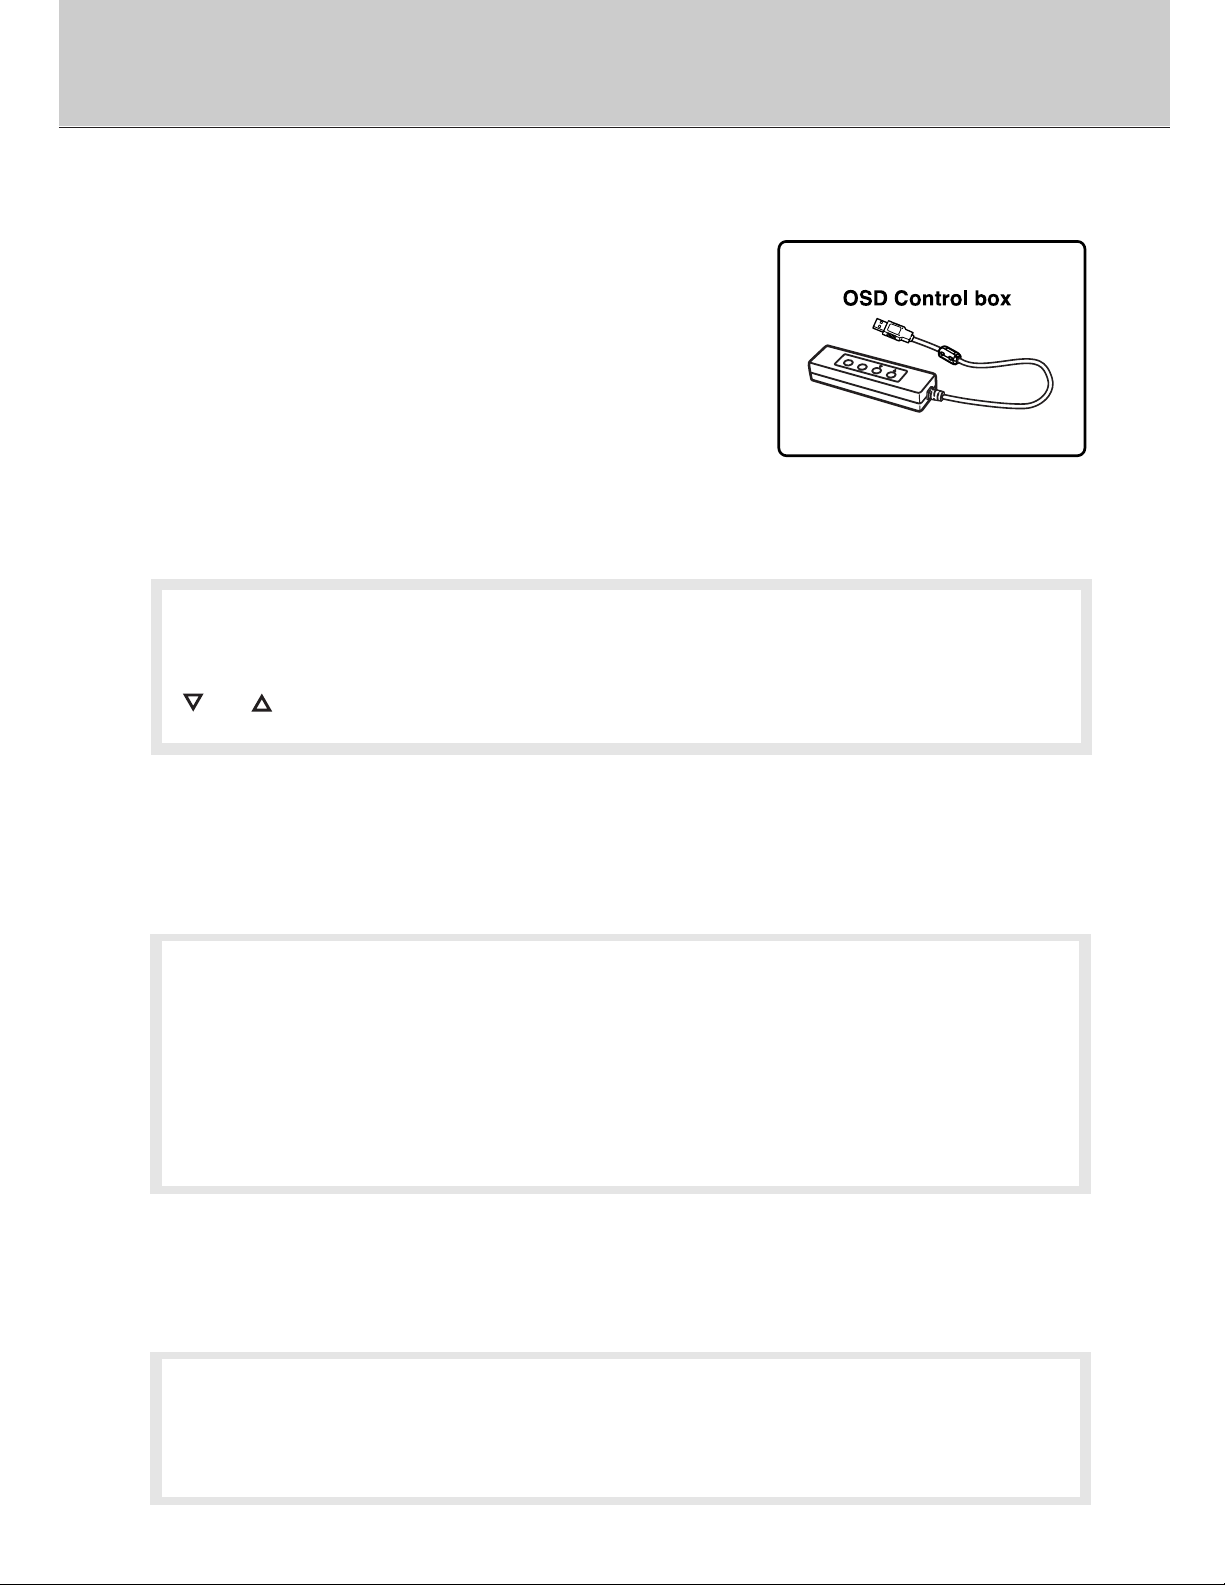
External OSD Control Box (
x
1)
¡¡
AC Power Cord ( x1)
¡¡
User's Guide (
x
1)
¡¡
RGB Cable ( x1)
¡ When you move the LCD monitor, please unplug AC cables connected to AC-IN
and/or AC-OUT, and disconnect the cables connected to the external equipments.
¡ When you carry the LCD monitor, please be careful not to shock it
and touch the
LCD panel, to avoid damaging the LCD panel.
NOTE
Page 5
4
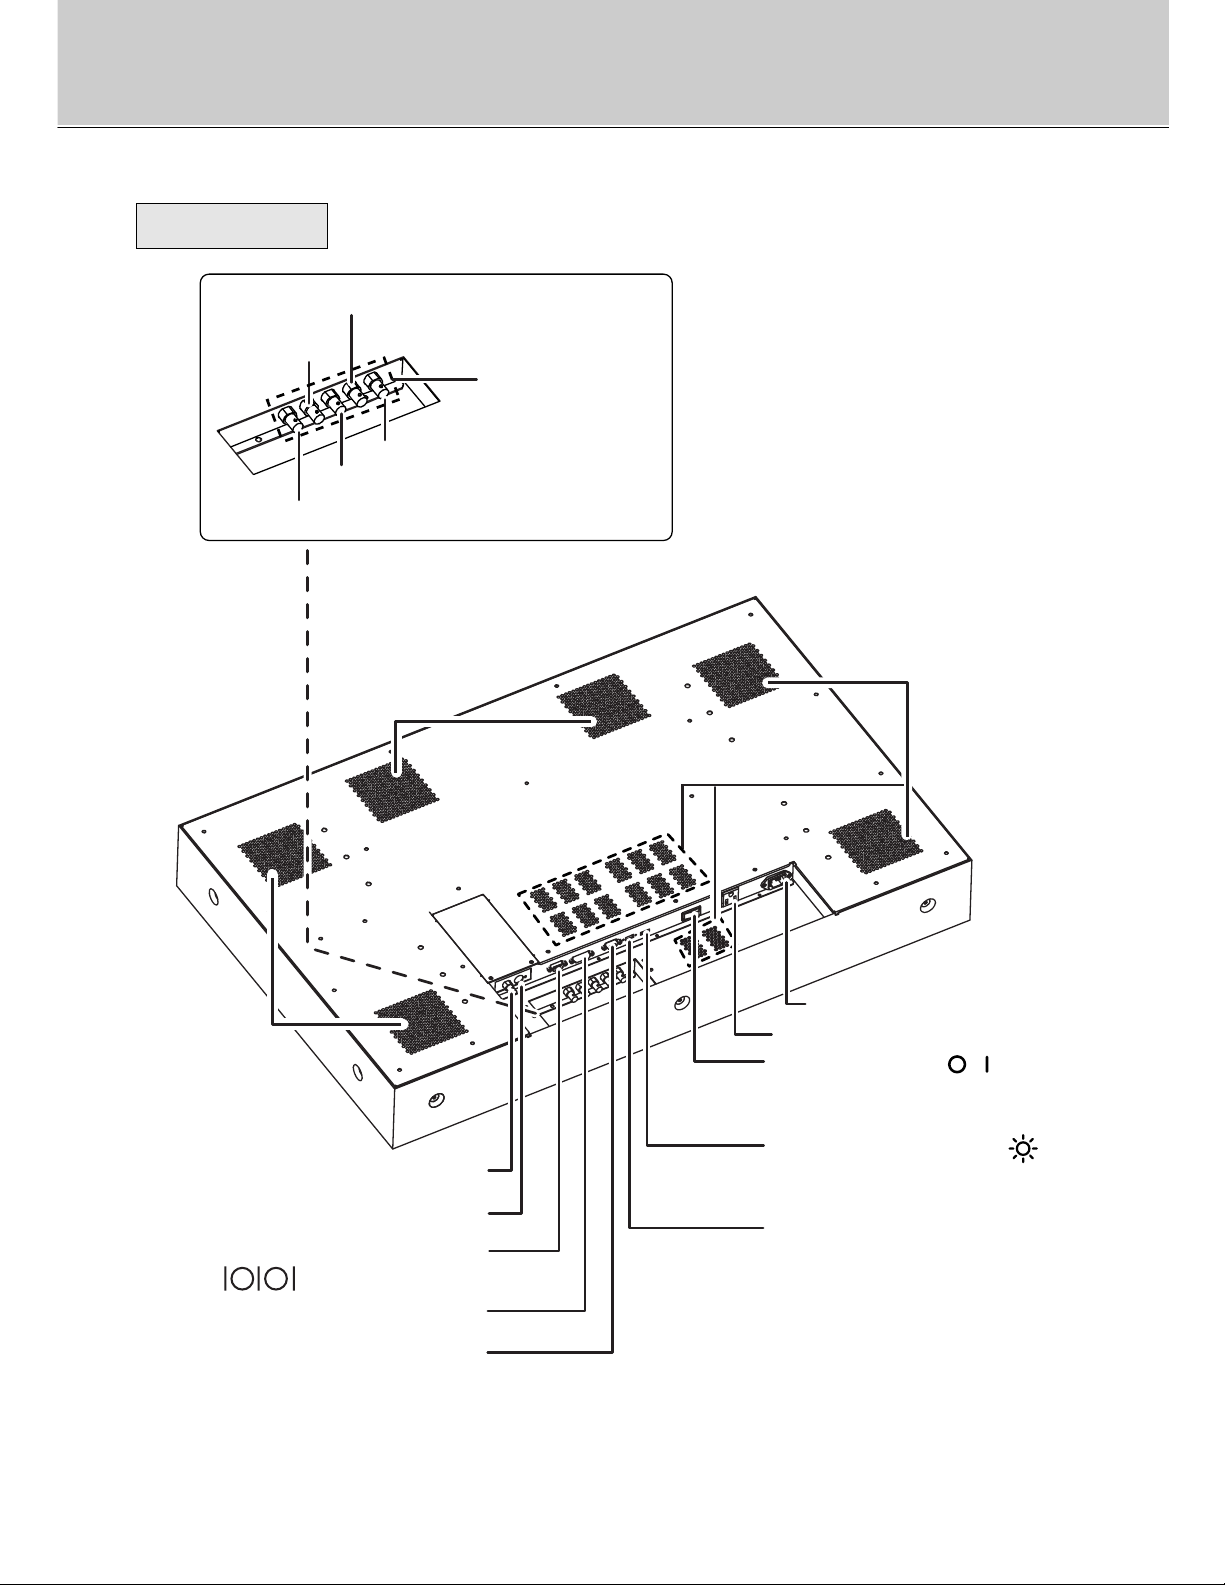
Rear View
HD/C SYNC
G/Y
B/Cb
R/Cr
Component
Video terminal
and
BNC terminal
VD
Ventilators
Fans
Ventilators
Composite Video Connector
S-Video Connector
EXTERNAL CONTROL
( )
DVI Connector
RGB Connector
AC-IN
AC-OUT
Power Switch ( )
Turns the power to the monitor
on and off.
Brightness Control ( )
Used to adjust the brightness
of the display.
OSD Connector
Page 6
5
Before First Use
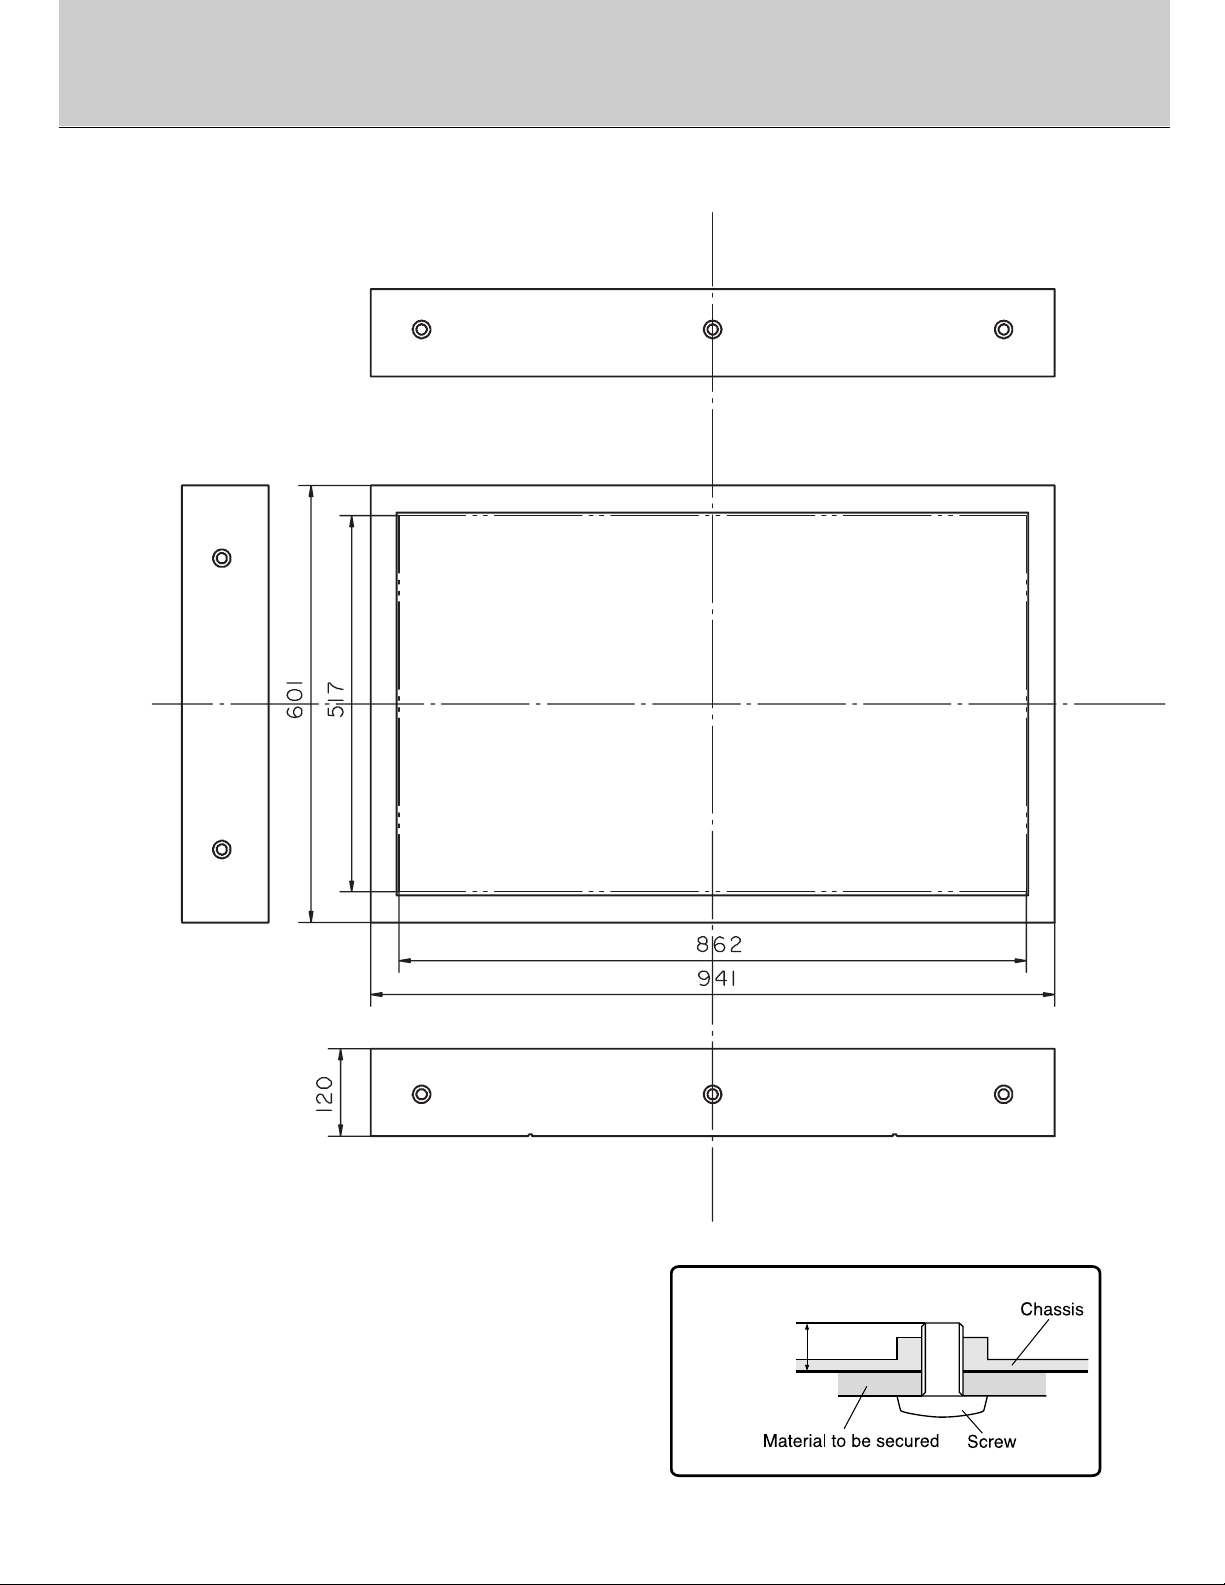
Outer Dimension
L: 12mm(min.)
20mm(max.)
When you install the LCD Monitor, please
take care the following:
• Use the M6 screws only for installation.
• The maximum length of the screw put through a
hole is 20mm on the surface of a metal chassis
(as shown right). Use the screw with effective
length 12-20mm, if not it may damage to the LCD
monitor.
• When you install the LCD monitor, please check
the strength of material to be secured.
Page 7
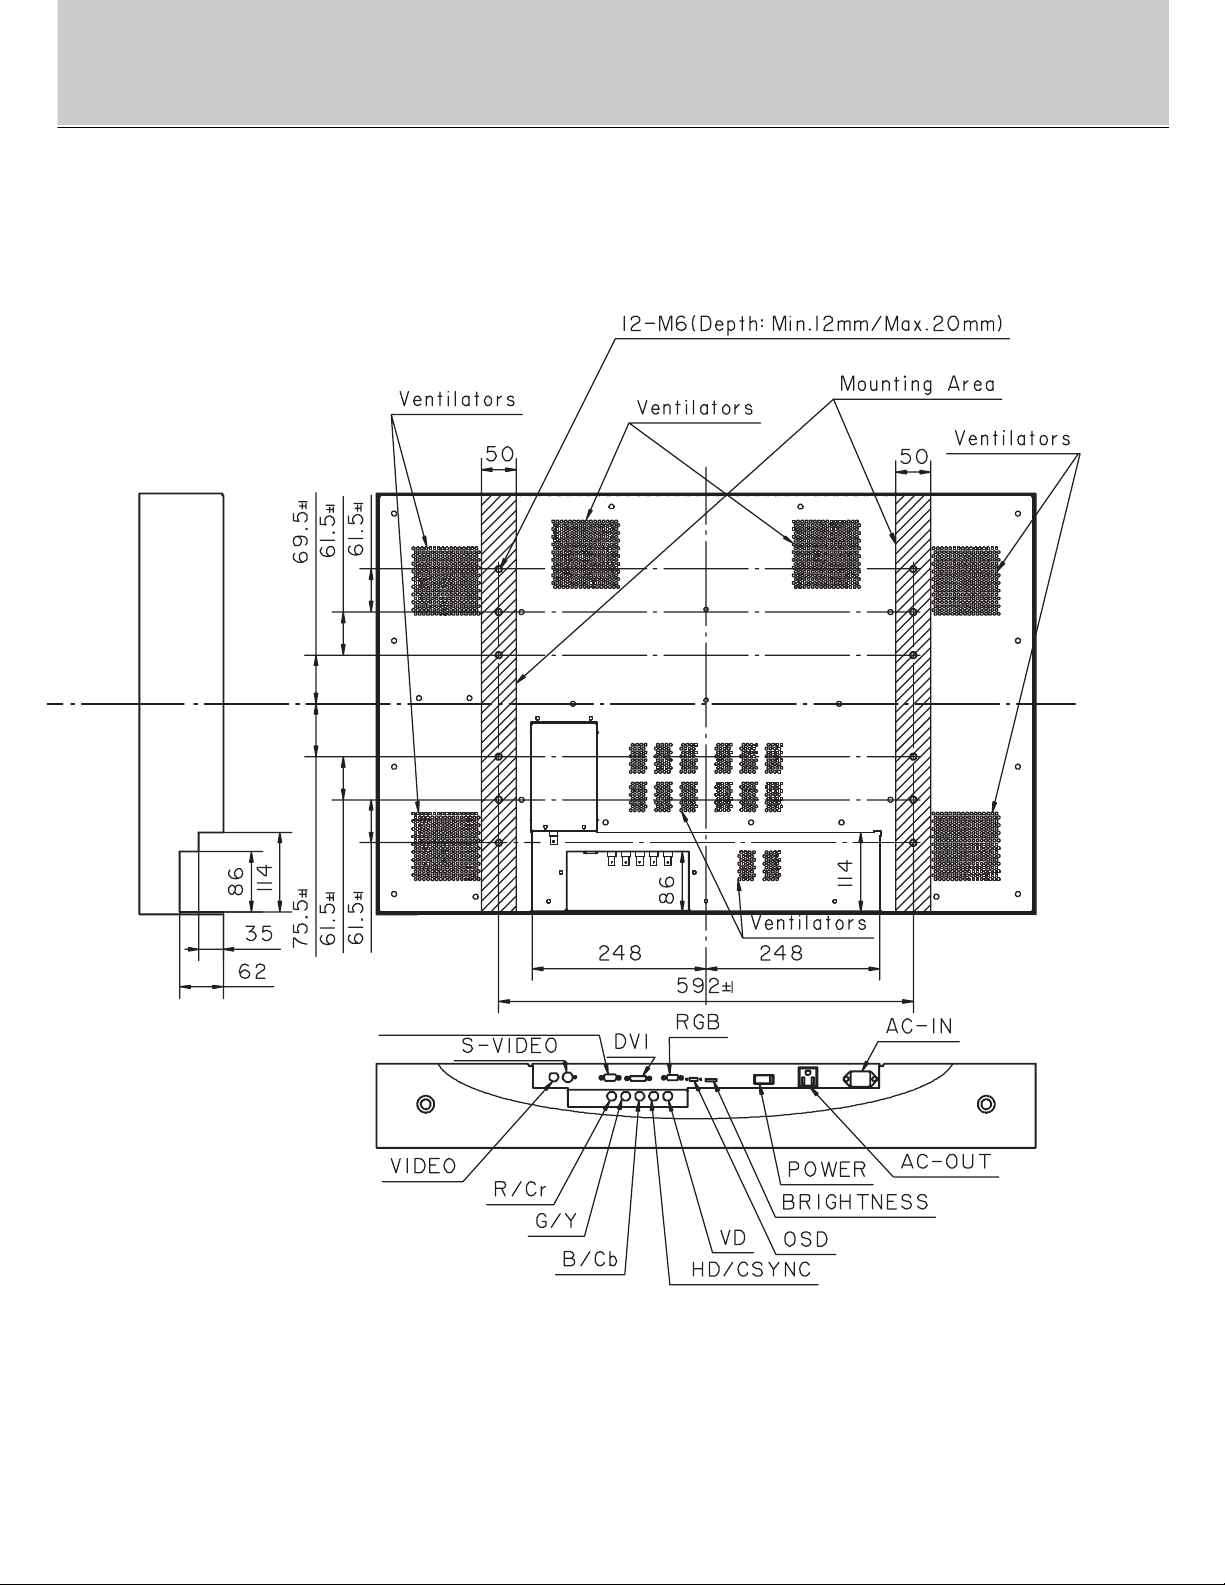
6
EXTERNAL CONTROL
Page 8
7
Before First Use
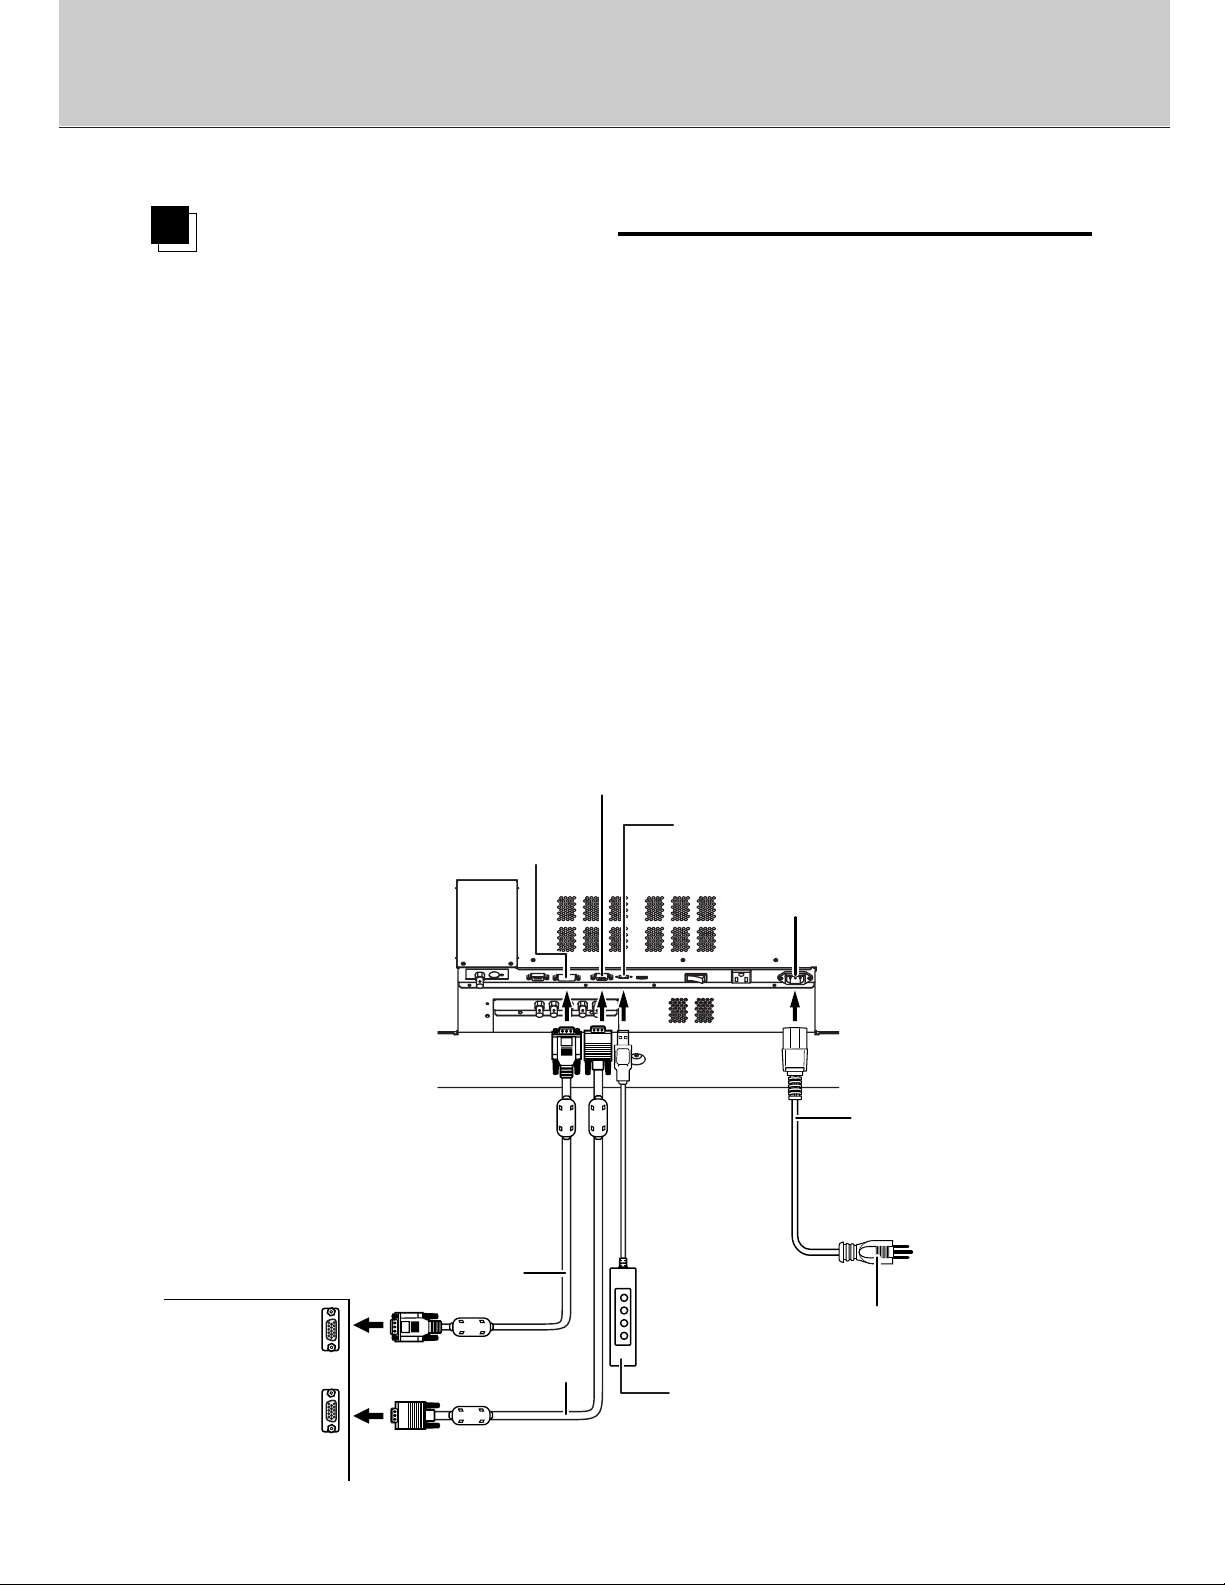
Installation
AC-IN
External OSD
Connector
External OSD Control Box
Power Plug
AC Power Cord
DVI Connector
RGB Connector
DVI Cable
(not included)
RGB Cable
Connect to the
computer’s
connectors
Connect the Computers
Before doing anything, make sure the Power Switch on the monitor and a computer are
turned off.
1
Plug the cable(s) into the connector on the monitor securely and fix
them in place with two screws (each).
2
Plug the other end of the cable(s) into the connector on a computer.
3
Plug the AC Power Cord into the AC-IN on the monitor.
4
Plug the Power Plug into an outlet.
5
Plug the External OSD Control Box if necessary.
6
Switch on the monitor before starting up a computer.
Page 9
8
¡
Do not plug the External OSD Control Box into the computer's USB port, as this may
cause malfunction of the computer.
¡When connecting a DVI Cable, be sure to use a DVI Cable with cores on the
market. If not, interference may happern to peripherals aside.
¡When
multiple video cables are connected to the monitor. It is necessary to connect
OSD Control Box to switch display signal
(see page 11).
Caution
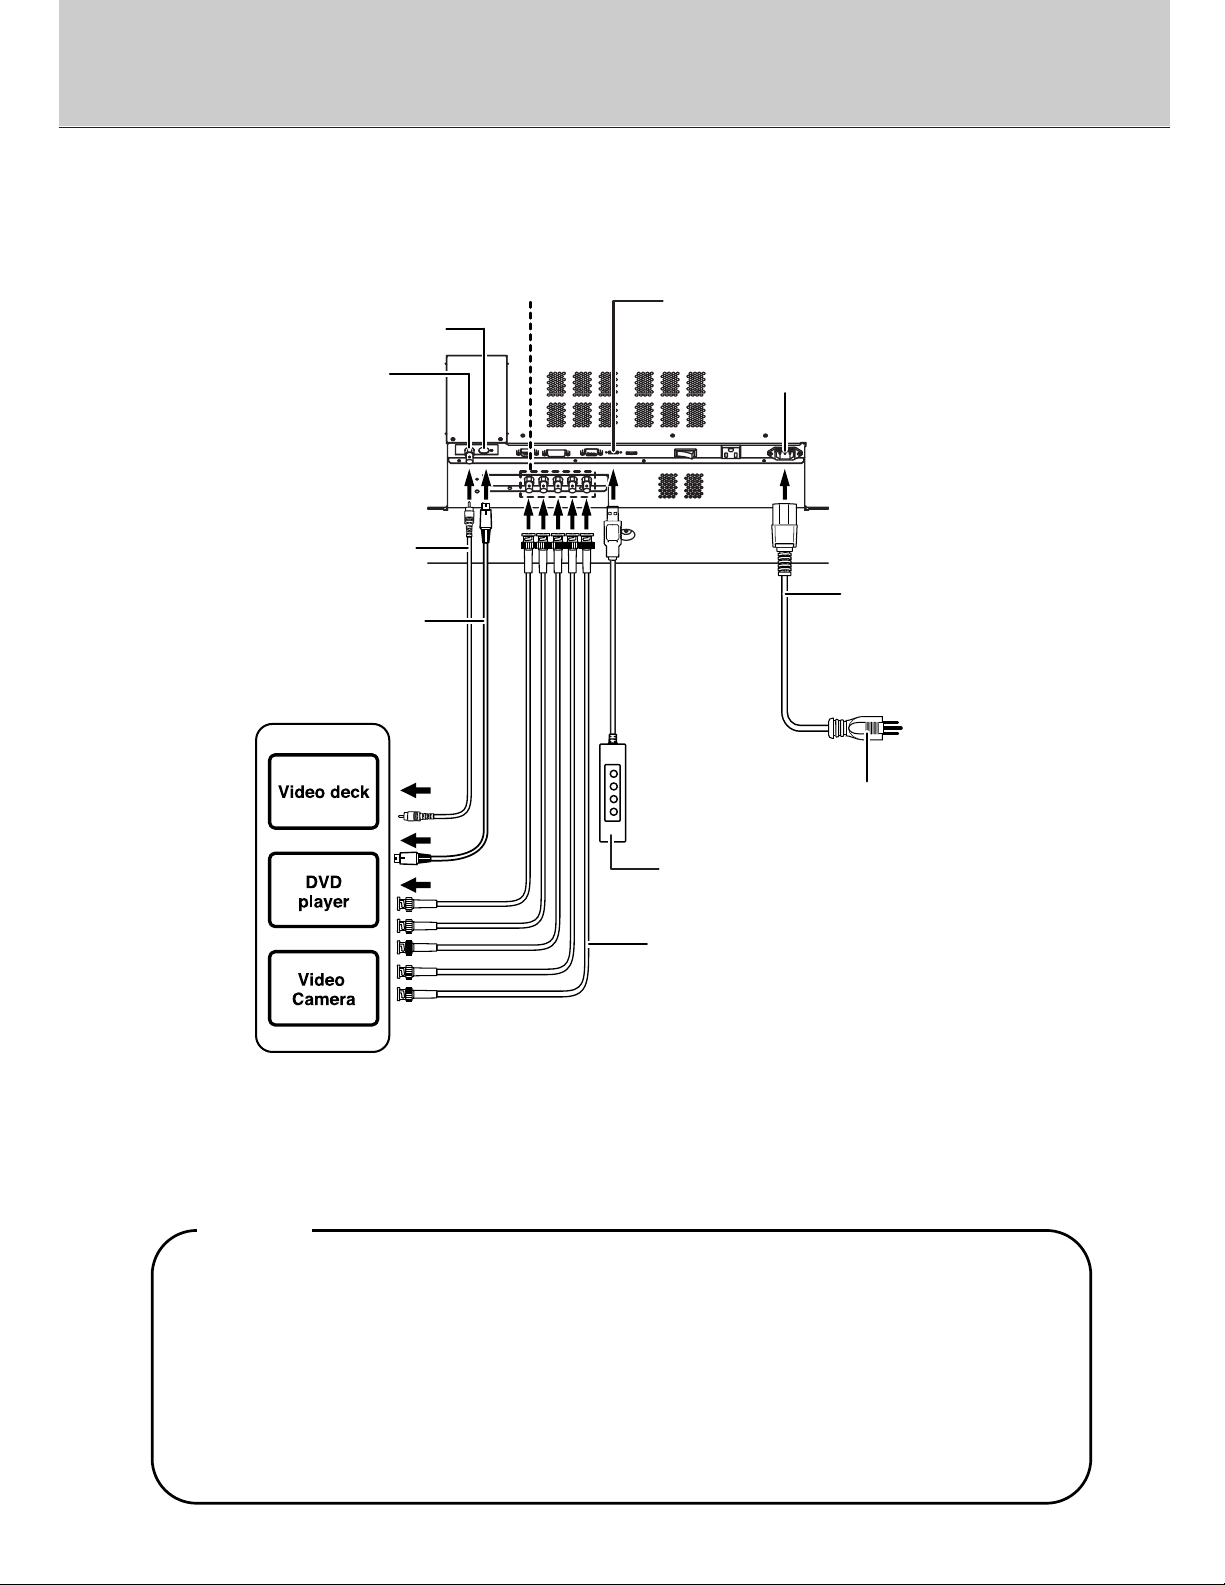
Connect the Video deck, DVD player etc.
Turn off the power for the monitor and AV equipment before the connection.
1
Plug the cable(s) into the connector on the monitor securely.
2
Plug the other end of the cable(s) into the connector on AV
equipment.
3
Plug the AC Power Cord into the AC-IN on the monitor.
4
Plug the Power Plug into an outlet.
5
Plug the External OSD Control Box if necessary.
6
Switch on the monitor before starting up AV equipment.
*Continued to next page.
Page 10
9
Before First Use
Installation
AC-IN
External OSD Connector
S-Video Cable
(not included)
AV Equipments
Video Cable
(not included)
Composite
Video Connector
S-Video
Connector
Component Video Terminal
and
BNC Terminal
External OSD Control Box
Power Plug
AC Power Cord
G/Y
B/Cb
HD/CSYNC
VD
R/Cr
Component Video Cable
(not included)
etc.
¡For S-Video Cable, Video Cable and Component Video Cable, please use the
cables on the market or ones come with AV equipments.
¡For clearer picture, using S-Video Cable is recommended compared with
Composite Video. When an equipment has S-Video output, please use SVideo Cable.
¡When several input cables are connected at once, it is necessary to connect
OSD Control Box to switch the screen (see page 11).
NOTE
Page 11
10
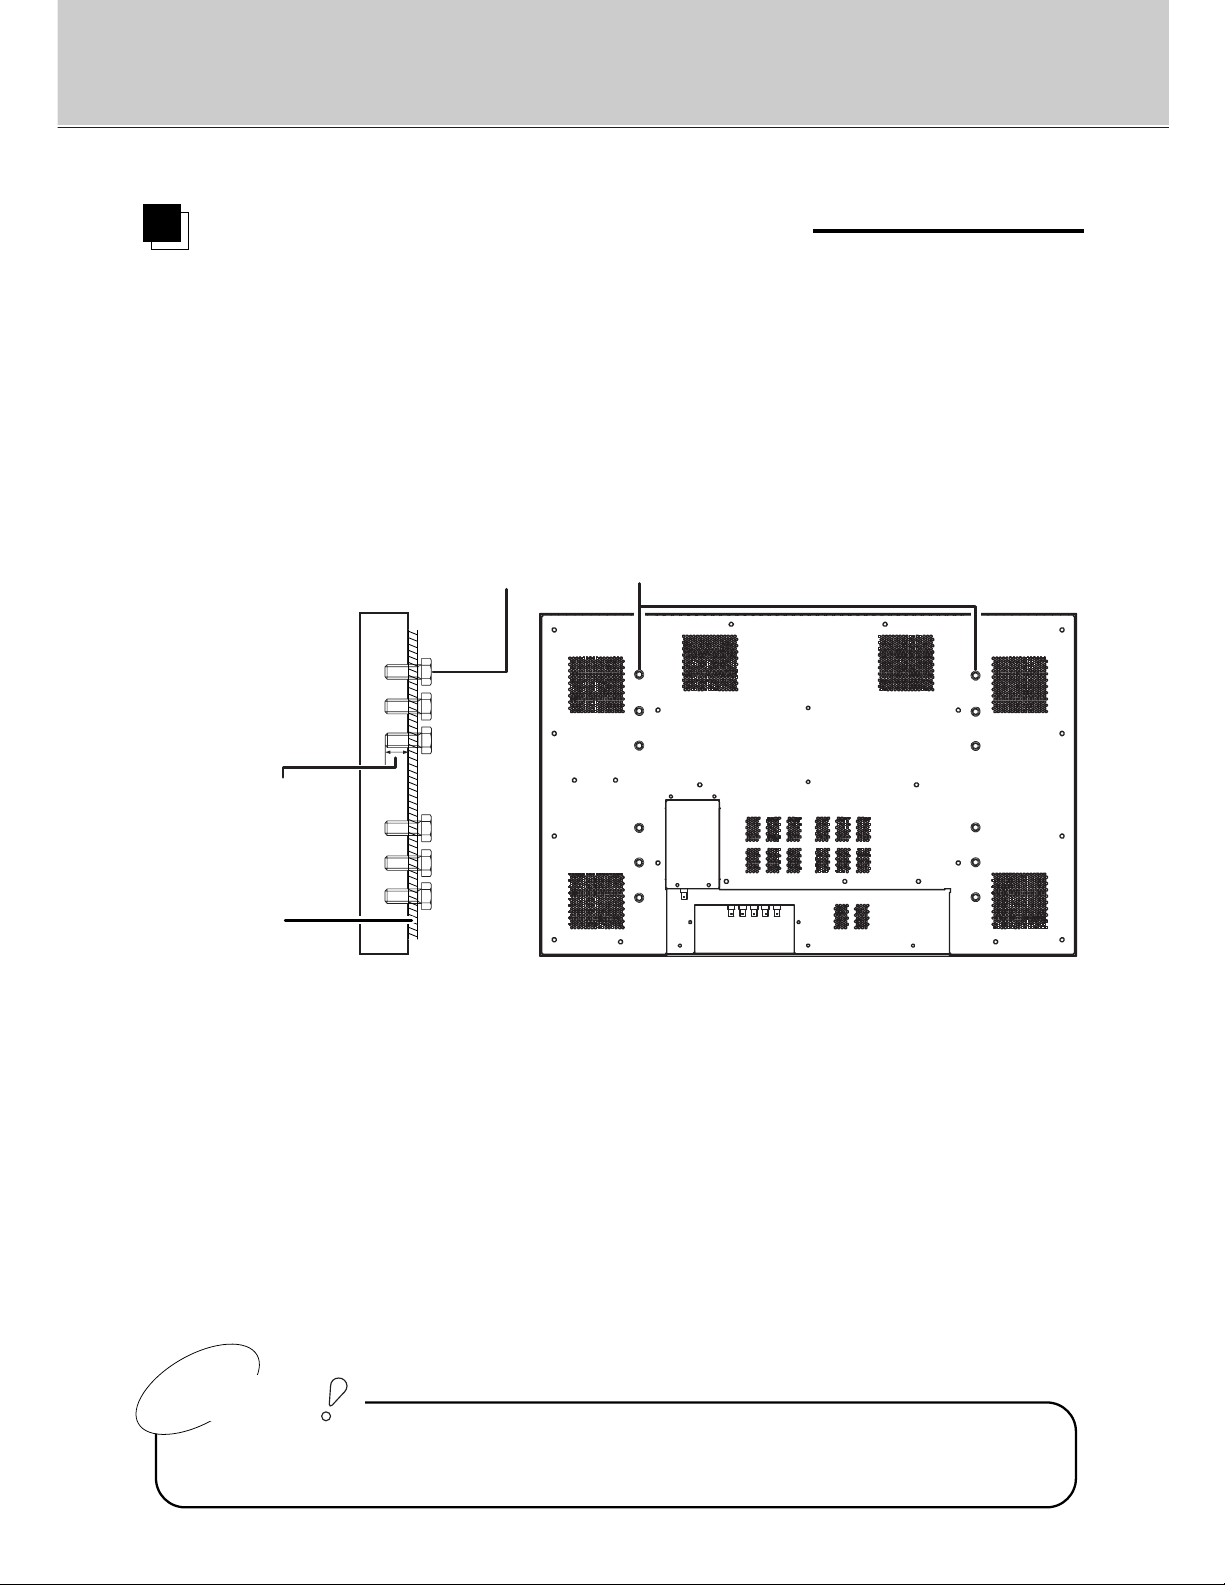
How to secure the monitor on a wall
Note: The following figure is only recommended.
Never cover the rear ventilators with cloth or something.
Secure enough space more than 30mm from the rear part of the monitor.
M6 bolt (12 places)
Side view of the monitor
Rear view of the monitor
Bracket
(not included)
Depth: Min. 12mm
Max. 20mm
UP
b
Caution
Page 12
11
LCD Monitor Instructions
Adjusting the Screen
This LCD monitor decodes the signal from a computer
automatically, and displays the image on a screen in
accordance with the preset mode. Unless a display
mode has been in preset table, the image is displayed
under the similar mode in preset table. In this case, the
adjustment for this LCD monitor must be done in
accordance with a computer connected with. Please
follow the OSD (On Screen Display) menu to adjust
screen settings.
Picture Menu (refer to page 17-21)
Adjustment Items for computer screen
BRIGHTNESS
‥
‥ ‥ ‥ ‥ ‥ ‥ ‥ ‥
Adjust the brightness for the screen
CONTRAST
‥ ‥ ‥ ‥ ‥ ‥ ‥ ‥ ‥
Adjust the contrast for the screen
H POSITION
‥ ‥ ‥ ‥ ‥ ‥ ‥ ‥ ‥
Adjust the horizontal position for the screen
V POSITION
‥ ‥ ‥ ‥ ‥ ‥ ‥ ‥ ‥
Adjust the vertical position for the screen
PHASE
‥ ‥ ‥ ‥ ‥ ‥ ‥ ‥ ‥ ‥ ‥
Adjust the phase for the screen
FREQUENCY
‥ ‥ ‥ ‥ ‥ ‥ ‥ ‥
Adjust the horizontal width for the screen
SCALING
‥ ‥ ‥ ‥ ‥ ‥ ‥ ‥ ‥ ‥
Scale the screen
Note
H position, v position, phase and frequency for the screen can be adjusted in Analog
mode only.
Name / Function of Buttons for Adjustment
[MENU] Button To display the OSD menu and step back to the screen
selected before
[ENTER] Button To select the item you wish to adjust
[ ] [ ] Button To move the cursor between the items adjusted and
change the adjustment data
Advanced Menu (refer to page 21-23)
COLOR
‥ ‥ ‥ ‥ ‥ ‥ ‥ ‥ ‥ ‥ ‥
Adjust the color temperature for the screen
USER RED
‥ ‥ ‥ ‥ ‥ ‥ ‥ ‥ ‥
Adjust the level of red for the screen
USER GREEN
‥ ‥ ‥ ‥ ‥ ‥ ‥ ‥
Adjust the level of green for the screen
USER BLUE
‥ ‥ ‥ ‥ ‥ ‥ ‥ ‥ ‥
Adjust the level of blue for the screen
Page 13

12
Adjustment Items
Pip(picture in picture) Menu (refer to page 23-28)
SIZE
‥ ‥ ‥‥‥‥‥‥‥‥‥‥
Select the size of pip
POS
‥ ‥ ‥‥‥‥‥‥‥‥‥‥
Select the position of pip
SOURCE
‥ ‥ ‥ ‥ ‥ ‥ ‥ ‥ ‥ ‥
Change the input signal
BRIGHTNESS
‥ ‥ ‥ ‥ ‥ ‥ ‥ ‥
Adjust the brightness of pip
CONTRAST
‥ ‥ ‥ ‥ ‥ ‥ ‥ ‥ ‥
Adjust the contrast of pip
COLOR
‥ ‥ ‥ ‥ ‥ ‥ ‥ ‥ ‥ ‥ ‥
Adjust the color of pip
TINT
‥ ‥ ‥‥‥‥‥‥‥‥‥‥
Adjust the tint of pip
SHARPNESS
‥ ‥ ‥ ‥ ‥ ‥ ‥ ‥
Adjust the sharpness of pip
Note
BRIGHTNESS, CONTRAST, COLOR, TINT and SHARPNESS for pip can be adjusted
when inputting Composite Video or S-Video signal and also selecting [small] or
[medium] or [large] in [size] menu.
Adv pip(Advanced picture in picture) Menu (refer to page 29,30)
H POSITION
‥ ‥ ‥ ‥ ‥ ‥ ‥ ‥ ‥
Select the horizontal position of pip
V POSITION
‥ ‥ ‥ ‥ ‥ ‥ ‥ ‥ ‥
Select the vertical position of pip
VIDEO FORMAT
‥ ‥ ‥ ‥ ‥ ‥ ‥
Select the video format (ntsc/pal/secam)
Options Menu (refer to page 31-33)
OSD
‥ ‥ ‥‥‥‥‥‥‥‥‥‥
Select the osd position
LANGUAGE
‥ ‥ ‥ ‥ ‥ ‥ ‥ ‥ ‥
Select language used in osd
AUTO ADJUST
‥ ‥ ‥ ‥ ‥ ‥ ‥
Adjust the screen automatically
RESOLUTION
‥ ‥ ‥ ‥ ‥ ‥ ‥ ‥
Display the resolution of the screen
INTERNAL FIRMWARE
‥ ‥ ‥ ‥
Display the osd version
Utilities Menu (refer to page 34,35)
OSD TIMEOUT
‥ ‥ ‥ ‥ ‥ ‥ ‥ ‥
Change the osd timeout
OSD BACKGROUND
‥ ‥ ‥ ‥ ‥
Select the osd background
RESET
‥ ‥ ‥ ‥ ‥ ‥ ‥ ‥ ‥ ‥ ‥
Delete the data saved at the current display
mode
Note
Adv pip Menu can be used when inputting Composite Video or S-Video signal and also
selecting [small] or [medium] or [large] in [size] menu.
Page 14
13
LCD Monitor Instructions
Adjustment Items
Picture Menu (refer to page 36-41)
BRIGHTNESS
‥ ‥ ‥ ‥ ‥ ‥ ‥ ‥
Adjust the brightness for video screen
CONTRAST
‥ ‥ ‥ ‥ ‥ ‥ ‥ ‥ ‥
Adjust the contrast for video screen
H POSITION
‥ ‥ ‥ ‥ ‥ ‥ ‥ ‥ ‥
Adjust the horizontal position for video screen
V POSITION
‥ ‥ ‥ ‥ ‥ ‥ ‥ ‥ ‥
Adjust the vertical position for video screen
COLOR
‥ ‥ ‥ ‥ ‥ ‥ ‥ ‥ ‥ ‥ ‥
Adjust the color for video screen
TINT
‥ ‥ ‥‥‥‥‥‥‥‥‥‥
Adjust the tint for video screen
SHARPNESS
‥ ‥ ‥ ‥ ‥ ‥ ‥ ‥
Adjust the sharpness for video screen
SCALING
‥ ‥ ‥ ‥ ‥ ‥ ‥ ‥ ‥ ‥
Scale the video screen
Advanced Menu (refer to page 42-44)
COLOR
‥ ‥ ‥ ‥ ‥ ‥ ‥ ‥ ‥ ‥ ‥
Adjust the color temperature for video screen
USER RED
‥ ‥ ‥ ‥ ‥ ‥ ‥ ‥ ‥
Adjust the level of red for video screen
USER GREEN
‥ ‥ ‥ ‥ ‥ ‥ ‥ ‥
Adjust the level of green for video screen
USER BLUE
‥ ‥ ‥ ‥ ‥ ‥ ‥ ‥ ‥
Adjust the level of blue for video screen
Adjustment Items for Composite Video, S-Video and
Component Video screen
Options Menu (refer to page 45,46)
OSD
‥ ‥ ‥‥‥‥‥‥‥‥‥‥
Select the osd position
LANGUAGE
‥ ‥ ‥ ‥ ‥ ‥ ‥ ‥ ‥
Select language used in osd
INTERNAL FIRMWARE
‥ ‥ ‥ ‥
Display the osd version
Utilities Menu (refer to page 47,48)
OSD TIMEOUT
‥ ‥ ‥ ‥ ‥ ‥ ‥ ‥
Change the osd timeout
OSD BACKGROUND
‥ ‥ ‥ ‥ ‥
Select the osd background
RESET
‥ ‥ ‥ ‥ ‥ ‥ ‥ ‥ ‥ ‥ ‥
Delete the data saved at the current display
mode
Video Menu (refer to page 44)
VIDEO FORMAT
‥ ‥ ‥ ‥ ‥ ‥ ‥
Select the video format (ntsc/pal/secam)
Page 15
14
You can change or indicate the signal input type following the steps.
Change or indicate the input signal
1.
While the OSD (On Screen Display) is not displayed, it is possible
to change or indicate the current mode.
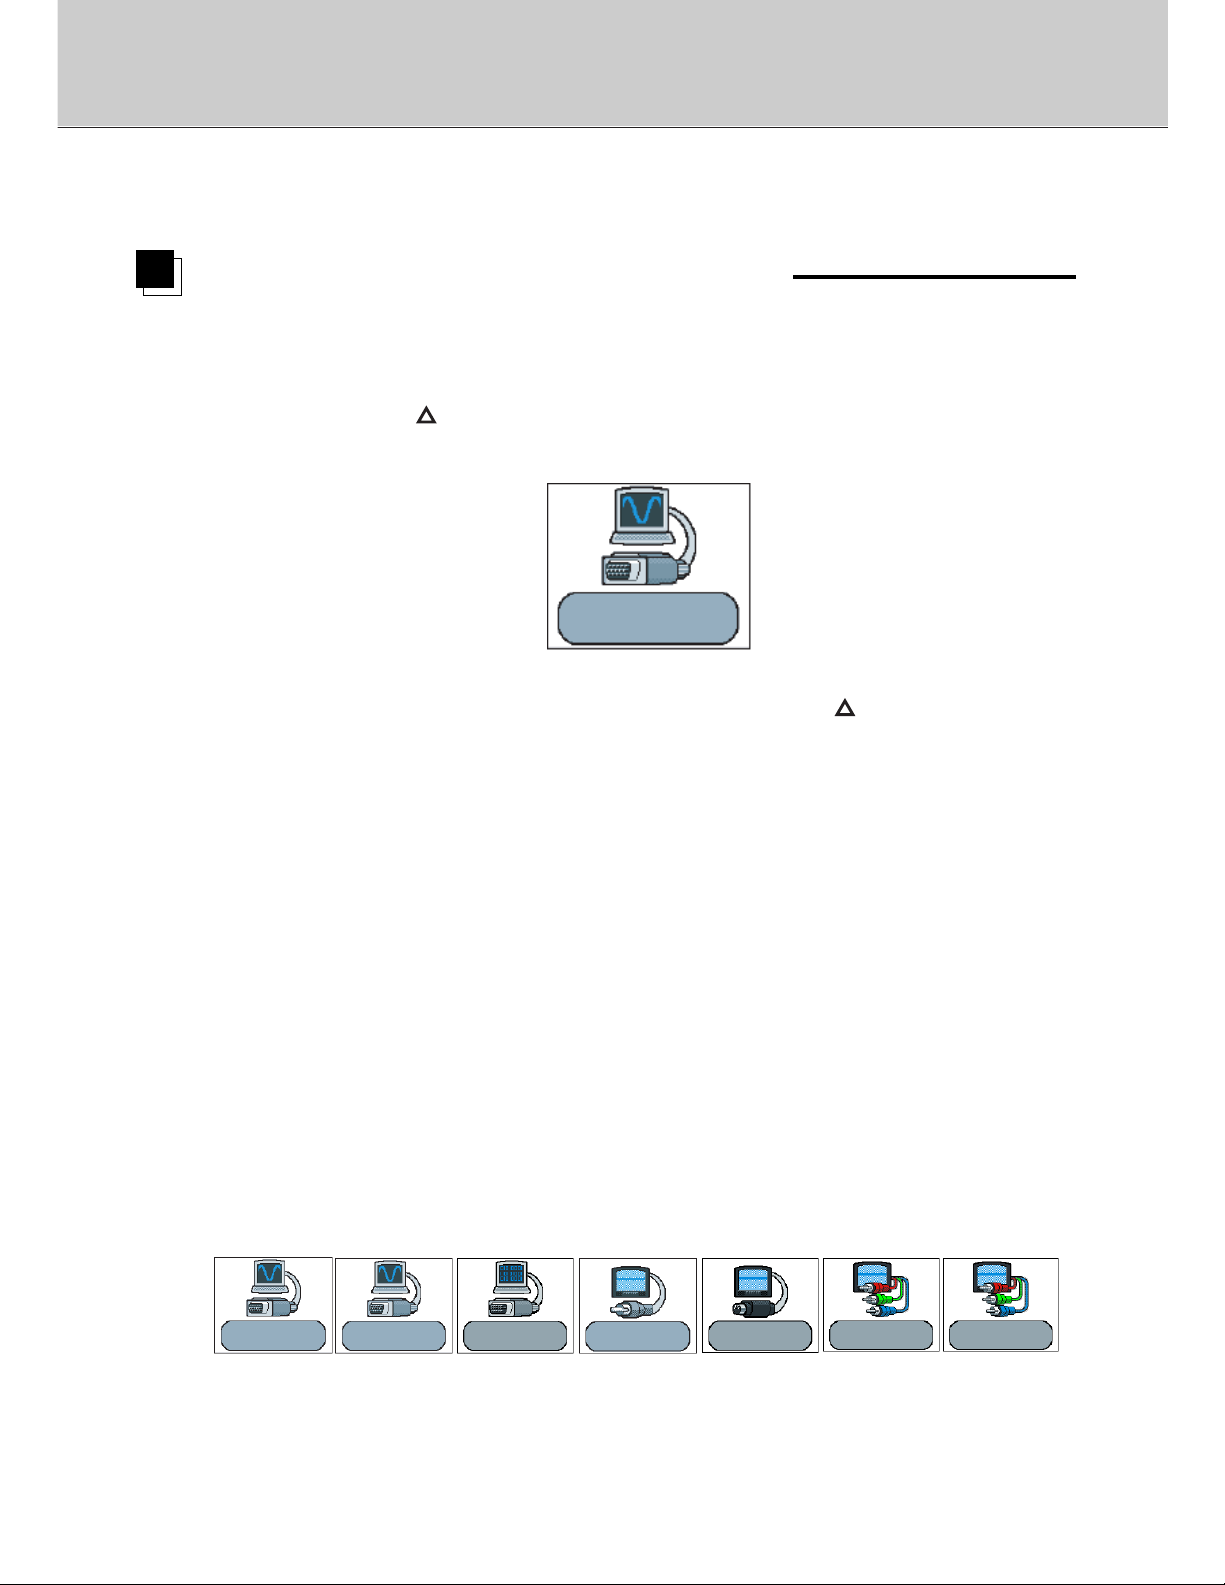
Press the [ ] button to indicate the current mode in the lower right
corner of the screen.
Analog RGB1
Mode: 88
1024 x 768 / 75 Hz
(Ex.)
2. While displaying the current mode, press the [ ] button again.
Start searching another mode according to the order [Analog RGB1] /
[Analog RGB2] / [Digital RGB] / [Composite Video] / [S-Video] /
[Component Video] / [RGB + C Sync] in sequence.
[Analog RGB1] / Switch to the signal from RGB terminal.
[Analog RGB2] / Switch to the signal from R/G/B/HD/VD terminal.
[Digital RGB] / Switch to the signal from DVI terminal.
[Composite Video] / Switch to the signal from Composite Video terminal.
[S-Video] / Switch to the signal from S-Video terminal.
[Component Video] / Switch to the signal from Cr/Y/Cb terminal.
[RGB + C Sync] / Switch to the signal from R/G/B/C SYNC terminal.
•
Every time the input signal is searched, display the searched and stop
searching picture.
• The current mode is indicated for each input signal type as follows:
Analog RGB1
Mode: 88
1024 x 768 / 75 Hz
Component Video
NTSC 60Hz/3.58MHz
RGB + C Sync
NTSC 60Hz/3.58MHz
Digital RGB
Mode: 88
1024 x 768 / 75 Hz
S-Video
NTSC 60Hz/3.58MHz
Analog RGB2
Mode: 88
1024 x 768 / 75 Hz
Composite Video
NTSC 60Hz/3.58MHz
Mode
Page 16
15
LCD Monitor Instructions
Adjustment Procedure
1
Display the Windows or other screen
After a computer is connected with this LCD Monitor, activate a computer and
then shows a bright screen on this LCD Monitor. It might not be possible to adjust
the screen correctly for a dark screen.
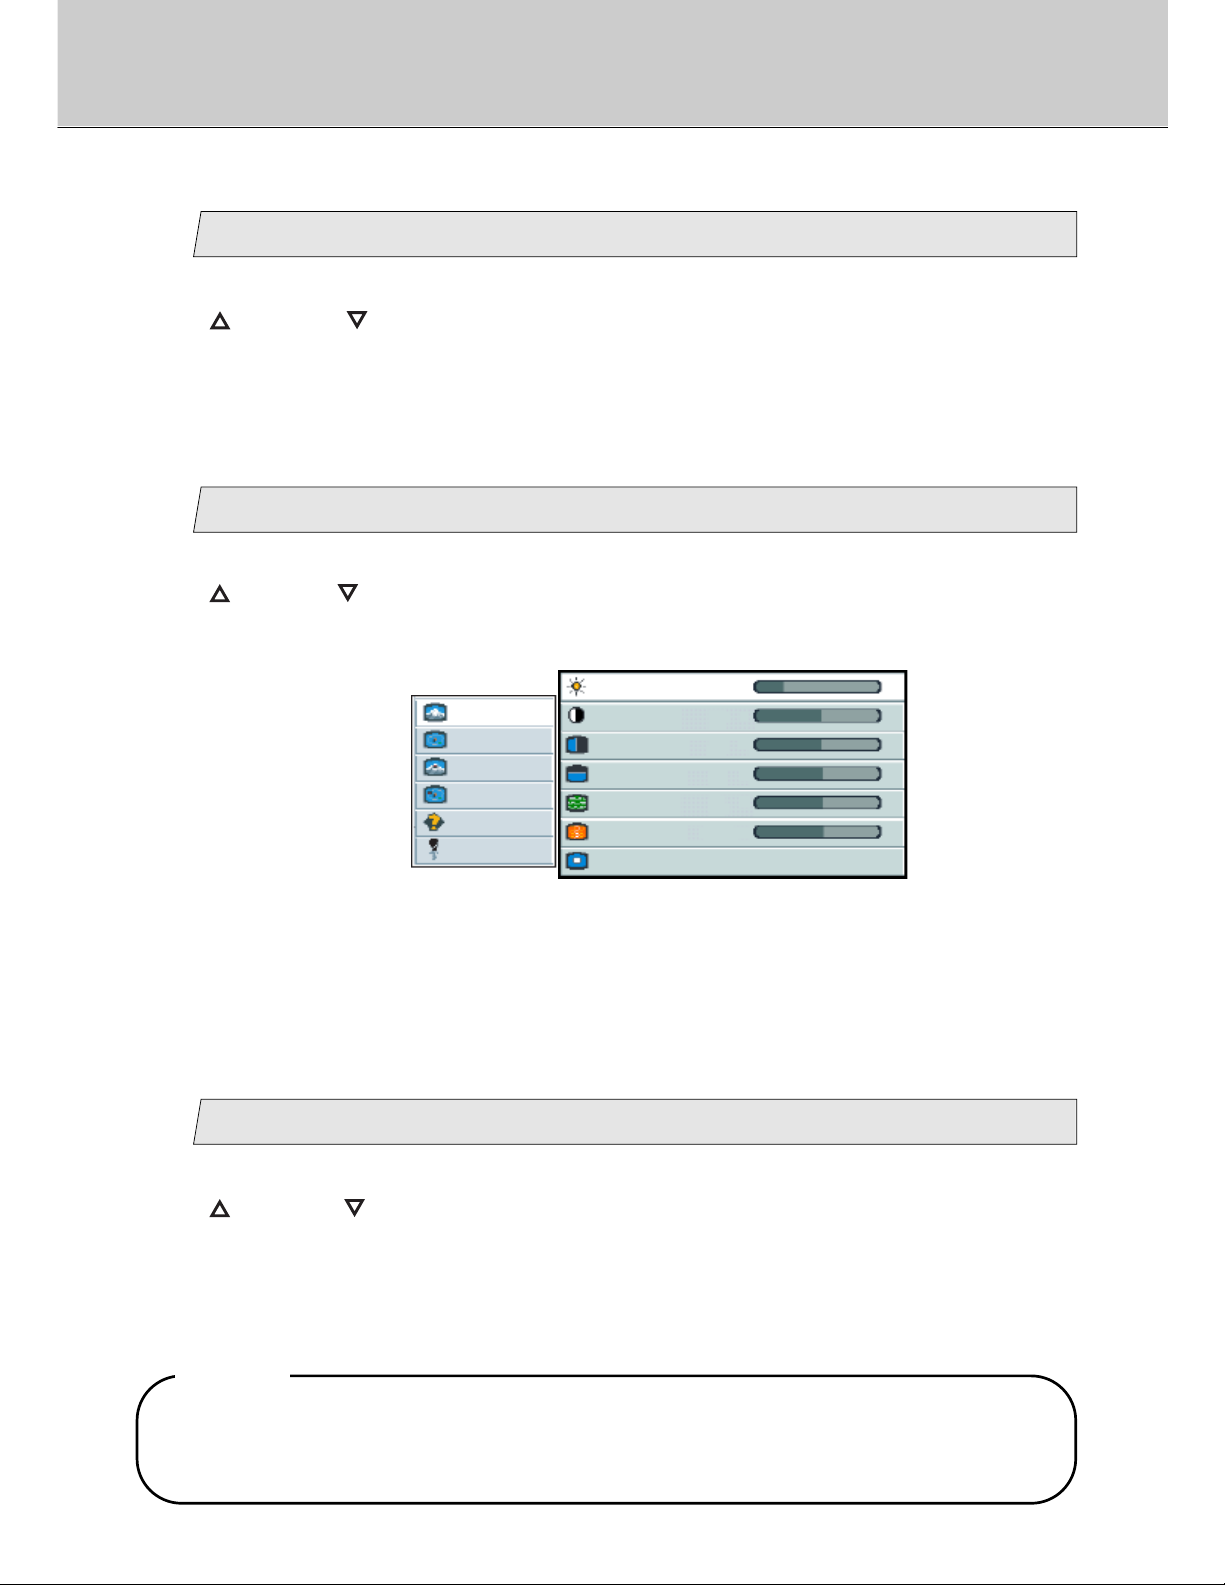
Display the OSD (On Screen Display) Menu
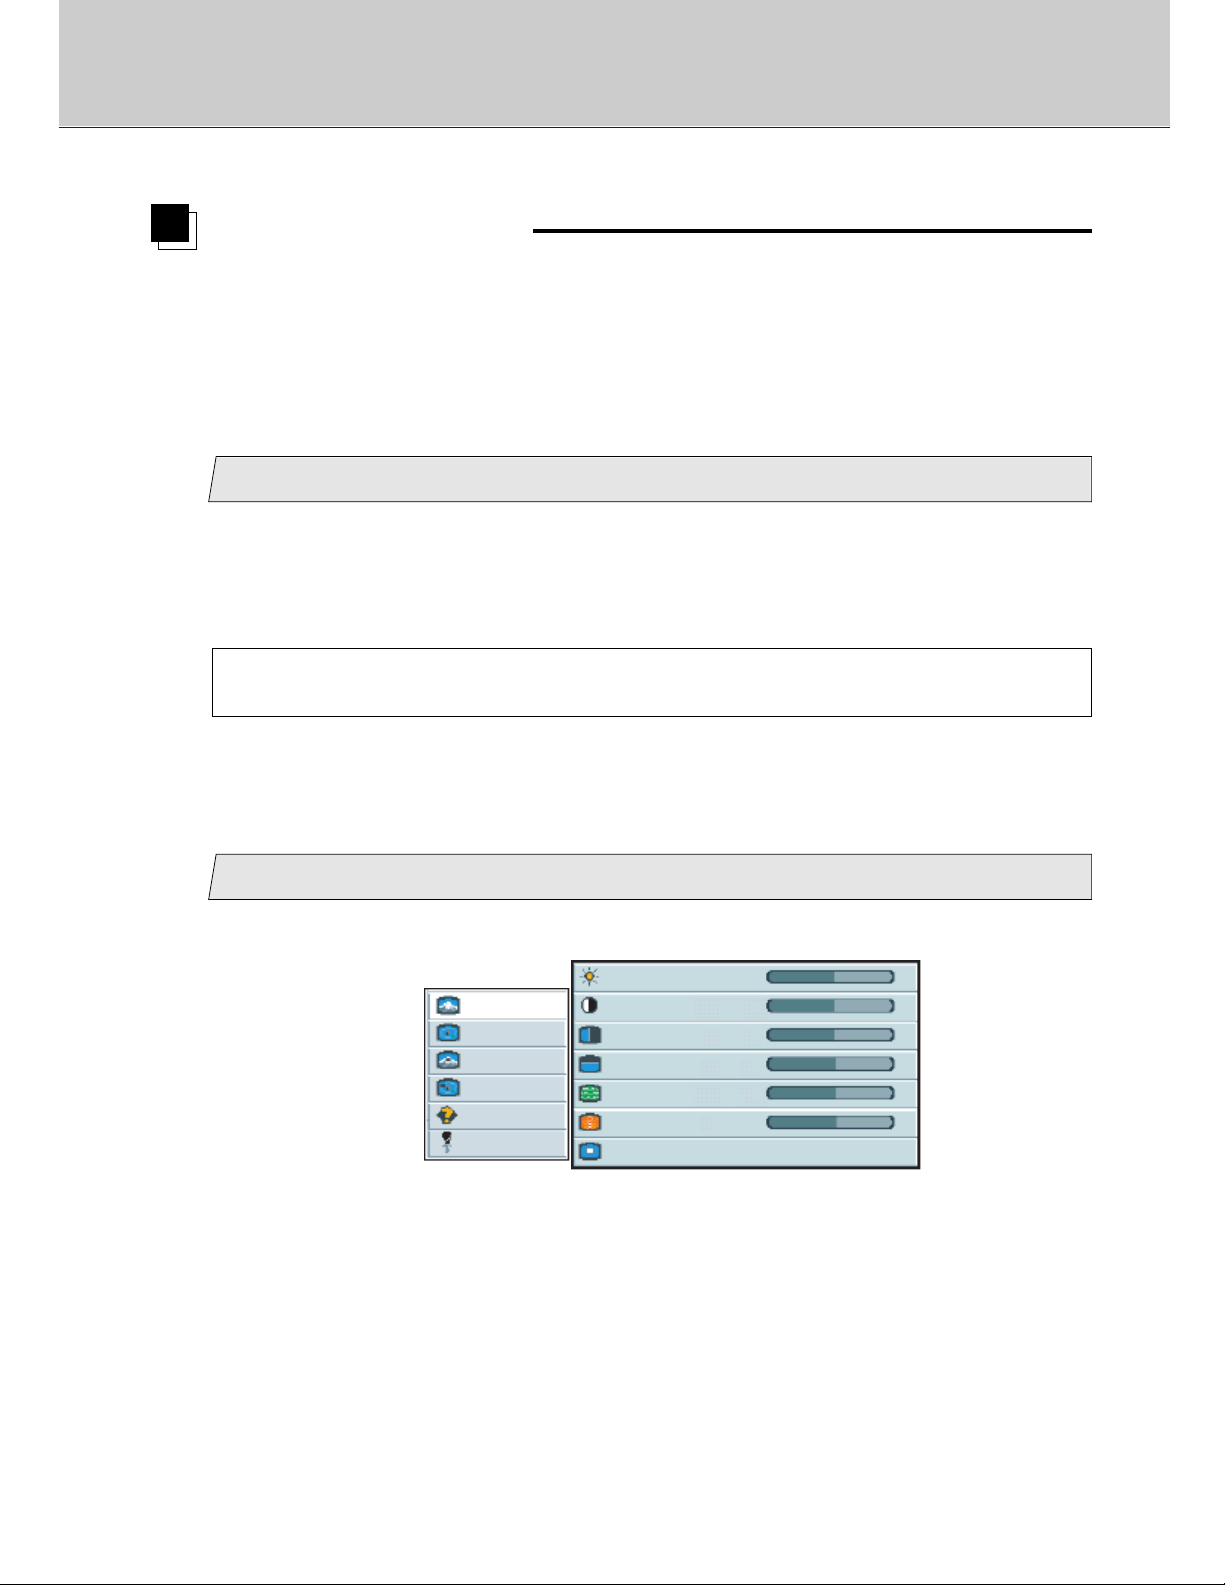
Press the [MENU] button to display the following menu.
For DOS mode, run an application that shows the edges of the screen (edit
etc.) to adjust screen.
Before Adjustment
picture
advanced
pip
adv pip
options
utilities
Main menu
(Ex.)
Sub menu
brightness
50
-
+
contrast
50
-
+
H position
50
-
+
V position
50
-
+
phase
15
-
+
1056
frequency
-
+
scaling Wide
The signal timing for a computer which this LCD monitor supports is listed in "Table of
Preset Data" on Page 55, the recommended value of Vertical Frequency for this model
is 60Hz. (Unlike CRT Monitors, the display becomes stable when Vertical Frequency is
low.) It is recommend to set Vertical Frequency of a computer connected at 60Hz by
"refresh rate setting" before starting adjustment procedure.
• To leave the Main menu, press the [MENU] button again.
2
Page 17
16
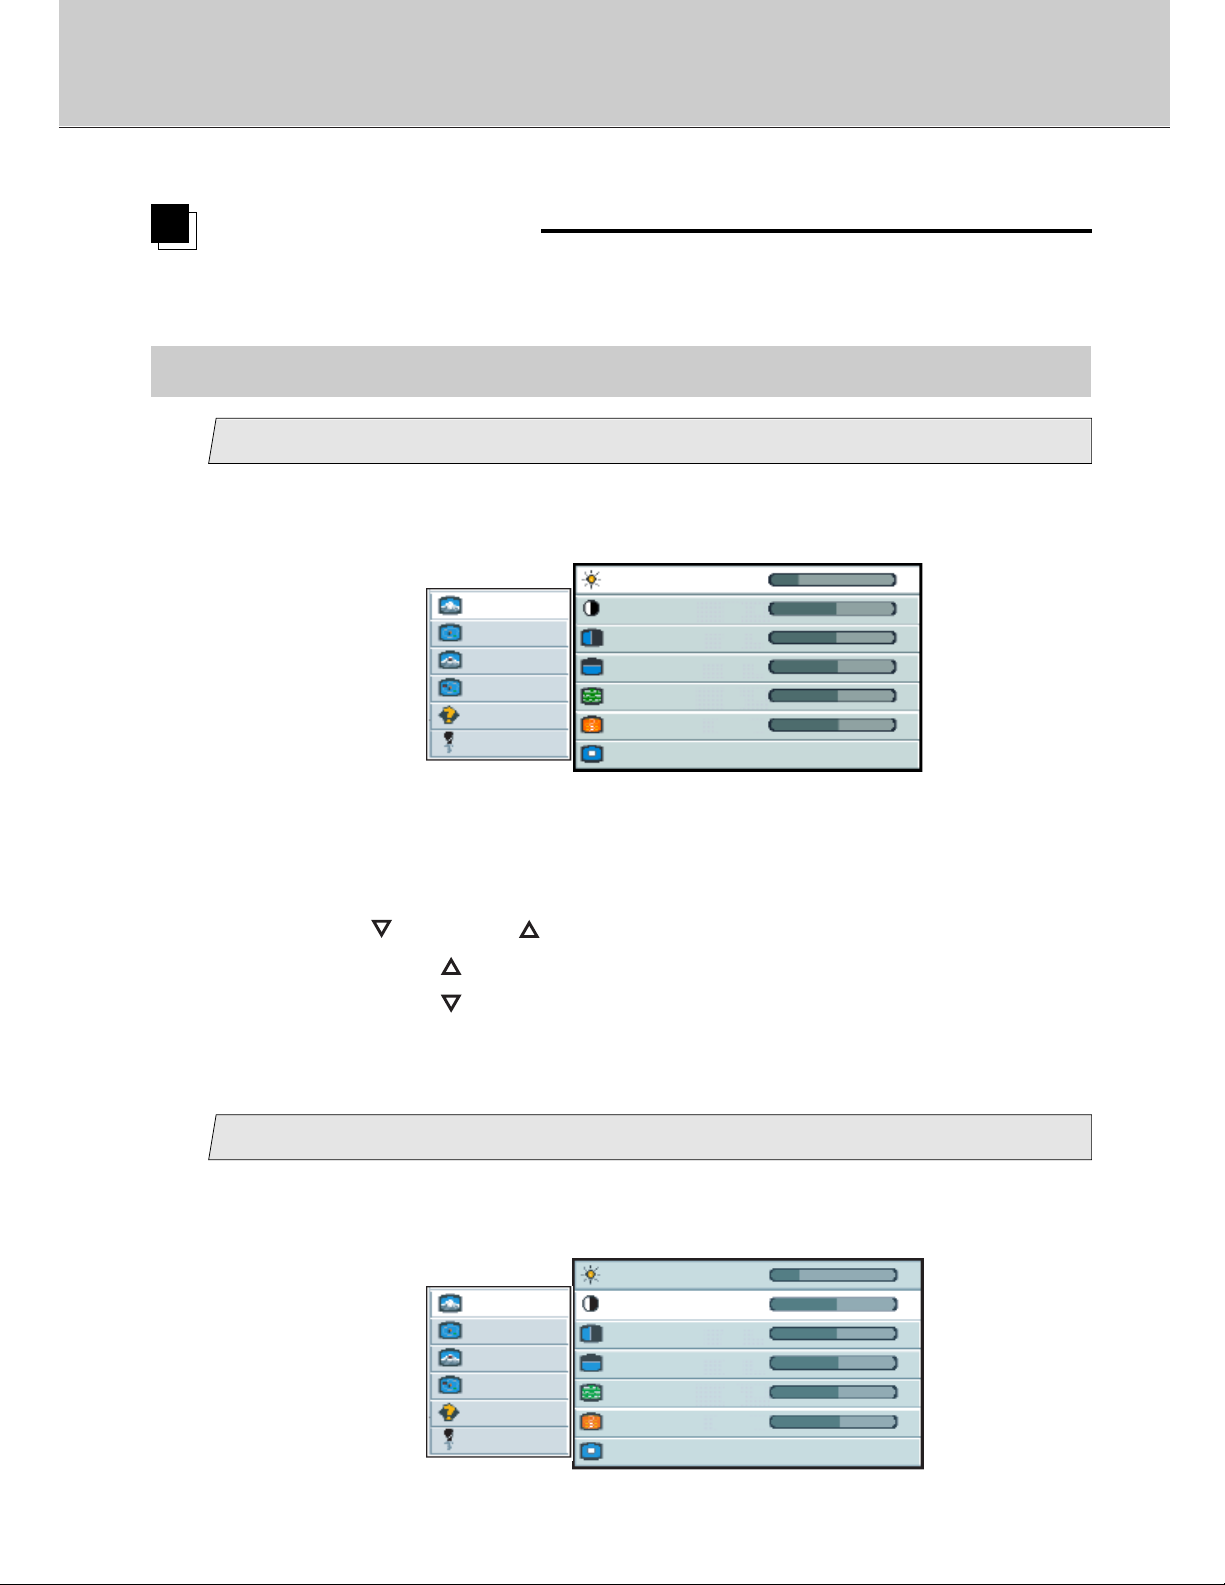
• To select another item on the Sub menu, press the [MENU] button.
Adjustment or Setting
For each item selected, the adjustment/setting has been made by pressing the
[ ] and/or [ ] button. This monitor saves adjusted value at intervals of about
5 seconds. Do not turn off the monitor for at the least 5 seconds after adjustment
or setting. (The detail steps for each item are described in the page 17-48)
5
picture
advanced
pip
adv pip
options
utilities
Main menu
(Ex.)
Sub menu
brightness
25
-
+
contrast
50
-
+
H position
50
-
+
V position
50
-
+
phase
15
-
+
1056
frequency
-
+
scaling Wide
Select the item to be adjusted on the Main Menu
Select the item to be adjusted by moving the cursor on the Main menu with the
[ ] and/or [ ] button and then press the [ENTER] button. You can see the
cursor moving to the Sub menu.
Select the item to be adjusted on the Sub Menu
Select the item to be adjusted by moving the cursor on the Sub menu with the
[ ] and/or [ ] button and then press the [ENTER] button.
• The selected item turns blue and then it is possible to control the item.
3
4
In case that Composite Video, S-Video and Component Video cables are
connected, each adjustment procedure needs to be done for Composite Video,
S-Video and Component Video, separately.
NOTE
Page 18
17
LCD Monitor Instructions
Adjustment Procedure (Picture Menu)
A. Picture Menu
If you wish to adjust the screen finely or in case the result adjusted by Auto Adjust (see
page 32) sequence is not sufficient enough, adjust the screen manually.
Adjust the brightness
1
1. Select [picture] on the Main menu and press the [ENTER] button.
You can see the cursor moving to the Sub menu.
Manual Adjustment
picture
advanced
pip
adv pip
options
utilities
Main menu
(Ex.)
Sub menu
brightness
25
-
+
contrast
50
-
+
H position
50
-
+
V position
50
-
+
phase
15
-
+
1056
frequency
-
+
scaling Wide
2. Select [brightness] on the Sub menu and press the [ENTER] button.
The selected item of [brightness] turns blue.
3. Use the [ ] and/or [ ] button to adjust. (Interval: 0~100)
By pressing the [ ] button, the whole screen is brighter.
By pressing the [ ] button, the whole screen is darker.
Adjust the contrast
2
1. Select [picture] on the Main menu and press the [ENTER] button.
You can see the cursor moving to the Sub menu.
picture
advanced
pip
adv pip
options
utilities
Main menu
(Ex.)
Sub menu
brightness
25
-
+
contrast
50
-
+
H position
50
-
+
V position
50
-
+
phase
15
1056
-
+
frequency
-
+
scaling Wide
Page 19

18
2. Select [contrast] on the Sub menu and press the [ENTER] button.
The selected item of [contrast] turns blue.
3. Use the [ ] and/or [ ] button to adjust. (Interval: 0~100)
By pressing the [ ] button, the contrast (difference between bright and dark)
becomes darker.
By pressing the [ ] button, the contrast (difference between bright and dark)
becomes lighter.
Adjust the horizontal position (Analog mode only)
3
1. Select [picture] on the Main menu and press the [ENTER] button.
You can see the cursor moving to the Sub menu.
2. Select [H position] on the Sub menu and press the [ENTER] button.
The selected item of [H position] turns blue.
3. Use the [ ] and/or [ ] button to adjust. (Interval: 0~100)
Press the [ ] button to shift the screen to the right.
Press the [ ] button to shift the screen to the left.
picture
advanced
pip
adv pip
options
utilities
Main menu
(Ex.)
Sub menu
brightness
25
-
+
contrast
50
-
+
H position
50
-
+
V position
50
-
+
phase
15
1056
-
+
frequency
-
+
scaling Wide
Adjustment for computer screen
Page 20

19
LCD Monitor Instructions
Adjustment Procedure (Picture Menu)
3. Use the [ ] and/or [ ] button to adjust. (Interval: 0~100)
Press the [ ] button to shift the screen to the top.
Press the [ ] button to shift the screen to the bottom.
2. Select [V position] on the Sub menu and press the [ENTER] button.
The selected item of [V position] turns blue.
Adjust the vertical position (Analog mode only)
4
1. Select [picture] on the Main menu and press the [ENTER] button.
You can see the cursor moving to the Sub menu.
picture
advanced
pip
adv pip
options
utilities
Main menu
(Ex.)
Sub menu
brightness
25
-
+
contrast
50
-
+
H position
50
-
+
V position
50
-
+
phase
15
1056
-
+
frequency
-
+
scaling Wide
Adjust the phase (Analog mode only)
5
3. Use the [ ] and/or [ ] button to be able to display the small
characters clearly. (Interval: 0~31)
1. Select [picture] on the Main menu and press the [ENTER] button.
You can see the cursor moving to the Sub menu.
2. Select [phase] on the Sub menu and press the [ENTER] button.
The selected item of [phase] turns blue.
picture
advanced
pip
adv pip
options
utilities
Main menu
(Ex.)
Sub menu
brightness
25
-
+
contrast
50
-
+
H position
50
-
+
V position
50
-
+
phase
15
1056
-
+
frequency
-
+
scaling Wide
Page 21

20
Adjust the frequency (Analog mode only)
6
3. Use the [ ] and [ ] button to adjust.
By pressing the [ ] button, the horizontal width becomes wider.
By pressing the [ ] button, the horizontal width becomes narrower.
1. Select [picture] on the Main menu and press the [ENTER] button.
You can see the cursor moving to the Sub menu.
2. Select [frequency] on the Sub menu and press the [ENTER] button.
The selected item of [frequency] turns blue.
picture
advanced
pip
adv pip
options
utilities
Main menu
(Ex.)
Sub menu
brightness
25
-
+
contrast
50
-
+
H position
50
-
+
V position
50
-
+
phase
15
1056
-
+
frequency
-
+
scaling Wide
Adjust the scaling
7
1. Select [picture] on the Main menu and press the [ENTER] button.
You can see the cursor moving to the Sub menu.
2. Select [scaling] on the Sub menu and press the [ENTER] button.
The selected item of [scaling] turns blue.
picture
advanced
pip
adv pip
options
utilities
Main menu
(Ex.)
Sub menu
brightness
25
-
+
contrast
50
-
+
H position
50
-
+
V position
50
-
+
phase
15
1056
-
+
frequency
-
+
scaling Wide
*Continued to next page.
Adjustment for computer screen
Page 22

21
LCD Monitor Instructions
Adjustment Procedure (Picture Menu)
3. Use the [ ] and/or [ ] button to adjust.
When pressing the [ ] button, the scaling can be selected according to the
order [Wide] / [Normal] / [1:1] / [Wide] in sequence.
When pressing the [ ] button, the scaling order is scrolled in opposite to the
above order.
[Wide] / Display the input picture to the full wide.
[Normal] / Display the input picture with keeping an aspect
ratio on the whole screen.
[1:1] / Display the input picture with the aspect ratio 1:1.
The screen varies due to the selected resolution settings of connected PC
system.
Adjust the color temperature (Preset)
picture
advanced
pip
adv pip
options
utilities
Main menu
Sub menu
(Ex.)
user red
-
+
color
Warm Neutral Cold user
user green
-
+
user blue
-
+
1
1. Select [advanced] on the Main menu and press the [ENTER] button.
You can see the cursor moving to the Sub menu.
2. Select [color] on the Sub menu and press the [ENTER] button.
The selected item of [color] turns blue.
B. Advanced Menu
You can adjust the color temperature for the screen manually. Three preset values of
color temperature are set up at the time of factory shipments. Besides, you can set your
preferable values.
3.
Use the [ ] and/or [ ] button to adjust.
<Preset value> <Screen condition>
Warm / a little reddish white
Neutral / natural light
Cold / a little bluish white
Page 23

22
(Advanced Menu)
Adjustment for computer screen
*Continued to next page.
When pressing the [ ] button, the color temperature can be selected according
to the order [Neutral] / [Cold] / [user] / [Warm] / [Neutral] in sequence.
When pressing the [ ] button, the color temperature order is scrolled in
opposite to the above order.
• If [user] is selected, three colors adjustment menu to adjust [user red] or
[user green] or [user blue] are available (see following step
2).
Adjust the color temperature (User)
2
If you wish to set user setting of color temperature, follow the steps.
(Ex.) In case adjusting the [user red], [user green] and [user blue] in
sequence.
1. Select [advanced] on the Main menu and press the [ENTER] button.
You can see the cursor moving to the Sub menu.
2. Select [color] on the Sub menu and press the [ENTER] button.
The selected item of [color] turns blue.
3. Select [user] with the [ ] and/or [ ] button and press the [ENTER]
button.
[user] turns red. Besides, [user red], [user green] and [user blue] are
displayed.
4. Select [user red] with the [ ] button and press the [ENTER] button.
The selected item of [user red] turns blue.
5. Adjust the red level with the [ ] and/or [ ] button. (Interval: 0~100)
(Ex.)
picture
advanced
pip
adv pip
options
utilities
Main menu
color
user red
user green
user blue
Warm Neutral Cold user
-
-
-
Sub menu
+
+
+
Page 24

23
LCD Monitor Instructions
Adjustment Procedure (Advanced Menu)
user red
user green
user blue
pressing the [ ] button
more reddish
more greenish
more bluish
pressing the [ ] button
less reddish
less greenish
less bluish
6. Press the [ENTER] button, and then press the [ ] button.
You can see the cursor moving to [user green].
Press the [ENTER] button.
The selected item of [user green] turns blue.
7. Adjust the green level with the [ ] and/or [ ] button.
(Interval: 0~100)
Press the [ENTER] button, and then press the [ ] button.
You can see the cursor moving to [user blue].
8. Press the [ENTER] button.
The selected item of [user blue] turns blue.
Adjust the blue level with the [ ] and/or [ ] button.
(Interval: 0~100)
C. Picture in picture Menu
If you wish to adjust a pip(picture in picture), you can adjust the size, position, source,
brightness, contrast, color, tint and sharpness manually.
Adjust the size
picture
advanced
pip
adv pip
options
utilities
Main menu
(Ex.)
Sub menu
size
off small medium large
pos
source
auto comp s-video
brightness
-
+
contrast
-
+
color
-
+
tint
-
+
-
+
sharpness
1
1. Select [pip] on the Main menu and press the [ENTER] button.
You can see the cursor moving to the Sub menu.
2. Select [size] on the Sub menu and press the [ENTER] button.
The selected item of [size] turns blue.
Page 25

24
(Pip Menu)
3. Use the [ ] and/or [ ] button to select the size.
When pressing the [ ] button, the size of pip can be selected according to
the order [off] / [small] / [medium] / [large] / [off] in sequence.
When pressing the [ ] button, the size of pip order is scrolled in opposite to
the above order.
• When [off] is selected, [pip] menu and pip disappear. In case selecting
[small] or [medium] or [large], [pip] menu appears.
Select the position
picture
advanced
pip
adv pip
options
utilities
Main menu
(Ex.)
Sub menu
size
off small medium large
pos
source
auto comp s-video
brightness
-
+
contrast
-
+
color
-
+
tint
-
+
-
+
sharpness
2
1. Select [pip] on the Main menu and press the [ENTER] button.
You can see the cursor moving to the Sub menu.
2. Select [pos] on the Sub menu and press the [ENTER] button.
The selected item of [pos] turns blue.
3. Use the [ ] and/or [ ] button to select the position.
When pressing the [ ] button, the position of pip(picture in picture) can be
selected according to the order // / ///
// in sequence.
When pressing the [ ] button, the position of pip order is scrolled in opposite
to the above order.
Adjustment for computer screen
Page 26

25
LCD Monitor Instructions
Adjustment Procedure (Pip Menu)
Change the input signal
3
3. Use the [ ] and/or [ ] button to adjust.
When pressing the [ ] button, the source of the input signal type on pip can be
selected according to the order [auto] / [comp] / [s-video] / [auto] in
sequence.
When pressing the [ ] button, the source of the input signal type on pip order is
scrolled in opposite to the above order.
[auto] / Search and switch to the input signal automatically.
[comp] / Switch to the composite signal.
[s-video] / Switch to the s-video signal.
picture
advanced
pip
adv pip
options
utilities
Main menu
(Ex.)
Sub menu
size
off small medium large
pos
source
auto comp s-video
brightness
-
+
contrast
-
+
color
-
+
tint
-
+
-
+
sharpness
1. Select [pip] on the Main menu and press the [ENTER] button.
You can see the cursor moving to the Sub menu.
2. Select [source] on the Sub menu and press the [ENTER] button.
The selected item of [source] turns blue.
Adjust the brightness (Video signal only)
4
1. Select [pip] on the Main menu and press the [ENTER] button.
You can see the cursor moving to the Sub menu.
You can adjust this item when selecting [small] or [medium] or
[large] in [size] menu (see page 23).
Page 27

26
*Continued to next page.
3. Use the [ ] and/or [ ] button to adjust. (Interval: 0~100)
By pressing the [ ] button, the whole screen becomes brighter.
By pressing the [ ] button, the whole screen becomes darker.
picture
advanced
pip
adv pip
options
utilities
Main menu
(Ex.)
Sub menu
size
off small medium large
pos
source
auto comp s-video
brightness
50
-
+
contrast
50
-
+
color
50
-
+
tint
50
-
+
50
-
+
sharpness
2. Select [brightness] on the Sub menu and press the [ENTER] button.
The selected item of [brightness] turns blue.
Adjust the contrast (Video signal only)
5
picture
advanced
pip
adv pip
options
utilities
Main menu
(Ex.)
Sub menu
size
off small medium large
pos
source
auto comp s-video
brightness
50
-
+
contrast
50
-
+
color
50
-
+
tint
50
-
+
50
-
+
sharpness
1. Select [pip] on the Main menu and press the [ENTER] button.
You can see the cursor moving to the Sub menu.
You can adjust this item when selecting [small] or [medium] or
[large] in [size] menu (see page 23).
2. Select [contrast] on the Sub menu and press the [ENTER] button.
The selected item of [contrast] turns blue.
Adjustment for computer screen
Page 28

27
LCD Monitor Instructions
Adjustment Procedure (Pip Menu)
Adjust the color (Video signal only)
6
3. Use the [ ] and/or [ ] button to adjust. (Interval: 0~100)
By pressing the [ ] button, the screen deepens.
By pressing the [ ] button, the screen lightens.
picture
advanced
pip
adv pip
options
utilities
Main menu
(Ex.)
Sub menu
size
off small medium large
pos
source
auto comp s-video
brightness
50
-
+
contrast
50
-
+
color
50
-
+
tint
50
-
+
50
-
+
sharpness
1. Select [pip] on the Main menu and press the [ENTER] button.
You can see the cursor moving to the Sub menu.
2. Select [color] on the Sub menu and press the [ENTER] button.
The selected item of [color] turns blue.
You can adjust this item when selecting [small] or [medium] or
[large] in [size] menu (see page 23).
Adjust the tint (NTSC signal only)
7
1. Select [pip] on the Main menu and press the [ENTER] button.
You can see the cursor moving to the Sub menu.
You can adjust this item when selecting [small] or [medium] or
[large] in [size] menu (see page 23).
3. Use the [ ] and/or [ ] button to adjust. (Interval: 0~100)
By pressing the [ ] button, the contrast (difference between bright and dark)
becomes darker.
By pressing the [ ] button, the contrast (difference between bright and dark)
becomes lighter.
Page 29

28
3. Use the [ ] and/or [ ] button to adjust. (Interval: 0~100)
By pressing the [ ] button, the skin color becomes more greenish.
By pressing the [ ] button, the skin color becomes more purplish.
Adjust the sharpness (Video signal only)
8
2. Select [tint] on the Sub menu and press the [ENTER] button.
The selected item of [tint] turns blue.
picture
advanced
pip
adv pip
options
utilities
Main menu
(Ex.)
Sub menu
size
off small medium large
pos
source
auto comp s-video
brightness
50
-
+
contrast
50
-
+
color
50
-
+
tint
50
-
+
50
-
+
sharpness
1. Select [pip] on the Main menu and press the [ENTER] button.
You can see the cursor moving to the Sub menu.
picture
advanced
pip
adv pip
options
utilities
Main menu
(Ex.)
Sub menu
size
off small medium large
pos
source
auto comp s-video
brightness
50
-
+
contrast
50
-
+
color
50
-
+
tint
50
-
+
50
-
+
sharpness
You can adjust this item when selecting [small] or [medium] or
[large] in [size] menu (see page 23).
3. Use the [ ] and/or [ ] button to adjust. (Interval: 0~100)
By pressing the [ ] button, the outline of the picture becomes clearly.
By pressing the [ ] button, the outline of the picture softens.
2. Select [sharpness] on the Sub menu and press the [ENTER] button.
The selected item of [sharpness] turns blue.
Adjustment for computer screen
Page 30

29
LCD Monitor Instructions
Adjustment Procedure (Adv pip Menu)
D. Advanced picture in picture Menu
Adjust the horizontal position
1
3. Use the [ ] and/or [ ] button to adjust. (Interval: 0~100)
Press the [ ] button to shift the screen to the right.
Press the [ ] button to shift the screen to the left.
video format
Auto NTSC PAL secam
h position
50
-
+
v position
50
-
+
picture
advanced
pip
adv pip
options
utilities
Main menu
Sub menu
(Ex.)
1. Select [adv pip] on the Main menu and press the [ENTER] button.
You can see the cursor moving to the Sub menu.
2. Select [h position] on the Sub menu and press the [ENTER] button.
The selected item of [h position] turns blue.
This menu can be used when inputting Composite Video or S-Video signal and also
selecting [small] or [medium] or [large] in [size] menu (see page 23).
You can adjust the horizontal/vertical position for pip and select the video format if you
select this menu.
2. Select [v position] on the Sub menu and press the [ENTER] button.
The selected item of [v position] turns blue.
Adjust the vertical position
2
1. Select [adv pip] on the Main menu and press the [ENTER] button.
You can see the cursor moving to the Sub menu.
picture
advanced
pip
adv pip
options
utilities
Main menu
Sub menu
video format
Auto NTSC PAL secam
h position
50
-
+
v position
50
-
+
(Ex.)
Page 31

30
Select the video format
picture
advanced
pip
adv pip
options
utilities
Main menu
Sub menu
video format
Auto NTSC PAL secam
h position
50
v position
50
(Ex.)
3
3. Use the [ ] and/or [ ] button to adjust. (Interval: 0~100)
Press the [ ] button to shift the screen to the bottom.
Press the [ ] button to shift the screen to the top.
1. Select [adv pip] on the Main menu and press the [ENTER] button.
You can see the cursor moving to the Sub menu.
2. Select [video format] on the Sub menu and press the [ENTER]
button.
The selected item of [video format] turns blue.
3. Use the [ ] and/or [ ] button to select the video format.
When pressing the [ ] button, the video format can be selected according to
the order [Auto] / [NTSC] / [PAL] / [secam] / [Auto] in sequence.
When pressing the [ ] button, the video format order is scrolled in opposite to
the above order.
[Auto] / Search and switch to the input signal automatically.
[NTSC] / Switch to the NTSC signal.
[PAL] / Switch to the PAL signal.
[secam] / Switch to the SECAM signal.
Adjustment for computer screen
Page 32

31
LCD Monitor Instructions
Adjustment Procedure (Options Menu)
E. Options Menu
You can change the osd position and language used in osd, adjust the screen by Auto
Adjust (Automatic Adjustment) and see the resolution at the time if you select this menu.
Select the osd position
1
picture
advanced
pip
adv pip
options
utilities
Main menu
Sub menu
1024 x 768 / 60 Hz Mode: 88
OSD
language
Auto Adjust
press <right> to select
Internal Firmware Rom Version
(Ex.)
1. Select [options] on the Main menu and press the [ENTER] button.
You can see the cursor moving to the Sub menu.
2. Select [osd] on the Sub menu and press the [ENTER] button.
The selected item of [osd] turns blue.
3. Use the [ ] and/or [ ] button to select the position.
When pressing the [ ] button, the position of pip(picture in picture) can be
selected according to the order // / ///
// in sequence.
When pressing the [ ] button, the position of pip order is scrolled in opposite
to the above order.
Select language used in OSD (On Screen Display)
2
picture
advanced
pip
adv pip
options
utilities
Main menu
Sub menu
1024 x 768 / 60 Hz Mode: 88
OSD
language
Auto Adjust
press <right> to select
Internal Firmware Rom Version
(Ex.)
1. Select [options] on the Main menu and press the [ENTER] button.
You can see the cursor moving to the Sub menu.
Page 33

32
3. Use the [ ] and/or [ ] button to select the language.
When pressing the [ ] button, the language can be selected according to the
order [English] / [German] / [Japanese] / [French] / [Spanish] /
[English] in sequence.
When pressing the [ ] button, the language is scrolled in opposite to the
above order.
2. Select [language] on the Sub menu and press the [ENTER] button.
The selected item of [language] turns blue.
Automatic Adjustment (Analog mode only)
3
picture
advanced
pip
adv pip
options
utilities
Main menu
Sub menu
1024 x 768 / 60 Hz Mode: 88
OSD
language
Auto Adjust
press <right> to select
Internal Firmware Rom Version
(Ex.)
1. Select [options] on the Main menu and press the [ENTER] button.
You can see the cursor moving to the Sub menu.
2. Select [Auto Adjust] on the Sub menu and press the [ENTER] button.
The selected item of [Auto Adjust] turns blue.
3. Press the [ ] button to start the Automatic Adjustment.
After the automatic adjustment successfully completed, the adjusted
value is saved.
Adjustment for computer screen
Page 34

33
LCD Monitor Instructions
Adjustment Procedure (Options Menu)
Display the osd version
5
picture
advanced
pip
adv pip
options
utilities
Main menu
Sub menu
1024 x 768 / 60 Hz Mode: 88
OSD
language
Auto Adjust
press <right> to select
Internal Firmware Rom Version
(Ex.)
Select [options] on the Main menu, the osd version is always
displayed in [Internal Firmware] on the Sub menu.
Display the resolution
4
Select [options] on the Main menu. Display the current resolution
below [Auto Adjust] on the Sub menu.
• Each time changing the resolution, its information is displayed.
picture
advanced
pip
adv pip
options
utilities
Main menu
Sub menu
1024 x 768 / 60 Hz Mode: 88
OSD
language
Auto Adjust
press <right> to select
Internal Firmware Rom Version
(Ex.)
Page 35

34
(Utilities Menu)
F. Utilities Menu
You can change the osd timeout and background, and also reset the osd setting if you
select this menu.
Change the osd timeout
1
picture
advanced
pip
adv pip
options
utilities
osd timeout
10 seconds
osd
background
opaque translucent
reset
press <right> to select
Main menu
Sub menu
(Ex.)
1. Select [utilities] on the Main menu and press the [ENTER] button.
You can see the cursor moving to the Sub menu.
3. Use the [ ] and/or [ ] button to adjust. (Interval: 5~60)
Press the [ ] button to set the osd timeout longer.
Press the [ ] button to set the osd timeout shorter.
Change the osd background
2
picture
advanced
pip
adv pip
options
utilities
Main menu
Sub menu
osd
background
opaque translucent
reset
press <right> to select
(Ex.)
osd timeout
10 seconds
1. Select [utilities] on the Main menu and press the [ENTER] button.
You can see the cursor moving to the Sub menu.
2. Select [osd timeout] on the Sub menu and press the [ENTER] button.
The selected item of [osd timeout] turns blue.
Adjustment for computer screen
*Continued to next page.
Page 36

35
LCD Monitor Instructions
Adjustment Procedure (Utilities Menu)
2. Select [reset] on the Sub menu and press the [ENTER] button.
The selected item of [reset] turns blue.
3. Press the [ ] button to reset the osd setting.
All data adjusted/saved are deleted and then the data programmed by
manufacturer is reloaded.
Delete the data saved at the current display mode
3
picture
advanced
pip
adv pip
options
utilities
Main menu
Sub menu
osd
background
opaque translucent
reset
press <right> to select
(Ex.)
osd timeout
10 seconds
1. Select [utilities] on the Main menu and press the [ENTER] button.
You can see the cursor moving to the Sub menu.
2. Select [osd background] on the Sub menu and press the [ENTER]
button.
The selected item of [osd background] turns blue.
3. Use the [ ] and/or [ ] button to select [opaque] or [translucent].
Page 37

36
A. Picture Menu
Adjust the brightness
2. Select [brightness] on the Sub menu and press the [ENTER] button.
The selected item of [brightness] turns blue.
3. Use the [ ] and/or [ ] button to adjust. (Interval: 0~100)
By pressing the [ ] button, the whole screen is brighter .
By pressing the [ ] button, the whole screen is darker.
Adjust the contrast
picture
advanced
video
options
utilities
Main menu
(Ex.)
Sub menu
brightness
50
-
+
contrast
50
-
+
H position
50
-
+
V position
50
-
+
color
50
-
+
tint
50
-
+
sharpness
1 2 3 4 5 6 7 8
scaling Wide
picture
advanced
video
options
utilities
Main menu
(Ex.)
Sub menu
brightness
50
-
+
contrast
50
-
+
H position
50
-
+
V position
50
-
+
color
50
-
+
tint
50
-
+
sharpness
1 2 3 4 5 6 7 8
scaling Wide
1
2
1. Select [picture] on the Main menu and press the [ENTER] button.
You can see the cursor moving to the Sub menu.
1. Select [picture] on the Main menu and press the [ENTER] button.
You can see the cursor moving to the Sub menu.
The adjustment of brightness, contrast, horizontal position, vertical position, color, tint,
sharpness and scaling for the picture are available.
Adjustment for Composite Video / S-Video / Component Video screen
(Picture Menu)
Page 38

37
LCD Monitor Instructions
Adjustment Procedure (Picture Menu)
2. Select [contrast] on the Sub menu and press the [ENTER] button.
The selected item of [contrast] turns blue.
3. Use the [ ] and/or [ ] button to adjust. (Interval: 0~100)
By pressing the [ ] button, the contrast (difference between bright and dark)
becomes lighter.
By pressing the [ ] button, the contrast (difference between bright and dark)
becomes darker.
Adjust the horizontal position
2. Select [H position] on the Sub menu and press the [ENTER] button.
The selected item of [H position] turns blue.
3. Use the [ ] and/or [ ] button to adjust. (Interval: 0~100)
Press the [ ] button to shift the screen to the right.
Press the [ ] button to shift the screen to the left.
picture
advanced
video
options
utilities
Main menu
(Ex.)
Sub menu
brightness
50
-
+
contrast
50
-
+
H position
50
-
+
V position
50
-
+
color
50
-
+
tint
50
-
+
sharpness
1 2 3 4 5 6 7 8
scaling Wide
3
1. Select [picture] on the Main menu and press the [ENTER] button.
You can see the cursor moving to the Sub menu.
Page 39

38
Adjust the vertical position
picture
advanced
video
options
utilities
Main menu
(Ex.)
Sub menu
brightness
50
-
+
contrast
50
-
+
H position
50
-
+
V position
50
-
+
color
50
-
+
tint
50
-
+
sharpness
1 2 3 4 5 6 7 8
scaling Wide
4
3. Use the [ ] and/or [ ] button to adjust. (Interval: 0~100)
By press the [ ] button to shift the screen to the top.
By press the [ ] button to shift the screen to the bottom.
1. Select [picture] on the Main menu and press the [ENTER] button.
You can see the cursor moving to the Sub menu.
2. Select [V position] on the Sub menu and press the [ENTER] button.
The selected item of [V position] turns blue.
Adjust the color
picture
advanced
video
options
utilities
Main menu
(Ex.)
Sub menu
brightness
50
-
+
contrast
50
-
+
H position
50
-
+
V position
50
-
+
color
50
-
+
tint
50
-
+
sharpness
1 2 3 4 5 6 7 8
scaling Wide
5
1. Select [picture] on the Main menu and press the [ENTER] button.
You can see the cursor moving to the Sub menu.
2. Select [color] on the Sub menu and press the [ENTER] button.
The selected item of [color] turns blue.
*Continued to next page.
Adjustment for Composite Video / S-Video / Component Video screen
Page 40

39
LCD Monitor Instructions
Adjustment Procedure (Picture Menu)
3. Use the [ ] and/or [ ] button to adjust. (Interval: 0~100)
By pressing the [ ] button, the screen lightens.
By pressing the [ ] button, the screen deepens.
Adjust the tint (NTSC signal only)
6
1. Select [picture] on the Main menu and press the [ENTER] button.
You can see the cursor moving to the Sub menu.
3. Use the [ ] and/or [ ] button to adjust. (Interval: 0~100)
By pressing the [ ] button, the skin color becomes more greenish.
By pressing the [ ] button, the skin color becomes more purplish.
2. Select [tint] on the Sub menu and press the [ENTER] button.
The selected item of [tint] turns blue.
picture
advanced
video
options
utilities
Main menu
(Ex.)
Sub menu
brightness
50
-
+
contrast
50
-
+
H position
50
-
+
V position
50
-
+
color
50
-
+
tint
50
-
+
sharpness
1 2 3 4 5 6 7 8
scaling Wide
Page 41

40
Adjust the sharpness
7
1. Select [advanced] on the Main menu and press the [ENTER] button.
You can see the cursor moving to the Sub menu.
2. Select [sharpness] on the Sub menu and press the [ENTER] button.
The selected item of [sharpness] turns blue.
3. Use the [ ] and/or [ ] button to adjust. (Interval: 1~8)
selected value
outline of the picture
1 2 3 4 5 6 7 8
clearly
darkly
picture
advanced
video
options
utilities
Main menu
(Ex.)
Sub menu
brightness
50
-
+
contrast
50
-
+
H position
50
-
+
V position
50
-
+
color
50
-
+
tint
50
-
+
sharpness
1 2 3 4 5 6 7 8
scaling Wide
Adjustment for Composite Video / S-Video / Component Video screen
Page 42

41
LCD Monitor Instructions
Adjustment Procedure (Picture Menu)
Adjust the scaling
8
1. Select [picture] on the Main menu and press the [ENTER] button.
You can see the cursor moving to the Sub menu.
2. Select [scaling] on the Sub menu and press the [ENTER] button.
The selected item of [scaling] turns blue.
picture
advanced
video
options
utilities
Main menu
(Ex.)
Sub menu
brightness
50
-
+
contrast
50
-
+
H position
50
-
+
V position
50
-
+
color
50
-
+
tint
50
-
+
sharpness
1 2 3 4 5 6 7 8
scaling Wide
3. Use the [ ] and/or [ ] button to adjust.
When pressing the [ ] button, the scaling can be selected according to the
order [Wide] / [Normal] / [LB to 16:9] / [Panorama] / [Gamemode] /
[Auto] / [Wide] in sequence.
When pressing the [ ] button, the scaling order is scrolled in opposite to the
above order.
[Wide] / Display the input picture converted the wide.
[Normal] / Display the standard input picture of an aspect ratio
of 4:3.
[LB to 16 : 9] / Display the input picture of LB with an aspect ratio of
4:3 on the whole screen.
*LB stands for Letter Box.
[Panorama] / Display the input picture converted to the panorama
size.
[Gamemode] / Display the input picture for TV game size.
[Auto] / Search the best mode for input picture from S-Video
terminal and display the picture.
*[Auto] works for only S-video mode.
Page 43

42
Adjust the color temperature (Preset)
3. Use the [ ] and/or [ ] button to adjust.
<Preset value> <Screen condition>
Warm / a little reddish white
Neutral / natural light
Cold / a little bluish white
When pressing the [ ] button, the color temperature can be selected
according to the order [Neutral] / [Cold] / [user] / [Warm] / [Neutral] in
sequence.
When pressing the [ ] button, the color temperature order is scrolled in
opposite to the above order.
• If [user] is selected, it is available to adjust three colors by [user red], [user
green] and [user blue]. (see following step
2)
(Ex.)
Sub menu
Main menu
picture
advanced
video
options
utilities
user red
-
+
color
Warm Neutral Cold user
user green
-
+
user blue
-
+
1
1. Select [advanced] on the Main menu and press the [ENTER] button.
You can see the cursor moving to the Sub menu.
2. Select [color] on the Sub menu and press the [ENTER] button.
The selected item of [color] turns blue.
B. Advanced Menu
You can adjust the color temperature for the screen manually if you select this menu.
Three preset values of color temperature are ready and you can set colors to your
preferable values.
(Advanced Menu)
Adjustment for Composite Video / S-Video / Component Video screen
Page 44

43
LCD Monitor Instructions
Adjustment Procedure (Advanced Menu)
(Ex.)
Sub menu
Main menu
picture
advanced
video
options
utilities
user red
-
+
color
Warm Neutral Cold user
user green
-
+
user blue
-
+
1. Select [advanced] on the Main menu and press the [ENTER] button.
You can see the cursor moving to the Sub menu.
2. Select [color] on the Sub menu and press the [ENTER] button.
The selected item of [color] turns blue.
3. Select [user] with the [ ] and/or [ ] button and press the
[ENTER] button.
[user] turns red. Besides, [user red], [user green] and [user blue] are ready
to adjust.
4. Select [user red] with the [ ] button and press the [ENTER]
button.
The selected item of [user red] turns blue.
5. Adjust the red level with the [ ] and/or [ ] button. (Interval: 0~100)
6. Press the [ENTER] button, and then press the [ ] button.
You can see the cursor moving to [user green].
Press the [ENTER] button.
The selected item of [user green] turns blue.
7. Adjust the green level with the [ ] and/or [ ] button. (Interval: 0~100)
Press the [ENTER] button, and then press the [ ] button.
You can see the cursor moving to [user blue].
8. Press the [ENTER] button.
The selected item of [user blue] turns blue.
Adjust the blue level with the [ ] and/or [ ] button. (Interval: 0~100)
Adjust the color temperature (User)
2
If you wish to set user settings of color temperature, follow the steps.
(Ex.) In case adjusting the [user red], [user green] and [user blue] in
sequence.
Page 45

44
C. Video Menu
Select the video format
picture
advanced
video
options
utilities
Main menu
(Ex.)
Sub menu
video format
Auto NTSC PAL secam
1
3. Use the [ ] and/or [ ] button to select the video format.
When pressing the [ ] button, the video format can be selected according to
the order [Auto] / [NTSC] / [PAL] / [secam] / [Auto] in sequence.
When pressing the [ ] button, the video format order is scrolled in opposite to
the above order.
[Auto] / Search and switch to the input signal automatically.
[NTSC] / Switch to the NTSC signal.
[PAL] / Switch to the PAL signal.
[secam] / Switch to the SECAM signal.
1. Select [video] on the Main menu and press the [ENTER] button.
You can see the cursor moving to the Sub menu.
2. Select [video format] on the Sub menu and press the [ENTER]
button.
The selected item of [video format] turns blue.
When video signal is input, you can select the video format (NTSC/PAL/SECAM)
manually.
(Video Menu)
Adjustment for Composite Video / S-Video / Component Video screen
user red
user green
user blue
pressing the [ ] button
more reddish
more greenish
more bluish
pressing the [ ] button
less reddish
less greenish
less bluish
Page 46

45
LCD Monitor Instructions
Adjustment Procedure (Options Menu)
Main menu
(Ex.)
picture
advanced
video
options
utilities
Sub menu
OSD
language
Internal Firmware Rom Version
2. Select [osd] on the Sub menu and press the [ENTER] button.
The selected item of [osd] turns blue.
Select language used in OSD (On Screen Display)
2
Main menu
(Ex.)
picture
advanced
video
options
utilities
Sub menu
OSD
language
Internal Firmware Rom Version
1. Select [options] on the Main menu and press the [ENTER] button.
You can see the cursor moving to the Sub menu.
3. Use the [ ] and/or [ ] button to select the position.
When pressing the [ ] button, the position of pip(picture in picture) can be
selected according to the order // / ///
// in sequence.
When pressing the [ ] button, the position of pip order is scrolled in opposite
to the above order.
D. Options Menu
Select the osd position
1
1. Select [options] on the Main menu and press the [ENTER] button.
You can see the cursor moving to the Sub menu.
You can select the osd position, language used in osd and display the osd version if
you select this menu.
Page 47

46
2. Select [language] on the Sub menu and press the [ENTER] button.
The selected item of [language] turns blue.
Display the osd version
3
Main menu
(Ex.)
picture
advanced
video
options
utilities
Sub menu
OSD
language
Internal Firmware Rom Version
Select [options] on the Main menu, the osd version is always
displayed in [Internal Firmware] on the Sub menu.
Adjustment for Composite Video / S-Video / Component Video screen
3. Use the [ ] and/or [ ] button to select the language.
When pressing the [ ] button, the language can be selected according to
the order [English] / [German] / [Japanese] / [French] / [Spanish] /
[English] in sequence.
When pressing the [ ] button, the language is scrolled in opposite to the
above order.
Page 48

47
LCD Monitor Instructions
Adjustment Procedure (Utilities Menu)
Change the osd background
2
Main menu
(Ex.)
Sub menu
picture
advanced
video
options
utilities
osd
background
opaque translucent
reset
press <right> to select
osd timeout
10 seconds
1. Select [utilities] on the Main menu and press the [ENTER] button.
You can see the cursor moving to the Sub menu.
2. Select [osd background] on the Sub menu and press the [ENTER]
button.
The selected item of [osd background] turns blue.
3. Use the [ ] and/or [ ] button to adjust. (Interval: 5~60)
Press the [ ] button to set the osd timeout longer.
Press the [ ] button to set the osd timeout shorter.
E. Utilities Menu
You can change the osd timeout and background, and also reset the osd setting if you
select this menu.
Change the osd timeout
1
Main menu
(Ex.)
Sub menu
picture
advanced
video
options
utilities
osd
background
opaque translucent
reset
press <right> to select
osd timeout
10 seconds
1. Select [utilities] on the Main menu and press the [ENTER] button.
You can see the cursor moving to the Sub menu.
2. Select [osd timeout] on the Sub menu and press the [ENTER]
button.
The selected item of [osd timeout] turns blue.
Page 49

48
3. Use the [ ] and/or [ ] button to select [opaque] or [translucent].
Delete the data saved at the current display mode
3
Main menu
(Ex.)
Sub menu
picture
advanced
video
options
utilities
osd timeout
10 seconds
osd
background
opaque translucent
reset
press <right> to select
1. Select [utilities] on the Main menu and press the [ENTER] button.
You can see the cursor moving to the Sub menu.
2. Select [reset] on the Sub menu and press the [ENTER] button.
The selected item of [reset] turns blue.
3. Press the [ ] button to reset the osd setting.
All data adjusted/saved are deleted and then the default settings
programmed by manufacturer is reloaded.
Adjustment for Composite Video / S-Video / Component Video screen
Page 50

49
LCD Monitor Instructions
Additional Functions
Shortcut Menu
You can shortcut to adjust the brightness and contrast of the whole screen and size of
picture in picture. When the OSD (On Screen Display) is not displayed, it is possible to
display the Shortcut Menu. The adjustment flow is described in below:
Display the Shortcut Menu
1
1. When the OSD (On Screen Display) is not displayed, it is possible
to display the Shortcut Menu. Press the [ENTER] button.
The shortcut menu is displayed.
brightness
50
-
+
(Ex.)
2. Use the [ENTER] button to select the shortcut menu.
When pressing the [ENTER] button, the shortcut menu can be selected
according to the order [brightness] / [contrast] / [pip enable] / [brightness]
in sequence.
• Every time the [ENTER] button is pressed, the shortcut menu changes.
• The shortcut menu disappears according to the setting in [osd timeout] menu
(see page 47).
Adjust the brightness
2
1. Use the [ENTER] button to select [brightness] menu.
brightness
50
-
+
(Ex.)
2. Use the [ ] and/or [ ] button to adjust. (Interval: 0~100)
By pressing the [ ] button, the whole screen is brighter.
By pressing the [ ] button, the whole screen is darker.
Page 51

50
Select the size of pip (picture in picture)
4
1. Use the [ENTER] button to select [pip enable] menu.
pip enable
off S M L
(Ex.)
2. Use the [ ] and/or [ ] button to select the size of pip.
The selected size turns red.
When pressing the [ ] button, the pip can be displayed at the size according
to the order [off] / [S] / [M] / [L] / [off] in sequence.
When pressing the [ ] button, the size of pip is scrolled in opposite to the
above order.
• When [off] is selected, [pip] menu and pip disappear. In case selecting
[small] or [medium] or [large], [pip] menu appears.
Adjust the contrast
3
1. Use the [ENTER] button to select [contrast] menu.
contrast
50
-
+
(Ex.)
2. Use the [ ] and/or [ ] button to adjust. (Interval: 0~100)
By pressing the [ ] button, the contrast (difference between bright and dark)
becomes darker.
By pressing the [ ] button, the contrast (difference between bright and dark)
becomes lighter.
Page 52

51
LCD Monitor Instructions
Additional Functions
This is the function to reduce the monitor's power consumption, when a computer has
not been used for long, even when the power to a LCD Monitor is "ON". In order to
activate this system, it must be connected and used with a computer that conforms to
DPMS (Display Power Management Signaling) Standard of the VESA (Video
Electronics Standards Association).
This monitor conforms to DDC2B (Display Data Channel 2B) standard of VESA. (DDC
stands for display data channel and is a registered trademark of VESA)
Plug and Play
Power Management System
*This monitor does not correspond to DDC1, so that Plug and Play function will not be
operated normally by some computers or graphic accelerators.
Page 53

52
Maintenance
Always unplug the AC cable from the outlet before maintenance.
Also unplug the signal cables from the computer.
Soak a soft cloth in water or neutral detergent, wring well,
and wipe the cabinet gently. Never use solvents such as
paint thinner or benzene as they will damage the surface
of the cabinet. Follow the manufacturer’s directions when
using chemically treated cloths.
Gently blow away any dust that has adhered to the
display screen. Apply a small amount of
water to a soft
cloth, wring well and then wipe gently. Do not use organic
solvents such as ethyl alcohol, thinner or benzine etc.
Do not rub with pointy objects such as a pen or screwdriver.
Cabinet
Display Screen
Page 54

53
Troubleshooting
Fault Finding
Problem Check Item Treatment
Page No.
No picture Is a computer's signal Check a computer manual and
timing (horizontal or Vertical set the signal timing so that it
synchronous signals) over falls within the range for this 57
the range specified for this monitor's specification.
monitor ?
Screen's display Is the computer's screen Reset the screen size.
–
range is incorrect. size set correctly ?
Part of screen is Is the adjustment for screen Adjust the screen.
11
missing. correctly ?
Picture is distorted. Is the RGB or DVI cable Check the RGB or DVI cable
7
connected securely ? connection.
Is the screen adjusted Adjust the screen correctly.
11
correctly ?
The computer's signal timing Check the computer’s
may not match the monitor's specifications. –
specifications.
Not change to Is the cable connected Check the RGB or DVI
7
another input signal. exactly? cable connection.
Fault Finding
Please check the following items before requesting repair. When this LCD monitor still
does not work properly after checking in following way, stop using it, turn off the power
switch, unplug the power plug from the AC Outlet, and contact the store where it was
purchased. In case a COMPUTER is connected, please refer to the User's Manual for
this LCD monitor also.
Computer Screen is displayed:
Video Screen is displayed:
Problem Check Item Treatment
Page No.
No picture Does the Power Switch on Check the power status on an
an equipment connected turn equipment connected. –
ON?
Is a signal cable connected Check the cable connection.
8,9
firmly?
Brightness, contrast Is the brightness or contrast Adjust the screen again.
and etc. are no good and etc. on the screen 36
adjusted correctly?
Page 55

54
Screen Display
• This monitor conforms to the WXGA mode (1,280 x 768 dots).
• This monitor does not support the computer’s display mode which is larger than
WXGA mode (1,280 x 768 dots). Its display is possible but there is no guarantee.
• Displaying the same screen for an extended period of time may leave a residual
image; this does not indicate a broken or defective display. The display will return to
normal after the power is turned off and the unit stands for a while. Use of a screen
saver is recommended.
• Bright dots (dots that remain lit) or black dots (unlit dots) on the LCD monitor’s display
are normal; they do not indicate a broken or defective display.
• When the LCD monitor shows the Composite Video, S-Video etc., it is displayed on
a little bit wider screen which compares to a normal television set. Depend on the
image, it might be possible to show it on a full screen.
Page 56

55
Specifications
Table of Preset Data
Fifteen signal timing patterns indicated in the tables below are preset when the monitor is
shipped from the factory. Up to 8 additional timing patterns can also be stored. The timing
pattern is automatically determined and displayed according to the synchronous signals of
the computer being used. The monitor will use the closest timing pattern for display when a
perfectly matched one is not available.
The frequencies of No.14 and No.15 in the list below are only recommended.
No. Resolution Vertical Frequency Horizontal Frequency
1 640 x 350 dots 70 Hz 31.4 kHz
2 640 x 400 dots 70 Hz 31.4 kHz
3 640 x 480 dots 60 Hz 31.5 kHz
4 640 x 480 dots 72 Hz 37.8 kHz
5 640 x 480 dots 75 Hz 37.5 kHz
6 800 x 600 dots 56 Hz 35.1 kHz
7 800 x 600 dots 60 Hz 37.9 kHz
8 800 x 600 dots 72 Hz 48.1 kHz
9 800 x 600 dots 75 Hz 46.9 kHz
10 832 x 624 dots 75 Hz 49.6 kHz
11 1,024 x 768 dots 60 Hz 48.4 kHz
12 1,024 x 768 dots 70 Hz 56.5 kHz
13 1,024 x 768 dots 75 Hz 60.2 kHz
14 1,280 x 768 dots 60 Hz 48.4 kHz
15 1,280 x 768 dots 75 Hz 60.2 kHz
Note : The frequency of No.15 is applied to Analog mode only.
Page 57

56
Cable Pin Arrangement (female)
No. Signal name No. Signal name No. Signal name
1 T.M.D.S. Data2- 9 T.M.D.S. Data1- 17 T.M.D.S. Data0-
2 T.M.D.S. Data2+ 10 T.M.D.S. Data1+ 18 T.M.D.S. Data0+
3 T.M.D.S. Data2/4 Shield 11 T.M.D.S. Data1/3 Shield 19 T.M.D.S. Data0/5 Shield
4 T.M.D.S. Data4- 12 T.M.D.S. Data3- 20 T.M.D.S. Data5-
5 T.M.D.S. Data4+ 13 T.M.D.S. Data3+ 21 T.M.D.S. Data5+
6 DDC Clock 14 +5V Power 22 T.M.D.S. Clock Shield
7 DDC Data 15 Ground (for +5V) 23 T.M.D.S. Clock+
8 No Connect 16 Hot Plug Detect 24 T.M.D.S. Clock-
Digital Video Input : DVI-D (24pin)
1
9
8
16
24
17
Cable Pin Arrangement (female)
No. Signal name No. Signal name No. Signal name
1 R 6 R GND 11 ––
2 G 7 G GND 12 DDC data line*
3 B 8 B GND 13 Hor. Sync.
4 –– 9 –– 14 Vert. Sync.
5 DDC GND* 10 GND 15 DDC clock line*
Analog Video Input : mini D-Sub (15pin)
* DDC Standard (VESA)
1 5
6 10
11 15
No. Signal name No. Signal name No. Signal name
1 No Connect 4 DTR 7 No Connect
2 RXD 5 GND 8 No Connect
3 TXD 6 DSR 9 No Connect
RS232C : D-SUB (9pin)
1 5
6 9
Cable Pin Arrangement (male)
Cable Pin Arrangement
Page 58

57
Specifications
Monitor Specifications
Liquid Crystal Panel TFT
Display Size 39.6''
Pixel Configuration 1,280 x 768
Pixel Pitch 0.6735 x 0.6735 mm
Brightness
42
0 cd/m
2
typ.
Response Time 22 ms
Contrast 600 : 1 typ.
Angle of Visibility Up 85, Down 85, Right 85, Left 85 degrees
(contrast ratio of less than 10)
Note : To improve this LCD monitor’s performance level, its specifications and
appearance are subject to change without notice.
LCD
PC Input
Vertical signal 56 - 75 Hz
Horizontal signal 31.4 - 60.2 kHz
Video Signal Analog: RGB 75Ω 0.7Vp-p Digital: DVI Standard Version 1.0
No. of Colors 16.77 million
OSD Language English, German, Japanese, French, Spanish
Plug & Play VESA DDC2B
Power Management VESA DPMS
Video Input
Composite Video Signal 75 Ω, 1Vp-p (NTSC, PAL, SECAM)
Connector BNC x 1
S-Video Signal Luminance : 75 Ω 1Vp-p
Chrominance : 75 Ω 0.286Vp-p (NTSC, PAL SECAM)
Connector Mini DIN 4pin X1
Component Video Signal Y/Cb/Cr, Analog RGB+C SYNC, Analog RGB+HD/VD
Connector BNC x 5
Dimensions 941 (W) x 601 (H) x 120 (D) mm
Weight 28.6 kg
Operating Conditions Temperature: Operating: 5°C to 35°C Storage: -20°C to +60°C
Humidity: 30% to 85% RH (no condensation)
Power Supply Input: AC 120V(North America) AC 220-240V(Europe)
Output: Available to cascade
Power Consumption 260 W (28 W in Energy Saving mode)
Physical
Page 59

Federal Communications Commission (FCC) Statement
This device has been tested and found to comply with the limits for a Class A
digital device, pursuant to Part 15 of the FCC rules. These limits are designed
to provide reasonable protection against harmful interference in a residential
installation. This equipment generates, uses and can radiate radio frequency
energy and, if not installed and used in accordance with the instructions, may
cause harmful interference to radio or television reception. However, there is no
guarantee that interference will not occur in a particular installation. If this
equipment does cause interference to radio and television reception, which can
be determined by turning the equipment off and on, the user is encouraged to
try to correct the interference by one or more of the following measures:
reorient or relocate the receiving antenna
increase the separation between the equipment and receiver
connect the equipment into an outlet on a circuit different from
that to which the receiver is connected
consult the dealer or an experienced radio/TV technician for help
Accessories: This equipment has been tested and found comply with the limits
of a Class A digital device. The accessories associated with this equipment are
as follows:
shielded video cable
These accessories are required to be used in order to ensure compliance with
FCC rules.
Page 60

Customer Service
E-mail: desktopmonitors@planar .com
Tel: 1-866-PLANAR-1 (1-866-752-6271)
Hours: M-F, 8am - 9pm Eastern Time
© 2003 Planar Systems, Inc. 04/03 Planar is a registered trademark of Planar Systems, Inc.
Other brands and names are the property of their respective owners.
Technical information in this document is subject to change without notice.
Online Support: http://planar.custhelp.com
2RS6P10A00300A
Planar Systems, Inc.
 Loading...