

Page 1
TECHNOLOGIE FÜR DEN HAUSHALT
TECHNOLOGY FOR DOMESTIC USE
14.03.2018
Bedienungsanleitung
Instruction Manual
Mode d'emploi
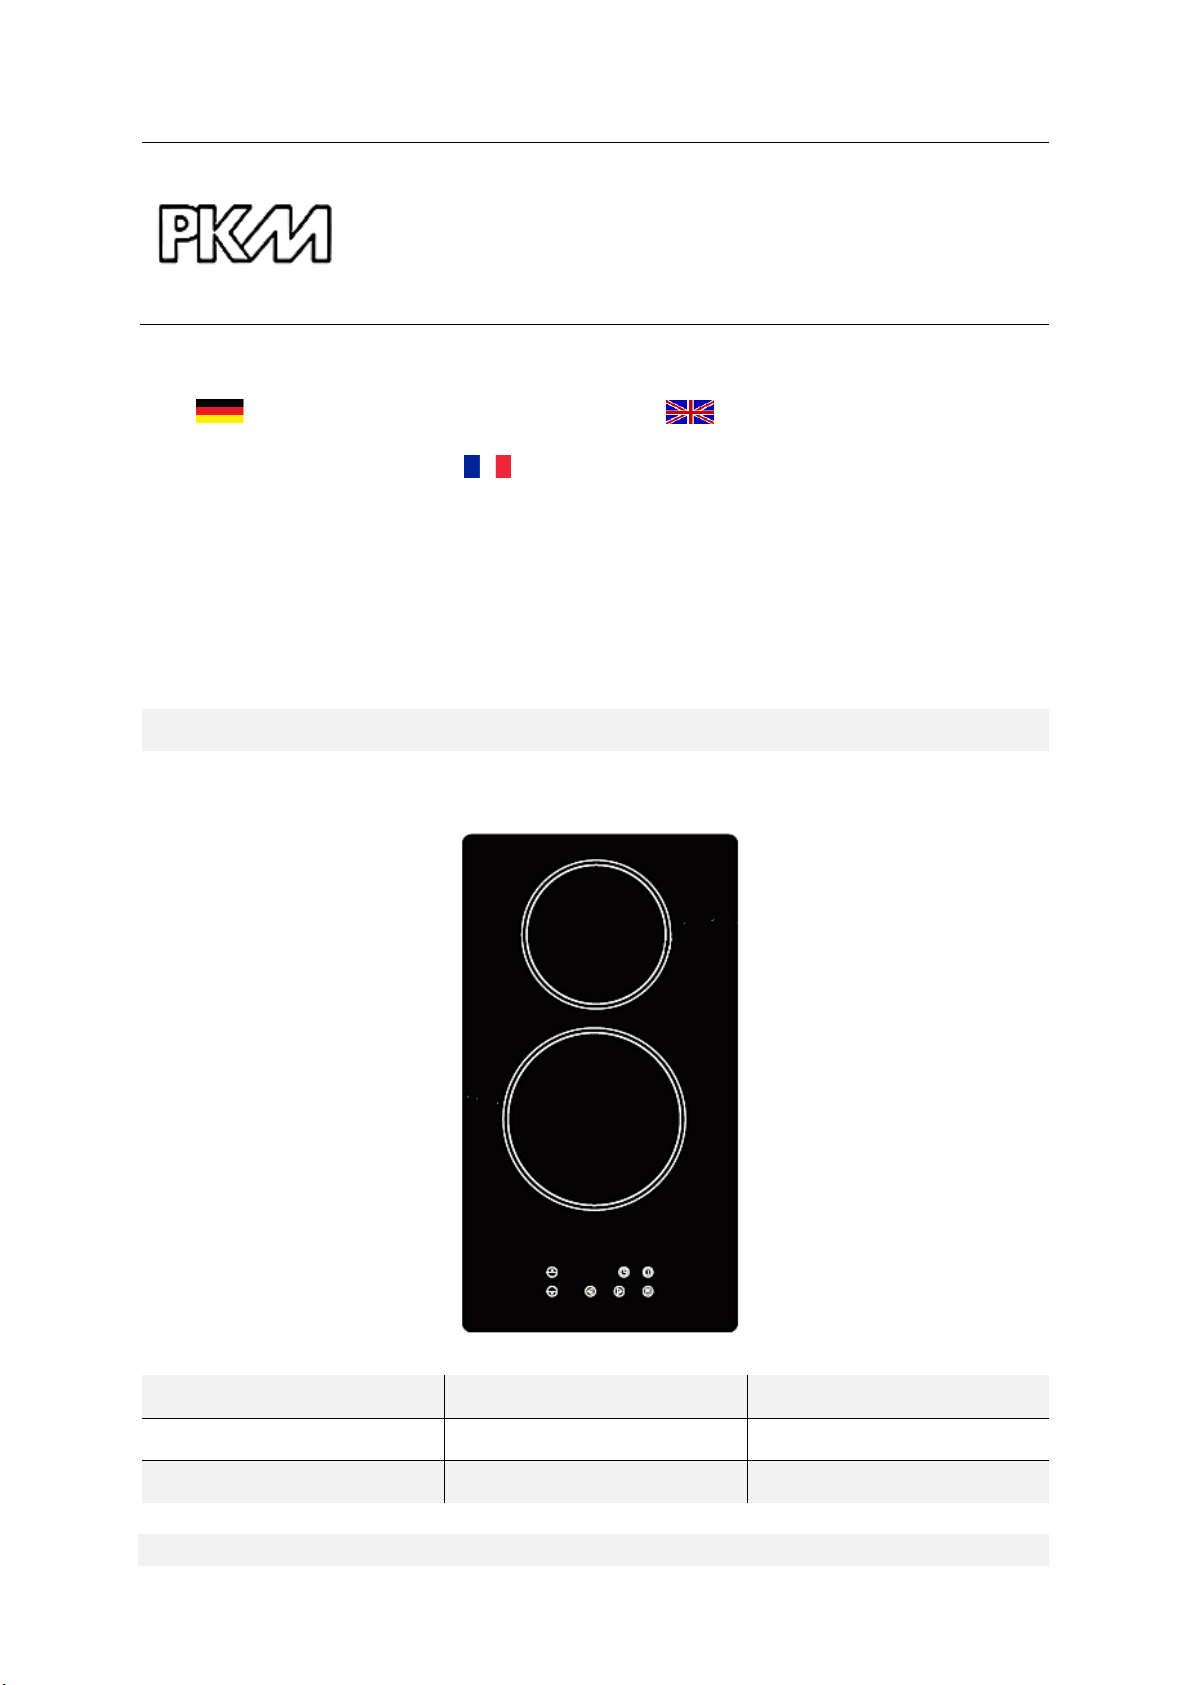
GLASKERAMIKKOCHFELD
GLASS CERAMIC HOB
LA PLAQUE EN VITROCÉRAMIQUE
EB-GK2-TC
Deutsch
Seite
2
English
Page
37
Français
Page
69
www.pkm-online.de
Page 2

Sehr geehrter Kunde! Sehr geehrte Kundin! Wir möchten Ihnen herzlich danken,
dass Sie sich zum Erwerb eines Produkts aus unserem reichhaltigen Angebot
entschieden haben. Lesen Sie die gesamte Bedienungsanleitung, bevor Sie das Gerät
zum ersten Mal benutzen. Verwahren Sie diese Bedienungsanleitung zur zukünftigen
Verwendung an einem sicheren Ort. Falls Sie das Gerät weitergeben, müssen Sie
diese Bedienungsanleitung ebenfalls mit übergeben.
Inhalt
1. Sicherheitshinweise ........................................................................................................ 4
1.1 Signalwörter .............................................................................................................. 5
1.2 Sicherheitsanweisungen ........................................................................................... 5
2. Installation .................................................................................................................... 10
2.1 Entpacken und Wahl des Standorts ..................................................................... 11
2.2 Anforderungen vor der Installation .................................................................... 11
2.3 Auswahl der Installationsumgebung / Maßangaben ......................................... 12
2.4 Einbau des Kochfeldes ......................................................................................... 13
2.5 Elektrischer Anschluss .......................................................................................... 17
3. Bedienung ..................................................................................................................... 18
3.1 Kochfeld und Bedienfeld ...................................................................................... 18
3.2 Bedienung der Sensoren ....................................................................................... 20
3.3 Vor der ersten Benutzung ..................................................................................... 20
3.4 Geeignetes Kochgeschirr ...................................................................................... 20
3.5 Einen Kochvorgang beginnen ............................................................................. 21
3.6 Nach Beendigung eines Kochvorgangs .............................................................. 22
3.7 Tastensperre / Kindersicherung .......................................................................... 23
3.8 Benutzung des Timers ........................................................................................... 24
3.9 Warnung vor Restwärme ....................................................................................... 25
3.10 Automatische Abschaltung ................................................................................. 25
4. Hinweise für das Kochen ............................................................................................ 26
4.1 Kochtipps ............................................................................................................... 26
4.2 Leistungsstärken ..................................................................................................... 28
4.3 Energie sparen ........................................................................................................ 28
5. Reinigung und Pflege .................................................................................................. 29
2
Page 3

6. Problembehandlung .................................................................................................... 31
Entsorgen Sie dieses Gerät nicht zusammen mit ihrem Hausmüll. Das
Gerät darf nur über eine Sammelstelle für wiederverwendbare
elektrische und elektronische Geräte entsorgt werden. Entfernen Sie
nicht die Symbole / Aufkleber am Gerät.
7. Technische Daten ........................................................................................................ 34
8. Entsorgung ................................................................................................................... 35
9. Garantiebedingungen .................................................................................................. 36
Die in dieser Bedienungsanleitung enthaltenen Abbildungen können in einigen
Details von dem tatsächlichen Design Ihres Gerätes abweichen. Folgen Sie in
einem solchen Fall dennoch den beschriebenen Sachverhalten.
Der Hersteller behält sich das Recht vor, solche Änderungen vorzunehmen, die
keinen Einfluss auf die Funktionsweise des Gerätes haben. Entsorgen Sie das
Verpackungsmaterial entsprechend den örtlichen Vorschriften Ihres Wohnorts.
Das von Ihnen gekaufte Gerät wurde möglicherweise inzwischen verbessert und
weist somit vielleicht Unterschiede zur Bedienungsanleitung auf. Dennoch sind
die Funktionen und Betriebsbedingungen identisch, sodass Sie die
Bedienungsanleitung im vollen Umfang nutzen können. Technische Änderungen
bzw. Druckfehler bleiben vorbehalten.
EG - KONFORMITÄTSERKLÄRUNG
Die in dieser Bedienungsanleitung beschriebenen Produkte entsprechen
sämtlichen harmonisierten Anforderungen.
Die relevanten Unterlagen können durch die zuständigen Behörden über den
Produktverkäufer angefordert werden.
3
Page 4

1. Sicherheitshinweise
Bewahren Sie diese Bedienungsanleitung so auf, dass sie bei Bedarf jederzeit
griffbereit ist. Befolgen Sie sorgfältig alle Hinweise, um Unfälle oder eine
Beschädigung des Gerätes zu vermeiden.
Prüfen Sie auf jeden Fall auch das technische Umfeld des Gerätes! Sind alle
Kabel oder Leitungen, die zu ihrem Gerät führen, in Ordnung? Oder sind sie
veraltet und halten der Geräteleistung nicht mehr Stand? Daher muss durch
eine qualifizierte Fachkraft (Elektrotechniker/-in) eine Überprüfung
bereits vorhandener wie auch neuer Anschlüsse erfolgen. Sämtliche Arbeiten,
die zum Anschluss des Gerätes an die Stromversorgung notwendig sind, dürfen
nur von einer qualifizierten Fachkraft (Elektrotechniker/-in)
durchgeführt werden.
Das Gerät ist ausschließlich zur privaten Nutzung bestimmt.
Das Gerät ist ausschließlich zum Kochen in einem Privathaushalt bestimmt.
Das Gerät darf in Wohnmobilen/Campingwagen bei Festeinbau unter
Einhaltung der TÜV-Vorschriften mit 230V AC betrieben werden.
Das Gerät ist ausschließlich zum Betrieb innerhalb geschlossener Räume
bestimmt.
Dieses Gerät darf nicht für gewerbliche Zwecke und in öffentlichen
Verkehrsmitteln betrieben werden.
Betreiben Sie das Gerät ausschließlich im Sinne seiner bestimmungsgemäßen
Verwendung.
Erlauben Sie niemandem, der mit der Bedienungsanleitung nicht vertraut ist,
das Gerät zu benutzen.
Dieses Gerät kann von Kindern ab 8 Jahren und darüber sowie von Personen
mit verringerten physischen, sensorischen oder mentalen Fähigkeiten oder
Mangel an Erfahrung und Wissen benutzt werden, wenn sie beaufsichtigt oder
bezüglich des sicheren Gebrauchs des Gerätes unterwiesen wurden und die
daraus resultierenden Gefahren verstehen. Kinder dürfen nicht mit dem Gerät
spielen. Reinigung und Benutzer-Wartung dürfen nicht von Kindern ohne
Beaufsichtigung durchgeführt werden.
LESEN SIE VOR DER ERSTEN BENUTZUNG DES GERÄTES DIE
GESAMTEN SICHERHEITSHINWEISE UND
SICHERHEITSANWEISUNGEN GRÜNDLICH DURCH.
Die darin enthaltenen Informationen dienen dem Schutz Ihrer Gesundheit.
Die Nichtbeachtung der Sicherheitshinweise und Sicherheitsanweisungen
kann zu schweren Beeinträchtigungen Ihrer Gesundheit und im schlimmsten
Fall zum Tod führen.
4
Page 5

DIESE BEDIENUNGSANLEITUNG MUSS FÜR JEDE PERSON, WELCHE
GEFAHR! verweist auf eine
Gefahrensituation, die, wenn sie nicht
abgewendet wird, eine unmittelbare
Gefährdung für Leben und Gesundheit
zur Folge hat.
WARNUNG! verweist auf eine
Gefahrensituation, die, wenn sie nicht
abgewendet wird, eine mögliche
bevorstehende Gefährdung für Leben
und Gesundheit zur Folge hat.
VORSICHT! verweist auf eine
Gefahrensituation, die, wenn sie nicht
abgewendet wird, zu mittelschweren
oder kleineren Verletzungen führen
kann.
HINWEIS! verweist auf eine
Gefahrensituation, die, wenn sie nicht
abgewendet wird, eine mögliche
Beschädigung des Gerätes zur Folge hat.
DAS GERÄT BETREIBT, STETS ZUGÄNGLICH SEIN; VERGEWISSERN
SIE SICH, DASS DIE BEDIENUNGSANLEITUNG VOR DEM BETRIEB
DES GERÄTES GELESEN UND VERSTANDEN WURDE.
1.1 Signalwörter
1.2 Sicherheitsanweisungen
Zur Verringerung der Stromschlaggefahr:
1. Eine Nichtbeachtung der Anweisungen in dieser
Bedienungsanleitung gefährdet das Leben und die Gesundheit des
Gerätebetreibers und / oder kann das Gerät beschädigen.
2. Das Gerät darf nur durch eine qualifizierte Fachkraft
(Elektrotechniker/-in) an die Stromversorgung angeschlossen
werden, welche die landesüblichen gesetzlichen Verordnungen und
die Zusatzvorschriften der örtlichen Stromversorgungsunternehmen
genau kennt und sorgfältig beachtet.
3. Alle elektrischen Arbeiten müssen von einer qualifizierten Fachkraft
(Elektrotechniker/-in) durchgeführt werden. Es dürfen keine
Änderungen oder willkürlichen Veränderungen an der
Stromversorgung durchgeführt werden. Der Anschluss muss in
Übereinstimmung mit den örtlich geltenden gesetzlichen
Bestimmungen erfolgen.
4. Schließen Sie das Gerät keinesfalls an die Stromversorgung an,
wenn das Gerät, das Netzkabel oder der Netzstecker sichtbare
Beschädigungen aufweisen.
GEFAHR!
5
Page 6

5. Versuchen Sie niemals selbst, das Gerät zu reparieren. Reparaturen,
die von dazu nicht qualifizierten Personen durchgeführt werden,
können zu ernsthaften Verletzungen und Schäden führen. Falls Ihr
Gerät nicht ordnungsgemäß funktioniert, kontaktieren Sie das
Geschäft, in dem Sie das Gerät erworben haben. Lassen Sie nur
Original-Ersatzteile einbauen.
6. Wenn das Netzanschlusskabel beschädigt ist, darf es ausschließlich
vom Hersteller oder einem vom Hersteller autorisierten
Kundendienst oder einer qualifizierten Fachkraft (Elektrotechniker/-
in) ausgetauscht werden.
7. Berühren Sie den Netzanschlussstecker, den Netzschalter oder
andere elektrische Komponenten niemals mit nassen oder feuchten
Händen. STROMSCHLAGGEFAHR!
WARNUNG!
Zur Verringerung der Verbrennungsgefahr, Stromschlaggefahr,
Feuergefahr oder von Personenschäden:
1. Betreiben Sie das Gerät nur mit 220 - 240 V AC / 50 Hz.
2. Trennen Sie das Gerät von der Stromversorgung, bevor Sie
irgendwelche Reinigungs- oder Wartungsarbeiten an dem Gerät
vornehmen.
3. Die technischen Daten Ihrer elektrischen Versorgung müssen den
auf dem Typenschild angegebenen Werten entsprechen. Ihr
Hausstrom muss mit einem Sicherungsautomaten zur
Notabschaltung des Gerätes ausgestattet sein.
4. Das Gerät muss immer entsprechen den Anforderungen der
jeweiligen Stromversorgung geerdet werden. Der
Hauptstromkreislauf muss über eine eingebaute
Sicherheitsabschaltung verfügen.
5. Sämtliche Arbeiten, die zum Anschluss des Gerätes an die
Stromversorgung notwendig sind, dürfen nur von einer
qualifizierten Fachkraft (Elektrotechniker/-in) durchgeführt
werden.
6. Sollte es zu irgendeiner Fehlfunktion aufgrund eines technischen
Defekts kommen, trennen Sie das Gerät umgehend von der
Stromversorgung (entsprechende Haussicherung abschalten).
Melden Sie die Fehlfunktion ihrem Kundendienst, damit diese
umgehend behoben werden kann.
7. Reparieren Sie das Gerät niemals selbst. Reparaturen, die von dazu
nicht qualifizierten Personen durchgeführt werden, können zu
ernsthaften Verletzungen und Schäden führen. Nehmen Sie
stattdessen immer Verbindung zu Ihrem Kundendienst auf. Lassen
6
Page 7

Sie ausschließlich Original-Ersatzteile einbauen.
8. Verwenden Sie zum Anschluss des Gerätes keine Adapter,
Steckdosenleisten oder Verlängerungskabel. BRANDGEFAHR!
9. Falls die Oberfläche des Gerätes Risse aufweisen sollte, schalten
Sie es umgehend aus und trennen Sie es von der Stromversorgung.
STROMSCHLAGGEFAHR!
10. Nehmen Sie keine Veränderungen an dem Gerät vor.
11. Dieses Gerät darf nicht unter Zuhilfenahme eines externen Timers
oder einer vom Gerät unabhängigen Fernbedienung betrieben
werden.
12. Schalten Sie das Gerät nach Benutzung immer wie in dieser
Bedienungsanleitung beschrieben ab.
13. Der Küchenraum muss trocken und gut zu belüften sein. Wenn das
Gerät aufgebaut wird, müssen alle Kontroll- und Bedienelemente gut
zugänglich sein.
14. Die Furnierungen von Schränken müssen mit einem hitzeresistenen
Leim befestigt sein, der Temperaturen von 100
0
C widersteht.
15. Angrenzende Möbelstücke und alle zur Installation verwendeten
Materialien müssen mindestens einer Temperatur von 85 0C über der
Raumtemperatur des Raums, in dem das Gerät installiert ist,
während des Betriebs des Gerätes widerstehen können.
16. Schließen Sie das Gerät nicht in Räumen oder an Orten an, in denen
oder in deren Umgebung sich brennbare Materialien wie Benzin, Gas
oder Farben befinden. Dieser Warnhinweis bezieht sich auch auf die
Dämpfe, die durch diese Materialien freigesetzt werden.
17. Dunstabzugshauben müssen entsprechend den Anweisungen ihrer
Hersteller angebracht werden.
18. Der Sicherheitsabstand zwischen der Kochoberfläche und einem
sich darüber befindenden Schrank muss mindestens 450 mm
betragen.
19. Der Sicherheitsabstand zwischen der Kochoberfläche und einer sich
darüber befindenden Dunstabzugshaube muss mindestens 760
mm betragen.
20. Lagern Sie keine Gegenstände auf dem Kochfeld. BRANDGEFAHR!
21. Unbeaufsichtigtes Kochen mit Ölen und Fetten kann gefährlich sein
und zu einem Feuer führen. Versuchen Sie NIEMALS, ein durch Öl
oder Fett unterstütztes Feuer mit Wasser zu löschen. Stattdessen
schalten Sie das Gerät ab und ersticken Sie das Feuer mittels eines
Deckels oder einer Feuerdecke.
22. Schließen Sie das Gerät nicht in der Nähe von Vorhängen oder
Polstermöbeln an. BRANDGEFAHR.
7
Page 8

23. Haushaltsausstattungen sowie elektrische Leitungen aller Art dürfen
niemals das Gerät berühren, da deren Isolierungsmaterial durch
hohe Temperaturen beschädigt oder zerstört wird.
24. Benutzen Sie niemals einen Dampfreiniger zum Reinigen des
Gerätes. Der Dampf kann die Elektrik des Gerätes nachhaltig
beschädigen. STROMSCHLAGGEFAHR.
25. Berühren Sie niemals die Kochzonen / Kochplatten solange die
Restwärmeanzeige nicht erloschen ist. VERBRENNUNGSGEFAHR!
26. Die zugänglichen Bereiche und Teile des Kochfeldes werden bei der
Benutzung sehr heiß. Kinder müssen deshalb während der
Benutzung des Gerätes von diesem ferngehalten werden. Das Gerät
während seines Betriebs zu berühren, kann zu schweren
Verbrennungen führen.
27. Kinder dürfen nicht mit dem Gerät spielen.
28. Beaufsichtigen Sie Kinder stets, wenn diese sich in der Nähe des
Gerätes aufhalten.
29. Dieses Gerät kann von Kindern ab 8 Jahren und darüber sowie von
Personen mit verringerten physischen, sensorischen oder mentalen
Fähigkeiten oder Mangel an Erfahrung und Wissen benutzt werden,
wenn sie beaufsichtigt oder bezüglich des sicheren Gebrauchs des
Gerätes unterwiesen wurden und die daraus resultierenden
Gefahren verstehen. Kinder dürfen nicht mit dem Gerät spielen.
Reinigung und Benutzer-Wartung dürfen nicht von Kindern ohne
Beaufsichtigung durchgeführt werden.
30. Erlauben Sie Kindern nur dann, das Gerät unbeaufsichtigt zu
benutzen, wenn sie vorher in einer solchen Art und Weise im
Gebrauch des Gerätes unterwiesen wurden, dass sie das Gerät
sicher bedienen können und sich der Gefahren, die durch eine
unsachgemäße Bedienung entstehen, unbedingt bewusst sind.
31. Achten Sie beim Auspacken unbedingt darauf, dass die Bestandteile
der Verpackung nicht in die Reichweite von Kindern und Tieren
gelangen. VERLETZUNGSGEFAHR! ERSTICKUNGSGEFAHR!
32. Verwenden Sie nur Herdwächter, die vom Hersteller des Kochfeldes
entwickelt wurden oder in der Bedienungsanweisung als geeignet
angegeben sind oder im Gerät integriert sind. Die Verwendung
ungeeigneter Herdwächter kann zu Unfällen führen!
VORSICHT!
1. Benutzen Sie keine aggressiven oder ätzenden Reinigungsmittel und
keine scharfkantigen Gegenstände zum Reinigen des Gerätes, da
diese die Oberfläche verkratzen und somit Risse im Glas
verursachen.
8
Page 9

2. Schalten Sie das Kochfeld nicht an, bevor Sie ein Kochgeschirr
darauf gestellt haben.
3. Halten Sie das Kochfeld immer sauber. Verunreinigte Bereiche
geben die Kochhitze nicht komplett weiter.
4. Schützen Sie das Kochfeld gegen Verunreinigungen.
5. Schalten Sie verunreinigte Bereiche sofort ab.
6. Schalten Sie das gesamte Kochfeld ab, falls Schäden oder
Fehlfunktionen auftreten.
7. Lassen Sie kein Kochgeschirr, das zubereitetes Gargut mit Anteilen
von Fett oder Öl enthält, unbeaufsichtigt auf einer eingeschalteten
Kochzone stehen. Heiße Fette oder Öle können sich spontan
entzünden.
8. Die Klingen von Kochfeld-Reinigungsschabern sind äußerst scharf.
Schneiden Sie sich nicht an den Klingen, wenn Sie deren
Sicherheitsabdeckung entfernt haben.
9. Metallene Gegenstände wie Messer, Gabeln, Löffel und Deckel
sollten nicht auf die Oberfläche des Gerätes gelegt werden, da
diese heiß werden können.
10. Das Gerät entspricht der gegenwärtigen europäischen
Sicherheitsgesetzgebung. Wir möchten hierbei aber ausdrücklich
betonen, dass diese Entsprechung nichts an der Tatsache ändert,
dass die Oberflächen des Gerätes während der Benutzung heiß
werden und nach dem Ende der Benutzung noch Restwärme
ausstrahlen.
HINWEIS!
1. Wenn Sie das Gerät bewegen, halten Sie es immer am unteren Ende
fest und heben Sie es vorsichtig an. Halten Sie das Gerät dabei
aufrecht.
2. Stellen oder legen Sie keine schweren Gegenstände auf das
Kochfeld.
3. Benutzen Sie ausschließlich für Glaskeramik geeignetes
Kochgeschirr, da Sie ansonsten das Gerät beschädigen.
4. Das Gerät muss von mindestens zwei Personen transportiert und
angeschlossen werden.
5. Merken Sie sich die Positionen aller Teile des Gerätes, wenn Sie es
auspacken, für den Fall, es noch einmal einpacken und
transportieren zu müssen.
6. Benutzen Sie das Gerät nicht, bevor alle dazugehörigen Teile sich
ordnungsgemäß an ihren dafür vorgesehenen Stellen befinden.
7. Die Belüftungsöffnungen des Gerätes oder dessen
Einbauvorrichtung (falls Ihr Gerät für einen Einbau geeignet ist)
müssen immer frei und unbedeckt sein.
9
Page 10
8. Das Typenschild darf niemals unleserlich gemacht oder gar entfernt
werden! Falls das Typenschild unleserlich gemacht oder
entfernt wurde, entfällt jeglicher Garantieanspruch!
LESEN SIE DIESE ANLEITUNG GRÜNDLICH DURCH UND
BEWAHREN SIE DIESE SICHER AUF.
Bei Nichtbeachtung dieser Anweisungen wird keinerlei Haftung für
Personen- oder Materialschäden übernommen.
2. Installation
GEFAHR! Das Gerät darf nur durch eine qualifizierte Fachkraft
(Elektrotechniker/-in) an die Stromversorgung angeschlossen
werden, welche die landesüblichen gesetzlichen Verordnungen und die
Zusatzvorschriften der örtlichen Stromversorgungsunternehmen genau
kennt und sorgfältig beachtet. Führen Sie die Installation niemals
eigenständig aus. STROMSCHLAGGEFAHR!
GEFAHR! Alle elektrischen Arbeiten müssen von einer
qualifizierten Fachkraft (Elektrotechniker/-in) durchgeführt werden.
Es dürfen keine Änderungen oder willkürlichen Veränderungen an der
Stromversorgung durchgeführt werden. Der Anschluss muss in
Übereinstimmung mit den örtlich geltenden gesetzlichen Bestimmungen
erfolgen. STROMSCHLAGGEFAHR!
WARNUNG! Der Sicherheitsabstand zwischen der Kochoberfläche
und einem sich darüber befindenden Schrank muss mindestens 450 mm
betragen.
WARNUNG! Der Sicherheitsabstand zwischen der Kochoberfläche
und einer sich darüber befindenden Dunstabzugshaube muss
mindestens 760 mm betragen.
VORSICHT! Das Gerät darf nicht über Kühlgeräten,
Geschirrspülmaschinen und Wäschetrocknern installiert werden.
10
Page 11

VORSICHT! Lassen Sie das Gerät so installieren, dass eine optimale
Wärmeabstrahlung zur Aufrechterhaltung der Betriebssicherheit
ermöglicht wird.
VORSICHT! Die Wand und die Einflussbereiche der
Wärmeabstrahlung oberhalb der Arbeitsplatte müssen hitzeresistent sein.
VORSICHT! Zur Vermeidung von Schäden müssen die
Verbundschichten und Kleber hitzeresistent sein.
2.1 Entpacken und Wahl des Standorts
1. Packen Sie das Gerät vorsichtig aus. Beachten Sie unbedingt die Hinweise zur
Entsorgung des Gerätes in dieser Bedienungsanleitung.
2. Das Gerät ist möglicherweise für den Transport mit Transportsicherungen
geschützt. Entfernen Sie diese komplett. Benutzen Sie keine aggressiven
Reinigungsmittel, um Reste der Transportsicherungen zu entfernen.
3. Überprüfen Sie vor dem Anschluss des Gerätes, ob das Netzanschlusskabel oder
das Gerät selbst keine Beschädigungen aufweisen.
4. Schließen Sie das Gerät ausschließlich an einer zugewiesenen und
ordnungsgemäß geerdeten Anschlussdose an.
5. Stellen Sie das Gerät nicht an einem Ort auf, an dem es mit Wasser oder Regen
in Kontakt kommen kann, damit die Isolierungen der Elektrik keinen Schaden
nehmen.
6. Schließen Sie da Gerät ordnungsgemäß an die Stromversorgung an.
2.2 Anforderungen vor der Installation
Die Arbeitsplatte muss rechteckig und eben sein und aus hitzeresistentem
Material bestehen.. Es dürfen keine Bauteile die Installationsfläche
beeinträchtigen.
Die Installation muss allen Sicherheitsanforderungen und relevanten Normen
und gesetzlichen Bestimmungen entsprechen.
Verwenden Sie hitzeresistente und leicht zu reinigende Wandabschlüsse wie
Keramikfliesen für die das Kochfeld umgebende Wandoberfläche.
Schranktüren und Schubladen dürfen nicht mit dem Netzanschlusskabel in
Kontakt kommen.
Das Gerät benötigt eine angemessene Frischluftzufuhr von außen zu seiner
Unterseite.
Wenn das Gerät über einem Backofen installiert wird, muss der Backofen über
eine Gehäusekühlung verfügen.
Installieren Sie eine Thermalschutzsperre unterhalb der Unterseite des Gerätes,
wenn Sie es über einer Schublade oder einem Schrank einbauen.
11
Page 12
Der Trennschutzschalter muss leicht zugänglich sein.
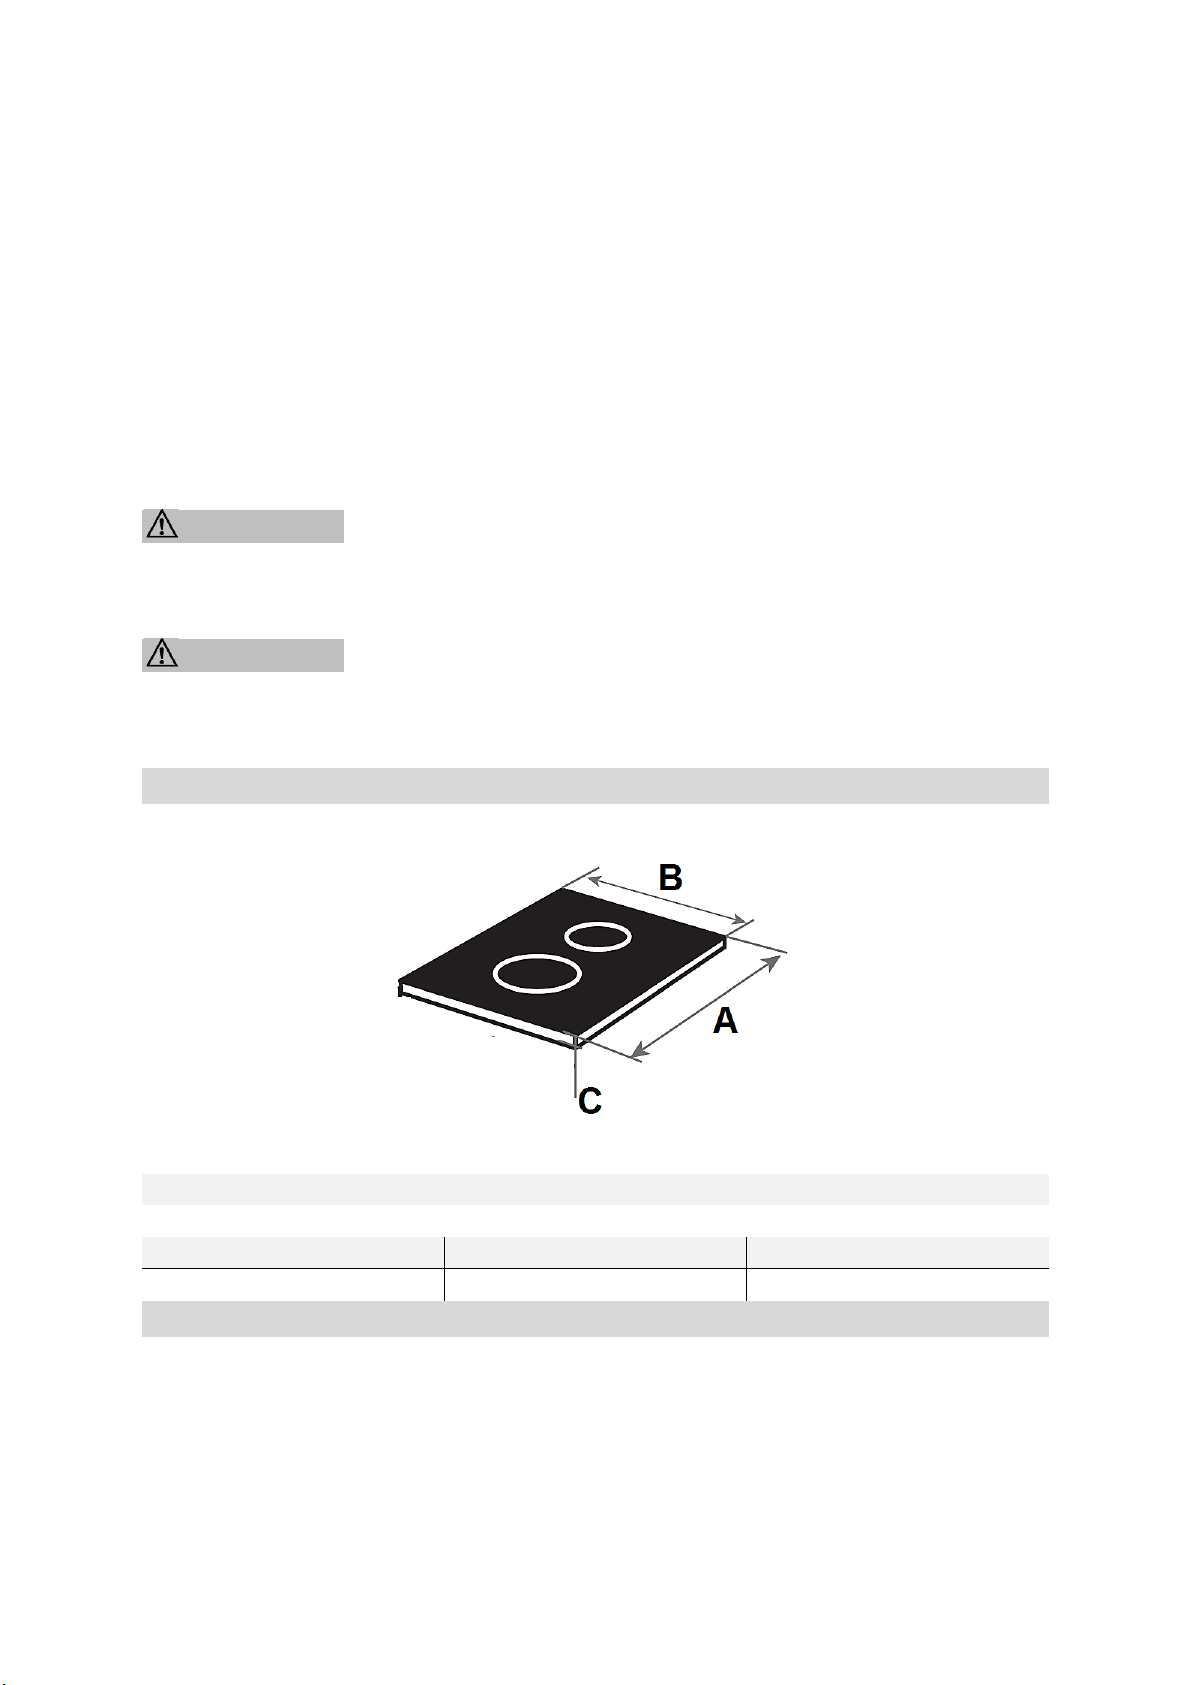
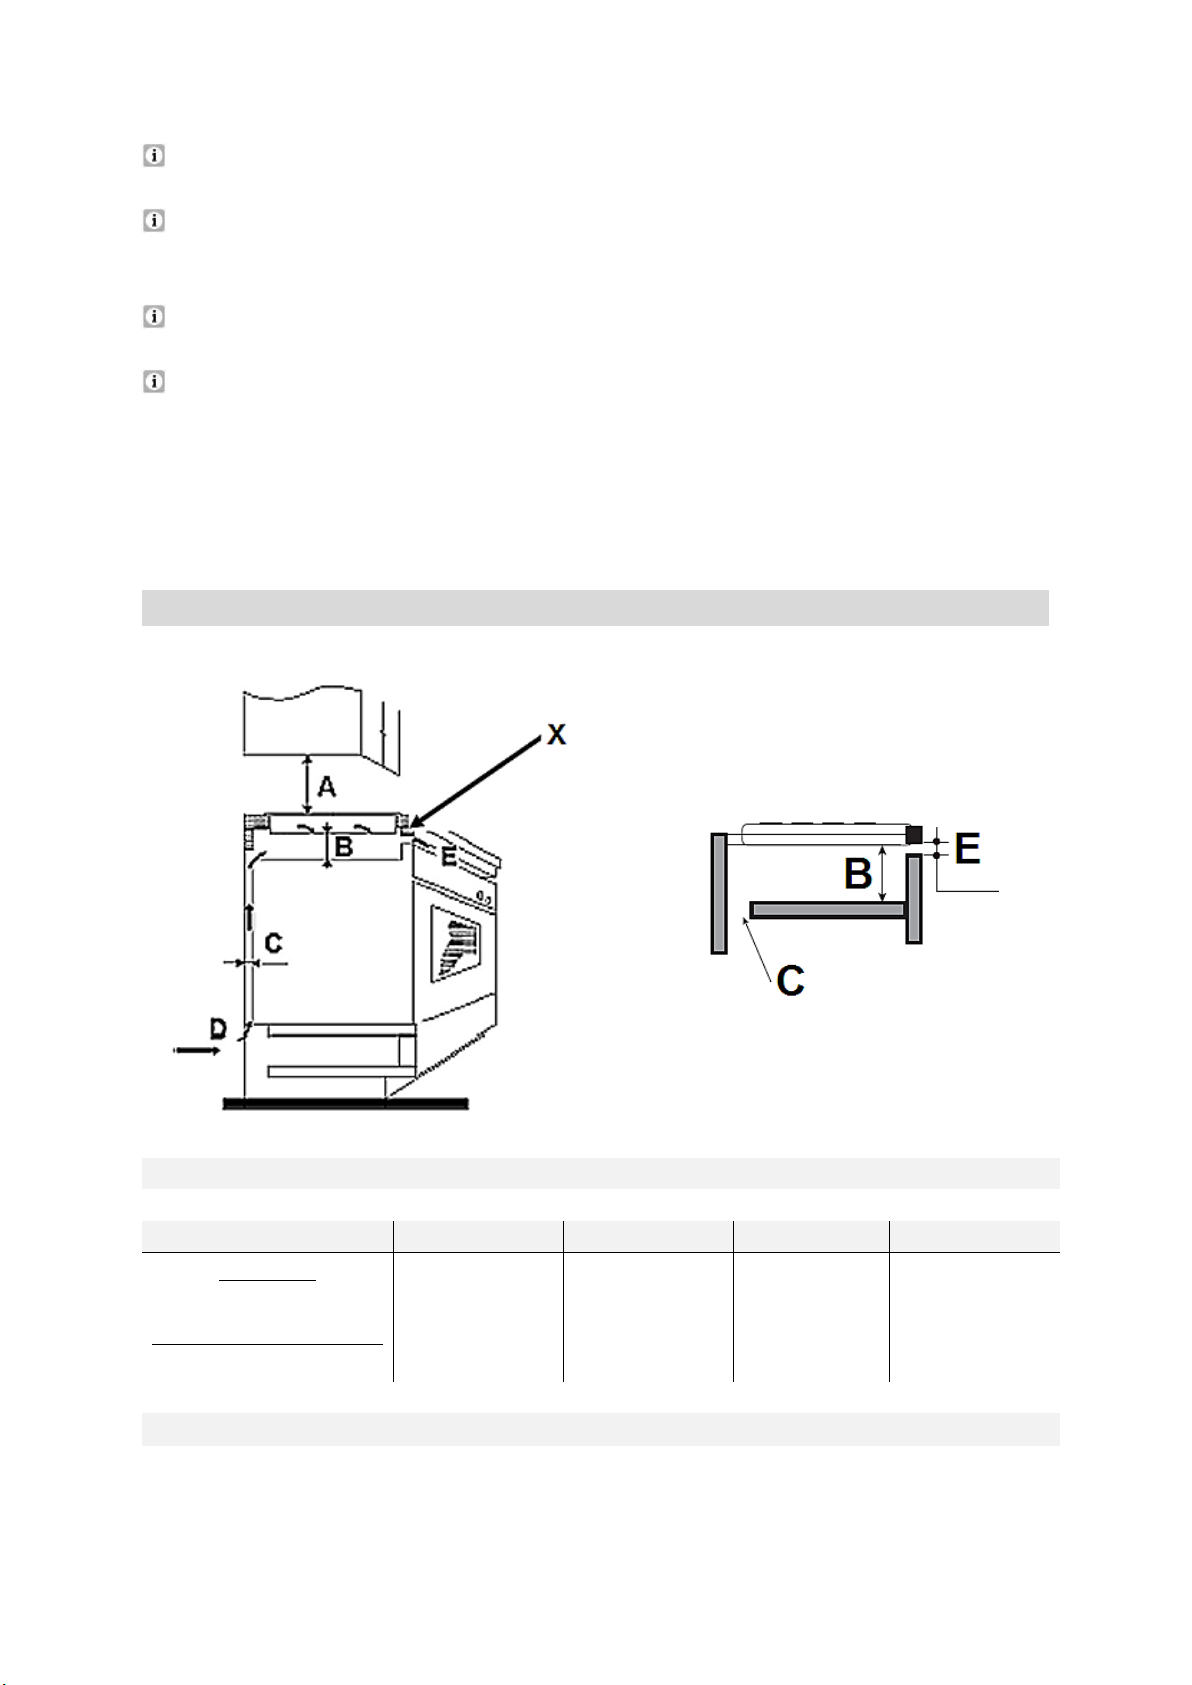
MAßE DES KOCHFELDES:
A = TIEFE / B = BREITE / C = HÖHE
A B C
520 mm
288 mm
47 mm
MAßE DER EINBAUÖFFNUNG:
2.3 Auswahl der Installationsumgebung / Maßangaben
Schneiden Sie die Einbauöffnung entsprechend der Angaben der Zeichnung in die
Arbeitsplatte. Stellen Sie für die Installation und Benutzung einen Mindestfreiraum
von 50 mm um die Öffnung herum bereit. Die Dicke der Arbeitsplatte muss
mindestens 30 mm betragen. Verwenden Sie für die Arbeitsplatte ausschließlich
hitzeresistentes Material, um Deformationen aufgrund der Wärmeabstrahlung des
Kochfeldes zu vermeiden.
WARNUNG! Der Sicherheitsabstand zwischen der Kochoberfläche
und einem sich darüber befindenden Schrank muss mindestens 450 mm
betragen.
WARNUNG! Der Sicherheitsabstand zwischen der Kochoberfläche
und einer sich darüber befindenden Dunstabzugshaube muss
mindestens 760 mm betragen.
12
Page 13
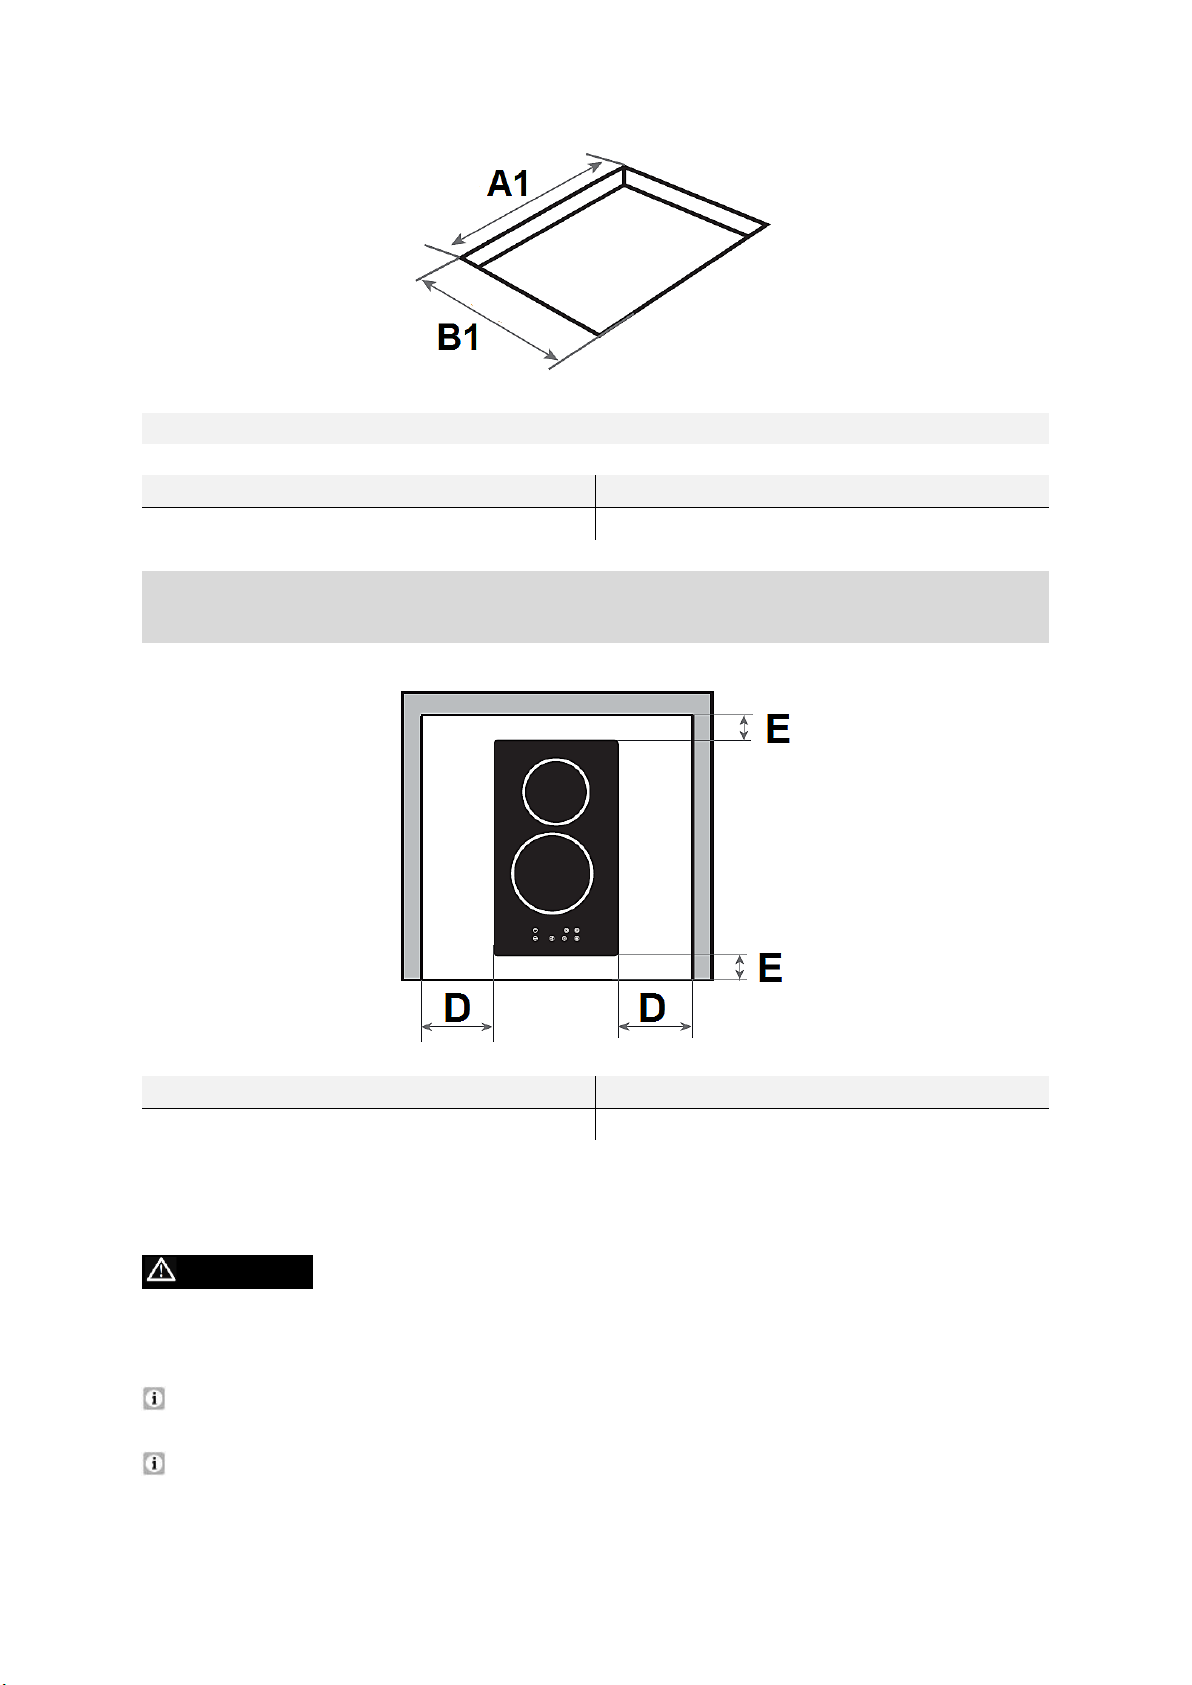
A 1 = TIEFE / B 1 = BREITE
A 1
B 1
500 mm
268 mm
ERFORDERLICHER MINDESTFREIRAUM UM DIE
EINBAUÖFFNUNG HERUM:
D
E
mind. 50 mm
mind. 50 mm
2.4 Einbau des Kochfeldes
GEFAHR! Das Kochfeld muss von einer qualifizierten Fachkraft
installiert werden. Führen Sie die Installation niemals eigenständig aus.
STROMSCHLAGGEFAHR!
Der Sicherheitsabstand zwischen der Kochoberfläche und einem sich
darüber befindenden Schrank muss mindestens 450 mm betragen.
Der Sicherheitsabstand zwischen der Kochoberfläche und einer sich
darüber befindenden Dunstabzugshaube muss mindestens 760 mm
betragen.
13
Page 14
Das Gerät darf nicht über Kühlgeräten, Geschirrspülmaschinen und
MINDESTABSTÄNDE FÜR EINE ORDNUNGSGEMÄßE BELÜFTUNG:
C = BELÜFTUNGSSCHLITZ / E = LUFTAUSLASS
A
B C D
E
Schrank
mind. 450 mm
Dunstabzugshaube
mind. 760 mm
mind. 50 mm
mind. 30 mm
Lufteinlass
mind. 15 mm
X
obere Abschlusskante des Einbaumöbels
Wäschetrocknern installiert werden.
Lassen Sie das Gerät so installieren, dass eine optimale
Wärmeabstrahlung zur Aufrechterhaltung der Betriebssicherheit
ermöglicht wird.
Die Wand und die Einflussbereiche der Wärmeabstrahlung oberhalb
der Arbeitsplatte müssen hitzeresistent sein.
Zur Vermeidung von Schäden müssen die Verbundschichten und
Kleber hitzeresistent sein.
Das Kochfeld muss unbedingt ordnungsgemäß belüftet werden. Der Lufteinlass
(D) und Luftauslass (E) dürfen in keiner Weise blockiert sein (s. Abb. unten). Das
Gerät muss sich immer im ordnungsgemäßen Zustand befinden.
Die obere Abschlusskante des Einbaumöbels (X) darf nicht direkt an die
Einbauöffnung anschließen (1). Bringen Sie die Abschlusskante versetzt an (2)
oder schrägen Sie die Abschlusskante ab (3).
14
Page 15
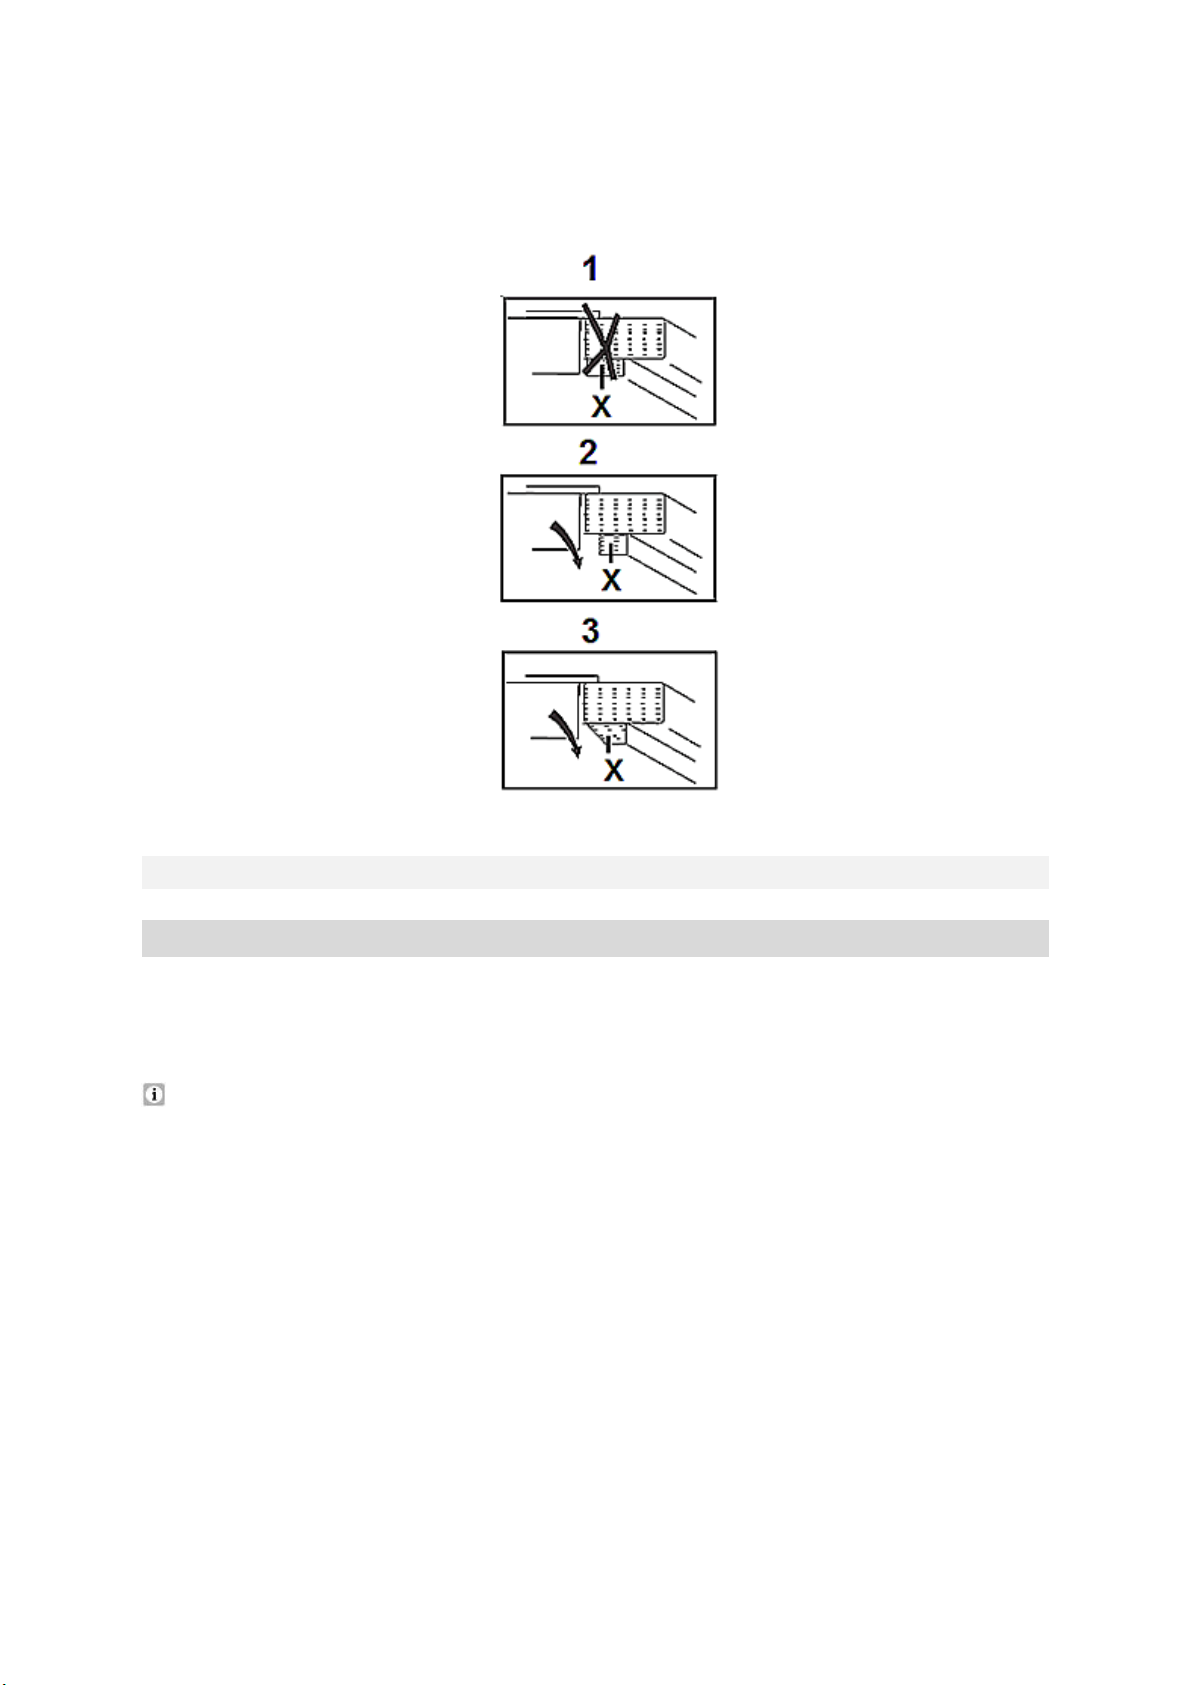
X
obere Abschlusskante des Einbaumöbels
EINBAU DES KOCHFELDES:
s. Abb. unten
1. Bevor Sie das Kochfeld in die Arbeitsplatte einbauen befestigen Sie die
selbstklebende Dichtung ordnungsgemäß an der unteren Kante des Kochfeldes.
Die Dichtung muss ordnungsgemäß befestigt werden. Die äußere Seite der
Dichtung muss mit der äußeren unteren Kante des Kochfeldes übereinstimmen
(s. Abb. unten). Die Dichtung muss fest an der Unterkante des Kochfeldes
anliegen (keine Überlappungen, keine Lücken etc.) um zu verhindern, dass später
Flüssigkeit etc. in die Einbauöffnung eindringen kann.
15
Page 16
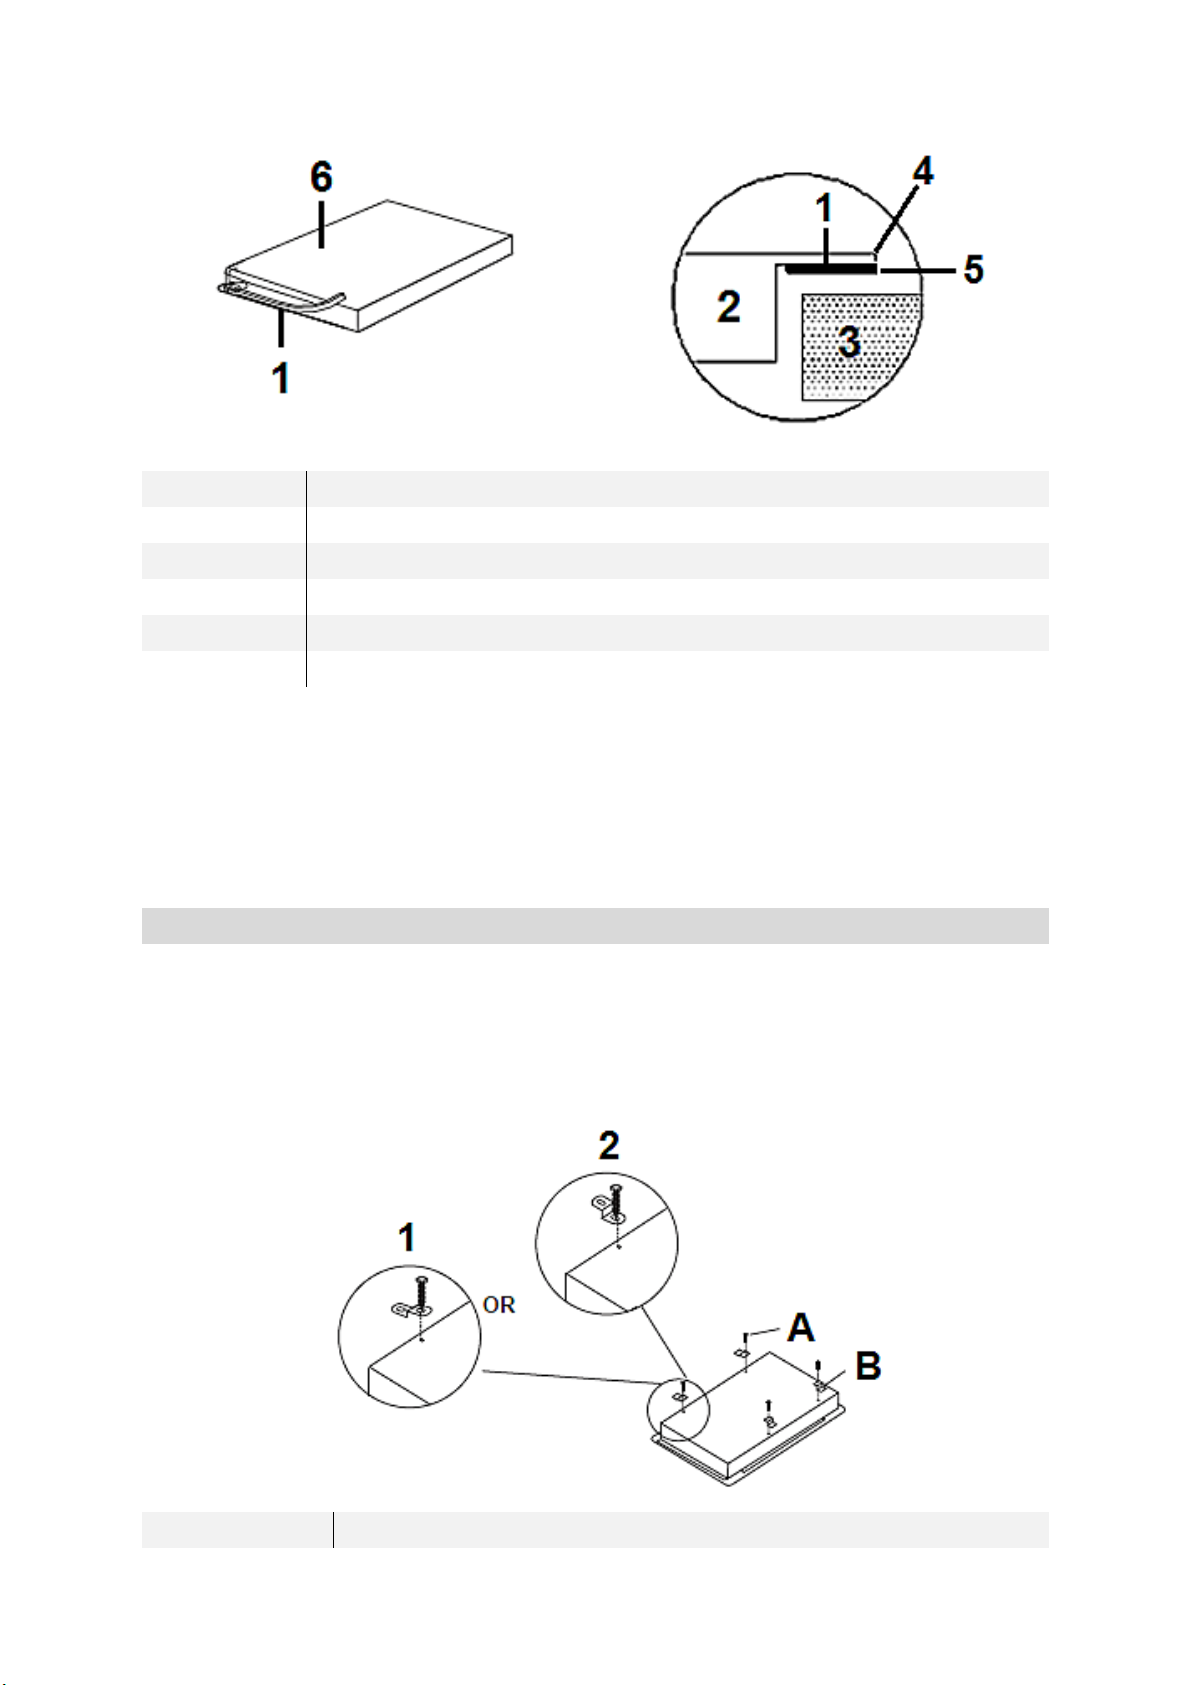
1
Dichtung
2
Kochfeld
3
Arbeitsplatte
4
Äußere Kante des Kochfeldes
5
Äußere Seite der Dichtung
6
Unterseite des Kochfeldes
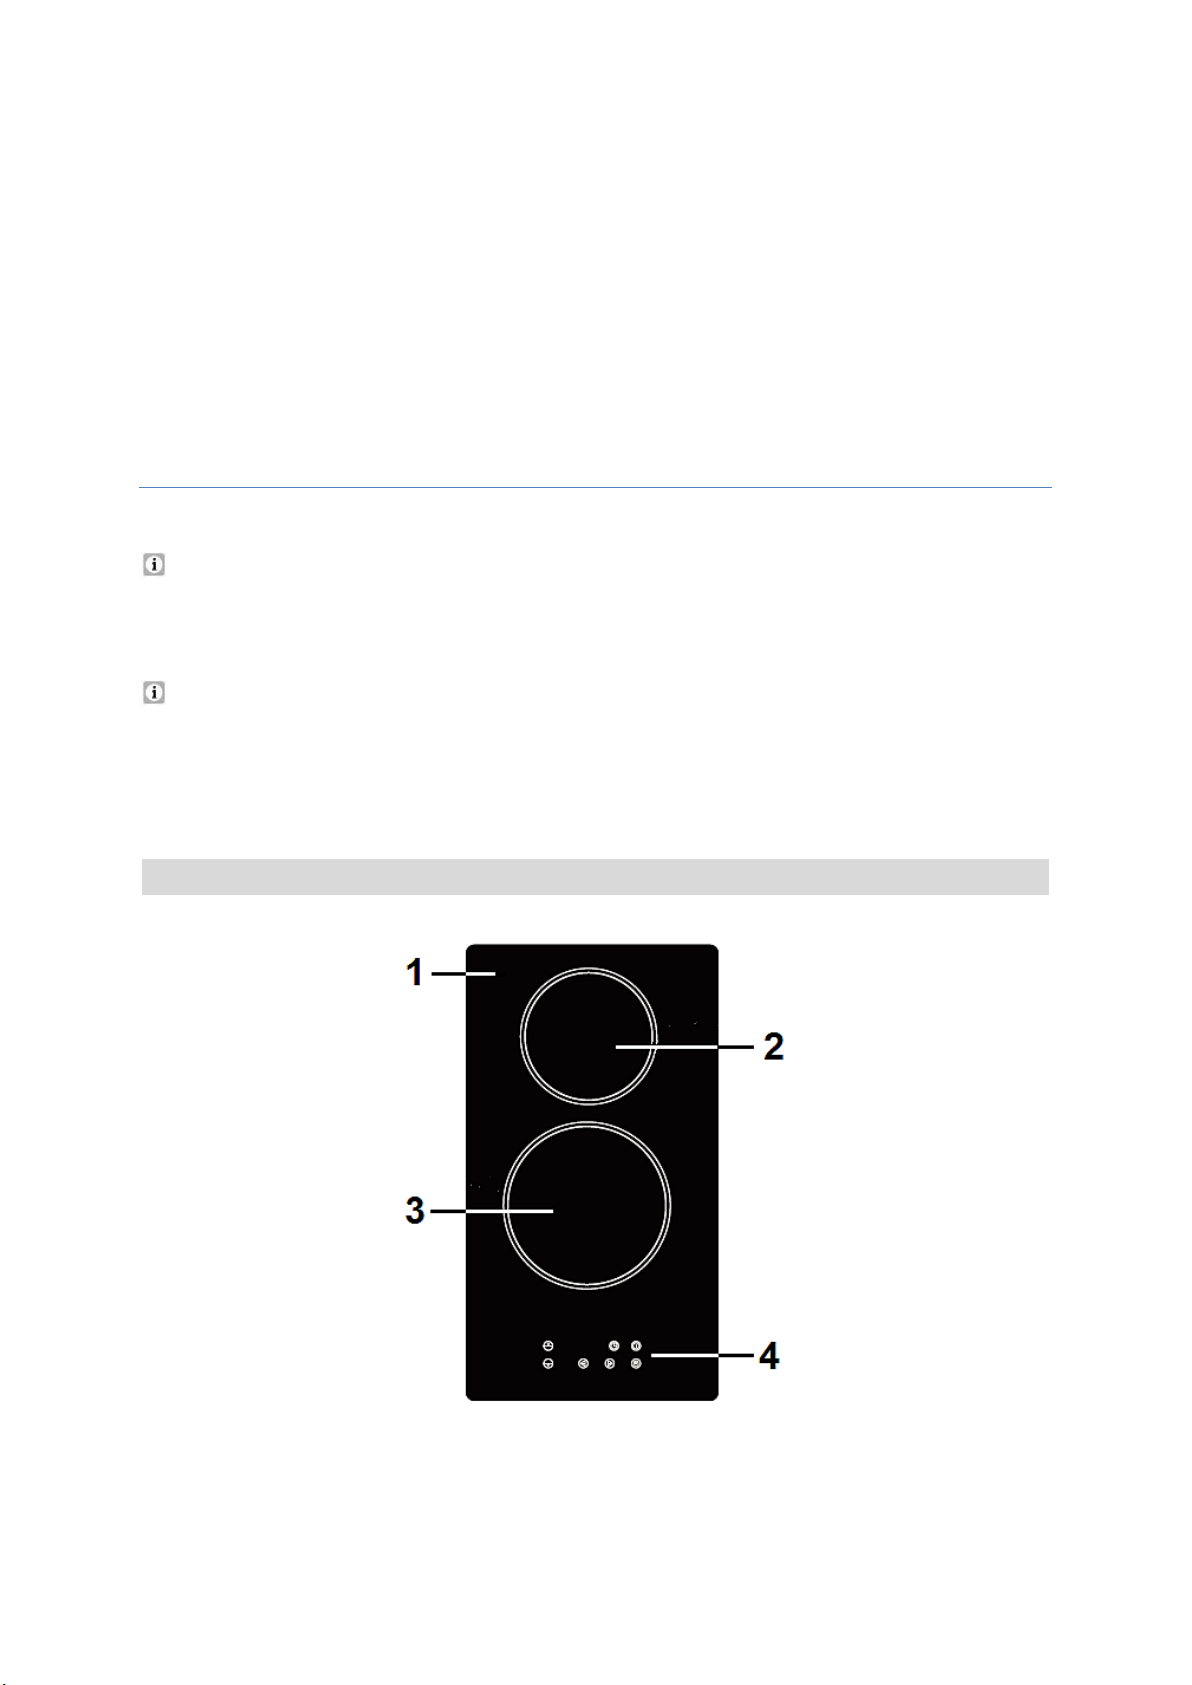
BEFESTIGUNG DER HALTEKLAMMERN:
A
Schraube
2. Setzen Sie das Kochfeld in die Einbauöffnung ein und drücken Sie es vorsichtig
nach unten, bis es fest auf der Arbeitsplatte aufliegt.
3. Befestigen Sie das Kochfeld mit den Halteklammern auf der Unterseite der
Arbeitsplatte (s. unten / BEFESTIGUNG DER HALTEKLAMMERN).
1. Befestigen Sie die Halteklammern mit den dazugehörigen Schrauben an der
Unterseite des Kochfeldes, indem Sie das eine Ende der Halteklammern in die
vorgebohrten Löcher einschrauben (wie unten in Abbildung 1 oder 2 gezeigt).
16
Page 17

B
Halteklammer
2. Befestigen Sie das andere Ende der Halteklammern mit den dazugehörigen
Schrauben an der Unterseite der Arbeitsplatte, um das Kochfeld fest und sicher
zu installieren.
2.5 Elektrischer Anschluss
GEFAHR! Das Gerät darf nur durch eine qualifizierte Fachkraft
(Elektrotechniker/-in) an die Stromversorgung angeschlossen
werden, welche die landesüblichen gesetzlichen Verordnungen und die
Zusatzvorschriften der örtlichen Stromversorgungsunternehmen genau
kennt und sorgfältig beachtet. STROMSCHLAGGEFAHR!
GEFAHR! Alle elektrischen Arbeiten müssen von einer
qualifizierten Fachkraft (Elektrotechniker/-in) durchgeführt werden.
Es dürfen keine Änderungen oder willkürlichen Veränderungen an der
Stromversorgung durchgeführt werden. Der Anschluss muss in
Übereinstimmung mit den örtlich geltenden gesetzlichen Bestimmungen
erfolgen. STROMSCHLAGGEFAHR!
GEFAHR! Führen Sie die Installation niemals eigenständig aus.
STROMSCHLAGGEFAHR!
HINWEISE FÜR DIE QUALIFIZIERTE FACHKRAFT
(ELEKTROTECHNIKER/-IN):
1. Verwenden Sie zum Anschluss des Gerätes ausschließlich einen Schuko-Stecker
und eine ordnungsgemäß geerdete Sicherheits-Netzanschlussdose.
2. Ihr Hausstromnetz muss für die Leistungsaufnahme des Gerätes geeignet sein.
3. Die Stromspannung muss den auf dem Typenschild angegebenen Werten
entsprechen.
4. Das Netzanschlusskabel muss den auf dem Typenschild angegebenen Werten
widerstehen können.
5. Verwenden Sie zum Anschluss keine Adapter, Spannungsminderer oder
Verzweigungsvorrichtungen, da diese zu einer Überhitzung führen können.
BRANDGEFAHR!
6. Das Netzanschlusskabel darf keine heißen Bereiche berühren und muss dergestalt
verlegt werden, dass seine Temperatur 750 C nicht übersteigt.
7. Wenn die Netzsteckdose für den Benutzer nicht mehr zugänglich ist oder ein
Festanschluss des Gerätes erforderlich ist, muss bei der Installation eine
Trennvorrichtung für jeden Pol eingebaut werden. Als Trennvorrichtung werden
Schalter mit einer Kontaktöffnung von mindestens 3 mm bezeichnet. Dazu
17
Page 18
gehören LS-Schalter, Sicherungen und Schütze (EN 60335). Die
KOCHFELD:
Stromversorgung des Gerätes muss über einen 16 A Sicherungsautomaten
erfolgen. Fragen Sie im Zweifelsfall die örtlichen Baubehörde um Rat und
informieren Sie sich über die entsprechenden Rechtsvorschriften.
8. Das Netzanschlusskabel darf nicht geknickt oder gepresst werden.
9. Überprüfen Sie das Netzanschlusskabel regelmäßig. Das Netzanschlusskabel darf
nur von einer qualifizierten Fachkraft (Elektrotechniker/-in) ausgetauscht
werden.
3. Bedienung
Lesen Sie die komplette Bedienungsanleitung, bevor Sie das Gerät
erstmalig in Betreib nehmen. Beachten Sie hierbei besonders die
Sicherheits- und Warnhinweise!
Entfernen Sie alle Schutzfolien, die sich noch an dem Gerät befinden
können.
3.1 Kochfeld und Bedienfeld
18
Page 19
1
GLASKERAMIKPLATTE
2
KOCHZONE / Ø 145 mm / max. 1200 W
3
KOCHZONE / Ø 180 mm / max. 1800 W
4
BEDIENFELD (s. unten)
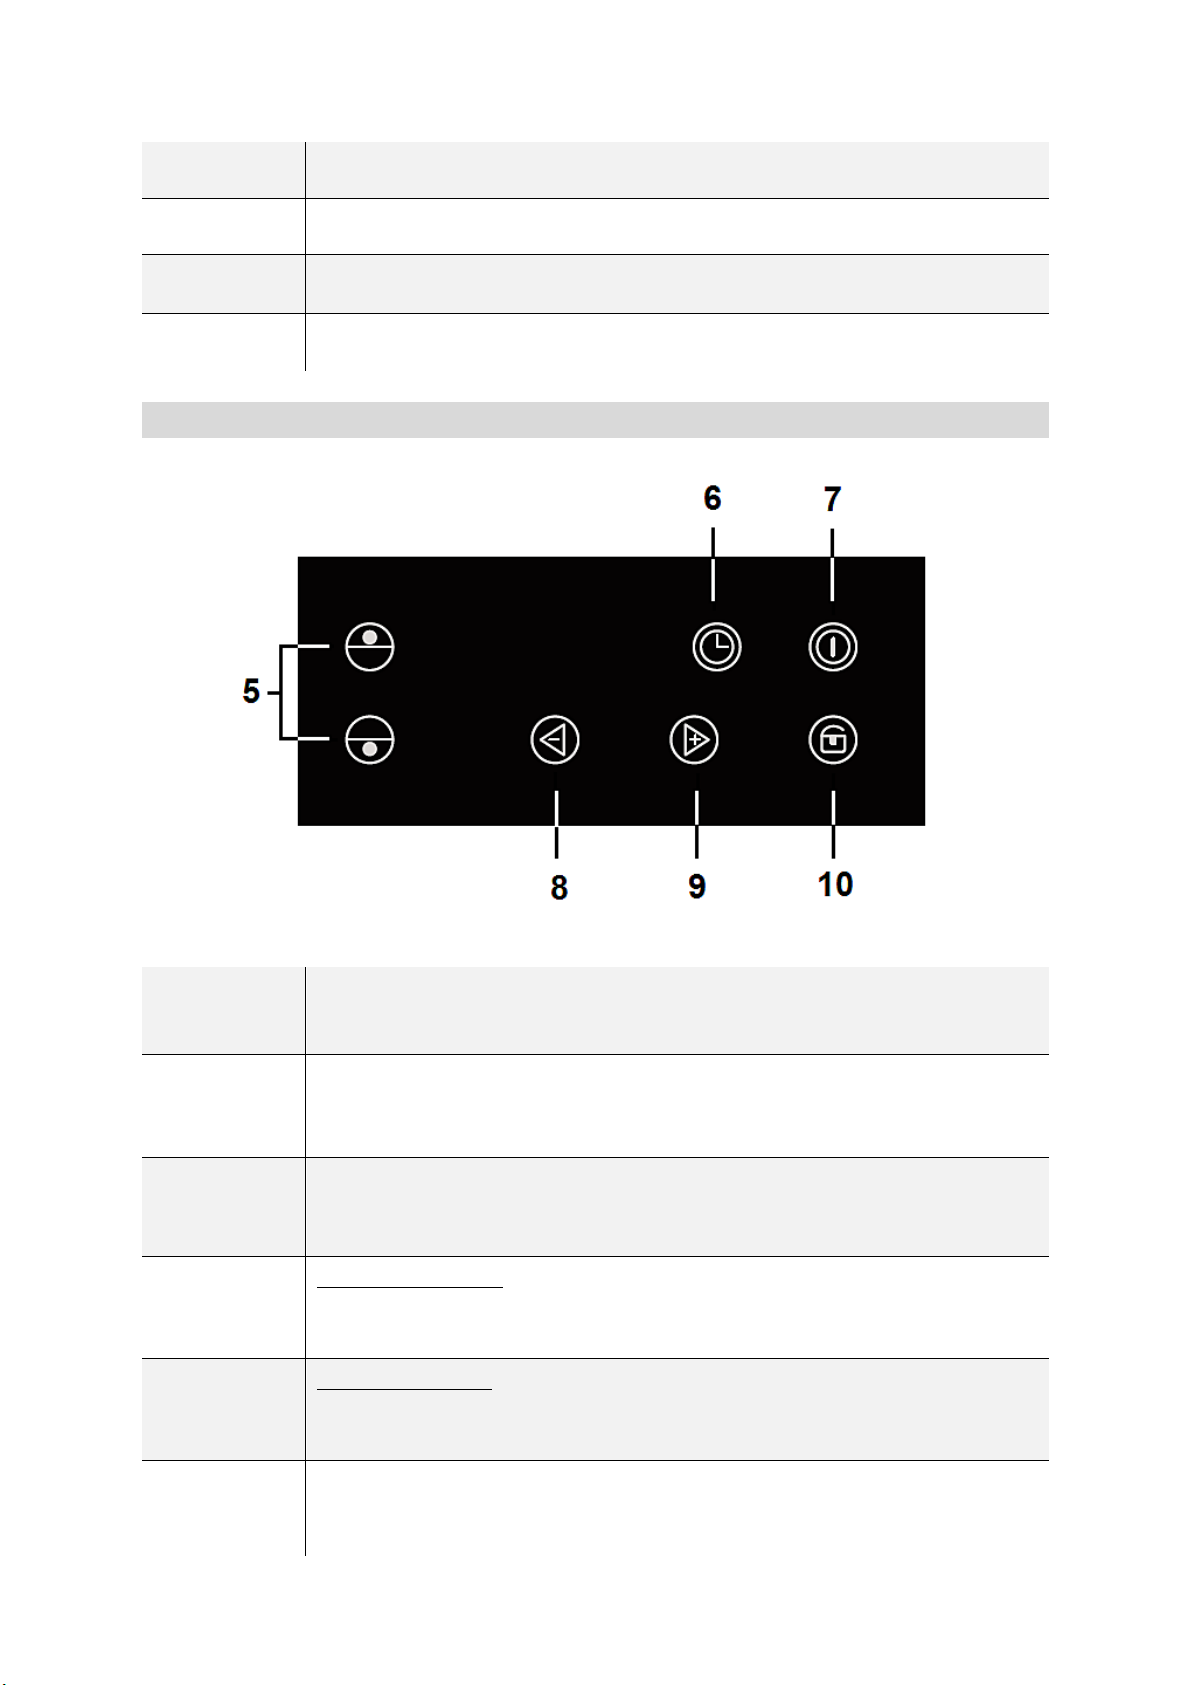
BEDIENFELD:
5
Sensortasten zur AUSWAHL DER KOCHZONEN
6
TIMER
7
Sensortaste: AN / AUS
8
SENSORTASTE: +
Zur Auswahl der Leistungsstufen der Kochzonen (1 - 9)
Zur Einstellung desTimers
9
SENSORTASTE: -
Zur Auswahl der Leistungsstufen der Kochzonen (1 - 9)
Zur Einstellung desTimers
10
TASTENSPERRE / KINDERSICHERUNG
19
Page 20
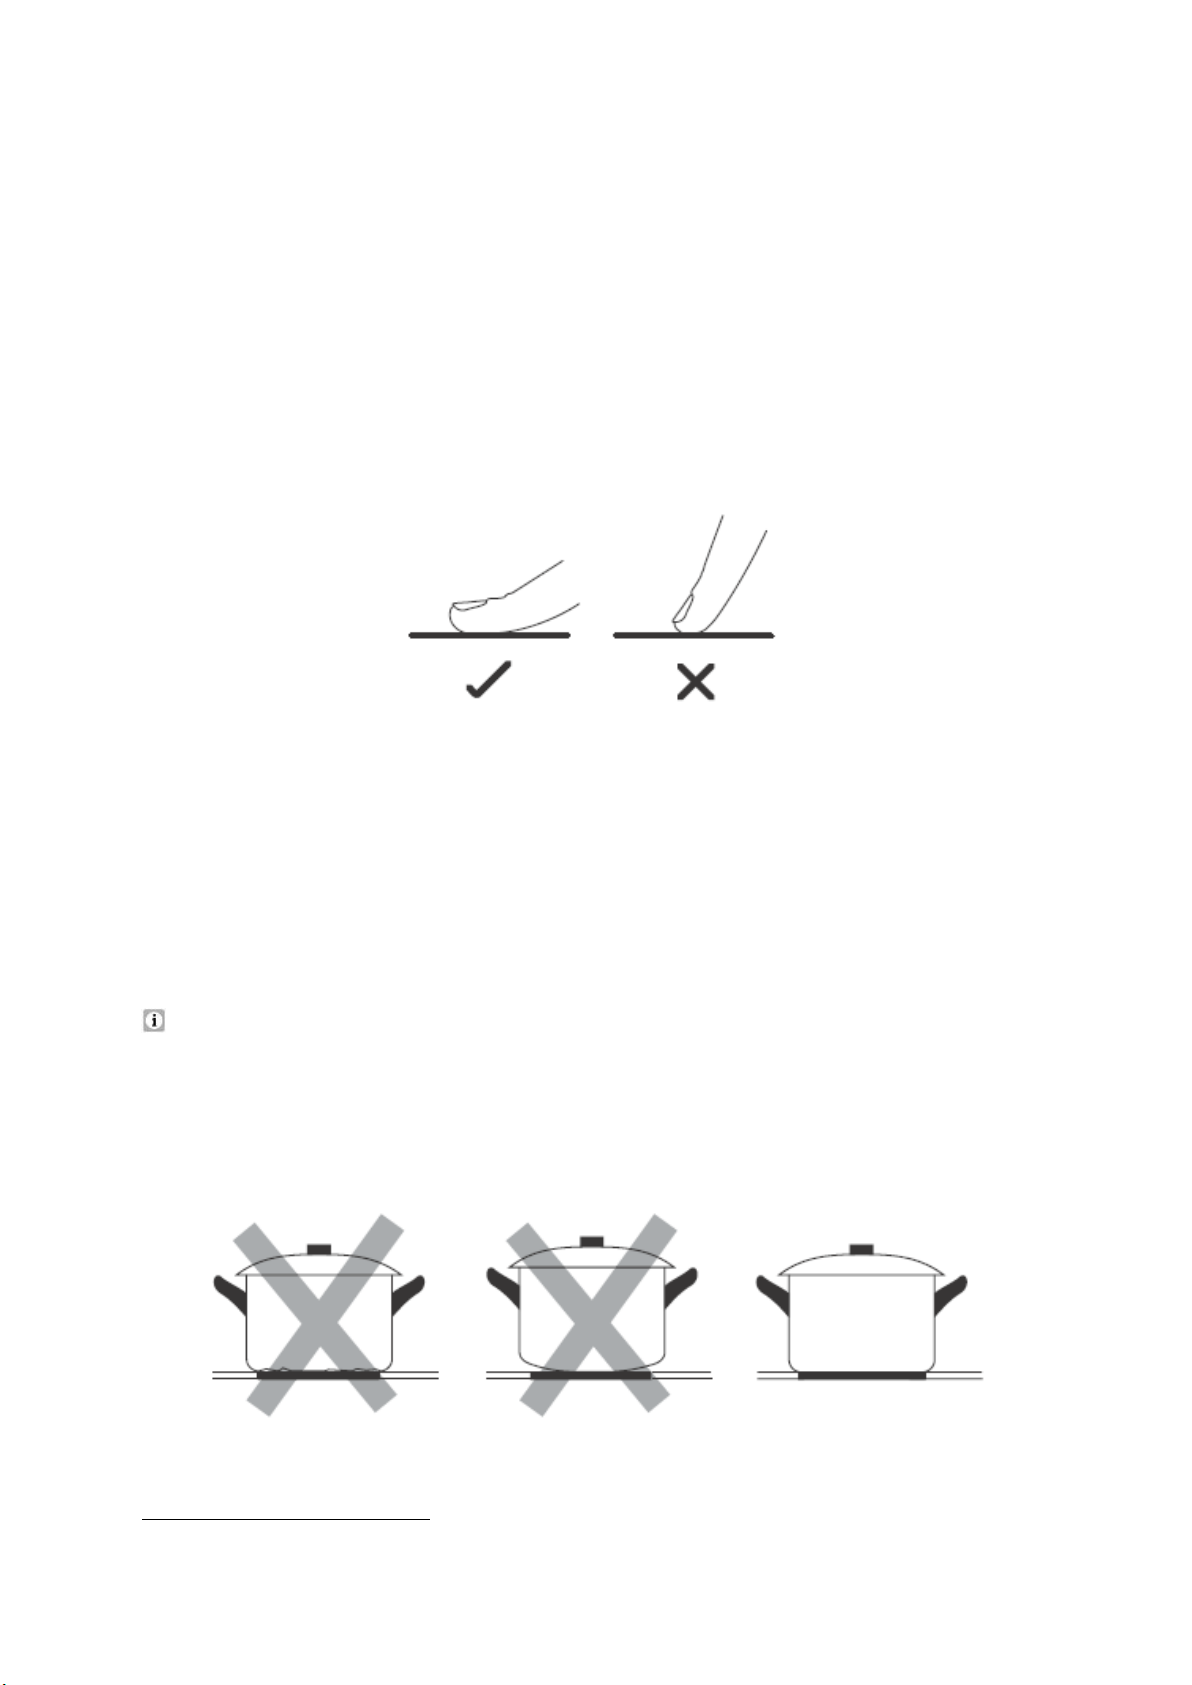
3.2 Bedienung der Sensoren
1
1
Die Sensortasten reagieren auf Berührung, so dass Sie keinen Druck ausüben
brauchen.
Berühren Sie die Sensoren mit der Unterseite des oberen Fingerglieds, nicht aber
mit der Fingerspitze (siehe Abbildung unten).
Sie hören nach jeder erfolgreichen Eingabe ein akustisches Signal
(Piepen).
Halten Sie den Kontrollbereich immer sauber und trocken. Lassen Sie keine
Gegenstände wie Kochutensilien oder Lappen den Kontrollbereich abdecken.
Schon ein dünner Film aus Wasser kann die Benutzung der Sensortasten
schwierig machen.
3.3 Vor der ersten Benutzung
Reinigen Sie die Oberfläche des Gerätes (siehe Kapitel REINIGUNG UND
PFLEGE).
3.4 Geeignetes Kochgeschirr
Verwenden Sie nur Kochgeschirr, das einen für Glaskeramik geeigneten
Boden aufweist.
Verwenden Sie kein Kochgeschirr mit zackigen oder scharfen Kanten und rauen
oder gekrümmten Böden.
Ausstattung abhängig vom Modell
20
Page 21
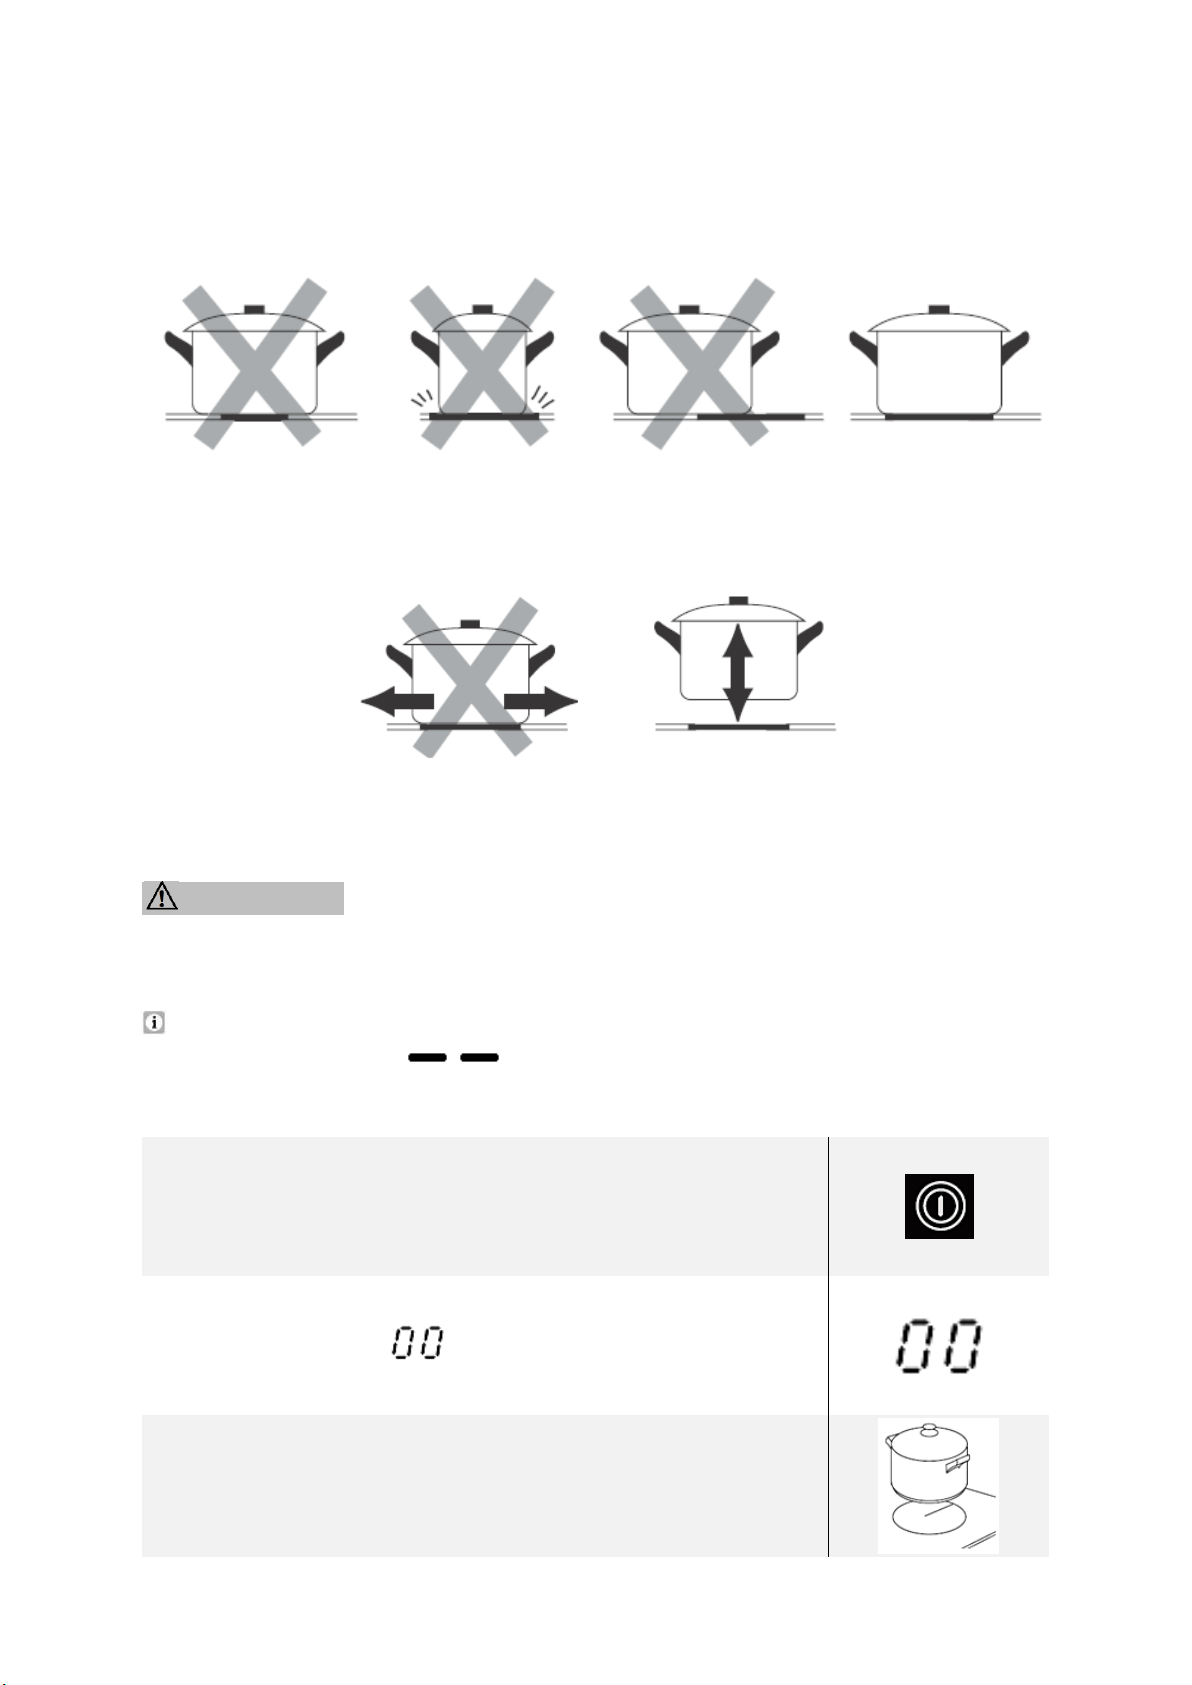
Der Boden Ihres Kochgeschirrs sollte gerade sein, flach auf der Glaskeramik
1. Berühren Sie den AN / AUS Sensor.
2. Das Display zeigt .
3. Stellen Sie ein geeignetes Kochgeschirr auf die
GEWÜNSCHTE KOCHZONE. Die Unterseite des
Kochgeschirrs sowie die Kochzone sollten dabei stets
sauber und trocken sein.
aufliegen und denselben Durchmesser wie die ausgewählte Kochzone aufweisen.
Zentrieren Sie das Kochgeschirr immer auf der Kochzone.
Heben Sie das Kochgeschirr immer an, wenn Sie es auf dem Kochfeld bewegen.
Schieben Sie es nicht über die Glaskeramik, da Sie diese ansonsten verkratzen
können.
3.5 Einen Kochvorgang beginnen
WARNUNG! Berühren Sie niemals die Kochzonen / Kochplatten
solange die Restwärmeanzeige nicht erloschen ist.
VERBRENNUNGSGEFAHR!
Nachdem Sie das Gerät eingeschaltet haben, ertönt das akustische Signal einmal;
alle Anzeigen zeigen . Daran erkennen Sie , dass sich das Gerät nun im
Stand-by Modus befindet.
21
Page 22
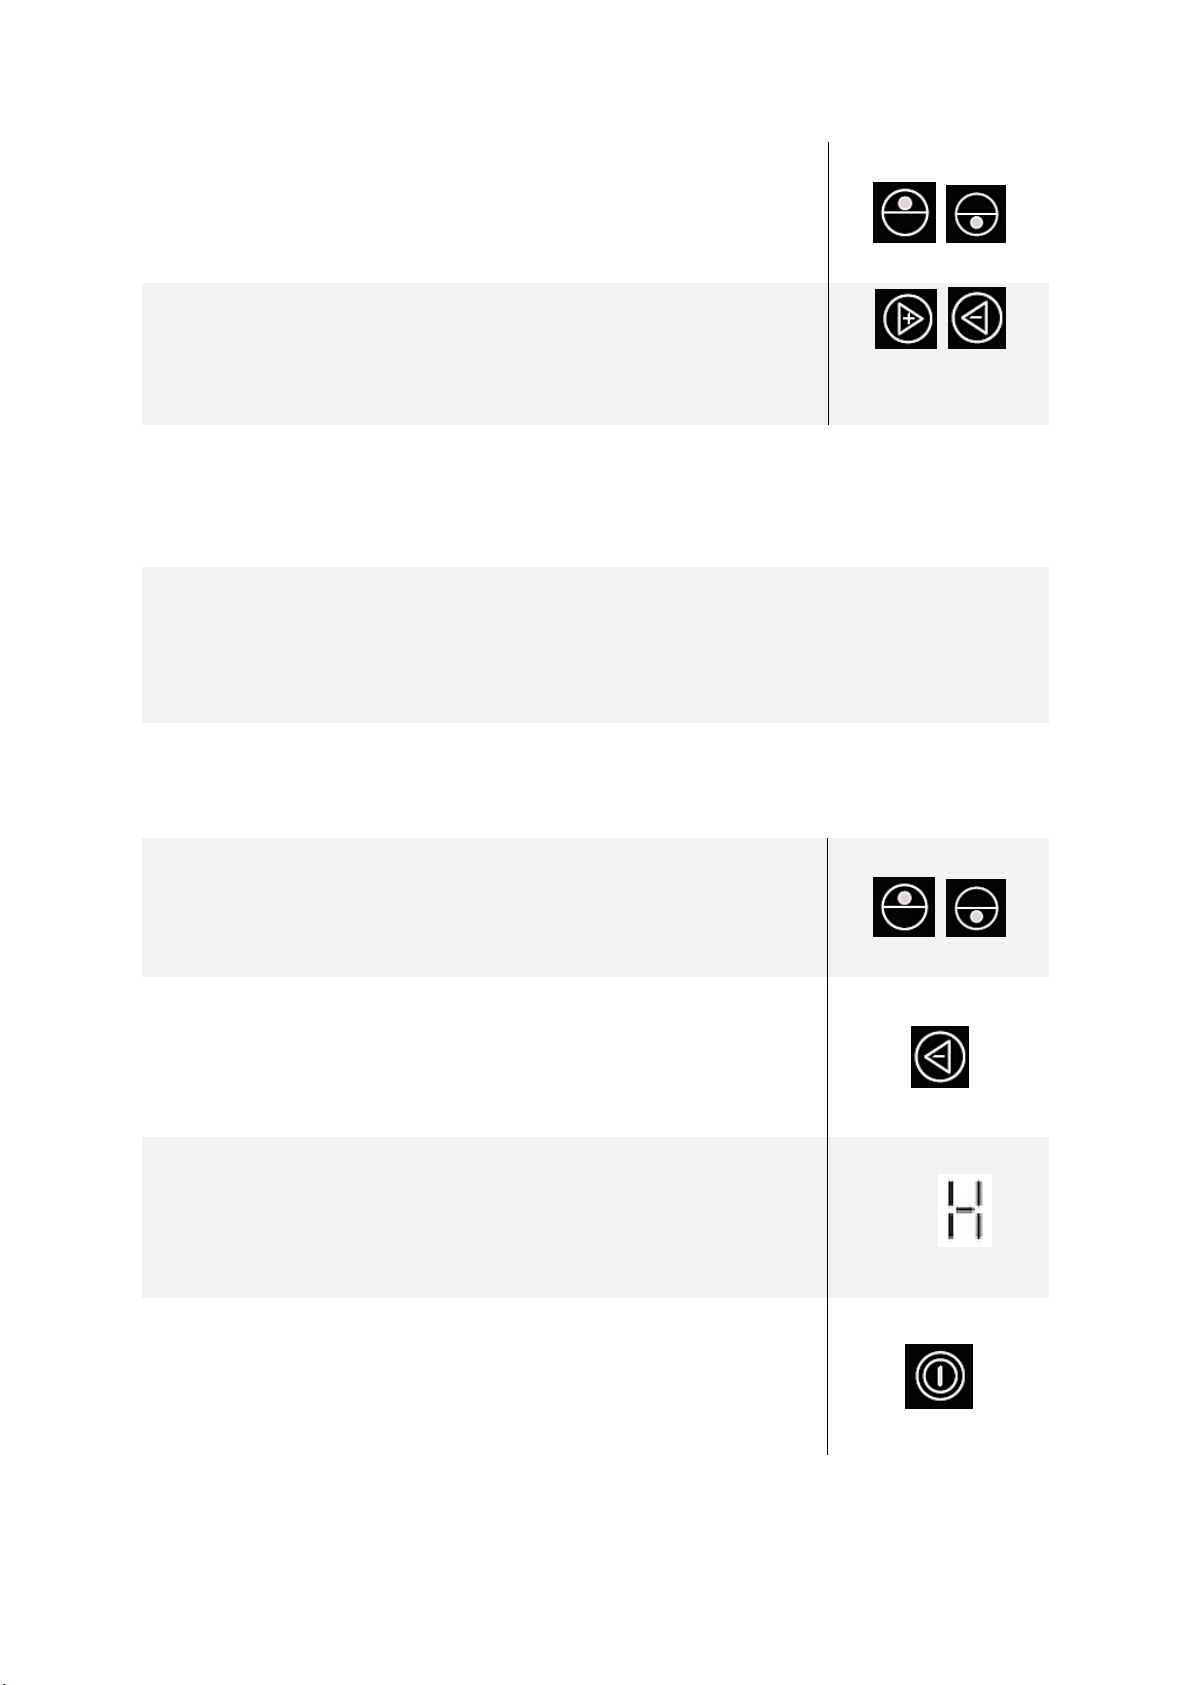
4. Wählen Sie eine Kochzone mit der entsprechenden
Sensortaste für die AUSWAHL DER KOCHZONE. Die
entsprechende Anzeige blinkt für 5 Sekunden.
5. Stellen Sie die Leistungsstärke mit dem + und - Sensor ein.
Jede Kochzone ist mit 9 Leistungsstufen ausgestattet (1 -
9).
1 - 9
6. Wenn Sie innerhalb 1 Minute keine Einstellung vornehmen, schaltet sich das
Gerät automatisch ab. Sie begännen nun wieder mit Schritt 1.
7. Sie können die Einstellung der Leistungsstärke während des Kochens jederzeit
ändern.
1. Berühren Sie in der AUSWAHL DER KOCHZONEN den
Sensor der Kochzone, die Sie abschalten wollen.
2. Schalten Sie nun die ENTSPRECHENDE KOCHZONE aus,
indem Sie sie mit dem - Sensor auf 0 stellen.
3. Überprüfen Sie, ob die Anzeige 0 und dann H anzeigt.
0 /
4. Schalten Sie das Gerät mit dem AN / AUS Sensor ab.
3.6 Nach Beendigung eines Kochvorgangs
22
Page 23
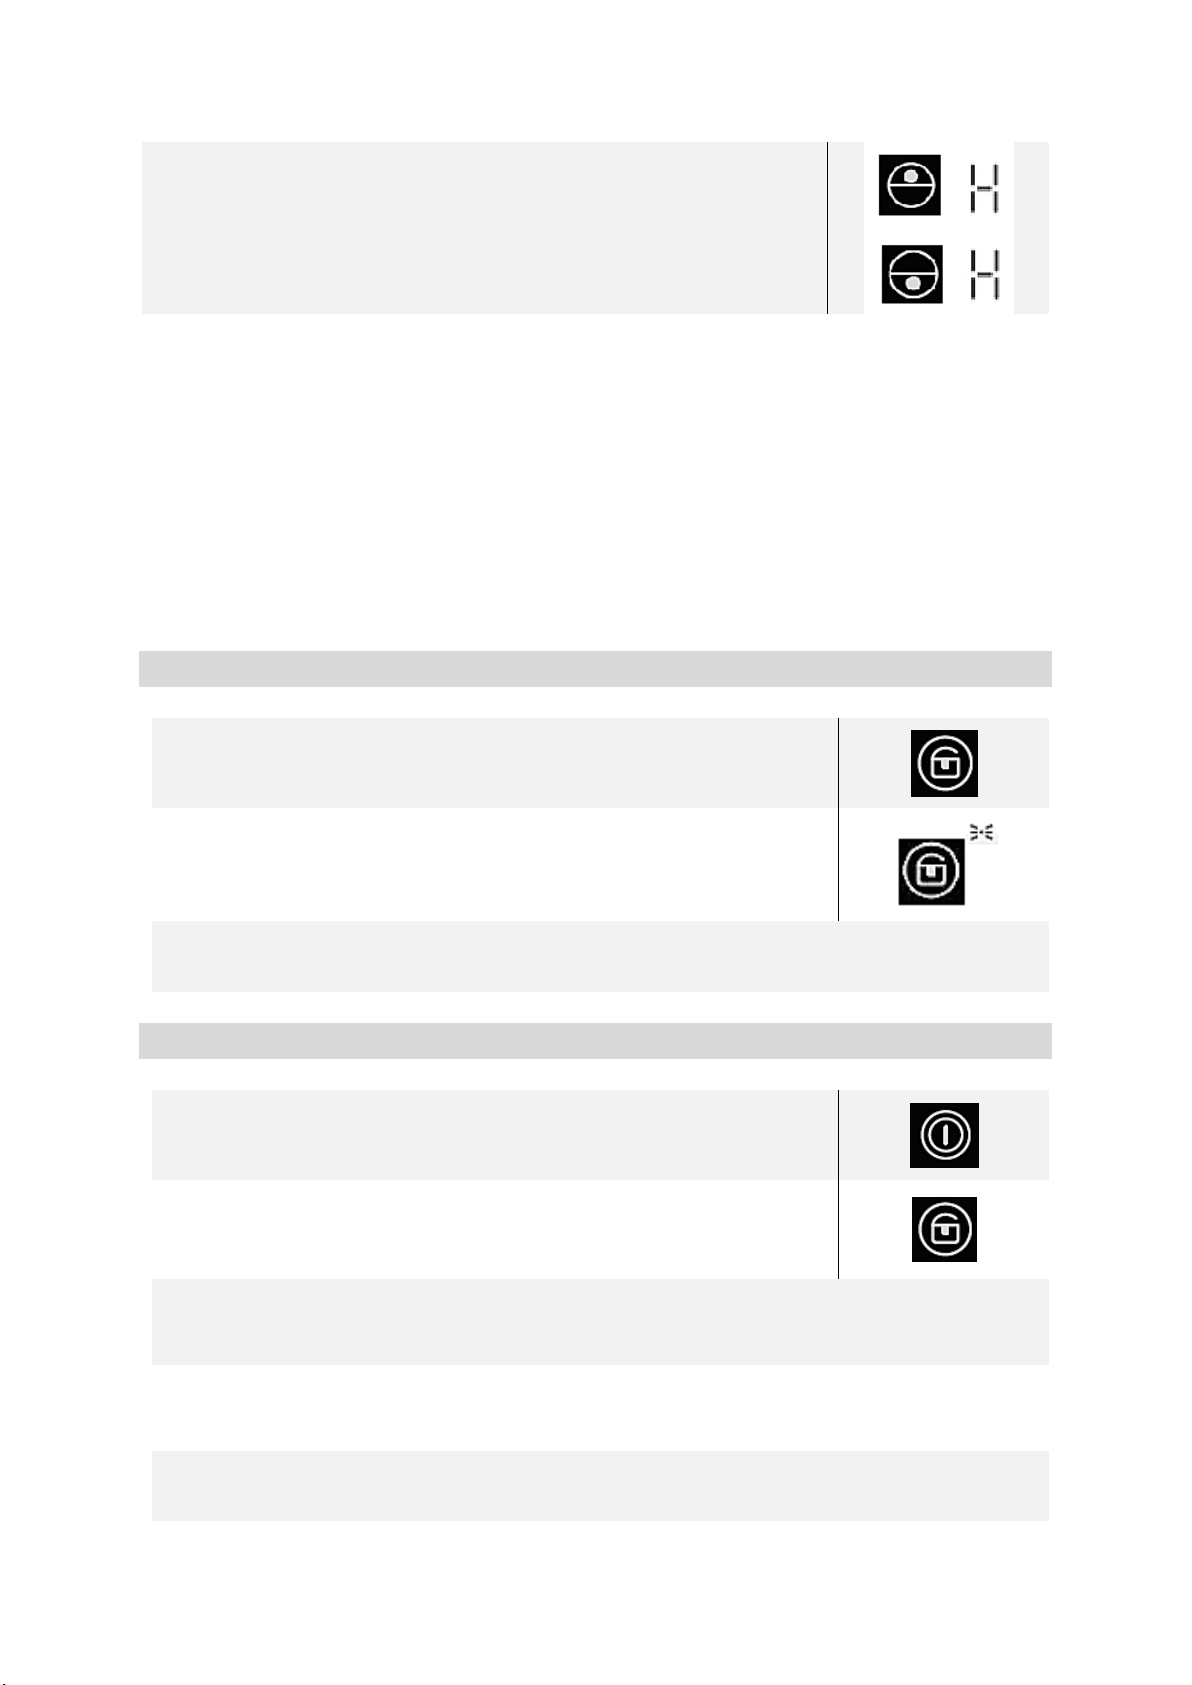
5. Hüten Sie sich vor der heißen Oberfläche der Kochzone!
Ein H zeigt an, welche Kochzonen noch heiß sind. Das H
erlischt, sobald die entsprechende Kochzone auf eine
sichere Temperatur abgekühlt ist.
6. Sie können die Restwärme auch als Energiesparfunktion nutzen, indem Sie
weitere Kochvorgänge auf Kochzonen beginnen, die noch heiß / warm sind.
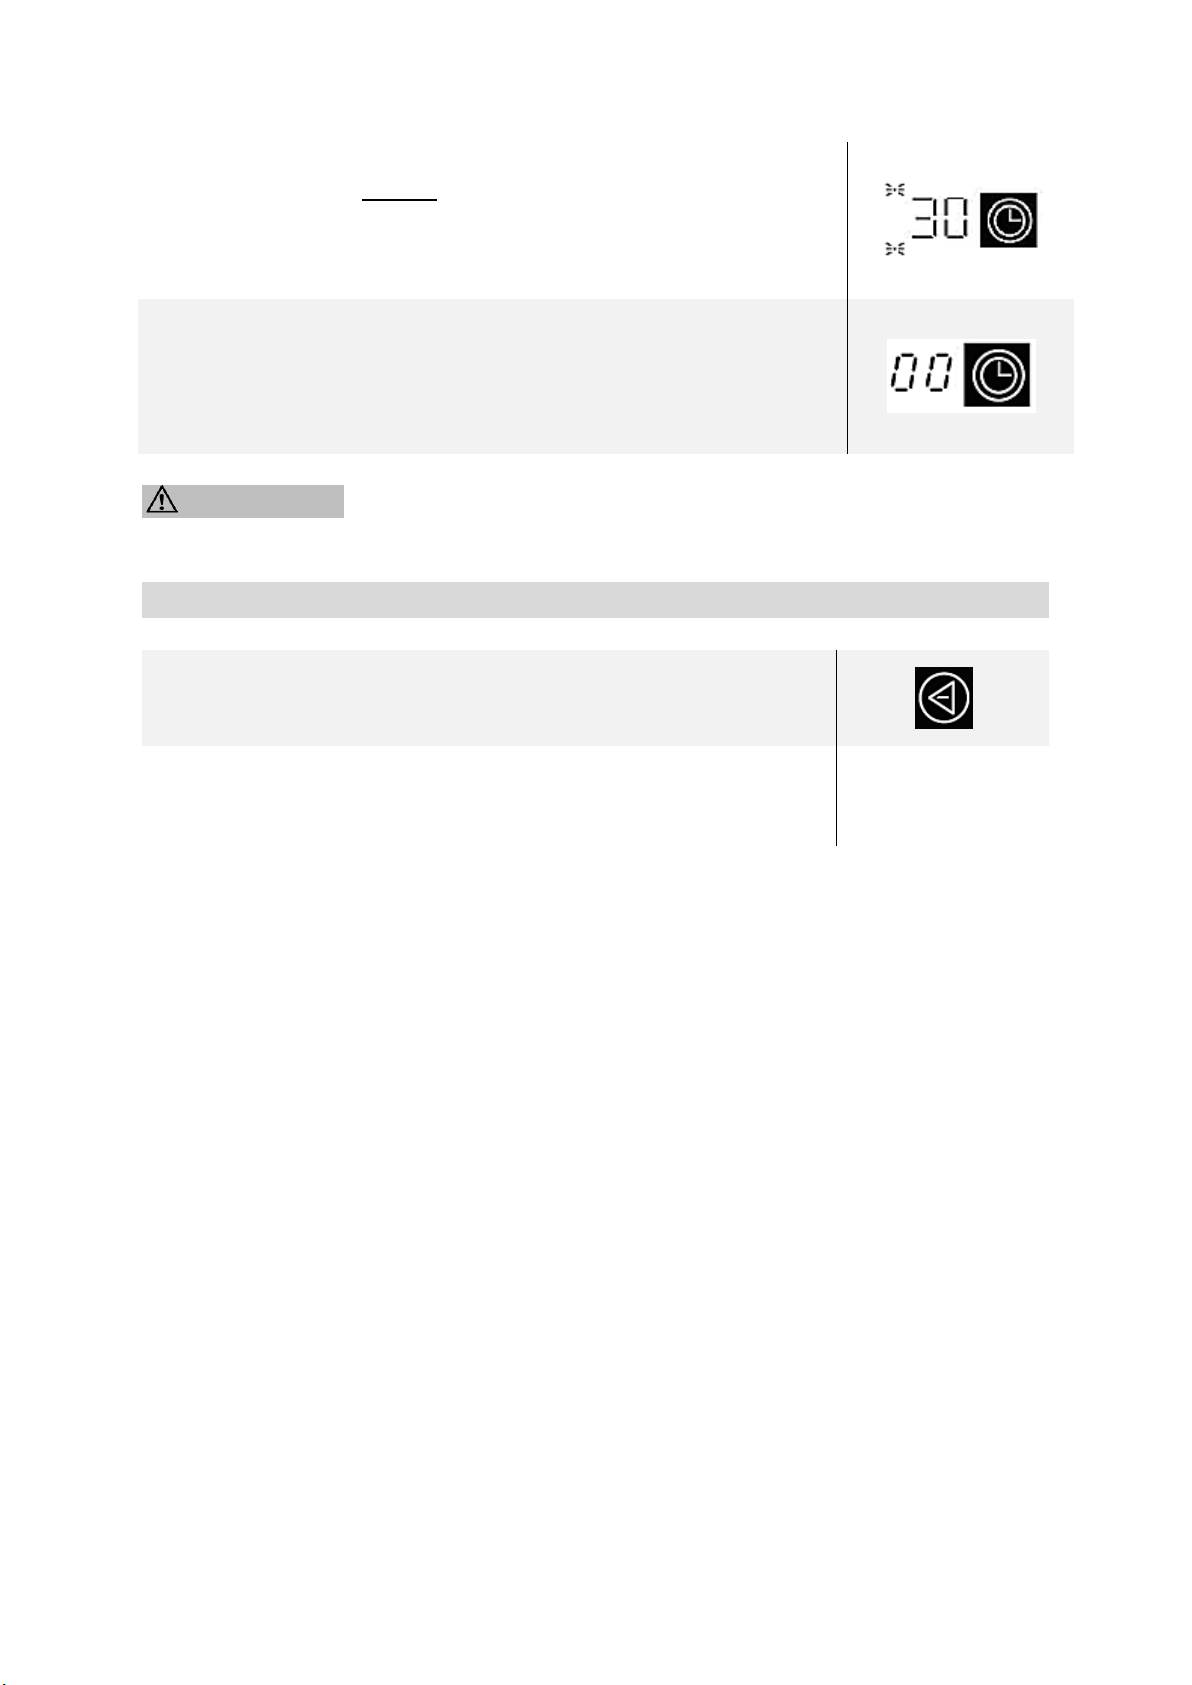
1. Berühren und halten Sie die TASTENSPERRE /
KINDERSICHERUNG.
2. Neben der TASTENSPERRE / KINDERSICHERUNG leuchtet
ein roter Punkt auf.
3. Alle Tasten außer dem AN / AUS SENSOR sind gesperrt.
1. Überprüfen Sie, ob das Gerät eingeschaltet ist.
2. Berühren und halten Sie die TASTENSPERRE /
KINDERSICHERUNG für einige Zeit.
3. Der rote Punkt neben der TASTENSPERRE / KINDERSICHERUNG erlischt.
4. Alle Tasten sind wieder freigegeben.
5. Sie können das Gerät nun wie gewohnt benutzen.
3.7 Tastensperre / Kindersicherung
Sie können die Sensortasten sperren, um diese gegen unbeabsichtigte Benutzung
als auch gegen die Benutzung durch Kinder zu sichern.
SPERREN DER SENSORTASTEN:
ENTSPERREN DER SENSORTASTEN:
23
Page 24

HINWEIS! Wenn die Sensortasten gesperrt sind, sind alle Sensoren
AUTOMATISCHE ABSCHALTUNG EINER KOCHZONE:
1. Berühren Sie mittels AUSWAHL DER KOCHZONEN den
Sensor der Kochzone, für die Sie den Timer einstellen
wollen.
oder
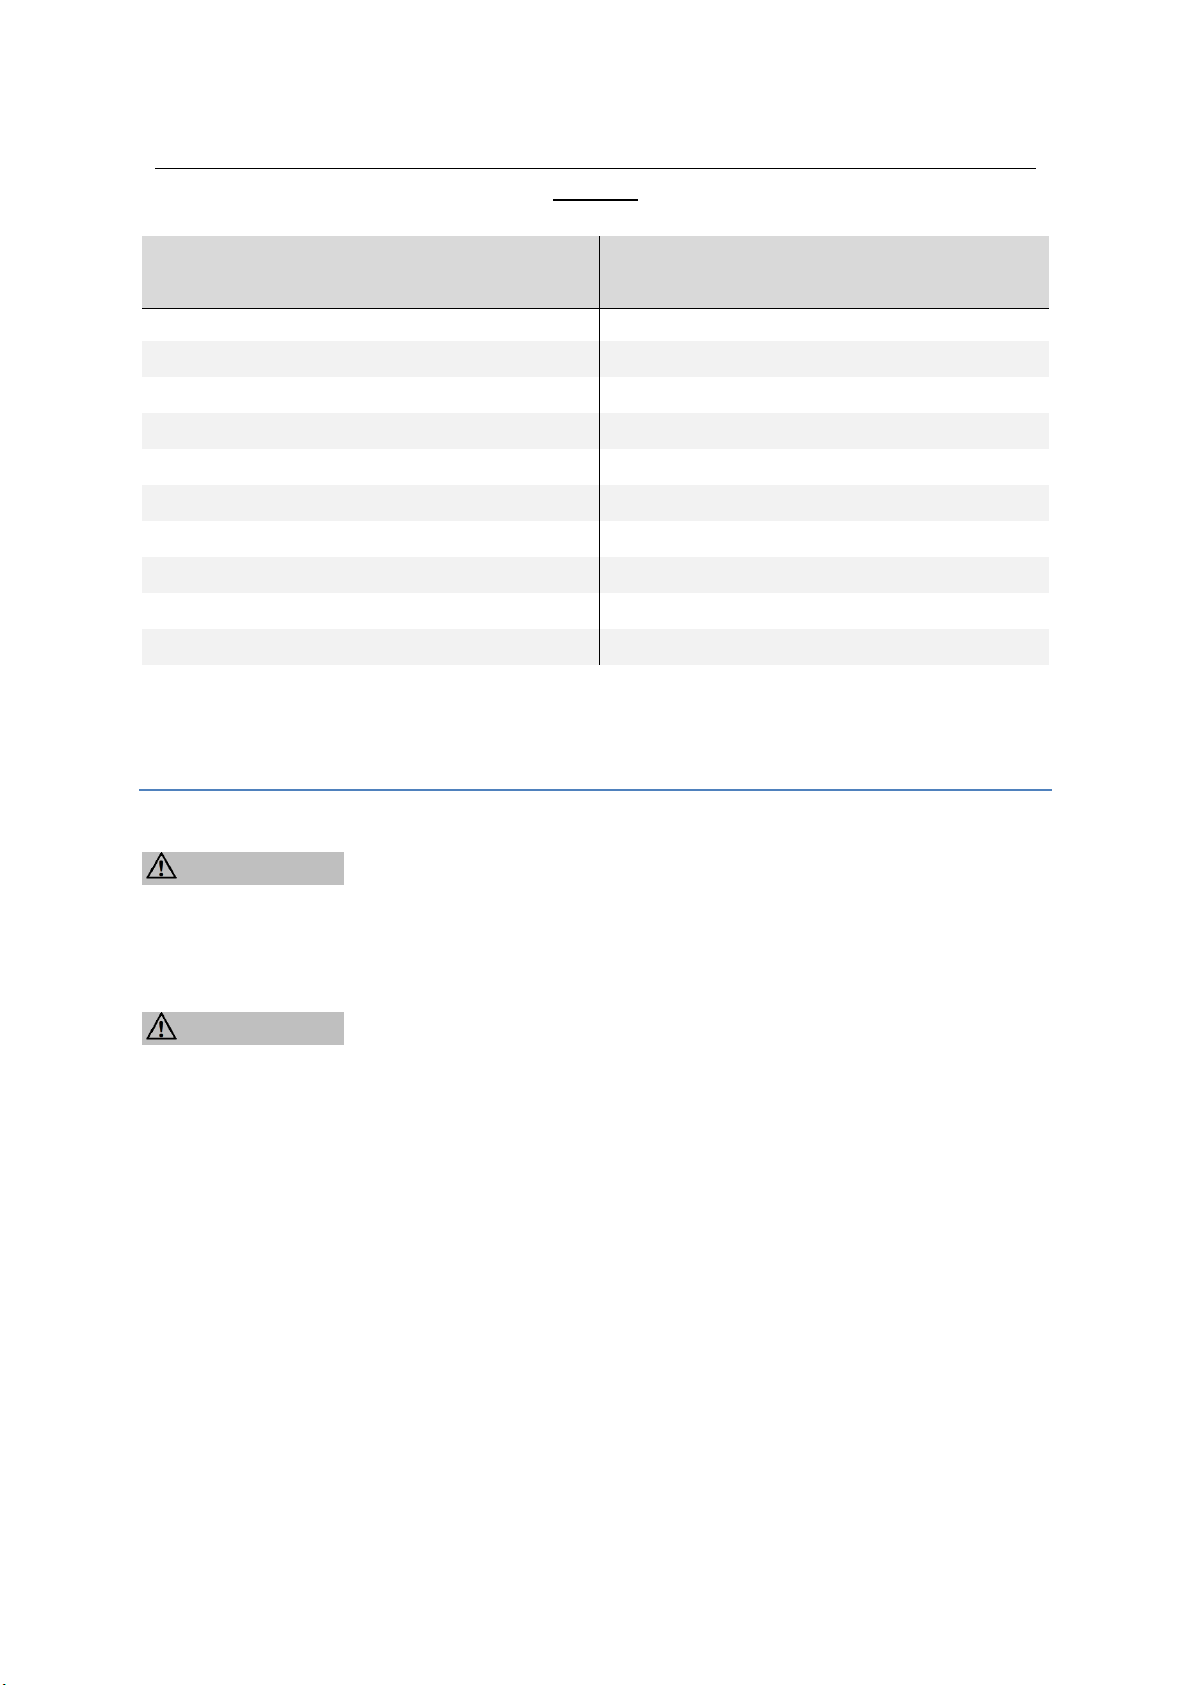
2. Berühren Sie den Sensor des TIMERS.
3. Die ANZEIGE DES TIMERS beginnt zu blinken und zeigt 00
an.
4. Stellen Sie die Zeit mit dem + und - Sensor ein.
Berühren Sie + oder - einmal, wird der Wert wird um 1
Minute erhöht / vermindert.
Berühren und halten Sie + oder -, wird der Wert im
Schnelllauf um 1 Minute erhöht / vermindert.
5. Nach dem Einstellen der Zeit beginnt der Countdown. Das
Display zeigt die verbleibende Zeit an.
außer dem AN / AUS SENSOR außer Funktion gesetzt. Sie können das
Gerät mit dem AN / AUS SENSOR jederzeit in einem Notfall abschalten,
sollten aber die Sensortasten danach zuerst entsperren.
3.8 Benutzung des Timers
Der Timer schaltet nach Ablauf der eingestellten Zeit die entsprechende
Kochzone automatisch ab.
Die maximal wählbare Zeitspanne beträgt 99 Minuten.
Falls die gewählte Zeitspanne 99 Minuten überschreitet, springt der Timer
automatisch auf 0.
24
Page 25
6. Um anzuzeigen welche Kochzone ausgewählt wurde (obere
/ untere Kochzone), leuchtet neben der TIMERANZEIGE ein
roter Punkt auf.
7. Wenn die Kochzeit abgelaufen ist, schaltet sich die
entsprechende Kochzone automatisch ab.
DEAKTIVIEREN DER TIMER-FUNKTION:
1. Berühren Sie den - SENSOR, um die noch verbleibende Zeit
auf 0 zurückzustellen.
2. Wenn das Display -00- anzeigt, ist die TIMER-FUNKTION
deaktiviert.
00
WARNUNG! Die andere Kochzone bleibt in Betrieb, falls sie vorher
eingeschaltet wurde.
3.9 Warnung vor Restwärme
Wenn das Gerät einige Zeit in Betrieb war, strahlen die verwendeten Kochzonen
auch nach dem Abschalten Restwärme aus. Zur Warnung erscheint der Buchstabe
"H".
3.10 Automatische Abschaltung
Die automatische Abschaltung stellt eine Sicherheitsfunktion Ihres Gerätes dar. Die
automatische Abschaltung findet immer dann statt, wenn Sie vergessen haben, eine
Kochzone nach deren Benutzung abzuschalten.
25
Page 26
Die voreingestellten automatischen Abschaltzeiten finden Sie in der folgenden
LEISTUNGSSTÄRKE
AUTOMATISCHE
ABSCHALTUNG (STUNDEN)
1 6 2 6 3 5 4 5 5 4 6
1,5 7 1,5 8 1,5 9 1,5
Tabelle:
4. Hinweise für das Kochen
WARNUNG! Lassen Sie beim Braten und Frittieren äußerste Vorsicht
walten, da Öle und Fette sehr schnell erhitzen, besonders bei einer hohen
Einstellung der Leistungsstärke. Extrem heiße Öle und Fette entzünden
sich spontan und stellen somit eine ernsthafte Brandgefahr dar.
WARNUNG! Versuchen Sie NIEMALS, ein durch Öl oder Fett
unterstütztes Feuer mit Wasser zu löschen. Stattdessen schalten Sie das
Gerät ab und ersticken Sie das Feuer mittels eines Deckels oder einer
Feuerdecke.
4.1 Kochtipps
Stellen Sie die Leistungsstärke niedriger, wenn ein Topf seine Kochtemperatur
erreicht hat.
Die Verwendung eines Deckels verkürzt die Kochzeit und spart Energie, da die
Kochhitze zurückgehalten wird.
Minimieren Sie die Menge an Flüssigkeiten oder Fett, um die Kochzeit zu
verringern.
Beginnen Sie den Kochvorgang auf einer hohen Leistungsstärke. Reduzieren Sie
dann die Leistungsstärke, wenn das zu kochende Lebensmittel erhitzt ist.
26
Page 27

AUF KLEINER FLAMME KOCHEN / REIS KOCHEN
Auf kleiner Flamme kochen bedeutet köcheln bei ca. 85
0
C, wenn gerade Bläschen
gelegentlich an die Oberfläche der Kochflüssigkeit aufsteigen. Köcheln ist die
ideale Art und Weise zur Zubereitung delikater Suppen und Eintöpfe, da sich die
Aromen ohne Überhitzung der Lebensmittel frei entfalten können. Sie sollten
Saucen auf Eierbasis und mittels Mehl angedickte Saucen ebenfalls unter dem
Siedepunkt zubereiten.
Einige Kochvorgänge, einschließlich des Kochens von Reis nach der
Absorptionsmethode (= dem kompletten Verbrauch des zugeführten Wassers),
bedürfen möglicherweise einer Einstellung oberhalb der niedrigsten
Leistungsstärke, damit das Kochgut ordnungsgemäß innerhalb der empfohlenen
Zubereitungszeit gegart wird.
STEAKS ANBRATEN
1. Lassen Sie das Fleisch vor dem Anbraten ca. 20 Minuten bei Raumtemperatur
ruhen.
2. Erhitzen Sie eine Bratpfanne mit schwerem Boden.
3. Reiben Sie beide Seiten des Steaks mit Öl ein. Träufeln Sie eine kleine Menge an
Öl in die heiße Pfanne und geben Sie dann das Fleisch in die Pfanne.
4. Wenden Sie das Fleisch während der Zubereitung nur einmal. Die genaue Garzeit
hängt von der Dicke des Steaks sowie Ihrer persönlichen Vorliebe hinsichtlich
des Garpunkts ab (medium, medium rare, etc.). Die Garzeit kann also von 2 bis
8 Minuten pro Seite variieren. Drücken Sie auf das Steak, um den Garpunkt zu
überprüfen - je fester es sich anfühlt, desto durchgebratener ist es.
5. Lassen Sie das Steak ein paar Minuten auf einem warmen Teller ruhen; so wird es
vor dem Servieren richtig zart.
ANSCHWENKEN
1. Wählen Sie einen für Glaskeramik geeigneten Wok mit flachem Boden oder eine
große Bratpfanne.
2. Bereiten Sie alle Zutaten vor und legen Sie die benötigten Kochutensilien bereit.
Das Anschwenken sollte schnell von statten gehen. Falls Sie eine große Menge
zubereiten wollen, teilen Sie das Kochgut in mehrere Teile auf.
3. Heißen Sie den Wok / die Pfanne kurz vor und geben Sie 2 Esslöffel Öl dazu.
4. Bereiten Sie Fleisch zuerst zu. Legen Sie es an die Seite und halten Sie es warm.
5. Schwenken Sie das Gemüse an. Wenn das Gemüse heiß, aber immer noch
knackig ist, stellen Sie die Leistungsstärke niedriger ein. Geben Sie nun das Fleisch
wieder hinzu und gegebenenfalls eine Sauce.
6. Schwenken Sie alles nochmals vorsichtig an, damit die Bestandteile auch heiß
sind.
27
Page 28

4.2 Leistungsstärken
LEISTUNGSSTÄRKEN:
EIGNUNG (BEISPIELE):
Stufe 1 - 2
Sanftes Aufwärmen kleiner Mengen an
Lebensmitteln.
Schmelzen von Schokolade, Butter etc.
Lebensmittel, die schnell anbrennen.
Schonendes Köcheln.
Langsames Aufwärmen.
Stufe 3 - 4
Nachwärmen.
Schnelles Köcheln.
Reis kochen.
Stufe 5 - 6
Pfannkuchen.
Stufe 7 - 8
Sautieren.
Nudeln kochen.
Stufe 9
Anschwenken.
Anbraten.
Suppe zum Kochen bringen.
Wasser kochen.
4.3 Energie sparen
Benutzen Sie geeignetes Kochgeschirr.
Kochgeschirr mit einem dicken und geraden Boden kann bis zu einem Drittel an
Energie sparen. Decken Sie ihr Kochgeschirr ab, wenn möglich; andernfalls
verbrauchen Sie das 4-fache an Energie.
Der Durchmesser des Kochgeschirrs sollte nicht kleiner als der Durchmesser des
verwendeten Kochrings sein.
Sorgen Sie dafür, dass der Kochring und der Boden des Kochgeschirrs sauber
sind.
Verunreinigungen können den Wärmeaustausch negativ beeinträchtigen.
Mehrfach eingebrannte Verunreinigungen können oft nur noch mit
umweltschädlichen Hilfsmitteln entfernt werden.
28
Page 29

Decken Sie ihr Kochgeschirr nicht zu oft auf (ein beobachteter Topfinhalt
2
2
beginnt niemals, zu kochen).
Sie können die Restwärme der Kochzonen als Energiesparfunktion nutzen,
indem Sie weitere Kochvorgänge auf Kochzonen beginnen, die noch heiß / warm
sind.
5. Reinigung und Pflege
WARNUNG! Schalten Sie das Gerät vor dem Reinigen unbedingt aus
und lassen Sie es vollständig abkühlen. Trennen Sie das Gerät vor allen
Wartungsarbeiten von der Stromversorgung (entsprechende Sicherung im
Sicherungskasten der Hausstromversorgung ausschalten)!
WARNUNG! Benutzen Sie kein Dampfreinigungsgerät. Der Dampf
kann in Kontakt mit elektrischen Teilen kommen und so einen Kurzschluss
auslösen. STROMSCHLAGGEFAHR!
REINIGUNGSMITTEL:
Benutzen Sie keine Scheuermittel !
Benutzen Sie keine organischen Reinigungsmittel !
Benutzen Sie keine ätherischen Öle !
Benutzen Sie niemals Lösungsmittel !
REINIGUNG DES KOCHFELDES:
Entfernen Sie Verunreinigungen wie Kochgutrückstände von der Glasoberfläche.
Benutzen Sie dazu ein weiches Tuch.
Scheuern Sie die Glaskeramik nicht.
Benutzen Sie zur Reinigung heißes Wasser und einen Spezialschwamm für die
Reinigung von Glaskeramik. Verwenden Sie an den verunreinigten Stellen ein
spezielles Produkt zur Reinigung von Glaskeramik (erhältlich im Supermarkt) und
wischen Sie diese dann mit einem weichen Tuch trocken.
Benutzen Sie einen Schaber, der für die Verwendung auf Glaskeramik geeignet
ist, zur Entfernung möglicher Rückstände. Ein entsprechendes Produkt aus
Silikon ist zum Schutz der Glaskeramik am geeignetsten.
Z.B. Essig, Zitronensäure etc.
29
Page 30

ART DER VERUNREINIGUNG
VORGEHENSWEISE
SICHERHEITSHINWEISE
ALLTÄGLICHE VERUNREINIGUNGEN DER GLASKERAMIK (FINGERABDRÜCKE,
FLECKEN DURCH LEBENSMITTEL ODER NICHT ZUCKERHALTIGE SPRITZER).
1. Trennen Sie das Gerät von der
Stromversorgung (Haussicherung).
2. Verwenden Sie einen geeigneten
Glaskeramik-Reiniger, während die
Glaskeramik noch warm - aber nicht
heiß! - ist.
3. Mit einem weichen Tuch /
Küchenpapier und klarem Wasser
abwaschen und dann
trockenwischen.
4. Schalten Sie die Stromversorgung
des Gerätes wieder ein.
Wenn das Gerät von der
Stromversorgung getrennt ist,
leuchtet die Restwärmeanzeige nicht.
Die Kochzonen können somit
trotzdem heiß sein. Seien Sie äußerst
vorsichtig!
Topfreiniger, Nylonreiniger und
Scheuermittel können die
Glaskeramik verkratzen. Lesen Sie
immer die Produktinformationen
Ihrer Reinigungsmittel hinsichtlich
deren Eignung für Glaskeramik.
Belassen Sie niemals Rückstände von
Reinigungsmitteln auf dem Glas, da
dieses dadurch nachhaltig fleckig
werden kann.
ÜBERGEKOCHTES, GESCHMOLZENES UND FLECKEN DURCH ERHITZTE
ZUCKERHALTIGE RÜCKSTÄNDE AUF DER GLASKERAMIK.
Entfernen Sie solche
Verunreinigungen umgehend mit
einem geeigneten GlaskeramikSchaber. Achten Sie auf noch heiße
Kochzonen!
1. Trennen Sie das Gerät von der
Stromversorgung (Haussicherung).
2. Halten Sie den Schaber in einem 30
0
Winkel und kratzen Sie die
Verunreinigungen von der
Glaskeramik zu einem nicht warmen
Bereich.
3. Reinigen Sie die Verunreinigungen
mit einem Geschirrtuch /
Küchenpapier.
4. Folgen Sie den Schritten 2 - 4 des
ersten Abschnitts dieser Tabelle.
Entfernen Sie solche
Verunreinigungen so schnell wie
möglich. Wenn diese auf der
Glaskeramik abkühlen, können Sie
nachher nur noch schwer zu
entfernen sein und auch die
Glaskeramik-Oberfläche dauerhaft
beschädigen.
Verwenden Sie den Glaskeramik-
Schaber äußerst vorsichtig, damit Sie
sich nicht an der Klinge schneiden,
besonders dann, wenn Sie die
Sicherheitsabdeckung
zurückgeschoben haben.
30
Page 31

VERUNREINIGUNGEN AUF DEN SENSORTASTEN.
1. Trennen Sie das Gerät von der
Stromversorgung (Haussicherung).
2. Nehmen Sie die Verunreinigung auf.
3. Wischen Sie die Sensortasten mit
einem feuchten Schwamm oder
Tuch ab.
4. Wischen Sie den gesamten Bereich
mit Küchenpapier trocken.
5. Schalten Sie die Stromversorgung
des Gerätes wieder ein.
Das Gerät kann piepen und sich
abschalten. Die Sensortasten können
nicht ordnungsgemäß arbeiten, wenn
sich Flüssigkeit auf ihnen befindet.
Wischen Sie das Bedienfeld gut trocken,
bevor Sie das Gerät wieder in Betrieb
nehmen.
FEHLER
MÖGLICHE URSACHE
MAßNAHMEN
DAS GERÄT KANN NICHT EINGESCHALTET WERDEN.
Eine Unterbrechung der
Stromzufuhr.
Kontrollieren Sie, ob das Gerät an
die Stromversorgung angeschlossen
ist. Kontrollieren Sie Ihren
Haushalts-Sicherungskasten. Liegt
ein Stromausfall in Ihrem
Wohngebiet vor?
6. Problembehandlung
GEHEN SIE BEI EINEM NOTFALL ODER EINER FEHLFUNKTION WIE FOLGT
VOR:
1. Schalten Sie das Gerät komplett ab.
2. Trennen Sie das Gerät von der Stromversorgung (entsprechende Sicherung im
Sicherungskasten der Hausstromversorgung).
3. Kontaktieren Sie das Geschäft, in dem Sie das Gerät erworben haben.
Überprüfen Sie die Angaben der Tabelle, bevor Sie das Geschäft, in dem Sie das
Gerät erworben haben, kontaktieren.
31
Page 32

DIE SENSORTASTEN REAGIEREN NICHT.
Die Sensortasten sind gesperrt.
Entsperren Sie die Sensortasten.
DIE SENSORTASTEN LASSEN SICH NUR SCHWER BEDIENEN.
Ein Flüssigkeitsfilm befindet sich
auf den Sensortasten.
Sie haben zum Benutzen die
Fingerspitze benutzt.
Trocknen Sie die Sensortasten.
Benutzen Sie die Fingerkuppe.
DIE GLASKERAMIK IST VERKRATZT.
Sie haben ungeeignetes
Kochgeschirr mit rauen und
scharfen Kanten verwendet.
Sie haben ungeeignete
Reinigungsmittel wie z.B.
Scheuermittel verwendet.
Verwenden Sie für Glaskeramik
geeignetes Kochgeschirr.
Verwenden Sie für Glaskeramik
geeignete Reinigungsmittel.
EINIGE PFANNEN / TÖPFE ERZEUGEN KRACKENDE ODER KLICKENDE
GERÄUSCHE.
Diese können durch die
Herstellungsart Ihres Kochgeschirrs
verursacht werden (Schichten aus
verschiedenen Metallen).
Das ist bei solchem Kochgeschirr
normal und weist nicht auf einen
Fehler hin.
SUMMENDES GERÄUSCH BEI HOHER LEISTUNGSEINSTELLUNG.
Wird durch das Induktionskochen
verursacht.
Normaler Betriebszustand, aber das
Summen sollte leiser werden oder
aufhören, wenn Sie die
Leistungsstärke verringern.
VENTILATIONSGERÄUSCHE DRINGEN AUS DEM GERÄT.
Der eingebaute Ventilator schützt
die Elektronik vor Überhitzung und
kann auch nach dem Abschalten des
Gerätes noch eine Zeit lang
weiterlaufen.
Normaler Betriebszustand. Trennen
Sie bei laufendem Ventilator das
Gerät nicht von der
Stromversorgung.
32
Page 33

KOCHGESCHIRR WIRD NICHT AUFGEHEIZT / DIE ANZEIGE AUF DEM DISPLAY
LEUCHTET.
Kochgeschirr wird nicht erkannt,
wenn es ungeeignet oder zu klein
oder falsch positioniert ist.
Verwenden Sie geeignetes
Kochgeschirr mit einem der
Kochzone entsprechendem
Durchmesser. Stellen Sie es zentral
auf die Kochzone.
DAS GERÄT ODER EINE KOCHZONE SCHALTET SICH UNERWARTET AB, EIN
AKUSTISCHES SIGNAL ERTÖNT UND ES WIRD EIN FEHLER-KODE ANGEZEIGT3
(MEIST ALTERNIEREND MIT EIN ODER ZWEI ZAHLEN AUF DEM TIMER-
DISPLAY).
Technische Fehlfunktion.
Schreiben Sie den Fehlercode auf,
trennen Sie das Gerät von der
Stromversorgung und kontaktieren
Sie das Geschäft, indem Sie das
Gerät erworben haben.
3
Sollte das Gerät Störungen abweichend von den oben beschriebenen aufweisen,
oder falls Sie alle Punkte der Liste überprüft haben, das Problem aber nicht
behoben werden konnte, setzen Sie sich mit dem Geschäft, in dem Sie das Gerät
erworben haben, in Verbindung.
Ausstattung abhängig vom Modell
33
Page 34

7. Technische Daten
Gerätetyp
Glaskeramik - Doppelkochfeld
Bedienfeld
Touch Control
Material
Glaskeramik
Anzahl Kochzonen
2
Durchmesser Kochzonen vorne / hinten
180 mm / 145 mm
Leistung Kochzonen vorne / hinten
1*1800 W / 1*1200 W
Maximale Leistung
3000 W
Eingangsspannung
220 - 240 V AC
Frequenz
50 Hz
Restwärmeanzeige
Timer / einstellbare Zeit
/ bis zu 99 Minuten
Kabellänge
120 cm
Heizstufen
9 pro Kochzone
Abmessungen Aussägung B*T in cm
26,80*50,00
Einbautiefe in cm
4,00
Produktmaße H*B*T in cm
4,70*28,80*52,00
Gewicht netto / brutto in kg
4,50 / 5,30
Technische Änderungen vorbehalten.
34
Page 35

8. Entsorgung
Alle mit diesem Symbol
gekennzeichneten Materialien sind
wiederverwertbar.
Alle verfügbaren Informationen zur
Mülltrennung erhalten Sie bei Ihren
örtlichen Behörden.
1. Achten Sie beim Entpacken unbedingt darauf, dass die Bestandteile der
Verpackung ( Polyäthylentüten, Polystyrenstücke ) nicht in die Reichweite von
Kindern und Tieren gelangen. ERSTICKUNGSGEFAHR!
2. Nicht mehr benutzte und alte Geräte müssen der zuständigen
Wiederverwertungsstelle zugeführt werden. Keinesfalls offenen Flammen
aussetzen.
3. Bevor Sie ein beliebiges Altgerät entsorgen, machen Sie dieses vorher
unbedingt funktionsuntüchtig! Das bedeutet, immer den Netzstecker ziehen
und danach das Stromanschlusskabel am Gerät abschneiden und direkt mit dem
Netzstecker entfernen und entsorgen.
4. Entsorgen Sie Papier und Kartonagen in den dafür vorgesehenen Behältern.
5. Entsorgen Sie Kunststoffe in den dafür vorgesehenen Behältern.
6. Falls es in Ihrem Wohnumfeld keine geeigneten Entsorgungsbehälter gibt,
bringen Sie diese Materialien zu einer geeigneten kommunalen Sammelstelle.
7. Nähere Informationen erhalten Sie von Ihrem Fachhändler oder bei Ihren
entsprechenden kommunalen Entsorgungseinrichtungen.
35
Page 36

9. Garantiebedingungen
für Elektro-Großgeräte der PKM GmbH & Co. KG, Neuer Wall 2, 47441 Moers.
Der Hersteller leistet dem Verbraucher für die Dauer von 24 Monaten, gerechnet
vom Tag des Kaufes Garantie für einwandfreies Material und fehlerfreie Fertigung.
Dem Verbraucher stehen neben den Rechten aus der Garantie die gesetzlichen
Gewährleistungsrechte zu, die der Verbraucher gegen den Verkäufer hat, bei dem er
das Gerät erworben hat. Diese werden durch die Garantie nicht eingeschränkt.
Der Garantieanspruch ist vom Käufer durch Vorlage des Kaufbelegs mit Kaufund/oder Lieferdatum nachzuweisen und unverzüglich nach Feststellung und
innerhalb von 24 Monaten nach Lieferung an den Erstendabnehmer zu melden.
Die Garantie begründet keine Ansprüche auf Rücktritt vom Kaufvertrag oder
Minderung (Herabsetzung des Kaufpreises). Ersetzte Teile oder ausgetauschte
Geräte gehen in unser Eigentum über.
Der Garantieanspruch erstreckt sich nicht auf:
1. zerbrechliche Teile wie z.B. Kunststoff oder Glas bzw. Glühlampen;
2. geringfügige Abweichungen der PKM-Produkte von der Soll-Beschaffenheit, die
auf den Gebrauchswert des Produkts keinen Einfluss haben;
3. Schäden infolge Betriebs- und Bedienungsfehler,
4. Schäden durch aggressive Umgebungseinflüsse, Chemikalien, Reinigungsmittel;
5. Schäden am Produkt, die durch nicht fachgerechte Installation oder Transport
verursacht wurden;
6. Schäden infolge nicht haushaltsüblicher Nutzung;
7. Schäden, die außerhalb des Gerätes durch ein PKM-Produkt entstanden sind -
soweit eine Haftung nicht zwingend gesetzlich angeordnet ist.
Die Gültigkeit der Garantie endet bei:
1. Nichtbeachten der Aufstell- und Bedienungsanleitung;
2. Reparatur durch nicht fachkundige Personen;
3. Schäden, verursacht durch den Verkäufer, Installateur oder dritte Personen;
4. unsachgemäße Installation oder Inbetriebnahme;
5. mangelnde oder fehlerhafte Wartung;
6. Geräten, die nicht ihrem vorgesehenen Zweck entsprechend verwendet werden;
7. Schäden durch höhere Gewalt oder Naturkatastrophen, insbesondere, aber nicht
abschließend bei Brand oder Explosion.
Garantieleistungen bewirken weder eine Verlängerung der Garantiefrist noch setzen
sie eine neue Garantiefrist in Lauf.
Der räumliche Geltungsbereich der Garantie erstreckt sich auf in Deutschland,
Österreich, Belgien, Luxemburg und in den Niederlanden gekaufte und verwendete
Geräte.
August 2014
36
Page 37

Dear customer! We would like to thank you for purchasing a product from our wide
range of domestic appliances. Read the complete instruction manual before you
operate the appliance for the first time. Retain this instruction manual in a safe place
for future reference. If you transfer the appliance to a third party, also hand over this
instruction manual.
Index
1. Safety information ....................................................................................................... 39
1.1 Signal words ............................................................................................................ 40
1.2 Safety instructions .................................................................................................. 40
2. Installation .................................................................................................................... 44
2.1 Unpacking and positioning ................................................................................... 45
2.2 Pre-installation requirements ................................................................................ 45
2.3 Selection of installation equipment / Dimensions ........................................... 45
2.4 Installation of the hob .......................................................................................... 47
2.5 Electrical connection ............................................................................................. 51
3. Operation ...................................................................................................................... 52
3.1 Hob and control panel .......................................................................................... 52
3.2 Use of the touch control ...................................................................................... 54
3.3 Before initial use .................................................................................................... 54
3.4 Suitable cookware .................................................................................................. 54
3.5 How to start cooking............................................................................................. 55
3.6 How to stop cooking ............................................................................................. 56
3.7 Key lock / Child protection ................................................................................. 57
3.8 Timer ....................................................................................................................... 58
3.9 Residual heat warning ............................................................................................ 59
3.10 Automatic switch-off ........................................................................................... 59
4. Cooking guidelines ...................................................................................................... 60
4.1 Cooking tips ........................................................................................................... 60
4.2 Power levels ............................................................................................................ 61
4.3 Saving of energy .................................................................................................... 62
5. Cleaning and maintenance .......................................................................................... 62
37
Page 38

6. Trouble shooting .......................................................................................................... 64
Do not dispose of this appliance together with your domestic waste.
The appliance must be disposed of at a collecting centre for recyclable
electric and electronic appliances. Do not remove the symbol from
the appliance.
7. Technical data ............................................................................................................... 66
8. Waste management ...................................................................................................... 67
9. Guarantee conditions .................................................................................................. 68
The figures in this instruction manual may differ in some details from the current
design of your appliance. Nevertheless follow the instructions in such a case.
Any modifications, which do not influence the functions of the appliance. shall
remain reserved by the manufacturer. Please dispose of the packing with respect
to your current local and municipal regulations.
The appliance you have purchased may be an enhanced version of the unit this
manual was printed for. Nevertheless, the functions and operating conditions are
identical. This manual is therefore still valid. Technical modifications as well as
misprints shall remain reserved.
EU - DECLARATION OF CONFORMITY
The products, which are described in this instruction manual, comply with the
harmonized regulations.
The relevant documents can be requested from the final retailer by the competent
authorities.
38
Page 39

1. Safety information
Store this manual in a safe place so you can use it whenever it is needed. Strictly
observe the instructions to avoid damage to persons and property.
Check the technical periphery of the appliance! Do all wires and connections
to the appliance work properly? Or are they time-worn and do not match the
technical requirements of the appliance? A check-up of existing and newlymade connections must be done by an authorized professional. All connections
and energy-leading components (incl. wires inside a wall) must be checked by a
qualified professional. All modifications to the electrical mains to enable the
installation of the appliance must be performed by a qualified professional.
The appliance is intended for private use only.
The appliance is intended for cooking in a private household only.
The appliance can be used with 230 V AC in RVs/caravans when built-in
according to all TÜV-regulations.
The appliance is intended for indoor-use only.
The appliance is not intended to be operated for commercial purposes and in
public transport.
Operate the appliance in accordance with its intended use only.
Do not allow anybody who is not familiar with this instruction manual to
operate the appliance.
This appliance may be operated by children aged from 8 years and above as
well as by persons with reduced physical, sensory and mental capabilities or lack
of experience and knowledge if they are supervised or have been instructed
concerning the safe use of the appliance and do comprehend the hazards
involved. Children must not play with the appliance. Cleaning and user-
maintenance must not be carried out by children unless they are supervised.
READ THE SAFETY INFORMATION AND SAFETY INSTRUCTIONS
CAREFULLY BEFORE YOU OPERATE THE APPLIANCE FOR THE
FIRST TIME.
All information included in those pages serve for the protection of the
operator. If you ignore the safety information and safety instructions, you will
endanger your health and life.
MAKE SURE THAT THIS MANUAL IS AVAILABLE TO ANYONE USING
THE APPLIANCE AND MAKE SURE THAT IT HAS BEEN READ AND
UNDERSTOOD PRIOR TO USING THE APPLIANCE.
39
Page 40

1.1 Signal words
DANGER! indicates a hazardous
situation which, if ignored, will result in
death or serious injury.
WARNING! indicates a hazardous
situation which, if ignored, could result
in death or serious injury.
CAUTION! indicates a hazardous
situation which, if not avoided, may
result in minor or moderate injury.
NOTICE! indicates possible damage to
the appliance.
1.2 Safety instructions
DANGER!
To reduce the risk of electrocution:
1. Non-compliance of the orders of this instruction manual will endanger
the life and health of the operator and / or can result in damages to
the appliance.
2. The appliance must be connected to the mains by a qualified
professional, who is familiar with and adheres to the local
requirements and supplementary regulations of your energy supplier.
3. All electrical work must be carried out by a qualified professional. Do
not modify the energy supply. The connection must be carried out in
accordance with the current local and legal regulations
4. Do not connect the appliance to the mains if the appliance itself or
the power cord or the plug are visibly damaged.
5. Never try to repair the appliance yourself. Repairs carried out by
unauthorized persons can cause serious damage. If the appliance
does not operate properly, please contact the shop you purchased
the appliance at. Original spare parts should be used only.
6. When the power cord is damaged, it must be replaced by the
manufacturer or an authorized aftersales service or a qualified
professional only.
7. Never touch the power plug, the power switch or other electrical
components with wet or damp hands. RISK OF ELECTRIC SHOCK!
40
Page 41

WARNING!
To reduce the risk of burns, electrocution, fire or injury to persons:
1. Operate the appliance with 220 ~ 240 V AC / 50 Hz only.
2. Disconnect the appliance from the mains before you clean or
maintain it.
3. The technical data of your energy supply must meet the data on the
rating label. The main current circuit must be equipped with a safety
shut-down device.
4. The appliance must always be grounded and protected
corresponding to the requirements of your local energy supplier. The
main current circuit must be equipped with a safety shut-down
device.
5. All modifications to the electrical mains to enable the installation of
the appliance must be performed by a qualified professional.
6. In case of an event caused by a technical malfunction, disconnect
the appliance from the mains. Report the malfunction to your service
centre so it can be repaired.
7. If any cracks occur on the glass-ceramic , switch off the appliance
and disconnect it from the mains. RISK OF ELECTRICAL SHOCK!
8. Do not use adapters, multiple sockets and extension cords for
connecting the appliance to the mains.
9. Do not carry out any modifications to your appliance.
10. Do not repair the appliance yourself. Repairs carried out by
unauthorized persons can cause serious damage. Always contact
the nearest service centre. Only original spare-parts should be used
for repairs.
11. The room the appliance is installed in must be dry and well-
ventilated. When the appliance is installed, an easy access to all
control elements is required.
12. The veneering of cabinets has to be fixed with a heat-resistant glue,
that is able to withstand a temperature of 100
0
C.
13. Adjacent furniture or housing and all materials used for installation
must be able to resist a temperature of min. 85 0C above the ambient
temperature of the room the appliance is installed in during operation.
14. Do not install the appliance in rooms or at areas which contain
flammable substances as petrol, gas or paint. This warning also
refers to the vapour these substances release.
15. Cooker-hoods should be installed according to their manufacturers'
instructions.
16. The safety distance between the hob and a wall/cupboard above
should be at least 450 mm.
41
Page 42

17. The safety distance between the hob and an extractor hood above
should be at least 760 mm.
18. Unattended cooking with fat or oil can be dangerous and may result
in fire. NEVER try to extinguish a fire with water, but switch off the
appliance and then cover flame e.g. with a lid or a fire blanket.
19. Do not install the appliance near to curtains or upholstered furniture.
RISK OF FIRE!
20. Do not store any objects on the hob. RISK OF FIRE!
21. Household equipment and connection leads must not touch the hob
as the insulation material is usually not heat-resistant.
22. Never use a steam cleaner to clean the appliance. The steam will
cause serious damage to the electric components of the appliance.
RISK OF ELECTRICAL SHOCK!
23. Never touch the cooking zones while the residual heat indicator is
still on. RISK OF BURNS!
24. After use, always switch off the cooking zones as described in this
manual(i.e. by using the touch controls). Do not rely on the autodetection feature to switch off the cooking zones when you remove
the cookware.
25. The appliance is not allowed to be operated with an external timer
or a separate remote-control-system.
26. The accessible parts of the appliance become hot during operation,
so keep children away from the operating appliance. Touching the
appliance while it is operating can cause serious burns.
27. Children must not play with the appliance.
28. Always supervise children when they are near the appliance.
29. This appliance may be operated by children aged from 8 years and
above as well as by persons with reduced physical, sensory and
mental capabilities or lack of experience and knowledge if they are
supervised or have been instructed concerning the safe use of the
appliance and do comprehend the hazards involved. Children must
not play with the appliance. Cleaning and user-maintenance must
not be carried out by children unless they are supervised.
30. Only allow children to use the appliance without supervision, when
adequate instructions have been given before so that the child is able
to use the appliance in a safe way and understands the risks of
improper use.
31. While unpacking, the packaging materials (polythene bags,
polystyrene pieces, etc.) should be kept away from children and pets.
RISK OF INJURY! CHOKING HAZARD!
32. Only use hob guards designed by the manufacturer of the cooking
appliance or indicated by the manufacturer of the appliance in the
42
Page 43

instructions for use as suitable or hob guards incorporated in the
appliance. The use of inappropriate guards can cause accidents.
CAUTION!
1. Do not use any aggressive, abrasive and acrid detergents or sharp-
edged items to clean the appliance. Otherwise you may scratch the
surface and damage the glass.
2. Do not switch on the hob before you have put a cookware on it.
3. The hob should be clean at every time. Soiled cooking zones do not
transfer the heat correctly.
4. Protect the hob against corrosion.
5. Switch off soiled cooking zones.
6. Switch off the complete hob if any damage or malfunction occurs.
7. Do not leave pans with prepared dishes based on fats and oils
unattended on a operating cooking zone; hot fat can spontaneously
catch fire.
8. The blades of scrapers for cleaning an induction hob are very
sharp. Do not cut yourself, especially when you have removed the
safety cover of the scraper.
9. Metal-made items such as knives, forks, spoons and pan lids
should not be put on the appliance, because they may become hot.
10. This appliance complies with the current European safety legislation.
We do wish to emphasize that this compliance does not negate the
fact that the surfaces of the appliance will become hot while
operating and will retain and emit heat even if it has stopped
operating.
NOTICE!
1. When you move the appliance, hold it at its base and lift it carefully.
Keep the appliance in an upright position.
2. The appliance must be transported and installed by at least two
persons.
3. When you unpack the appliance, you should take note of the position
of its components in case you have to repack and transport it at a
later point of time.
4. Do not put any heavy items on the hob.
5. Only use cookware which is suitable to be used on ceramic glass;
otherwise you will damage the appliance.
6. Do not operate the appliance unless all components are installed
properly.
7. The air vents of the appliance or its built-in structure (if the appliance
is suitable for being built-in) must be completely open, unblocked and
43
Page 44

free of any kind of dirt.
8. The rating plate must not be removed or made illegible, otherwise
all terms of the warranty become invalid!
SAVE THESE INSTRUCTIONS.
The manufacturer and distributor are not responsible for any damage or
injury in the event of failure to comply with these instructions.
2. Installation
DANGER! The appliance must be connected to the mains by a
qualified professional, who is familiar with and adheres to the local
requirements and supplementary regulations of your electricity supplier.
Do not carry out the installation yourself. RISK OF ELECTRIC SHOCK!
DANGER! All electrical work must be carried out by a qualified
professional. Do not modify the energy supply. The connection must be
carried out in accordance with the current local and legal regulations.
RISK OF ELECTRIC SHOCK!
WARNING! The safety distance between the hob and a wall
cupboard above should be at least 450 mm.
WARNING! The safety distance between the hob and an extractor
hood above should be at least 760 mm.
CAUTION! Do not install the appliance above cooling equipment, dish
washers or laundry dryers.
CAUTION! When installing the appliance ensure optimal heat
radiation to maintain the operating safety.
CAUTION! The wall and the reach of the heat radiation above the
worktop must be made of heat-resistant materials.
CAUTION! To avoid any damage, the sandwich layer and adhesive
must resist heat.
44
Page 45

2.1 Unpacking and positioning
1. Unpack the appliance carefully. Dispose of the packaging as described in chapter
WASTE MANAGEMENT.
2. The appliance may be equipped with a the transport-protection. Be very careful
and do not use any aggressive or abrasive detergents to remove residuals of the
transport-protection.
3. Check that the appliance and the power cord are not damaged.
4. Connect the appliance to a dedicated socket only.
5. Do not install the appliance in a place where it may come in contact with water
or rain; otherwise the insulation of the electrical system will be damaged.
6. Connect the appliance to the mains properly.
2.2 Pre-installation requirements
The worktop must be rectangular and plane and made of heat-resisting material.
Structural elements should not interfere with the installation area.
The installation must meet the safety requirements as well as the legal rules and
regulations.
The wall sat the hob should be covered with heat-resistant material, e.g. ceramic
tiles.
The power cable must not come into contact with cabinet doors or drawers.
The appliance must be supplied with an adequate flow of fresh air from outside
the cabinet to the base of the hob.
If the hob is installed above an oven, the oven must be equipped with a cooling
system.
Install a thermal protection below the bottom of the appliance when installing it
above a drawer or a cupboard.
The circuit breaker must be easily accessible.
2.3 Selection of installation equipment / Dimensions
Cut out the installation hole as described on the drawing below. For installation and
use, a minimum of 50 mm space shall be preserved around the hole. The thickness
of the work top should be at least 30 mm. Choose heat-resistant materials for the
work top only to avoid any deformation caused by the heat-radiation of the
appliance.
WARNING! The safety distance between the hob and a wall
cupboard above should be at least 450 mm.
WARNING! The safety distance between the hob and an extractor
hood above should be at least 760 mm.
45
Page 46

DIMENSIONS OF THE HOB:
A 1= DEPTH / B 1 = WIDTH / C = HEIGHT
A B C
520 mm
288 mm
47 mm
DIMENSIONS OF THE INSTALLATION OPENING:
A 1= DEPTH / B 1 = WIDTH
A 1
B 1
500 mm
268 mm
46
Page 47

MINIMUM CLEAR SPACE REQUIRED AROUND THE INSTALLATION
OPENING:
D
E
min. 50 mm
min. 50 mm
2.4 Installation of the hob
DANGER! The hob must be installed by a qualified professional
only. Do not carry out the installation yourself. RISK OF ELECTRIC
SHOCK!
The safety distance between the hob and a wall cupboard above should be at
least 450 mm.
The safety distance between the hob and an extractor hood above should be at
least 760 mm.
Do not install the appliance above cooling equipment, dish washers or laundry
dryers.
When installing the appliance ensure optimal heat radiation to maintain the
operating safety.
The wall and the reach of the heat radiation above the worktop must be made of
heat-resistant materials.
To avoid any damage, the sandwich layer and adhesive must resist heat.
The hob must be ventilated properly. The air inlet (D) and outlet (E) must never
be blocked or covered (s. fig. below). Always keep the appliance in proper
condition.
47
Page 48

MINIMUM DISTANCES REQUIRED FOR PROPER VENTILATION:
C = VENTILATION SLOT / E = AIR OUTLET
A
B C D
E
WALL CUPBOARD
min. 450 mm
Extractor hood
min. 760 mm
min. 50 mm
min. 30 mm
Air inlet
min. 15 mm
X
top closing edge of the cabinet
The top closing edge of the cabinet (X) must not be flush with the installation
opening (1). Install the closing edge in offset positioning (2) or bevel the closing
edge (3).
s. fig. below
48
Page 49

X
top closing edge of the cabinet
INSTALLATION OF THE HOB:
1
Seal
2
Hob
3
Worktop
4
Outer edge of the hob
5
Outer side of the seal
6
Bottom of the hob
1. Before installing the hob to the worktop, the adhesive seal has to be fixed on the
bottom edge of the hob properly.
The seal has to be fixed properly. The outer side of the seal must match the
bottom outer edge of the hob (s. fig. below). The seal must be fitted tightly on
the bottom edge of the hob (no overlaps, no gaps etc.) to prevent liquids etc.
from entering the installation opening subsequently.
49
Page 50

2. Insert the hob into the installation opening and push it downward carefully until
MOUNTING OF THE FIXING BRACKETS:
A
Screw
B
Fixing bracket
the hob is in firm contact to the worktop.
3. Fix the hob at the bottom of the worktop using the fixing brackets (s. below).
1. Mount the fixing brackets at the bottom of the hob using the appropriate
screws.
2. Screw one end of the fixing brackets into the predrilled holes at the bottom
of the hob (as shown below in fig 1 or 2).
3. Mount the other end of the fixing brackets at the bottom of the worktop using
the appropriate screws to fix the hob tightly and safely.
50
Page 51

2.5 Electrical connection
DANGER! The appliance must be connected to the mains by a
qualified professional, who is familiar with and adheres to the local
requirements and supplementary regulations of your electricity supplier.
Do not carry out the installation yourself. RISK OF ELECTRIC SHOCK!
DANGER! All electrical work must be carried out by a qualified
professional. Do not modify the energy supply. The connection must be
carried out in accordance with the current local and legal regulations.
RISK OF ELECTRIC SHOCK!
DANGER! Do not carry out the installation yourself. RISK OF
ELECTRIC SHOCK!
INSTRUCTIONS FOR THE INSTALLER (QUALIFIED PROFESSIONAL):
1. The appliance is equipped with a Schuko safety plug. Only use a Schuko safety
plug and a properly-grounded safety socket for connecting the appliance to the
mains.
2. Your household power supply must meet the power consumption of the
appliance.
3. The voltage must meet the values on the nameplate.
4. The power cord must withstand the values on the nameplate.
5. When connecting do not use adapters, reducers and branching devices as they
cause overheating. RISK OF FIRE!
6. The power cord must not touch hot areas and its temperature must not exceed
75 0C.
7. When the socket is not accessible for the user or a fixed electrical connection
of the appliance is required, an all-pole disconnecting device must be
incorporated during installation. Disconnecting devices are switches with a
contact opening distance of at least 3 mm. These include LS-switches, fuses and
protectors (EN 30335). Read the information on the nameplate and the
connection diagram before connecting the appliance to the mains. The electricity
supply must be performed via a 16A automatic cut-out. If in doubt, always
contact the local building authorities and consult the relevant legal provisions.
8. Do not bend or compress the power cord.
9. Check the power cord regularly. The power cord must be replaced by a qualified
professional only!
51
Page 52

3. Operation
HOB:
1
GLASS CERAMIC PLATE
2
COOKING ZONE / Ø 145 mm / max. 1200 W
3
COOKING ZONE / Ø 180 mm / max. 1800 W
4
CONTROL PANEL (s. below)
Read the complete instruction manual before you operate the appliance
for the first time. Strictly observe the safety guidelines!
Remove the complete protective film !
3.1 Hob and control panel
52
Page 53

CONTROL PANEL:
5
Sensor buttons for the SELECTION OF THE COOKING ZONES
6
TIMER
7
Sensor button: ON / OFF
8
SENSOR BUTTON: +
For the selection of the POWER LEVELS of the cooking zones (1 - 9)
For the setting of the TIMER
9
SENSOR BUTTON: -
For the selection of the POWER LEVELS of the cooking zones (1 - 9)
For the setting of the TIMER
10
KEY LOCK / CHILD PROTECTION
53
Page 54

3.2 Use of the touch control
4
4
The sensor keys respond to touches so you do not need to press them.
Touch the sensors with the bottom side of your top phalanx but not with your
fingertip (see figure below).
You will hear a beep
after each effective input.
Always keep the touch control clean and dry. Cooking utensils and cloths should
not cover the touch control. A thin water film may already complicate operating
the sensors.
3.3 Before initial use
Clean the glass-ceramic (look at chap. CLEANING AND MAINTENANCE).
3.4 Suitable cookware
Use glass-ceramic suitable cookware only.
The base of cookware must have a minimum diameter relevant to the diameter
of the cooking zone you use the cookware on.
Do not use cookware with rough edges or a curved base.
depending on model
54
Page 55

The base of your cookware should be flat, contact the glass ceramic completely
1. Touch the ON / OFF sensor
2. The display indicates .
3. Place a proper cookware on the DESIRED COOKING ZONE.
Always keep the bottom of the cookware as well as the
cooking zone clean and dry.
and have the same diameter as the relevant cooking zone. Always centre the
cookware on the cooking zone.
Always lift your cookware, when you want to move it on the glass ceramic. Do
not push cookware as you may scratch the glass ceramic.
3.5 How to start cooking
WARNING! Never touch the cooking zones while the residual heat
indicator is still on. RISK OF BURNS!
When the power is on, an acoustic signal sounds once; all indicators show
. Now the appliance has entered the stand-by mode.
55
Page 56

4. Select the desired cooking zone by touching the
SELECTION OF COOKING ZONE sensor. The indicator
flashes for 5 seconds.
5. Set the power level using the + and - sensor.
Each cooking zone is equipped with 9 power levels (1 - 9)
1 - 9
6. When you do not set a power level within 1 minute, the appliance will switch
off automatically. You have to start at step 1 again.
7. While cooking, the power level can be changed at any time.
1. Touch the SELECTION OF COOKING ZONE-sensor of the
cooking zone you want to switch off.
2. Switch off the RELEVANT COOKING ZONE by setting the -
sensor to 0.
3. Check that the indicator displays 0 and then H.
0 /
4. Switch off the appliance with the ON / OFF sensor.
3.6 How to stop cooking
56
Page 57

5. Beware of the hot surfaces of the cooking zones! An H
indicates which cooking zones are still hot. The H
disappears as soon as the relevant cooking zone has cooled
down.
6. You can use the residual heat for saving energy when starting a new cooking
procedure on a cooking zone which is still warm / hot.
LOCKING OF THE SENSORS:
1. Touch the KEY LOCK / CHILD PROTECTION.
2. A red dot next to the KEY LOCK / CHILD PROTECTION goes
on.
3. All sensors except ON / OFF are deactivated.
UNLOCKING OF THE SENSORS:
1. Check that the appliance is switched on.
2. Touch and hold the KEY LOCK / CHILD PROTECTION for
some time.
3. The red dot next to the KEY LOCK / CHILD PROTECTION goes off.
4. All sensor buttons are released again.
5. Now you can proceed operation as normal.
3.7 Key lock / Child protection
You can lock the sensors to protect them from unintentional operation or
operation by children.
57
Page 58

NOTICE! When the sensors have been locked, all sensors except
AUTOMATIC SWITCH-OFF FUNCTION OF ONE COOKING ZONE:
1. Touch the SELECTION OF COOKING ZONE-sensor you want
to control via the timer.
or
2. Touch the sensor button of the TIMER.
3. The INDICATOR OF THE TIMER starts flashing and indicates
00.
4. Set he desired time using the + and - sensor.
Touch + or - once to increase / decrease the value by 1
minute.
Touch and hold + or - to increase / decrease the value
by 1 minutes in fast mode.
5. When you have finished the setting, the count-down of the
set time starts. The display indicates the remaining time.
ON/OFF are deactivated. You can switch off the appliance with the
ON/OFF sensor in case of emergency, but you should unlock the sensors
afterwards.
3.8 Timer
The timer switches off the relevant cooking zones as soon as the set time has
elapsed.
The max. selectable period of time is 99 minutes.
When the selected period of time exceeds 99 minutes, the timer will be set back
to 0.
58
Page 59

6. To indicate which cooking zone (upper / lower cooking
zone) has been enabled a red dot next to the INDICATOR OF
THE TIMER goes on.
7. When the set time has elapsed, the relevant cooking
zone is switched off automatically.
DEACTIVATING OF THE TIMER FUNCTION:
1. Touch the - SENSOR to set the remaining time back to 0.
2. The TIMER FUNCTION is deactivated when the display
indicates -00-.
00
POWER LEVEL
AUTO SWITCH-OFF (HOURS)
1 6 2
6
3 5 4
5
WARNING! Other cooking zones will keep operating if they have been
turned on previously.
3.9 Residual heat warning
If the appliance has been operated for a while, the cooking zones will emit residual
heat even after operation. In such a case the letter "H" is indicated.
3.10 Automatic switch-off
The automatic switch-off represents a safety component of your appliance. The
automatic switch-off is activated, when you forgot to switch off a cooking zone after
operation. The default times are described on the schedule below.
The default times are described on the schedule below:
59
Page 60

5 4 6
1.5 7 1.5 8 1.5 9 1.5
4. Cooking guidelines
WARNING! Be very careful when frying, because oil and fat heat up
very fast especially when operating a high power level. Extremely hot oil
and fat inflame spontaneously and represent a serious fire risk.
WARNING! NEVER try to extinguish a fire with water, but switch off
the appliance and then cover flame e.g. with a lid or a fire blanket.
4.1 Cooking tips
Decrease the power level as soon as the desired cooking temperature is reached.
Use pot-lids to shorten cooking times and save energy.
Minimize the amount of cooking liquids or fat / oil to shorten cooking times.
Select a high power level, when you start cooking. Reduce the power level, when
your food has been heated up.
SIMMERING / COOKING OF RICE
Simmering is cooking with a temperature of approx. 85
0
C. At this temperature
small bubbles ascend to the surface of the cooking liquid. Simmering is a perfect
way to cook delicious soups and stews as the flavours of the food unfold
completely without being over-heated. You should also cook egg-based sauces
and sauces thickened with flour in this way.
Some cooking procedures, including the cooking of rice with the absorption-
method (= the water is consumed completely), require a setting above the lowest
power level, so the food is cooked within the recommended cooking time.
STEAKS
1. Take the meat out of the fridge and let it rest at room temperature for approx. 20
minutes.
2. Heat up a pan with a heavy base.
60
Page 61

3. Rub both sides of the steak with oil. Drizzle a small amount of oil into the hot
POWER LEVEL:
SUITABILITY (EXAMPLES):
Level 1 - 2
Delicate warming of small amounts of food.
Melting of chocolate, butter etc.
Food which burns quickly.
Gentle simmering.
Slow warming.
Level 3 - 4
Reheating.
Fast simmering.
Rice.
Level 5 - 6
Pancakes.
pan and place the steak into the pan.
4. Turn the meat just once while cooking. The exact cooking time depends from the
size of your steak and your individual preferences (medium, medium rare etc.).
So the cooking time of each side may vary from 2 to 8 minutes. Press the steak
to check the cooking result - a firm steak is well done.
5. Leave the steak on a warm plate for a few minutes; so it will become tender.
ASIAN-STYLE COOKING
1. Choose a wok with a flat base or a big pan.
2. Prepare all ingredients and the cooking utensils you need. Asian-style cooking
should work fast. If you want to cook a big amount of food, you should divide
the food into several portions.
3. Preheat the wok / pan briefly and add two tablespoons of oil.
4. Cook the meat first. Put it aside and keep it warm.
5. Now cook the vegetable. When the vegetable is hot but still crisp, reduce the
power level. Add the meat and, if desired, a sauce.
6. Sauté the complete food carefully so all components are hot.
7. Serve immediately.
4.2 Power levels
61
Page 62

Level 7 - 8
Sautéing.
Pasta.
Level 9
Asian-style.
Frying.
Reaching of the boiling point of soup / water.
4.3 Saving of energy
Use proper cookware for cooking.
Cookware with thick, flat bases can save up to1/3 of electric energy. Remember
to cover your cookware if possible; otherwise you will use four times as much
energy!
Match the size of the cookware to the surface of the heating plate. A cookware
should never be smaller than a heating plate.
Ensure that the heating plates and the cookware are clean.
Soils prevent heat-transfer. Repeatedly burnt-on spillages can often be removed
by products, which will damage the environment, only.
Do not uncover the cookware too often (a watched pot-content will never boil!).
You can use the residual heat for saving energy when starting a new cooking
procedure on a cooking zone which is still warm / hot.
5. Cleaning and maintenance
WARNING! Switch off the appliance and let it cool down before
cleaning. Disconnect the appliance from the mains before maintenance
(fuse box of your household power supply)!
WARNING! Do not use a steam cleaner. Risk of electric shock! The
steam can damage the electric components of the appliance.
62
Page 63

DETERGENTS:
5
KIND OF CONTAMINATION
STRATEGY
SAFETY GUIDELINES
DAILY CONTAMINATION OF THE GLASS CERAMIC (FINGERPRINTS, STAINS
CAUSED BY FOOD, NON-SUGARY SPILLAGES).
1. Disconnect the appliance from the
mains (fuse-box).
2. Use a suitable detergent for glass
ceramic while the glass ceramic is still
warm - but not hot!
3. Clean with a soft cloth / kitchen
paper and water, then dry carefully.
4. Connect the appliance to the mains
again.
While the appliance is disconnected
from the mains the residual heat
indicator does not work, so the
cooking zones may be still hot. Be
very careful.
Scourers, nylon-scourers and
abrasive detergents can scratch the
glass ceramic. Read the product
information of these detergents, so
you know if they are suitable to clean
glass ceramic.
Do not leave any residuals of a
detergent on the glass ceramic as it
can turn stained permanently.
5
Do not use any abrasive detergents !
Do not use any organic detergents !
Do not use essential oils !
Never use solvents !
CLEANING OF THE HOB:
Clean the hob after use.
Clean the glass-ceramic with a commercially available detergent for glass-ceramic.
Use a special sponge and warm water.
Remove residuals on the glass-ceramic with a soft cloth.
Do not scrub the glass-ceramic.
Remove residuals with a silicon-made scraper, which is suitable for glass-ceramic.
Such scrapers are commercial available.
Detergents such as vinegar, citric acid etc.
63
Page 64

OVERCOOKED OR MELTED FOOD AND STAINS CAUSED BY HEATED SUGAR-
CONTAINING FOOD ON THE GLASS CERAMIC.
Remove such a contamination
immediately with a suitable glass
ceramic scraper. Beware of cooking
zones which are still hot!
1. Disconnect the appliance from the
mains (fuse-box).
2. Hold the scraper in a 30
0
-angle and
scrape off the contamination to a
cold area.
3. Clean the contaminated area with a
dish towel / kitchen paper.
4. Proceed as described in steps 2 - 4 in
the previous section.
Remove such contaminations as
soon as possible. When they cool
down on the glass ceramic, they are
difficult to remove and may damage
the glass ceramic permanently.
Be very careful when using the
scraper so that you do not cut
yourself (especially, when you have
removed the safety cover).
CONTAMINATION OF THE CONTROL PANEL.
1. Disconnect the appliance from the
mains (fuse-box).
2. Take away the contamination.
3. Wipe the sensors with a damp
sponge or cloth.
4. Dry the sensors with kitchen paper.
5. Connect the appliance to the mains
again.
The appliance may beep and
automatically turn off. The sensors may
not work properly when they are wet.
Dry the control panel carefully before
you put it into operation again.
6. Trouble shooting
EMERGENCY MEASURES:
1. Switch off the entire appliance.
2. Disconnect the appliance from the mains (fuse box of your household power
supply).
3. Contact the shop you purchased the appliance at.
Check the schedule below before you contact the shop you purchased the
appliance at.
64
Page 65

ERROR
CAUSES
MEASURES
THE APPLIANCE CANNOT BE SWITCHED ON.
Break in the power supply.
Check that the appliance is
connected to the mains. Check the
household fuse box. Is there a power
failure at your place of residence?
THE SENSORS DO NOT RESPOND.
The sensors are locked.
Unlock the sensors.
THE SENSORS ARE DIFFICULT TO OPERATE.
Liquid on the sensors.
You used your fingertip.
Dry the sensors.
Use the bottom of your top phalanx.
THE GLASS CERAMIC IS SCRATCHED.
You used unsuitable cookware with
sharp edges.
You used an unsuitable detergent,
e.g. an abrasive.
Use suitable cookware.
Use suitable detergents.
SOME COOKWARE MAKE CRACKING OR CLICKING NOISE.
Your cookware is produced with
layers made of different kinds of
metal.
This is normal for such a cookware
and does not indicate a malfunction.
THE APPLIANCE MAKES HUMMING NOISE WHEN USED ON A HIGH HEAT
SETTING.
Caused by induction-cooking.
Normal operating condition, but the
noise should decrease or disappear
after decreasing the heat setting.
NOISE CAUSED BY THE FAN INSIDE THE APPLIANCE.
The cooling-fan the appliance is
equipped with protects the
electronics from being overheated. It
may continue to run even after you
have switched the appliance off.
Normal operating condition. Do not
disconnect the appliance from the
mains while the fan is running.
65
Page 66

COOKWARE DOES NOT BECOME HOT AND THE RELEVANT SYMBOL IS
DISPLAYED.
Cookware cannot be detected,
because it is unsuitable, too small or
improperly positioned on the
cooking zone.
Use suitable cookware which meets
the diameter of the cooking zone.
Place cookware on the centre of the
cooking zone.
THE APPLIANCE OR A COOKING ZONE HAS BEEN SWITCHED OFF
AUTOMATICALLY AND UNEXPECTEDLY, AN ACOUSTIC SIGNAL SOUNDS AND AN
ERROR CODE IS DISPLAYED6 (TYPICALLY ALTERNATING WITH ONE OR TWO
DIGITS ON THE TIMER-DISPLAY).
Technical malfunction.
Note the complete error-code,
disconnect the appliance from the
mains and contact the shop you
purchased the appliance at
Model
Glass ceramic Hob
Control panel
Touch Control
Material
Glass ceramic
Cooking zones
2
Power of cooking zones front / rear
1*1800 W / 1*1200 W
Diameter of cooking zones front /
rear
180 mm / 145 mm
Maximum power
3000 W
Voltage
220 - 240 V AC
Frequency
50 Hz
Residual heat indicator
Power levels
9 per cooking zone
Power cable
120 cm
Timer / adjustable time
/ up to 99 minutes
Dim. installation opening B*T in cm
26.80*50.00
Installation depth in cm
4.00
Dim. installation H*B*T in cm
4.70*28.80*52.00
Weight net / gross in kg
4.50 / 5.30
6
If the appliance shows a malfunction not noted on the schedule above or if you
have checked all items on the above schedule but the problem still exists, please
contact the shop you purchased the appliance at.
7. Technical data
Technical modifications reserved.
depending on model
66
Page 67

8. Waste management
Materials marked with this symbol are
recyclable.
Please contact your local authorities to
receive further information.
1. While unpacking, the packaging materials (polythene bags, polystyrene pieces,
etc.) should be kept away from children and pets. CHOKING HAZARD!
2. Old and unused appliances must be send for disposal to the responsible recycling
centre. Never expose to open flames.
3. Before you dispose of an old appliance, render it inoperative. Unplug the
appliance and cut off the entire power cord. Dispose of the power cord and the
plug immediately.
4. Dispose of any paper and cardboard into the corresponding containers.
5. Dispose of any plastics into the corresponding containers.
6. If suitable containers are not available at your residential area, dispose of these
materials at a suitable municipal collection point for waste-recycling.
7. Receive more detailed information from your retailer or your municipal facilities.
67
Page 68

9. Guarantee conditions
for large electric appliances, PKM GmbH & Co. KG, Neuer Wall 2, 47441 Moers.
This appliance includes a 24-month guarantee for the consumer given by the
manufacturer, dated from the day of purchase, referring to its flawless materialcomponents and its faultless fabrication. The consumer is accredited with both the
dues of the guarantee given by the manufacturer and the vendor's guarantees. These
are not restricted to the manufacturer's guarantee. Any guarantee claim has to be
made immediately after the detection and within 24 months after the delivery to
the first ultimate vendee. The guarantee claim has to be verified by the vendee by
submitting a proof of purchase including the date of purchase and/or the date of
delivery. The guarantee does not establish any entitlement to withdraw from the
purchase contract or for a price reduction. Replaced components or exchanged
appliances demise to us as our property.
The guarantee claim does not cover:
1. fragile components as plastic, glass or bulbs;
2. minor modifications of the PKM-products concerning their authorized condition
if they do not influence the utility value of the product;
3. damage caused by handling errors or false operation;
4. damage caused by aggressive environmental conditions, chemicals, detergents;
5. damage caused by non-professional installation and haulage;
6. damage caused by non common household use;
7. damages which have been caused outside the appliance by a PKM-product unless
a liability is forced by legal regulations.
The validity of the guarantee will be terminated if:
1. the prescriptions of the installation and operation of the appliance are not
observed.
2. the appliance is repaired by a non-professional.
3. the appliance is damaged by the vendor, the installer or a third party.
4. the installation or the start-up is performed inappropriately.
5. the maintenance is inadequately or incorrectly performed.
6. the appliance is not used for its intended purpose.
7. the appliance is damaged by force majeur or natural disasters, including, but with
not being limited to fires or explosions.
The guarantee claims neither extend the guarantee period nor initiate a new guarantee
period. The geographical scope of the guarantee is limited with respect to appliances,
which are purchased and used in Germany, Austria, Belgium, Luxembourg and the
Netherlands.
August 2014
68
Page 69

Cher client ! Nous tenons à vous remercier pour l'achat d'un produit de notre vaste
gamme d'appareils électroménagers. Veuillez lire le mode d'emploi en entier avant
d'utiliser l'appareil pour la première fois. Conservez le présent mode d’emploi dans
un lieu sûr pour référence ultérieure. Si vous transmettez l'appareil à un tiers,
remettez-lui aussi ce mode d'emploi.
Contenu
1. Consignes de sécurité .................................................................................................. 71
1.1 Mentions d'avertissement ..................................................................................... 72
1.2 Instructions de sécurité ......................................................................................... 72
2. Installation .................................................................................................................... 77
2.1 Déballage et installation ........................................................................................ 77
2.2 Exigences avant Mise en Service ......................................................................... 78
2.3 La sélection de l’environnement de l’installation / des dimensions ................ 78
2.4 Installation de la table de cuisson ........................................................................ 80
2.5 Prise électrique ....................................................................................................... 84
3. Fonctionnement ........................................................................................................... 85
3.1 Table de cuisson et bandeau de commande ...................................................... 85
3.2 Réglage des touches ............................................................................................... 87
3.3 Avant la première utilisation ................................................................................. 87
3.4 Batterie de cuisine appropriée .............................................................................. 87
3.5 Commencer avec le processus de cuisson .......................................................... 88
3.6 Après le processus de cuisson .............................................................................. 89
3.7 Verrouillage de touche / sécurité-enfants ........................................................... 90
3.8 Utilisation de la minuterie ..................................................................................... 91
3.9 Attention à la chaleur résiduelle ........................................................................... 92
3.10 Déclenchement automatique .............................................................................. 92
4. Remarques pour la cuisson ......................................................................................... 93
4.1 Conseils de cuisine ................................................................................................. 93
4.2 Tableau des niveaux de puissance ........................................................................ 95
4.3 Comment économiser de l’énergie ...................................................................... 95
5. Nettoyage et entretien ................................................................................................. 96
69
Page 70

6. Instructions de dépannage .......................................................................................... 98
Ne vous débarrassez pas cet équipement ensemble avec les ordures
ménagères. Remettez l’équipement impérativement à un poste de
collecte d’appareils électriques et électroniques réutilisables. N’enlevez
pas les pictogrammes / autocollants appliqués sur l’équipement.
7. Données techniques .................................................................................................. 100
8. Mise au rebut .............................................................................................................. 101
9. Conditions de la garantie .......................................................................................... 102
Les chiffres figurant dans le présent mode d’emploi peuvent différer dans certains
détails de la conception actuelle de votre appareil. Néanmoins, dans un tel cas,
veuillez suivre les instructions. Contenu non compris.
Le fabricant se réserve le droit d’apporter toute modification qui n'a pas
d’influence sur les fonctions de l'appareil. Veuillez éliminer l'emballage
conformément aux réglementations locales et municipales en vigueur.
L'appareil que vous avez acheté peut être une version améliorée de l'unité pour
lequel le présent mode d’emploi a été imprimé. Néanmoins, les fonctions et les
conditions d’utilisation sont identiques. Ce mode d’emploi est donc toujours
valable. Les modifications techniques ainsi que les fautes d'impression demeurent
sous réserve.
DECLARATION DE CONFORMITE EUROPEENNE
Les produits, décrits dans ce mode d’emploi, sont conformes aux réglementations
harmonisées.
Les documents pertinents peuvent être demandés auprès du détaillant par les
autorités compétentes.
70
Page 71

1. Consignes de sécurité
VEUILLEZ LIRE ATTENTIVEMENT L'ENSEMBLE DES
CONSIGNES DE SECURITE ET DES INSTRUCTIONS DE SECURITE
AVANT LA PREMIERE UTILISATION DE L'APPAREIL.
Les informations contenues servent à protéger votre santé. Le non-respect des
consignes de sécurité peut mettre en péril votre santé et entraîner la mort dans
le pire des cas.
Conservez ce mode d'emploi pour qu'il soit à portée de main en toutes
circonstances. Respectez scrupuleusement toutes les remarques pour éviter les
accidents ou une détérioration de l'appareil.
Vérifiez toujours l'état technique de l'appareil! Tous les câbles ou fils reliés à
l'appareil sont-ils en bon état? Ou sont-ils usés ( ?? ) et ne résistent-ils plus à la
puissance de l'appareil ? C'est pourquoi il est indispensable de faire vérifier les
connexions déjà présentes (voire neuves) par un professionnel (électricien).
Tous les travaux qui sont nécessaires au raccordement de l'appareil à
l'alimentation secteur doivent être effectués exclusivement par un professionnel
qualifié (électricien).
L'appareil est exclusivement destiné à un usage privé.
L'appareil est uniquement destiné à cuisiner des aliments dans le cadre d'un usage
familial.
L'appareil peut être utilisé dans des camping-cars / caravanes à installation fixe
conformément à la réglementation TÜV en 230V AC.
L'appareil est uniquement destiné à fonctionner dans des espaces clos.
Cet appareil ne peut pas être utilisé à des fins professionnelles ou dans des
transports publics.
Utilisez l'appareil uniquement conformément à l'usage prévu.
Ne laissez personne utiliser l'appareil s'il ne s'est pas familiarisé avec le mode
d'emploi.
Cet appareil peut être utilisé par des enfants âgés de 8 ans et plus, ainsi que par
des personnes ayant des capacités physiques, sensorielles et mentales réduites ou
le manque d'expérience et de connaissances si elles sont surveillées ou ont reçu
des instructions concernant l'utilisation sécuritaire de l'appareil et comprennent
les risques encourus. Les enfants ne doivent pas jouer avec l'appareil. Le
nettoyage et l’entretien quotidien ne doivent pas être effectués par les enfants,
à moins qu’ils soient surveillés.
LES PRESENTES INSTRUCTIONS D’UTILISATION DOIVENT ETRE
ACCESSIBLES POUR CHAQUE PERSONNE APPELEE A UTILISER
L'APPAREIL. ASSUREZ-VOUS QUE LES UTILISATEURS AIENT LU ET
71
Page 72

COMPRIS LES INSTRUCTIONS D’UTILISATION AVANT D’UTILISER
DANGER ! attire l’attention sur
une situation dangereuse qui crée un
risque direct pour la vie et la santé si elle
n’est pas écartée.
MISE EN GARDE ! attire
l’attention sur une situation dangereuse
susceptible de créer un risque pour la vie
et la santé si elle n’est pas écartée.
ATTENTION ! attire l’attention
sur une situation dangereuse susceptible
de provoquer des blessures
moyennement graves ou bénignes si elle
n’est pas écartée.
OBSERVATION ! attire l’attention
sur une situation dangereuse susceptible
d’endommager l’équipement si elle
n’est pas écartée.
L’EQUIPEMENT.
1.1 Mentions d'avertissement
1.2 Instructions de sécurité
Attention aux risques d’électrocution :
1. Le non-respect des consignes dans ce mode d’emploi peut
représenter un danger pour la vie et la santé de l’utilisateur et / ou
peut endommager l’appareil.
2. L'appareil doit être branché au secteur par un professionnel qualifié,
qui est formé et qui se tient aux exigences locales et règlements
supplémentaires de votre fournisseur d'énergie.
3. Tous les travaux électriques doivent être effectués par un
professionnel qualifié. Ne modifiez pas l'alimentation en énergie. La
connexion doit être effectuée conformément aux réglementations
locales et juridiques actuelles.
4. Ne branchez pas l'appareil au secteur si l'appareil lui-même ou le
cordon d'alimentation ou la fiche sont visiblement endommagés.
5. N’essayez jamais de réparer l'appareil vous-même. Si l'appareil ne
fonctionne pas correctement, nous vous prions de vouloir bien
contacter le service après-vente. Si votre appareil ne fonctionne pas
correctement consultez le magasin dans lequel vous l’avez acheté.
Utilisez uniquement les pièces détachées originales.
6. Si le câble secteur est endommagé, il doit être remplacé
exclusivement par le fabricant ou un service après-vente agréé par
le fabricant ou une personne qualifiée équivalente.
DANGER !
72
Page 73

7. Ne jamais toucher l’interrupteur d’alimentation, la prise de
branchement ou d’autres components électriques avec des mains
humides ou mouillées. RISQUE DE CHOC ELECTRIQUE !
MISE EN GARDE !
Attention aux risques de brûlure, d’électrocution, de feu ou de
dommages corporels :
1. N'utilisez l'appareil qu'avec une tension alternative de 220 ~ 240 V /
50 Hz.
2. Débranchez l'appareil du réseau électrique avant le nettoyage et
l'entretien.
3. Les données techniques de votre alimentation électrique doivent
correspondre aux valeurs indiquées sur la plaquette signalétique.
Votre courant domestique doit être équipé d'un fusible automatique
déconnectant d'office l'appareil.
4. L'appareil doit toujours être mis à la terre et protégé conformément
aux exigences de votre fournisseur d'énergie local. Le circuit de
courant principal doit être équipé d'un dispositif de mise en arrêt de
sécurité.
5. Toutes les modifications au réseau électrique pour permettre
l'installation de l'appareil doivent être effectuées par un
professionnel qualifié.
6. Dans le cas d'un événement provoqué par un dysfonctionnement
technique, débranchez l'appareil du secteur. Signalez le
dysfonctionnement à votre centre de service de sorte à ce qu'il
puisse être réparé.
7. Ne réparez pas l'appareil vous-même. Les réparations effectuées par
des personnes non autorisées peuvent causer de graves dégâts.
Toujours contacter le centre de service le plus proche. Seules les
pièces de rechange d'origine doivent être utilisées pour les
réparations.
8. Avec une tension secteur de 220 ~ 240 V / 50 Hz, n'utilisez pas de
multiprises, de dominos ou de rallonges.
9. Si les zones de cuisson sont fissurées ou endommagées en quel que
soit la sorte, éteignez immédiatement l'appareil et débranchez-le du
secteur (le boîtier à fusibles). RISQUE DE CHOC ELECTRIQUE !
10. N’effectuez pas de modifications à votre appareil.
11. Cet appareil ne doit pas être utilisé avec une minuterie externe ou
une télécommande indépendante de l’appareil.
12. Eteignez toujours l’appareil après utilisation, comme indiqué dans ce
mode d’emploi.
73
Page 74

13. La pièce où l'appareil est installé dans doit être sèche et bien
ventilée. Lorsque l'appareil est installé, il est nécessaire d’assurer un
accès facile à l'ensemble des éléments de commande.
14. Le placage d'armoires doit être fixé avec une colle résistante à la
chaleur, qui est peut résister à une température de 100 0C.
15. Les meubles adjacents ou l’encastrement et tous les matériaux
utilisés pour l'installation doivent être en mesure de résister pendant
le fonctionnement de l’appareil à une température de 85 0C au
minimum au-dessus de la température ambiante de la pièce où
l'appareil est installé.
16. Ne pas installer l'appareil dans les pièces ou dans les zones qui
contiennent des substances inflammables comme l'essence, le gaz
ou la peinture. Cet avertissement se réfère également à la vapeur
que ces substances dégagent.
17. Les hottes aspirantes doivent être installées selon les consignes de
leurs fabricants.
18. La distance de sécurité minimale entre la table de cuisson et le
placard ci-dessus = min. 760 cm.
19. La distance de sécurité entre la table de cuisson et la hotte
d’aspiration placée au-dessus de celle-ci doit respecter min. 760
mm.
20. Ne pas mettre des objets sur la table de cuisson. RISQUE DE FEU !
21. La cuisson avec de la graisse ou de l'huile sans surveillance peut
être dangereuse et peut causer un incendie. NE tentez JAMAIS
d'éteindre un incendie avec de l'eau, mais éteignez l'appareil, puis
couvrez la flamme par exemple avec un couvercle ou d'une
couverture anti-feu.
22. N’installez pas l'appareil à la proximité des rideaux ou des meubles
rembourrés. RISQUE D'INCENDIE !
23. L’équipement ménager et les fils de raccordement ne doivent pas
toucher le four chaud ou la table de cuisson vu que le matériau
d'isolation n’est généralement pas résistant à la chaleur.
24. N’utilisez jamais un nettoyeur à vapeur pour nettoyer l'appareil. La
vapeur causera de graves dégâts aux composants électriques de
l'appareil. RISQUE DE CHOC ELECTRIQUE !
25. Ne jamais toucher les zones de cuisson si l’indicateur de chaleur
résiduelle n’est pas encore éteint. RISQUE DE BRÛLURE !
26. Les parties accessibles du four deviennent chaudes pendant le
fonctionnement, donc ne laissez pas les enfants s’approcher de
l'appareil lorsqu’il fonctionne. Toucher l'appareil pendant son
fonctionnement peut causer des brûlures graves.
27. Les enfants ne doivent pas jouer avec l'appareil.
28. Surveillez toujours les enfants s’ils sont près de l'appareil.
74
Page 75

29. Cet appareil ne peut être utilisé par des enfants de plus de 8 ans
ainsi que par des personnes aux capacités physiques, sensorielles
ou mentales réduites, ou manquant d'expérience ou de
connaissances que s'ils sont placés sous la supervision d'une
personne chargée de leur sécurité ou que s'ils ont reçu les directives
nécessaires à l'utilisation de l'appareil et ont été informés des
dangers en résultant. Les enfants ne peuvent pas jouer avec
l'appareil. Le nettoyage et l'entretien par l'utilisateur ne peuvent
pas être effectués par des enfants sans surveillance.
30. Ne laissez les enfants utiliser l'appareil sans surveillance que s'ils
ont été formés à l'utilisation de l'appareil d'une telle manière qu'ils
puissent se servir de l'appareil en toute sécurité et ont pris
connaissance des dangers qu'une utilisation inappropriée peut
entraîner.
31. Lors du déballage, veillez impérativement à ce que les composants
de l'emballage (sacs en polyéthylène, morceaux de polystyrène)
n'aboutissent pas entre les mains des enfants et animaux. RISQUE
D'ETOUFFEMENT ! RISQUE DE BLESSURE !
32. Utilisez uniquement des protections de cuisinière conçues par le
fabricant de l'appareil de cuisson ou mentionnées par le fabricant de
l'appareil dans les instructions d'utilisation comme appropriées ou
des protections de cuisinière incorporées dans l'appareil. L’utilisation
des protections inappropriées peut provoquer des accidents.
ATTENTION !
1. N’utilisez pas de détergents agressifs, abrasifs et âcres ou des objets
acérés pour nettoyer la porte du four. Sinon, vous risquez de rayer la
surface et d’endommager le verre.
2. Ne pas allumer la table de cuisson avant avoir posé une batterie de
cuisine appropriée sur la cuisson.
3. La table de cuisson doit être propre à chaque fois. Les zones de
cuisson salies ne transfèrent pas la chaleur correctement.
4. Protégez la table de cuisson contre la corrosion.
5. Éteignez les zones de cuisson salies.
6. Éteignez la table de cuisson complètement en cas
d’endommagement ou de dysfonctionnement.
7. Ne laissez pas les casseroles avec des plats préparés à base de
graisses et d'huiles sans surveillance sur une zone de cuisson
allumée ; la graisse chaude peut prendre feu spontanément.
8. Les lames des racloirs sont très fortes. Attention de ne pas vous
blesser quand vous avez retiré le couvercle de sécurité.
9. Ne pas poser des objets métalliques comme par ex. des couteaux,
fourchettes, cuillères et des couvercles sur la zone de cuisson. Ils
75
Page 76

peuvent devenir très chauds.
10. Le présent appareil est conforme à la législation de sécurité
européenne actuelle. Nous tenons à souligner que cette conformité
ne nie pas le fait que les surfaces de l'appareil deviennent chaudes
pendant l'utilisation et continueront à garder et à émettre de la
chaleur, même si l’appareil cesse de fonctionner.
OBSERVATION !
1. Lorsque vous déplacez l'appareil, maintenez-le à sa base et
soulevez-le soigneusement. Gardez l'appareil en position verticale.
2. Ne pas mettre des objets lourds sur la table de cuisson.
3. Utilisez exclusivement la batterie de cuisine appropriée à la cuisson.
Sinon vous pourriez endommager l’appareil.
4. L'appareil doit être transporté et installé par au moins deux
personnes.
5. Lorsque vous déballez l'appareil, vous devriez prendre note de la
position de chaque partie des accessoires à l'intérieur au cas où vous
avez à le remballer et à le transporter ultérieurement.
6. N’utilisez pas l'appareil à moins que tous les composants soient
installés correctement.
7. Les sorties d'air de l'appareil ou de sa structure encastrée (si
l'appareil est apte à être encastré) doivent être complètement
ouvertes, débloquées et libres de tout type de saleté.
8. Il est strictement interdit d’altérer la lisibilité de la plaque signalétique,
voire de la démonter ! Les contraventions ont pour effet d’exclure
tout recours à la garantie du fabricant !
LISEZ LES PRÉSENTES INSTRUCTIONS ATTENTIVEMENT ET
CONSERVEZ-LES EN LIEU SÛR.
Le fabricant décline toute responsabilité pour les dommages corporels ou
matériels en cas d’inobservation des instructions.
76
Page 77

2. Installation
DANGER ! L'appareil doit être branché au secteur par un
professionnel qualifié, qui est formé et qui se tient aux exigences locales
et règlements supplémentaires de votre fournisseur d'énergie. RISQUE
D'ÉLECTROCUTION !
DANGER ! Tous les travaux électriques doivent être effectués par
un professionnel qualifié. Ne modifiez pas l'alimentation en énergie. La
connexion doit être effectuée conformément aux réglementations locales
et juridiques actuelles. RISQUE D'ÉLECTROCUTION !
MISE EN GARDE ! La distance de sécurité entre la table de cuisson
et la hotte d’aspiration placée au-dessus de celle-ci doit respecter min.
760 mm.
MISE EN GARDE ! La distance de sécurité minimale entre la table de
cuisson et le placard ci-dessus = min. 760 cm.
ATTENTION ! L’appareil ne doit pas être installé au-dessus des
réfrigérateurs, lave-vaisselles et sèche-linges.
ATTENTION ! Faites installer l’appareil de telle manière qu’un
rayonnement thermique optimal puisse permettre la sécurité
opérationnelle.
ATTENTION ! Le mur et les zones d’influence du rayonnement
thermique au-dessus de la plaque doivent être résistants à la chaleur.
ATTENTION ! Les couches composites et les adhésifs doivent être
résistants à la chaleur pour éviter des dommages.
2.1 Déballage et installation
1. Déballez l'appareil avec soin. Débarrassez-vous de l'emballage comme décrit dans
le chapitre de gestion des déchets.
2. Enlevez complètement la protection pour le transport. Soyez très prudent et
n’utilisez pas de détergents agressifs ou abrasifs pour enlever les résidus de la
protection pour le transport.
3. Vérifiez à ce que l'appareil et le cordon d'alimentation ne sont pas visiblement
endommagés.
4. L’appareil doit être branché selon les directives d’installation.
77
Page 78

5. N’installez pas l'appareil dans un endroit où il pourrait entrer en contact avec de
l'eau ou de la pluie ; sinon l'isolation de l'installation électrique sera endommagée.
6. Branchez l’appareil correctement à l’alimentation électrique.
2.2 Exigences avant Mise en Service
La plaque doit être rectangulaire et plate et doit consister du matériel
incombustible. La surface de montage ne doit pas être affectée de composants.
L’installation doit être conforme aux exigences de sécurité, aux normes
applicables et aux exigences légales.
Utilisez des raccordements muraux résistants à la chaleur et faciles à nettoyer pour
la surface qui entoure la plaque comme des carreaux céramiques.
Des portes de placard et des tiroirs ne doivent pas être en contact avec le câble
d’alimentation.
L’appareil a besoin d’une connexion de l’air extérieur approprié en direction de
sa face inférieure.
Si l’appareil est installé au-dessus d’un four, le four doit avoir un refroidissement.
Installez une barrière de protection thermique en-dessous de la face inférieure de
l’appareil si vous installez l’appareil au-dessus d’un tiroir ou d’un placard.
Le disjoncteur de protection doit être facilement accessible.
2.3 La sélection de l’environnement de l’installation/des dimensions
Faites une ouverture d’encastrement aux dimensions indiquées sur le dessin ci-
dessous.
L'espace libre minimal entourant l' ouverture d'installation : 50 mm.
Epaisseur minimal / surface d'installation : 30 mm.
MISE EN GARDE ! La distance de sécurité entre la table de cuisson
et la hotte d’aspiration placée au-dessus de celle-ci doit respecter min.
760 mm.
MISE EN GARDE ! La distance de sécurité minimale entre la table de
cuisson et le placard ci-dessus = min. 760 cm.
78
Page 79

DIMENSIONS DE LA TABLE DE CUISSON :
A = PROFONDEUR / B = LARGEUR / C = HAUTEUR
A B C
520 mm
288 mm
47 mm
DIMENSIONS DE L’OUVERTURE D‘ENCASTREMENT :
A 1 = PROFONDEUR / B 1 = LARGEUR
A 1
B 1
500 mm
268 mm
79
Page 80

ESPACE LIBRE MINIMALE NECESSAIRE AUTOUR DE L’OUVERTURE
DE MONTAGE :
D
E
min. 50 mm
min. 50 mm
2.4 Installation de la table de cuisson
DANGER ! La table de cuisson doit être installée du personnel
qualifié. Ne jamais effectuer l’installation indépendamment. RISQUE
D‘ÉLECTROCUTION !
La distance de sécurité entre la table de cuisson et la hotte d’aspiration placée
au-dessus de celle-ci doit respecter min. 760 mm.
La distance de sécurité minimale entre la table de cuisson et le placard ci-dessus
= min. 760 cm.
L’appareil ne doit pas être installé au-dessus des réfrigérateurs, lave-vaisselles et
sèche-linges.
Faites installer l’appareil de telle manière qu’un rayonnement thermique optimal
puisse permettre la sécurité opérationnelle.
Le mur et les zones d’influence du rayonnement thermique au-dessus de la plaque
doivent être résistants à la chaleur.
Les couches composites et les adhésifs doivent être résistants à la chaleur pour
éviter des dommages.
La table de cuisson doit être correctement ventilée. L’entrée (D) et la sortie (E)
d'air ne doivent pas être bloquées (voir illustration ci-dessous).
80
Page 81

ESPACES LIBRES MINIMALES POUR LA BONNE VENTILATION :
C = FENTE DE VENTILATION / E = SORTIE D‘AIR
A
B C D
E
Placard
min. 450 mm
Hotte de ventilation
min. 760 mm
min. 50 mm
min. 30 mm
entrée de
l‘air
min. 15 mm
X
bord terminal supérieur du meuble encastrable
Le profil de finition (X) ne peut pas toucher l´ appareil (1). Installez le profil
décalée (2) ou biseautée (3).
voir illustration ci-dessous
81
Page 82

X
bord terminal supérieur du meuble encastrable
INSTALLATION DE LA TABLE DE CUISSON :
1. Avant l’installation de la table de cuisson dans le plan de travail fixez le joint
adhésif correctement au bord inférieur de la table de cuisson.
Le joint doit être fixé correctement. La partie extérieure du joint doit
correspondre avec le bord inférieur extérieur de la table de cuisson (voir
illustration ci-dessous). Le joint doit être directement en contact avec le bord
inférieur de la table de cuisson (aucuns chevauchements, écarts etc.) pour éviter
une pénétration des liquides plus tard dans l’ouverture de montage.
82
Page 83

1
Joint
2
Table de cuisson
3
Plan de travail
4
Bord extérieur de la table de cuisson
5
Partie extérieure du joint
6
Partie inférieure de la table de cuisson
FIXATION DES CLIPS DE FIXATION :
A
Vis
B
Clip de Fixation
2. Installez la table de cuisson dans l’ouverture de montage et pressez la
prudemment vers le bas, jusqu’à la table de cuisson repose fermement sur le plan
de travail.
3. Fixer la table de cuisson avec des clips de fixation sur la partie inférieure du plan
de travail (voir ci-dessous / FIXATION DES CLIPS DE FIXATION).
1. Fixer les clips de fixation avec des vis associées à la partie inférieure de la table
de cuisson en vissant l’une fin des clips de fixation dans les trous prépercés
(comme illustré ci-dessous, fig. 1 ou 2).
2. Fixer l’autre fin des clips de fixation avec des vis associées à la partie inférieure
du plan de travail pour pouvoir installer la table de cuisson de manière ferme et
sûre.
83
Page 84

2.5 Prise électrique
DANGER ! L'appareil doit être branché au secteur par un
professionnel qualifié, qui est formé et qui se tient aux exigences locales
et règlements supplémentaires de votre fournisseur d'énergie. RISQUE
D'ÉLECTROCUTION !
DANGER ! Tous les travaux électriques doivent être effectués par
un professionnel qualifié. Ne modifiez pas l'alimentation en énergie. La
connexion doit être effectuée conformément aux réglementations locales
et juridiques actuelles. RISQUE D'ÉLECTROCUTION !
LES INSTRUCTIONS POUR L’INSTALLATEUR (PROFESSIONNEL
QUALIFIE) :
1. Pour le branchement de l’appareil utilisez uniquement une fiche Schuko et une
prise de sécurité raccordée à la terre.
2. Votre réseau électrique doit être approprié pour la consommation électrique de
votre appareil.
3. Vérifiez à ce que les données techniques de votre approvisionnement en énergie
respectent les valeurs sur la plaque signalétique.
4. Le câble d’alimentation doit résister aux valeurs mentionnées sur la plaque
signalétique.
5. Pour le branchement n’utilisez pas des adapteurs, des agents anti-tension ou des
dispositifs de dérivation; ils peuvent résulter en une surchauffe. RISQUE
D‘INCENDIE !
6. Le câble d’alimentation ne doit pas toucher des zones chaudes et doit être placé
de telle manière que sa température ne dépasse pas 75 0C.
7. Lorsque la prise n’est pas accessible pour l'utilisateur ou une connexion
électrique fixe de l'appareil est exigée, un dispositif de coupure omnipolaire
doit être incorporé lors de l'installation. Les dispositifs de coupure sont des
interrupteurs avec une distance d'ouverture des contacts d'au moins 3 mm. Il
s’agit notamment des interrupteurs LS, les fusibles et les protecteurs (EN 60335).
L’alimentation électrique de l’appareil doit être effectuée par un disjoncteur
électronique de 16 A. En cas de doute consultez les autorités locales et informezvous des lois applicables.
8. Le câble d’alimentation ne doit pas être plié ou pressé.
9. Vérifiez régulièrement le câble d’alimentation. Si le câble secteur est endommagé,
il doit être remplacé exclusivement par le fabricant ou un service après-vente agréé
par le fabricant ou une personne qualifiée équivalente.
84
Page 85

3. Fonctionnement
TABLE DE CUISSON :
1
PLAQUE VITROCERAMIQUE
2
ZONE DE CUISSON / Ø 145 mm / 1200 W max.
3
ZONE DE CUISSON / Ø 180 mm / 1800 W max.
4
BANDEAU DE COMMANDE (voir ci-dessous)
BANDEAU DE COMMANDE :
Veuillez lire toute la documentation avant la première mise en service.
Faites attention aux conseils de sécurité et précautions d‘emploi !
Enlevez toutes les films de protection qui peuvent encore se trouver à
l’appareil.
3.1 Table de cuisson et bandeau de commande
85
Page 86

5
Touches à effleurement pour CHOISIR LES ZONES DE CUISSON
6
MINUTERIE
7
Touche à effleurement: EN / HORS
8
TOUCHE : +
Pour choisir les niveaux de puissance des zones de cuisson (1 - 9)
Réglage de la minuterie
9
TOUCHE : -
Pour choisir les niveaux de puissance des zones de cuisson (1 - 9)
Réglage de la minuterie
10
VERROUILLAGE DE TOUCHE / SECURITE-ENFANTS
86
Page 87

3.2 Réglage des touches
7
7
Il suffit d’effleurer les touches pour l’activer.
Effleurez le centre des touches avec le doigt, pas avec le bout du doigt (fig.
suivante).
Vous entendez un signal acoustique (bip) après chaque bonne entrée
.
La zone de contrôle doit toujours être maintenue sèche et propre. Ne pas placer
des objets comme des ustensiles de cuisine ou chiffons sur la zone de contrôle.
Déjà une couche mince de l’eau peut rendre l’utilisation des touches difficile.
3.3 Avant la première utilisation
Nettoyez la surface de l’appareil (v. chapitre NETTOYAGE ET ENTRETIEN).
3.4 Batterie de cuisine appropriée
Utilisez exclusivement la batterie de cuisine appropriée à la cuisson. Sinon vous
pourriez endommager l’appareil.
Utilisez uniquement casseroles avec un fond plat.
L’équipement dépendant du modèle
87
Page 88

Ø casseroles = Ø plaque de cuisson. Centrez les casseroles.
1. Effleurer la touche EN / HORS.
2. L’écran indique
3. Posez de la batterie de cuisine appropriée sur la ZONE DE
CUISSON. La face inférieure de la batterie de cuisson ainsi
que la zone de cuisson doivent toujours être sèches et
propres.
Ne poussez pas ou ne tirez pas les casseroles. Soulevez les casseroles.
3.5 Commencer avec le processus de cuisson
MISE EN GARDE ! Ne jamais toucher les zones de cuisson si
l’indicateur de chaleur résiduelle n’est pas encore éteint. RISQUE DE
BRÛLURE !
Après avoir allumé l’appareil le signal acoustique retentit une fois; toutes les
affiches indiquent . L’appareil est maintenant en fonction stand-by.
88
Page 89

4. Choisissez une zone de cuisson avec SELECTION - ZONE
DE CUISSON. L'affichage correspondant clignote pendant 5
secondes.
5. Réglez la puissance avec la touche + et - .
Chaque zone de cuisson est équipée avec 9 niveaux de
puissance.
1 - 9
6. Si aucun niveau de puissance n’a été sélectionné pendant 1 minute, l’appareil
se désactive automatiquement. Vous recommencez avec niveau 1.
7. Vous pouvez ajuster tout le temps la puissance pendant le processus de
cuisson.
1. Effleurez la touche de la zone de cuisson SELECTION -
ZONE DE CUISSON que vous voulez éteindre.
2. Eteignez maintenant la ZONE DE CUISSON
CORRESPONDANTE en effleurant la touche – sur 0.
3. Vérifiez si l’écran indique 0 et après H.
0 /
4. Eteignez l’appareil avec la touche EN / HORS.
3.6 Après le processus de cuisson
89
Page 90

5. Ne touchez jamais la surface chaude de la zone de cuisson!
Si un H apparaît dans l’affichage le foyer est encore chaud.
Le symbole H s’éteint lorsque la zone de cuisson
correspondante est suffisamment refroidie.
6. Vous pouvez aussi utiliser la chaleur résiduelle comme fonction d’économie
d’énergie en commençant avec des autres processus de cuisson sur des zones
qui sont encore chaudes.
1. Touchez et maintenez VERROUILLAGE DE TOUCHE /
SECURITE ENFANTS.
2. À côté de VERROUILLAGE DE TOUCHE / SECURITE
ENFANTS, un point rouge est allumé.
3. Toutes les touches sauf EN / HORS sont désactivées.
1. Vérifiez si l’appareil est enclenché.
2. Touchez et maintenez VERROUILLAGE DE TOUCHE /
SECURITE ENFANTS pendant un certain temps.
3. Le point rouge à côté de VERROUILLAGE DE TOUCHE / SECURITE ENFANTS
s'éteint.
4. Le verrouillage est désactivé.
5. Vous pouvez maintenant utiliser l’appareil comme d’habitude.
3.7 Verrouillage de touche / sécurité-enfants
Vous pouvez désactiver les touches pour les assurer contre l’utilisation
involontaire ainsi que l’utilisation par des enfants.
VERROUILLAGE DES TOUCHES :
DEVERROUILLAGE DES TOUCHES :
90
Page 91

OBSERVATION ! Si les touches à effleurement sont verrouillées, toutes
DECLENCHEMENT AUTOMATIQUE D`UNE ZONE DE CUISSON :
1. A l’aide de la touche SELECTION - ZONE DE CUISSON
effleurez la touche pour laquelle vous voulez régler la
minuterie.
ou
2. Effleurez la touche de la MINUTERIE.
3. L’AFFICHAGE DE LA MINUTERIE commence à clignoter et
montre 00.
4. Réglez la durée de la minuterie souhaitée avec la touche +
ou - .
Si vous touchez une fois + ou -, la valeur est
augmentée/diminuée d' 1 minute.
Si vous touchez et maintenez + ou -, la valeur est
augmentée/diminuée à grande vitesse d'1 minute.
les touches sont désactivées sauf la touche EN / HORS. En cas de besoin
vous pouvez déclencher l’appareil tout le temps avec la touche EN / HORS,
mais après vous devriez d’abord déverrouiller les touches.
3.8 Utilisation de la minuterie
La minuterie arrête la zone de cuisson automatiquement après le temps
programmé.
La minuterie fonctionne comme un sablier électronique. Le délai max. est 99
minutes.
Si le délai choisi dépasse 99 minutes, la minuterie se place automatiquement à 0.
91
Page 92

5. Après réglage du temps le compte à rebours commence.
L’écran montre le temps restant.
6. Pour afficher la zone de cuisson qui a été sélectionnée (zone
de cuisson supérieure/inférieure), un point rouge est allumé
à côté de L'AFFICHAGE MINUTERIE.
7. Quand le temps de cuisson est expiré, la zone de
cuisson s’éteint automatiquement.
DESACTIVER LA MINUTERIE :
1. Effleurez la touche – pour réinitialiser le temps restant à 0.
2. Si l’écran indique -00- la MINUTERIE est désactivée.
00
MISE EN GARDE ! L’autre zone de cuisson reste en service si elle
était enclenchée avant.
3.9 Attention à la chaleur résiduelle
Si l’appareil était en service pour quelque temps les zones de cuisson utilisées
émettent encore de la chaleur résiduelle après le déclenchement. Pour avertir la lettre
" H " apparaît.
3.10 Déclenchement automatique
Le déclenchement automatique est une fonction de sécurité de votre appareil. Le
déclenchement automatique a donc lieu quand vous avez oublié de déclencher une
zone de cuisson après l’utilisation.
92
Page 93

Veuillez trouver les temps d’arrêt automatiques préréglés dans le tableau
Niveau de puissance
Déclenchement automatique
(heures)
1 6 2 6 3 5 4 5 5 4 6
1,5 7 1,5 8 1,5 9 1,5
suivant :
4. Remarques pour la cuisson
MISE EN GARDE ! Faites attention lors de la cuisson du rôti et de la
friture. La graisse et l’huile surchauffées s’enflamment facilement surtout
avec des températures élevées et représentent un risque d’incendie
sérieux.
MISE EN GARDE ! NE tentez JAMAIS d'éteindre un incendie avec de
l'eau, mais éteignez l'appareil, puis couvrez la flamme par exemple avec
un couvercle ou d'une couverture anti-feu.
4.1 Conseils de cuisine
Réglez le niveau de puissance plus faible quand une casserole a atteint sa
température de cuisson.
Couvrez la casserole avec un couvercle réduit le temps de cuisson. Vous
économisez de l’énergie parce que la chaleur est retenue.
Faites cuire avec peu d’eau ou de graisse. Cela réduit le temps de cuisson.
Commencez la cuisson avec un niveau de puissance plus élevé. Réglez à une
position de chauffe inférieure quand l’aliment est chauffé.
93
Page 94

FAITES CUIRE A FEU DOUX / CUIRE DU RIZ
Faites cuire à feu doux, c’est-à-dire mijotez à env. 85
0
C quand des petites bulles
remontent à la surface du liquide de lessivage. Mijoter est idéale pour la
préparation des soupes délicates et des ragoûts parce que les arômes peuvent se
développer sans surchauffe des aliments. Vous devriez préparer les sauces dans
un mélange liquide à base d’œuf ainsi que des sauces épaisses avec de la farine à
une température inférieure au point d’ébullition.
Quelques cuissons inclusivement la cuisson du riz selon la méthode d’absorption
( = la consommation complète de l’eau utilisé) ont probablement besoin d’un
réglage un peu au-dessus du niveau de puissance le plus bas, afin que l’aliment
soit cuit dûment dans le temps de préparation recommandé.
ROTIR DES STEAKS
1. Laissez reposer la viande avant de faire rôtir env. 20 minutes à température
ambiante.
2. Chauffez une poêle avec un fond indéformable.
3. Frottez les deux côtés du steak avec de l’huile. Mettez une petite quantité de l’huile
dans la poêle chaude et après la viande là-dedans.
4. Retournez la viande pendant la préparation seulement une fois. Le temps de
cuisson exact dépend de l’épaisseur du steak ainsi que de vos préférences
personnelles (médium, rosé, etc.). Le temps de cuisson peut varier de 2 à 8
minutes la côté. Pressez sur le steak pour vérifier le point de cuisson. Le plus
ferme le steak, le plus cuit le steak.
5. Laissez reposer le steak sur une assiette chaude pour quelques minutes. Dans ce
cas le steak devient tendre avant d’être servi.
SAUTER
1. Choisissez un wok approprié pour la vitrocéramique avec un fond plat ou une
poêle grande.
2. Préparez tous les ingrédients et les ustensiles de cuisson. Sautez rapidement. Si
vous voulez préparer une grande quantité partagez les matières de cuisson en
plusieurs pièces.
3. Chauffer le wok / la poêle rapidement. Ajouter 2 cuillères de huile.
4. Préparez d’abord la viande. Mettez à côté, maintenir au chaud.
5. Sautez les légumes. Quand les légumes sont chauds mais toujours croquants
réglez le niveau de puissance à un niveau plus bas. Ajoutez de nouveau la viande,
éventuellement une sauce.
6. Sautez tous les ingrédients encore une fois prudemment afin que tous les
ingrédients soient chauds.
94
Page 95

4.2 Tableau des niveaux de puissance
NIVEAU DE
PUISSANCE :
APPLICATION PRATIQUE (DES EXEMPLES) :
Position 1 - 2
Réchauffage doux de petites quantités d’aliments
Fondre du chocolat, du beurre etc.
Des aliments qui brûlent rapidement
Mijotage soigné
Réchauffage doux
Position 3 - 4
Chaleur résiduelle
Mijotage rapide
Cuire du riz
Position 5 - 6
Crêpes
Position 7 - 8
Sauter
Cuire des nouilles
Position 9
Sauter
Rôtir
Bouillir des soupes
Bouillir de l‘eau
4.3 Comment économiser de l’énergie
Utilisez des plats appropriés pour la cuisson.
Les plats de cuisson à fond plat et épais peuvent vous faire économiser jusqu'à
1/3 d'énergie électrique. Si possible, n’oubliez pas de couvrir vos plats de cuisson
; sinon vous allez utiliser quatre fois plus d'énergie !
Prenez soin à ce que la taille des plats de cuisson correspond à la surface de la
plaque chauffante. Un plat de cuisine ne doit jamais être inférieur à une plaque
chauffante.
Assurez-vous à ce que les plaques chauffantes et les plats de cuisson sont propres.
La saleté empêche le transfert de chaleur. Plusieurs déversements brûlés peuvent
souvent être éliminés par les produits, qui pourraient endommager
l'environnement.
95
Page 96

Ne laissez pas un plat de cuisson trop souvent découvert (le contenu dans un
8
8
récipient surveillé ne bouillera jamais !).
Vous pouvez utiliser la chaleur résiduelle des zones de cuisson comme fonction
d’économie d‘énergie si vous utilisez d’autres cuissons sur des zones de cuisson
qui sont encore chaudes.
5. Nettoyage et entretien
MISE EN GARDE ! Arrêtez l’appareil et laissez-le se refroidir avant de
le nettoyer. Débranchez l’appareil du réseau électrique avant l’entretien
(éteindre le fusible correspondant dans la boîte à fusibles dans
l’installation domestique) !
MISE EN GARDE ! N’utilisez jamais un nettoyeur à vapeur pour
nettoyer l'appareil. La vapeur causera de graves dégâts aux composants
électriques de l'appareil. RISQUE DE CHOC ELECTRIQUE !
LE DETERGENT :
N’utilisez pas de détergents abrasifs !
N’utilisez pas de détergents bios !
N’utilisez pas d’huiles essentielles !
N’utilisez jamais de solvants !
NETTOYAGE DU TABLEAU DE CUISSON :
Nettoyez les résidus immédiatement de la vitrocéramique. De légères salissures
peuvent être éliminées avec un chiffon doux.
Ne pas frotter les surfaces en vitrocéramique.
Nettoyer la vitrocéramique avec de l’eau chaude et une éponge spéciale. Utilisez
des nettoyants appropriés à la vitrocéramique (disponible en supermarché).
Séchez après avec un chiffon doux.
Utiliser un racloir à verre approprié pour vitrocéramique pour enlever des résidus.
Un produit correspondant de silicone est la meilleure solution pour protéger la
vitrocéramique.
Produits comme vinaigre, acide citrique, etc.
96
Page 97

TYPE DES IMPURETES
METHODE SUIVANTE
CONSIGNES DE SECURITE
DES TACHES DE TOUS LES JOURS SUR LA VITROCERAMIQUE (EMPREINTES,
TACHES D’ALIMENTS OU DES RESIDUS PAS SUCRES).
1. Débranchez l’appareil de
l’alimentation électrique (installation
domestique).
2. Nettoyez la surface à l’aide d’un
racloir à verre approprié lorsque le
tableau de cuisson est encore chaud
– pas trop chaud !
3. Nettoyez a l’aide d’un chiffon doux
/ du papier absorbant et de l’eau
propre et après séchez.
4. Rebranchez l’alimentation électrique
de l‘appareil.
Si l’appareil est débranché de
l’alimentation électrique le symbole
chaleur résiduelle n’est pas allumé.
Les zones de cuisson peuvent être
chaudes. Soyez prudent !
Des nettoyants abrasifs (éponges
abrasives, paille de fer etc.) risquent
d‘endommager la surface. Respectez
les recommandations du fabricant du
produit nettoyant pour l’utilisation
sur vitrocéramique.
Eliminez toujours tous les résidus
des nettoyants sur la vitre. Sinon la
vitre peut avoir des taches.
DES DEBORDEMENTS, ALIMENTS FONDUS AINSI QUE DES TACHES PAR DES
RESIDUS SUCRES CHAUFFES SUR LA VITROCERAMIQUE.
Enlevez de telles salissures
immédiatement avec un racloir à
verre approprié. Faites attention aux
zones de cuisson chaudes !
1. Débranchez l’appareil de
l’alimentation électrique (installation
domestique).
2. Tenez le racloir à verre dans un angle
de 300 et frottez les salissures. Faites
attention aux zones de cuisson
chaudes.
3. Nettoyez les salissures avec un
torchon / du papier absorbant.
4. Suivrez les étapes 2 - 4 de la 1
ère
section du tableau.
Enlevez de telles salissures le plus tôt
possible. Cela évite que des résidus
alimentaires peuvent s’incruster et
endommager la surface de manière
permanente.
Utilisez le racloir à verre avec soin.
Faites attention à ne pas vous couper
en glissant le couvercle de sécurité.
97
Page 98

DES SALISSURES SUR DES TOUCHES.
1. Débranchez l’appareil de
l’alimentation électrique (installation
domestique).
2. Enlevez des salissures.
3. Essuyer les touches avec une éponge
ou chiffon humide.
4. Séchez la zone entière avec du papier
absorbant.
5. Rebranchez l’appareil à
l’alimentation électrique.
Un signal acoustique peut retentir et
l‘appareil s’éteint. Les touches ne
travaillent pas dûment si elles sont
humides. Séchez le bandeau de
commande avant remise en service.
DYSFONCTIONNEMENT
CAUSES POSSIBLES
MESURES
L’APPAREIL NE FONCTIONNE PAS.
L‘interruption de l’alimentation
électrique.
Contrôlez l’alimentation électrique.
Contrôlez votre boîtier de fusible.
Est-ce qu’il y a une panne de courant
chez vous?
LES TOUCHES NE FONCTIONNENT PAS.
Les touches sont bloquées.
Débloquez les touches.
6. Instructions de dépannage
MESURES D’URGENCE :
1. Arrêtez complètement l’appareil.
2. Débranchez l’appareil du secteur (le boîtier à fusibles de votre réseau électrique
domestique).
3. Contactez le magasin dans lequel vous avez acheté l‘appareil.
Vérifiez les indications du tableau avant de contacter le magasin dans lequel vous
avez acheté l’appareil.
98
Page 99

LES TOUCHES SONT DIFFICILES A UTILISER.
Il y a un film de liquide sur les
touches.
Vous avez utilisé votre bout du doigt
pour l‘utilisation.
Séchez les touches.
Utilisez votre bout du doigt.
LA VITROCERAMIQUE EST GRIFFEE.
Vous avez utilisé une batterie de
cuisine non-appropriée avec des
bords rugueux et coupants.
Vous avez utilisé des nettoyants non-
appropriés comme par ex. des
produits abrasifs.
Utilisez de la batterie de cuisine
appropriée pour la vitrocéramique.
Utilisez des nettoyants appropriés
pour la vitrocéramique.
QUELQUES POELES / CASSEROLES EMETTENT DES BRUITS CRAQUANTS OU
DES CLIQUETEMENTS.
Ces bruits peuvent être produits par
la mode de production de votre
batterie de cuisine (des couches de
plusieurs métaux).
C’est normal dans le cas de cette
batterie de cuisine et ne signale pas
une erreur.
DES BRUITS DE BOURDONNEMENT A UN NIVEAU DE PUISSANCE ELEVE.
Peut être provoqué par la cuisson par
induction.
Fonctionnement normal, mais des
bruits de bourdonnement devraient
devenir moins ou arrêter quand vous
réduisez le niveau de puissance.
DES BRUITS DE VENTILATION VIENNENT DE L‘APPAREIL.
Le ventilateur monté protège
l’électronique contre la surchauffe
continue. Il peut également rester
active un certain temps après le
déclenchement de l’appareil.
Fonctionnement normal. Ne
débranchez pas l’appareil de
l’alimentation électrique lorsque le
ventilateur est en marche.
LA BATTERIE DE CUISINE NE CHAUFFE PAS / L’AFFICHAGE SUR L‘ECRAN
BRILLE.
L’appareil ne reconnaît pas la
batterie de cuisine parce qu’elle n‘est
pas appropriée ou trop petite ou pas
bien placée.
Utilisez de la batterie de cuisine
appropriée avec une zone de cuisson
correspondante à la taille de la
batterie de cuisine. Placez-la au
centre de la zone de cuisson.
99
Page 100

L’APPAREIL OU LA ZONE DE CUISSON SE DECLENCHENT BRUSQUEMENT OU
UN SIGNAL ACOUSTIQUE RETENTIT ET UN CODE ERREUR EST AFFICHE9
(SOUVENT EN ALTERNANCE AVEC UNE OU DEUX CHIFFRES SUR L’ECRAN DE
LA MINUTERIE).
Défaillance technique.
Ecrivez le code erreur, débranchez
l’appareil de l’alimentation électrique
et contactez le magasin dans lequel
vous avez acheté l‘appareil.
Type
La plaque en vitrocéramique
Panneau de commande
Touch control
Table de cuisson
Vitrocéramique
Nombre de zones de cuisson
2
Ø (des plaques de cuisson):
devant / derrière
180 mm / 145 mm
Puissance des plaques de cuisson:
devant / derrière
1*1800 W / 1*1200 W
Valeur nominale maximale
3000 W
Tension d'entrée
220 - 240 V AC
Fréquence
50 Hz
Indicateur de chaleur résiduelle
Minuterie / temps réglable
/ jusqu'à 99 minutes
Longueur du câble
120 cm
Niveaux de chauffage
9 (par zone de cuisson)
Dimensions de l’ouverture d‘encastrement:
Largeur *Profondeur en cm
26,80*50,00
Profondeur de montage en cm
4,00
Dimensions de la table de cuisson:
Hauteur*Largeur*Profondeur en cm
4,70*28,80*52,00
Poids net / brut en kg
4,50 / 5,30
9
En cas de perturbations de fonctionnement divergeant par rapport aux
perturbations décrits ci-dessus ou en cas de problèmes vous ne pouvez pas
résoudre bien que vous ayez vérifié tous les points du tableau, veuillez vous
adresser directement au magasin dans lequel vous avez acheté l’appareil.
7. Données techniques
Sous réserve de modifications techniques.
L’équipement dépendant du modèle
100
 Loading...