

Page 1
Makes great tasting,
traditional Italian pizza –
with bubbly cheese, crispy
crust & toasty toppings.
OWNER’S MANUAL
IMPortANt: This instruction manual contains important information necessary for the proper
assembly and safe use of the appliance.
Read and follow all warnings and instructions before assembling and using the appliance. Keep this
manual for future reference.
Pizzeria Pronto™
Pizzacraft
PC6000/ PC6002/ PC6004/ PC6005
CS092413
©The Companion Group 2013
1250 9th Street, Berkeley, CA 94710
1.800.521.0505
CERTIFICATION ETL-Pending
Conforms to ANSI STD Z21.89b-2012
Certi ed to CSA STD 1.18b-2012
Outdoor cooking specialty gas appliances
®
Page 2
UNPACKING INstrUCtIoNs
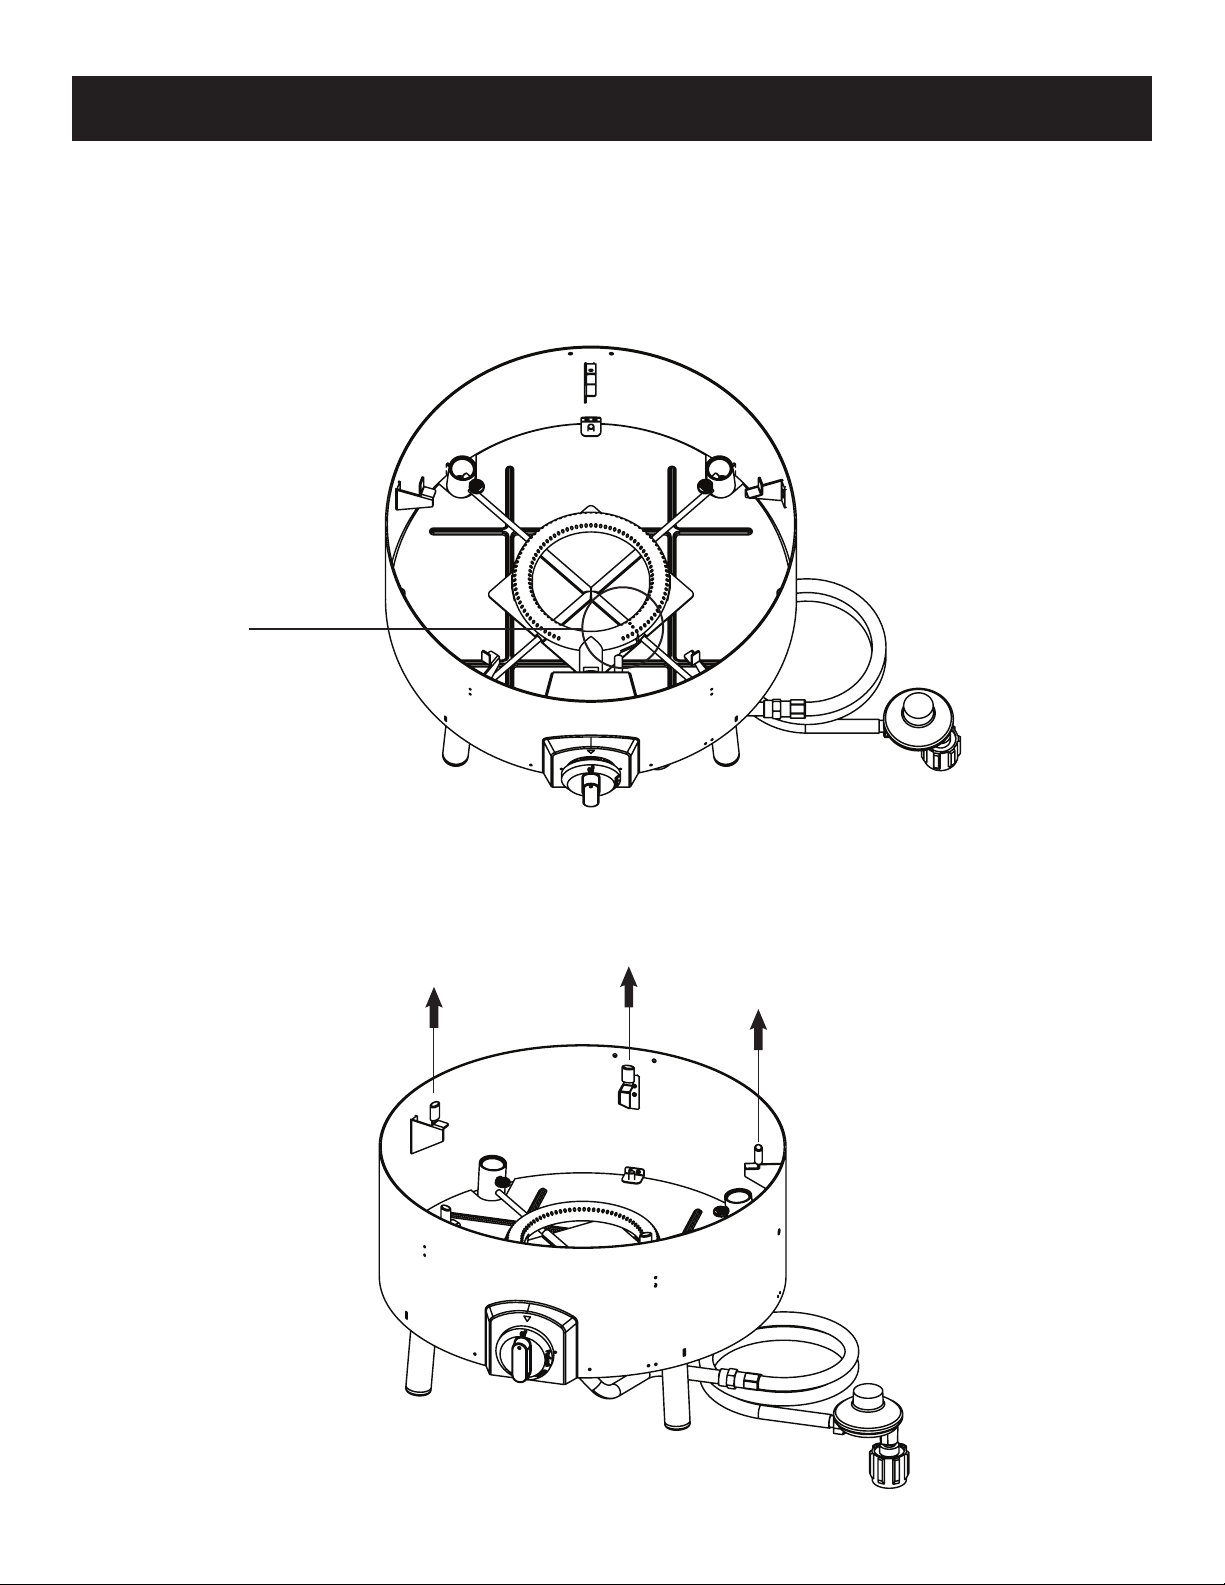
When unpacking do not disturb starter, doing so could aect starting performance. Position is set at factory.
Starter
Remove protective silicone caps from stone brackets before use.
Page 3
dANGer
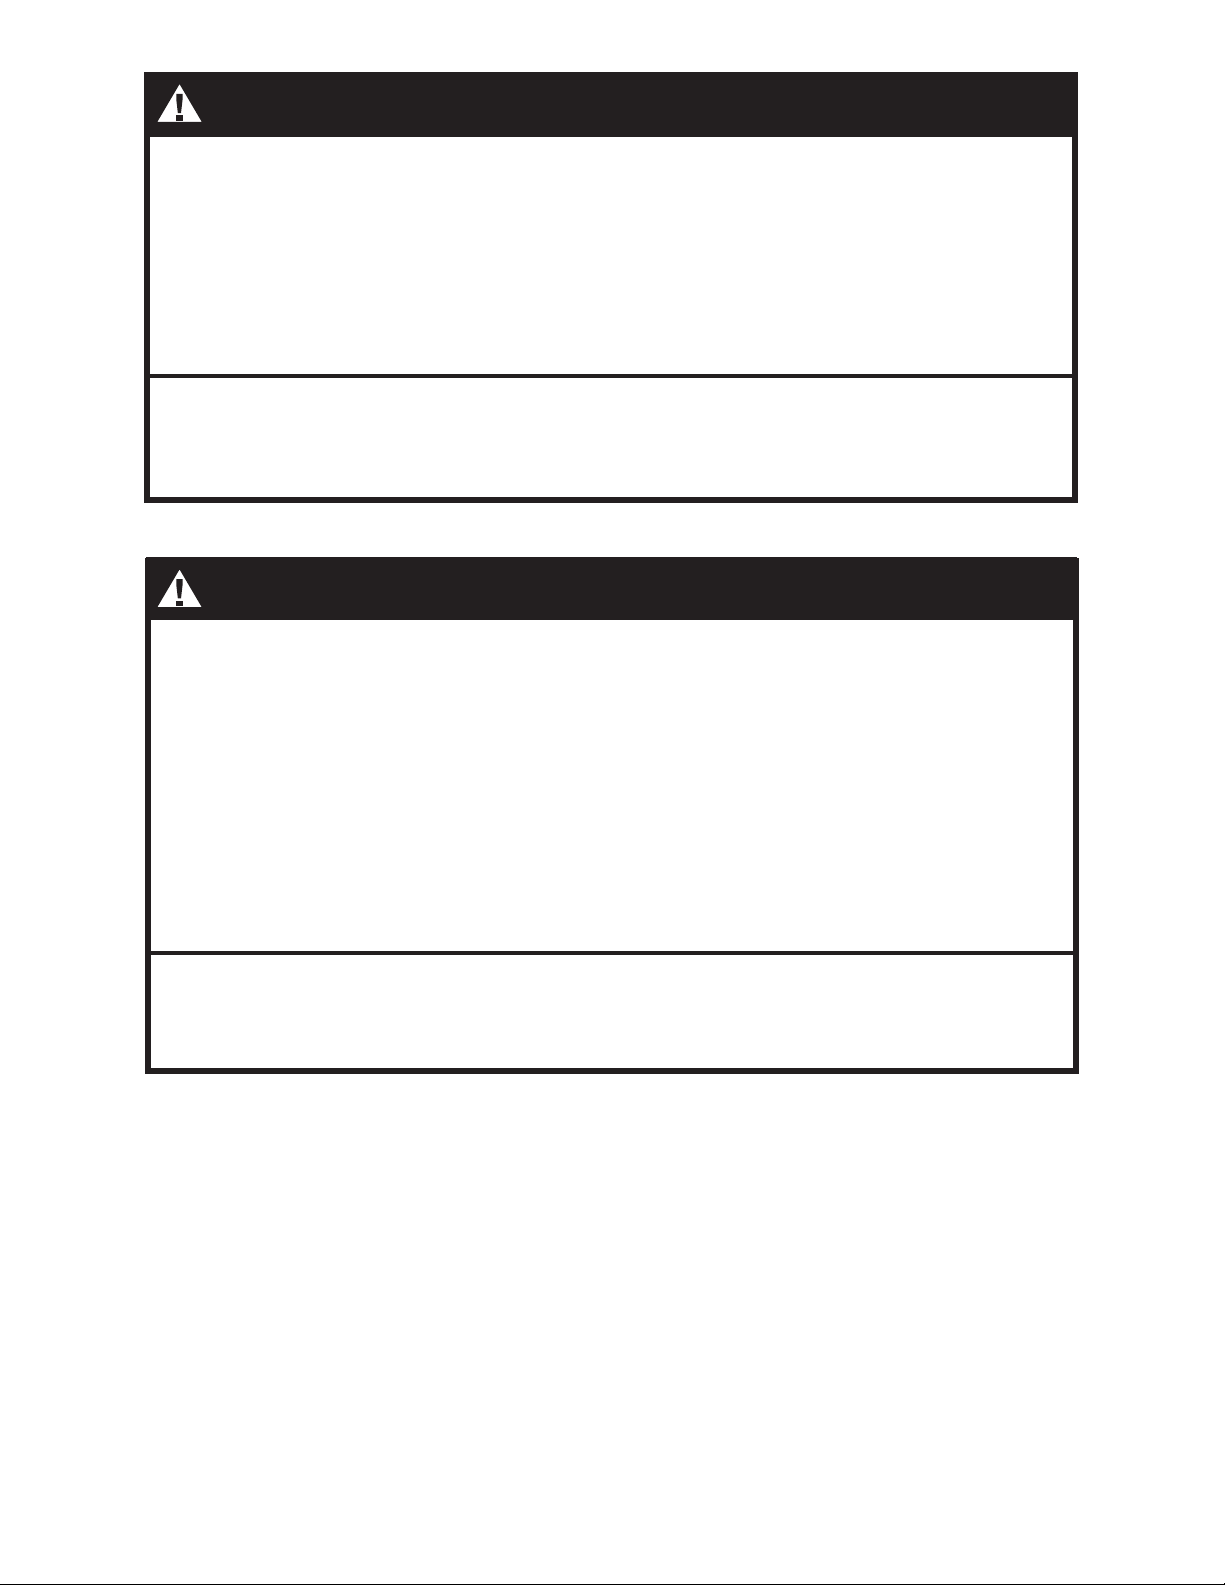
If you smell gas:
1. Shut off gas to the appliance.
2. Extinguish any open ame.
3. Remove hood.
4. If odor continues, keep away from the appliance and immediately call
your re department.
Failure to follow these instructions could result in fire or explosion,
which could cause property damage, personal injury or death.
dANGer
1. Never operate this appliance unattended.
2. For outdoor use only.
3. Never operate this appliance within 48 inches (122 cm) of any structure,
combustible material or other gas cylinder.
4. Never operate this appliance within 25 ft. (7.5 m) of any ammable liquid.
5. If a re should occur, keep away from the appliance and immediately
call your re department. Do not attempt to extinguish an oil or grease
re with water.
Failure to follow these instructions could result in fire or explosion,
which could cause property damage, personal injury or death.
CALIForNIA ProPosItIoN 65 WArNING:
The burning of gas cooking fuel generates some by products, which are on the list of substances
known by the State of California to cause cancer, reproductive harm, or other birth defects. This
product may contain chemicals known to the state of California to cause cancer, reproductive
harm, or birth defects. To reduce exposure to these substances, always operate this unit according
to the use and care manual, ensuring you provide good ventilation when cooking with gas.
Page 4

tAbLe oF CoNteNts
safety Information ......................................5
Assembly Instructions ...............................6
Installation Instructions .............................9
operation Instructions ..............................12
Care and Maintenance ...............................15
troubleshooting .........................................17
Accessories ...............................................18
replacement Parts ....................................19
Warranty and registration ........................20
Page 5

sAFety INForMAtIoN
1. Installation of this appliance must conform with
local codes, or in the absence of local codes, with
the National Fuel Gas Code, ANSI Z223.1/NFPA
54, Storage and Handling of Liqueed Petroleum
Gases, ANSI/NFPA 58; or Natural Gas and Propane Installation Code, CSA B149.1; Propane Storage and Handling, CSA B149.2; or the Standard
for Recreational Vehicles, ANSI A119.2/NFPA
1192; and Recreational Vehicle Code, CSA Z240
RV Series, as applicable.
2. This appliance shall be used only outdoors, and
shall not be used in a building, garage or any other
enclosed area. Keep the oven away from windy areas but keep the oven in a well-ventilated area. Do
not obstruct the ow of combustion and ventilation
air around the oven.
3. This appliance should not be installed in or on a
boat or on recreational vehicles.
4. Keep appliance area clear and free from combusti-
ble materials, gasoline and other ammable vapors
and liquids. A minimum clearance of 48 inches
(122 cm) from combustible constructions must be
maintained. This outdoor cooking gas appliance
must not be placed under overhead combustible
construction.
9. Do not leave the appliance unattended. Keep
children and pets away from the appliance at all
times.
10. This appliance is not intended for commercial use.
11. Use caution when placing anything into oven
while the appliance is in operation.
12. Do not move the appliance when in use. Allow
the oven to cool to 115°F (45°C) before moving or
storing.
13. This appliance is not intended for and should never
be used as a heater.
14. This appliance will be hot during and after use.
Use insulated oven mitts or gloves for protection
from hot surfaces.
15. This oven is equipped with a ame observation
hole on the right side of the oven body. Wear
protective eye wear to look through hole as it will
be very hot and could burn you. Do not get too
close.
16. Oven should be protected from windy areas during
use.
17. The hood should not be removed during cooking or
while oven is hot.
5. Inspect the hoses before each use for excessive
abrasion or wear, or cuts that may affect safe operation of the oven. If there is evidence of excessive abrasion or wear, or the hose is cut, it must be
replaced prior to the oven being put into operation.
The replacement hose assembly must be specied
by the manufacturer, by calling 1-800-521-0505.
6. Keep the fuel supply hose away from any heated
surface(s). Hose should not be routed under oven.
7. The use of alcohol, prescription or non-prescrip-
tion drugs may impair the consumer’s ability to
properly assemble or safely operate the appliance.
8. When cooking, the appliance must be on a level
surface in an area clear of combustible material.
Specication
Product weight: 25 lbs
Assembled Dimensions: 38.5 mm x 42 mm x 45.5 mm
Heat output: 14,500 Btu’s
5
Page 6
AsseMbLy INstrUCtIoNs
Before beginning assembly of product, make sure all parts are present. Compare parts with package
contents and hardware contents list. Do not discard packing materials before assembly is complete.
If any part is missing or damaged, do not attempt to assemble the product. Call customer service at 800521-0505.
To watch assembly video go to companion-group.com/pizzeria-pronto/assembly.html
estimated assembly time: 20 minutes
tools re quired - # 2 Phillips screwdriver, not included.
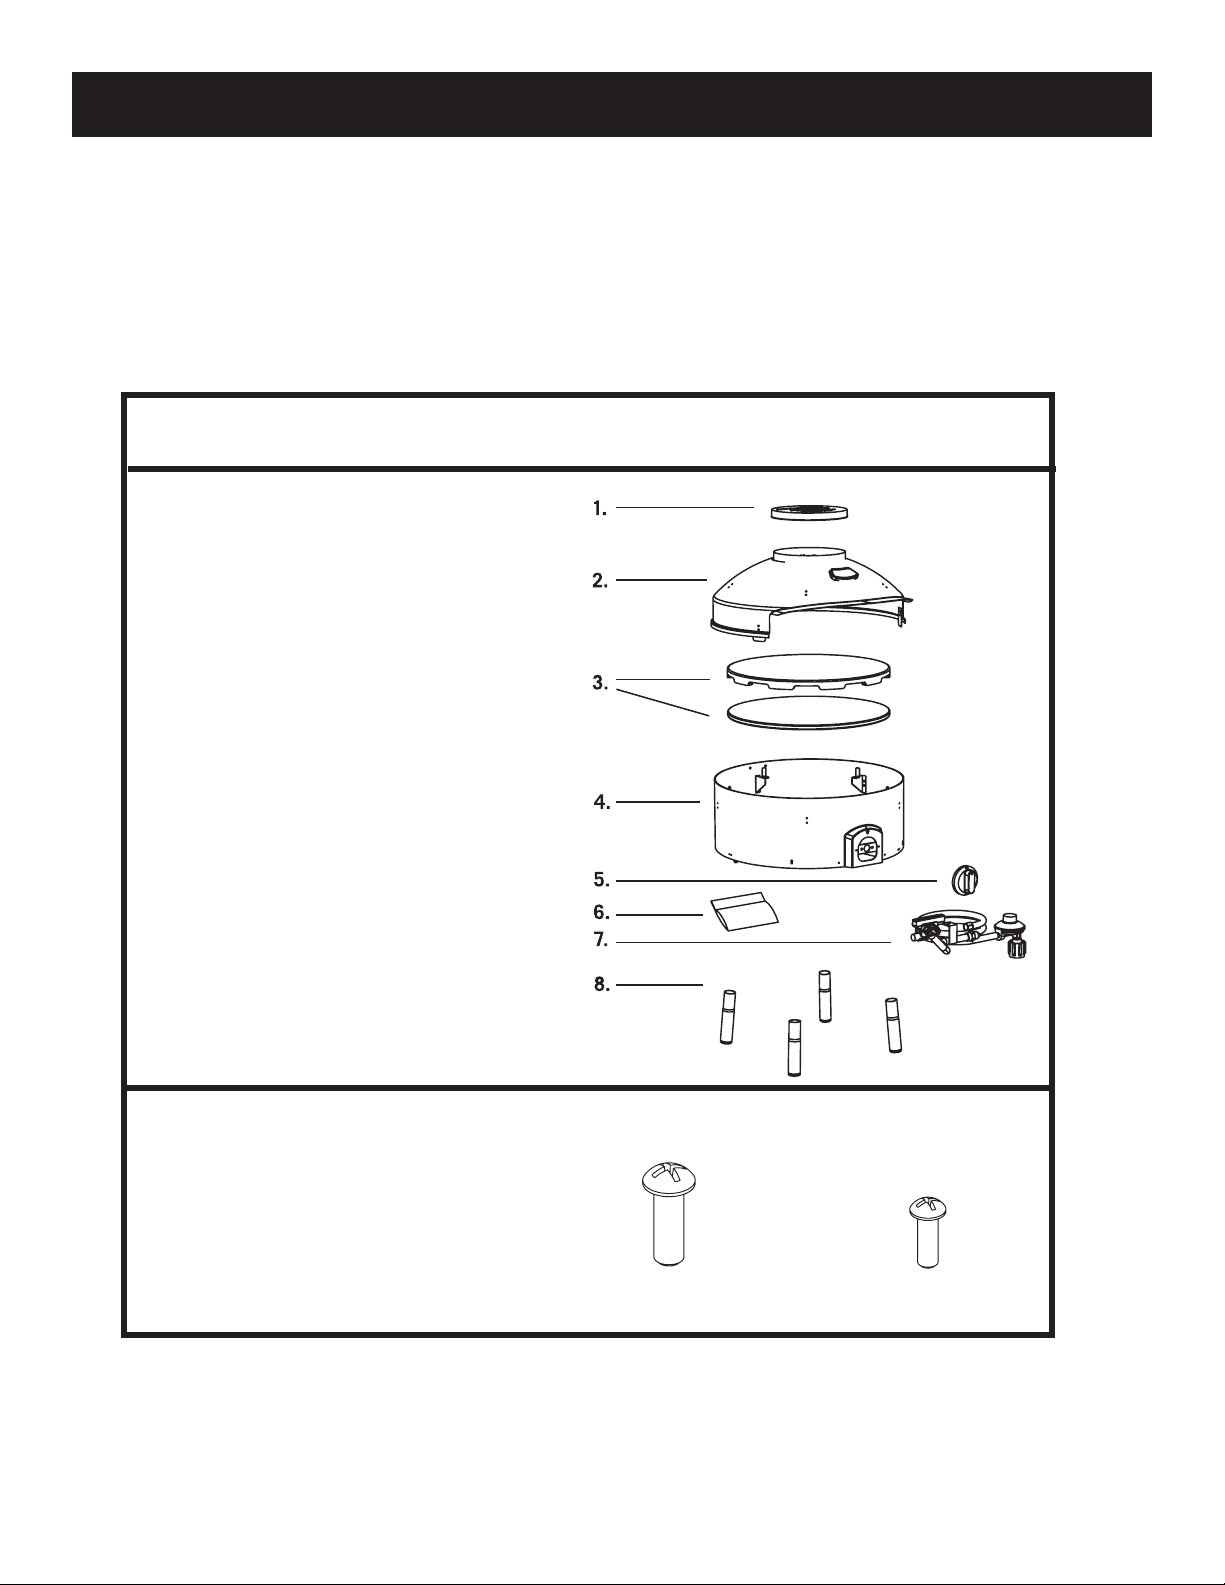
PACKAGE CONTENTS:
1. Rain cover
2. Hood
3. Baking stone (2 parts)
4. Oven body
5. Knob
6. Hardware package
7. Gas inlet assembly
8. Legs (4)
HARDWARE PACKAGE CONTENTS:
1. (4) M4x8 Phillips screws - for legs
2. (3) M3x5 Phillips screws - for gas
inlet assembly
1. 2.
6
Page 7
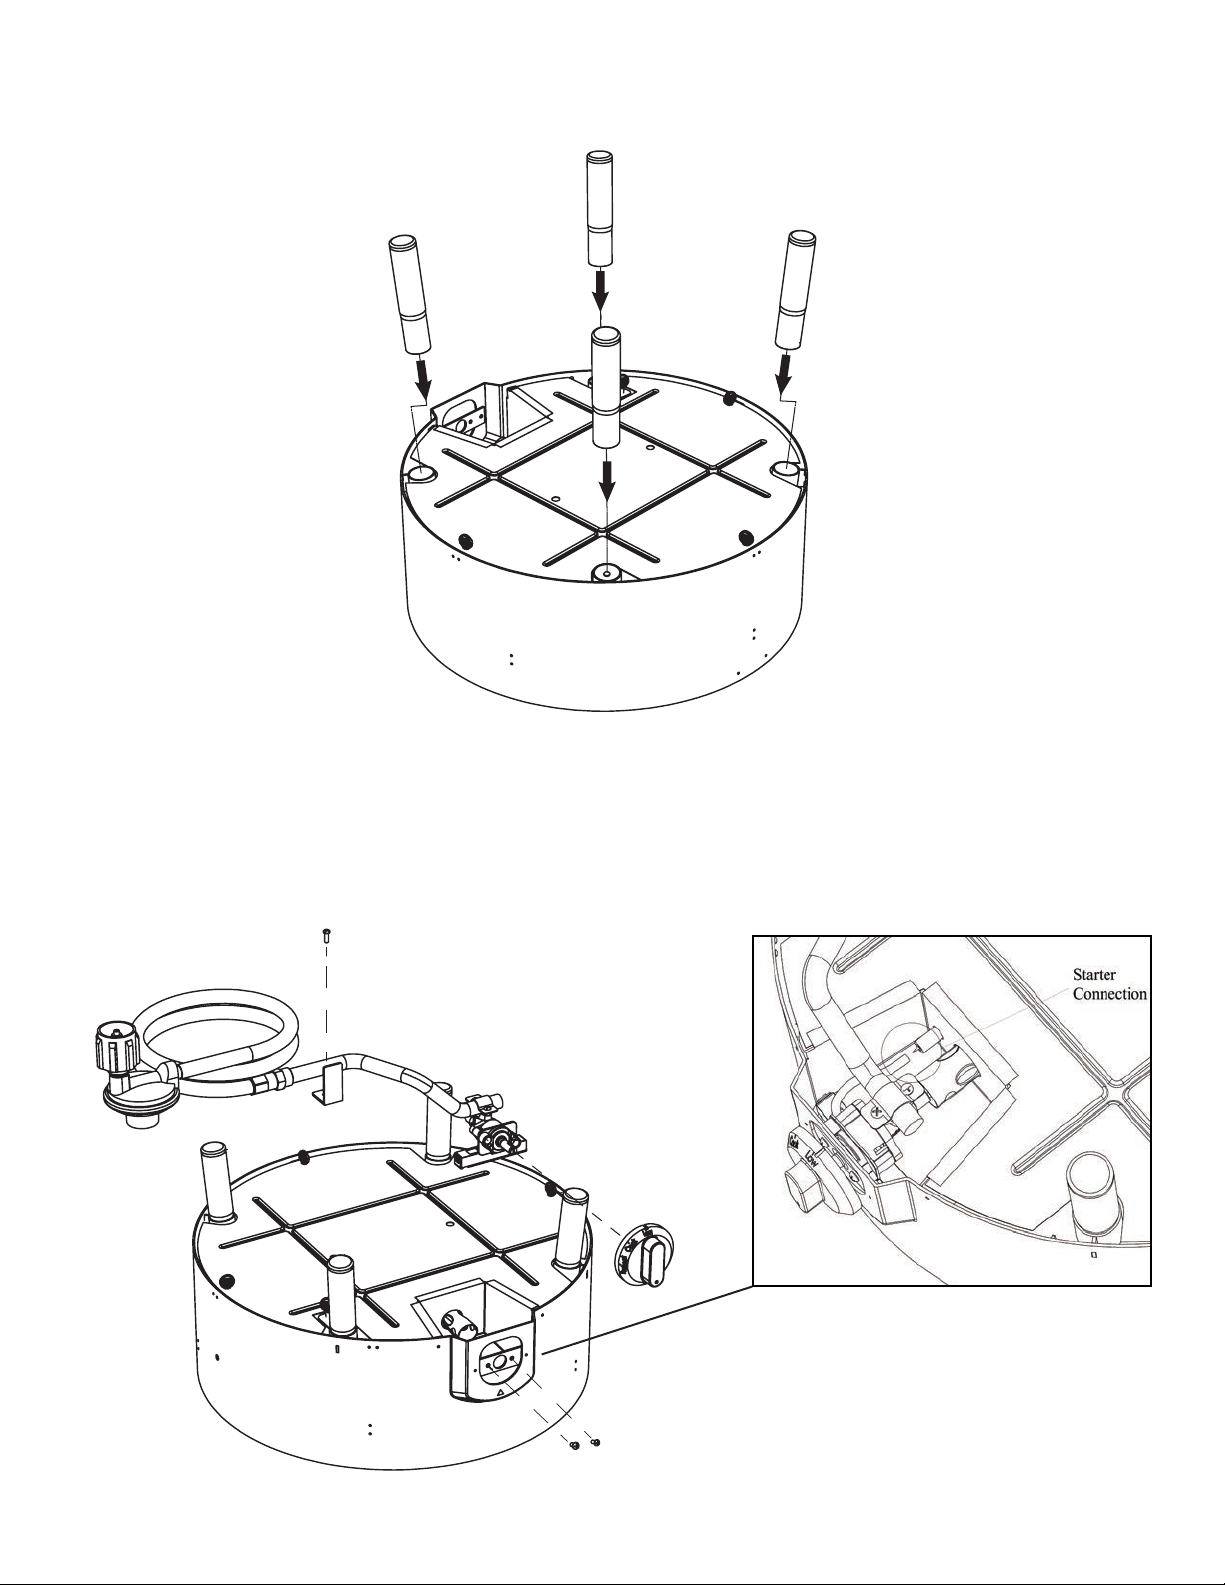
1. Attach legs to body as shown; secure with M4x8 Phillips screws. Tighten by hand, level oven as
needed.
2. Insert gas inlet assembly into body as shown. Secure control valve with 2 supplied screws to body
front then secure pipe support with the third M3x5 Phillips screw. Attach control knob by aligning the
keyway and pushing onto valve spindle. Connect starter wire from valve assembly to starter plug by
rmly pushing it into place.
7
Page 8
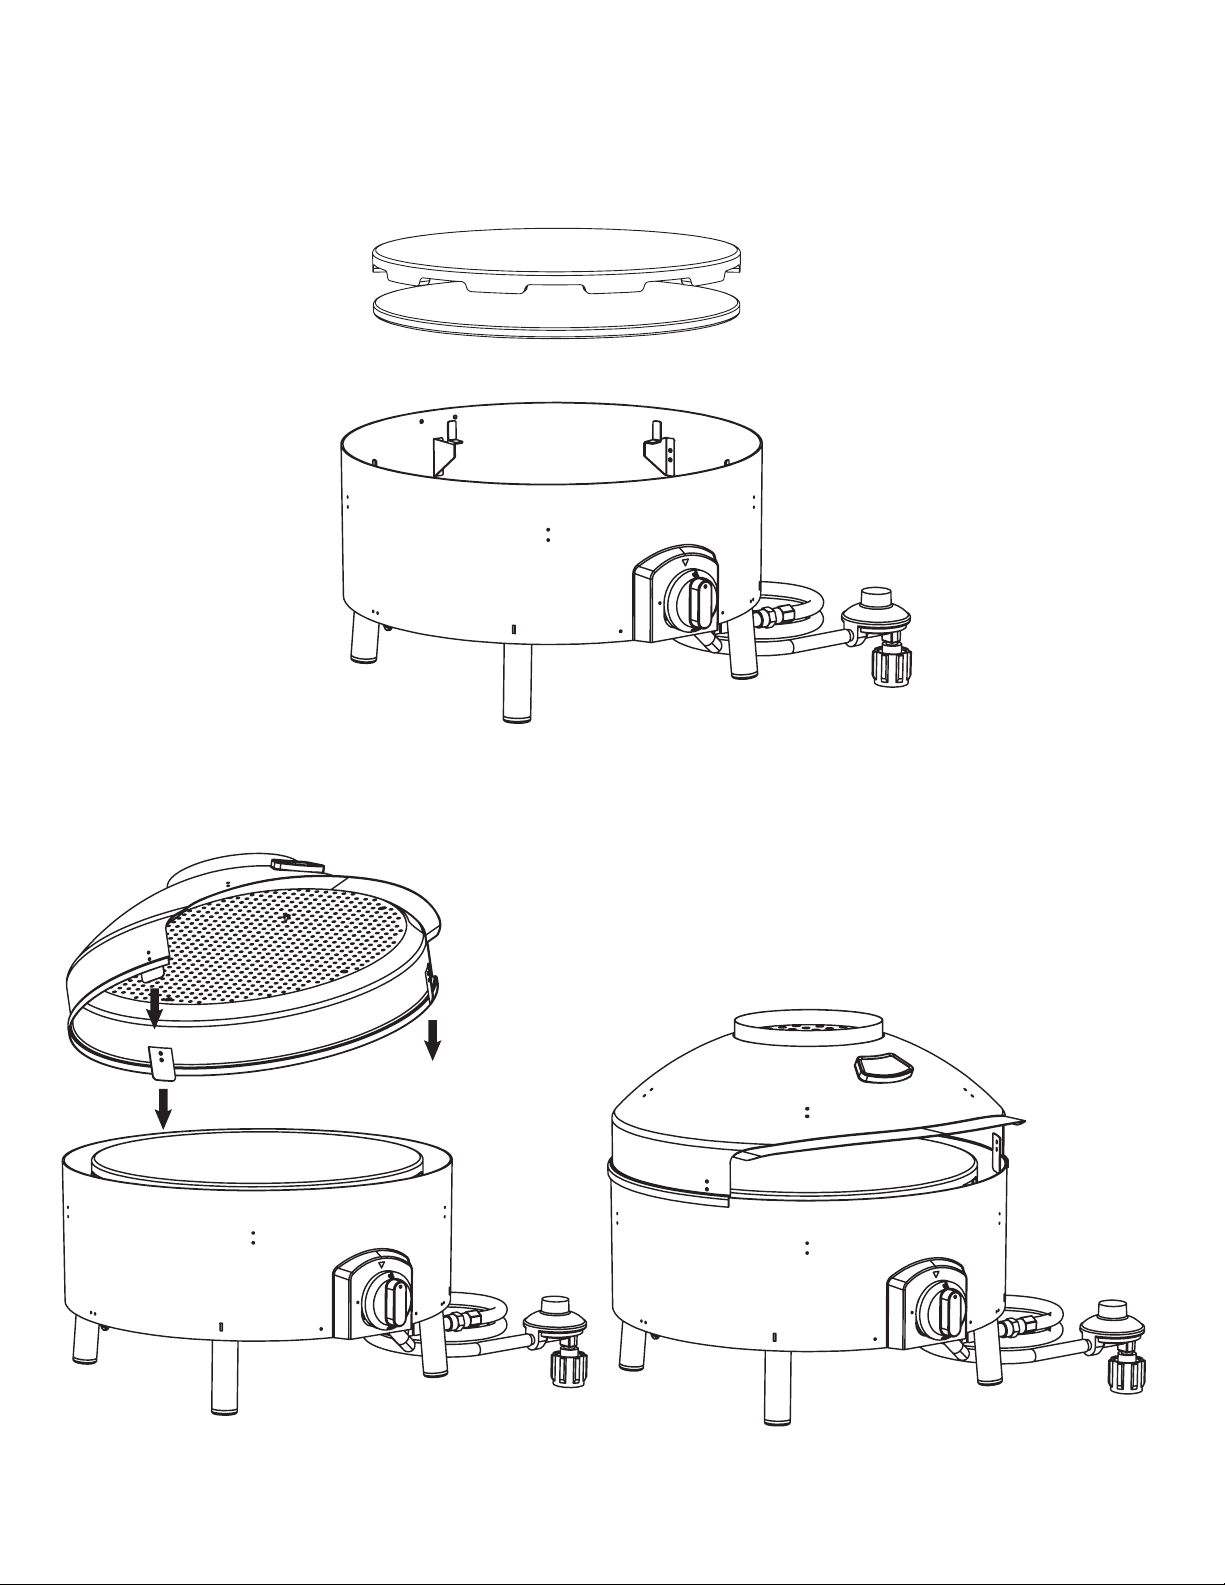
3. Place the oven on a sturdy, level, heat-resistant surface on which you will be cooking. Place the two bak-
ing stones as shown into oven so they rest on the support brackets. The at stone belongs on the bottom;
the stone with indentations should be placed on top as shown below. Note the stones are fragile; use care in
handling and placing the stones.
4. Place the hood with the rear-aligning tab contacting rst. Then set down the cover so the cover rim over-
laps the oven body.
8
Page 9
INstALLAtIoN INstrUCtIoNs
For Portable Liquid Propane -Gas Connection
Gas requirements:
the oven is set and tested at the factory for use with LP gas only.
WArNING
Do not attempt to operate your oven on other gases. Failure to follow this warning could lead to a
re hazard and bodily harm. Doing so will void your warranty.
WArNING
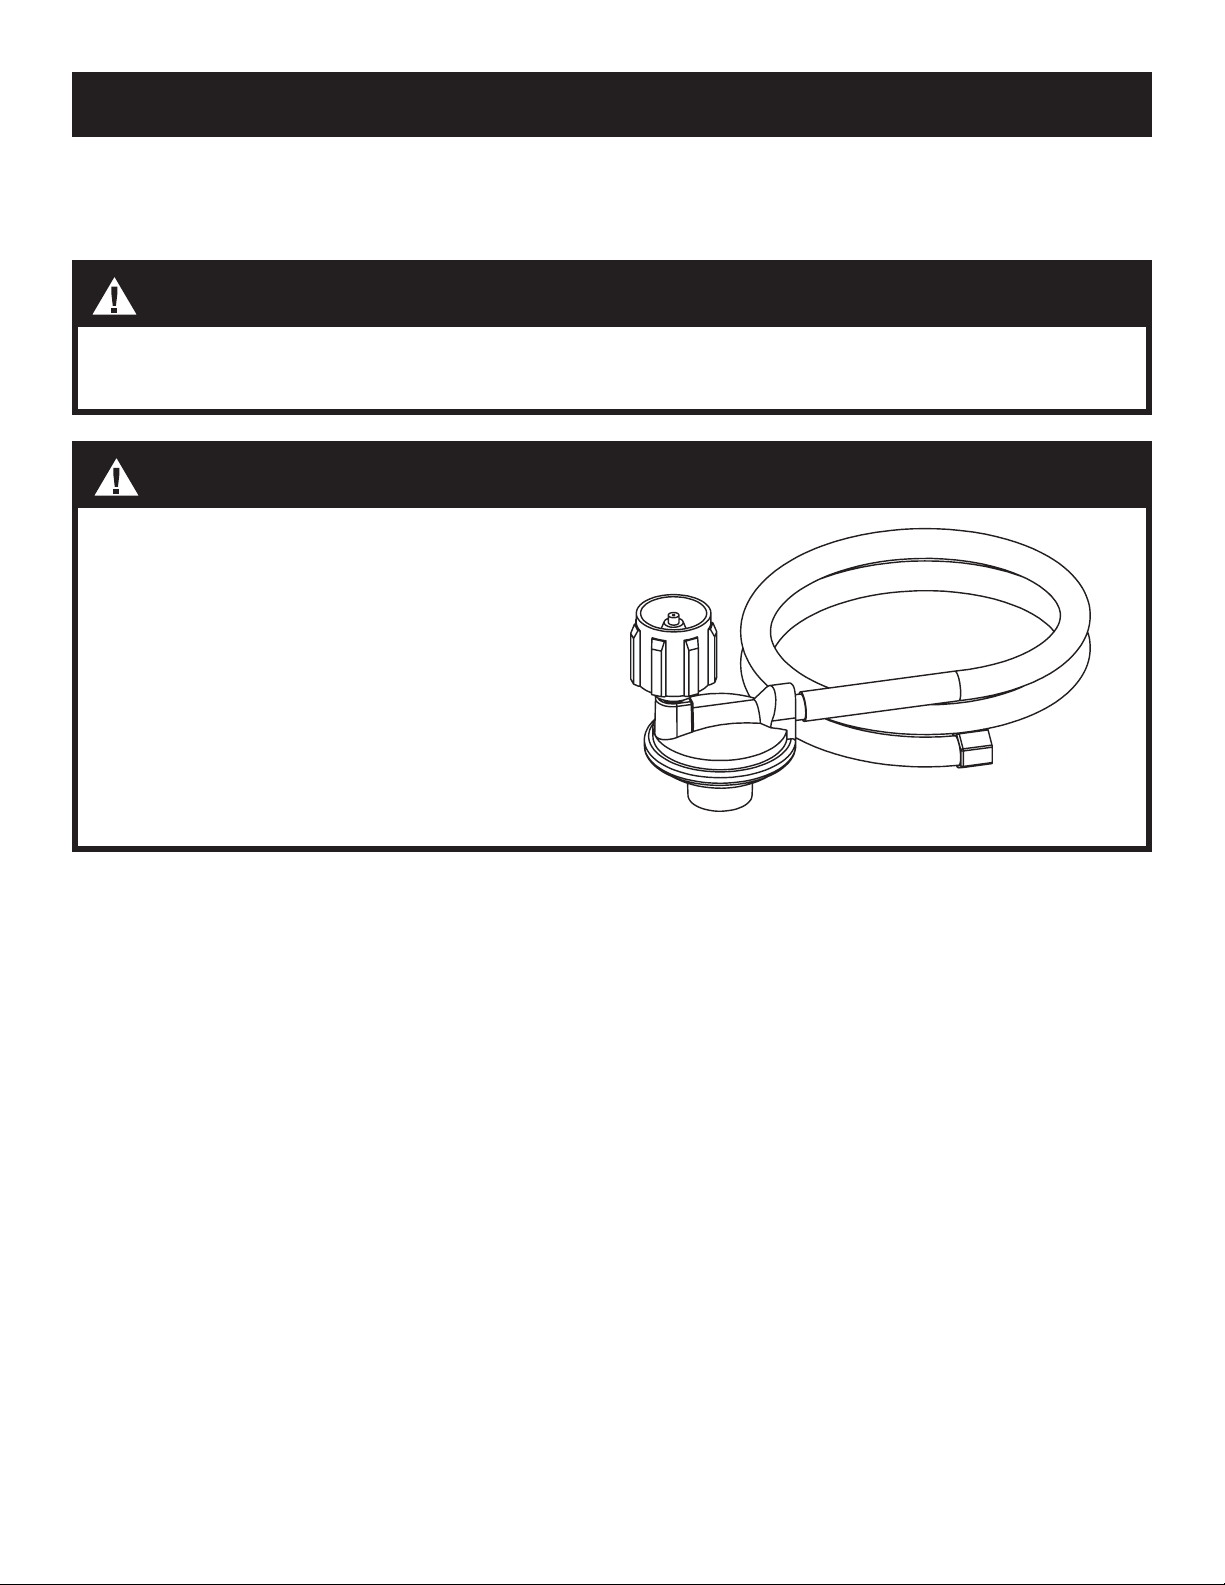
The Type 1 connective coupling supplied with
your oven must not be replaced with a different
type of oven/tank connection system. Removal
could result in loss of warranty, gas leakage,
re, and severe bodily harm. Doing so will void
your warranty.
The propane tank valve connection supplied
with this oven incorporates four important safeguards: Hand Assembly, Hand Disassembly,
Excess Flow Control, and Temperature- Activated Shut-Off.
A. HAND ASSEMBLY
1. Make certain the tank valve and all the appliance
valves are in the “OFF” position.
2. When connecting the regulator/burner valve as-
sembly to the tank valve, turn the large
plastic nut clockwise until it stops.
3. Gas will not ow unless the plastic nut is com-
pletely connected.
4. HAND TIGHTEN ONLY.
B. HAND DISASSEMBLY
C. EXCESS FLOW CONTROL
The propane regulator assembly incorporates an ex-
cess ow device designed to supply the oven with suf-
cient gas ow under normal conditions yet control
excess gas ow. Rapid changes in pressure can trigger
the excess ow device providing a low ame and low
temperature. If the tank valve is turned open to allow
gas ow while a burner valve is open, the surge of
pressure will cause the device to activate. The device
will remain closed until the pressure is equalized.
This should occur within 5 seconds. To ensure this
does not cause difculty in lighting the oven, follow
these instructions:
1. Make certain the tank valve and all the appliance
valves are in the “OFF” position.
2. Turn the large plastic nut counter-clockwise until it
is disassembled.
3. HAND LOOSEN ONLY.
1. Make sure the burner valve is “OFF”.
2. Open the tank valve and wait 5 seconds.
9
Page 10

D. TEMPERATURE-ACTIVATED SHUT-OFF
The large plastic nut on the regulator assembly is
designed in coordination with a check valve in the
tank valve to shut off the ow of gas when exposed
to temperatures between 240°-300° F (115°-148° C).
In the event of a re or hose break, one of the safe-
guards will function to control or stop the ow of gas
from the propane tank. Never attempt to use damaged
equipment.
Checking for Gas Leaks
Before operating your oven or after refueling, check
carefully to be certain that all connections are tight
and there are no gas leaks.
1. Make 3 oz. of leak solution by mixing liquid dish
washing soap with water.
2. Make certain the control knob is in the “OFF”
position on the oven.
3. Brush small amounts of the leak solution on all the
ttings and turn the gas on at the tank.
4. If bubbl es appear, there is a leak. Proceed to step 5.
Liquid Propane (LP) tank safety Information
1. Up to 20 lb. gas cylinder can be used with the
oven. The cylinder must be constructed and
marked in accordance with the Specications
for LP Gas Cylinders of the U.S. Department of
Transportation (D.O.T.) or the National Standard
of Canada, CAN/CSAB339, Cylinders, Spheres,
and Tubes for Transportation of Dangerous Goods;
and Commission. Storing the appliance indoors
is permissible only if the cylinder is disconnected
and removed from the appliance.
2. DO NOT obstruct the ow of combustion and
ventilation air to this appliance.
3. Never use the oven without the crumb tray in-
stalled under the burner area. Without the crumb
tray, hot debris could leak downward and produce
a re hazard.
4. Do not store a spare LP-gas cylinder under or near
this appliance.
5. Never ll the cylinder beyond 80% full.
5. T urn the gas o ff at the tank and tighte n c o nnections.
6. Go back to step 1 to retest the ttings.
7. If bubbles continue to appear, turn the gas off at
the tank. Contact customer service.
WArNING
Make certain your LP (propane) tank is lled by
a reputable propane dealer. An incorrectly lled
or an overlled LP tank can be dangerous. The
overlled condition combined with the warning
of the LP tank (a hot summer day, tank left in
the sun, etc.) can cause LP gas to be released
by the pressure relief valve on the tank since
the temperature increase causes the propane
to expand. LP gas released from the tank is
ammable and can be explosive.
The tank supply system must be arranged for
vapor withdrawal.
Do not store the tanks (whether full or empty)
inside your home, the living area of an R.V., a
garage, basement, or in reach of children or
pets. It is unlikely that liquid propane will leak
from the tanks. If it should leak, the fuel could
be exposed to sparks from automobiles, power
tools, or other appliances. When storing or
transporting your LP tank, it must remain in an
upright position. Never lay your LP tank down
on its side whether it is full or empty. Never
store a spare tank under or near your gas
appliance.
10
The tank used must include a collar to protect
the cylinder valve.
Page 11
CAUtIoN
Never transport or move your oven or oven tank without rst closing the manual valve on your LP
(liquid propane) gas tank.
Gauging Amount of LP (liquid propane) Fuel In tank
To gauge the amount of propane fuel in your gas tank, the oven must be in operation with the tank connected.
Using caution not to get too close to the oven, place your hand at the top of the tank and slowly move down the
side until the tank feels cool to the touch. This will indicate the approximate amount of propane gas in your
tank; if ¾ empty, rell.
WArNING
Do not use charcoal briquettes or any other ammable material with your oven. Use of such mate-
rial will void your warranty and may lead to a re, explosion, and bodily harm.
WArNING
Never use a match or open ame for leak detection. Use of an open ame could result in a re,
explosion, and bodily harm.
IMPortANt: Before using a fresh tank of gas check leakage around the connections according to
section “Checking Gas Leaks” above and make sure there is no leakage.
IMPortANt: Place dust cap on cyli nder valve outlet whenever cylinder is not in use. Only install the type of
dust cap on the cylinder valve outlet that is provided with the cylinder valve. Other types of caps or plugs may
result in leakage of propane.
11
Page 12

oPerAtING INstrUCtIoNs
BREAKING IN YOUR OVEN
When ring your oven for the rst time, it is advisable to run the burner on “High” for 20 minutes and
then turn the oven off and let cool to room temperature. This tempers the oven and once cool is ready
for use. Note that each burner has been tested before it left the factory, discoloration of the metal is a
natural result of the material being heated.
OVEN LIGHTING INSTRUCTIONS
to Light the burner:
1. Make sure the control knob i s in t h e “OFF”
position.
2. Make sure chimney vent in the hood is unob-
structed and rain cover is removed.
3. Open the LP (liquid propane) Gas tank valve.
4. Push the control knob in and turn to the left to
“High” position.
5. If the burner does not ignite within 5 seconds,
immediately turn control knob back to “OFF”
position. Wait 5 minutes and repeat step 3 two or
three times.
6. If the burner still does not ignite, TURN OFF
THE GAS. WAIT 5 MINUTES for excess gas to
dissipate.
7. If the burner still can’t be lit, refer to the Trouble-
shooting section.
8. If the burner ame is accidentally extinguished
during cooking repeat steps 1-7.
ABOUT COOKING PIZZA
Pizzeria Pronto™ is designed to provide an authentic
pizza experience that wasn’t possible before with a
barbecue grill or kitchen oven. Pizzeria Pronto
™
res
to 700°F or more for an ambient temperature that
quickly cooks the top of the pizza while the lower
stone temperature carefully crisps the crust.
This balance can be greatly effected by the type of
pizzas you are cooking (crust thickness, amount of
topping) and the weather conditions (outside temperature and wind). Don’t worry if it takes a few pizzas to
get your technique perfected. After all, Rome wasn’t
built in a day!
PREHEATING OVEN
It is extremely important that your oven reach the
ideal baking temperature before you begin using it.
After lighting, run the oven on “High” for 10 minutes,
but no more than 15 minutes. This preheating will
ensure that the internal oven and stone temperatures
are hot enough for proper baking.
9. Keep the tank valve closed when not in use.
12
Page 13
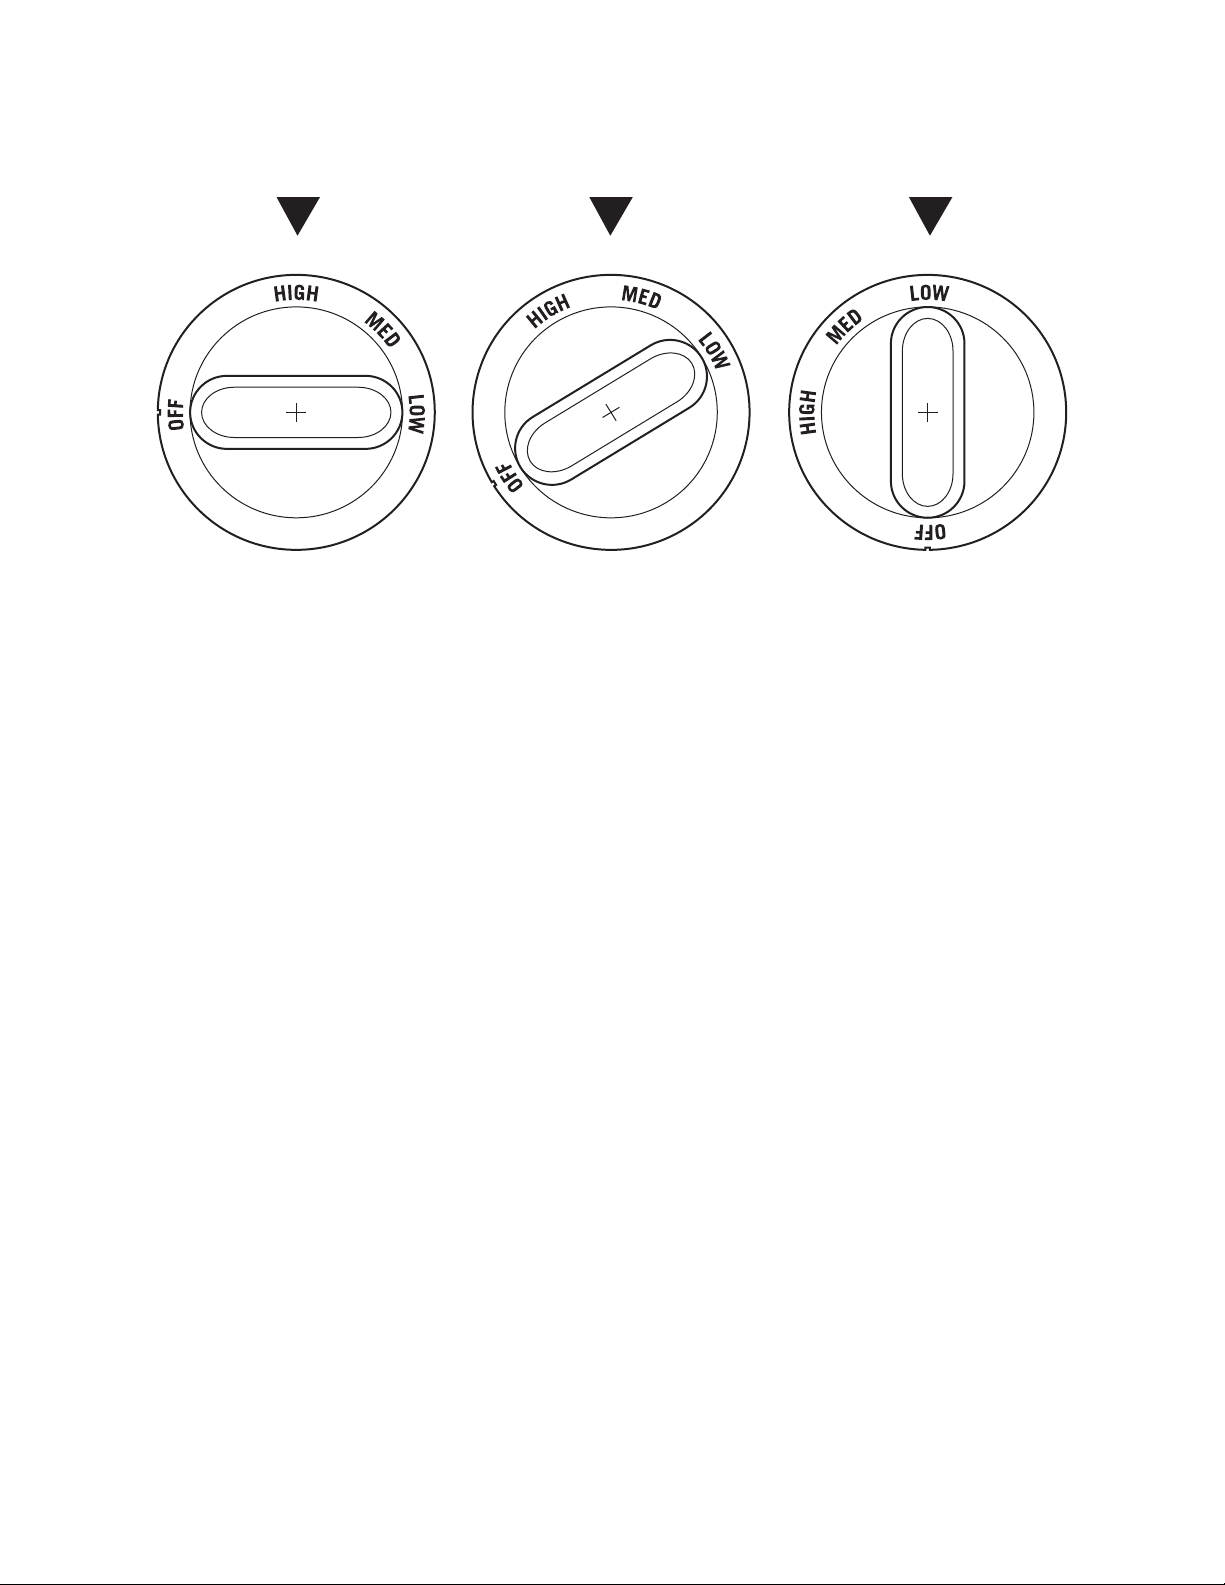
COOKING PIZZA
Start/ Preheat Setting Fresh Pizza Setting Frozen Pizza Setting
FRESH PIZZA
If cooking a fresh pizza with raw pizza dough turn
the control knob slightly b etween “Med” and “High”
depending on the weather. Using a peel, place the
pizza in the center of the oven.
Expect the pizza to cook in 5 minutes. The pizza
should be tur ned 180 degrees halfway through for
even cooking. Once cheese is melted and the outer
crust and underside has browned your pizza is done
and the oven is ready for the next pizza.
tips
• Dust the pizza peel with plenty of our, or corn
meal to prevent sticking. Don’t let a fresh, un-
cooked pizza sit on the peel for longer than ve
minutes, as it will stick.
• An aluminum peel prevents sticking best and is
recommended by the manufacturer.
• Check the underside of the pizza 2-3 minutes after
it is in the oven to make sure the stone isn’t getting
too hot. If so, turn the temperature down slightly.
• The thicker the crust, the lower you will want to
set the oven temperature.
of the stone. It is possible to push the pizza off the
back of the stone- take care to center your pizza.
If you need to move the pizza, wait approximately
30 seconds while the dough sets, then move the
pizza to center.
• Protect the oven from wind. Strong wind can
cause the internal temperature to drop. The thermometer needs to stay about 600°F to make perfect pizzas.
• Once a pizza is nished cooking, the oven imme-
diately is ready for another one. Pizzeria Pronto
™
performs best when pizza are cooked successively.
Do not allow the oven to run empty longer than 15
minutes between pizzas as this can also allow the
stone to overheat.
• For camping and tailgating consider using a 1 lb.
disposable propane bottle that typically lasts 2
hours of use.
• Oven temperature will vary with the outside tem-
perature. The oven temperature may need to be
hotter on a cold day or cooler on a hot day, as with
any oven or grill.
• Dough will be much easier to work with if it’s at
room temperature. Leave it out covered at few
hours before cooking.
• When sliding in the raw pizza aim for the center
13
Page 14

PIZZACRAFT® DOUGH RECIPE
Ingredients
• 3 cups pizzacraft
®
“00” pizza our
• ½ teaspoon active yeast
• 1 ½ teaspoons kosher salt
• 1 ½ cup water
Combine all ingredients in a mixing bowl and stir
to form a rough, shaggy dough. Use more water if
dough is overly dry and more our if it seems very
wet. Before kneading, allow rough dough to rest
for 10 m i nutes so that the water has time to absorb.
Knead dough in a stand mixer for 6-7 minutes or
10-12 minutes by hand until smooth and elastic.
Place the dough in a clean bowl and let it rise for
2 hours or until doubled in size. Punch dough to
release gas and divide into 2 or 3 pieces. Shape
dough into balls and place onto a oured mat, cover with plastic wrap and let rise again for approximately one hour. After the second rise, the dough
is ready to be shaped into a pizza and topped with
your favorite i ngredients.
Note: If time allows, let dough rise in the refrigerator for at least 24 hours. A slow rise in the refriger-
ator will produce more avorful dough. When you
are ready to use, remove from the refrigerator and
shape into 2 or 3 smaller dough balls. Place onto
a oured mat, cover with plastic wrap and let rise
again for approximately two hours or until it feels
warm to the touch. Shape and top as desired.
Store pizzacraft
®
“00” our in an airtight container
to preser ve f r eshness.
PAR-BAKED AND FROZEN PIZZA
For frozen pizza or pizza purchased from a restaurant that was partial ly baked, set the control knob
to “Low”. Set the pizza in the center of the stone. A
much lower heat is required to nish cooking this
type of pizza. Follow the pizza manufacturing instructions.
tips
• Using a pizza screen helps keep the underside
from cooking too quickly.
• Less our or corn meal is needed as frozen pizzas
stick far less than fresh.
• You can still add your own toppings to your frozen crust to customize it.
14
Page 15

CAre ANd MAINteNANCe
CLEANING
Porcelain Coated steel Finish
The outside of this oven is made of high heat rated
porcelain coated steel. To clean, wipe the outside
surfaces with a cloth dampened with water and a
mild dish washing detergent; dry immediately. Do
not use abrasive scrubbers or the nish may be come
scratched or damaged. Never clean the oven when it
is hot. The manufacturer recommends cleaning the
exterior of the oven twice yearly or as needed.
Cordierite baking stone
To keep the baking stones free of charred food remains, run the oven on “High” for 10 minutes after
cooking is complete and pizza has been removed.
Most food particles that remain on the stone will burn
off due to the high heat inside the oven. If necessary,
the stone may be removed from the oven occasionally
for a more thorough cleaning. Only when the oven and
baking stone have completely cooled, remove the hood
to reveal the stone. Run it under hot water while scrubbing with a brush. Natural stiff bristled brushes are
recommended b y the m an ufacturer. Do not use soap
on the stones as it may leave a soapy aftertaste. The
natural properties of the baking stone will cause it to
darken and spot with age – do not attempt to remove
this discoloration. Air-dry the stone and store inside
the oven. The manufacturer recommends cleaning the
baking stone after each use.
burner tubes for insects and nests. A clogged tube can
lead to a re beneath the oven.
storage
Once cooled and cleaned the oven can be stored outside with the rain cover in place or with an optional
fabric cover. We recommend disconnecting the gas
tank before storing inside.
Crumb tray
Particles of food are caught in the crumb tray directly
below the oven. Only once the oven has cooled, use a
long handled brush or shop vacuum to clear out burnt
particles. The tray can also be removed with the cover
and stone in place by unscrewing the three thumb
screws and lower the tray. Clean with mild soap and
water. The manufacturer recommends cleaning the
crumb tray after each use.
burner tube
Visually check the burner ames prior to each use.
The ames should be blue. If they are not, clean
15
Page 16
WArNING
The baking stones must be completely cooled before handling. The stones can hold high temperatures long after the oven has been turned off. Please use extreme caution when handling to avoid
severe burns. Baking stones should be air dried completely before use. Failure to do so may result
in damage to the stone.
WArNING
Do not cover the oven while it is in use or still hot. Oven and all parts must be completely cooled
before covering to avoid damage to oven, or creating a re hazard which may result in property
damage or injury.
WArNING
Please remember this is an outdoor gas oven. Many areas of the oven generate extreme heat. We
have taken every precaution to protect you from the contact areas. However, it is impossible to isolate all hig h-t e mper ature areas . The r e f o r e, use good judgment a nd a certain degre e o f ca u tion when
using this product. We suggest covered, protected hands during operation of oven. Do not move
your oven when it is in operation or hot to the touch. Wait until your unit is turned off and properly
cooled down before moving it. Failure to follow this warning could result in personal injury.
16
Page 17
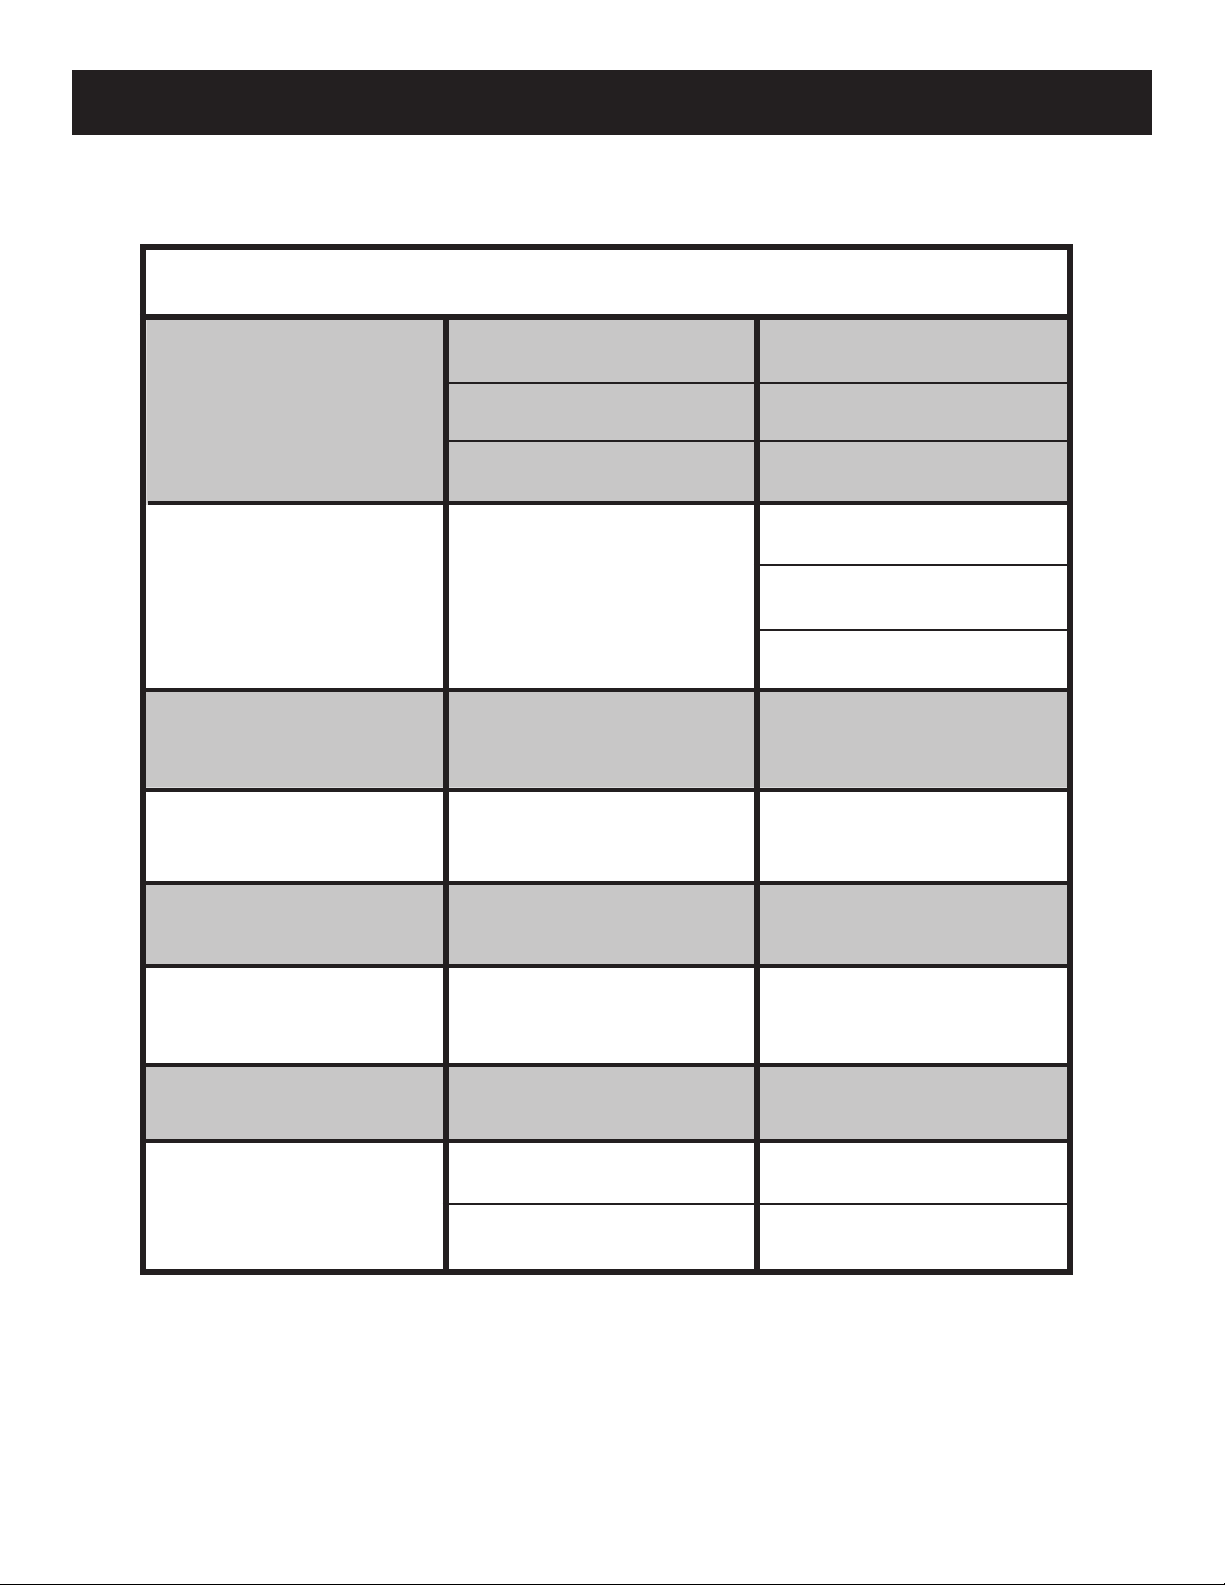
troUbLeshootING
PROBLEM CAUSE SOLUTION
burner will not light
bottom of pizza burning
bottom not cooking
quickly
oven not hot enough
oven too hot
Low fuel
Starter mechanism damaged
Safety mechanism trip
Stone too hot
Stone too cold
Wind pulls heat from the oven
Too much flame
Replace tank
Replace
Follow resest instructions
Turn down burner, wait 5 minutes
Use metal screen under pizza
Precook toppings
Preheat longer
Protect from the wind
Turn down the burner
excessive smoke coming
from oven
Yellow ame
burner self extinguishes
Crumb tray needs to be cleaned
Venturi clogged
Low fuel
Supply line damaged or leaking
Let cool, clean tray
Clean burner tube
Replace tank
Replace line
17
Page 18
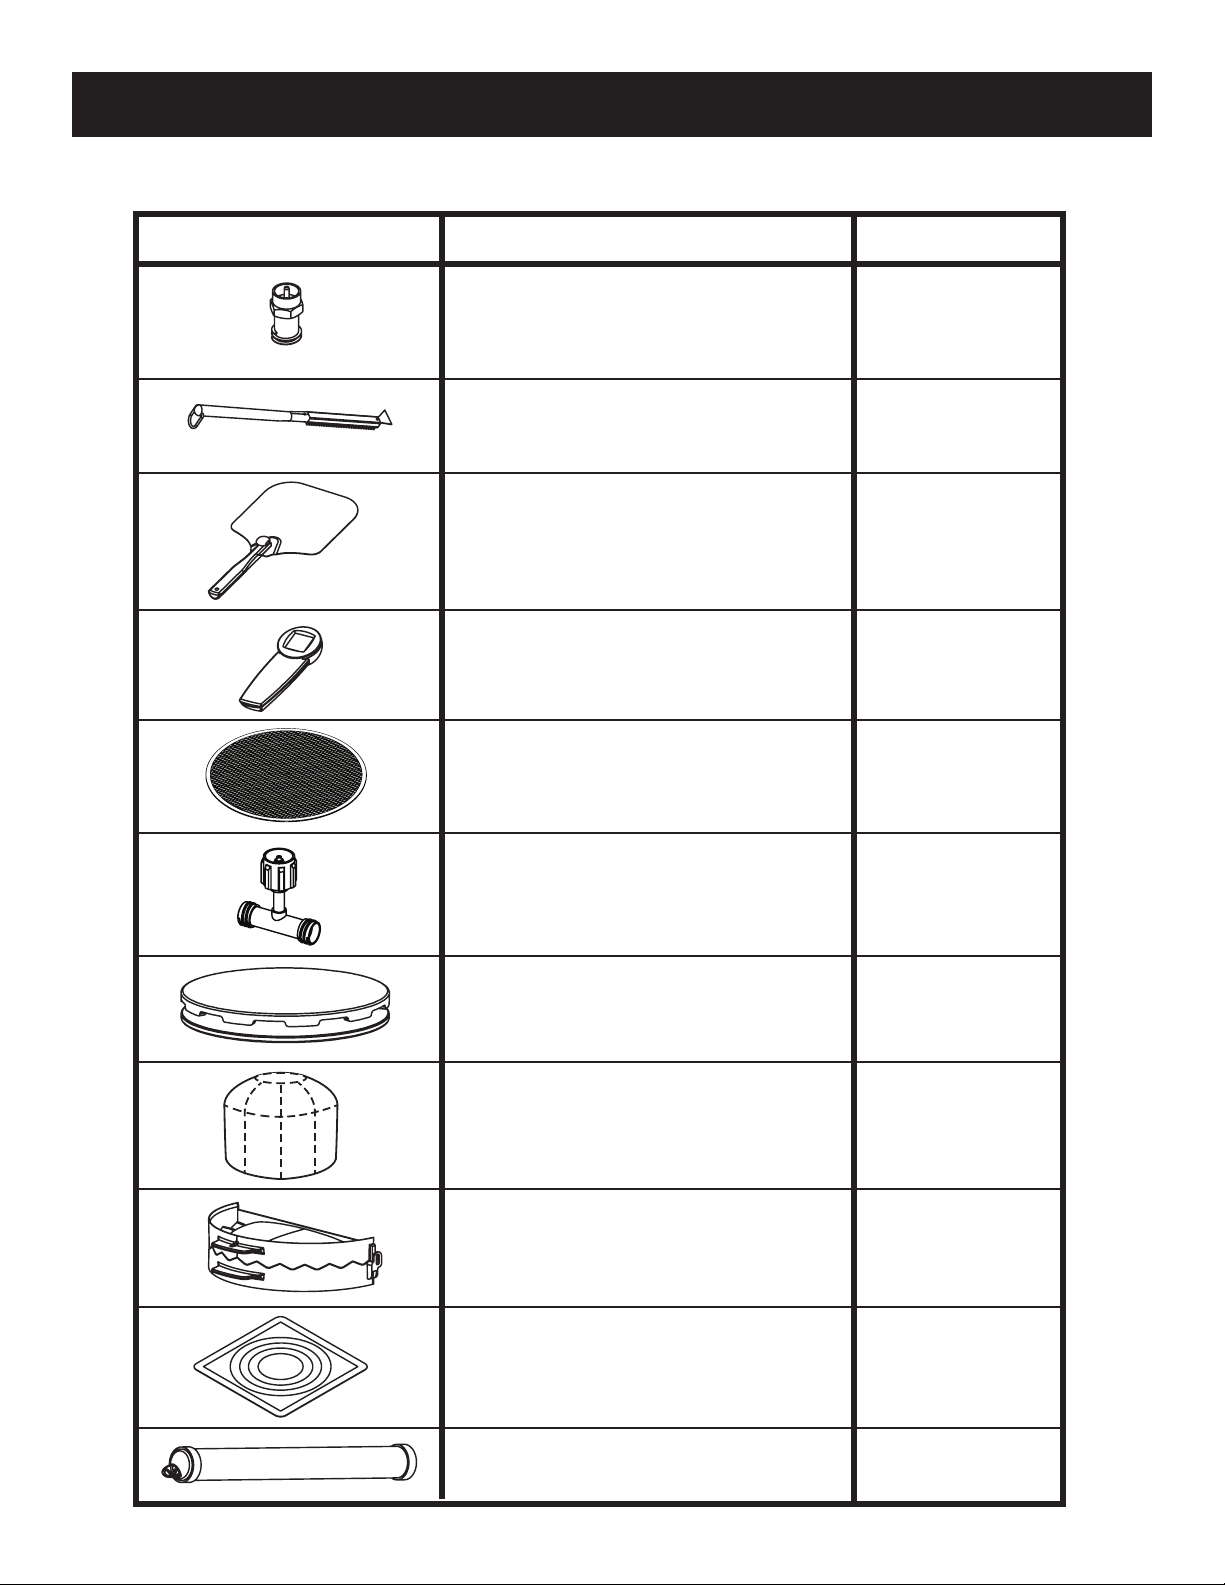
ACCessorIes
Available at pizzacraft.com/accessories.html
ACCESSORY
DESCRIPTION ITEM NUMBER
1 Pound disposable tank Adapter:
Allows small portable propane bottle to be
used with the pizza oven. Great for tailgating
and camping.
stone brush: Long handle brush with natu-
ral ber bristles. Keeps stone clean between
pizzas.
Folding Pizza Peel: Aluminum peel sized
perfect for pizza oven and storage.
Infrared thermometer: Accurately reads
stone surface temperatures. 32°-800° F range.
Pizza screen: Aluminum screen helps even
cooking for frozen pizzas.
PM6013
PM0218
PM0216
PM0 413
PM0306
tee Valve: Allows you to use only one or two
cooking units for a 20 lb. portable propane tank.
stone replacement set: Designed
specically for the oven to ensure even heat and
a crisp crust. (identical to original stone set)
deluxe rain Cover: Nylon rain cover oers
additional protection for outdoor storage.
Calzone Press: Easy to cra calzones, pas-
tries and more.
Flexible dough rolling Mat: Easy to
measure and roll perfectly sized pizza crust.
PM6014
PM6015
PM6012
Large PM0406
Small PM0405
PM0408
18
rolling Pin: Easy to roll out pizza dough.
PM0 412
Page 19
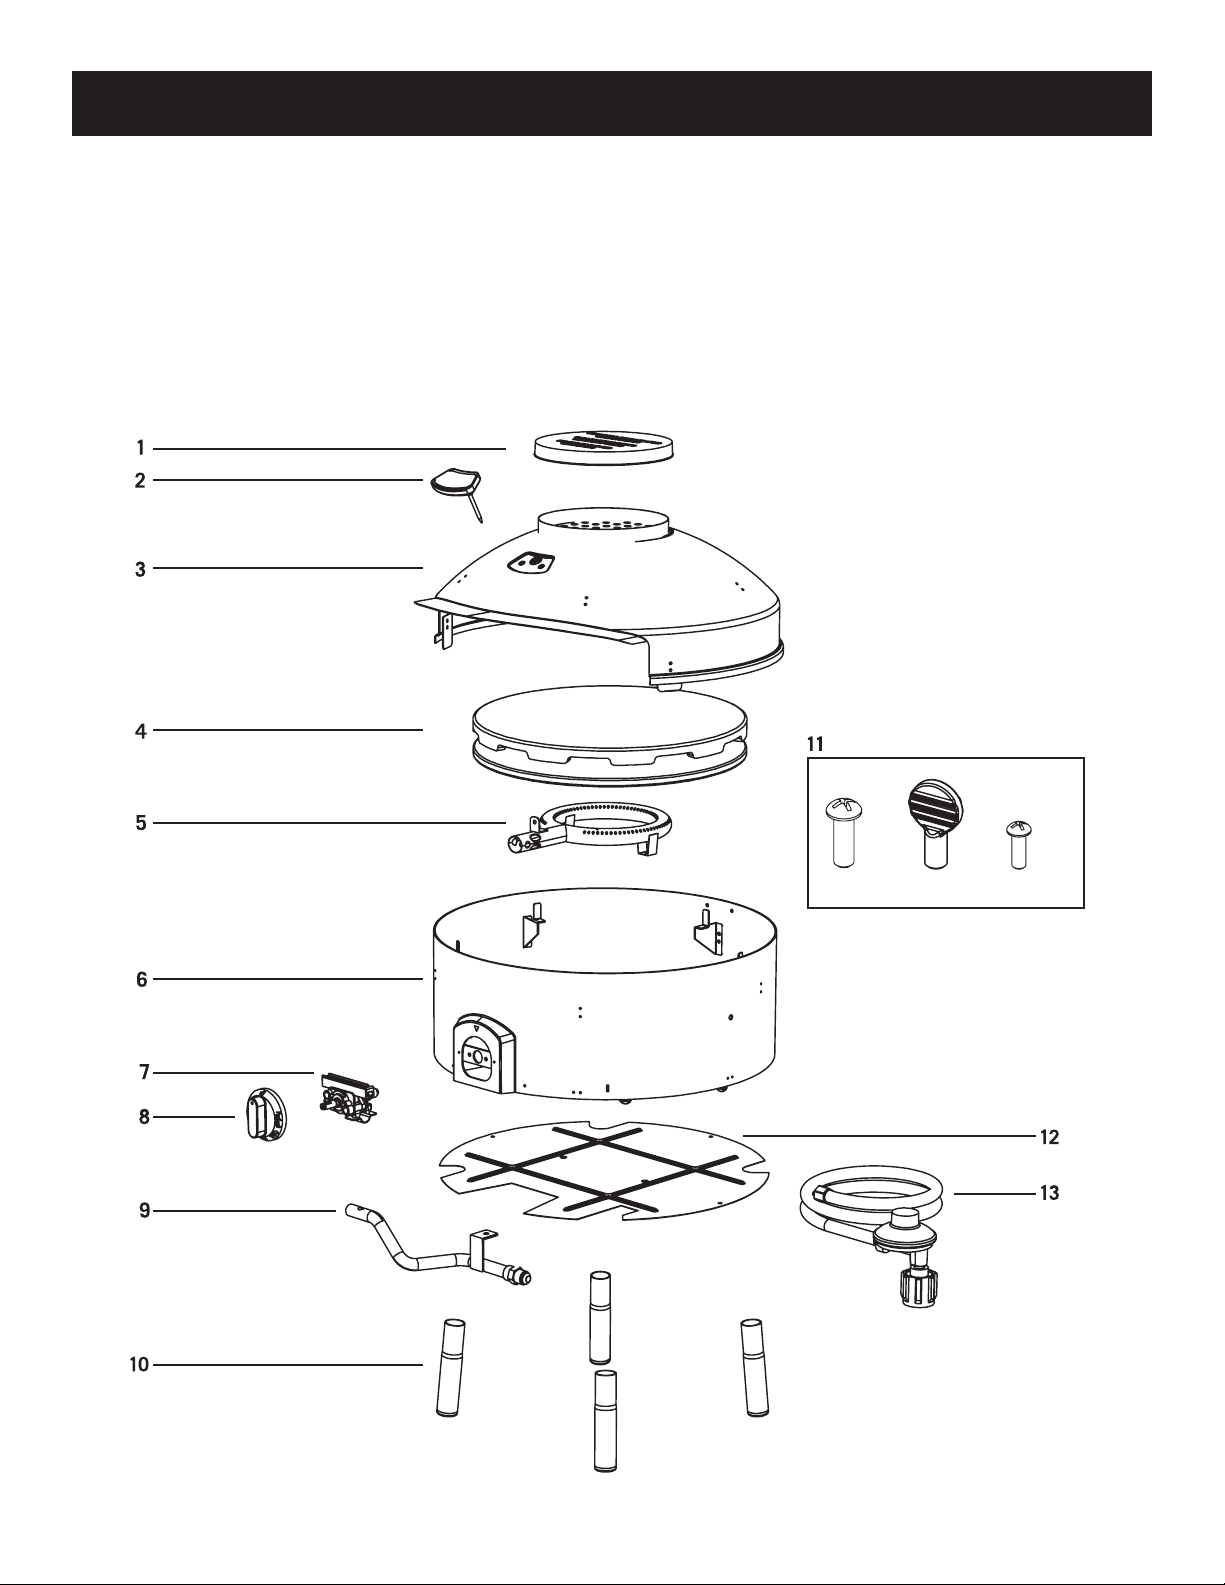
rePLACeMeNt PArts
PARTS
1. Rain cover
6. Body
11. Hardware package
2. Thermometer
3. Hood
4. Stone
5. Burner
7. Gas valve
8. Knob
9. Gas inlet pipe
10. Legs
12. Crumb tray
13. Hose and regulator
x4 x3 x3
19
Page 20

W ArrANty ANd reGIstrA tIoN
We guarantee our products for one year from date of purchase for defects in manufacture or materials.
We will repair or replace at our option. Proof of purchase is required.
For replacement parts call 1.800.521.0505
Please register your oven at
pizzacraft.com/register-pizza-oven.html
or with enclosed postcard
20
 Loading...