

Page 1
Page 2
Page 3
-1-
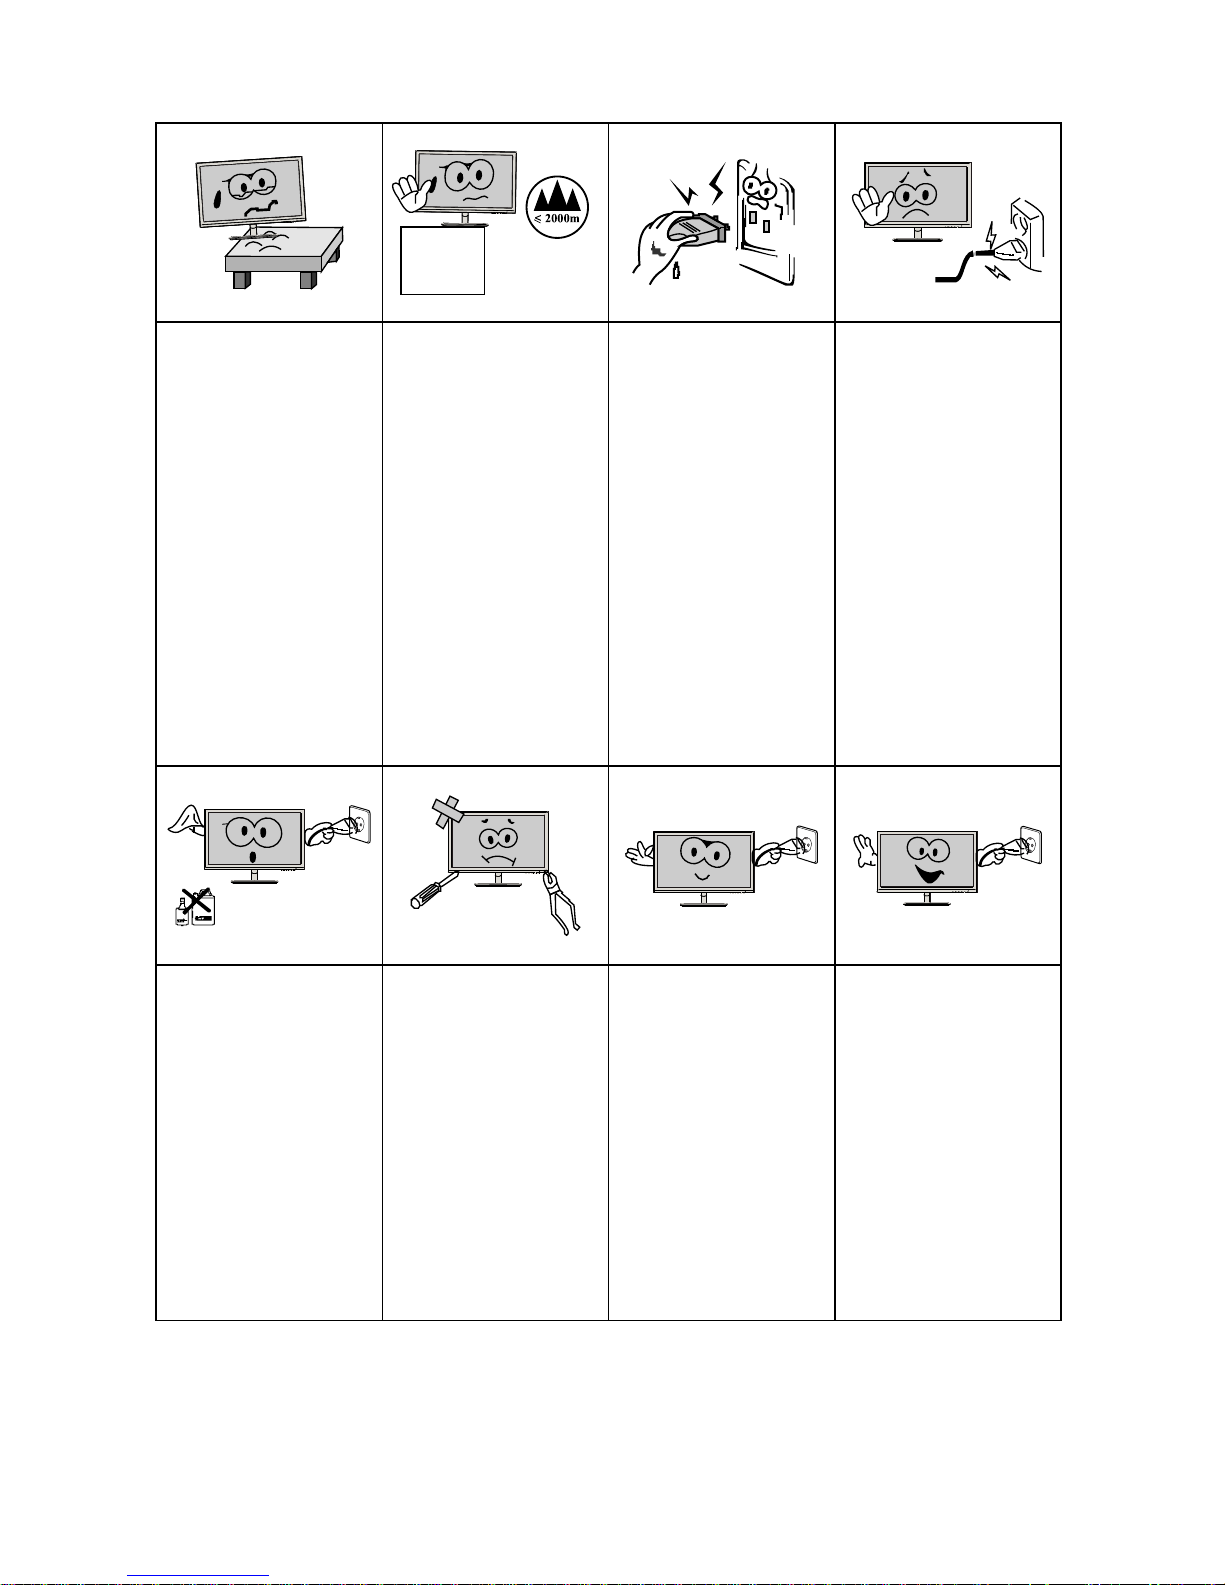
The altitude and the
tropical environment
the adapter fits depend
on which adapter is
used for the device.
The rating plate on
the back of the device
with the above warning
sign indicates that
this productis applicable for the safe use
of the region with
altitude of 2,000m and
below.
Please always place
this device on a stable
surface; otherwise, it
may fall and be damaged.
Do not hold the plug
with wethand ;
otherwise, electric
shock may occur.
Make sure the plug
has a good touch
because poor touch
may cause fire.
Do not use a broken
power plug nor keep
a power cord near
heat source; otherwise,
electric shock or fire
may occur.
Do not disassemble
this device without
permission. In case
of failure, be sure to
contact a profesional
servicing person to
fix it. The authorized
disassembly of this
device may result in
electric shock or fire.
When cleaning the
device, be sure to
remove the powerplug , use a piece
of soft cloth rather
than industrial chemical to clean the
device, be sure not
to let water enter the
device.
In case of rare smell
or noise out of this
device, be sure to immediately cut off the
power supply and ask
a professional servicing person to fix the
problem.
When this device is
idle for long time,
be sure to power it off;
otherwise, electric
shock or fire may
occur.
I. Safety Prevention Measures
Note:
The device with AC switch may use such AC switch as cut-off component.
The device without AC switch may use power plug or coupler as cut-off component.
In case of the normal use of the equipment, make sure the cut-off component can be accessed
easily.
All specifications and informations are subject to change without notice.
Page 4
All specifications and informations are subject to change without notice.
-2-
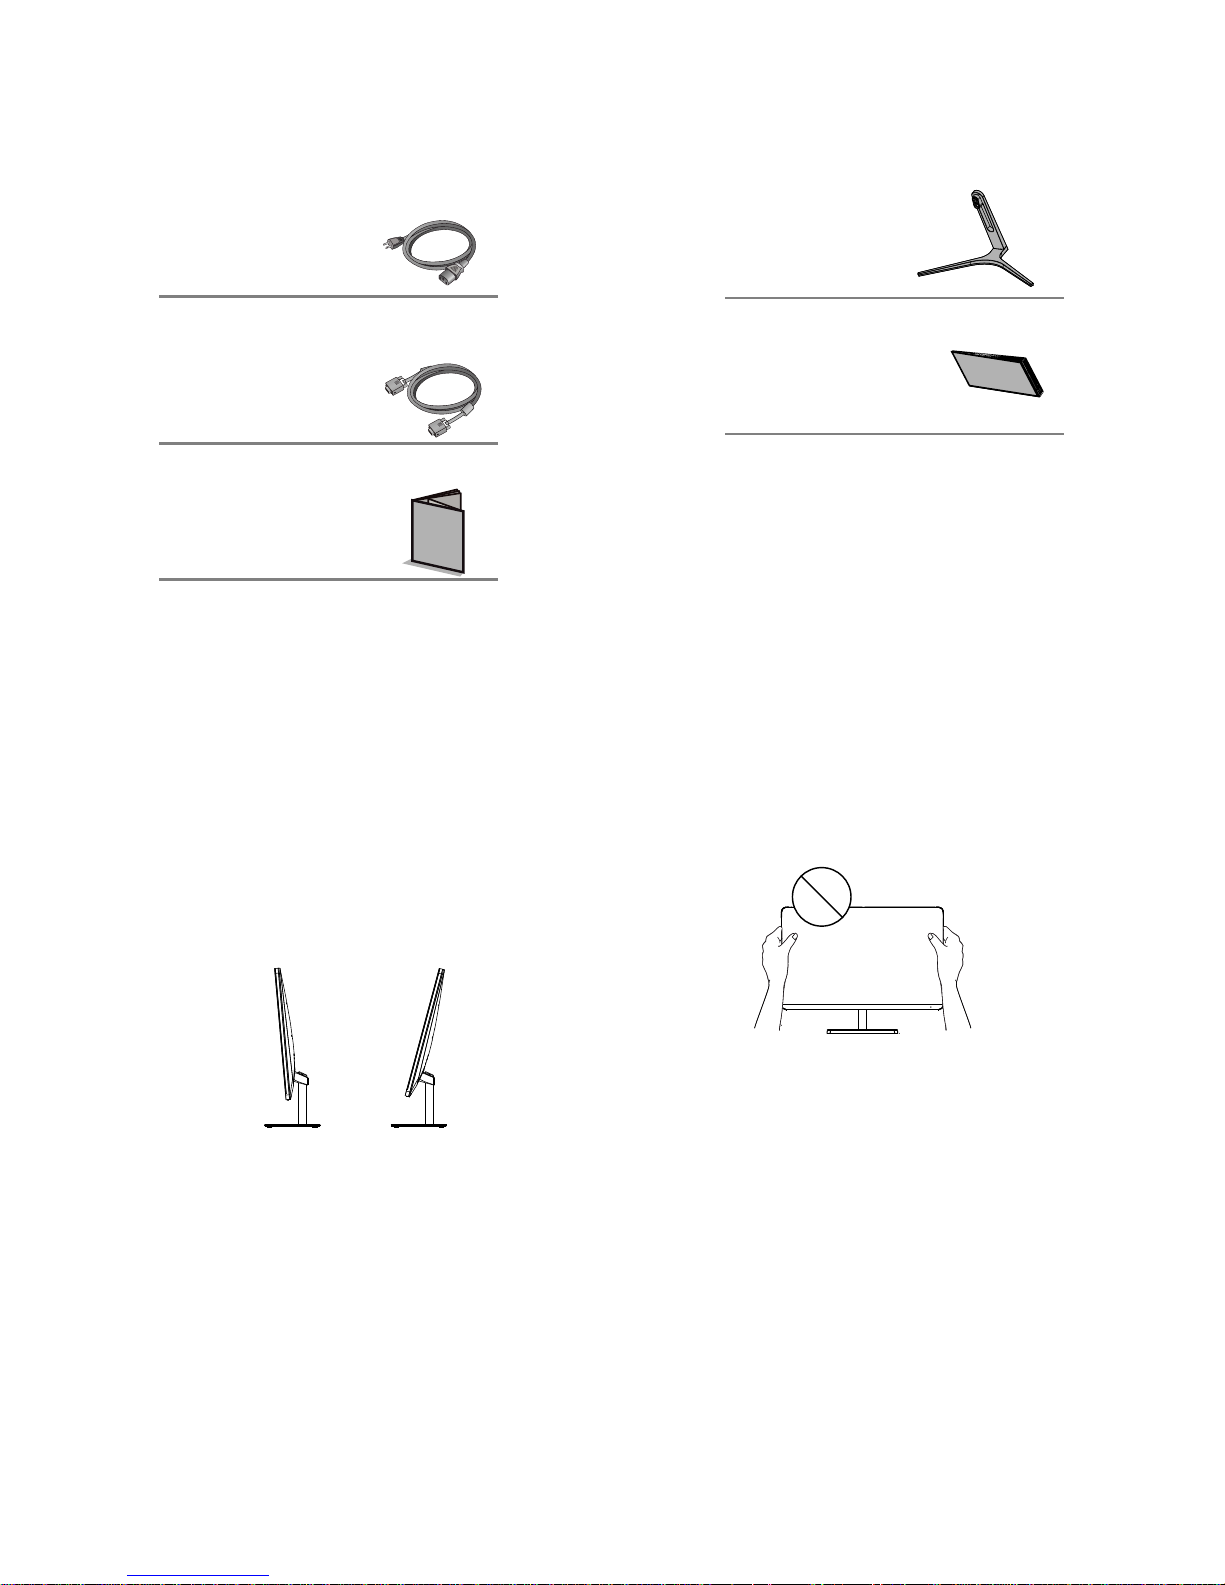
Power cord
Signal cable
User manual
Base/Stand
Warranty card and
certificate of conformity
(The above pictures are for illustration only and the physical accessories shall govern.)
2. Angle Adjustment
2.2 When adjusting the angle of the
monitor, be sure not to touch or press
the area of the screen.
(The above pictures are for illustration only and the physical accessories shall govern.)
II. Installation Instructions
1. Accessories
2.1 The screen can be adjusted by
inclining forward and backward;
however, the specific adjustment
depends on the specific model of the
device. Generally, it may be inclined
5±2° forward and 15±2° backward.
Page 5
(The above pictures are for illustration only and the physical accessories shall govern.)
1
2
4
3
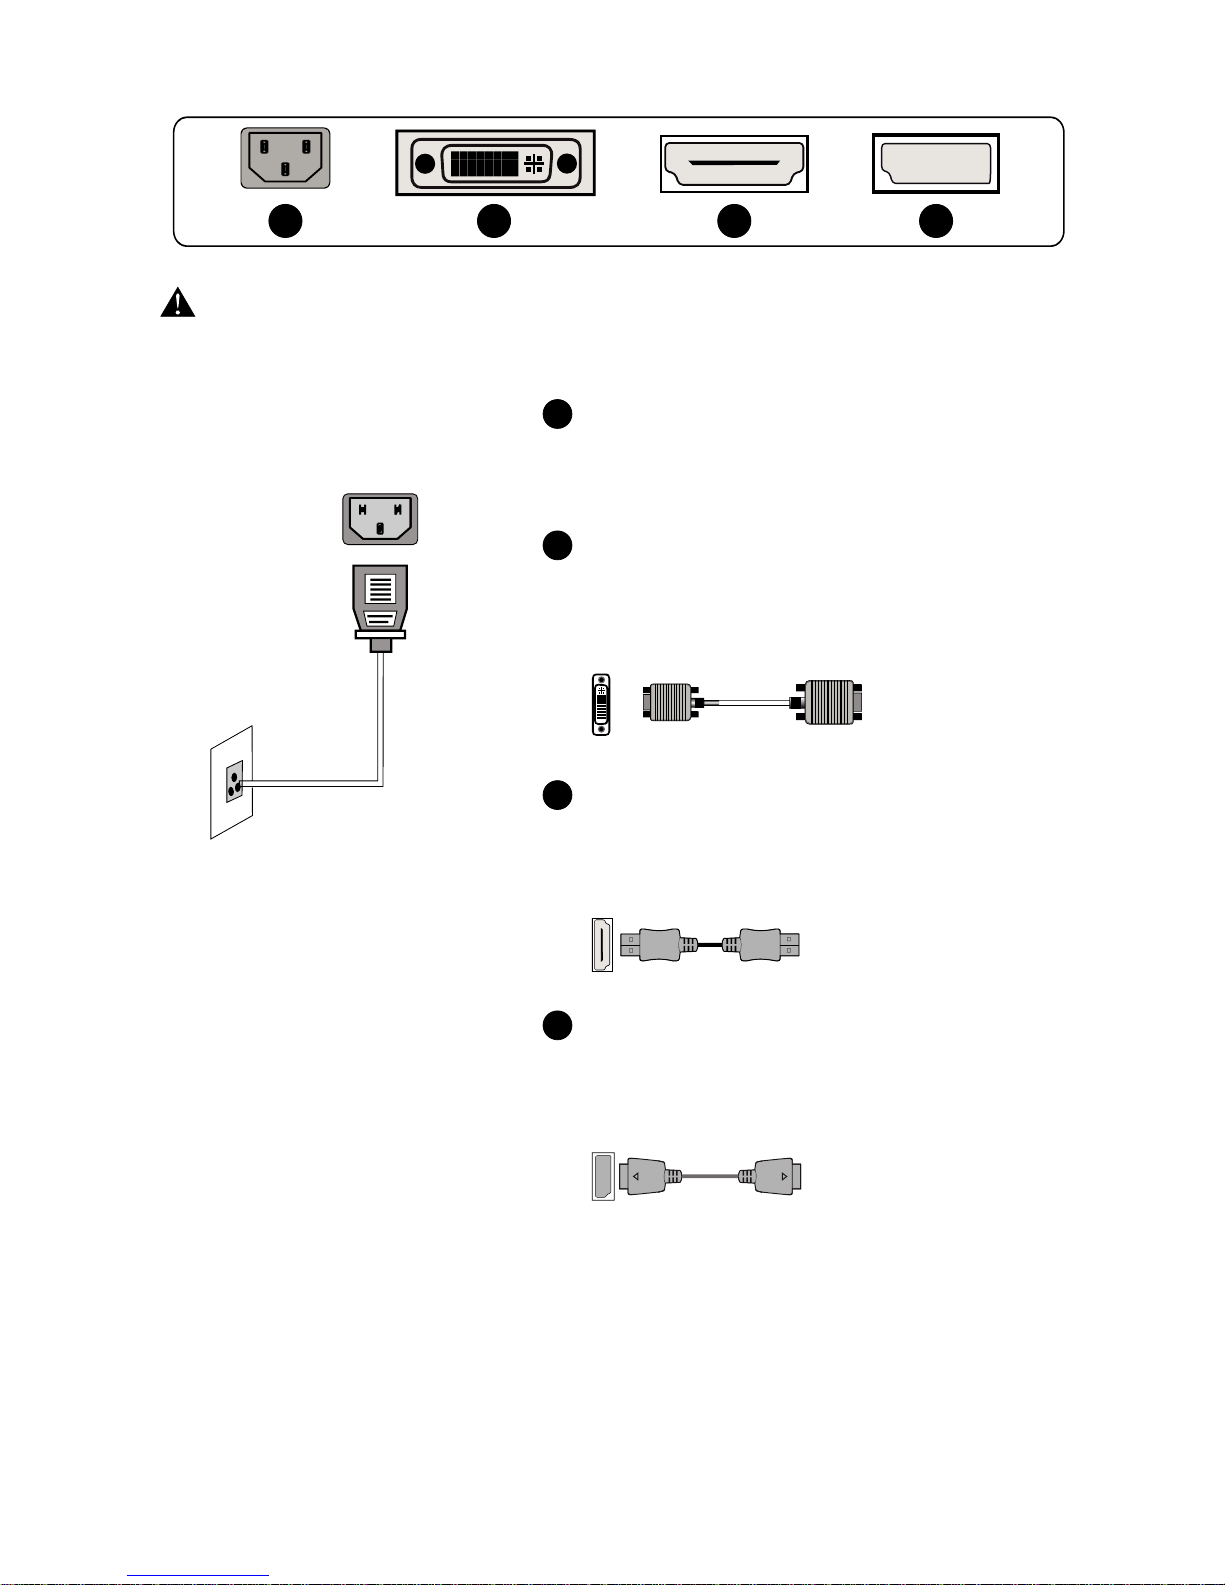
Before connecting the LCD monitor to PC, please power the PC and the monitor
Model with inbuilt power supply
* Warning: Always use the power
cord of standard configuration.
2
4
3
Power Plug
Connect the power cord of the monitor into
the POWER port in the back of the monitor.
DVI Port
Connect the DVI cable into the DVI IN port
in the back of the monitor (this needs the
support of the monitor).
HDMI Port
Connect the HDMI cable into the HDMI IN
port into the back of the monitor (this needs
the support of the monitor).
DP Port
Connect the DP cable into the DP IN port of
the monitor (this needs the support of the
monitor).
1
-3-
III. Connect the Monitor to PC
All specifications and informations are subject to change without notice.
Page 6
IV. User Setup
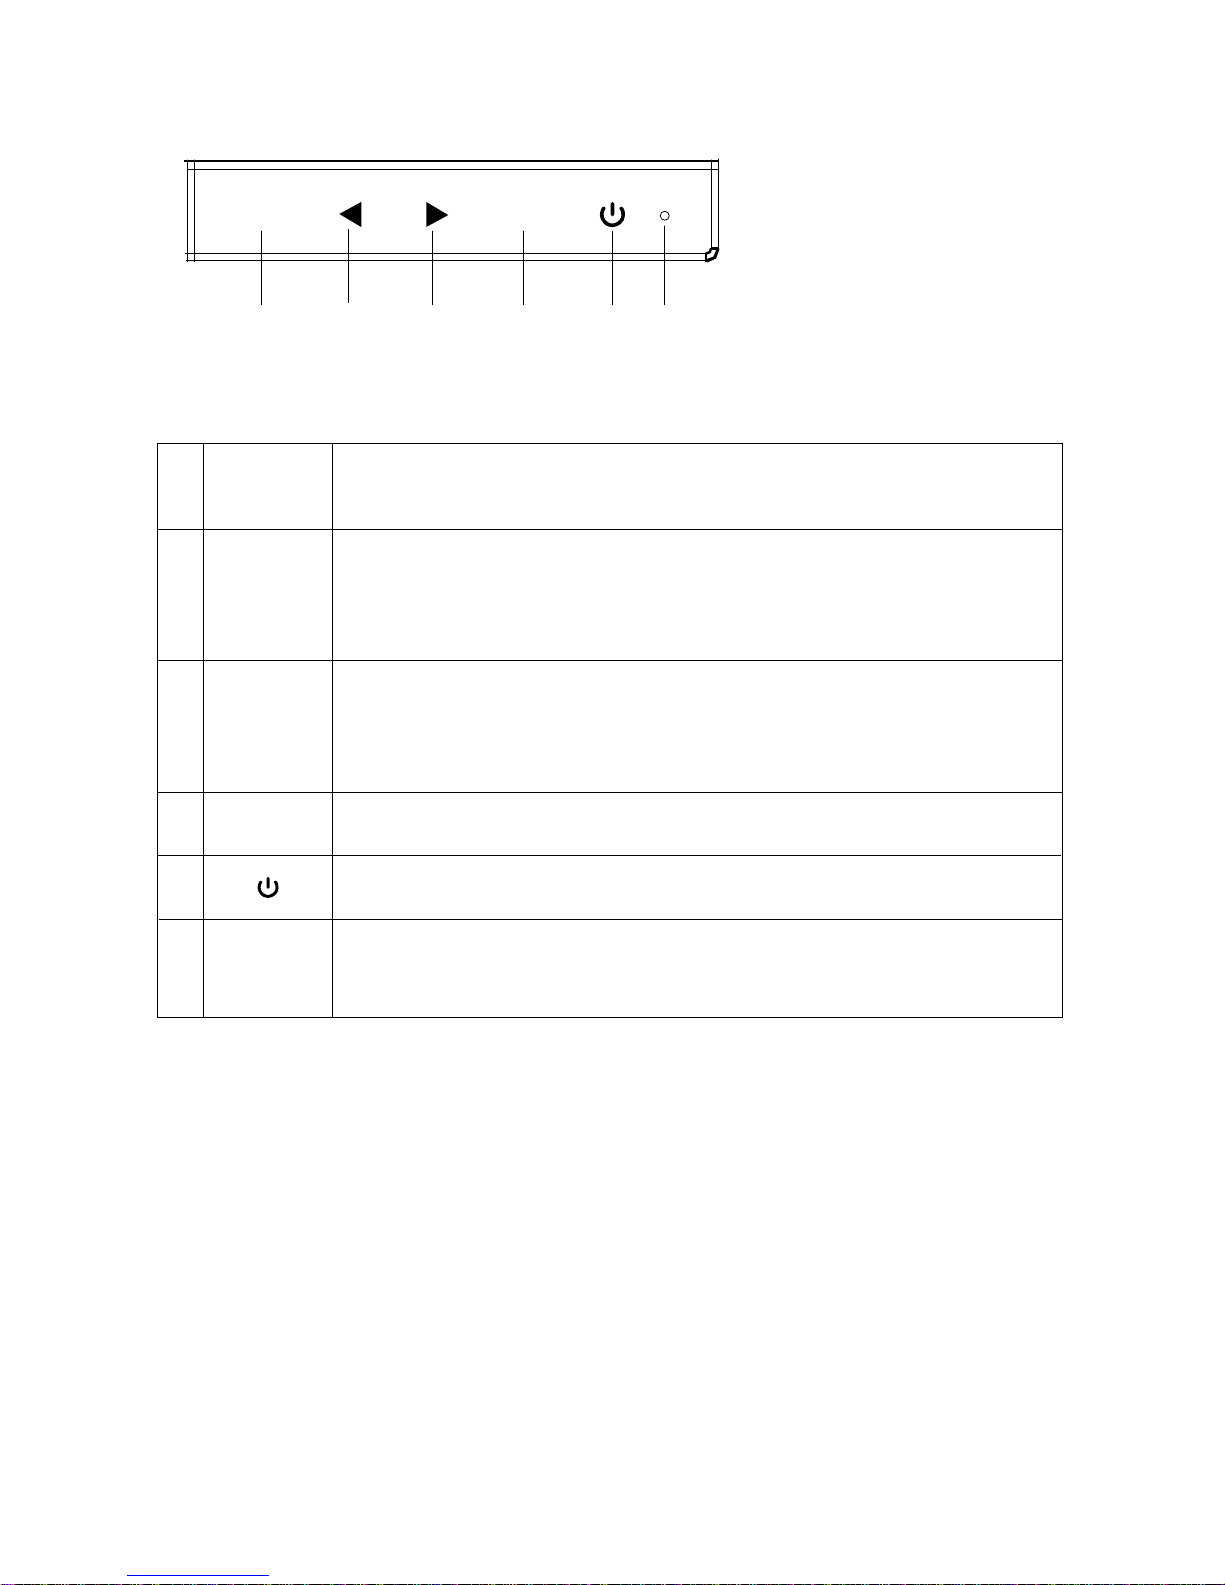
1. Schematic Diagram of Keys
M
E
1 2 3 4 5 6
2. Description of Keys' Functions
Note: The physical keys of the specific model shall govern.
LED
indicator
light
1.
2.
3.
4.
6.
5.
Pops up the menu/Ba cks to the previous menu ( in case of ma in menu,
exits from the whole menu) .
Whe n th e men u is a ctivated, use d as the left function se lection ke y,
and decreases progre ssively the va lue of the progress bar.
When the menu is activated, used as the right function selection key,
and increases progressively the v alue of the progress bar; whe n the
men u i s inactivated, us e d a s th e spe ci fi ed shor tcut mo de h ot ke y
( FPS/R T S mode) .
If the me nu is a ctivate d, chooses the corresponding fun
ction.
Power switch: P owe r s on/off the monitor.
Blue: in normal switch-on sta te ; flickering in blue: in power-saving state.
M
E
▲
▲
-4-
All specifications and informations are subject to change without notice.
Page 7
PIP
On
Off
Return
Exit
NONE
NONE
Standard
Movie
FPS
RTS
EyeSa ver
Return
Exit
Cool
Warm
User
Return
Exit
Auto
21:9
4:3
Return
Exit
DVI
HDMI
DP
Return
Exit
SRGB
NONE
NONE
NONE
NONE
NONE
NONE
NONE
NONE
NONE
NONE
NONE
NONE
NONE
NONE
NONE
NONE
NONE
NONE
NONE
NONE
NONE
NONE
NONE
NONE
NONE
NONE
NONE
NONE
NONE
NONE
PI P PBP
DCR
Contrast
Brightness
Mode
Color Temp.
Aspect
Input
MultiWindow
Reset the window display
Return to the previous menu
Exit from the whole menu
Adjust display contrast
Activate dynamic contrast
Inactive dynamic contrast
Return to the previous menu
Exit from the whole menu
Normal work mode
De s cr i pti o n
Adju st display bri gh tn ess
Movie mode
FPS game mode
RTS game mode
Eye protection ray filter application mode
Fine tuning of red color temperature
Return to the previous menu
Exit from the whole menu
Set as cold color temperature
Set as warm color temperature
Fine tuning of green color temperature
Fine tuning of blue color temperatur
e
Return to the previous menu
Exit from the whole menu
Automatically adjust picture aspect ratio
Picture in 21:9 mode
Picture in 4:3 mode
Return to the previous menu
Exit from the whole menu
DVI (digital) signal input
HDMI (digital) signal input
Display port (digital) signal input
Return to the previous menu
Exit from the whole menu
Switching signal source
Change the picture in picture
display position
Home screen and the picture in
picture singnal source interchange
SET TO SRGB
Reset
Return
Exit
Su bm en u
It e m
Main Menu
Ic o n
Main Menu
Ic o n
Main Menu
Ic o n
Mai n Men u
It e m
Su bm en u
Op t i o n s
NONE
NONE
NONE
NONE
NONE
NONE
Red
Green
Blue
NONE
NONE
NONE
NONE
NONE
NONE
NONE
NONE
NONE
NONE
NONE
NONE
NONE
NONE
NONE
NONE
NONE
NONE
NONE
NONE
NONE
SwapInput
PIPPOS
NONE
WindowSwap
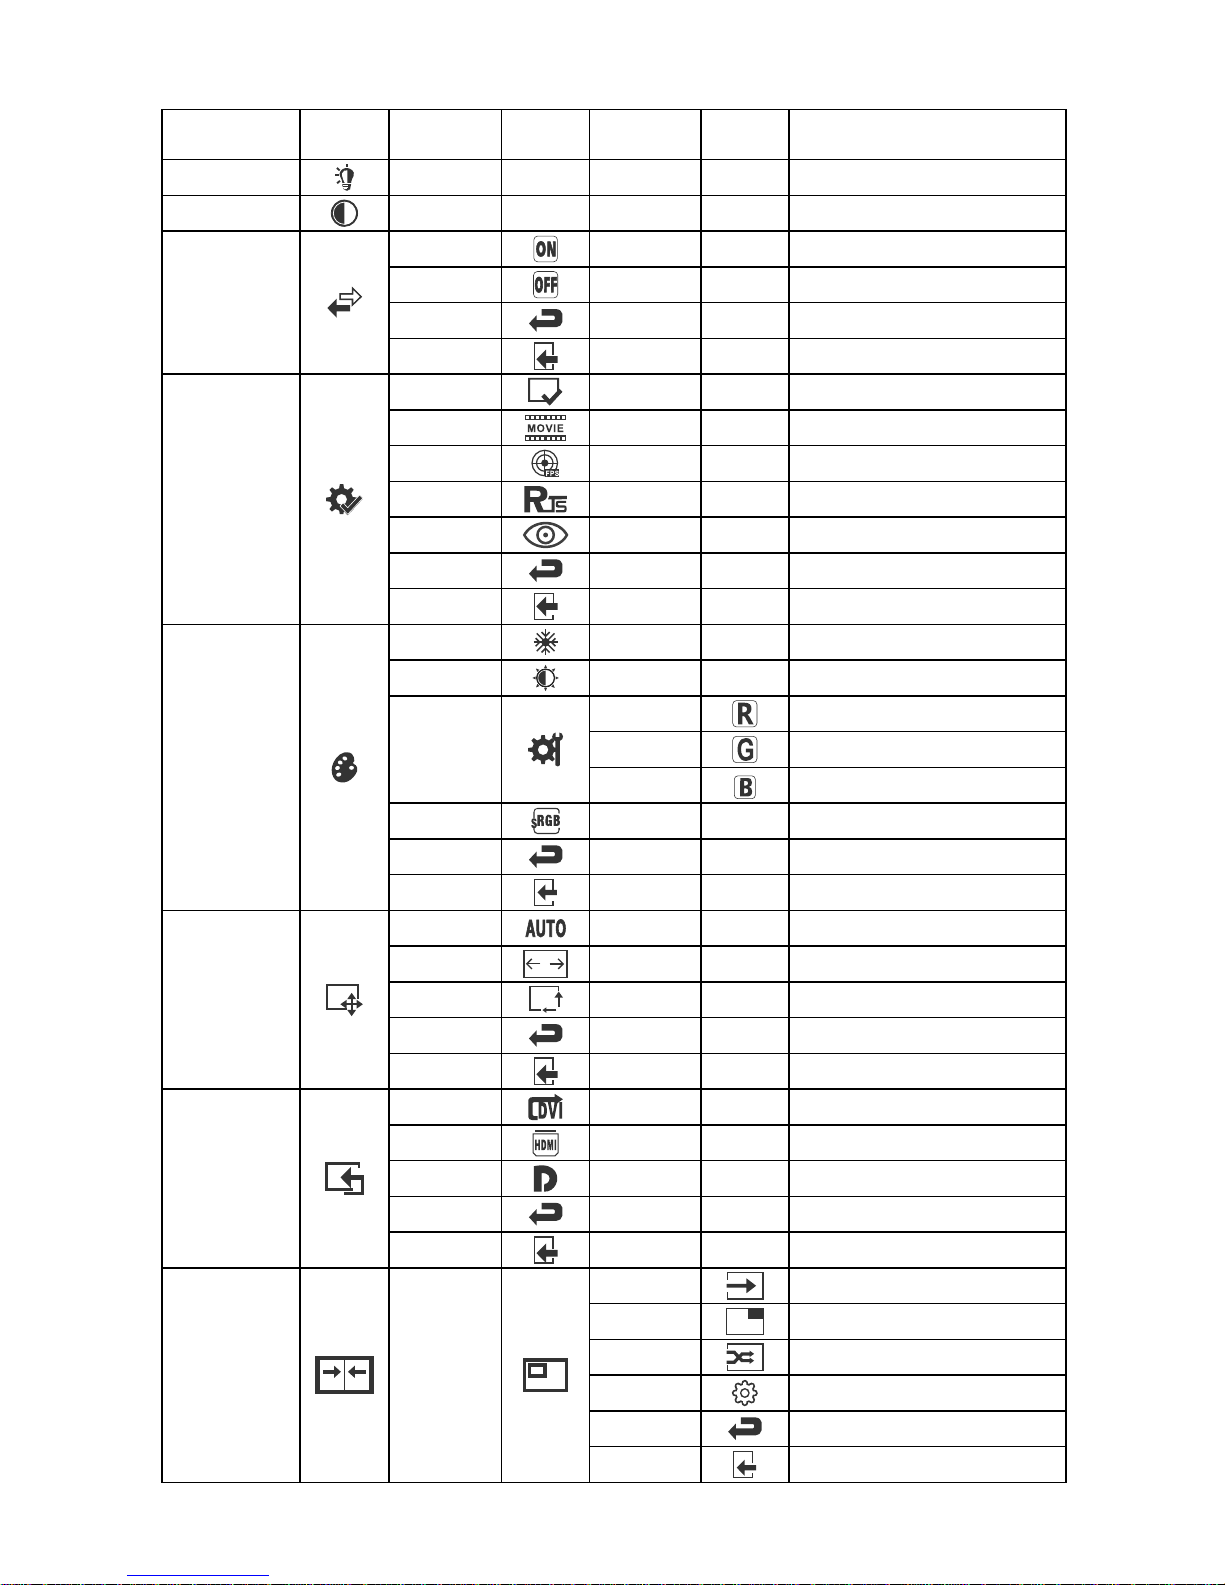
V. Operation Menu (OSD) Function Descriptions
-5-
All specifications and informations are subject to change without notice.
Page 8
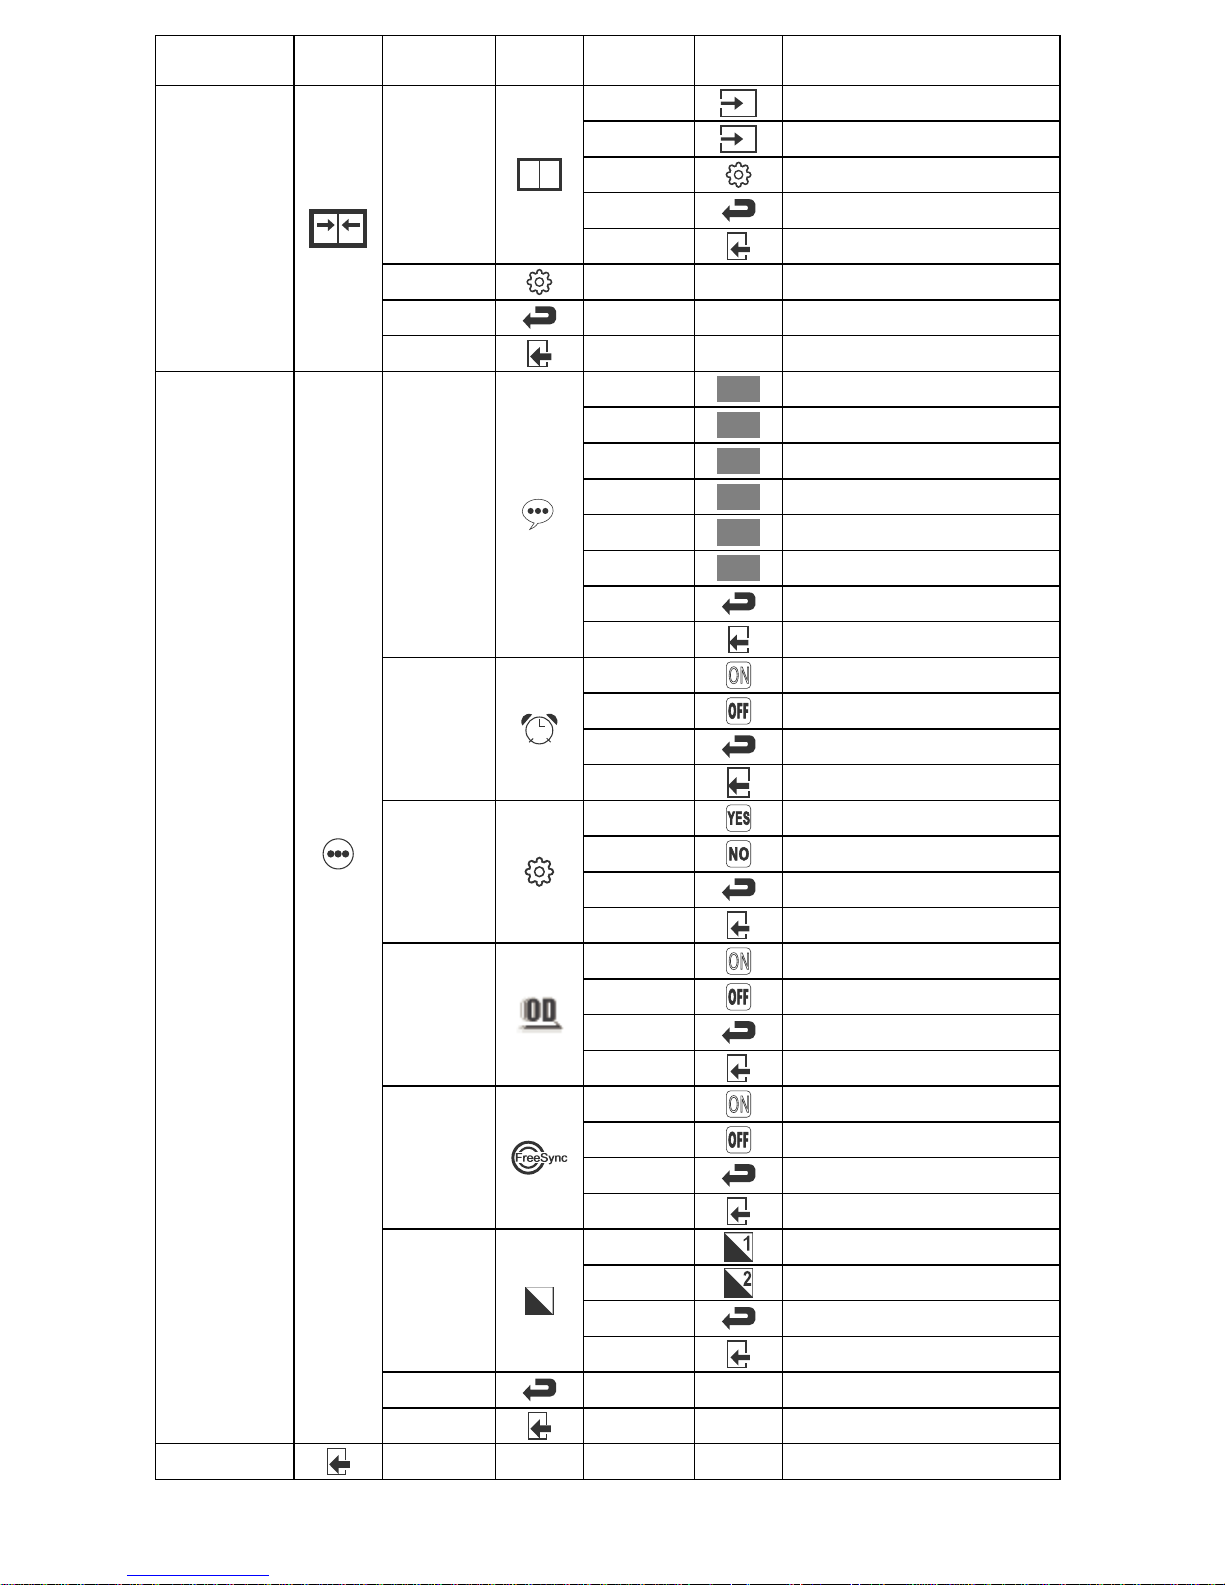
Note: The functions may be adjusted due to specific model or the upgrade of software version. The physical model shall govern.
-6-
Su bm en u
It e m
Main Menu
Ic o n
Main Menu
Ic o n
Main Menu
Ic o n
Mai n Men u
It e m
Su bm en u
Op t i o n s
NONE
Reset
Return
Exit
PBP2WIN
Return
Exit
NONE
Language
Power Off
Reset
Over driver
FreeSync
MultiWindow
Exit
Other
NONE
NONE
NONE
Win1Input
Win2Input
Reset
Return
Exit
Return
Exit
On
Off
Return
Exit
YES
NO
Return
Exit
On
Off
Return
Exit
NONE
NONE
NONE
English
Française
Deutsch
Italiano
Español
On
Off
Return
Return
Exit
Exit
한국어
NONE
NONE
NONE
1
2
NONE
NONE
NONE
Español
Italiano
Deutsch
Française
Englis h
ON
ON
ON
한국어
Switch split screen 1 signal source
Switch split screen 2 signal source
Reset the window display
Return to the previous menu
Exit from the whole menu
Reset the window display
Return to the previous menu
De s cr i pti o n
Exit from the whole menu
Return to the previous menu
Exit from the whole menu
Automatically turn off after saving
power for 1s
Inactivate the function of timed
switch-off
Return to the previous menu
Exit from the whole menu
Reset to factory setup
Exit from this function
Activate OD function (this needs the
support of the monitor)
Inactivate OD function (this needs the
support of the monitor)
Return to the previous menu
Exit from the whole menu
Return to the previous menu
Exit from the whole menu
Return to the previous menu
Exit from the whole menu
Exit from the whole menu
English
Française
Deutsch
Italiano
Español
Return to the previous menu
Return to the previous menu
Exit from the whole menu
Exit from the whole menu
Inactivate FreeSync function (this
needs the support of the monitor)
Activate FreeSync function (this
needs the support of the monitor)
한국어
PI P
PBP
Gamma
Gamma1
Gamma2
Adjust color tone brightness grey1
Adjust color tone brightness grey2
All specifications and informations are subject to change without notice.
Page 9
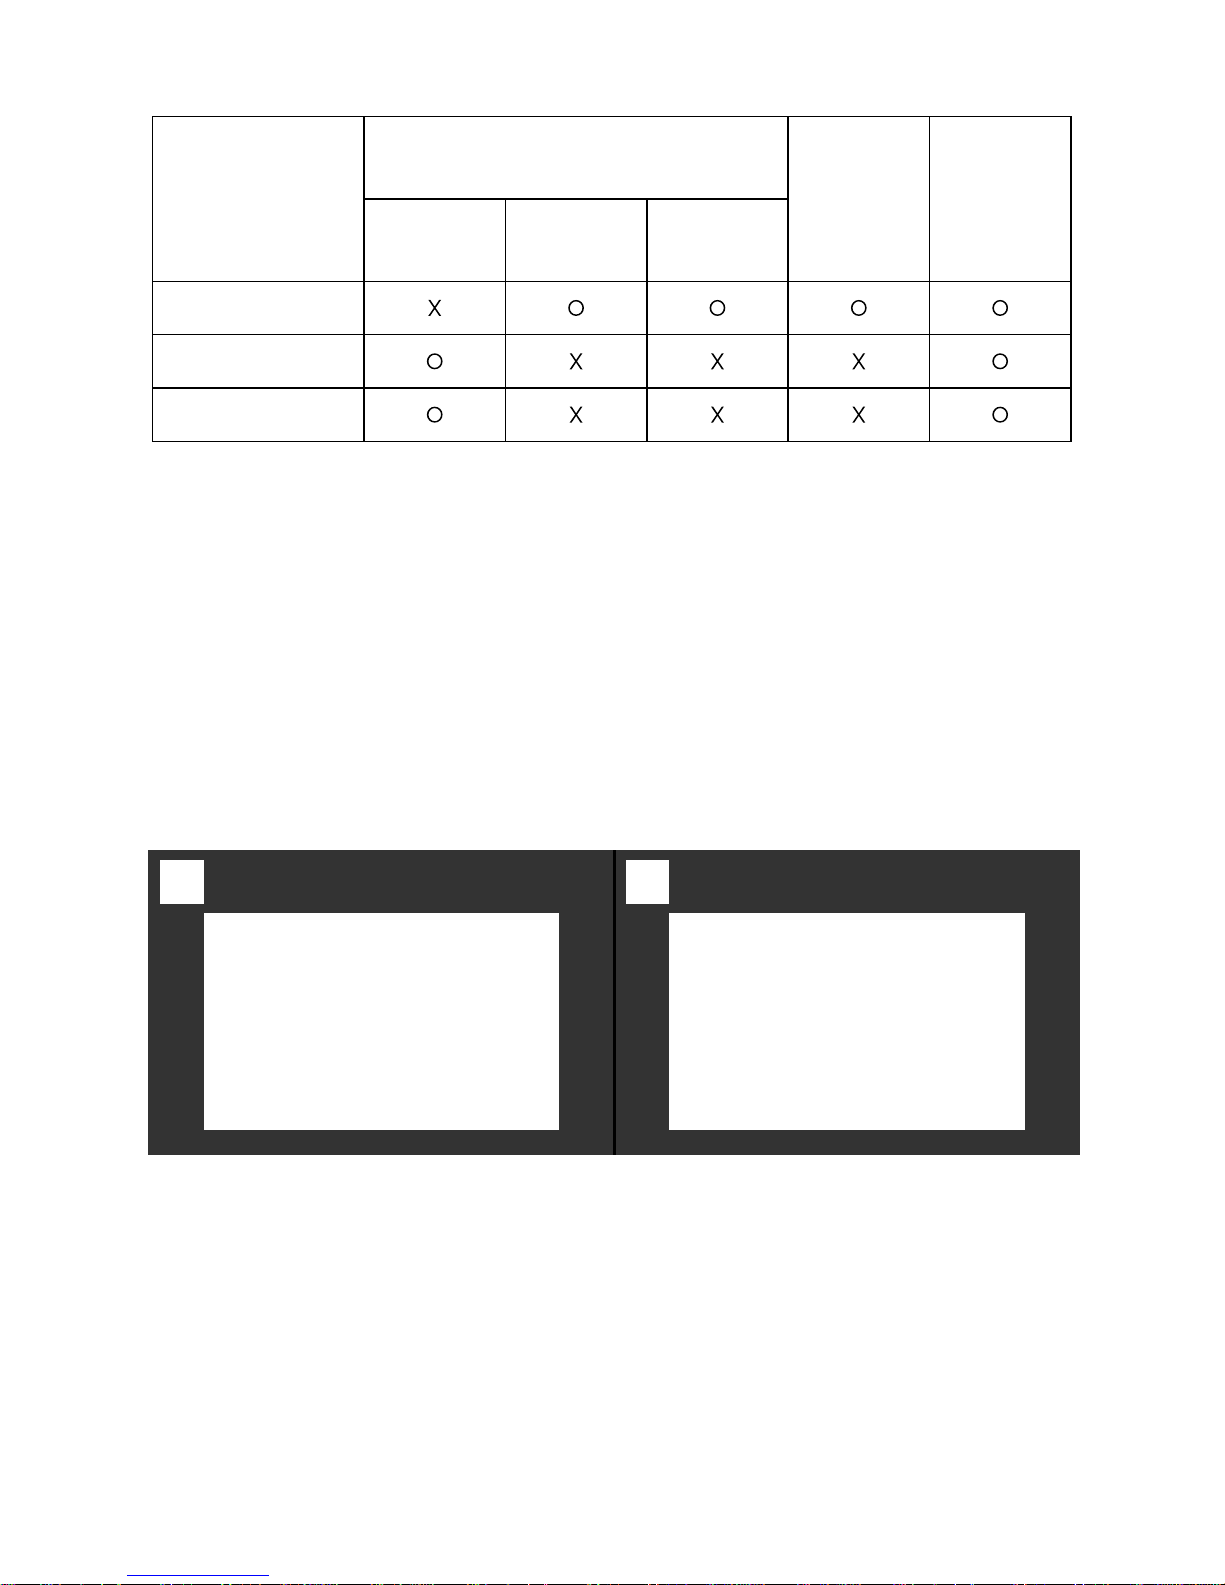
2
1680x1050p
1680x1050p 1680x1050p
1. PIP (Picture in Picture) Input Information
Note:"O" means this feature is supported while "X" means it is not supported.
2. PBP (Picture by Picture) Resolution Information
The above information is related to input options and the monitor's OSD Menu.
For more information on these, refer to the "Basic Setup" and "OSD Menu" sections
of the manual.
Picture in Picture
Additional Input Source
DP HDMI DV I
Window
Swap
picture
mode
1
Main screen
input source
When using the PBP function, certain resolution settings are recommended in order
to prevent image deformation or other undesired visual effects. 1680x1050p is the
recommended resolution setting for each window.
-7-
DP
HDMI
DV I
All specifications and informations are subject to change without notice.
Page 10
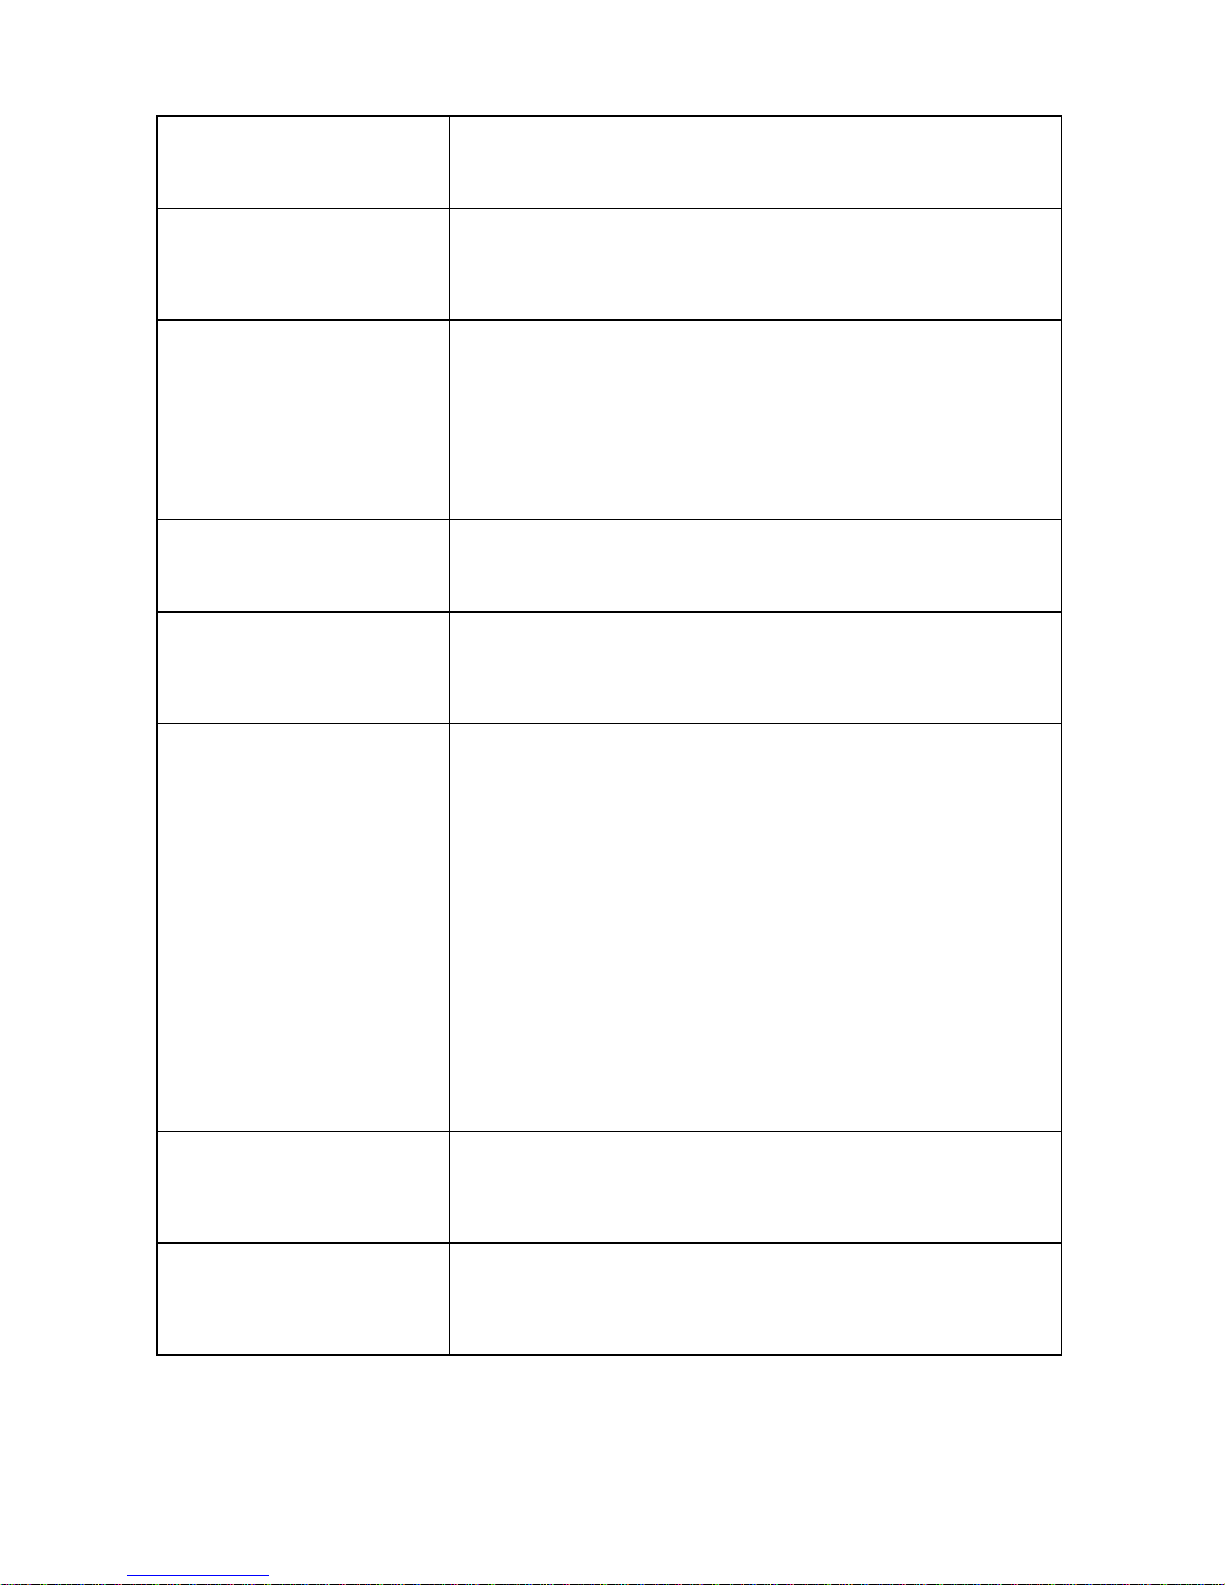
VI. FAQ
Faults occurring
The power indicator
light is not on
Possible solutions
Dimming picture
Flickering picture or
picture with ripples
The power indicator
light is on (flickering),
but the monitor has no
pictures.
Color shortage
(red, green and blue)
Picture with color difference (white looks not white)
◆
Check if the power is on.
◆
Check if the power cord is connected.
◆
◆
Check if the display card is compatible with the
plug-and-play function.
Check if the function of plug-and-play of the device
is compatible with PC.
◆
Adjust brightness and contrast.
◆
There may be electrical appliances or equipment
with electronic disturbance.
◆
◆
Check if the PC display card is inserted properly.
◆
Check if the signal cable of the monitor is correctly
connected with the PC.
◆
Check the signal cable plug of the monitor and make
sure every pin has no bending.
◆
Observe the indicator light by pressing the Caps
Lock key on the PC keyboard and check if the PC
is working.
Check if the PC power is on.
◆
Check the signal cable of the monitor and make
sure every pin has no bending.
◆
Adjust RGB color or reselect color temperature.
Impossible plug-and-play
-8-
All specifications and informations are subject to change without notice.
Page 11
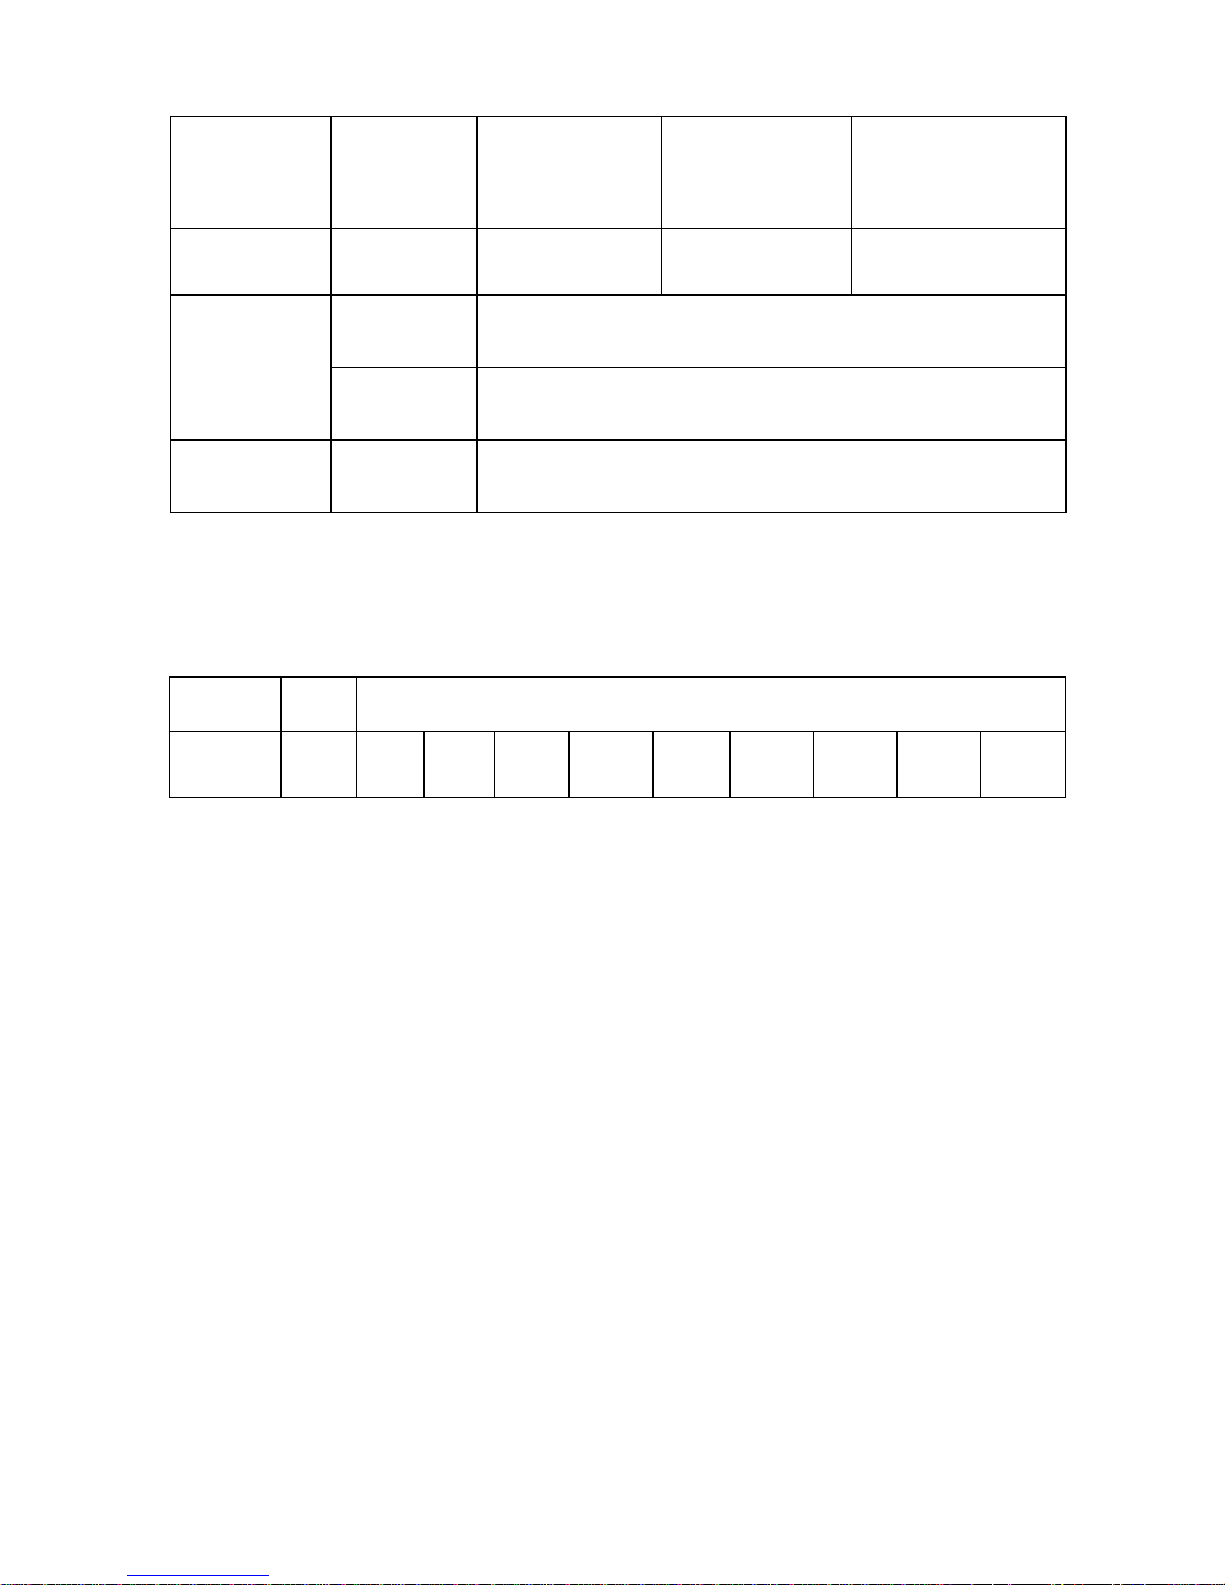
VII. Product Specifications
NNote: The actual application of the above parameters shall be subject to the
specific model.
VIII. Table of Product Preset Modes
*All trademarks and registered trade names are the property of their respective owners.
Remark: When the resolution are 2560*1440@60Hz/3440*1440@60Hz/
1920*1080@144Hz/2560*1440@144Hz/3840*2160@30Hz connection via
DVI port, pls choose 24+1 pin double - channel DVI cables.
IX. System Requirements
Below are the minimum system requirements for your monitor. The requirements
are recommended in order to properly use all of the monitor's features and ensure
high-quality picture.
Minimum Requirements
Operating System: Windows® 7 / Windows® 8 / Windows® 10 64-bit (latest
service pack) or higher
Processor (CPU): Intel® Core™ i5 or AMD Phenom™ II X3 or higher
Graphics Card: NVIDIA® GeForce® GTX 950 or AMD Radeon™ R9 380 or higher
Memory: 6 GB RAM
21:9
34"(WQHD)
Preset resolution/Re fresh ra te
3440x1440
(60Hz)
2560x1080
(60Hz)
1920x1080
(60Hz)
1680x1050
(60Hz)
1440x900
(60Hz)
1280x1024
(60Hz)
1024x768
(60Hz)
800x600
(60Hz)
640x480
(60Hz)
Diagonal
dimensions
Picture
aspect ratio
Picture
dimensions (mm)
Dot distance (mm)
Optimal resolution
34"(86.36cm)
Ambient
temperature
Humidity
21:09
Storage
temperature
Working
temperature
RH for
operation
797.22*333.72
-20
℃ to 45℃
0℃ to 40℃
10% to 85%
0.07725*0.23175
3440*1440@60Hz
Display
dimensions
Aspect
ratio
-9-
All specifications and informations are subject to change without notice.
Page 12

 Loading...