

Page 1
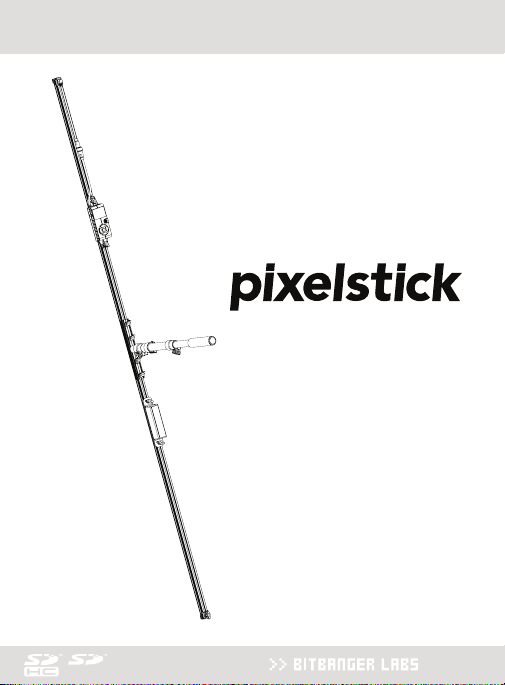
USER GUIDE
© 2014
Page 2

Page 3

Table of Contents ............................................................. 3
Welcome ............................................................................ 4
Components List .......................................................... 5-7
Assembly ..................................................................... 8-11
Using pixelstick.........................................................12-19
User Settings .................................................................. 20
Brightness .............................................................21
Speed ..................................................................... 22
Direction ................................................................ 23
Vertical Flip ........................................................... 24
Increment ..............................................................25
Repeat....................................................................26
Countdown ............................................................27
Xtra Bright ............................................................. 27
Postshoot Data .....................................................28
Startup Pattern.....................................................28
LCD Contrast ........................................................ 29
Show Advanced .................................................... 29
Technique ........................................................................ 30
Specifications ..................................................................36
Troubleshooting ....................................................... 38-39
Safety and Handling ....................................................... 40
3
Page 4
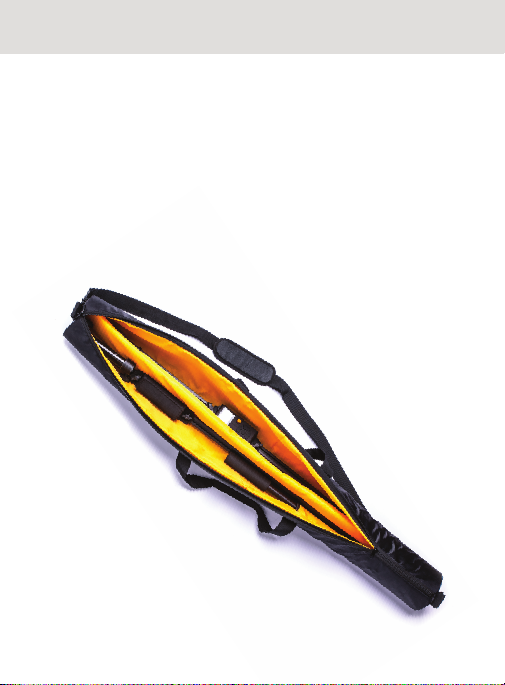
WELCOME!
THANK YOU PURCHASING PIXELSTICK
In your hands is nothing less than the most powerful tool for
creating stunning long exposures and lightpainted timelapse.
The sections ahead will show you how to assemble, operate, and
get the most out of your pixelstick.
For more information, tutorials, and further support, visit
thepixelstick.com
4
Page 5
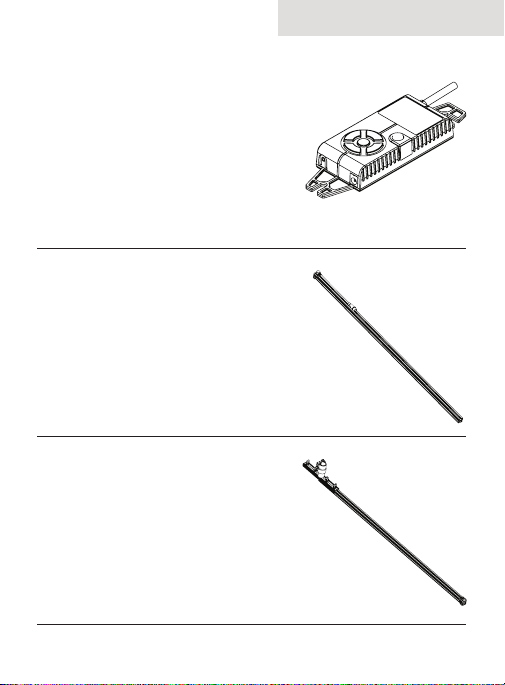
CONTROLLER
Pixelstick’s “brain”. Reads 24-bit BMP
images from an SD card and displays
them on pixelstick’s 200 RGB LEDs,
with full control over the brightness,
speed and orientation of the image.
TOP HOUSING
The Top Housing secures the top 100
LEDs. The LED cable attached at the
one end and secured with an endcap
connects to the Controller Handbox
to the LEDs. The Top Housing arrives
with the Controller Handbox attached.
BOTTOM HOUSING
The Bottom housing secures the
lower 100 LEDs. The endcap is held
on with a thumbscrew and can be removed to swap lenses. It arrives with
the Handle Bracket and Battery Bag
already fastened to the rear channel.
COMPONENTS
5
Page 6
COMPONENTS
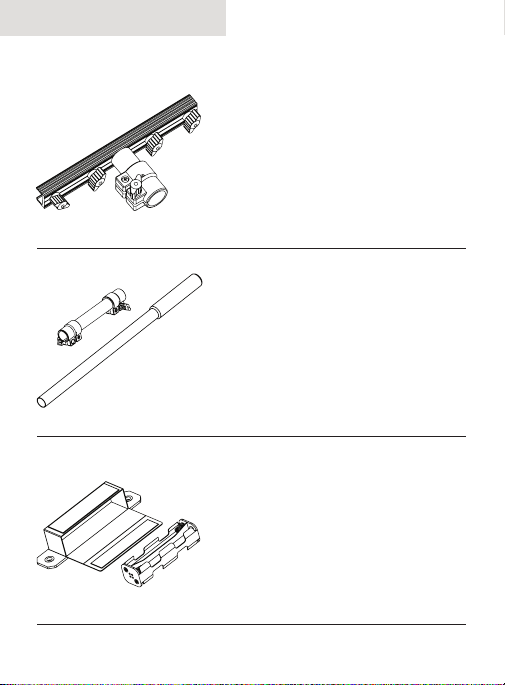
HANDLE BRACKET
The Handle Bracket keeps the two
halves of the Housing together and
provides a mounting point for the
Handle. Never attach the two housing
halves without the Handle Bracket for
support.Screws in with 4 thumbscrews.
HANDLE & SPIN HANDLE
Handle with foam grip that mounts
into the Handle Bracket. The spin
sleeve slides over the handle, allowing
pixelstick to spin freely. When not in
use, lock the spin handle in place with
the clamps on each end.
BATTERY BAG & HOLDER
Plastic holder for 8 AA batteries with
a snap connector. During use the
holder is secured inside the canvas
battery bag.The bag mounts to the
housing with two thumbscrews.
6
Page 7
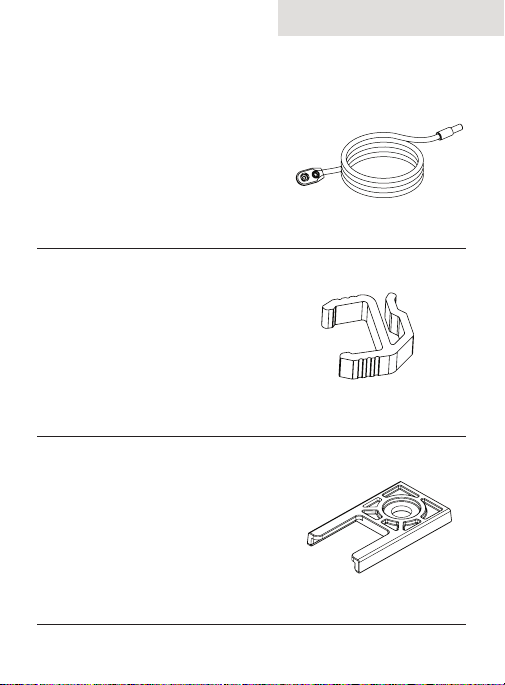
BATTERY CABLE
The Battery Cable clips into the
included Battery holder at one end
and the Controller Handbox at the
other. It is approximately 600mm long
and can be secured to the pixelstick
housing using the cable clips.
CABLE CLIPS
The cable clips can be applied at
various places along the housing to
keep cables clamped down. Larger
cables can be put in the channel with
the clip snapped over. Pixelstick arrives with 6 of these clips.
COLD SHOE ADAPTER
A small plastic clip that attaches to
the rear channel of the housing using
the included button head screw and
square nut. The adapter provides a
mounting point for a wireless remote
that has a flash shoe mount.
COMPONENTS
x 6
7
Page 8
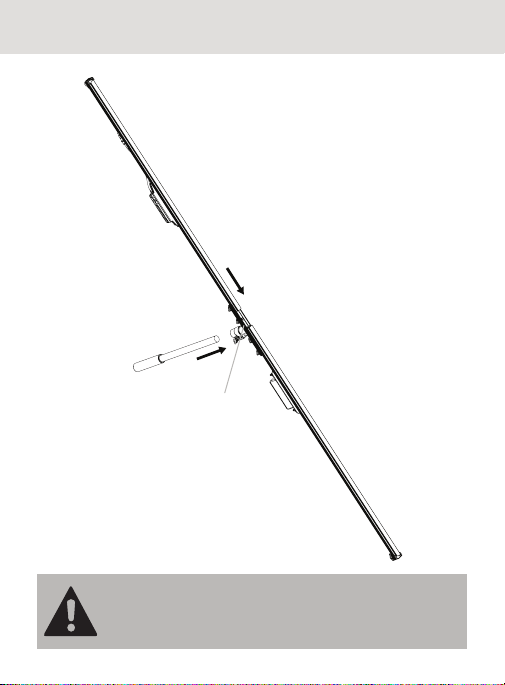
ASSEMBLY
Top Housing
Handle
TO AVOID DAMAGING PIXELSTICK, NEVEr CONNECT ThE
TOP AND bOTTOM hOuSING wIThOuT ThE hANDLE
brACKET. ThIS INSurES ThAT ThE E LECTrONIC
CONNECTION IS NEVEr PhySICALLy STrESSED.
8
Handle Bracket
Bottom Housing
Page 9
ASSEMBLY
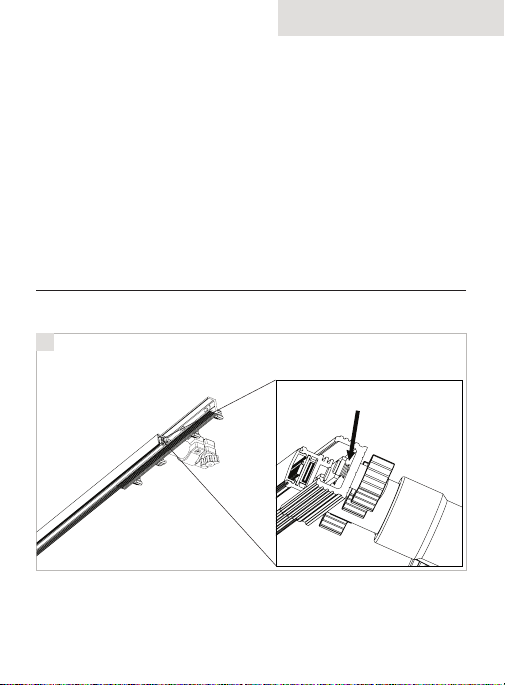
OVERVIEW
Pixelstick arrives to in 4 main pieces: Top Housing, Bottom
Housing, Handle Bracket, and Handle. The Handle Bracket holds
all three pieces together and comes attached to the bottom
housing.The main assembly steps below outline sliding the Top
Housing into the Handle Bracket, so that it mates with the Bottom
housing, then inserting the Handle. It is important to note that the
Handle Bracket keeps the circuit boards protected and you should
never try and connect the top and bottom without it. Before you
begin assembling, make sure you have 8 AA Batteries (rechargeable
is best) inserted into the battery pack.
PROCEDURE
1
Partially loosen top two thumbscrews on Handle Bracket,
creating a space between the slot nut and extrusion.
9
Page 10
ASSEMBLY
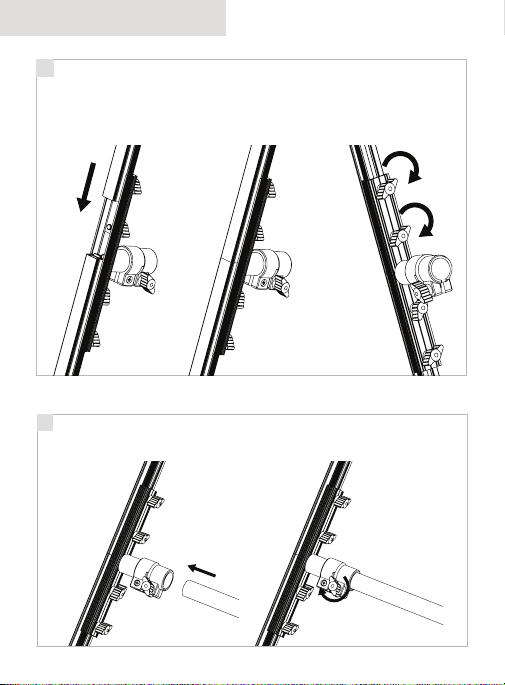
2
Carefully slide Top Housing into Handle Bracket, making
sure that the slot nut is sliding inside the channel. Press Top
Housing and Bottom Housing firmly together to insure the LED
Connector is mated. Tighten Handle Bracket thumbscrews.
3
Loosen Handle Bracket clamp thumbscrew. Slide Handle into
clamp. Tighten clamp thumbscrew.
10
Page 11
ASSEMBLY
4
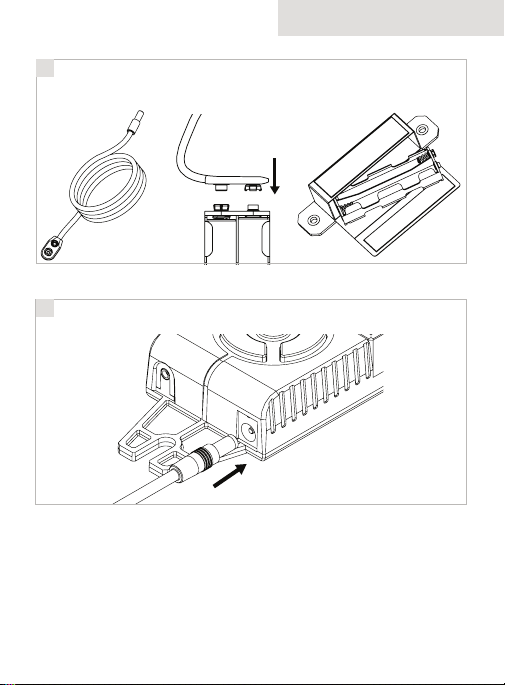
Remove Battery cable from parts bag and attach Snap end of
Battery Cable to Battery Pack. Insert Battery Pack into Battery
Bag.
5
Attach Barrel end of battery Cable to bottom of Handbox.
Once your pixelstick is assembled, you’ll want to get started!
Provided you have inserted the batteries already, you can turn
pixelstick on using the top Power Switch and proceed to the next
section, Using Pixelstick!
11
Page 12
USING PIXELSTICK
THE CONTROLLER
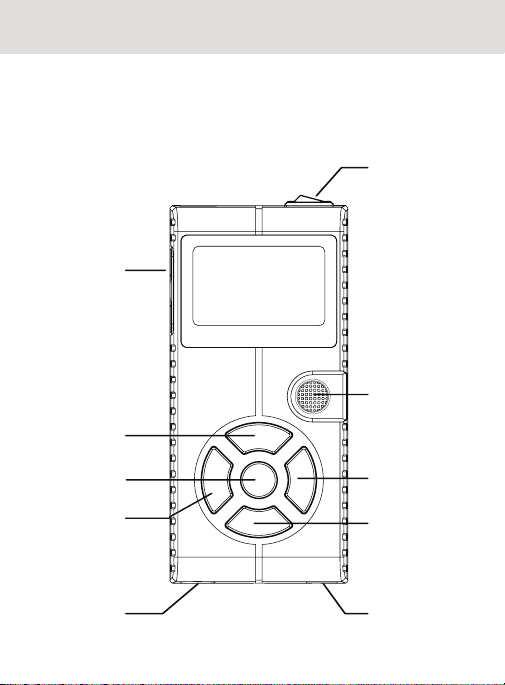
The Controller has six buttons for navigating the menus. UP and
DOWN scroll through menus vertically and SELECT chooses the
highlight item.
Power
Switch
SD Card
Slot
FIRE
UP
SELECT
Remote
Trigger Port
12
LEFT
RIGHT
DOWN
DC Power
Jack
Page 13
USING PIXELSTICK
THE INTERFACE
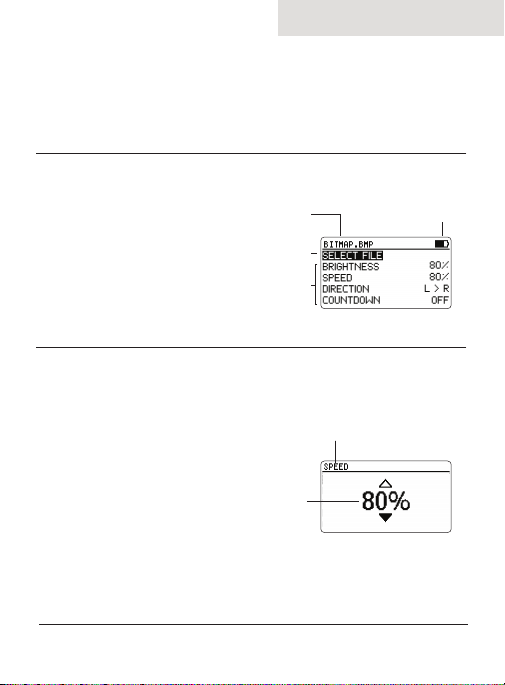
The interface is broken down into four main screens: the Main Menu,
the Settings Menu, the File Browser, and the Folder Browser.
MAIN MENU
Provides access to all of
pixelstick’s functionality. The
SELECT FILE option allows
you to choose a BMP file
from an SD card. The rest
of the Main Menu consists of
customizable user settings.
Current File
File Browser
Settings
Battery Level
SETTINGS MENU
The settings menu allows you
to change one of pixelstick’s
10 User Settings, which
control both the operation
of the Controller and the
appearance of the images
being displayed. Use the UP
and DOWN keys to change
the value of a setting, and the
SELECT key to save the
change and return to the
Main Menu.
Setting Name
Value
13
Page 14
USING PIXELSTICK
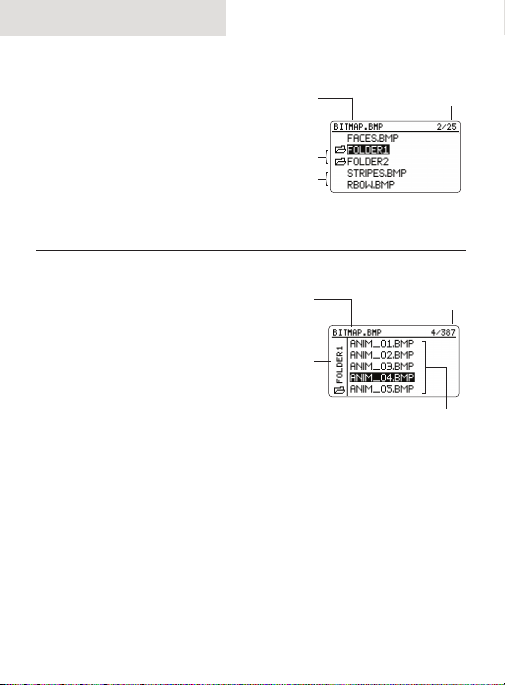
FILE BROWSER
The file browser allows you
to choose images from the
main folder or a subfolder of
your SD card. UP and DOWN
move through the list of files
and folders, SELECT selects
a file or enters a folder.
Current File
Folders
Images
Battery Level
SUBFOLDERS
The Subfolder Menu shows
the list of images within a
Subfolder. UP and DOWN
navigate the list of images.
SELECT selects the highlighted
image and returns to the main
menu. LEFT exits to the File
Browser.
14
Current File File Count
Current
Folder
Images
Page 15
USING PIXELSTICK
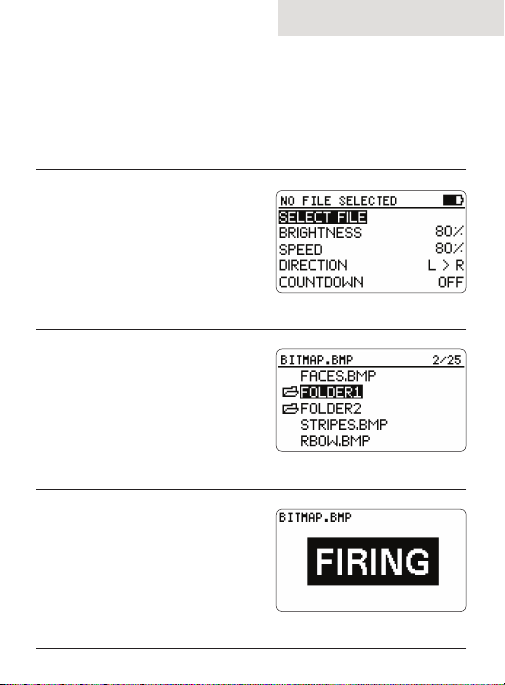
FIRING AN IMAGE
When the Main Menu appears, pixelstick is ready to select and
display images from an SD Card.
Using the SELECT button,
Choose SELECT FILE from the
main menu to enter the FILE
BROWSER menu where you
can select an image to fire.
Using UP, DOWN, and SELECT,
choose the desired image from
the list. If your image is in a
folder, choose the folder by
pressing SELECT, then choose
the image.
Press FIRE. The backlight will turn
off and the image will display. When
finished, pixelstick will return to the
Main Menu with the backlight off
until a key press. Pressing FIRE a
second time before completion will
cancel.
15
Page 16
USING PIXELSTICK
FILE MANAGEMENT
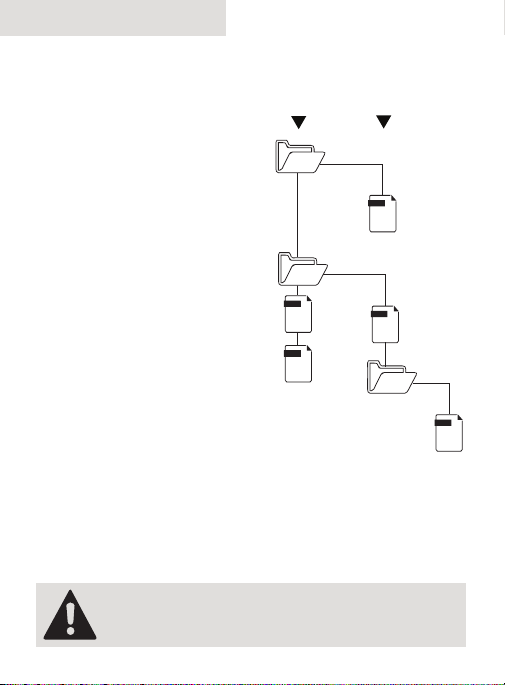
• Pixelstick can read 24-bit BMP
files from the main folder of
your SD Card or from a first
level sub folder.
• Images and folders display
alphabetically.
• Folders within folders are not
accessible.
• There is a 768 image limit per
folder. Folders that have more
than 768 images will only
display the first 768 files.
• Files on the SD card that don’t
have the .BMP extension are not
displayed.
• Grouping images that are part
of a series or animation into a
folder is the easiest way to keep
your SD Card organized.
• File names should be limited to
8 characters. If filenames are
longer than 8 characters, they
will truncate like so:
File name: nametoolong.bmp
File name: nametoolongstill.bmp
PIXELSTICK DOES NOT DISPLAy FOLDErS wIThIN FOLDErS.
ONLy ThE FIrST LEVEL OF FOLDErS ArE ACCESSIbLE.
SD ROOT SUBFOLDER
Images and
folders ok
bMP
bMP
Images ok,
folders hidden
bMP
bMP
X
becomes: nameto~1.bmp
becomes: nameto~2.bmp
bMP
X
16
Page 17
USING PIXELSTICK
CREATING IMAGES
Pixelstick reads 24-bit BMP images from an SD card and displays
them on its 200 LEDs. You can use images you’ve downloaded from
the internet or created yourself, but in both cases, the images will
require some preparation before they can be used.
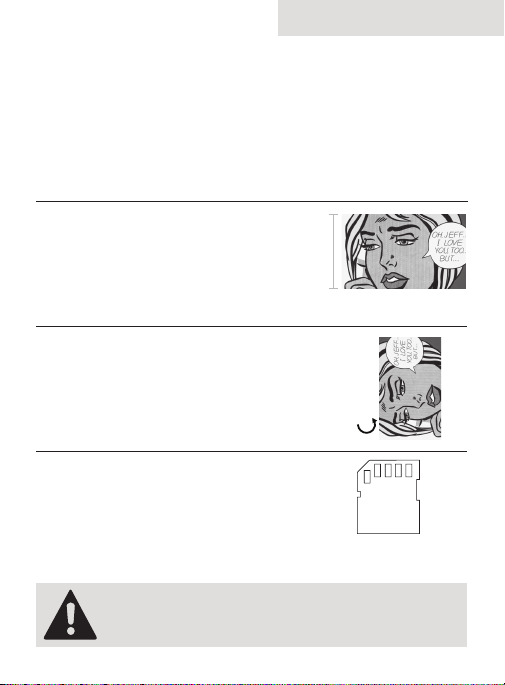
RESIZE
Resize the image to 200px in height.
Images taller than 200px will be
cropped by pixelstick.
200px
ROTATE
Rotate the image 90 degrees counter
clockwise. Unrotated images will
appear sideways and cropped.
SAVE TO SD
Save as a 24-bit Windows BMP and
copy it to the SD card. This step will
differ for each image editor.
PIXELSTICK rEquIrES 24-bIT .bMP IMAGES. OThEr FOrMATS
SuCh AS JPEG, PNG, AND GIF MuST bE CONVErTED bEFOrE ThEy CAN bE uSED wITh PIXELSTICK.
17
Page 18
USING PIXELSTICK
DEMO PATTERNS
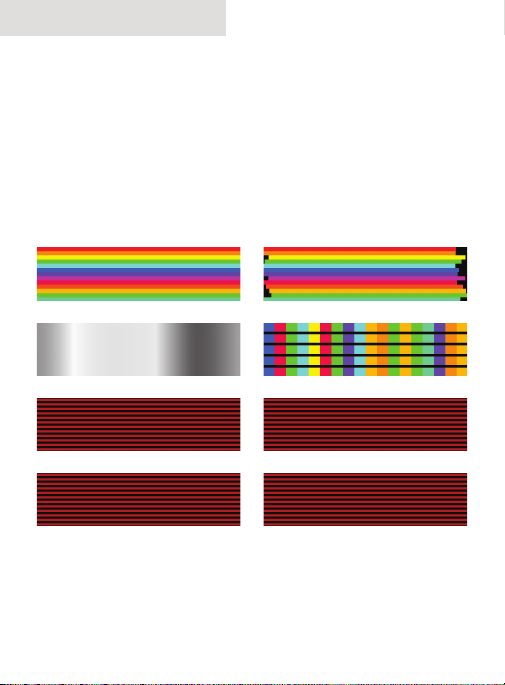
Pixelstick comes with 8 built-in demo patterns, which allows you to
create images without an SD card or BMP images.
Demo Patterns respect the following user settings:
Brightness, Speed, Repeat, Increment, & Countdown
RAINBOW1
GRADBOW
RSTRIPES
BSTRIPES
18
RAINBOW2
SLOTRBOW
GSTRIPES
WSTRIPES
Page 19
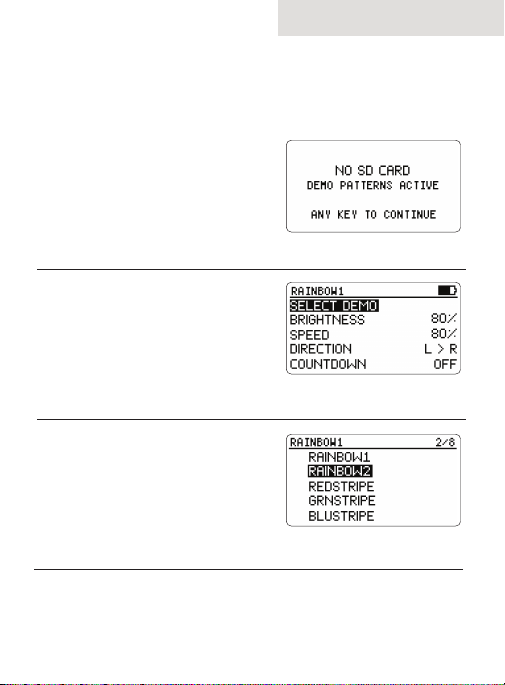
USING DEMOS
EJECT
Power on pixelstick with no SD Card
or eject the SD card of an already
powered on pixelstick. Press a key
to clear the NO SD CARD message.
SELECT
Using the UP & DOWN buttons,
highlight the SELECT DEMO options
and press SELECT the Demo Pattern
browser.
FIRE
Using the UP and DOWN buttons,
highlight the desired Demo Pattern
from the list. Press SELECT to return
to the Main Menu. Press FIRE.
USING PIXELSTICK
19
Page 20
USER SETTINGS
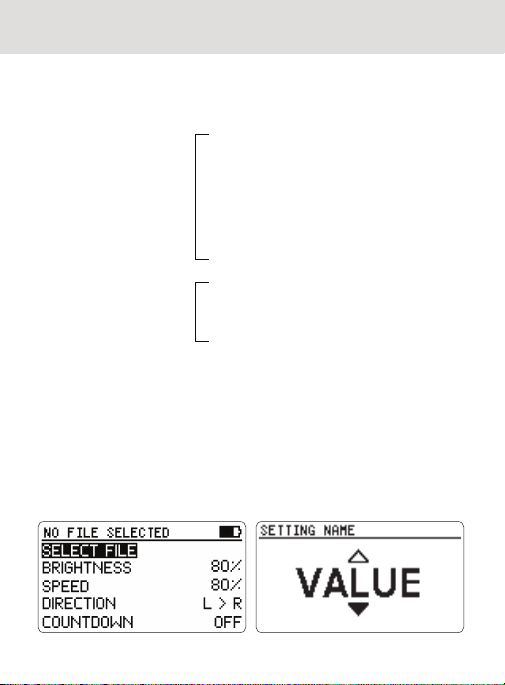
Pixelstick offers nine User Settings that affect luminance, speed,
and orientation of the image you’re displaying on pixelstick. The
settings are divided into Standard and Advanced.
Brightness
Speed
Countdown
STANDARD
SETTINGS
ADVANCED
SETTINGS
CHANGING SETTINGS
To alter user settings, use the UP and DOWN buttons in the main
menu until the desired setting is highlighted. Press the SELECT key
to enter a Setting Submenu. Use the UP and DOWN key to change
the setting to your desired value, and the press SELECT to confirm
the change and return to the main menu.
Direction
Vertical Flip
Increment
Repeat
Show Advanced
Xtra Bright
Postshoot Data
Startup Pattern
LCD Contrast
20
Page 21
USER SETTINGS
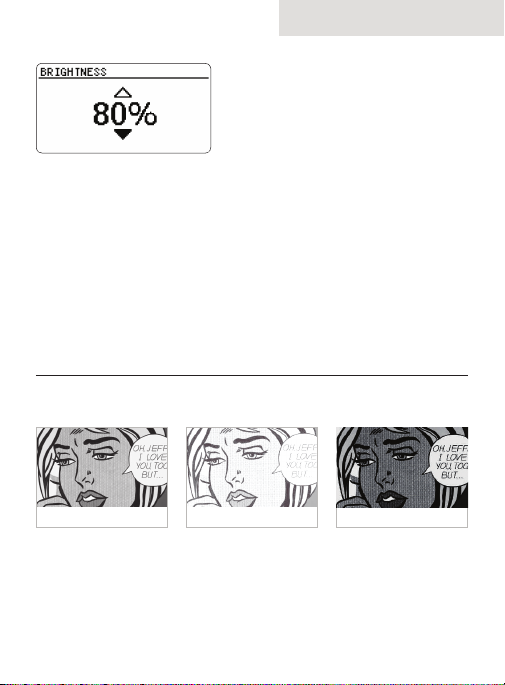
BRIGHTNESS
DEFAULT: 80%
RANGE: 5%-100%
Controls the overall brightness of the pixelstick. While this setting is
capped at 100%, many images can be shot at up to 200% brightness.
See the section titled Xtra Bright for more information on achieving
maximum brightness for a specific image.
IN ACTION
80% (Default) 100% 40%
Given the nature of long exposure photography, the desired brightness
of your pixelstick will vary depending on the exposure settings of
your camera.
21
Page 22
USER SETTINGS
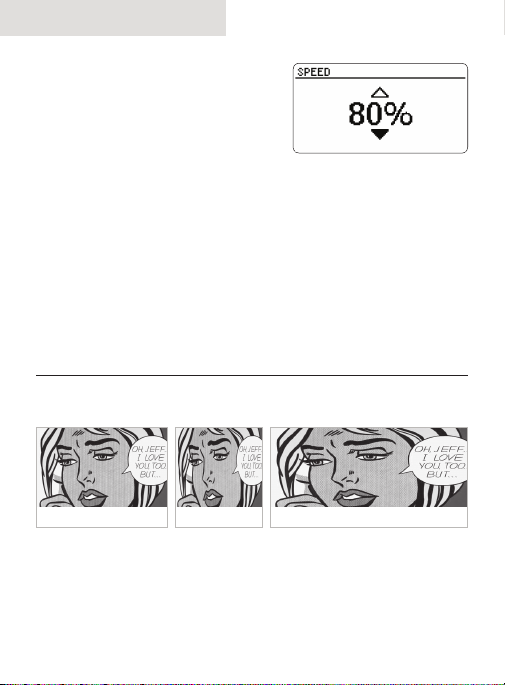
SPEED
DEFAULT: 80%
RANGE: 5%-100%
Controls the amount of delay between vertical rows of pixels. 100%
speed means no delay and represents the fastest pixelstick can
display an image. Default speed is 80%. An average walking speed
should produce an undistorted picture at this speed, but if you walk
faster or are mounting pixelstick to a faster apparatus, raise your
speed to 100%.
IN ACTION
100%80% (Default)
The appearance of your image in frame is affected not only by the
speed of pixelstick, but the speed at which you move pixelstick.
Below is an example of how the speed setting affects an image,
given that the user is moving at a similar rate.
22
50%
Page 23
USER SETTINGS
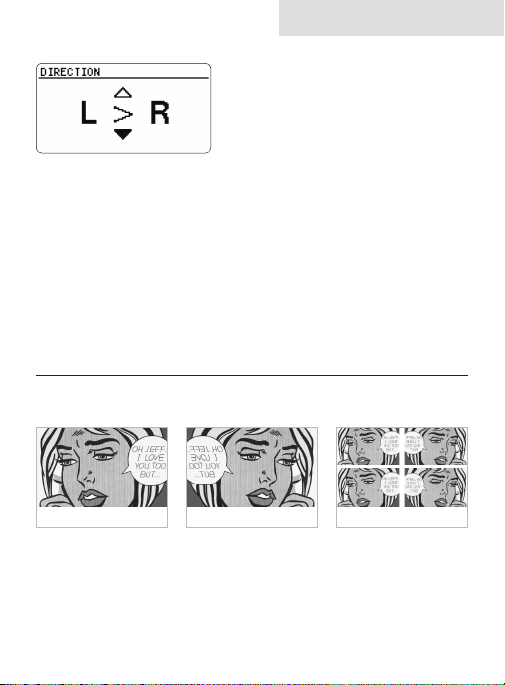
DIRECTION
VALUES: R>L, L>R, YoYo
DEFAULT: R > L
Allows the image to be displayed forwards or backwards, so that
the user can achieve desired image while still choosing which
direction to move pixelstick in. This setting can be L > R (Left to
Right, default), R > L (Right to Left), or YoYo, which will change the
current direction after an image is fired.
IN ACTION
L > R (Default) R>L YoYo
This practical effect of this setting depends entirely upon what
direction the user is moving pixelstick in. Circumstances may
dictate that moving the stick in a particular direction makes
more sense, in which case reversing the image using this setting
becomes vital.
23
Page 24
USER SETTINGS
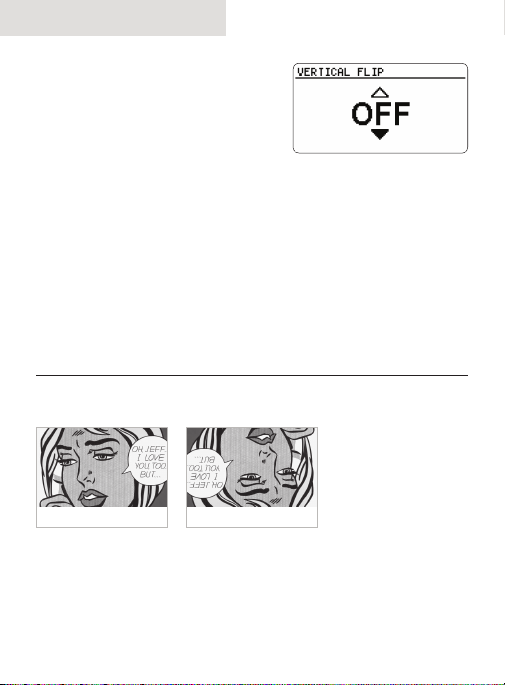
VERTICAL FLIP
DEFAULT: OFF
VALUES: OFF, ON
Controls whether image data displays from top to bottom or bottom
to top on pixelstick. This setting can be ON (bottom to top) or OFF
(top to bottom, default.)
IN ACTION
OFF (Default) ON
This feature is mainly to correct for .bmp files that aren’t oriented
correctly, but can be used any time the user wishes to display an
image upside down.
24
Page 25
USER SETTINGS
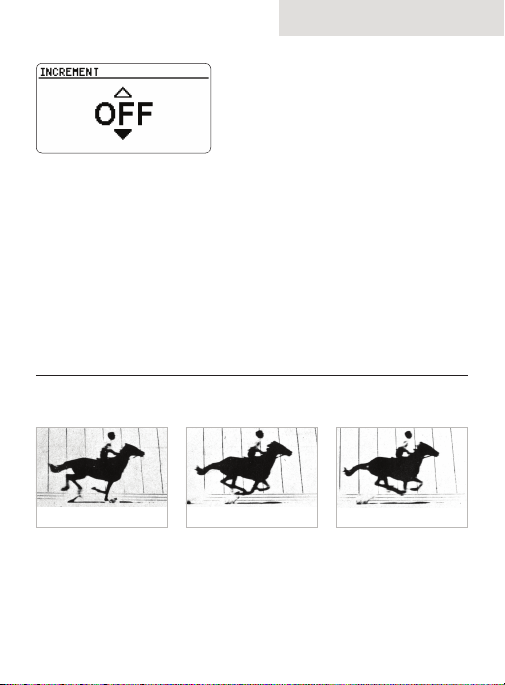
INCREMENT
DEFAULT: OFF
VALUES: OFF, ON
Allows for automatic iteration through sequential images without
requiring the user to manually select the next image in the series.
Ideal for efficiently shooting animations.
IN ACTION
horse1.bmp horse2.bmp horse3.bmp
Increment will automatically select the next alphabetical image in
the same folder. When it reaches the end of the list it will select the
first file again. Once the new file is automatically selected, the user
only needs to press FIRE to display it. If you cancel an image part way
through using the FIRE button, it will not increment.
25
Page 26
USER SETTINGS
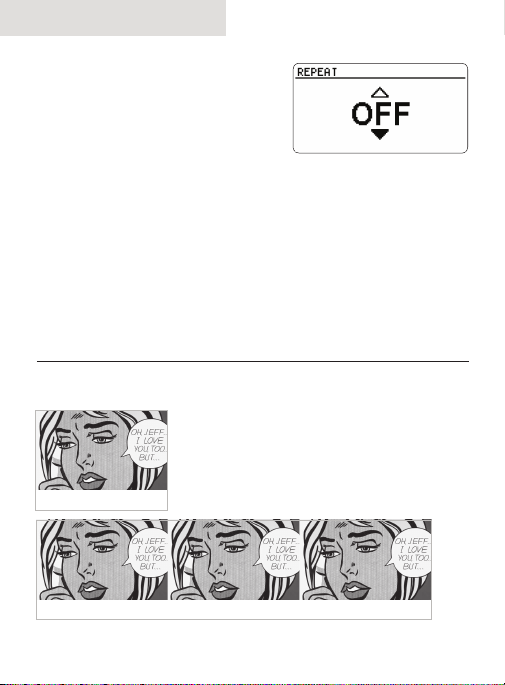
REPEAT
DEFAULT: OFF
RANGE: OFF, 1x-5x
Allows the same image to be displayed in repetition with a single
press of the FIRE button. The image can be repeated up to 5 times,
and there is no gap between repetition.
IN ACTION
OFF (Default
Repeat x3
26
Page 27
USER SETTINGS
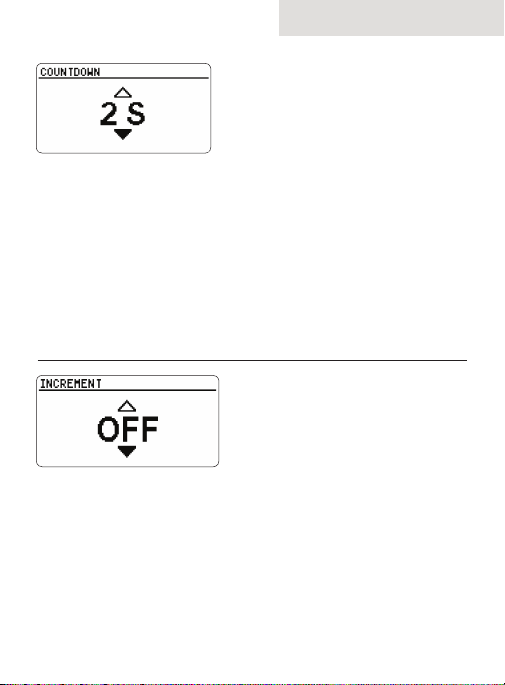
COUNTDOWN
DEFAULT: OFF
RANGE: OFF, 1s-99s
Inserts a delay after pressing FIRE button, allowing user to re-orient
pixelstick or move in to position before it begins to display an image.
Can be OFF (default) or 1-10 seconds.
XTRA BRIGHT
DEFAULT: OFF
VALUES: OFF, ON
Pixelstick’s 100% brightness limit is calculated based on the power
draw of an all white image. Xtra Bright calculates a new maximum
brightness level on a per image basis, allowing many images to
exceed 100%.
27
Page 28
USER SETTINGS
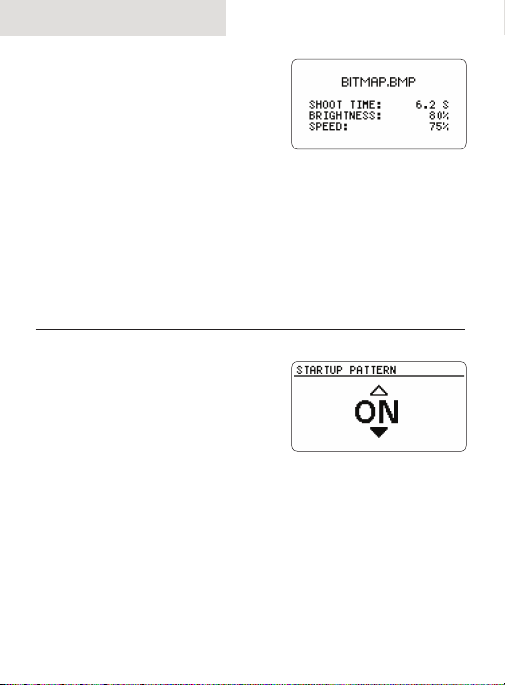
POSTSHOOT DATA
DEFAULT: OFF
RANGE: OFF, ON
Controls whether pixelstick displays an information screen about an
image after it is fired. This screen will display immediately after an
image is done firing and is dismissed by pressing any button.
STARTUP PATTERN
DEFAULT: OFF
VALUES: OFF, ON
Controls whether pixelstick shows a quick pattern on startup. This
gives both a visual indication that the unit is powered on and a quick
confirmation that the center connector is joined and all of the LEDs
are functional.
28
Page 29
USER SETTINGS
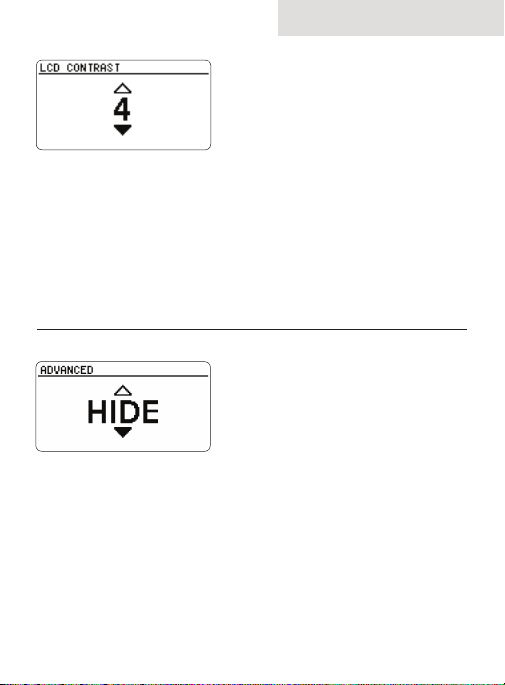
LCD CONTRAST
DEFAULT: 4
RANGE: OFF, 1-10
Allows user to change the contrast level of pixelstick’s LCD screen,
in case of an improperly calibrated screen. No change should be
required.
ADVANCED
DEFAULT: HIDE
VALUES: SHOW, HIDE
Shows or Hides “Advanced” features in the Main Menu, for settings
that may not get changed often or do not apply to some users. The
Advanced Settings are Xtra Bright, PostShoot Data, LCD Contrast,
and Startup Pattern.
29
Page 30

TECHNIQUE
A (VERY) BRIEF HISTORY
OF LIGHTPAINTING
In 1889, artist Georges Demeny created the first known lightpainting photograph, “Pathological Walk From in Front”, by attaching
lightbulbs to his assistant’s clothing and taking a long exposure. The
technique was groundbreaking and became the touchstone for 125
years of unique and compelling works of art.
WHAT DO I NEED?
Light painting is fairly simple to do, as it only requires three things:
1. A Camera with a long exposure mode
2. A tripod or other means of keeping a camera still and steady
3. A light source to move during a long exposure (i.e. pixelstick)
Almost every DSLR, and most point-and-shoots, have a long
exposure mode. It’s as simple as choosing the length of the
exposure (seconds, minutes, or hours), choosing an image to
display on pixelstick, and moving pixelstick within the frame of
the long exposure. The process itself is fun and the excitement of
seeing what you captured immediately can be extremely rewarding.
I GET IT! SO NOW WHAT?
Read on to learn about the various techniques, tips, and tricks to
get the most out of your pixelstick.
30
Page 31
TECHNIQUE
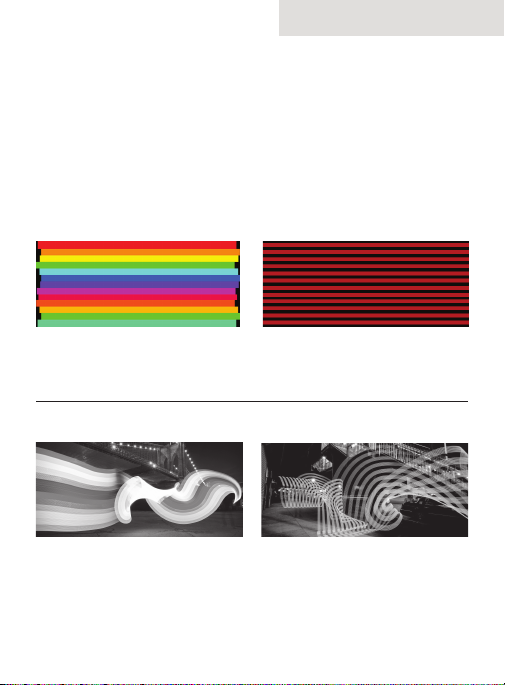
RIBBONS
Ribbons are among the most compelling things pixelstick can
produce. Moving pixelstick in an abstract manner through the frame
creates unique and often difficult to duplicate shapes and patterns.
BMP SOURCE
rainbow.bmp stripes.bmp
PHOTO RESULT
31
Page 32
TECHNIQUE
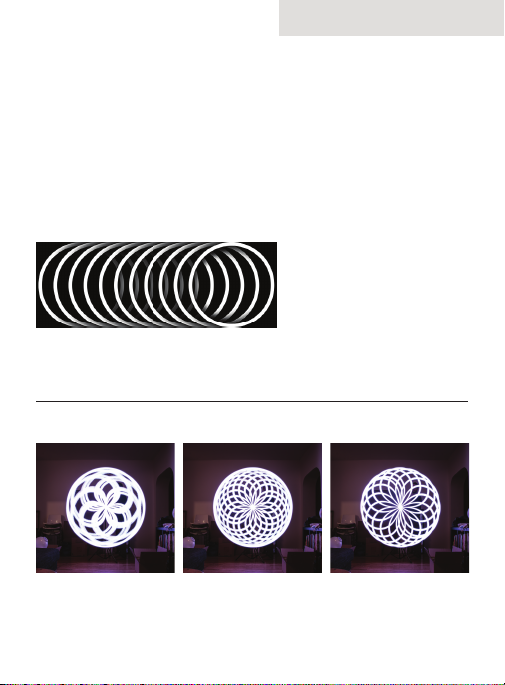
SPINNERS
The Spinner technique relies on pixelstick’s included spin handle,
which allows pixelstick to spin freely about its center point,
creating stunning geometric patterns. Spinning the same image at a
different rate can result in very different images.
BMP SOURCE
circles.bmp
PHOTO RESULT
(circles.bmp spun at different speeds, with pixelstick clamped to a
lightstand creates dramatically different images.)
32
Page 33
TECHNIQUE
TECHNIQUE
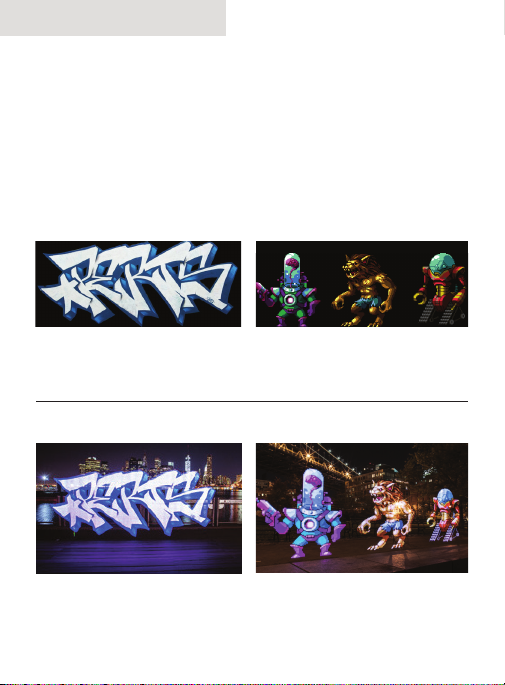
GRAPHIC ART
Pixelsticks tight LED spacing allows high fidelity photos and
graphics to be displayed directly in your long exposures. Unlike
ribbons, these generally work best when pixelstick is moved straight
and at a relatively steady rate of speed.
BMP SOURCE
graffiti.bmp
monsters.bmp
PHOTO RESULT
33
Page 34

TECHNIQUE
TECHNIQUE
ANIMATION
Using the increment feature, pixelstick will advance to the next image
between shots, allowing frames of animation to be created which can be
stacked over many exposures to create amazing lightpainted timelapse
animations. this can be time-intensive but rewarding. Follow the steps
below to capture animated frames using pixelstick. The steps required to
assemble those frames into a timelapse are outside of the scope of this
instruction manual but can be found at thepixelstick.com/tutorials
ANIMATION PROCEDURE
1. Name the frames alphabetically or numerically e.g.:
image001.bmp
image002.bmp
image003.bmp
2. Move frames on to your SD card. Grouping these images
into their own folder is the easiest way to keep the card
organized and make sure pixelstick can always keep track of
the order of your animation.
3. Turn Increment setting ON.
4. Set camera to take long exposure.
5. Fire camera. Fire pixelstick.
6. Return to original start point and repeat 5 and 6 until
animation is finished. Focus on starting your stripes at the same
point everytime and keeping a steady walking pace. Having
someone help and a remote trigger make the process
immensely easier.
34
Page 35
ALTERNATE LENSES
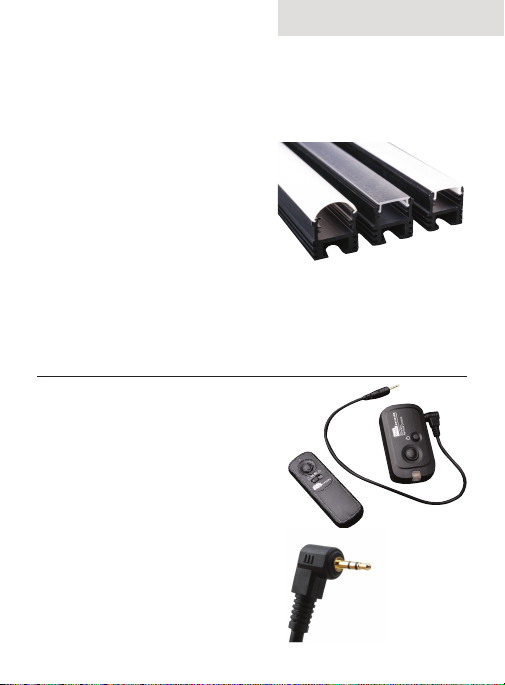
Pixelstick is compatible with
three lenses. The included lens
is flat and milky, providing good
diffusion. The flat frosted lens
(sold separately) allows the
individual LEDs to be seen more
clearly, creating a “scanline” effect
you might remember from classic
video games. The milky rounded
lens provides the most diffusion
and increases the viewing angle.
This is particularly useful when
shooting ribbons, as the complex
movements can be captured from
more angles. Both extra lenses are
available at thepixelstick.com
REMOTE TRIGGER
A Remote Trigger allows the user (or
a second person) to display images
on pixelstick without pressing the
FIRE button on the Controller, a handy
feature, especially when animating.
Pixelstick can accomodate a variety of
remotes, including the one available at
thepixelstick.com.
TECHNIQUE
Compatible with
Canon RS-60e3
remotes.
35
Page 36
SPECIFICATIONS
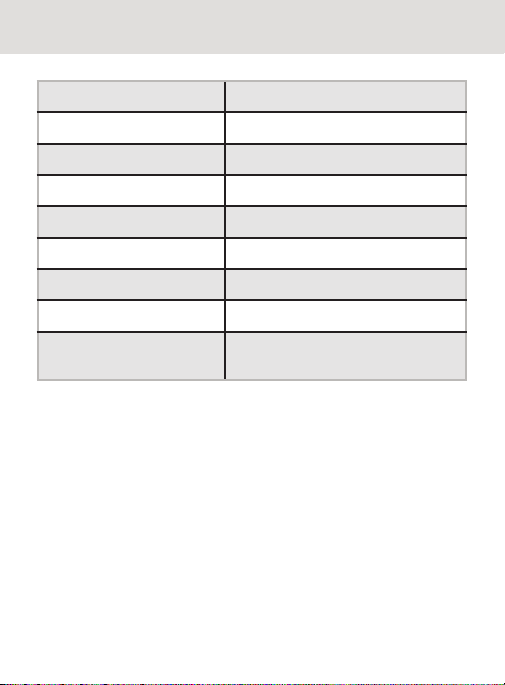
Length (Assembled) 73” (187cm)
Length (In Carry Bag) 43” (109cm)
Weight 6.5lbs (3kg)
Power DC 9.6v - 12v 5A
LCD Screen 128x64 pixels
LEDs 200 RGB (4 boards of 50)
Compatible Cards SD, SDHC
File Format 24-bit Windows BMP
Power Source 8AA Batteries (Rechargeable
recommended)
36
Page 37

37
Page 38

TROUBLESHOOTING
PIXELSTICK BEHAVIOR
Pixelstick will not turn on - Make sure the battery cable is
clipped to the battery holder and
plugged into Controller.
- Make sure Batteries are charged
and loaded correctly into holder.
Pixelstick turns on but images - Make sure Top LED cable is
do not display/no startup pattern connected to Handbox.
- Remove Top Endcap and make
sure Top LED cable is connected to
circuit boards.
INTERFACE BEHAVIOR
Controller says “No Files Found” - Make sure there are 24-bit BMP
images on the SD Card.
- Make sure the images on the card
are not more than one folder deep.
Controller says “Invalid File” - Open the images in your image
editor and re-save them as 24-bit
BMP files.
Controller says “Unknown Error” - Restart pixelstick.
38
Page 39

TROUBLESHOOTING
IMAGE BEHAVIOR
Images appear cut off/cropped - Make sure your images are 200px
wide or less.
Image is flipped upside down - Make sure Vertical Flip is OFF
- Check the image in Image Editor
Image is flipped left to right - Make sure Direction is R > L
- Image was rotated clockwise
Image has a white background - Images that require a transparent
background should be set over a
black background in your image
editor.
Image appears smashed together - Decrease pixelstick Speed or walk
faster.
Image appears stretched out - Increase pixelstick Speed or walk
slower.
39
Page 40

SAFETY AND HANDLING
FAILurE TO FOLLOw ThESE SAFETy INSTruCTIONS COuLD
rESuLT IN FIrE, ELECTrIC ShOCK, Or OThEr INJurIES, Or
DAMAGE TO PIXELSTICK Or OThEr PrOPErTy. rEAD ALL
SAFETy INFOrMATION bELOw bEFOrE uSING PIXELSTICK.
SAFE HANDLING
Pixelstick is designed to be rugged, but still contains sensitive
electronic components that can be damaged if proper care is not
taken. Your pixelstick can be damaged if it is burned, crushed,
subject to heavy impact, or comes in contact with liquid.
MOISTURE
Pixelstick is a fair weather device and should not be submerged,
used during rain, sleet, or snow, taken into the shower, or
brandished during a water gun fight.
TEMPERATURE
Pixelstick is designed to work in temperatures between 0º and 35º
C (32º to 95º F) . Pixelstick can be damaged if stored or operated
outside of this temperature range (for example, if left in a hot car).
Avoid exposing pixelstick to dramatic changes in temperature or
humidity. If you notice any part of pixelstick becoming unusually hot,
disconnect the power and contact support.
EXPLOSIVE ATMOSPHERES
Do not use pixelstick in any area with a potentially explosive atmosphere, such as at a fueling area, or in areas where the air contains
chemicals or particles (such as grain, dust or metal powders). Obey
all signs and instructions.
40
Page 41

SAFETY AND HANDLING
FCC COMPLIANCE STATEMENT
This device complies with part 15 of the FCC rules. Operation is
subject to the following two conditions:
1. This device may not cause harmful interference, and
2. This device must accept any interference received,
including interference that may cause undesired
operation.
RADIO AND TV INTERFERENCE
This equipment generates, uses, and can radiate radio-frequency energy. If it is not installed and used properly—that is, in strict
accordance with instructions—it may cause interference with radio
and TV reception.
This equipment has been tested and found to comply with the limits
for a Class B digital device in accordance with the specifications in
Part 15 of FCC rules. These specifications are designed to provide
reasonable protection against such interference in a residential
installation. However, there is no guarantee that interference will
not occur in a particular situation.
ChANGES Or MODIFICATIONS TO ThIS PrODuCT NOT
AuThOrIzED by bITbANGEr LLC COuLD VOID ThE EMC
COMPLIANCE AND NEGATE yOur AuThOrITy TO OPErATE ThE
PrODuCT. ThIS PrODuCT wAS TESTED FOr EMC COMPLIANCE
uNDEr CONDITIONS ThAT INCLuDED ThE uSE OF SuPPLIED
APPrOVED CAbLES.
41
Page 42

www.thepixelstick.com
www.bitbangerlabs.com
 Loading...